PixInsight – Load Default Project/Process Icons

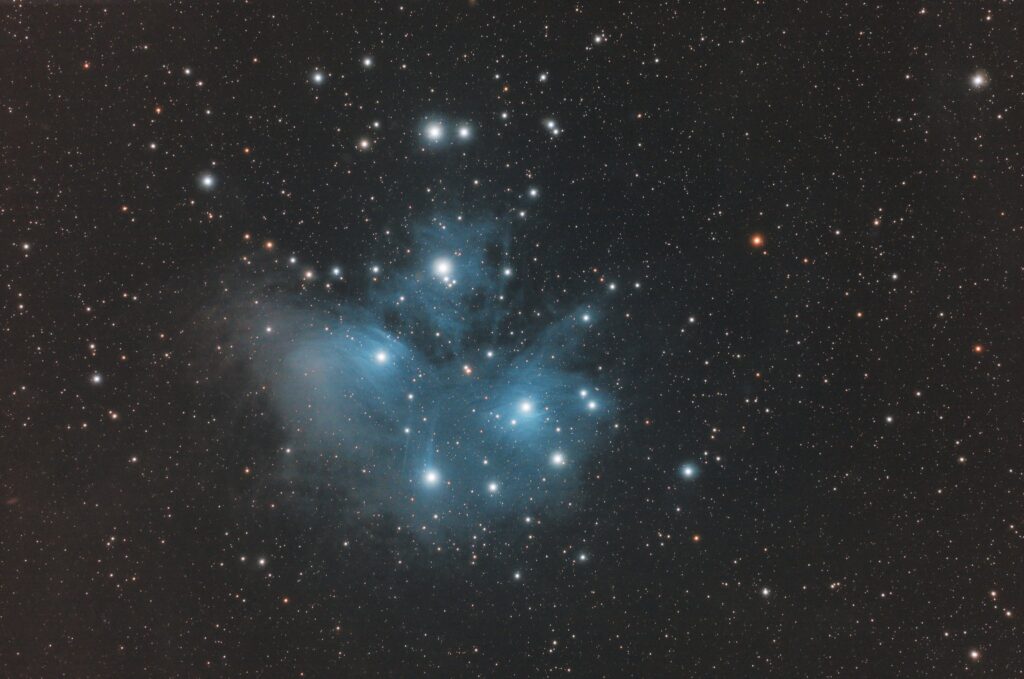
So whilst Dave was processing our M45 QHY268C data, he mentioned how it is frustrating that he has to reload his process icons for his workflow every single time.

After finishing the communications/process diagram for IMT I decided to have a quick look if it was possible. Watching PixInsight startup I noticed access to a few files – banner and startup.scp. For me these were located in the C:\Program Files\PixInsight\etc\startup directory.

Looking through the documentation it seemed possible to add statements to the file which was possible once I had modified it as Administrator.

Method 1 – Load Process Icons

This will load just the process icons into the current workspace on startup. Add the line below to the bottom of C:\Program Files\PixInsight\etc\startup\startup.scp :

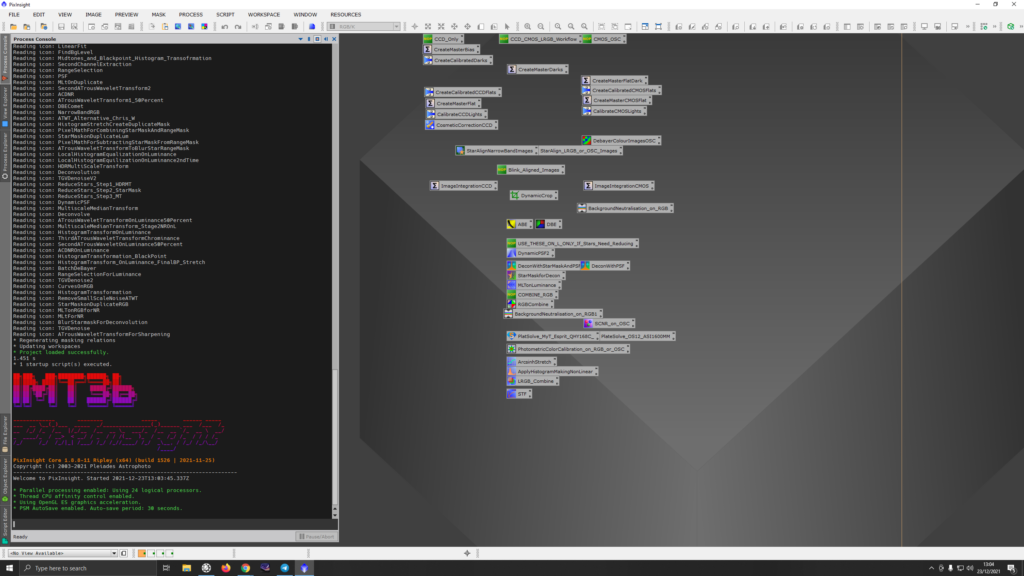
open "C:\Users\gingergeek\Pixinsight\Pixinsight DSW Process Icons V10.1.6.xpsm"

Save the file and restart pixinsight.

Method 2 – Load An Empty Project With Process Icons

Another method (preferred) is to create a new project (Empty-process-icons.pxiproject), load in the process icons. Save the project and then change the properties to make it read-only so you can’t accidentally overwrite it later on.

Add the line below to the bottom of C:\Program Files\PixInsight\etc\startup\startup.scp :

open "C:\Users\gingergeek\Pixinsight\Empty-process-icons.pxiproject"

Save the file and restart pixinsight.

I also modified the banner file (in the same directory as startup.scp) so it would show the IMT3b designation. I generator the ASCII art from one of the many online sites, if I can remember which one I will link it here.

\x1b[1;38;2;255;000;000m██╗███╗ ███╗████████╗██████╗ ██╗\x1b[39;21m
\x1b[1;38;2;230;000;000m██║████╗ ████║╚══██╔══╝╚════██╗██║\x1b[39;21m
\x1b[1;38;2;204;000;102m██║██╔████╔██║ ██║ █████╔╝██████╗\x1b[39;21m
\x1b[1;38;2;179;000;153m██║██║╚██╔╝██║ ██║ ╚═══██╗██╔══██╗\x1b[39;21m
\x1b[1;38;2;153;000;204m██║██║ ╚═╝ ██║ ██║ ██████╔╝██████╔╝\x1b[39;21m
\x1b[1;38;2;128;000;255m╚═╝╚═╝ ╚═╝ ╚═╝ ╚═════╝ ╚═════╝\x1b[39;21m
Our new PixInsight default project with process icons

Thoughts

The downside to both these methods is that if PixInsight is upgraded/reinstalled then you will lose the settings – not a disaster to be honest as they are easy to put back into place.

Processed Image (M45)

So visiting Dave one evening as we have not met for a while whilst I was updating software Dave processed the QHY268C data we took of M45.

M45 – PixInsight Processed Image

So I’m disappointed that although the image is a good first start I forgot to change the change setting on the gain which in SGPro is in the event settings and not in the top level sequence display 🙁

Dave ran the image through the annotate function of PixInsight. The galaxy PGC13696 near the bottom of the image is actually 232 million light years away.

M45 – PixInsight Annotated Image

Viewing Report 10/11th December 2021

Unusually it was a clear Friday evening. I did plan to be ready to go as soon at the pole star was visible but my imaging PC insisted on updates and the local hard disk was running at 10MB/s (replacement SSD on the way).

By the time I was ready, mount setup, polar aligned and balanced it was already late. I decided not to use the latest SGPro or NINA beta but just use the existing SGPro version. I was delayed starting as I was having issues with SGPro hanging when it couldn’t talk to the SQM (ASCOM Conditions Observing Hub) on a previous COM port, I need to report this back to the devs as a bug.

At this point Peg-Leg Dave joined me on a video call and we discussed imaging M45 in different modes on the QHY268C OSC. So we moved the scope to Alp Ari and proceeded to plate solve in SGPro, sync’d the scope Cartes Du Ciel and calibrated OpenPHD2.

Using the SGPro framing and mosaic wizard to decide on the framing for the target sequence I wanted as much of the reflection nebula as possible rather than being dead center.

M45 – SGPro Framing Wizard (FSQ85/QHY268C)

I’ve used the multi-star guiding in OpenPHD2 since it was first released in an earlier beta and I know Dave is looking forward to using it when he moves from using an OAG on his 12-inch RC to a 90mm guide scope to make it easier to get more guide stars or even one star.

Multi-Star Guiding in OpenPHD2

Whilst trying some mode/exposure tests the guiding started acting up in RA, so parking the mount and disengaging the clutches I redid the balance of the scope. It was only marginally off but it was enough to cause issues for the CEM60 …. it is not forgiving !

We decided to increase the Gain/Offset to 15/75 and use the Extended Full-Well mode (#2) of the QHY268C, testing the star brightness levels of various exposure times we opted for 180 seconds as that was under the maximum brightness level.

As I currently have no IP camera outside I like to see the mount position using GSPoint3D as I like to view where it is especially during meridian flips. NINA has this built-in now in the recent version 2.0 betas. As SGPro lacks this functionality I can use the view via this is standalone version that connects to the ASCOM mount.

Mount/Telescope virtual view
M45 – Pre Meridian Flip

SGPro paused the guiding just prior to the meridian flip. Following the automated flip, the guider and the imaging sequence automatically restarted after a plate solve and auto centering were performed.

Inverted shot of M45 (180s) – Post Meridian Flip

It gradually got cloudier just after midnight and the quality of the subs declined so I decided to stop acquiring data even though we really wanted over 4 hours of exposure.

I proceeded to take calibration frames. Using a target ADU of ~23,000 the SGPro flat wizard on the Pegasus FlatMaster (100%) gave an exposure time of 9.68s for the Optolong L-Pro filter, 25 flat-frames were taken followed by 25 dark-flat frames of the same exposure time and finally 25 dark frames of 180 seconds.

It was at this point that I realised that the FITs header showed a gain level of 0 and not 15, the offset was correct but I can’t be sure if the EFW mode was used as it’s not in the FITs headers. Only when using the native driver in NINA can you set the mode within the sequence, in SGPro the mode is set in the external ASCOM driver when the camera is not active in SGPro even though though it’s in the ASCOM API as the Camera.ReadoutModes property.

Also for some reason the default setting in the QHY driver is to NOT disable the overscan area which means I have black borders on my images which will make processing the data in Pixinsight a challenge !

I actually got to bed after 3am even though I had planned to stay up until the dawn. Next morning I noticed that my counter-weight had slipped and rotated on the bar. This may have also caused some of the issues with the guiding so I need to set-up earlier and check things more thoroughly in future to avoid these mistakes.

So although it’s not the data we planned it will be worth processing over a wine. The evening was a really a useful experiment and hopefully lessons will be learned …. if I remember the next time.

Viewing Report 10th December 2021 – IMT3

04:00 – 06:53

Comet C/2021 A1 Leonard. The last day to get this lovely little comet. Dave Boddington had captured a wonderful image yesterday through his 6″ and 4″ refractors. I was was never going to be able to do that with my 5″ refractor due to my broken foot and not being able to move it from the Warm room to the verge on the other side of the lane at the front of my property.

Space boot 🙂

So instead I settled for the good old Canon 6D on a tripod. I had slowly gone up and retrieved the kit the day before in the light and now at 4am set off out the front, crutches in hand, camera on tripod strapped round my neck, in the dark at 1℃.

After getting comfortable standing on the verge, I extended the tripod legs balancing on 1 foot and set the camera on Arcturus to focus at 100mm. I had chosen the 100-300mm lens for maximum flexibility. After achieving focus by hand and by using the zoom function on the camera screen, I placed the camera roughly in the direction of where the comet should appear just below Corona Borealis in the faint constellation of Serpens. This is the shot I got.

Comet C2021 A1 Leonard

I then changed focal length going to 300mm on the zoom lens, switched back to Arcturus to focus and then, after a few attempts, actually some 20 minutes, I managed to get the comet back on the chip. Result!

Comet C2021 A1 Leonard – 300mm

I packed up the tripod, hung it round my neck and headed slowly and gingerly across the lane and back up the drive to the house. When I had removed my one shoe, cleaned my boot and my crutches I looked at the camera lens and was not surprised to see a lens full of dew 🙄

Dew on the lens

I then set about opening the dome of the observatory as the comet would have now cleared the tree line. However it would not open 😳 On closer inspection, meaning I went back out in the cold and up the garden, I found the shutter would not operate. Some time spent investigating led me to believe the battery in the shutter box was dead 🥺 so I removed and took back to the house for further investigation later today. That meant no comet photo through the 12″, however I was pleased with my results given the challenge.

Battery box for shutter