Pegasus NYX-101 Harmonic Mount

I’ve always liked what PegasusAstro have been doing with their astronomy equipment and I already own an original FlatMaster120, UPBv1 and a UPBv2.

Overview

Packaging – The mount transport box is (21cm x 34cm x 34cm) which is larger than the AM5 transport box. Weight/Size (6.4 Kg compared to ZWO AM5 5 Kg). The build quality follows the same high quality and blue anodised styling of recent products.

On opening the packaging I found damage to the mount knob indicated a possible rough handling in transit with plastic shrapnel in its plastic bag. This was superficial and did impact the function or integrity of the mount.

There was no hand-controller supplied in the box but the manual hints that a hand controller can be connected to the ST-4 (EXT) port but no detail on if that is compatible with any existing hand controllers, so for now we have to use the Unity PC application, ASCOM access or the mobile phone application (Android).

The USB2.0 port is better than others I have encountered on other mounts such as iOptron and it grasps the cable securely and does not feel loose or feels like it would just drop off. This is especially useful as I tear down each night so let’s see over time if it maintains the positive connection it has at the moment. I connected the mount USB and power to the UPBv2 sat on top of the scope.

The carbon fibre tripod has no stone bag which can be found on other astro/photography tripods. You could suspend some form of weight from the leg spreader that might help prevent the tripod from tipping over with heavier scopes.

I found the Altitude adjustment a bit loose and takes a bit of getting used to even though the NYX101 has altitude tightening bolts which themselves seem to shift the altitude which again affects polar alignment if you are not careful.

Due to the compact nature of the mount there is no room for a GPS receiver so this function is relied upon either from your phone or by pushing the values from Unity or via Uranus device. If you push from your phone and you have Unity running then Unity will not see the change until you restart Unity.

I like the SW tripod (adapter required) and M12 counterweight compatibility, LX200 protocol support, polemaster placement support. There is a polemaster mounting plate but this is a permanent fixture via screws with no quick release mechanism. However there was a post on Cloudy Nights by PhilippeL on a release adapter he made, CAD link here.

Experience

Usage

Set your park/home positions and then enter in your location/altitude via Unity/Mobile phone app so that the mount understanding things like horizon limits.

As with other mounts, care needs to be exercised that your scope does not collide with the tripod legs, this is still a risk when using the pier extender with longer length scopes.

Unity Software

I couldn’t find a change history or date on the released Unity Platform on the website so it’s not easy to look back when things happened but you can use this link to check the currently available version. I used version 1.8.1733.15, when upgrading the existing Unity software the update process will remove all older versions including the ASCOM drivers and then install the latest version.

I do seem to lose wireless connection to my house router randomly even though the mount was positioned within 6ft of it. I had setup the router to give the mount a static IP address via DHCP but I don’t know it loses the connection – DHCP lease time is set high.

Firmware Update

When I first looked at configuring the NYX-101 to connect to my house network I had no end of trouble getting a connection. The only way I could achieve a connection was to have both the PC/laptop and mount connect to one of my travel routers which itself was also connected my the house wifi.

I soon worked out that the “Smart Connect” feature of my house wifi router was attempting to connect the ESP32 wireless (2.4GhZ) of the NYX to the 5GhZ band. Once I had put the MAC address of the NYX-101 into the exclude list of the house router 5GhZ band then it would reliably connect to the 2.4GhZ band. From that point onwards everything worked as expected and I could then successfully perform the firmware update to 1.15.

The 1.19 firmware (released the week 13th March 2023) also brought a pleasant surprise of the motor noise being reduced when slewing. This is a welcome change since making any noise in a suburban garden location in the early hours of the morning when people sleep with their windows open is highly undesirable.

Resetting park & home

I actually turned off the mount by accident whilst the mount was pointing somewhere in the sky so it lost its position and didn’t know where park and home was. This is easily rectified by moving the mount via one of the applications to the correct marks and setting the home and park positions again. This issue was mostly solved with a later firmware update where the mount now remembers where it is pointed once power is restored. However on performing a meridian flip (no slew & center) and then instructing the mount to home resulted in the mount not being it’s predefined home location.

Mobile App (Android)

Originally there was only Android11+ support but after raising a support ticket (support@pegasusastro.com) to request that the documentation state that the linked app only supported Android 11 I also requested a pre-Android 11 support. This actually appeared pretty quickly on the website so kudos to PegasusAstro for the fast response.

I do suffer regular disconnects from the mount when using the mobile app via the hotspot. I’m not sure why this is as I was sat right next to the mount, could be down to an idle time-out ?

I also see the NYX-101 disconnect from my house wireless router in Unity but could locate no reason why (DHCP lease was valid), I could find no entry in the Unity log files or see no reason on the router. Now this could possibly be either interference from other 2.4GhZ networks or down to the Aluminium casing, would an external aerial resolve this problem ?

There is no way to reconnect to the wireless other than shutting down Unity so as long as you have a USB connection then everything should continue working.

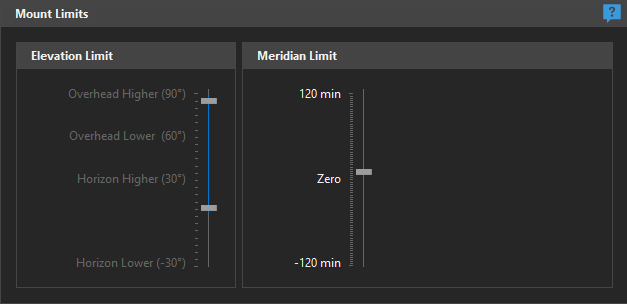
Mount/Altitude Limits & Meridian Flip

To begin with I set the meridian and altitude mount limits in Unity and then test the automated meridian flip using ASCOM simulator for the camera. Regardless would I did the mount would stop 10 degrees because hitting the Meridian. It slowly dawned on me that I had set the meridian limit to -10 which I thought was 10 degrees after the meridian but the value should have been +10 so it was actually stopping 10 minutes before the meridian ……. dooh !

Unity hard limits for Elevation & Meridian

Once I made the change then both NINA and SGPro performed the meridian flip just fine. There is also a switch to enable automatic meridian flip to prevent any potential crashes but I opted to leave this disabled so the mount would just stop tracking but NINA would continue taking new subs in both simple & advanced scheduler.

One item that would really help here in a text box with optional input to set either limits instead of having to grab the slider to see the current setting – I can query/set this in the API but it’s not easy to view and change using the slider method.

Polar Alignment

I used the polemaster software to perform a polar alignment but decided to utilise SharpCap to compare the alignment procedure and difference. Because SharpCap requires the scope to be slewed 90° so the scope weight was now on on horizontal the RA axis dropped causing the mount to shift and results in the PA being 4° off axis.

This would happen regardless even if I tightened up the axis bolts. Talking to another user he suggested at using a counterweight but to me this would negate the mount as a portable mount.

Guiding

Using the OpenPHD guiding reference document (link), it appears the that the harmonic gears have a period of 430 seconds with a periodic error of +/- 20 arcsecs or less. Two complete periods are required for the Permanent Periodic Error Correction (PPEC) before guiding any improvement will be seen, this is pertinent for the imaging train in use at the time. If you change the imaging target the model will re-initiate the PPEC learning cycle.

The recommendation is to set the guiding interval to 1 – 1.5 seconds and try to be within 30 arcsecs of polar alignment error. I certainly found keeping the FSQ85 setup to around 1.5 seconds resulted in better guiding graphs compared to 3 second intervals.

Support

After initially purchasing the mount I took my NYX-101 along to Astrofest 2023 (UK) for Evans to look at (by prior appointment) as I was not entirely happy with the resonance during slewing. I compared my mount against two other NYX-101 mounts in my astronomy society and it definitely sounded like it had been treated roughly during delivery transit. Although Evans did a great job to investigate the mount during the show, due to the noisy nature of the exhibitor floor it was not obvious that it had been resolved until I was in a quiet environment back at home.

On contacting PegasusAstro I was offered to have the mount picked up by DHL and couriered back to Greece for inspection. The whole process from DHL pickup was professional from picking up to receiving the mount back, the service was excellent and he mount was backed with me 7 days later. The courier communications was good but I received no notes or communication on what was done (board serial number was the same) under I enquired. The most important thing the mount operation was much better and more akin to the other two reference mounts I had listened to; my gratitude to Evans and the team for their patience with me.

It had been reported on various forums that the ZWO ASIAir had suddenly stopped working with the NYX-101 and some heated speculation quickly arose as to the reason why this occurred. ZWO was quick to dispel any conspiracy theories and rightly put their hands up and stated it was a bug in ASIAir software (link) which would be resolved in the 2.1 beta release (you will also need the latest firmware). Kudos should go to ZWO for setting for the story straight and resolving the issue to the benefit of the astro community.

First Light Use

So Dave asked me to come over to the observatory for the evenings of 26th & 27th so I could do a test run on the kit I would be taking to Tenerife later that Summer. At this time the M101 Supernova SN 2023ixf so I decided to image it alongside Dave using his 17inch RDK and Bob’s 24 inch RDK.

Using the QHY Polemaster I noticed that when I rotated the mount for alignment that the chosen calibration star moved away from the rotation circle – is the mount slightly misaligned ?

The guiding document available here were extremely helpful in testing out various settings. Certainly I was seeing some trailing around 3 seconds but that could have been due to the PA issues or balance. I ended up using Predictive PEC and setting the interval to 1 second just to see what would happen. I still noticed large variations every now and then and it was not as smooth as I’d hoped for.

Slewing to a target after plate solving it was clear that the mount had moved outside my FoV at first slew. This was unusual for me as my CEM60/NEQ6 first slews were always in the FoV, this issue may be related to an situation observed by Chris Woodhouse and can be rectified by following his forum post.

Chris asked me to confirm his experience of overshoot when slewing in the DEC axis causing the target not to be in resulted field of view. Chris had raised a support ticket for this issue and PegasusAstro were investigating.

Closing Thoughts

The NYX-101 is more expensive that the competing ZWO AM5 but the NYX-101 offers more weight carrying capacity (20 Kg versus 13 Kg without counterweights) and compatibility with those already own QHY Polemaster, SW NEQ6 or similar tripods.

The direct open API (REST) via Unity or access via ASCOM Alpaca allows me to query components and it’s easy to script up web status pages quite easily.

If you only ever plan to use light imaging equipment and are already invested into the ZWO eco system then the AM5 might make more sense but if you wanted to use other vendors equipment then for me ZWO is a closed ecosystem with limited flexibility.

If using USB3 cables for any equipment such as CCD/CMOS cameras then it is wise to invest in a high quality shielded cable as USB3 tends to have issues in the presence of 2.4GhZ. I used 5Ghz wireless from my Mele Quieter3c mini PC to avoid this problem but I would advise to use good shielded cables in all situations.

I’m looking forward to taking the mount on the upcoming trip to Mount Teide, Tenerife to see how well it performs under dark and clear skies 😀

Wishlist

The following wishlist is based on my experience of using the NYX-101 alongside the Ultimate Power Box v2 (Firmware 2.4) and NYX-101 (Firmware X.Y.Z) via the Unity software (1.9.1825.32) :

  • Would be nice to see dust covers provided in the box for all the various ports on the back of the mount.
  • An external aerial port might be useful for the included ESP32 wireless connection ?
  • An option to power other Pegasus items such as the UPBv2 from the aux power port on the mount ? This would mean that then I would only have one cable going up/down from the scope to the mount which is especially useful for those who are mobile and don’t use the NYX mount in a permanent setting.
  • Include a hand controller in the default offering or document compatibility with any existing hand controllers. Could utilise the USB port instead of relying on the ESP32 internal module ?
  • Display the MAC address of the ESP32 module in the Unity app (wi-fi network tab) so it’s not necessary to hunt for it in the router’s client connection pages.
  • A disconnect/reconnect button for an existing wifi connection definition.
  • An editable display box for both the meridian and altitude limits where I can enter the desired value as I can only know what the settings are by actually grabbing the sliders or reading/setting the position from the REST API.
  • API call to set/get horizon & meridian limits as a profile similar to the location. This would allow the user with different scopes/piers/tripods to store different hard horizon/meridian and auto meridian flip settings.
  • If possible add a NYX-101 uptime value to Unity and API similar to other products like the UPBv2 to show how long the NYX-101 has been powered on.
  • If possible add a timer field to the wireless tab to indicate how long the mount has been connected to the configured wireless access point and/or the USB connection.
  • The NYX-101 health status in Unity sometimes doesn’t not render correctly on smaller/different aspect screens between Unity releases such as a Dell 13.3″ laptop.
  • API call to provide NYX-101 health status if the information is not already available via other API calls.
  • API call to indicate if a new firmware (inc version) is available as it is indicated in Unity ?
  • A changelog history for NYX-101, Unity & UPB between versions.

Update

As of May/June 2023 there is now a XT60 cable available to run from the AUX port to run to the UPBv2 and now I only need an adapter cable to fit my 10 Amp PSU with a XT60 connector.

14th June : Firmware 1.21 released by PegasusAstro and the patch notes show this release fixes the DEC axis overshoot experienced by Chris Woodhouse :

  • DEC motor accuracy improvement during slews. In previous firmware declination axis tends to overshoot.
  • Wi-fi hotspot channel width was reduced from 40MHz to 20MHz to improve channel data integrity.
  • Wi-fi hotspot can turn ON and OFF.
  • Wi-fi hotspot channel can be selected from 1 to 11 (11 is the default).
  • Reset home is not allowed when mount is hard encoder limit.
  • Improved accuracy after n-star calibration.
  • Improved mount position store interval.

Viewing report & Filter Comparison 8th March 10pm 2023

I wanted to compare 2 filters this evening as I have recently purchased the new Antlia Triband RGB Ultra filter. The original filter I had for the one shot colour was the ZWO Duo-Band filter.

M42/M43 Filter Comparison

As can be seen above the difference without a filter is quite dramatic (Top – No Filter, Middle – Antlia Triband RGB Ultra, Bottom – ZWO Duo-Band). There is more broadband light captured. The red nebula is less apparent and the background sky is much brighter.

Running Man Nebula Filter Comparison

The above image from the running man nebula, NGC 1977 demonstrates that without a filter a reflection nebula comes through best (Left – No Filter, Middle – Antlia Triband RGB Ultra, Right – ZWO Duo-Band). The ZWO filter gives a more green image over that of the Antila, which in itself reduces the reflection nebula but does start to pick up some of the red emission nebula within the Running Man.

Inverted background sky and stars

The inverted background above gives a sense of the reduction in star luminance that is allowed through without a filter.

This image shows the background with the details of the readout from each of the pixel across the colour channels. Here you get a sense of the green seen in the ZWO filter is less the extra green coming through, moreover the lack of blue being allowed through. Without a filter the background sky is swamped with all colour channels.

With no filter the full effect can be seen above, much brighter background, nebula less colourful and less detailed.

With the Antlia filter above, the final single image I personally find is much more pleasing.

Finally with the ZWO filter you can see quite clearly the green effect.

So in summary I would say the ZWO filter is better than no filter except when imaging reflection nebula, however the best filter is the Antlia filter when paired with my one shot colour ZWO ASI2600MC camera.

Below is a random drawing of a scientist with a Tak laser beam.

PixInsight – Noise & BlurXTerminator plugins

Introduction

Two plugins I have recently been using are the NoiseXTerminator and BlurXTerminator written by Russell Croman and available from the RC-Astro website.

The new BlurXTerminator plugin is priced at $99.95 although you will get a $10 discount if you already own other RC Astro products and provide the license key at purchase time. Before purchasing it is suggested that you should first check the web site that your hardware and OS meet the requirements to function and download the trial version to test.

The data used was 60*300seconds (5 hours) frames at -20℃ of the Iris Nebula (NGC7023) captured at the IMT3 dark site using a NEQ6 mount, Takahashi FSQ85, Tak Flattener, QHY OAG and QHY268C CMOS camera.

NoiseXTerminator

Recommended Usage

Taken directly from the web site :

  • NoiseXTerminator can be used at any point in your processing flow. The PixInsight version can handle both linear and nonlinear (stretched) images.
  • Using NoiseXTerminator on images that have already been heavily processed, particularly with other noise reduction/sharpening software, can produce less than optimal results.
  • If processing a linear (unstretched) image in PixInsight:
    • Make sure PixInsight is configured to use 24-bit STF lookup tables. Otherwise you might see what looks like posterization in your image, when it is really just limitations of the lower-precision default lookup tables.
    • In PixInsight, you can create a preview containing a representative sample of your image, including bright and dark regions, important detail, etc. Select this preview and run NoiseXTerminator on it to allow rapid adjustment of the parameters.

Before & After Comparison

It’s clear that the noise reduction plugin has done a great job although it would have been better had I collected more data to increase the SNR in the first place !

BlurXTerminator

Recently released in December 2022, I thought I would give this plugin a try as I’m rubbish at all the deconvolution/sharpening attempts and I tend to make my images poorer rather than better !

The web page states the following – BlurXTerminator can additionally correct for other aberrations present in an image in limited amounts. Among those currently comprehended for most instruments are:

  • Guiding errors
  • Astigmatism
  • Primary and secondary coma
  • Chromatic aberration (color fringing)
  • Varying star diameter (FWHM) and halos in each color channel

Before & After Comparison

The central part of image before BlurXterminator
The central part of the image after BlurXterminator

Again we can see that the RC Astro BlurXterminator has done a good job at sharpening the detail in the dust cloud.

Thoughts

Investing in these two plugins should be considered as money well spent especially when it can save you time in the processing pipeline. The minimally processed image (DBE, SCNR) of NGC7023 (Iris Nebula) where hot pixels and other artifacts still exist but is shown to demonstrate the power of Noise and BlurXterminator :

NGC7023 (Iris Nebula) Minimal Process

The Night Sky Observer Guide Series

When I started attending the Practical Astronomy Show held at Kettering I picked up my first copy of “The Night Sky Observers Guide Volume 4 – The Glories Of The Milky Way to -54°” written by George Robert Kepple and published by Willmann-Bell inc. These were sold at the Kettering show by the very helpful and knowledgeable staff of The Webb Deep-Sky Society for around £20.

Then in December 2019 ‘The Global Human Malware’ happened and the world went nuts, the Astronomy shows were cancelled year on year and I forgot to complete acquiring the rest of the series. Then suddenly in late 2020 it was announced that the publishers Willmann-Bell had closed and their entire portfolio went out of print.

Unfortunately I did not see the announcement until late Jan 2021, however I managed to obtain a copy of “Volume 2 – Spring & Summer” (ISBN 0-943396-60-3 (V2)) from Zoltan at 356 Astronomy but he told me he was out of stock for the rest of the series.

I contacted the Webb Deep-Sky Society to see if they had any available copies in stock. The president of the society Owen Brazell very promptly replied but informed me that they had sold their remaining stock just days before. He was extremely helpful in trying to help me source any remaining stock but eventually to no avail ! I recommend any avid astronomer should consider subscribing to the Webb Deep-Sky Society here …… I just did 🙂

Example of Webb Deep Sky Society Digital Issue

Fast forward to 16th August 2021 and it was announced that the American Astronomical Society would acquire the inventory and related assets of Willmann-Bell. Luckily by January 2022 I noticed that FLO (First Light Optics) in the UK had managed to obtain a few copies and I promptly ordered a copy of “Volume 1 – Autumn & Winter” (ISBN 0-943396-58-1 (V1)) for £35.

Well, it arrived this morning and I apologised to my regular postman for having to carry it around by hand all morning.

As with the other volumes the information, maps, diagrams and descriptions are very useful for planning imaging or observing sessions.

The King of the Northern Winter Constellations – Orion
The fantastic Perseus Galaxy Cluster

I now have only Volume 4 “The Southern Skies” left to purchase but as that would only be a reference for objects I can’t see from the UK it would go mostly underused unless I start using my remote telescope account or travel around or below the equator.

I would like to thank Owen Brazell for all his time and for the ongoing activities of the Webb Deep Sky Society and hopefully we will see them at the next Practical Astronomy Show in March 2022 …. fingers crossed !

FSQ85 Flattener & QHY286C CMOS

I’ve taken the plunge and dipped my toe into the CMOS world. Since I didn’t have any OSC experience I chatted with DSW (has a QHY186c) and decided on the QHY286C. This I purchased from Bern at ModernAstronomy who has always provided excellent service.

The issue with APS-C sensors when coupled with the Takahashi FSQ85 is that the edges start to show signs of star elongation, I already see this on my Atik460. This can be corrected with the FSQ-85 flattener (ordered from FirstLightOptics) which has the effect of slightly increasing the focal length but also reduces the back focus from the native 197.5mm to 56mm.

Effective Focal Length455mm (f/5.4)
Image Circle Diameter44mm
Metal Back Focus56mm
FSQ-85 EDX with Flattener 1.01x

This means that I can’t use my existing Atik OAG->Atik EFW2 and Atik460 because it’s total distance is 59mm (22mm+24mm+13mm) so it’s out by 2mm even once you include the filter effect on the back focus. Note – This is also true for my Starlight Xpress configuration.

I do not understand why Atik could not have got to within the 55-56mm range by shaving off a mm here and there 🙁 I may need to replace all Atik gear when I convert to mono CMOS or replace the OAG with a guide scope.

So onto the QHY268C, the OSC CMOS unfortunately has a CAA tilt adapter instead of a direct thread connection. This wastes 11mm of precious back focus giving a total distance of 23.5mm whereas the recently released QHY286M CMOS has a 12.5mm back focus !!!!

Also the QHY268C does not have an IR/UV cut filter in place so you need to buy an additional filter and holder and add that to the cost and factor in the adapter and distance needed …. I’m starting to regret this purchase more and more !

Source – QHYCCD.com

Back to the Takahashi Flattener (TKA37852), the back focus is 56.2mm but we add on the filter thickness as it changes the light path (2mm/3=0.66mm) so ~57mm (56.9mm), the imaging train is as follows :


Adapter
Distance (mm)Accumulated Distance (mm)Connector
OU03122M54(M) -> M54(M)
QHY 02077046M54(F)
QHY Spacers14.420.4screw
QHY OAG-M1030.4screw
QHY 0200552.532.9screw
inc filter0.633.5
QHY CAA adapter639.5screw
QHY268C CMOS17.557screw
FSQ85 Flattener to QHY268C imaging train

The combined weight is 1365g so I may need to adjust the balance of the scope a little as it heavier than my Atik460/EFW2/OAG setup at 1080g.

Completed – Imaging train ready for first light

I may have to adjust the spacers a little but I won’t know until I have received a 2-inch Optolong L-Pro light pollution filter which is currently on back order from FLO.

Transmission chart for Optolong L-Pro

QHY268M

The recently released mono version of the QHY268 looks like it has a proper screw face plate with a more acceptable back focus of 12.5mm. This is more reasonable and would allow me to couple a filter wheel and OAG as well not requiring a IR/UV cut filter.

Like SyedT on StarGazersLounge I could go back to using a guide scope and ditch the OAG and then the imaging train could incorporate a rotator :

ComponentDistance (mm)
QHY268M CMOS12.5
QHYCFW3M-US17.5
M54 (M) to M54 (M) adapter2
Pegasus Falcon Rotator18
M54 extension ring5
M54 (M) to M54 (M)2
Total57
FSQ85 Flattener/QHY268M Imaging Train – Credit SyedT

I was thinking of a rotator for the remote Esprit120 which has a generous back focus of 76mm so I should have no problems there but that will be another adventure for the future !

Optec Flip-Flat Service – Vendor Review

So during the ongoing Human Malware situation we have been concentrating on imaging asteroids, comets and more recently performing exoplanet measurements on the 12inch RC than long exposure deep sky astrophotography.

Astronomy is one those hobbies that is for most part is sole activity for the dark early hours of the morning and these days is usually done remotely. It was therefore disappointing that when one of the team went to use the Sky-Watcher Esprit 120ED for a night of astrophotography and found that he was unable to open the Optec Alnitak Flip-Flat. As the lockdown and travel restrictions progressed due to the initial wave of the human malware situation the issue was soon forgotten as we continued our focus to performing exoplanet observations on the 12inch RC for the ESA Ariel Mission.

Now that IMT3 has been decommissioned ready for it to be reborn as IMT3b at it’s new rural darker sky site I decided to take the opportunity to retrieve the FlipFlat and diagnose the issue at home on my desk.

Using the Alnitak controller software, I could hear the motor running but it never seemed to complete the close or open. All it continued to display was the TIMEDOUT message as shown below.

Timing out !

I sent an email off to the vendor I purchased it from but after a month I got no reply. In the hope I would not be left with an expensive paperweight I reached out to Optec. After quite a few weeks of getting no reply I was pleasantly surprised to receive a message from Jeff Dickerman (President) of Optec. Jeff apologised for not responding earlier and offered to help resolving the issue. The error message seemed to be a known issue and it was generally an easy resolution which required taking the box apart. Jeff sent me instructions on how to take the unit apart and fix the problem.

You’ll see the motor is attached to an internal wall with a modified shoulder screw and stack of Belleville washers.  These spring washers are used to allow the arm to slip when someone grabs the lamp and physically tries to force the cover closed.  Unfortunately they can also allow the arm to slip during an open or close operation which leads to that dreaded “TIMED OUT” message.  Optec have redesigned the stack a bit to eliminate this issue going forward. 

To correct, you might be able to adjust the washer stack by removing the lock nut and sliding off the washer stack to the pivot arm.  Check carefully to see if the shoulder screw protrudes beyond the pivot arm.  If so, rather than installing the cork washer next, install a 5/16” ID washer first to cover the exposed shoulder.  Next add the cork washer and stack of Belleville washers.  Finally screw the lock nut back in place and tighten while holding the shoulder screw near the motor (this is important to avoid breaking the internal motor gears).

Step 1 – Pry open clamshell
Step 2 – Shows what to secure
Step 3 – Tools needed
Step 4 –
Step 5 – Check shoulder visibility
Step 5a – Shoulder
Step 6 – Washer Stack

In the end I decided to courier the unit back to Optec for repair as I did not want to render my unit completely useless in case I made a mistake.

I’m extremely grateful to Jeff, Tina and the team at Optec for all there help, patience and understanding. I’m a very happy customer and the flip-flat will be rejoining the Esprit120 when the IMT relocation is complete at it’s new rural location. I can then do a Homer Simpson and annoy Dave with “Flap goes open, flap goes shut, flap goes open ……”

AllSkyEye – 0.9.17.1 Pro

So for a short period of time we had settled on using AllSkyEye. Recently we noticed that the author had issued a Kerogram and stretched horizon generate of the latest image but only available in a new Pro Edition.

The Pro edition was only £20 for a 3 user license, the author gives this purchase as a donation to the charity of his choice – good man ! So now we have AllSkyEye Pro in use at the IMT2 and IMT3 domes.

Latest Image with custom text overlays
Latest Image Horizon Projection

A Keogram is an image composed of slices taken from images in a sequential time order.The slices (which are always taken from the same location and with the same shape) are stitched together to form an image displaying a timeline of the selected part of the image as shown below.

Keogram

We still have the dark map to take to remove the hot pixels from the image but at the moment it gives us a nice view remotely before we decide to open the dome – that’s if the AAG Cloudwatcher limits agree and it thinks it’s safe to do so of course !

Bob noticed we had our local security guard aka Fluffy watching over his night’s imaging and turning to watch an ISS pass.

Fluffy stands guard at the weather station as the ISS passes over

AAG CloudWatcher Installation

We recently decided to replace our existing weather station with one that had better ASCOM integration. I had previously looked at the AAG CloudWatcher but at the time felt it offered more than we need but that turned out to not be the correct choice.

We ordered the AAG with an internal humidity sensor, the optional anemometer, mounting kit and 10 meter communications cable. Due to the ongoing human malware situation it took two weeks for it to arrive from Spain and was delivered to the IMT3 chief TOSA.

Once the new PSU arrived the Chief TOSA then set about removing the existing weather station and installing the AAG cloudwatcher.

All Sky Camera, AAG CloudWatcher, Unihedron SQM and another rain sensor

This also meant connecting the safety relay circuit wires to the Pulsar Dome, installing the AAG software, downloading the ASCOM boltwood driver and configuring SGPro. Within SGPro we have set the safety status set to be “OK to image” where the required conditions are more stringent than the conditions for the dome to open. The reason being that we want the dome to open as the light begins fade and allow the scopes to cool down but not be okay to image until it is dark.

On the first night of operation we ran into a problem. Unlike the other sensor readings and graphs we would see the temperature and cloud readings have an expected shape but the sky brightness sensors kept going up and down at a regular interval then gave the graph a saw-tooth shape.

Unfortunately this resulted in the safety status going on and off until we overrode it. We sent a quick email to Lunatico reporting the symptoms and asking for advice. It didn’t take long for Jaime to reply informing us that another customer reported the same issue and asked for a few days to investigate.

Good to his word we received an email from Jaime explaining the issue and asking if we could perform a firmware upgrade. Now due to the current lockdown restrictions this meant that I had to co-ordinate over the phone with the resident Chief TOSA to physically disconnect and reconnect the power whilst I remotely set the firmware update. The initial issues encountered were due to PEBCAK (Problem Exists Between Chair And Keyboard) as I had not read the documentation correctly !

New Firmware 5.73 loaded

That evening we watched and the Sky Brightness line graph was now as expected and not looking like a cog shaped wheel. Well done Jaime@Lunatico.es for the quick response and fix, Chief TOSA was a happy dome dwarf again and that’s what counts !

At the moment we are trying to get the cloud sensor to be more accurate to what we visually observe, this is an ongoing effort. We decided to record the AAG Sky Brightness sensor readings at various times and compare with our SQM readings :

EventSQMAAG Brightness Value
Civil Darkness13.08949
Chief TOSA setting OK to open 13.892100
Nautical Darkness18.9228588
Astronomical Darkness19.0328588

Using the above values it looks like we could reduce our chosen threshold level of 2100 to 1000 in order to allow the dome to open and the scopes to cool down. The Sky Brightness does not appear to change beyond Nautical Darkness. We are now investigating the correct value for the early morning from the AAG logs. This is so we know what the Sky Brightness value should be at which to stop imaging and close the dome in the early morning when unattended.

We still have at lot to configure and read up about using the AAG CloudWatcher but at the moment our initial experience is a positive one. Obviously we will be chatting to Lunatico about our level settings and make some suggestions regarding the software.