On January 15th 2022 at 15:10 AEDT (04:10 GMT) the Hunga Tonga Hunga Ha’apai underwater volcano near Tonga erupted. Hunga Tonga-Hunga Ha’apai is 1.8 kilometres tall and 20 kilometres wide, but most of it is underwater, with the top 100 metres visible above sea level. The pressure wave generated by the explosion blasted through the atmosphere at more than 1000 kilometres per hour.
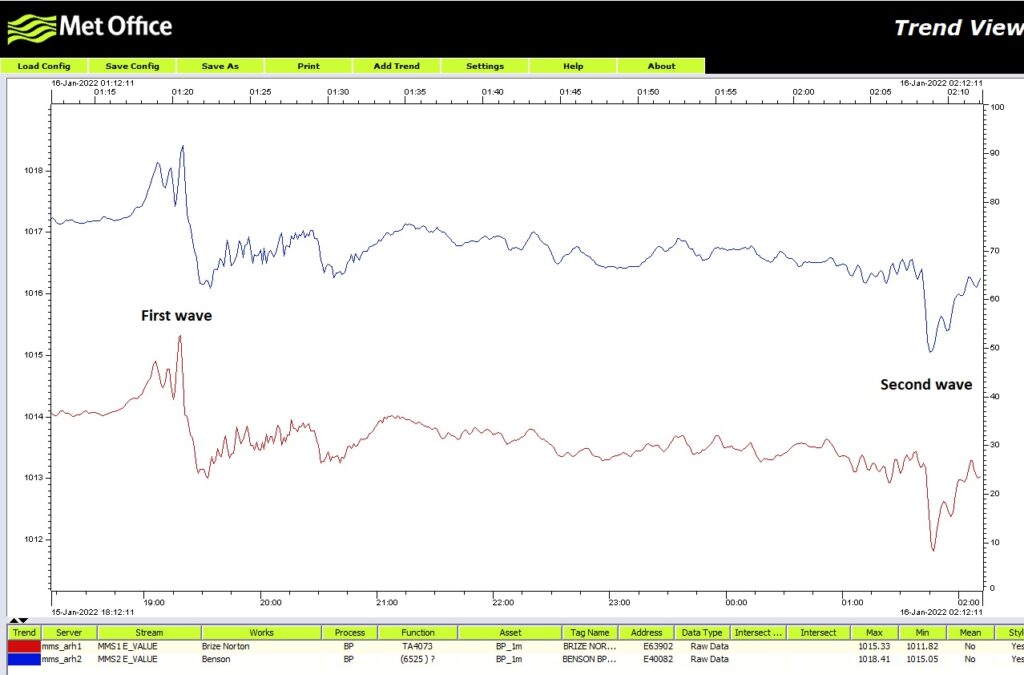
Dave mentioned to me that the people had registered a pressure increase on their monitoring devices due to the pressure wave and checking the internet the Met Office has issued a nice graph on Twitter.
On the observatory Grafana dashboard I could indeed see two pressure waves at the correct time. We only record the pressure every 60 seconds because for astronomy that’s all we need so we do not have the resolution of others but the height of the two events are in the correct range compared to the graph above.
Double pressure wave
The first pressure wave arrived (19:13-19:24) we was 2hPa increase as we have lost some resolution due to sampling period and the Met Office is ~2.5 hPa. We could change the sampling to be lower (15 or 30 secs) as storage is not an issue and then we would have caught a nice defined peak. The second pressure wave (2022/1/16 01:55-2:14) and we measured ~1hPa drop and again was lower than the Met Office due to our sampling period.
Our auxiliary pressure monitoring install was down during this period as the box appeared to have been restarted/rebooted and the ASCOM Alpaca instance was not running which was unfortunate 🙁
Session period 21:00 – 23:57, transit start ~21:16 and end ~00:05
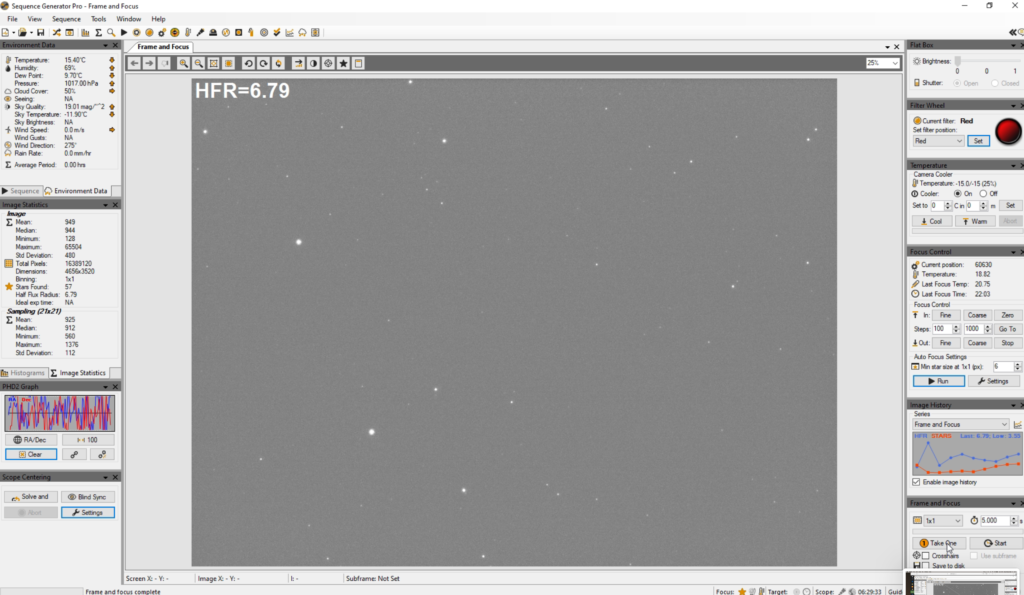
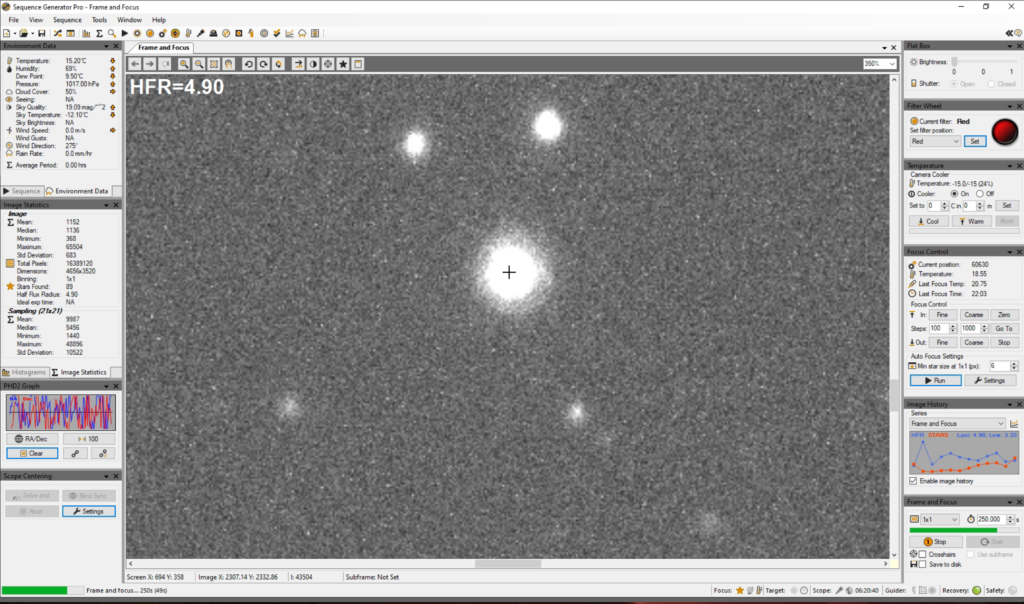
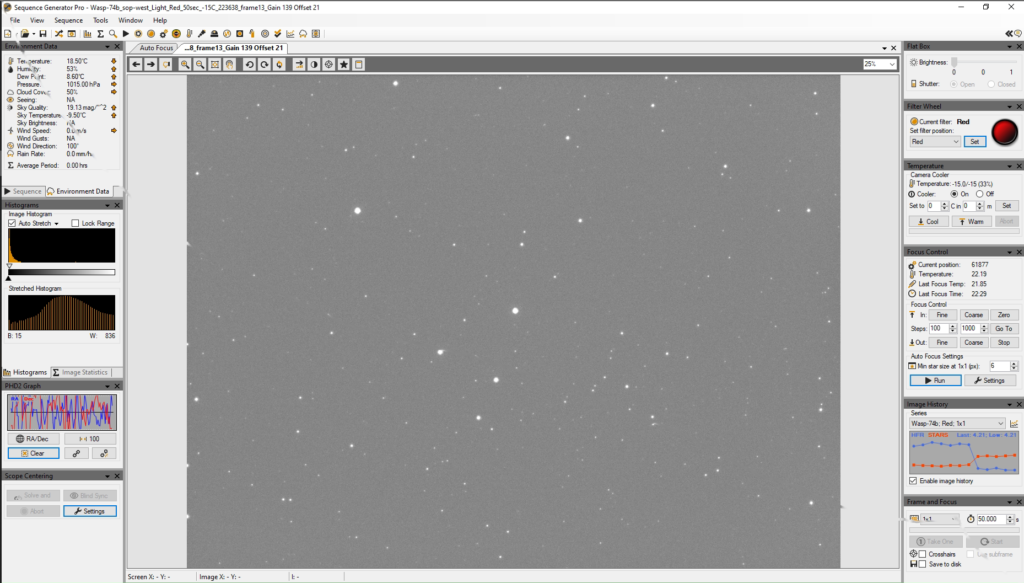
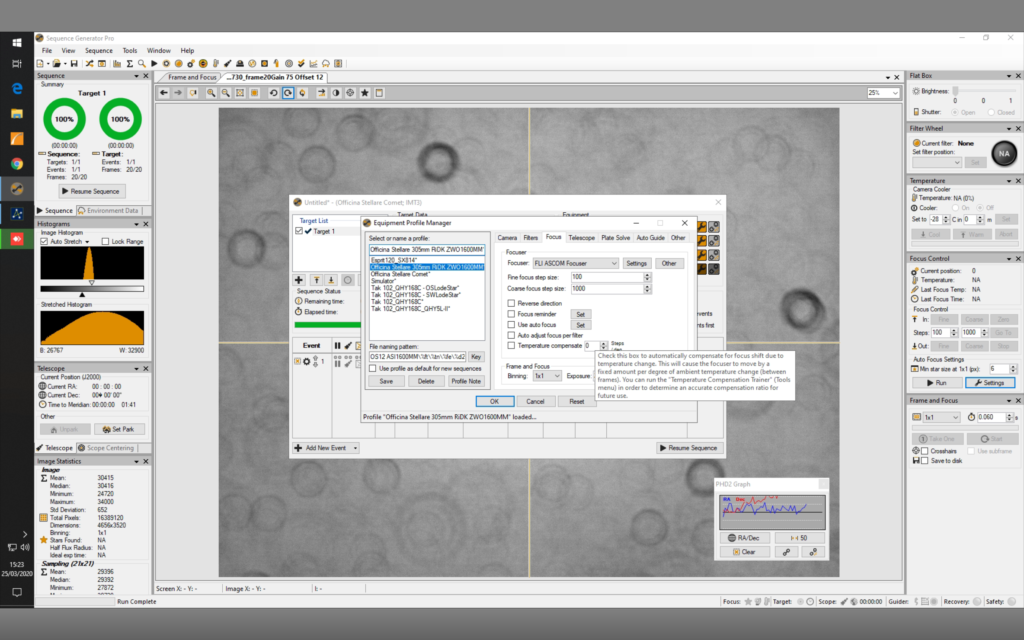
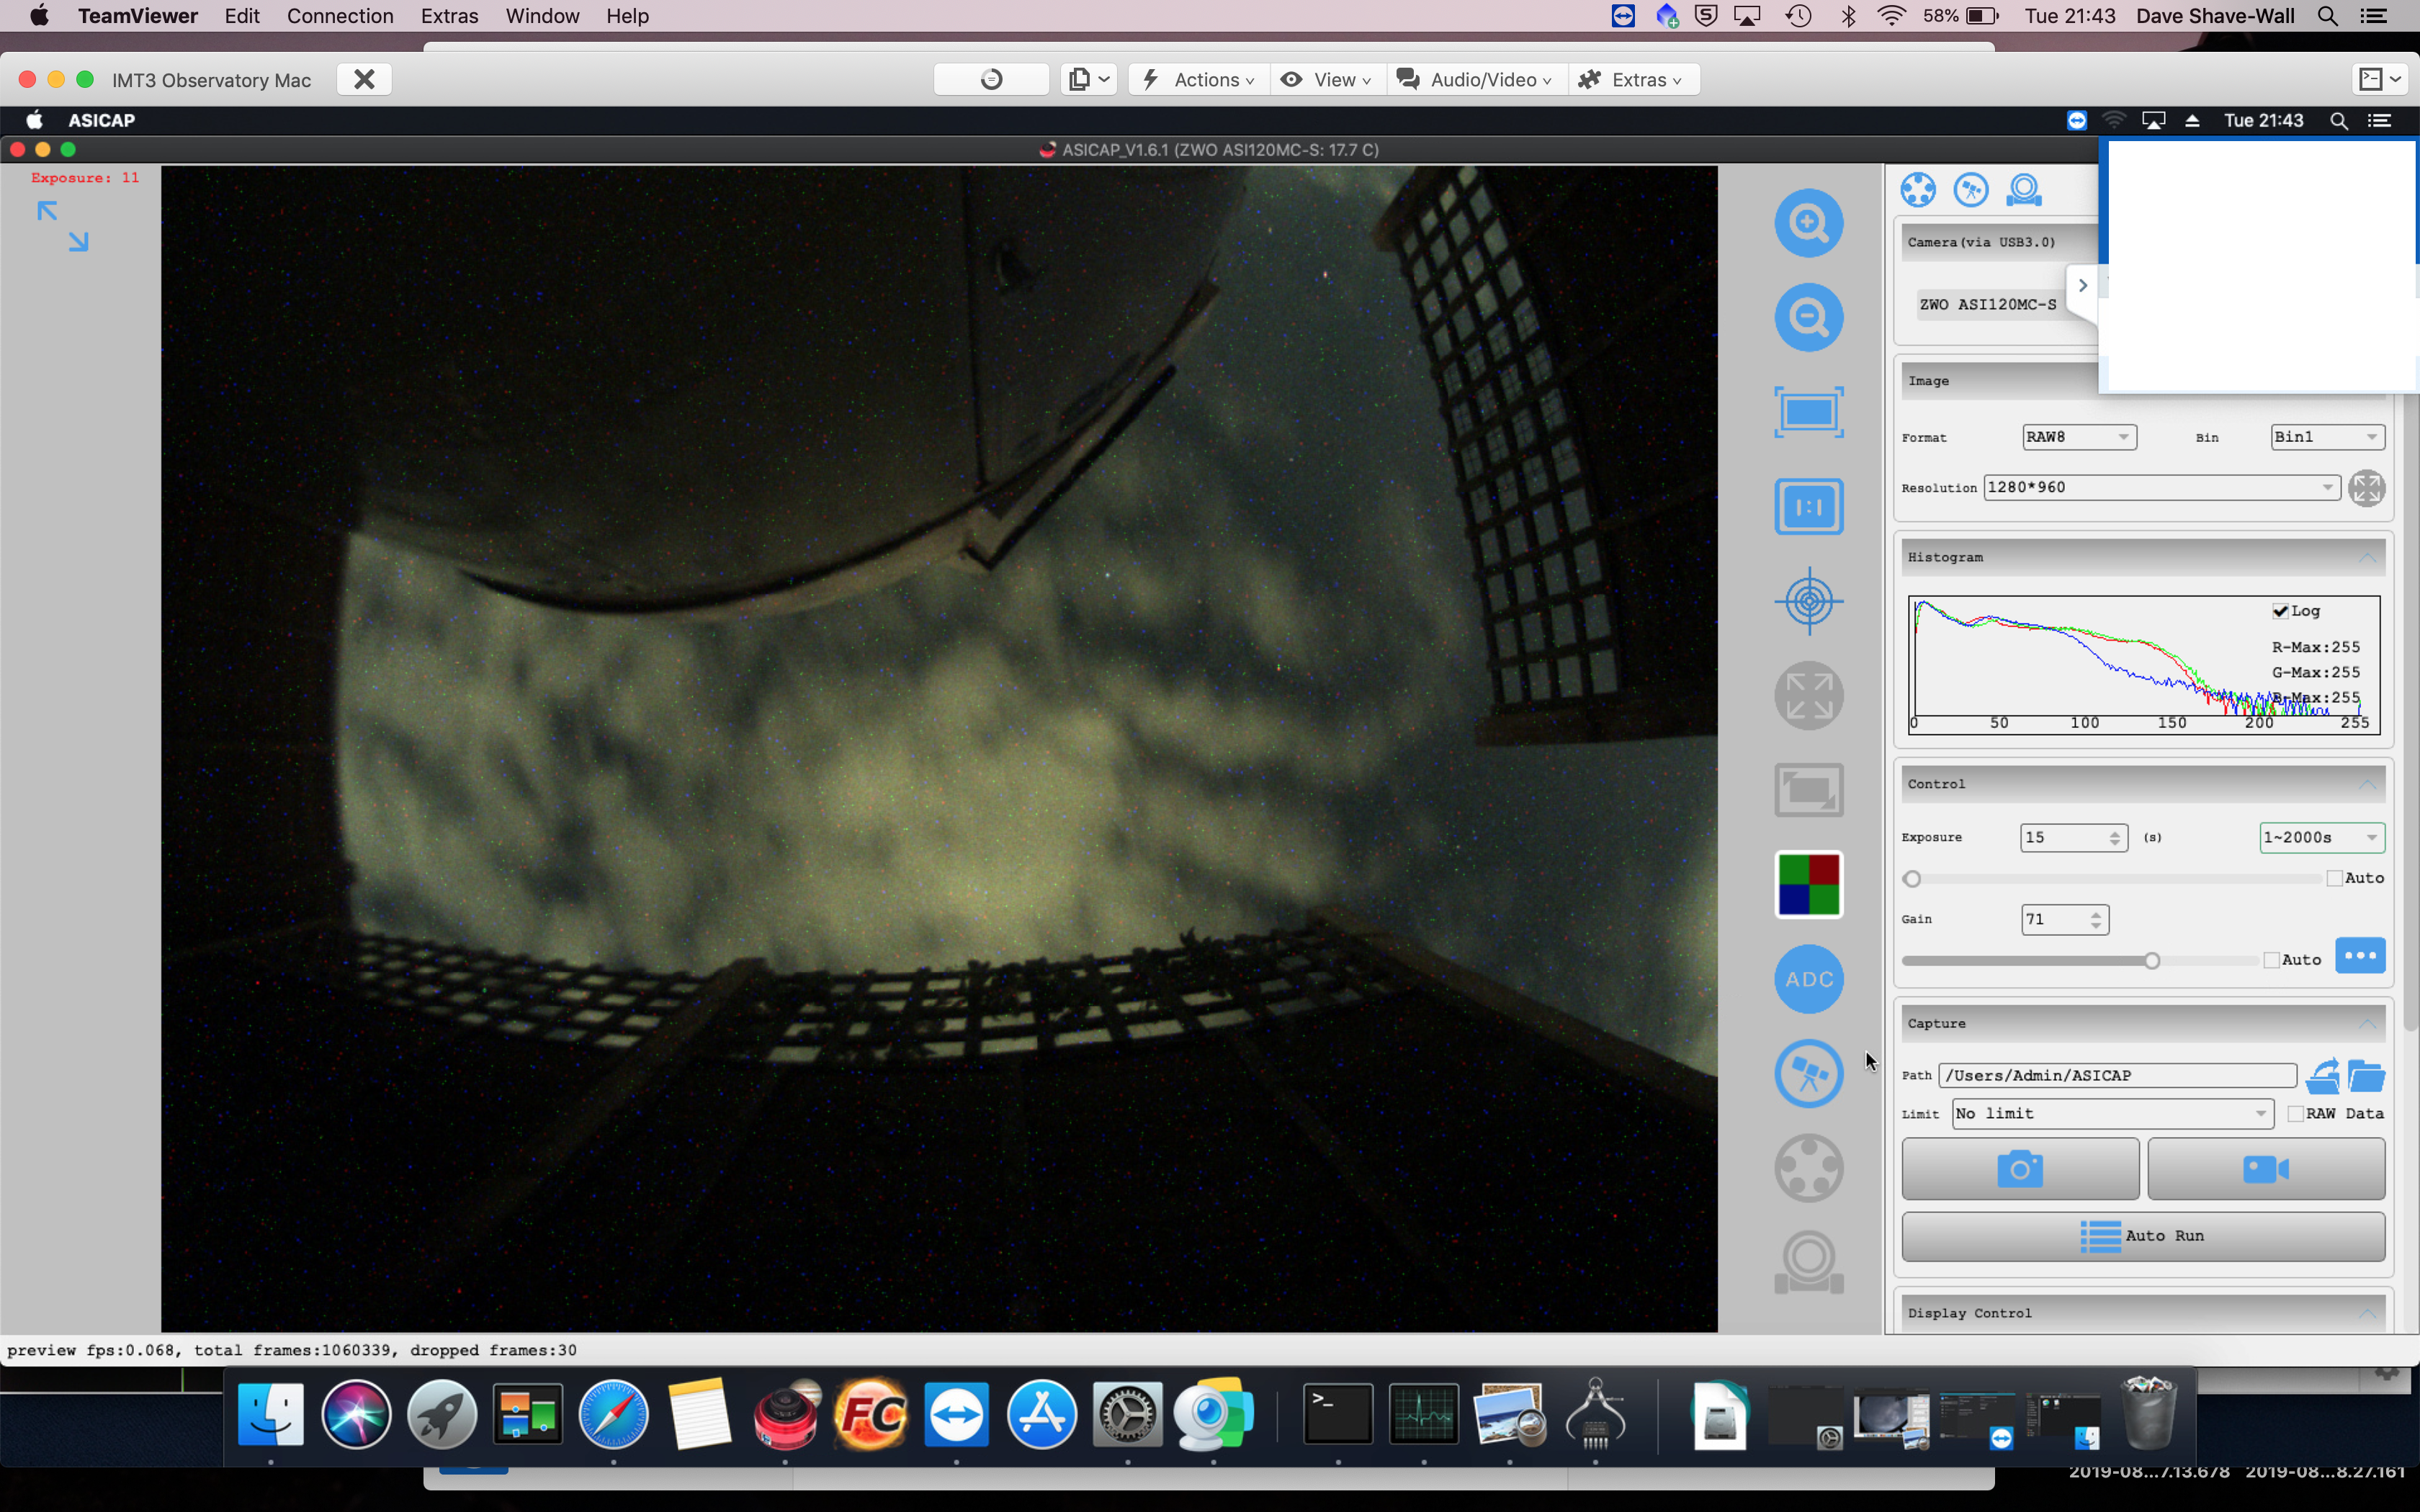
Started with Lum autofocus at 21:17 but on changing to the Red filter the HFR rose to 8.5 so refocused on Red at 21:20, position 60789, HFR 3.97 at 21℃. The change in HFR was more likely the warm sky and seeing conditions.
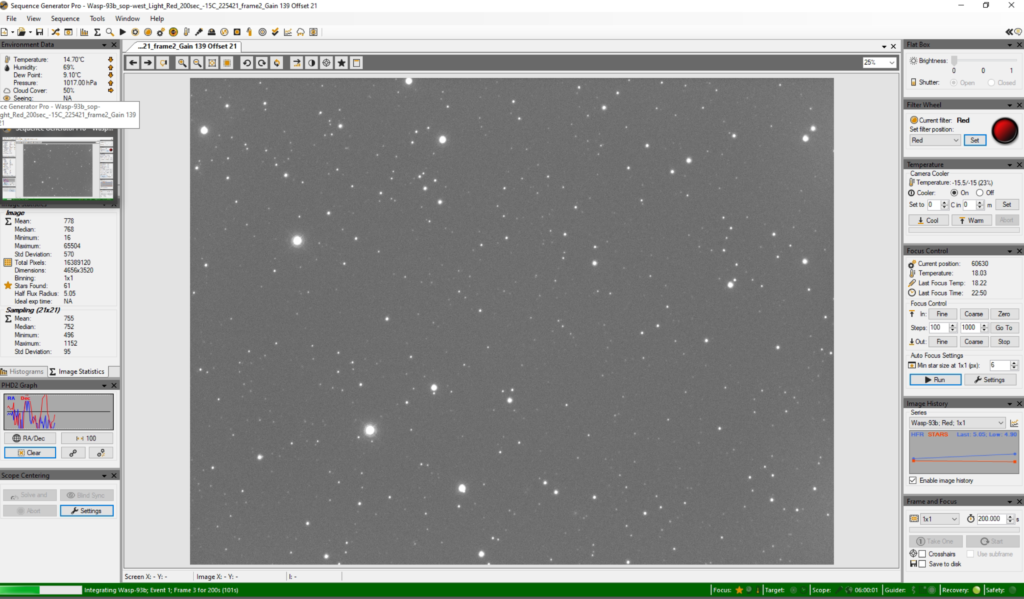
Restarted imaging at 21:39 at new Gain 10 and Offset 10 with a 15 second exposure to get the exposure down well below the 65k max to around 35k. The target star is a magnitude +7.69 so the initial Gain 139 Offset 21 and even Gain 75 Offset 12 were too high even at 10 seconds exposure.
We started with no delay in between the exposures until the start of the transit, then decided due to the large amount of data (35GB) being collected we should put a delay in which we did of 60 seconds. In hindsight we should be placed a smaller delay period in 15-30 seconds to allow us to gather more data points for the transit period. We have emailed the ESA team to start a conversation on planning exposure/delay settings for transits.
We then finished was forced to finish before the projected transit was completed when the clouds rolled in, and took Dark, Bias and Flats frame at Gain 10, Offset 10 ready for the analysis software.
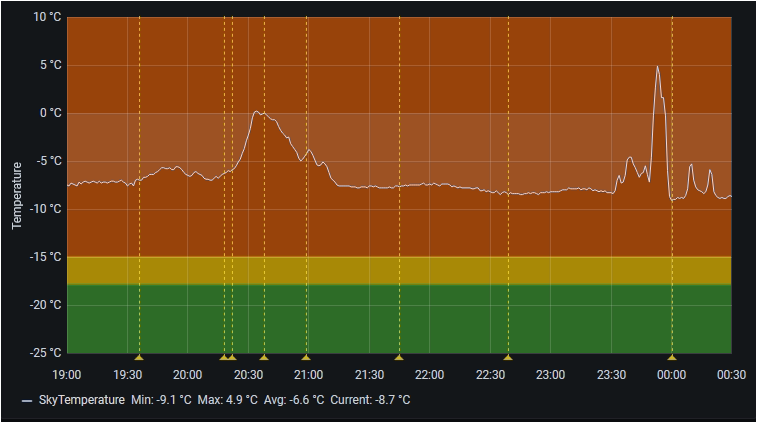
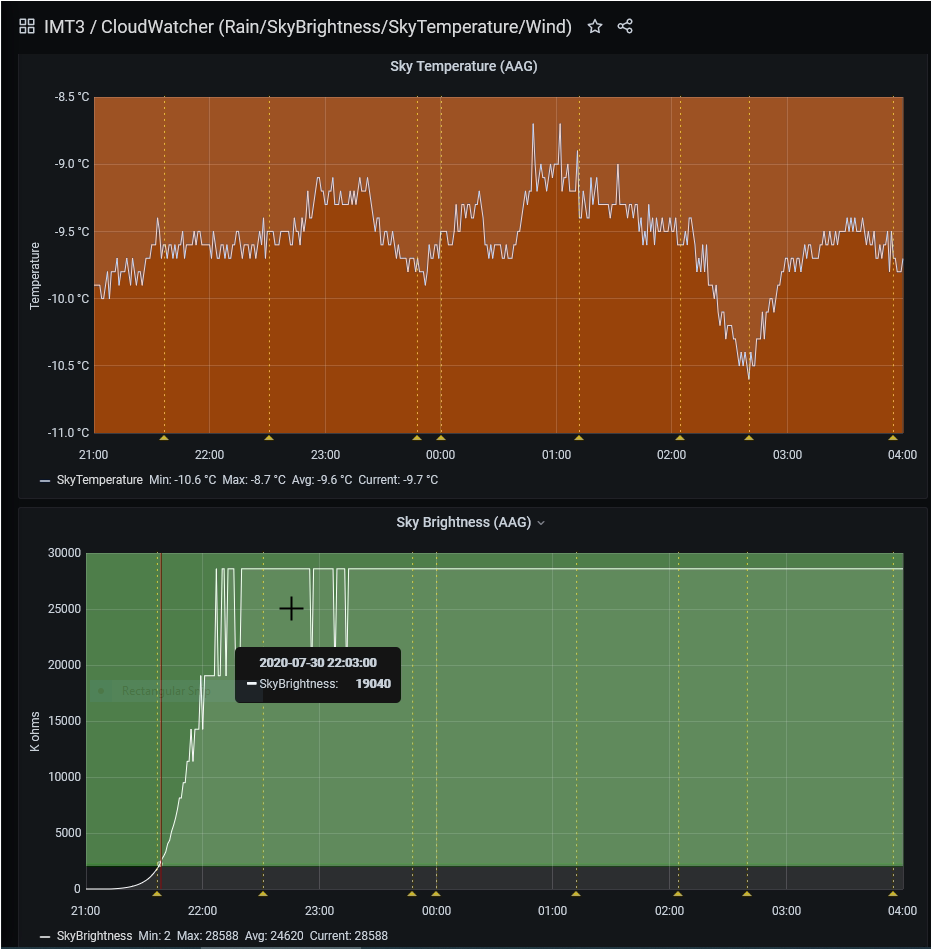
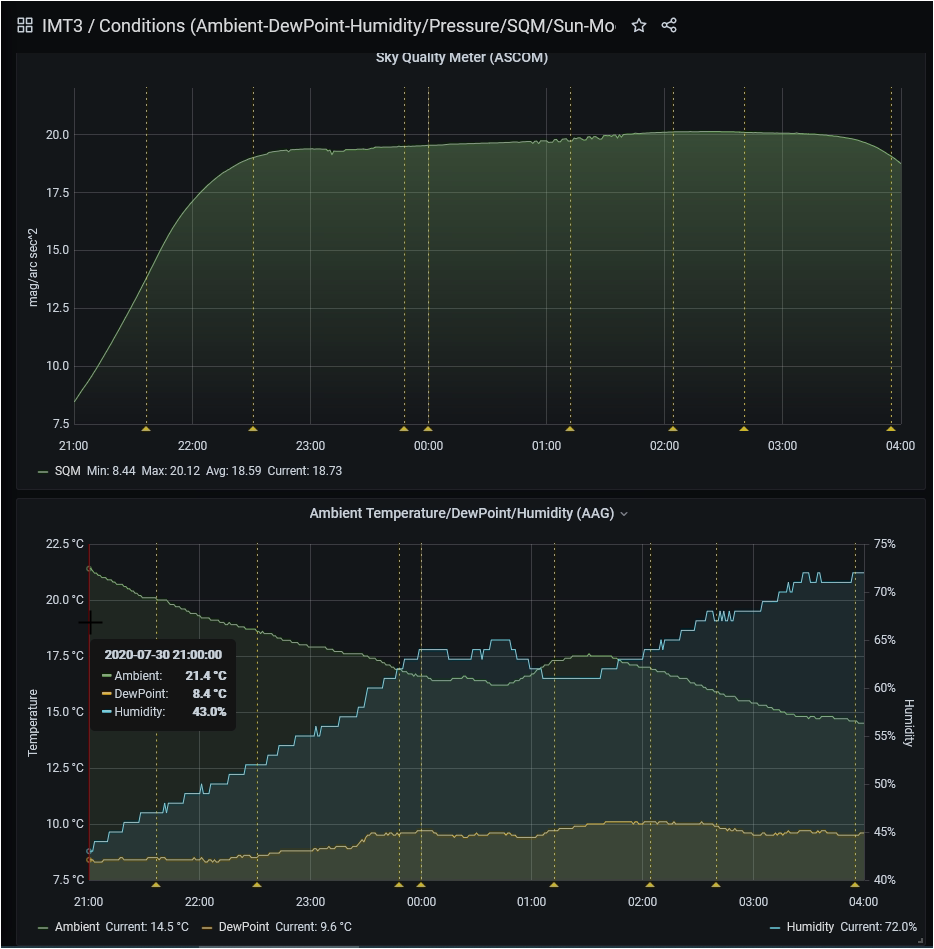
After reviewing the data and the monitoring graphs it is obvious that the less than desirable Sky Temperature showed it was not truly clear. Below is the effect of high haze and cloud passing across the sky during our observation session. It should be noted that we have not had sky with a reading <= -18℃ since mid July.
Not a truly clear sky during the transit
How much impact this has on the observation and measurements we will discuss with the Exoplanet team.
@ 19:00 Opened dome in order to cool the dome and scope down.
@ 21:00 GingerGeek arrives, wine is poured and we took 5 x darks, flats and bias for both the last run and tonight. The flats (red) were 3 seconds exposure to get 2/3 well depth required for this.
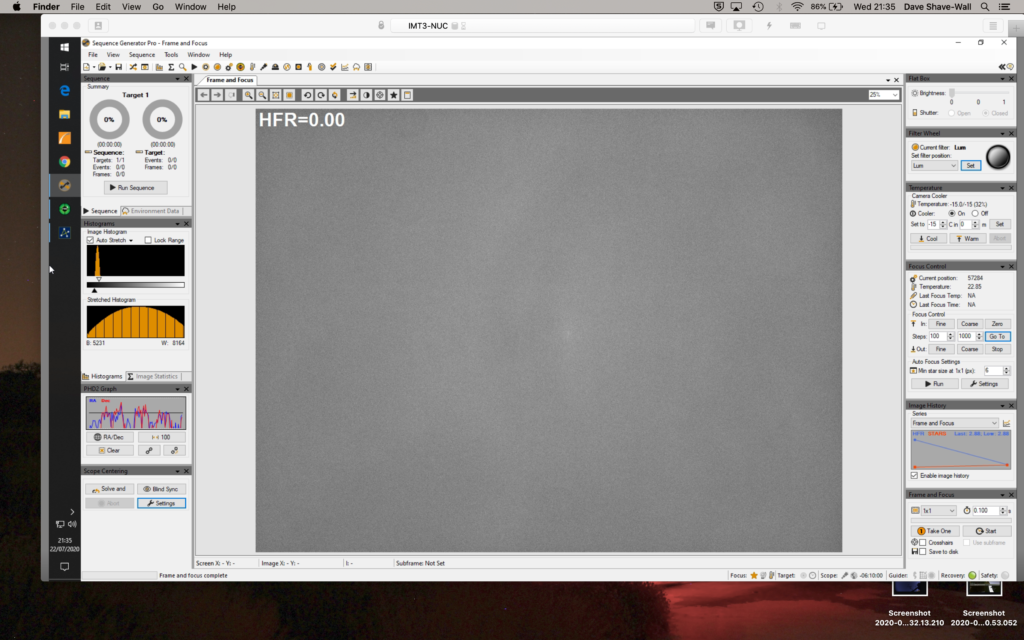
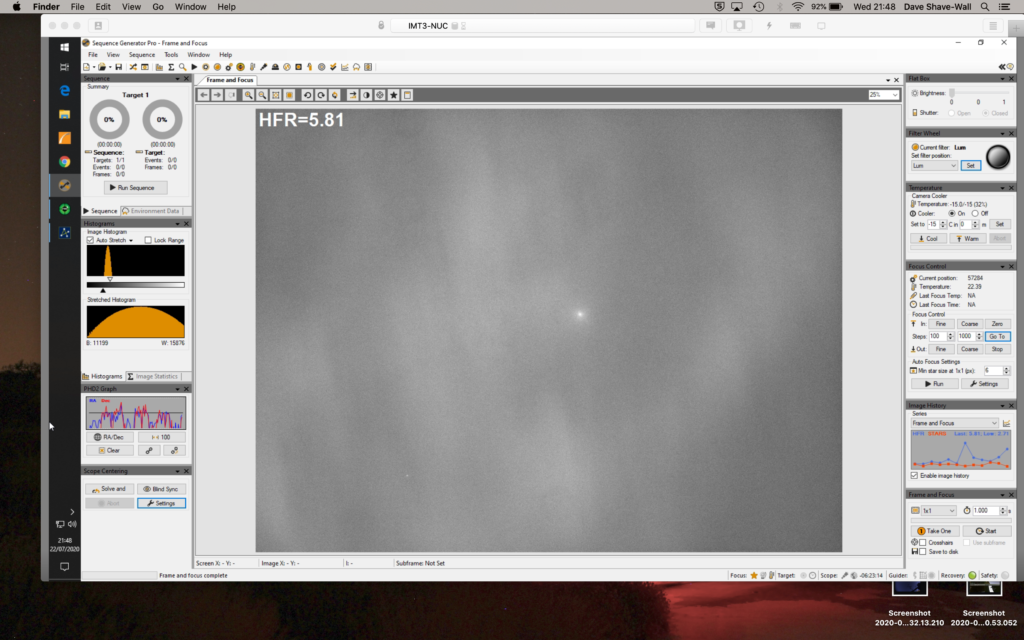
@ 21:44 Slewed to WASP-93b before we set about focusing on a nearby magnitude 5 star using the Red filter. Starting focus position was 58841@19.42℃.
@ 22:06 After failing to focus using the Red filter we resorted to using the Luminance filter to auto focus and achieved a excellent fit (focus position 61630, HFR 4.95 @20.83℃).
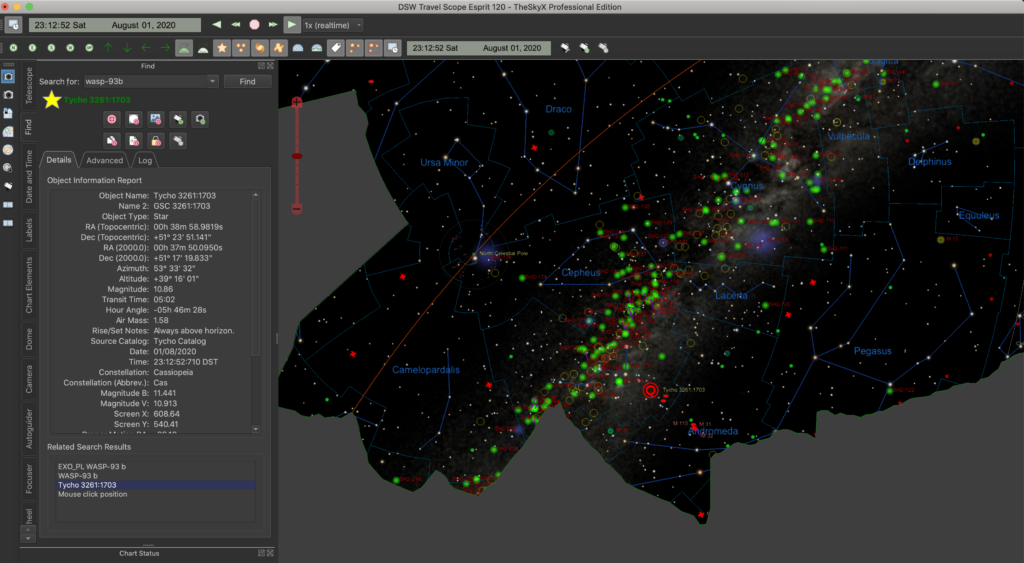
When we swapped back to the Red filter, SGPro then moved the filter offset to focuser position 60630. We slewed back to WASP-93b (GSC:3261:1703) and found a guide star just off centre of the star field with the exoplanet target.
Started to take exposures to find the brightest value of the centre pixel of the star and make sure it was 2/3 full well depth and thus 33,000 ADU (even though it is a 12-bit camera SGPro is set to 16-bit for ease of use. Eventually this was achieved at around 200 second exposure.
@ 22:51 Started imaging, 18.21℃ was measured at the focuser.
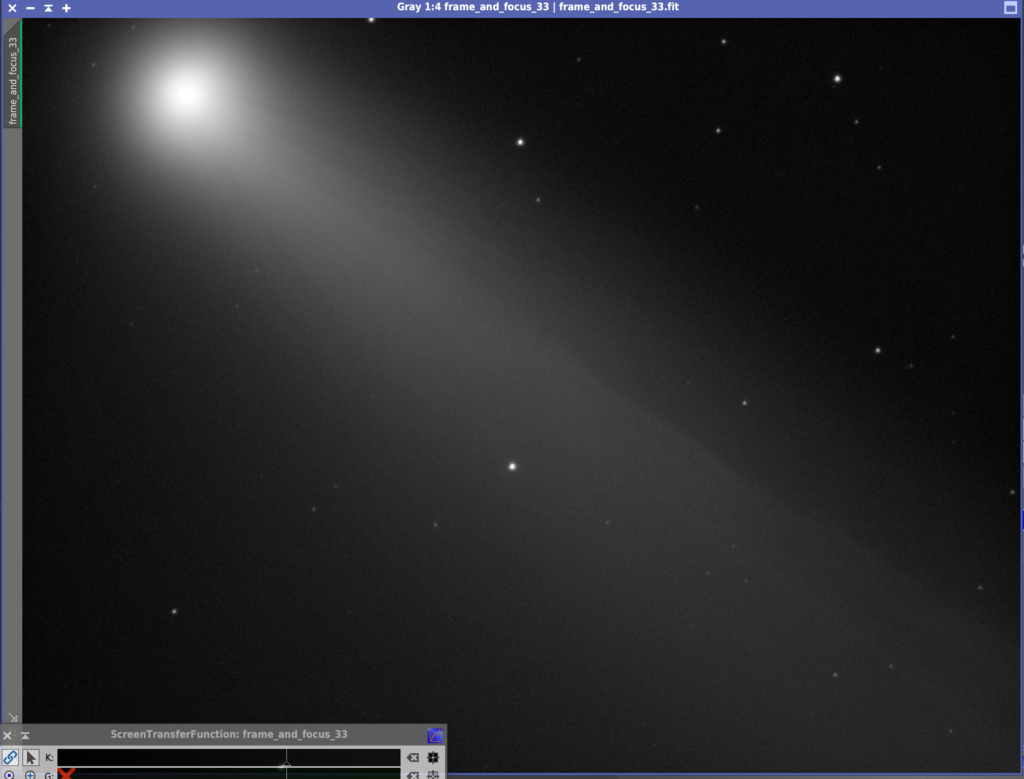
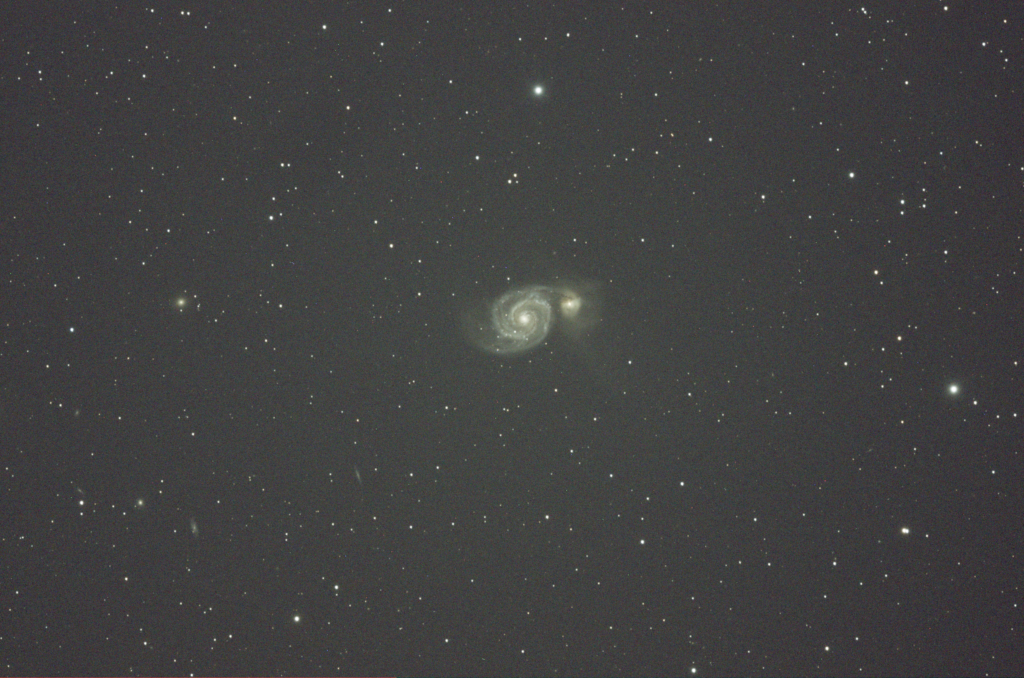
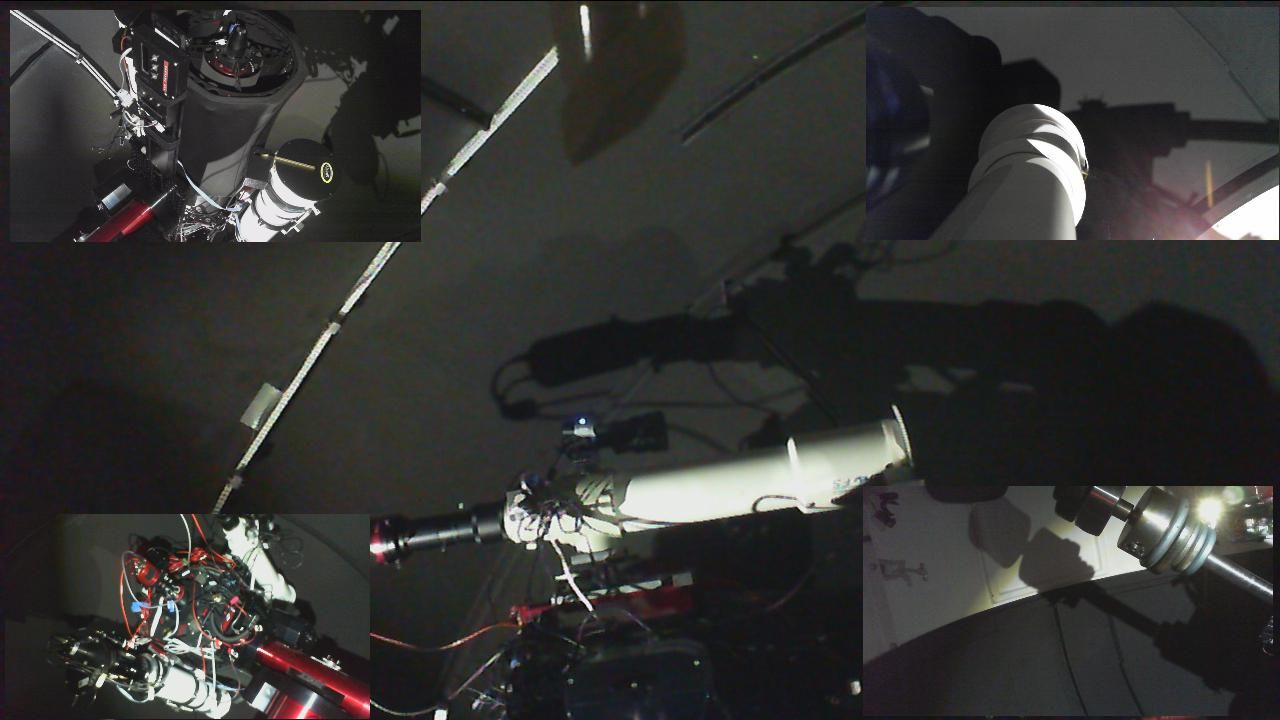
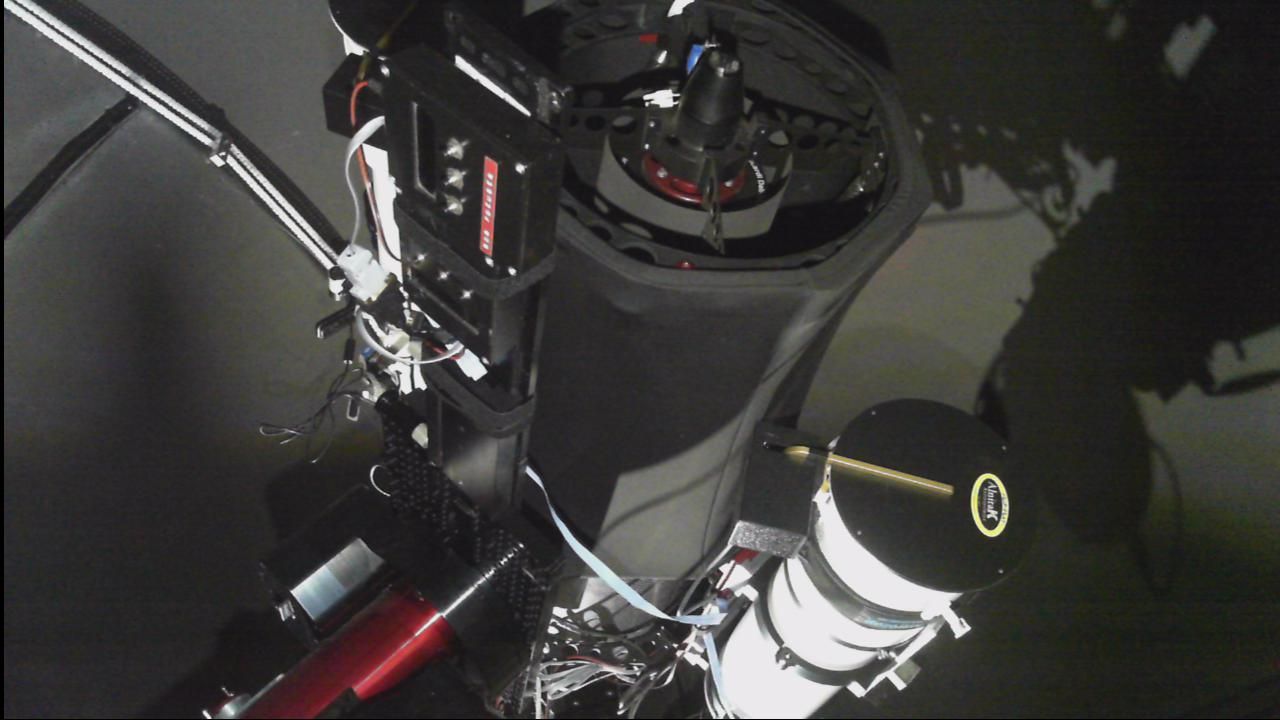
Frame and focus of starfieldTarget star for Exoplanet measurements Local conditions200s exposure of starfield
Started around 21:15, Guiding by 22:02, Capture started 22:22, Finished at 03:31.
Dave and I are part of the amateur exoplanet monitoring effort for the ESA Ariel mission. We decided that we would allocate some time to try and provide observing data towards the project whenever we could.
Part of this requires some forward planning such as looking at the upcoming transit visible and their associated time. This is due to the altitude of the object, the ingress and the egress times of the projected transit.
Prior to this we had discussed in advance which object to target for the chosen evening. All the hard work of choosing objects is done by the Exospies project website as they list the candidates they need data for via a schedule. So it’s a simple task for use to go through the list and work out what fits best for us.
Unfortunately whilst opening the dome to cool down I decided to review the schedule but I was hit with a server 500 error from the website. In a panic that I might miss the start of the event I scoured the internet for alternate exoplanet transit time websites and found the excellent Exoplanet Transit Database of the Czech Astronomical Society.
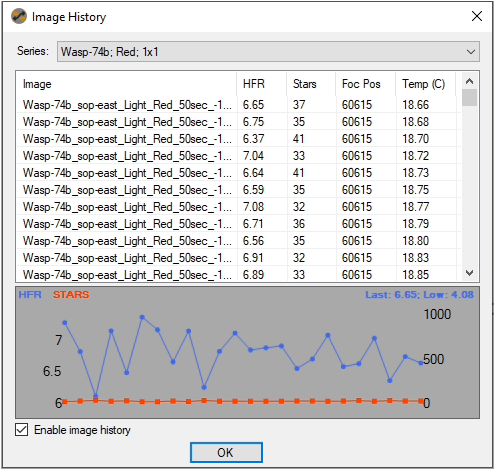
I had issues with focus drift all night due to the temperature fluctuations but at a recent Zoom session it was discussed that images can be out of focus with no detrimental effect on the measurements :
SGPro Image History
I was unable to auto focus successfully maybe due to the low altitude and seeing. I also discovered that temperature compensation was enabled so we probably need to remeasure the temperature compensation coefficients so the focus deltas are better between the par focal filters.
The object was at a relative low altitude, the outside temperature was warm and although the skies appeared clear our AAG CloudWatcher sensors via the Grafana dashboard told a different story. For us a truly clear sky is anything equal or lower than -18℃.
Sky Temperature – it was clear but it wasn’t !
Sky Temperature – T’was warm !
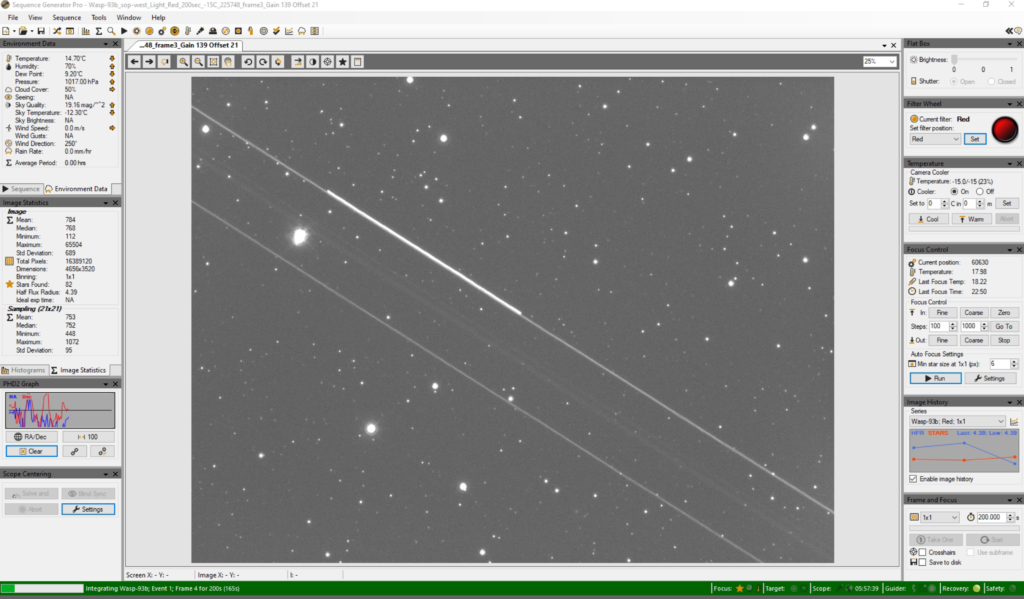
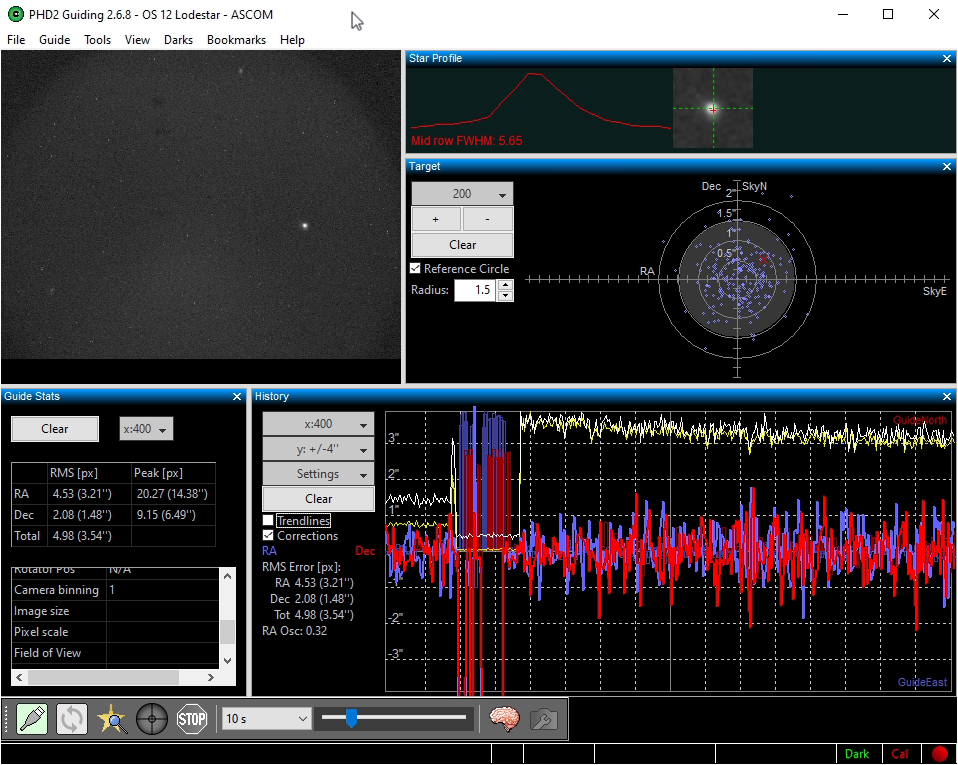
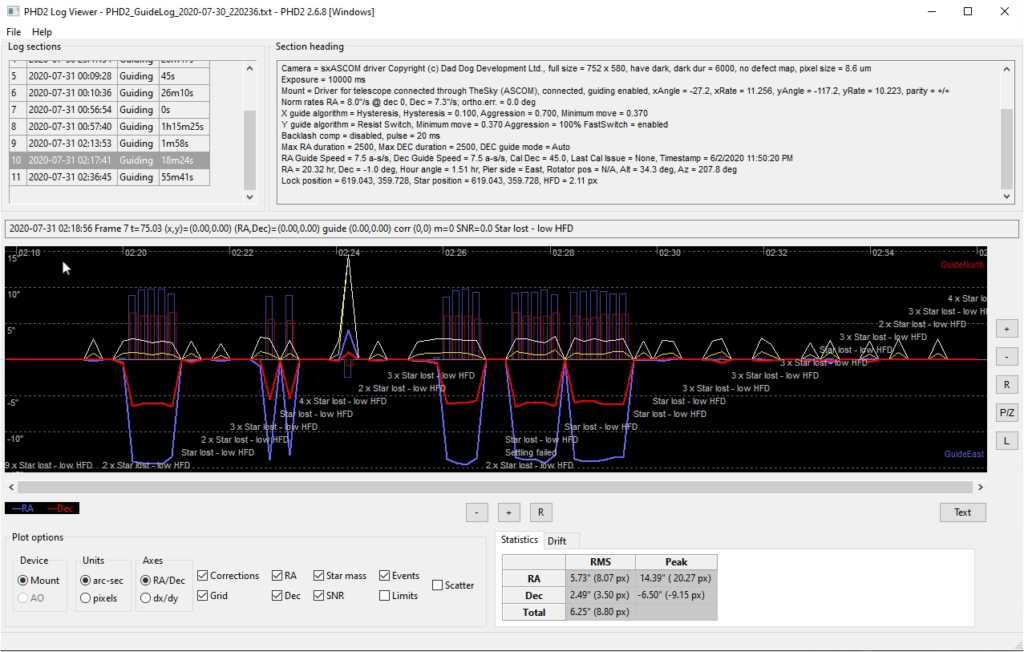
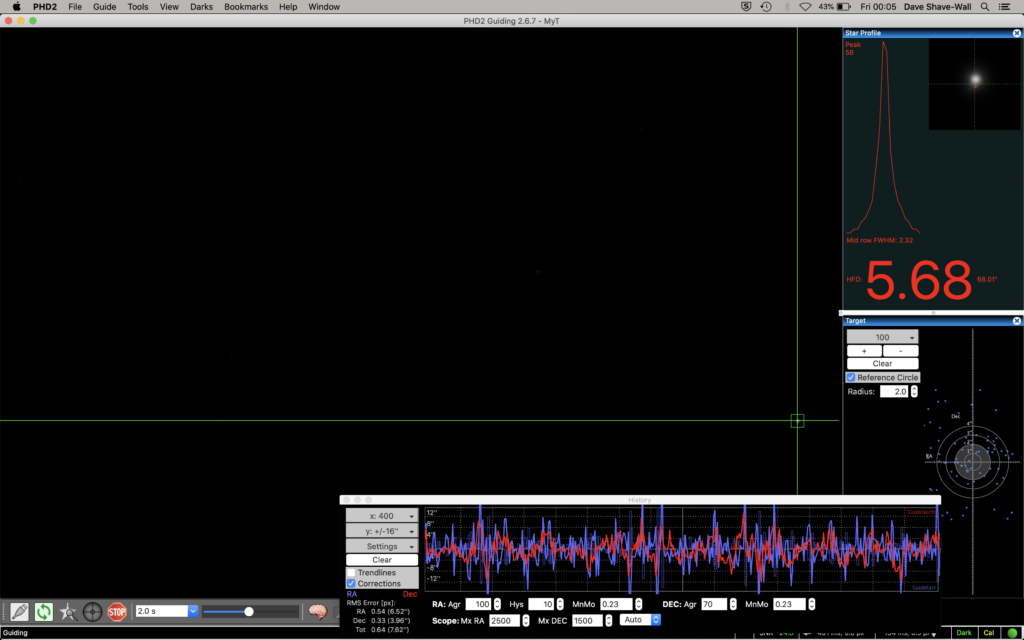
After performing a meridian flip, resumed the guiding I started to feel tired so I set my alarm for 3am and went to bed. Unfortunately there appeared to be a guiding issue at some point shortly I went to bed.
Guiding issues shortly after meridian flip
This was investigated using the phdLogViewer and shown to be a loss of guide star and didn’t recover for around 18 minutes.
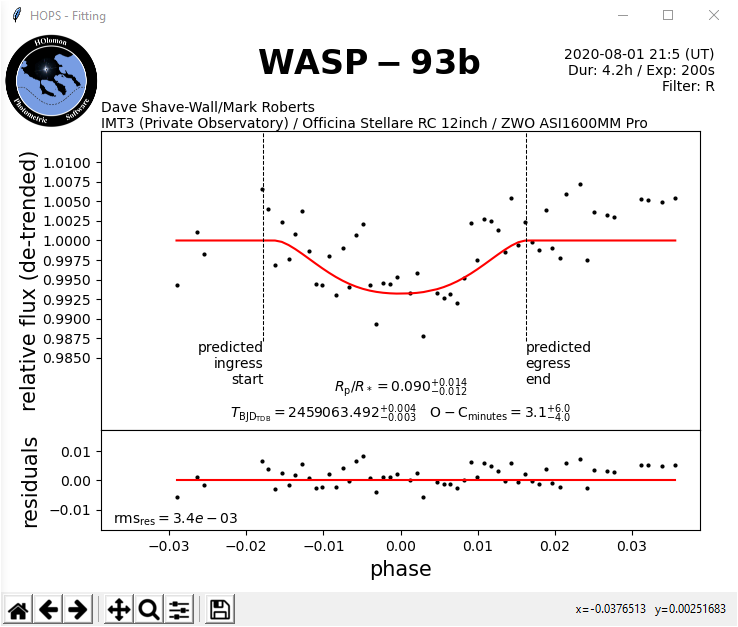
The guiding issue also caused the image to shift so the target and reference stars moved. We need this in frame in order to run the frames through the provided HOPs data analysis program which hopefully won’t have a problem in reading them. That’s an exercise for this weekend and hopefully we will have enough data to yield a decent light curve that we can submit.
I opened the dome at 8:30pm and then went off to do some more work. A few calls later and it was time to come back and see if I could grab comet C/2020 F3 NEOWISE which had now moved further West and further in altitude over the past week, meaning it should be visible from the dome. Below is Arcturus as I performed a quick sync.
Arcturus
Below you can see Arcturus on The Sky X with the dome slit showing and the obstructions from the horizon also present.
TSX
Comet NEOWISE can be seen just above next doors tree.
NEOWISE
A quick peek with the camera and I could just make out the comet.
Quick peek of the comet but clouds
Clearly more clouds rolled in which is typical
More clouds!
Looking at the cameras in the dome I could see the cloud bank of cloud (picture top right)
Cloud bank approaching
Fortunately the comet could be seen at the back of the cloud bank.
45 second exposure of Comet C/2020 F3 NEOWISE
So I set about quickly taking some images before the comet disappeared behind the tree.
90 second exposure of Comet C/2020 F3 NEOWISE
The other useful thing tonight was using the monitoring GingerGeek put together. Below are a selection of shots from the website.
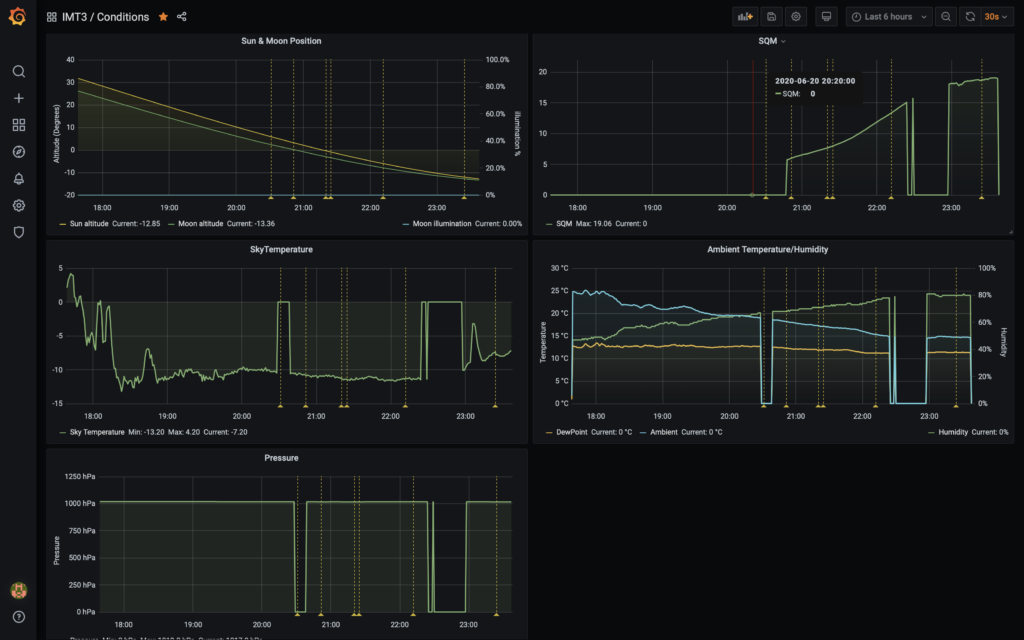
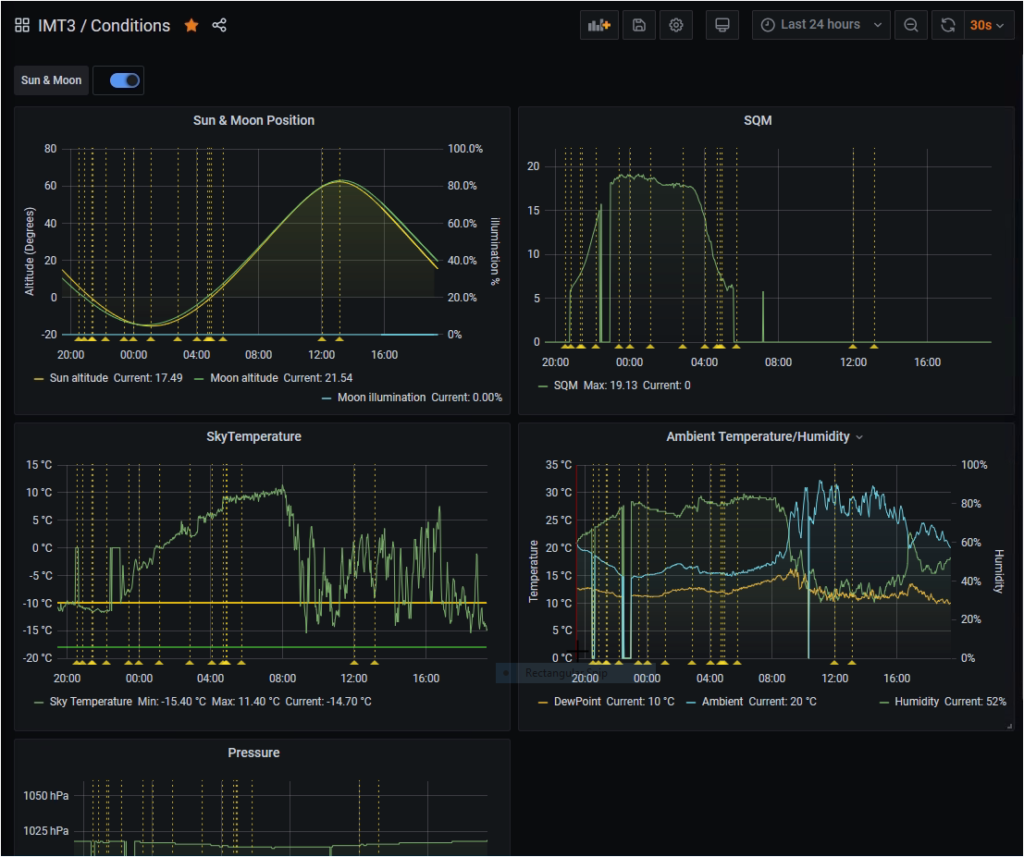
IMT3 Conditions
The chart below shows the light cloud cover and the sky temperature is representative of the sky clarity and relates to cloud coverage too. The scale is inverted to -18℃ is a cloudless beautifully clear night sky, which tonight was not!
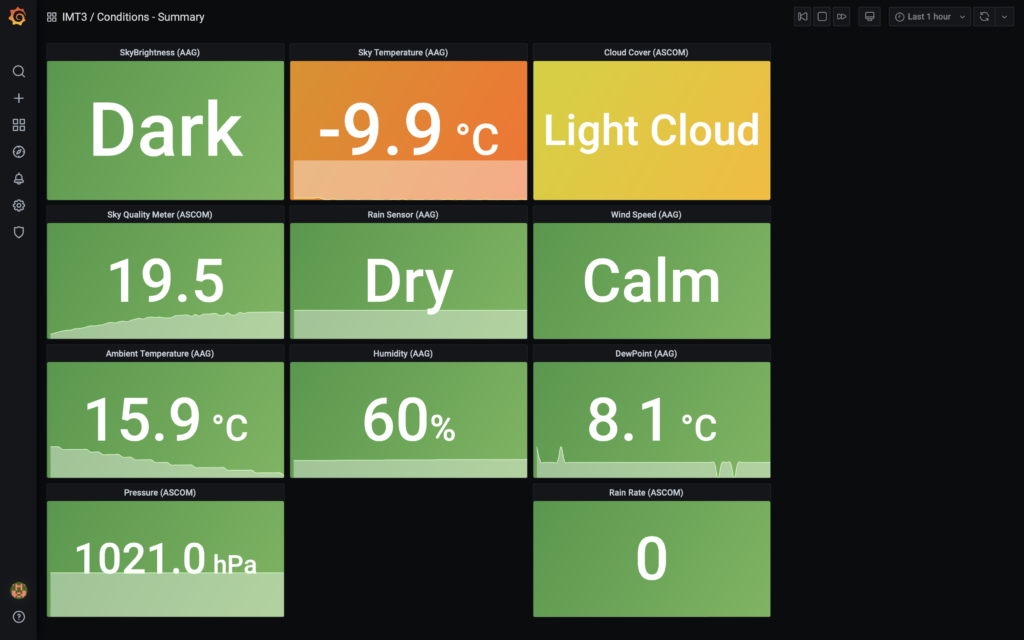
IMT Conditions Summary – Fisherprice style 🙂
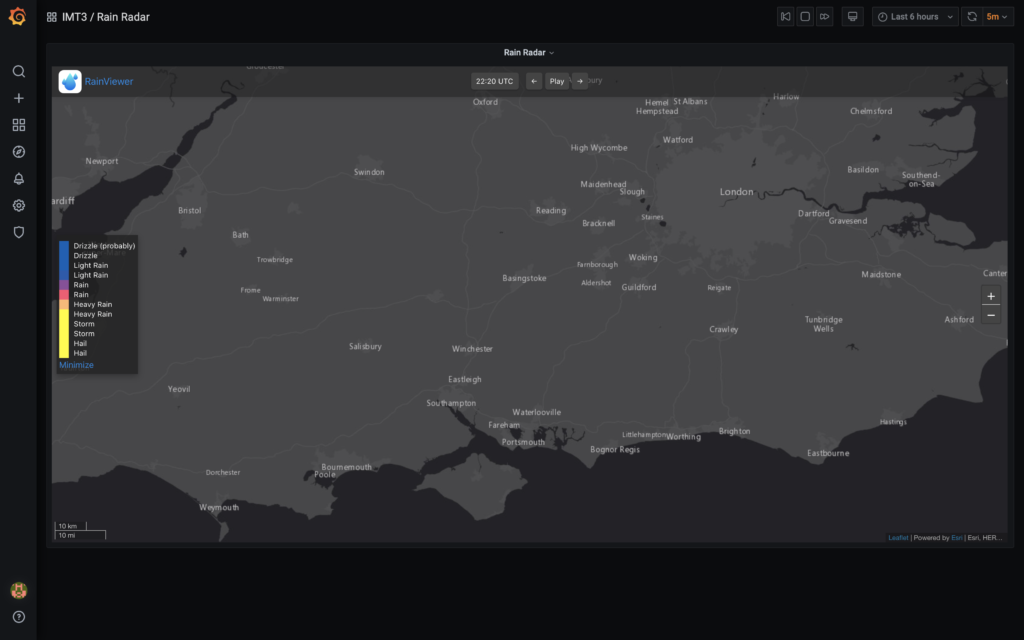
At least there was no rain 🙂
IMT3 Rain Radar
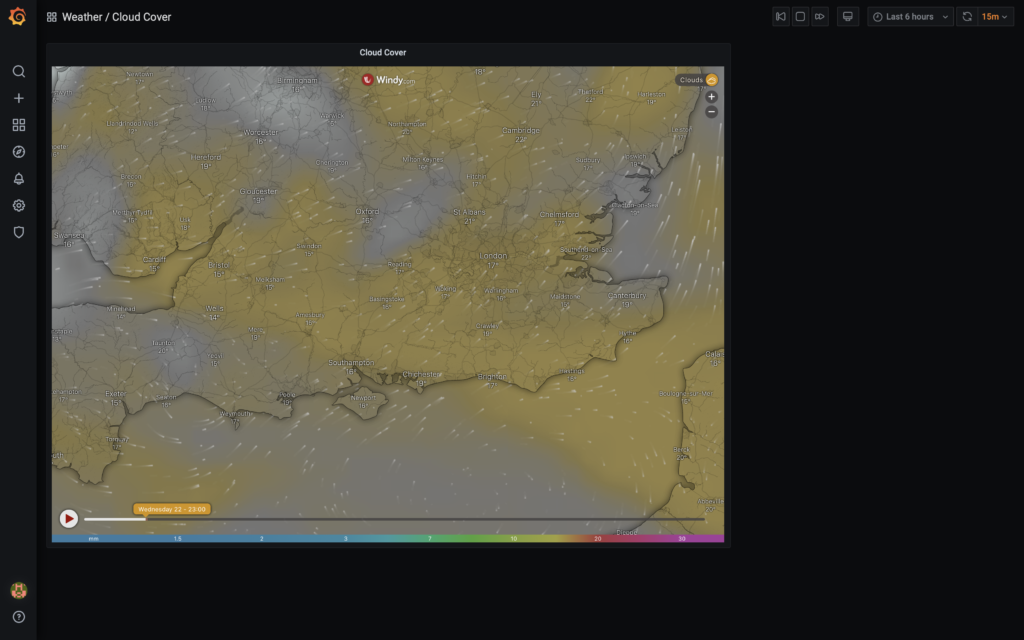
This image below shows the cloud bank just North West of Reading that was a problem.
IMT3 Cloud Cover
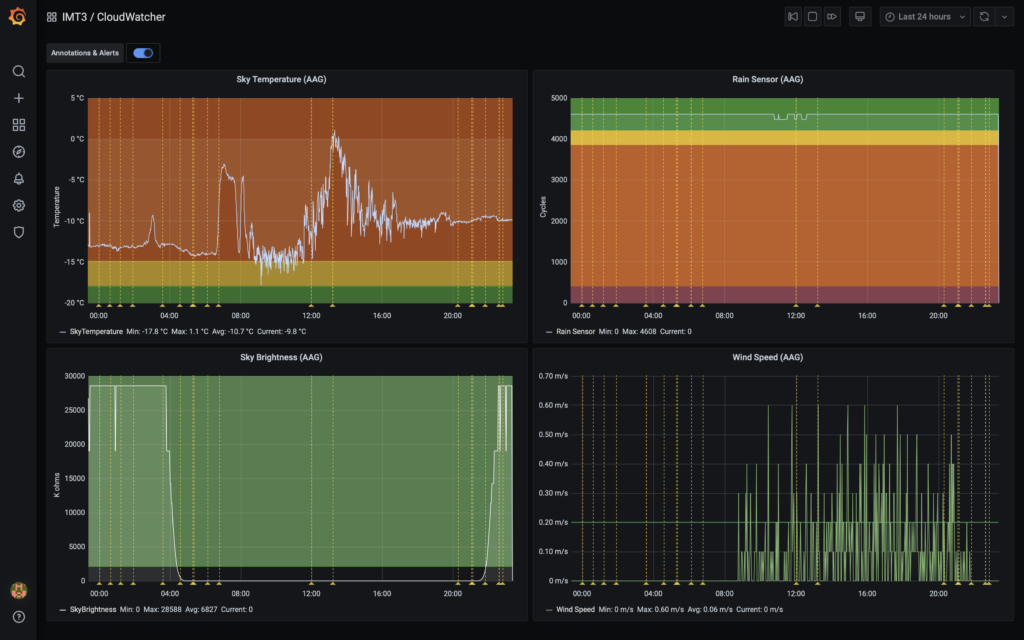
This next chart is from the data produced by the AAG CloudWatcher weather station. Note the sky temperature is nowhere near the -18℃ to be clear.
IMT3 AAG Cloudwatcher weather station
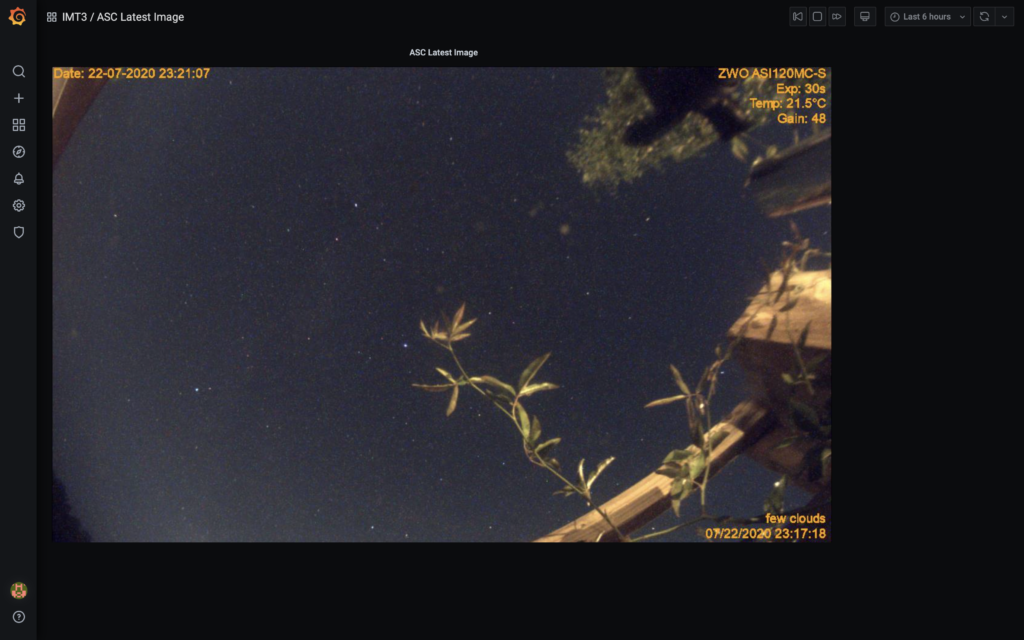
And finally the all sky cam just as I packed up showing the clouds clearing
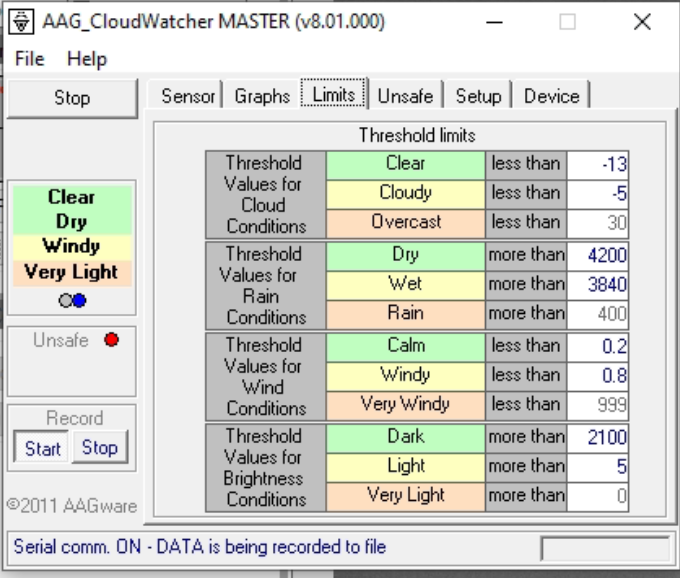
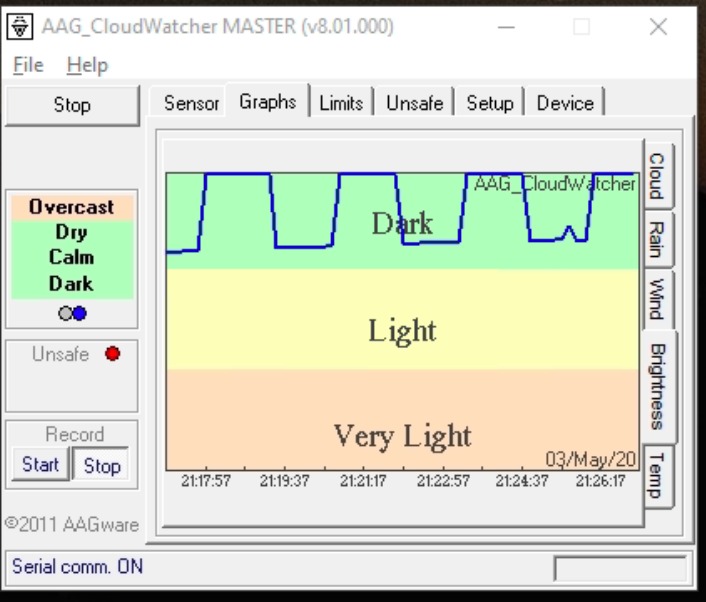
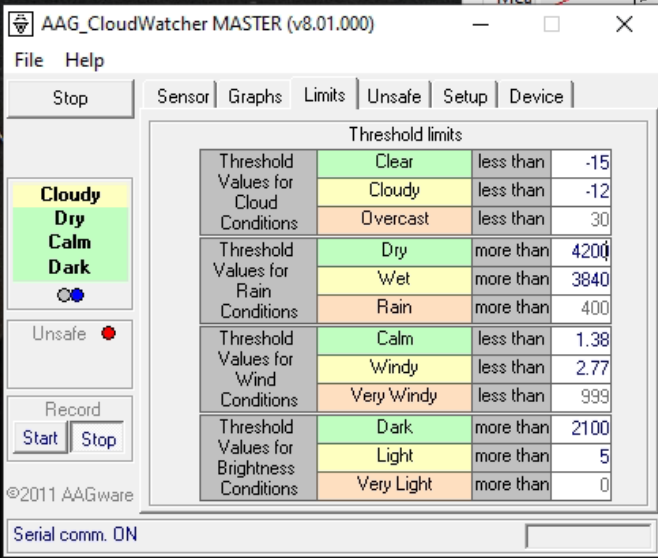
Tonight GingerGeek came over for a bit of social distancing friendly astronomy along with a bottle of Malbec wine. The idea was to calibrate the AAG, specifically when it goes from Very Bright to Light to Dark and at those points what the SQM value is along with the Sun’s position below the horizon. The AAG needs to get to 2100 which is dark, light is 5 and very light is 0.
The first time we noticed the values starting to change on the AAG brightness when it moved from its continuous reading throughout the day was at 21:47 when the Sun was -3.45 degrees below the horizon and the SQM was 10.15.
Within seconds the AAG read 9 and was already on Light vs Very Light and the Sun was now -3.54 degrees below the horizon and the SQM read 10.28.
It took almost half an hour for the AAG to get to dark. At 22:16 the AAG finally reached 2100, the SQM was at 13.97 and Sun was at -6.52 degrees below the horizon.
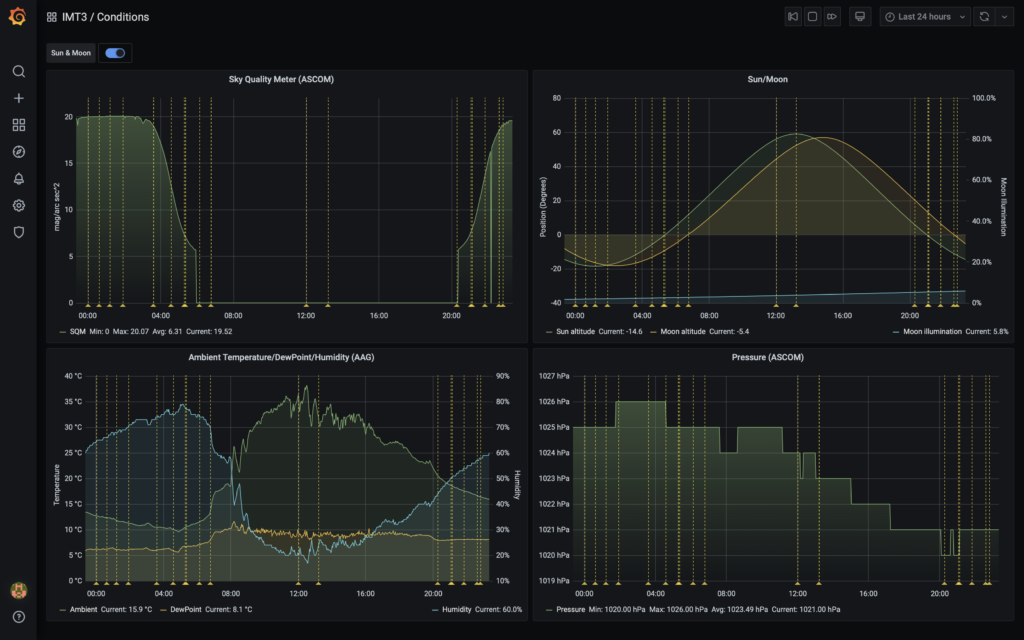
GingerGeek had also developed a new server for IMT3 to visualise some of the data from the observatory. The Grafana dashboard charts below show the data along with the Sun altitude.
New IMT3 Grafana dashboard
Looking at the last 24 hours shows the effect of the light nights on the SQM. The raised values after 4am went the value should be reducing or zero is the effect of a cat or bird covering the sensor. Also worthy of note is the sky temperature which shows the effect of cloud as the SkyTemperature increases. A truly clear sky would yield a value of -18℃ or better.
Shows the entire night
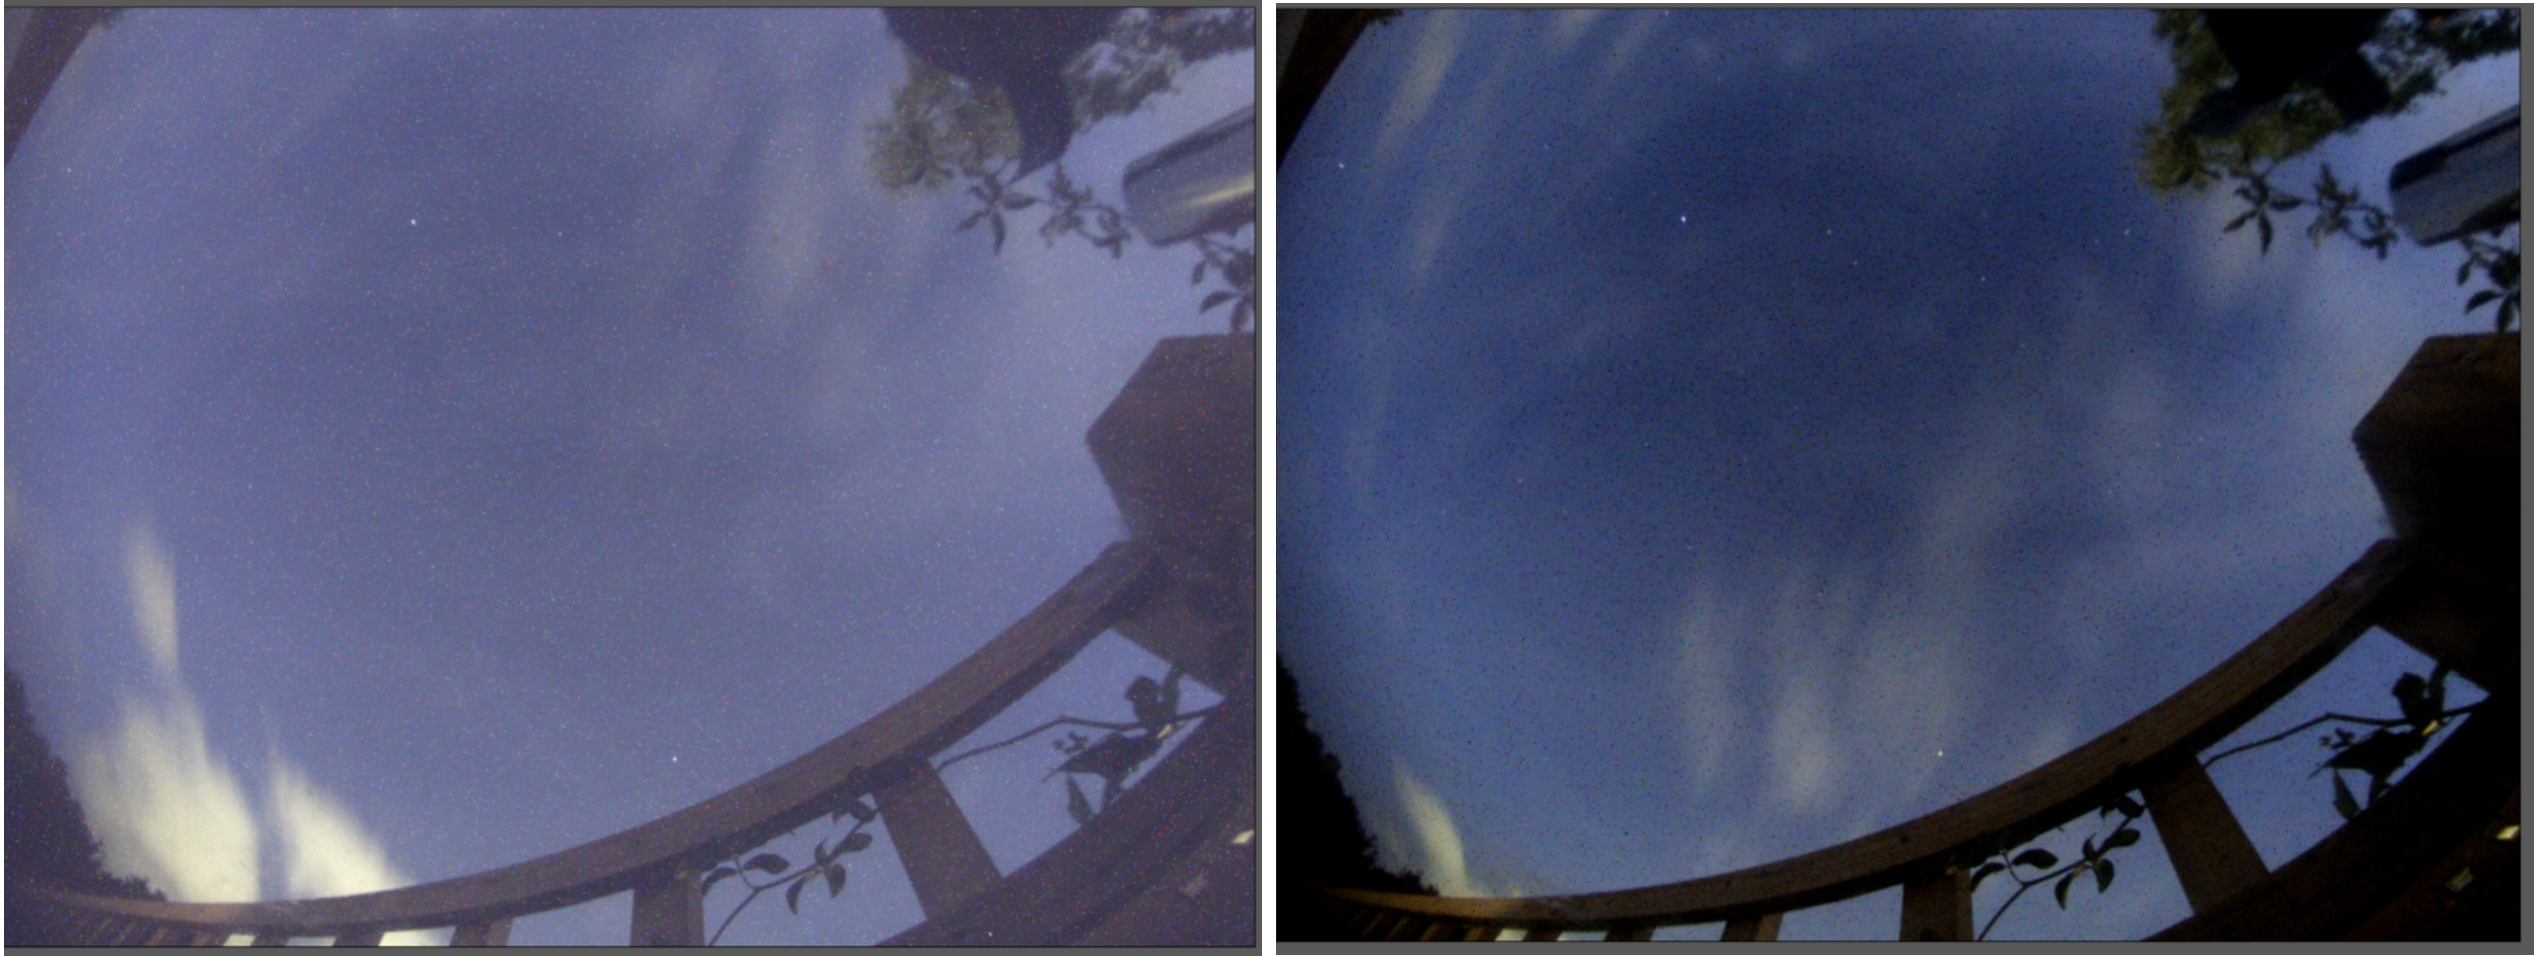
We also took darks on the ASC and applied them since we had never bothered to do it before. The shot below shows the before and after effect of applying the dark/bad pixel map. The whole image looks a lot cleaner and darker, although there seems to be some negative representation going on with dark pixels.
Before and after applying darks
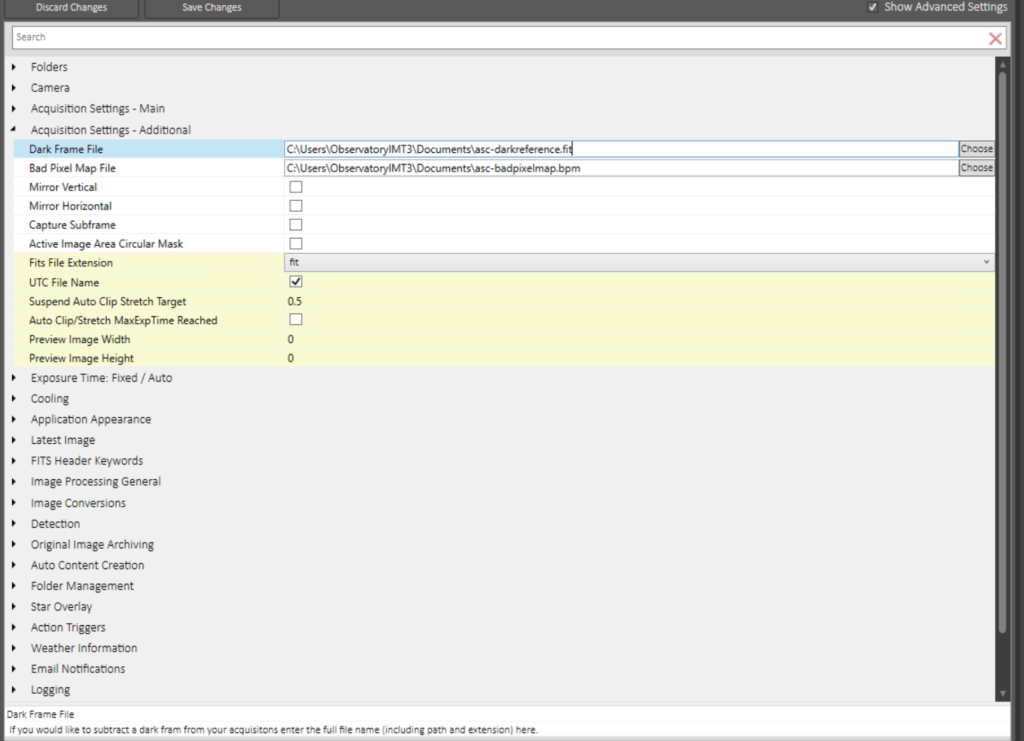
The setting that needed to be changed in the ASC software took GingerGeek a while to find.
ASC Setting to apply darks
During the daytime the ASC looked awful but remote the darkframe reference file and just applying the badpixel map seem to be better. Tonight’s set of images will show if this is better or not.
The only other odd thing that happened tonight was the dome closed without the safety setting it off. Not sure why yet ……
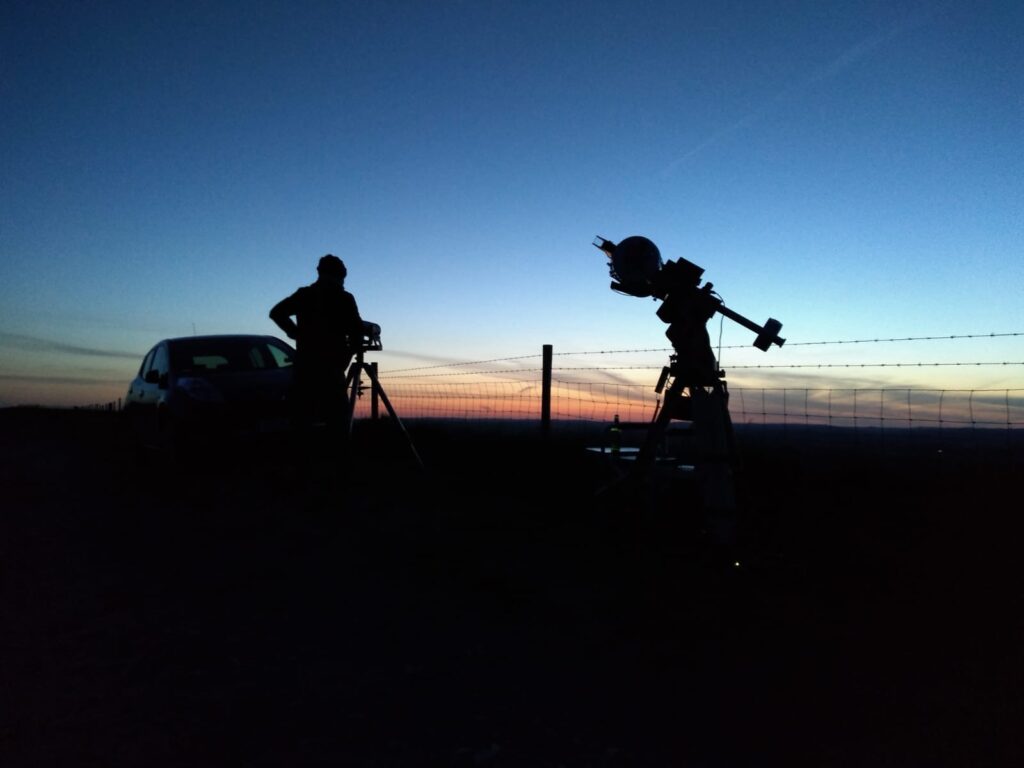
Another visit to Combe Gibbet tonight with another astronomer, GingerGeek. After forcing him to leave the comfort and safety of his own home, where his girlfriend gives him tea, coffee and beer and with the luxury of mains electricity, he joined me at the very dark, very blustery sight near 1,000 ft up in the North Downs of Berkshire, formally Hampshire, they moved the line!
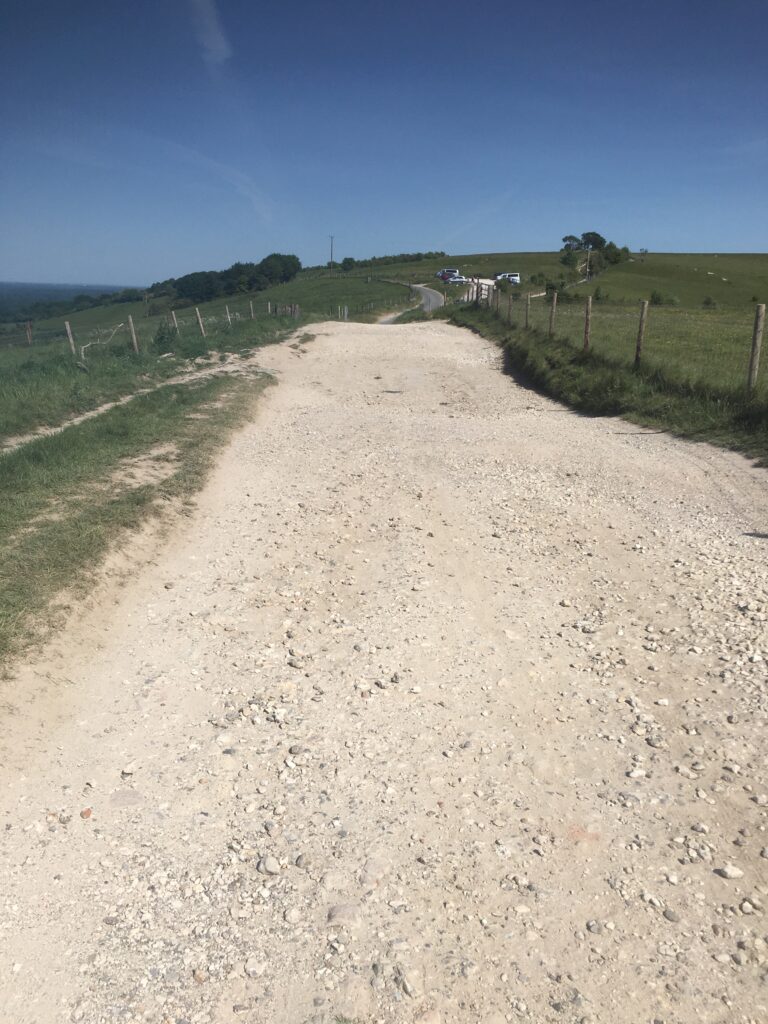
We left at 7:30pm and after the 50min trip arrived at the long road up to and past the Gibbet, which is really not much of a road at all.
Not a road, looking down the bottom part of the track
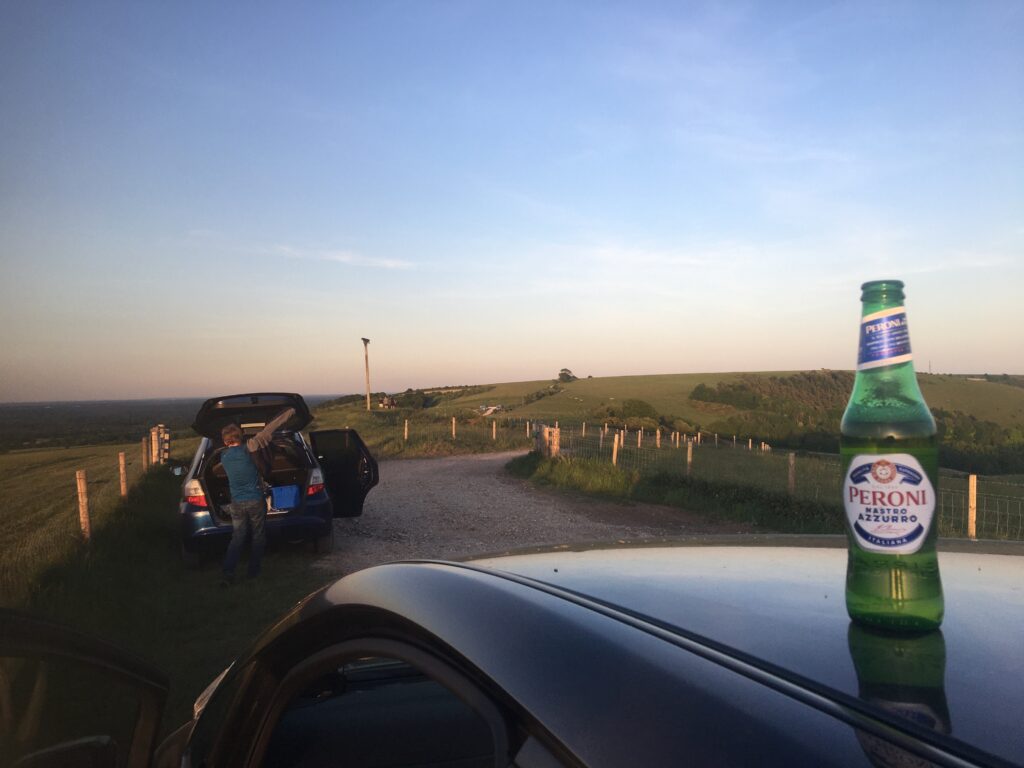
We drove carefully to the top, both parked our cars and set about setting up for the evening. GingerGeek had his Tak FSQ85 on his CEM 60 iOptron mount whilst I setup my usual array of large 4″ binoculars and at first the Mak 180 on the Paramount MyT. Later I would swap to the Esprit 120ED. To celebrate the outing, little geek had brought some beer 🙂
Beer O’Clock!
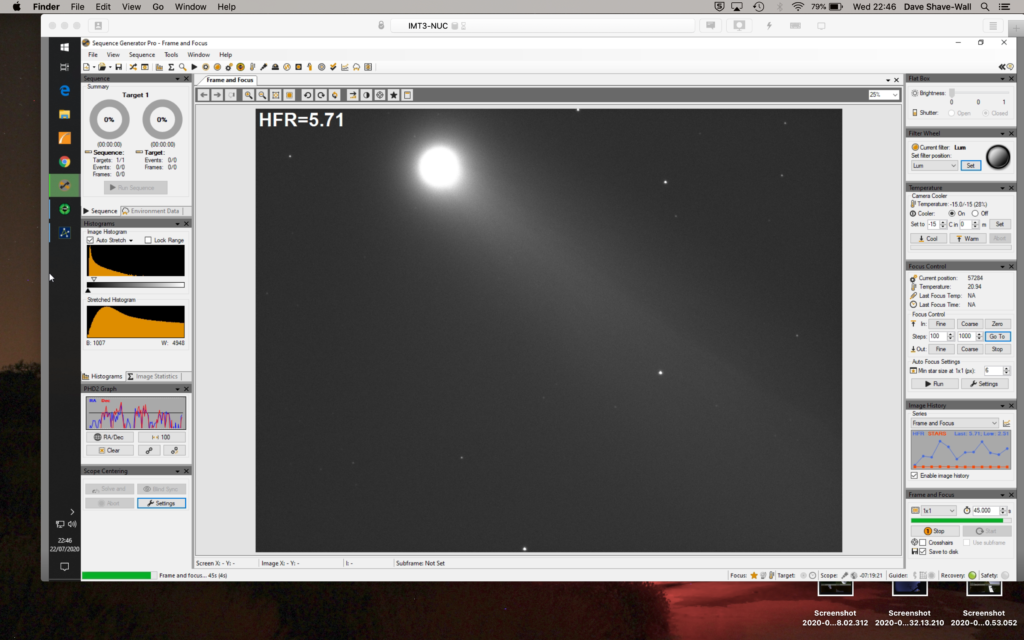
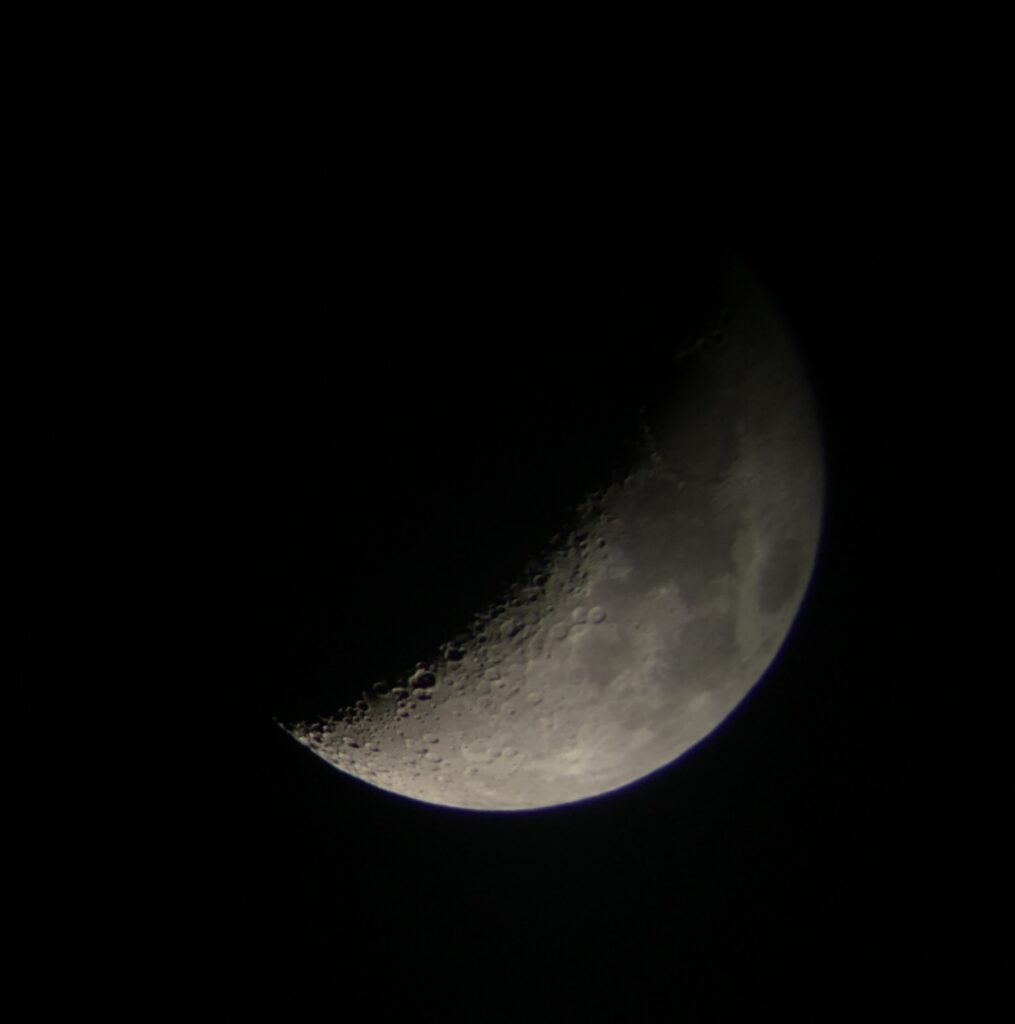
The Sun soon started to set, the day trippers hung around to watch the sunset and then were gone. I started looking at the Moon through the Altair Astro binoculars which is just a wonderful sight. A Camera cannot capture the experience of seeing the Moon with its Earthshine and in full as the FoV is 1 degree in the binoculars was a wonderful framing.
Moon through binos taken afocal with iPhone 6sPlus
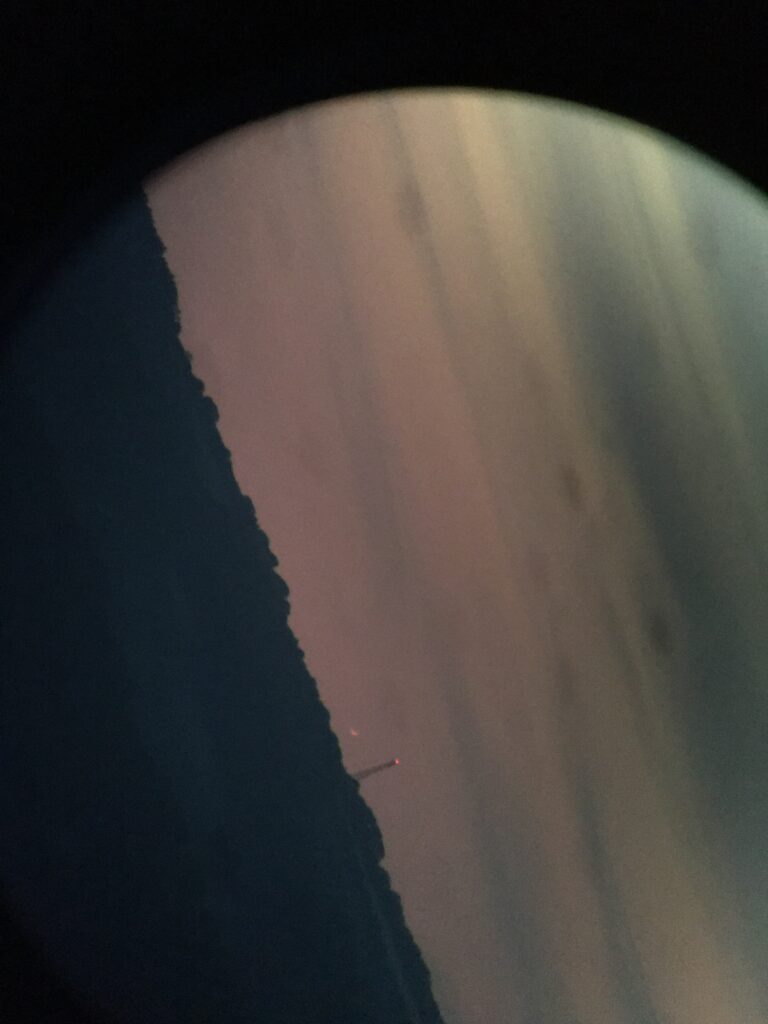
Next up was Venus before it sets, it is amazing just how bright it still is given its phase. I found in the binoculars eventually as it was hidden behind that cloud band in the distance. I then tried to get it in the Mak180, when a few new things happened. Firstly I could not slew to it as I had yet to polar align, so I had to place the scope in the right place. At the focal length of the Mak180, some 2.7m it is difficult to find something faint behind cloud just by pointing. I eventually gave up. I then noticed my laptop power had diminished by nearly 30% over about 20-25 minutes, this was due to Firecapture just hogging the USB bus capturing 100’s fps. So I was going to start the night short on juice! So I turned Firecapture off whilst I went to find Mercury in the binoculars.
Venus through 4″ binos taken afocal with iPhone 6sPlus
Mercury was a challenge, so much so I could not find it, I put that down to that not well placed cloud band. Meanwhile I pointed the Mak180 at the Moon to have a look, but by the time I had finished I the laptop was done to 53% !!!! Not so good.
So it was time to chat to GingerGeek (GG) before I put the Esprit 120 on the mount. GG was having lots of problems setting up. Firstly he had swapped the rings on the mount for the Tak that day and was struggling to balance the scope. It was so bad the scope kept dropping nose first then camera first and then either way depending on its orientation. Eventually, after much cursing, actually a lot of cursing, GG settled for the imbalance and continued to setup, unfortunately not before he knocked his beer over in his boot of the car ? fortunately I did not laugh too much ??
I went back to my setup, placed the Esprit on the mount and then set about getting focus with Ezcap, the software that comes with the ZWO camera. I do find the software very straight forwards and does what it says on the tin as it were. I then slewed to one of the open clusters I wanted to image and realised it resided in the North and that the twilight was still very much apparent so not suitable for imaging. Instead I settled for M51 high up as to the West was the Moon.
M51 300s Image uncalibrated
It is a lovely image at 5 minutes, I could see instantly at least 4 other galaxies and the colour of the main Messier galaxy was very pleasing. I look forward to processing the resulting subs. I set the timer for 1 hour (12x300secs) and went back off for veggie soup, cheese rolls, brownies and coffee that GG had kindly brought along.
crop of uncalibrated 300s M51
GG at this point was having issues focusing for his 5 minutes shot of the Pelican in Ha, he had made some other changes to the software before heading up the hill too which was confounding him. After some more time he finally had focus and started to image. However whilst a few of the images were okay, the resulting imbalance and gusts of wind made it difficult to keep pin sharp images. It should also be notes at this point that GG and I were running from the same car battery, although GG was only running the camera from it, the mount was running from his Lithium battery.
Stunning Pelican Nebula – 300s Ha uncalibrated
At just before 1am the inverter connected to the spare car battery turned off due to loading and power. Everything stopped for both of us ??? however GGs mount kept running due to the Lithium battery. I closed down my setup and allowed GG to reset his camera and reconnect, he then went on to start imaging, however the resulting image had moved significantly and GG decided to give up. So we spend the next 40 minutes packing up. Whilst this was going on we looked at Saturn and Jupiter through the binoculars which was a wonderful sight. Now for the 50 minute drive home to unload the car just before dawn, although by 2am it was clearly getting lighter.
Guiding graph on Esprit 120 Paramount MyT last night, all over the place with wind
The SQM for the site last night was 20.91 although the Moon was very bright. The site is also very dusty, and my laptop was covered in the morning. Another incident was that I inadvertently unscrewed the cover from the guider as I transferred from one scope to another and the glass cover fell out, I now have dust and dirt on the sensor to clean. It is not a great design by ZWO for the ASI290MC as it really needs a locking grub screw to top that happening or a reverse thread.
Herbig-Haro object at the end of the long feature can just be seen.
GGs image has set us on a little project to image the HH 555 bipolar jet at the end of the major turn of gas in the Pelican Nebula. We will attempt over the next few nights to get an image from both the Esprit 120 ED Pro from the IMT3 dome in Ha and also from the OS 12″ to see what it looks like compared to the Tak FSQ85. Another good social distancing astronomy session ? goodnight.
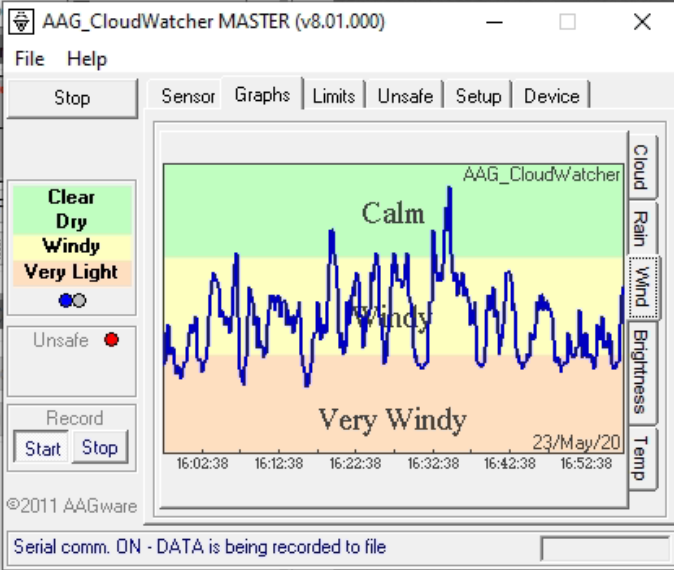
Today has been wet, windy and cloudy, which for once is a blessing! Why I hear you ask? Well simply put, to calibrate the hell out of the AAG one needs inclement weather and today has provided that in spades 🙂
So after monitoring the AAG all day here are the final settings. I have changed the limits for the wind only today, but I have extended the time period for the graph from 10mins to 1 hour. The wind has recorded over 1.1 m/s which may not seem a lot but at times has blown garden furniture around and the bins.
We recently decided to replace our existing weather station with one that had better ASCOM integration. I had previously looked at the AAG CloudWatcher but at the time felt it offered more than we need but that turned out to not be the correct choice.
We ordered the AAG with an internal humidity sensor, the optional anemometer, mounting kit and 10 meter communications cable. Due to the ongoing human malware situation it took two weeks for it to arrive from Spain and was delivered to the IMT3 chief TOSA.
Once the new PSU arrived the Chief TOSA then set about removing the existing weather station and installing the AAG cloudwatcher.
All Sky Camera, AAG CloudWatcher, Unihedron SQM and another rain sensor
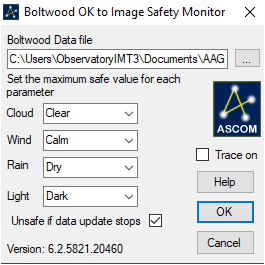
This also meant connecting the safety relay circuit wires to the Pulsar Dome, installing the AAG software, downloading the ASCOM boltwood driver and configuring SGPro. Within SGPro we have set the safety status set to be “OK to image” where the required conditions are more stringent than the conditions for the dome to open. The reason being that we want the dome to open as the light begins fade and allow the scopes to cool down but not be okay to image until it is dark.
On the first night of operation we ran into a problem. Unlike the other sensor readings and graphs we would see the temperature and cloud readings have an expected shape but the sky brightness sensors kept going up and down at a regular interval then gave the graph a saw-tooth shape.
Unfortunately this resulted in the safety status going on and off until we overrode it. We sent a quick email to Lunatico reporting the symptoms and asking for advice. It didn’t take long for Jaime to reply informing us that another customer reported the same issue and asked for a few days to investigate.
Good to his word we received an email from Jaime explaining the issue and asking if we could perform a firmware upgrade. Now due to the current lockdown restrictions this meant that I had to co-ordinate over the phone with the resident Chief TOSA to physically disconnect and reconnect the power whilst I remotely set the firmware update. The initial issues encountered were due to PEBCAK (Problem Exists Between Chair And Keyboard) as I had not read the documentation correctly !
New Firmware 5.73 loaded
That evening we watched and the Sky Brightness line graph was now as expected and not looking like a cog shaped wheel. Well done Jaime@Lunatico.es for the quick response and fix, Chief TOSA was a happy dome dwarf again and that’s what counts !
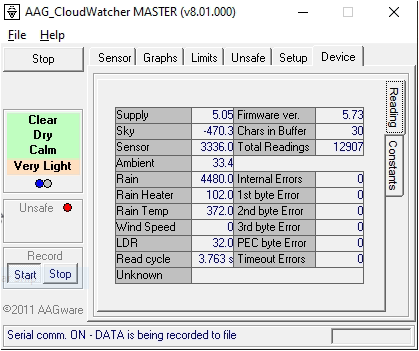
At the moment we are trying to get the cloud sensor to be more accurate to what we visually observe, this is an ongoing effort. We decided to record the AAG Sky Brightness sensor readings at various times and compare with our SQM readings :
Event
SQM
AAG Brightness Value
Civil Darkness
13.08
949
Chief TOSA setting OK to open
13.89
2100
Nautical Darkness
18.92
28588
Astronomical Darkness
19.03
28588
Using the above values it looks like we could reduce our chosen threshold level of 2100 to 1000 in order to allow the dome to open and the scopes to cool down. The Sky Brightness does not appear to change beyond Nautical Darkness. We are now investigating the correct value for the early morning from the AAG logs. This is so we know what the Sky Brightness value should be at which to stop imaging and close the dome in the early morning when unattended.
We still have at lot to configure and read up about using the AAG CloudWatcher but at the moment our initial experience is a positive one. Obviously we will be chatting to Lunatico about our level settings and make some suggestions regarding the software.
Opened dome early switching the safety for the brightness on the new AAG. The first thing to do tonight was to calibrate a little but more the infrared sensor which informs the cloud coverage. This was suggesting it was Cloudy, borderline Overcast and given it was very clear with a hint at wisps of cloud I adjusted the couple of figures for the sensor, from -17 for Clear to -14 and from -14 for Cloudy to -12.
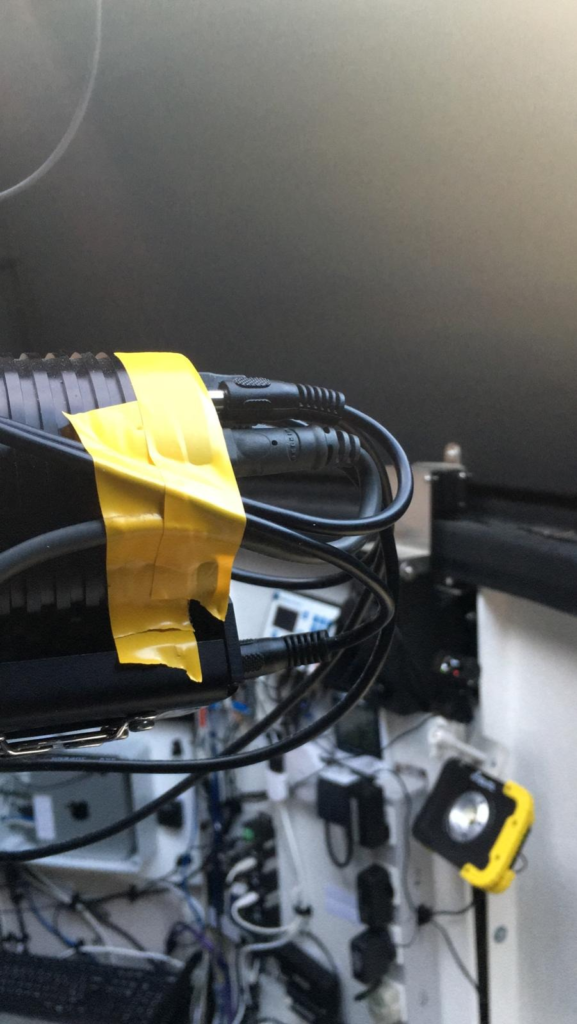
I then set about taping up the USB and power for the SX camera on the Esprit. This is because the connectors supplied are clearly not in tolerance as I have tried many cables and they call fall out. The tape should suffice for the moment and now the camera reconnects to the NUC computer running SGPro.
Tape for USB cable
GingerGeek and I started to have a look at the sky around 9pm. The sky was not totally clear with some wisps of cloud. We tried to get to a point where we could test guiding the 12″ through the Esprit, however as ever the clouds rolled in. However, during setting up the SX814 camera on the Esprit as the guider and performing a darks calibration run we got an error on the USB bus again (we get lots of USB errors) which not only kicked out the SX814 but also the AAG weather station. The problem was it almost killed the AAG software and we had to cancel the process running to resolve. This meant we lost all the settings in the AAG so we have tried to rebuild as per the new screen shots below.
AAG Weather Station New Settings
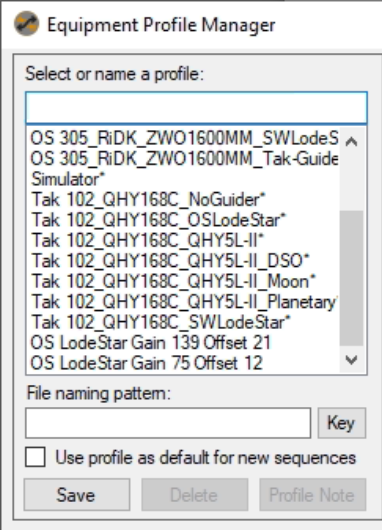
So instead we re-ran the Flats Calibration Wizard for the OS with the camera set to Gain 139 Offset 21 and also another run at Gain 75 Offset 12. The reason for re-running is that I suspect the flats we have are ever so slightly over exposed at 30-32k rather I prefer them to be at 22-23k.
We also created 2 new profiles that were simply named so we can see them in the list and simplify the naming convention and amount of profiles needed. We will choose the guider on the night within one of the two profiles created. We will also look to review and simply the other profiles for the two additional OTAs tomorrow and delete the remains profiles given the large number we now have.
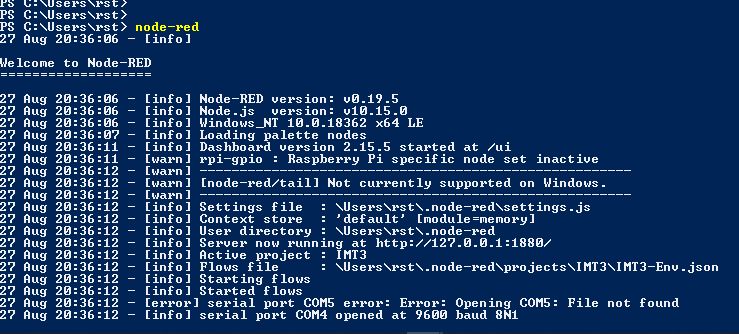
During one of our video sessions whilst watching the T-point run, Chief TOSA Dave mentioned about how it would be nice to see status information of observatory operations in a simple web page.
Since I’d never used Node-Red but had used ASCOM Alpaca via Python I thought this may be the time to learn something new. As I was designing this for Dave I decided to keep the layout, presentation simple along with colour coding in the spirit of Fisher Price toys.
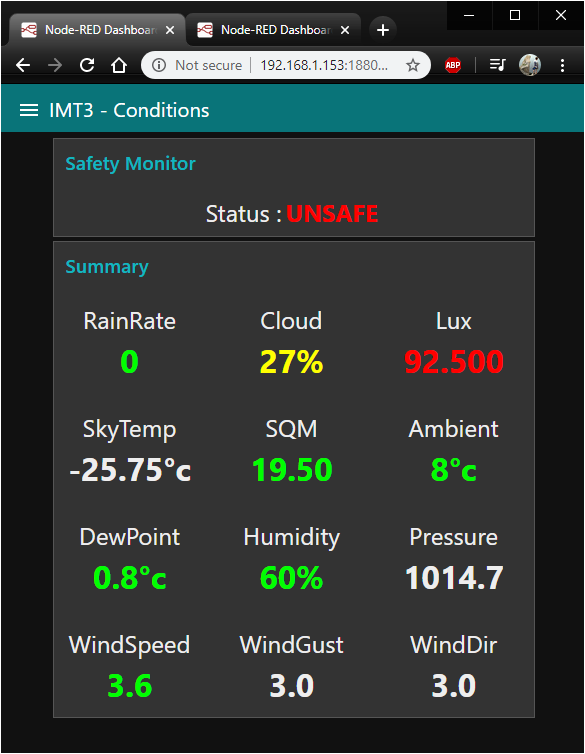
The safety monitor is always visible across all tabs, the colour changes depending on the threshold levels we decide on.
ASCOM Alpaca Weather Conditions
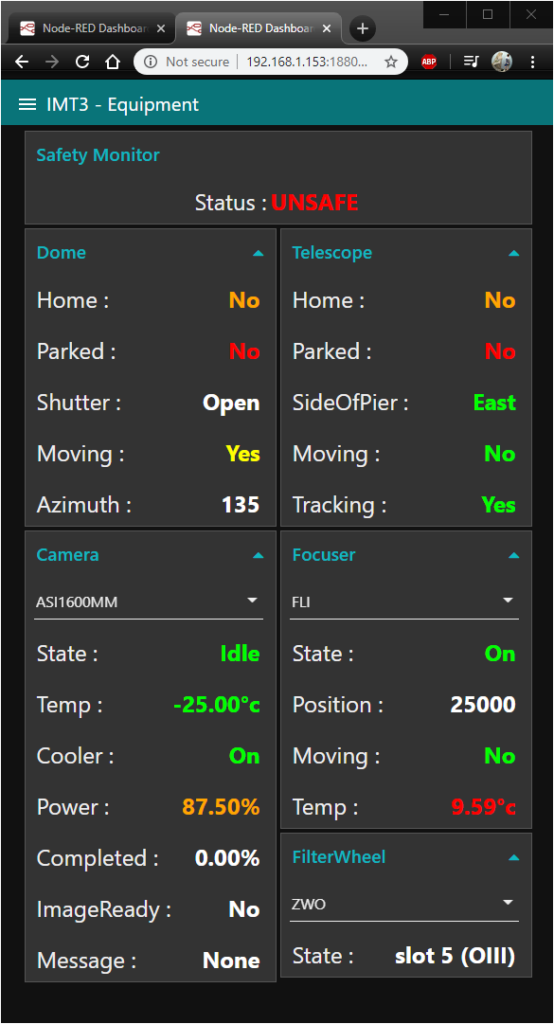
Likewise the main equipment tab displays the equipment status and allows us to select which camera, focuser or filter wheel to monitor.
ASCOM Equipment Status
This project is still very much a work in progress but there is many different ways that the same thing can be accomplished.
Tonight I plan on setting the 12″ imaging M94, a Messier galaxy in Canes Venatici.
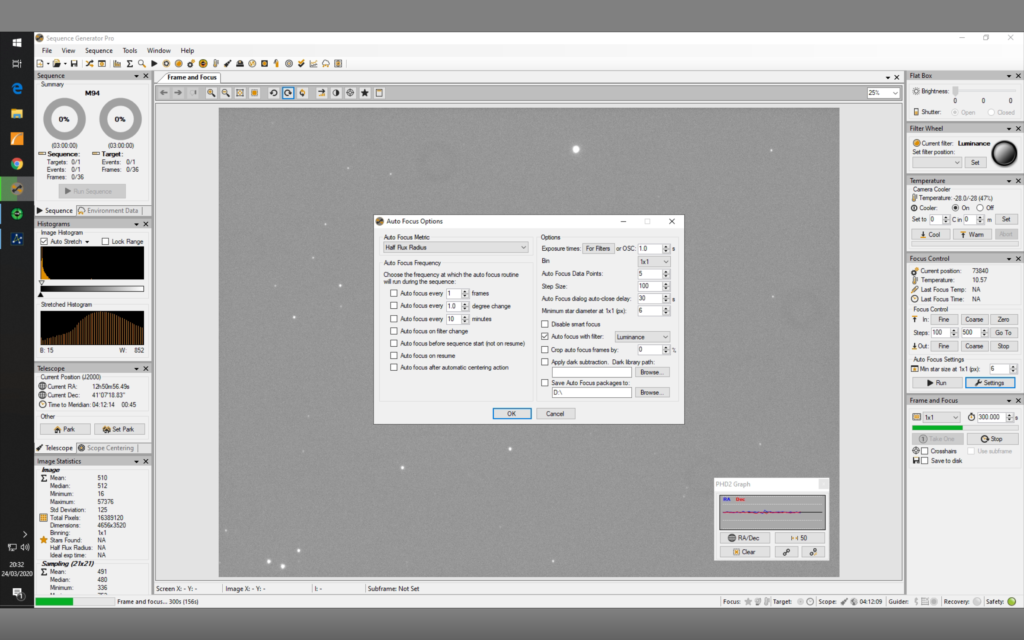
I slewed to nearby star and focused using SGPro after changing a couple of settings in the step size and amount of data points to be used, I set step size to 100 from previous 1000 and data point to 5 from previous 10 and got a much better focus. Focus landed up first time around at 738840
SGPro Autofocus settings changed
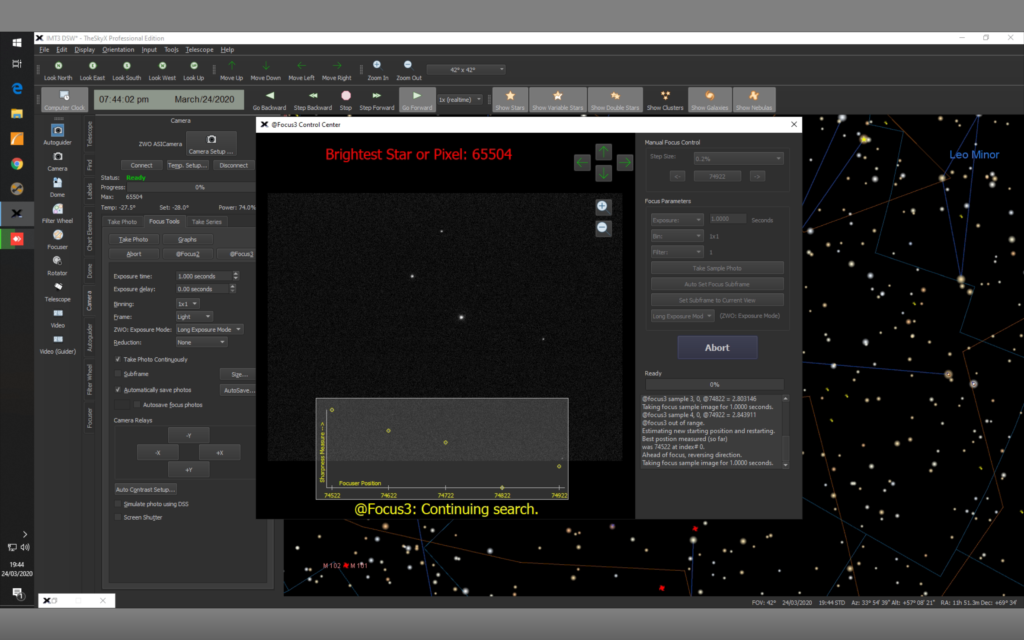
I had tried to get @focus working in TSX but it would fail every time on the galaxy with not enough stars. This meant I could not use TSX to solve and sync to centre M94.
SGPro autofocus
I then tried to centre with SGPro and that also failed so instead I used TSX to connect to the camera and manually moved M94 to the centre of the chip. I ned to get the local plate solver working as it was not running.
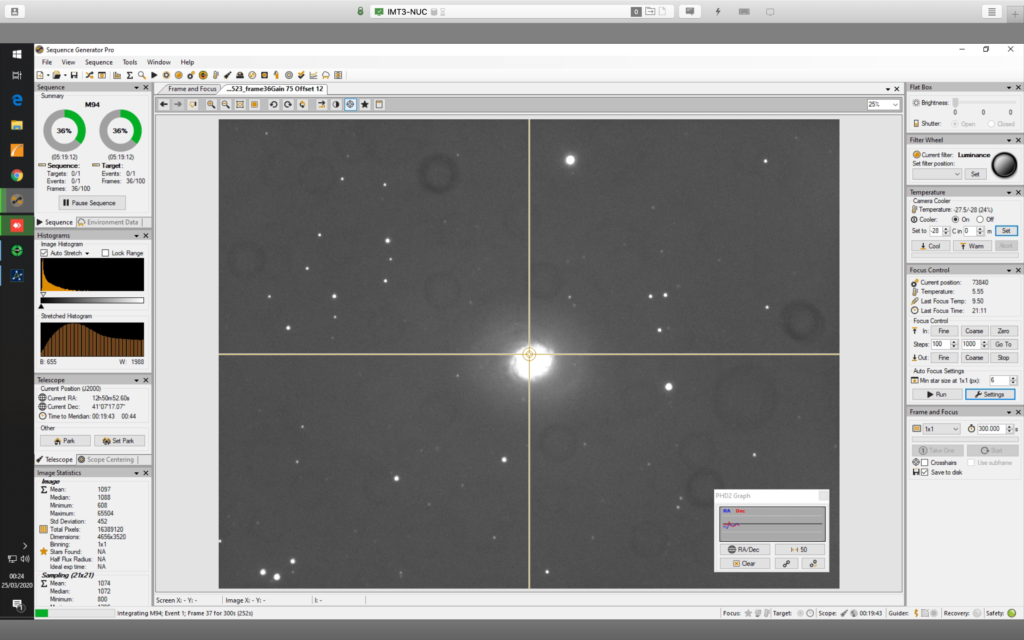
@ 20:32 I took an initial 5min sub to see what the image would be like after setting PHD2 guiding running.
5 min M94 sub
@1:20 and after gathering 3 hours of data I moved to other side of mount so meridian flip. I refocused as it had drifted a lot. I now need to consider setting up focus move for temp as the focus shift is dramatic. I also changed PHD2 Hysteresis setting to 0.20 from 0.10 as the PHD was having problems guiding.
I struggled to find guide star and landed up exposing for 15s and then having to increase, possibly needs recalibrating on this side of the mount. But also I need to find a brighter guide star by moving the mount offsetting the galaxy. The other way is using one of the piggy backed scopes which I may do next time.
@1:43 the dome closed, not sure why, might have been high cloud but probably because the WSX software lost contact with the WSX hardware. I did a reset and reconnected and then it was fine, but as the dome had closed I packed up with 3 hours of Luminance data on M94. I now need to take flats on the morning.
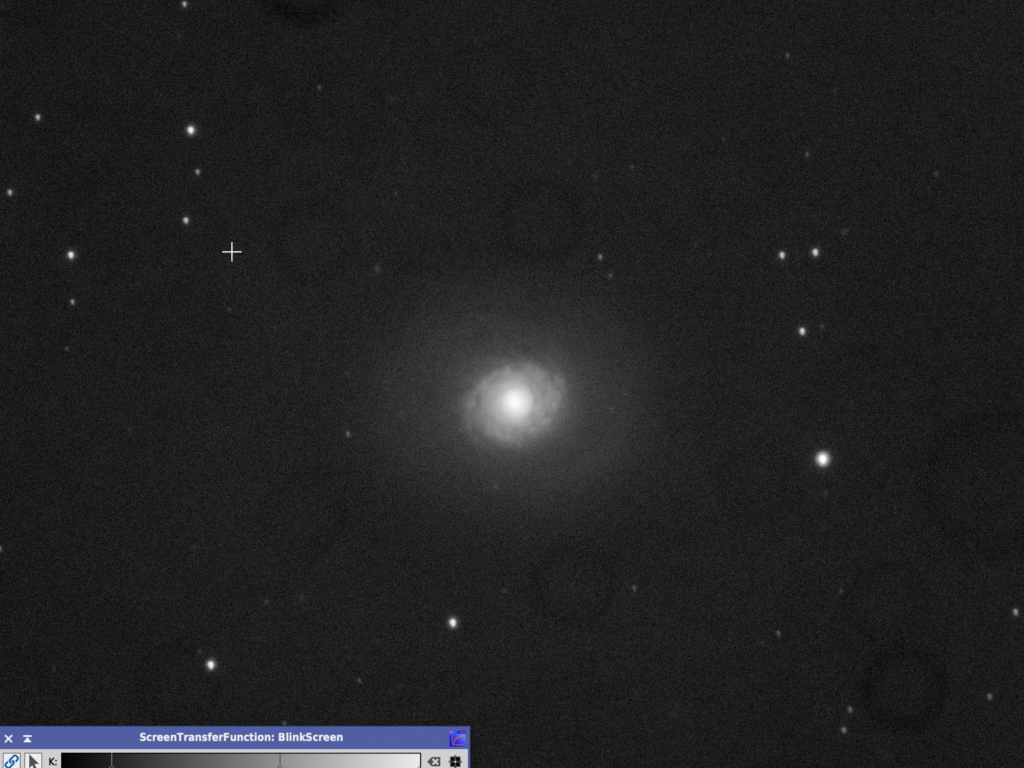
Single 5 min sub stretched in PI
Learning’s for next time……….
Update the SGPro Equipment profile with the changes for step size and data points for autofocus
Make sure the local plate solver is working and online at localhost
Review Anydesk bug that changes mapping of keyboard
Check out why WSX is loosing connection and shutting the dome
Work out how to use temperature compensation for the focuser in SGPro
Flats from the following day at the same focus point
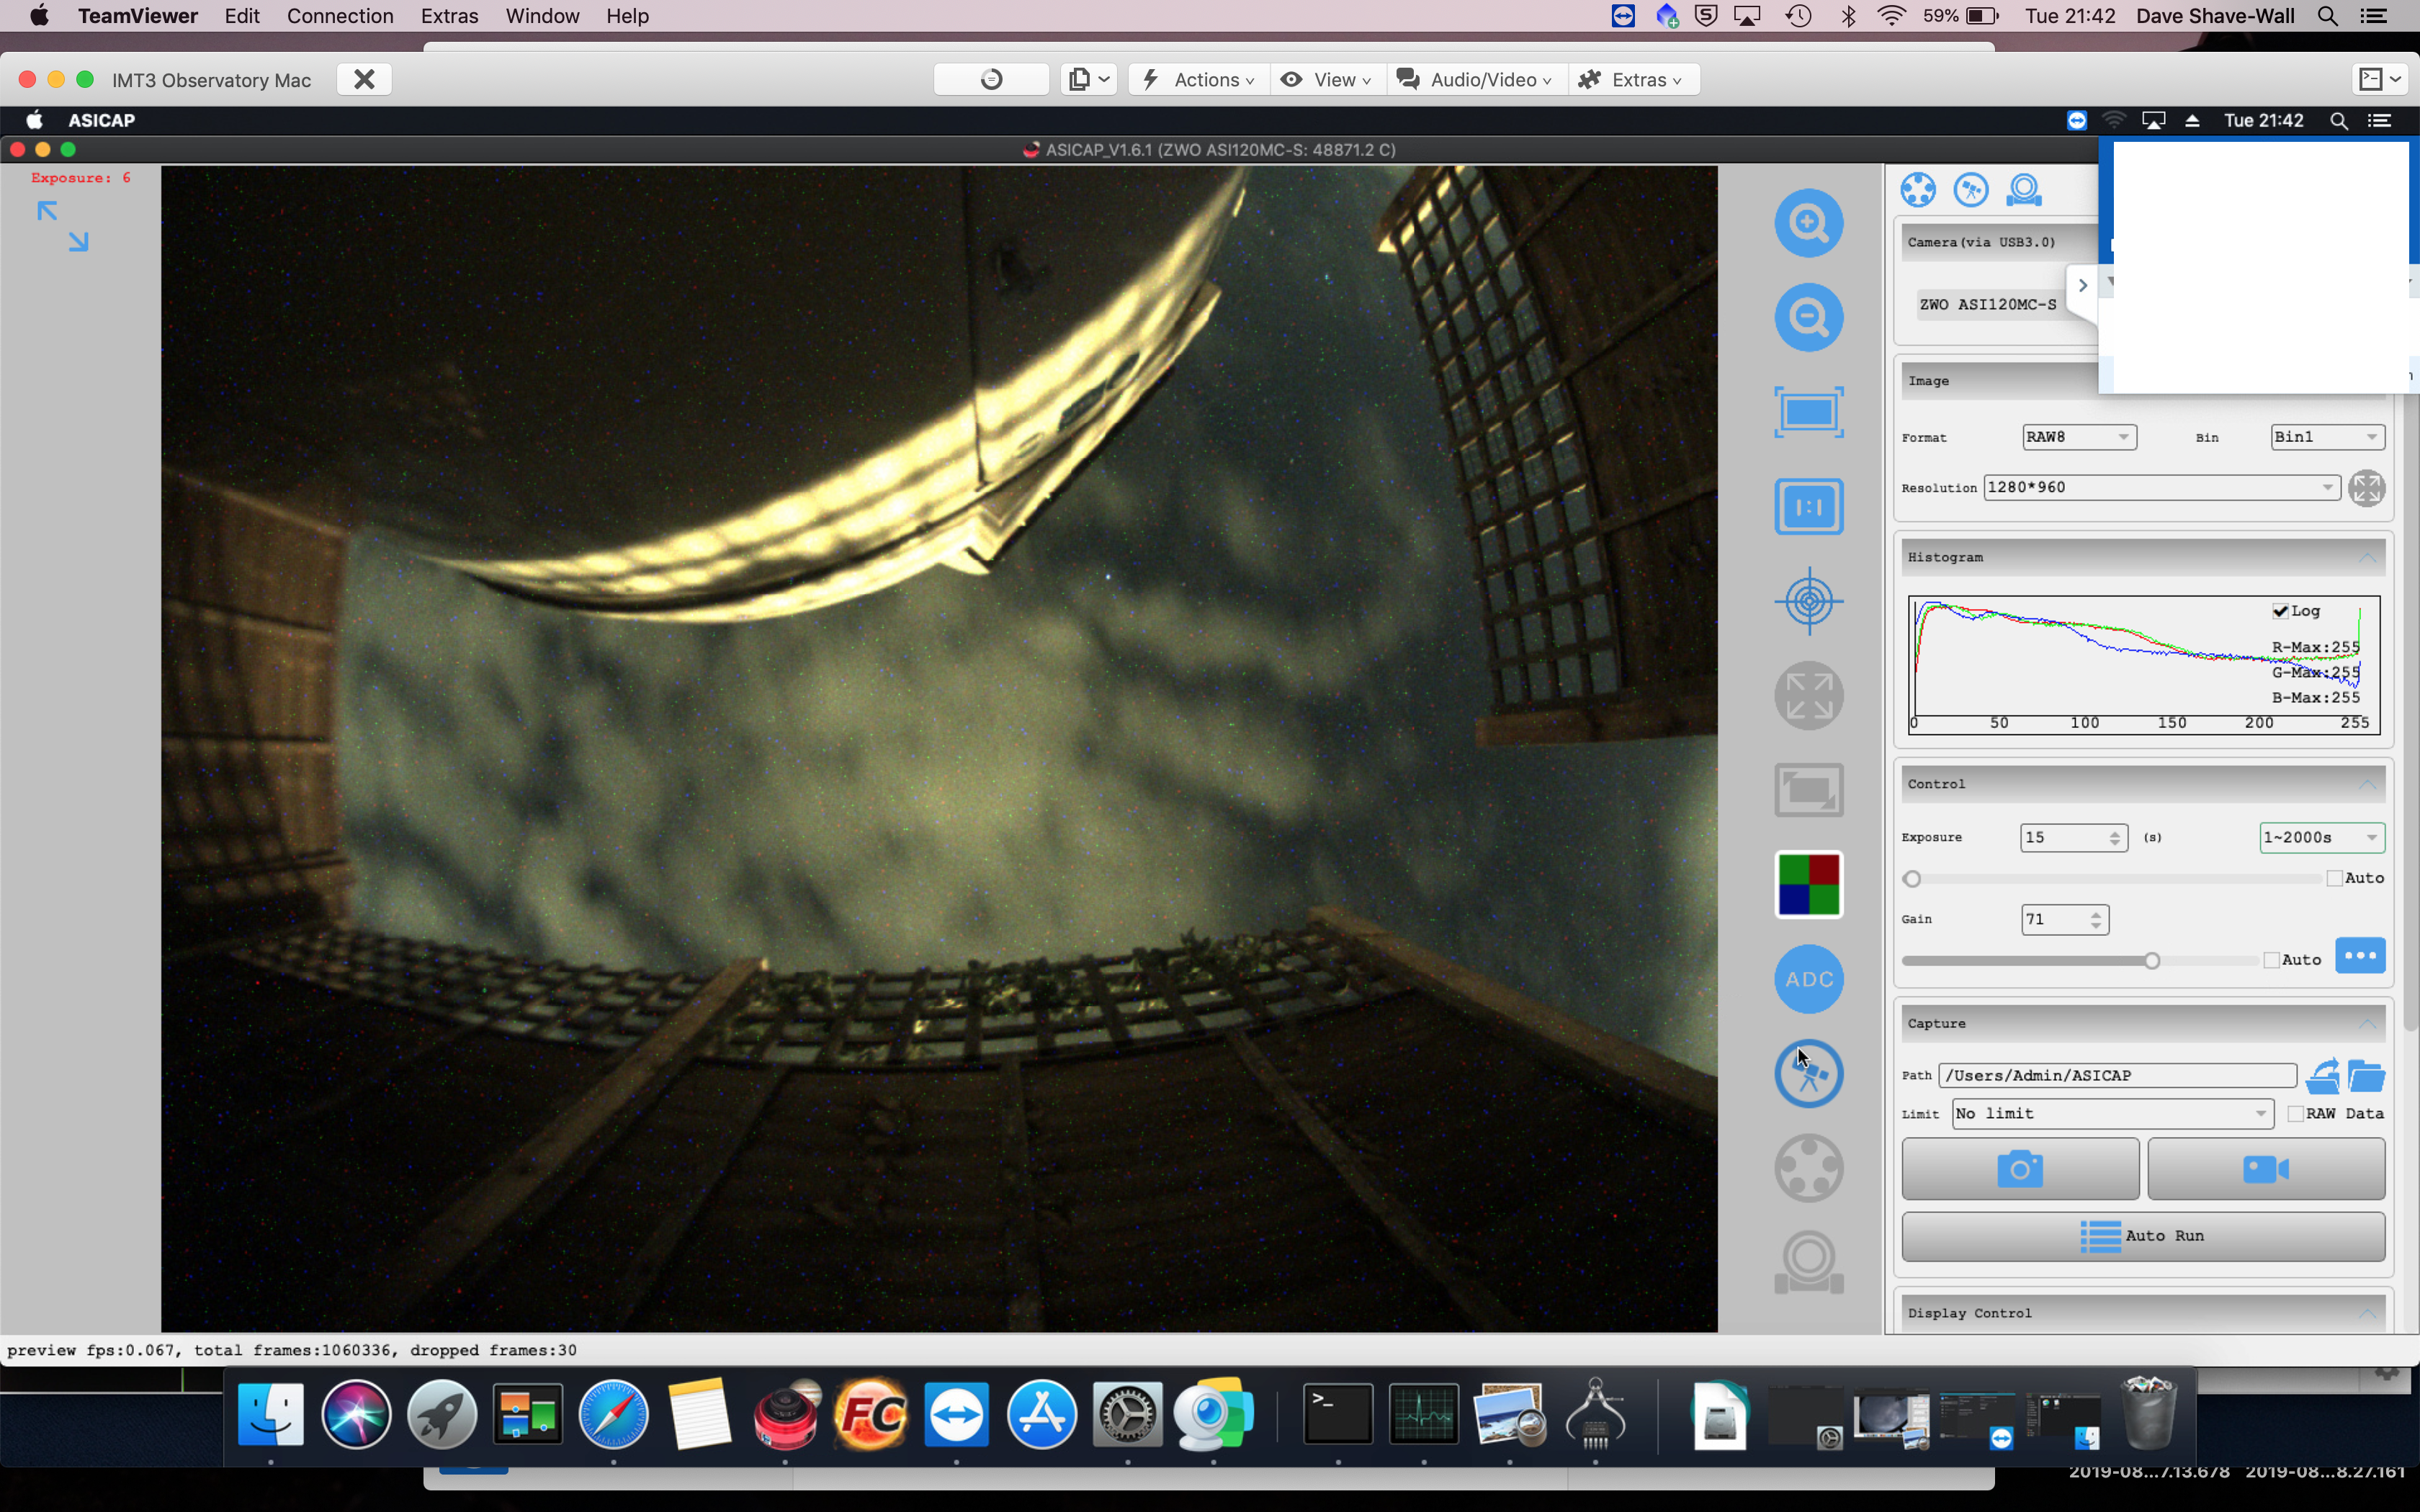
At the IMT we were experiencing stability issues with the ZWO ASI120MC USB3 camera on the MAC/NUC so we decided to move it to it’s own Raspberry Pi4 (4GB) as a cheap experiment.
The Raspberry Pi4 has the advantage of improved networking and connectivity including USB3. One of the downsides of the RPi4 is the increased heat generated by the CPU which is mitigated by housing it in a FLiRC passive case to dissipate the heat and prevent thermal throttling.
Additionally in order to prevent SD card wear and improve the I/O throughput we configured the RPi4 just to boot off the SD card but serve the rest of the file systems from a SSD connected via USB3.
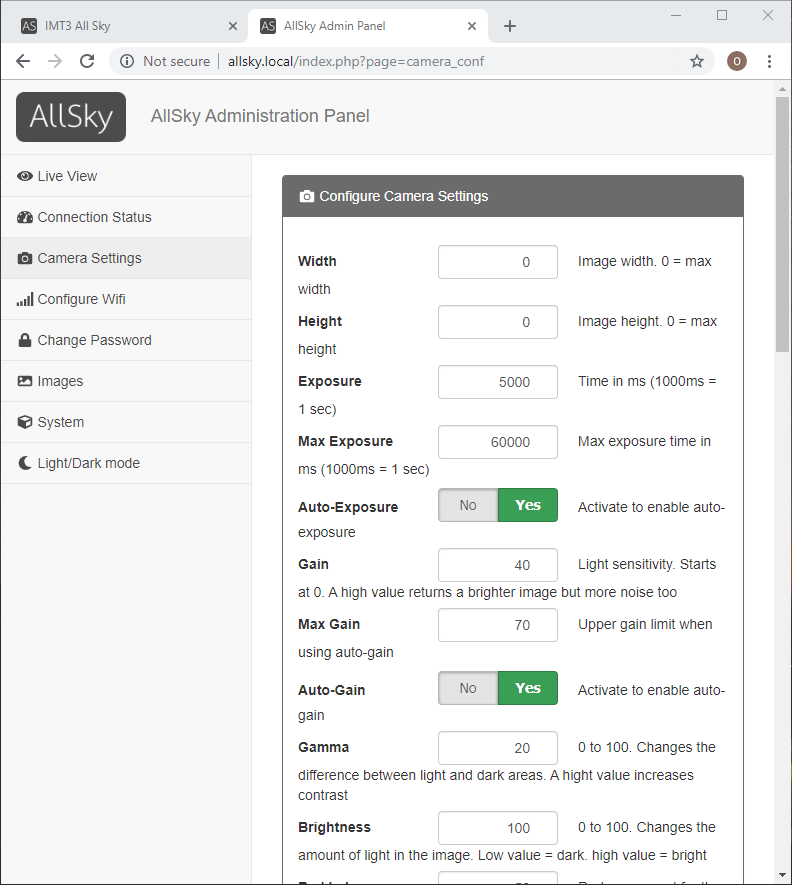
AllSky Camera Software
Using the open-source AllSky Camera project for ASI camera support we gain some advantages. The main advantage is that it’s open source (served via Git), provides an admin and public web portal which is addressed locally as http://allsky.local and the software can be set to start on system startup.
Admin Web Portal
The allskycam software can restart on system reboot but it can also be stopped/restarted via the web admin portal.
The configuration is simple and the mode/behaviour of the software can be controlled via the GUI or via a settings.json file from the command line.
Admin Portal – Camera Settings
I recommend you take the time to create a dark reference image, again this is done via the GUI panel as long exposure frame will show extensive hot pixels.
RGB24 image hot pixels with no dark applied
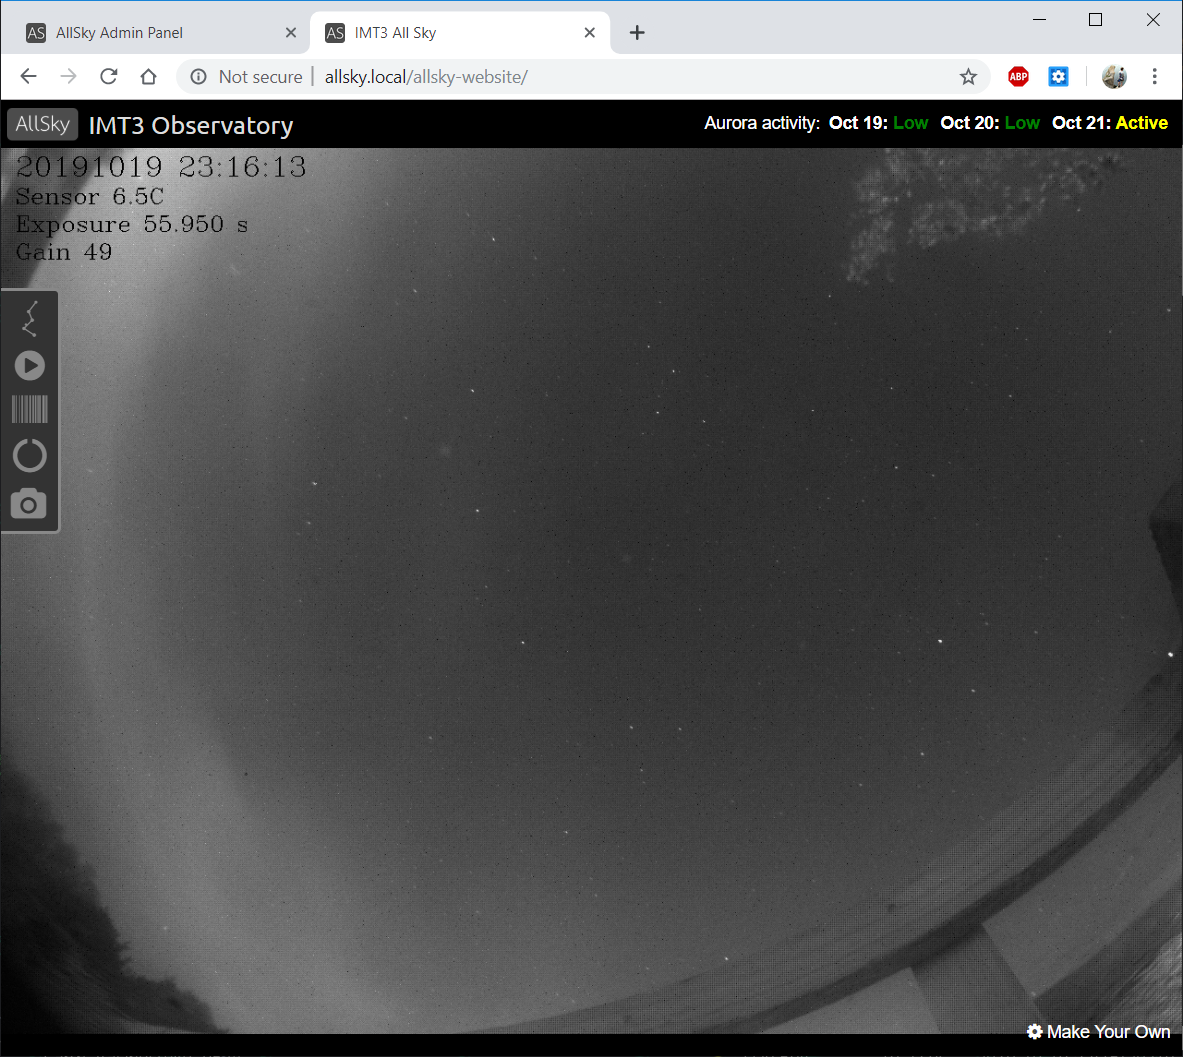
Non Admin Web Portal
This is accessed via the address http://allsky.local/allsky-website and provides the latest captured image, a constellation overlay and the ability to view time-lapses and star trails.
Local network web site for non admin users
One of the nice features of the software is it’s ability to create a time-lapse of acquired images for the previous night. The following video shows the debayer issues as well as the dewing of the dome cover.
Time Lapse of evening showing dew issues/grayscale bayer
Bob is due to connect up the resistor ring he’s placed around the camera which hopefully should fix the dome dewing we encountered on the first night.
So it remains for us to fix and implement the following :
Resolve the lack of colour images (RGB24)
Image quality breakup
Resolve dark daytime images
Secure copy latest image/time-lapse to an external public website
Scale VirtualSky constellation overlay (180 degrees) down to 150 degrees
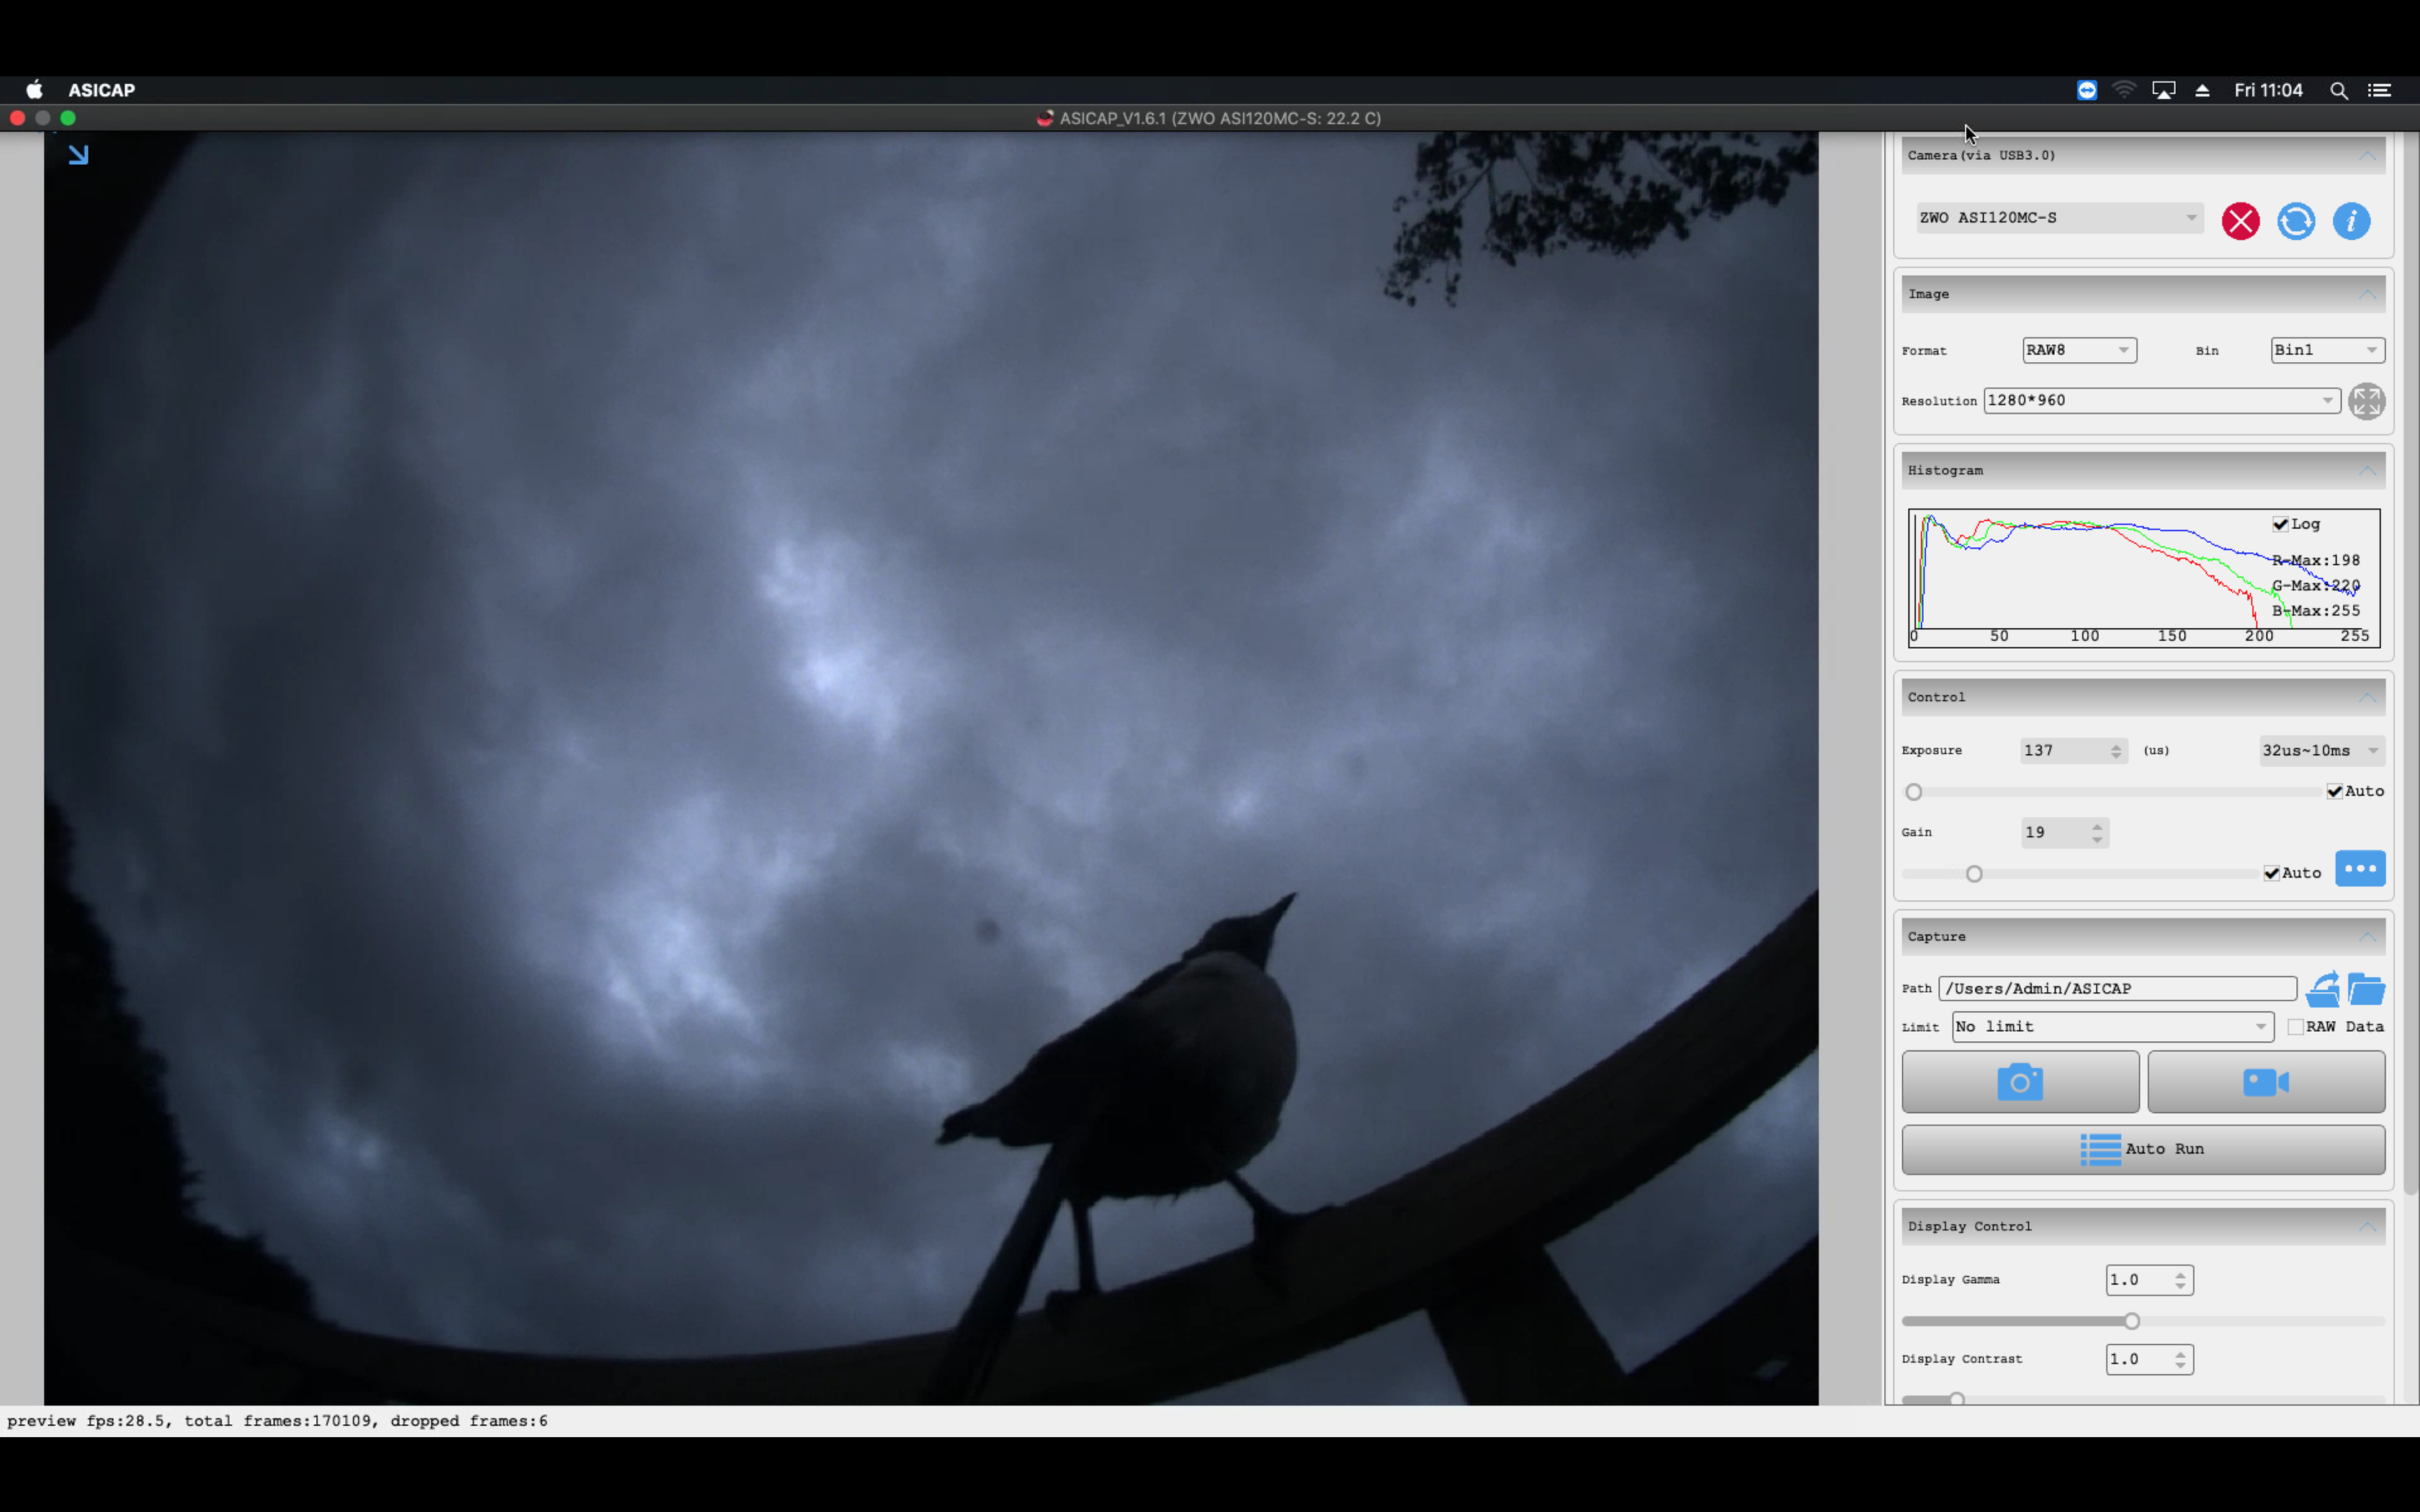
I find I notice some interesting things on the All Sky Camera, which is a USB 3 ZWO ASI120MC-S CMOS camera inside a purpose built casing and clear dome. Firstly I land up with beautiful clouds rolling past. I also noticed the light pollution as I mentioned in a previous post from the bathroom window upstairs. This image is when I had the camera on the ground by the observatory as I was testing the maximum length of powered USB I could get away with before data loss caused issues.
Bathroom light on
When the light is turned off it is noticeably darker.
Bathroom light off
Sometimes I get visitors to the camera.
Daytime visitor
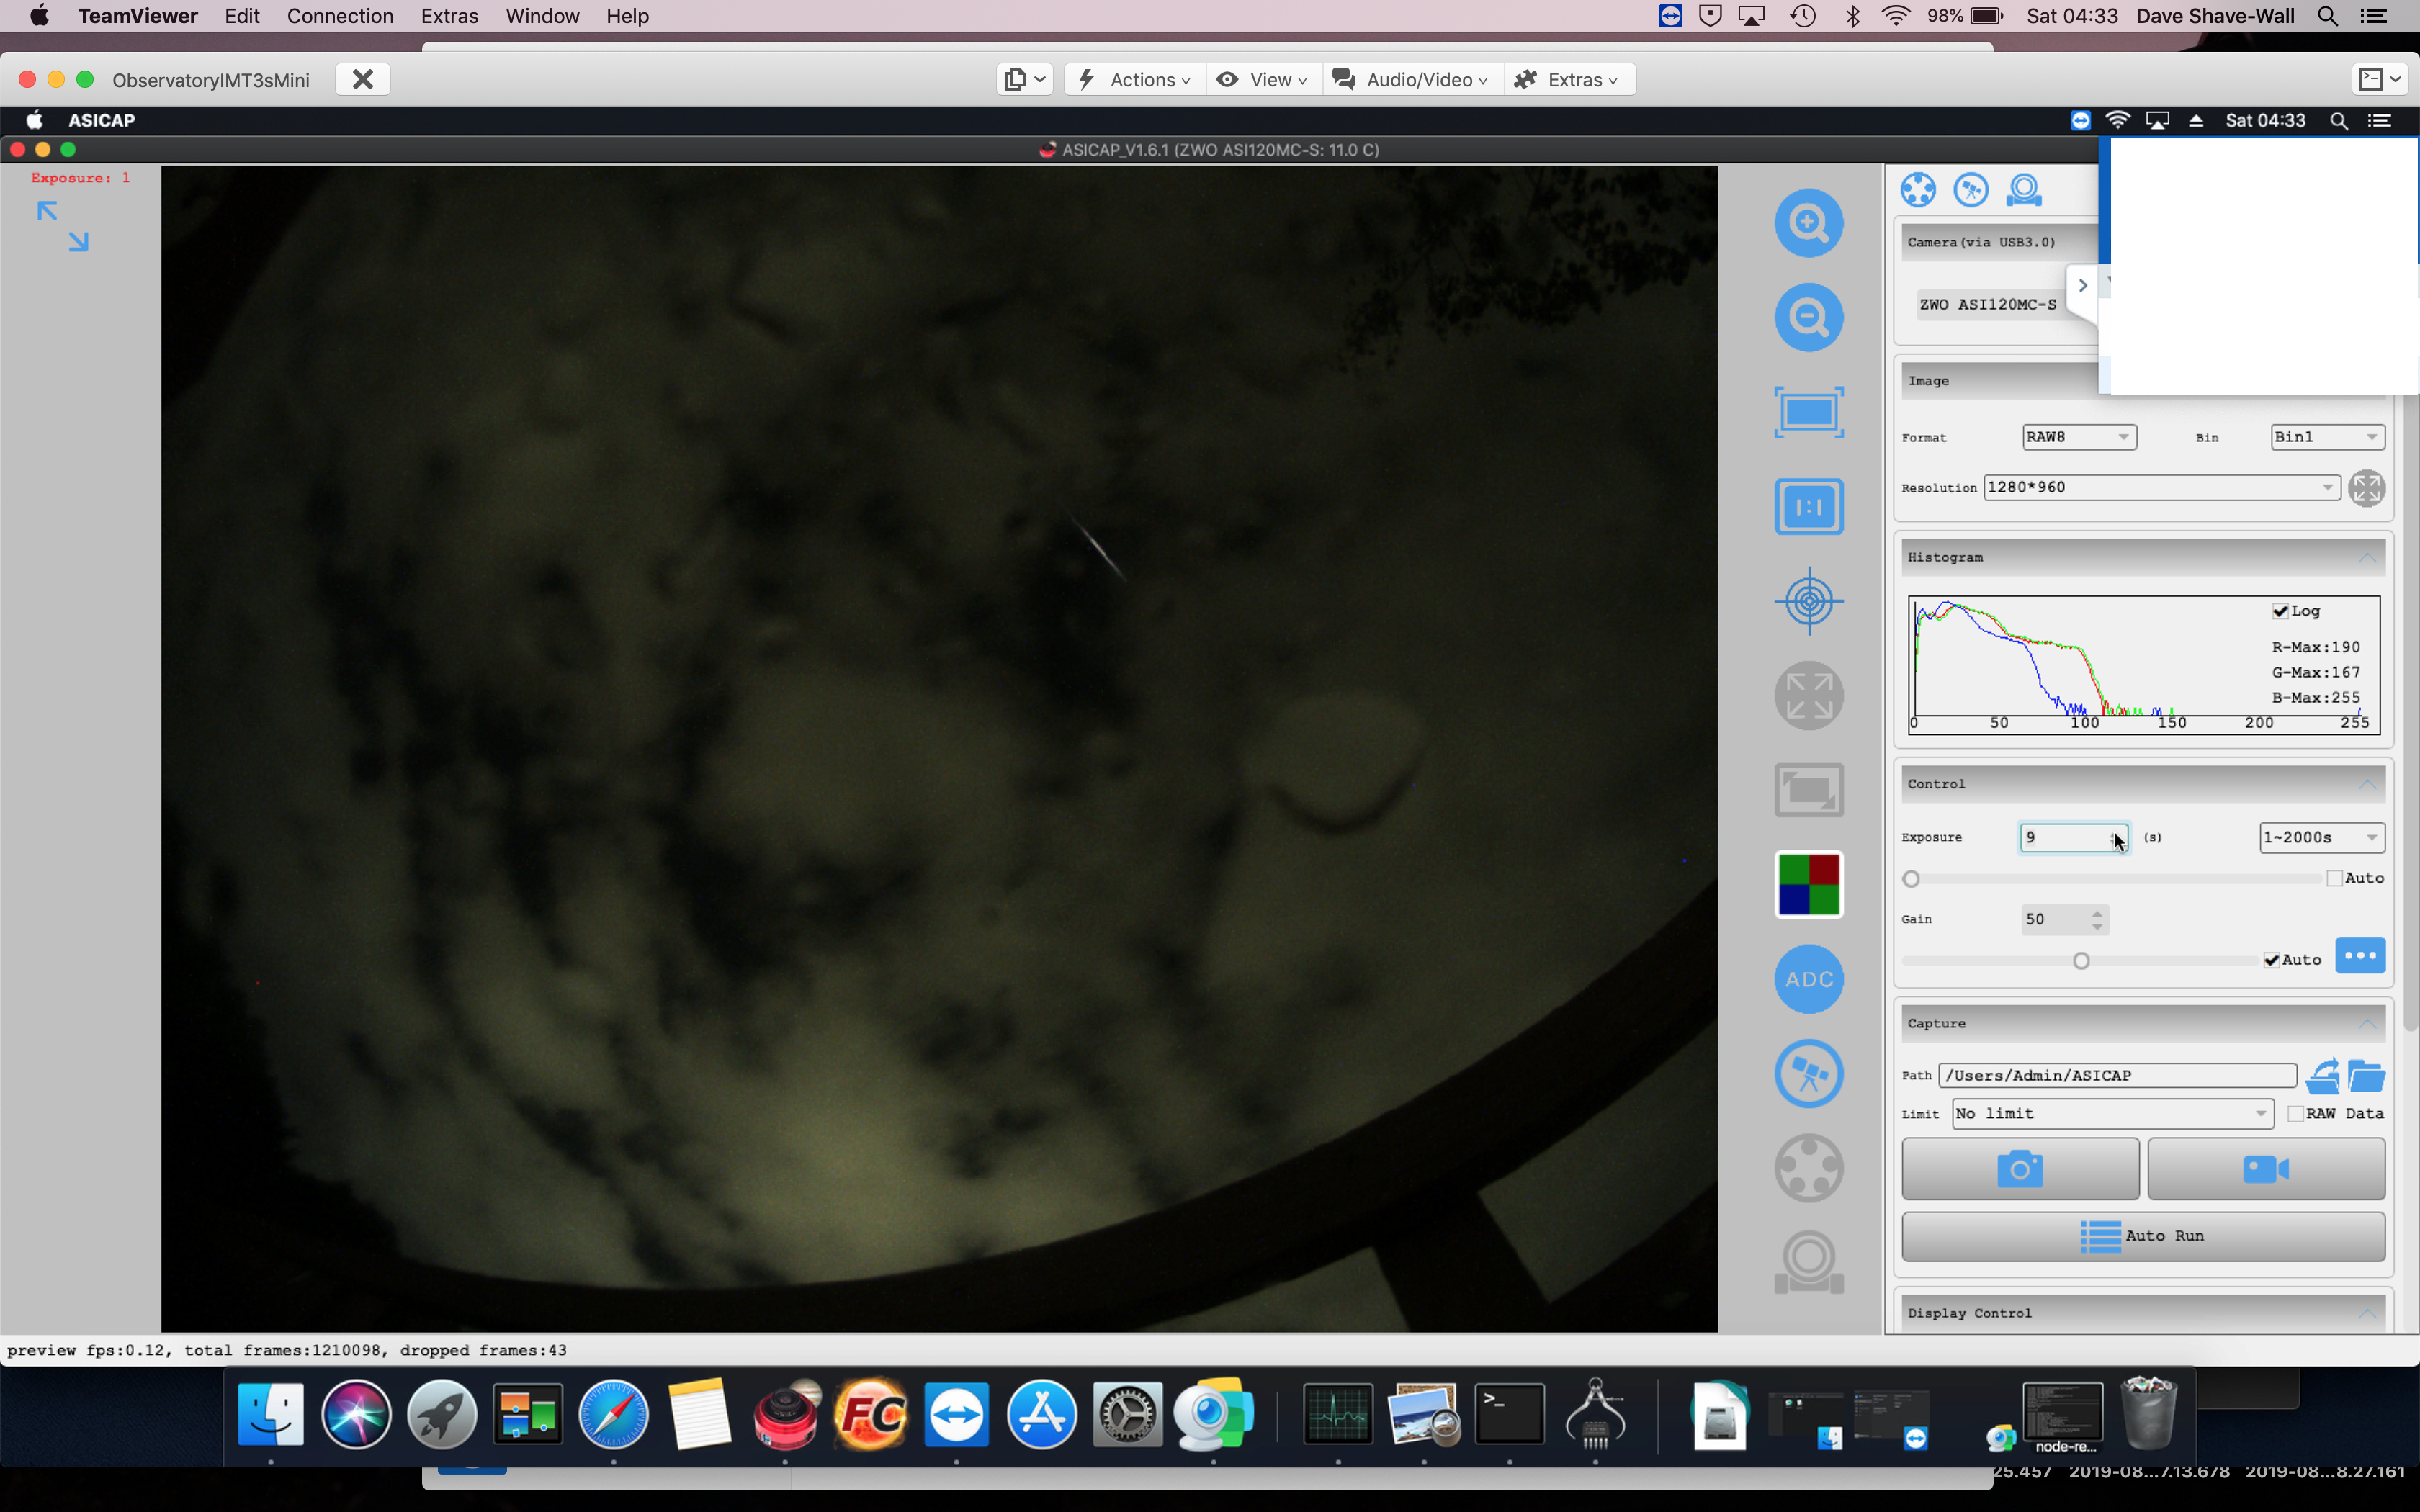
and sometimes I unexpectedly capture a meteor 🙂
Raindrop, Clouds and Meteor
So it transpires I can use a single 3m powered USB cable to the USB hub, I cannot use 2 x 3m powered USB as that causes data loss and hangs and I cannot use a single unpowered cable either.
Apart from the various benefits of darker nights such as better sleeping patterns for humans alongside a bat friendly environment then the benefits for astronomers cannot be understated.
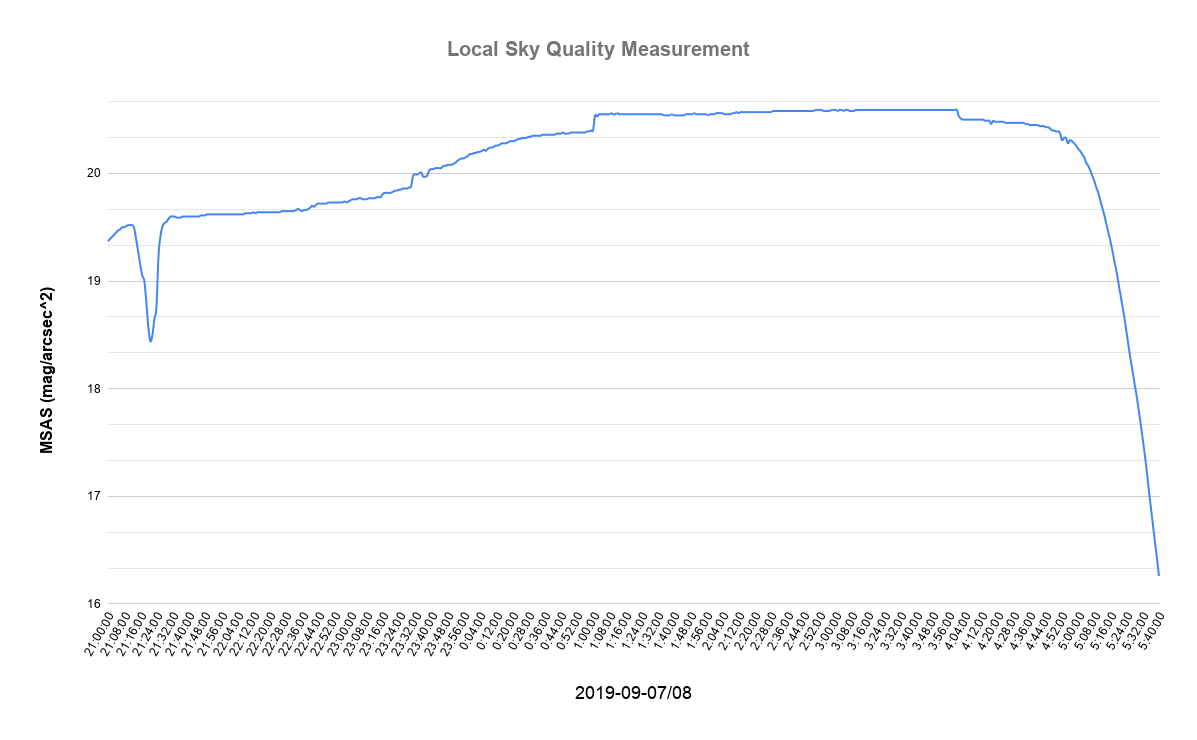
We use a Sky Quality Meter from Unihedron in order to measure the seeing conditions and record it in the long exposure deep sky objects we try to image.
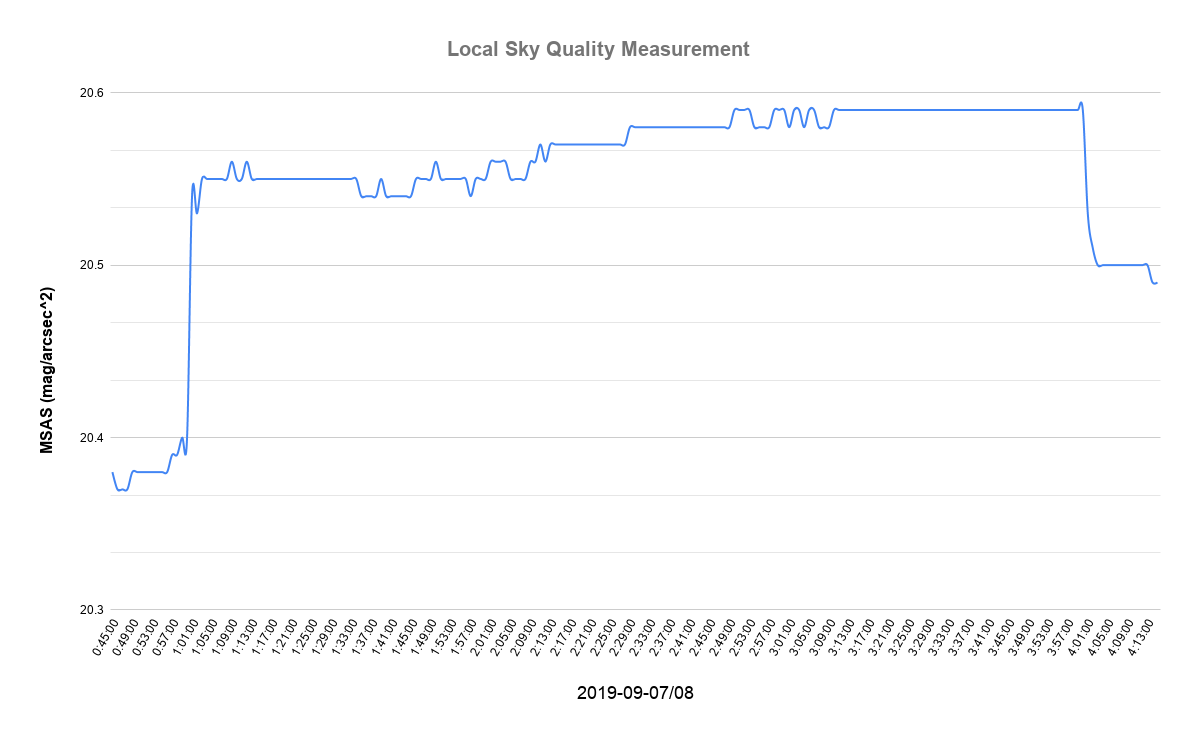
Below is the graph for the entire night of 8/9th September 2019 and the effect of bathroom light close by can be observed at around 21:20. This clearly demonstrates how bad local light pollution can be. By 4:30am the astronomical darkness window had passed and the SQM was dropping.
The effect of the new street light policy at 1am is obvious as an increase from a SQM reading from 20.4 to a maximum of 20.59 is observed until 4am when the street light came back on again and the sky quality immediately drops.
This places the local area as bortle class 4 ( 21.69–20.49) and a long way from a rural setting (21.69-21.89) or even Kielder Water (21.88) which can only get worse with more housing developments and unnecessary outdoor lighting.
So although we are grateful for improvement in the local dark skies it would be great to see the lights staying off for longer in winter so we can attempt to get better images. Hopefully we can start to come close to appreciate what people saw before the intrusion of unnecessary artificial lights in our life bloated out the wonders of the night sky without having to resort to traveling to the top of La Palma.
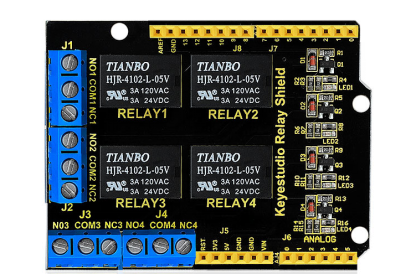
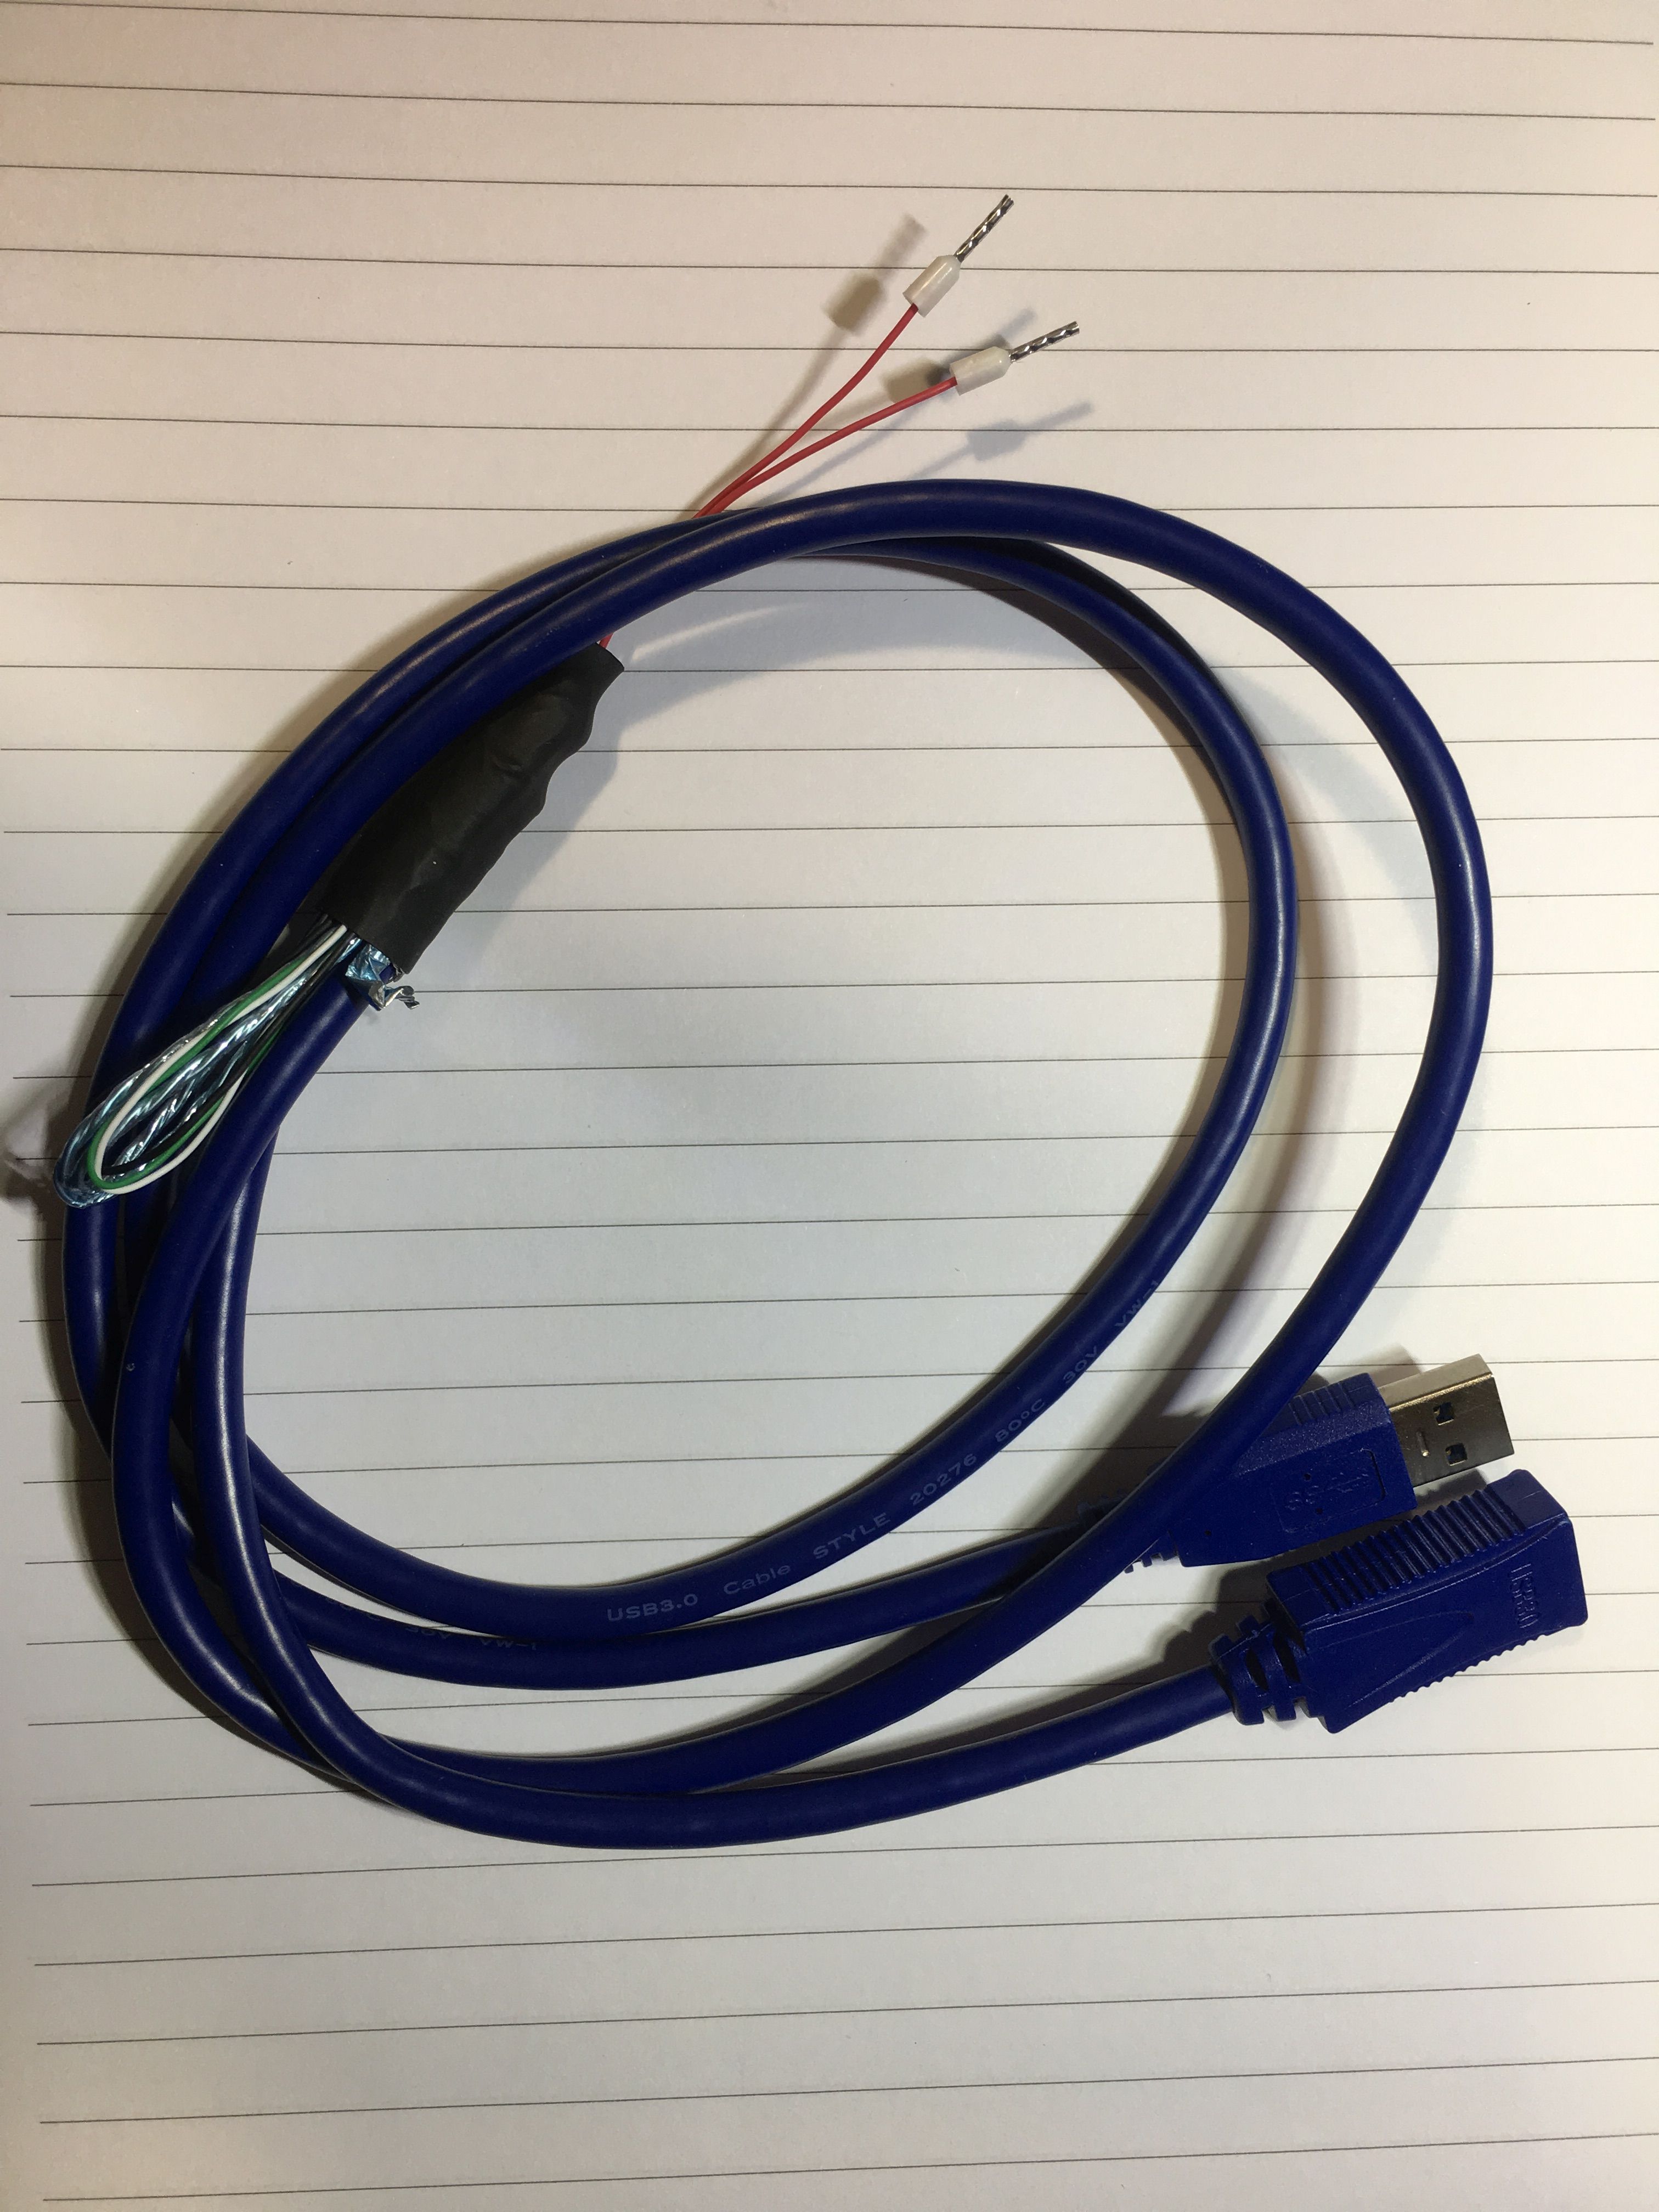
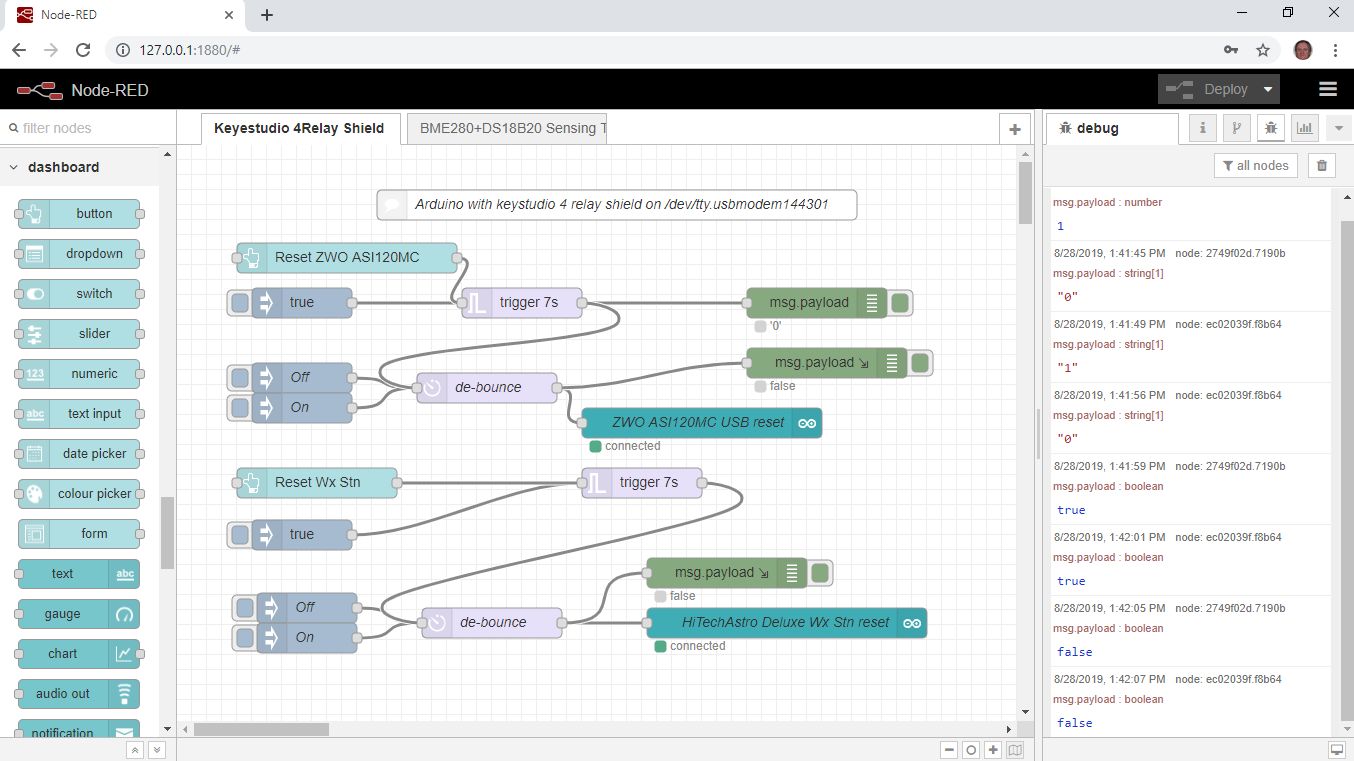
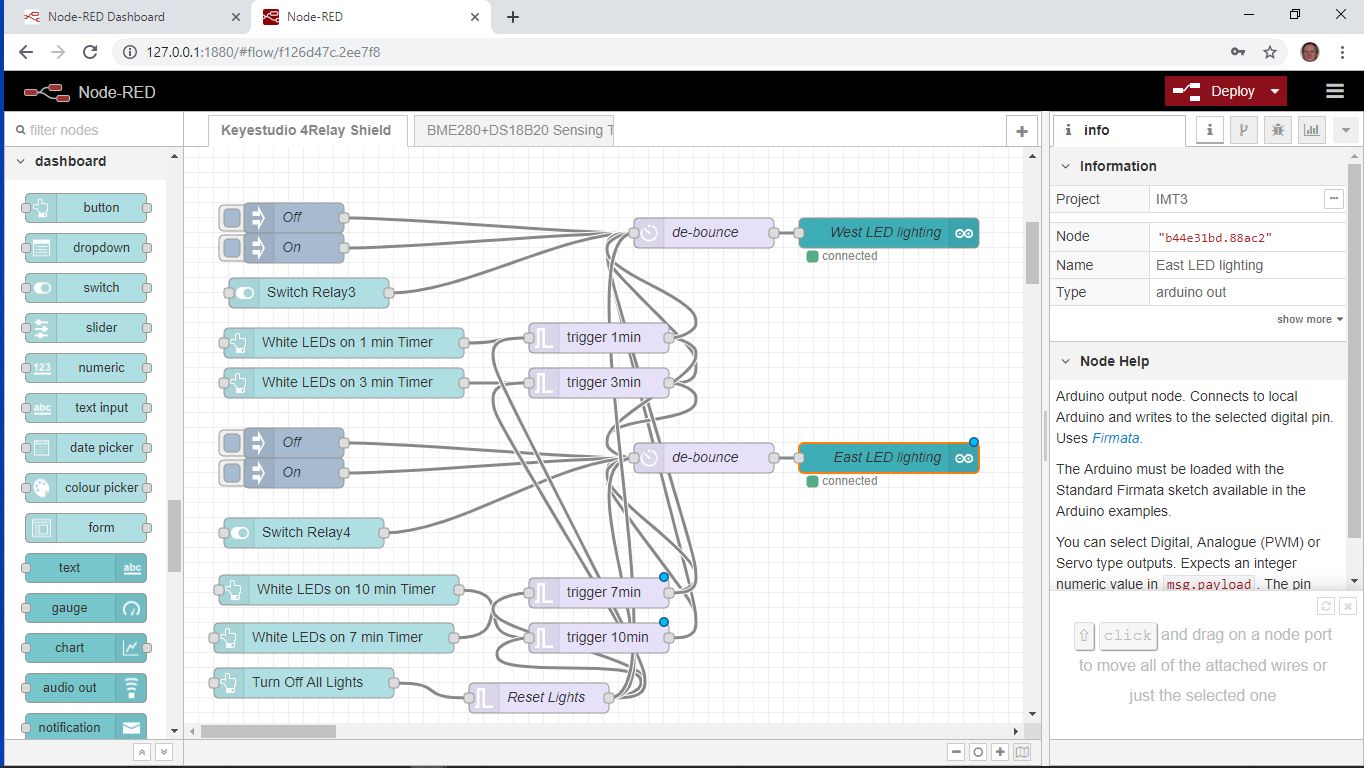
In this part we’ll look at the Node-RED flow that controls the Arduino with a 4-Relay Shield attached. As previously mentioned, these relays are used to allow us to remotely reset the All Sky Camera and HiTechAstro Wx STn, which we found had a tendency to hang and wouldn’t reset unless the USB connection was broken and remade. As we would not be in a position to unplug and re-plug the USB connections I came up with a solution. By modified some short USB extension cables and breaking into the +5v line I could then connect to the ‘Normally Closed’ contacts of one of the relays, picking the relay effectively turns off the USB device connected to that cable.
Relay Shield that attaches directly to an Arduino UNO
Modified USB extension cableSnapshot of the flow to control the relays to reset ASC and Wx Stn
For this solution, we don’t write any code for the Arduino but do load it with Standard Firmata code that comes with the Arduino IDE.
Just open a new sketch, select the StandardFirmata from the Examples and upload to the Arduino.
Firmata is a generic protocol for communicating with microcontrollers from software on a host computer. It is intended to work with any host computer software package.
If not done already we need to go to npm and install the node-red-node-arduino nodes.
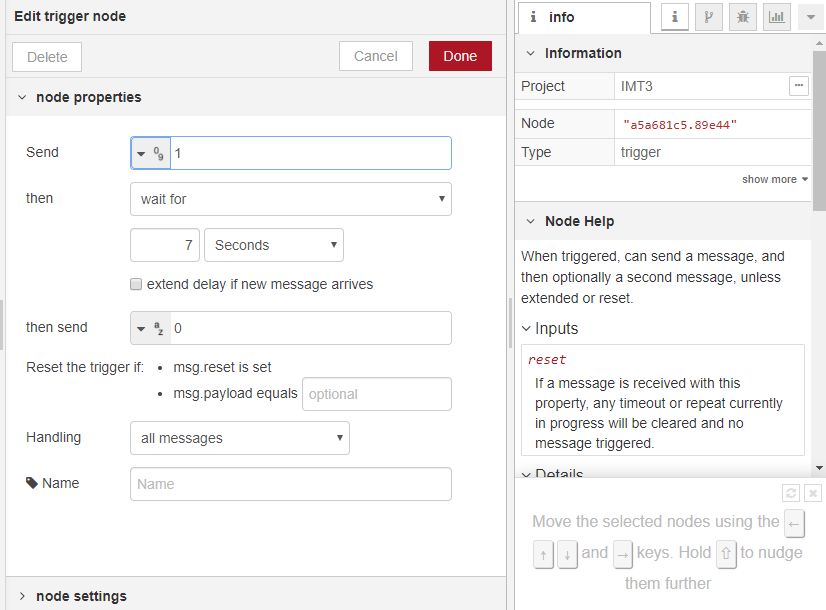
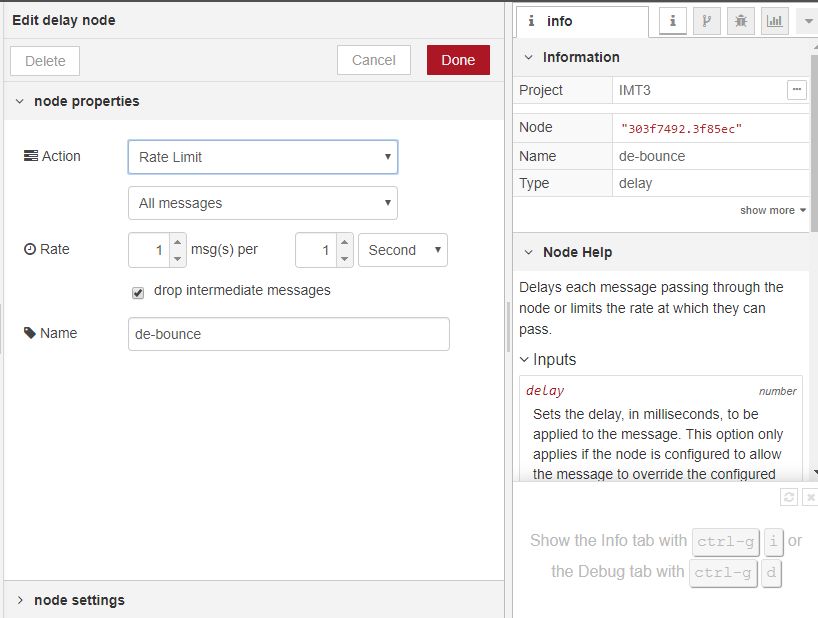
Originally I used a Dashboard Switch to select each relay, but it can get confusing when turning on the relay turns off the device attached, so I replaced the Switch with a Button node, pass the message to a Trigger node that will activate for 7 seconds (give the OS time to recognize the USB device has been disconnected), debounce the signal before passing onto the Arduino Output node which connects to the local Arduino and writes to the selected digital pin turning the relevant Relay On.
As there are only a few basic nodes in this flow, here are some snapshots of how each is set-up:
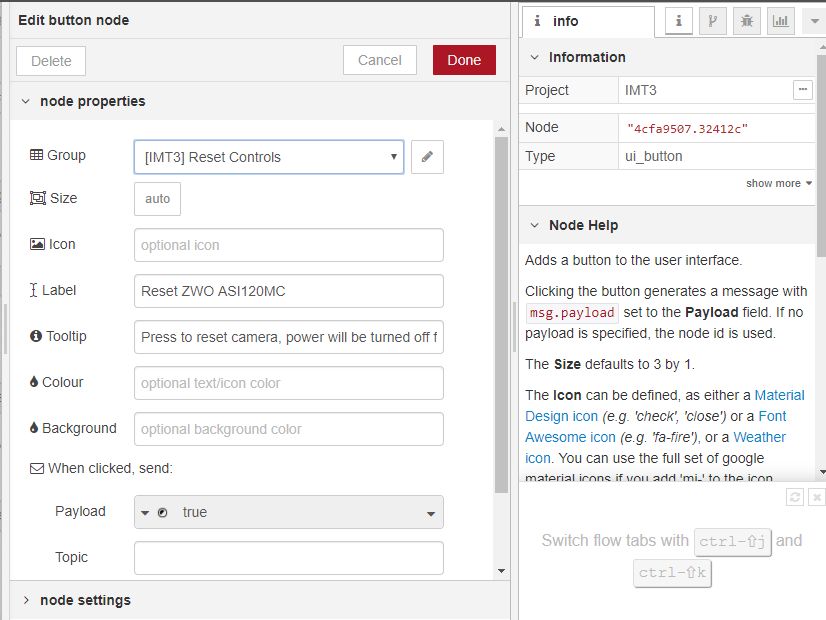
This button will appear on the Dashboard under the Reset Controls group
7 seconds seems long enough but can easily be changed.
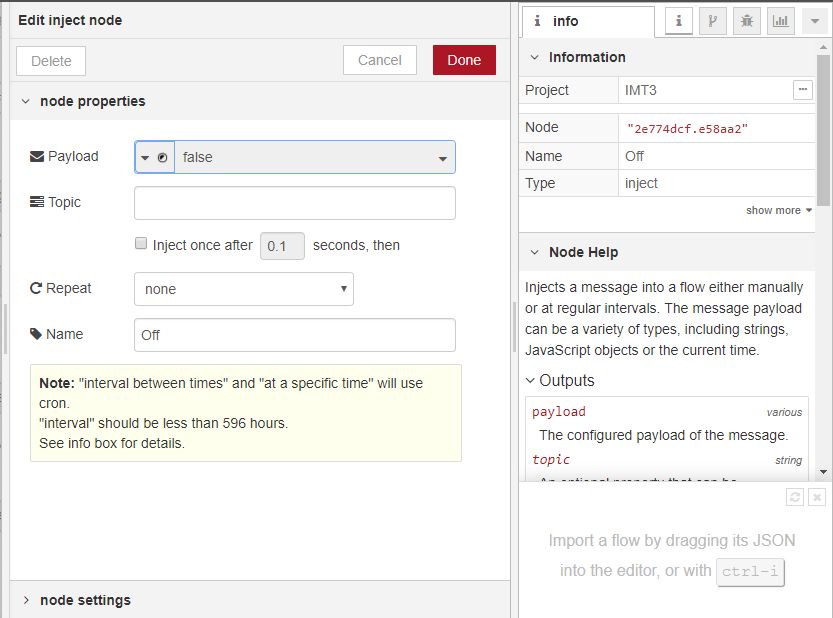
Off Button
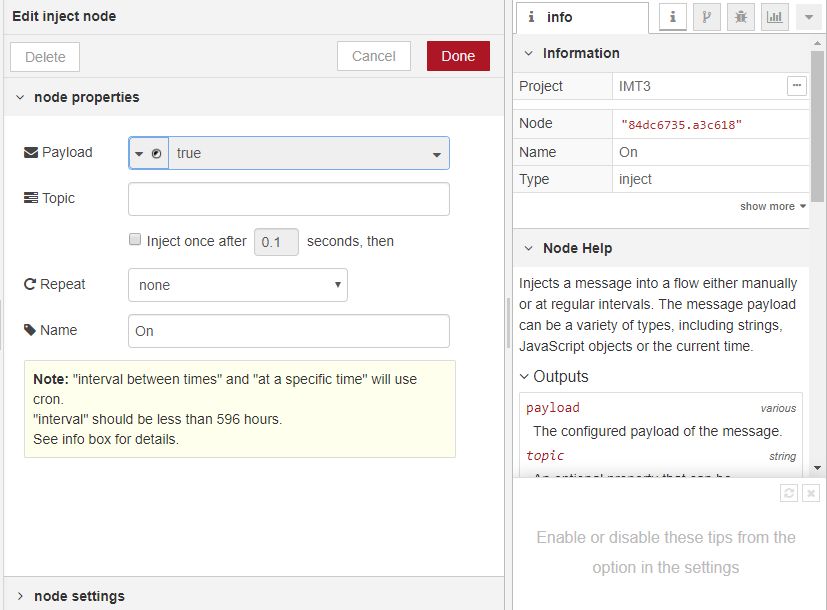
On Button
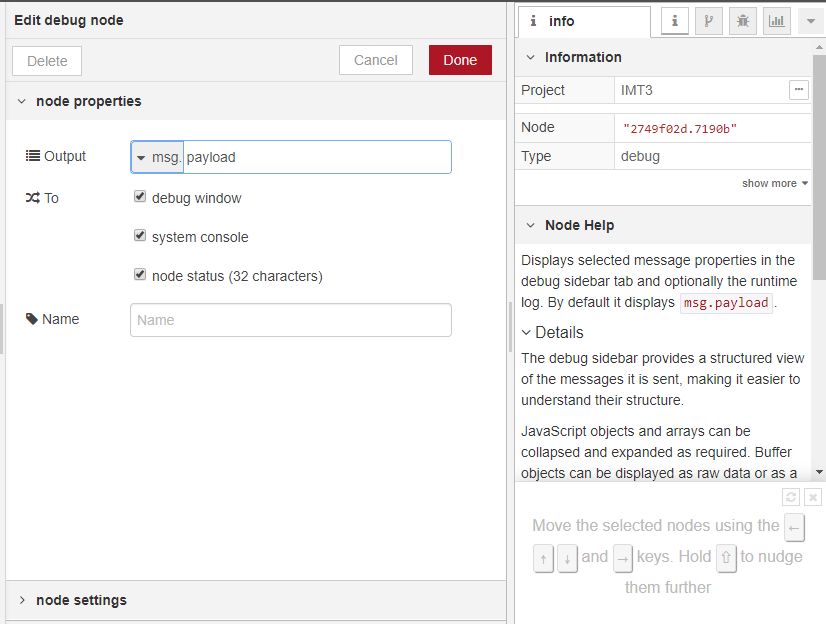
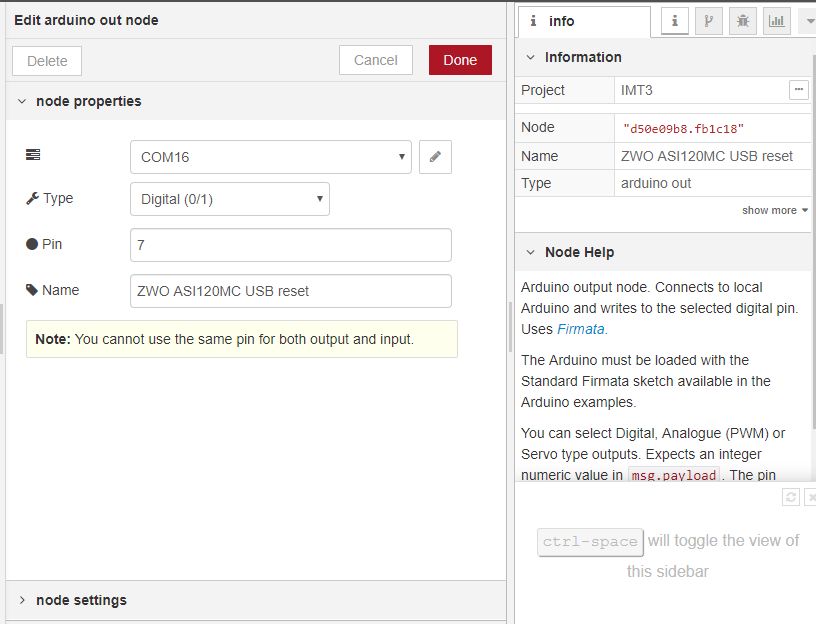
debounce the signaldebug options Pin 7 drives the appropriate relay
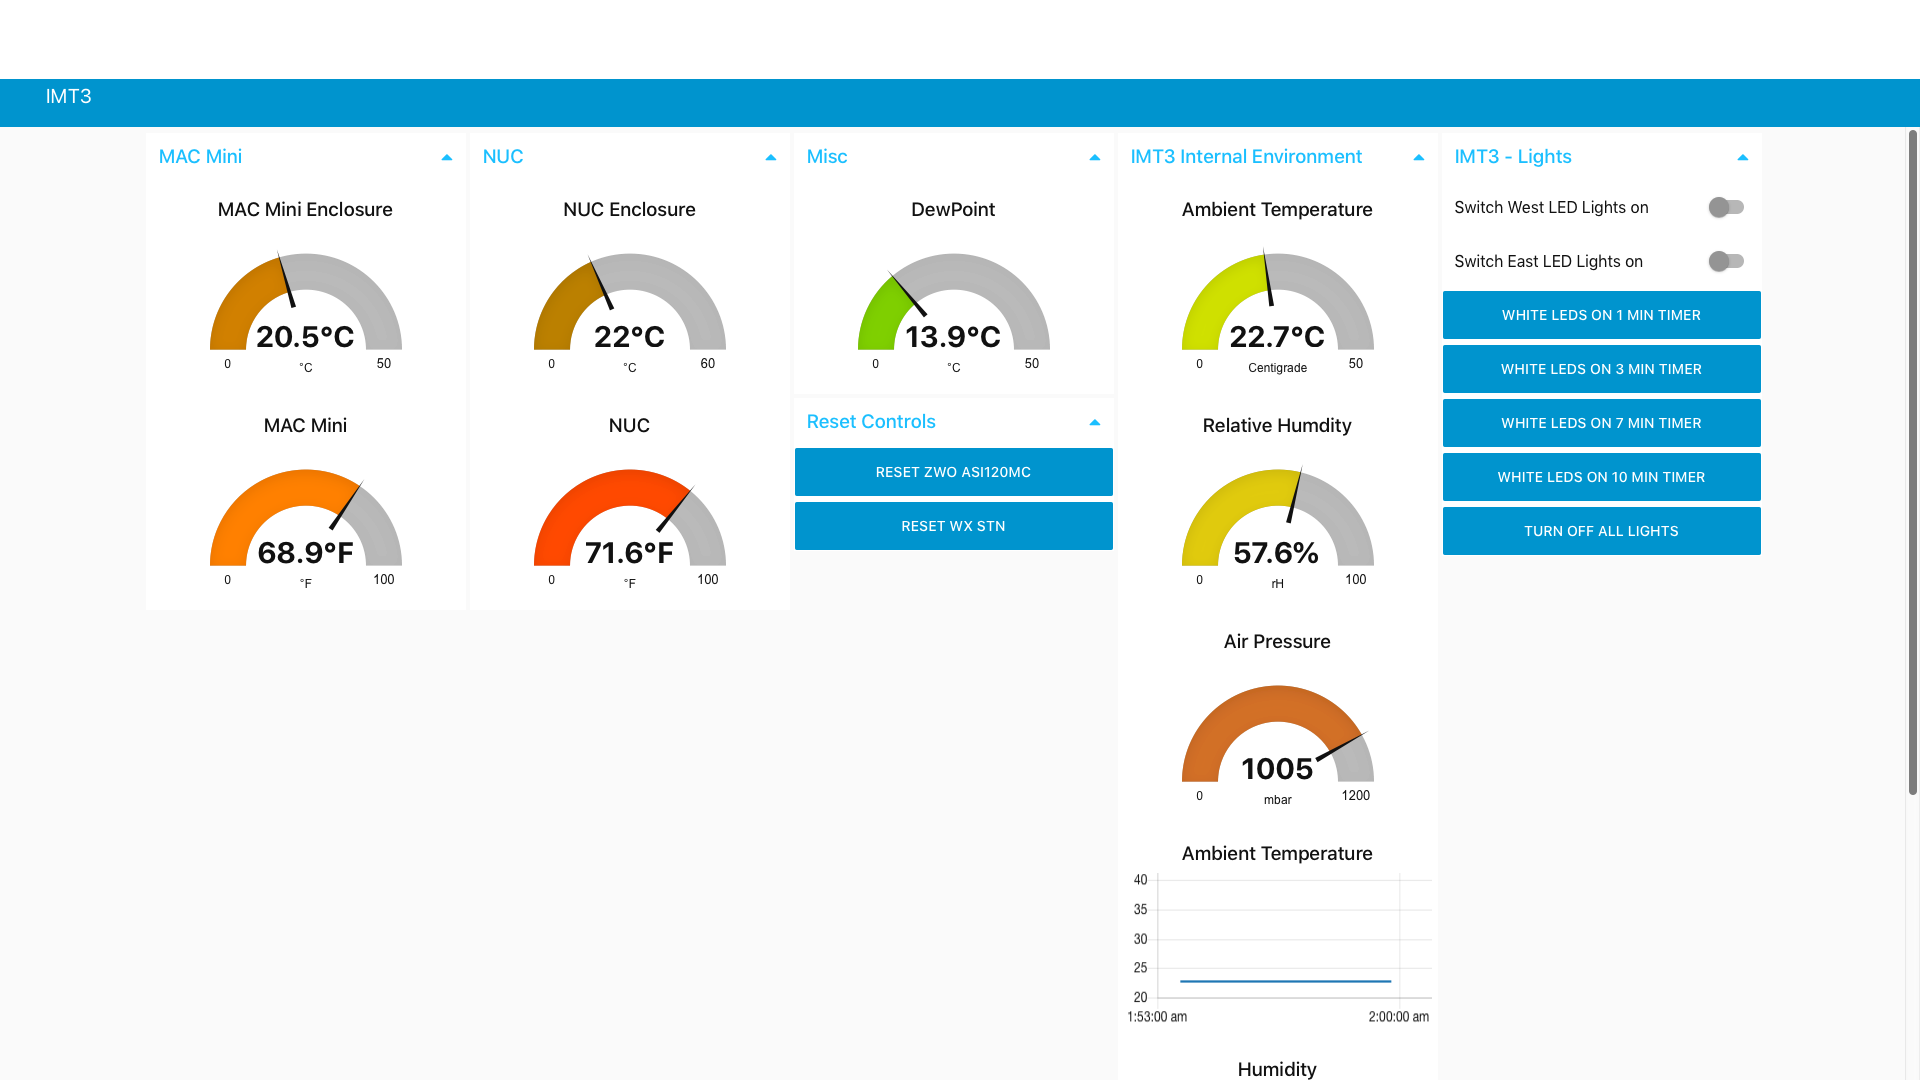
So the above covers the two relays that are used to reset the All Sky Camera and HiTechAsto Wx Stn. The same building blocks are used to control a pair of battery power LED worklights to provide illumination for the Web Cameras we have dotted around the dome and on the mount. After inadvertently leaving the lights on, on one occasion, the batteries needed to be replaced after a single use. So now in addition to having switches control the lights, we also have Buttons to push for preset times on of 1, 3, 7 or 10 minutes, with an option to turn them off early.
LED lighting control
Unlit dome
Picture-in-Picture Flip-Flat ClosedJust a couple of counter-weightsWill the last one out please turn off the lights
Wrapping up for today
Here’s the Node-RED flow for the Relay Shield
[{"id":"f126d47c.2ee7f8","type":"tab","label":"Keyestudio 4Relay Shield","disabled":false,"info":""},{"id":"56ffe7a5.6b85f8","type":"comment","z":"f126d47c.2ee7f8","name":"Arduino with keystudio 4 relay shield on /dev/tty.usbmodem144301","info":"Bob T - 28July2019\n\nKeyestudio 4 card shield to control LED lights, \nHiTechAstroDeluxe weather station and \nZWO ASI120MC All Sky Camera \n\nBosch BME280 and Dallas DS18B20 displays on the Dashboard","x":440,"y":60,"wires":[]},{"id":"2e774dcf.e58aa2","type":"inject","z":"f126d47c.2ee7f8","name":"Off","topic":"","payload":"false","payloadType":"bool","repeat":"","crontab":"","once":false,"onceDelay":0.1,"x":125,"y":233,"wires":[["303f7492.3f85ec"]]},{"id":"303f7492.3f85ec","type":"delay","z":"f126d47c.2ee7f8","name":"de-bounce","pauseType":"rate","timeout":"5","timeoutUnits":"seconds","rate":"1","nbRateUnits":"1","rateUnits":"second","randomFirst":"1","randomLast":"5","randomUnits":"seconds","drop":true,"x":310,"y":243,"wires":[["d50e09b8.fb1c18","2749f02d.7190b"]]},{"id":"84dc6735.a3c618","type":"inject","z":"f126d47c.2ee7f8","name":"On","topic":"","payload":"true","payloadType":"bool","repeat":"","crontab":"","once":false,"onceDelay":0.1,"x":125,"y":263,"wires":[["303f7492.3f85ec"]]},{"id":"5c5f0bd2.1c2534","type":"inject","z":"f126d47c.2ee7f8","name":"Off","topic":"","payload":"false","payloadType":"bool","repeat":"","crontab":"","once":false,"onceDelay":0.1,"x":130,"y":463,"wires":[["f88adc8a.2c784"]]},{"id":"d7751e20.14c83","type":"inject","z":"f126d47c.2ee7f8","name":"On","topic":"","payload":"true","payloadType":"bool","repeat":"","crontab":"","once":false,"onceDelay":0.1,"x":130,"y":493,"wires":[["f88adc8a.2c784"]]},{"id":"d59eb4bd.942ae8","type":"inject","z":"f126d47c.2ee7f8","name":"Off","topic":"","payload":"false","payloadType":"bool","repeat":"","crontab":"","once":false,"onceDelay":0.1,"x":110,"y":615,"wires":[["2743f87.650a908"]]},{"id":"c1c23f86.91668","type":"inject","z":"f126d47c.2ee7f8","name":"On","topic":"","payload":"true","payloadType":"bool","repeat":"","crontab":"","once":false,"onceDelay":0.1,"x":110,"y":645,"wires":[["2743f87.650a908"]]},{"id":"84553f20.8f26c","type":"inject","z":"f126d47c.2ee7f8","name":"Off","topic":"","payload":"false","payloadType":"bool","repeat":"","crontab":"","once":false,"onceDelay":0.1,"x":110,"y":840,"wires":[["35bc3b9f.4f8f94"]]},{"id":"39cd3cf9.7a7024","type":"inject","z":"f126d47c.2ee7f8","name":"On","topic":"","payload":"true","payloadType":"bool","repeat":"","crontab":"","once":false,"onceDelay":0.1,"x":110,"y":870,"wires":[["35bc3b9f.4f8f94"]]},{"id":"f88adc8a.2c784","type":"delay","z":"f126d47c.2ee7f8","name":"de-bounce","pauseType":"rate","timeout":"5","timeoutUnits":"seconds","rate":"1","nbRateUnits":"1","rateUnits":"second","randomFirst":"1","randomLast":"5","randomUnits":"seconds","drop":true,"x":315,"y":478,"wires":[["f55deca6.8236f","ec02039f.f8b64"]]},{"id":"2743f87.650a908","type":"delay","z":"f126d47c.2ee7f8","name":"de-bounce","pauseType":"rate","timeout":"5","timeoutUnits":"seconds","rate":"1","nbRateUnits":"1","rateUnits":"second","randomFirst":"1","randomLast":"5","randomUnits":"seconds","drop":true,"x":520,"y":630,"wires":[["9f8d9580.1d3348"]]},{"id":"35bc3b9f.4f8f94","type":"delay","z":"f126d47c.2ee7f8","name":"de-bounce","pauseType":"rate","timeout":"5","timeoutUnits":"seconds","rate":"1","nbRateUnits":"1","rateUnits":"second","randomFirst":"1","randomLast":"5","randomUnits":"seconds","drop":true,"x":520,"y":855,"wires":[["b44e31bd.88ac2"]]},{"id":"2749f02d.7190b","type":"debug","z":"f126d47c.2ee7f8","name":"","active":true,"tosidebar":true,"console":true,"tostatus":true,"complete":"payload","x":650,"y":218,"wires":[]},{"id":"ec02039f.f8b64","type":"debug","z":"f126d47c.2ee7f8","name":"","active":true,"tosidebar":true,"console":true,"tostatus":true,"complete":"payload","x":550,"y":428,"wires":[]},{"id":"a5a681c5.89e44","type":"trigger","z":"f126d47c.2ee7f8","op1":"1","op2":"0","op1type":"num","op2type":"str","duration":"7","extend":false,"units":"s","reset":"","bytopic":"all","name":"","x":345,"y":158,"wires":[["d0ab65b2.542c38","303f7492.3f85ec"]]},{"id":"d0ab65b2.542c38","type":"debug","z":"f126d47c.2ee7f8","name":"","active":true,"tosidebar":false,"console":false,"tostatus":true,"complete":"payload","x":640,"y":158,"wires":[]},{"id":"af46adb4.e7a03","type":"inject","z":"f126d47c.2ee7f8","name":"","topic":"","payload":"true","payloadType":"bool","repeat":"","crontab":"","once":false,"onceDelay":0.1,"x":125,"y":158,"wires":[["a5a681c5.89e44"]]},{"id":"688bcc2f.63ec14","type":"trigger","z":"f126d47c.2ee7f8","op1":"1","op2":"0","op1type":"str","op2type":"str","duration":"7","extend":false,"units":"s","reset":"","bytopic":"all","name":"","x":315,"y":360,"wires":[["f88adc8a.2c784"]]},{"id":"ab716ad9.cd6008","type":"inject","z":"f126d47c.2ee7f8","name":"","topic":"","payload":"true","payloadType":"bool","repeat":"","crontab":"","once":false,"onceDelay":0.1,"x":125,"y":390,"wires":[["688bcc2f.63ec14"]]},{"id":"5a6fb133.d07c7","type":"trigger","z":"f126d47c.2ee7f8","op1":"1","op2":"0","op1type":"str","op2type":"str","duration":"10","extend":false,"units":"min","reset":"false","bytopic":"all","name":"","x":415,"y":1035,"wires":[["35bc3b9f.4f8f94","2743f87.650a908"]]},{"id":"d50e09b8.fb1c18","type":"arduino out","z":"f126d47c.2ee7f8","name":"ZWO ASI120MC USB reset","pin":"7","state":"OUTPUT","arduino":"ae78048.c81a0f8","x":585,"y":285,"wires":[]},{"id":"f55deca6.8236f","type":"arduino out","z":"f126d47c.2ee7f8","name":"HiTechAstro Deluxe Wx Stn reset","pin":"6","state":"OUTPUT","arduino":"ae78048.c81a0f8","x":610,"y":478,"wires":[]},{"id":"9f8d9580.1d3348","type":"arduino out","z":"f126d47c.2ee7f8","name":"West LED lighting","pin":"5","state":"OUTPUT","arduino":"ae78048.c81a0f8","x":705,"y":630,"wires":[]},{"id":"b44e31bd.88ac2","type":"arduino out","z":"f126d47c.2ee7f8","name":"East LED lighting","pin":"4","state":"OUTPUT","arduino":"ae78048.c81a0f8","x":705,"y":855,"wires":[]},{"id":"d111e9f5.d3a008","type":"ui_switch","z":"f126d47c.2ee7f8","name":"Switch Relay4","label":"Switch East LED Lights on","tooltip":"","group":"4486153f.db803c","order":2,"width":0,"height":0,"passthru":true,"decouple":"false","topic":"","style":"","onvalue":"true","onvalueType":"bool","onicon":"","oncolor":"","offvalue":"false","offvalueType":"bool","officon":"","offcolor":"","x":120,"y":930,"wires":[["35bc3b9f.4f8f94"]]},{"id":"1ed486f7.f803b9","type":"ui_switch","z":"f126d47c.2ee7f8","name":"Switch Relay3","label":"Switch West LED Lights on","tooltip":"","group":"4486153f.db803c","order":1,"width":0,"height":0,"passthru":true,"decouple":"false","topic":"","style":"","onvalue":"true","onvalueType":"bool","onicon":"","oncolor":"","offvalue":"false","offvalueType":"bool","officon":"","offcolor":"","x":125,"y":690,"wires":[["2743f87.650a908"]]},{"id":"4cfa9507.32412c","type":"ui_button","z":"f126d47c.2ee7f8","name":"","group":"207b2faf.303c7","order":1,"width":0,"height":0,"passthru":false,"label":"Reset ZWO ASI120MC","tooltip":"Press to reset camera, power will be turned off for 7 seconds","color":"","bgcolor":"","icon":"","payload":"true","payloadType":"bool","topic":"","x":170,"y":113,"wires":[["a5a681c5.89e44"]]},{"id":"334aa4c3.95f1bc","type":"ui_button","z":"f126d47c.2ee7f8","name":"","group":"207b2faf.303c7","order":1,"width":0,"height":0,"passthru":false,"label":"Reset Wx Stn","tooltip":"Press to reset Weather Station, power is removed for 7 seconds","color":"","bgcolor":"","icon":"","payload":"","payloadType":"str","topic":"","x":140,"y":338,"wires":[["688bcc2f.63ec14"]]},{"id":"dce61d46.cf408","type":"ui_button","z":"f126d47c.2ee7f8","name":"","group":"4486153f.db803c","order":6,"width":0,"height":0,"passthru":false,"label":"White LEDs on 10 min Timer","tooltip":"","color":"","bgcolor":"","icon":"","payload":"true","payloadType":"bool","topic":"","x":155,"y":987,"wires":[["5a6fb133.d07c7"]]},{"id":"1e8859e3.2aa6a6","type":"ui_button","z":"f126d47c.2ee7f8","name":"","group":"4486153f.db803c","order":4,"width":0,"height":0,"passthru":false,"label":"White LEDs on 3 min Timer","tooltip":"","color":"","bgcolor":"","icon":"","payload":"true","payloadType":"bool","topic":"","x":160,"y":780,"wires":[["88932bbe.119258"]]},{"id":"88932bbe.119258","type":"trigger","z":"f126d47c.2ee7f8","op1":"1","op2":"0","op1type":"str","op2type":"str","duration":"3","extend":false,"units":"min","reset":"false","bytopic":"all","name":"","x":415,"y":780,"wires":[["2743f87.650a908","35bc3b9f.4f8f94"]]},{"id":"ab204ac6.07c528","type":"ui_button","z":"f126d47c.2ee7f8","name":"","group":"4486153f.db803c","order":5,"width":0,"height":0,"passthru":false,"label":"White LEDs on 7 min Timer","tooltip":"","color":"","bgcolor":"","icon":"","payload":"true","payloadType":"bool","topic":"","x":150,"y":1035,"wires":[["d37c1fc3.44ece"]]},{"id":"d37c1fc3.44ece","type":"trigger","z":"f126d47c.2ee7f8","op1":"1","op2":"0","op1type":"str","op2type":"str","duration":"7","extend":true,"units":"min","reset":"false","bytopic":"all","name":"","x":415,"y":990,"wires":[["35bc3b9f.4f8f94","2743f87.650a908"]]},{"id":"9ec5abcd.94bff8","type":"ui_button","z":"f126d47c.2ee7f8","name":"","group":"4486153f.db803c","order":3,"width":0,"height":0,"passthru":false,"label":"White LEDs on 1 min Timer","tooltip":"","color":"","bgcolor":"","icon":"","payload":"true","payloadType":"bool","topic":"","x":160,"y":740,"wires":[["871ac8c.880b438"]]},{"id":"871ac8c.880b438","type":"trigger","z":"f126d47c.2ee7f8","op1":"1","op2":"0","op1type":"str","op2type":"str","duration":"1","extend":false,"units":"min","reset":"false","bytopic":"all","name":"","x":415,"y":735,"wires":[["35bc3b9f.4f8f94","2743f87.650a908"]]},{"id":"9b4c5ff.75b30a","type":"ui_button","z":"f126d47c.2ee7f8","name":"","group":"4486153f.db803c","order":6,"width":0,"height":0,"passthru":false,"label":"Turn Off All Lights","tooltip":"","color":"","bgcolor":"","icon":"","payload":"","payloadType":"str","topic":"","x":120,"y":1080,"wires":[["eb116cf.e91769"]]},{"id":"eb116cf.e91769","type":"trigger","z":"f126d47c.2ee7f8","op1":"0","op2":"false","op1type":"str","op2type":"bool","duration":"250","extend":false,"units":"ms","reset":"","bytopic":"all","name":"Reset Lights","x":355,"y":1095,"wires":[["d37c1fc3.44ece","5a6fb133.d07c7","88932bbe.119258","871ac8c.880b438","35bc3b9f.4f8f94","2743f87.650a908"]]},{"id":"9fd74bd7.3fd648","type":"ui_button","z":"f126d47c.2ee7f8","name":"","group":"4486153f.db803c","order":7,"width":0,"height":0,"passthru":true,"label":"Don't Push this button","tooltip":"","color":"","bgcolor":"","icon":"","payload":"true","payloadType":"bool","topic":"","x":250,"y":1290,"wires":[["2ed3e3dc.0f6cac"]]},{"id":"2ed3e3dc.0f6cac","type":"trigger","z":"f126d47c.2ee7f8","op1":"true","op2":"false","op1type":"bool","op2type":"bool","duration":"1","extend":false,"units":"s","reset":"","bytopic":"all","name":"","x":435,"y":1290,"wires":[["8af19751.a0fec8"]]},{"id":"ffabd20f.040af","type":"inject","z":"f126d47c.2ee7f8","name":"","topic":"","payload":"true","payloadType":"bool","repeat":"","crontab":"","once":false,"onceDelay":0.1,"x":80,"y":1290,"wires":[["9fd74bd7.3fd648"]]},{"id":"8af19751.a0fec8","type":"arduino out","z":"f126d47c.2ee7f8","name":"","pin":"13","state":"OUTPUT","arduino":"ae78048.c81a0f8","x":590,"y":1290,"wires":[]},{"id":"ae78048.c81a0f8","type":"arduino-board","z":"","device":"COM16"},{"id":"4486153f.db803c","type":"ui_group","z":"f126d47c.2ee7f8","name":"IMT3 - Lights","tab":"a9e9728d.77c83","order":6,"disp":true,"width":"6","collapse":true},{"id":"207b2faf.303c7","type":"ui_group","z":"","name":"Reset Controls","tab":"a9e9728d.77c83","order":7,"disp":true,"width":"6","collapse":true},{"id":"a9e9728d.77c83","type":"ui_tab","z":"f126d47c.2ee7f8","name":"IMT3","icon":"dashboard","order":2,"disabled":false,"hidden":false}]
I chose to run Node-RED locally on my Windows 10 laptop so my first step was to download and install a supported prerequisite version of Node.js which will also include npm (Node Package Manager).
npm is the worlds largest Software Registry containing over 800,000 code packages. It is free to use and Open-source developers use npm to share their software.
npm includes a CLI (Command Line Client) that we will use to download and install software.
Having installed Node.js open Windows PowerShell to execute the npm cli command to install Node-RED
npm install -g --unsafe-perm node-red
The command installs Node-RED as a global module along with its dependencies.
Once installed as a global module we can use the node-red command to start Node-RED in a terminal. Ctrl-C or closing the terminal window will stop Node-RED.
You can then access the Node-RED editor by pointing your browser at http://localhost:1880/
To access the Node-RED Dashboard point your browser at http://localhost:1881/
By default, Projects are disabled 🙁 , so brush up on your Vi skills* as we need to go and edit settings.js file located in the .node-red directory. *other editors are available.
Just remember to press escape key, colon, w q bang when done! … now where did I drag that up from, I hadn’t used Vi in years!
After an initial foray into Node-RED, I realised I would need to use Projects within Node-RED. A pre-req for this is Git. With that installed I was good to create my first Project.
I was surprised how quickly I was able get some meaningful results and was soon using npm to add nodes from the Node-RED library for the Dashboard, Arduino and much more. It wasn’t long before I had my first Dashboard displaying the output of the BME280 sensor which looked like the following:
My first Node-RED Dashboard display
An early comment from our dear friend Mil Dave asked “What’s the Dew Point“? … thanks Dave !
Google to the rescue, however the Dewpoint calculation formulae found on the web look pretty scary. Fortunately a search of the Node-RED library found a flow with a dewpoint function defined that I was able to adapt to my flow. A snapshot of the flow follows as it is now beginning to take shape and looks like this:
Node-RED Flow
The green debug nodes are useful to follow the message as they progress through the flow, the debug output can be displayed in the debug window, the system console or as node status appearing just below the debug node
The data from the Arduino arrives on the Serial node which is configured for the com port the Arduino is connected to. I’ve found it easier to determine the relevant com port from the Arduino IDE rather than via control panel and device manager. Also the ‘Get board info’ from the IDE has prove very useful when running Node-RED on MAC OS.
Double clicking any node will open up an Edit window to let you configure each node
Connected to the Serial node is a Split Node. This splits the incoming message into a sequence of messages and is setup to split the message when it finds a comma.
The message is passed to the next node which is a function node which contains some Javascript to give a variable name to each of the values received from the Arduino.
The next Function node Splits these seven values and presents them on a separate output of the node which can then be connected to individual Dashboard Gauges.
var msgS1C = {payload: (msg.payload.S1C).toFixed(2)};
var msgS1F = {payload: (msg.payload.S1F).toFixed(2)};
var msgS2C = {payload: (msg.payload.S2C).toFixed(2)};
var msgS2F = {payload: (msg.payload.S2F).toFixed(2)};
var msgBT = {payload: (msg.payload.BT-1.4).toFixed(1)};
var msgBH = {payload: (msg.payload.BH).toFixed(1)};
var msgBP = {payload: (msg.payload.BP).toFixed(0)};

return [msgS1C, msgS1F, msgS2C, msgS2F, msgBT, msgBH, msgBP];
Having split these values out, the Temperature and Humidity values need to be recombined by the Join node so they can be passed to the Dew Point function node.
var newMsg = {};
var parts = msg.payload.split(",");
var Th = parseFloat(parts[0]);
var Hu = parseFloat(parts[1]);

var temp = -1.0*Th;
es = 6.112*Math.exp(-1.0*17.67*temp/(243.5 - temp));
ed = Hu/100.0*es;
eln = Math.log(ed/6.112);
td = -243.5*eln/(eln -17.67);

var Dp = td.toFixed(1);

newMsg = {payload: Dp,
     topic: "DewPoint"};

return newMsg;
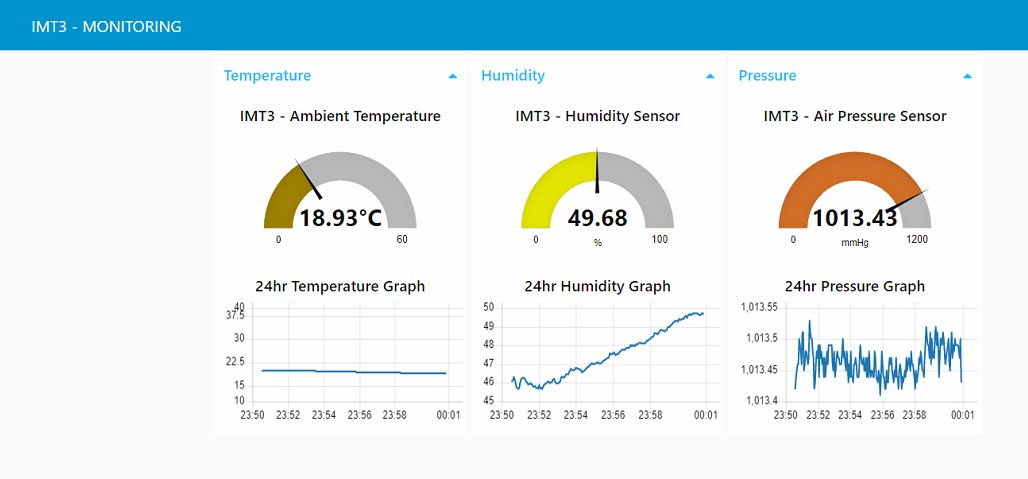
The DewPoint is now passed to a Dashboard Gauge node and displayed. The Dashboard currently looks like this:
IMT3 Environmental Dashboard
In Pt.3 we’ll take a look at the flow that controls the Arduino with the 4-Relay Shield that allows us to remotely reset the All Sky Camera, HiTechAstro Wx Stn and control a pair of LED lights to illuminate the rig so we can use ManyCam to monitor the web cams installed in the observatory.
The following is the current Node-RED flow running on the IMT3 MAC Mini
IMT3 Environmental Monitoring Pt.1 Bob Trevan – Aug2019
When Dave, Mark and I first started planning what equipment we were going to install in IMT3 we started with a block diagram of what we thought we were going to install so we could determine the number of USB ports we would need and the power requirements. This soon morphed into much more as we started adding kit to the project.
Although the Observatory is install in the UK and not Spain as was originally planned, we decided we would still need a fair bit of monitoring to allow remote sensing of the local conditions. In particular making sure it was safe to open the shutter for a remote observing session
During AstroFest in Feb 2019 we bought a HiTechAstro Deluxe Weather Station which can be used as an ASCOM safety device to autonomously close the Dome Shutter if rain or cloud is detected. Although we were lead to believe it would directly interface with the Pulsar Dome Controller, this was not the case and required a simple interface consisting of a SPST Relay to control the shutter. Once the Relay is picked the shutter closes and will stay closed until the operator manually resets the state of the relay via the weather station software. The software has a number of options to configure to determine when to close the shutter
Although the Shutter itself has a battery pack that has sufficient capacity to close the shutter in the event of a power outage we decided to add an APC UPS with PowerChute software so provide AC power resilience to critical components. The shutter battery is wirelessly charged when the dome is parked at the end of each observing session.
In addition to the Cloud and Rain sensor, we also have a Sky Quality Meter and All Sky camera mounted on the same pole. The cable run to the pole from the panel inside the dome to which we were mounting various components … MAC Mini, 10-port USB HUB, Power Bricks, etc … is about 10m. The cabling provided with the Weather Station was somewhat shorter than this which meant having to extend it with the challenges of making the external connections water tight.
The HiTechAstro Wx Stn is also a Cloud Sensor utilizing an IR sensor to measure the Sky Temperature and a Dallas DS18B20 to measure Ambient Temperature. The waterproof probe is attached to the underside of the mounting bracket.
For monitoring the Dome Internal conditions I started looking at what we could achieve using an Arduino (*1) with various sensors. Currently we have two Arduinos installed, the first utilizes an Arduino UNO R3 with a Bosch BME280 (*2) Temperature, Humidity and Pressure Sensor and a pair of Dallas DS18B20 (*3) temperature probes for monitoring the internal temperatures of the enclosures housing the MAC Mini and Intel NUC (*4) (more on the NUC later). The current version of code running on this Arduino is provided at the end of this part of the blog.
A second Arduino has a 4-relay shield attached. The relays are used to control two 380 lumens LED lights inside the dome and after modifying a couple of short USB extension leads, breaking into the +5v line, the remaining 2 relays are used to reset the All Sky Camera and HiTechAstro Deluxe Wx Stn, when the need arises (which is all too frequently). This Arduino is programmed to run Standard Firmata code allowing Node-RED to communicate via the serial port and control the relays.
*1 Arduino is an open-source electronics platform based on easy-to-use hardware and software. Arduino boards are able to read inputs – light on a sensor, a finger on a button, or a Twitter message – and turn it into an output – activating a motor, turning on an LED, publishing something online.
The Arduino integrated development environment (IDE) is a cross-platform application (for Windows, macOS, Linux) that is written in the programming language Java, C, C++. It is used to write and upload programs to Arduino compatible boards. User-written code only requires two basic functions, for starting the sketch and the main program loop. For more info see https://en.wikipedia.org/wiki/Arduino_IDE
*2 Bosch BME280 The BME280 is an integrated environmental sensor developed specifically for mobile applications where size and low power consumption are key design constraints. The unit combines individual high linearity, high accuracy sensors for pressure, humidity and temperature in an 8-pin metal-lid 2.5 x 2.5 x 0.93 mm³ LGA package, designed for low current consumption (3.6 μA @1Hz), long term stability and high EMC robustness.
*3 Dallas DS18B20 The DS18B20-PAR digital thermometer provides 9 to 12–bit centigrade temperature measurements and has an alarm function with nonvolatile user-programmable upper and lower trigger points. The DS18B20-PAR communicates over a 1-Wire bus, which by definition requires only one data line (and ground) for communication with a central microprocessor. It has an operating temperature range of –55°C to +100°C and is accurate to ±0.5°C over a range of –10°C to +85°C.
*4 Next Unit of Computing (NUC) is a line of small-form-factor barebone computer kits designed by Intel. The NUC motherboard measures 4 × 4 inches (10.16 × 10.16 cm)
The Bosch BME280 Sensor uses the I2C bus and the Dallas DS18B20 probes use a One-Wire interface. Each of the DS18B20 has a unique internal 64-bit address created during the manufacturing process, so you can just keep adding as many as you need with relative ease.
Currently, every 20 seconds, the Arduino spits out 7 values separated by commas and terminated with a line feed, these are:
DS18B20 Ext sensor Temperatue in °C
DS18B20 Ext sensor Temperature in °F
DS18B20 Int sensor Temperature in °C
DS18B20 Int sensor Temperature in °F
BME280 sensor Temperature in °C
BME280 sensor Humidity in %
BME280 sensor Pressure in mPa
e.g. 27.0000,80.6000,26.0000,78.8000,28.53,43.53,1008.28
Mark also donated a HiTechAstro Hub to the project which is used to control DC power to the Cameras, Focuser, Filter Wheels and potentially Dew Heaters, but with three rigs mounted on the SB Paramount ME-II we were quickly using all available USB Ports and Switched DC power ports available.
After several ‘Hangs’ of the NUC due the to the software packages tested with the All Sky Camera, we added a MAC mini to run the environment applications, leaving the Intel NUC to run the Main Applications to control the mount and Cameras. The Sky X, Sequence Generator Pro etc…
So we now have a number of PC / MAC applications, controlling and displaying various functions of IMT3. But how do we display the Arduino data ?
Working for IBM, Dave had been exposed to Node-RED. Originally developed by IBM, Node-RED is a flow based development tool for visual programming for wiring together hardware devices, APIs and online services as part of the Internet of Things.
Node-RED provides a web browser-based flow editor, which can be used to create Javascript fuctions. The runtime is built on Node.js. The flows created in Node-RED are stored using JSON. Since version 0.14 MQTT nodes can make properly configured TLS connections.
In 2016, IBM contributed Node-RED as an open source JS Foundation project.
One of the Node-RED projects is a dashboard UI for Node-RED, and this is how the Arduino sensor data is displayed, along with the flow that controls the 4 relays on the Arduino Relay Shield.
We have a new vocabulary to learn; IoT, MQTT, node.js, Node-RED, JSON, Arduino, Sketch, Flow and new languages to learn C, C++, Javascript and we haven’t even mentioned the BBC MicroBit or Raspbery Pi and Python 🙂
I’ll describe the Node-RED flows I currently have working and the Dashboard in Pt. 2.
Arduino Code:
/********************************************************************
* Arduino code used for monitoring the Internal Ambient Temperature,
* Humidity and Air Pressure of IMT3 Observatory using a Bosch BME280 sensor
* and two Dallas DS18B20 temperature probes to measure the temperatures of
* the MAC Mini and Intel NUC enclosures.
*
* I have commented out alot of the lines used during development, but left
* them in to help comment the code.
*
* Currently, every 20 seconds, the Arduino spits out 7 values separated by
* commas and terminated with a line feed, these are:
*
* DS18B20 Ext sensor Temperatue in °C
* DS18B20 Ext sensor Temperature in °F
* DS18B20 Int sensor Temperature in °C
* DS18B20 Int sensor Temperature in °F
*
* BME280 sensor Temperature in °C
* BME280 sensor Humidity in %
* BME280 sensor Pressure in mPa
*
* e.g. 27.0000,80.6000,26.0000,78.8000,28.53,43.53,1008.28
*
* The above will be displayed as Gauges on a Node-RED Dashboard.
*
* Bob Trevan August 2019
*******************************************************************/
/******************************************************************
This is a library for the BME280 humidity, temperature & pressure sensor
Designed specifically to work with the Adafruit BME280 Breakout
----> http://www.adafruit.com/products/2650
 These sensors use I2C or SPI to communicate, 2 or 4 pins are required
to interface. The device's I2C address is either 0x76 or 0x77.
 Adafruit invests time and resources providing this open source code,
please support Adafruit and open-source hardware by purchasing products from Adafruit!
Written by Limor Fried & Kevin Townsend for Adafruit Industries.
BSD license, all text above must be included in any redistribution
*******************************************************************/
#include <Wire.h>
#include <SPI.h>
#include <Adafruit_Sensor.h>
#include <Adafruit_BME280.h>
#include <OneWire.h>
#include <DallasTemperature.h>

#define BME_SCK 13
#define BME_MISO 12
#define BME_MOSI 11
#define BME_CS 10

Adafruit_BME280 bme; // I2C
char buffer[60];
// Onewire Reference and assign it to pin 5 on the Arduino
OneWire oneWire(5);
// declare as sensor reference by passing oneWire reference to Dallas Temperature.
DallasTemperature sensors(&oneWire);
// declare the device addresses
//Device 1: 0x28, 0x41, 0x0F, 0x84, 0x1F, 0x13, 0x01, 0x16
//Device 2: 0x28, 0x89, 0x25, 0x6E, 0x1F, 0x13, 0x01, 0x3F

//Device 3: 0x28, 0xAD, 0x43, 0xE2, 0x1B, 0x13, 0x01, 0x8D
//Device 4: 0x28, 0x0B, 0xA9, 0x63, 0x1F, 0x13, 0x01, 0xCC

//Device 5: 0x28, 0x52, 0xDA, 0x71, 0x1F, 0x13, 0x01, 0x68
//Device 6: 0x28, 0xAA, 0xBD, 0x68, 0x3C, 0x14, 0x01, 0x4E

// Select the pair of sensor used with this Arduino, these addresses have previously been read with a separate piece of Arduino code.
DeviceAddress ExtSensor = {0x28, 0xAA, 0xBD, 0x68, 0x3C, 0x14, 0x01, 0x4E};
DeviceAddress IntSensor = {0x28, 0x52, 0xDA, 0x71, 0x1F, 0x13, 0x01, 0x68};

// Variables to hold the temperatures
float ExtC; // originally had one sensor hanging out of my study window
float IntC; // and a second sensor by my desk.

void setup() {
Serial.begin(9600);

// Serial.println(F("BME280 test"));
bool status;
status = bme.begin(0x76); // I2C Address
if (!status) {
Serial.println("Could not find a valid BME280 sensor, check wiring!");
while (1);
}

// Serial.println("-- Default Test --");

Serial.println();

// set the resolution to 9 bit - Valid values are 9, 10, or 11 bit.
sensors.setResolution(ExtSensor, 9);

// confirm that we set that resolution by asking the DS18B20 to repeat it back
//Serial.print("Exterior Sensor Resolution: ");
//Serial.println(sensors.getResolution(ExtSensor), DEC);
//Serial.println();
// set the resolution to 9 bit - Valid values are 9, 10, or 11 bit.

sensors.setResolution(IntSensor, 9);

// confirm that we set that resolution by asking the DS18B20 to repeat it back
//Serial.print("Interior Sensor Resolution: ");
//Serial.println(sensors.getResolution(IntSensor), DEC);
//Serial.println();
}

void loop() {
// Tell the Ext sensor to Measure and Remember the Temperature it Measured
sensors.requestTemperaturesByAddress(ExtSensor); // Send the command to get temperatures
// Get the temperature that you told the sensor to measure

ExtC = sensors.getTempC(ExtSensor);

//Serial.print("Exterior Sensor: ");
//Serial.print("Temp C: ");

Serial.print(ExtC,4); // The four just increases the resolution that is printed
Serial.print(",");

//Serial.print(" Temp F: ");
// The Dallas Temperature Control Libray has a conversion function... we'll use it

Serial.print(DallasTemperature::toFahrenheit(ExtC),4);
Serial.print(",");

// Tell the INT sensor to Measure and Remember the Temperature it Measured sensors.requestTemperaturesByAddress(IntSensor); // Send the command to get temperatures
// Get the temperature that you told the sensor to measure

IntC = sensors.getTempC(IntSensor);

//Serial.print("Interior Sensor: ");
//Serial.print("Temp C: ");

Serial.print(IntC,4); // The four just increases the resolution that is printed
Serial.print(",");

//Serial.print(" Temp F: ");
// The Dallas Temperature Control Libray has a conversion function... we'll use it

Serial.print(DallasTemperature::toFahrenheit(IntC),4);
Serial.print(",");
//Serial.println("\n");
printTemp();
printHum();
printPa();
delay(20000);
}

void printTemp() {
dtostrf(getTemp(),1,2,buffer);

// Serial.print("Temperature = ");

Serial.print(buffer);
Serial.print(",");

// Serial.println(" *C");
}

void printHum() {
dtostrf(getHum(),1,2,buffer);

// Serial.print("Humidity = ");

Serial.print(buffer);
Serial.print(",");

// Serial.println(" %");
}

void printPa() {
dtostrf(getPa(),1,2,buffer);

// Serial.print("Pressure = ");

Serial.println(buffer);

// Serial.println(" hPa");
}

double getTemp(void) {
double t;
t = bme.readTemperature();
return (t);
}

double getHum(void) {
double h;
h = bme.readHumidity();
return (h);
}

double getPa(void) {
double p;
p = (bme.readPressure() / 100.0F);
return (p);
}