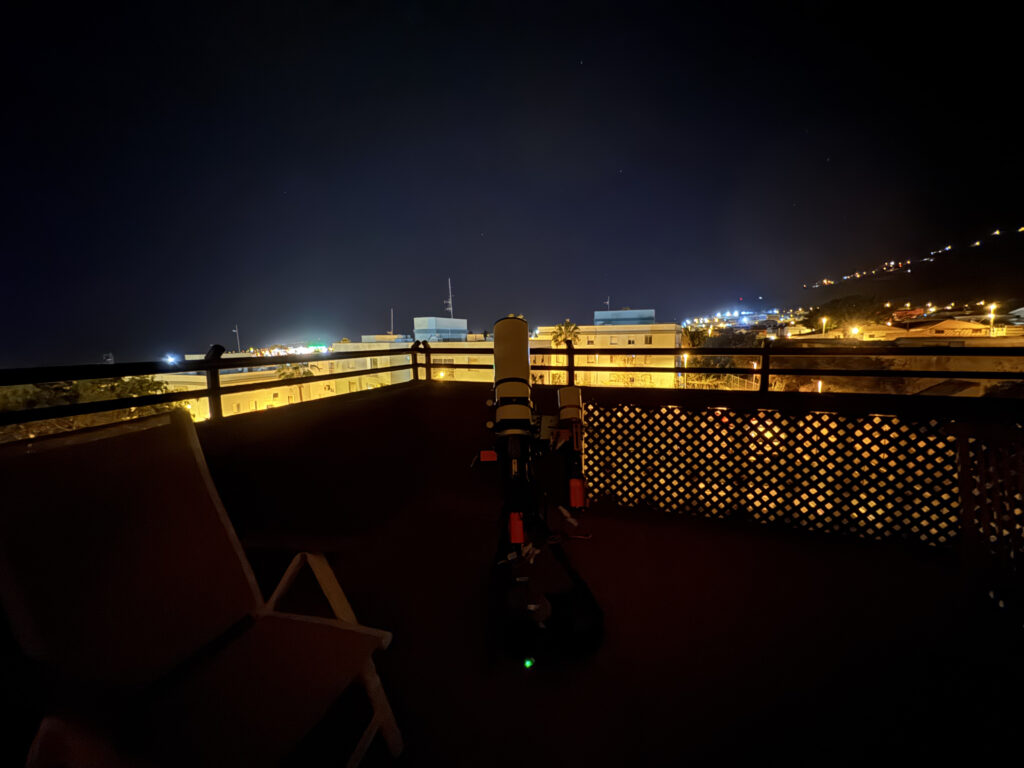
Setup in the light polluted Adeje town north of the TF1. We are staying in a 3 story townhouse and I am imaging from the 2nd floor terrace.
New Camera
I have brought with me for the first time the ZWO ASI2600MC AIR and I am imaging with that using the small 220 built in guide chip for guiding and imaging through the Esprit 100 whilst trying to cut down the light pollution using the Antlia Triband RGB filter.
Light polluted Adeje
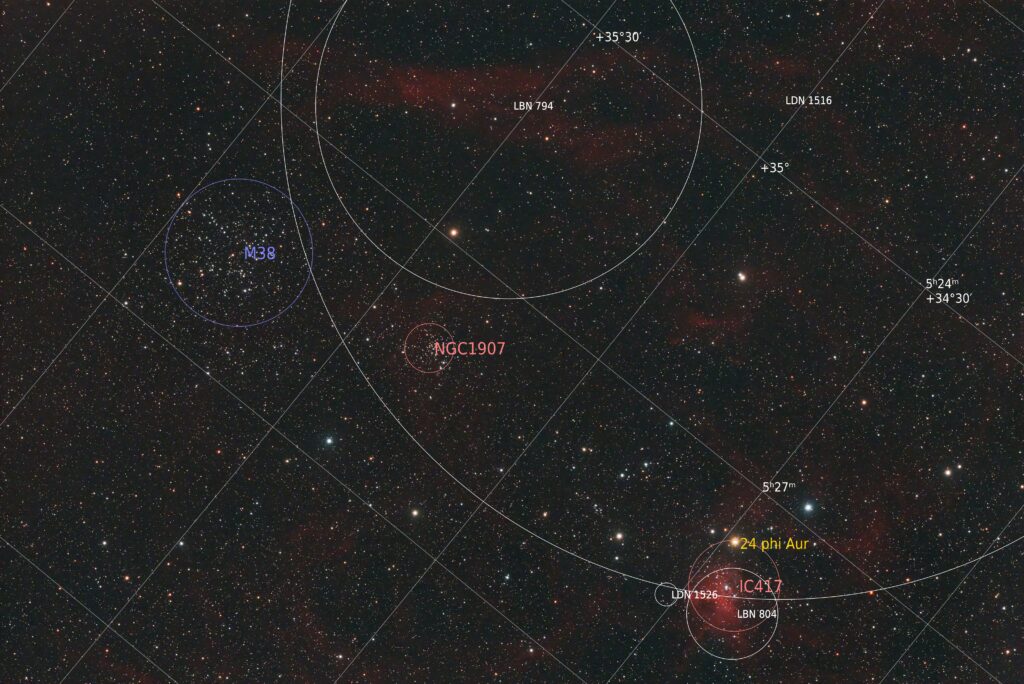
Focusing on completing my Messier collection, given the full moon, I am imaging M38 an open cluster. Taking 60s exposures to try and keep the chance of over exposing the stars, I am also West of the Meridian and at a starting imaging altitude of 55 degrees thus limiting the ingress of light into the telescope.
M38 Stacked and Annotated 101 x 60s
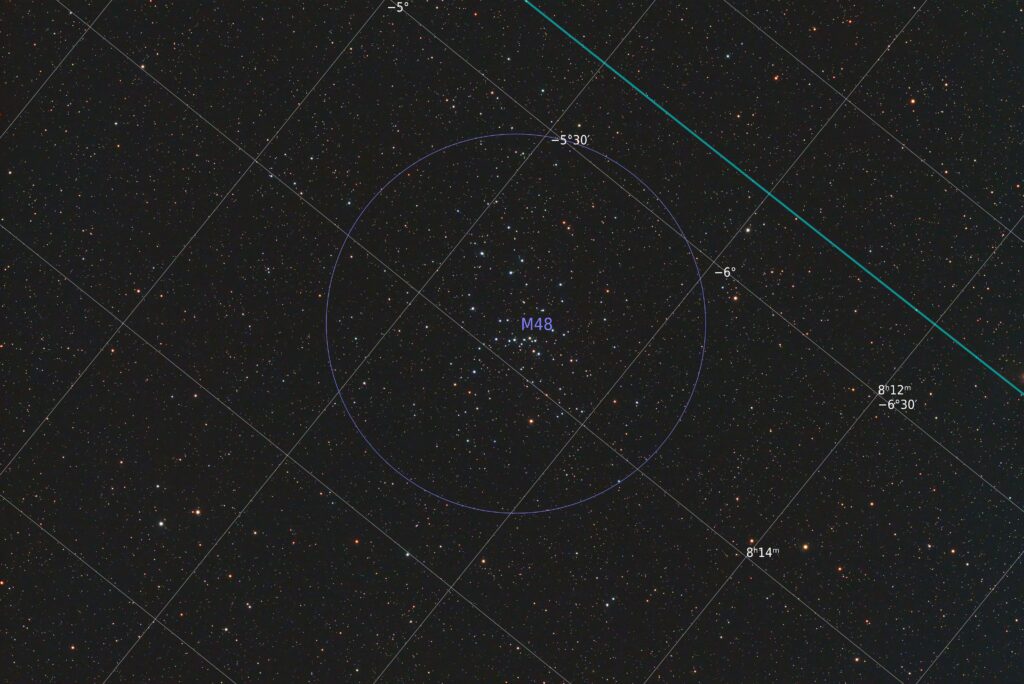
After 2 hours I moved on to M48 another open cluster. Again it was reasonably high at 42 degrees to allow for 2 hours of imaging before I hit the lights of the buildings. Imaging overhead is clearly what is needed after looking at the last few images of M38.
M48 Stacked and Annotated 102 x 60s
Another 2 hours completed and I then had a hard choice of what to image past the meridian, away from the Moon but before the lights of the buildings. I landed up targeting M109 to the left, along with NGC 3953 to the right of centre and NGC 391 to the far right. One of the stars making up the constellation of Ursa Major, 64 Gamma Uma can be seen. I went back to sleep and woke up around 7am to shut down the imaging run. A good first night.
So given it was a non-work night and predicted to be clear Dave invited me over to test the gear/setup prior to the BASEG Tenerife 2024 trip.
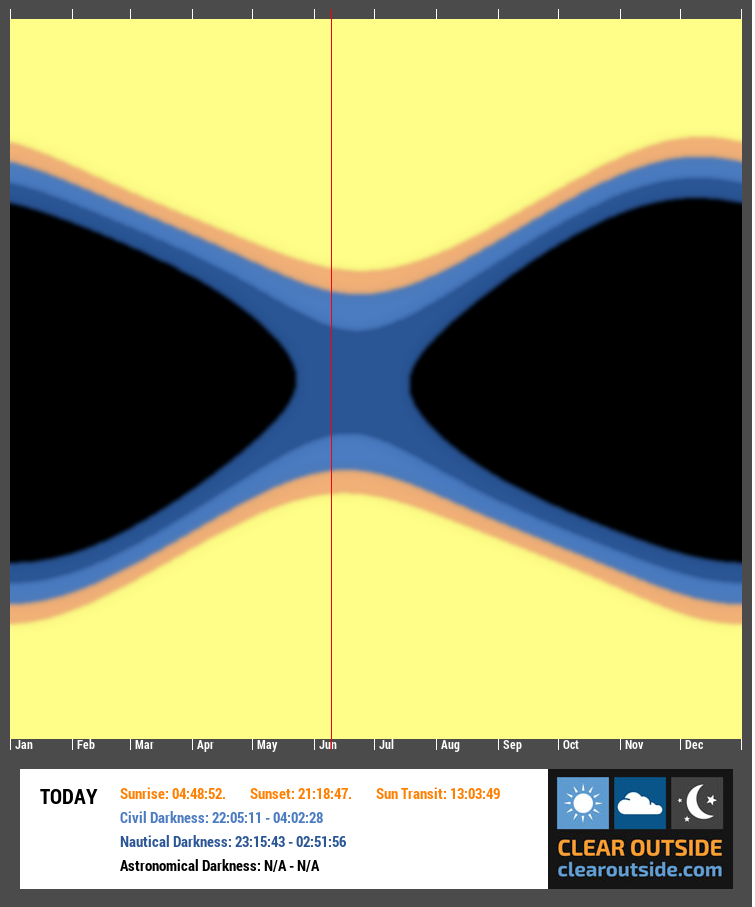
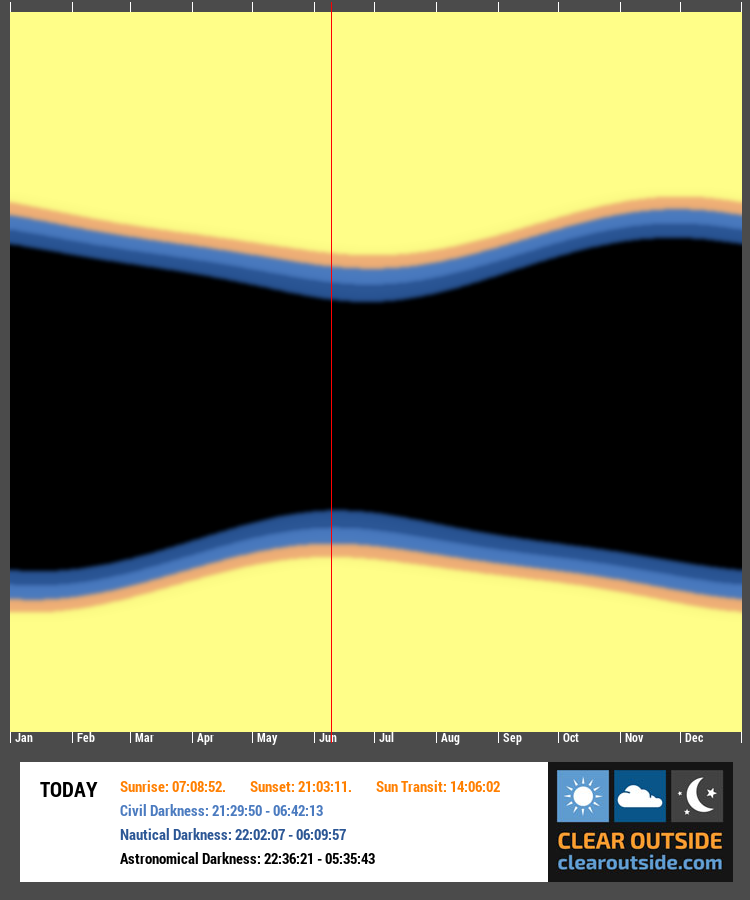
Given we are fast approaching the summer solstice, the nights are getting shorter and lighter. The Annual Darkness chart for IMT3 shows that we currently have no astronomical darkness and the nautical darkness lasts only for some 3.5hrs (left image) and now compare that the darkness graph for Mount Teide in Tenerife (right image) and although we lose some dark hours around the Summer Solstice it’s not as much as is lost being located at 52°N.
Setup – added BlueAstro stick station to measure pressure as Pegasus have not exposed the pressure measurement from the NYX101 mount to the ASCOM layer … why not ? Added weight bag to NYX-101 and GL.inet travel router to top of the scope as MS Windows keeps messing up the Wi-Fi hotspot on the Mele Quieter3C if it does not detect a internet connection ….. how stupid is that. Now I have a permanent hotspot thanks to the instructions given by Cuiv the Lazy Geek on his YouTube channel.
When attempting to polar align when using the QHY PoleMaster I noticed that the sky brightness below 15 mag2/sec (measured by a Unihedron SQM) produced a white screen due to over exposure – the minimal exposure in the now aged the QHY PoleMaster software (> 4yrs since last release) was 50ms which is too long even though I could eyeball Polaris in the early evening sky.
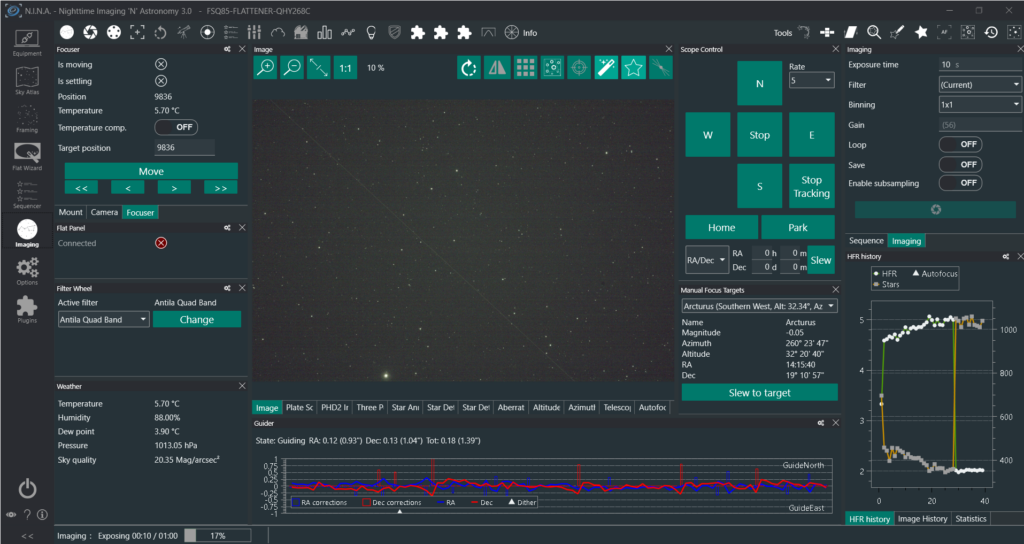
NINA 3.0 start up had not detected the QHY native driver and after I shutdown and restarted the app it then was able to detect the QHY 268C camera. However, it disconnected when it could not cool to -10℃ which I’ve never encountered before. I did eventually managed to get it cool and stay connected.
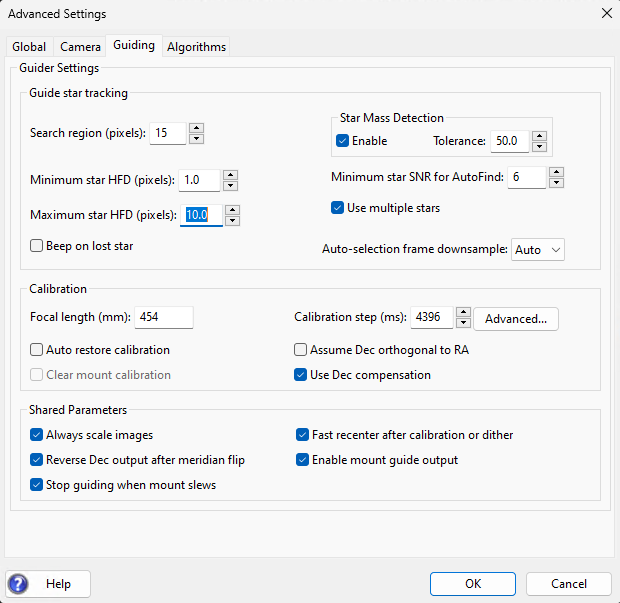
During guiding calibration OpenPHD2 would constantly complain about losing the star. Again the star was clearly visible on the PHD display and after downgrading from 2.6.13dev4 to dev3 and then I suddenly realised the value the error was referring to. I changed the minimal star HFD down to 1.0 from 1.5, also recreated the dark library to remove the possibility of the guider attempting to guide on a hot pixel.
Once guiding, the guide graphs were reporting 0.08 – 0.19 arcsec total polar alignment error. Hopefully I will learn to improve that and maybe repeat the polar alignment procedure or use PHD drift align to refine it.
I also forgot to change filter at the start of the evening from the Antila Quad Band filter to the Baader UV/IR filter. I noticed a halo from the bright star Arcturus in the constellation Bootes which I was testing autofocus on but I decided to continue regardless as I was only testing.
The goal for the night was to grab a base image of T Coronae Borealis (“The Blaze Star”) before it goes nova – it’s a reoccurring nova with a 80 year cycle. The star is currently hovering around 10.2 magnitude and it is predicted based on previous eruptions to reach around magnitude 2. As I ultimately wanted to perform some photometry on the star using the UV/IR cut filter I did want to blow out the cores of any bright star so I opted to use the ExtendedFullWell2CMS mode at gain 0, offset 30 with 60 second exposures. During the sequence I forgot to watch HFR/Star count graph and it rose above 5 which meant I have to refocus to (HFR ~2.0) and so due to my oversight due to chatting I will have to dump a lot of the early subs.
At the end of nautical darkness I stopped the sequence and used the NINA flat wizard (dynamic exposure) with the old PegasusAstro 120 flat panel at 100% brightness to create 25 flats and flat darks for a target of 33% ADU. After packing up and the with the pre-dawn temperature hitting 4℃ just before 4am I was looking forward to getting to bed.
At the next clear non-working evening I will attempt to grab some subs again but this time using the correct filter. Thank you to Dave and family for hosting me once more.
NB – NINA 3.1 was formally released the following day (09/06/2024) !
I’ve always liked what PegasusAstro have been doing with their astronomy equipment and I already own an original FlatMaster120, UPBv1 and a UPBv2.
Overview
Packaging – The mount transport box is (21cm x 34cm x 34cm) which is larger than the AM5 transport box. Weight/Size (6.4 Kg compared to ZWO AM5 5 Kg). The build quality follows the same high quality and blue anodised styling of recent products.
On opening the packaging I found damage to the mount knob indicated a possible rough handling in transit with plastic shrapnel in its plastic bag. This was superficial and did not impact the function or integrity of the mount.
There was no hand-controller supplied in the box but the manual hints that a hand controller can be connected to the ST-4 (EXT) port but no detail on if that is compatible with any existing hand controllers, so for now we have to use the Unity PC application, ASCOM access or the mobile phone application (Android).
The USB2.0 port is better than others I have encountered on other mounts such as iOptron and it grasps the cable securely and does not feel loose or feels like it would just drop off. This is especially useful as I tear down each night so let’s see over time if it maintains the positive connection it has at the moment. I connected the mount USB and power to the UPBv2 sat on top of the scope.
The carbon fibre tripod has no stone bag which can be found on other astro/photography tripods. You could suspend some form of weight from the leg spreader that might help prevent the tripod from tipping over with heavier scopes.
I found the Altitude adjustment a bit loose and takes a bit of getting used to even though the NYX101 has altitude tightening bolts which themselves seem to shift the altitude which again affects polar alignment if you are not careful.
Due to the compact nature of the mount there is no room for a GPS receiver so this function is relied upon either from your phone or by pushing the values from Unity or via Uranus device. If you push from your phone and you have Unity running then Unity will not see the change until you restart Unity.
I like the SW tripod (adapter required) and M12 counterweight compatibility, LX200 protocol support, polemaster placement support. There is a polemaster mounting plate but this is a permanent fixture via screws with no quick release mechanism. However there was a post on Cloudy Nights by PhilippeL on a release adapter he made, CAD link here.
Experience
Usage
Set your park/home positions and then enter in your location/altitude via Unity/Mobile phone app so that the mount understanding things like horizon limits.
As with other mounts, care needs to be exercised that your scope does not collide with the tripod legs, this is still a risk when using the pier extender with longer length scopes.
Unity Software
I couldn’t find a change history or date on the released Unity Platform on the website so it’s not easy to look back when things happened but you can use this link to check the currently available version. I used version 1.8.1733.15, when upgrading the existing Unity software the update process will remove all older versions including the ASCOM drivers and then install the latest version.
I do seem to lose wireless connection to my house router randomly even though the mount was positioned within 6ft of it. I had setup the router to give the mount a static IP address via DHCP but I don’t know it loses the connection – DHCP lease time is set high.
Firmware Update
When I first looked at configuring the NYX-101 to connect to my house network I had no end of trouble getting a connection. The only way I could achieve a connection was to have both the PC/laptop and mount connect to one of my travel routers which itself was also connected my the house wifi.
I soon worked out that the “Smart Connect” feature of my house wifi router was attempting to connect the ESP32 wireless (2.4GhZ) of the NYX to the 5GhZ band. Once I had put the MAC address of the NYX-101 into the exclude list of the house router 5GhZ band then it would reliably connect to the 2.4GhZ band. From that point onwards everything worked as expected and I could then successfully perform the firmware update to 1.15.
The 1.19 firmware (released the week 13th March 2023) also brought a pleasant surprise of the motor noise being reduced when slewing. This is a welcome change since making any noise in a suburban garden location in the early hours of the morning when people sleep with their windows open is highly undesirable.
Resetting park & home
I actually turned off the mount by accident whilst the mount was pointing somewhere in the sky so it lost its position and didn’t know where park and home was. This is easily rectified by moving the mount via one of the applications to the correct marks and setting the home and park positions again. This issue was mostly solved with a later firmware update where the mount now remembers where it is pointed once power is restored. However on performing a meridian flip (no slew & center) and then instructing the mount to home resulted in the mount not being it’s predefined home location.
Mobile App (Android)
Originally there was only Android11+ support but after raising a support ticket (support@pegasusastro.com) to request that the documentation state that the linked app only supported Android 11 I also requested a pre-Android 11 support. This actually appeared pretty quickly on the website so kudos to PegasusAstro for the fast response.
I do suffer regular disconnects from the mount when using the mobile app via the hotspot. I’m not sure why this is as I was sat right next to the mount, could be down to an idle time-out ?
I also see the NYX-101 disconnect from my house wireless router in Unity but could locate no reason why (DHCP lease was valid), I could find no entry in the Unity log files or see no reason on the router. Now this could possibly be either interference from other 2.4GhZ networks or down to the Aluminium casing, would an external aerial resolve this problem ?
There is no way to reconnect to the wireless other than shutting down Unity so as long as you have a USB connection then everything should continue working.
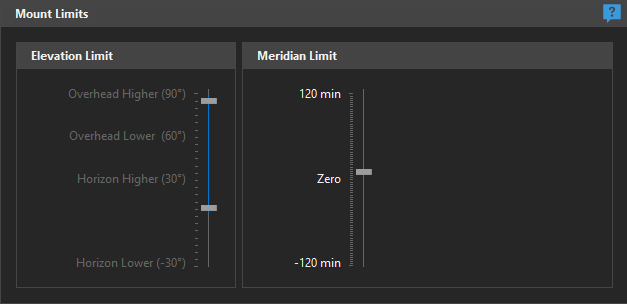
Mount/Altitude Limits & Meridian Flip
To begin with I set the meridian and altitude mount limits in Unity and then test the automated meridian flip using ASCOM simulator for the camera. Regardless would I did the mount would stop 10 degrees because hitting the Meridian. It slowly dawned on me that I had set the meridian limit to -10 which I thought was 10 degrees after the meridian but the value should have been +10 so it was actually stopping 10 minutes before the meridian ……. dooh !
Unity hard limits for Elevation & Meridian
Once I made the change then both NINA and SGPro performed the meridian flip just fine. There is also a switch to enable automatic meridian flip to prevent any potential crashes but I opted to leave this disabled so the mount would just stop tracking but NINA would continue taking new subs in both simple & advanced scheduler.
One item that would really help here in a text box with optional input to set either limits instead of having to grab the slider to see the current setting – I can query/set this in the API but it’s not easy to view and change using the slider method.
Polar Alignment
I used the polemaster software to perform a polar alignment but decided to utilise SharpCap to compare the alignment procedure and difference. Because SharpCap requires the scope to be slewed 90° so the scope weight was now on on horizontal the RA axis dropped causing the mount to shift and results in the PA being 4° off axis.
This would happen regardless even if I tightened up the axis bolts. Talking to another user he suggested at using a counterweight but to me this would negate the mount as a portable mount.
Guiding
Using the OpenPHD guiding reference document (link), it appears the that the harmonic gears have a period of 430 seconds with a periodic error of +/- 20 arcsecs or less. Two complete periods are required for the Permanent Periodic Error Correction (PPEC) before guiding any improvement will be seen, this is pertinent for the imaging train in use at the time. If you change the imaging target the model will re-initiate the PPEC learning cycle.
The recommendation is to set the guiding interval to 1 – 1.5 seconds and try to be within 30 arcsecs of polar alignment error. I certainly found keeping the FSQ85 setup to around 1.5 seconds resulted in better guiding graphs compared to 3 second intervals.
Support
After initially purchasing the mount I took my NYX-101 along to Astrofest 2023 (UK) for Evans to look at (by prior appointment) as I was not entirely happy with the resonance during slewing. I compared my mount against two other NYX-101 mounts in my astronomy society and it definitely sounded like it had been treated roughly during delivery transit. Although Evans did a great job to investigate the mount during the show, due to the noisy nature of the exhibitor floor it was not obvious that it had been resolved until I was in a quiet environment back at home.
On contacting PegasusAstro I was offered to have the mount picked up by DHL and couriered back to Greece for inspection. The whole process from DHL pickup was professional from picking up to receiving the mount back, the service was excellent and he mount was backed with me 7 days later. The courier communications was good but I received no notes or communication on what was done (board serial number was the same) under I enquired. The most important thing the mount operation was much better and more akin to the other two reference mounts I had listened to; my gratitude to Evans and the team for their patience with me.
It had been reported on various forums that the ZWO ASIAir had suddenly stopped working with the NYX-101 and some heated speculation quickly arose as to the reason why this occurred. ZWO was quick to dispel any conspiracy theories and rightly put their hands up and stated it was a bug in ASIAir software (link) which would be resolved in the 2.1 beta release (you will also need the latest firmware). Kudos should go to ZWO for setting for the story straight and resolving the issue to the benefit of the astro community.
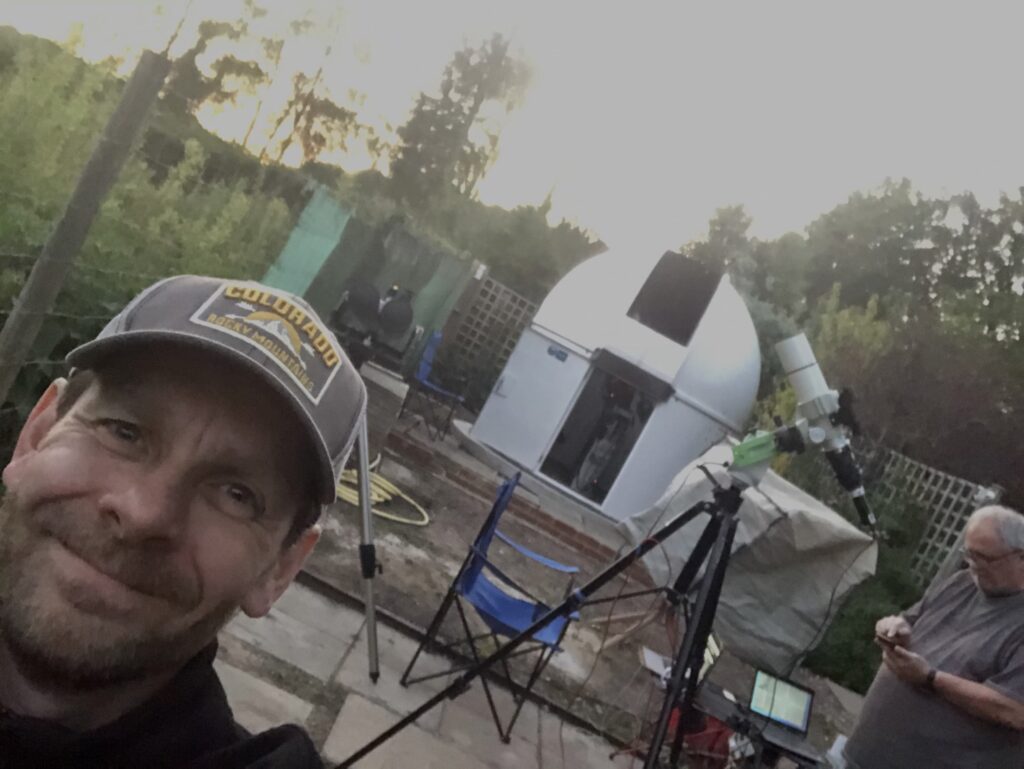
First Light Use
So Dave asked me to come over to the observatory for the evenings of 26th & 27th so I could do a test run on the kit I would be taking to Tenerife later that Summer. At this time the M101 Supernova SN 2023ixf so I decided to image it alongside Dave using his 17inch RDK and Bob’s 24 inch RDK.
Using the QHY Polemaster I noticed that when I rotated the mount for alignment that the chosen calibration star moved away from the rotation circle – is the mount slightly misaligned ?
The guiding document available here were extremely helpful in testing out various settings. Certainly I was seeing some trailing around 3 seconds but that could have been due to the PA issues or balance. I ended up using Predictive PEC and setting the interval to 1 second just to see what would happen. I still noticed large variations every now and then and it was not as smooth as I’d hoped for.
Slewing to a target after plate solving it was clear that the mount had moved outside my FoV at first slew. This was unusual for me as my CEM60/NEQ6 first slews were always in the FoV, this issue may be related to an situation observed by Chris Woodhouse and can be rectified by following his forum post.
Chris asked me to confirm his experience of overshoot when slewing in the DEC axis causing the target not to be in resulted field of view. Chris had raised a support ticket for this issue and PegasusAstro were investigating.
Closing Thoughts
The NYX-101 is more expensive that the competing ZWO AM5 but the NYX-101 offers more weight carrying capacity (20 Kg versus 13 Kg without counterweights) and compatibility with those already own QHY Polemaster, SW NEQ6 or similar tripods.
The direct open API (REST) via Unity or access via ASCOM Alpaca allows me to query components and it’s easy to script up web status pages quite easily.
If you only ever plan to use light imaging equipment and are already invested into the ZWO eco system then the AM5 might make more sense but if you wanted to use other vendors equipment then for me ZWO is a closed ecosystem with limited flexibility.
If using USB3 cables for any equipment such as CCD/CMOS cameras then it is wise to invest in a high quality shielded cable as USB3 tends to have issues in the presence of 2.4GhZ. I used 5Ghz wireless from my Mele Quieter3c mini PC to avoid this problem but I would advise to use good shielded cables in all situations.
I’m looking forward to taking the mount on the upcoming trip to Mount Teide, Tenerife to see how well it performs under dark and clear skies 😀
Wishlist
The following wishlist is based on my experience of using the NYX-101 alongside the Ultimate Power Box v2 (Firmware 2.4) and NYX-101 (Firmware X.Y.Z) via the Unity software (1.9.1825.32) :
Would be nice to see dust covers provided in the box for all the various ports on the back of the mount.
An external aerial port might be useful for the included ESP32 wireless connection ?
An option to power other Pegasus items such as the UPBv2 from the aux power port on the mount ? This would mean that then I would only have one cable going up/down from the scope to the mount which is especially useful for those who are mobile and don’t use the NYX mount in a permanent setting.
Include a hand controller in the default offering or document compatibility with any existing hand controllers. Could utilise the USB port instead of relying on the ESP32 internal module ?
Display the MAC address of the ESP32 module in the Unity app (wi-fi network tab) so it’s not necessary to hunt for it in the router’s client connection pages.
A disconnect/reconnect button for an existing wifi connection definition.
An editable display box for both the meridian and altitude limits where I can enter the desired value as I can only know what the settings are by actually grabbing the sliders or reading/setting the position from the REST API.
API call to set/get horizon & meridian limits as a profile similar to the location. This would allow the user with different scopes/piers/tripods to store different hard horizon/meridian and auto meridian flip settings.
If possible add a NYX-101 uptime value to Unity and API similar to other products like the UPBv2 to show how long the NYX-101 has been powered on.
If possible add a timer field to the wireless tab to indicate how long the mount has been connected to the configured wireless access point and/or the USB connection.
The NYX-101 health status in Unity sometimes doesn’t not render correctly on smaller/different aspect screens between Unity releases such as a Dell 13.3″ laptop.
API call to provide NYX-101 health status if the information is not already available via other API calls.
API call to indicate if a new firmware (inc version) is available as it is indicated in Unity ?
A changelog history for NYX-101, Unity & UPB between versions.
Update
As of May/June 2023 there is now a XT60 cable available to run from the AUX port to run to the UPBv2 and now I only need an adapter cable to fit my 10 Amp PSU with a XT60 connector.
14th June : Firmware 1.21 released by PegasusAstro and the patch notes show this release fixes the DEC axis overshoot experienced by Chris Woodhouse :
DEC motor accuracy improvement during slews. In previous firmware declination axis tends to overshoot.
Wi-fi hotspot channel width was reduced from 40MHz to 20MHz to improve channel data integrity.
Wi-fi hotspot can turn ON and OFF.
Wi-fi hotspot channel can be selected from 1 to 11 (11 is the default).
Reset home is not allowed when mount is hard encoder limit.
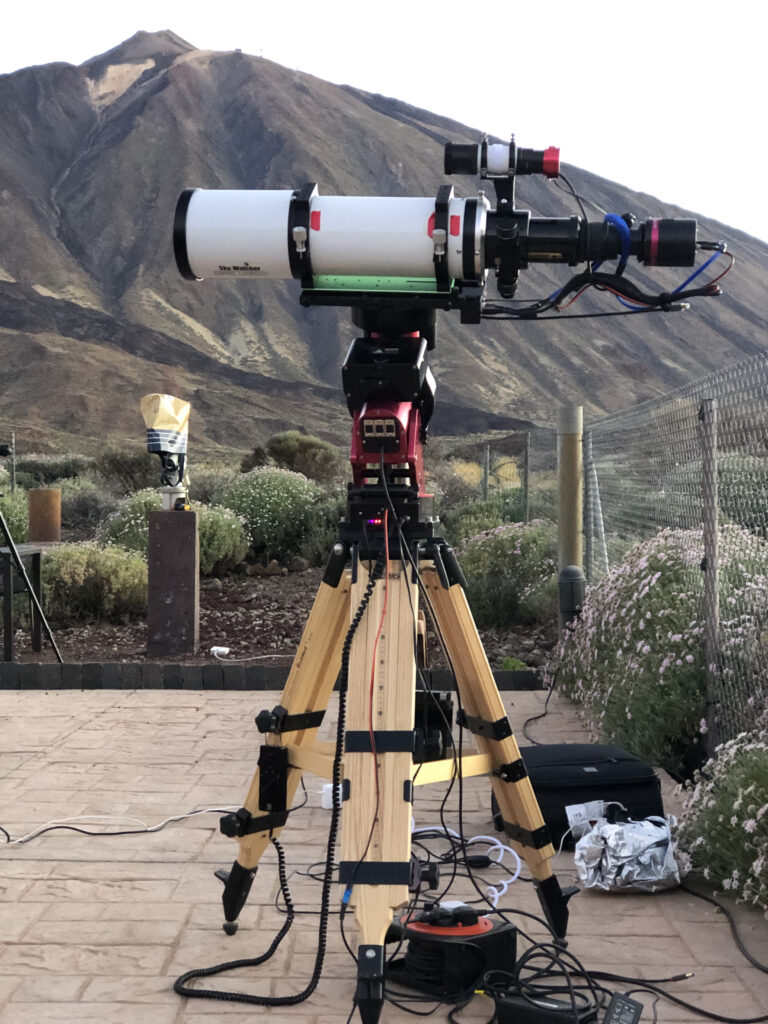
DSW invited me over to the IMT3 observatory for an imaging weekend to image M101 and the recent supernova2023ixf discovery. DSW was using the 12inch RDK and I decided to put the FSQ85 on the Pegasus NYX-101 to test out the setup ready for our Tenerife trip to Mount Teide.
I ran the QHY268C at high gain mode, gain 56, offset 30 and -20℃. I finally managed to cure the noise banding I was experiencing on the QHY268C but using a fully shielded high quality USB3 short length cable that I run from direct to a Pegasus UPBv2 that sits on top of the scope.
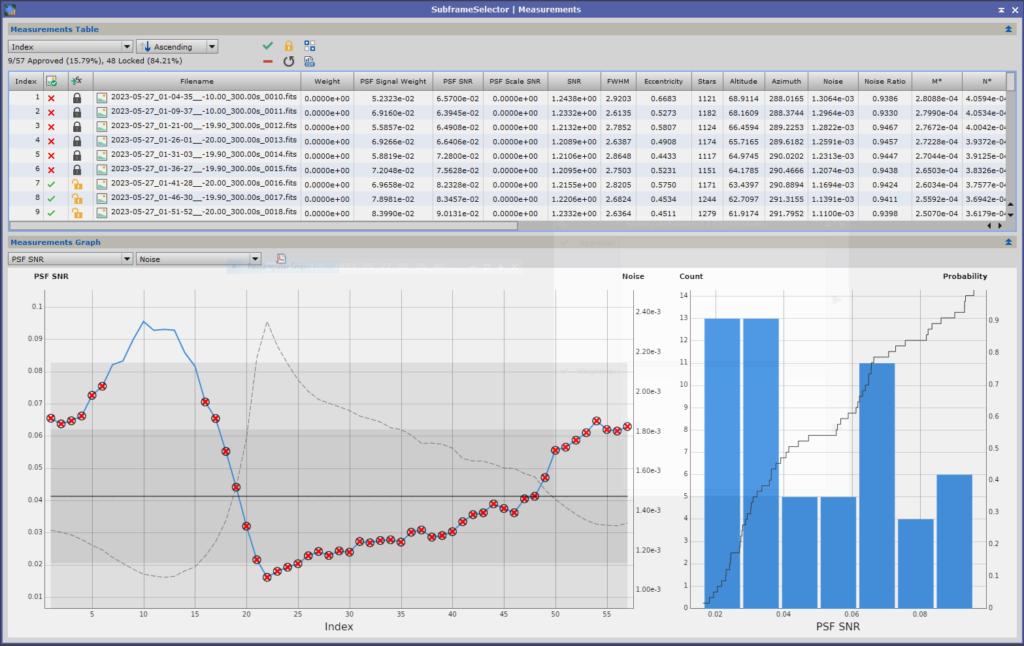
Although it’s mid summer and the Moon was bright and approaching full the phase, the sky conditions on the first night appeared to be okay at first sight. Before processing I decided to check on data quality via the blink module in PixInsight it was obvious that they were a lot of unusable subs due to high cloud and using them would have ruined the quality of any resulting stacked image.
Running the data stack of raw images through the PixInsight Subframe Selector to analyse the PSF SNR versus noise it clearly shows that I could only use 7 frames (35 minutes) didn’t drop below 0.08 from night one whilst all the data from night two should go straight into the bin along with most of night one 🙁
Pixinsight SubFrameSelector
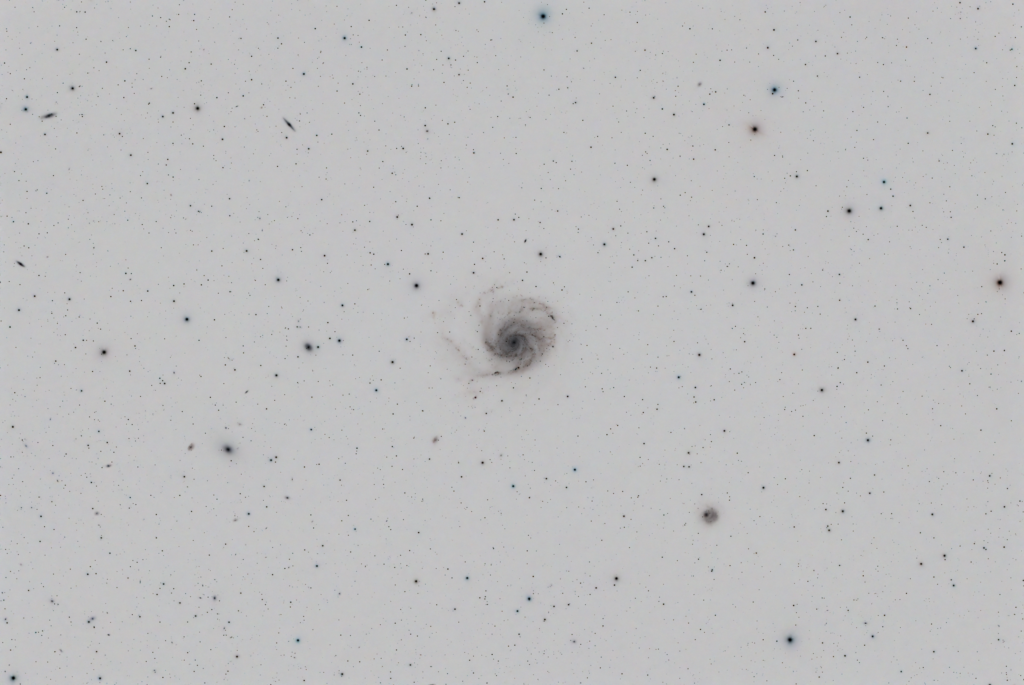
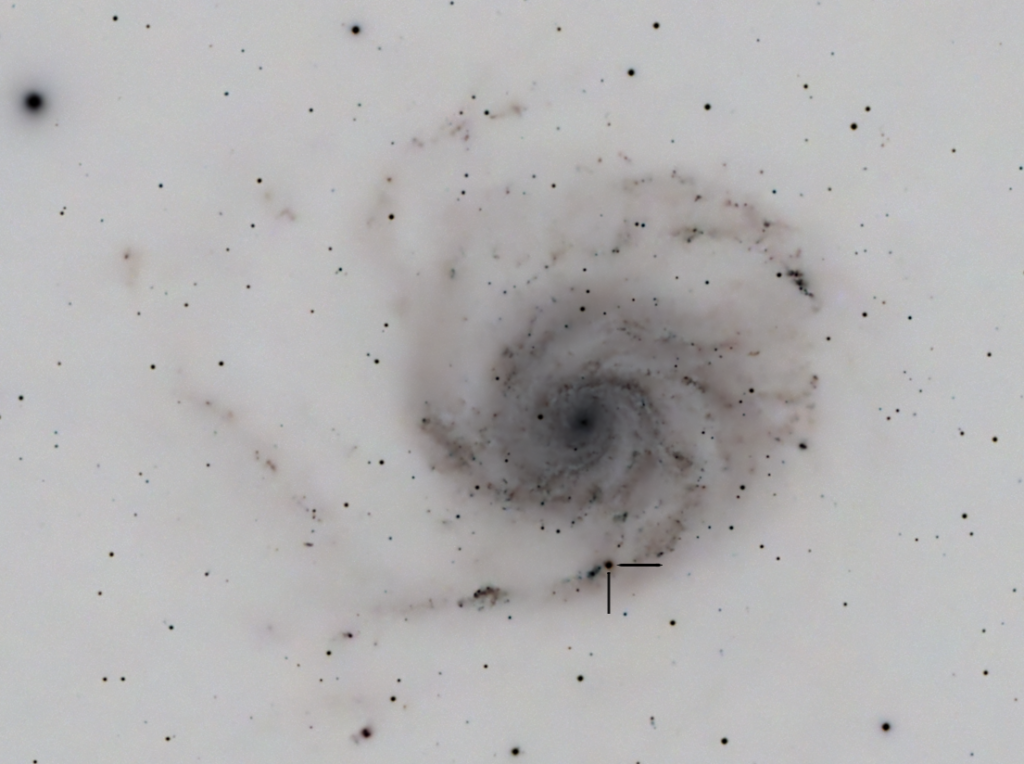
Given I don’t have enough data to do the end result justice due to my poor PixInsight skills I decided to invert the images – I really should subscribe to Adam Block Studios (Shout out !)
Inverted image of M101, supernova 2023ixf and surrounding area
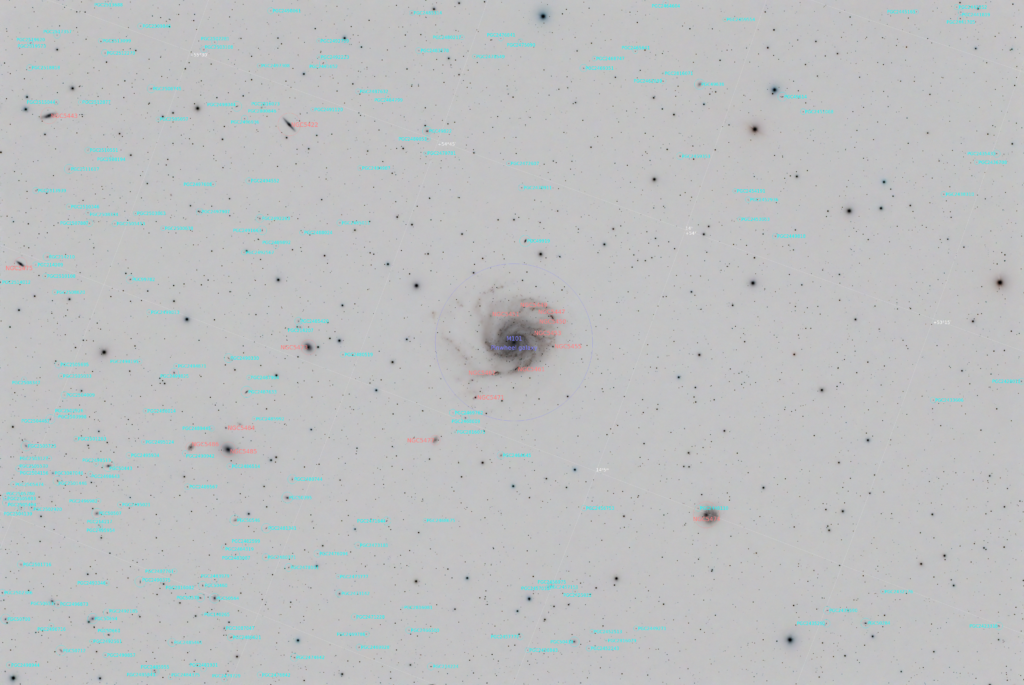
Running the AnnotateImage Script labels the various galaxies in the image which I enjoy looking up to see which type they are, magnitude and how far away they are.
Annotated FoV for area around M101, supernova is not labelled
Zooming in to M101 to see the Supernova better, it is located to the right of NGC5461 and indicated by the two arrows.
M101 with SN2023ixf indicated by the arrows
Light Curve
The AAVSO have a light curve plotted from measurements submitted by amateurs, just enter “SN 2023ixf” and submit here. It was still around 11th magnitude on 18th June but there does appear to be a slight decline in the brightness curve.
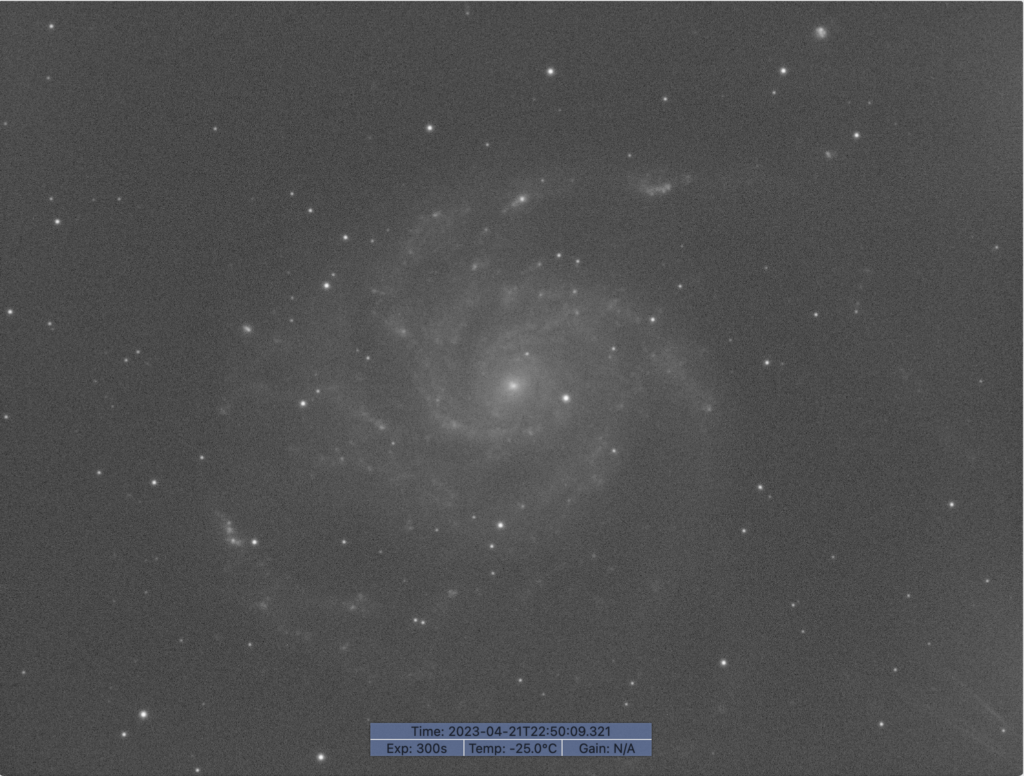
M101 for me this evening to try and get there RGB data in one night. GingerGeek has come round to test out his travel setup, he has a Takahashi FSQ85, QHY268C and the Pegasus NYX-101 harmonic mount.
Focused at 20,105 on Luminance so RGB will be 21,105
1 x 300s Red
Taking 2 minute exposures for each colour at -25℃. I then realised 5 minutes is so much better. So at 1:30am I then started exposing at 5 minutes with the plan to combine both data sets. The SkyX worked brilliantly as can be seen below, looking after the guiding and image capture.
The main challenge I had early on was the the dome shutting unexpectedly. I will attempt to find out why over the next few months. The camera noise continues to be an issue but less so tonight so I think it may be USB related, again I will troubleshoot and check there cable lengths.
GingerGeek had a productive night troubleshooting a multitude of problems on his untested travel kit and was pleased with the results including taking his first image of a supernova in M101.
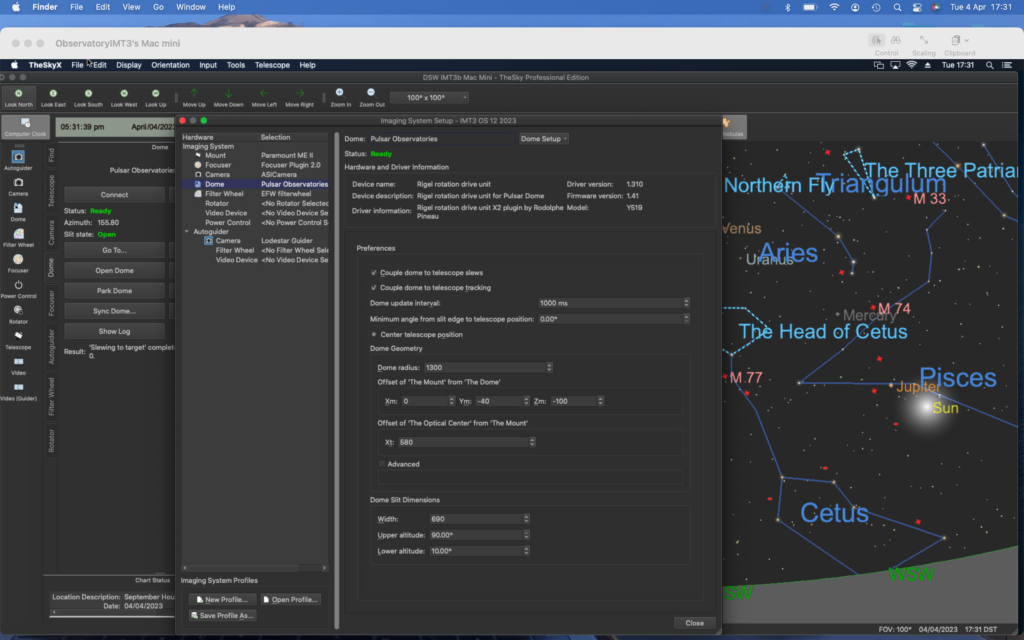
Before sunset I wanted to reset the dome parameters in TSX as these had got corrupted since loosing the NUC. I now have a set of working settings.
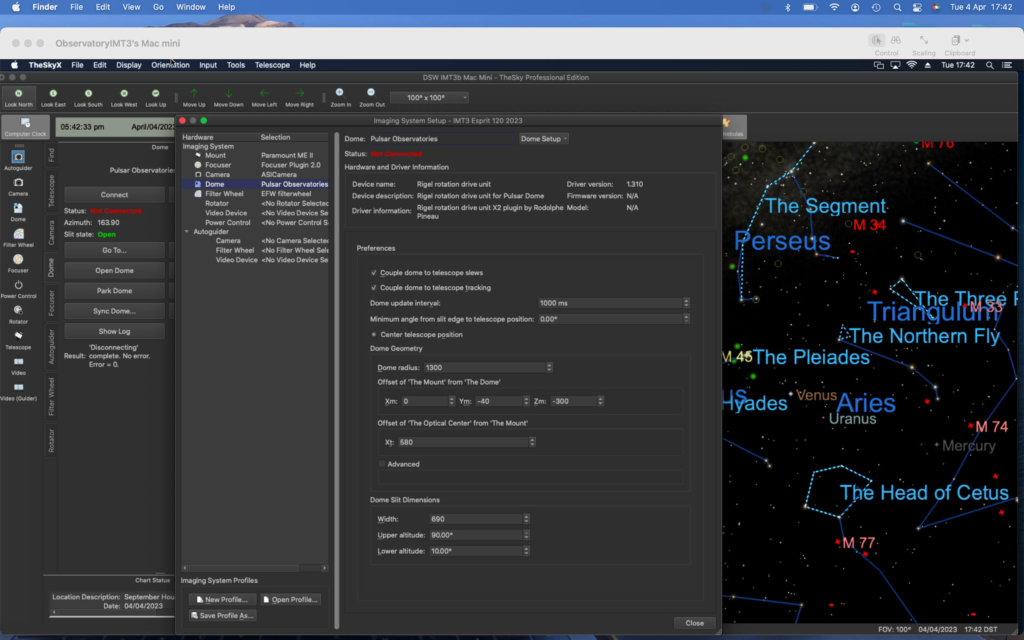
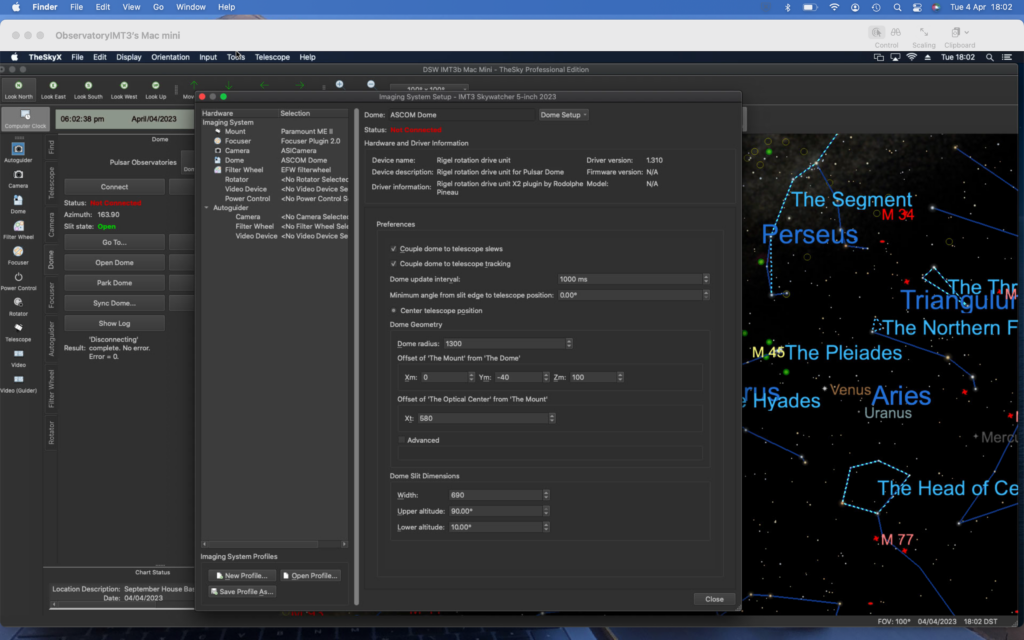
So I have managed to get the dome rotation working. The settings can be seen here for the OS12 and are documented for the other 2 scopes which are piggybacked in my TOSA manual.
OS 12″ Dome Settings
Skywatcher 120 Esprit Dome Settings
Skywatcher 5″ Dome Settings
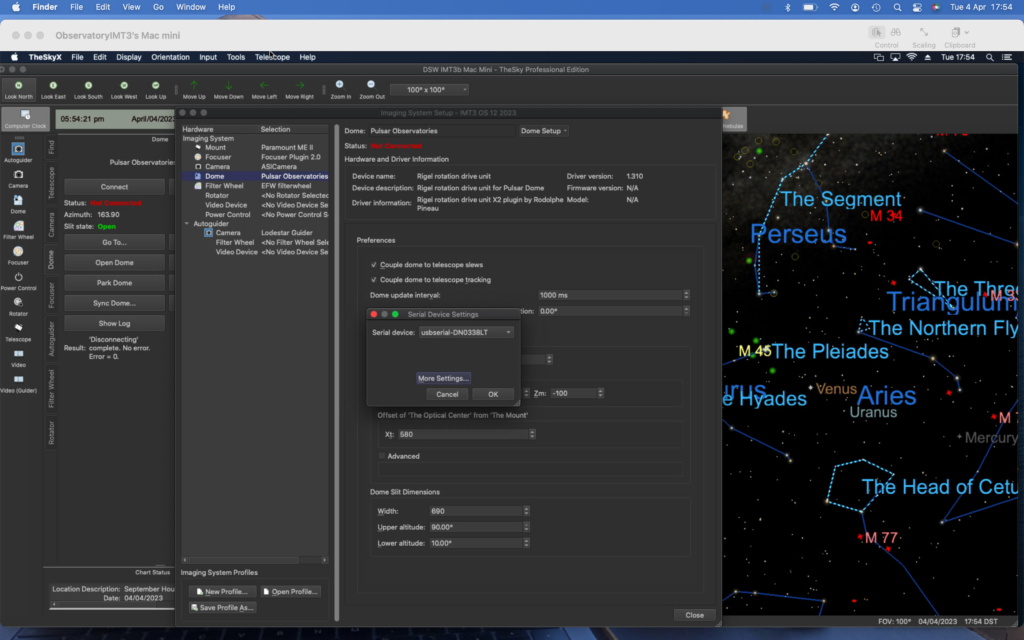
Serial Device used for Dome
Unfortunately the night did not produce any images as the last thing I could not get working was guiding, I will take and look tomorrow. The main problem was I could get TSX, PHD2 or a 3rd party piece of software to calibrate the guider.
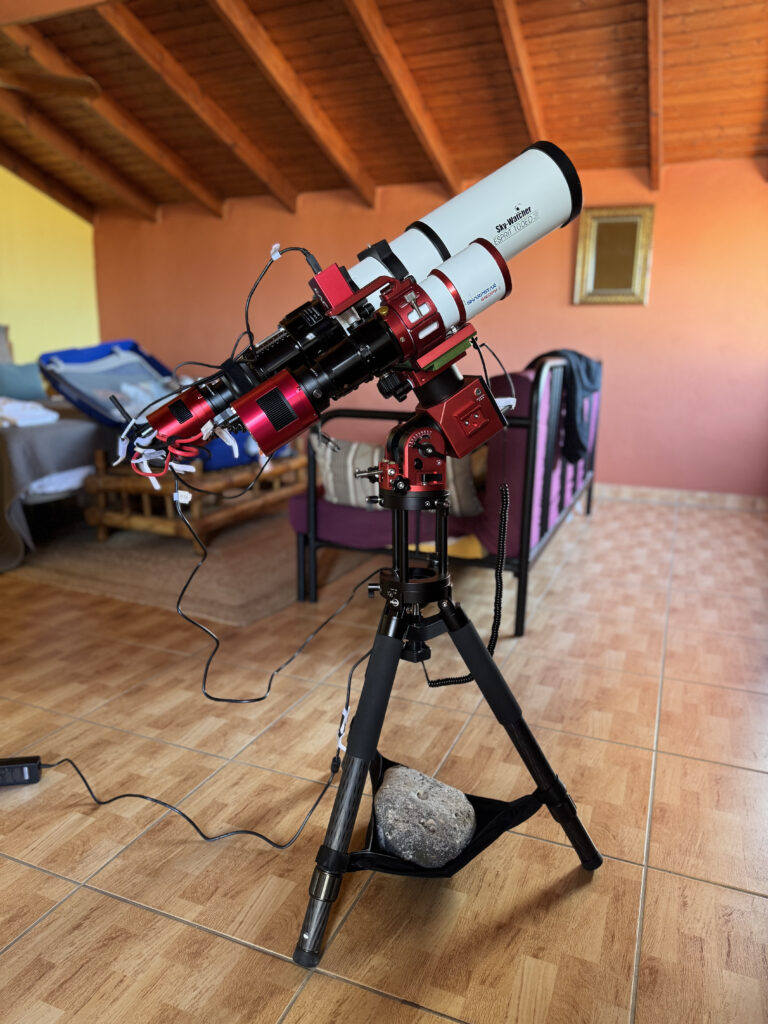
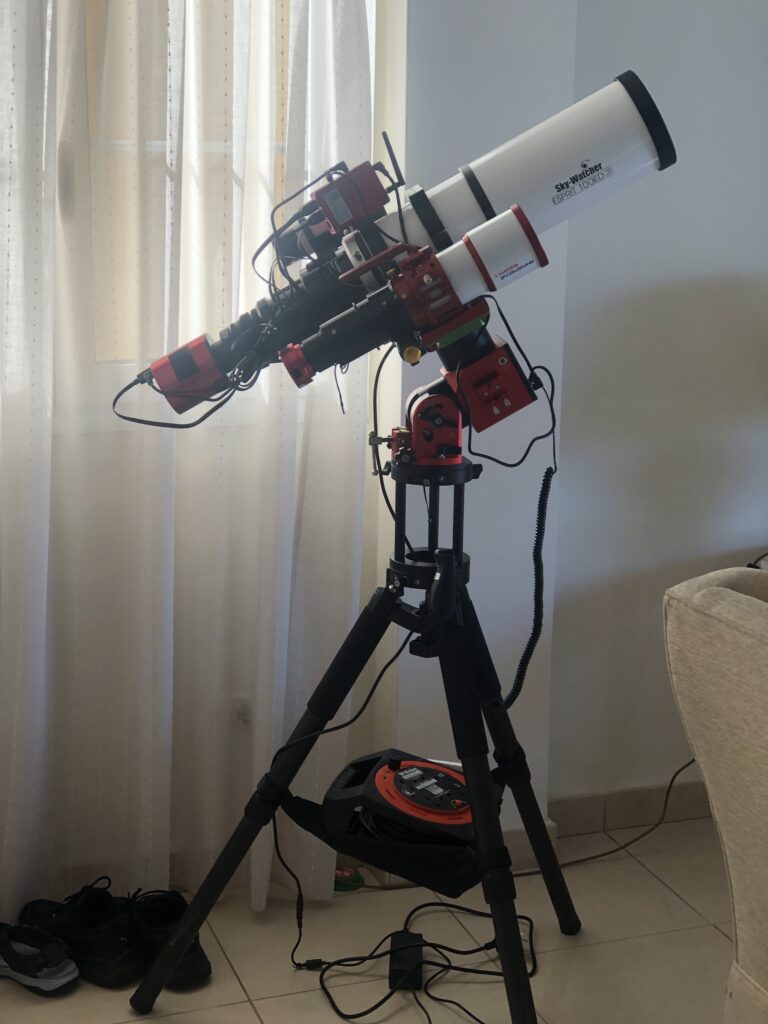
A week with the family in Tenerife afforded me the opportunity to test out for the 2nd time this year the Skywatcher 100 Esprit on the AM5 harmonic mount with the ASIAIR in control and the ASI2600MC with a new Antlia Triband RGB Ultra filter.
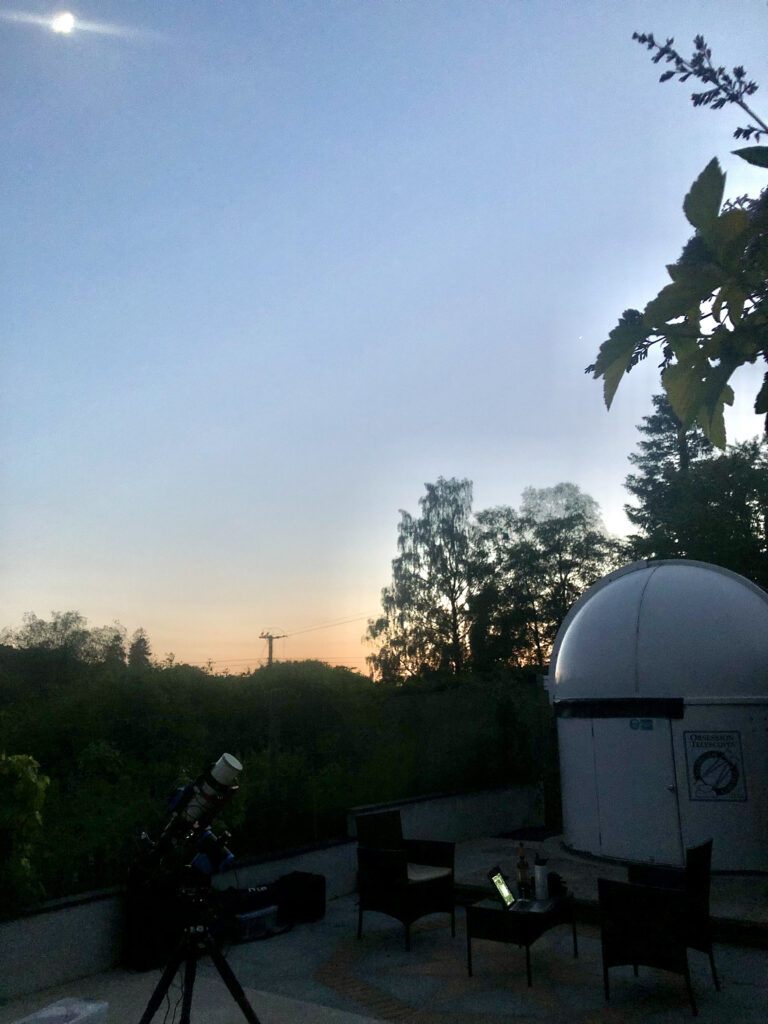
Travel Rig
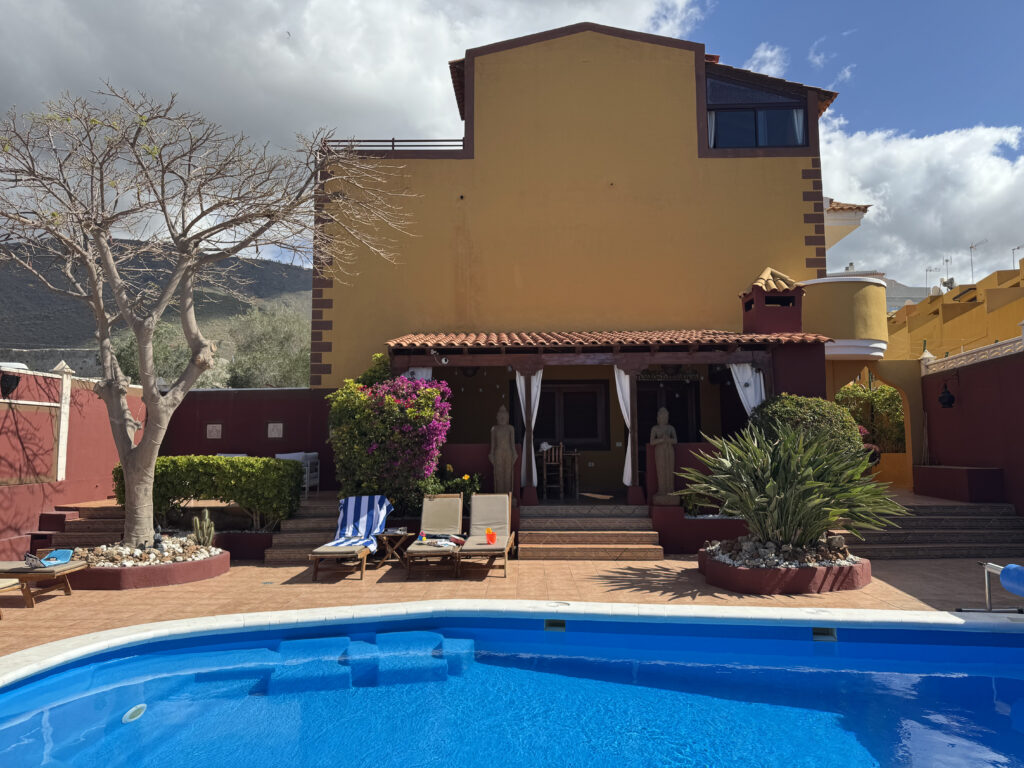
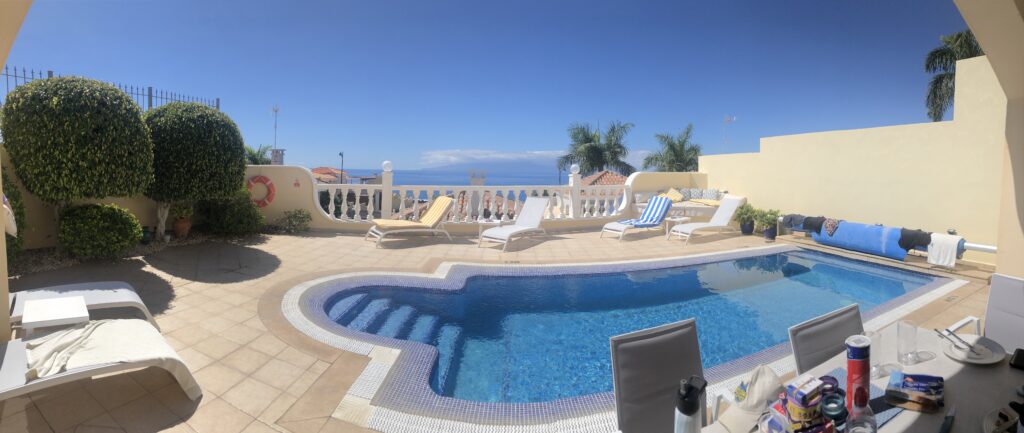
Over the period of the week I picked 2 nights when I wanted to observe. Because of the clement environment of Tenerife and the Canaries and unlike the UK, you can decide when to go out and image as almost all nights are clear, the weather warm, around 22 deg Celsius and the bed not that far away from the pool. Given when we were on holiday which was decided around other activities, the Moon phase was Full.
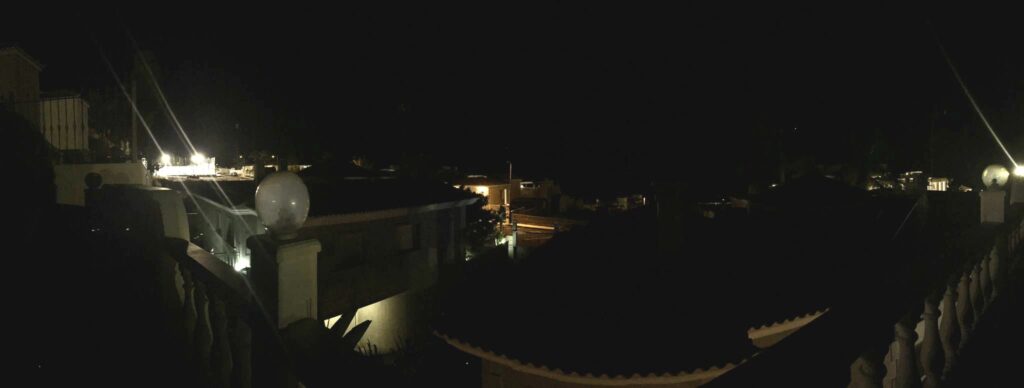
Night time flood lit pitches
The one problem with renting a villa is when the owners will not pinpoint where on a map it is. There is normally a reason. In this case it was because of the proximity of the local sports buildings. A swimming pool to the front of the villa including a floodlit pitch and 2 more flood lit pitches to the left and right of the villa at the rear.
Impact of flood lighting
So yes it was bright, very bright, as can be seen on the villa party wall.
Full Moon and Floodlights
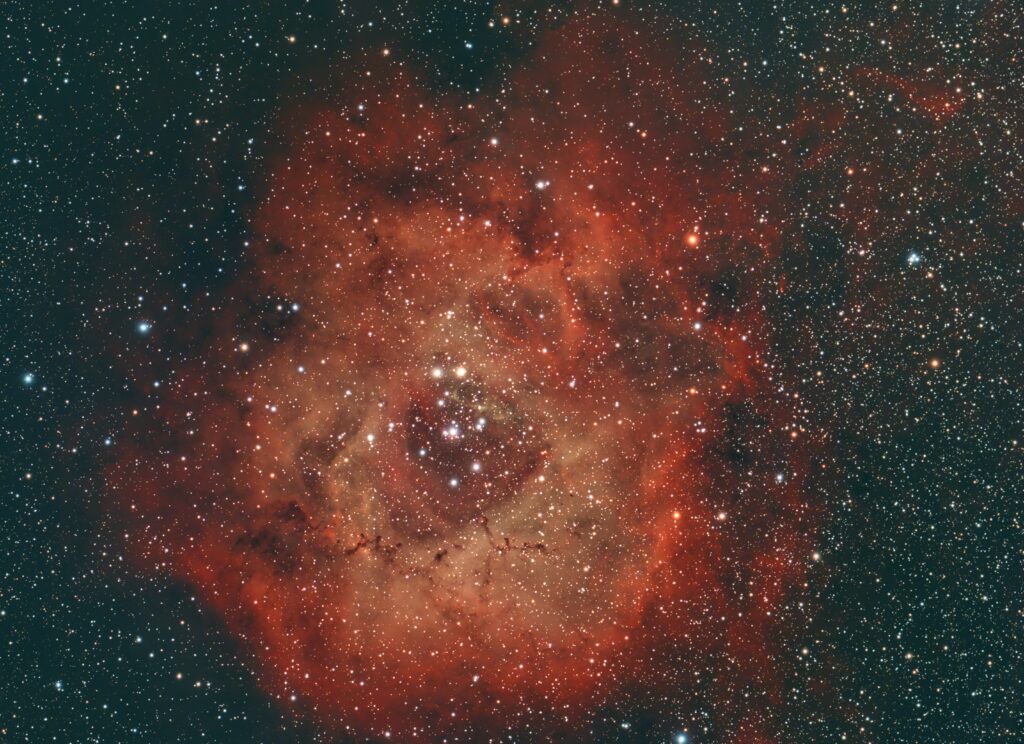
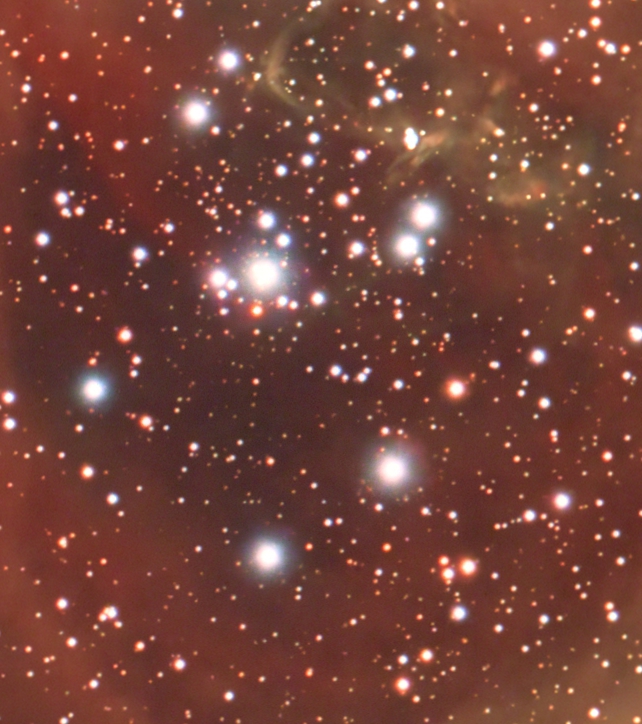
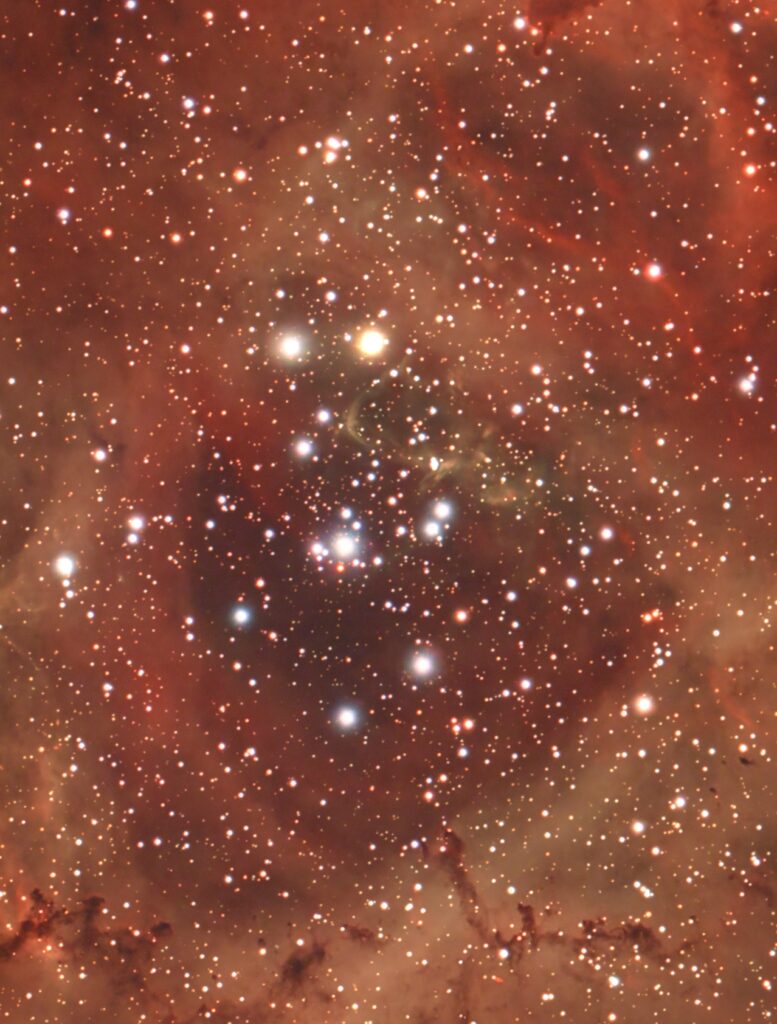
So given all that light pollution I was then pleasantly surprised how well the final image came out of the singular target I chose. NGC 2244, the Rosette Nebula.
NGC 2244 Rosette Nebula – 6 hours
I exposed for some 75 x 300s over the 2 nights. All the images were on the West side of the Meridian to make it easier without a flip.
Crop of cluster
I found stacking 75 images instead of just the first night of 30+ images gave a much smoother background and nebula, much less noise and easier to work with the data.
Wider crop including dust
So not a bad photo for Full Moon and 3 flood lit pitches. I look forward to testing out the kit at the top of the mountain later in the year under New Moon dark skies.
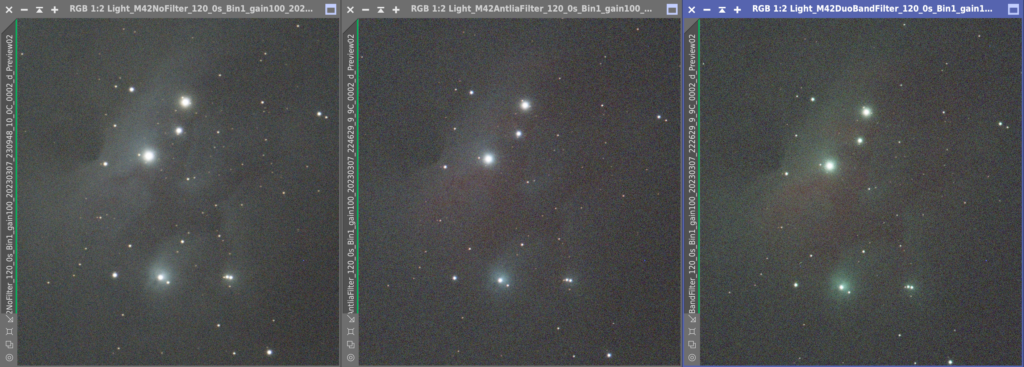
I wanted to compare 2 filters this evening as I have recently purchased the new Antlia Triband RGB Ultra filter. The original filter I had for the one shot colour was the ZWO Duo-Band filter.
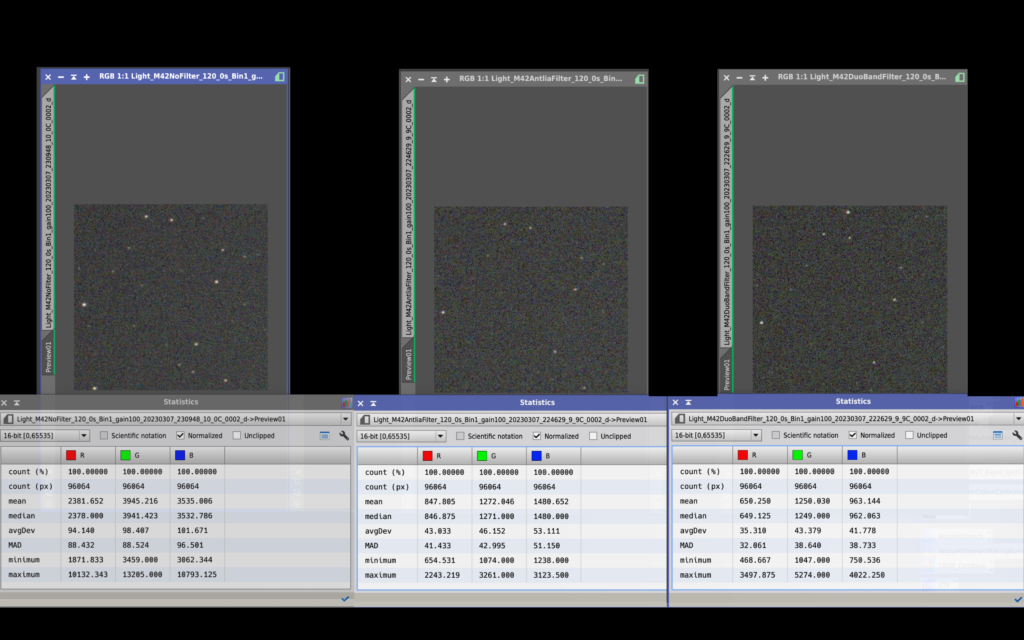
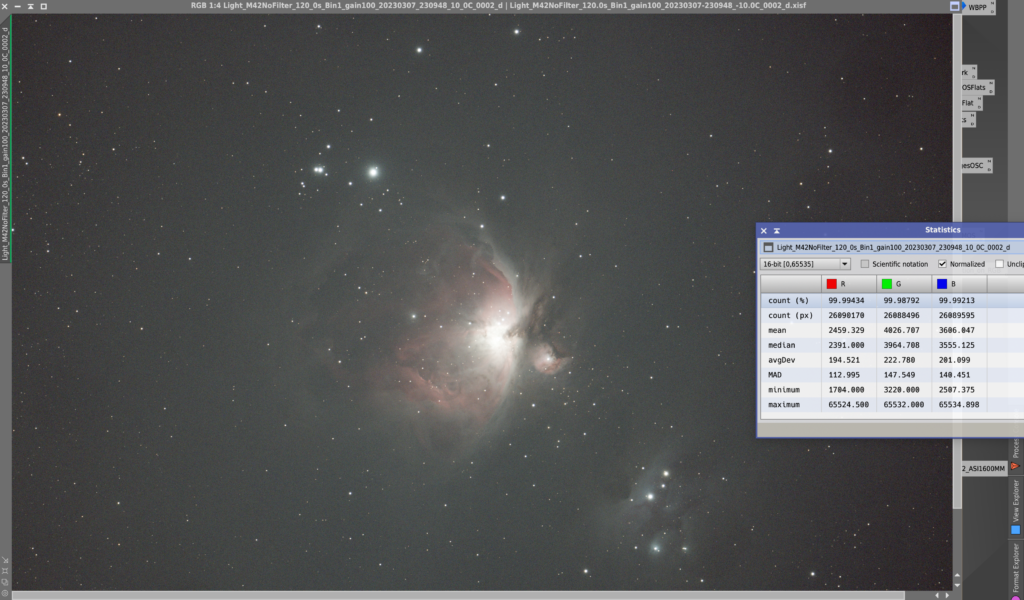
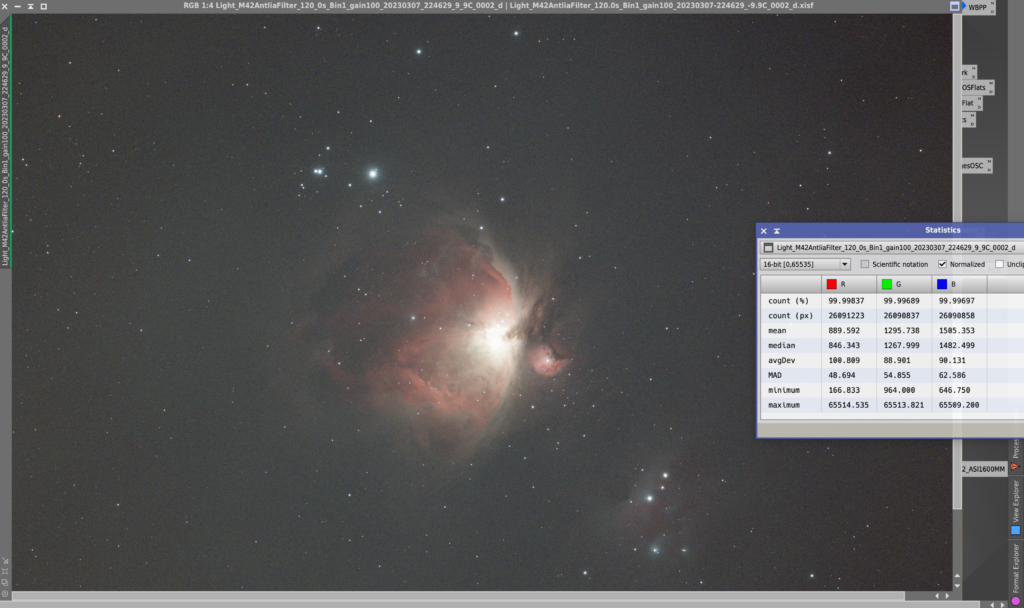
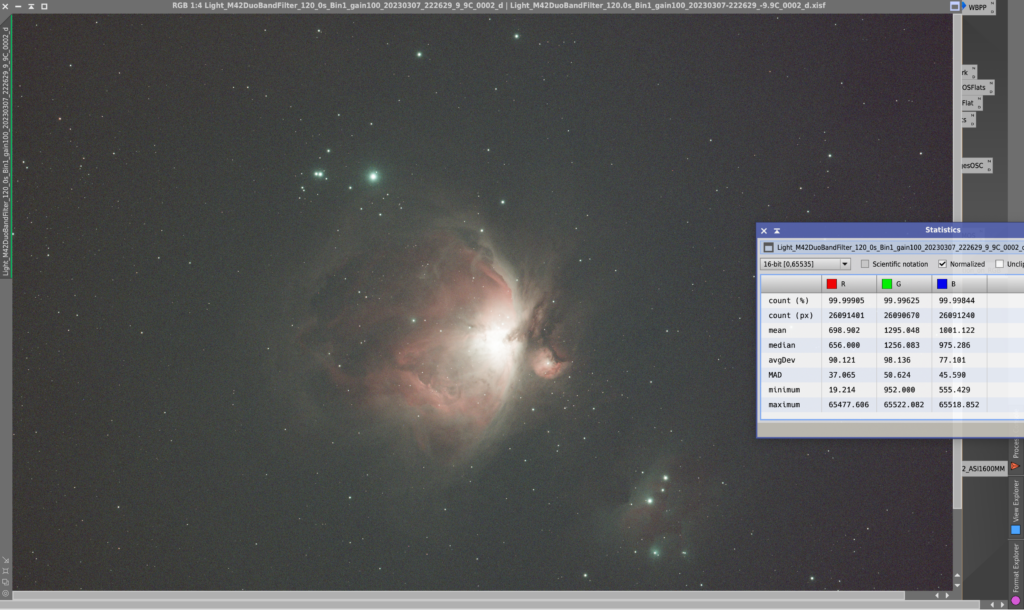
M42/M43 Filter Comparison
As can be seen above the difference without a filter is quite dramatic (Top – No Filter, Middle – Antlia Triband RGB Ultra, Bottom – ZWO Duo-Band). There is more broadband light captured. The red nebula is less apparent and the background sky is much brighter.
Running Man Nebula Filter Comparison
The above image from the running man nebula, NGC 1977 demonstrates that without a filter a reflection nebula comes through best (Left – No Filter, Middle – Antlia Triband RGB Ultra, Right – ZWO Duo-Band). The ZWO filter gives a more green image over that of the Antila, which in itself reduces the reflection nebula but does start to pick up some of the red emission nebula within the Running Man.
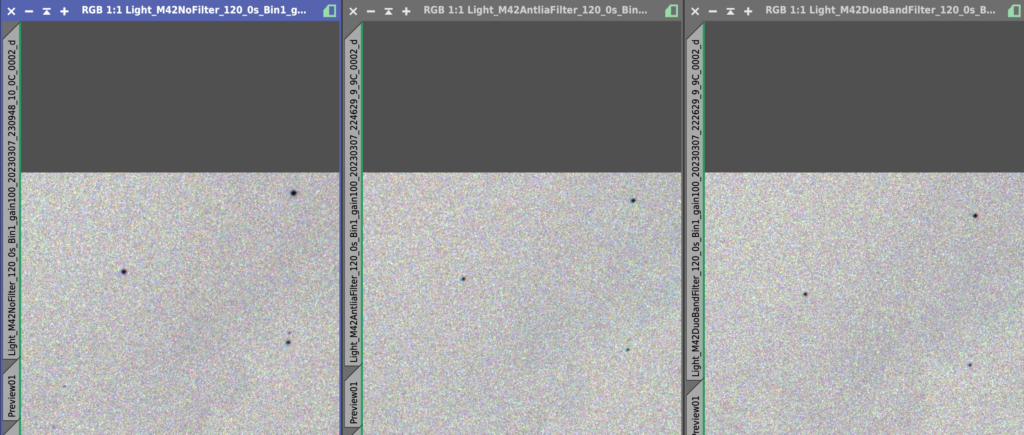
Inverted background sky and stars
The inverted background above gives a sense of the reduction in star luminance that is allowed through without a filter.
This image shows the background with the details of the readout from each of the pixel across the colour channels. Here you get a sense of the green seen in the ZWO filter is less the extra green coming through, moreover the lack of blue being allowed through. Without a filter the background sky is swamped with all colour channels.
With no filter the full effect can be seen above, much brighter background, nebula less colourful and less detailed.
With the Antlia filter above, the final single image I personally find is much more pleasing.
Finally with the ZWO filter you can see quite clearly the green effect.
So in summary I would say the ZWO filter is better than no filter except when imaging reflection nebula, however the best filter is the Antlia filter when paired with my one shot colour ZWO ASI2600MC camera.
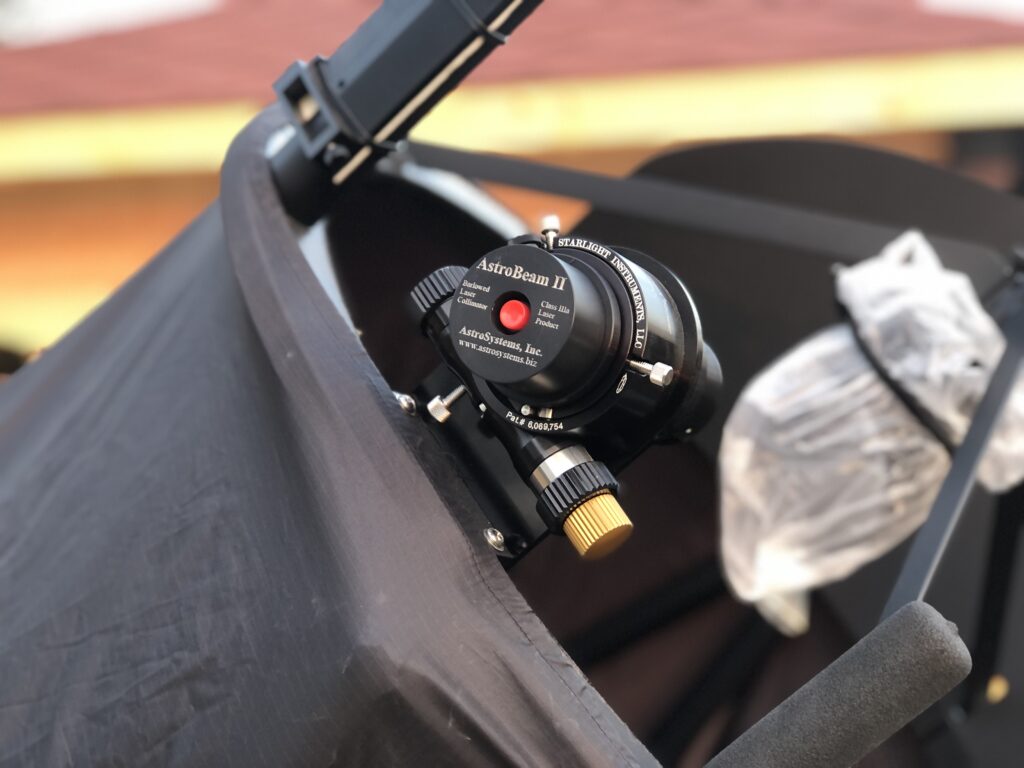
Below is a random drawing of a scientist with a Tak laser beam.
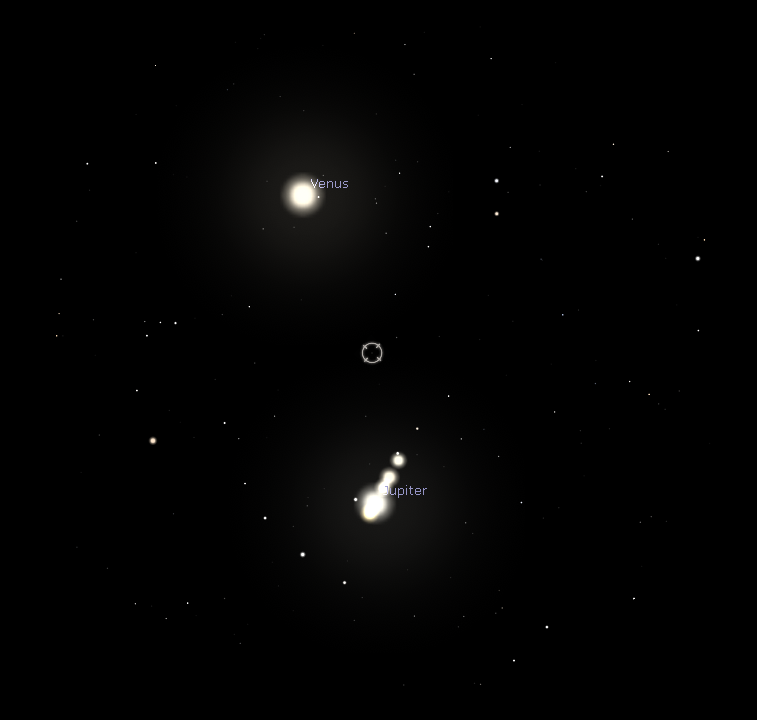
At 18:15 I decided to grab the SkyWatcher Heritage 150 baby Dobsonian and setup it up in the back garden to view the Moon and the conjunction of Venus & Jupiter that were following the setting Sun in the West.
My neighbour saw us in the garden and asked if he could pop over and take a peek. In the 25mm eyepiece we could fit Venus and Jupiter in the same field of view. Venus was way too bright for me to see the slight phase (85.5%) but with Jupiter the two main belts and three moons were clearly visible. In the 10mm we could make out the main four moons with ease.
25mm simulated view (credit Stellarium)
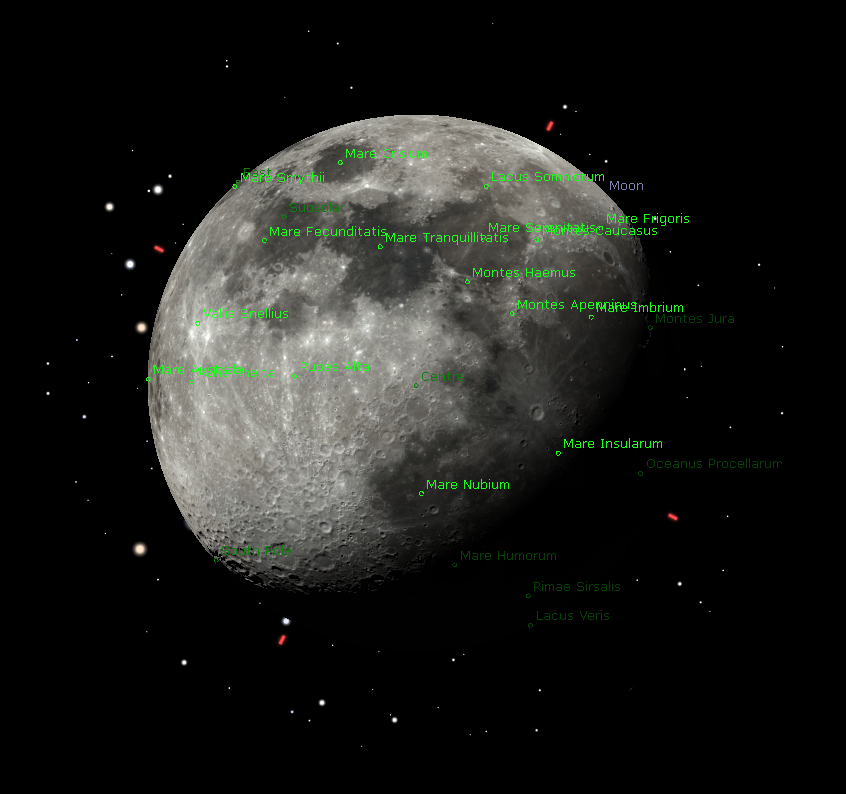
Moving to the Moon we used both the 25mm and 10mm eyepieces to view the craters on the shadow terminator. We tried to grab a mobile phone picture but the baby Dob really isn’t up to the task and all attempts were disappointing.
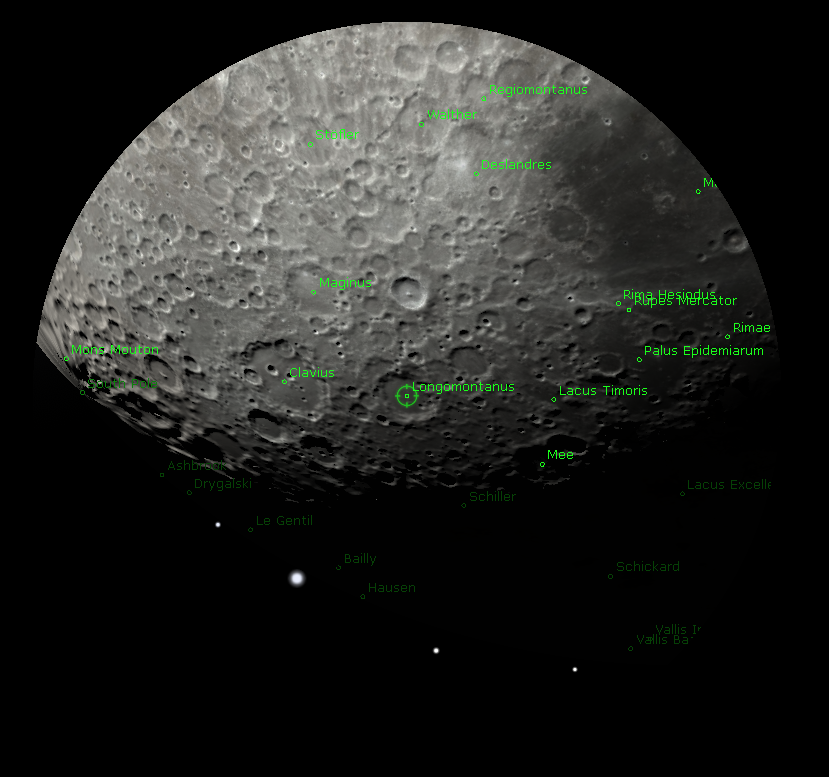
10mm simulated view (credit Stellarium)
Using the Televue x3 barlow and the 10mm we could see craters in the shadow terminator nicely along with Clavus and the craters within.
Although the baby dob is great for grab and go I feel that SW 8-inch Dobsonian with a really good eyepiece would have done Jupiter more justice but hey the views were good enough and the experience enjoyable.
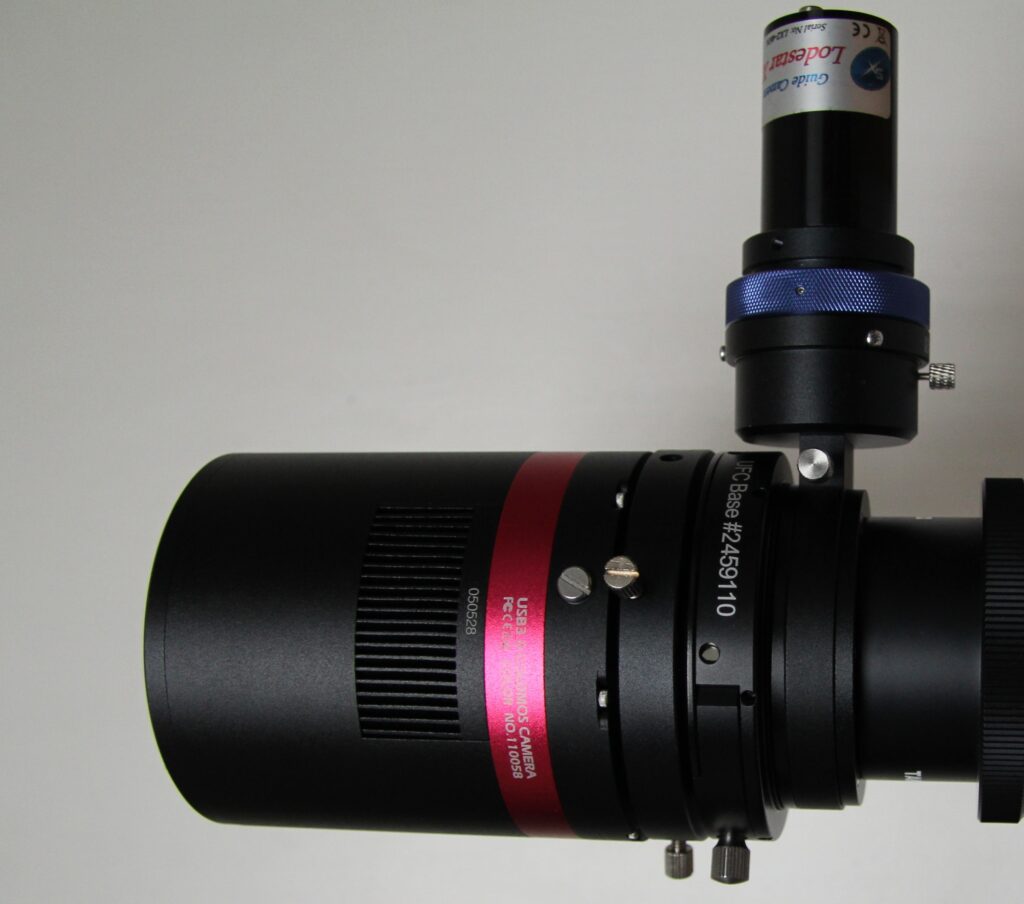
My current setup for OSC on the Takahashi FSQ-85 uses the QHY-OAG-M and the various QHY metal spacers which you screw through the OAG onto the CAA that fronts the QHY286C.
However, I’ve never liked the screw adapter approach for this sensor as unnecessary back focus is wasted due to the weird CAA to QHY286C not being a screw thread. The lack of an IR cut window on the QHY268C sensor means I need to sit an additional filter in the QHY 020055 M48 (F) adapter, in order to change the filter I would have to take the imaging train apart to remove it !!!
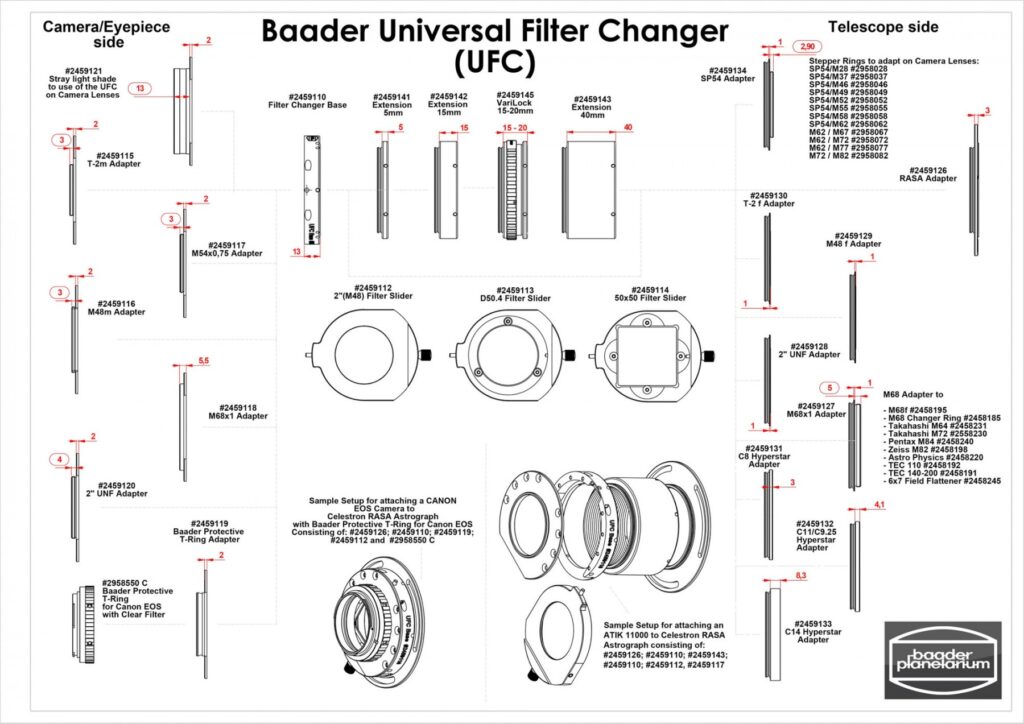
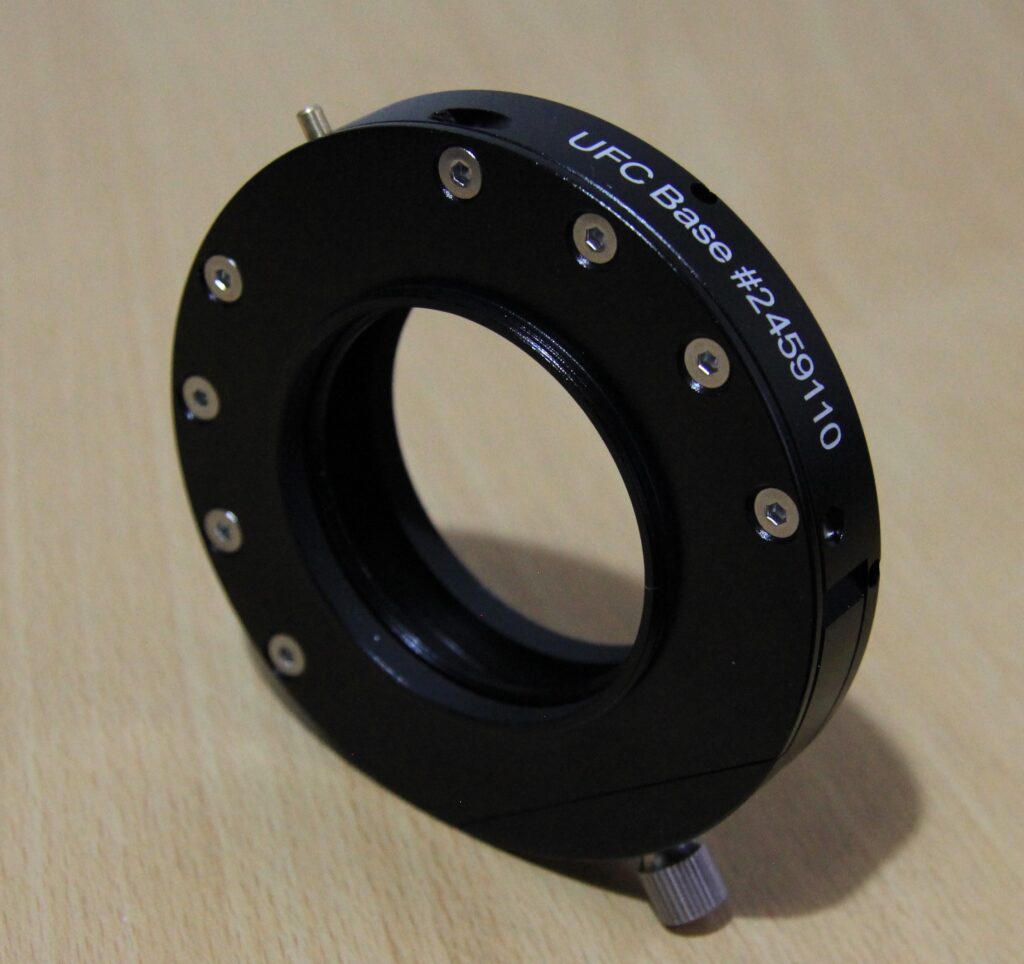
Baader Universal Filter Changer
Enter the Baader Universal Filter Changer (UFC) , the chart below details the core base changer alongside the adapters required to match to most common setups.
You can purchase additional sliders than can hold 50mm, unmounted and threaded 2 inch (M48) filter. The slider is magnetic so it will not dislodge during slews or during scope assembly or disassembly.
The 4 assembled components of the Baader UFC
Proposed Set-up
The Takahashi Flattener (TKA37582) has a metal back focus distance of ~56.2 mm so I need to get close to that but being under that distance is better than being over as I can add additional spacers if needed. The effect of adding a 2mm thick 2-inch filter decreases the optical backfocus by 0.6mm (2mm/3) so I will need to add 0.6mm spacing to account for the filter effect which results in a total distance of ~56.7mm.
Order
Component
Thickness (mm)
1
QHYCCD QHY268C CMOS
17.5
2
QHYCCD CAA M54(f) (#020002)
6
3
Baader UFC M54(m) camera side adapter (#2459117)
2
4
Baader UFC base (#2459110)
13
5
Baader UFC SP54(m) telescope side adapter (#2459134)
1
6
QHYCCD OAG-M M54(f) (#020079) adapter
3
7
M54 Metal Spacer
0.5
8
QHYCCD OAG-M
10
9
QHYCCD Metal Spacer
0.4
10
QHYCCD OAG-M M54(f) adapter
3
11
M54 Metal Spacer
0.3
12
Baader M54 x 0,75 Inverter Ring
0
Total
56.7mm
New Imaging Train
I should now be able to change filters much easily albeit at an additional cost but the flexibility should be worth it. Of course I will need to test the star shapes in the field to make sure that I have the correct back focus and add extra distance if needed.
Vendors
The majority of the Baader UFC components were purchased from FLO (First Light Optics) and the remaining adapter (#2459134) from Tring Astronomy. Delivery and communication by both vendors was great, shame about the Royal Mail industrial action messing deliveries about during the Christmas holiday.
Thanks
My gratitude to Stuart1971 from StargazersLounge who helped me with suggestions to try to sort out the QHY268C noise banding issues.
So after ages I’m planning to perform some imaging after being challenged by Dave to produce a OSC image of M31 with the QHY268C that can be of print quality.
The first step was upgrading all the necessary software to make sure both the NUC and laptop would not be interrupted during my planned imaging session.
Windows10 latest Updates (Dec2022)
SGPro (4.2.0936)
NINA (2.1 HF1 Beta002)
ASTAP (2022.12.09)
ASCOM (6.6SP1)
Pegasus Ultimate PowerBox (1.6.1230.46)
iOptron commander (5.9.0.2)
The iOptron CEM60 mount hadn’t been updated in ages and it showed :
HandControllerV2 : 210106
MainBoard : 190716
RA board : 201005
DEC board : 190716
After performing the firmware update procedure, the mount was now showing the following levels :
HandControllerV2 : 220119
MainBoard : 211018
RA board : 211018
DEC board : 211018
Catalog : 150429
Of course I will need to perform a new zero mount position following the upgrade. Tonight I will also be changing the OpenPHD algorithm to PredictivePEC as described by Cuiv the LazyGeek :
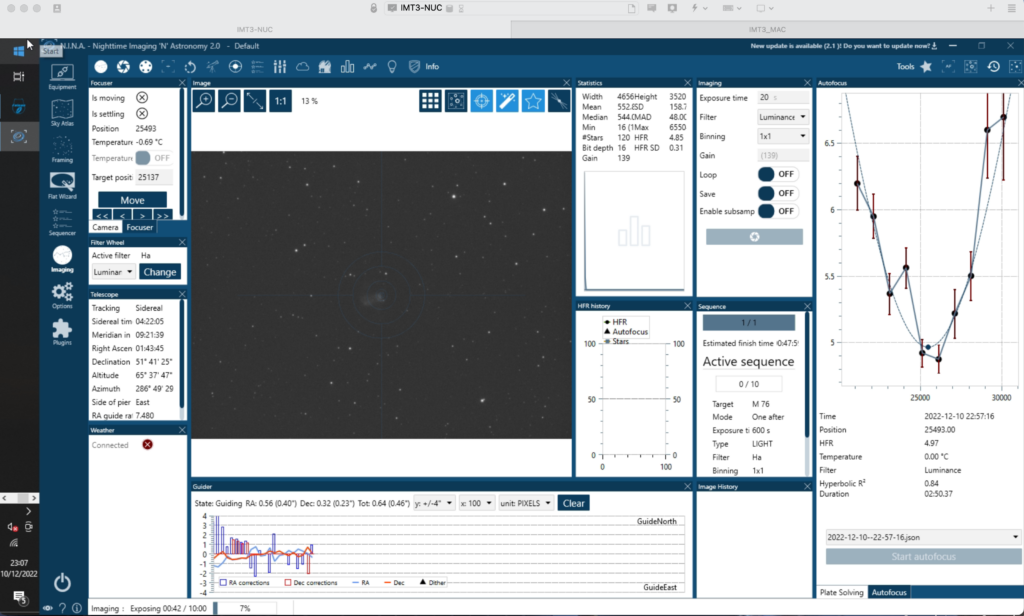
So it’s about time I tried to find a replacement for SGPro, given the continued problems with it, it’s less than intuitive design and find something that does not cause friction in my desire to capture more photons from the distant universe! So after looking at NINA briefly earlier this year, I have gone for it this evening to see if I can indeed capture some images.
The problem that set me back once before with NINA was the lack of connection to the FLI focuser. I just simply got an ASCOM error (I really dislike ASCOM). So after some educated guessing I got it connected. Instead of connecting to the FLI focuser directly I actually went through ASCOM which bizarrely cured the error.
With that done. I could now run autofocus, and only the 2nd time in my life this astronomy programme focused on the first go. The only other piece of software that good is the ZWO ASIAIR that I really enjoy because it just works.
I have now connected NINA to PHD2, also to TSX and left TSX to control the dome. I may change this later, however it works just fine and has not caused any problems. The only reason may be to further automate the dome for closing and reporting on status if that is a feature of NINA, something to look into later.
NINA at work
Managed to take 5 or 6 Ha images of 600s this evening before the cloud rolled in. I can use the flats from yesterday. A good evening testing given conditions including the almost full but waining Moon.
Not entirely clear this Bank Holiday weekend, however good enough to test out the newly cleaned ASI1600MM with the new desiccant. I received the desiccant from Zoltan at Astronomy365 and cooked in the microwave for 2 mins on medium power before letting cool down and then placing in the camera. I managed to get most of the dust off the sensor, however it is very difficult.
At 00:15 I started to image M72 the globular cluster low down in Aquarius using LRGB 60s on Luminance and 300s on RGB. Note that I will need all new flats today due to the cleaning of the camera. I will leave the observatory running overnight and head off to bed.
Update from this morning, looks like the observatory run all night without a problem and however I believe the object went behind the trees in the distance that have grown after about 10 luminance frame 🙁 I took flats this morning and will take darks tonight.
First thing tonight is to complete taking the darks from yesterday, so I need 20 x 120s -20℃, but also the flat darks I forgot for the 0.35ms flats. Then I will move to taking longer images tonight. The challenge with open clusters is that you need short exposures so you don’t oversaturate the stars.
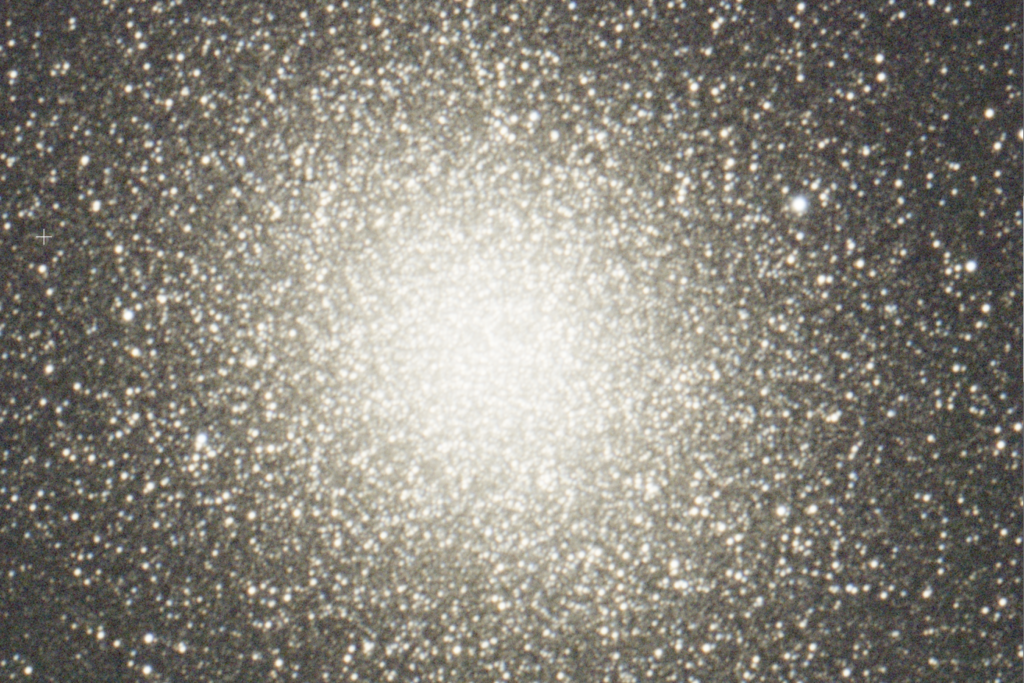
@22:50 Omega Centauri 30s -20℃
Omega Centauri
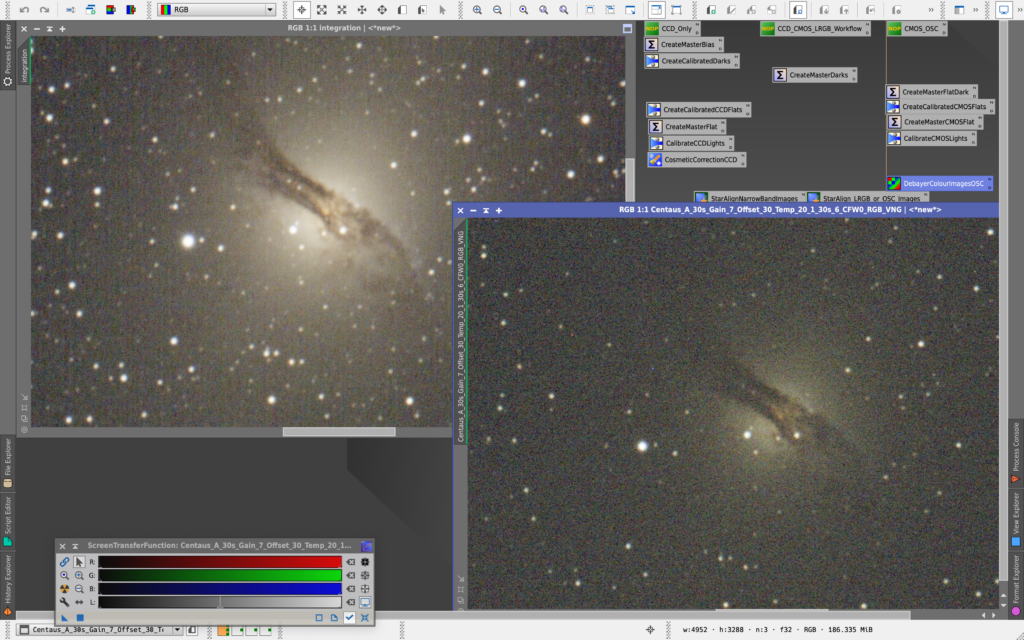
@23:20 Centaurus A 300s -20℃
Centaurus A
@00:09 Makemake 120s -20℃ x 10
@00:29 Haumea 120s -20℃ x 10
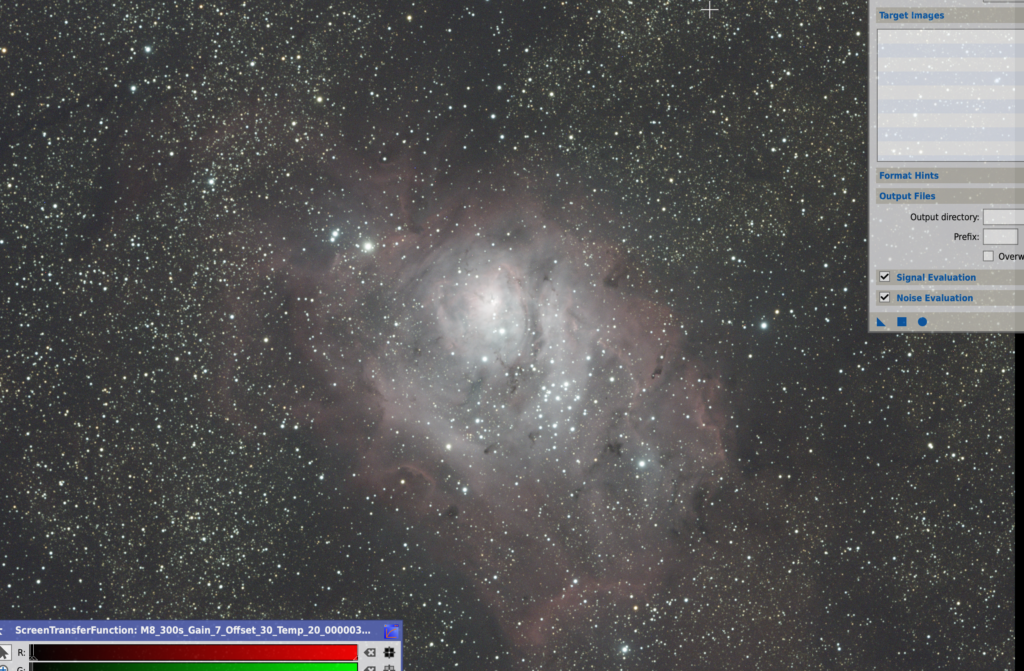
@01:07 M8 Lagoon 300s -20℃ x 24 (focus drifted so review later images)
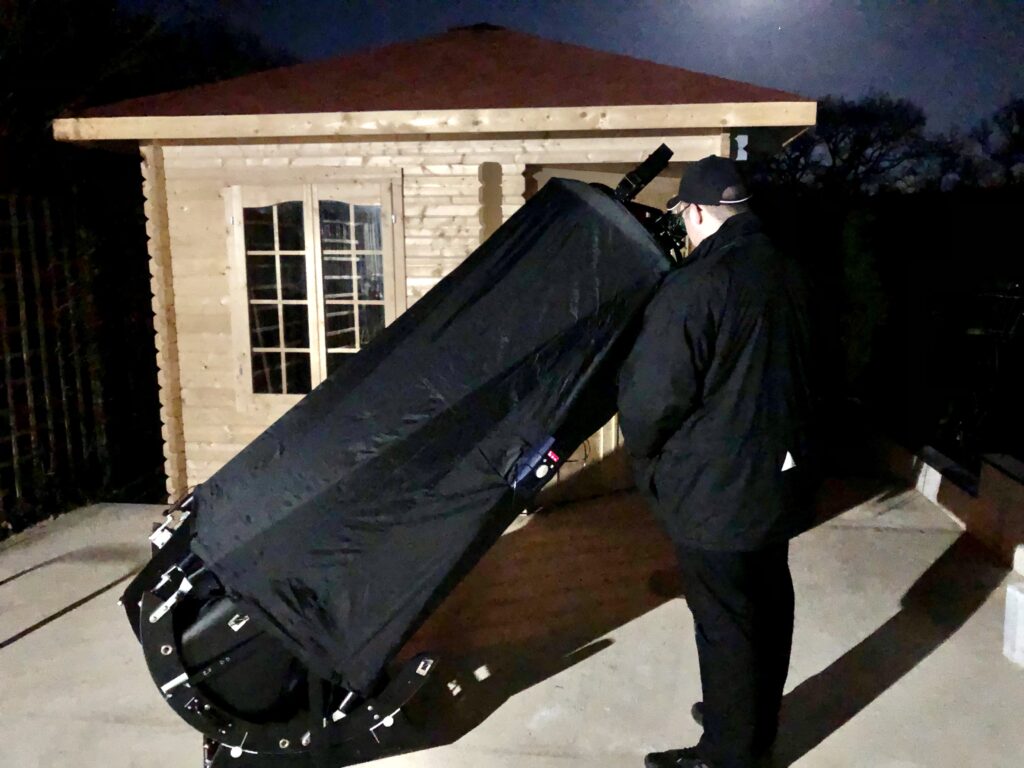
Opened the dome and setup the 22″ Obsessions telescope for visual.
I have gone with a recommendation of Mark Radice this evening andI will both image and perform visual on M46 including the planetary nebula Herschel H39-4 that resides within it.
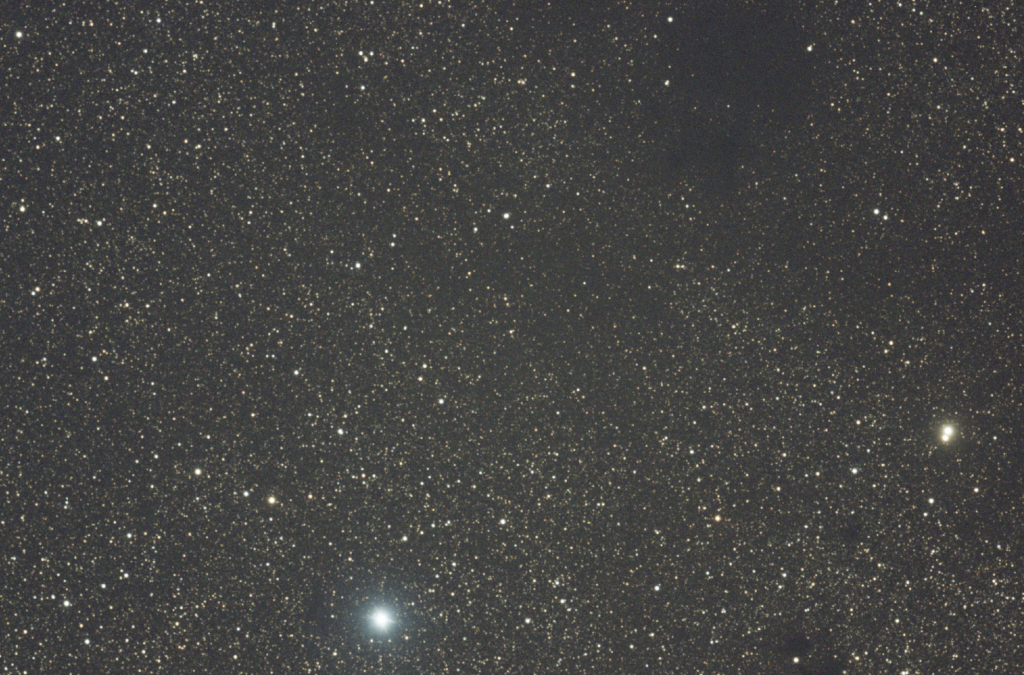
So with the 120 Esprit inside the dome imaging away on M46, now that it is to the East of the Meridian, I connected the Argo Navis to the 22″ and set about aligning the scope. After a few minutes and with the alignment complete, I pushed to M46.
M46 Observing Notes
31mm Nagler 75x Mag. M46 Open Cluster fills the view. Apparent instantly is the planetary nebula Herschel H39-4 towards the 5 o’clock position. A small ring can be seen with direct vision and with averted vision the contrast increases. I am not using any filter yet.I can resolve many stars. With the 13mm Ethos 180 x Mag H39-4 becomes much larger and you can resolve easily the star within the centre of the ring. Now only several handfuls of stars can be resolved.
M42 Observing Notes
31mm Nagler 75 x Mag. M42 steller nursary and hydrogen nebula is very bright with the wings sweeping outward. The trapezium is clearly seen. With averted vision much more gas is forthcoming around the area within the FoV. Moving to the 13 Ethos 180 x Mag the trapezium is resolved pleasantly into a much wider set of 4 stars. The hydrogen gas now takes on structure and lingering on this one can make out dark features within it give the nebula a 3 dimensional feel. Now you experience a warm glow within the eyepiece that seems to draw your eye towards the gas in which the trapezium stars sit.
At this point I cam back into there Warmroom to write up my notes and review the images being taken in the observatory. I have now taken 21 x 300s of M46. Now switching to M48.
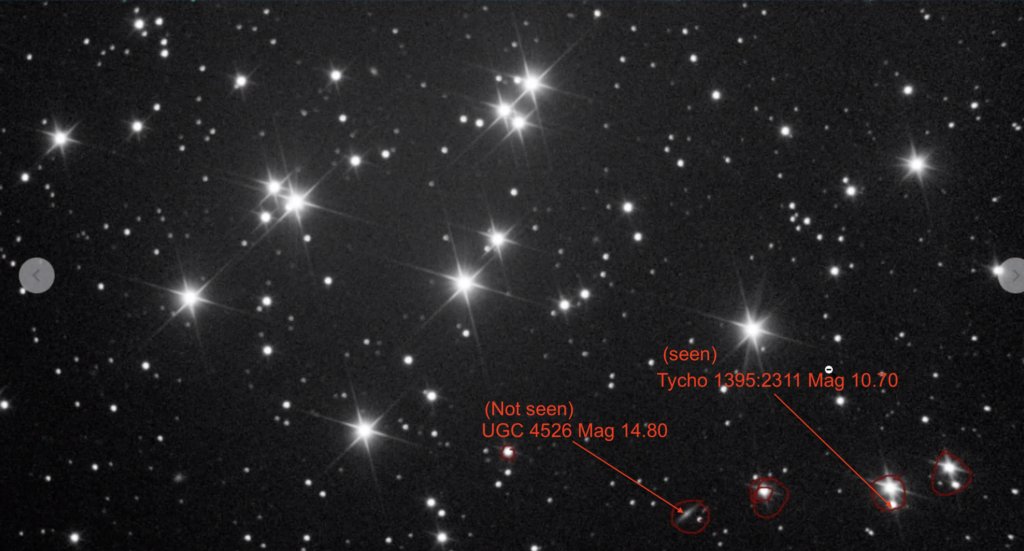
I then joined the BAS Zoom call to speak with Derek, Nigel, Bob and Mil Dave. We discussed M44 taken by Bob and suggested if I could see the UGC 4526 galaxy. So I went out to take a look.
M44 and UGC 4526 from Bob
M44 Observing Notes
Looking at M44 with Nagler 31mm at 75x Mag…..
I landed up finishing M48 at 23:47. I took 30 x 300s but then checked through the last few when the dome closed and I actually got 26, I might have lost the guide or the dome slewed incorrectly or shut, not sure which.
Addendum – It turned out to be loosing the guide star and because the camera wears not in focus, so connecting the focuser and moving from 14000 to 21000 position fixed it. The star profile was much better and SNR was 25-30 instead of 10.
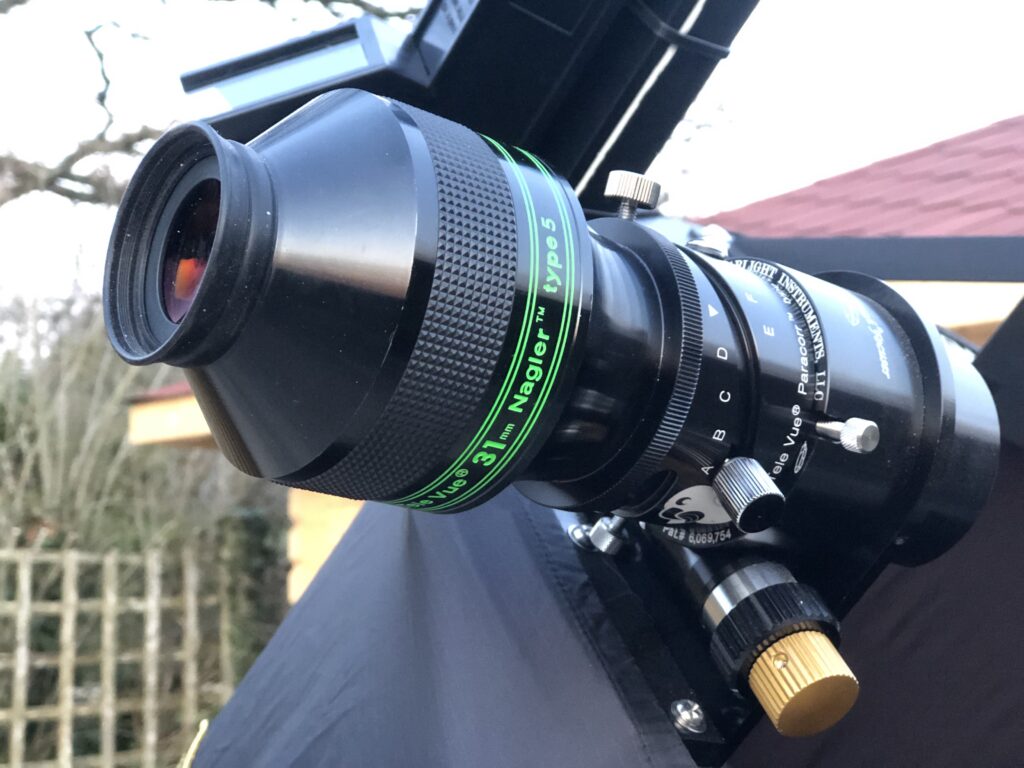
So after a successful day at The Practical Astronomy show it was time to head on out to play with my new toys. In this case a new 31mm Nagler Type 5 2″ eyepiece that I purchased from Owen Brazzel.
31mm Nagler
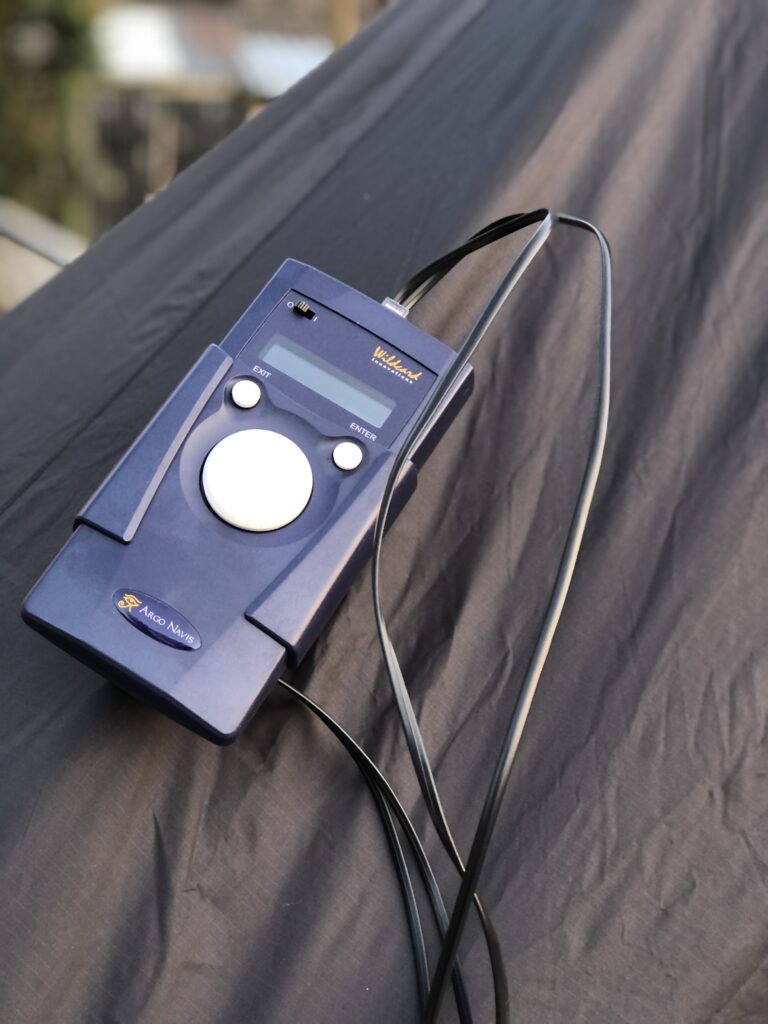
The other aim tonight was to setup the Argo Navis computer to allow me to find objects in the night sky on the 22″. Owen had said to me at the show that this is a must else I would find it difficult to star hop from one object to another without it, which was proved out the last time Bob and I ventured out.
Argo Navis
So I went to the Workshop where the Dob is stored and took it out onto the observing space and started to put it together. It only takes about 15-20 mins and then I set about collimating quickly with the laser collimator.
Laser colimator
Once done I fitted the Paracorr optical corrector followed by the 2″ eyepiece. I then set about putting the cables in for the Argo Navis computer and clipping it onto the side of the 22″.
It took me over an hour to finally setup the computer, in the main I did not RTFM and finally succumbed like all good blokes to reading the manual. It was them extremely straight forward. I had a good look through the menus to familiarise myself, but really the only thing to do was to identify 2 stars. The process for this must be followed for it to work correctly.
So I selected Mode Align Star option form the menu clicking the Enter key, then selected a star using the Dial, in this case BETELGEUSE came up. Now DO NOT PRESS ENTER!! Put the star in the centre of the eyepiece and then press the Enter button. Then WARP= +0.00 (1) should appear briefly meaning 1 star is aligned. Now using the Dial select another star (in this case SIRIUS) and repeat. Once you select ENTER then you see WARP= +0.00 (A) which means aligned. Now you are good to go and use the catalogue to tour the night sky.
I then selected some objects including M42, which looked lovely but low, the double double which really allowed the eyepiece quality to show off its abilities. I went round few other objects and Luke came out too, In fact to be fair he helped me get the computer working and then we shared the views in the scope. It was a good evening. We then between us took the scope apart and put it back in it’s home.
Obsession in use with the light on for the photo of course 🙂
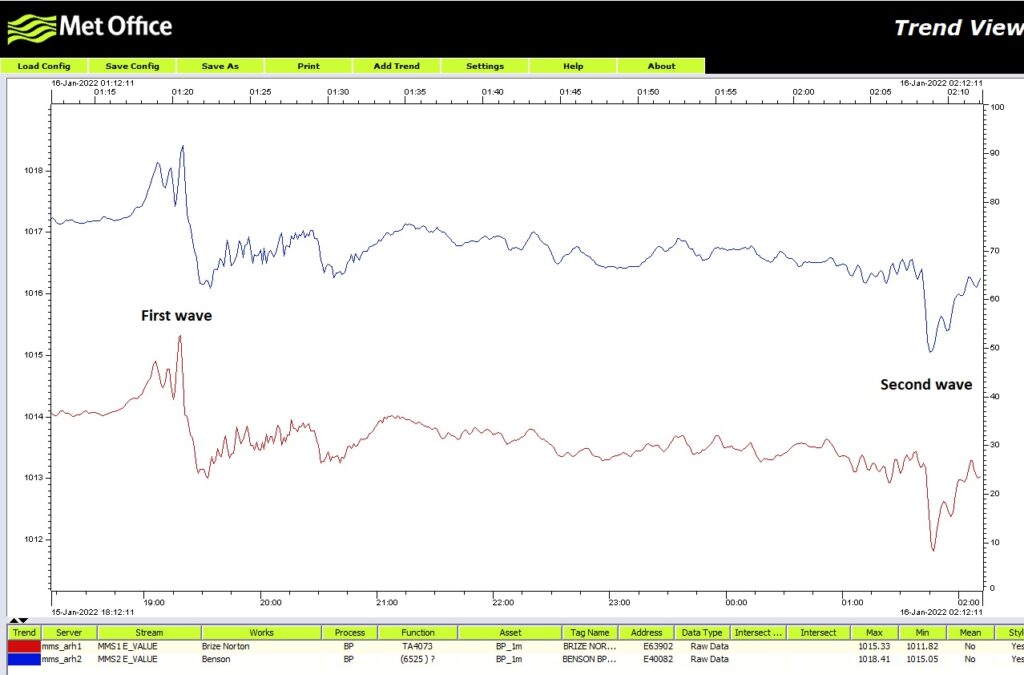
On January 15th 2022 at 15:10 AEDT (04:10 GMT) the Hunga Tonga Hunga Ha’apai underwater volcano near Tonga erupted. Hunga Tonga-Hunga Ha’apai is 1.8 kilometres tall and 20 kilometres wide, but most of it is underwater, with the top 100 metres visible above sea level. The pressure wave generated by the explosion blasted through the atmosphere at more than 1000 kilometres per hour.
Dave mentioned to me that the people had registered a pressure increase on their monitoring devices due to the pressure wave and checking the internet the Met Office has issued a nice graph on Twitter.
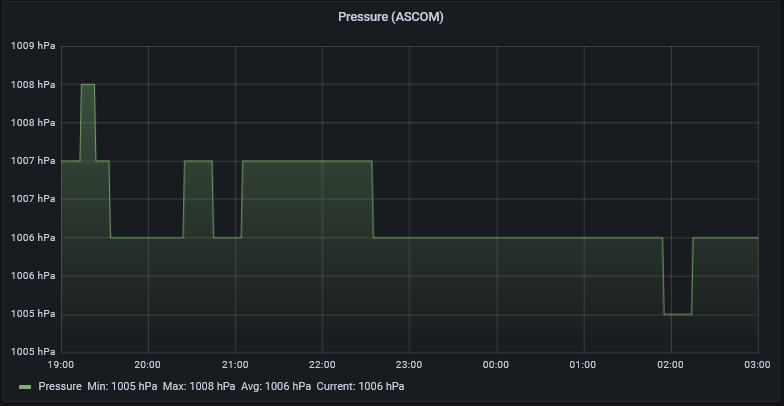
On the observatory Grafana dashboard I could indeed see two pressure waves at the correct time. We only record the pressure every 60 seconds because for astronomy that’s all we need so we do not have the resolution of others but the height of the two events are in the correct range compared to the graph above.
Double pressure wave
The first pressure wave arrived (19:13-19:24) we was 2hPa increase as we have lost some resolution due to sampling period and the Met Office is ~2.5 hPa. We could change the sampling to be lower (15 or 30 secs) as storage is not an issue and then we would have caught a nice defined peak. The second pressure wave (2022/1/16 01:55-2:14) and we measured ~1hPa drop and again was lower than the Met Office due to our sampling period.
Our auxiliary pressure monitoring install was down during this period as the box appeared to have been restarted/rebooted and the ASCOM Alpaca instance was not running which was unfortunate 🙁
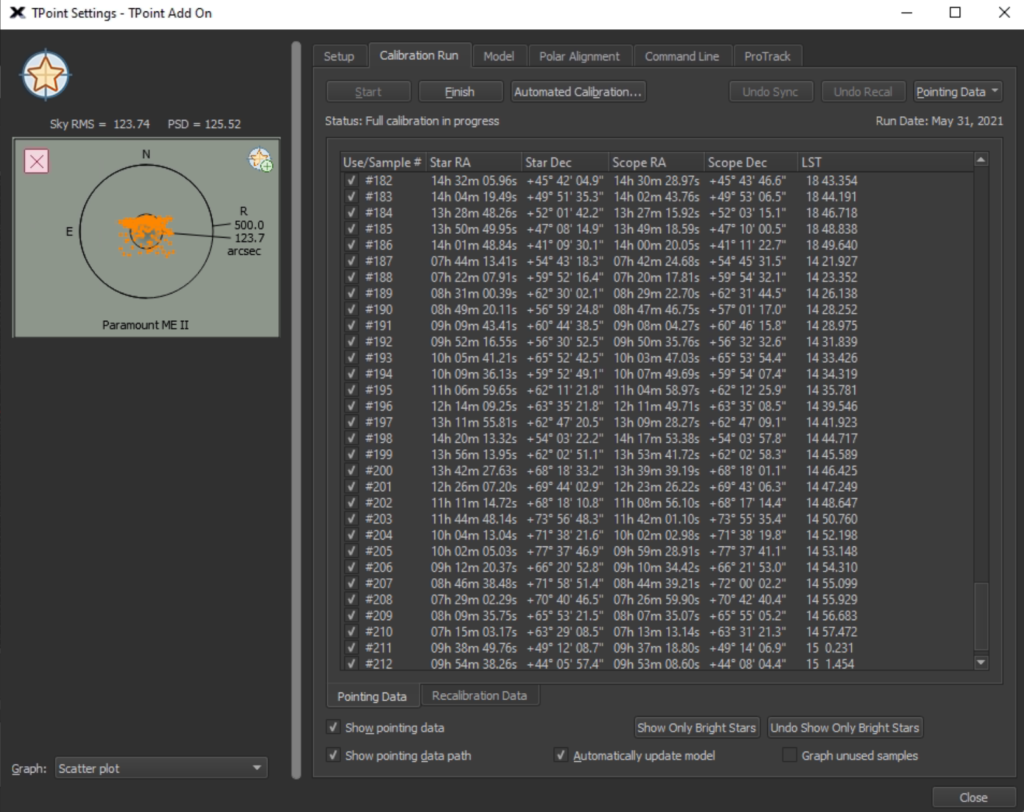
I will start by completing the TPoint run tonight before moving on to calibrate the guider and make sure I can get and image. So by 10:30pm it was just on the border of being dark enough to take and plate solve the first image and continue the TPoint session.
So by 11:30pm I had finished the 212 TPoint model.
212 TPoints
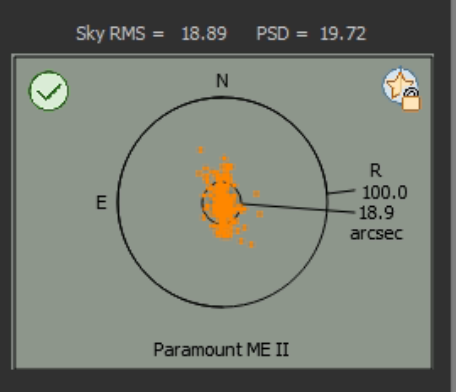
The next thing was to do a Supermodel on the data. This reduced the error pointing from 500 & 23.7 arcsecs to 100 & 19.
Model
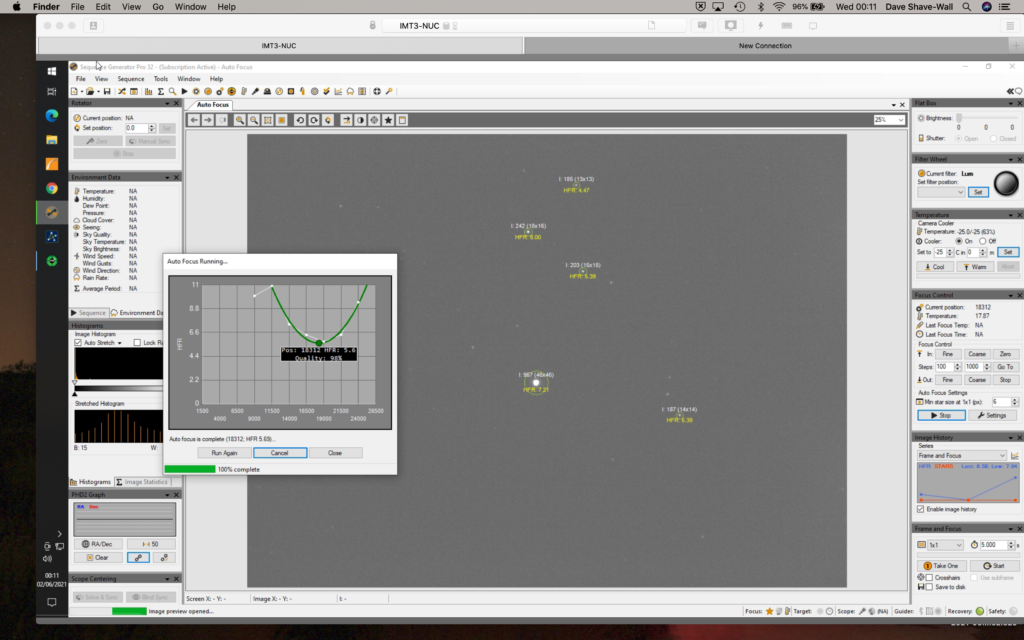
Now connected camera to SGP and running autofocus on a mag 6 star, new focus position for Luminance is 18,312 at 00:13
New focus position
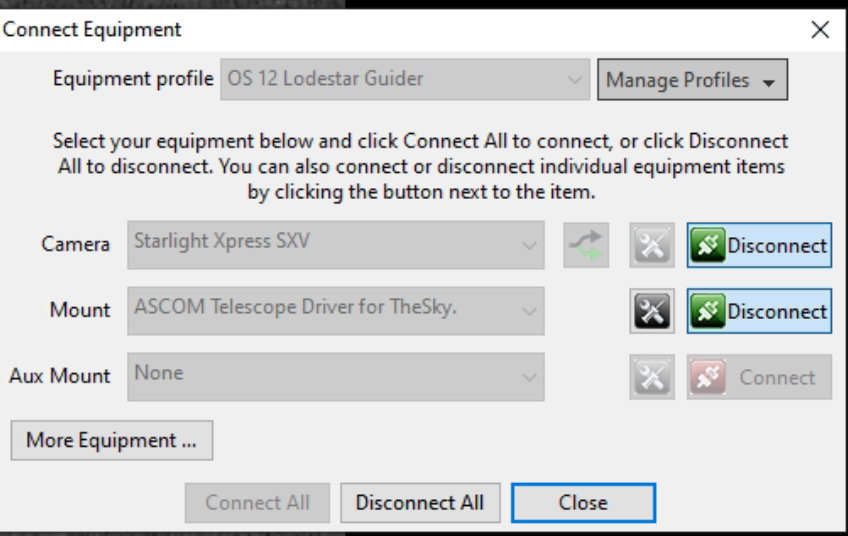
I then setup OpenPHD2 to guide and here I hit a problem. The guider did not move the mount. I have not got a guider cable attached as I do not want to do Pulse Guiding. Instead I always do Direct Guiding. So I looked at the settings in PHD2 and the mount was not set. So I went and searched my blog and I need to select the ASCOM Telescope Driver for TheySky. However it is not in the dropdown list.
ASCOM Telescope Driver for TheSky
Finally after a lot of head scratching I remember GingerGeek removed ASCOM and upgraded when I moved house. He had inadvertently removed the said driver and forgot to reinstall. I went to the ASCOM webpage, found the driver which took me to the Bisque website and downloaded. I then installed, restarted TheSkyX using PHD2 after I had restarted PHD2, I selected the said driver in the Mount dropdown and connected. This then moves the mount when I calibrate and subsequently guide. Fortunately I found all these answers on my blog posts from last year when I had setup the guiding originally.
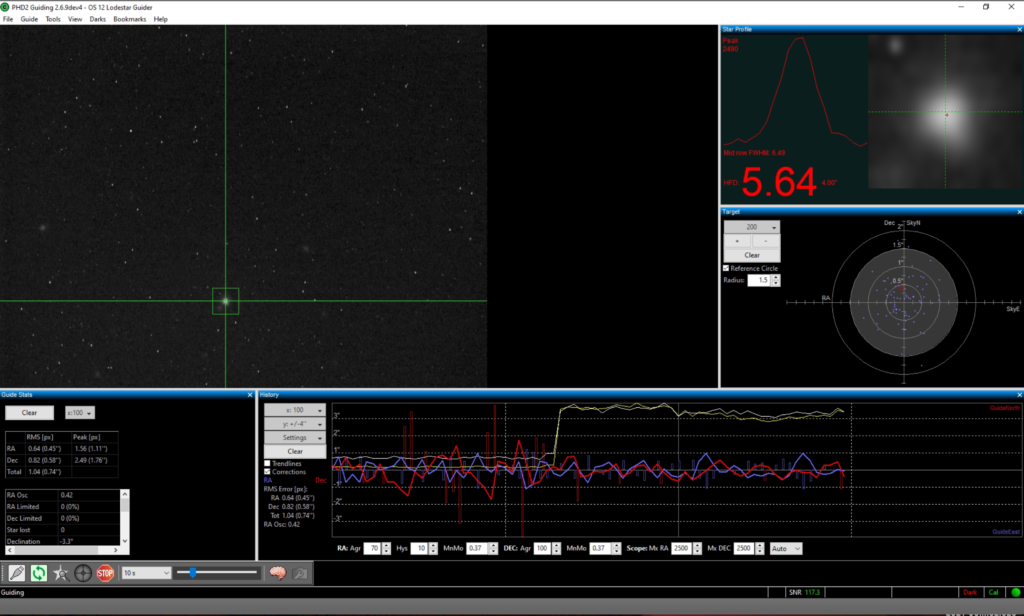
Finally guiding
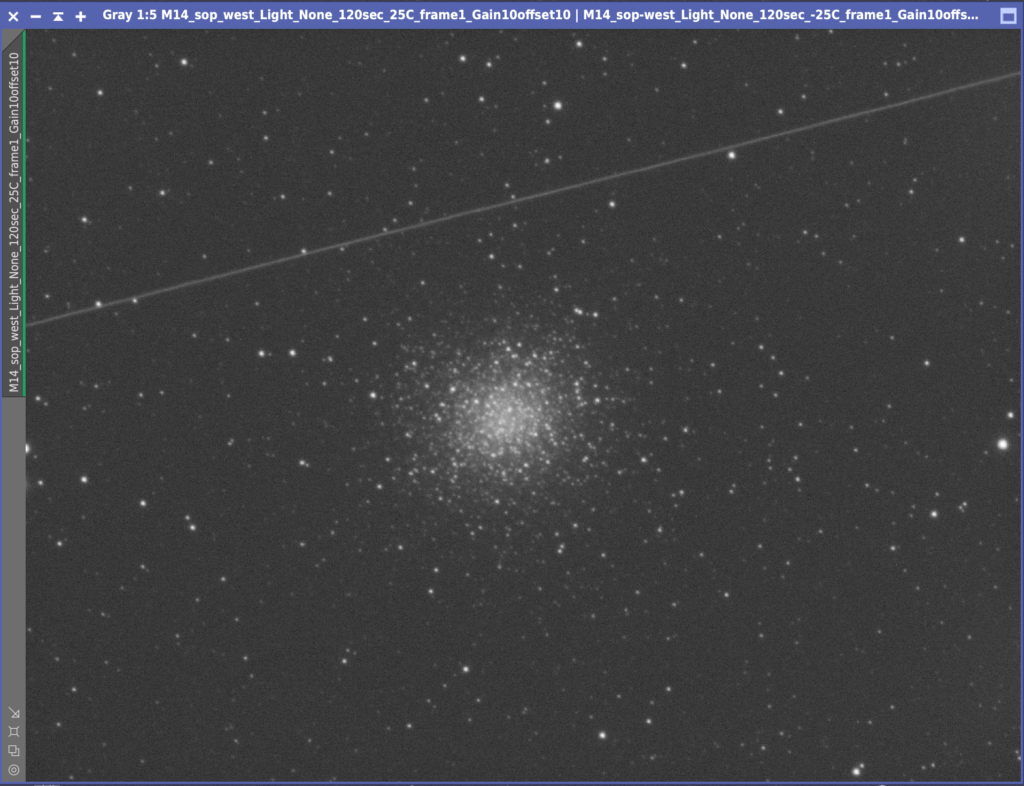
Now all of this is working it is rapidly approaching the time when the sky brightens, so it is already after 1am. I slewed to M14 using TSX, performed a Closed Loop Slew with the camera connected to TSX initially. Once I confirmed the object was in the centre of the FoV, I then disconnected the camera from TSX and reconnected to SGP.
M14
Guiding started, all started to work well. A couple of snags, focus position was wrong in the filter setup so I need to change. Tries to autofocus on start of sequence so I need to change that. I then decided to grab 1, 2 and 5 min subs of LRGB to determine the best exposure. However half way through and some localised cloud rolled in and stopped the session.
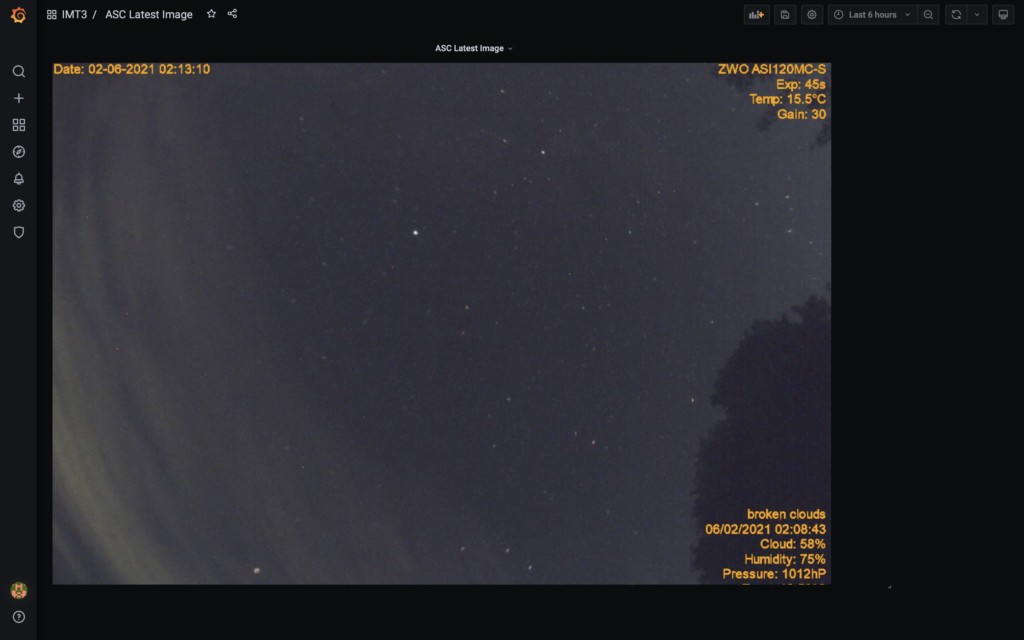
Clouds
The good thing its the closed loop slew is working well in TSX.
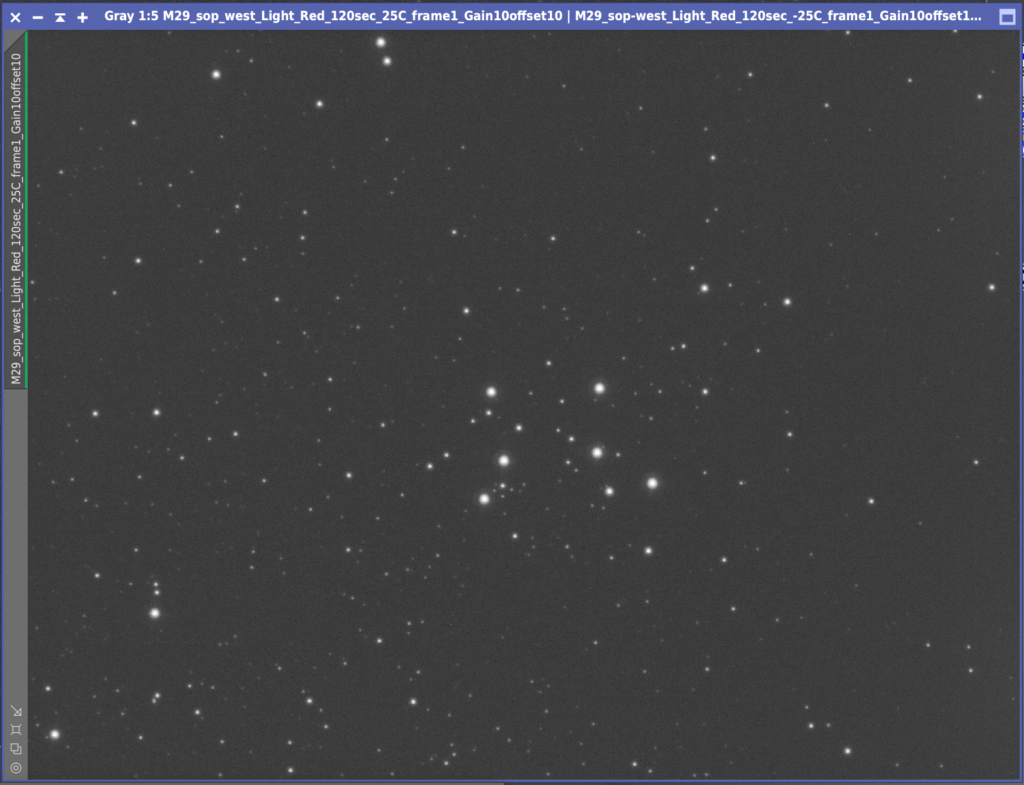
So with the local cloud still causing issues to the South, I slewed North East to another Messier target on my list, M29. Once again I setup 1,2 and 5 min exposures across LRGB to see which would be best. All the imaging tonight for Globular Clusters and Open Clusters was done at Gain 10 Offset 10.
M29 test 2mins Red
I manage to get frames and then I was afflicted by the same cloud. So instead I packed up and called it a night.
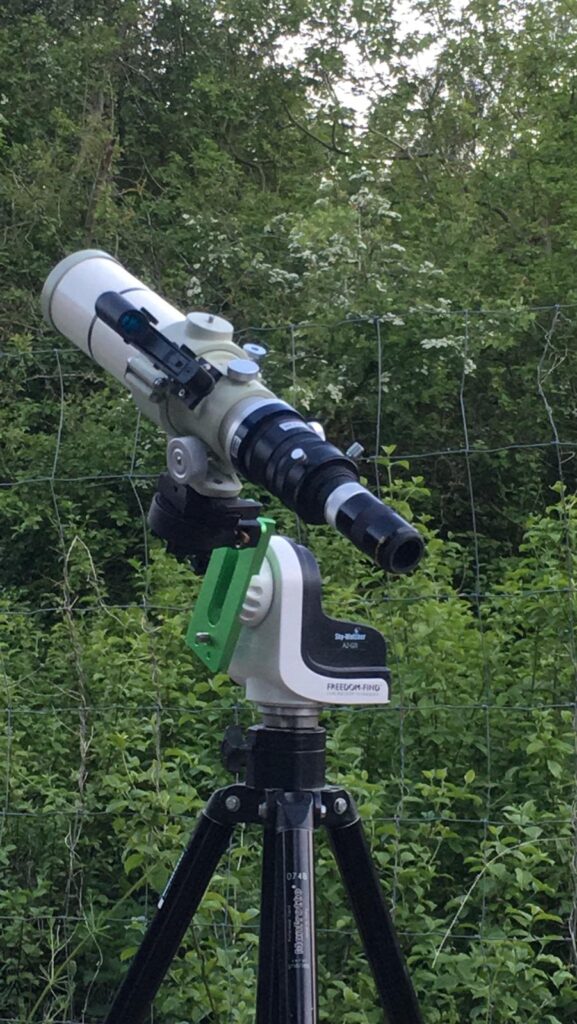
Bob came over again tonight which is great company. He setup his Skywatcher AZ-GTI portable mount with his Tak FS60 on it so we could do visual throughout the night on a goto mount along with my star hoping through the 100mm binos.
Skywatcher AZ-GTI
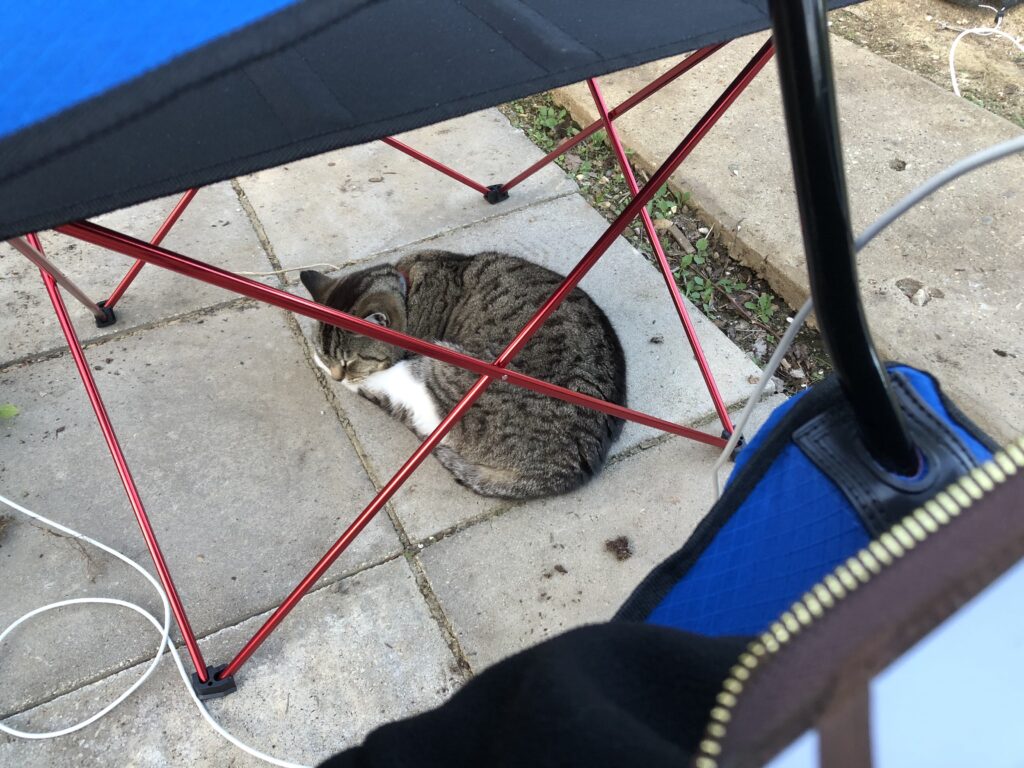
I started the evening whilst light, measuring for the replacement T2 (M42) adapter for the camera train. Given the 0.083 microns per movement of the FLI Atlas focuser I need to reduce the image train length by 3mm. So the new adapter needs to be 31mm, current M42 adapter is 35mm. Meanwhile my AstroCat Fluffy decided to get some more sleep before dark.
Fluffy taking a hard earned nap
Next up was writing the Lat Long on the dome so I can give it to anyone that visits. With that done I started testing the rotation of the dome to make sure the dome no longer slips since I put the anti-slip tape around the edge. After spending some 15mins rotating the dome it seemed ok, it would be fully tested later when I redo the Tpoint model. This is due to the 2.1 arc minutes of error in my azimuth polar alignment that needs adjusting by 4.2 tics.
I adjusted the mount as above and ran a 20 point model. This told me the error int he azimuth was less than 1 arc min and that there was no need to adjust the mount any further, however it had low confidence. So now I will run a full 212 Tpoint model to see what it reports.
212 TPoint Model map
On starting the run I hit another problem, the mount hung and beeped. This was due to a balance problem on the tube which is weird as I thought it was fine. However maybe I had not rebalanced since adding the rotator properly. I removed a little weight at the front of the OTA and shifted it backward. I then tried again but again it hung and beeped. It transpired to be the same loose cale I had before, the focuser cable which had come loose. I applied some more white electrical tape to hold it in until I get round to changing the 2.1mm adapter.
At 23:40 I started a new TPoint run and am now 7 stars in and all is well. That did not last for long, around 47 Tpoints and I kept getting blank images. It seems the dome had lost its position. The Home sensor does not seem to be registering. I slewed the dome manually to Home at 123 degrees and synced that back into the dome controller. Starting the TPoint again resumed stars being seen.
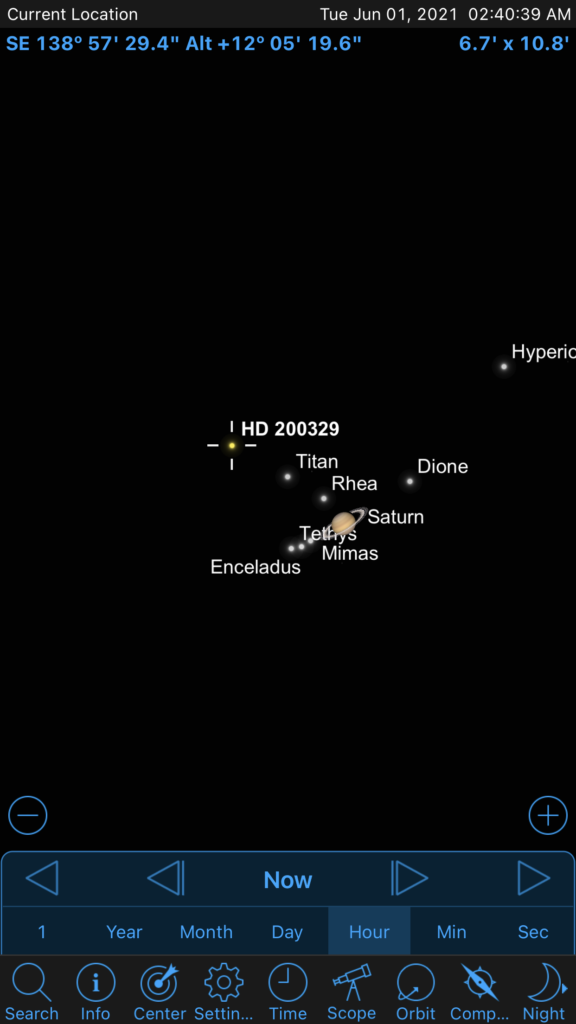
Meanwhile Bob was moving from object to object without the AZ-GTI mount. M5, M57, M10, M12 along the way. We easily split Albeiro although Bob was slightly worried about my eyesight as I initially struggled. We saw the head of Scorpius pop up above the tree line but we didn’t get M4 from the IMT Plateau and Antares only just made it above the tree line. So I decided to relocate my bins to another spot in the garden by the Sun Plateau so we got M4 through them. M17 was seen through he 100mm binos also, looking remarkably like a Swan! Finally as it got light just after 3am we nabbed Saturn, Jupiter and the Moon.
We could see the star HD 200329 and Titan along with Saturn
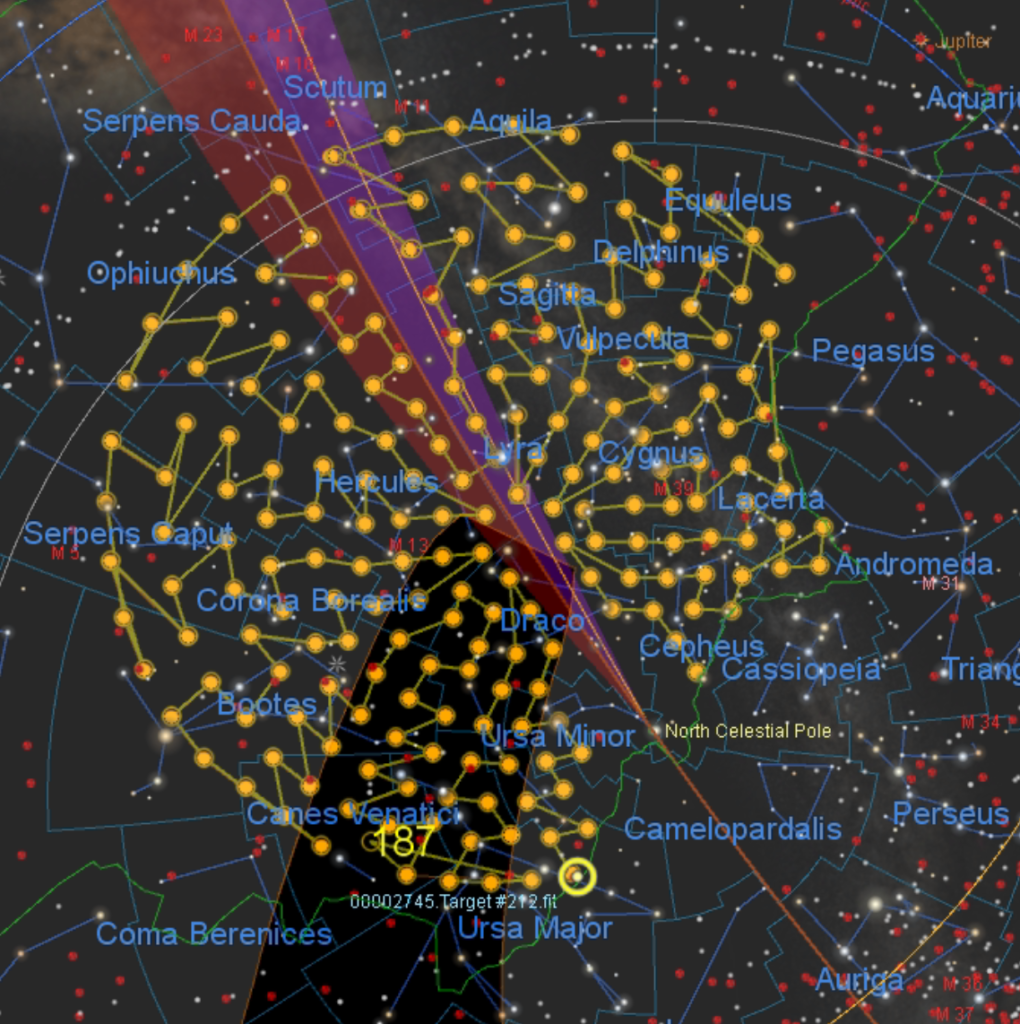
By the end of the night I was at 187 TPoints so not enough for me to be confident the whole sky was mapped, nor enough to fix the model and have Protrack running. I will continue the mapping when dark tomorrow night.