After a full day of all three geeks making more changes to the observatory, I setup my travel scope, Esprit 120 to get some more time logged before taking it on any serious holiday.
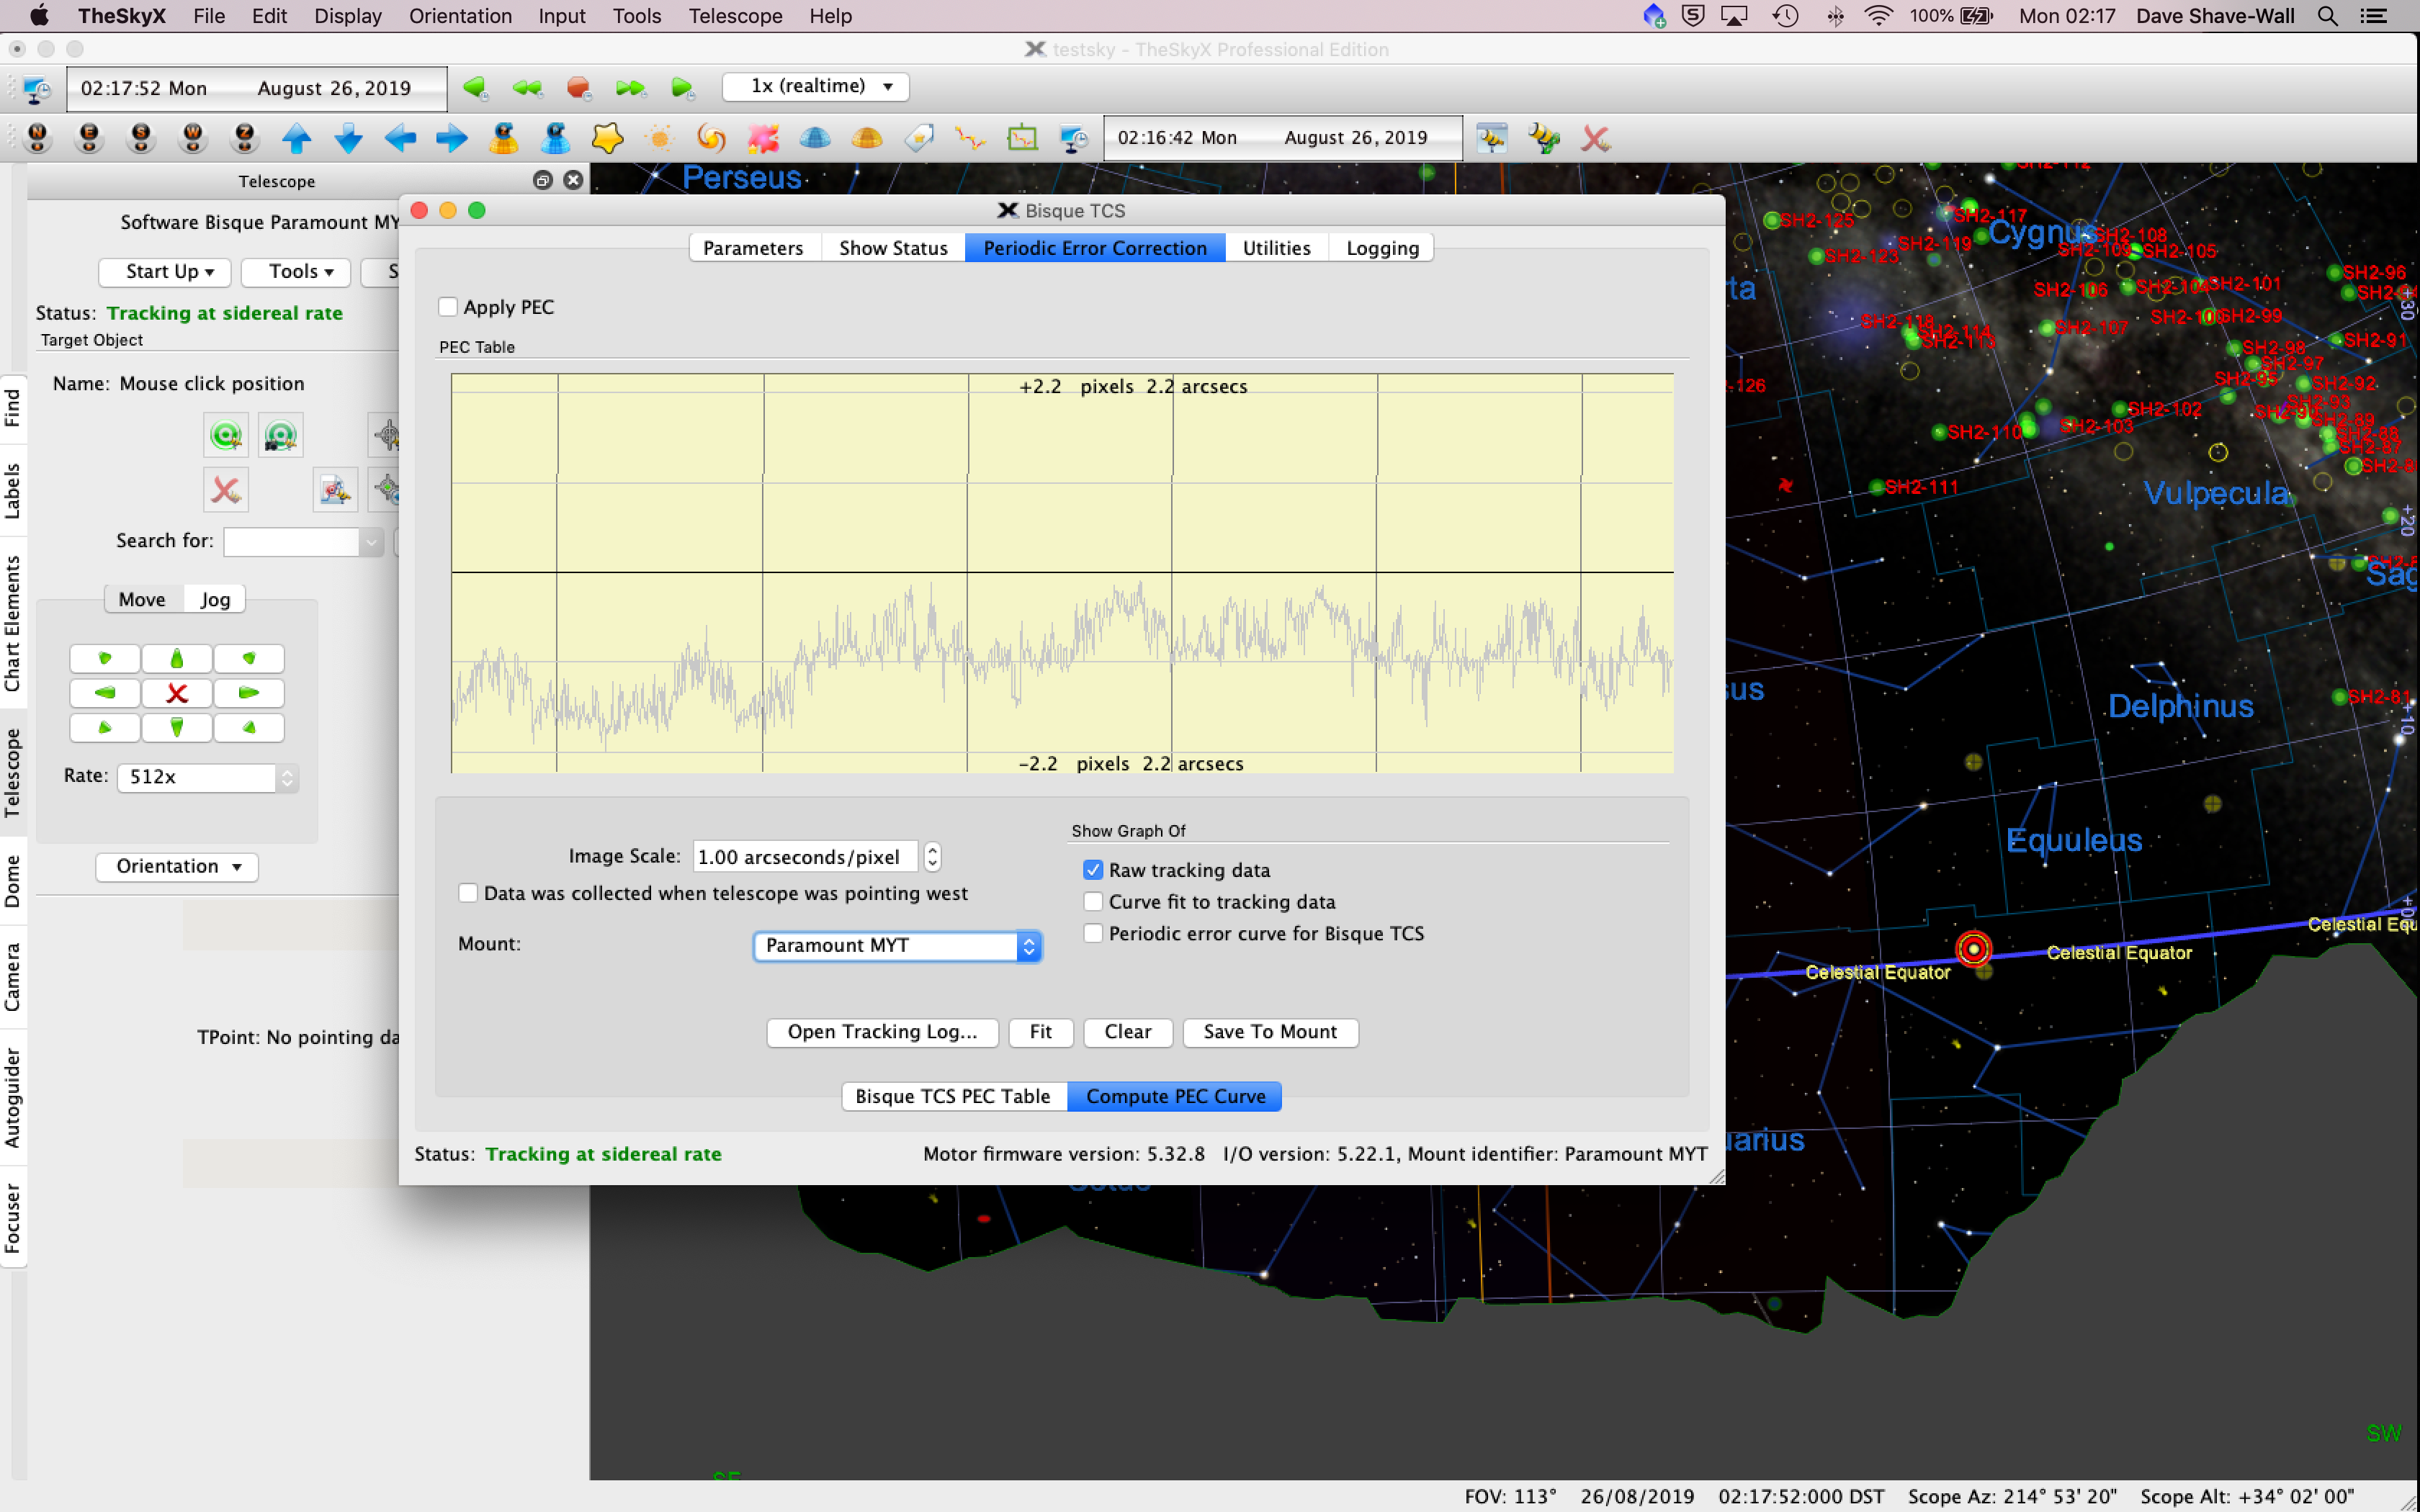
Before starting I thought I would record, compute and apply a Periodic Error Correction (PEC) model to the MyT mount similar to doing the one on the MEII earlier. Recording it was fairly straightforward using TheSkyX (TSX), connecting to my camera and then continuously recording the output to a log which you then read in and apply. Even though the log looked pretty terrible a periodic curve was able to be computed and looked a good fit and represented a peak to peak error of +/- 0.5 arcsecs.
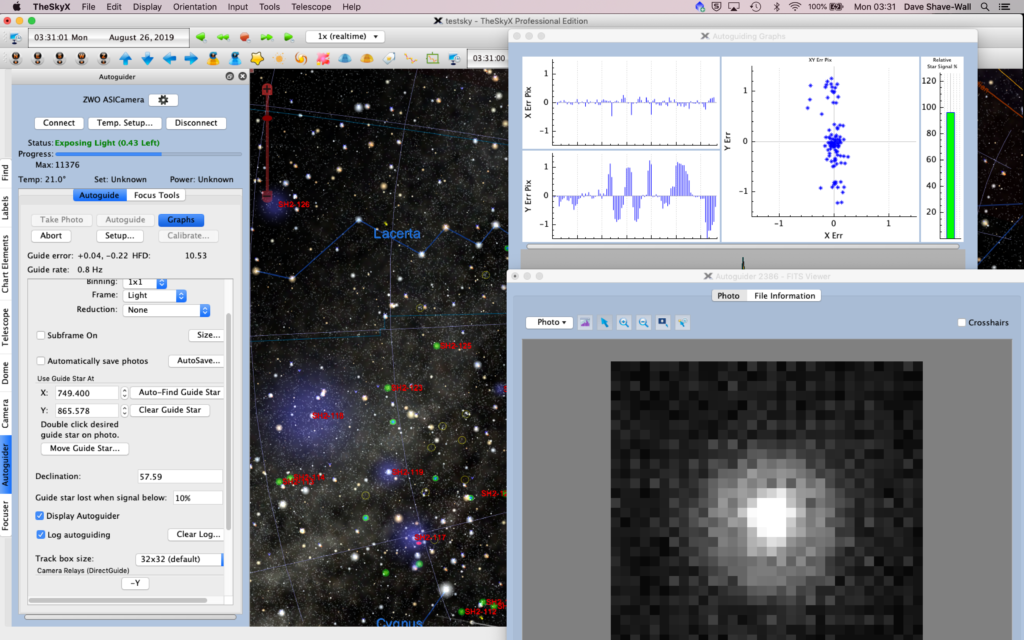
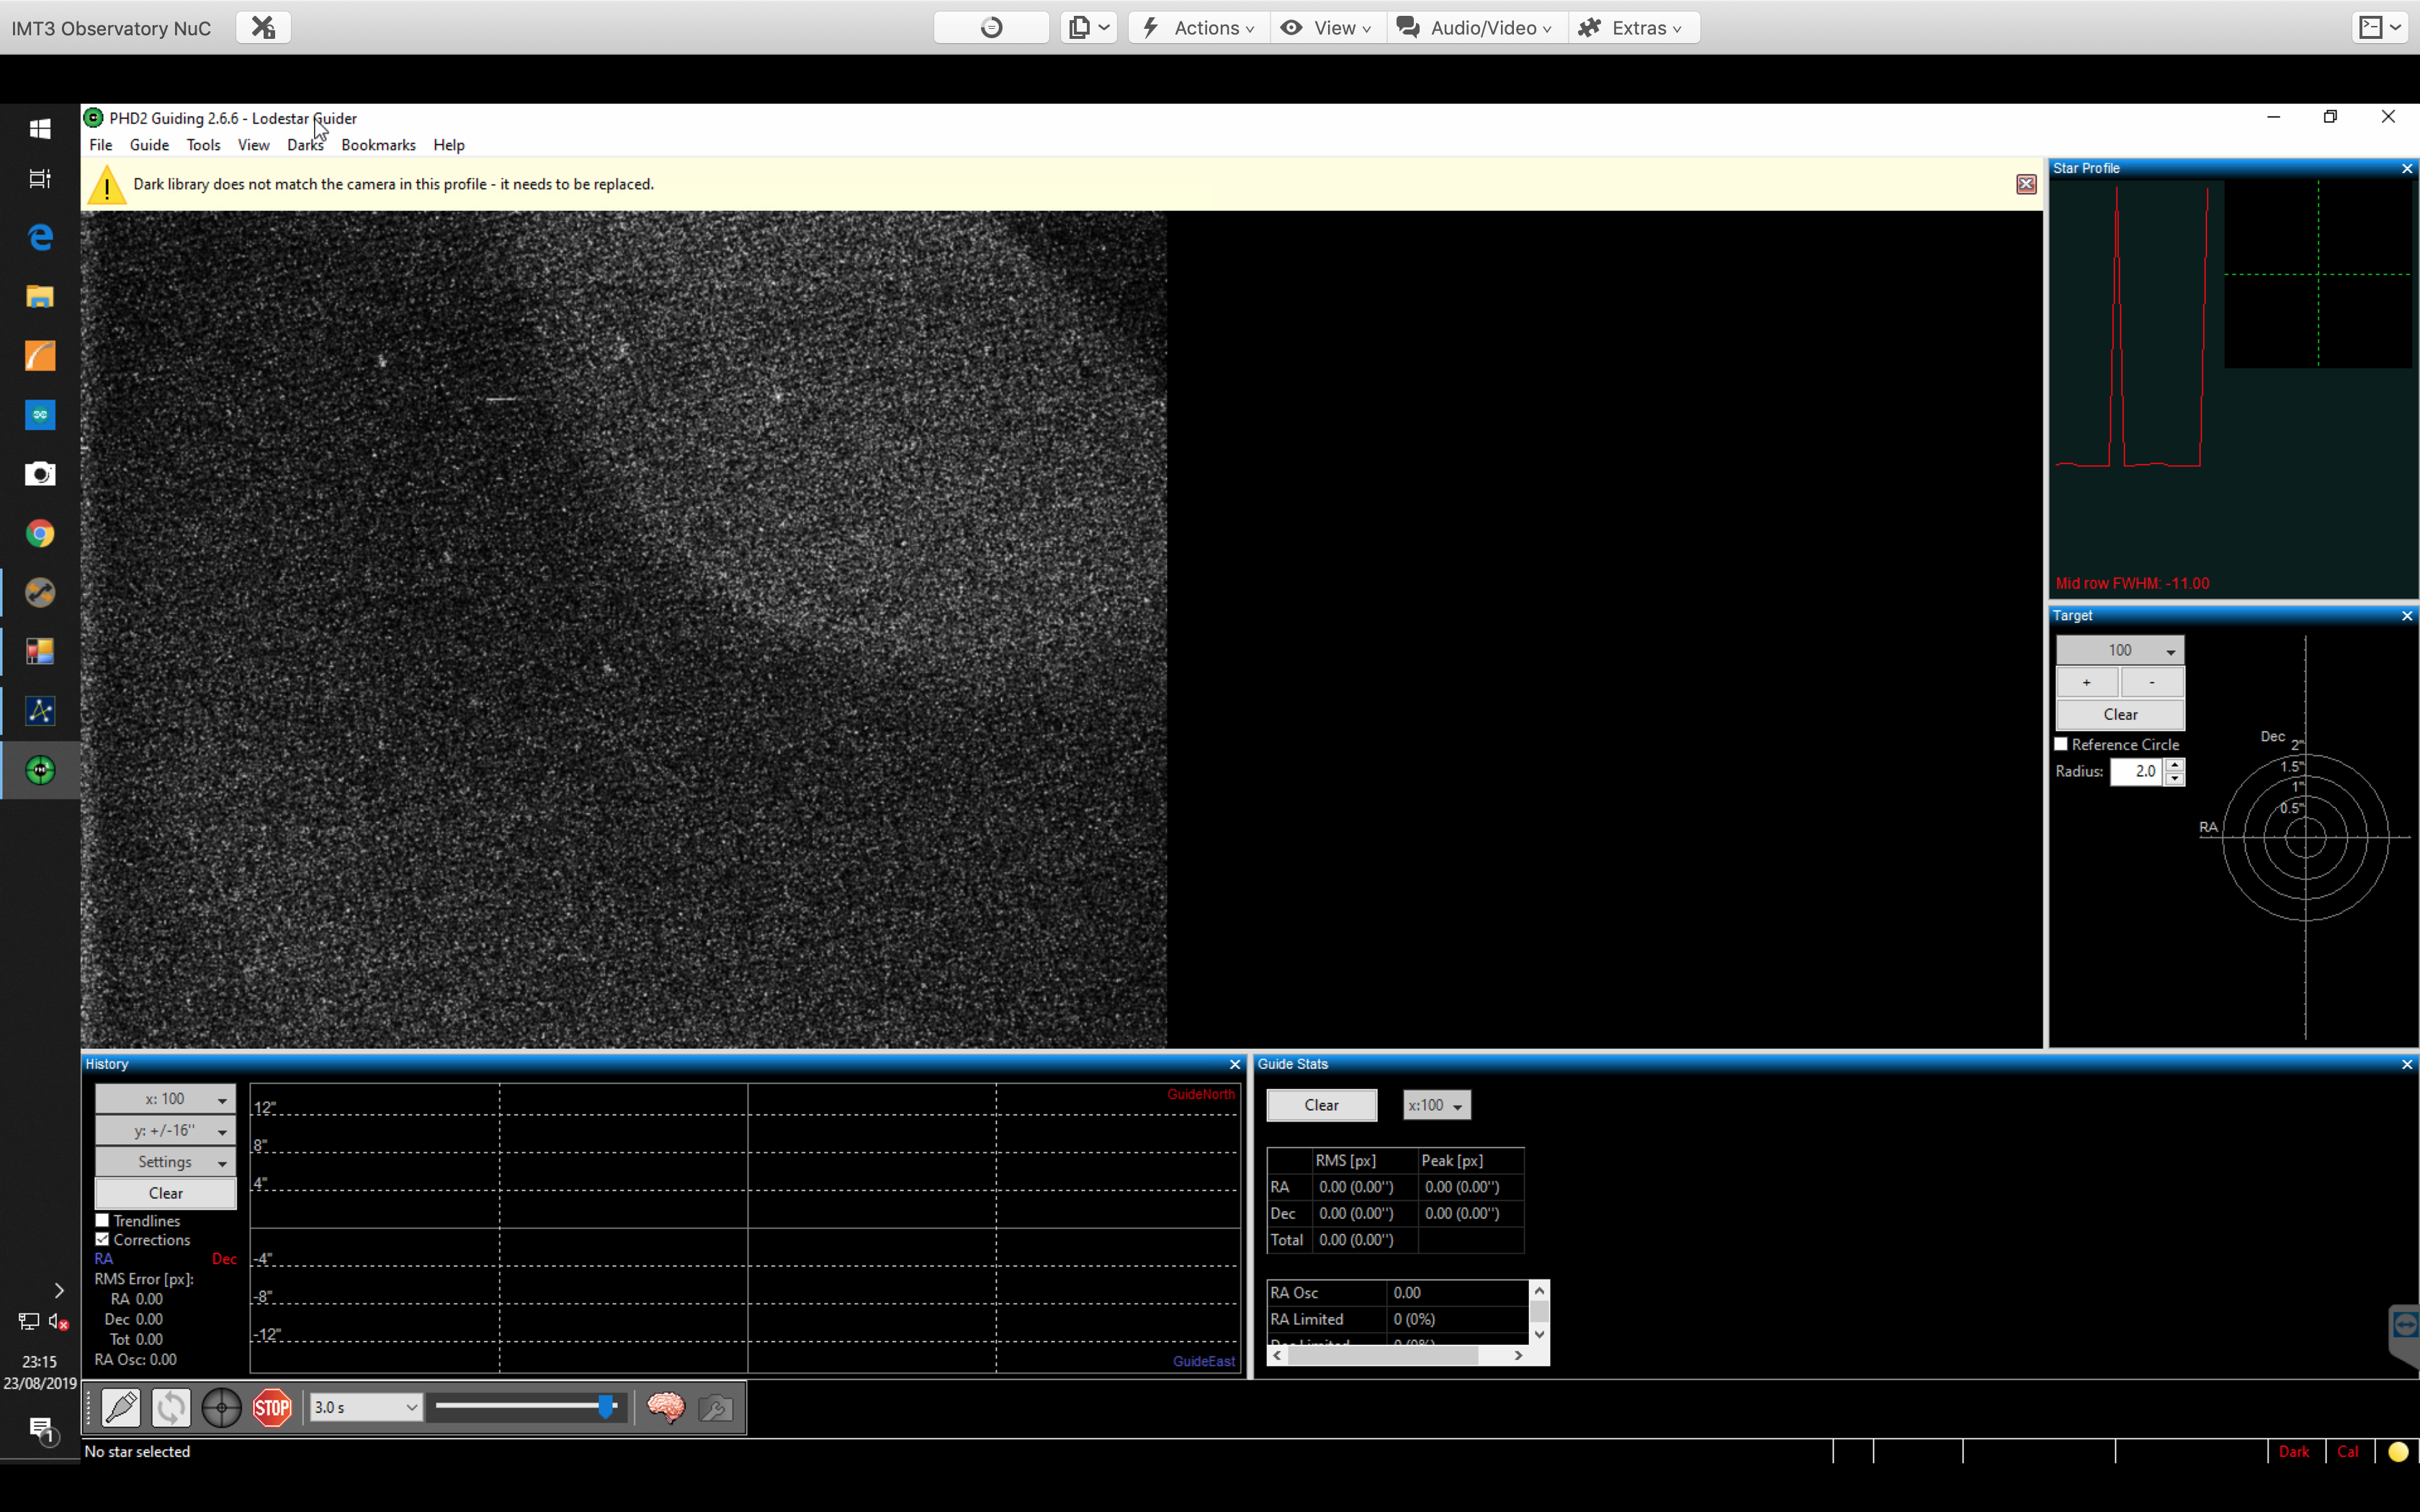
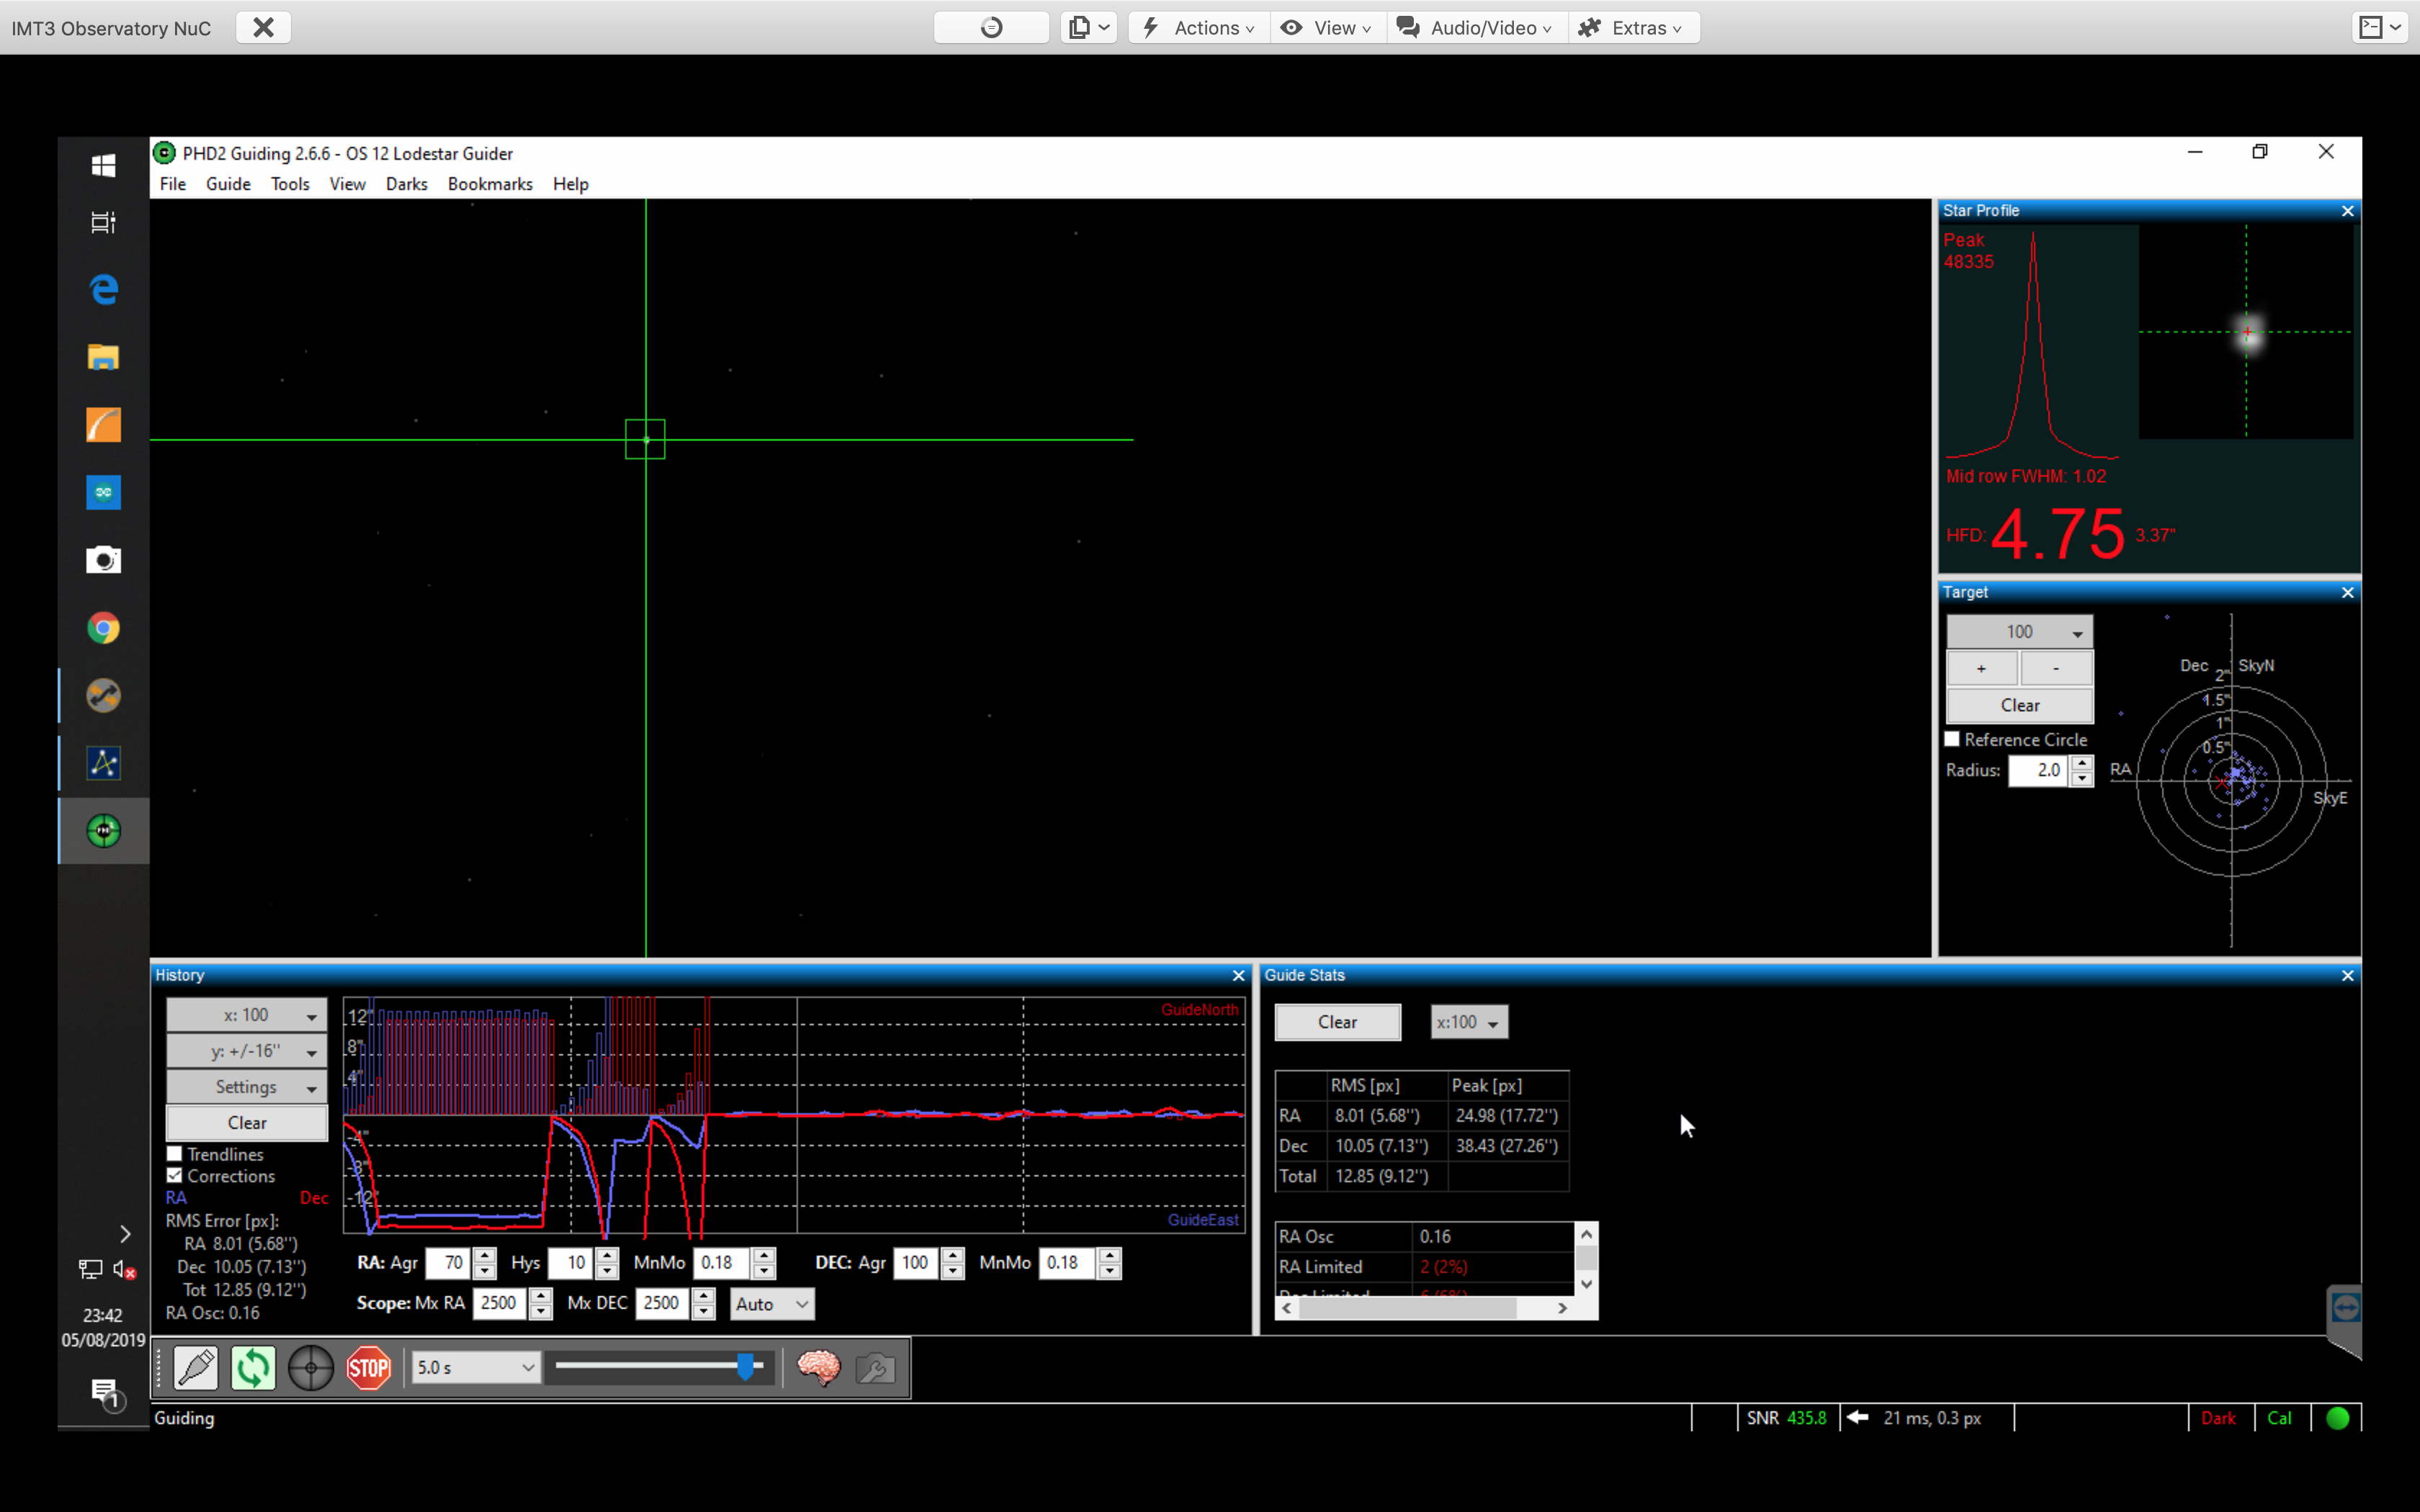
Connecting the camera to PHD2 though was somewhat of a challenge, I managed to guide in DEC but the RA was wildly out even though I tried a few different settings for the aggressiveness and Hysteresis which is the previous adjustment percentage to apply as well.
When trying to image with this sort of guide graph from PHD2 the resulting image is trailed. Note the greenness of the image is due to the bayer matrix array of the camera being RGGB and thus 50% of the light is in the green and would be corrected later. The picture below is a zoomed in portion of that image.
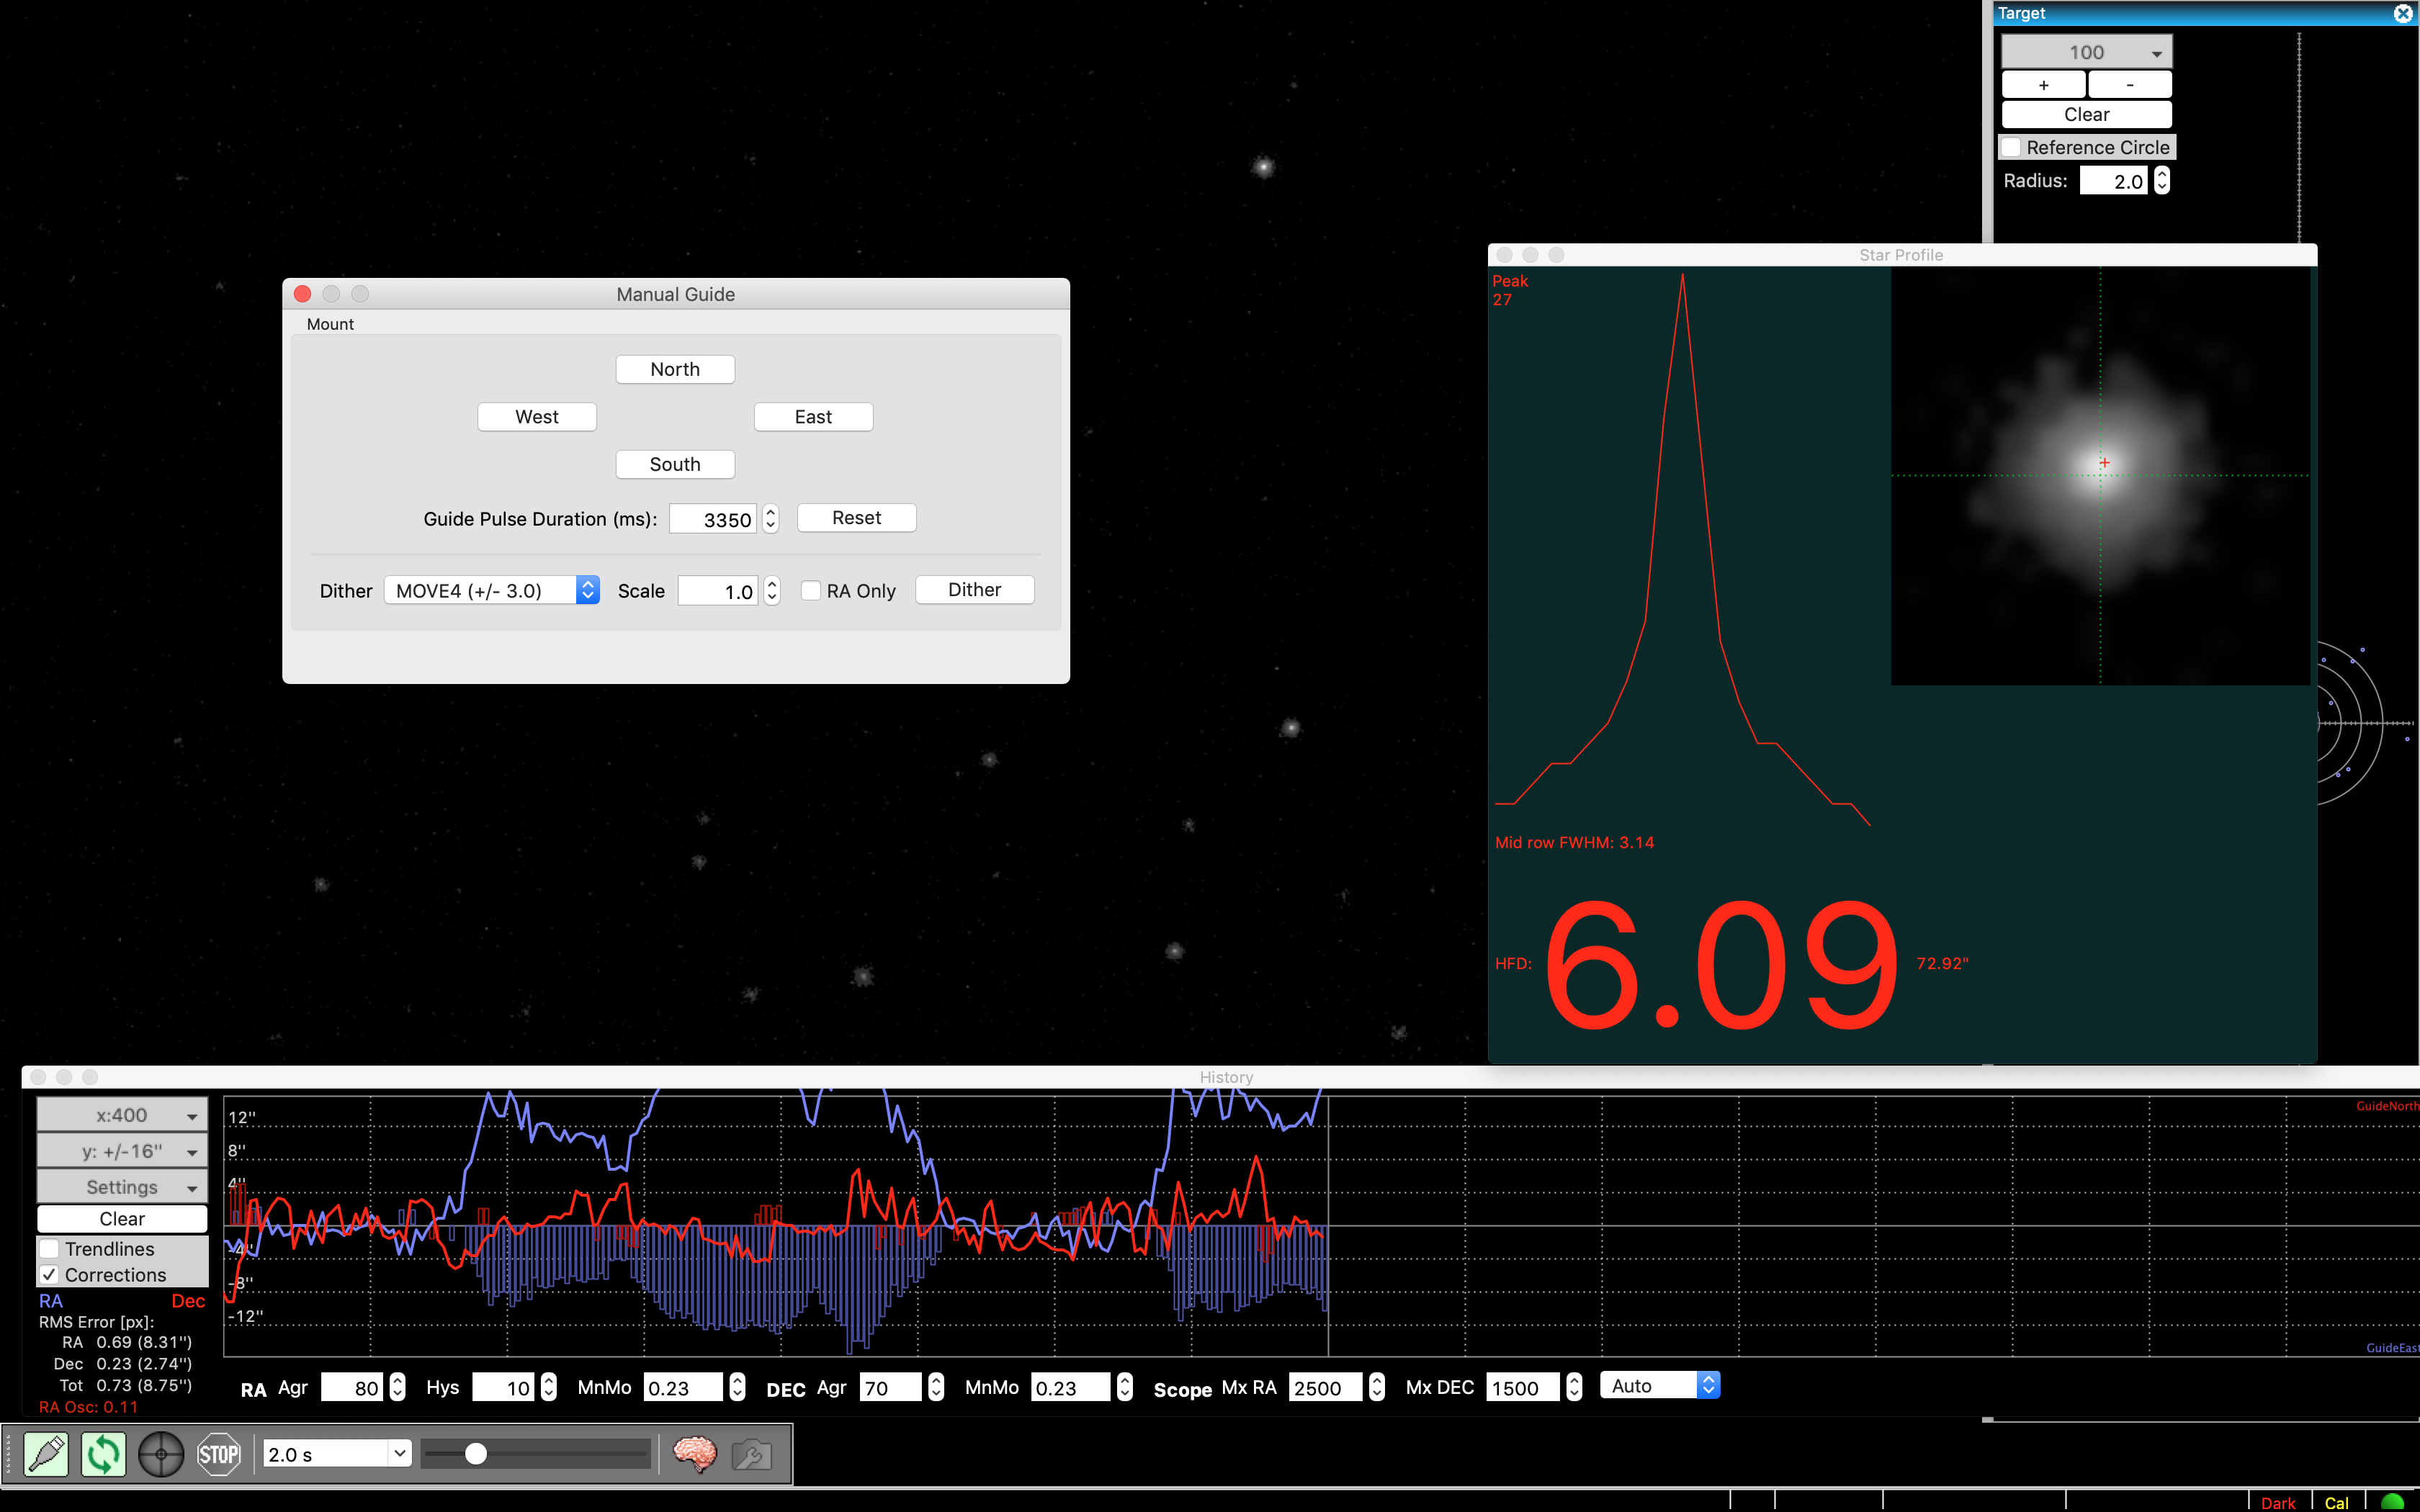
So instead I moved to TSX to see if it would guide any better, knowing full well that PHD2 should be able to do this if I could get the right settings. In TSX I took the default values and then choose a guide star and started guiding. The output is fairly similar to PHD2 in the graph and immediately the RA error again could be seen and the resulting trailing of the image taken with EZCAP on the Mac apparent.
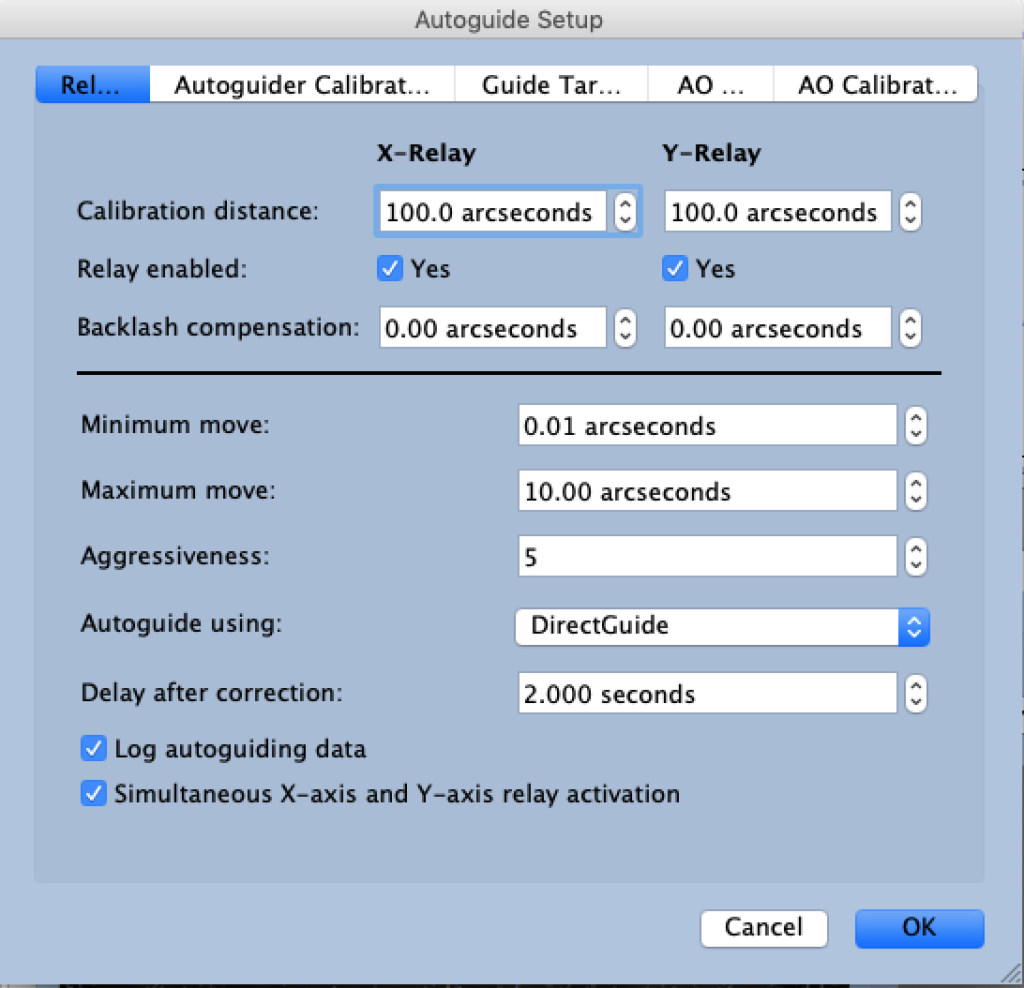
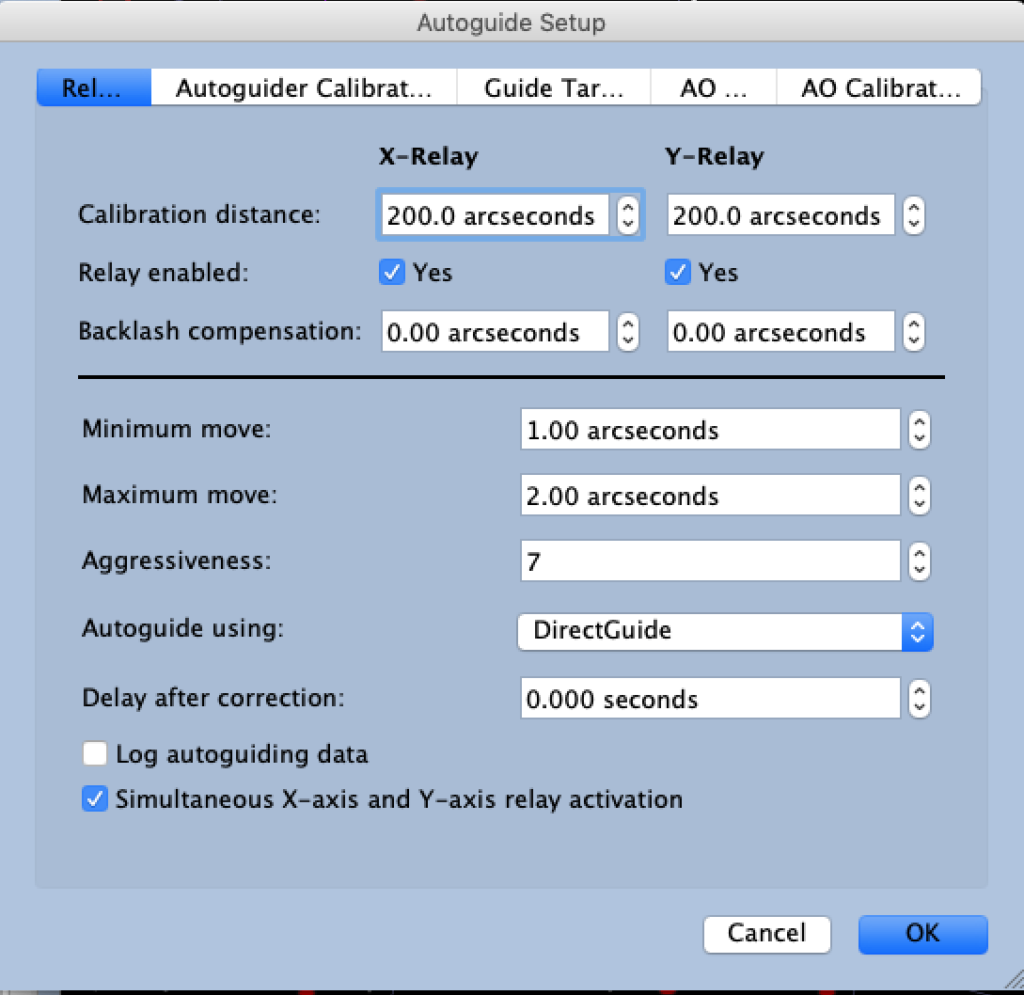
At this point I changed the settings for the guiding in TSX noting that the calibration was really quick, almost too quick, with a single move of the scope in either axis which is not enough. So I changed the calibration distance for both axis from 100 pixels to 200 pixels, I also changed the Minimum and Maximum move figures from 0.01 arcsecs and 10 arcsecs to 1 and 2 arcsecs respectively. Finally I added a delay after correct of 2 seconds.
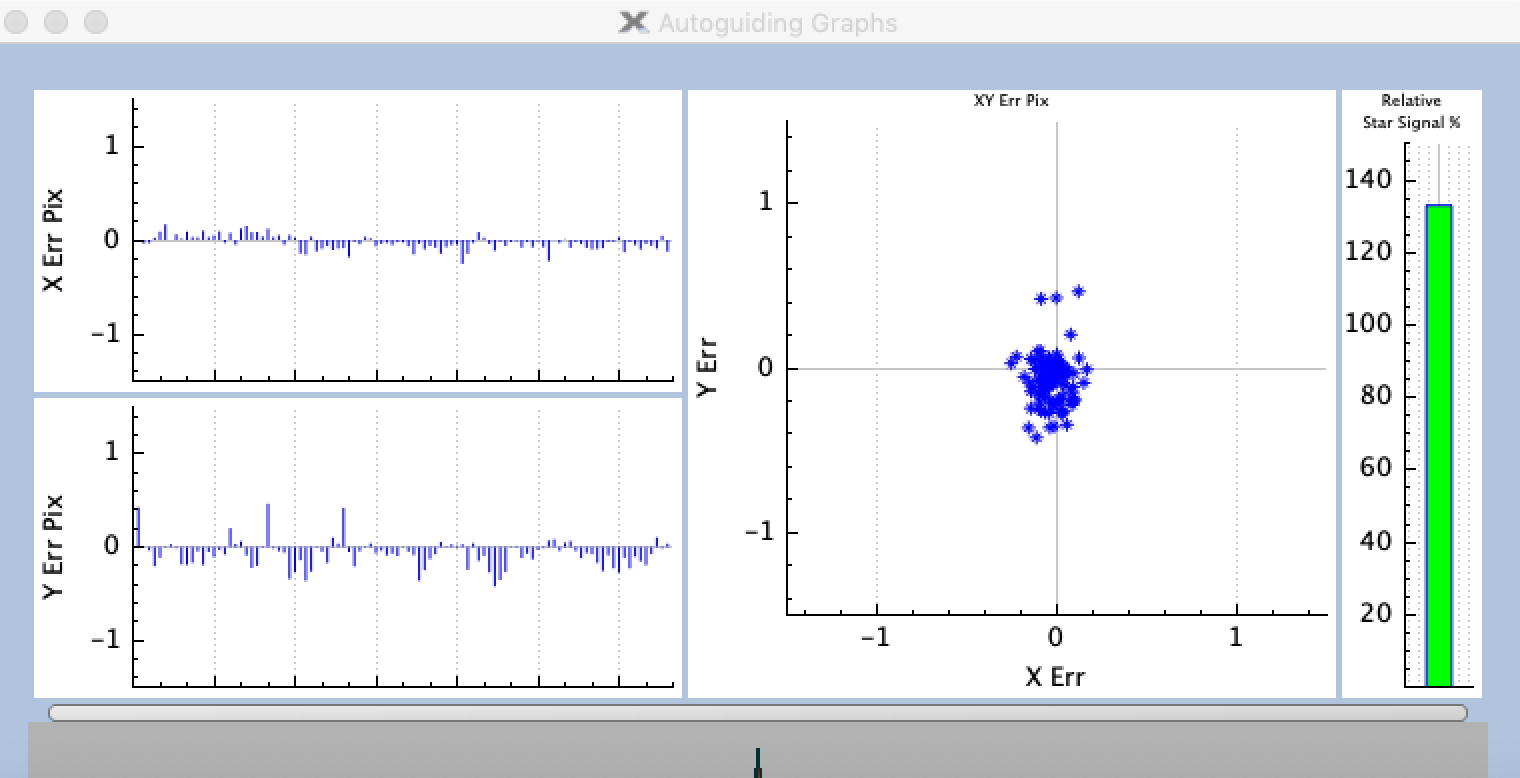
I then started guiding again to look at the results. The new set of data was promising with the RA axis having a lot less correction needed and the scatter graph (to the right) being a tighter set of points which is good and requiring less correction.
Well that was enough tonight and I was pleased with a bit more work being completed on the scope so as the clouds rolled in I packed up and went to bed.
GingerGeek round tonight to align his guide scope, focus it and make sure guiding works. The first thing we had to do though was unplug my camera and then plug his into the Mount Hub Pro due the fuse problem from the last session when it melted through the fuse holder, that will be fixed later this weekend.
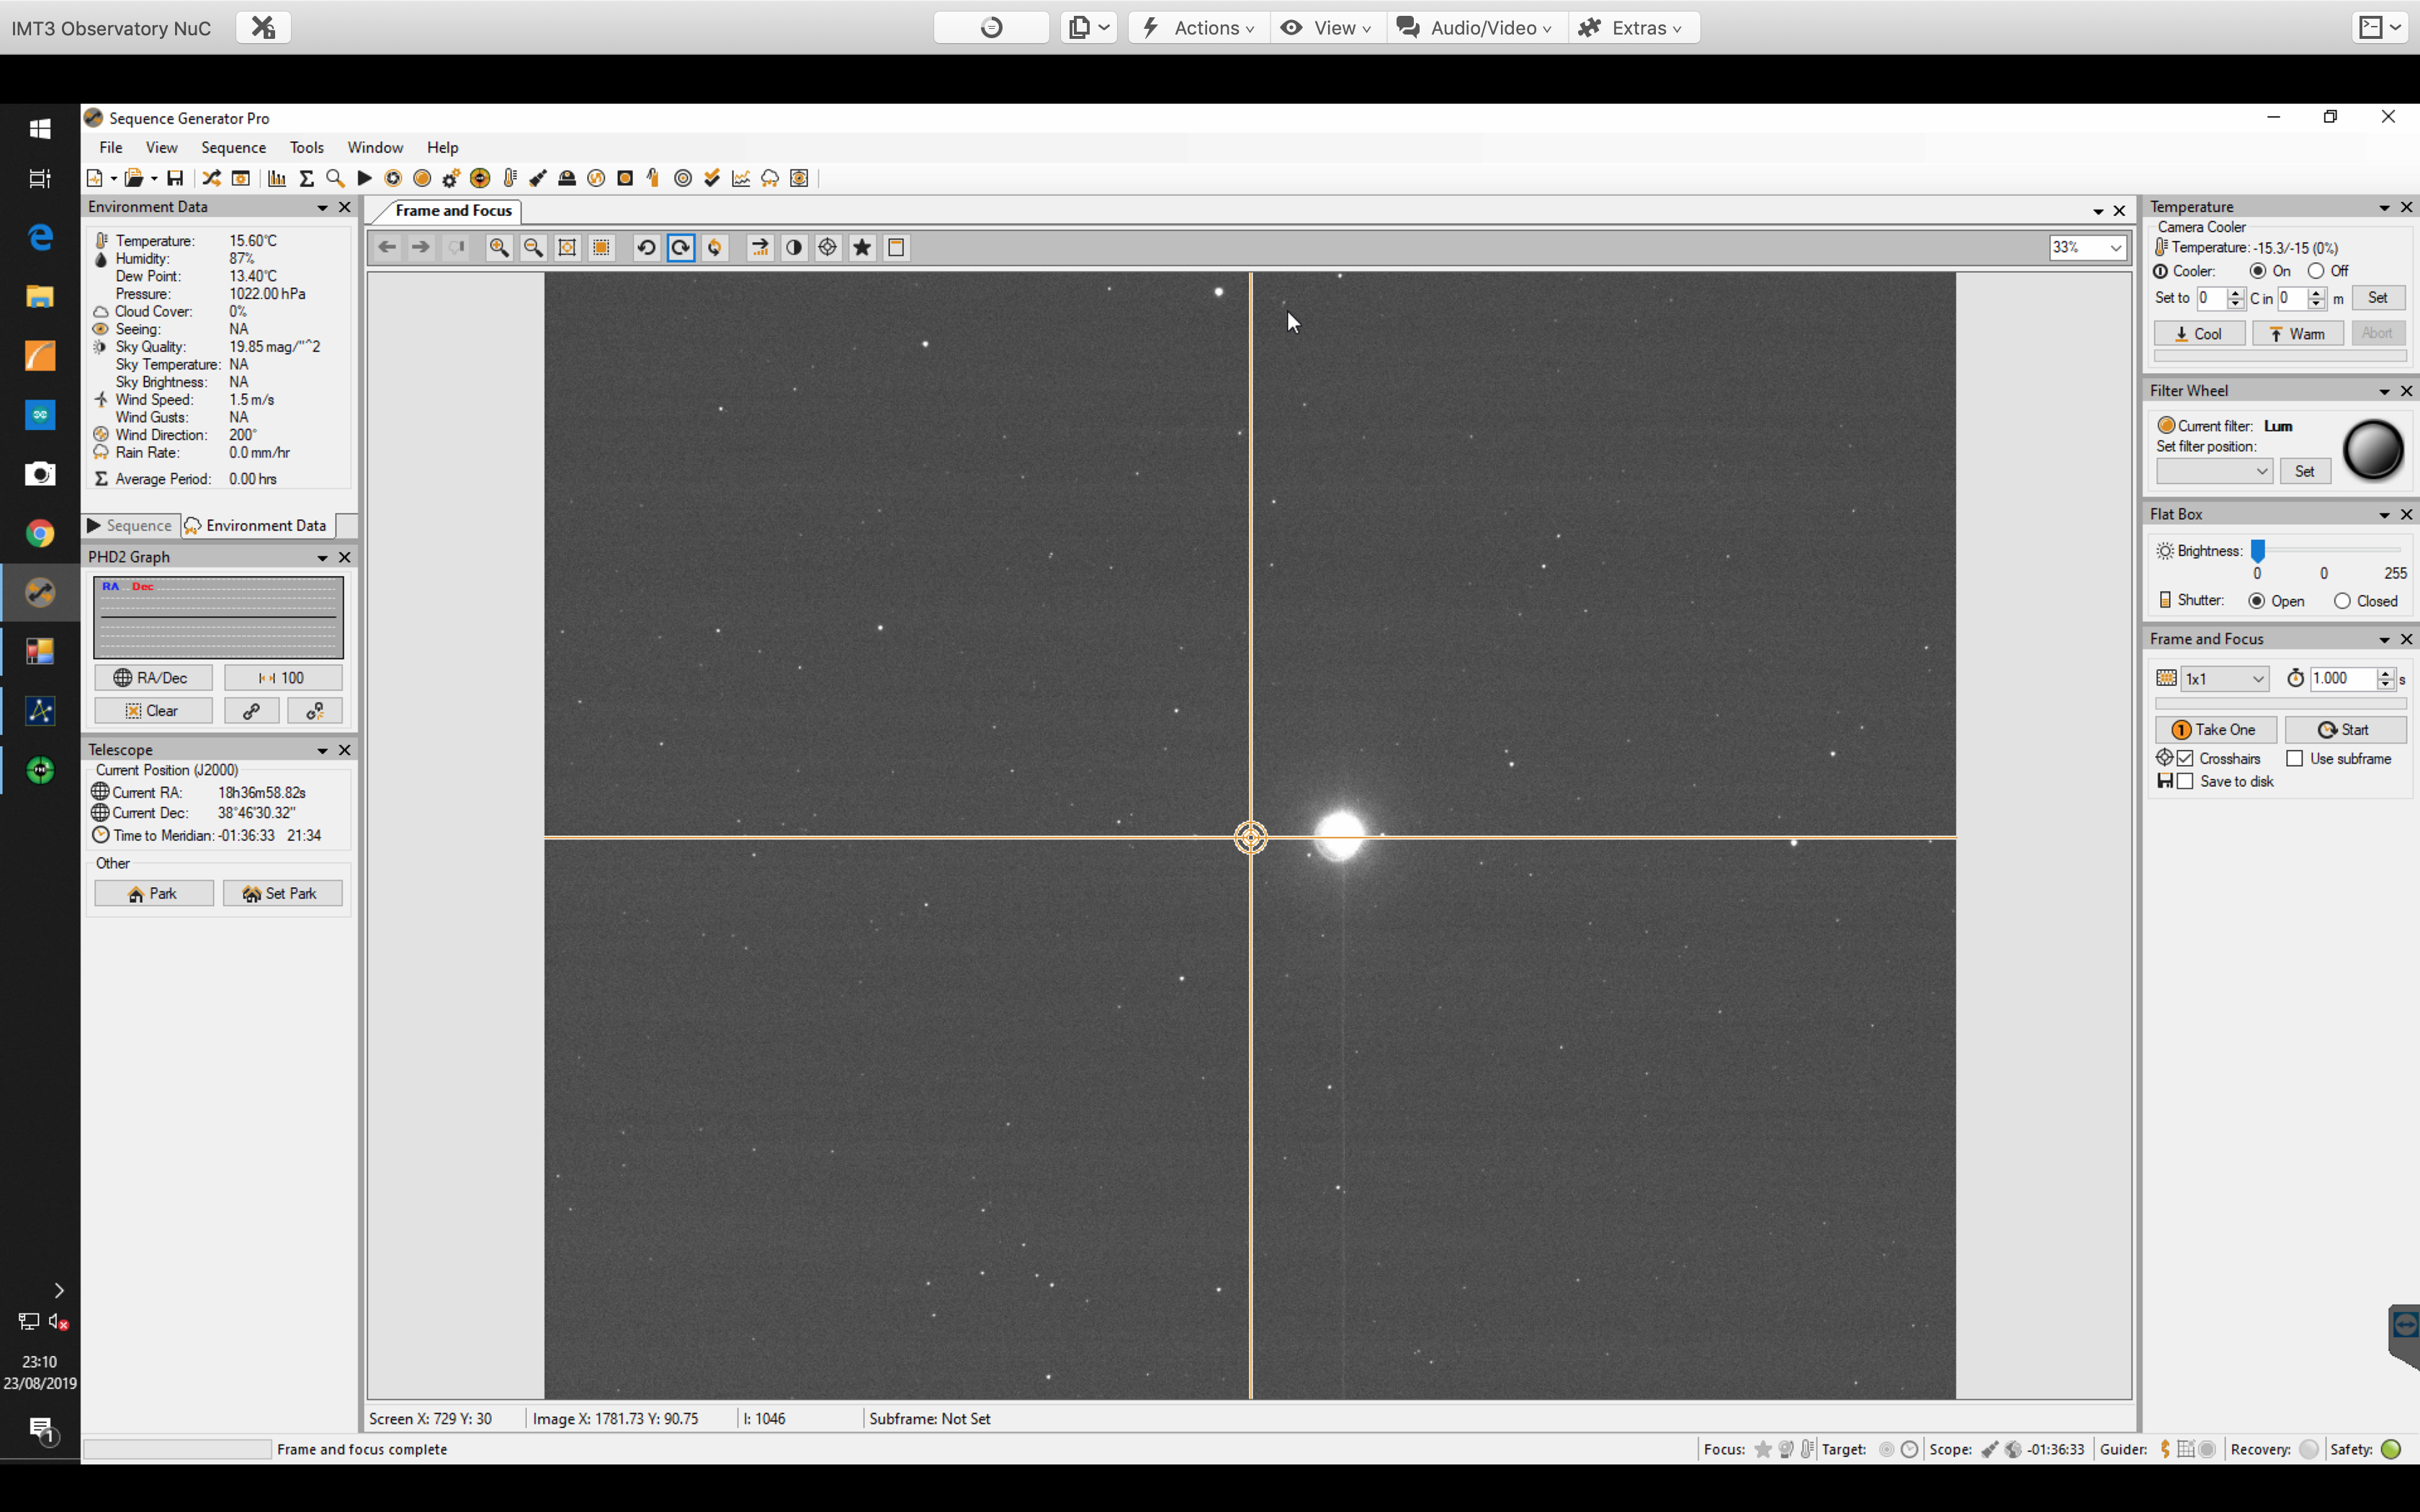
Next we slewed to Vega as seen above and took a quick image to see how far out the Esprit 120 is compared to where the OS12″ is pointing so that we can adjust it later.
Espri 120 missalignment from OS12″
So it would seem focusing was a bit more of a challenge than we thought. The first thing is we bought an adapter for the guide scope (aka the finder that came with the Esprit 120) but it did not provide enough back focus for the camera. We had a look round the adapters in the dome and found a nose extension for the Lodestar, however it was not a c-mount end to it so we landed up duck taping it on tonight until GingerGeek can bring round his adapter.
The next challenge was not seeing any stars in the lodestar, after what seemed like a long while we came to the conclusion that the picture we were looking at on the screen in PHD2 was not the camera we thought, it was instead the one from the OS12″ which at this point was not pointing through the slit.
Wrong Lodestar selected
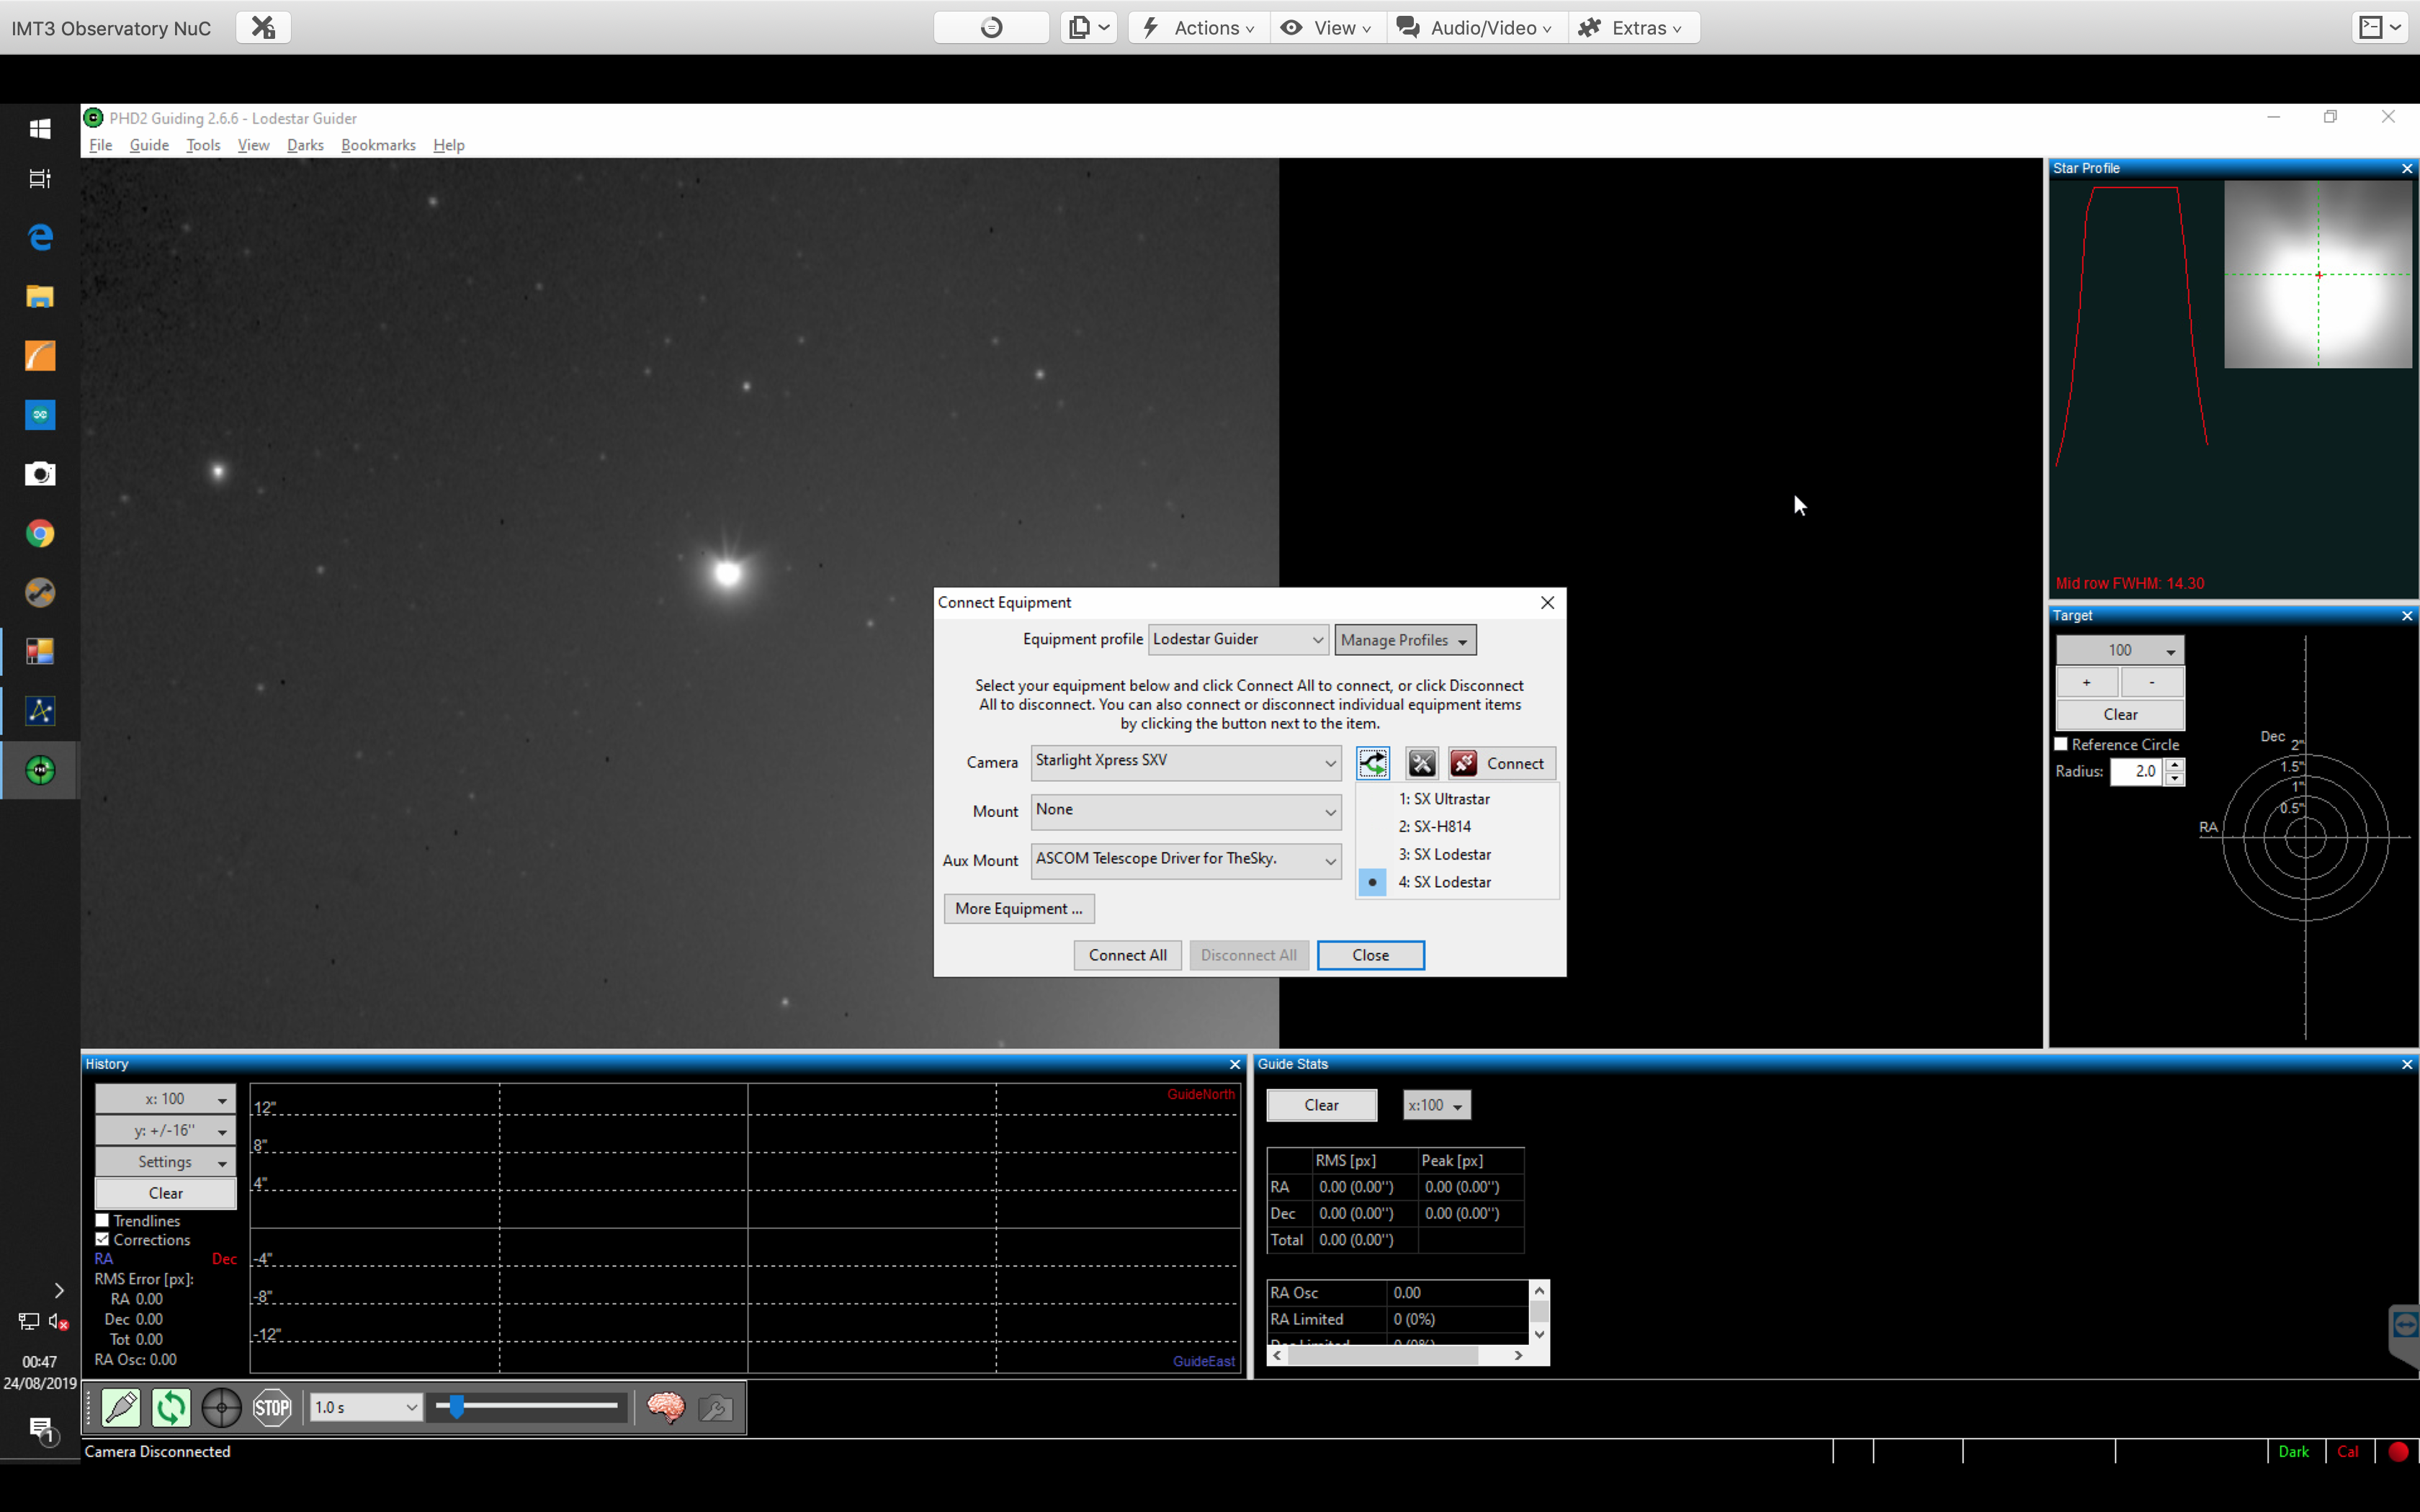
After looking through the settings on PHD2 we found a new setting we had not seen before, which seemed to be because we have multiple ASCOM cameras connected.
Selecting the right camera
The symbol is a double arrow and when clicked a drop down list of 4 Starlight Xpress cameras appeared, so we chose the 4th one which was one of the two Lodestars and that worked.
I then adjusted the guide scope in its two ring holders and aligned close to Vega which we had slewed to. Now the guide scope was spot on and the main scope ever so slightly off. This will be solved when we either shim the scope to align with the OS12″ or when we add/change the way in which it is connected to the losmandy mounting plate.
By 12:40am we had the focus sorted for the guide scope and we moved back in doors to connect back to the 2 cameras for this evening, lodestar and main imaging camera and then the Lakeside focuser to start an autofocus run on the main camera.
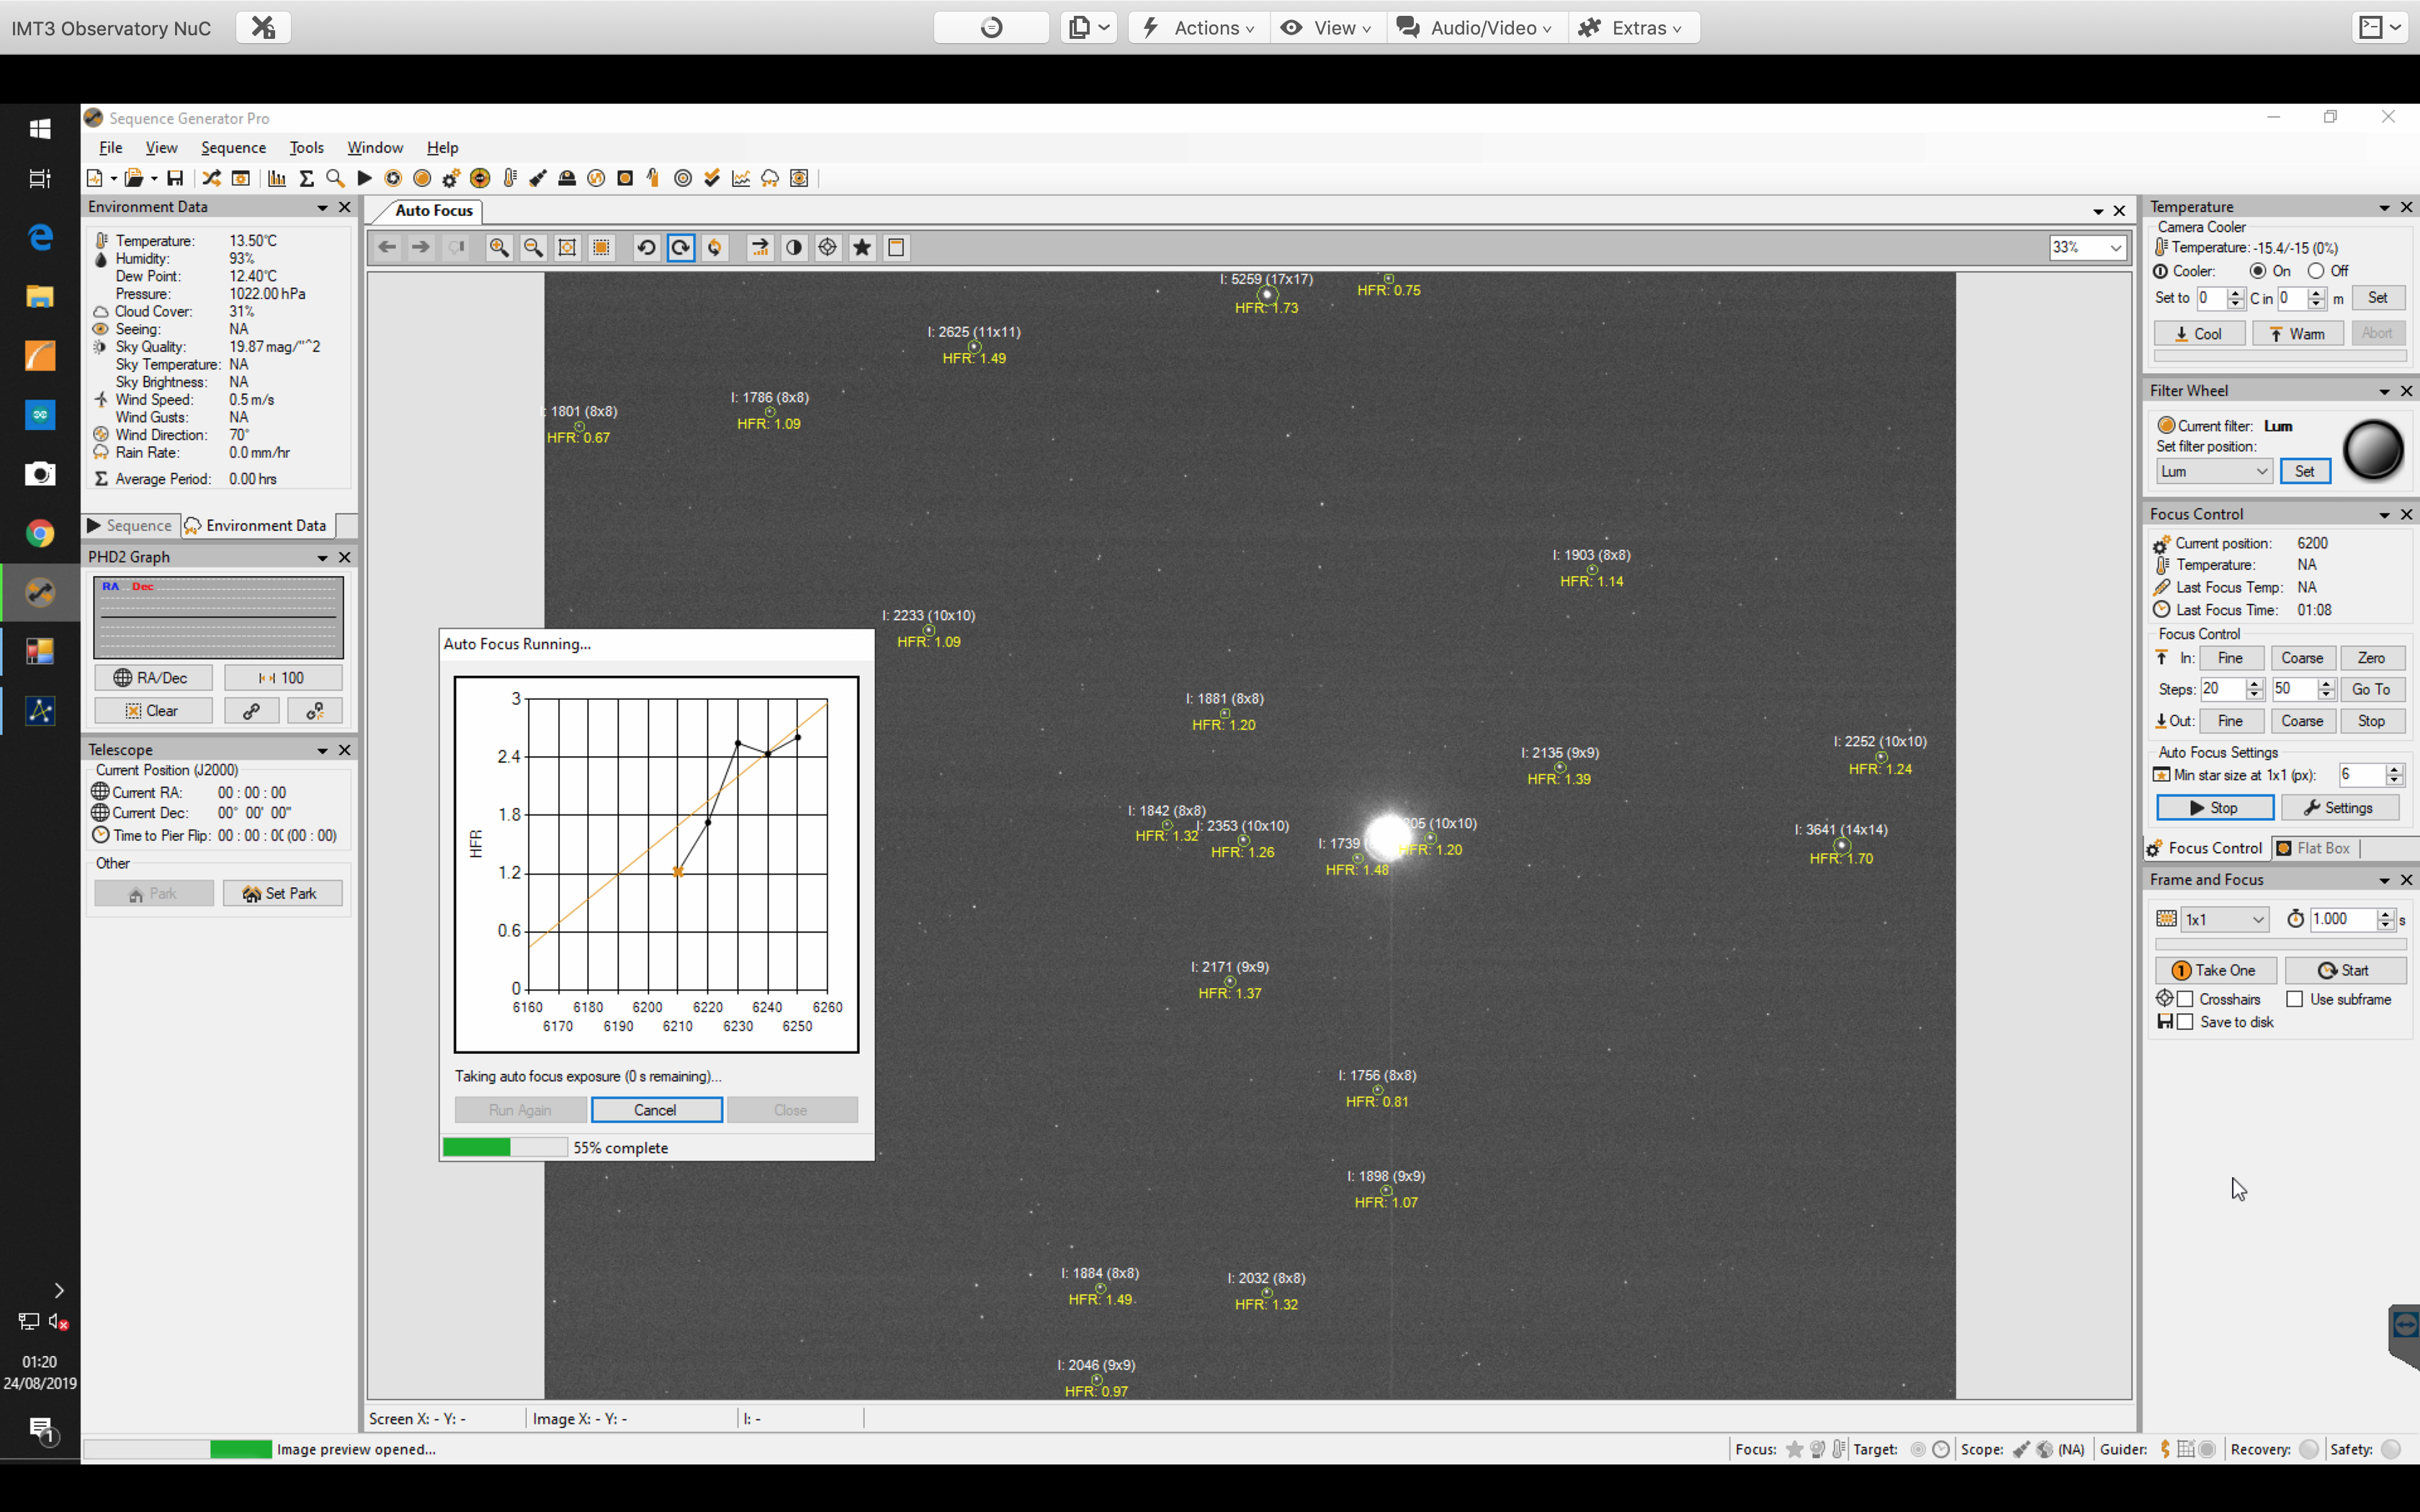
Finally starting auto focus
At 1:20am we were still trying to focus as we had not setup the autofocus routing for the Esprit 120 before, the OS12″ is now fine but this was a new challenge. GingerGeek spend an appreciable amount of time changing the step size and other settings in SGPro to effect the focus routine. Finally autofocus did a great job and we landed up at a focus point of 6225 for the Luminance filter. However there was an amount of backlash and this caused the focus point to not be the same in a one direction. GingerGeek needs to find out where he wrote down the figure we measured for backlash so we can add in.
Good auto focus achieved but with slight errorIn focus Luminance Image
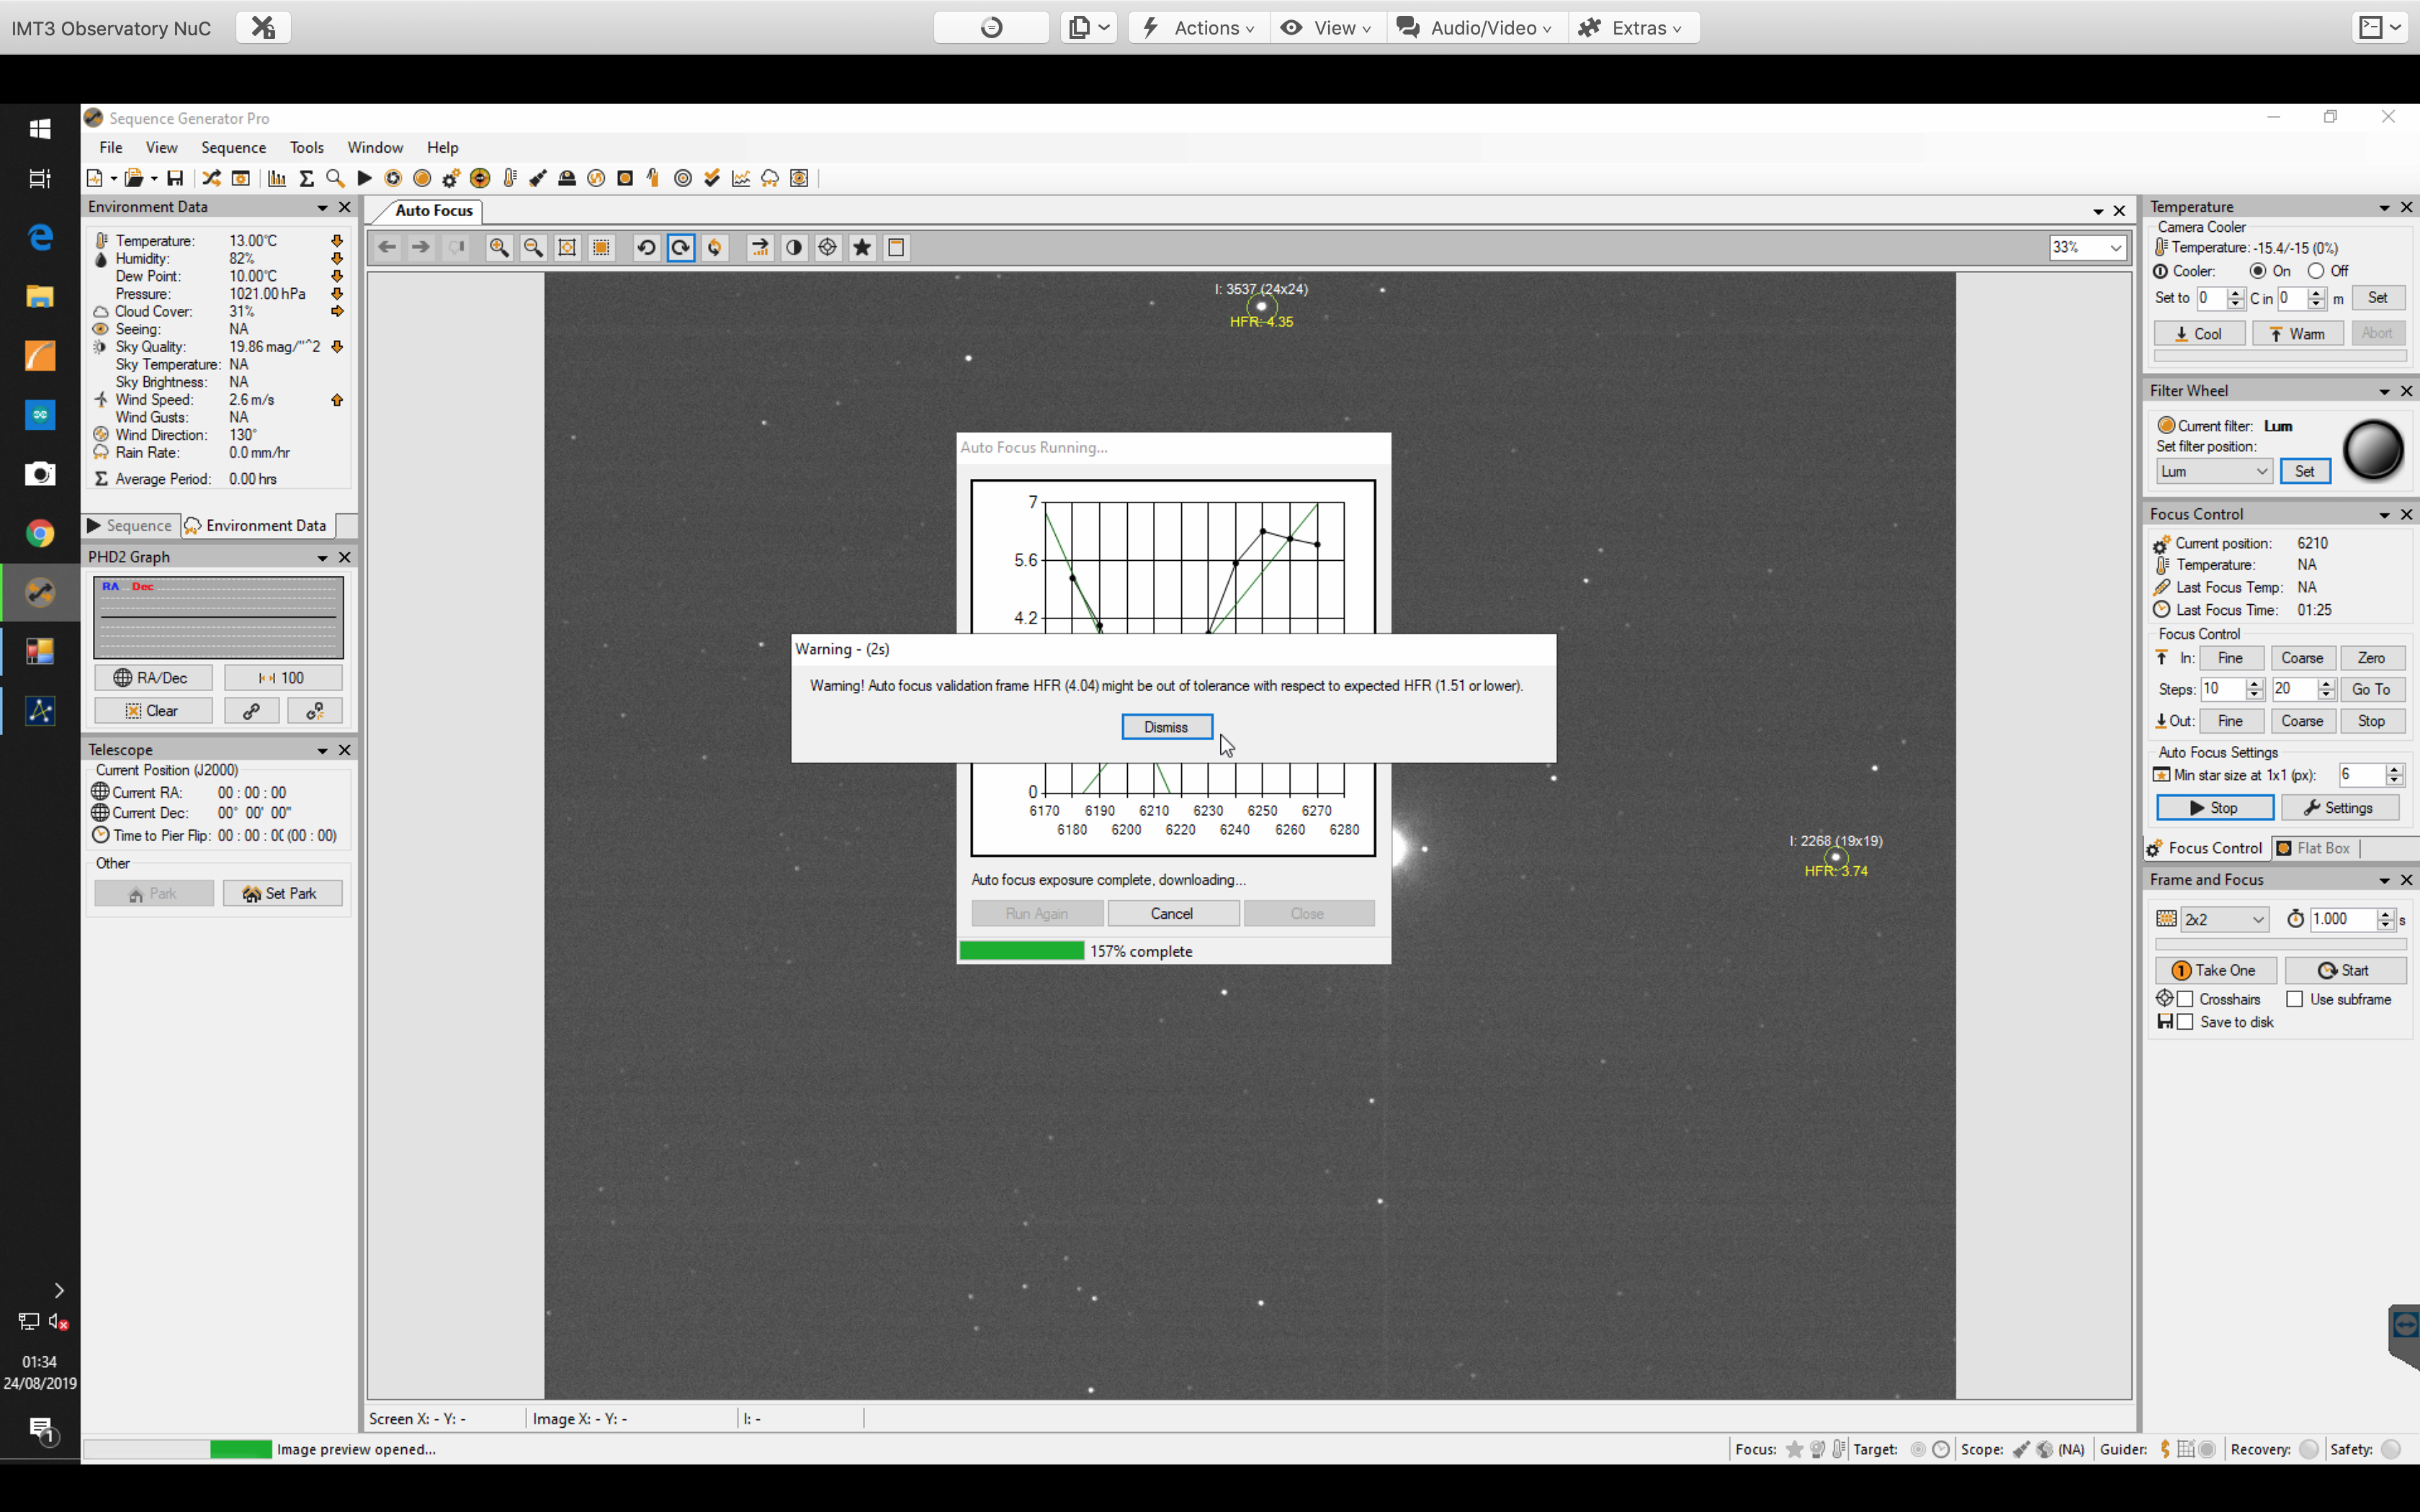
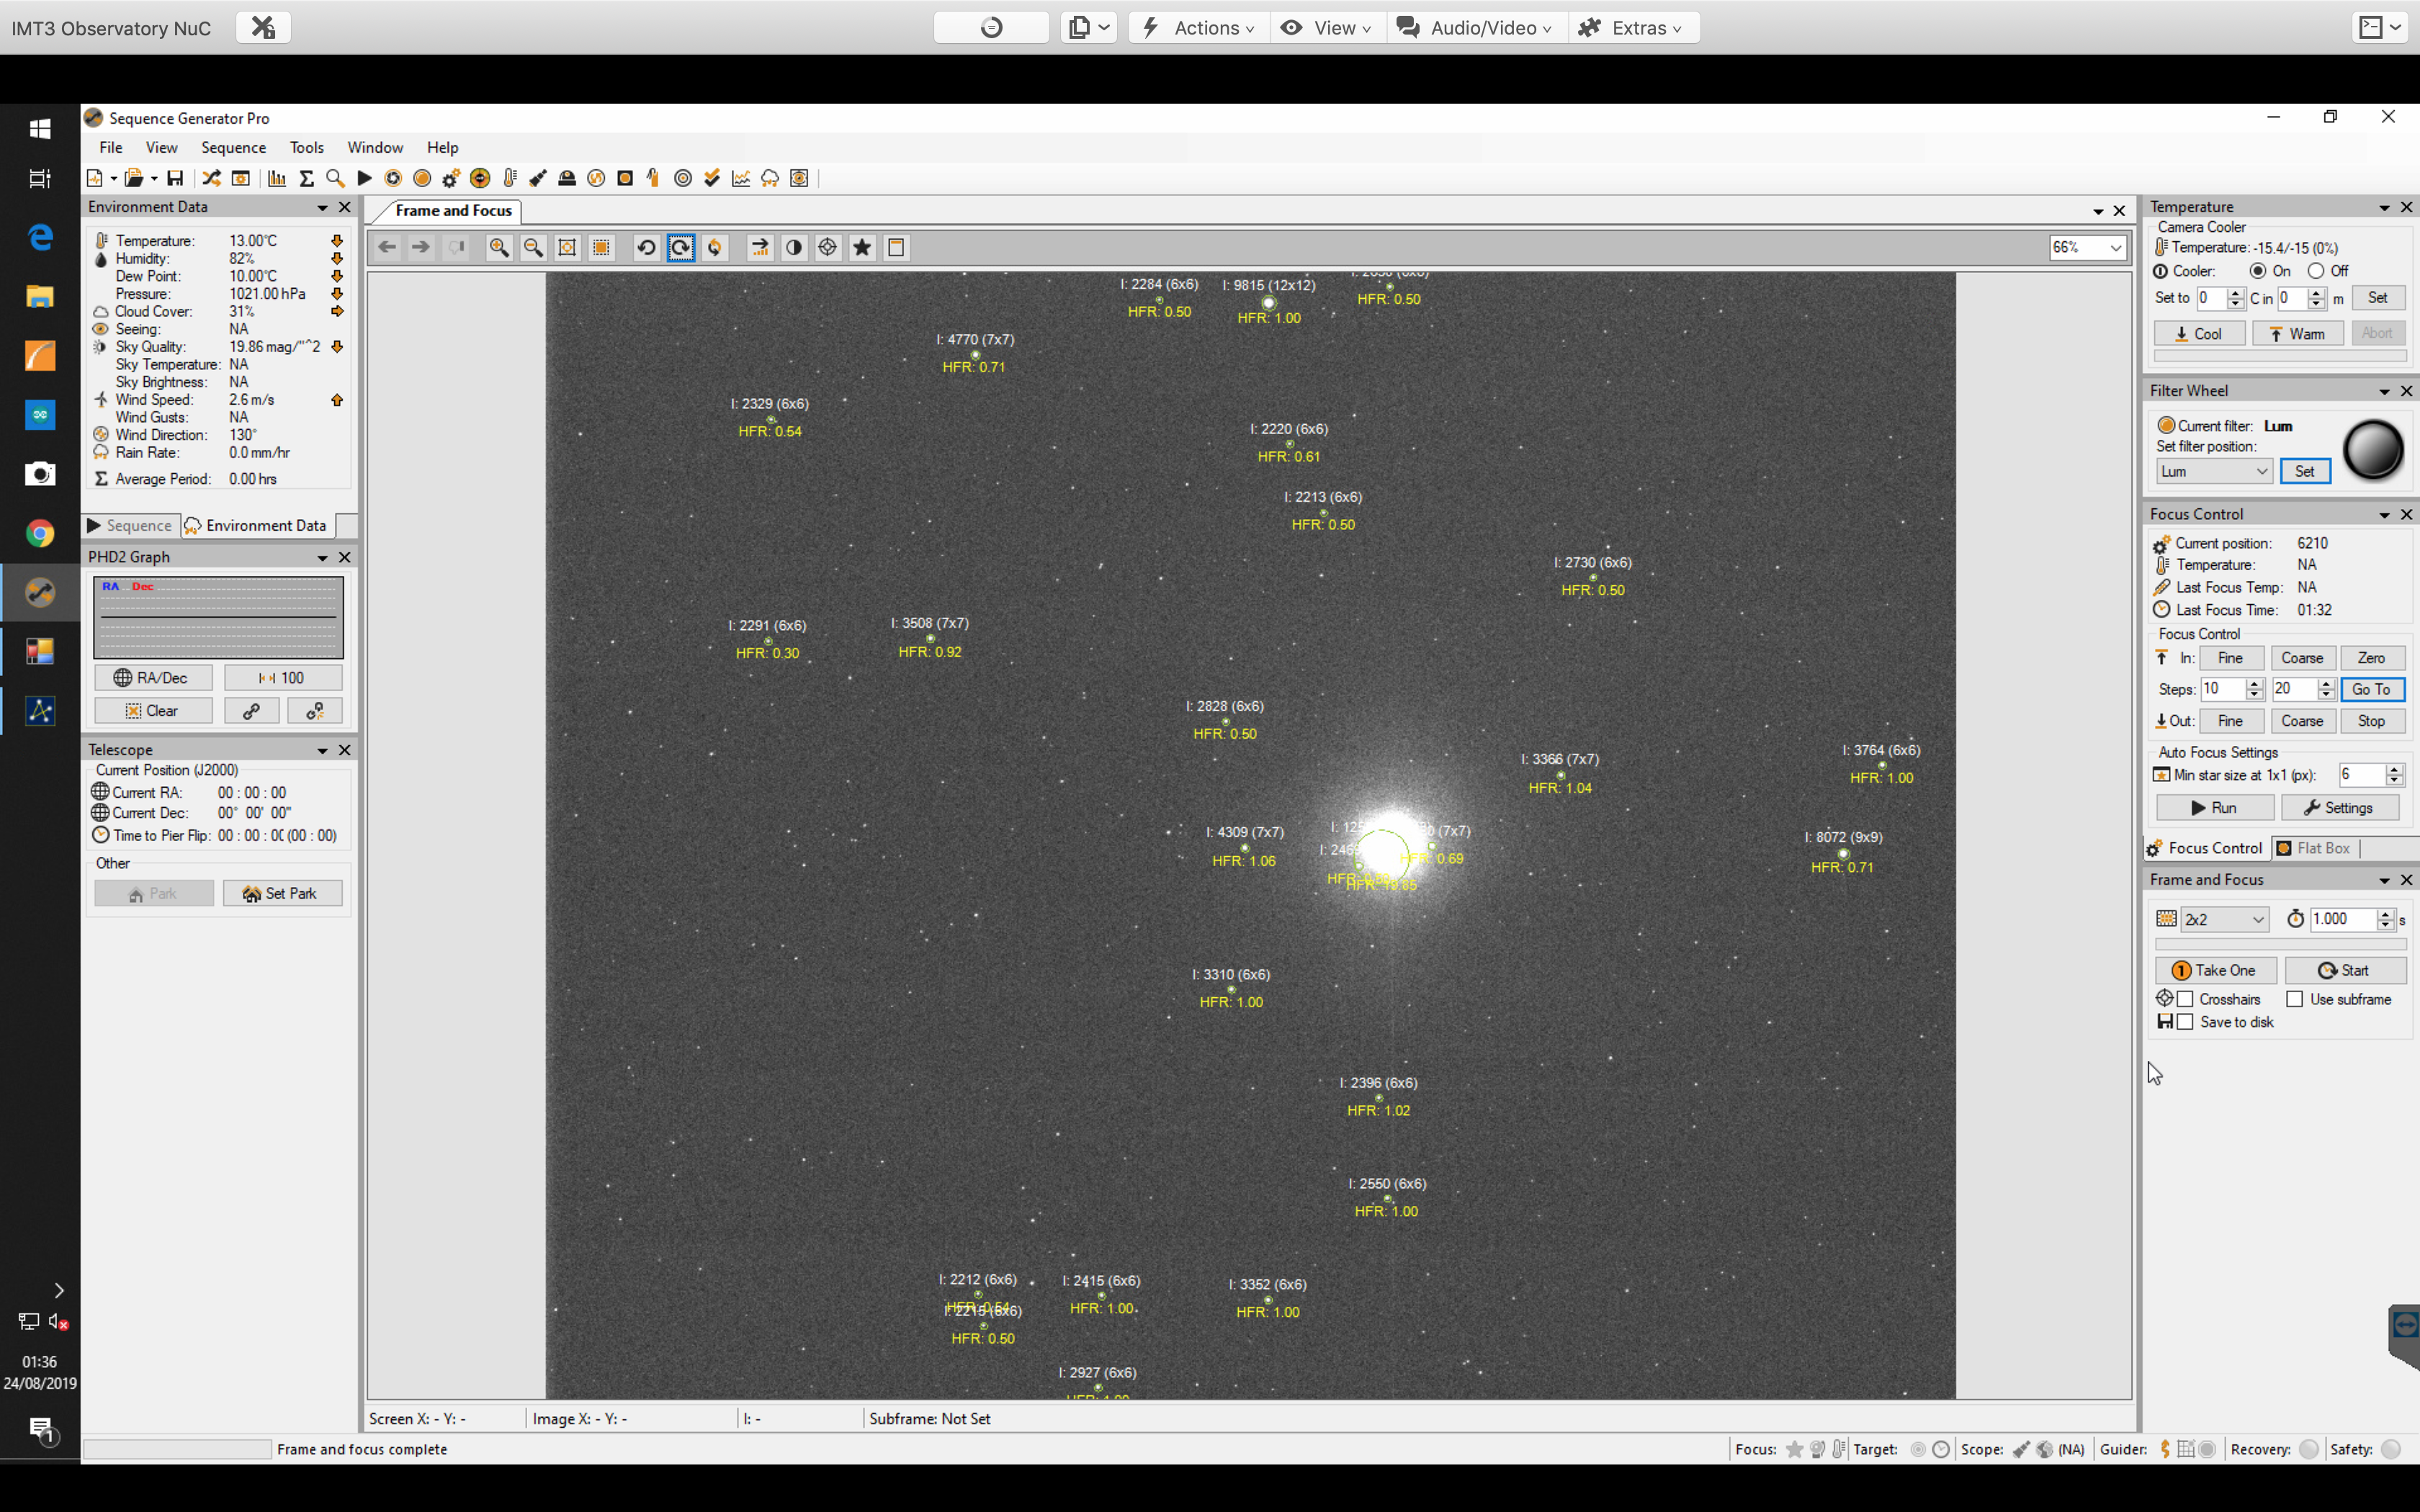
Next we slewed to the star near the Elephant Trunk, SAO 33570 and changed the filter to Ha. GingerGeek then started an auto focus run for this filter. As it was now late we were missing setting simple things such as the exposure time increase from 1s to 15s needed to actually register any stars to focus on.
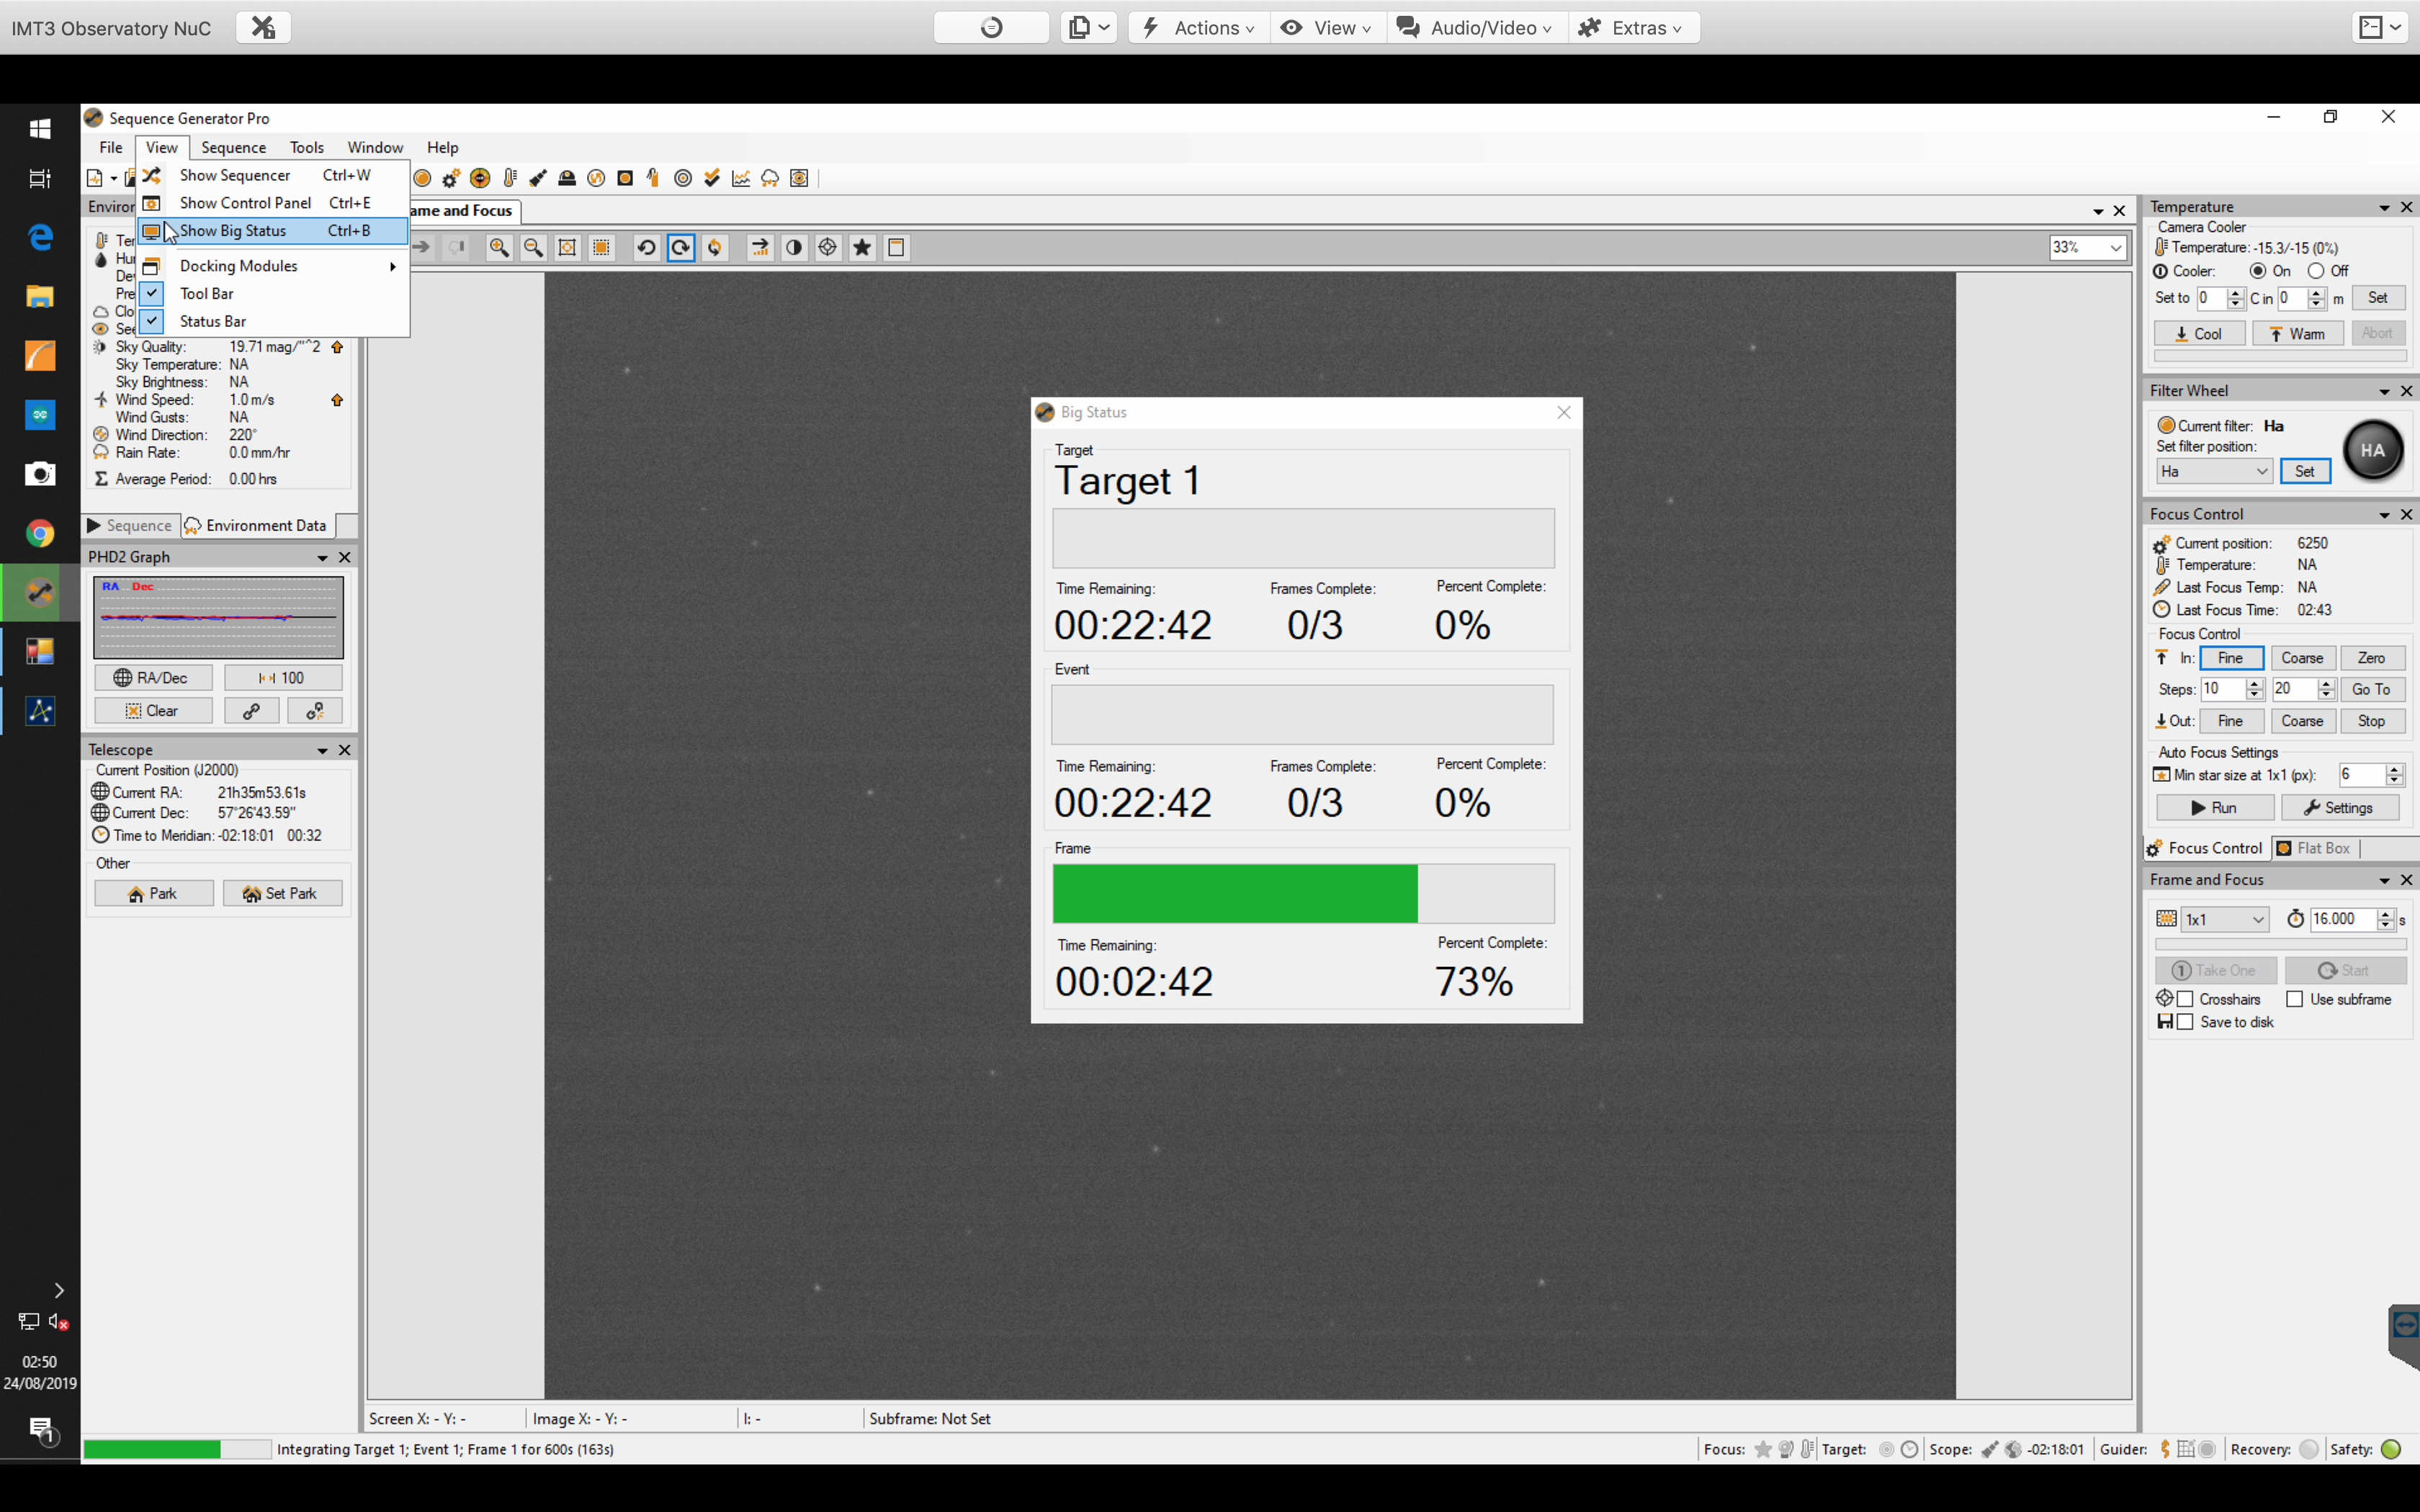
Once focused (ish) as we are tired now, we started a short test image run of 10mins subs for the Ha. GingerGeek showed me the Big Status window which is a much nicer interface to your image progress.
Big Status window
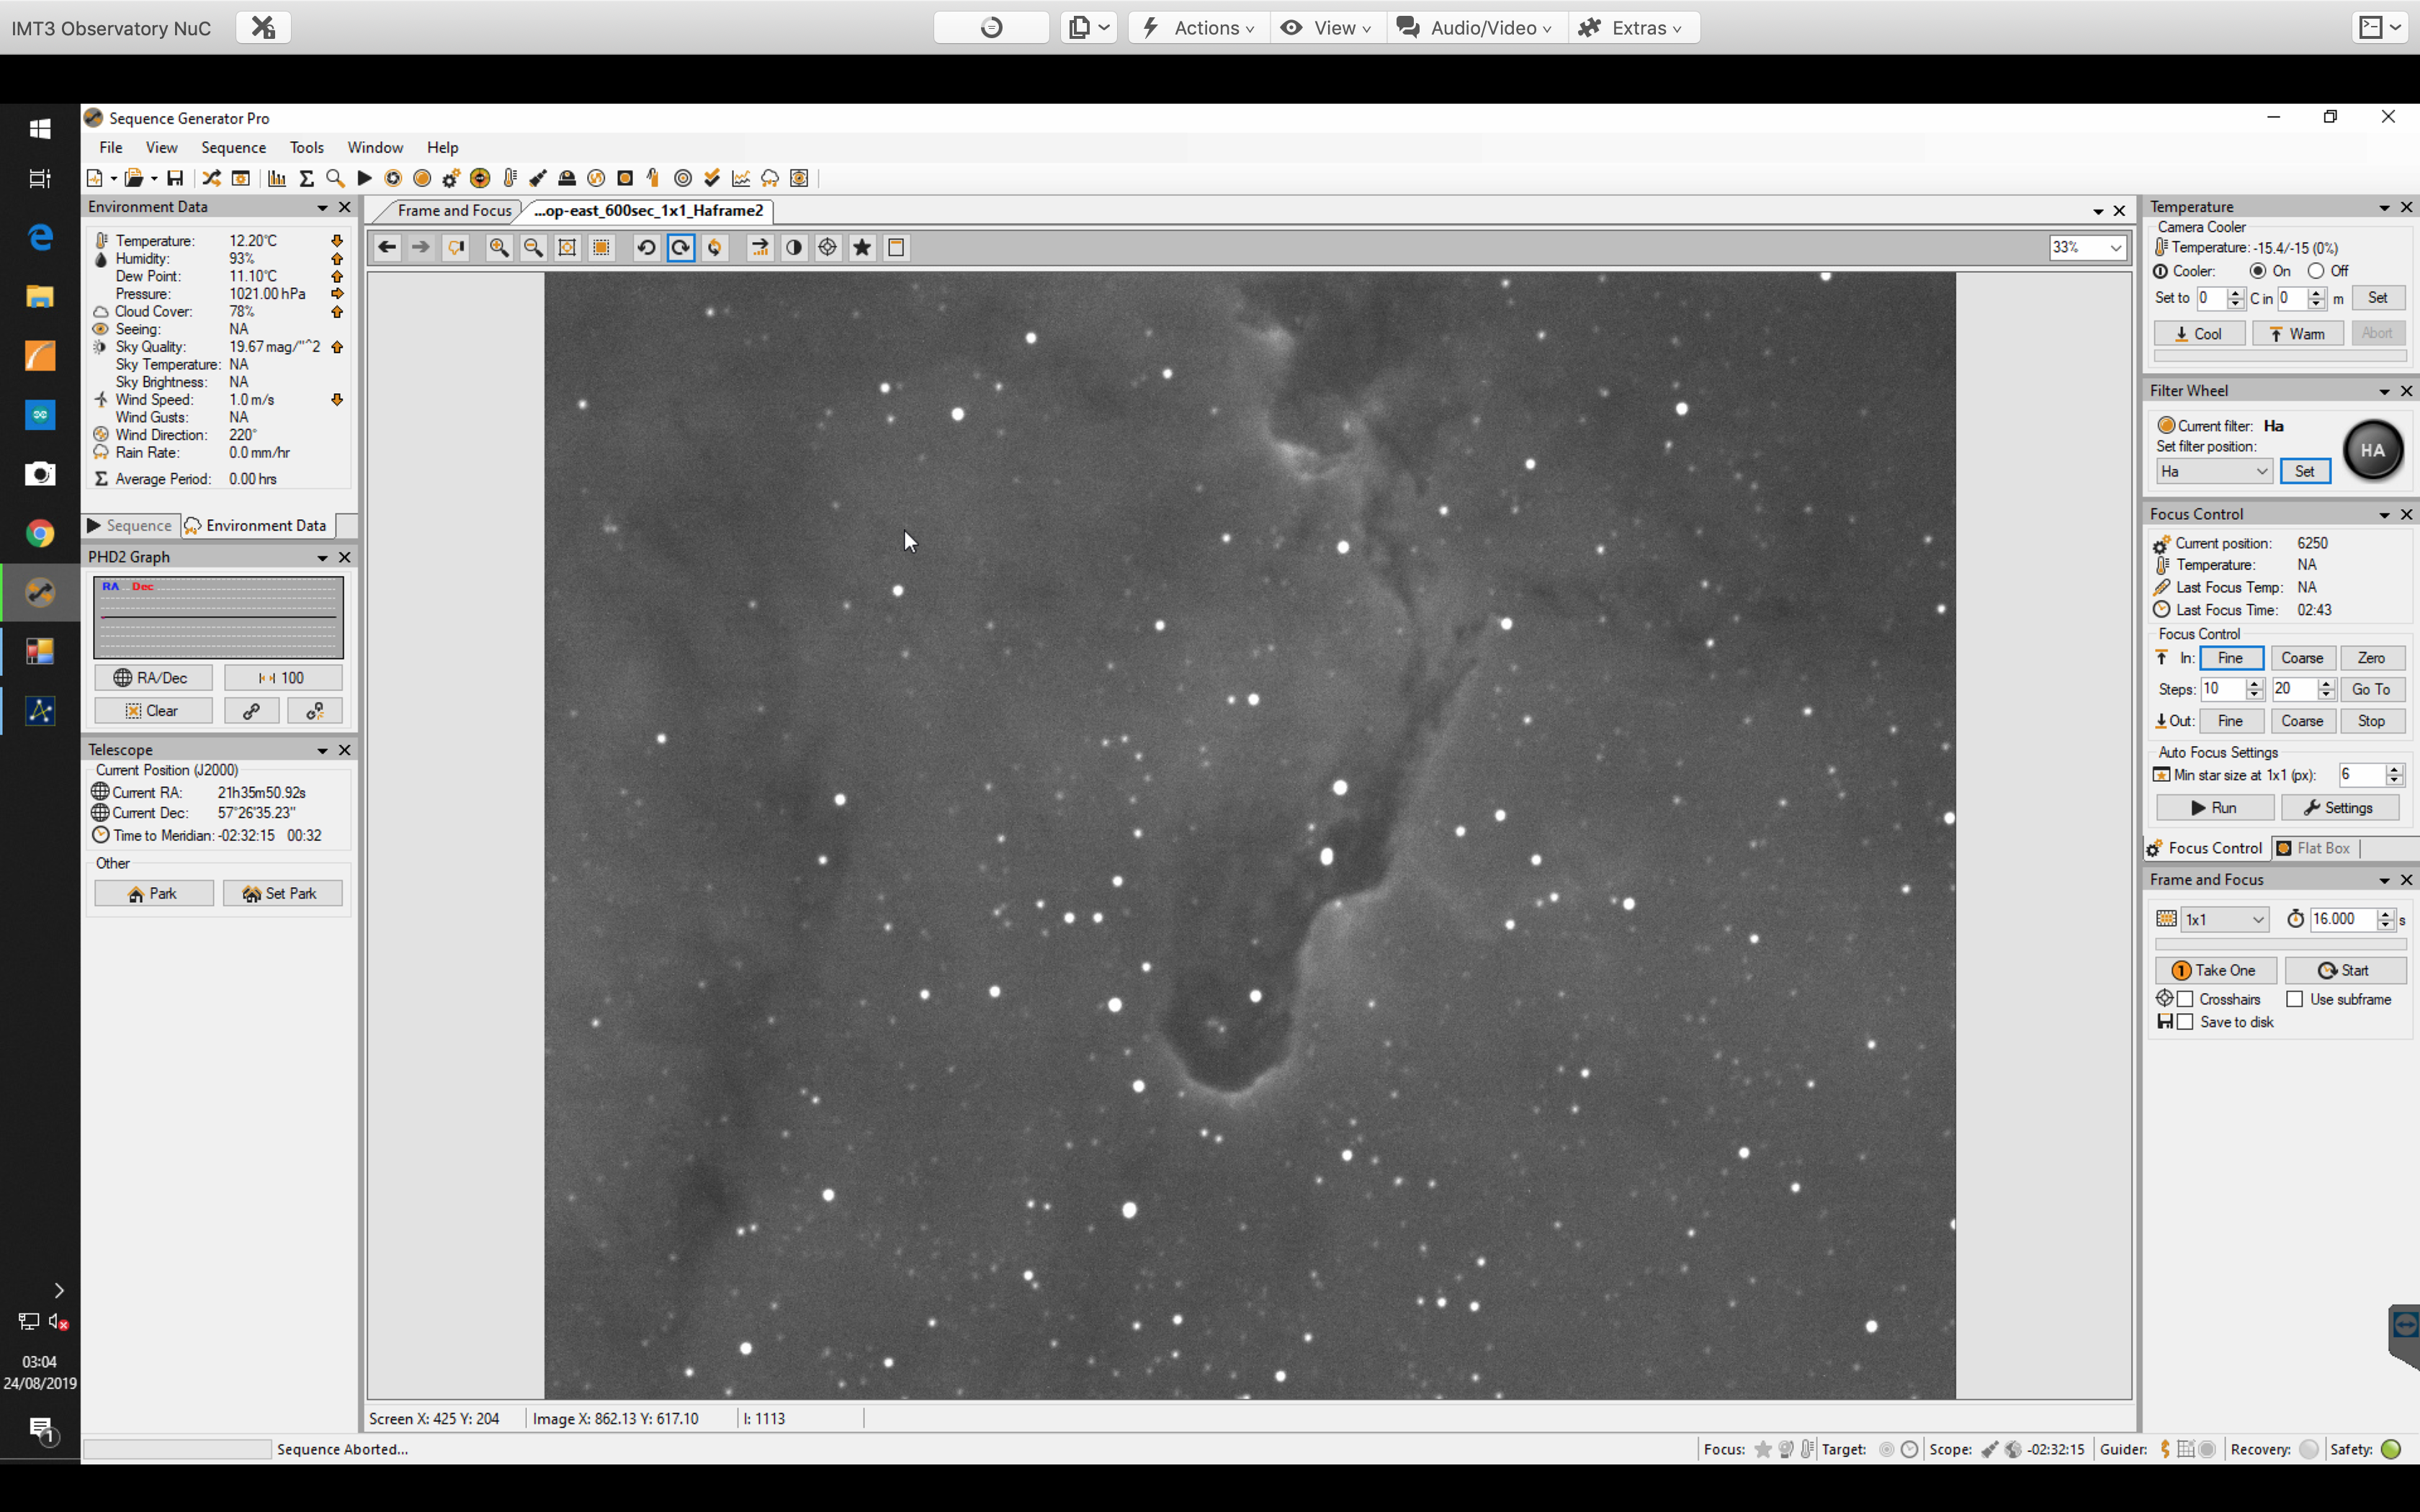
We then had a problem with guiding, there were inconsistent rates between the RA and DEC axis. This caused trailing of stars so we stopped the guiding, however the next image although still out of focus showed promise especially given we were not guiding.
So whilst the wind is blowing a gale and branches have come down off of 300 year old oaks where I live, the weather decided to ease as we went into the evening. There were still gusts of high wind but nothing really to be too concerned about for the dome.
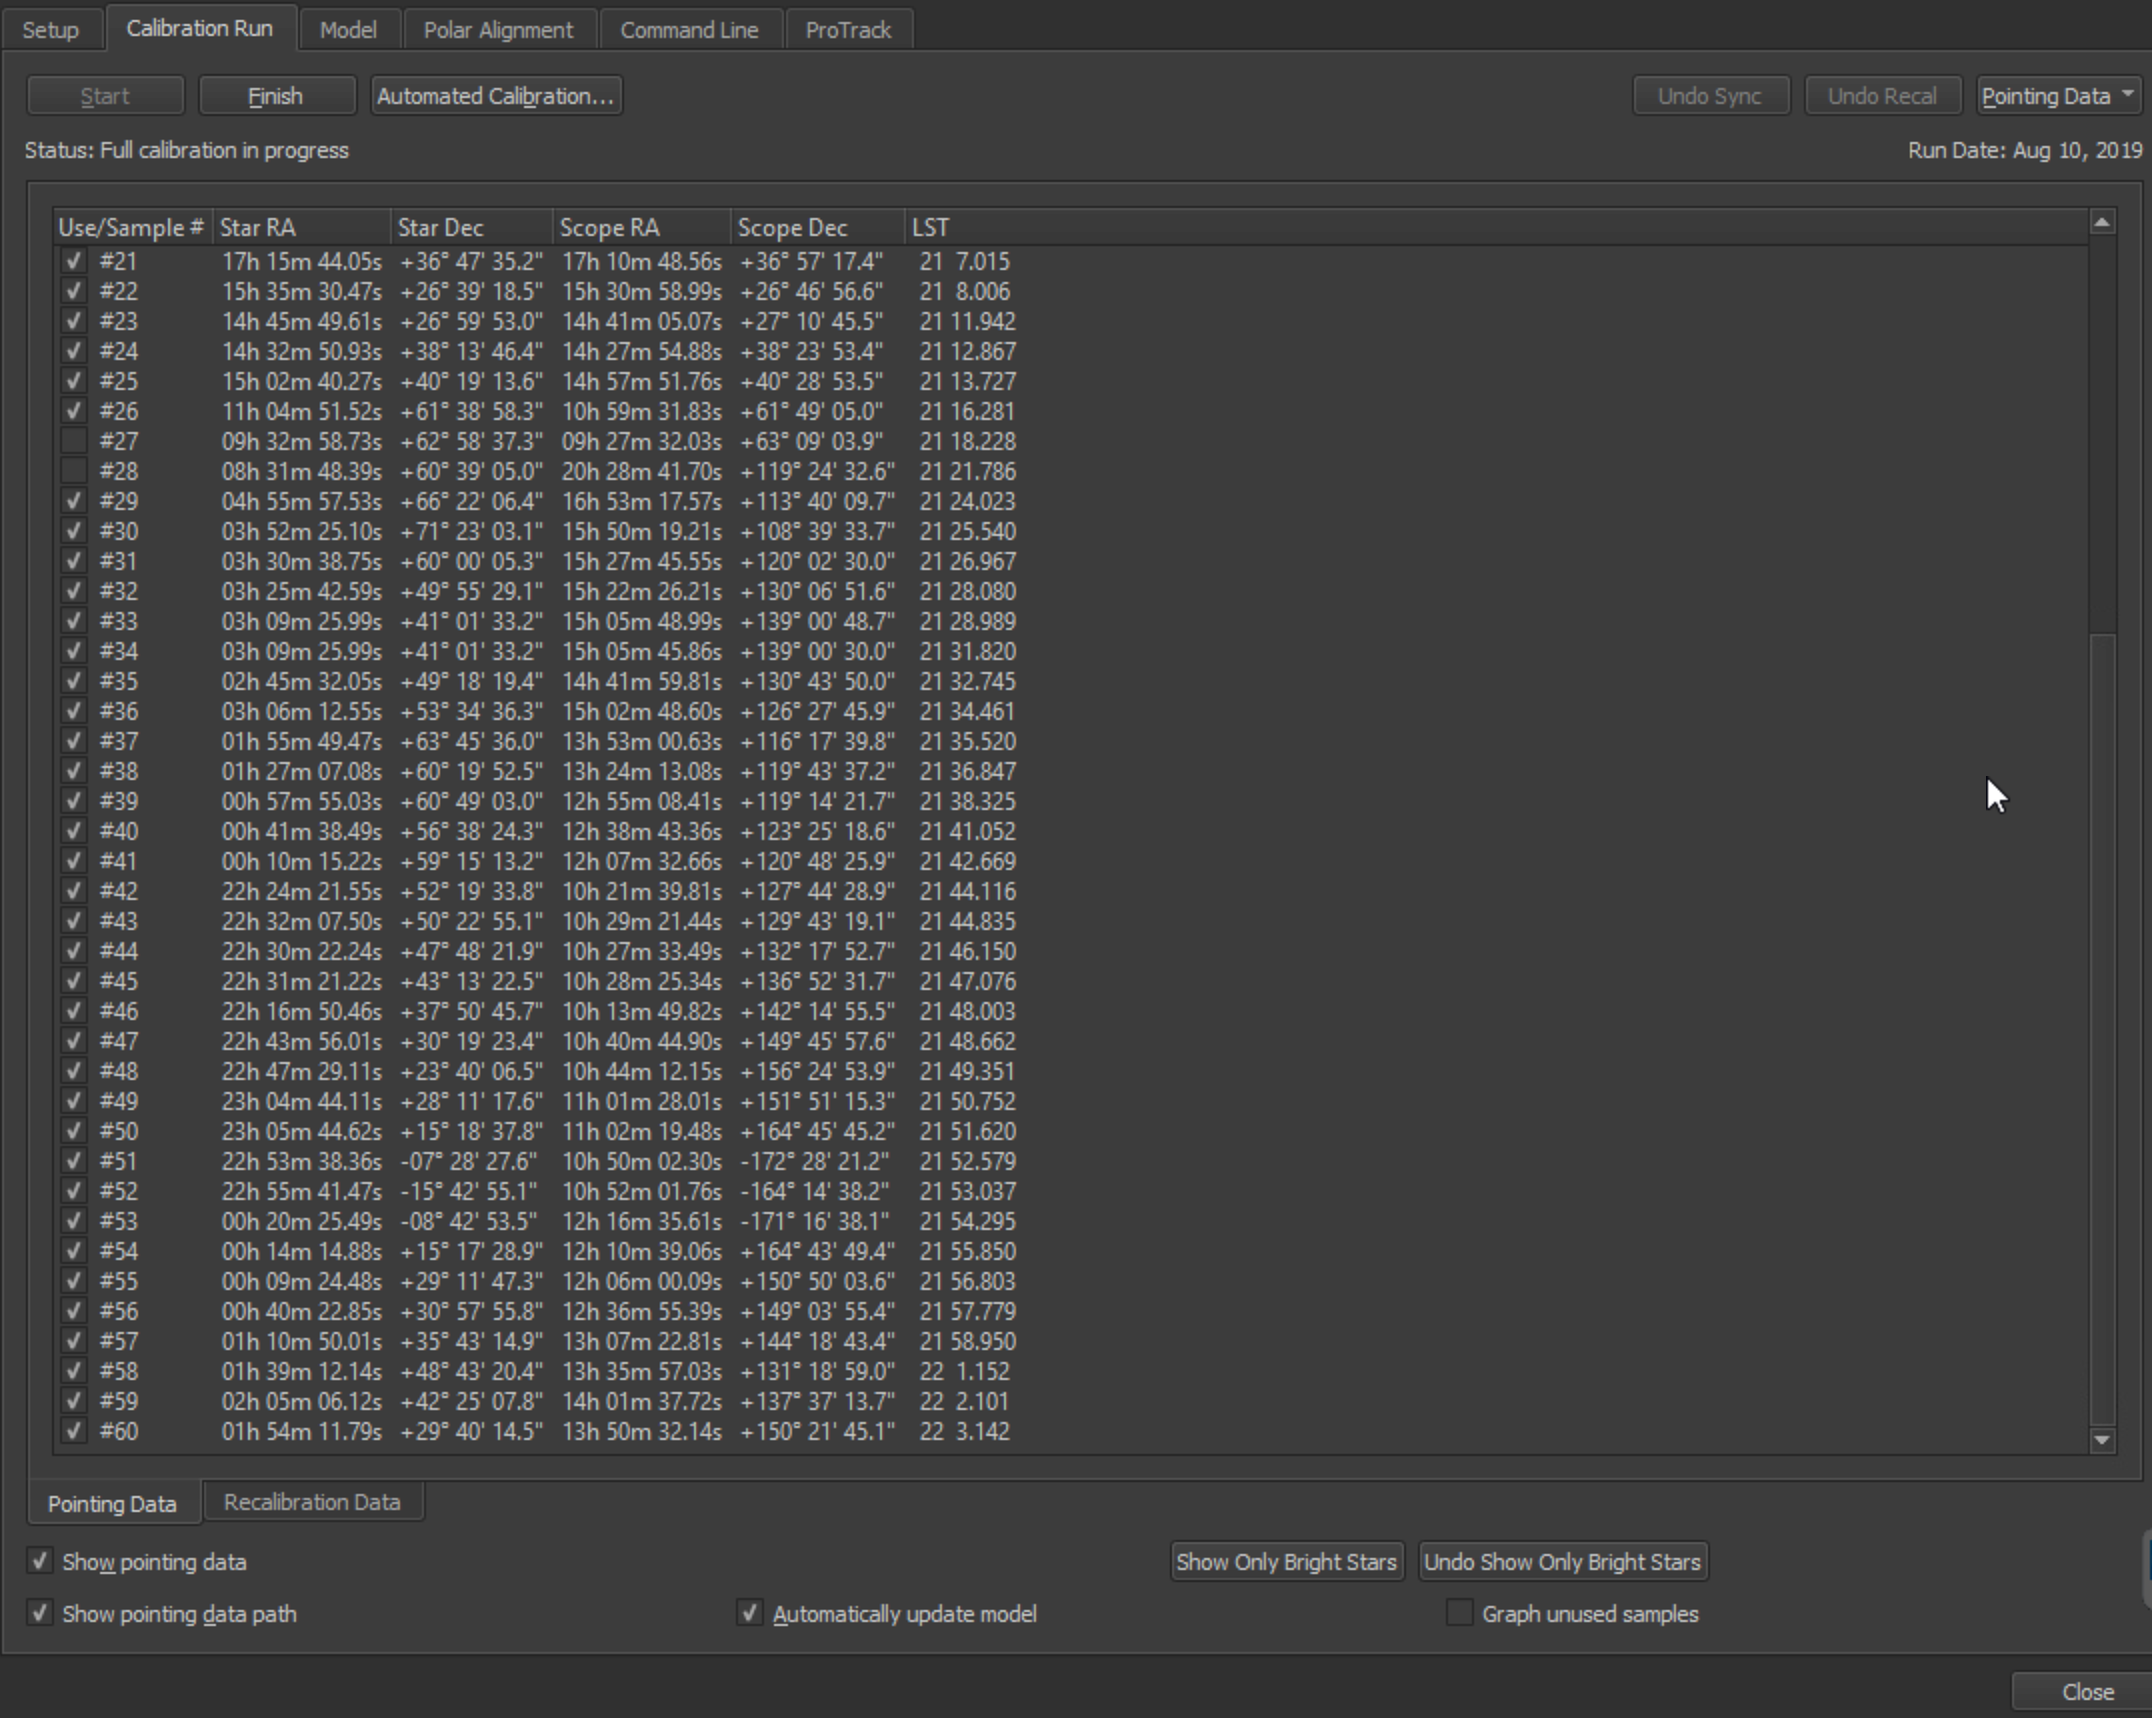
Due to more changes on the mount and the polar alignment changes I needed to do a new TPoint run. I first tried to complete a recalibration run that would add additional data, however after a 30 point run the pointing got worse to the point where I was not landing up on the object but several fields of view. So I bit the bullet and deleted the recalibration data and the original model and started again.
60 point TPoint Run
It took me about 1.5 hours to run 30 points on the East side of the mount and another 1.5 hours to run the next 30 on the West. I was happy with the results and I turned on some new Terms as I went through. As you select the term you can see the resulting change to the position of the telescope. So rightly or wrongly I used this process a few times when the pointing was either not improving or it just needed to improve a little.
TPoint Terms
I also created a Supermodel of the data and once again enabled Protrack. I then went to my usual target of the Elephant Trunk to try and get use to pointing to the right object and then imaging it from SGPro. I decided the easiest thing was to use The SkyX to move to the object as I knew I wanted to be centred on SAO 33570 a star in the trunk. I did this and with my new pointing capability since this evenings TPointing, the scope landed up pointing at pretty much the right area. So instead of Sync and Solve I left it at this location for tonight.
Centred on SAO 33570
The Polar Alignment report produced by TPoint on this new 60 point model showed very little error in either RA or DEC which is a testament to the long hours I put in drift aligning the mount.
Polar Alignment Report
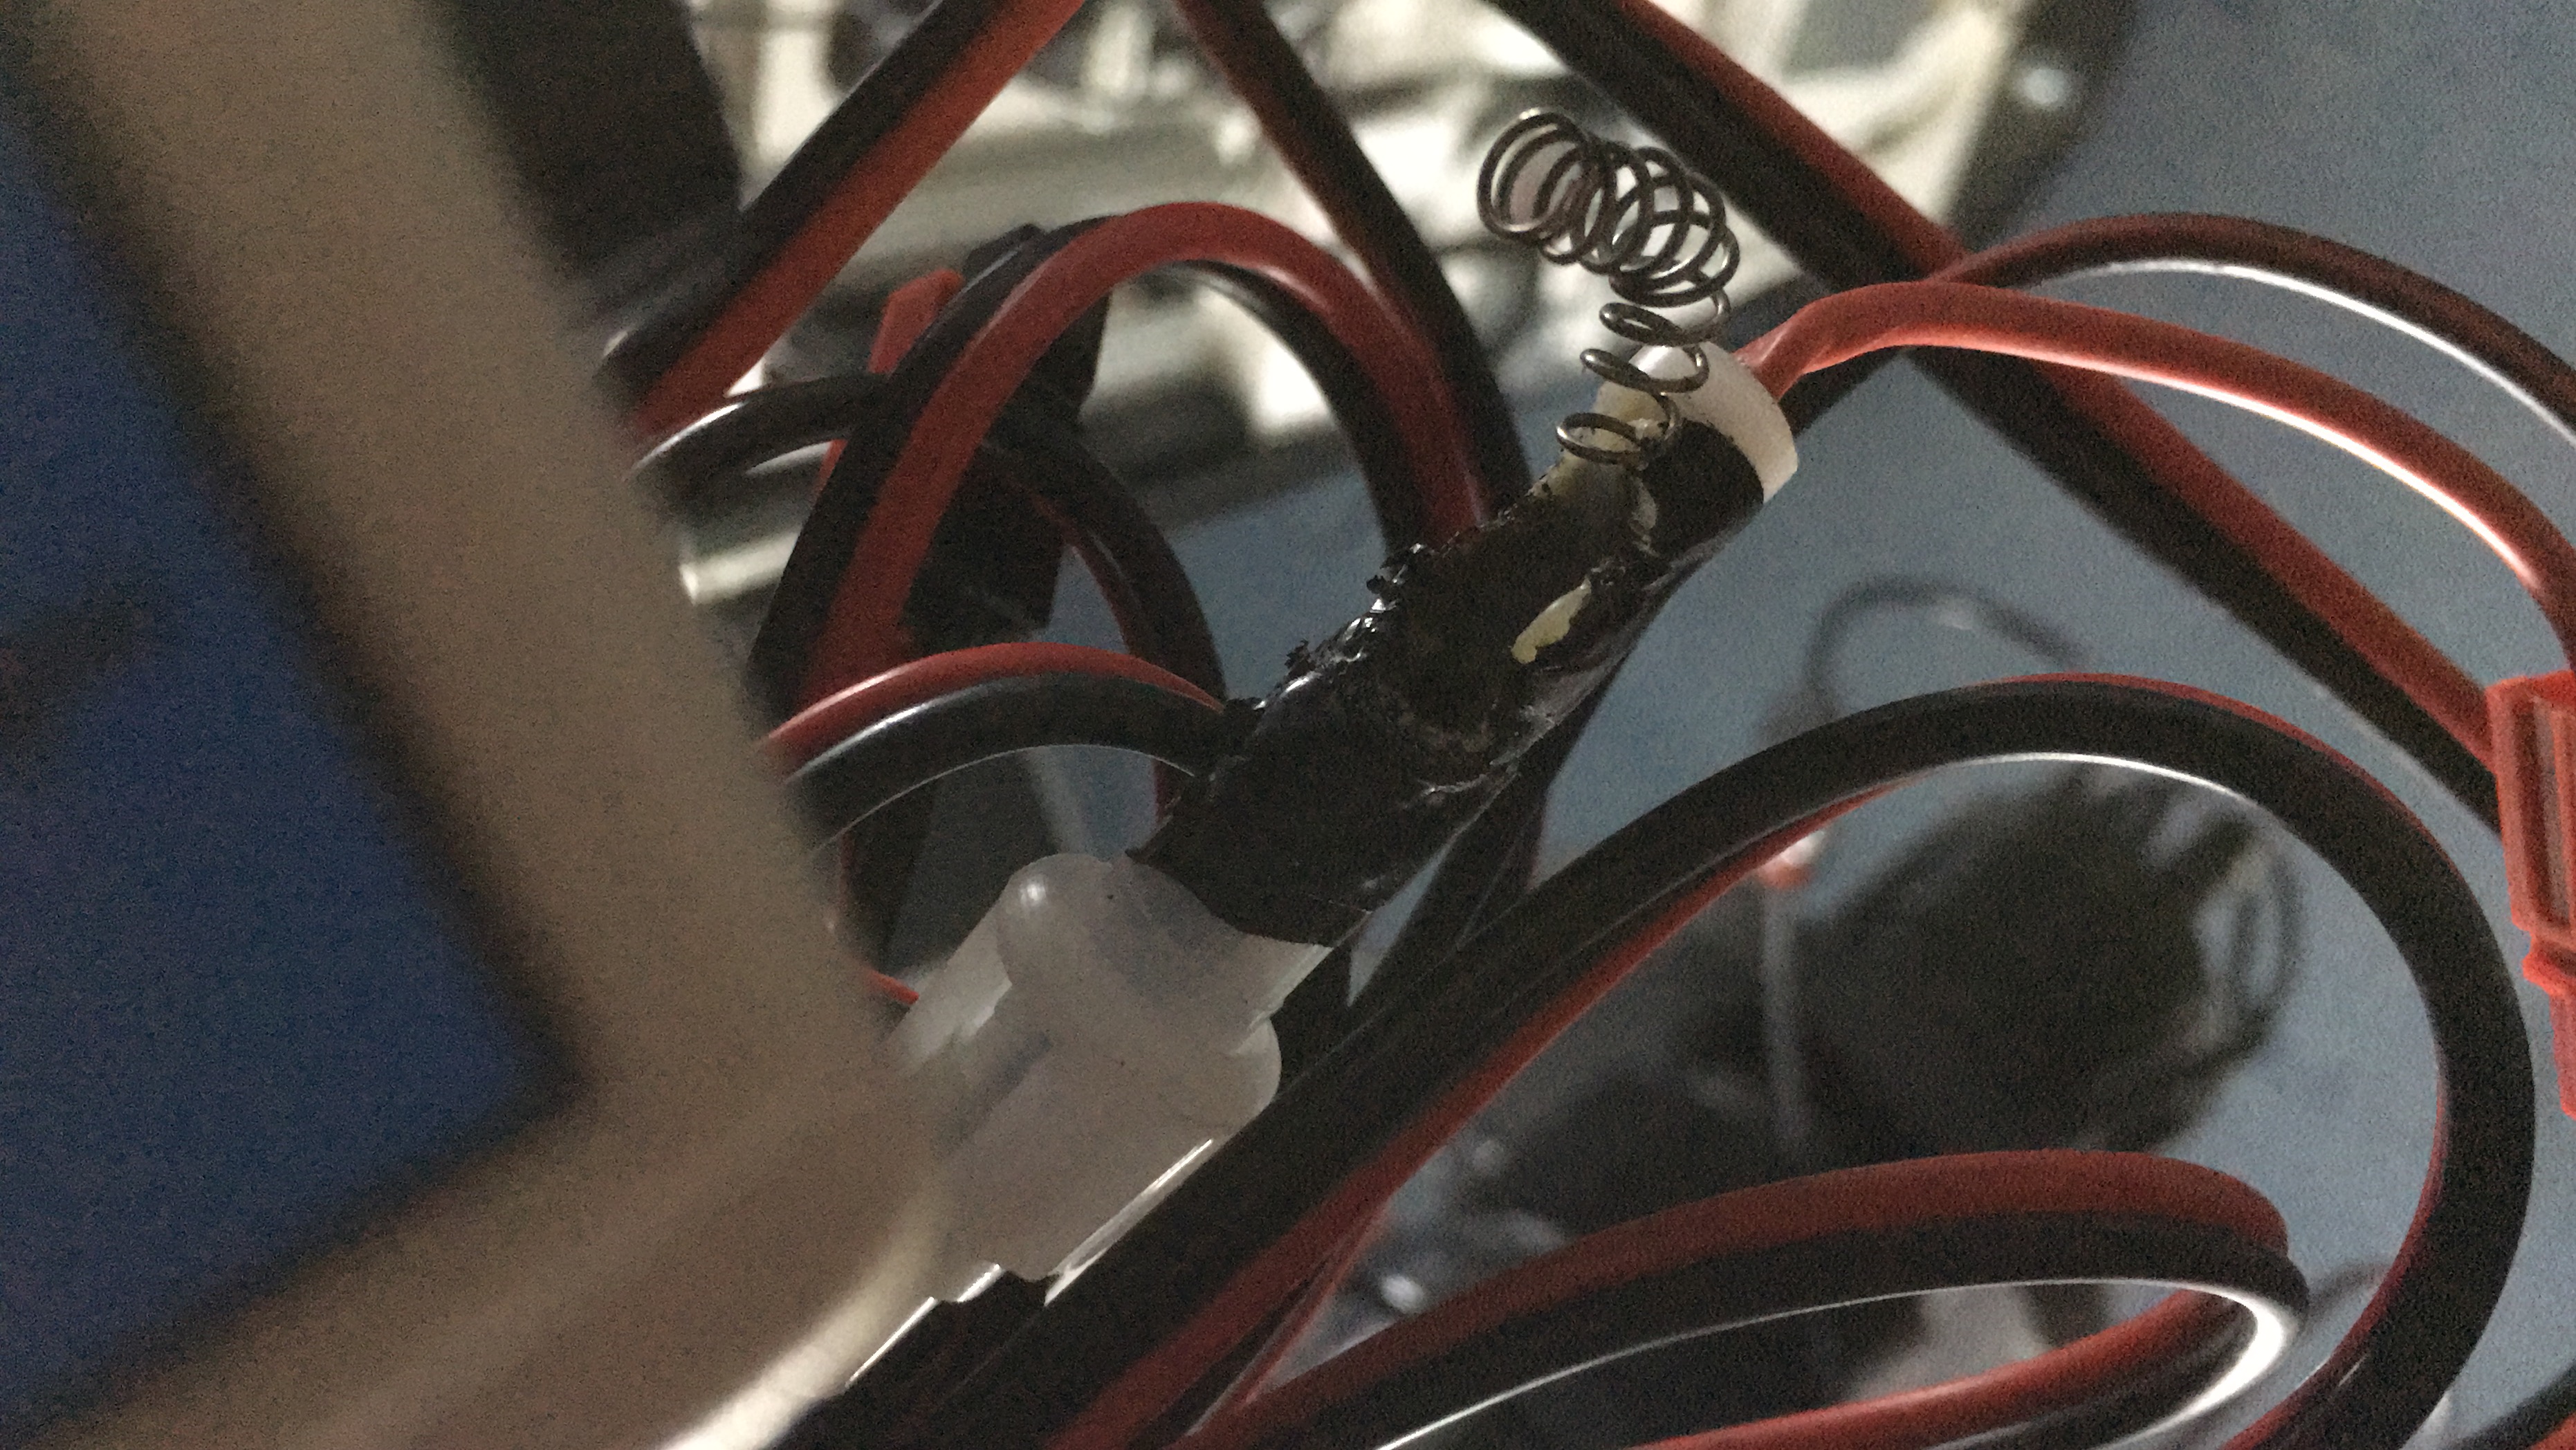
At 2:04 am I then tried to cool the camera but it was non responsive……..this threw me for a while then I remembered the other evening having this same problem which probably meant the camera power was not on.I went into the dome to find that was the case and the reason once again was the fuse on the Mount Hub Pro had melted. I cut this off and put a chocky block in for this evening to bypass the fuse, but I did unplug everything else from the mount hub pro whilst there was no fuse there.
Melted fuse and related spring
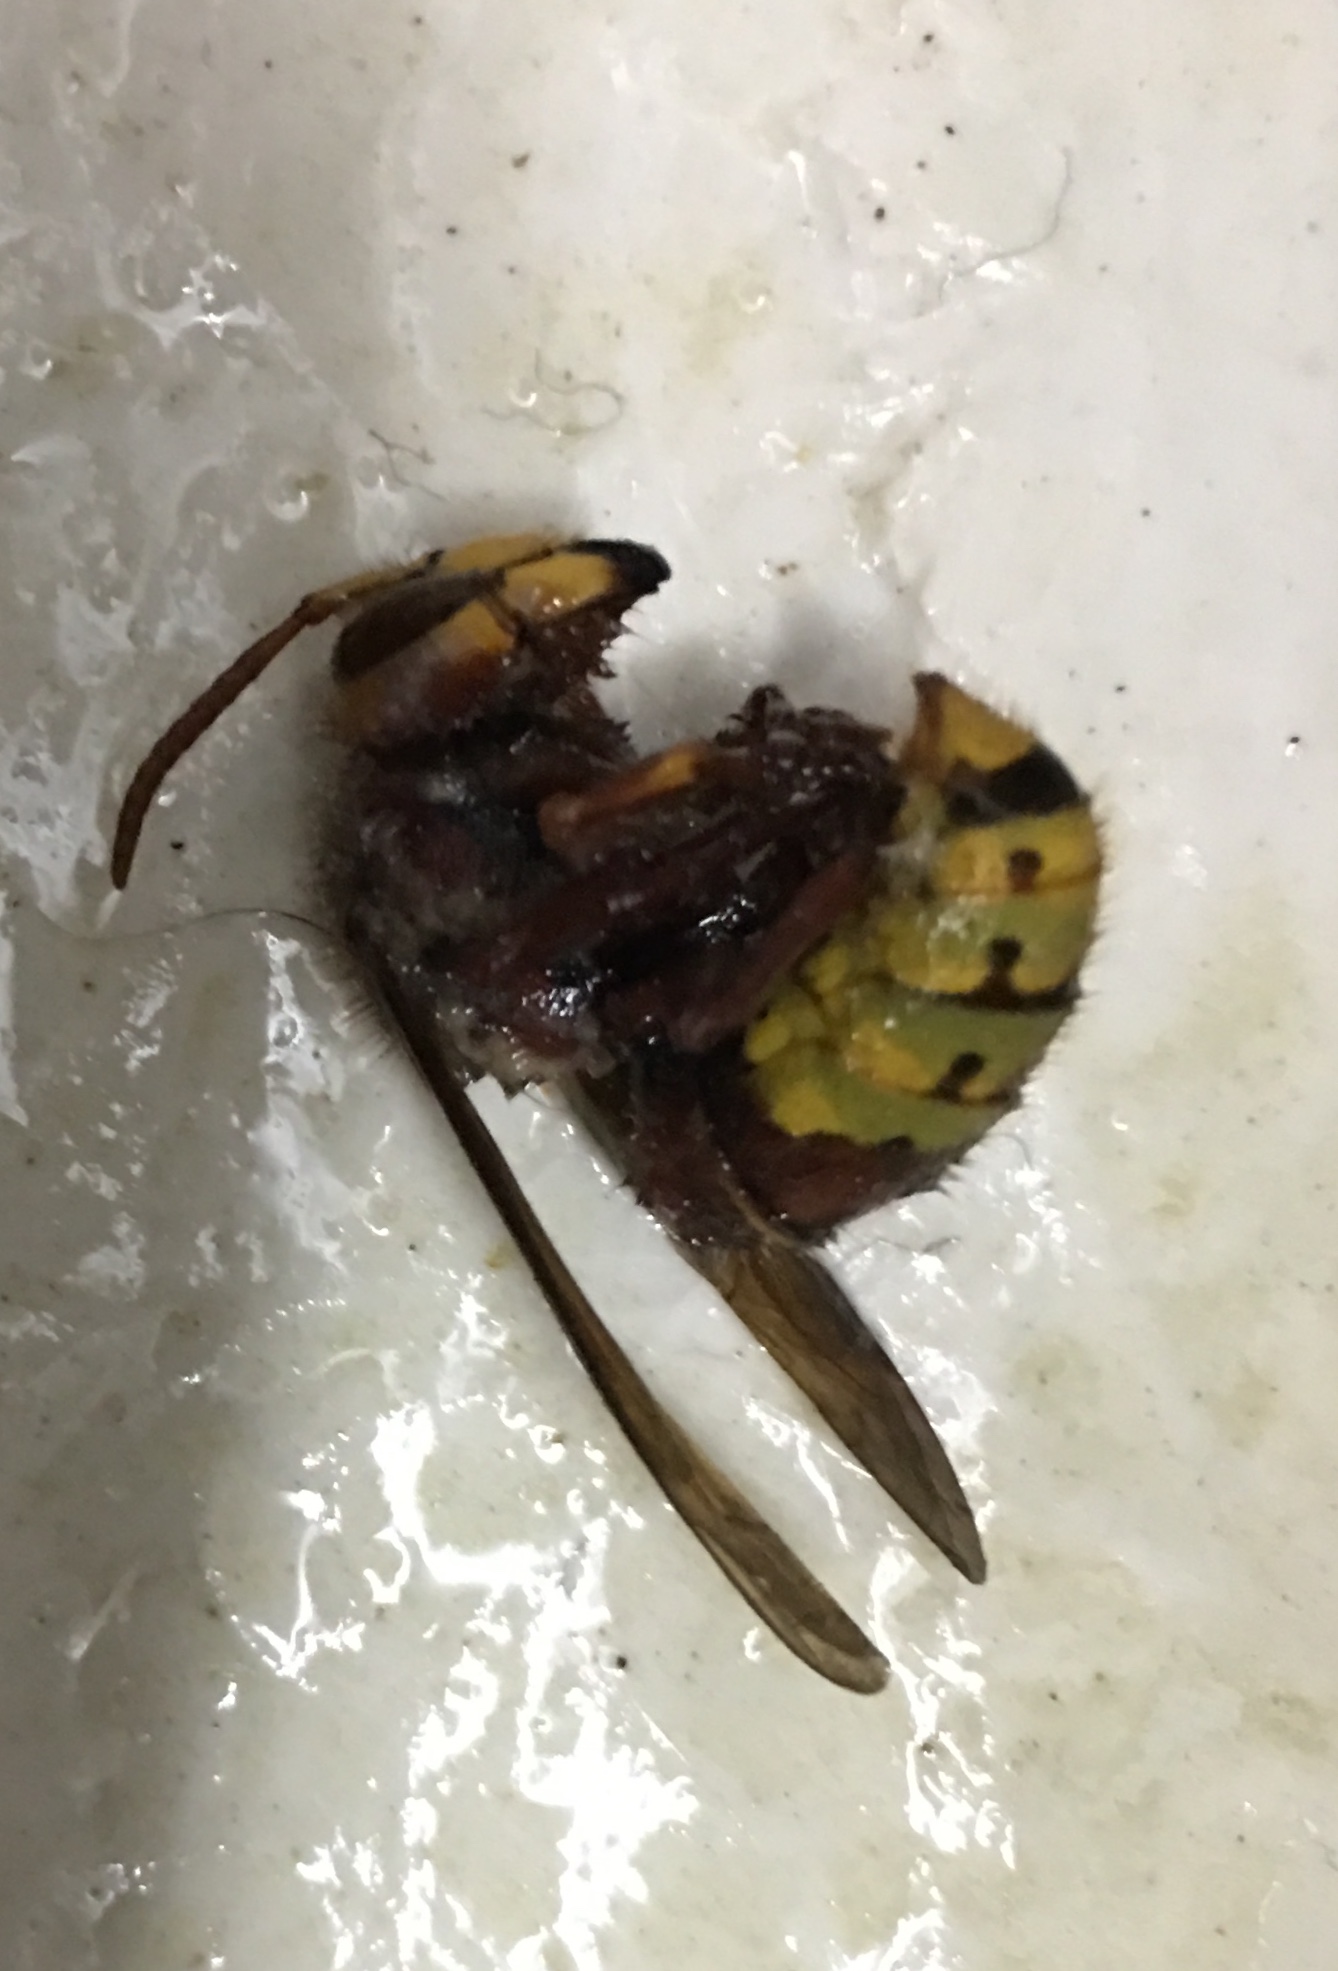
Whilst doing this I was reintroduced to nature with a Hornet the size of my thumb bouncing around in the dome. After quickly removing myself from the dome I cam back armed with an insecticide and sprayed the offending hornet. It kealed over and died quickly.
Hornet R.I.P
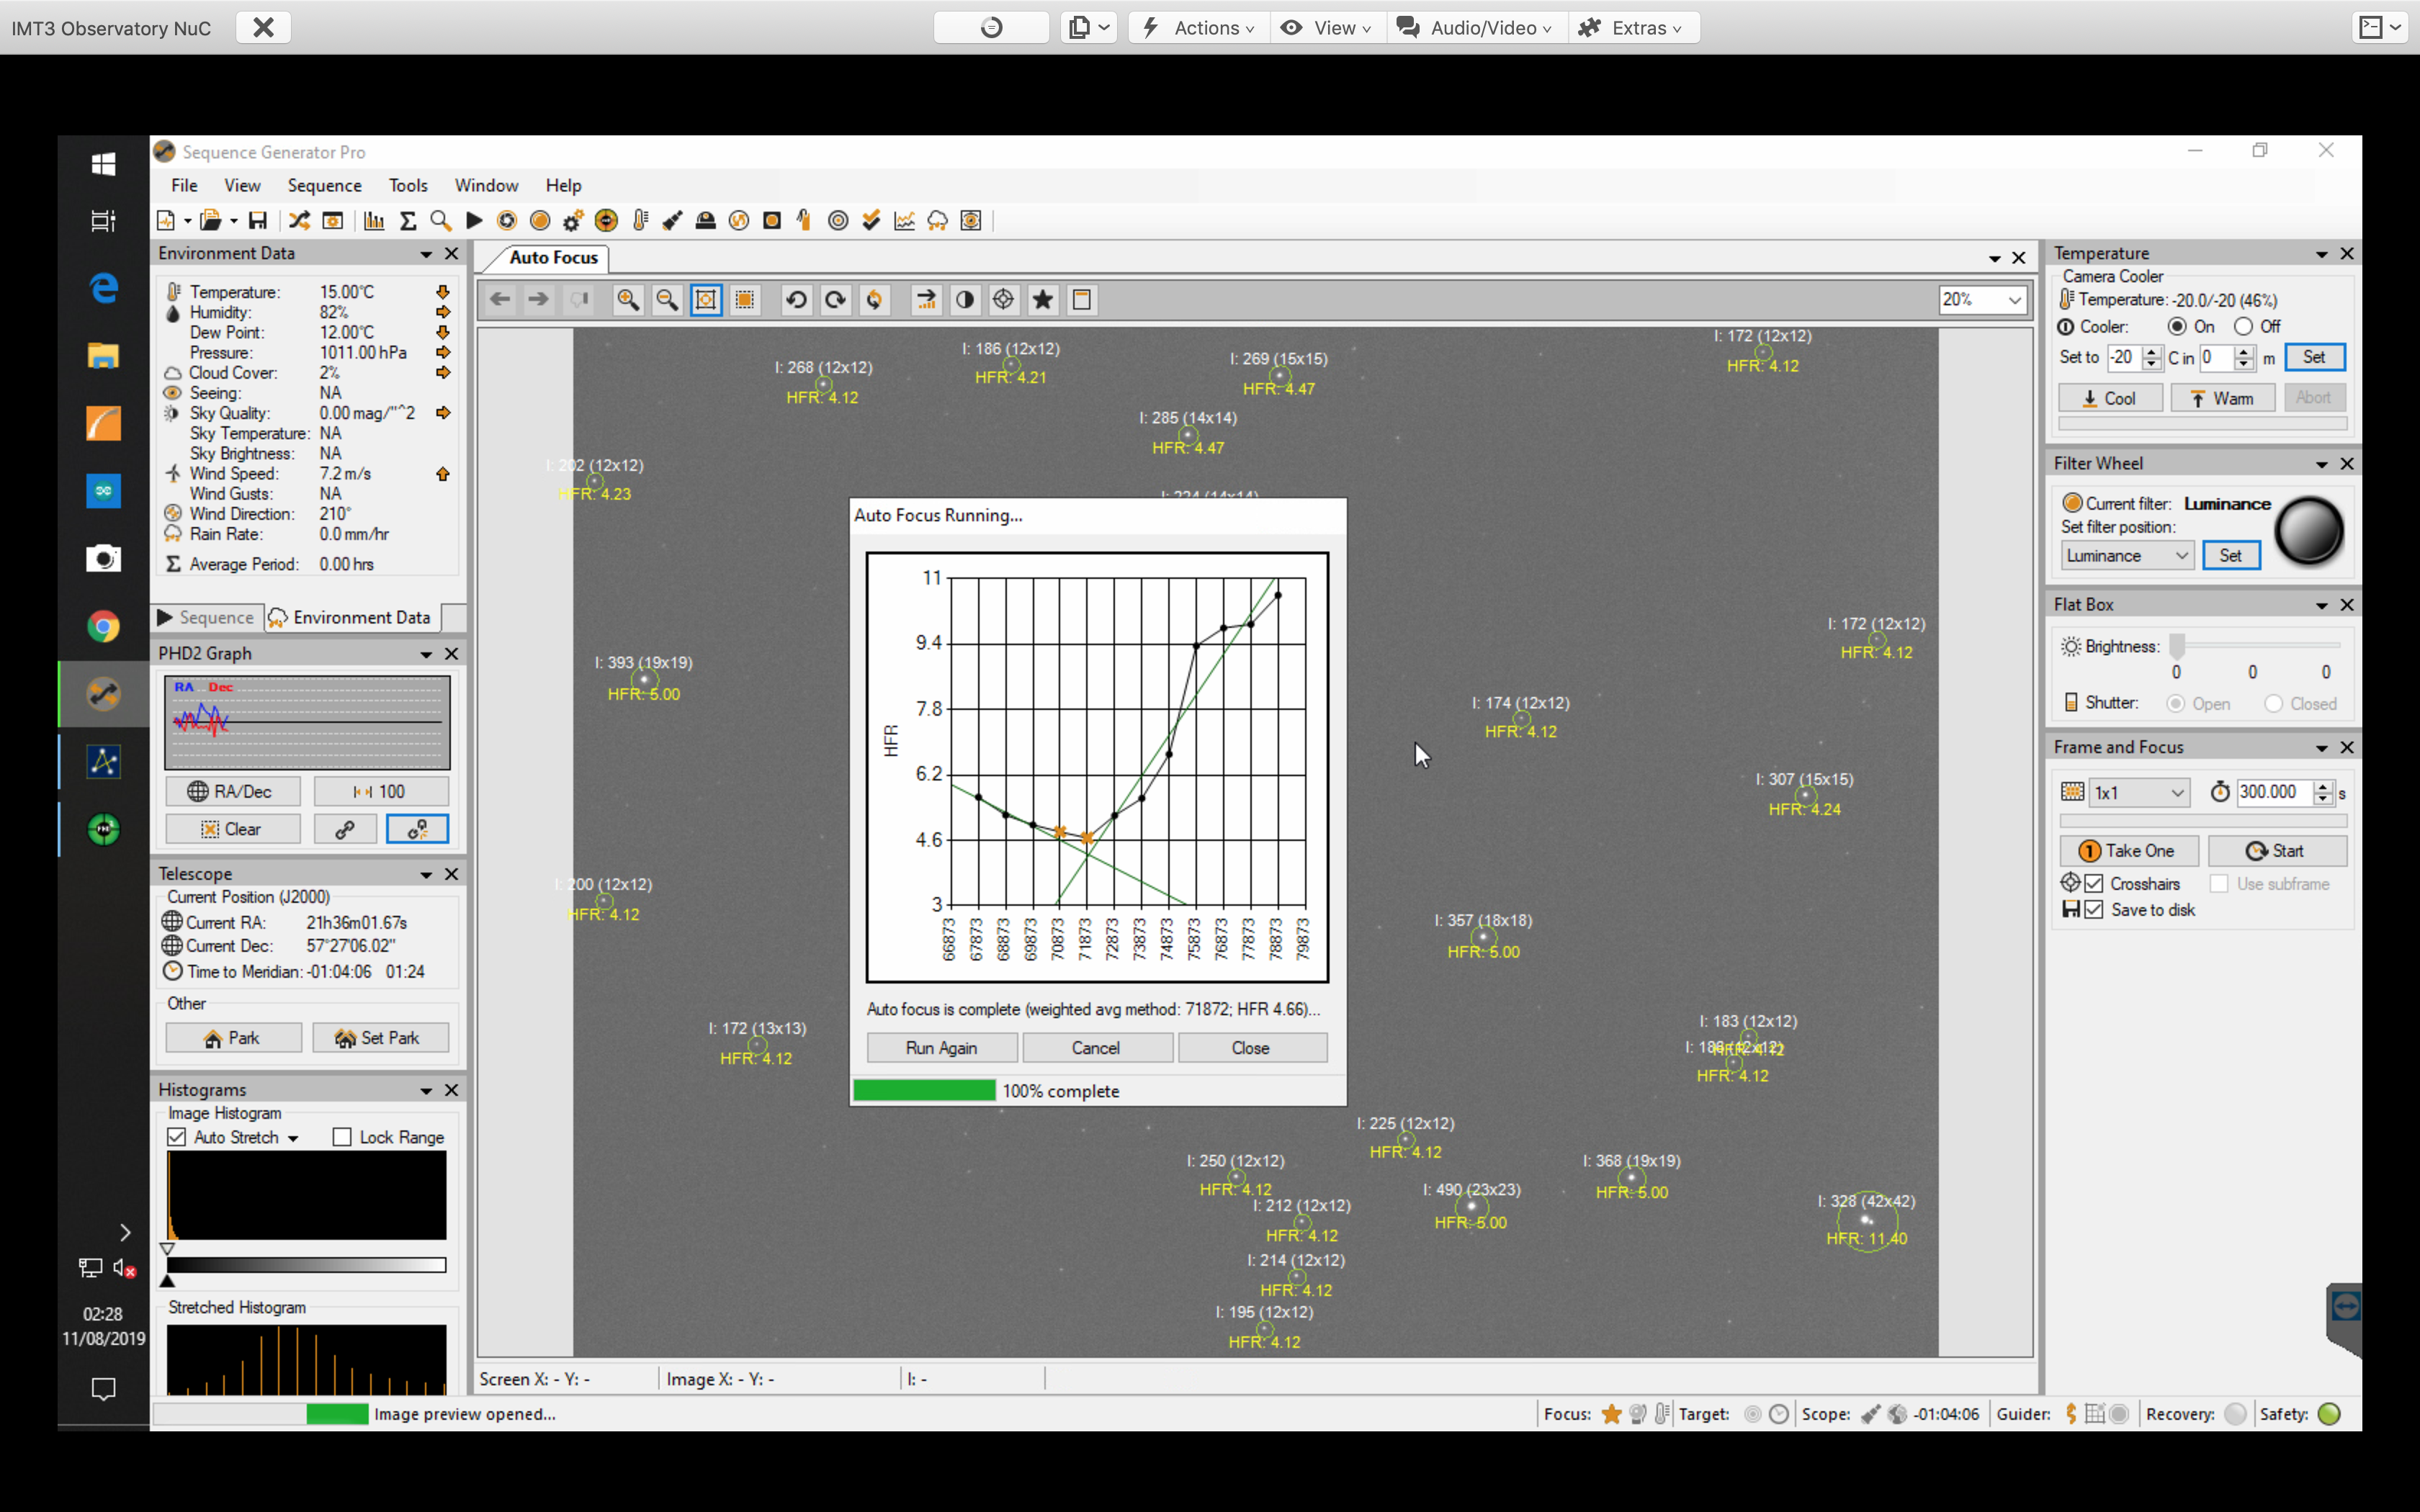
Next I focused and this worked very well, a nice V curve on the Luminance and then I switched to Ha for the imaging, This would be slightly out but I need to find a strong HA source of stars to be able to focus with Ha.
Nice V Curve
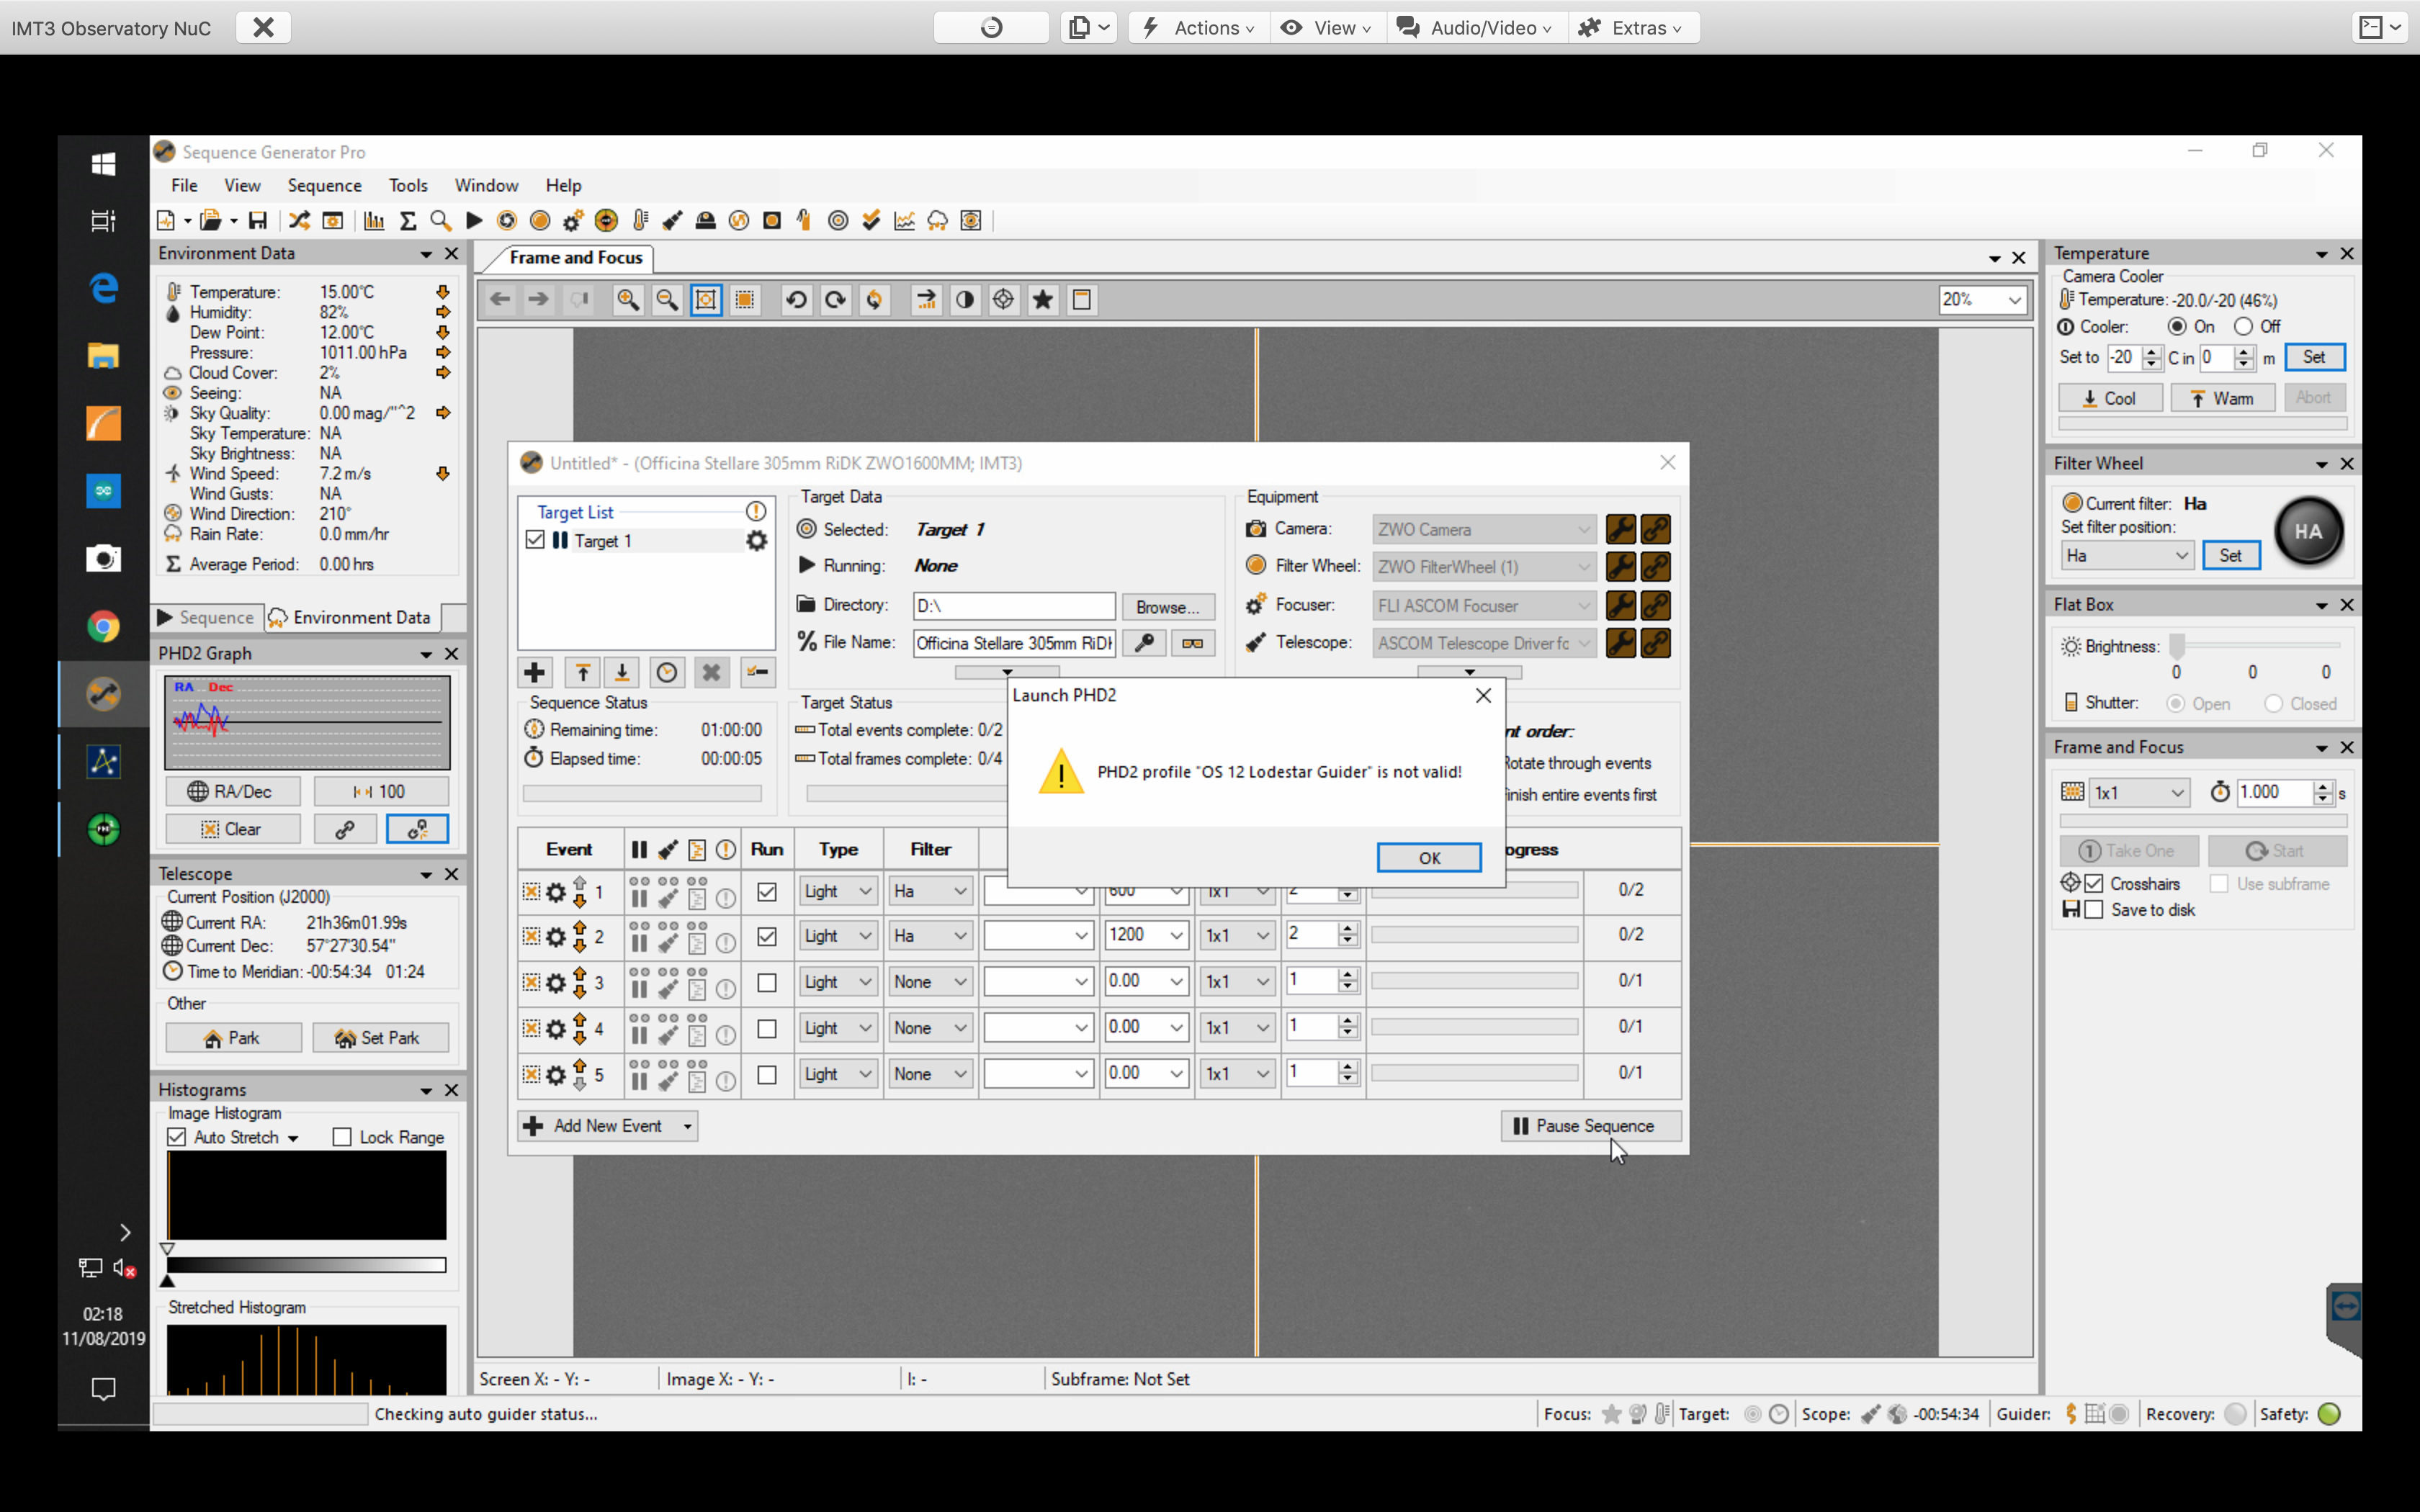
Once again I ran the Image Sequencer to see if this would work given I had made some changes suggested by my good friend Mil Dave to the guider settings in PHD2 and SGPro. However once again I was foiled with some new error messages, I am either getting use to this or possibly very fed up, SGPro may be a great piece of software from a functionality perspective, but it is complex, unintuitive and a pain. The error complained about the PHD2 profile ‘OS 12 Lodestar Guider’ is not valid.
Error PHD2 Profile
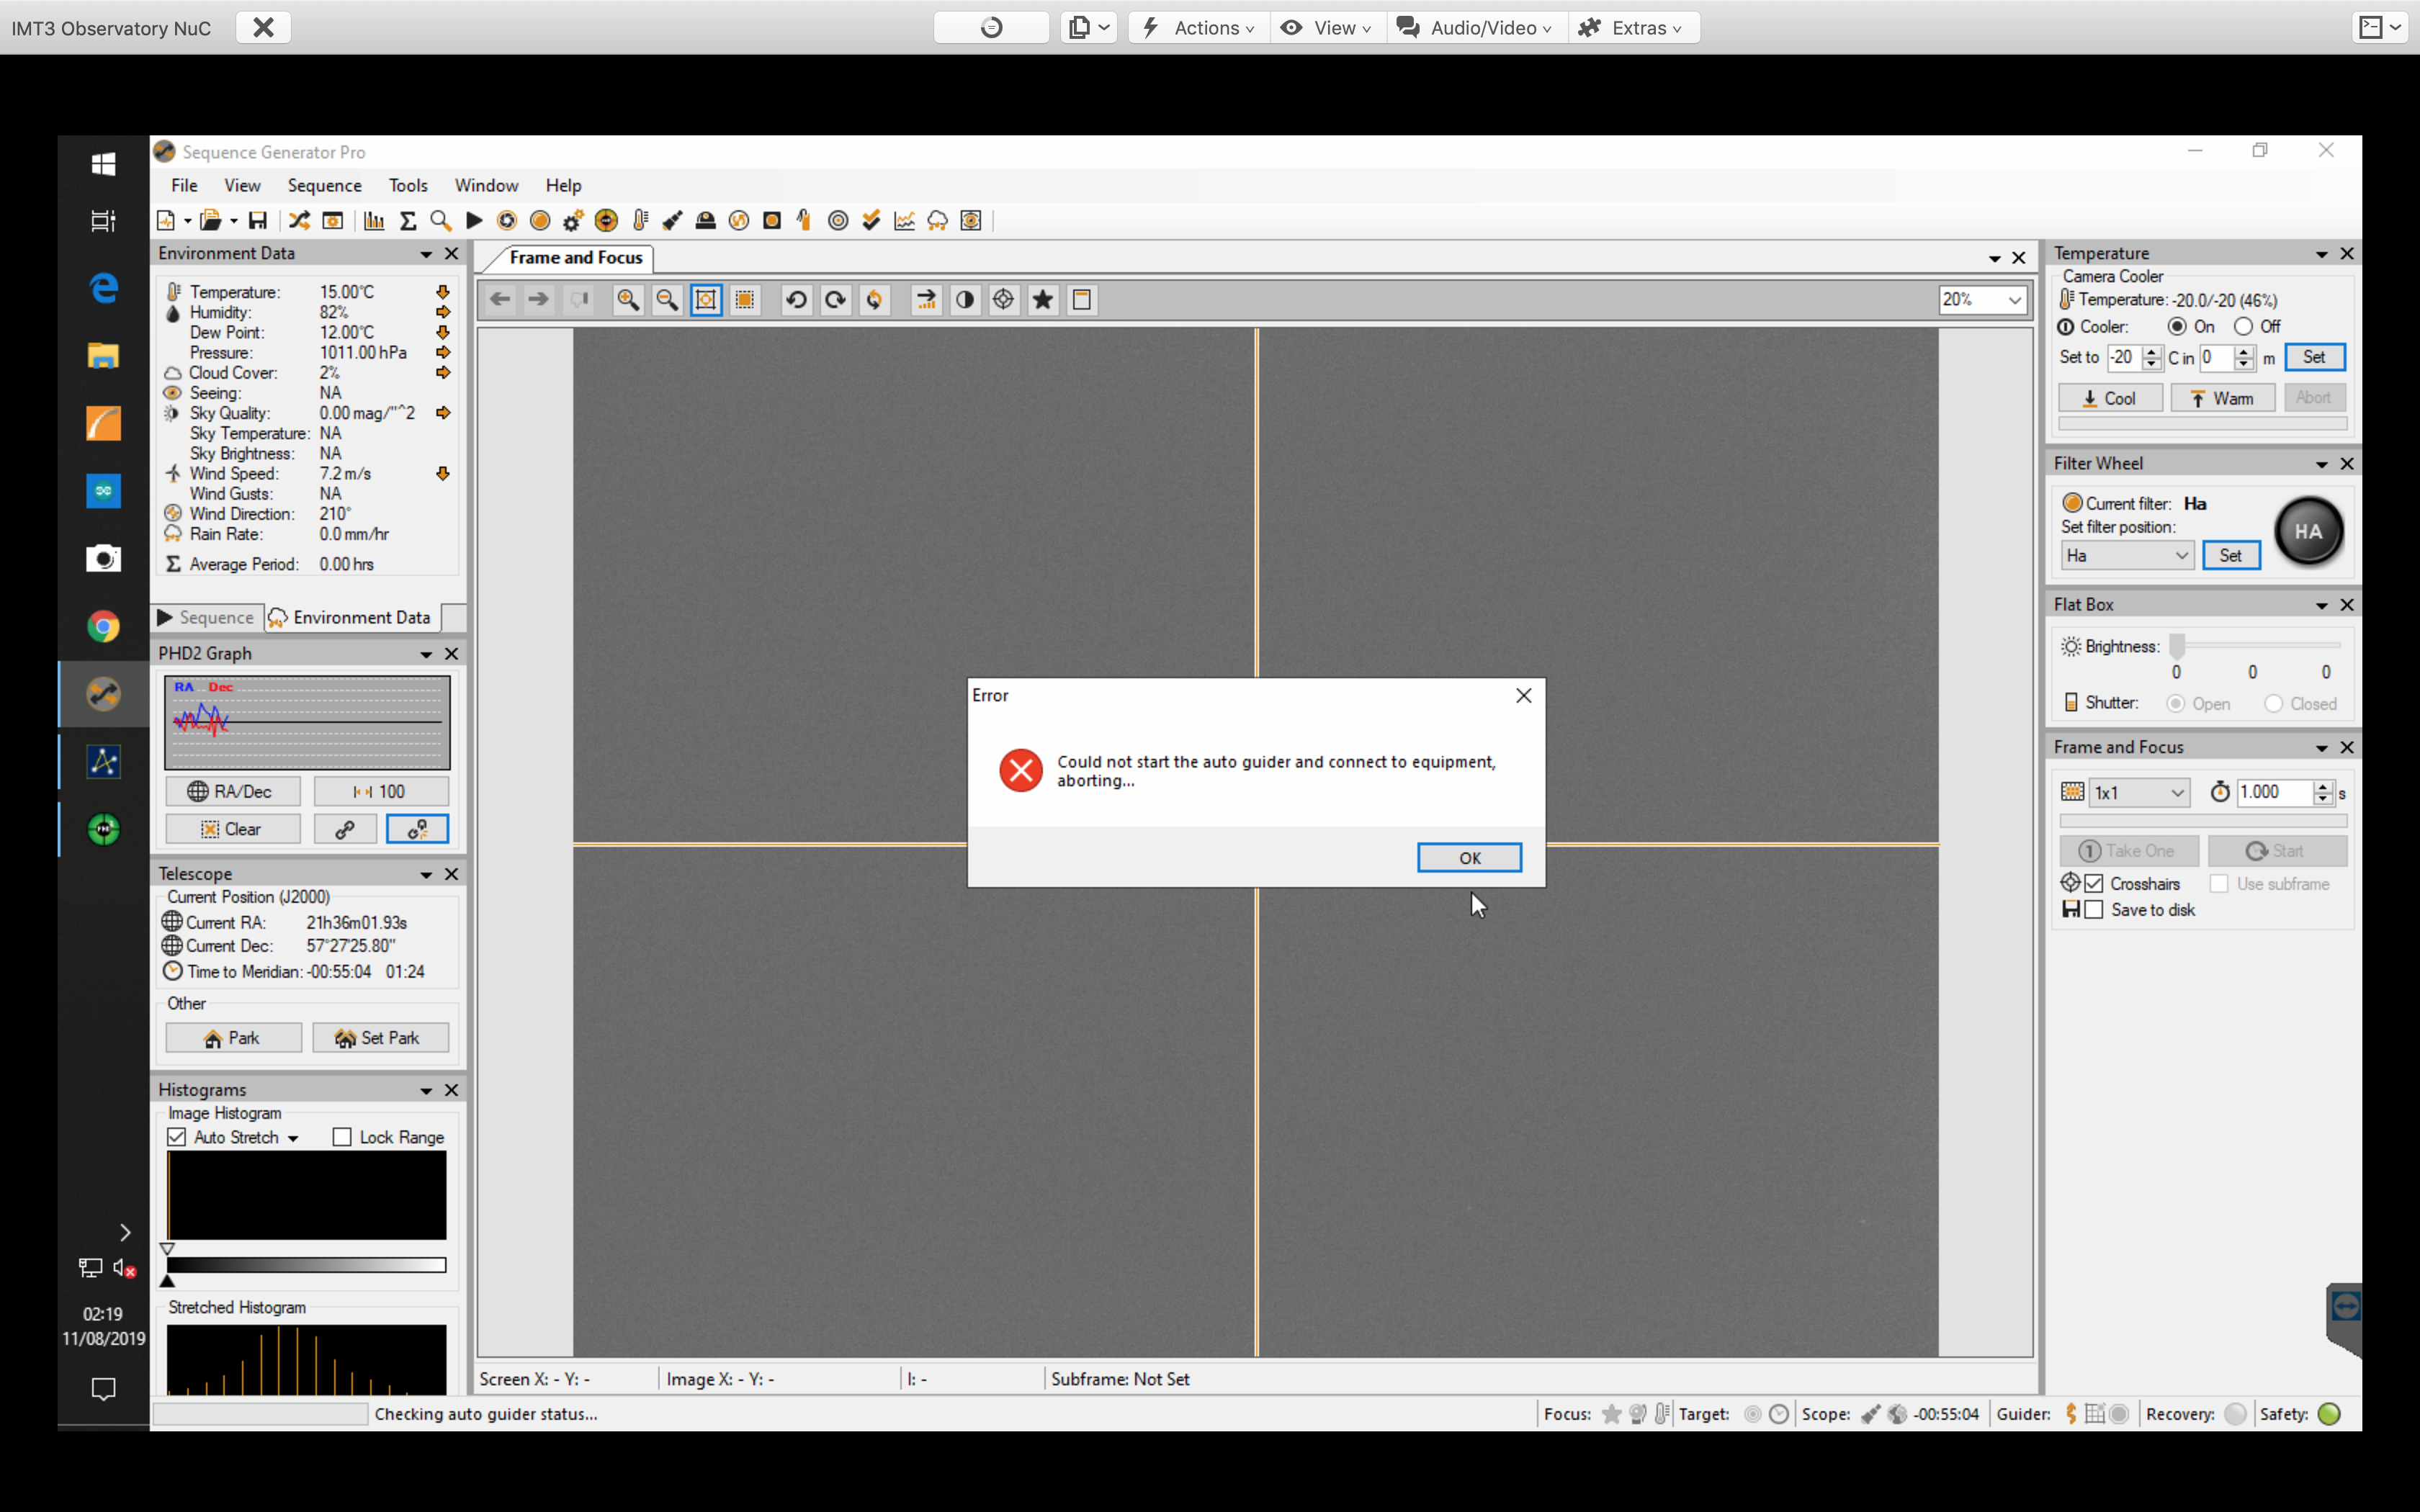
This is indeed my profile and is valid so not sure about this, another thing to investigate when I am not so tired. The follow on message was Could not start the autoguider and connect to the equipment so aborting. This is to be expected.
Error connecting to guider
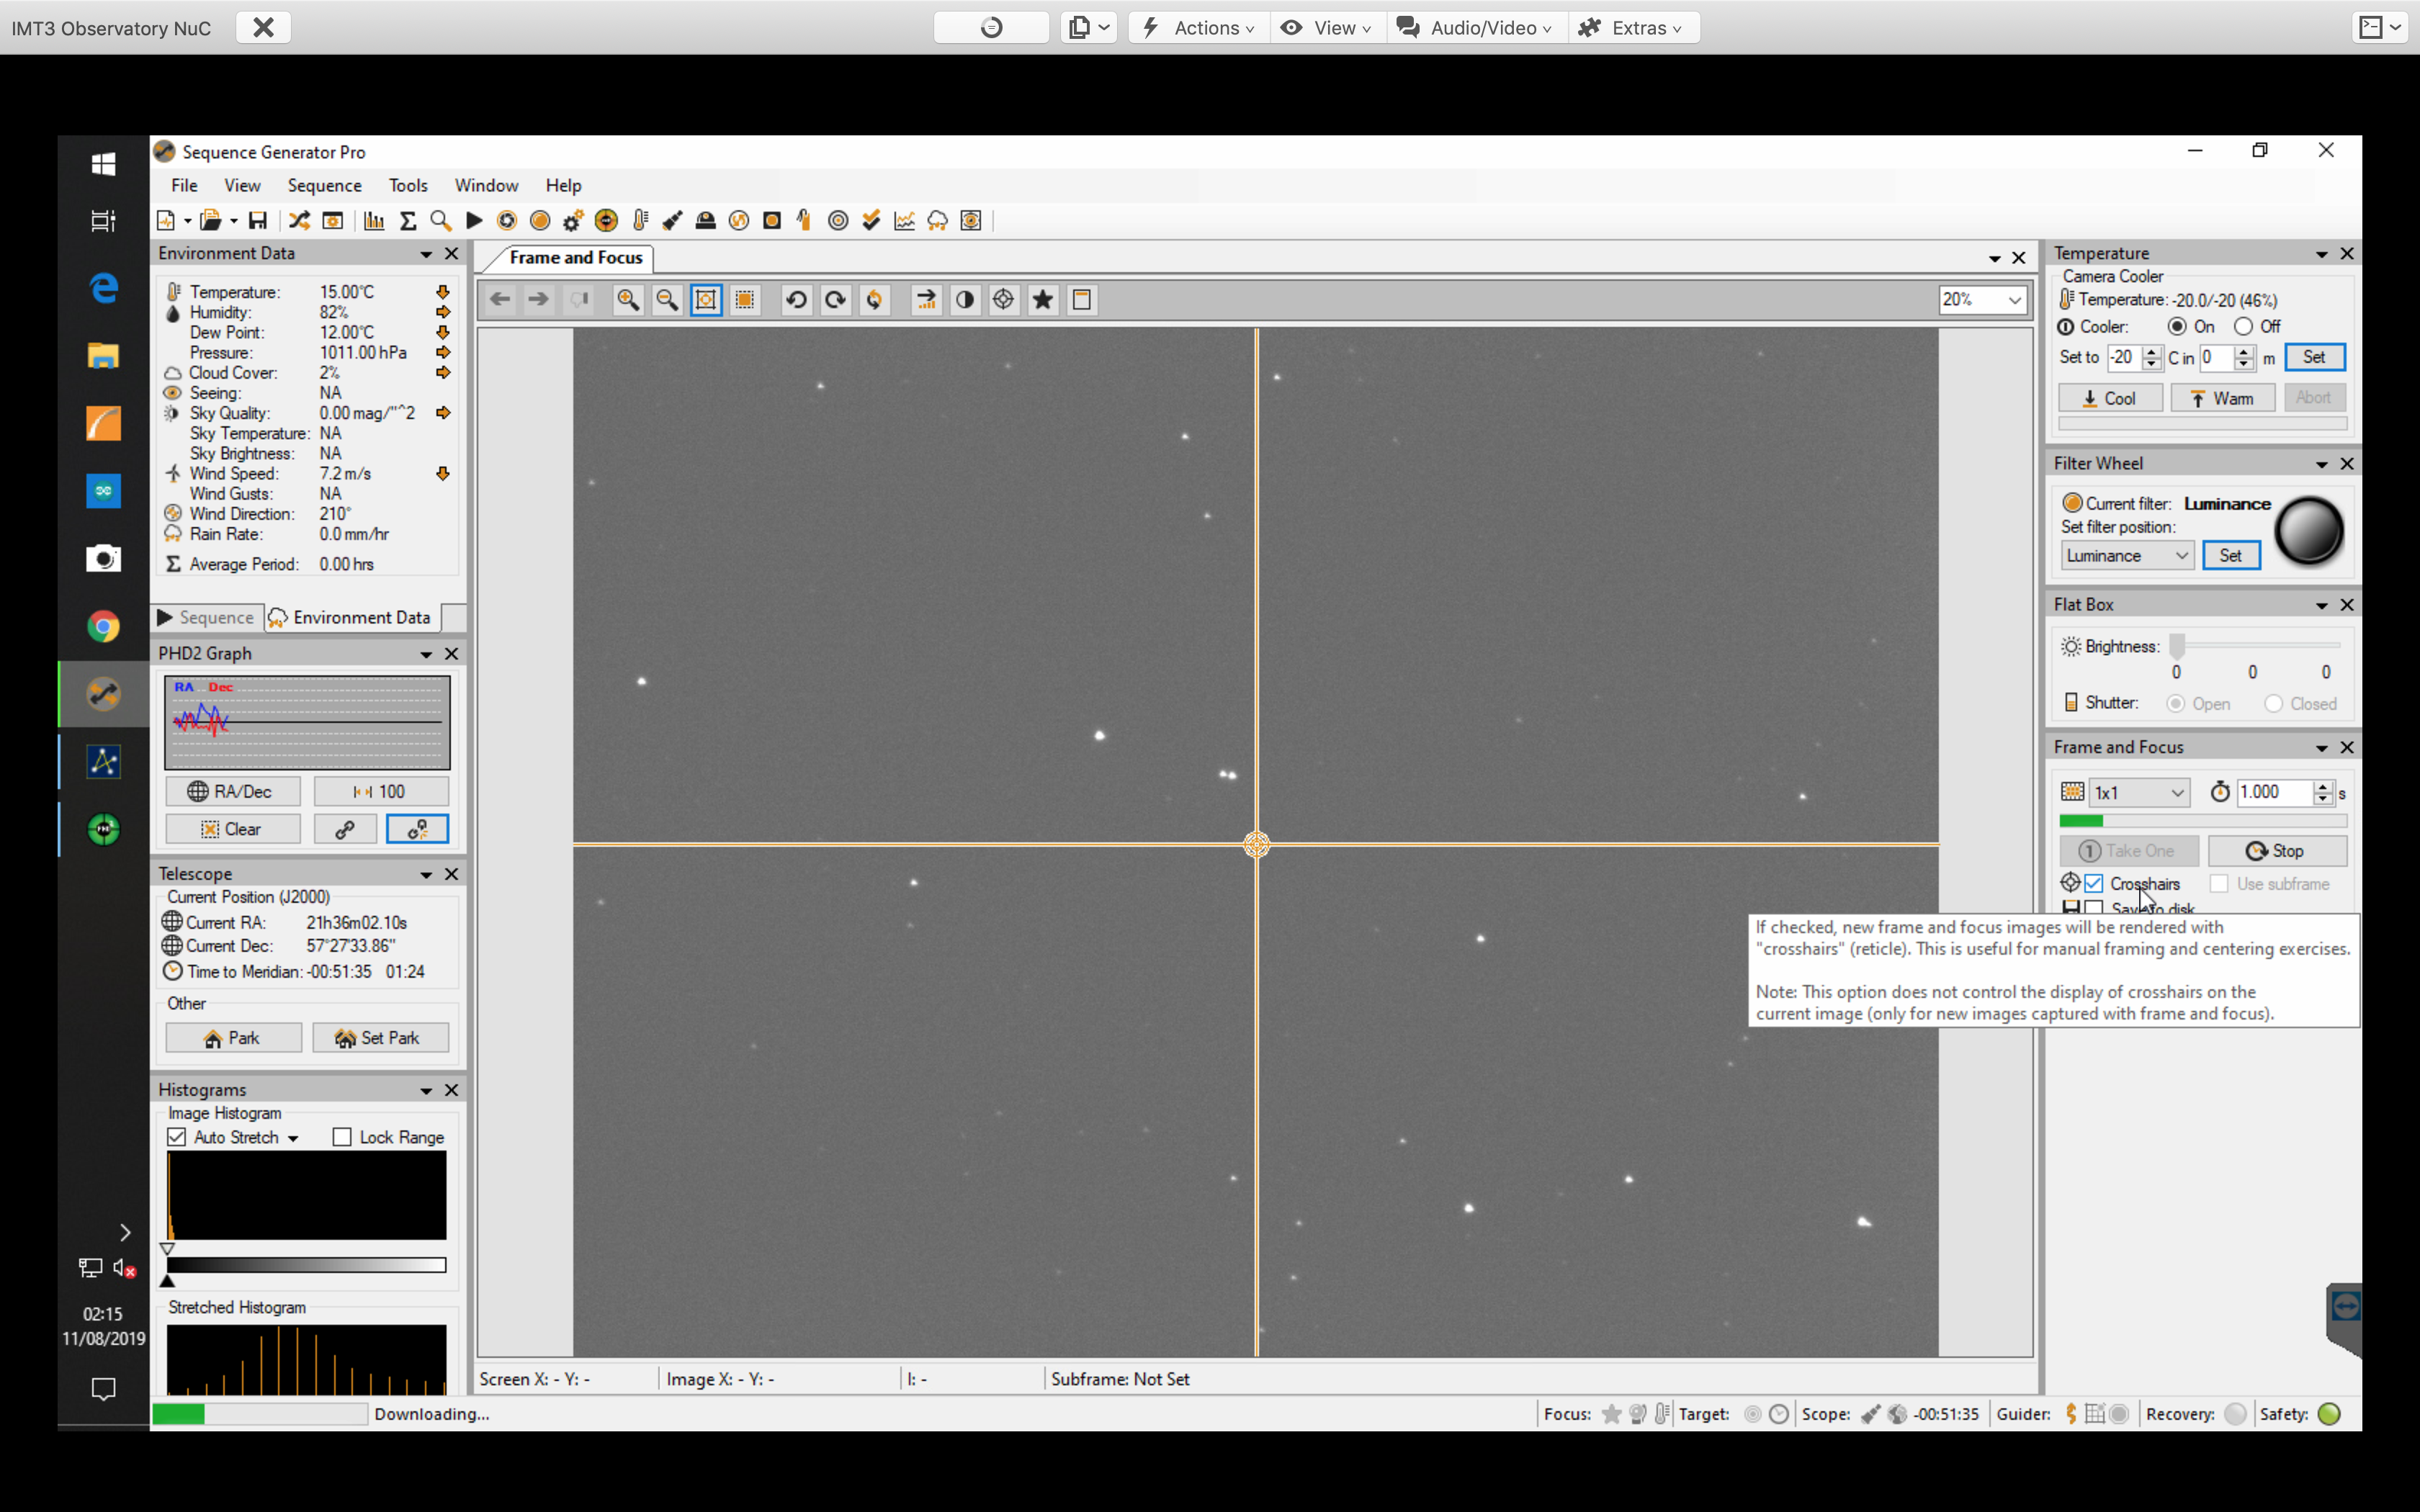
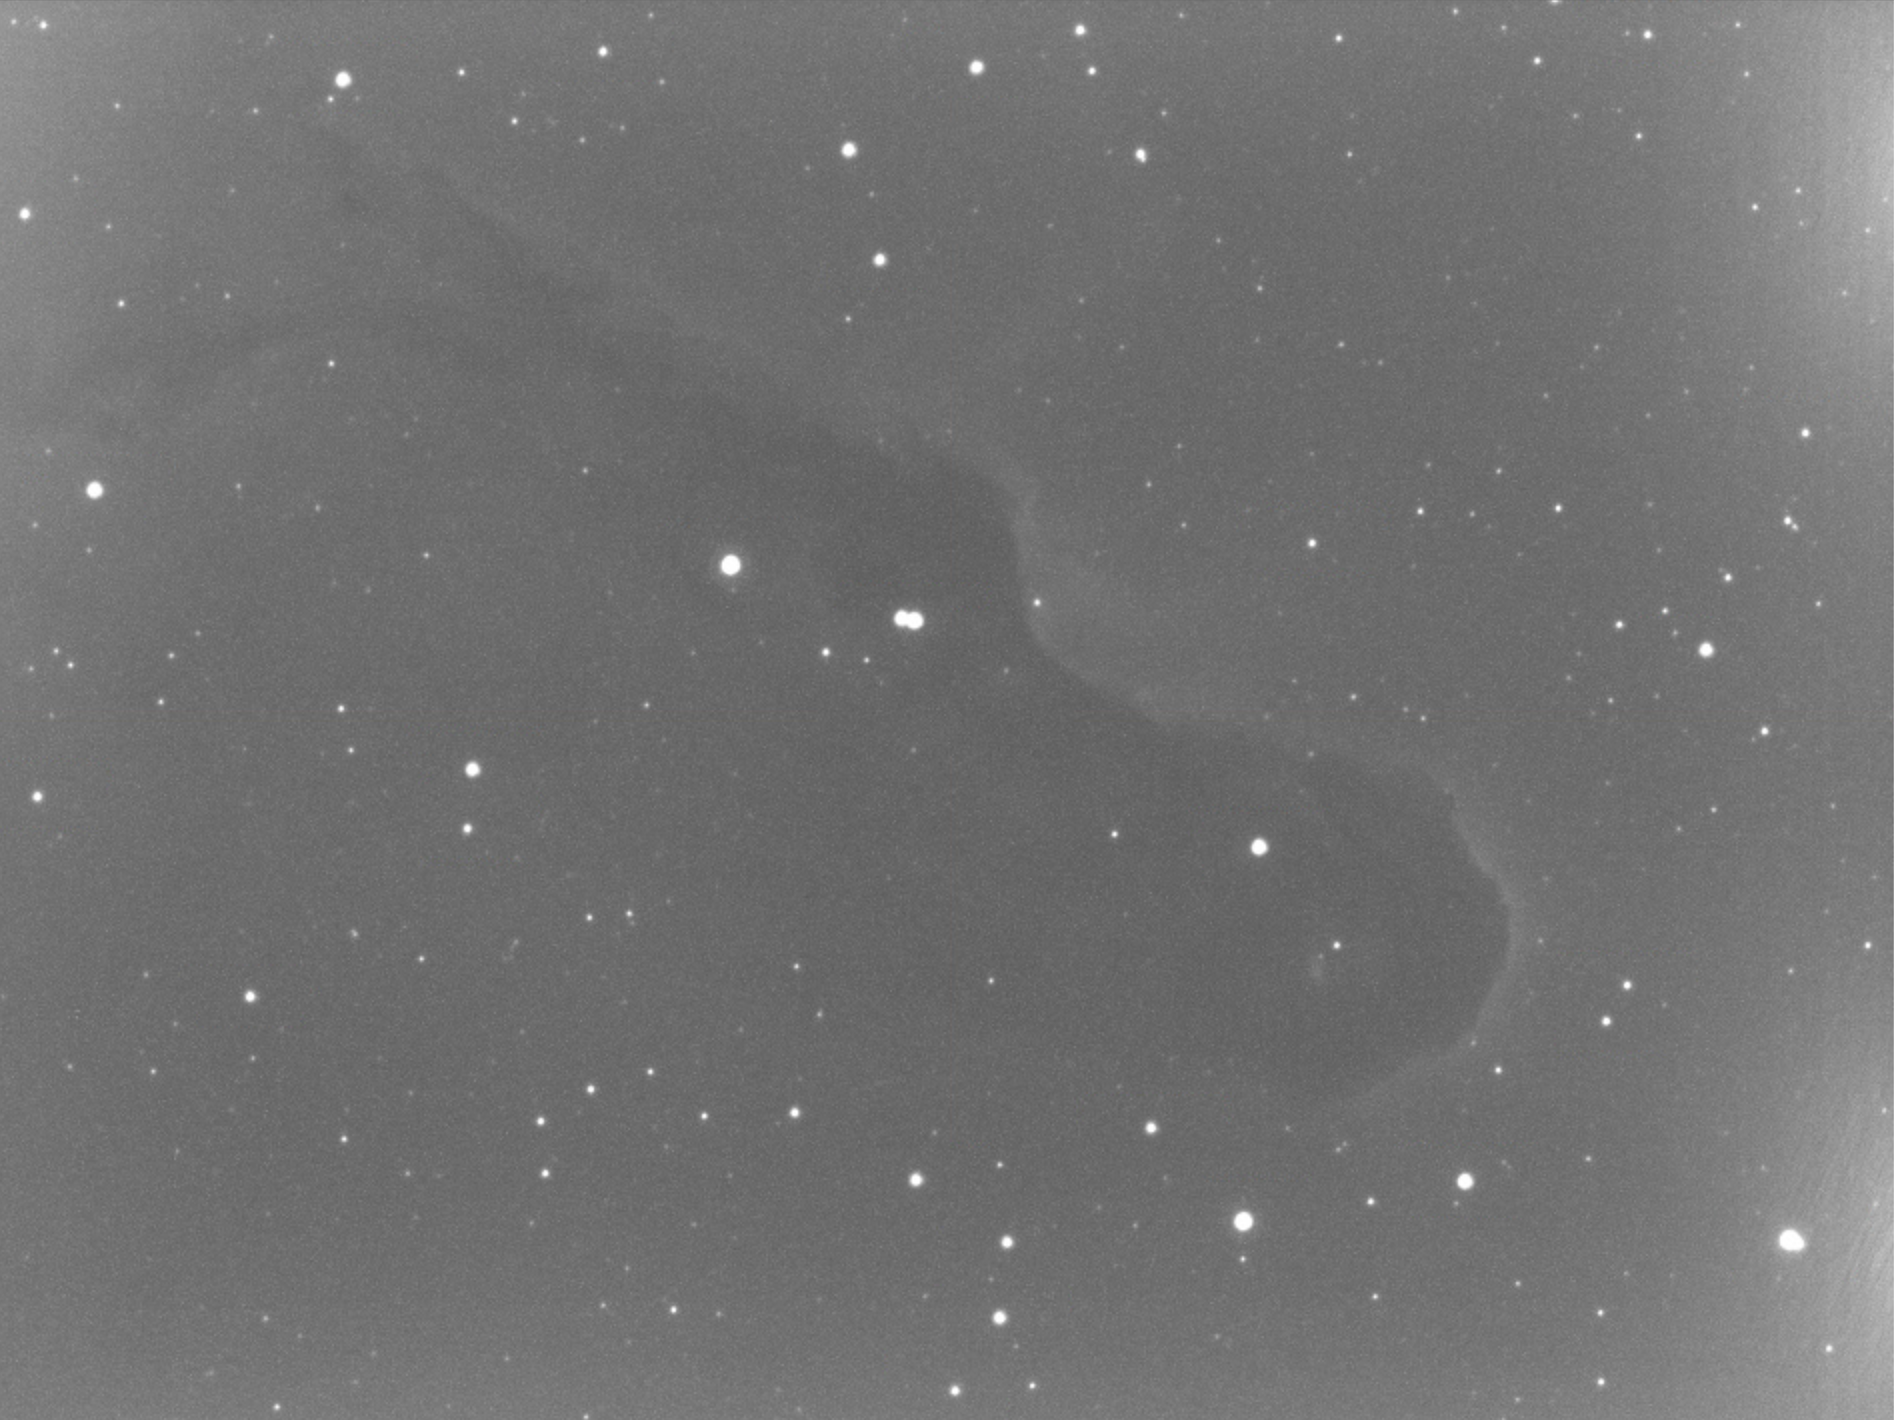
So I went back to Frame and Focus and too a single 5min shot, guiding on a good star that was in the FoV of the Lodestar off-axis guider. I took a 10min image and then a 20min image.
Elephant Trunk Uncalibrated 20min image
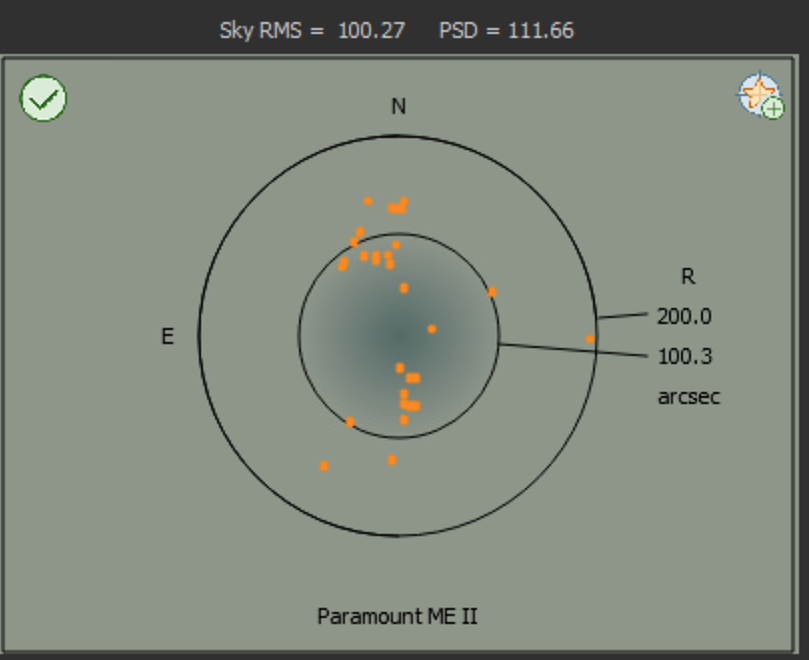
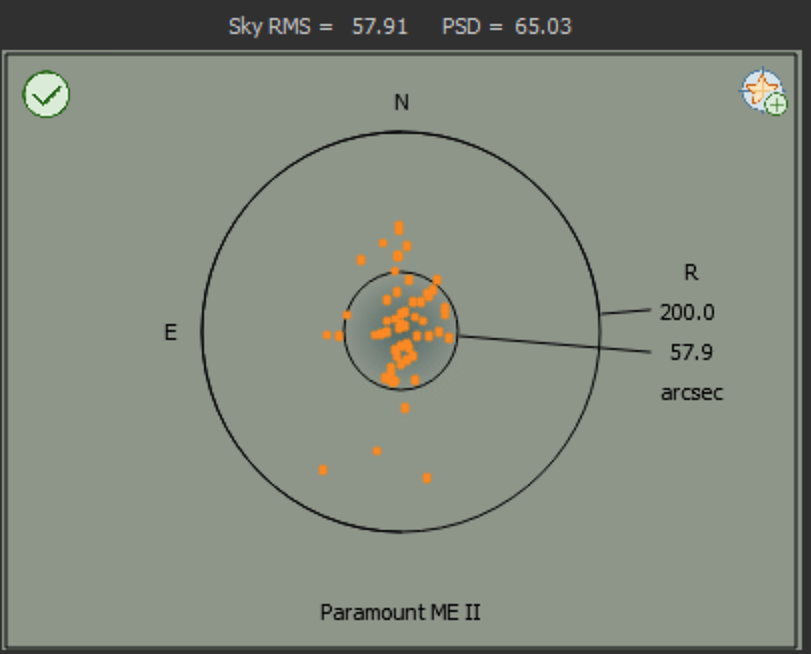
Looking at the TPoint model there was a nice improvement for where I started with a with an RMS, Root Mean Square of 100 so when pointing the object I am targeting will be within 100 arc seconds of the centre of the CMOS chip, so 1.7 arc minutes, whereas now it is leas than 1 arc minutes out at 57.9.
I then went back to SGPro to try and fix this error as I don’t like giving up. I changed more settings within SGPRo and PHD2 around the error size for the guider to settle, however SGPro was still waiting for PHD to report it had settled even though it was now guiding.
Error message
I turned off both the Settle At and the Settle Auto Guider check boxes. This then allowed me to bypass the whole settling thing which wis is really not that important to me as I manually setup guiding first and now the sequence has started at last!
Turning off settling guider connection
Finally the guider looks very smooth and the only thing now stopping me from taking some more images is the fact it is 4:28am and I am very tired and it is getting light. So I will disconnect and shut down until the next clear night at a weekend. All in all a very productive night.
So I used to be able to guide on the Paramount ME without the need for an ST-4 guider cable. This is achieved through information being shared about the position of the star to PHD2 and it then sending commands to the relays on the Paramount ME, however I had yet to be able to get this working with the Paramount ME II and using SGPro as the host program.
So for a short period on the evening of 5th August 2019 I ventured out to complete the setup and get the guider working.
As information is key I had spent time re-reading pieces of the Paramount User Manual, The Sky X Manual and the PHD2 Manual, the later having partial information needed to setup, another piece of information was in The Sky X Manual.
So what did I do? Well DirectGuide is a bit like Pulse guiding that is supported on other mounts, however for the Paramount ME II pulse guiding is NOT supported. So you need to configure and setup for Direct Guide, but where?
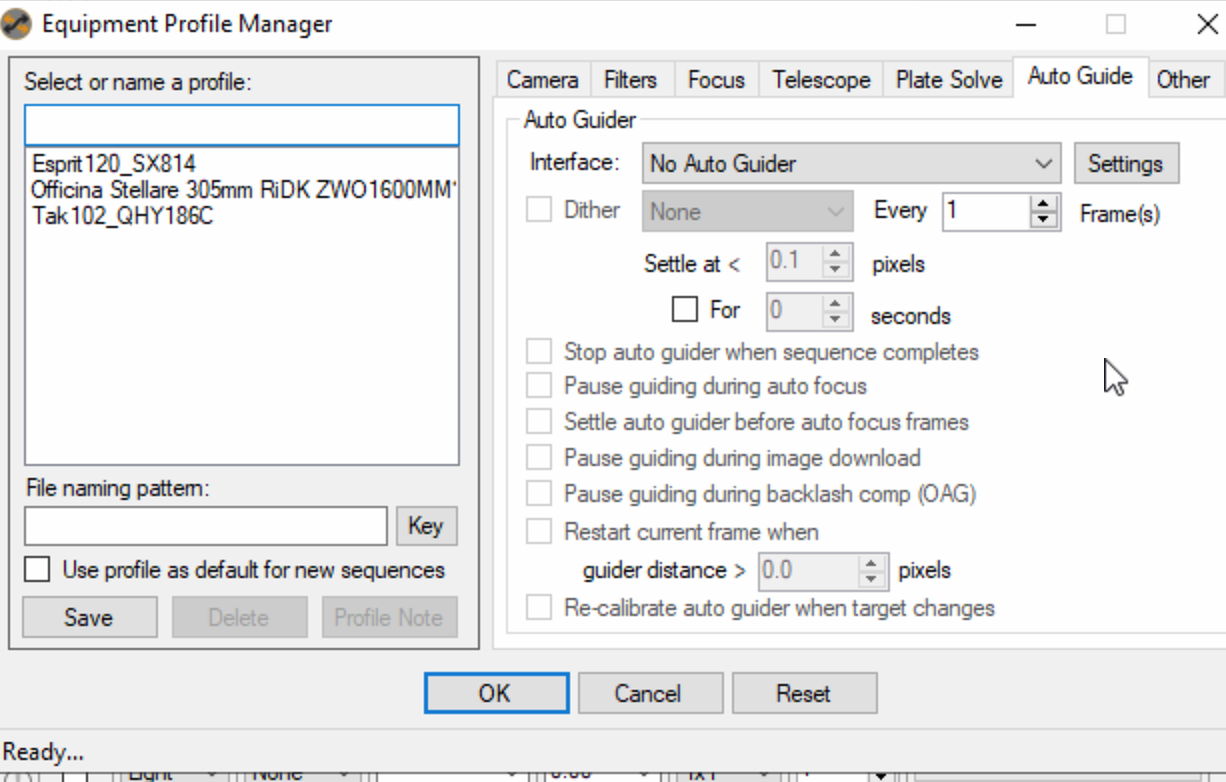
Looking at the Connect Equipment window in PHD2 you are presented with 3 options, How to connect the camera, how to connect the mount and a 3rd option around how to connect an Aux mount. It is important to understand when to use that 3rd option around Aux mount as that is what can cause confusion when trying to get Direct Guiding to work.
Aux Mount should only be chosen if you are using an ST-4 cable, if you are not then this option should remain set to None. If you inadvertently select ASCOM Telescope Driver for The Sky within this box the mount will not behave correctly. So leave it set to None!
Configuring Camera and Mount ONLY
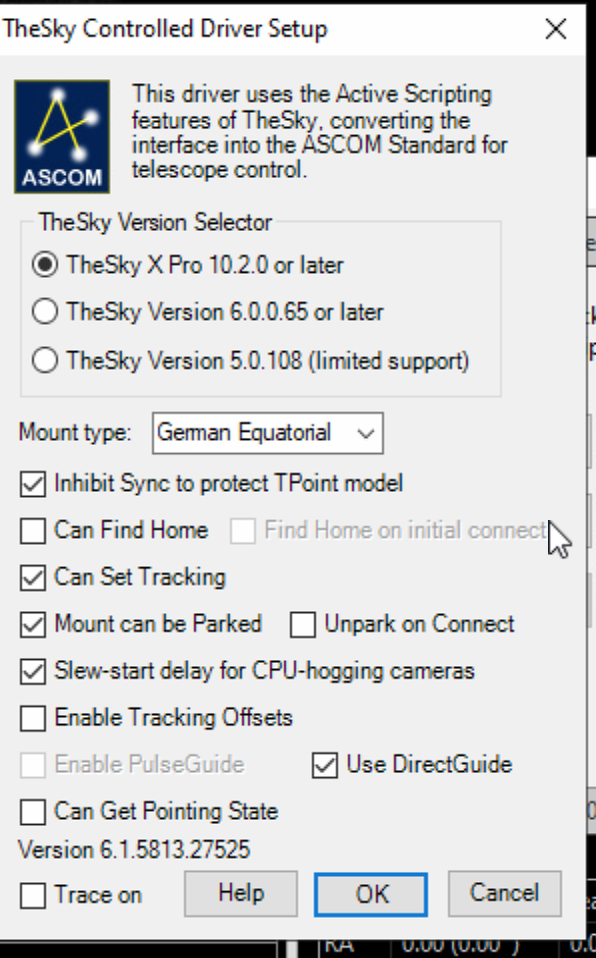
Camera needs to be set for the camera of choice, for me my trusty Starlight Xpress Lodestar is selected. For the Mount I selected ASCOM Telescope Driver for The Sky. Next you need to configure the Mount by clicking on the spanner and screwdriver icon next to the option.
Under here you can configure The Sky Controller Driver Setup, selecting The Sky version, X Pro for me and various options for the mount itself. The key checkbox is Use DirectGuide. This menu of options is from the ASCOM Chooser and you should select any settings you wish to enable. Mine can be seen below.
ASCOM Chooser for Mount and DirectGuide setting
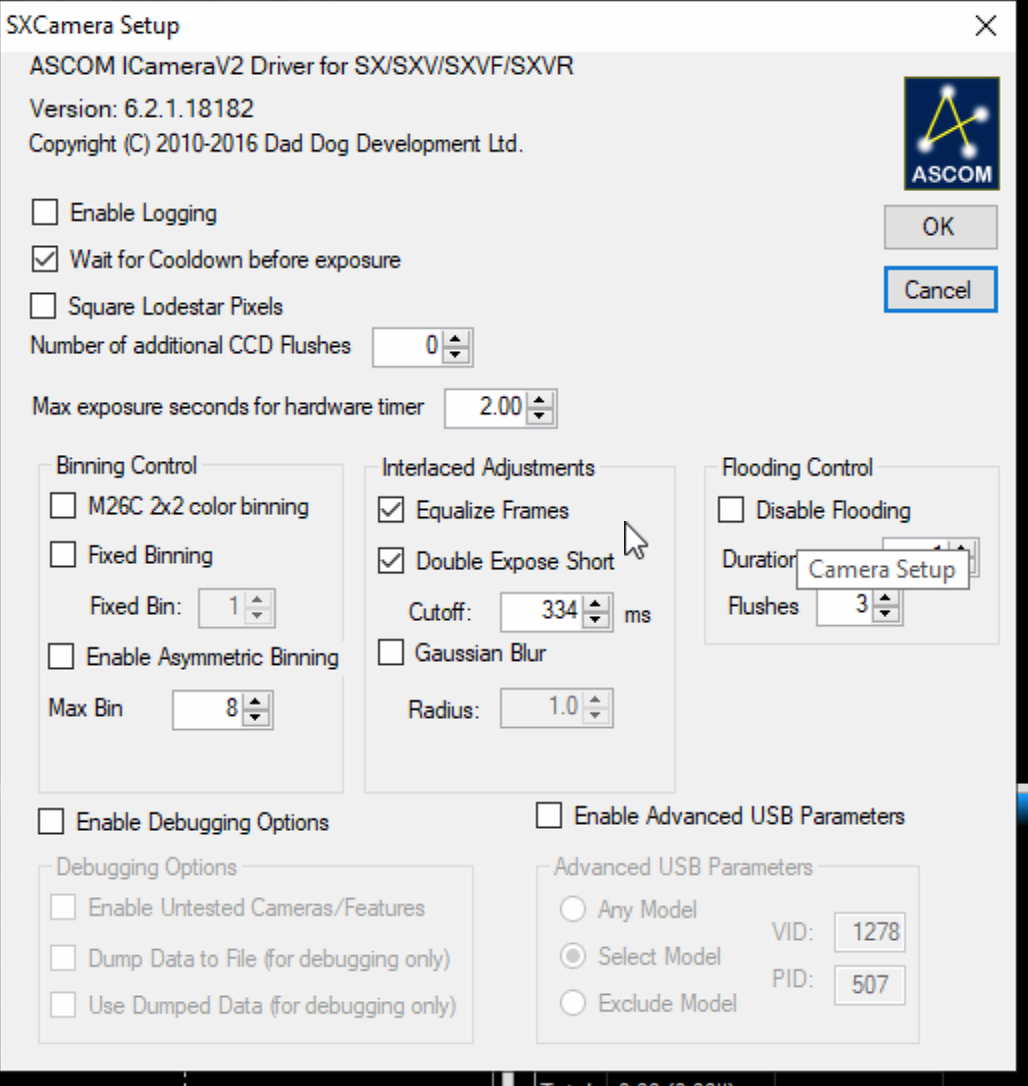
I quickly configured the Camera also and below are the settings that work well.
SX Lodestar Camera Configuration
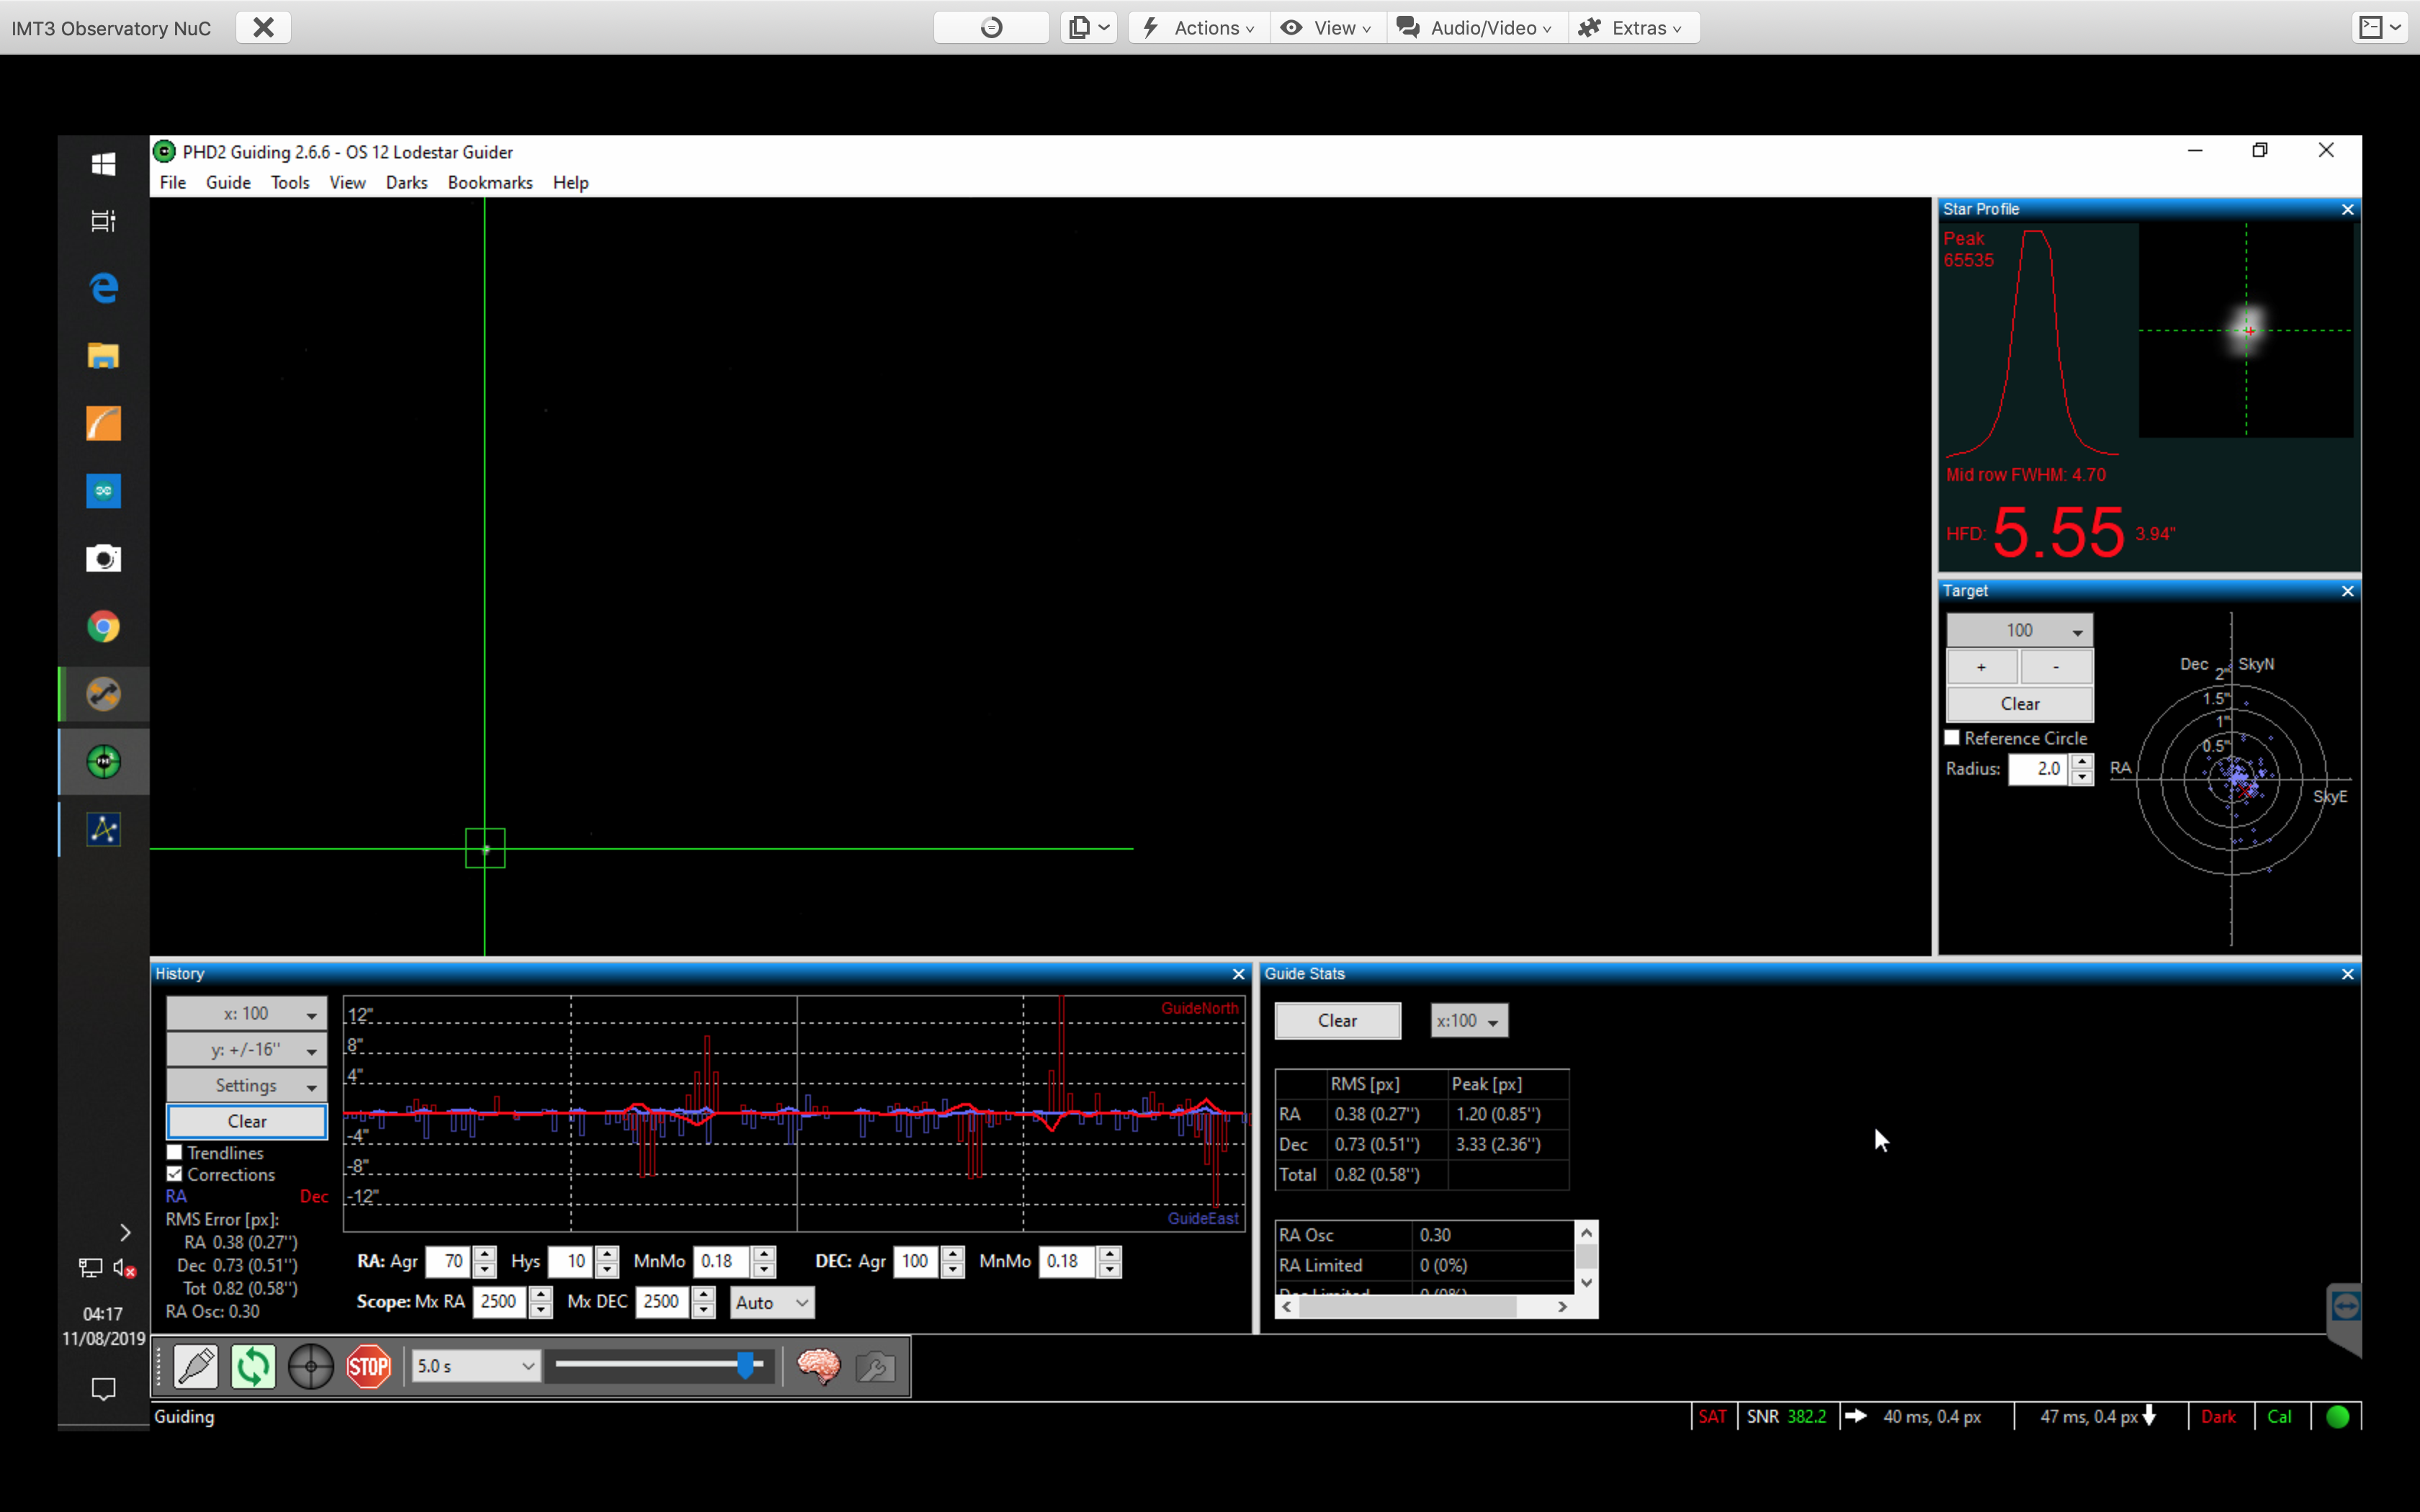
On connecting to both the camera and mount, selecting a guide star and calibrating the guider it is apparent that I have configured the setup correctly. All is now well with the guiding and it produces a smooth chart with tonights seeing as can be seen after several dips produced by cloud at the begging of the guider graph.
There were two things I wanted to do tonight, one was to get first light with GingerGeek through the Skywatcher Esprit 120ED, the other was to setup my Esprit 120 on the MyT in the garden and grab a photo of the Moon to celebrate 50 years since Neil and Buzz stepped out onto the lunar surface. As a bonus I wanted to to get the guiding working on the MyT too.
As GingerGeek opened the dome on the IMT3 I setup the portable gear on the patio. I connected the setup to a 12V car battery to see how well it did at running the Mount and the camera. The initial voltage of the battery was 13.1v when I started. I connected the camera to EZCap and the Mount to TheSkyX (TSX).
Meanwhile GingerGeek opened the dome, connected the mount, opened the very geeky but cool Flip Flap covering the Esprit 120 and slewed to a bright star for deterring the focus and the position relative to the 12″ main scope.
Remarkably the focus was fairly near and after a few iterations GingerGeek managed to get the V curve sorted for good focus. Before this was done he setup the Luminance filter on the filter wheel control with SGPro that had not been configured. I then looked at the resulting image and determined the FoV within TSX. The field almost fits the 12″ and so the position is fairly close, close enough for solving and being in the right area for imaging. There was an error by SGPro complaining about 800px difference with what was to be expected, the problem being the difference in the angle of the Esprit 120 vs where the mount knows it is pointing as shown through the 12″.
Despite that we managed to take an image and then move on to see if we could guide with the 12″ off-axis guider for the Esprit. This worked a little but the guider graph was way off at various points, I believe this is potentially either a setup issue on the guider and/or the fact that we are too frequently taking too many images to correct and thus chasing the seeing. I will look at this next time are out.
Back on the portable setup, I managed to very quickly connect, perform polar alignment using the PoleMaster and the new bracket I fitted. I then slewed to a star which was not quite in the FoV so I need to spend more time on this next time I am out. No problems though, I nudged the scope and found the star. Performing a sync on this solved any further slewing problems.
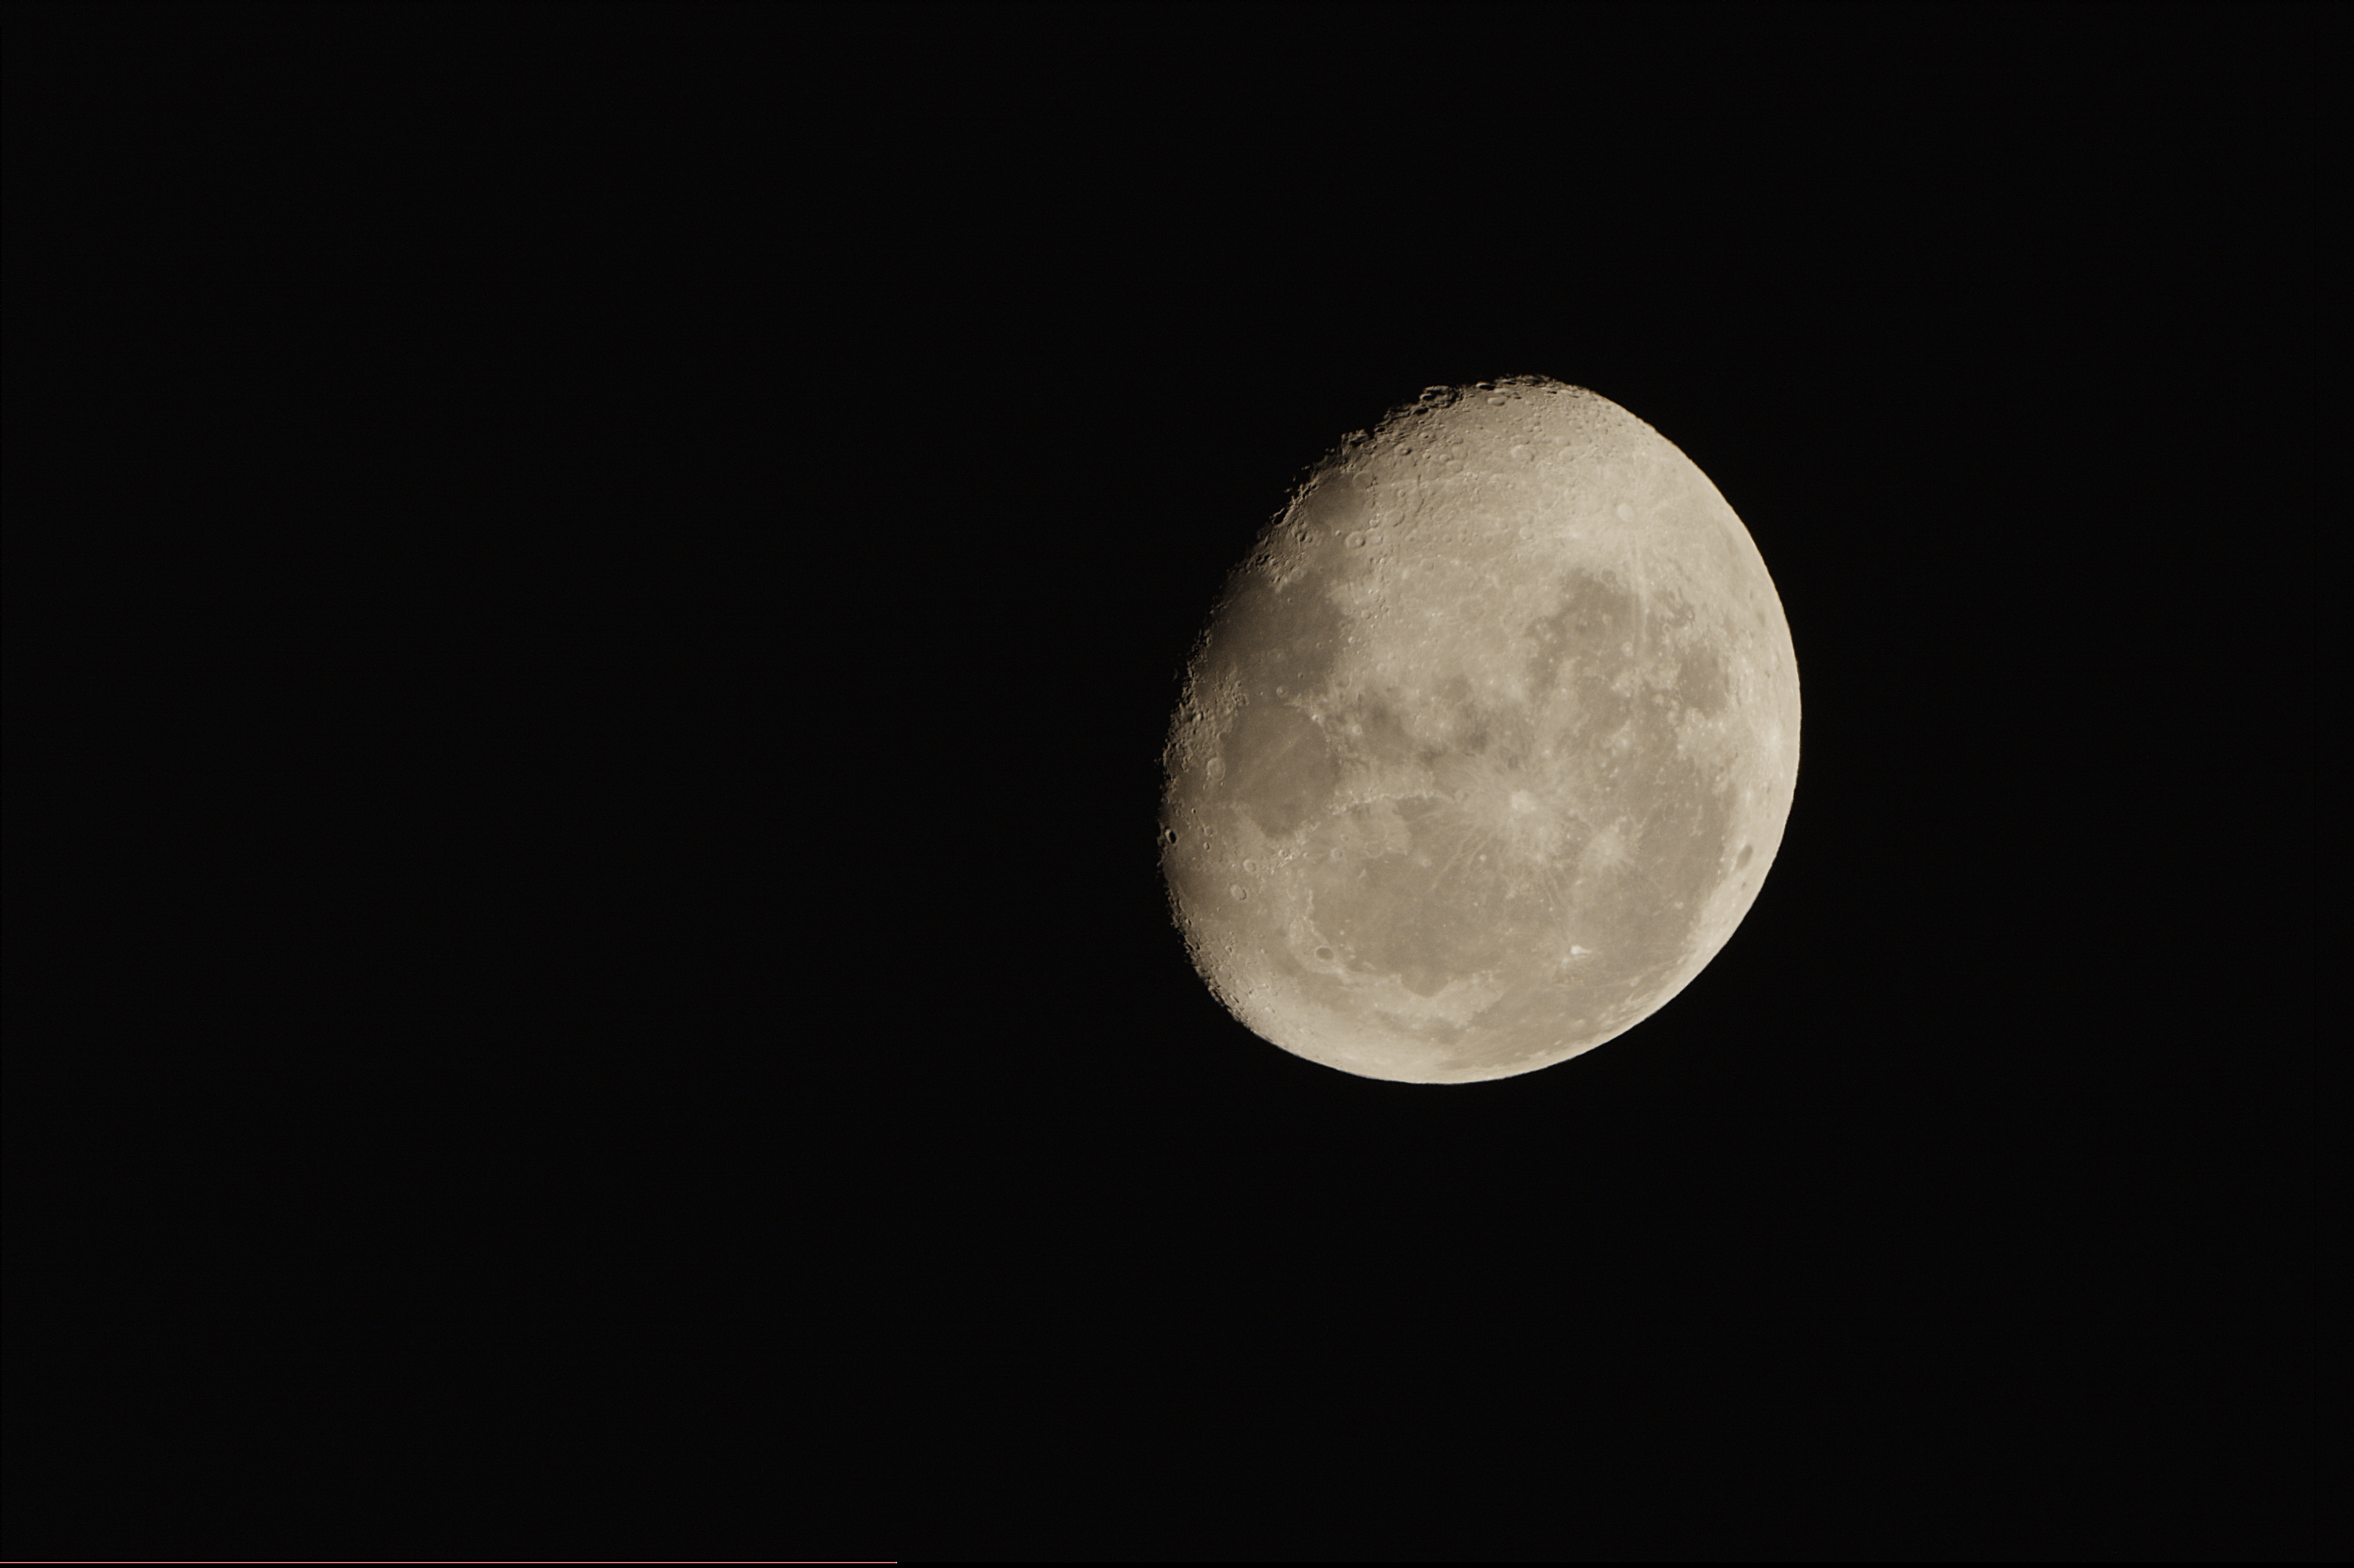
I then waited for the Moon to come up over the roof tops which was unfortunately not until 2am of the 21st thus slightly missing the landing date of 20th by 2 hours (Eagle landed at 9:17pm BST) but non the less still obtaining an image of the Moon to celebrate the 50th anniversary of the first lunar landing at the time Neil put that famous foot on the Moon at 1:56am BST on the 21st July 1969 🙂
Apollo 11 50th Anniversary
GingerGeek managed to get a few images but nothing much was showing on them especially the Elephant Trunk nebula he was imaging, I suspect, but am not sure, the wrong filter was selected so probably OIII rather than Ha as a previous Frame and Focus command through SGPro for 15 seconds showed the Elephant Trunk, at this point we were taking 10 minute exposures so it should have easily been visible. Again another problem to sort next time we are out.
Tonight Bob and GingerGeek came over to progress with commissioning the observatory. The task for tonight was to get the Esprit 120 focused and given first light. As the evening progressed there was slight frustration of how long it was taking to sync on a star, in terms of finding it and then being able to sync so we could go back to it. This is because I had been the night before messing with the polar alignment and we have yet to perform a Point run.
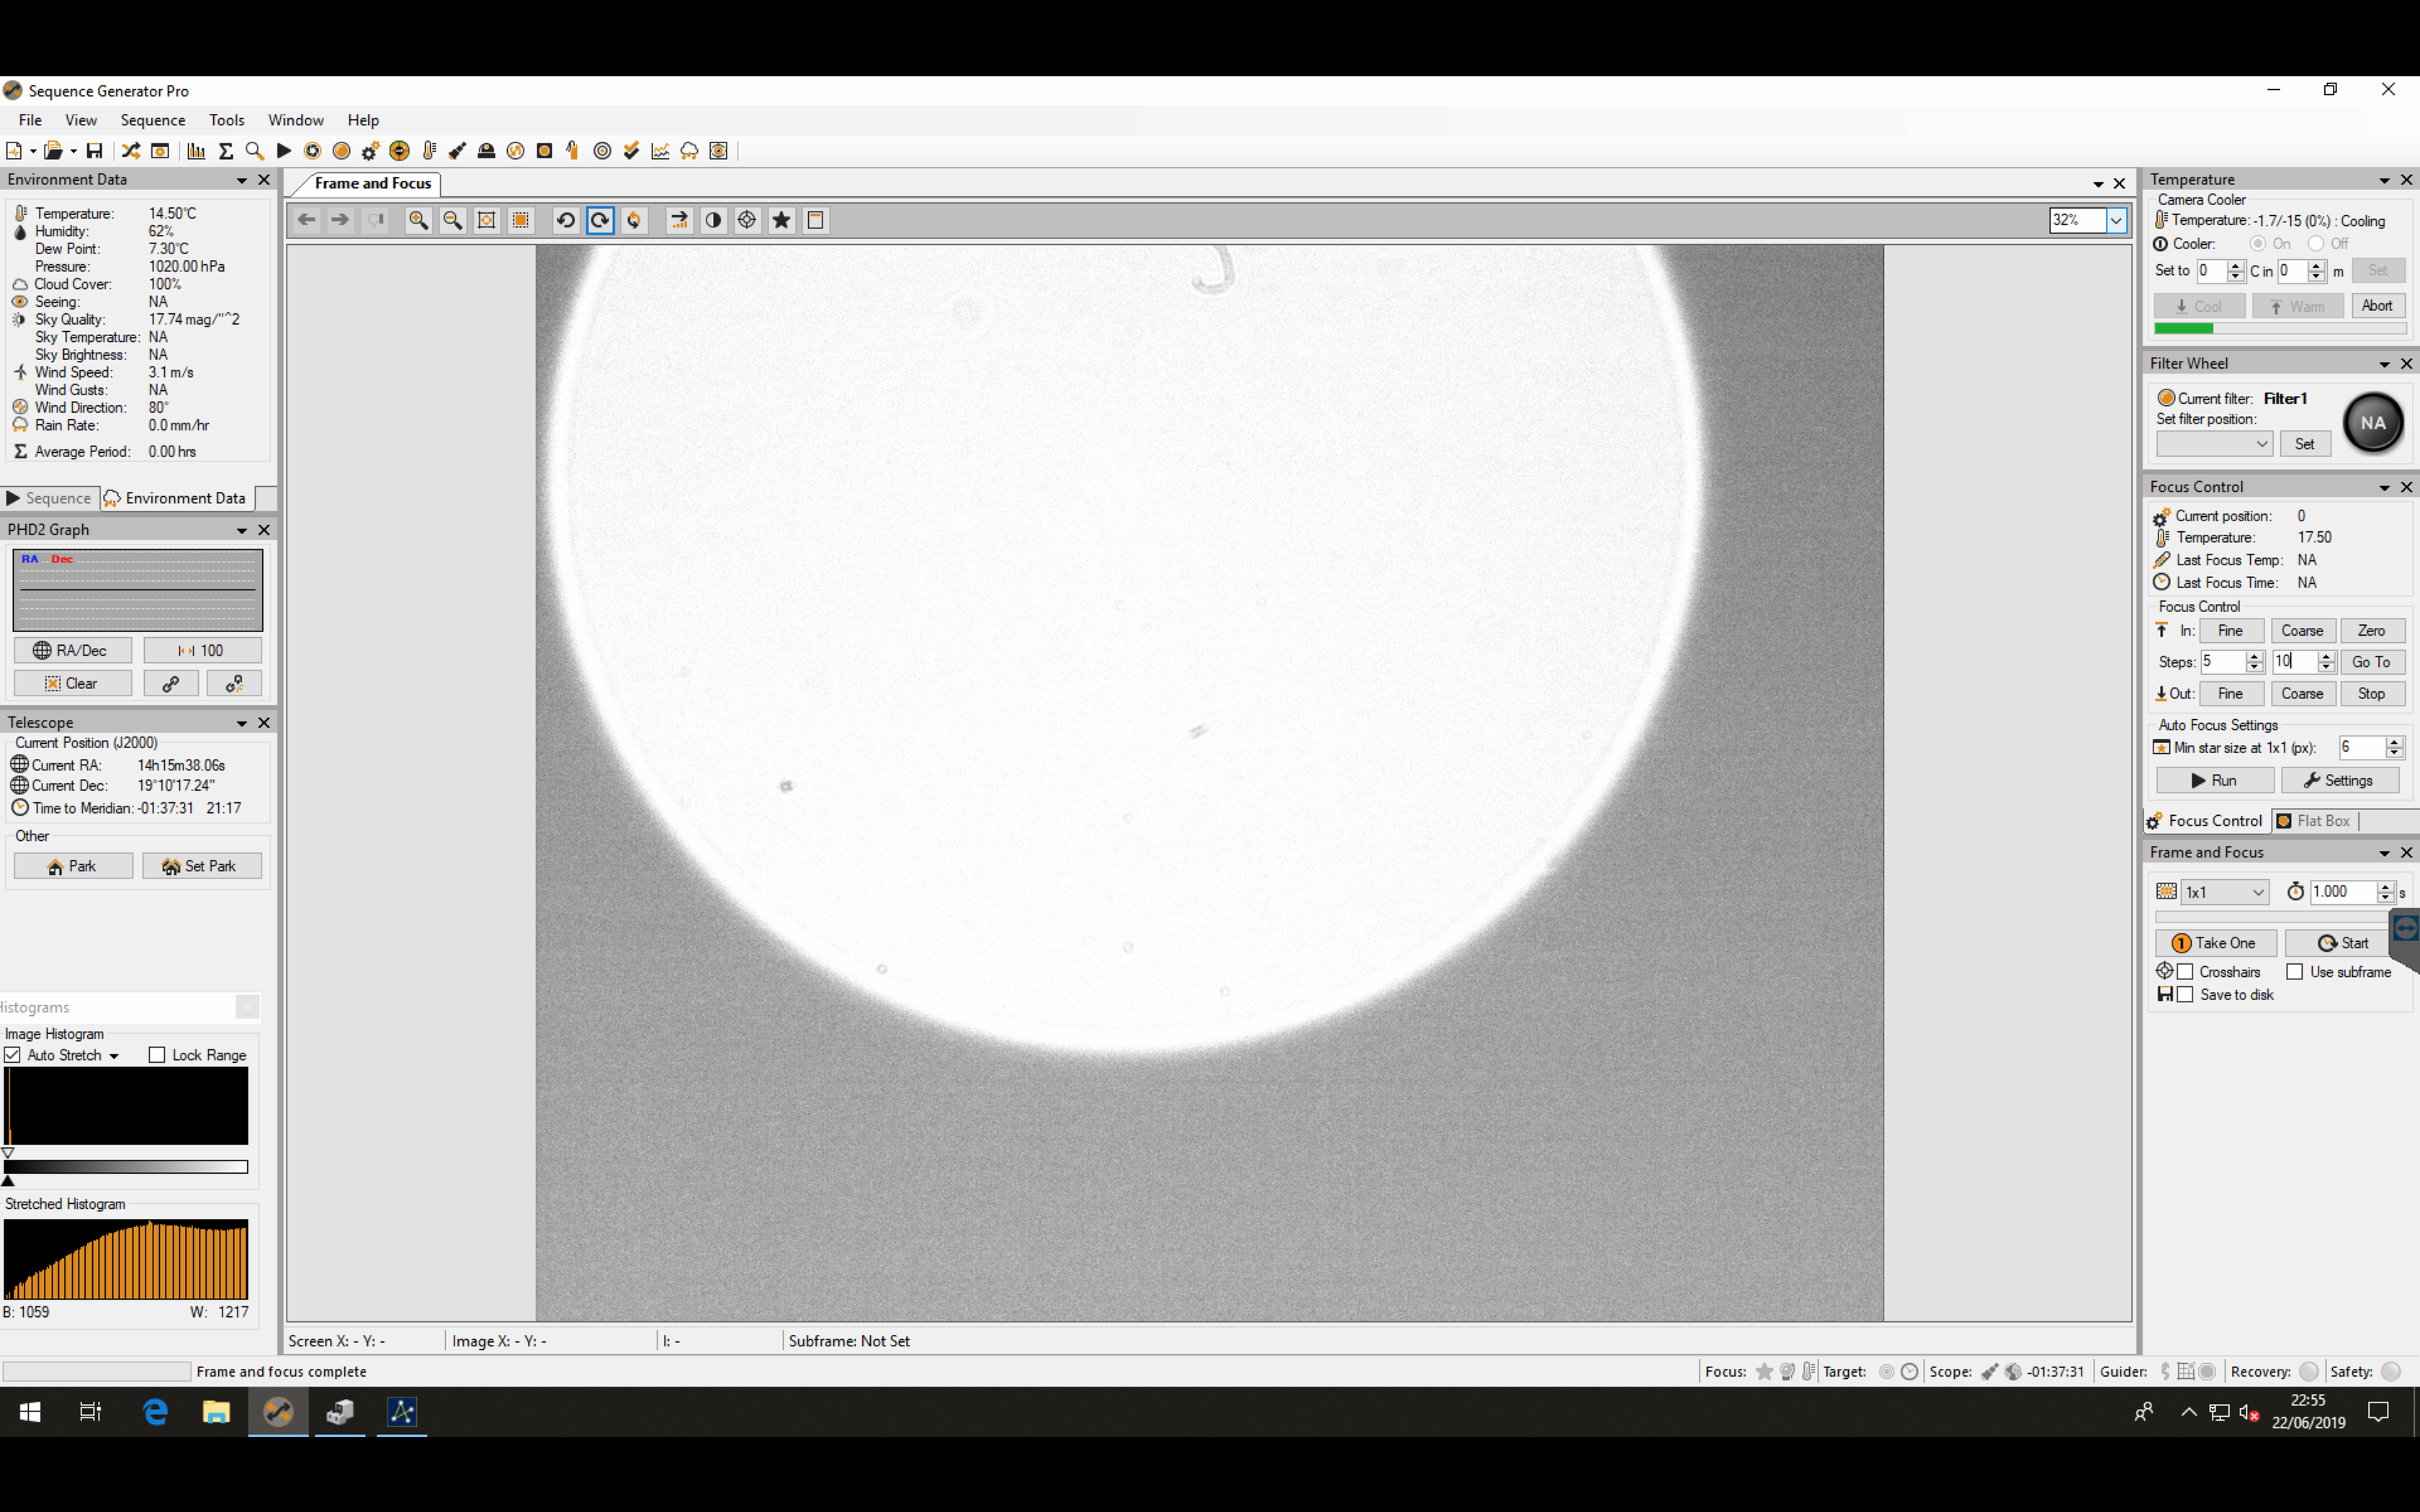
Out of focus Esprit 120
It also took some time to get focused on the Esprit due to us setting the maximum extent to the focuser tube incorrectly, falling short of the distance needed at the back focus to get good focus. We then had to go into the observatory and modify the maximum out figure for the Lakeside focuser.
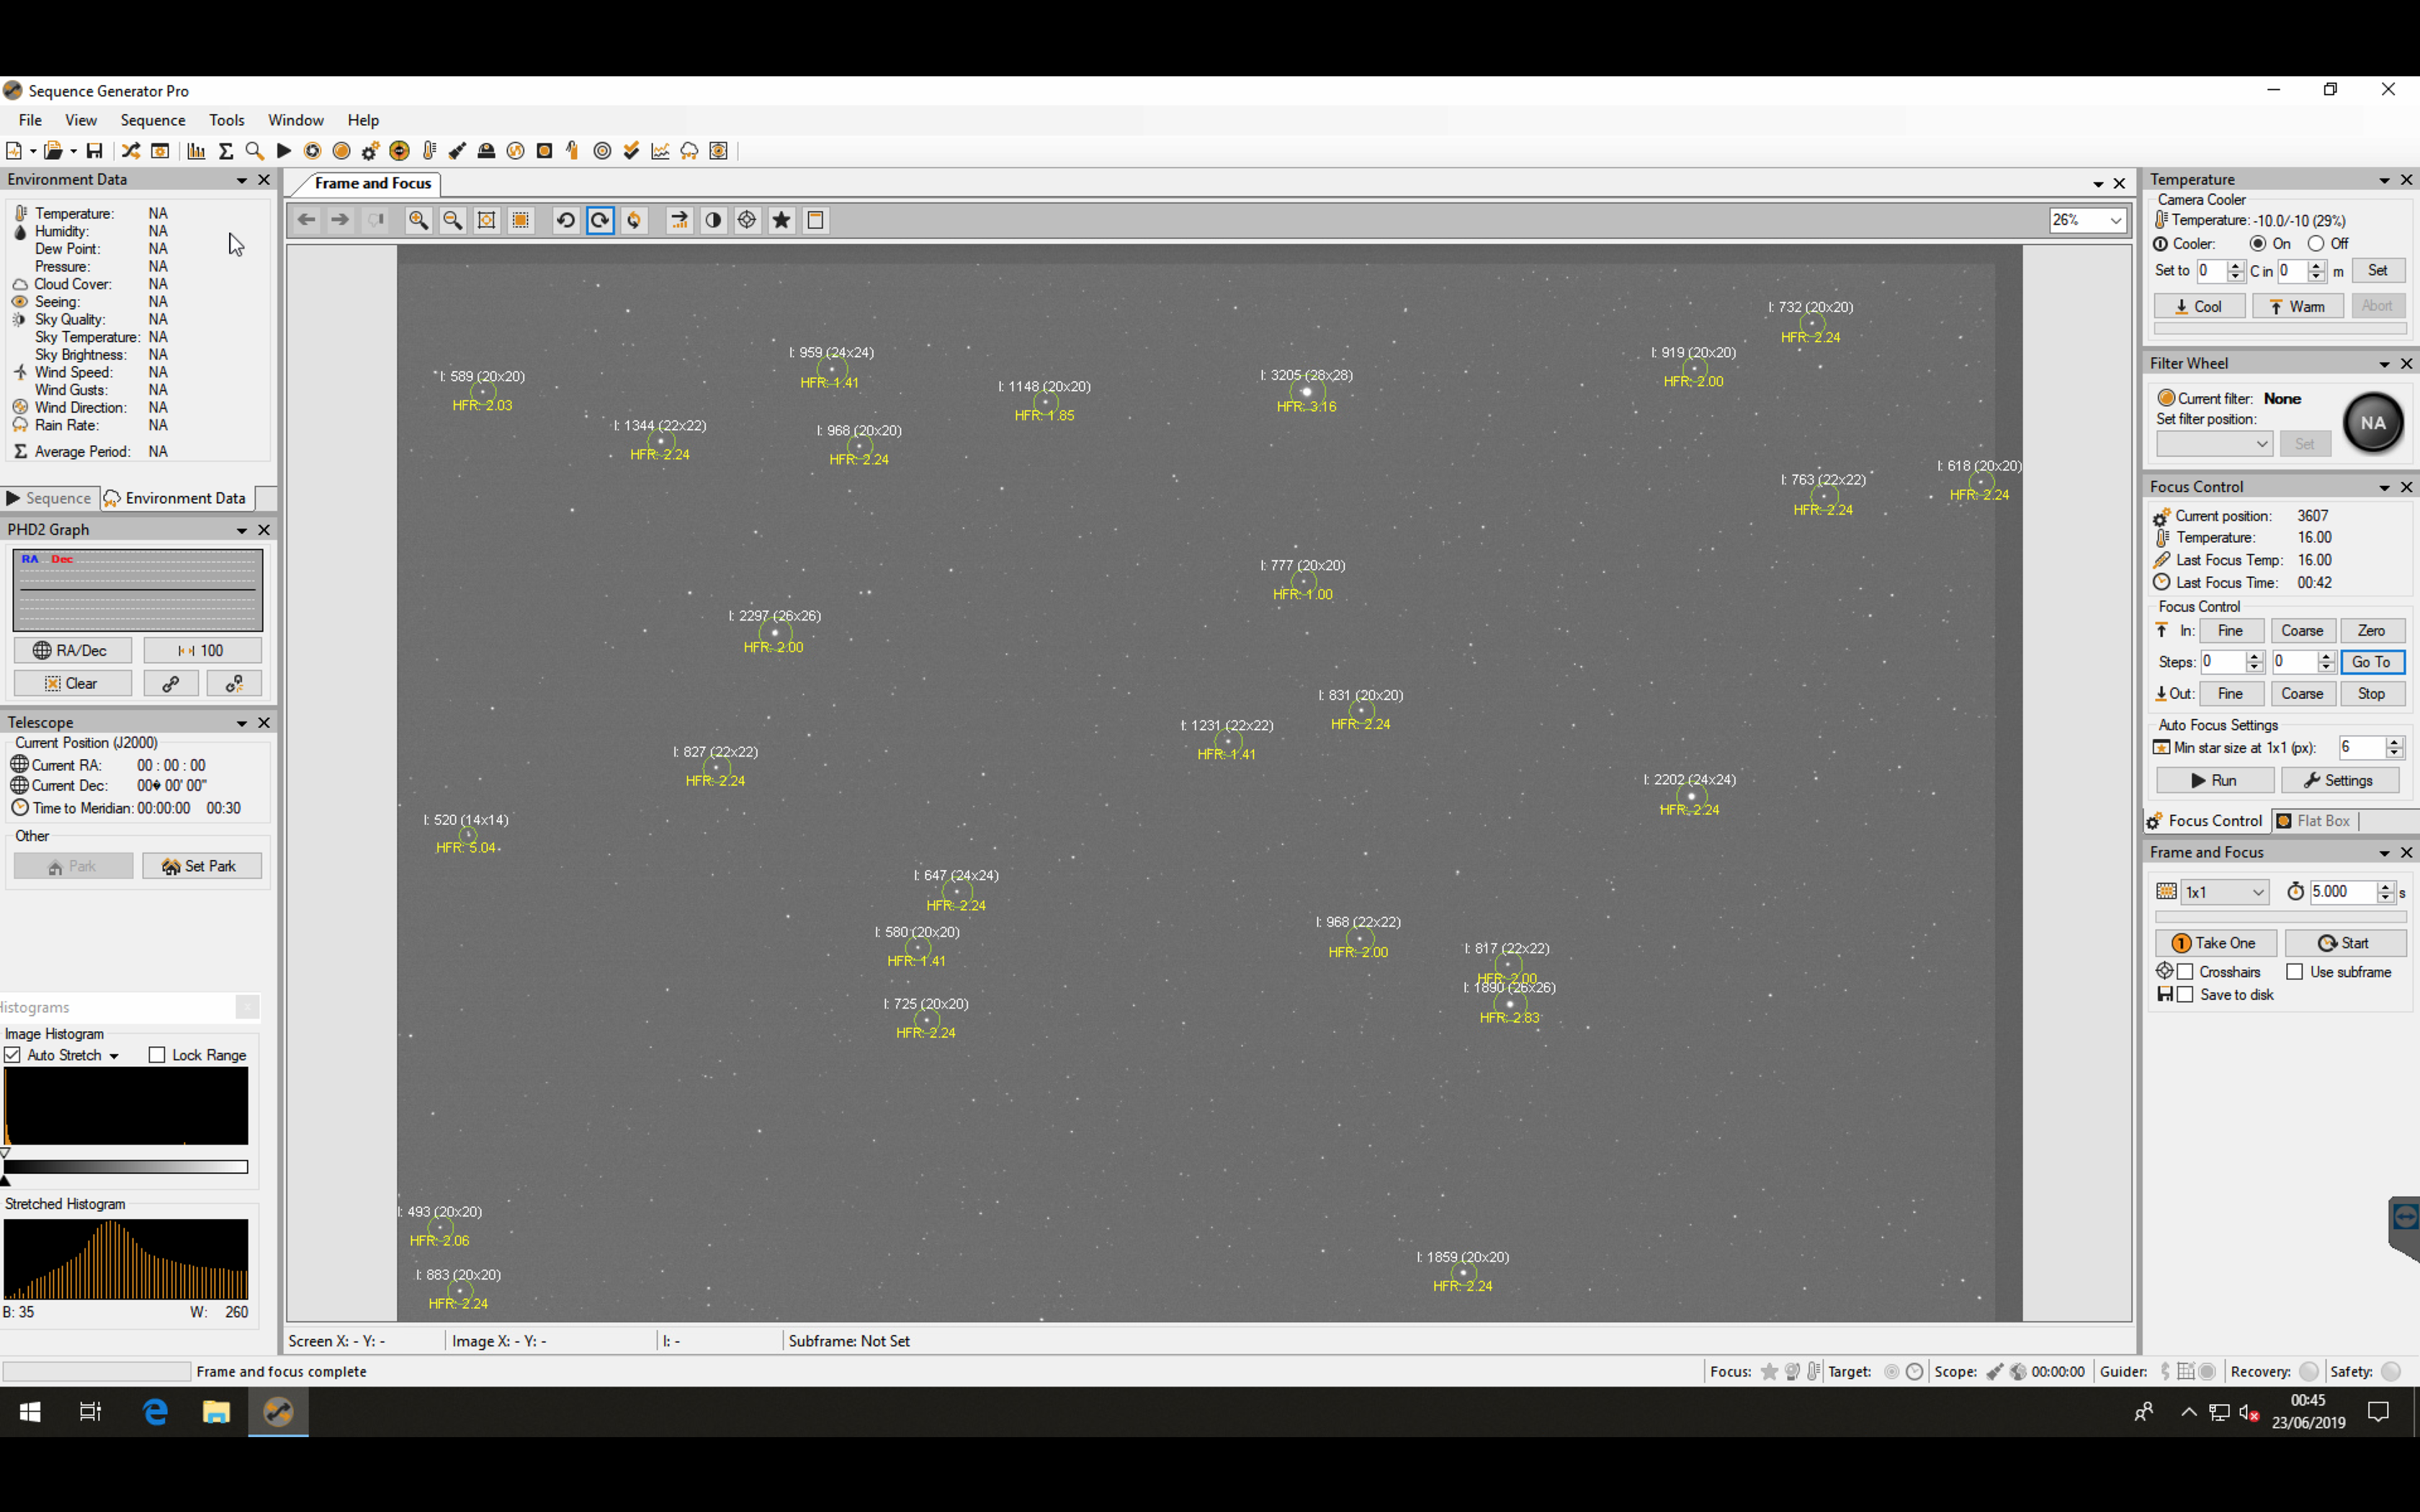
Once this was done focus was achieved and GingerGeek used autofocus within SGPro to get good focus.
In focus Esprit 120
A single image was taken to prove it.
Next we need to refine the polar alignment with a TPoint run and then perform a longer Point run to finish the commissioning of the Paramount MEII.
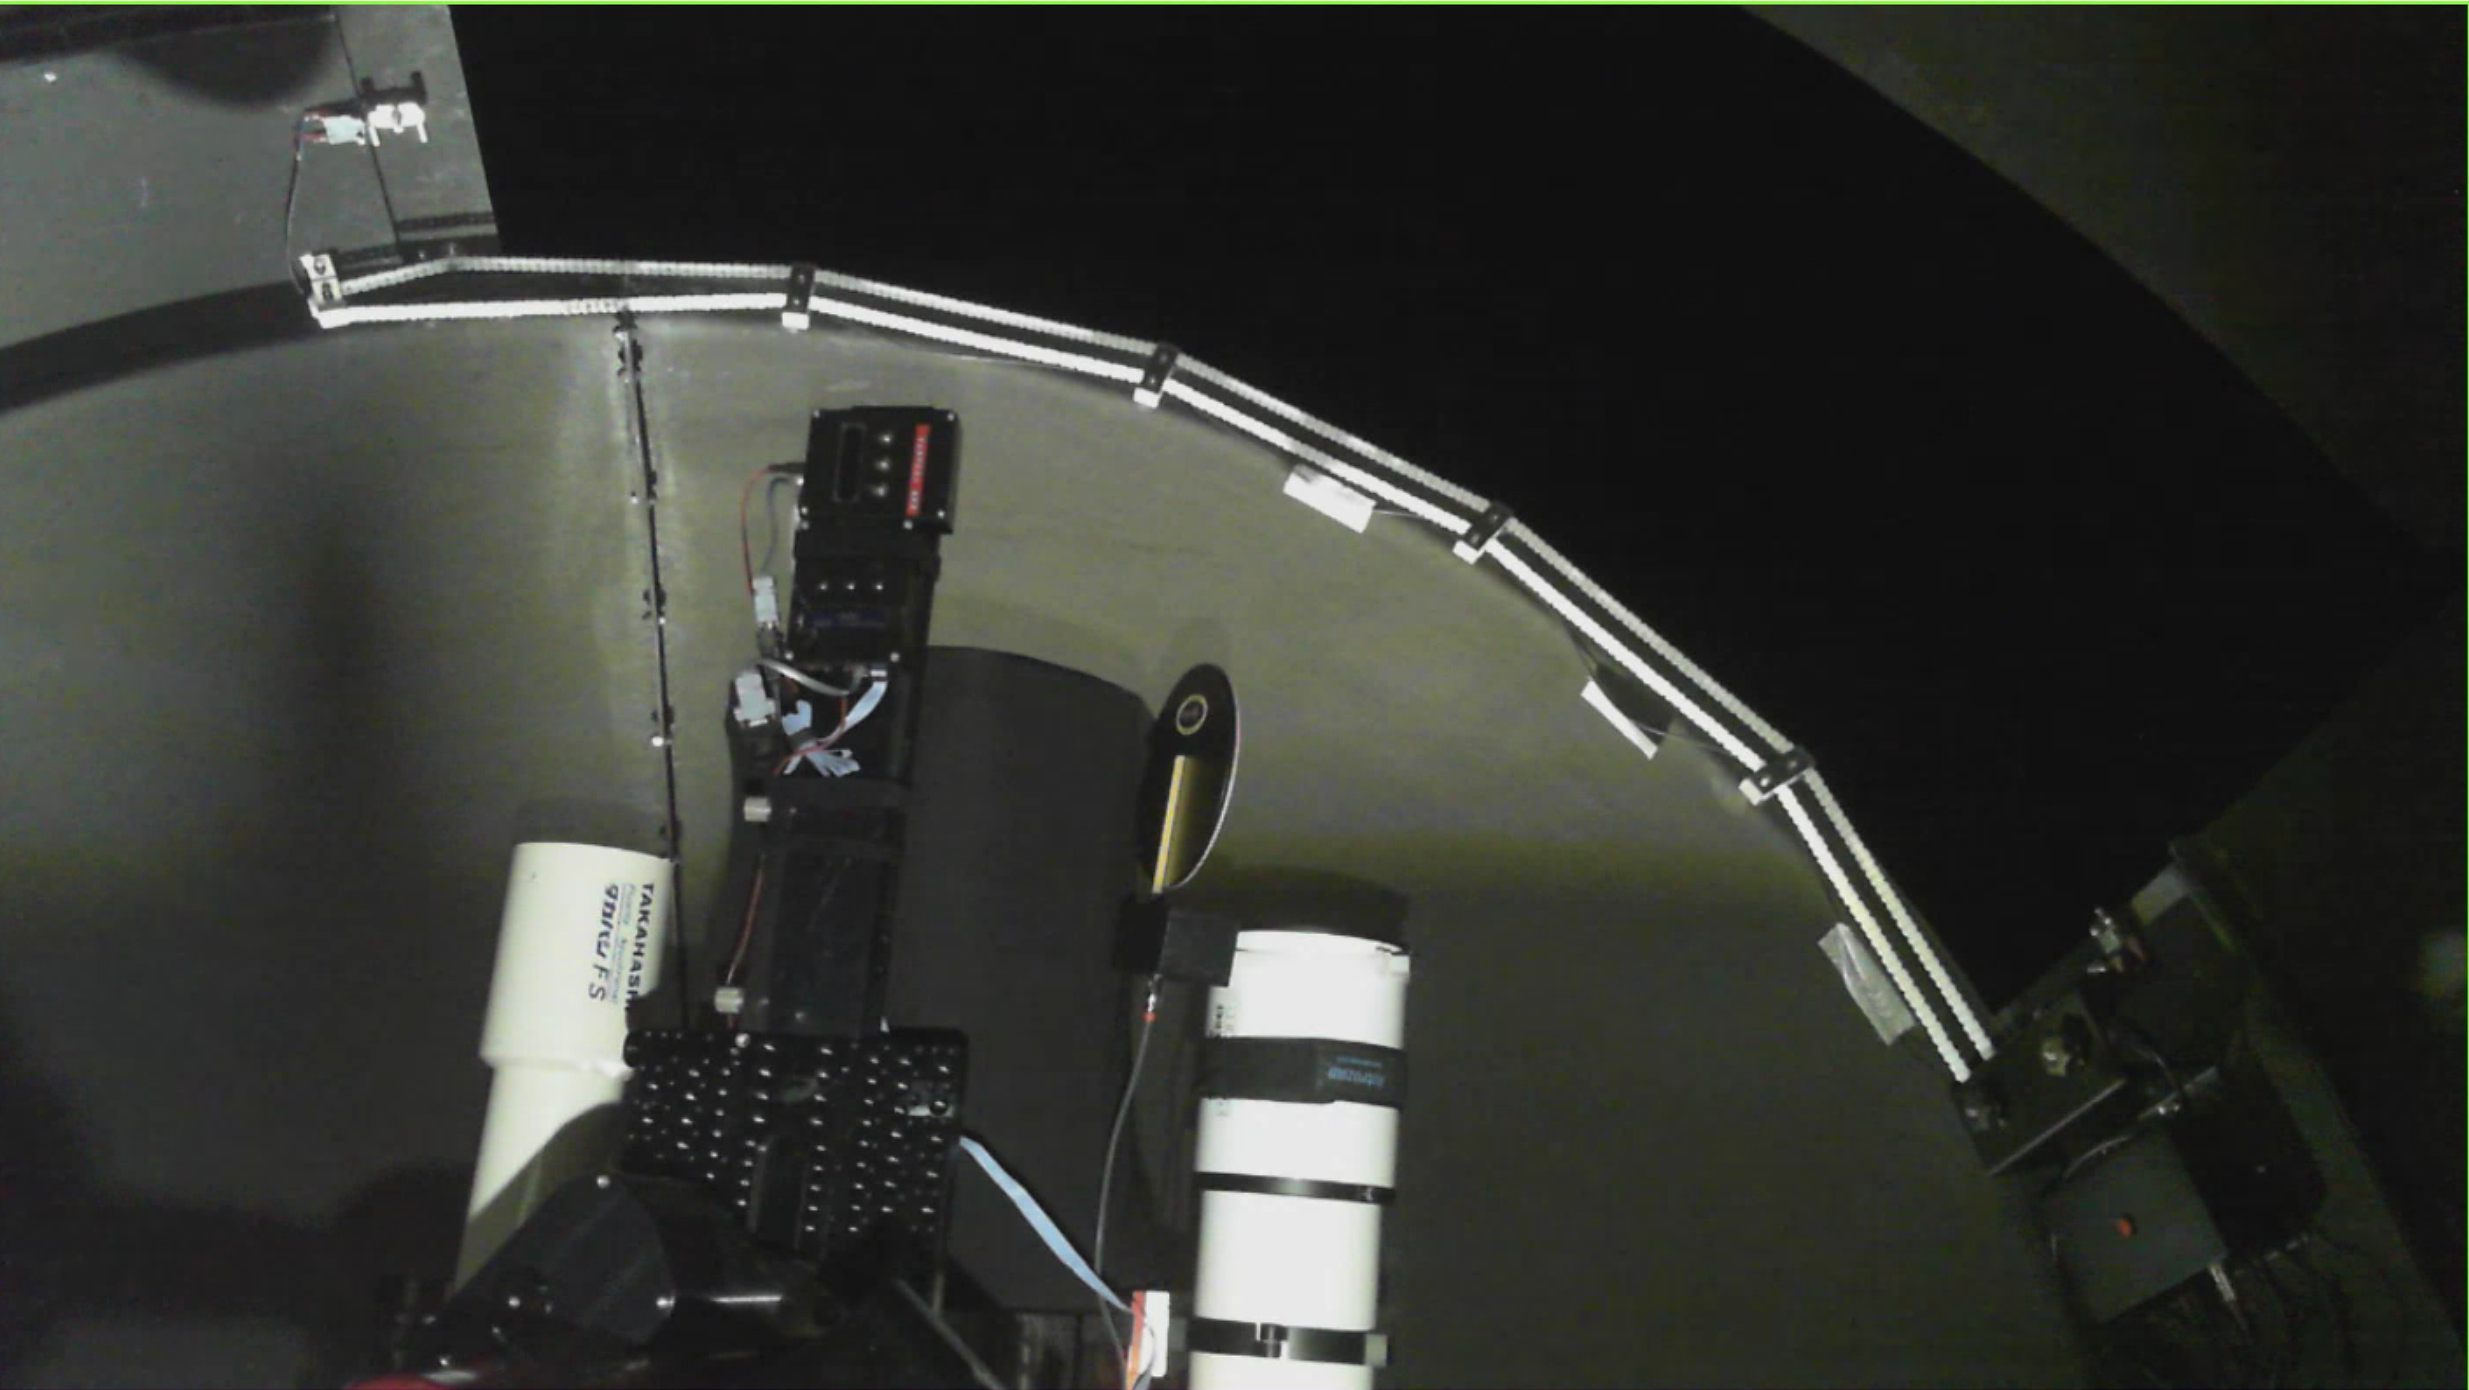
So another day spent with Dave and Bob just finishing off the finishing touches to the scope/mount installation whilst Dave messed about pretending to be a brickie and spent lots of time not actually doing any brick work so we think he may now be qualified.
We spent some time tidying up cabling and testing a low light camera for use in the dome at night so we can see what the mount and dome are actually doing.
Now the Chroma Ha and OIII 3nm filters are now installed into the SX filter wheel the only things that remains is to wait for the delivery of a cable (FTDI) to connect to the Optec Flip Flat panel.
Obviously the next bit is working out if the reducer to CCD spacing for the 3rd scope is correct and work out the focuser backlash so we can correctly use SGPro focus offsets for the filters.
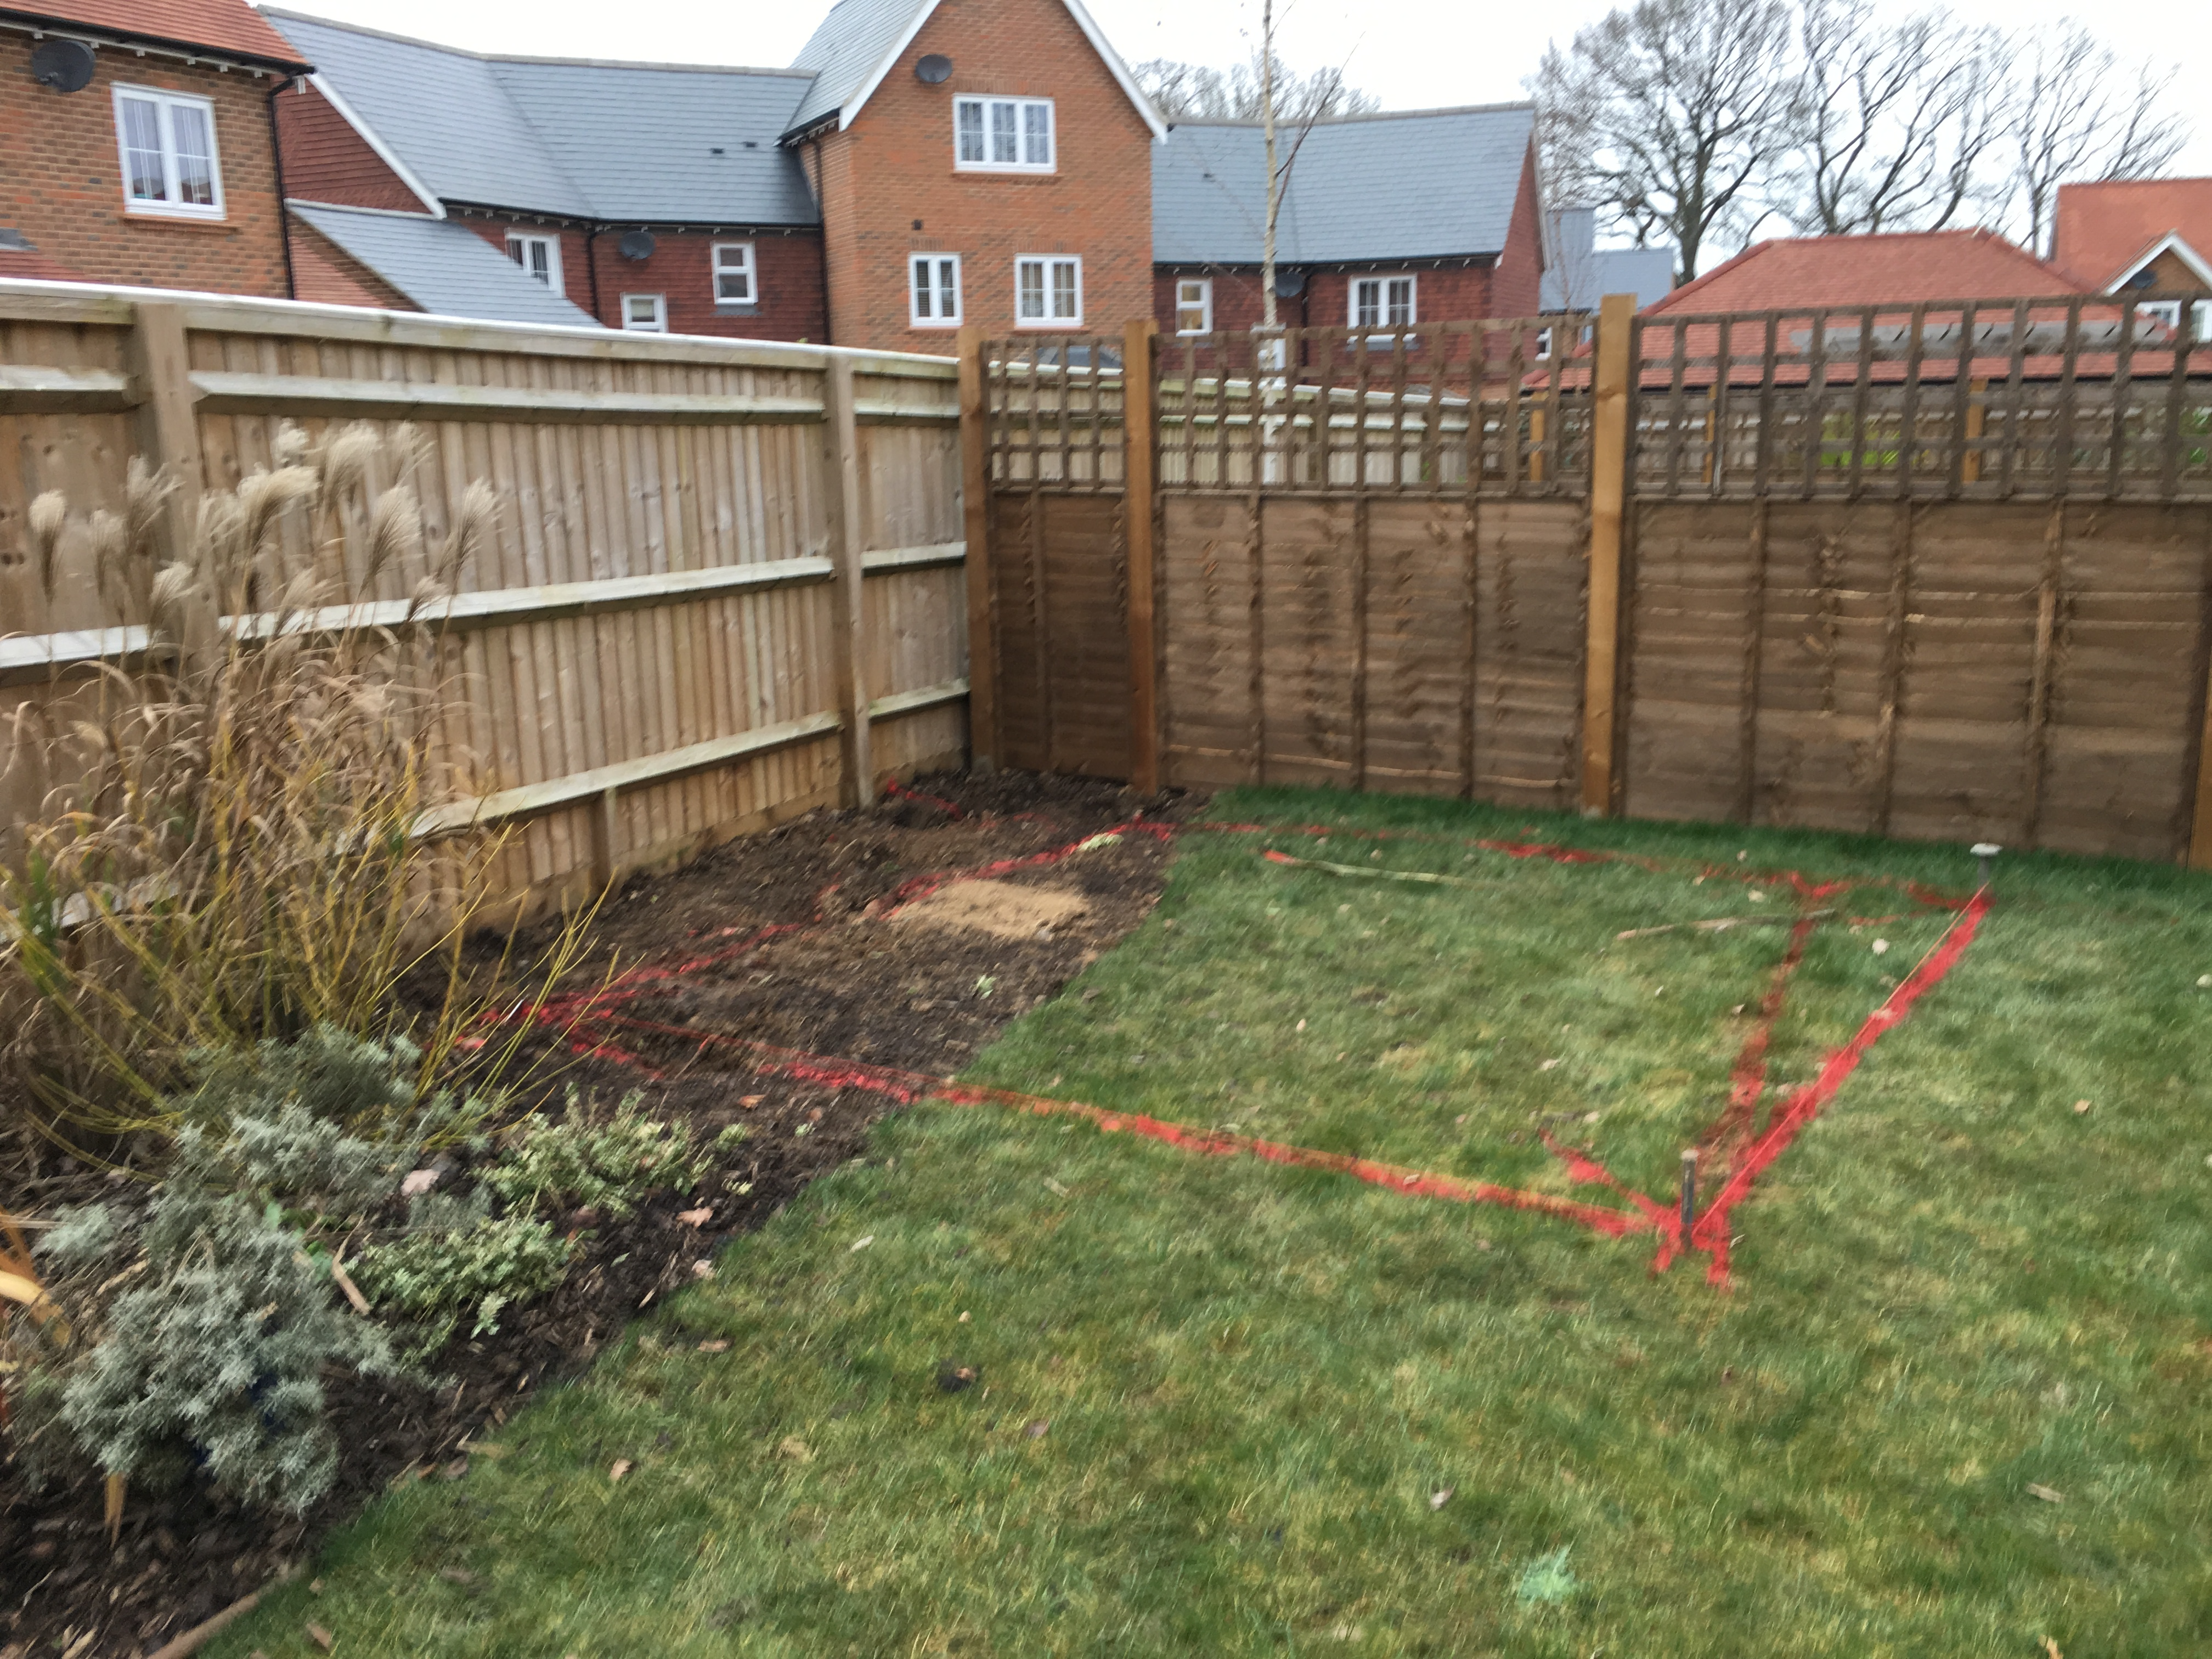
On Thursday the 10th January 2019, Ripton Windows, who are also building me an Orangery, marked out for the first time the location of the main slab of concrete that the IMT3 will be built upon. It is with great excitement that a new IMT is being built even if this time it is not manufactured by myself, Bob and Brendan.
I will undoubtably blog about the progress of the observatory here that will house 3 setups for myself, Bob and GingerGeek which will be used by all three of use remotely. The idea is this is a dark site setup not requiring any hands on for most of its use.
IMT3 Schematic C/O Pulsarastro.com
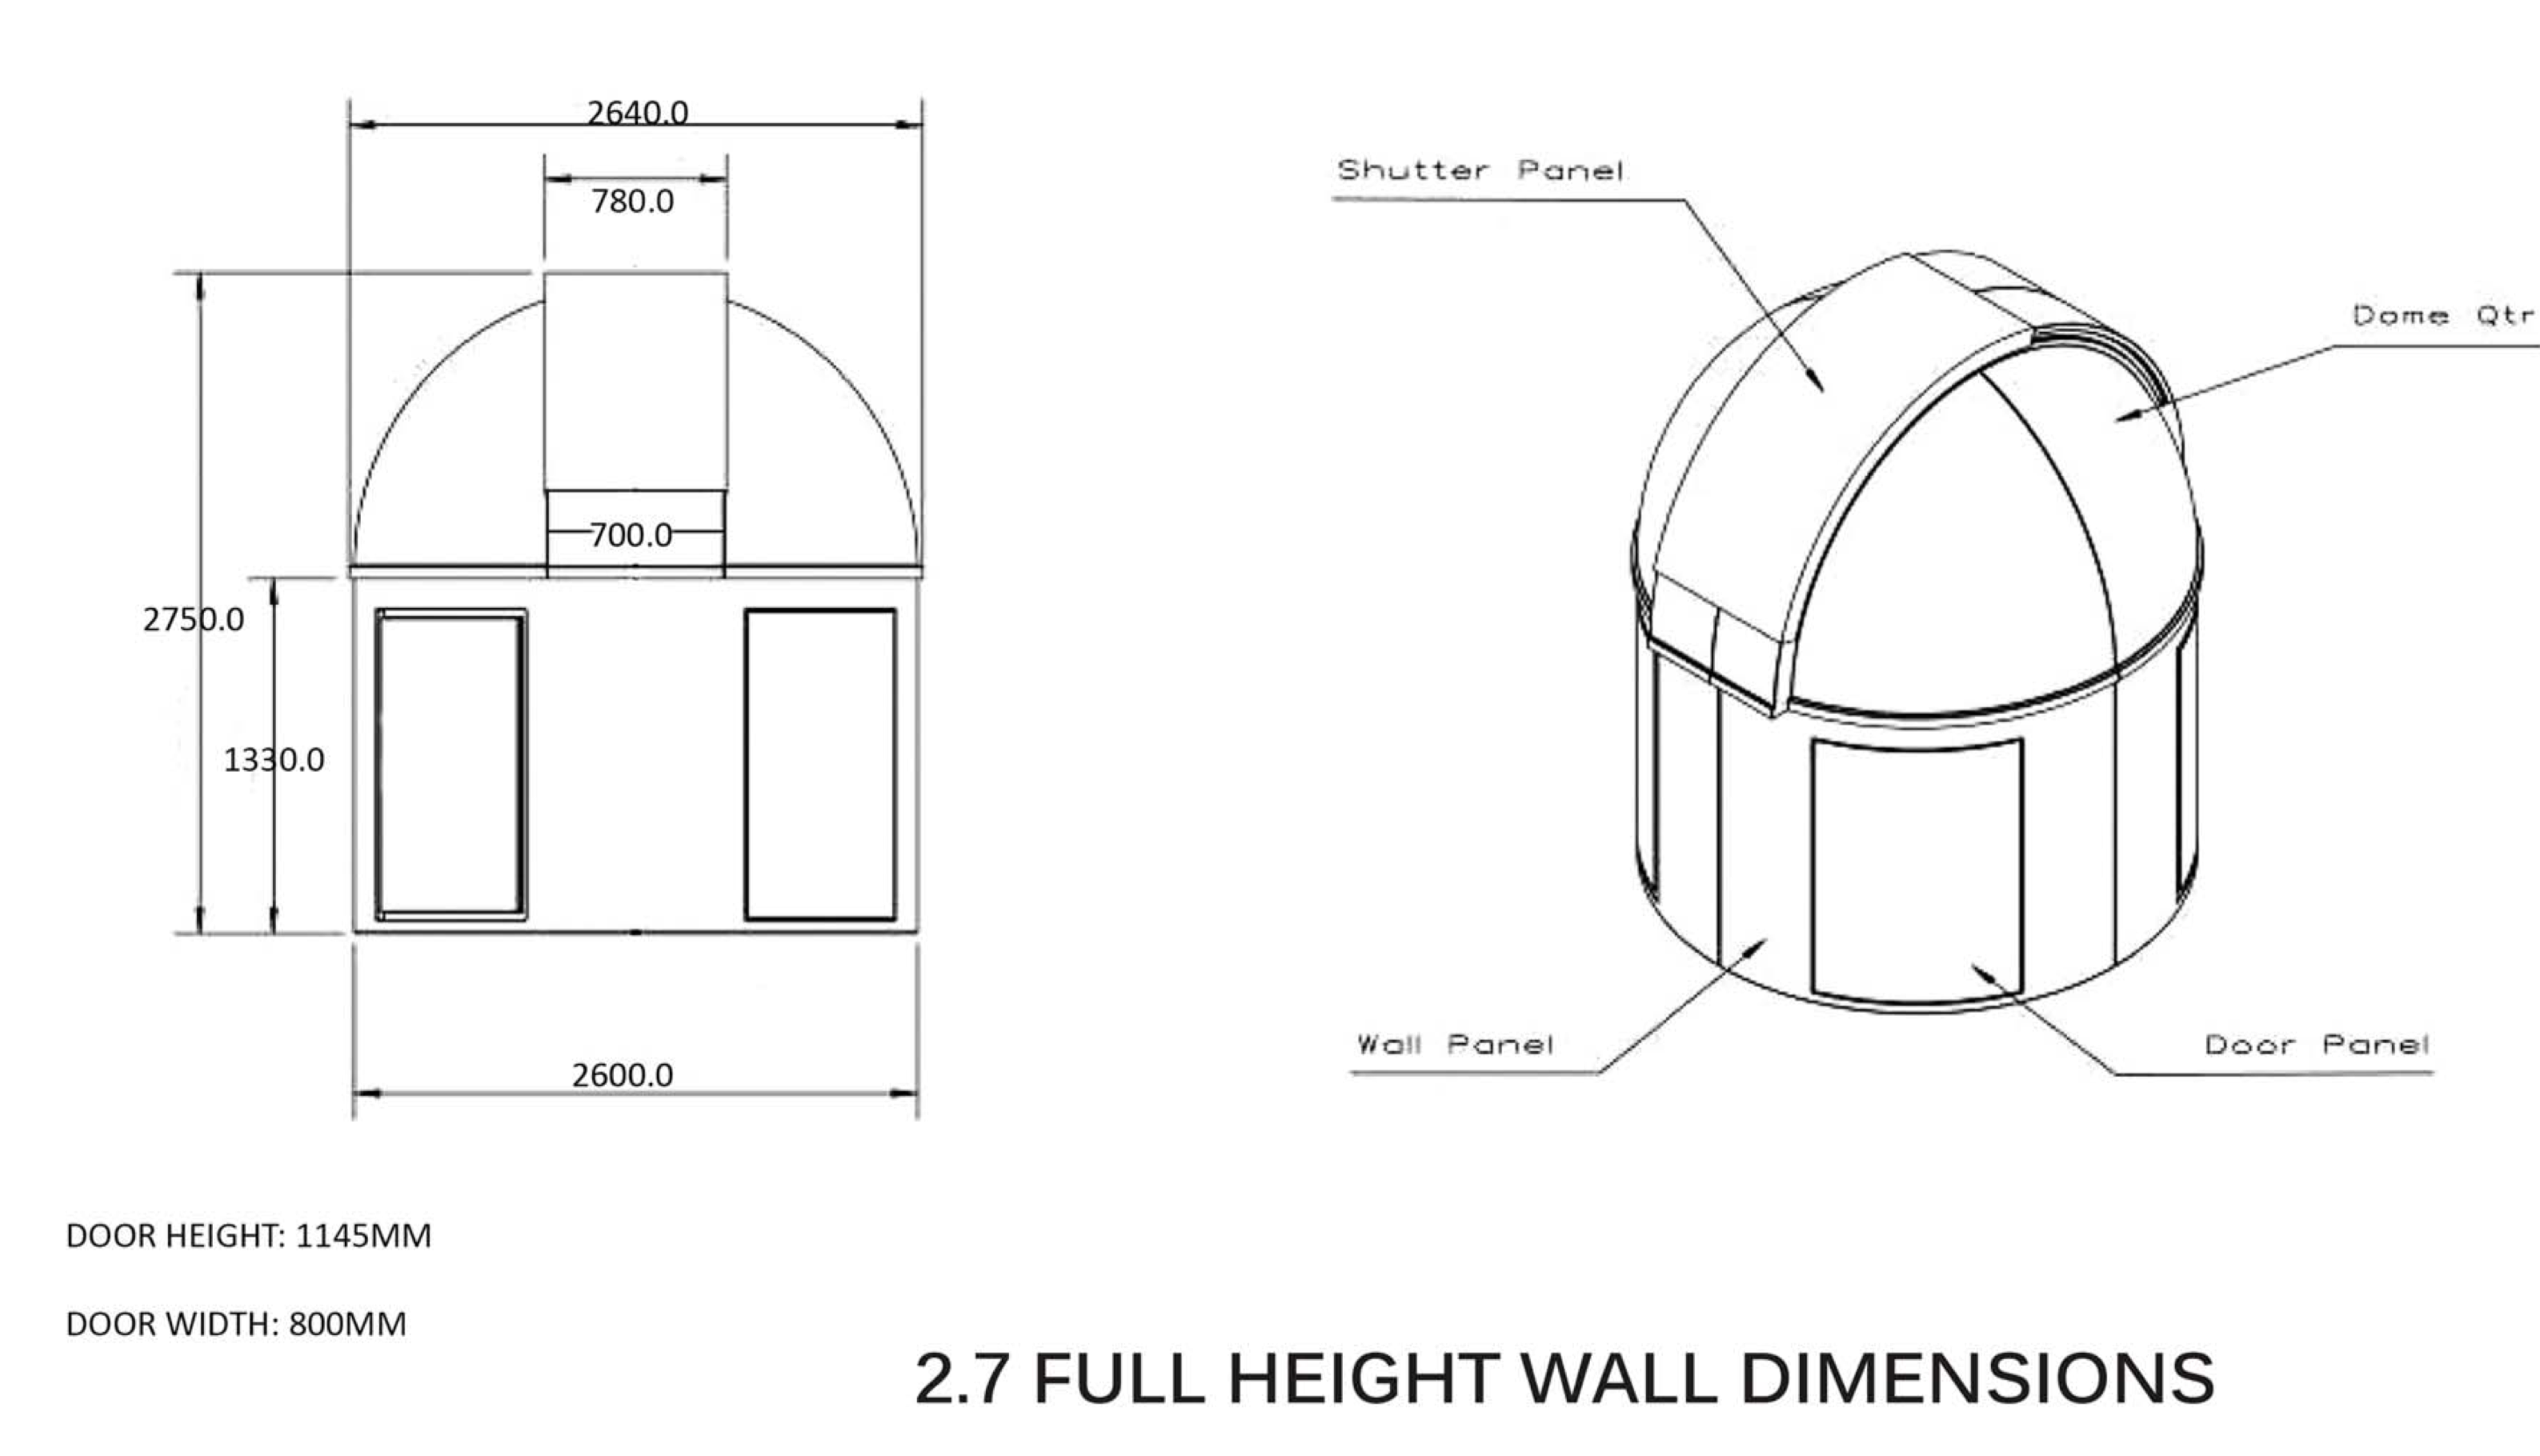
The observatory will be a full height 2.7m dome with full automation, both of the shutter and the dome rotation. The equipment within will be accessible from any remote location in the world and with the planned suite of software will automatically close should the conditions require it.
I look forward to giving more details as they come, for now I await the first spade of digging next week as the foundations of the orangery are finished and the observatory and patio foundations are started.