After a successful morning of Luke helping me rewire the 12″ due to the removal of all computers apart from the Mac Mini, I looked at why the guider kept disconnecting last night and then not calibrating. It transpired to be the length of the USB run. I was hoping through 3 hubs and many meters of cable. On replacing the cable with a shorter one and plugging it into a single hub, the connection error went away. The only thing left to do was test auto guiding at night.
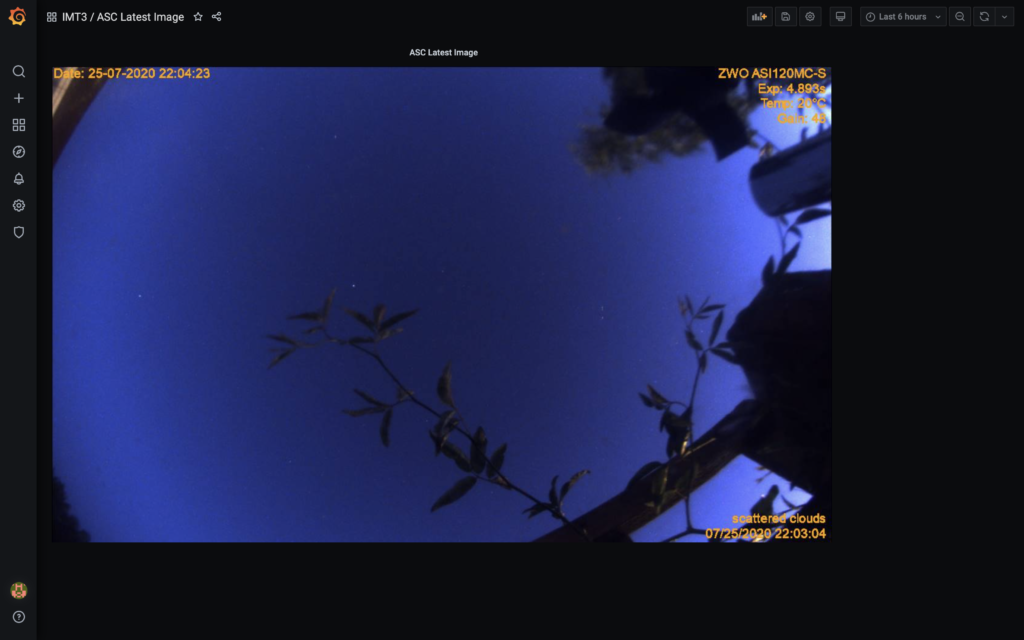
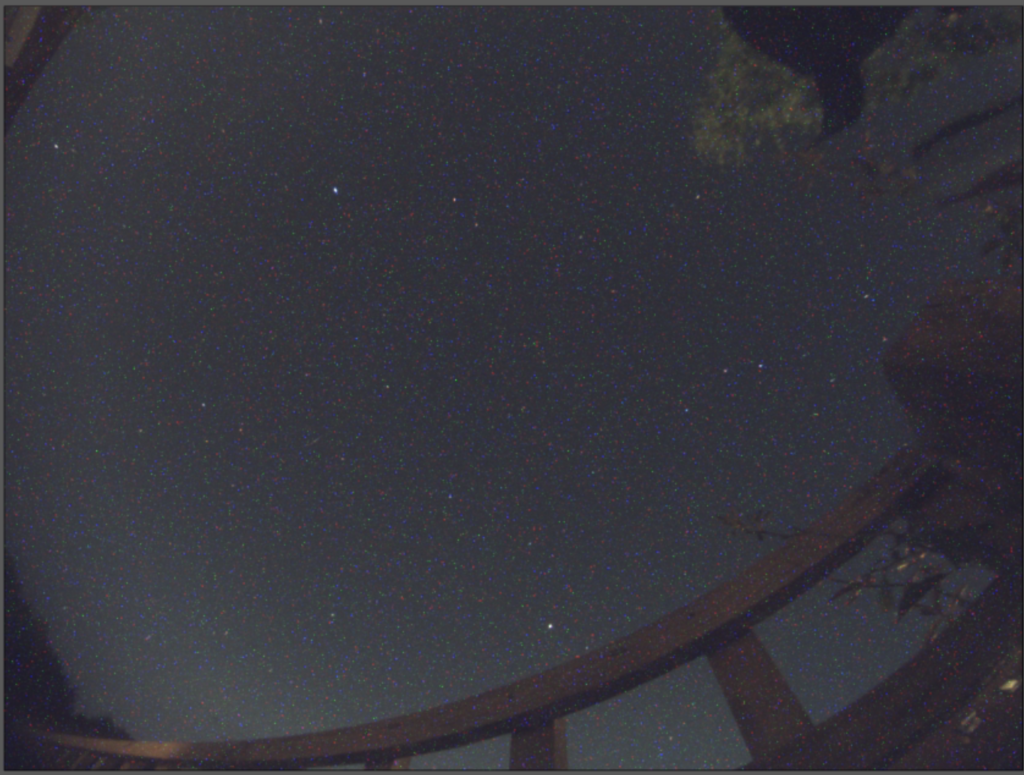
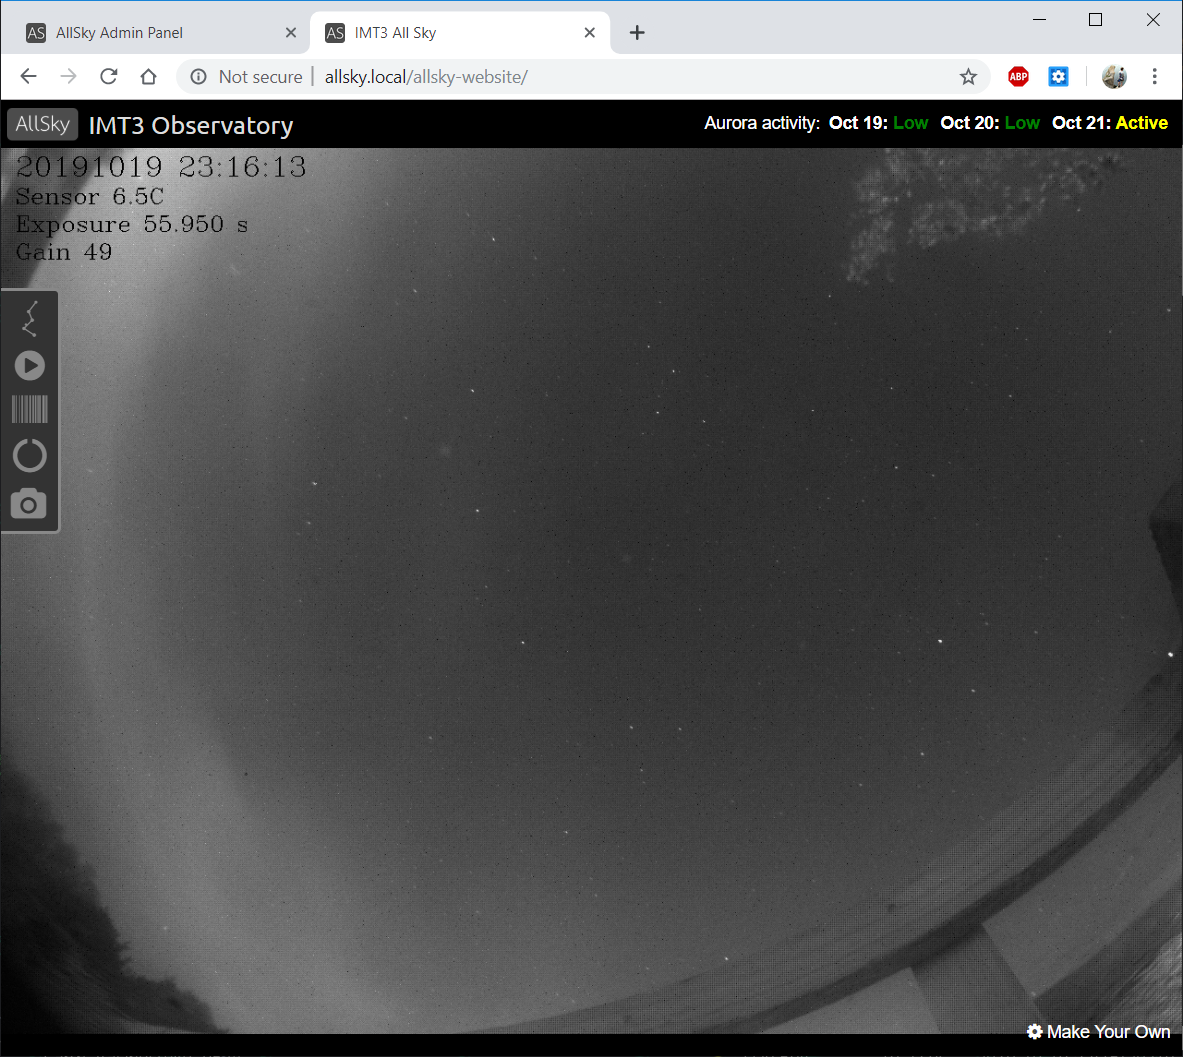
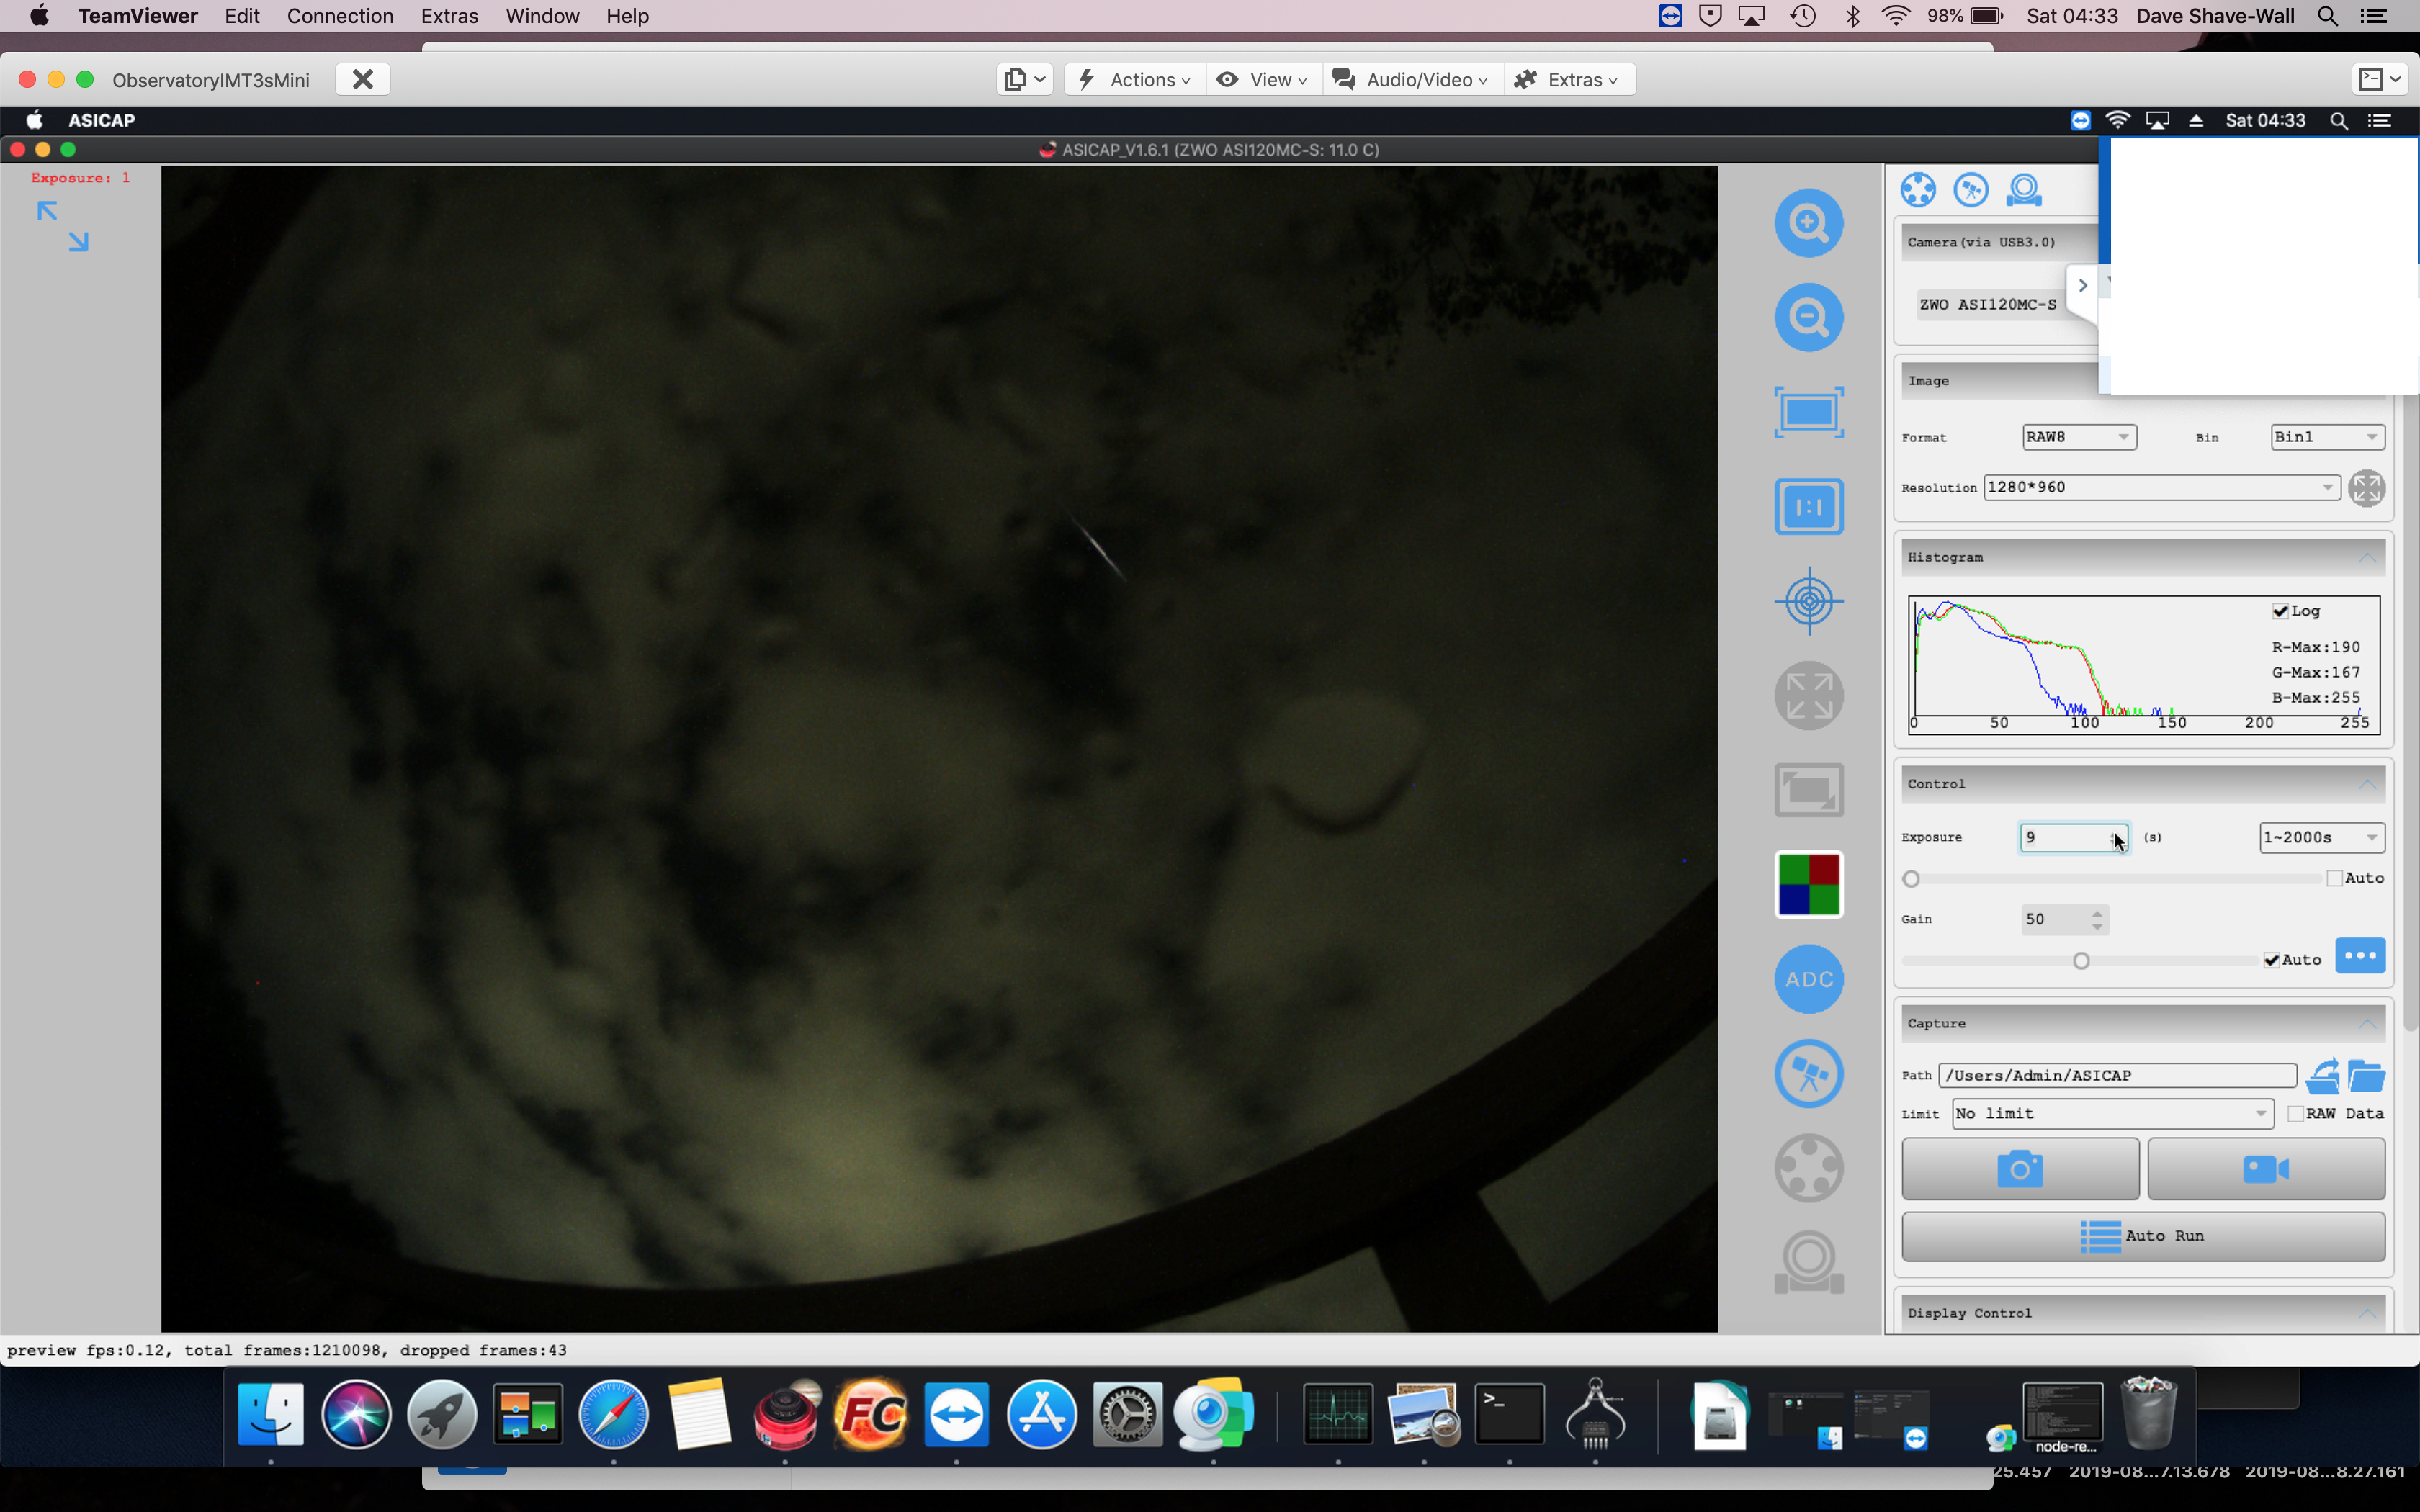
So roll on evening and I went out early to catch the first starts. Luke and I had replaced the All Sky Camera during the day so we wanted to see what that looked like, It is fair to say the ZWO ASI178MC is an amazing upgrade to the rubbish little ZWO ASI120MC I had been using.
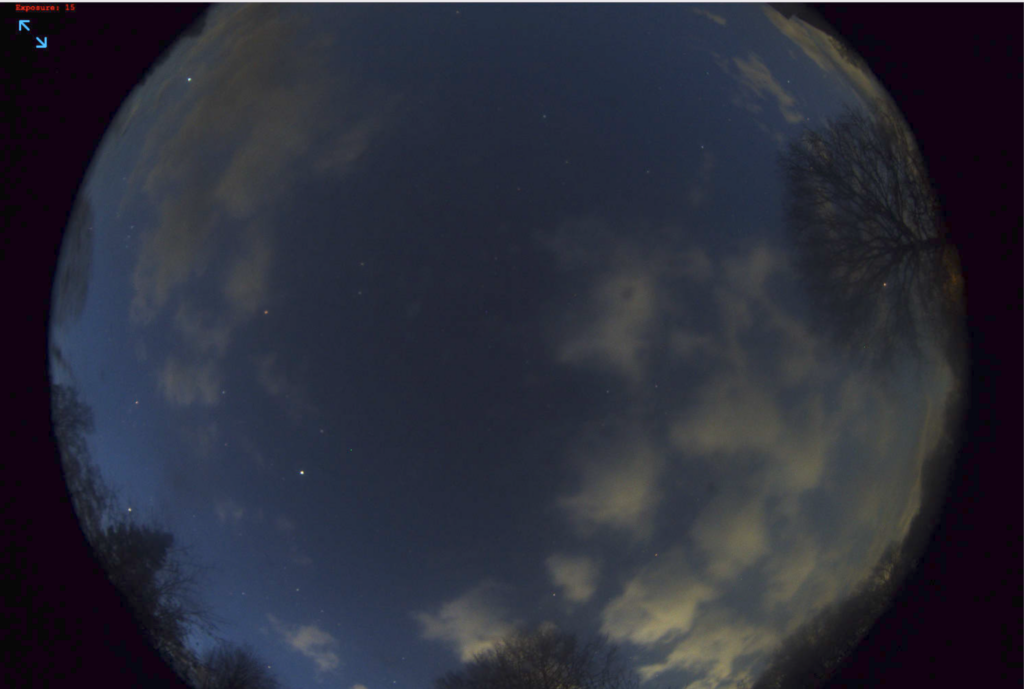
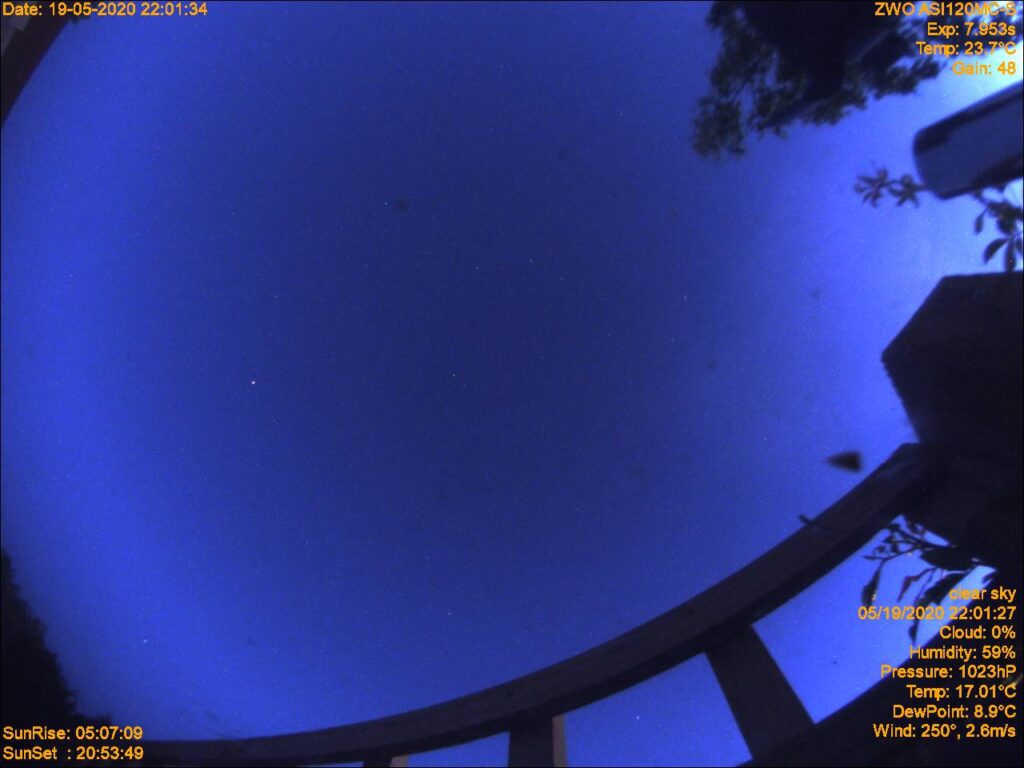
New ASC with wider lens
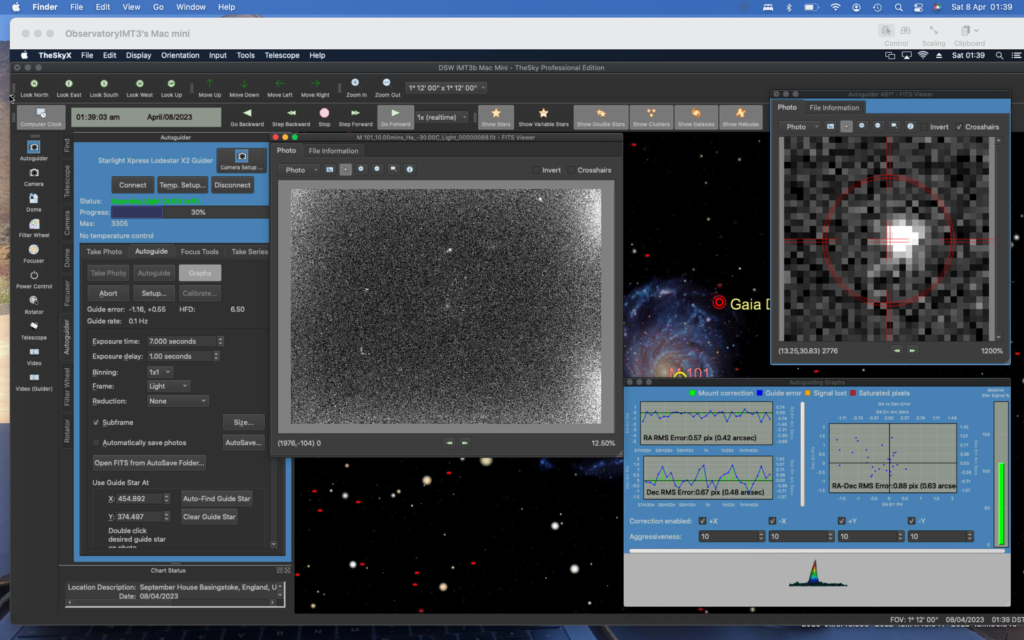
So after much messing about with trying a camera other than the SX Lodestar, trying several pieces of software including PHD2 that I could not get working, I settled on TSX for guiding and managed to get it calibrated. On swapping the side of the mount and recalibrating I had a similar problem, however I think the brightness of the guidestar, along with the exposure time and the order I was doing things in had caused the issue.
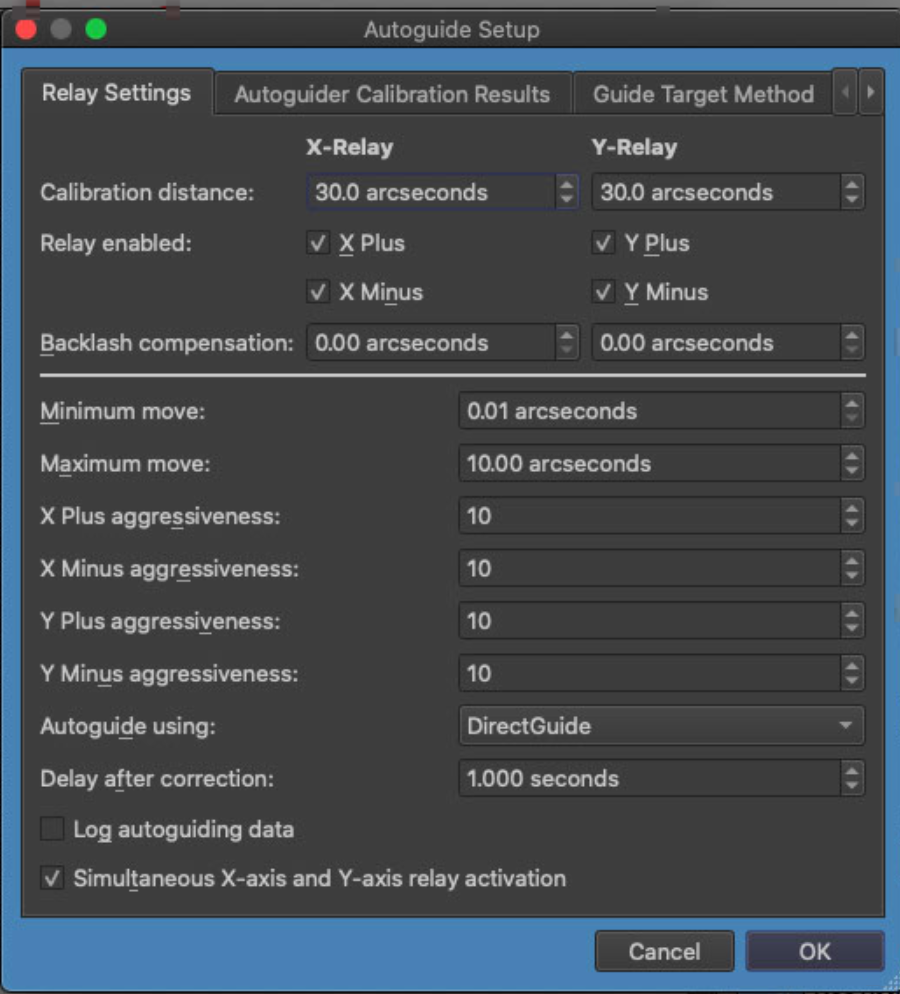
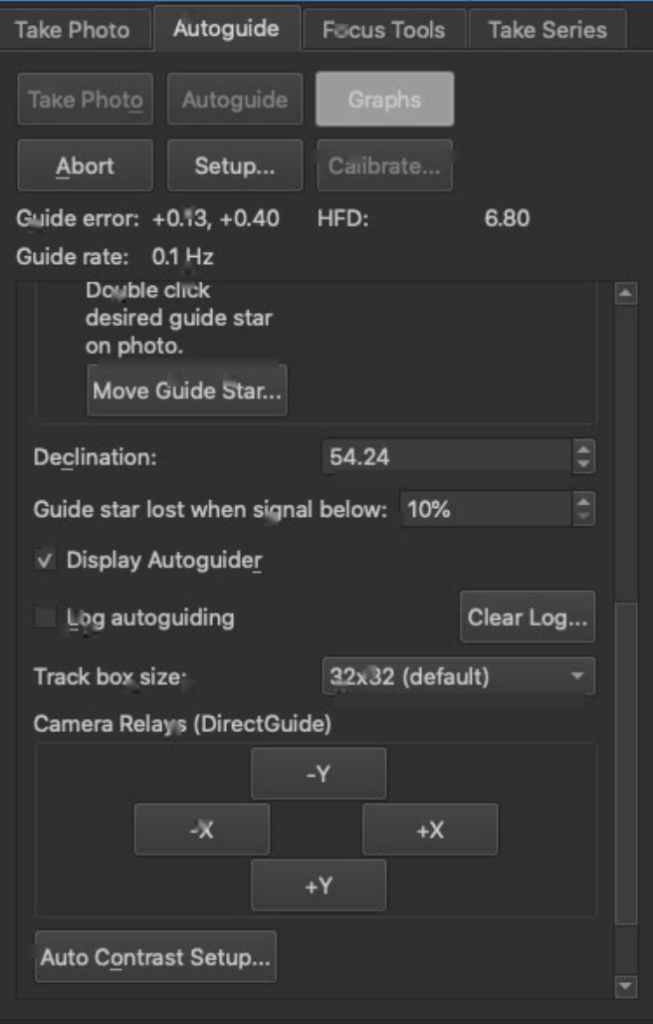
Below are the settings used for the working system, note the calibration distance is 30 arcsecs which is fine if you calibrate on a star rather than a hot pixel.
Relay Settings including Direct Guide! 30 arc seconds for calibration distance
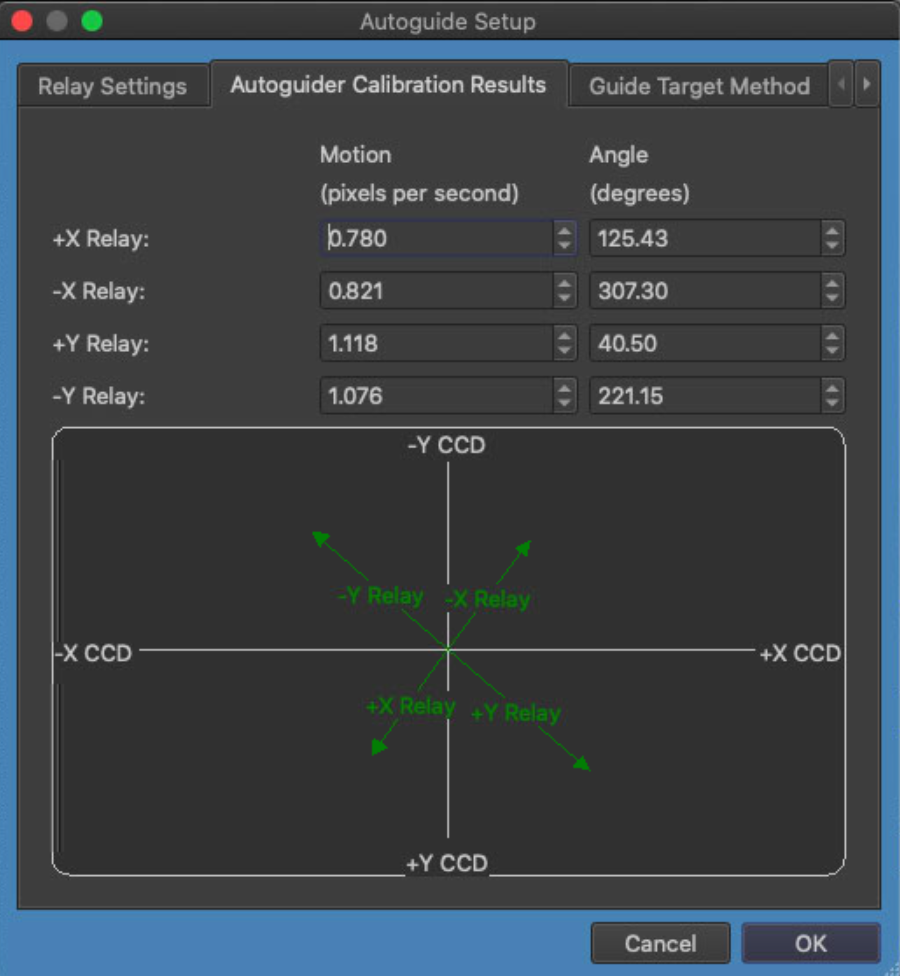
Successful calibration East side of mount
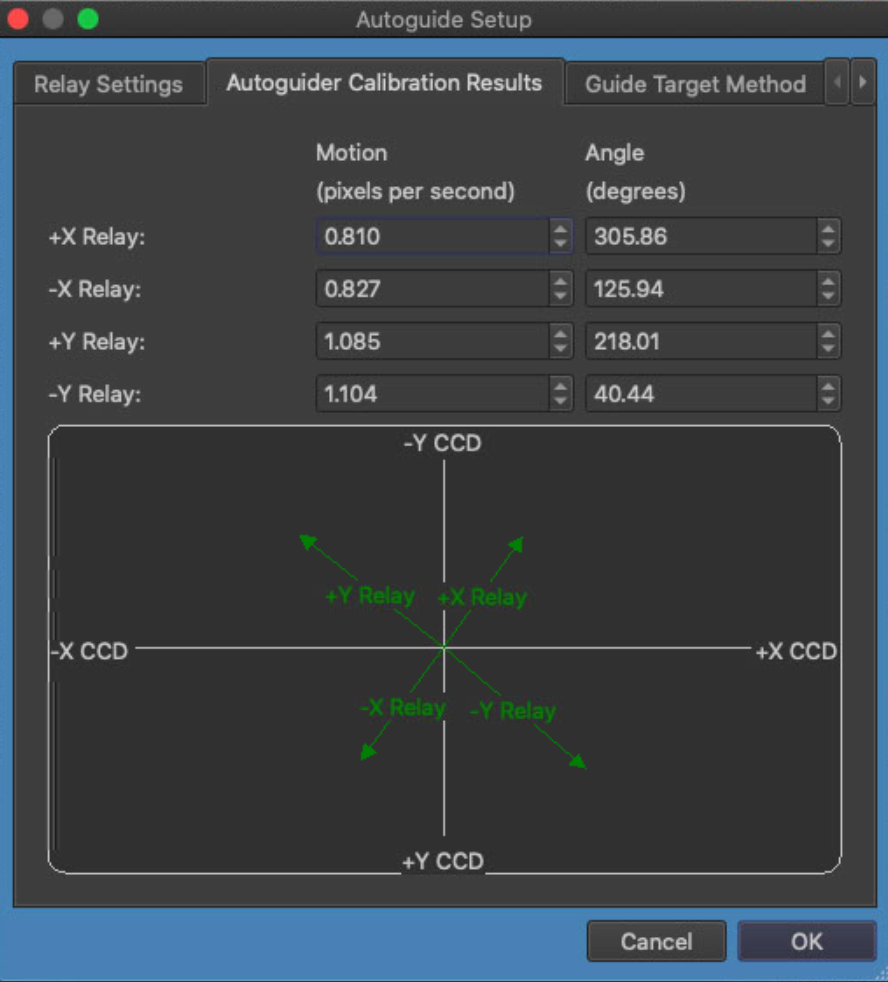
Successful calibration West side of mount
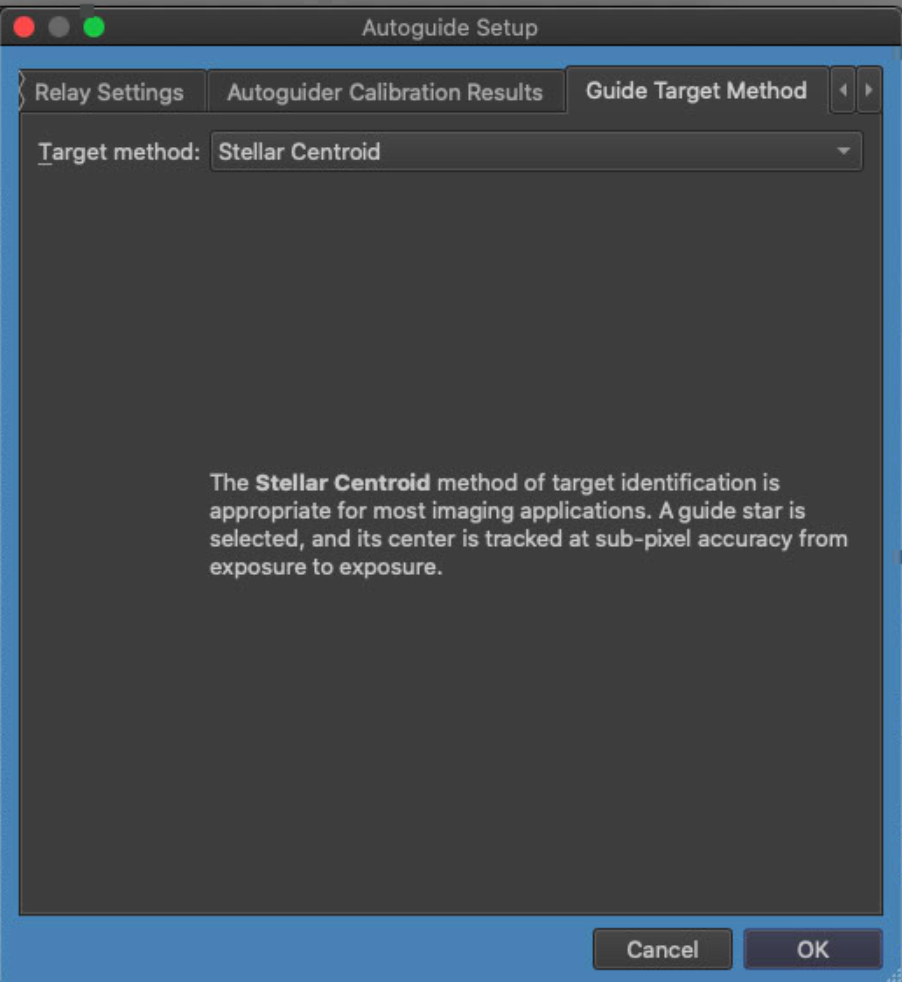
Guide Target Method
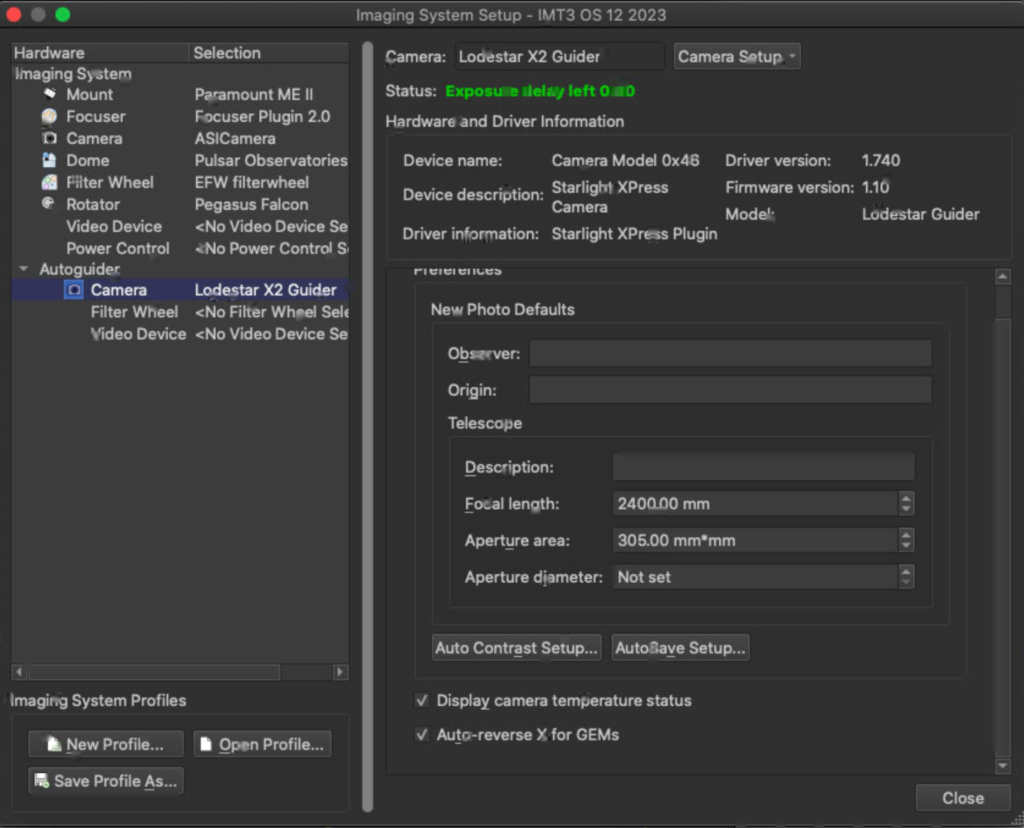
Settings
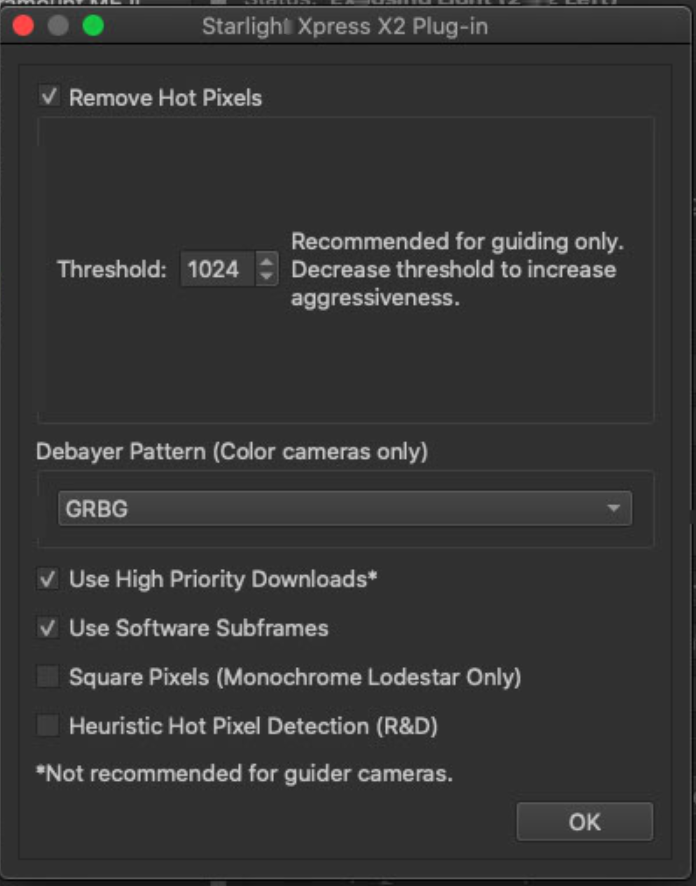
X2 Plugin and remove hot pixels
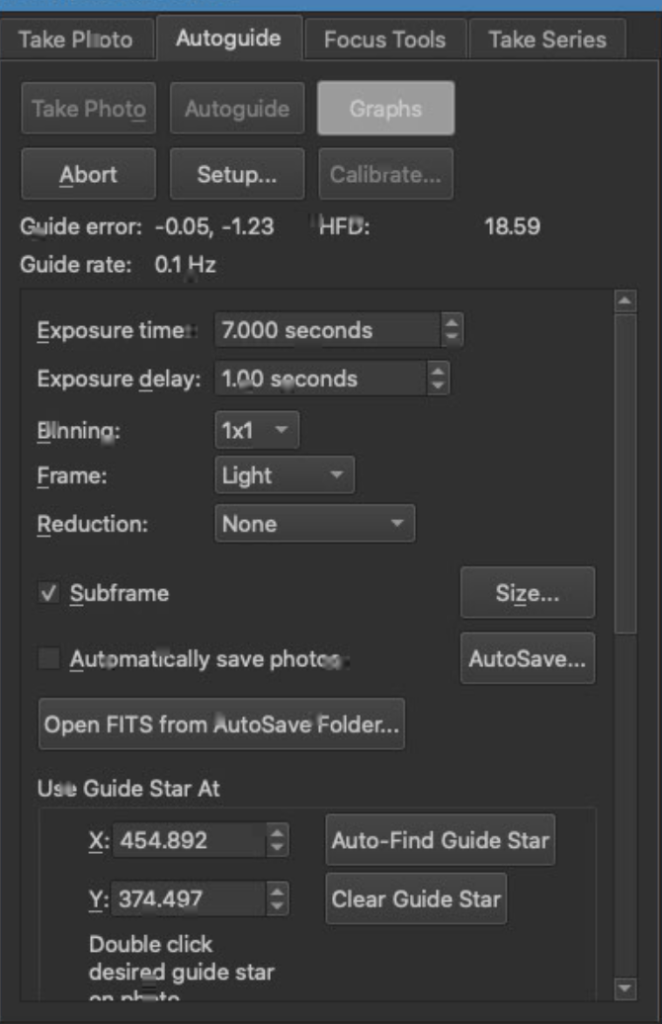
Autoguide tab – long exposure and subframe selected
Session period 19:00 – 01:18, transit start ~23:06 and end ~02:37
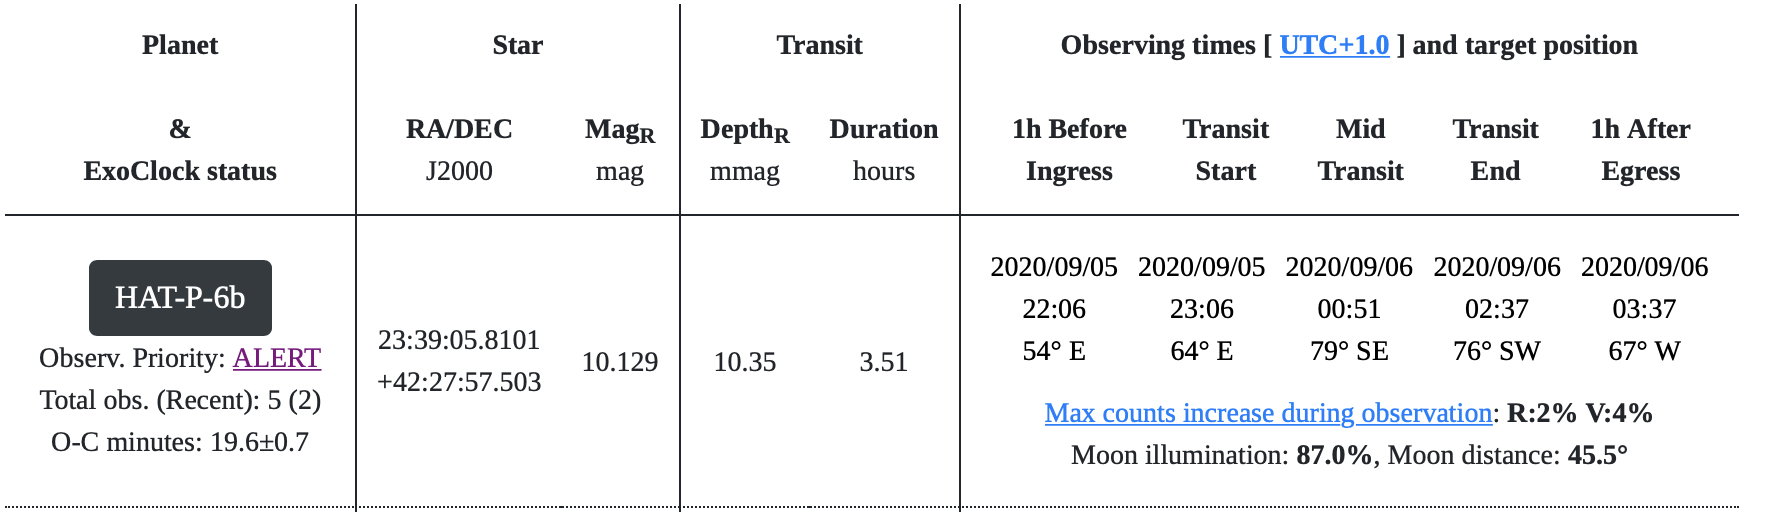
Before I move house, we are going to try and grab another exoplanet or two or possibly three…..we’ll see. Tonight whilst it is currently clear and due to cloud over by 1am, we will go for HAT-P-6b that is on alert from Exoclock.
Exoclock Exoplanet on Alert tonight
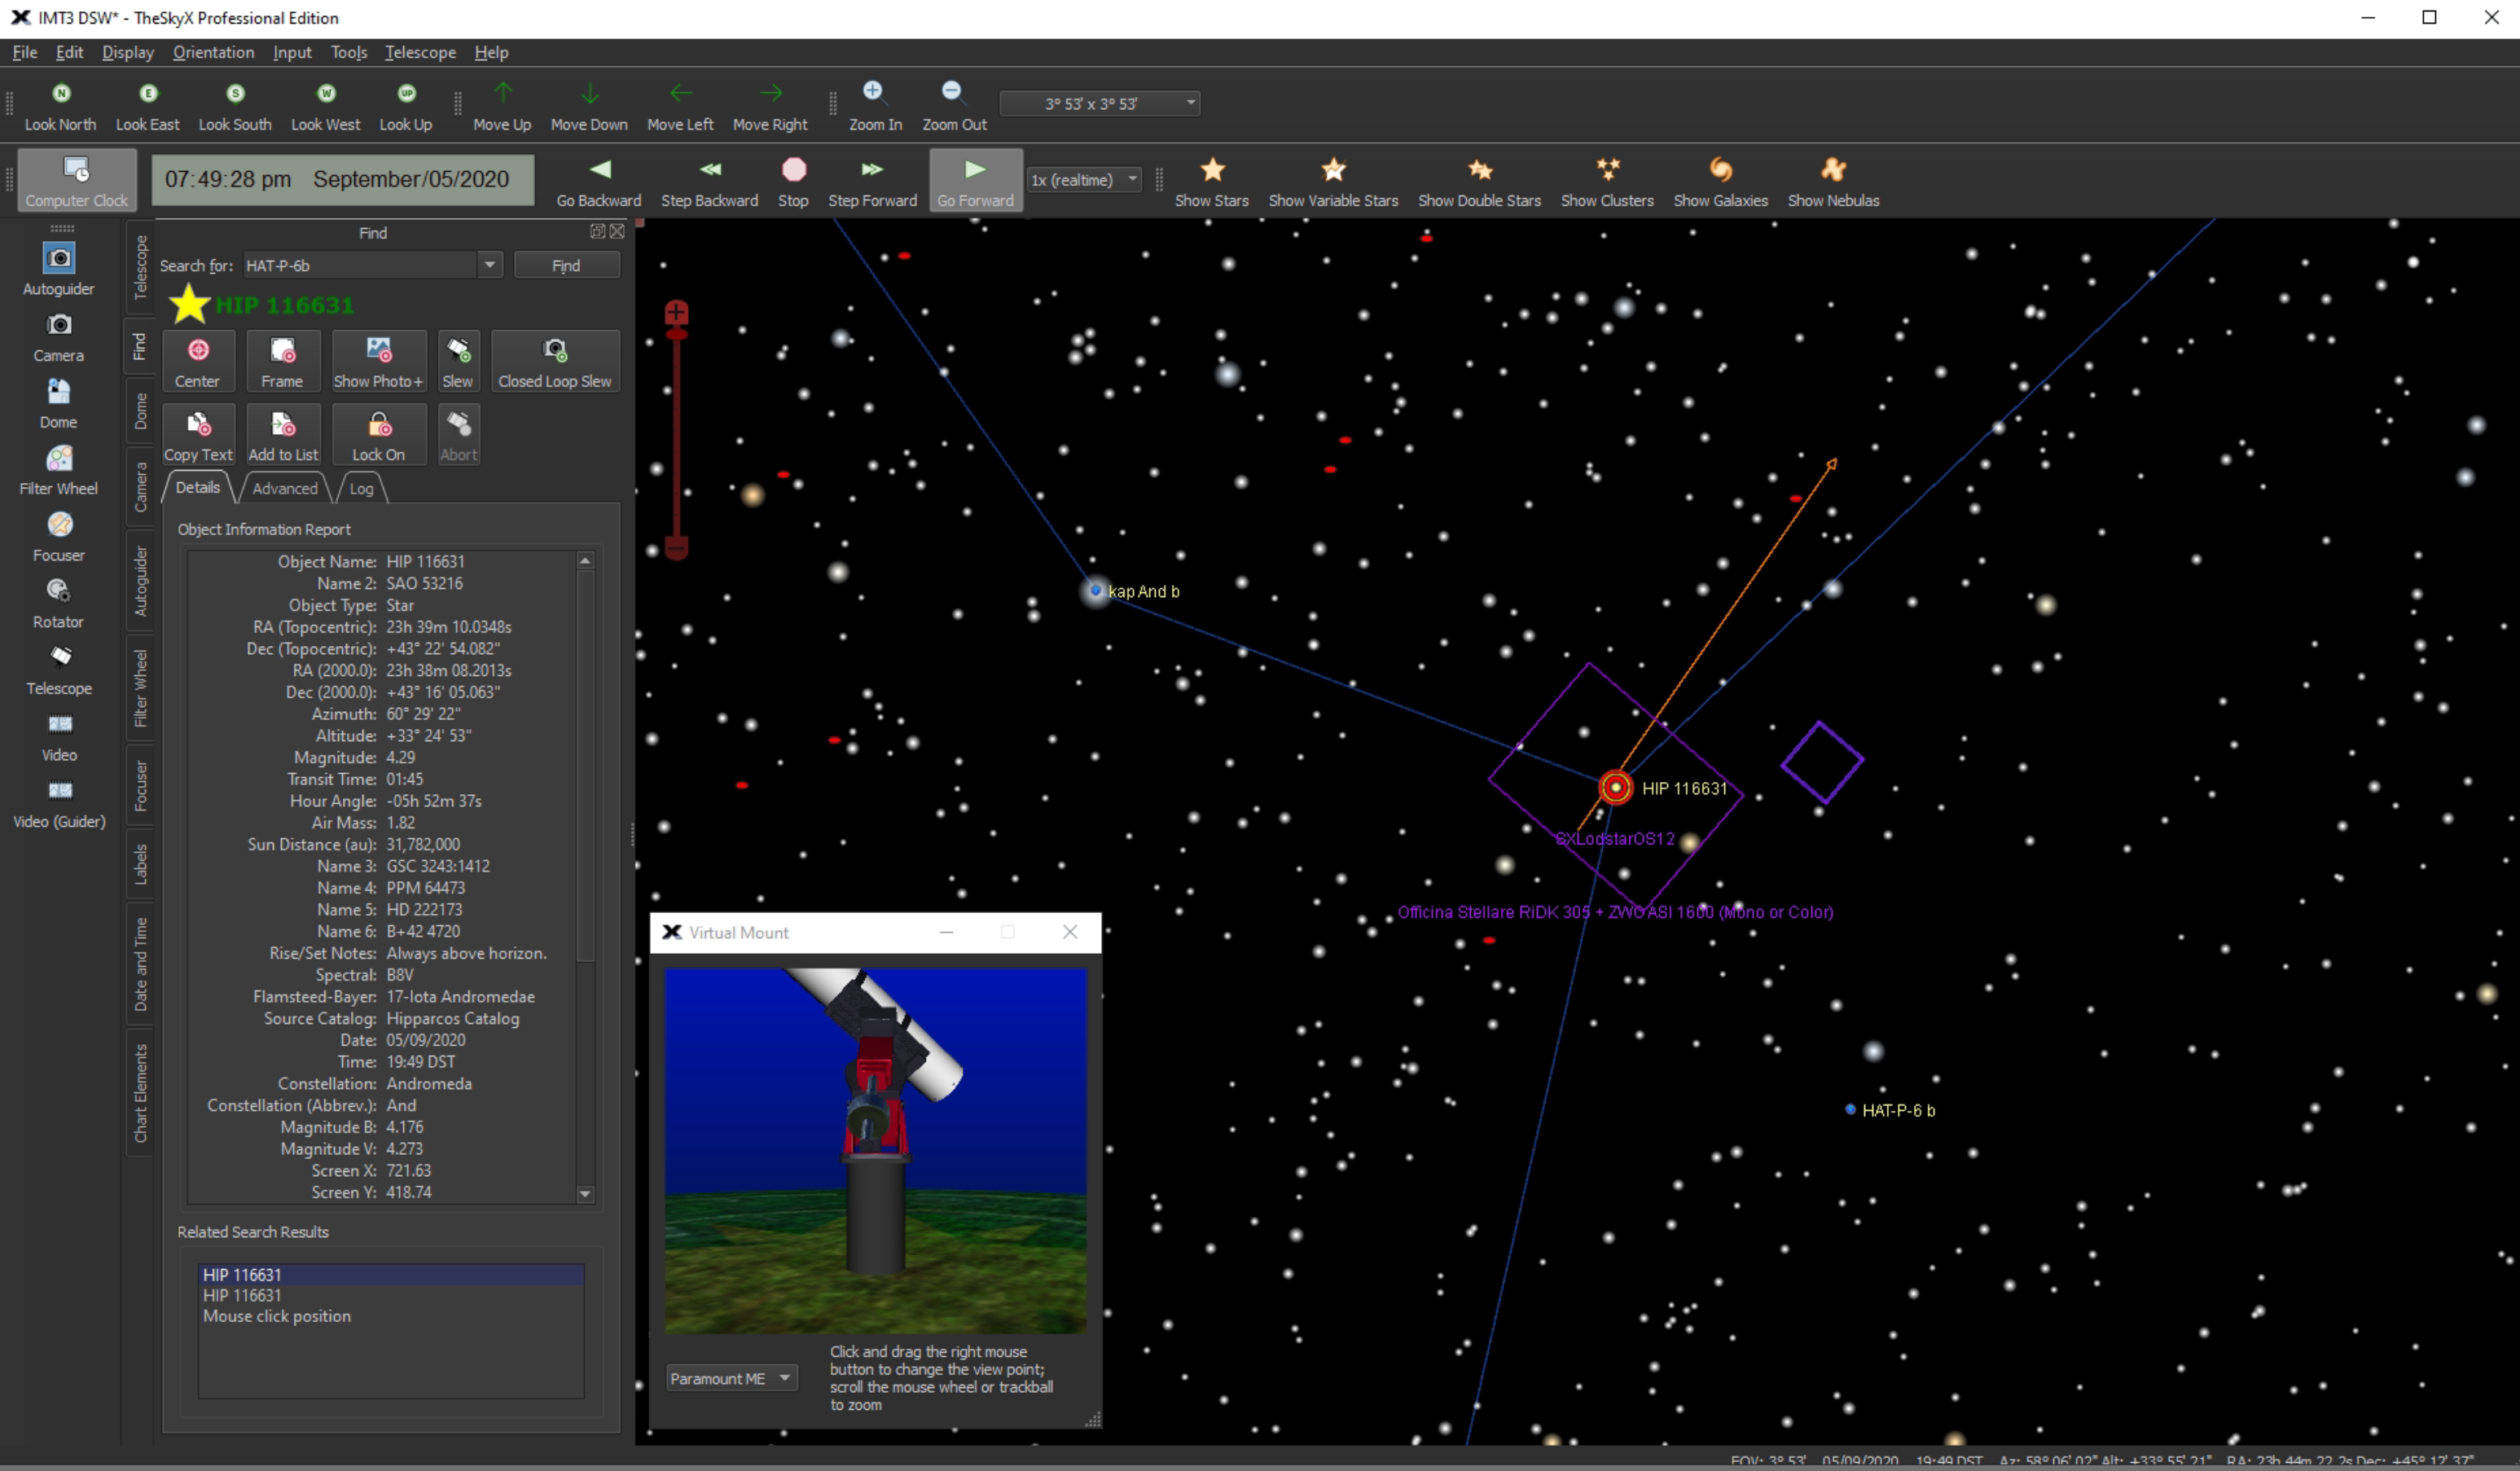
The transit end time is after it is due to cloud over but we may be able to get the start of the transit and some useful data to possibly half way through. So I have opened the dome, started to cool the 12″ down and slewed to a magnitude 4.29 star in the vicinity of Andromeda called HIP 116631 also known as 17 Iota Andromedae in the Flamsteed catalogue so that I can slew and centre on the object when it gets dark.
HIP 116631
I’ve now manually centred the star due to the brightness of the sky still and synced in The Sky X
Manually centredHIP 116631 in relation to HAT-P-6b
I’m now waiting for a bit more darkness to perform the first focus run.
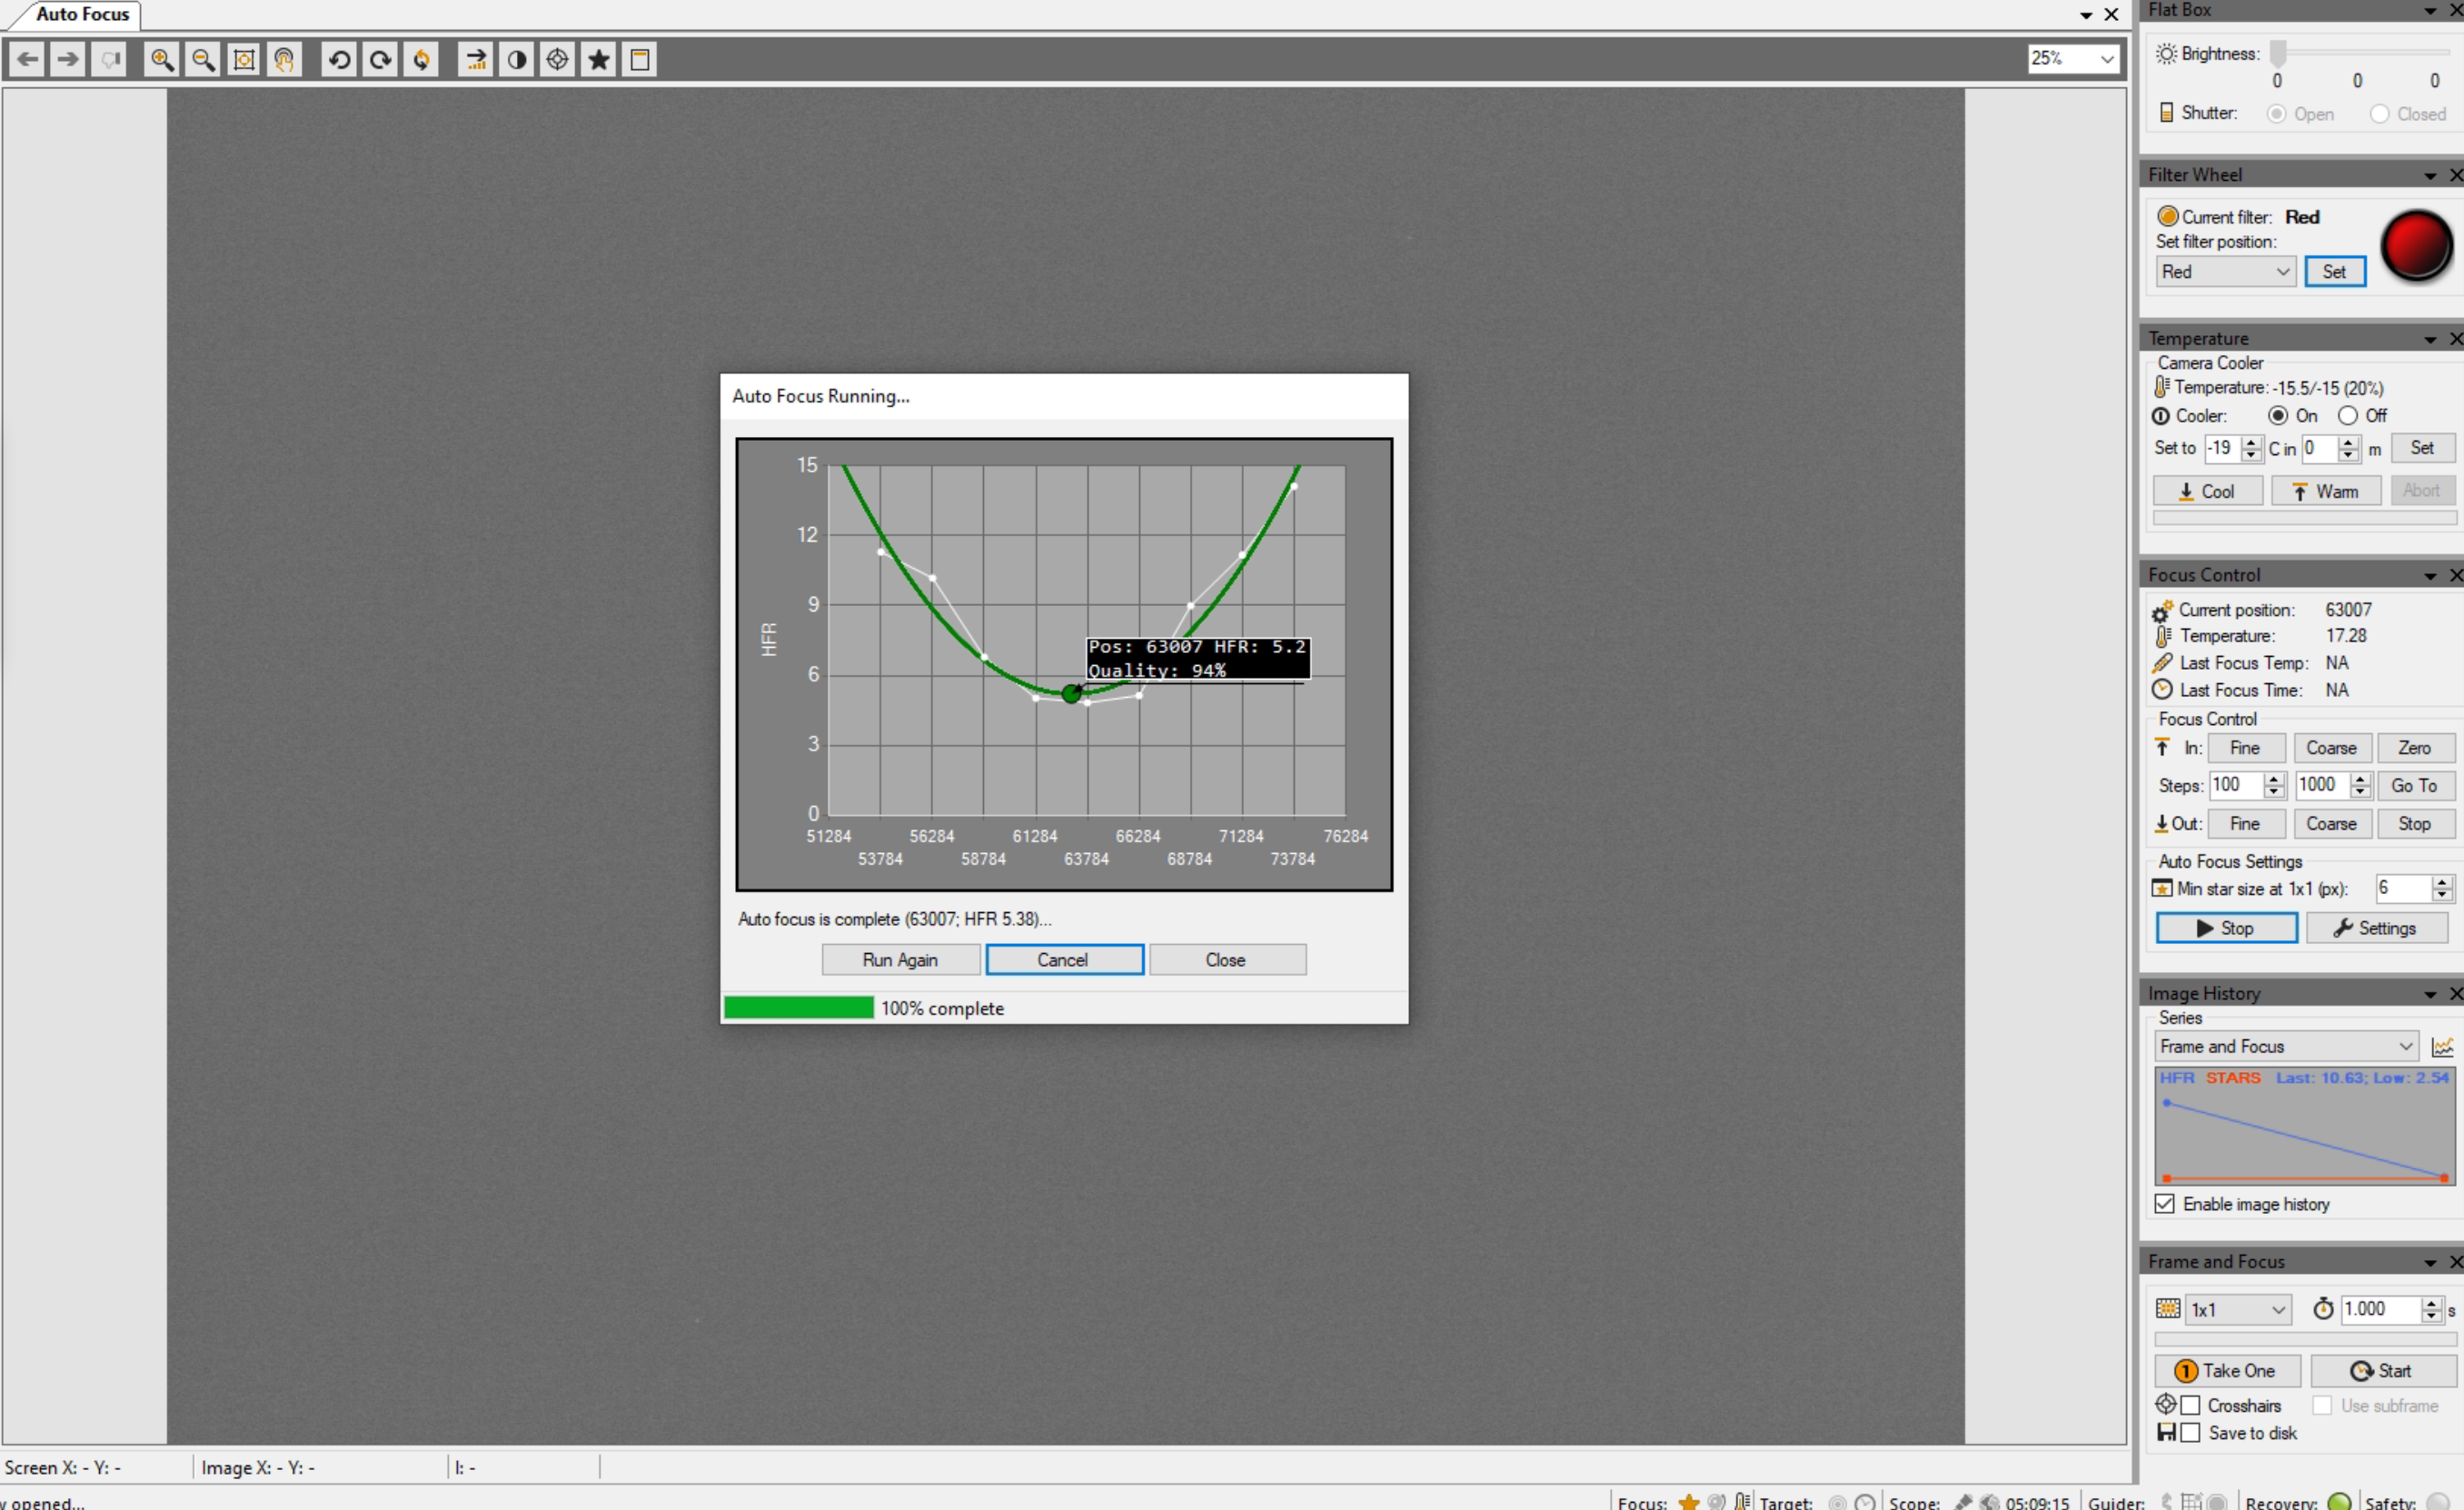
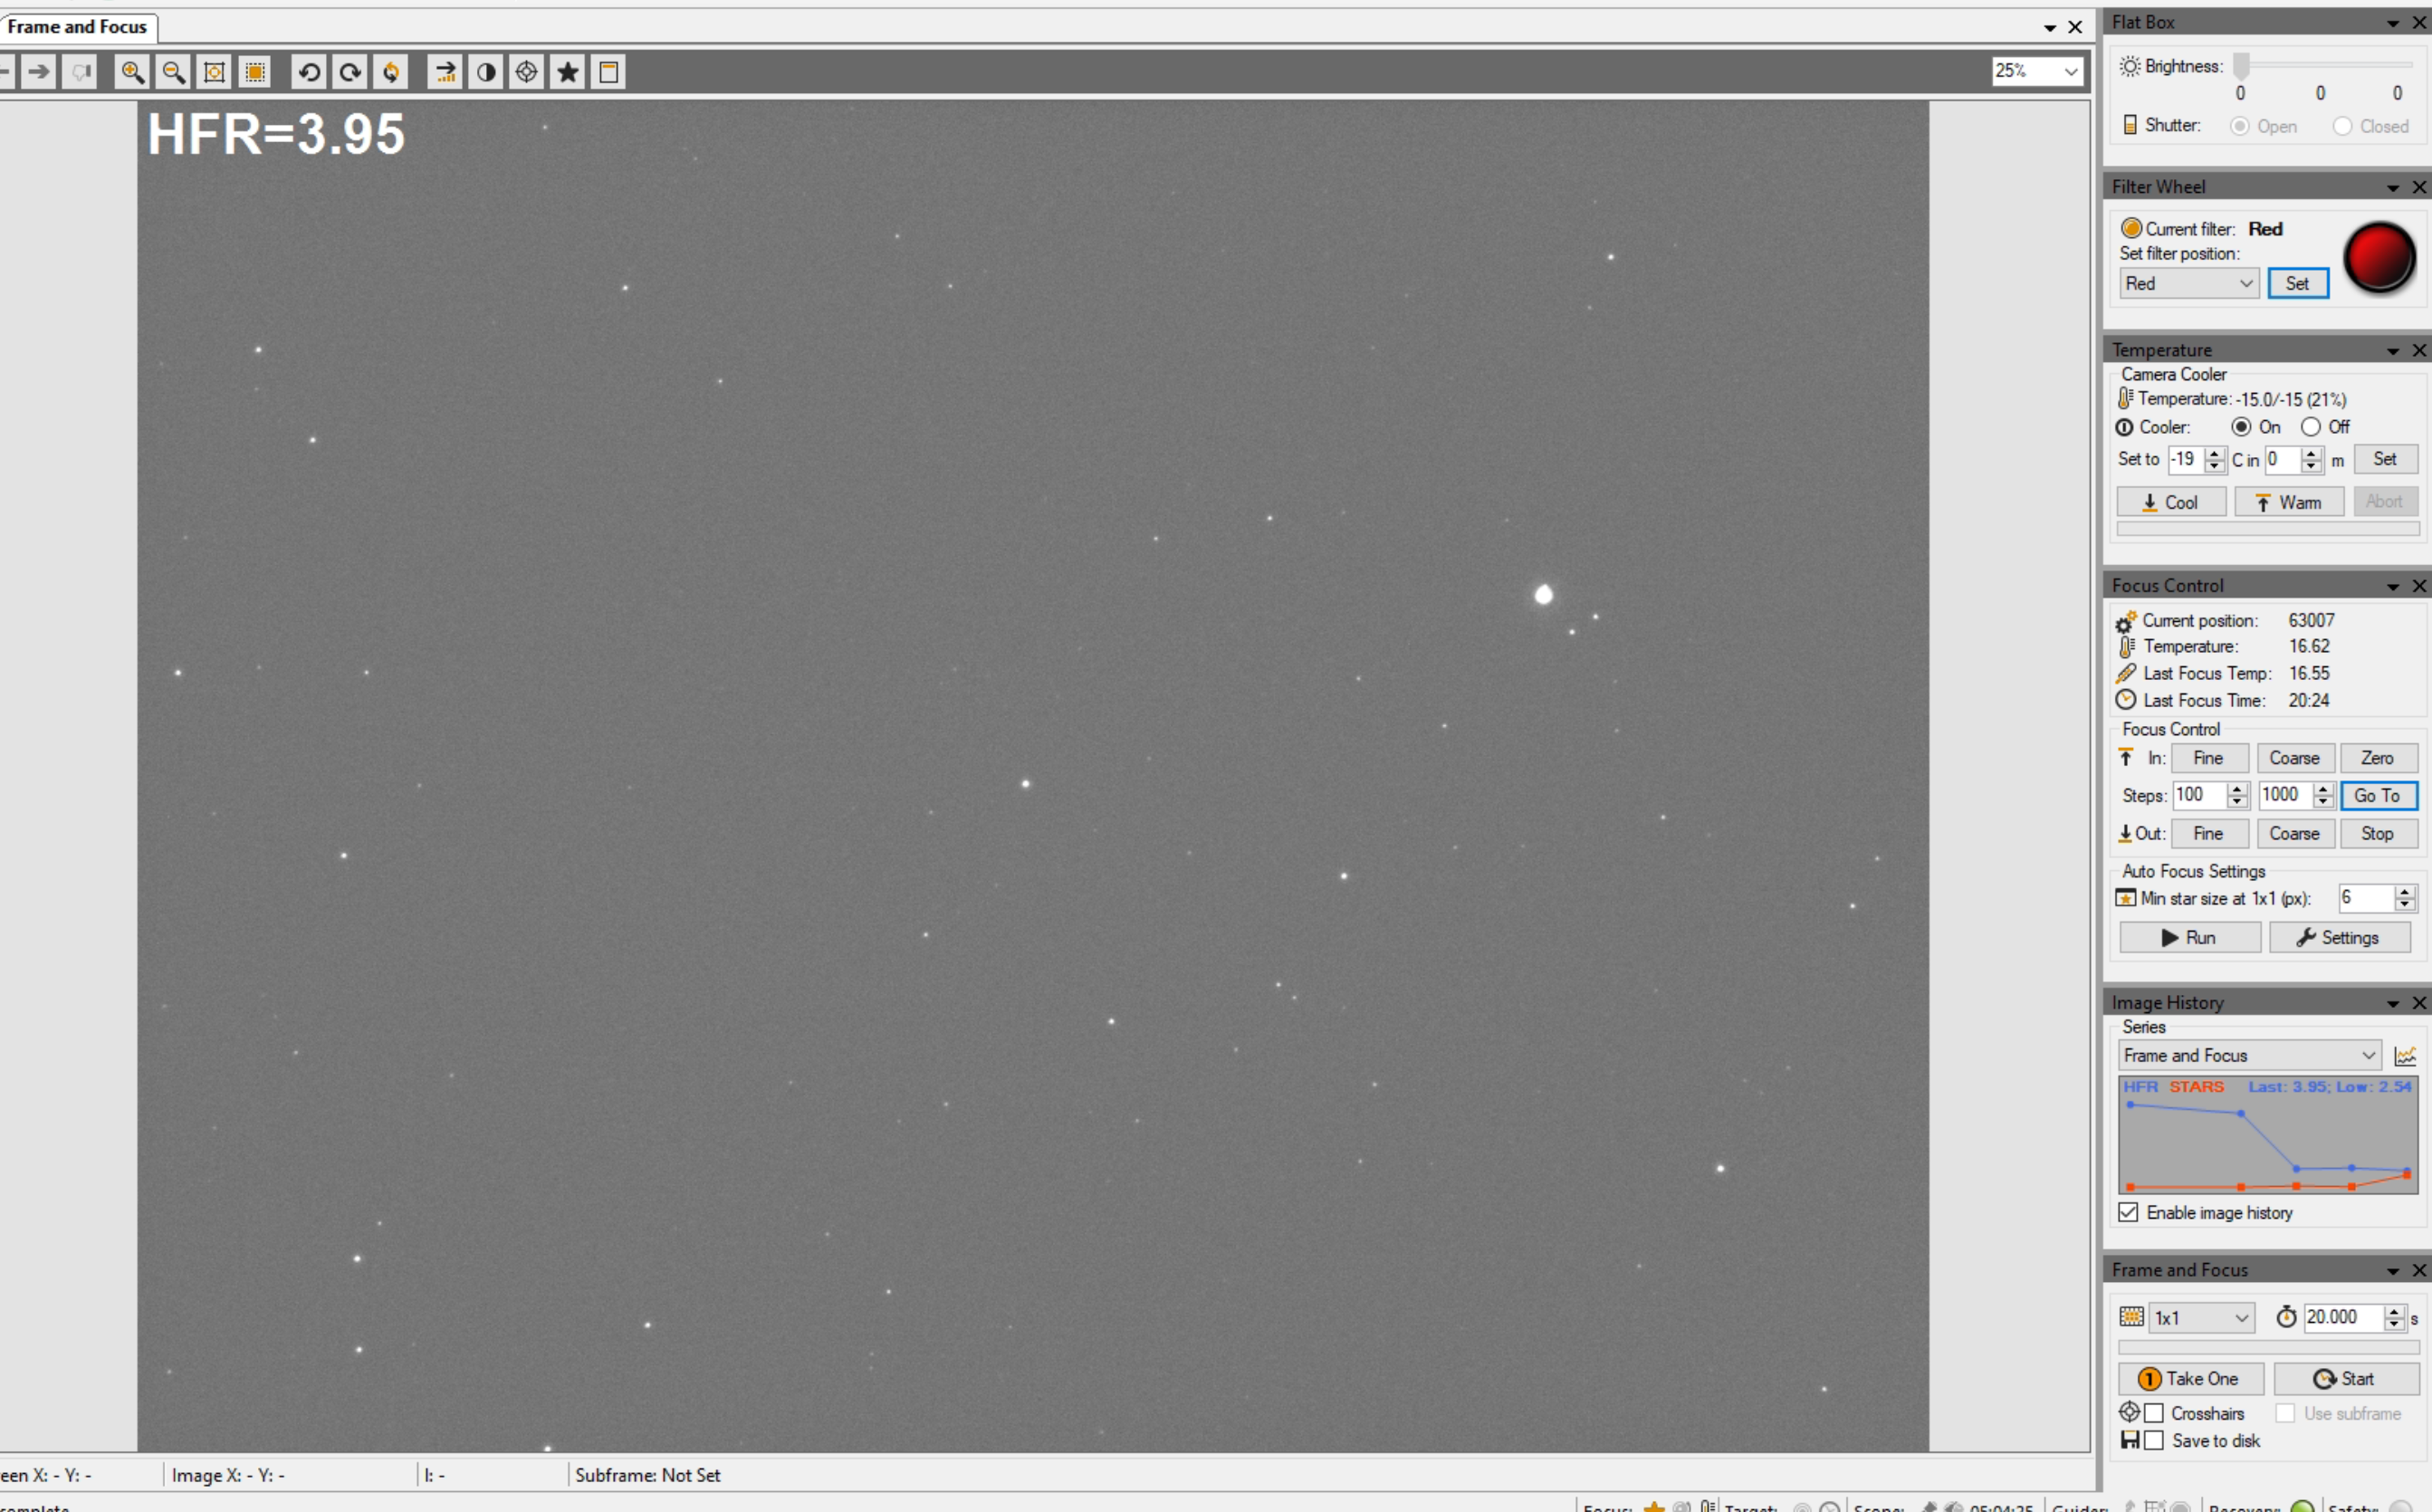
At 20:31 I performed a focus run on the mag 4.29 star with the red filter and got position 63007 @ HFR 5.2 and temperature at the focuser of 17.28℃.
Focus run on red filter
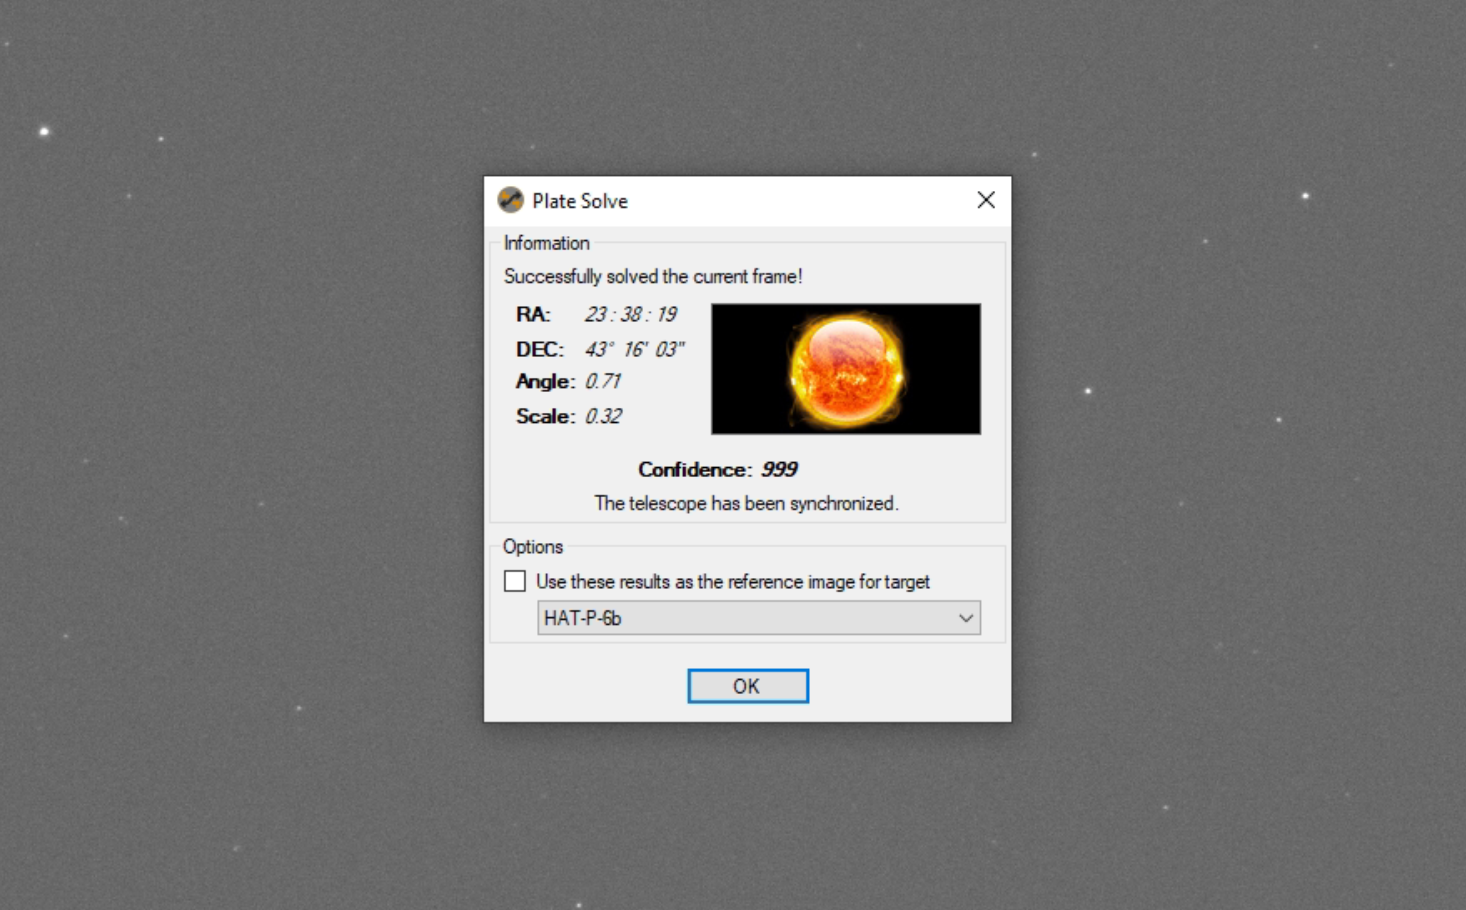
I have performed another solve and sync as I had left the scope running for a while without guiding and the star had moved slightly.
Solve and Sync on target
I have now taken a quick 20 second exposure of the target to confirm it was the right star as per the star chart from the Exoclock website and it was.
20s exposure of HAT-P-6b
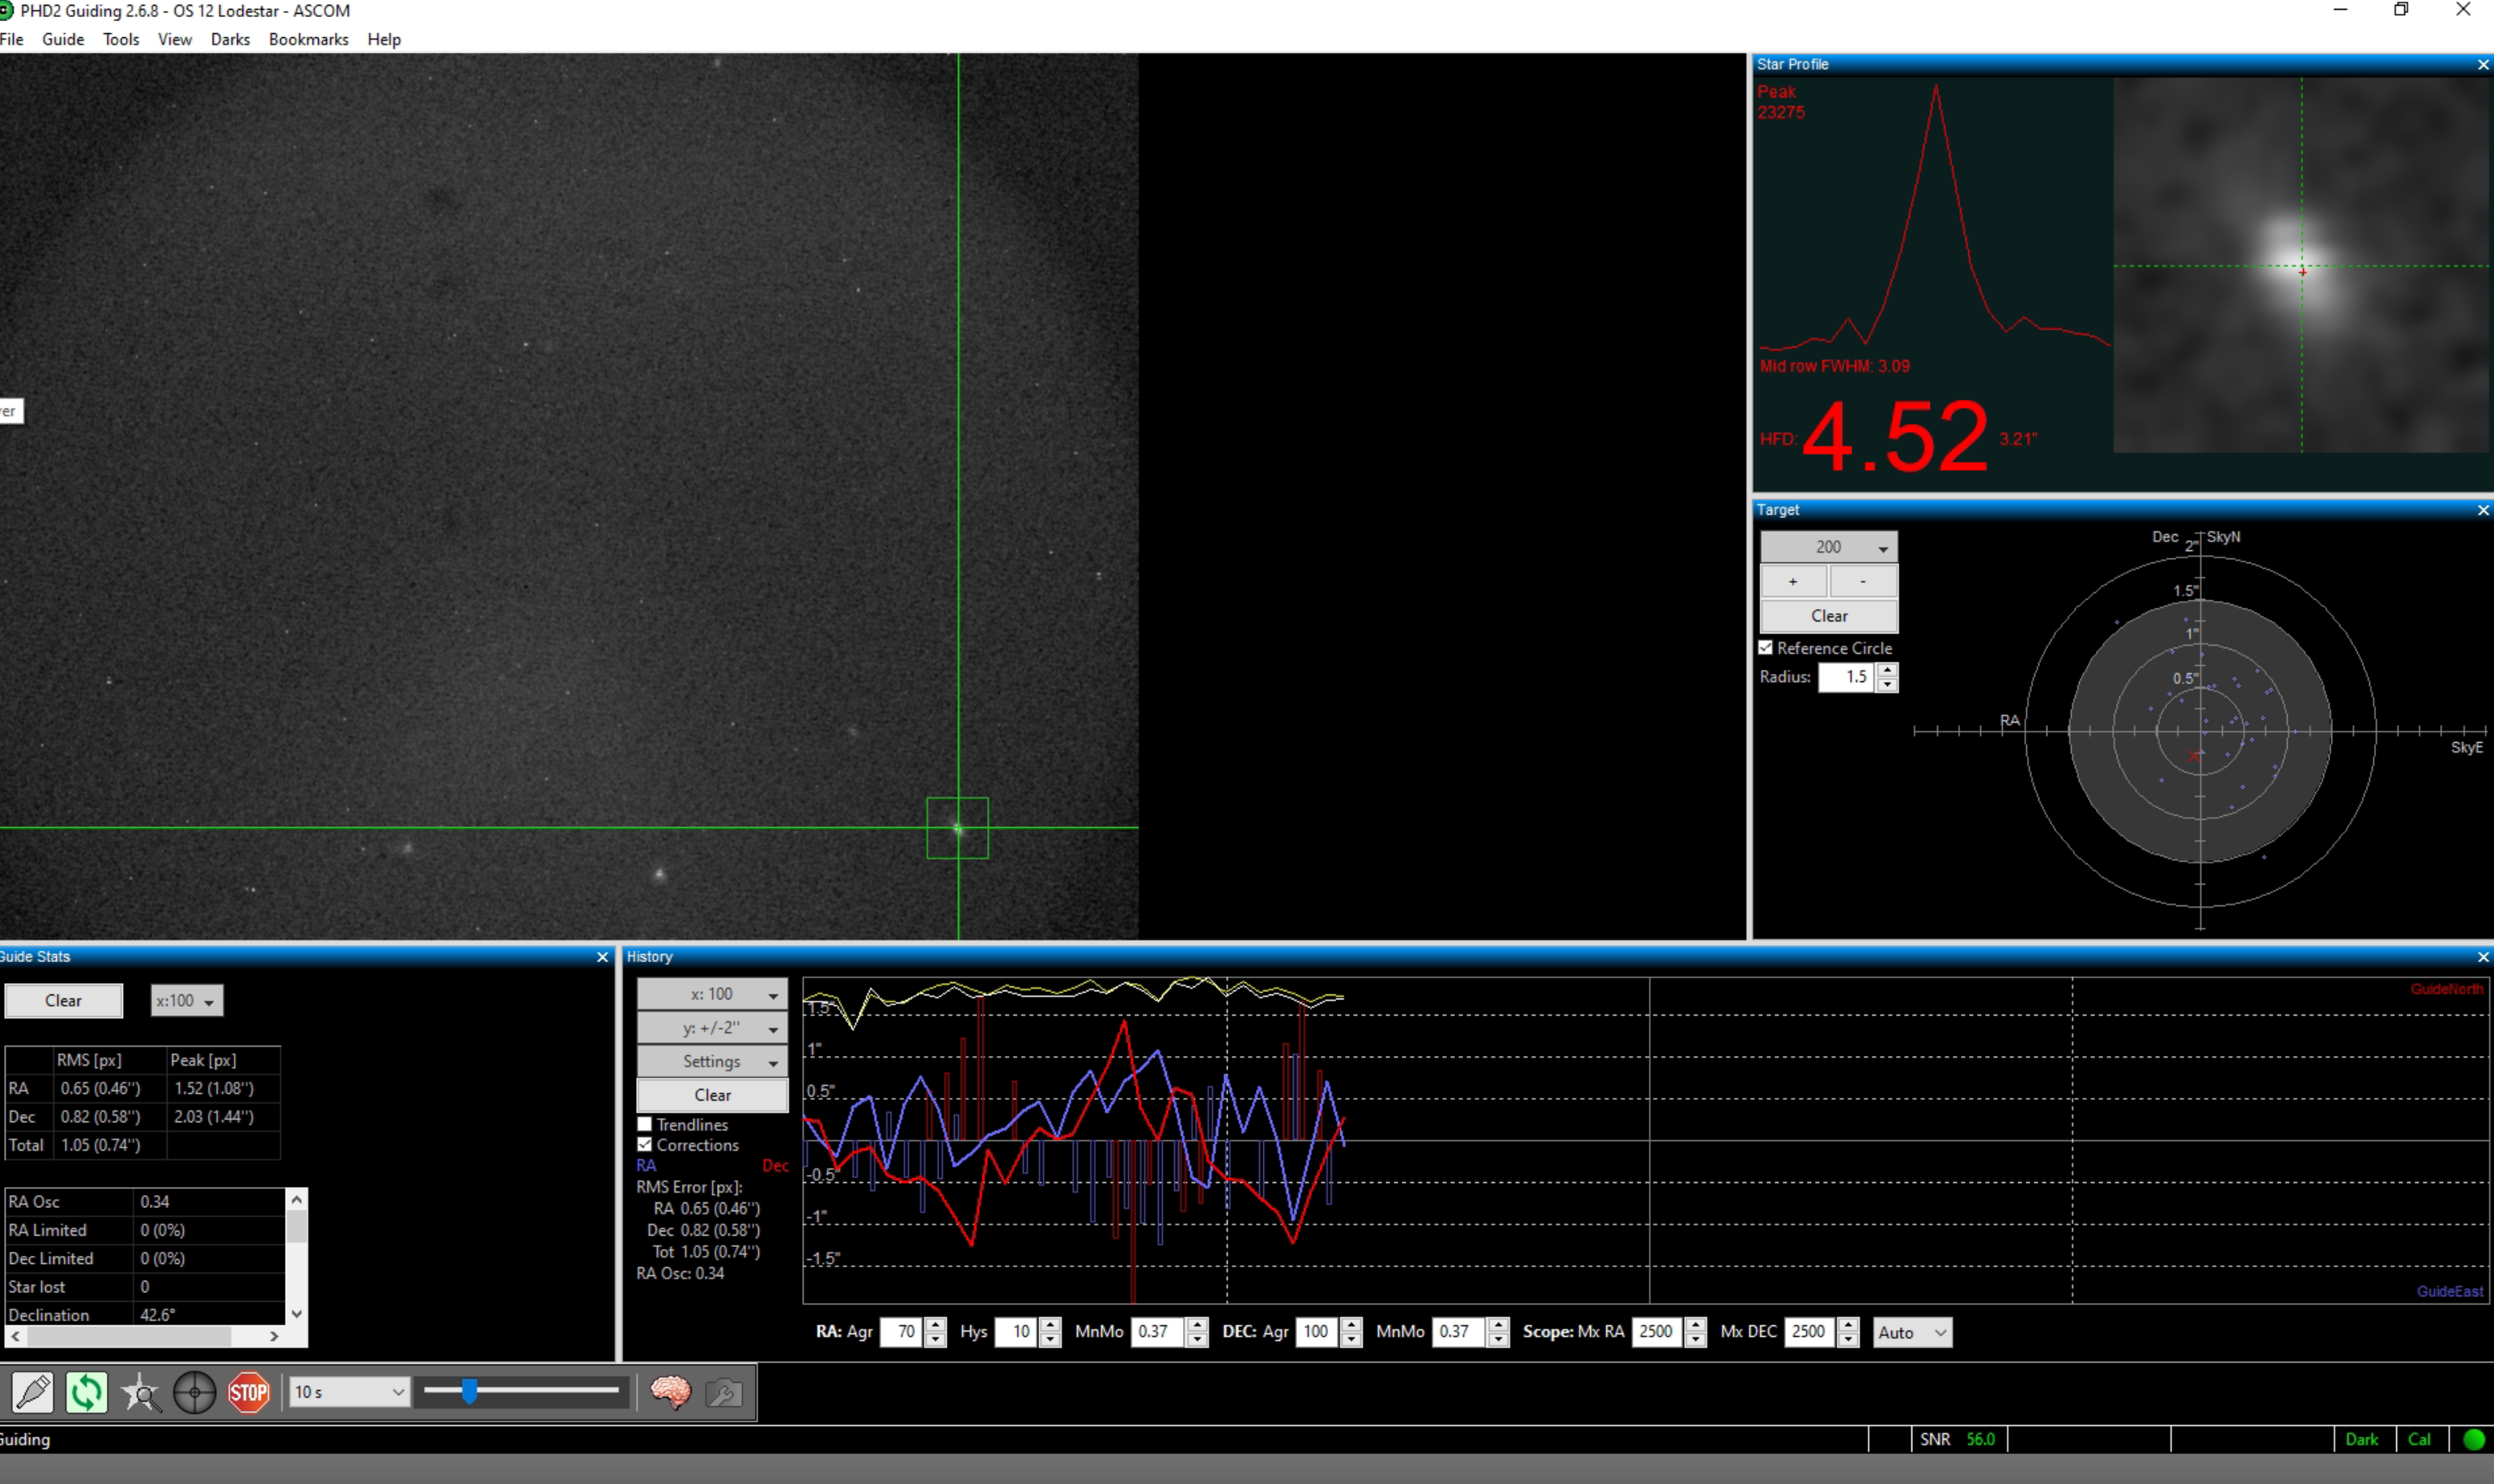
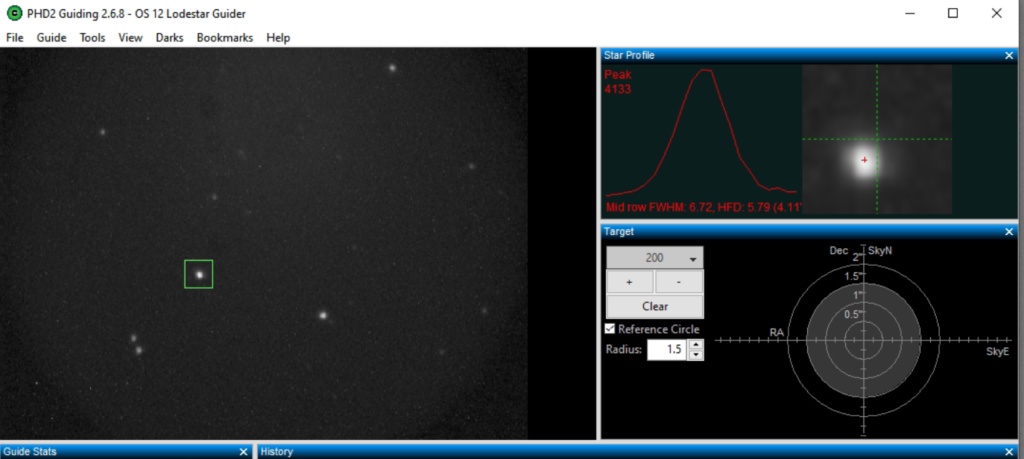
I have started guiding on a nearby star with PHD2.
Guiding
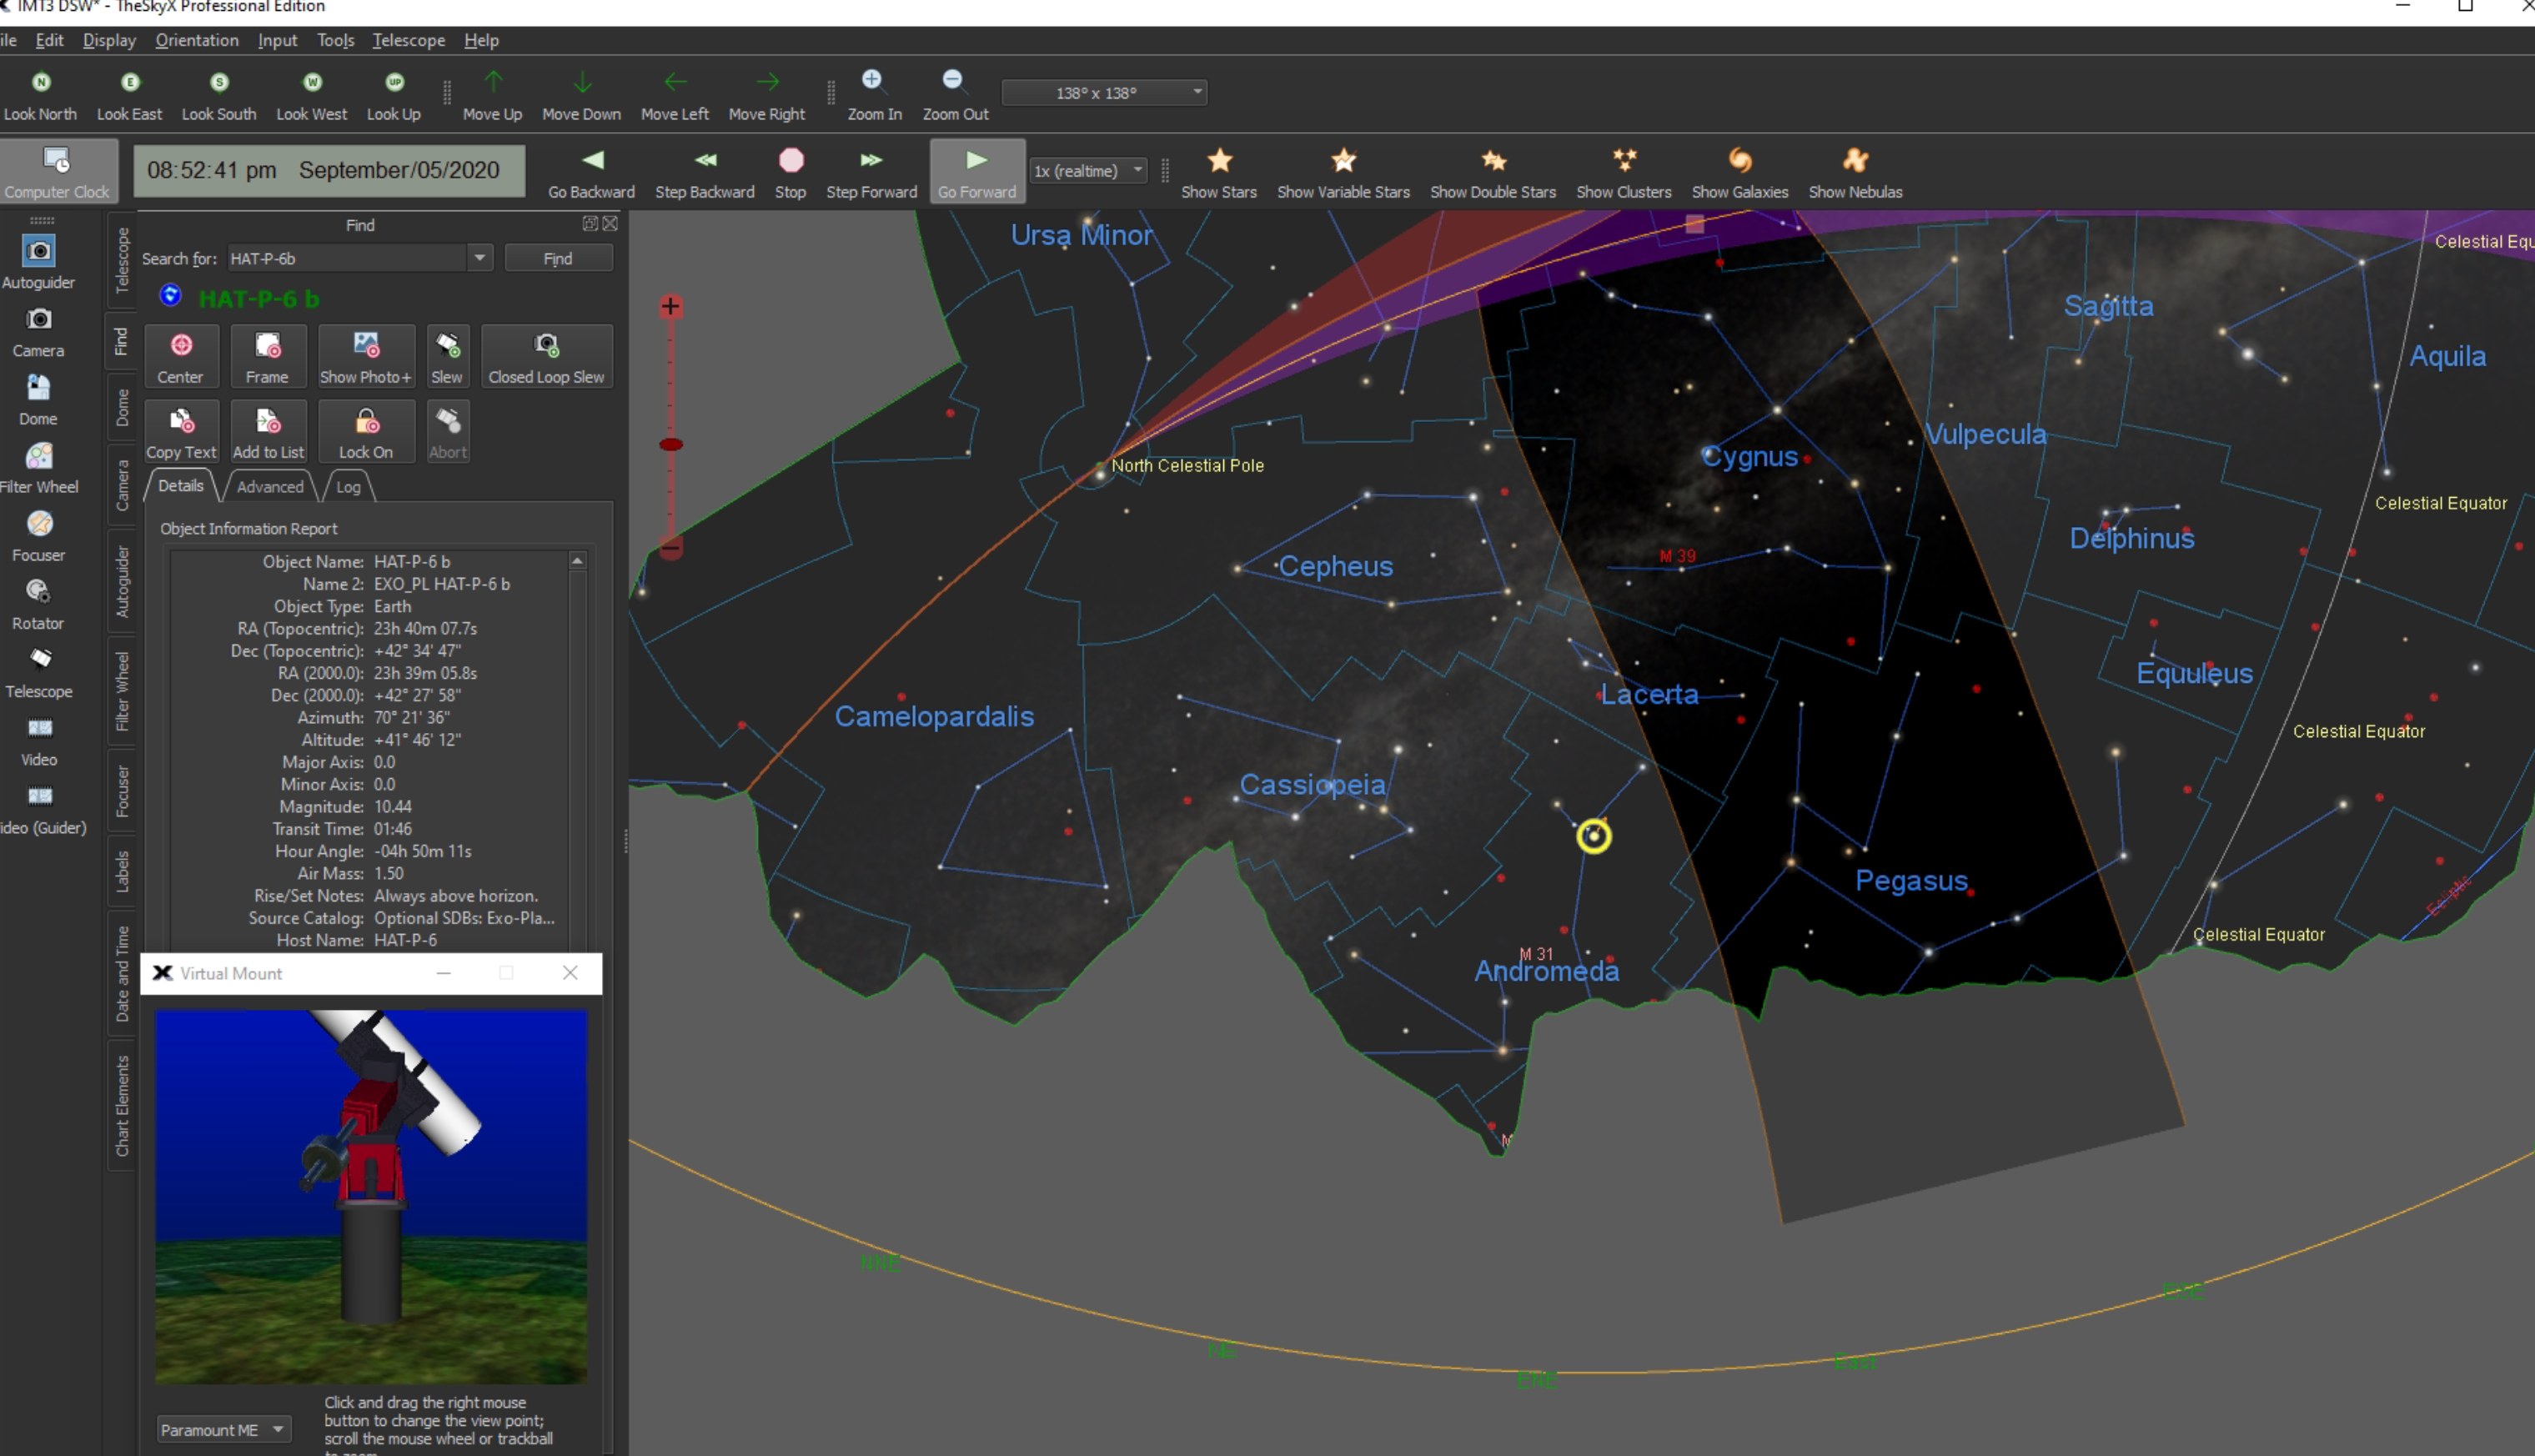
HAT-P-6b rising from the East as can be seen in TSX.
HAT-P-6b rising in the East
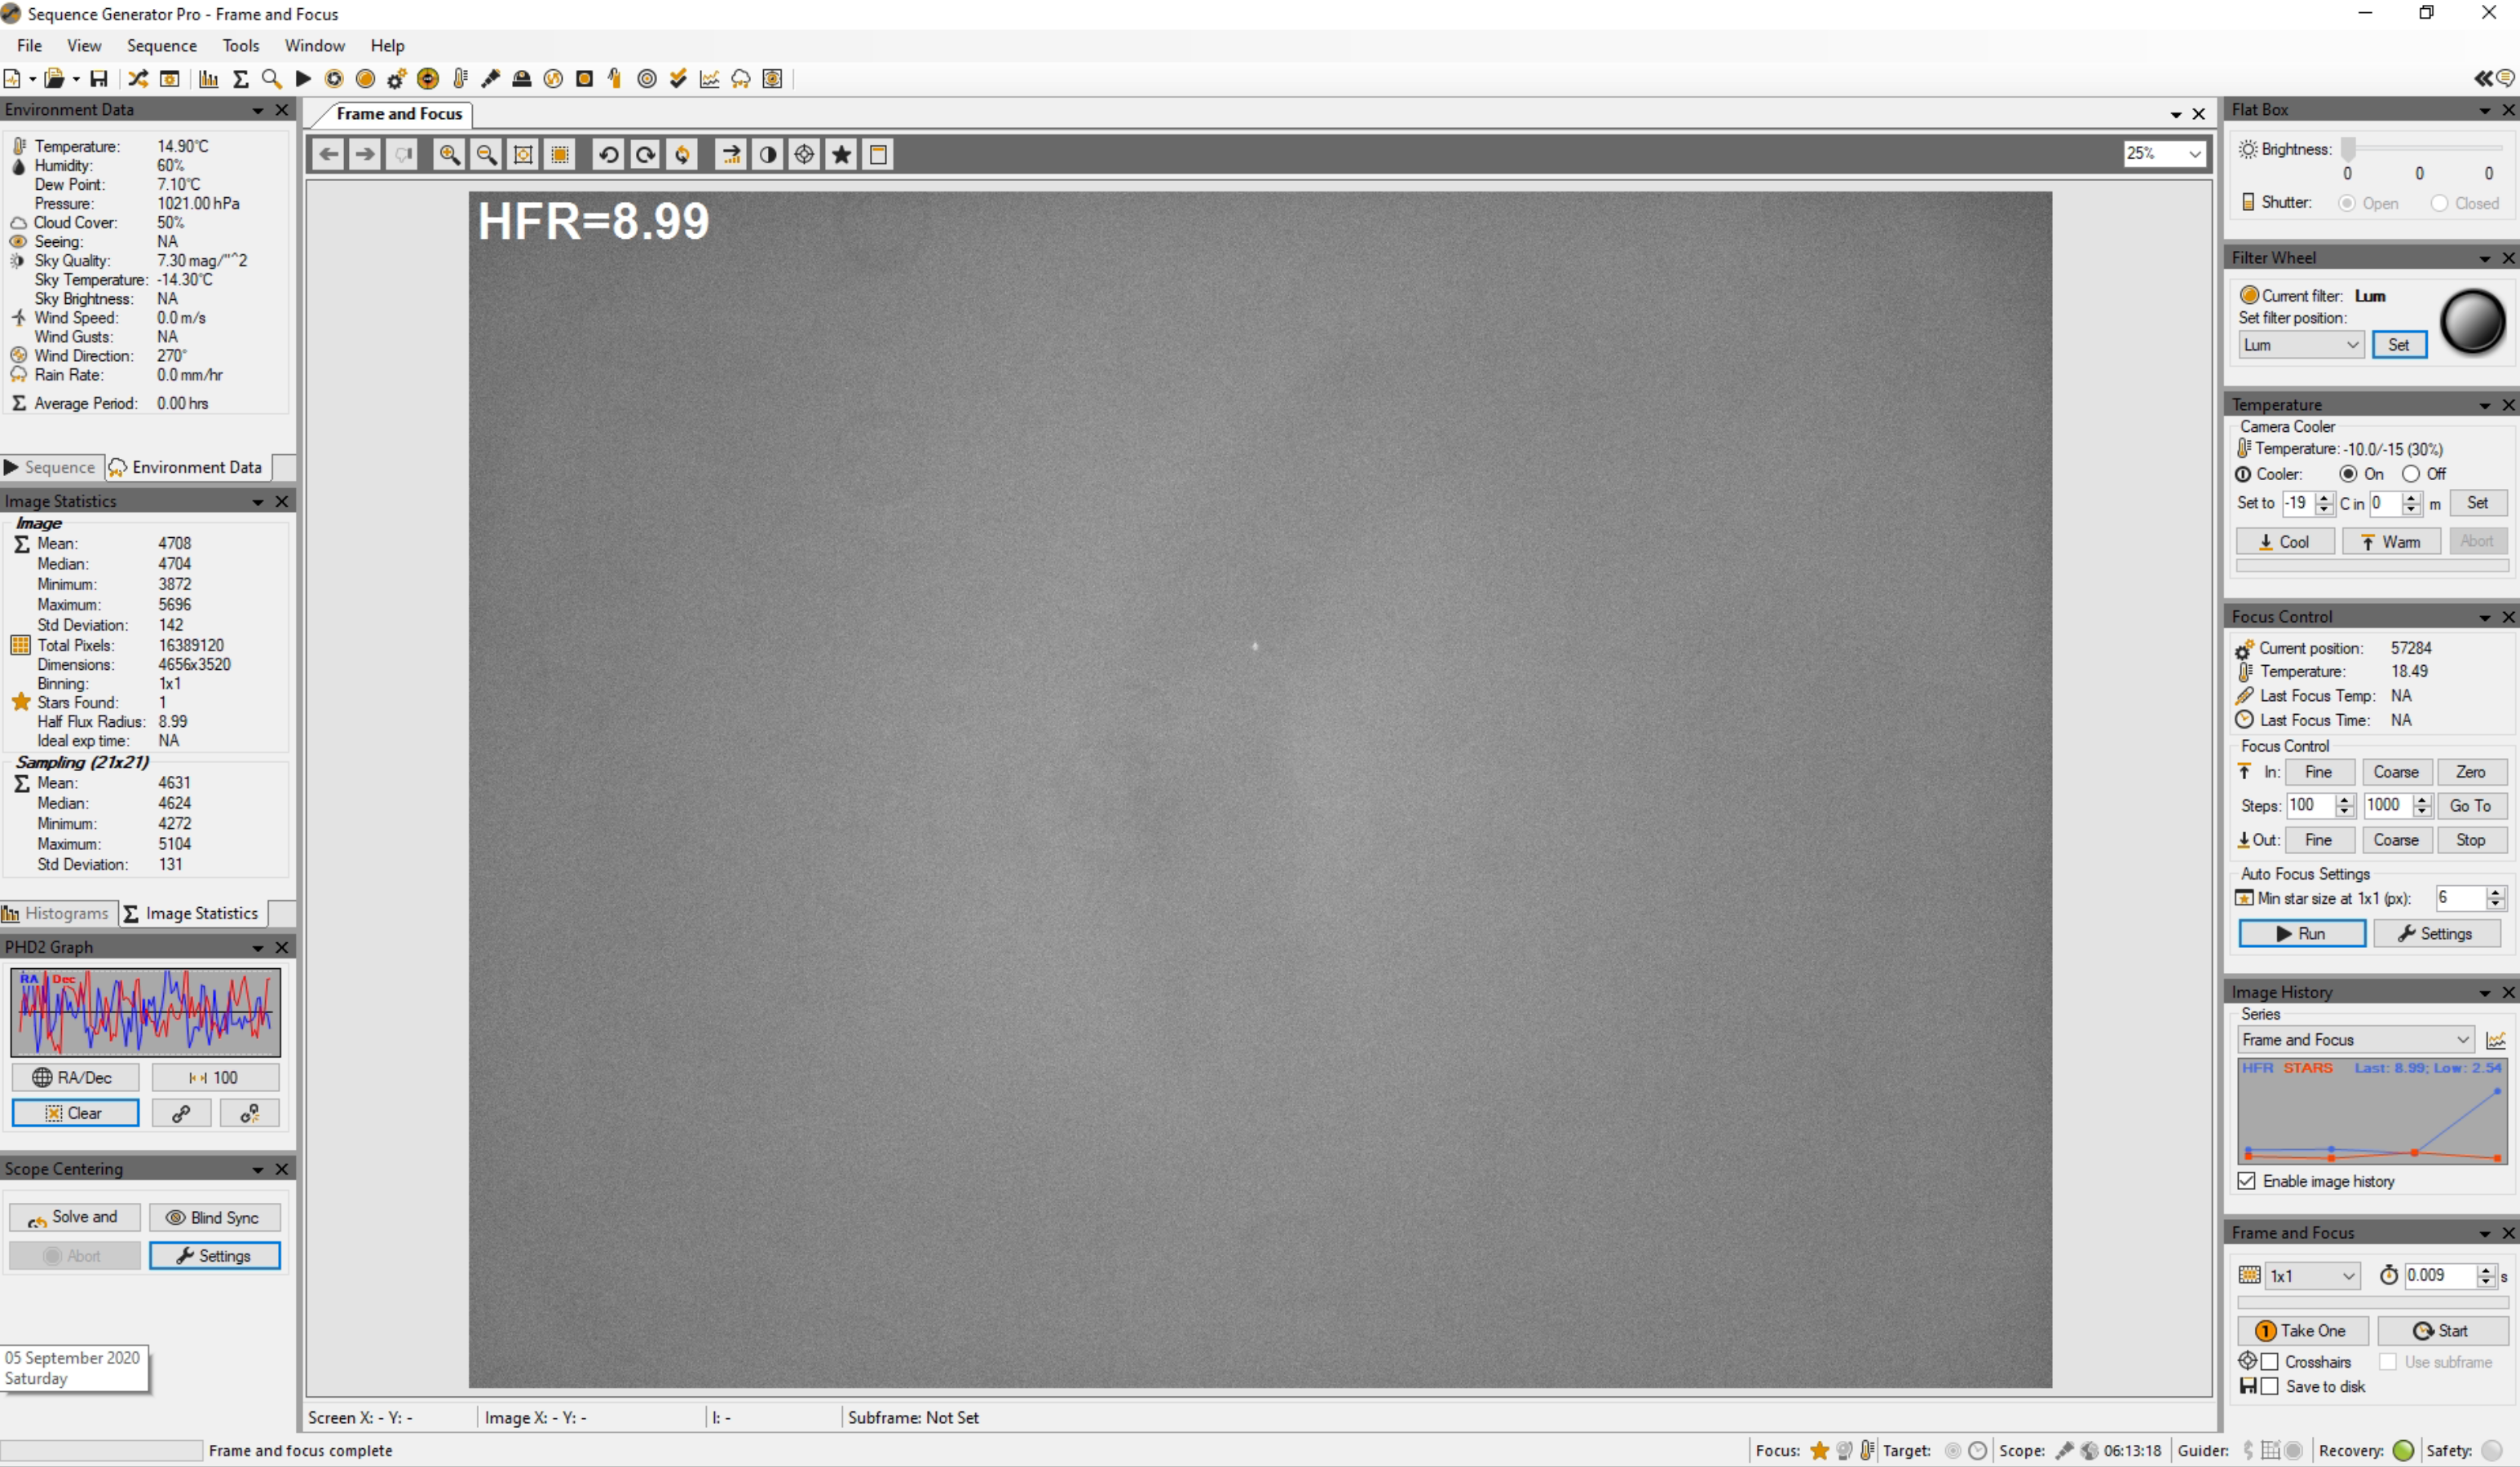
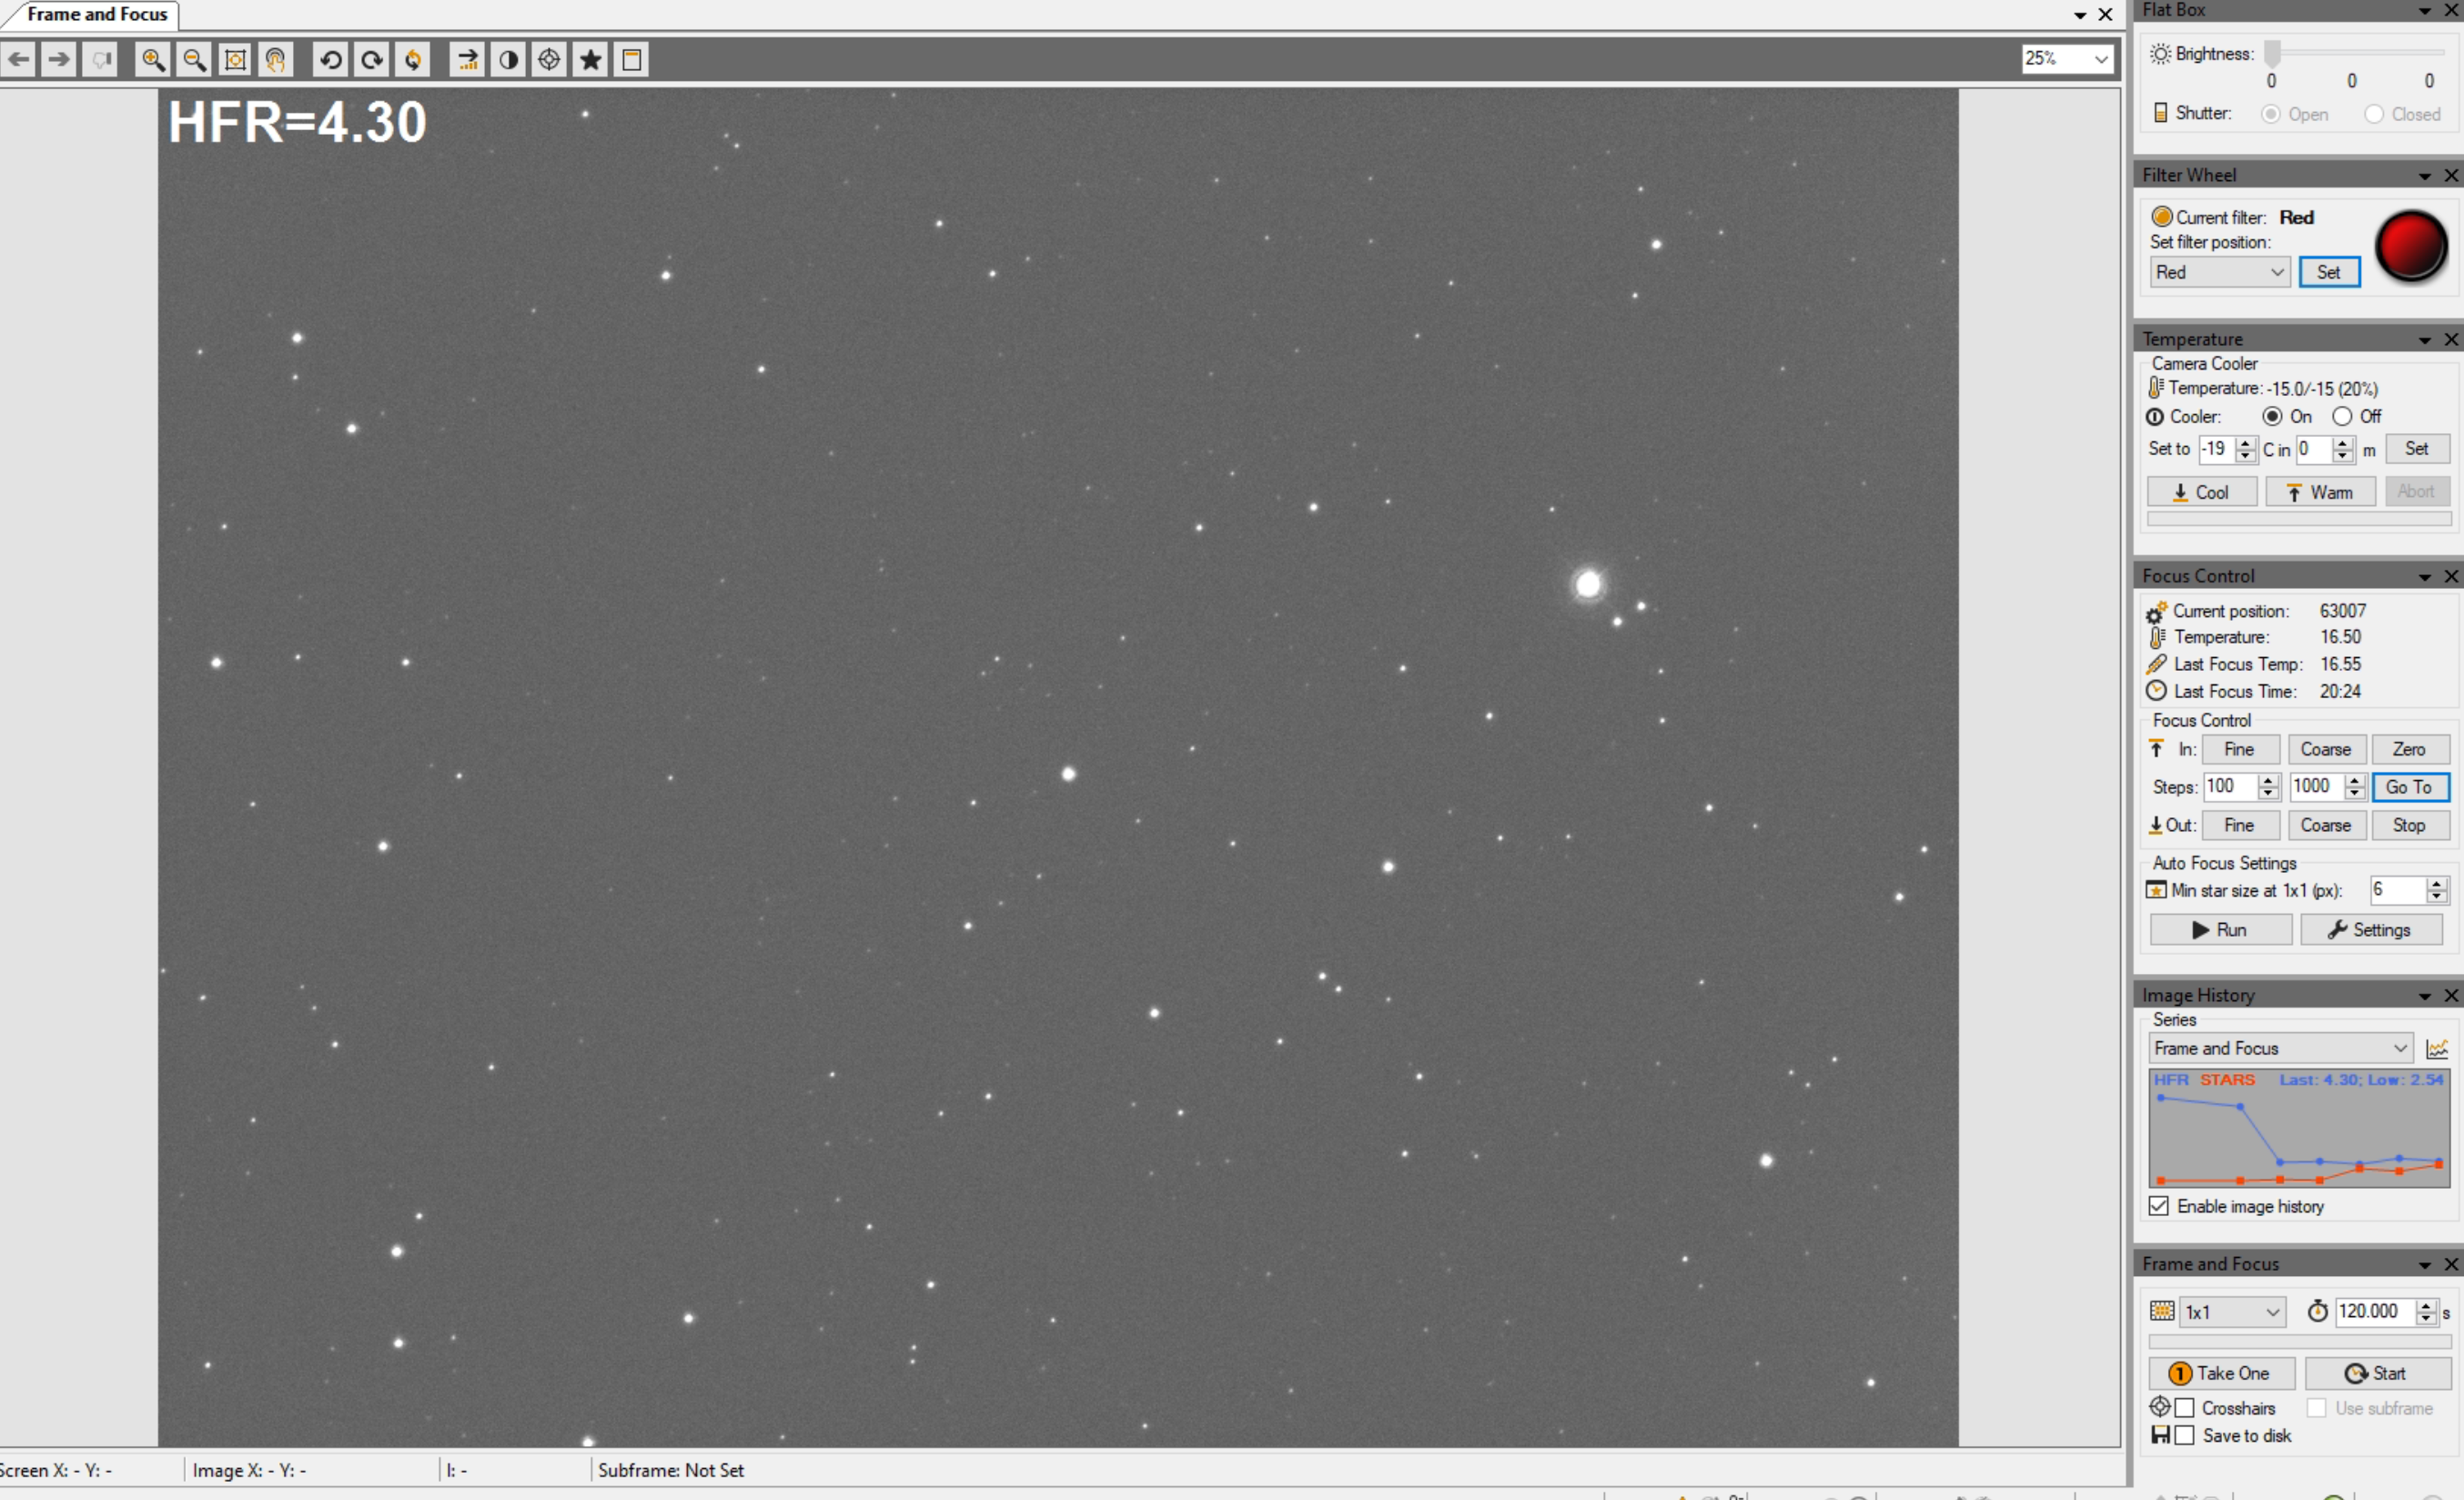
So here is a 2 minute exposure of the target. I tried 60 second but given I am running Gain 10 Offset 10 the maximum pixel count for the centre of the star was 1,648 out of 65k. So a 2 minute exposure produces 9,488 which is still low but I will continue on the low side for now. 1 hour before the transit is in about 45 minutes so I will wait then start gathering data.
2 minute exposure of HAT-P-6b
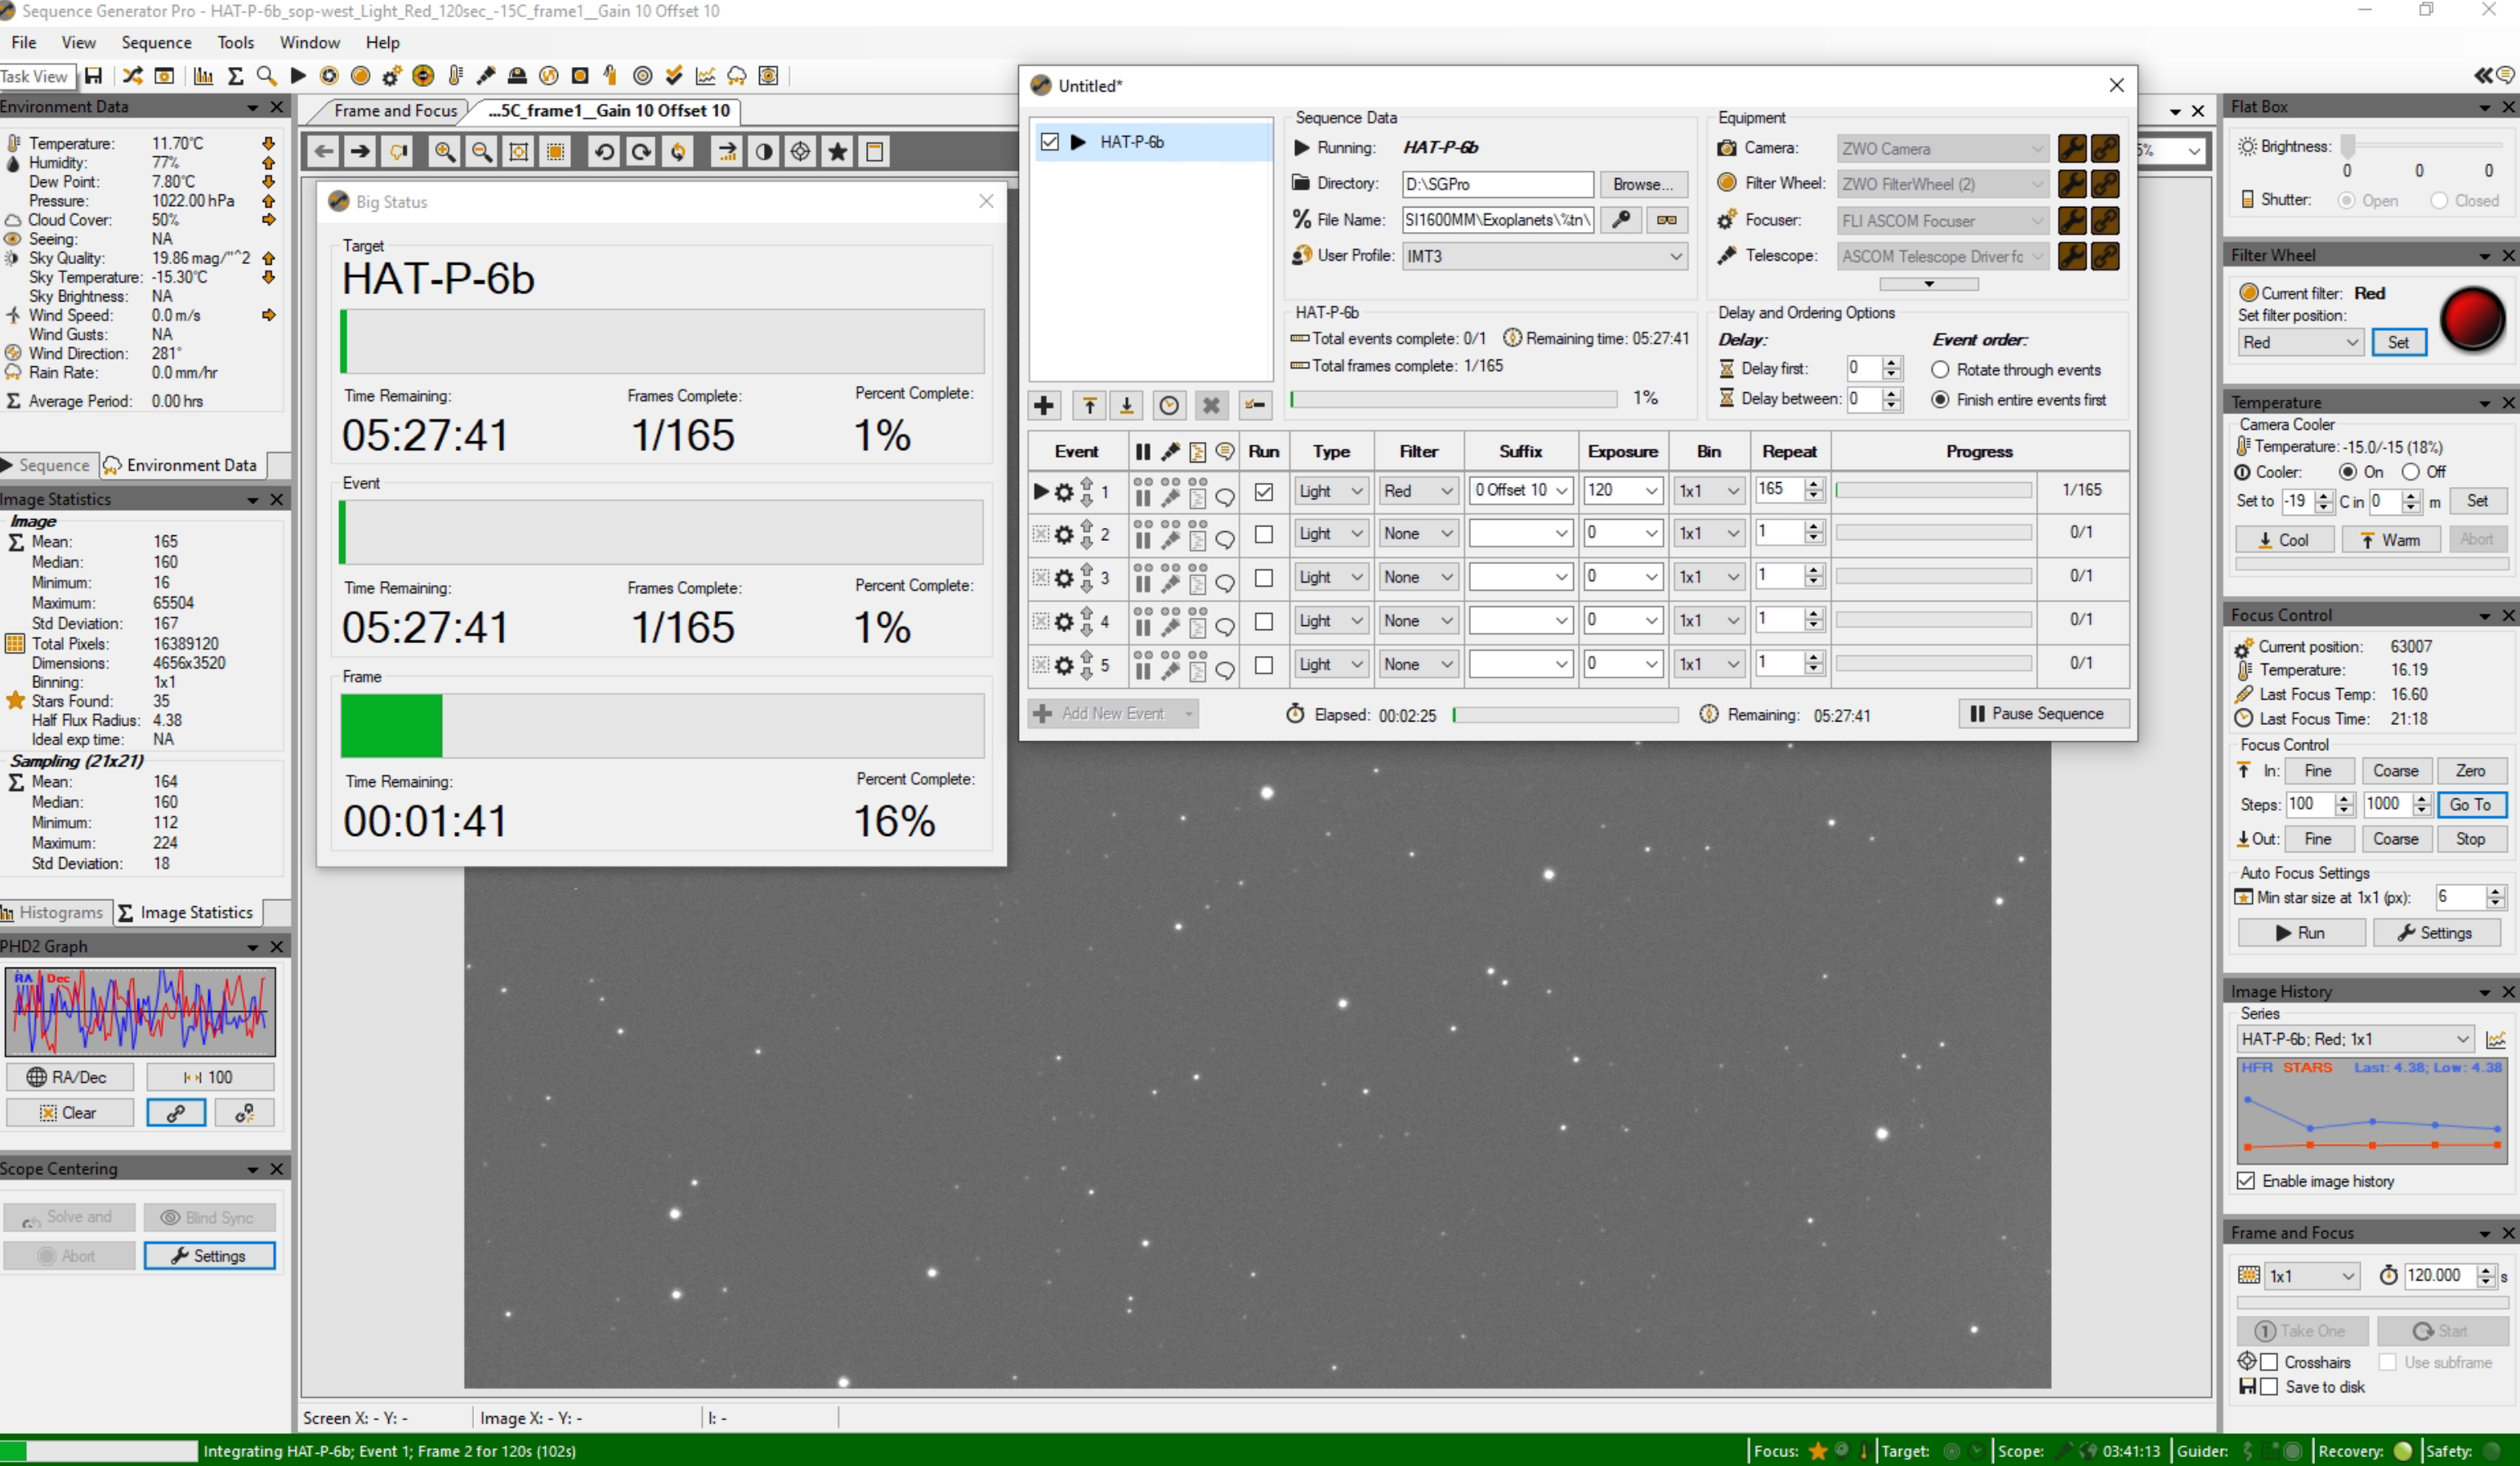
So we’ve started and set to run for 5.5 hours, this means a a meridian flip in 4 hours time so I will need to stay up until 2am, perform the flip then head back to bed.
First image down
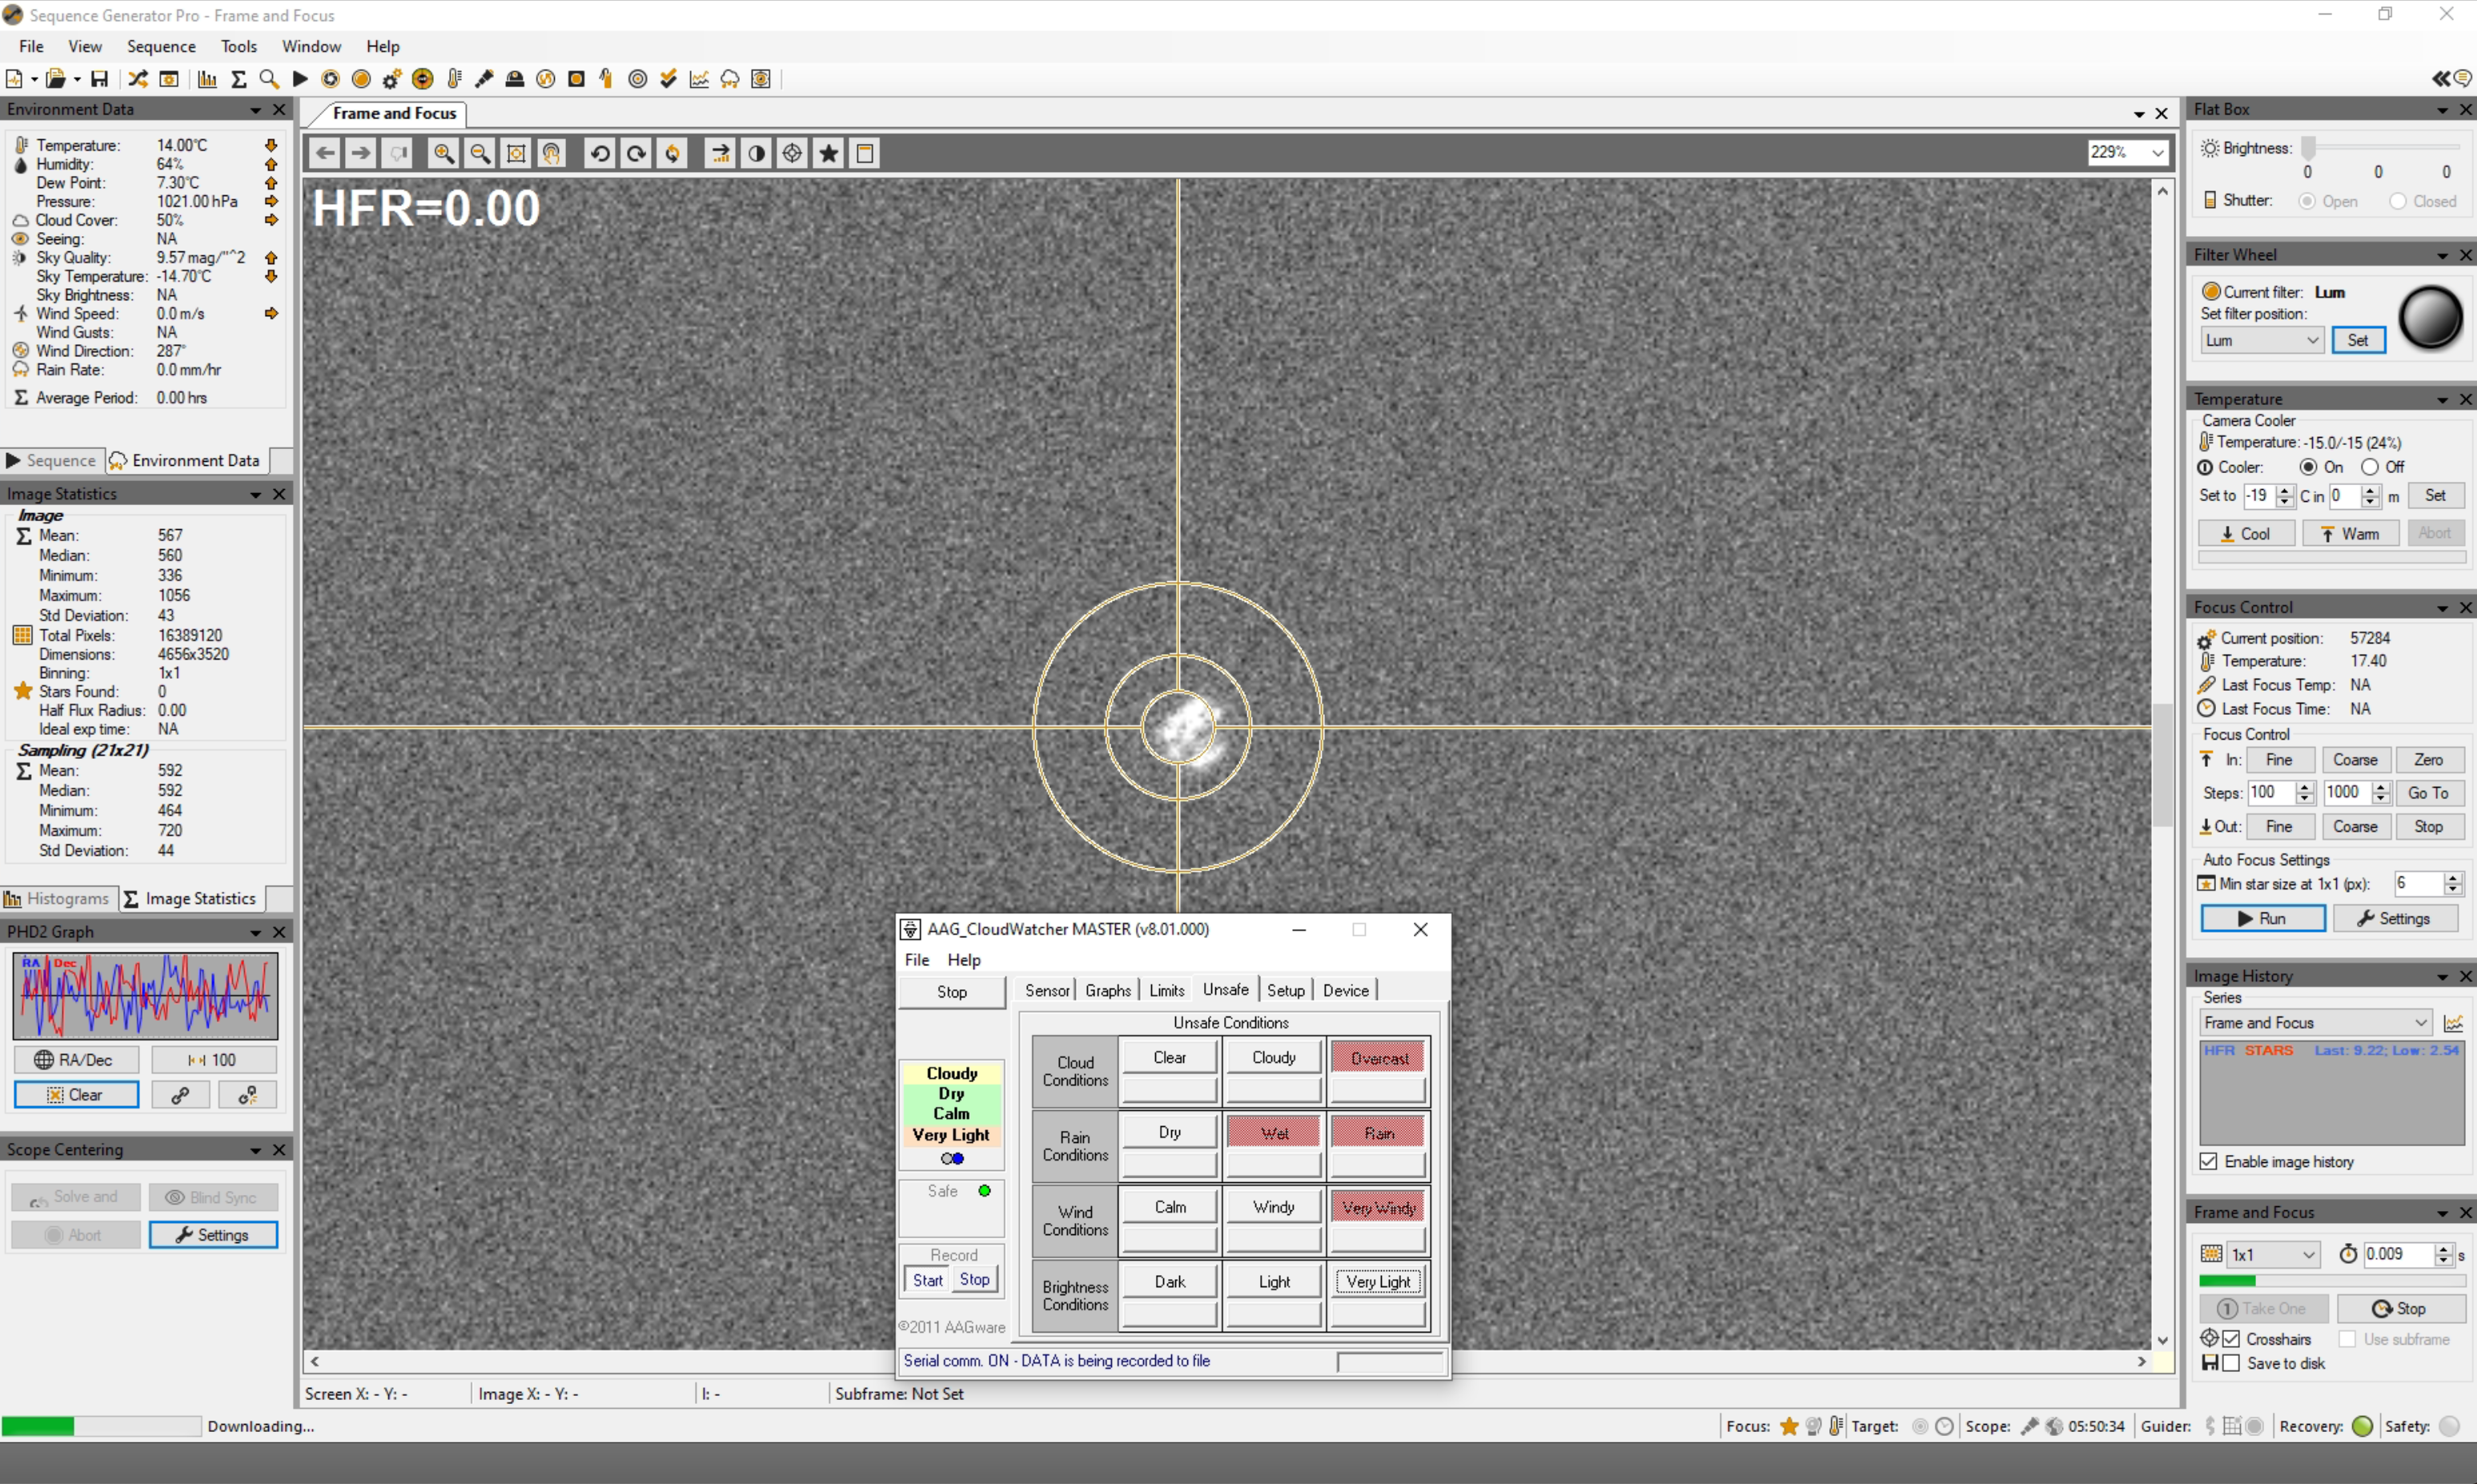
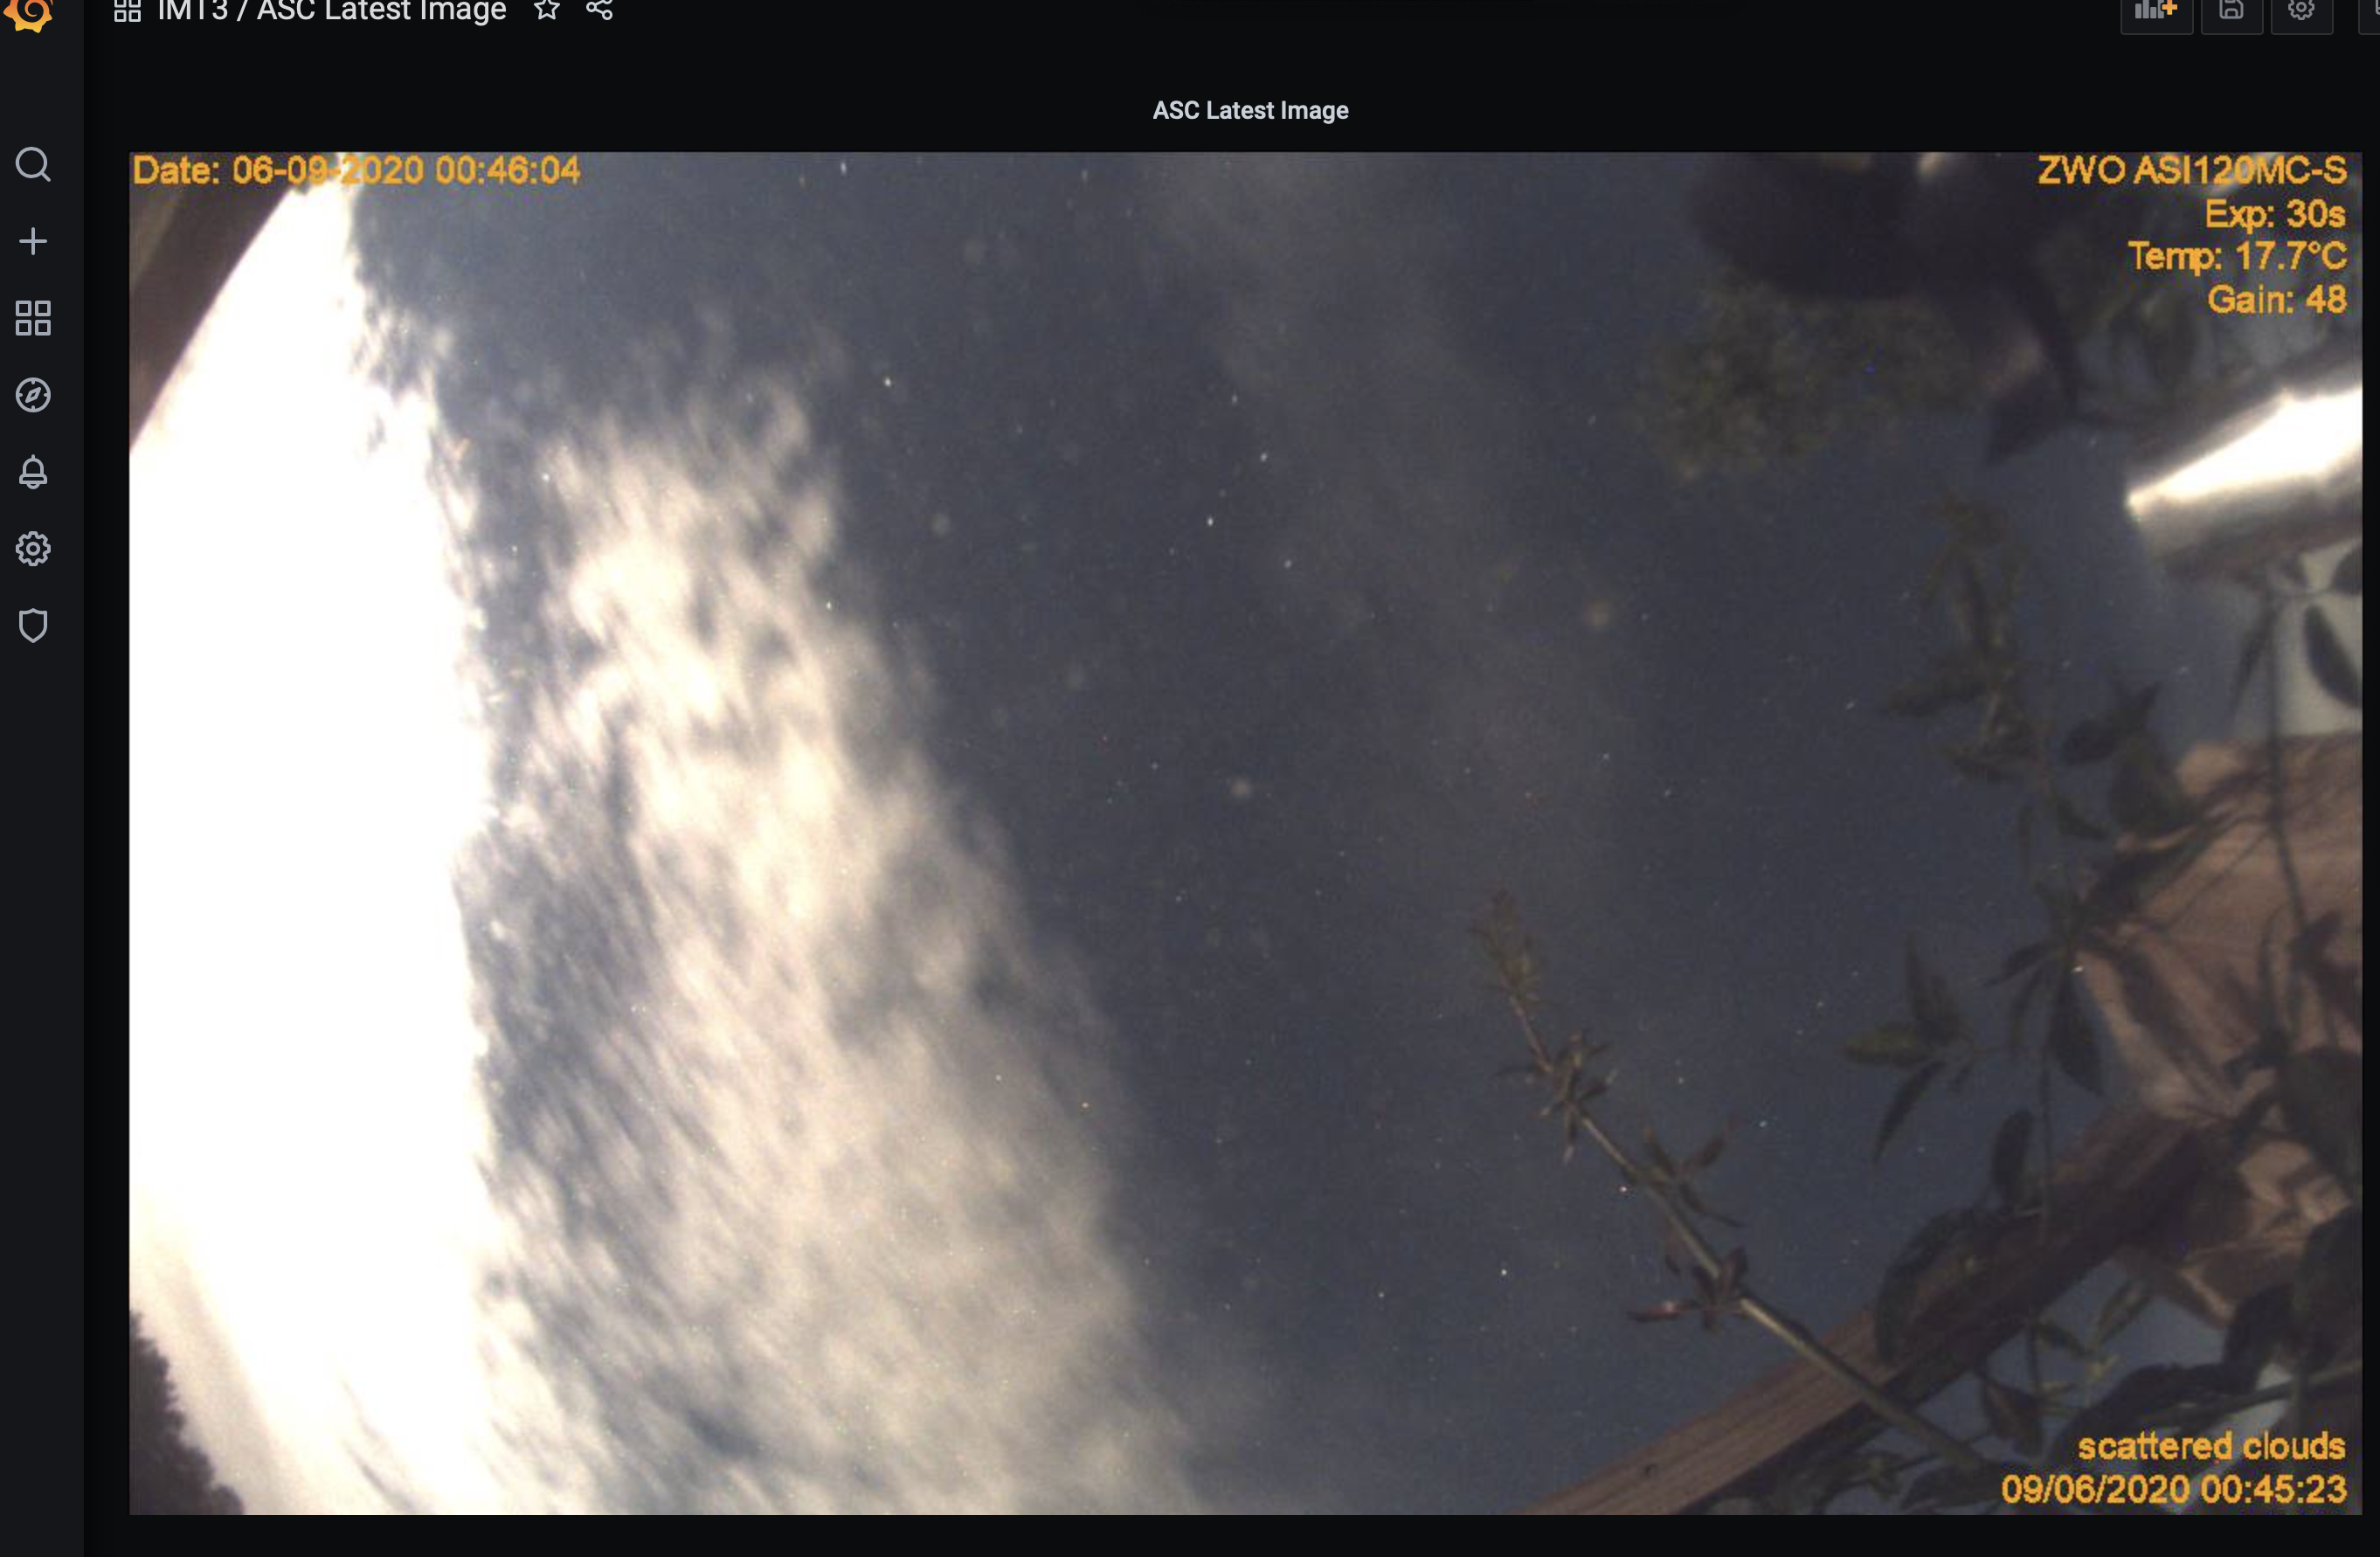
The clouds have started to roll in, however so far we have been lucky and our star and planet are just outside the bank of cloud …… but for how long?
Cloud
So it finally clouded over around 1am although the data for the past 20 minutes is suspect, so I hope we at least have the first half of the transit.
GingerGeek and I were out imaging tonight. The sky unexpectedly cleared and we thought given the impending move of IMT3 to another site that we would try to gather some more data on M57, specifically LRGB and some additional Ha on the 12″.
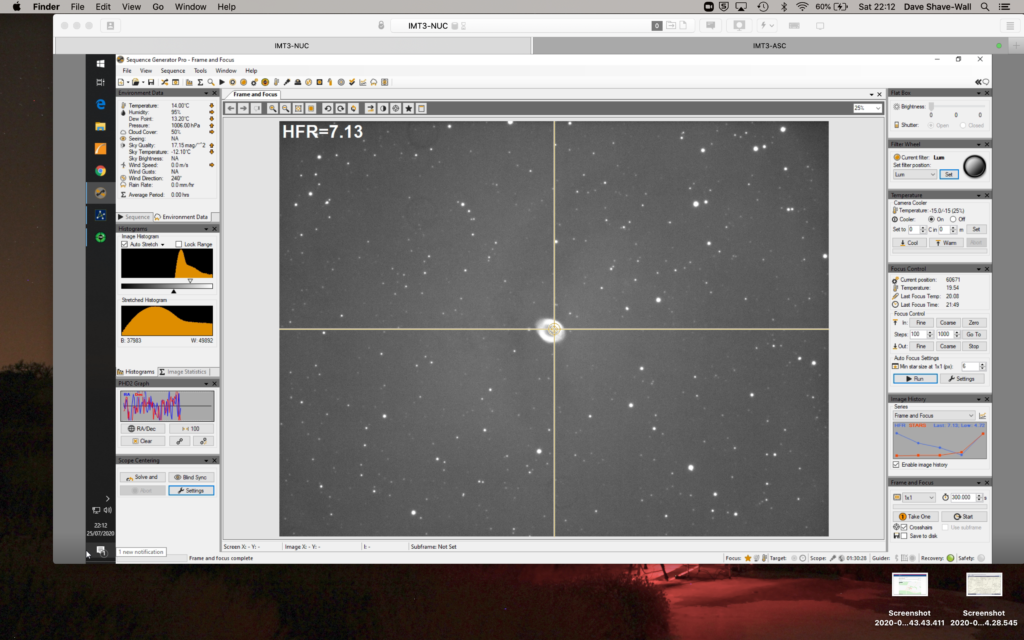
We ran Autofocus on Luminance which gave 60,671 at 20.64℃ and HFR 6.5. We then started to image and after a few frames the temperature started to drop. In the main this is because we opened the dome last minute rather than a minimum of 2 hours before we used it so the dome was warm and now cooling down the optical train shifts.
M57 quick frame and focus
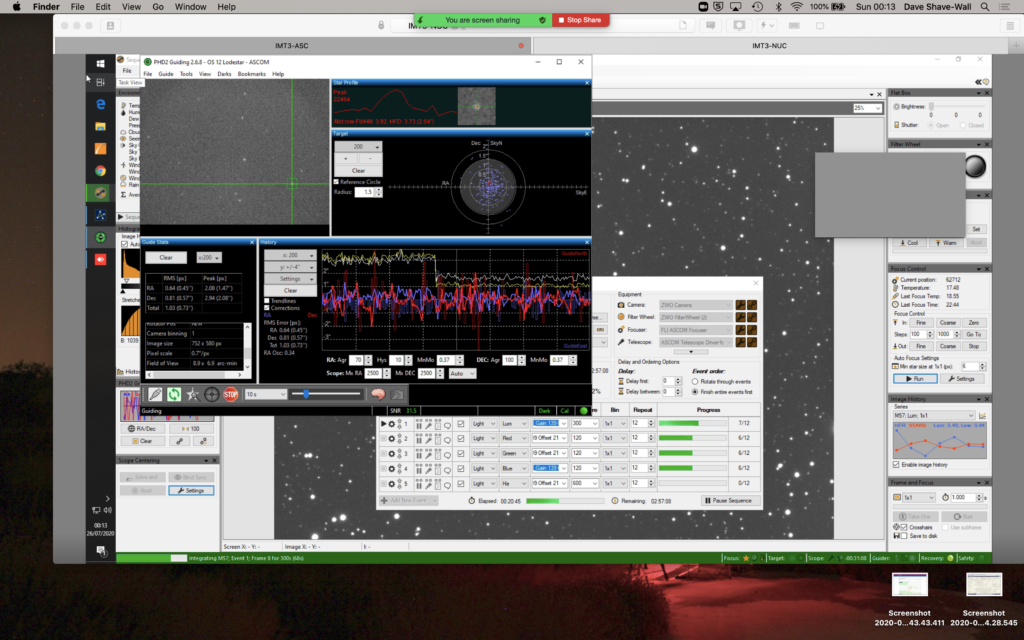
We refocused to 62,712 on luminance at 19.10 with an of HFR 5.15. We then ran the image acquisition and below is a screenshot of the guiding, which looked like it was going to cause an issue but it was ok. If it had then it would have been the local fog rather than anything on the mount. At midnight we performed a Meridian flip nice and early which afforded us to leave the observatory running and go to bed. Notice the graph below, the yellow line drops as we performed the meridian flip, this is due to the dome now shielding against next doors light !!!!!!!
Guiding ok, notice the drop in the graph
The neighbours light continue to be a pain as can be seen here, I really cannot wait to move the observatory to it’s new dark site.
LIGHT!!!!!
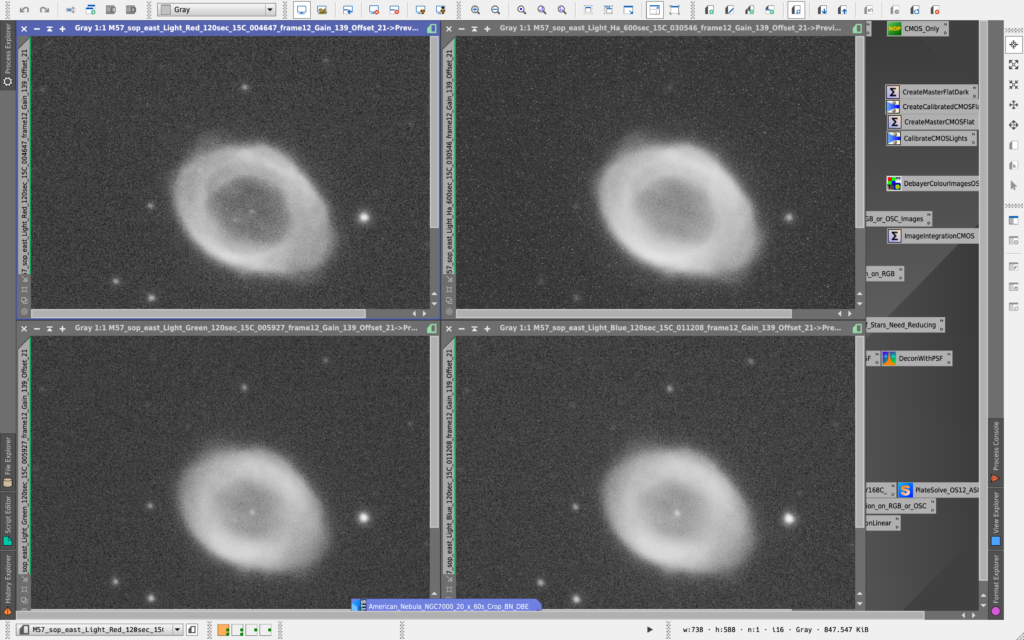
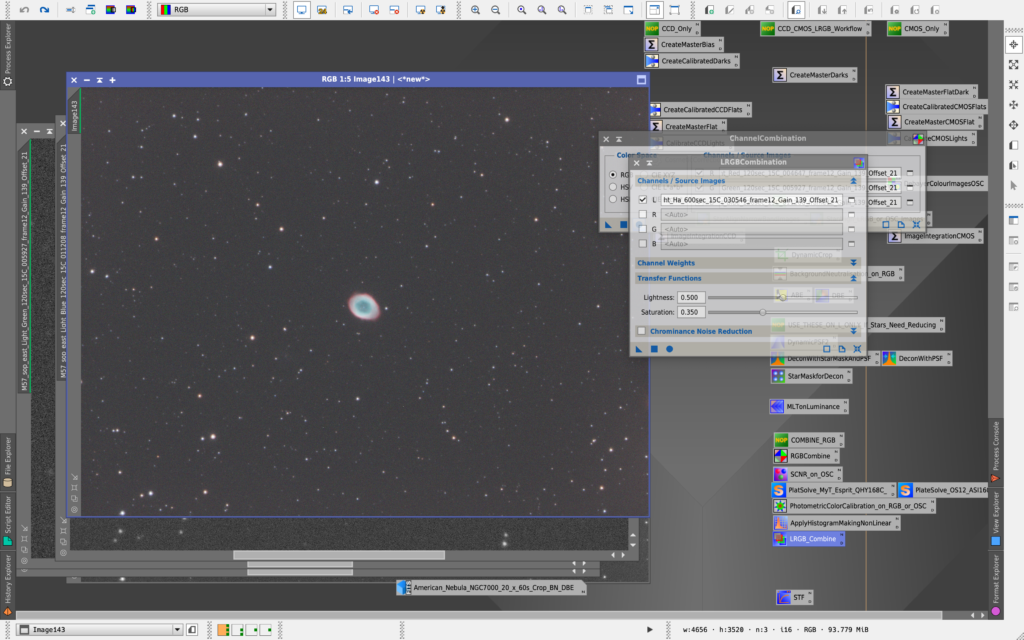
Finally managed to capture LRGB and Ha, below the RGB and Ha frames can be seen in PI. Note the central star is not visible in the Ha frame,
RGB and Ha raw frames
Finally I stacked 1 of each colour without calibration to see what it would look like.
RGB quick single stack no calibration
So we left the observatory imaging, I had a quick peek outside around 12:30am and there was water running off the dome and the outside windows of the orangery! The Observatory ran until the dome shut at 3:58am (it woke me up) when the light levels started to rise.
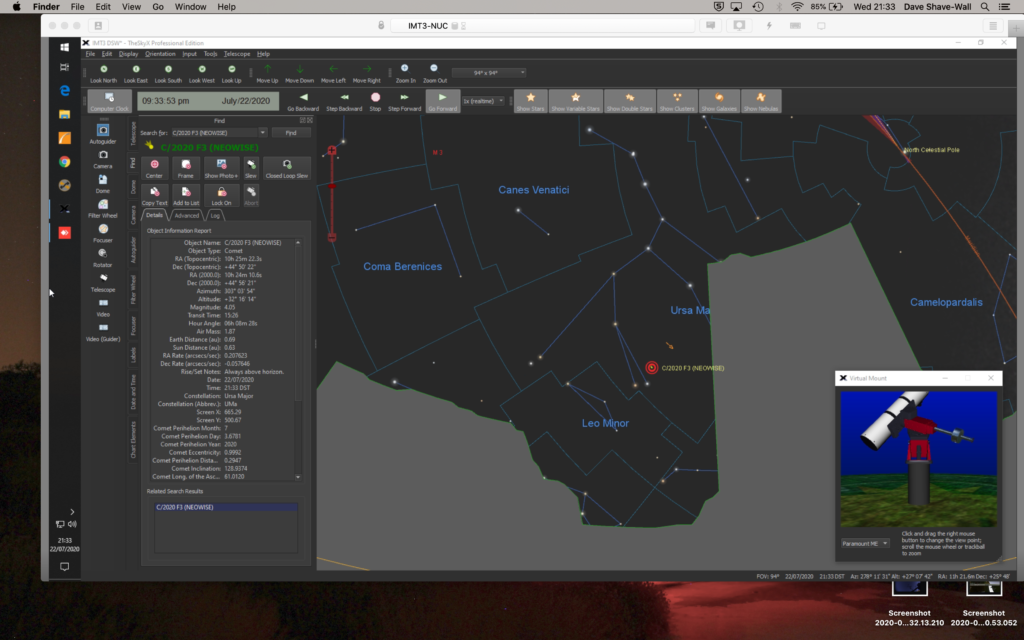
I opened the dome at 8:30pm and then went off to do some more work. A few calls later and it was time to come back and see if I could grab comet C/2020 F3 NEOWISE which had now moved further West and further in altitude over the past week, meaning it should be visible from the dome. Below is Arcturus as I performed a quick sync.
Arcturus
Below you can see Arcturus on The Sky X with the dome slit showing and the obstructions from the horizon also present.
TSX
Comet NEOWISE can be seen just above next doors tree.
NEOWISE
A quick peek with the camera and I could just make out the comet.
Quick peek of the comet but clouds
Clearly more clouds rolled in which is typical
More clouds!
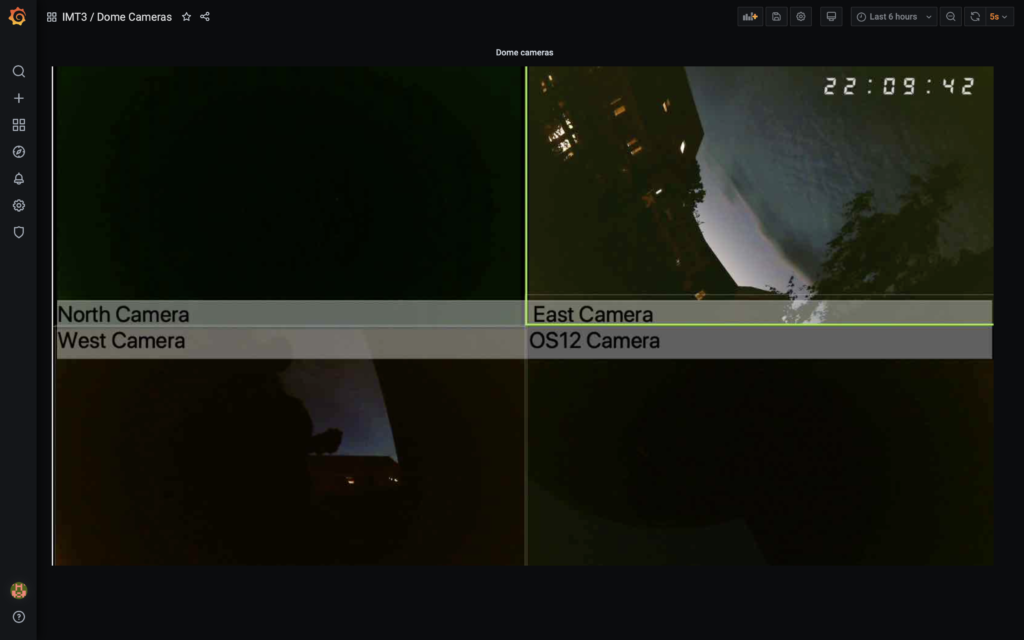
Looking at the cameras in the dome I could see the cloud bank of cloud (picture top right)
Cloud bank approaching
Fortunately the comet could be seen at the back of the cloud bank.
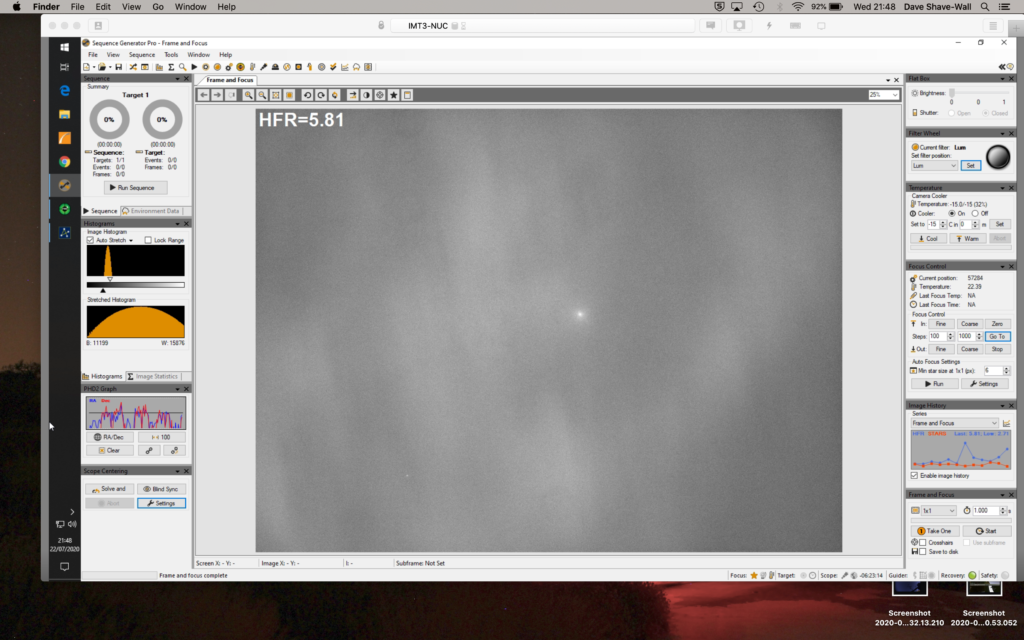
45 second exposure of Comet C/2020 F3 NEOWISE
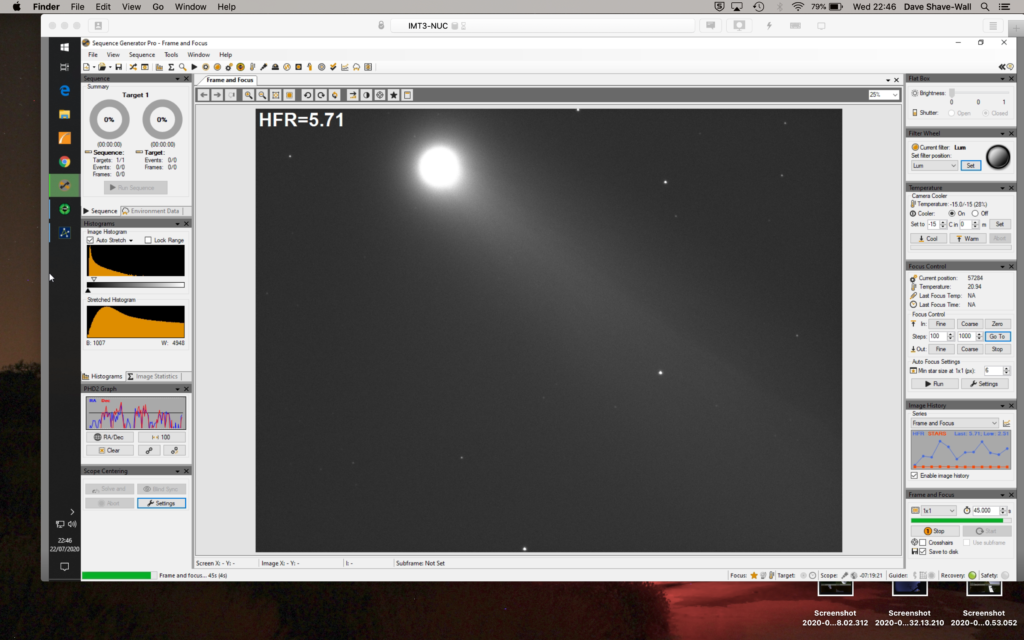
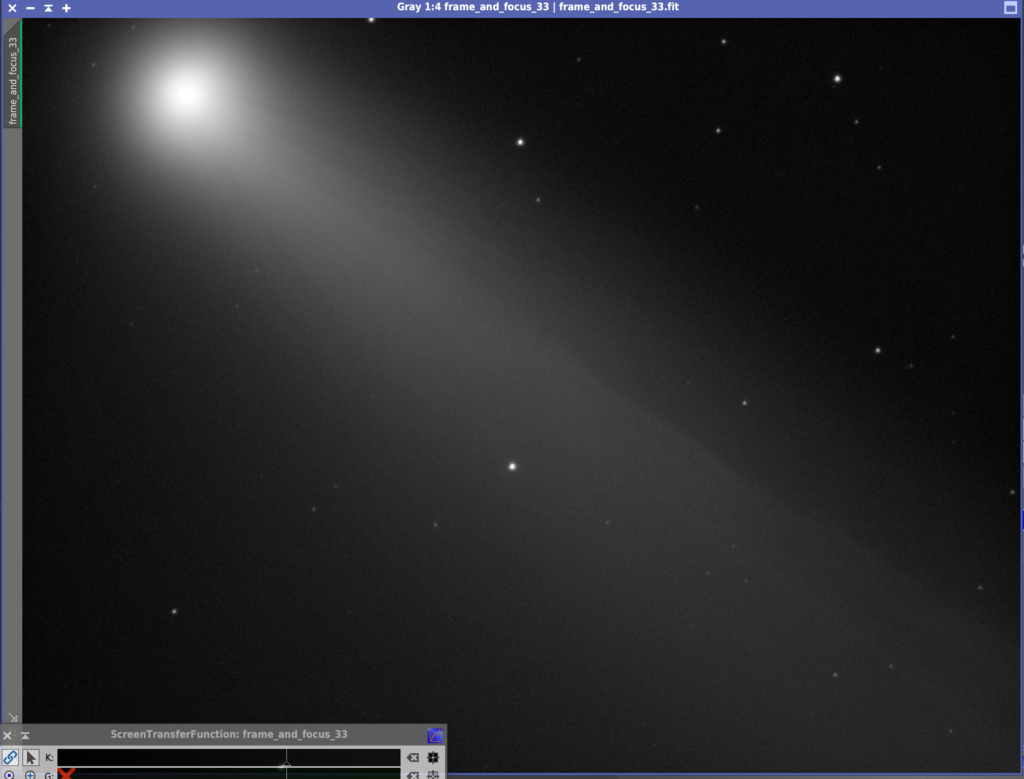
So I set about quickly taking some images before the comet disappeared behind the tree.
90 second exposure of Comet C/2020 F3 NEOWISE
The other useful thing tonight was using the monitoring GingerGeek put together. Below are a selection of shots from the website.
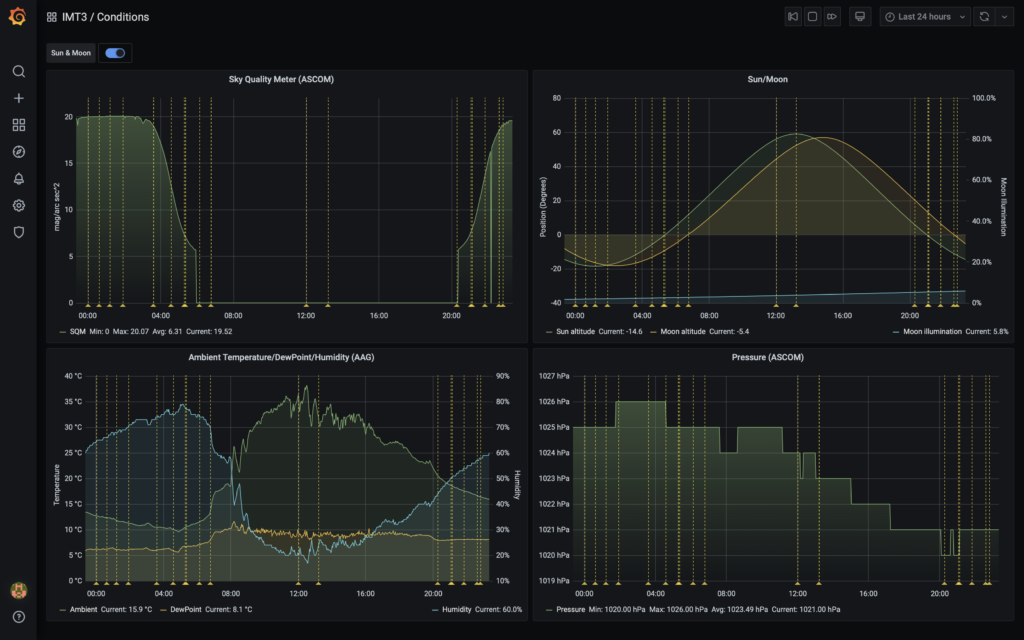
IMT3 Conditions
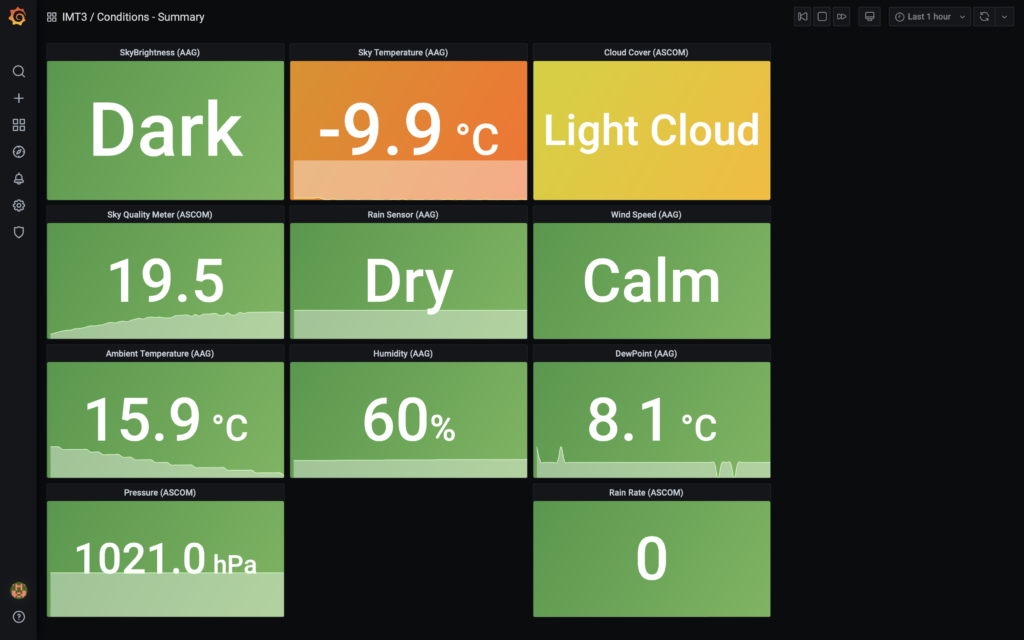
The chart below shows the light cloud cover and the sky temperature is representative of the sky clarity and relates to cloud coverage too. The scale is inverted to -18℃ is a cloudless beautifully clear night sky, which tonight was not!
IMT Conditions Summary – Fisherprice style 🙂
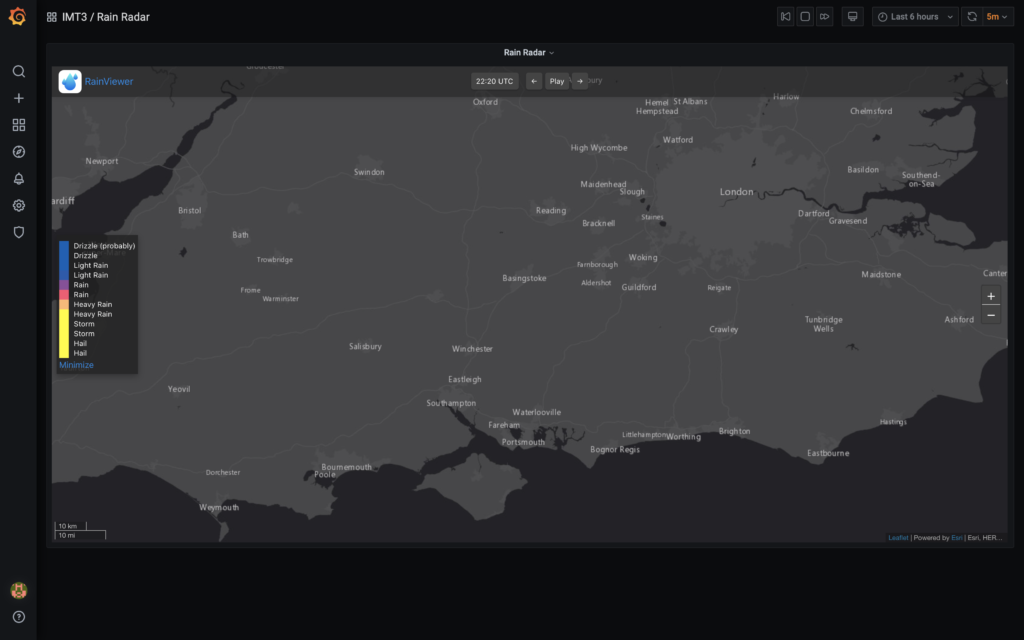
At least there was no rain 🙂
IMT3 Rain Radar
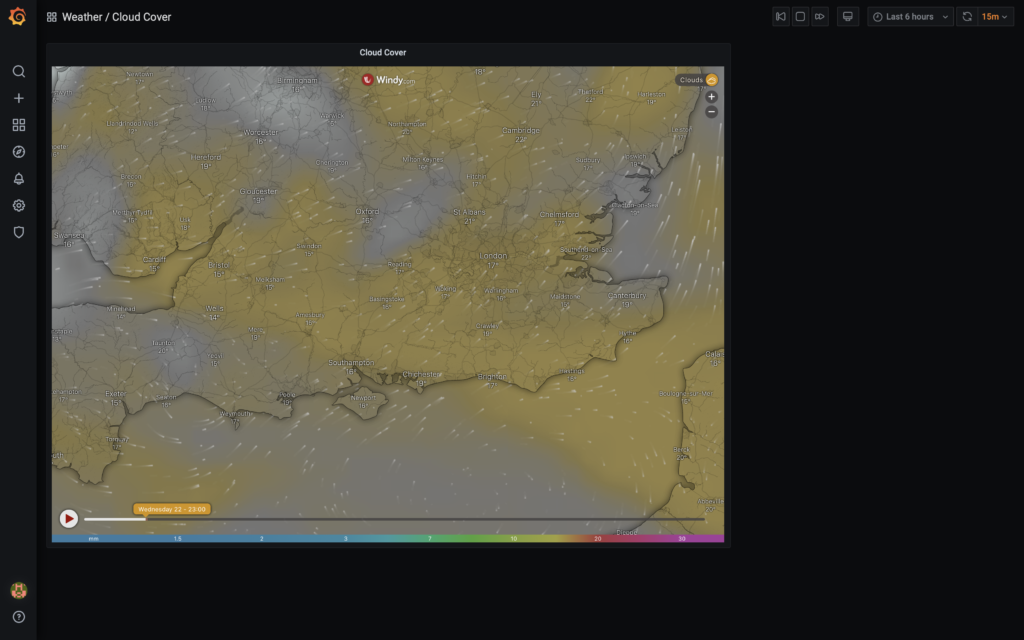
This image below shows the cloud bank just North West of Reading that was a problem.
IMT3 Cloud Cover
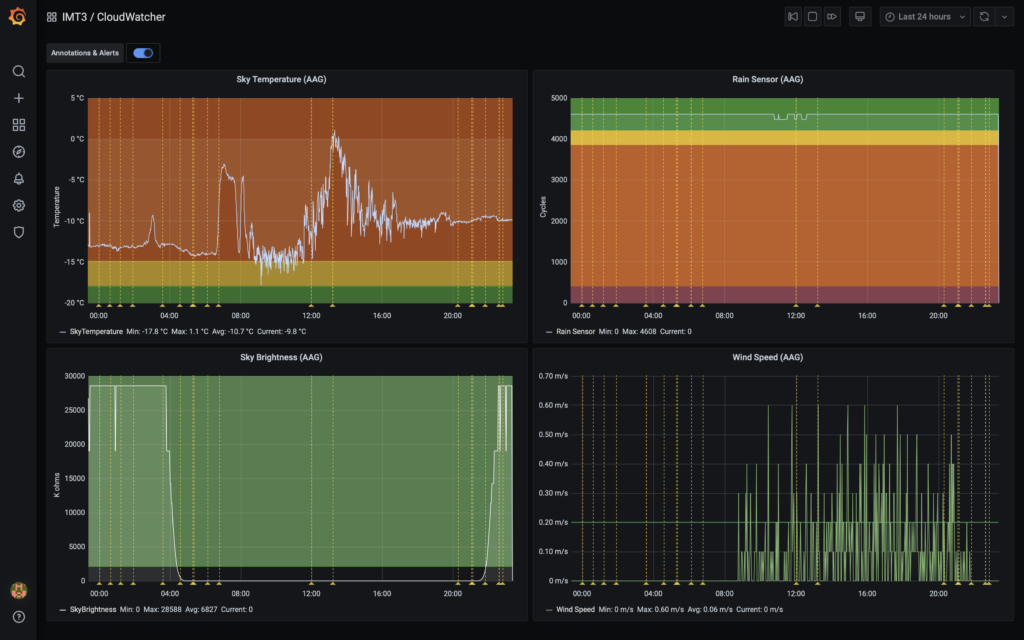
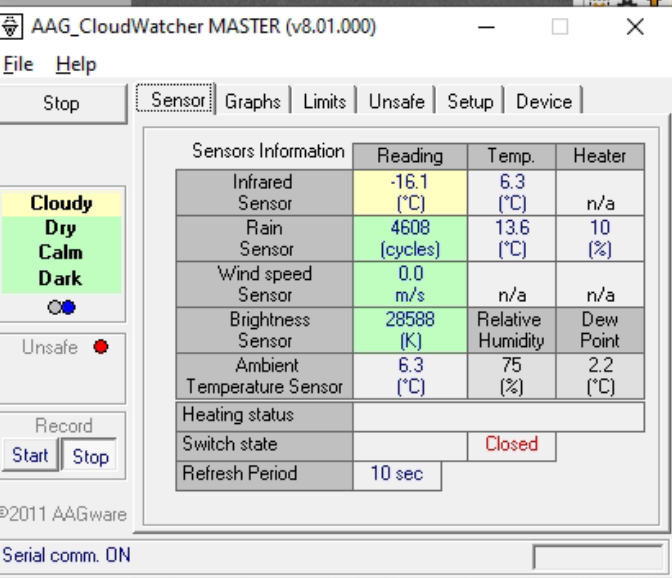
This next chart is from the data produced by the AAG CloudWatcher weather station. Note the sky temperature is nowhere near the -18℃ to be clear.
IMT3 AAG Cloudwatcher weather station
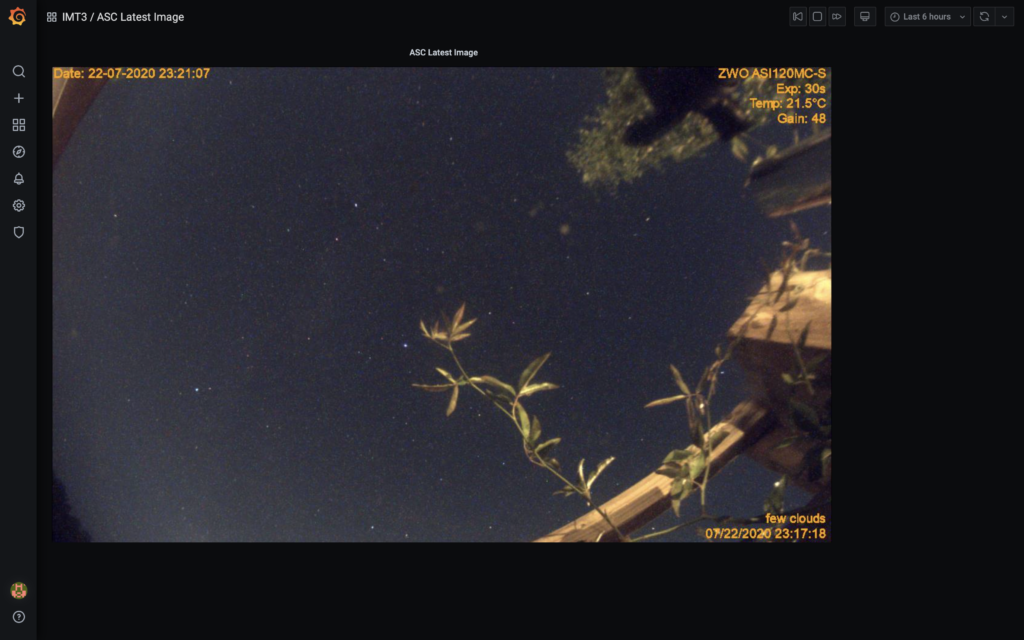
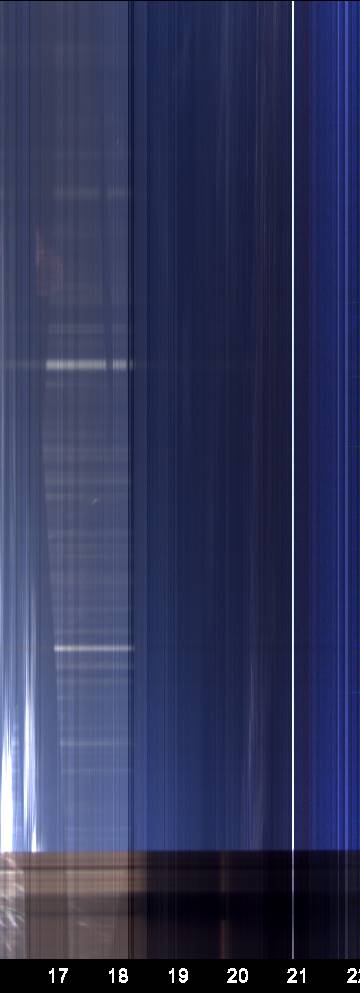
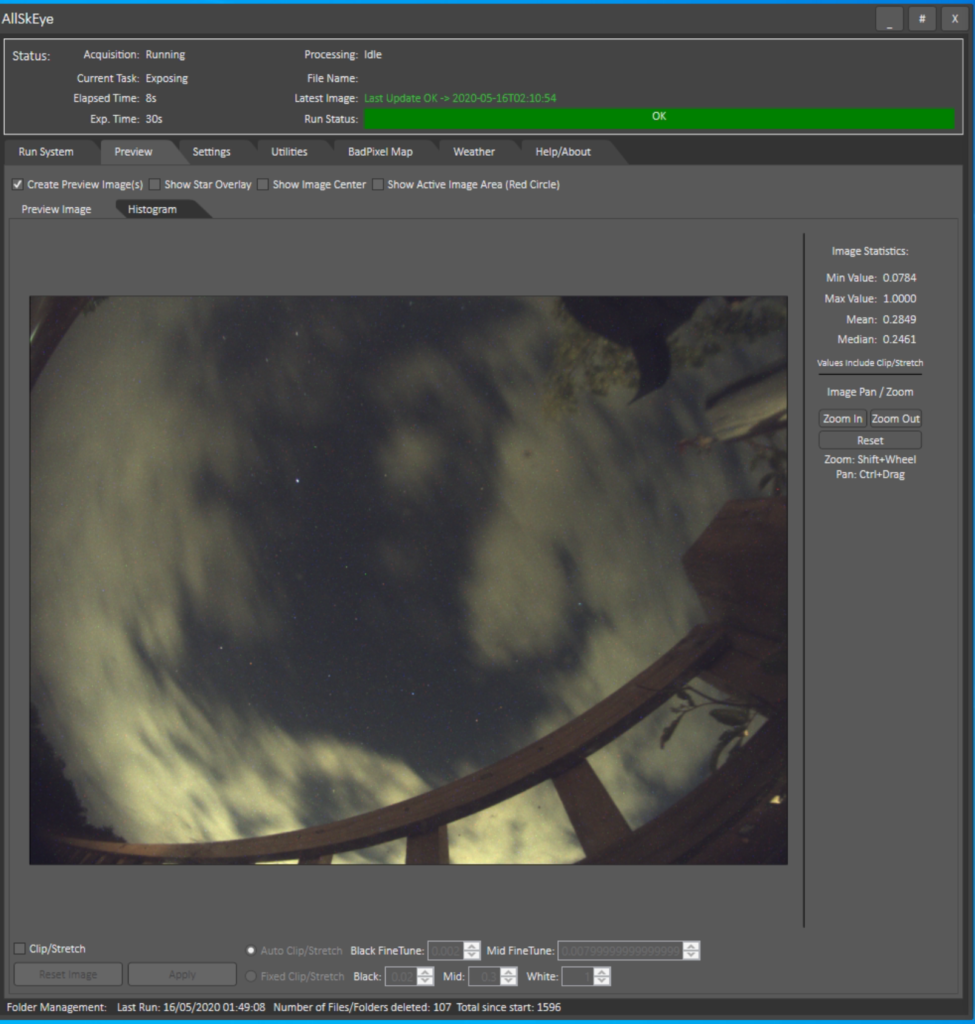
And finally the all sky cam just as I packed up showing the clouds clearing
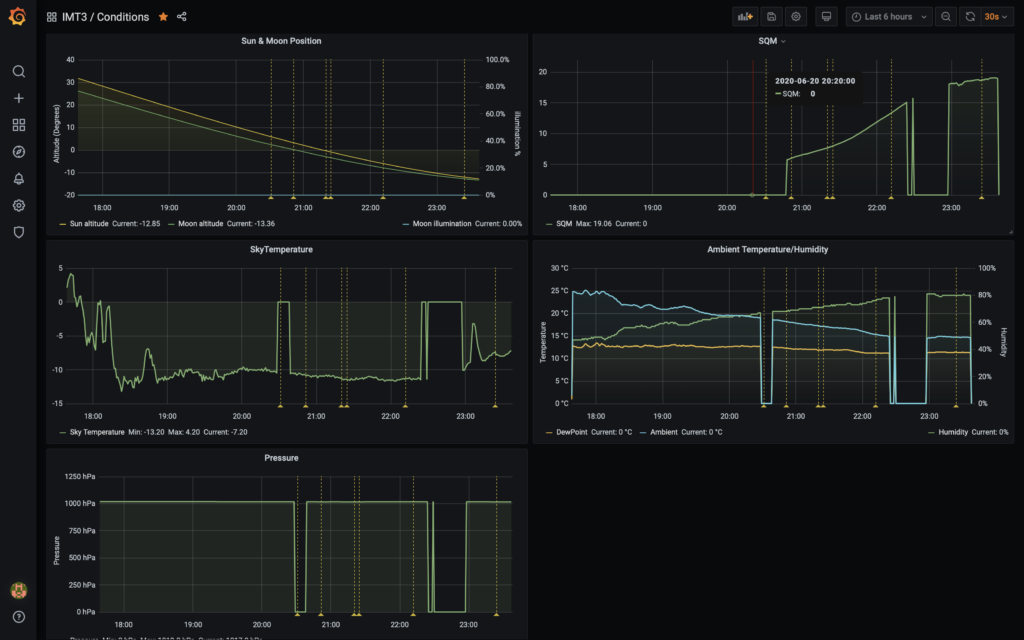
Tonight GingerGeek came over for a bit of social distancing friendly astronomy along with a bottle of Malbec wine. The idea was to calibrate the AAG, specifically when it goes from Very Bright to Light to Dark and at those points what the SQM value is along with the Sun’s position below the horizon. The AAG needs to get to 2100 which is dark, light is 5 and very light is 0.
The first time we noticed the values starting to change on the AAG brightness when it moved from its continuous reading throughout the day was at 21:47 when the Sun was -3.45 degrees below the horizon and the SQM was 10.15.
Within seconds the AAG read 9 and was already on Light vs Very Light and the Sun was now -3.54 degrees below the horizon and the SQM read 10.28.
It took almost half an hour for the AAG to get to dark. At 22:16 the AAG finally reached 2100, the SQM was at 13.97 and Sun was at -6.52 degrees below the horizon.
GingerGeek had also developed a new server for IMT3 to visualise some of the data from the observatory. The Grafana dashboard charts below show the data along with the Sun altitude.
New IMT3 Grafana dashboard
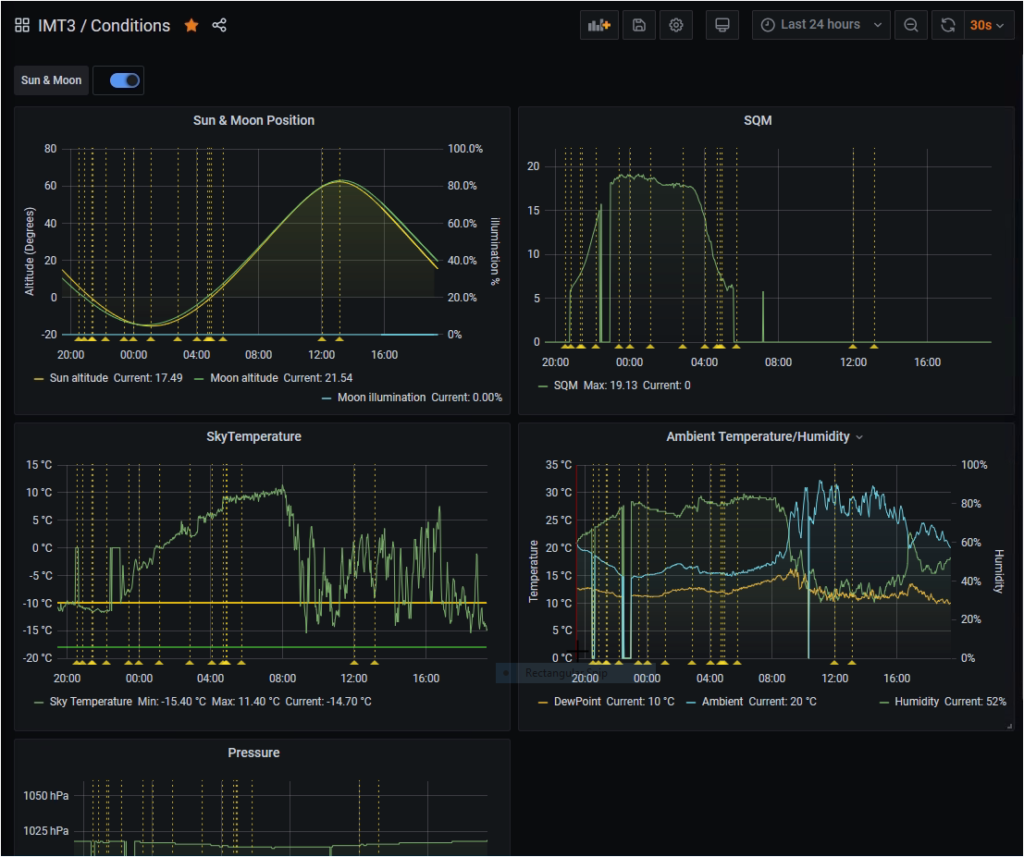
Looking at the last 24 hours shows the effect of the light nights on the SQM. The raised values after 4am went the value should be reducing or zero is the effect of a cat or bird covering the sensor. Also worthy of note is the sky temperature which shows the effect of cloud as the SkyTemperature increases. A truly clear sky would yield a value of -18℃ or better.
Shows the entire night
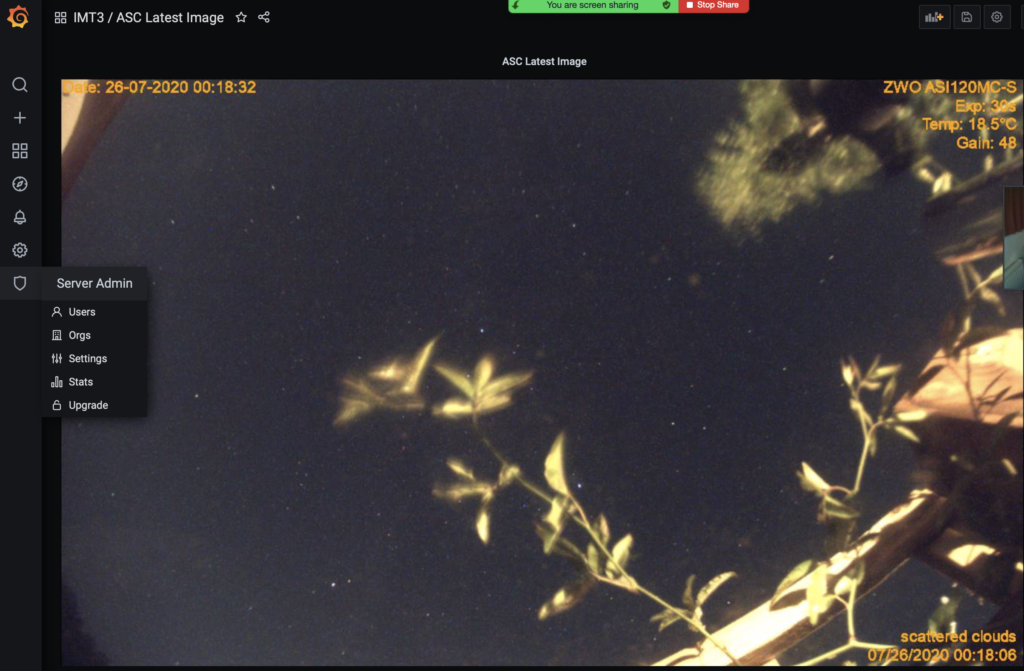
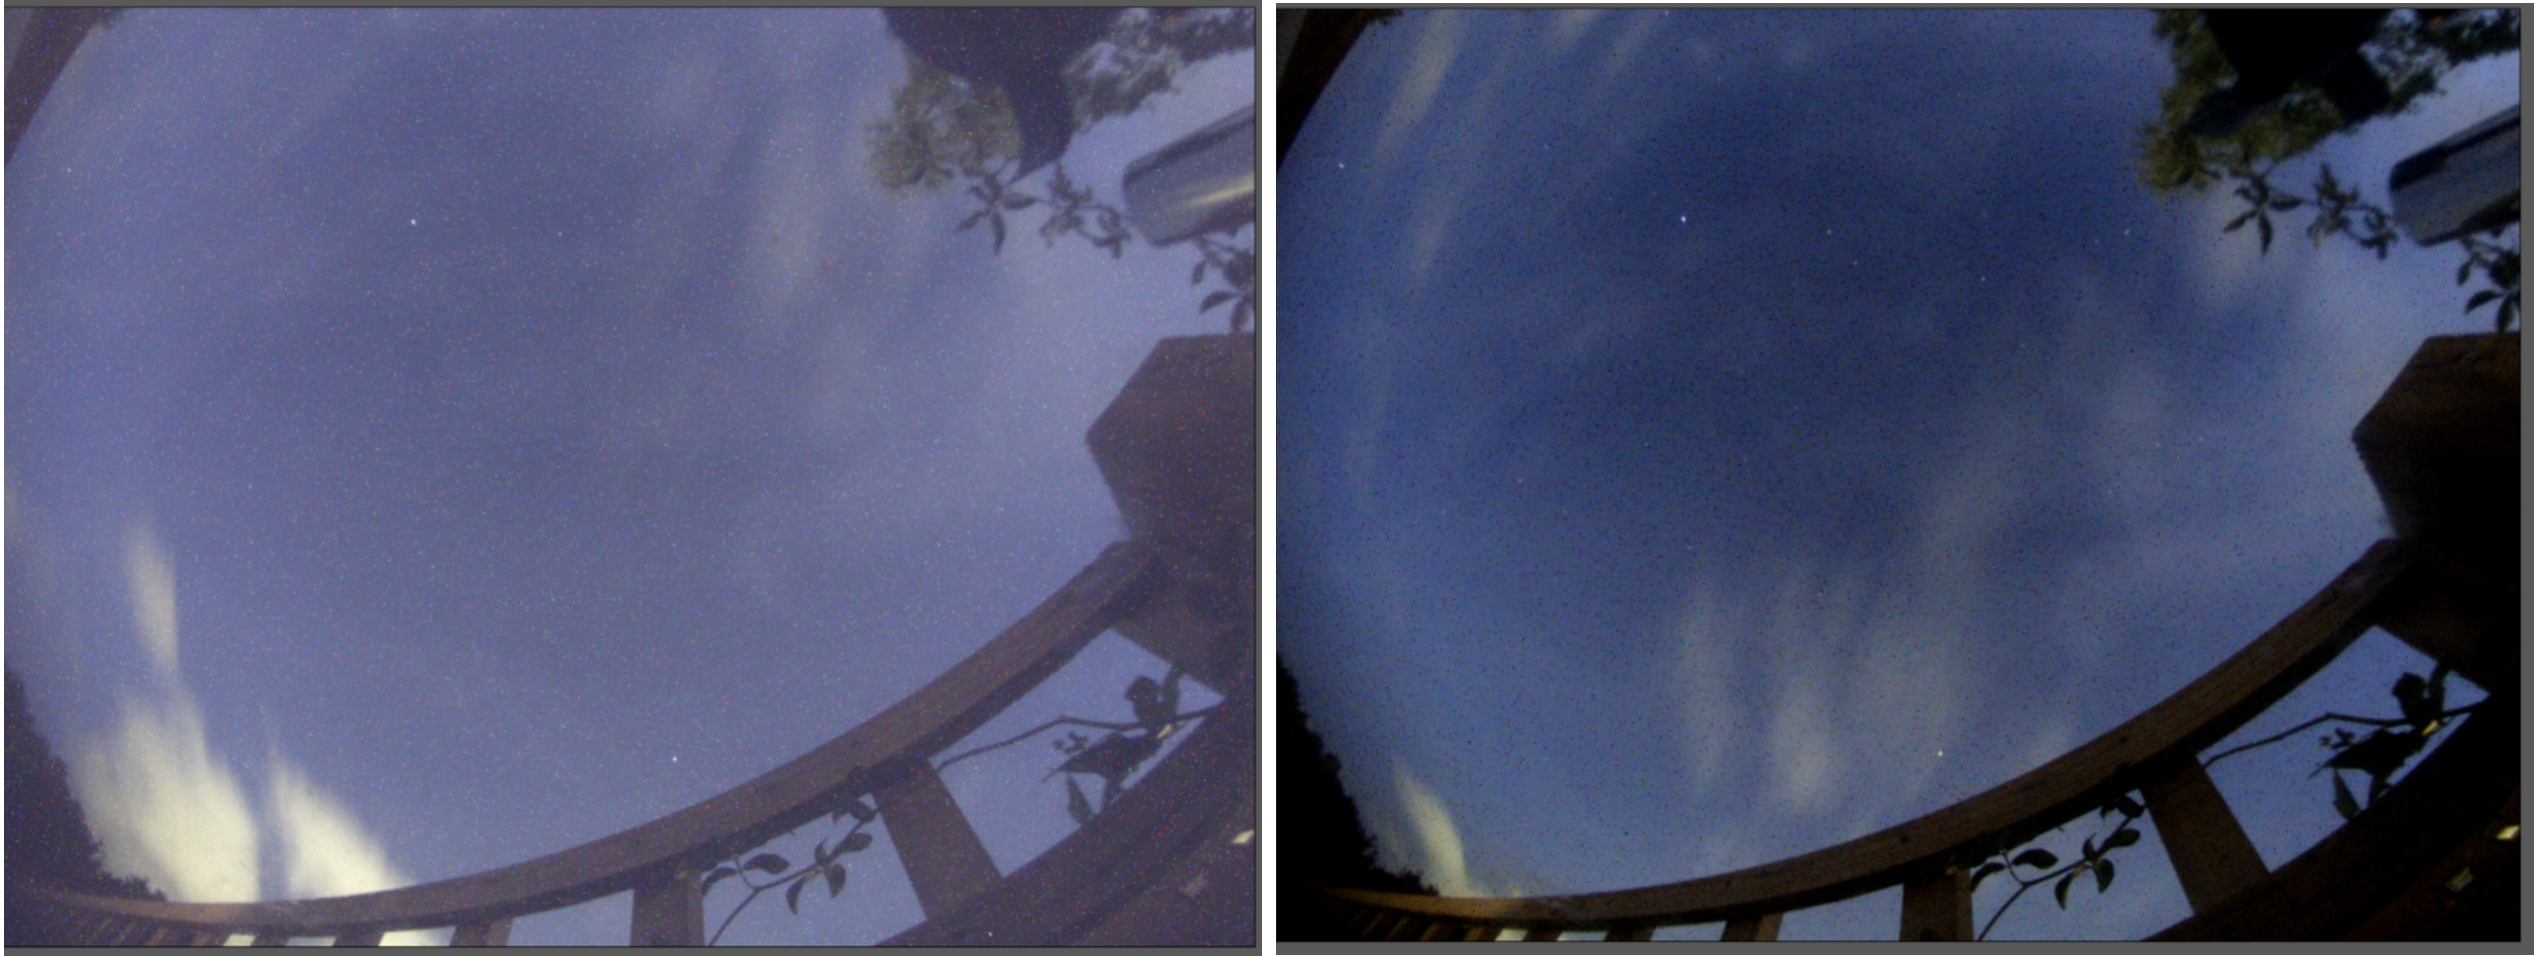
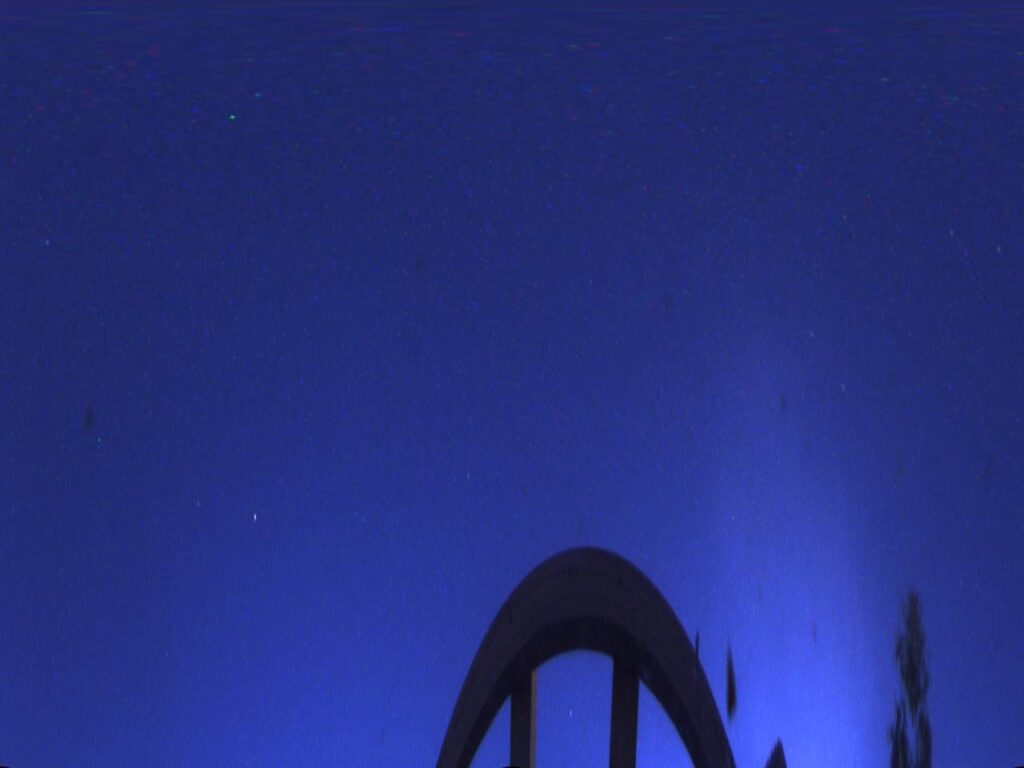
We also took darks on the ASC and applied them since we had never bothered to do it before. The shot below shows the before and after effect of applying the dark/bad pixel map. The whole image looks a lot cleaner and darker, although there seems to be some negative representation going on with dark pixels.
Before and after applying darks
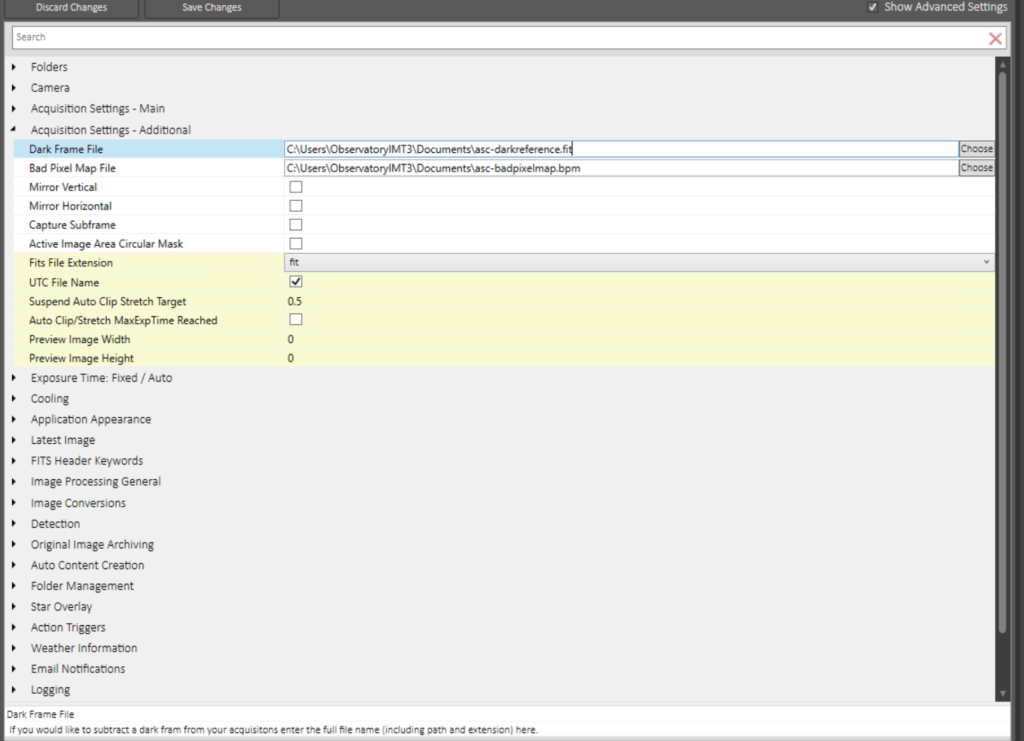
The setting that needed to be changed in the ASC software took GingerGeek a while to find.
ASC Setting to apply darks
During the daytime the ASC looked awful but remote the darkframe reference file and just applying the badpixel map seem to be better. Tonight’s set of images will show if this is better or not.
The only other odd thing that happened tonight was the dome closed without the safety setting it off. Not sure why yet ……
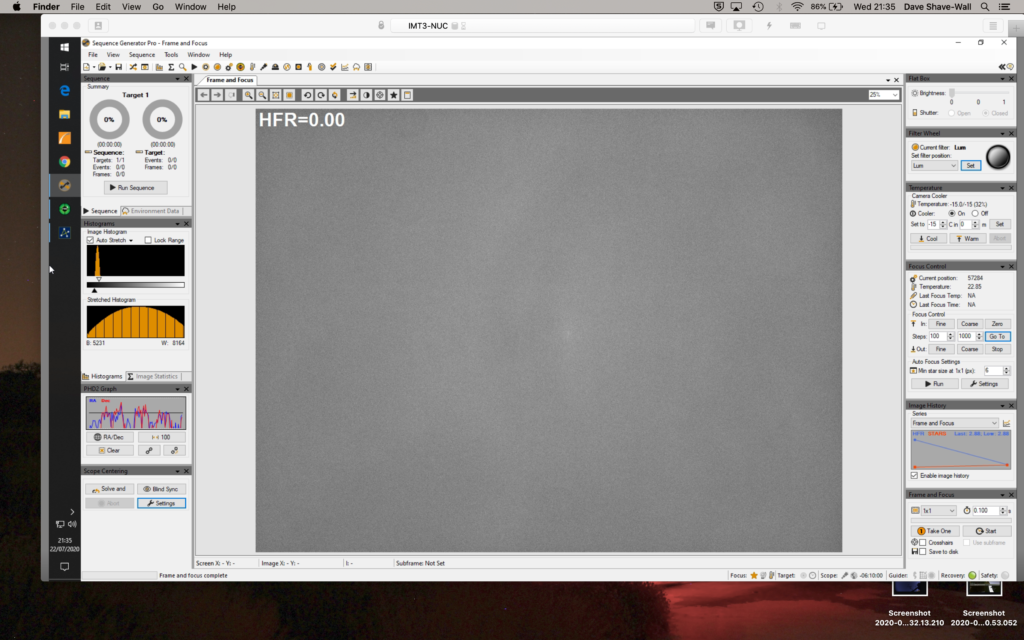
Esprit 120 FHR was 1.99 for Lum and 2.54 on the Ha
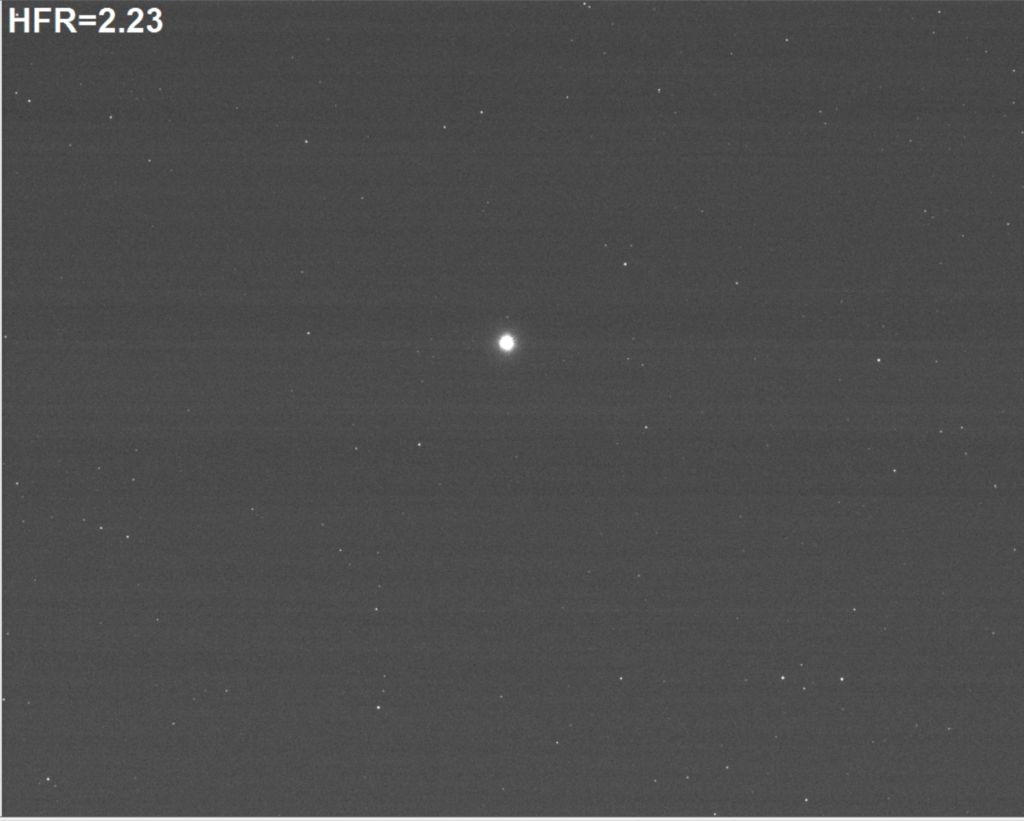
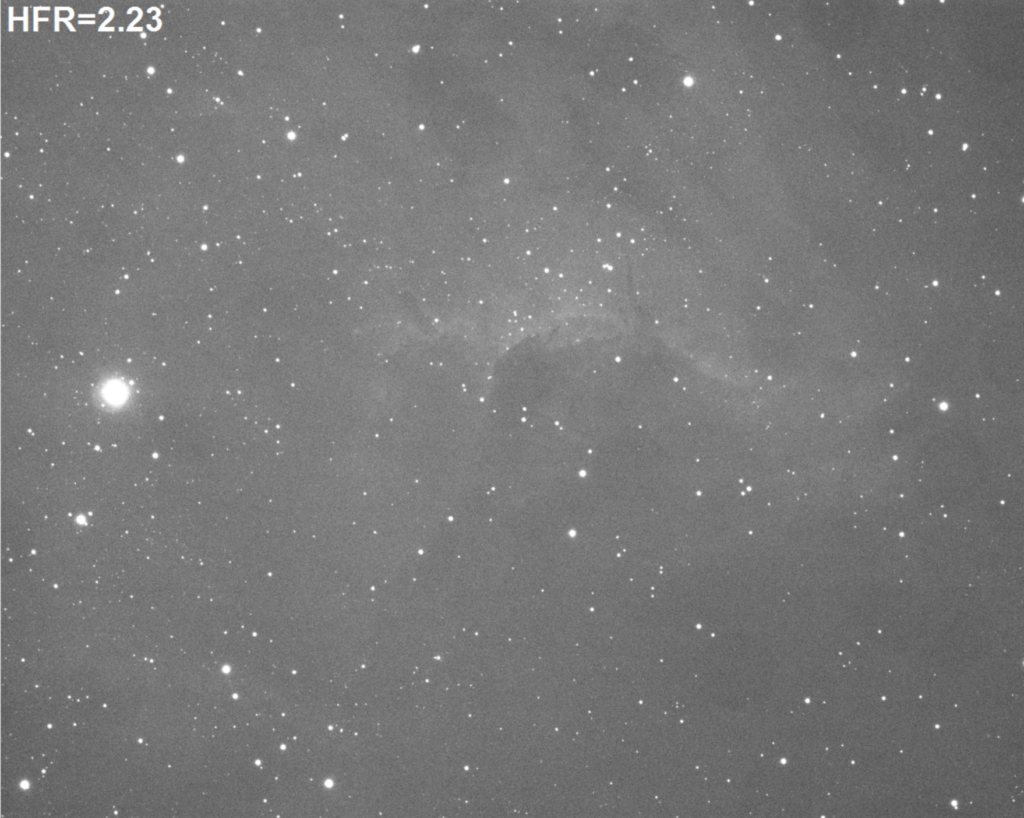
Focused on Deneb , 30 seconds exposure produced HFR 2.23
Deneb – 30 seconds in Ha
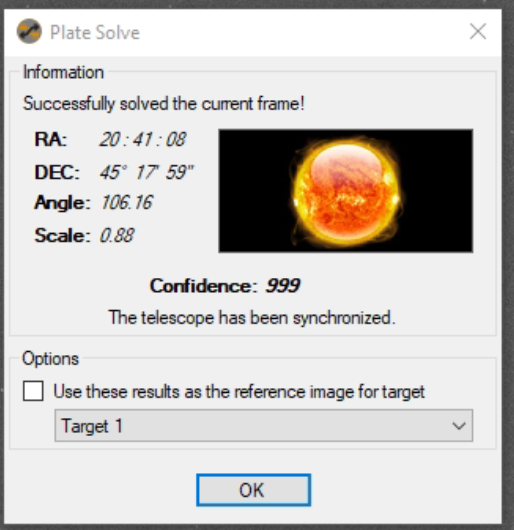
Solve and Sync
Solve and sync completed on Deneb in Ha
The focus point for Ha was 6217
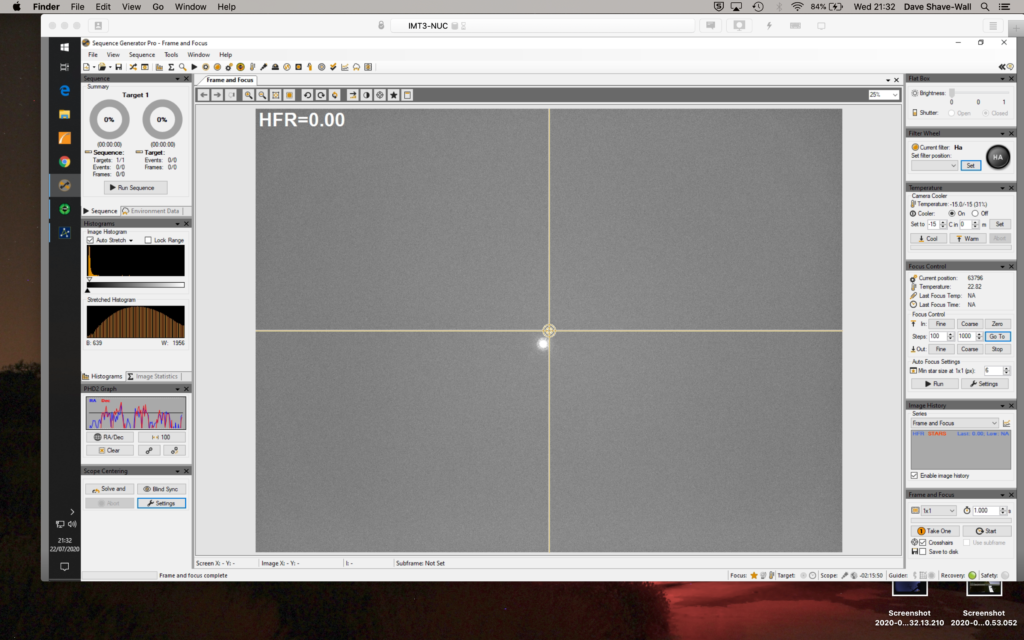
Now for a quick frame and focus, 30 seconds exposure
30 seconds Ha on Pelican as Frame and Focus test
That looked good, next up was to see if we can image for 5 minutes unguided and see what the resulting image looked like
300s Ha Pelican
Again the resulting image looked very good and no star trails
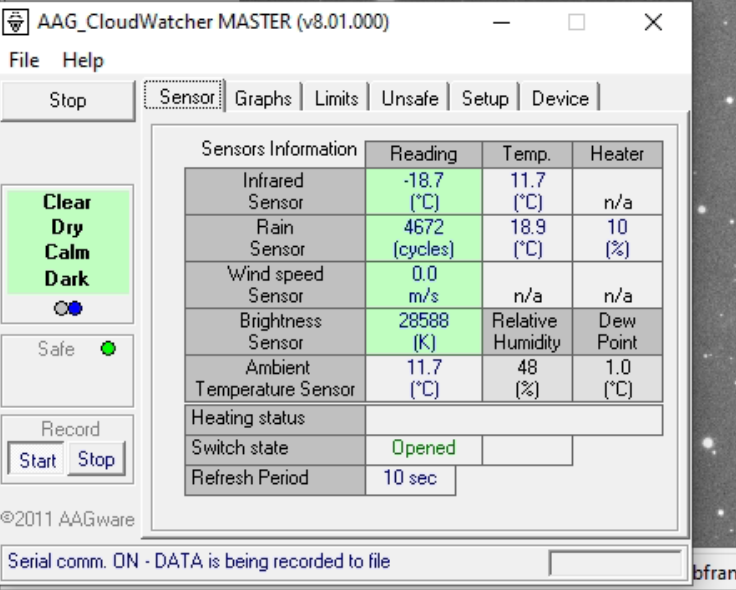
Clear skies with -18℃ measured by the Infrared sensor on the AAG Cloud-Watcher.
AAG Infrared sensor read -18c so zero clouds
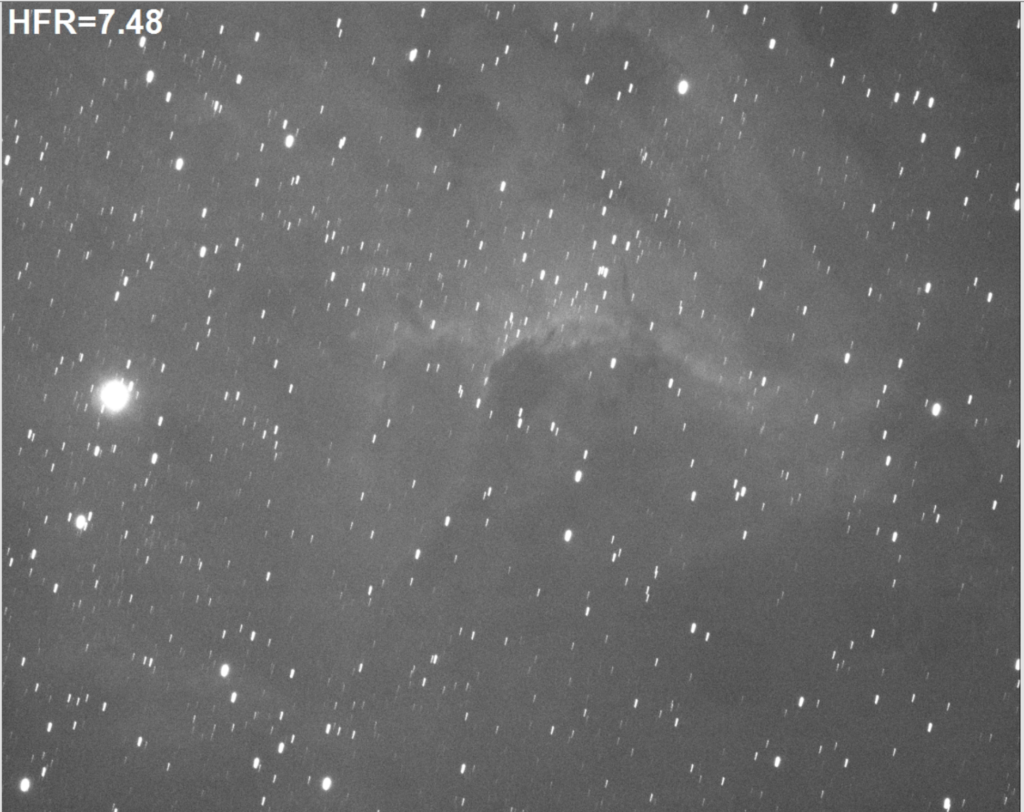
I then tried a 10min image but got clear trailing.
Star trailing at 10 minute exposure
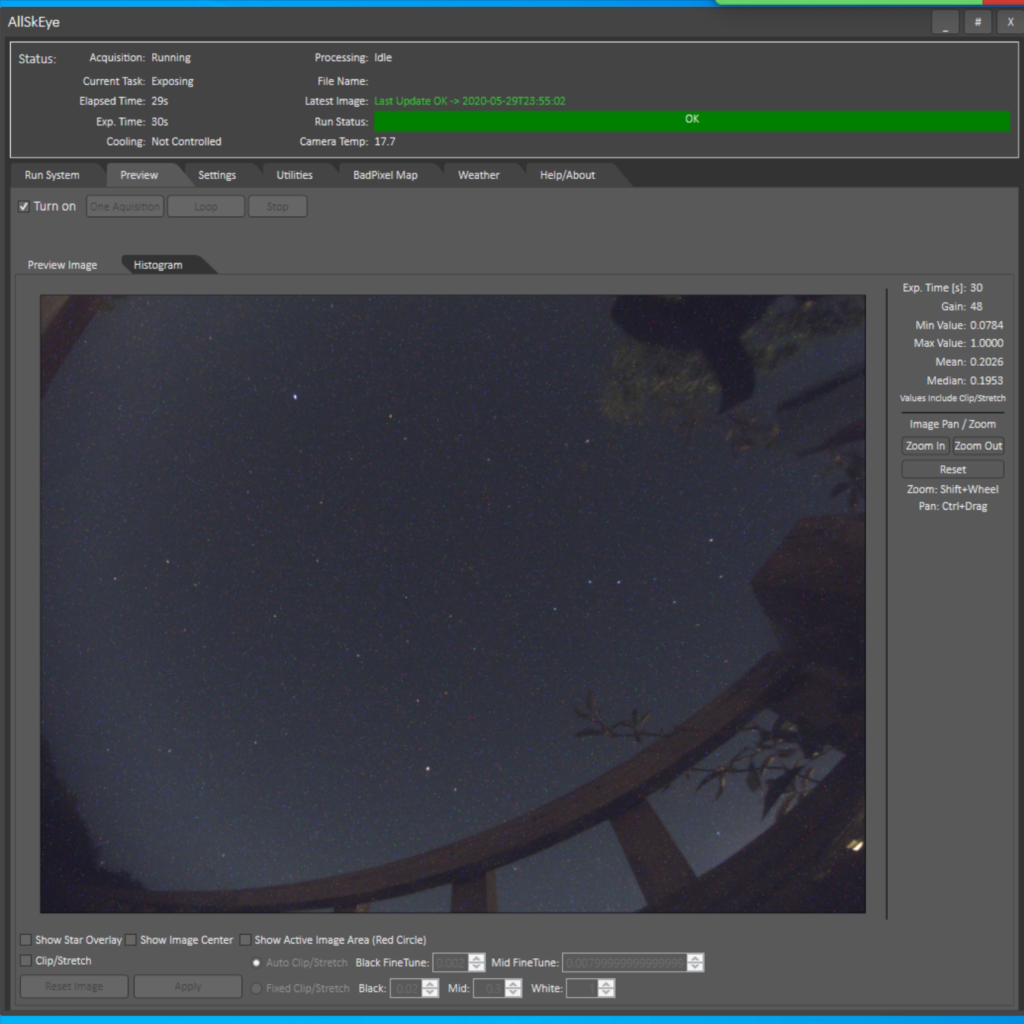
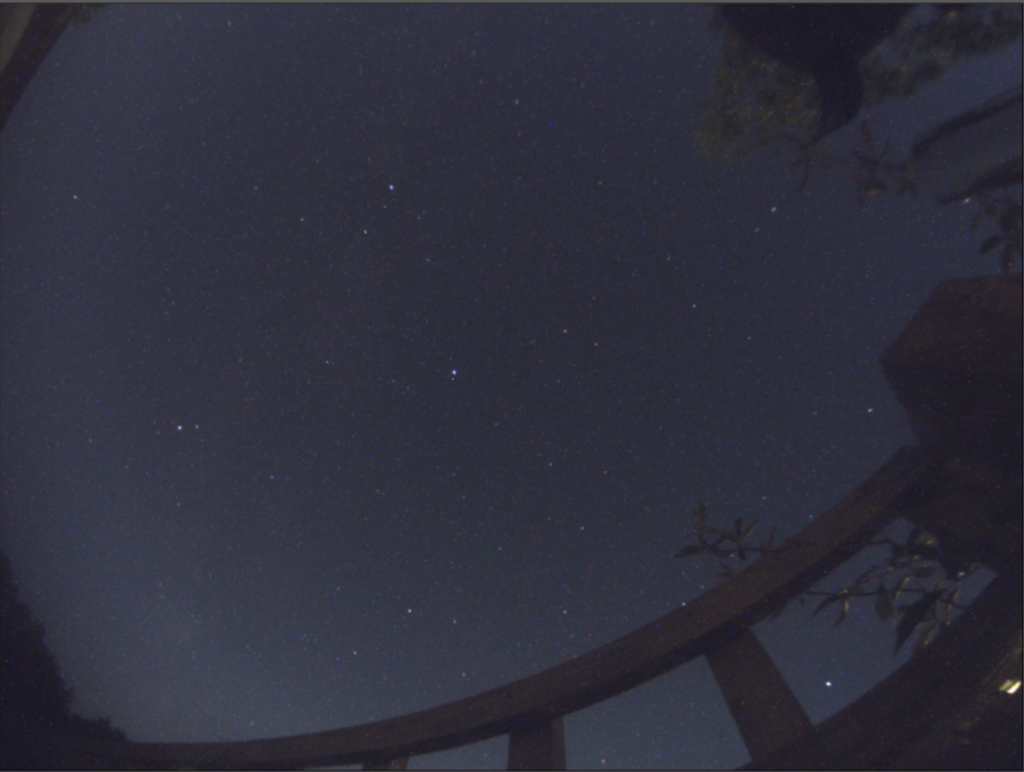
So I set the guiding up with PHD2, went out to the dome and created a dark library as this was not done. I then set about training the guider and then set it running, initially with a 4 second exposure. The resulting guide graph looked a bit bumpy. The ASC looked very clear this evening which was the first time in a while. You could see stars to the left hand edge of the image which is normally obscured by cloud.
ASC Clear skies
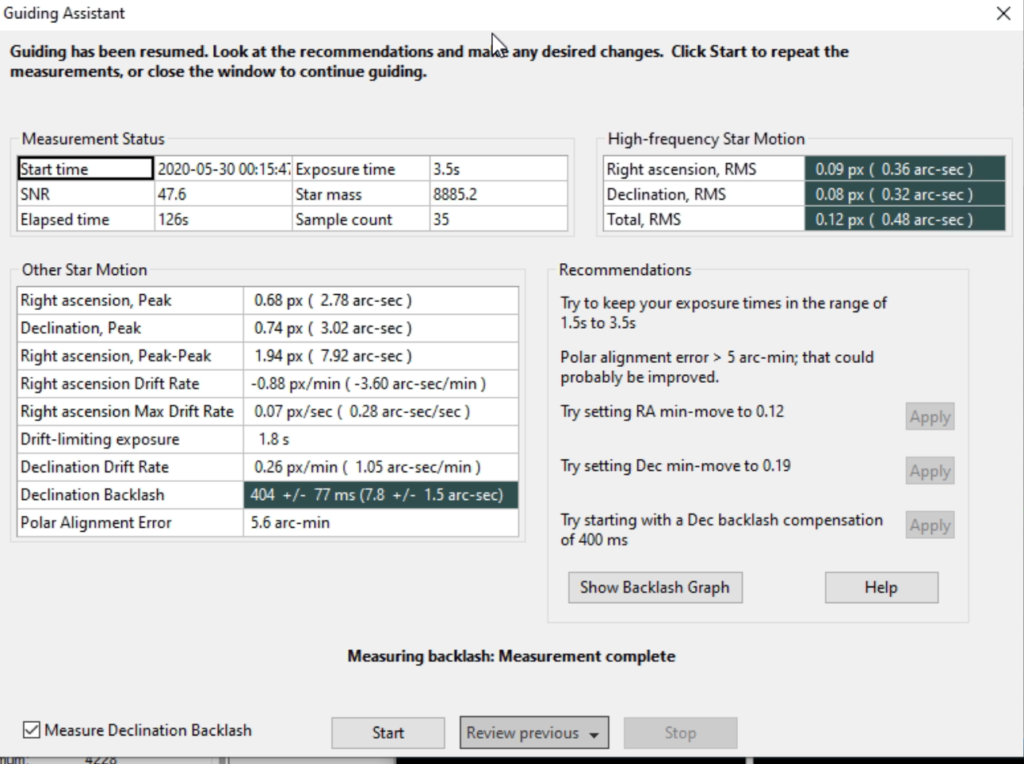
We decided to run the guiding assistant in PHD2 and see if there were any changes that needed to be made. It came up with some suggestions including redoing the calibration and changing the calibration step size from 1600 to allow more steps in the calibration, in this case I changed to 1200 to try and go from 3 steps per axis to 8, however I got to 6 steps and this seemed good enough. When I then reran the guiding assistant I no long got the error about calibration. I did have a few suggestions as seen below which I applied.
Guiding Assistant recommendations
So the changes made still have not allowed 10mins images, they are still trailed. So that I do not waste any further time this evening I captured 5 minute images instead of 10 minutes and I will relook at the guiding next week when the Moon get brigheter.
At 1:38 we gave up on guiding and switched to 12″, Autofocus on Lum, 63384 HFR 5.4. Took some 5 minute and a single 10 minute frame guided, scope trailing ?
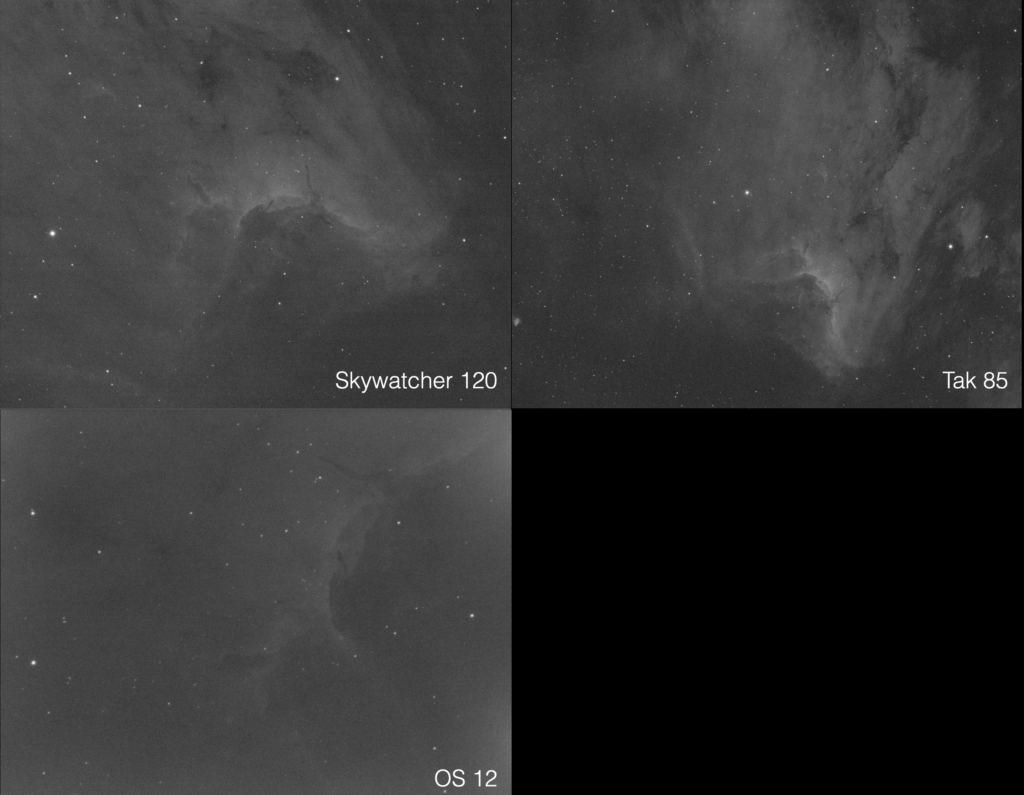
There were three scopes on the Pelican Nebula (IC5070/IC5067) tonight as GingerGeek was imaging with the Tak FSQ85 from his back garden.
3 Different image scales from tonight
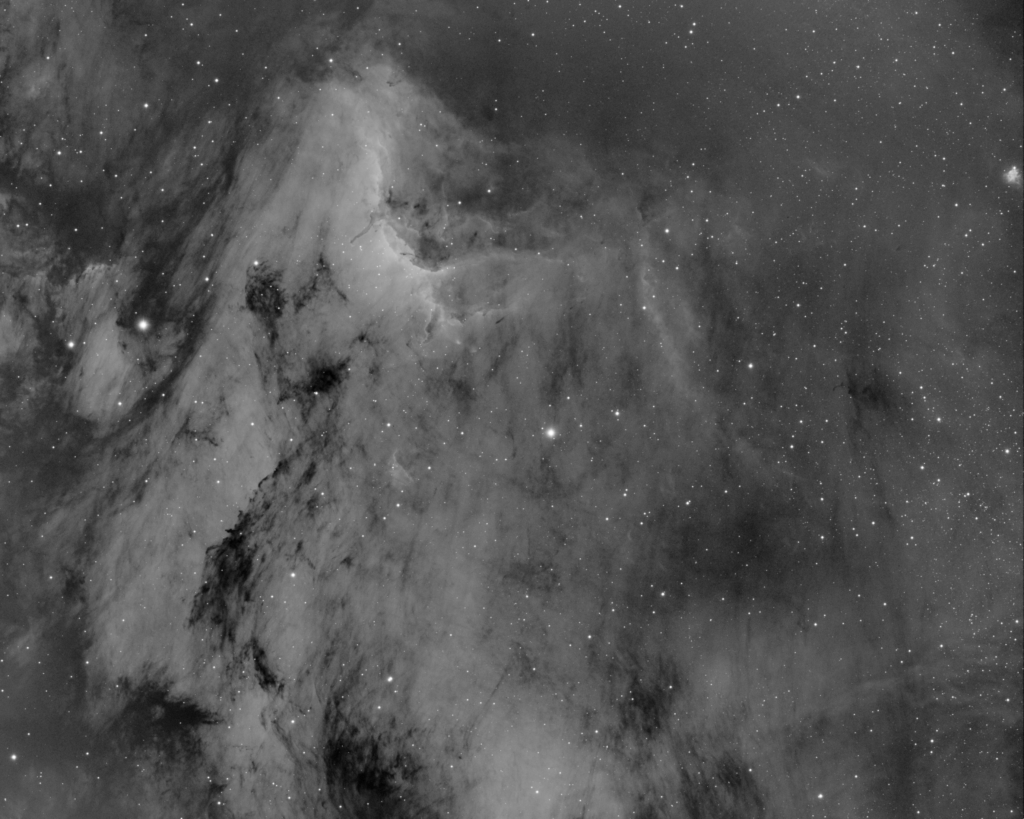
Finished to go to bed at 2:56 am, GingerGeek finished the session by taking flats, warming up the CCD and bringing the scope indoors just after 3am.
Rough stack of Ha (5nm) 10×600 seconds, -15℃ From the FSQ85
Opened dome at 4pm to start cooling the 12″, but actually started to play by looking at guider on the 12″ at 9pm. The guider had never really produced round stars and I suspected this was due to it not being pushed all the way in, far enough to be in the sweet spot for focus.
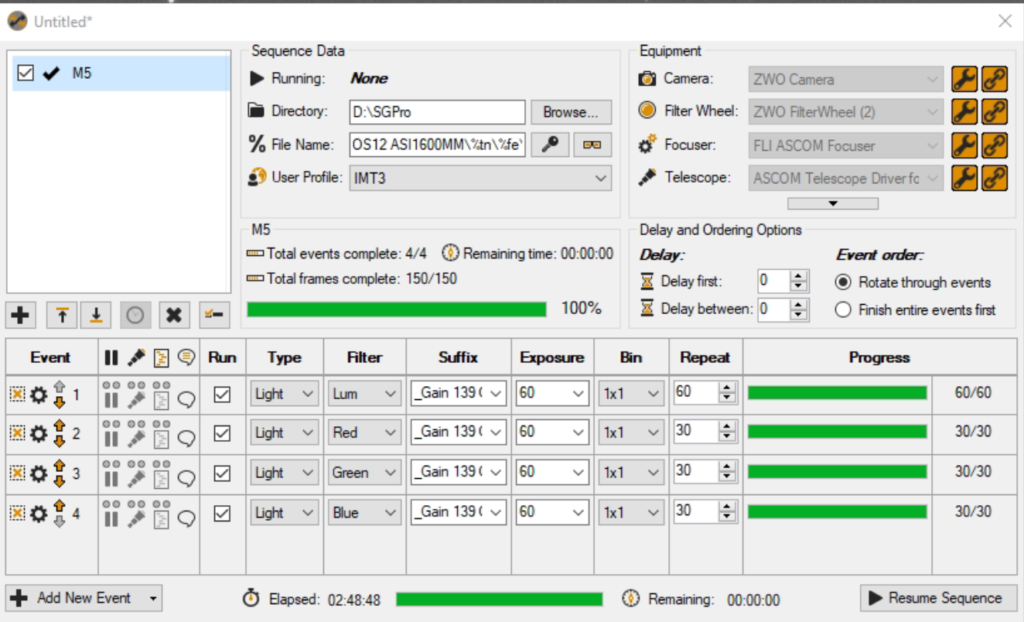
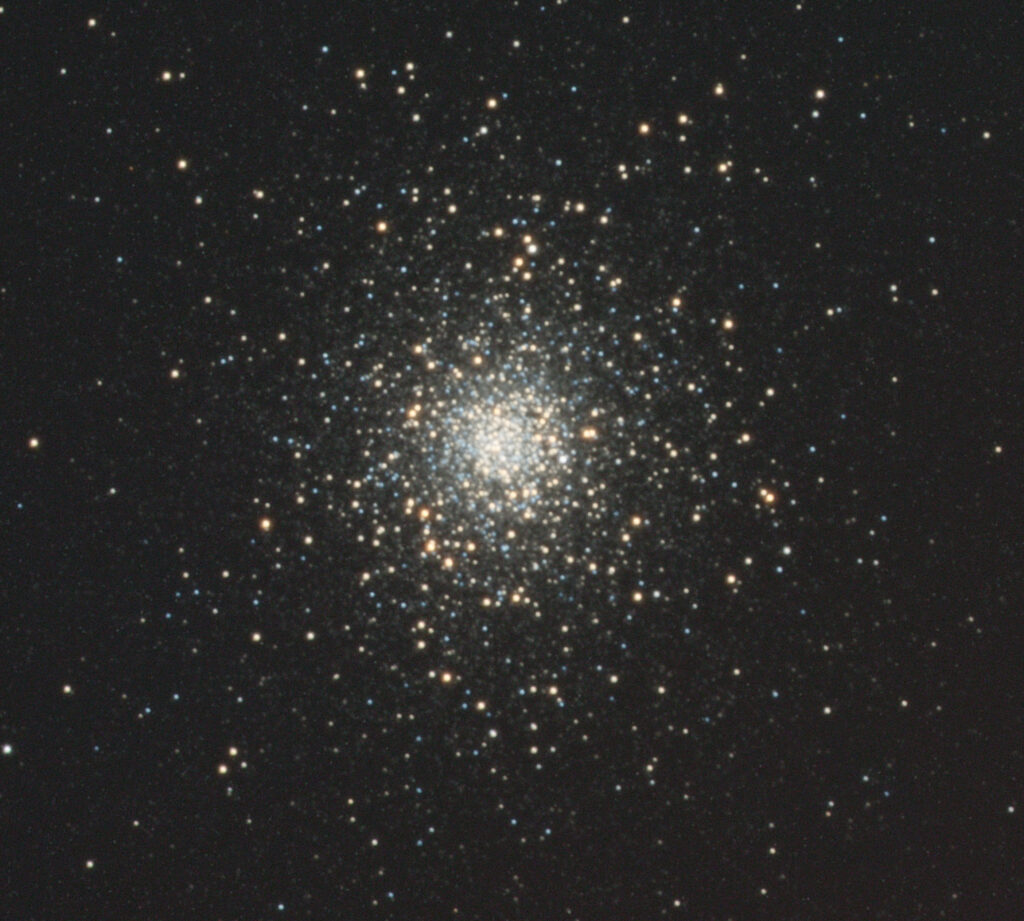
So I took off and adjusted with a spacer of which I had many in different thicknesses. I found the ideal one to fit that would allow the filter wheel Now round stars. Given high cloud I have set running on M5 LRGB, 60 x 60 seconds L / 30 x 60s RGB. Not guiding. Gain 139 Offset 21. Cooler -15. to rotate far enough that it did not fowl the guide camera, which until now it had. Now this was done, it was time to test.
Round guider stars
The images were much better, the stars tight and round. I also changed the rotation of the guider so that its chip was square to the rectangular whole in the light pickoff shaft.
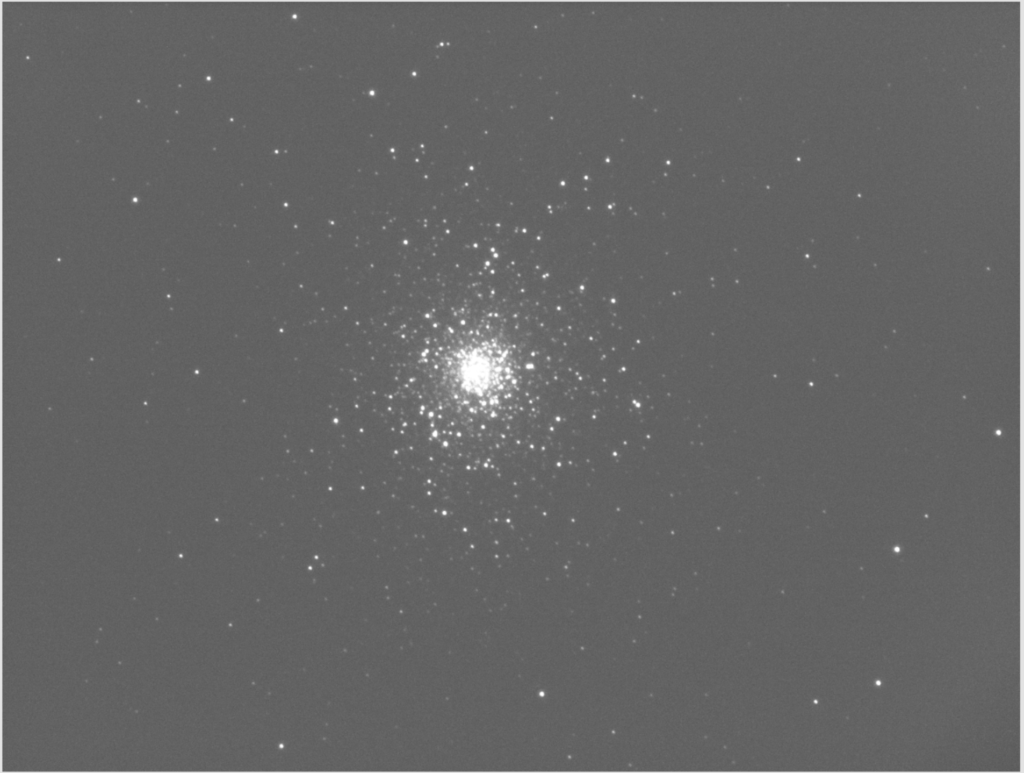
Stretched M5
So now that was achieved I went off to image M5, but without the guider as I could not find a guide star……..typical. I chose M5 as we have some frames from a previous night in May but focus was not as good as tonight and the ADU was too high. I left the scope running 60 x Luminance and 30 x RGB and went to bed.
Images captured for M5
Addendum. The dome shut when the Sun started to rise which is fantastic and working as designed. What is not is the AAG must have hung and although I could see in Windows Task Manager it was nowhere to be seen, not in the icon tray or open as a window. Also I forgot to keep the dome log open in TSX so could not see the time stamp of closure. I will have a check list for the next night out. Also I now realise the pick off mirror obscuring the corner of the camera chip for the main camera so I need to either move where the light is picked off from or move the mirror out slightly without effecting the focus.
OAG Pick off mirror obscuring main camera in corner
I have also now started to process the image and on close inspection to the frames I can see the cloud moving across in the Red channel. Here is the results for the processed image.
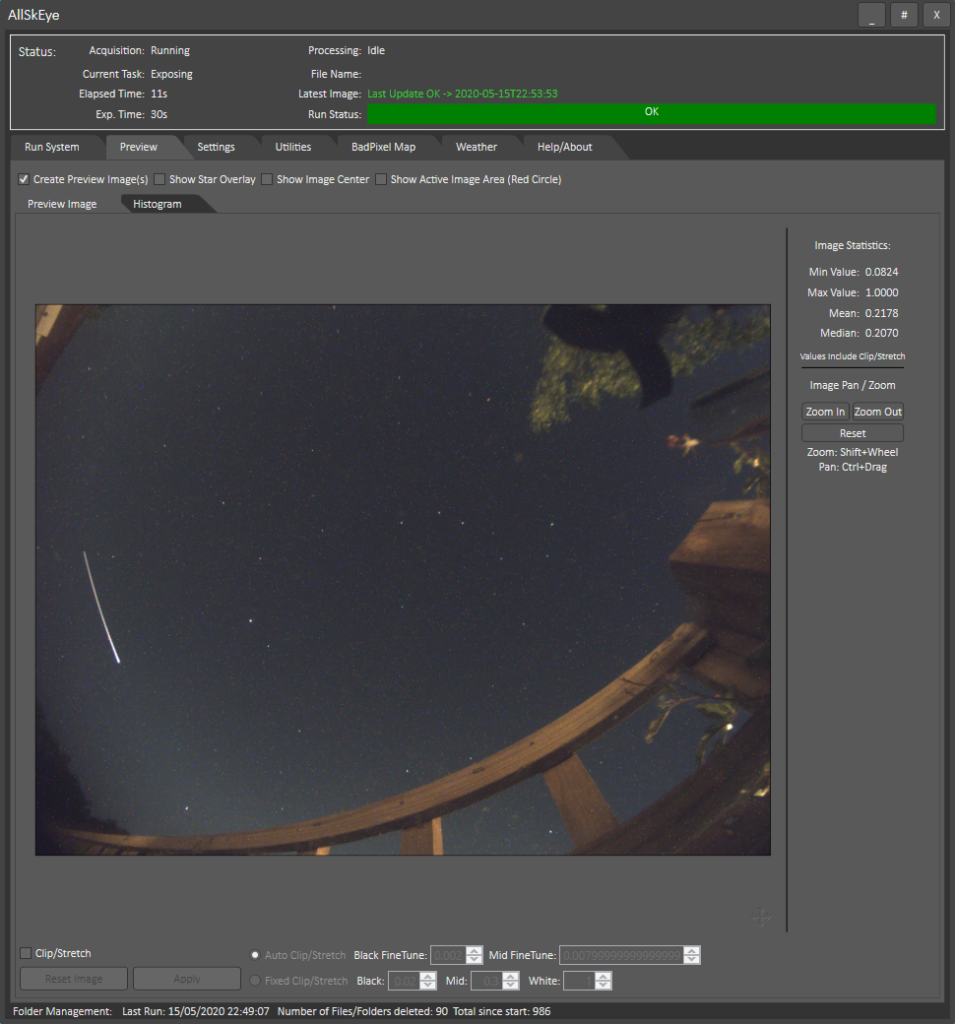
So for a short period of time we had settled on using AllSkyEye. Recently we noticed that the author had issued a Kerogram and stretched horizon generate of the latest image but only available in a new Pro Edition.
The Pro edition was only £20 for a 3 user license, the author gives this purchase as a donation to the charity of his choice – good man ! So now we have AllSkyEye Pro in use at the IMT2 and IMT3 domes.
Latest Image with custom text overlays
Latest Image Horizon Projection
A Keogram is an image composed of slices taken from images in a sequential time order.The slices (which are always taken from the same location and with the same shape) are stitched together to form an image displaying a timeline of the selected part of the image as shown below.
Keogram
We still have the dark map to take to remove the hot pixels from the image but at the moment it gives us a nice view remotely before we decide to open the dome – that’s if the AAG Cloudwatcher limits agree and it thinks it’s safe to do so of course !
Bob noticed we had our local security guard aka Fluffy watching over his night’s imaging and turning to watch an ISS pass.
Fluffy stands guard at the weather station as the ISS passes over
Just setting up for an imaging run and to test imaging without temp compensation to see if the 12″ keeps focus without it. I started by myself then was joining by GingerGeek and then Bob.
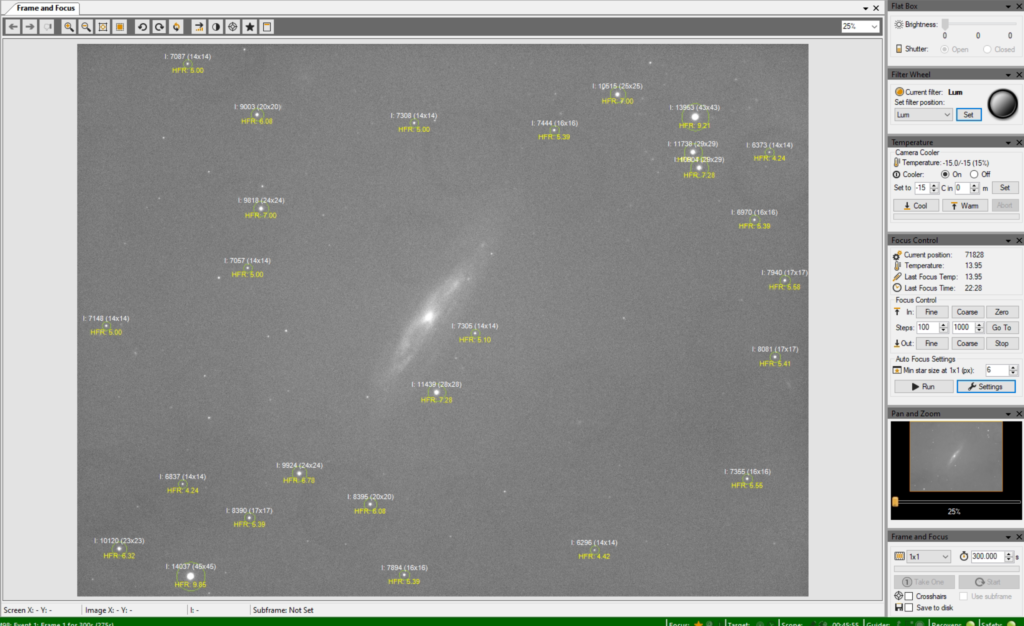
Performed a SGPro autofocus run on Mag 7 star produced focus position of 71,828 @ 4.6 HFR at 14.47℃.
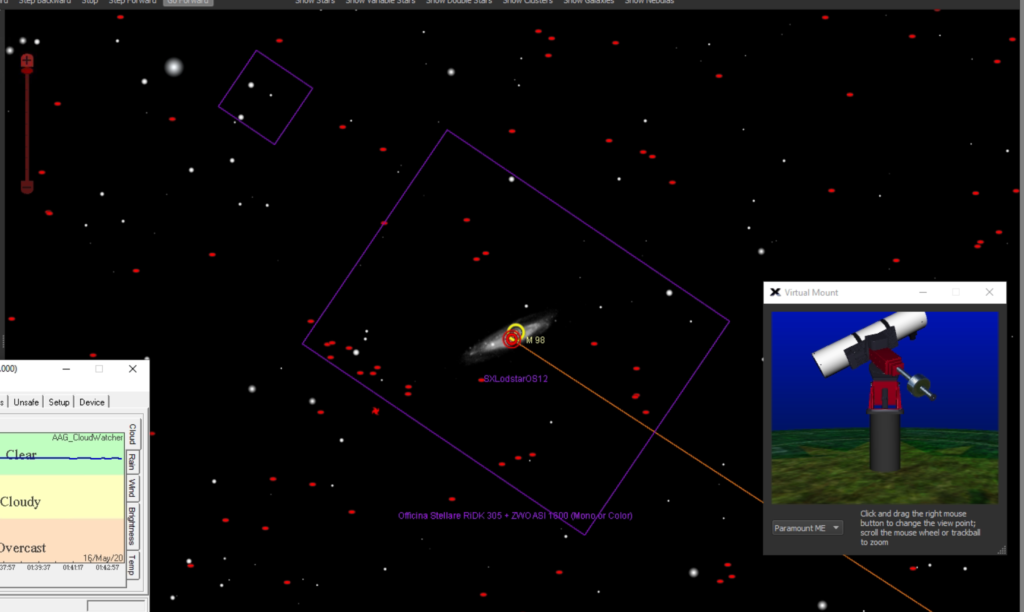
1st autofocus runResulting M98 image from 1st autofocus run
The resulting image was good with good star shapes. Although I suspected at this point the seeing was not excellent.
I let the sequence run for a bit imaging M98 through LRGB and then decided the HFR was gradually getting larger so I performed a 2nd Autofocus run which came in at position 72,215 HFR 5.7 at 13.97℃.
Again I let the sequence continue for at least 4 images and the performed another Autofocus run, note all the time this was on M98 and not slewing away to another star. This came in at focus position 72,697 @HFR 5.7 at 13.82℃.
I continued this routine again and performed another Autofocus run on M98 focus position 73,441 HFR 5.4 at 12.98℃.
I then decided, due to struggling to get a good HFR on focus runs to see if the autofocus was introducing an issue so I changed the autofocus setting from 9 data points to 11 data points to try and get fuller deeper curve. The resulting curve was better and more complete on both sides of the U shape. I then imaged further and then attempted an autofocus with the settings change for the step size from 2500 to 1500 and data points from 11 to 15. This was because I felt we always have a flatfish bottom to the autofocus which at this focal length of 2.5m shows the quality of the seeing with a narrower flat bottom being better seeing. The new autofocus came in at position 73,534 HFR 5.1 at 12.66℃. Meanwhile we kept noticing satellites going across the ASC which I now believe are potentially StarLink so very annoying.
ASC with Satellite
The new autofocus settings seem to work better. Anything less than 1500 step size would be less than the seeing, as proved tonight so I may find that 2000 is ideal, a test for another night. Also noted that Red filter was showing the worst HFR changes due to seeing and humidity was around 75%, again worthy of note to see how good the seeing is. The guiding was all over the place tonight, again another indicator of poor seeing. So all these things are not poor setup or poor software but poor seeing!
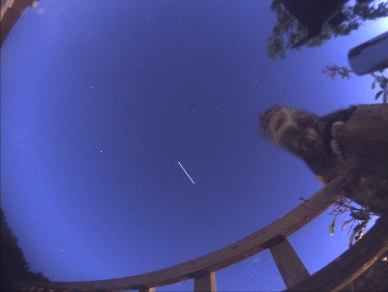
This I believe was the ISS going over captured in the ASC.
ASC and ISS
I was really pleased GingerGeek and I had spent time a week or so ago when the Moon was around working out the location of the Field of View (FoV) indicator on TSX, it makes it much easier to find a guide star, although tonight M98 had a couple strategically placed which was great.
FoV for Off Axis Guider and the OS main camera
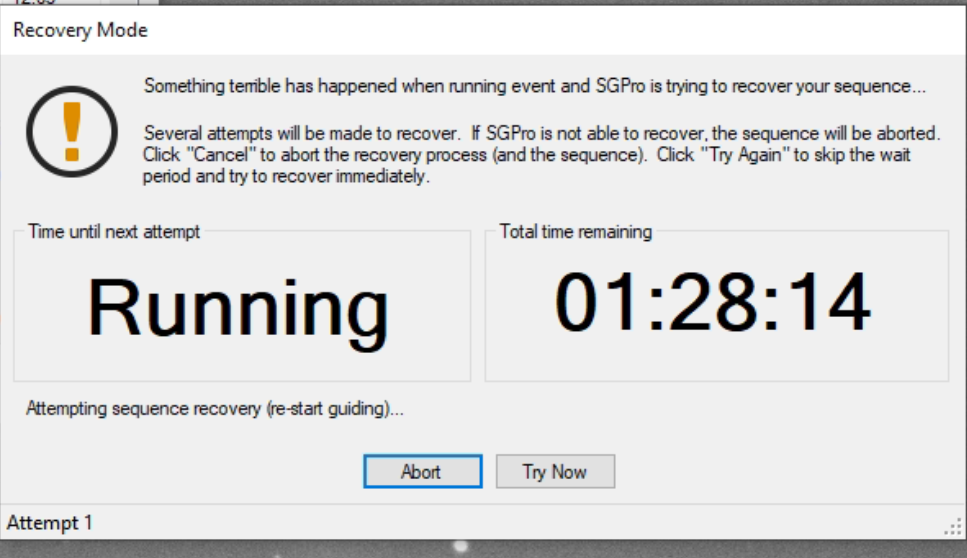
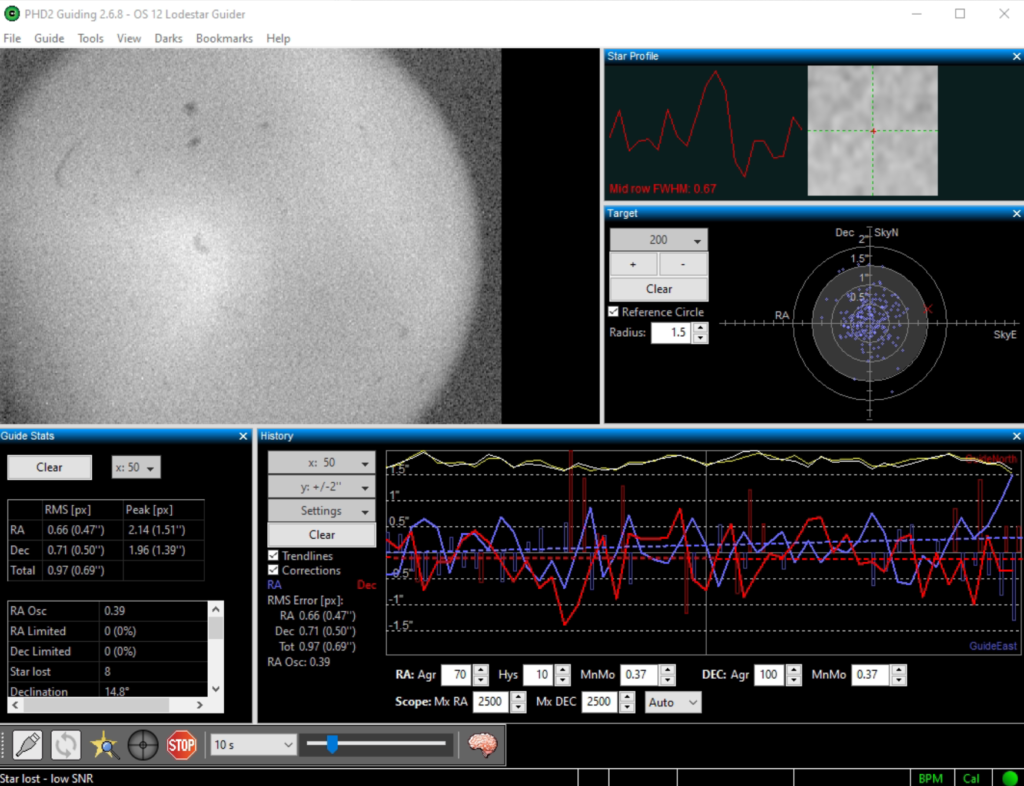
By 2pm the cloud had started to appear, first at South Winston with Steve’s setup, then at Mil Dave’s at Tadley and finally here some 15 minutes later. The guide star was lost by PHD and SGPro in a well ordered fashion did what it is really good at and stopped imaging.
SGPro can’t continue imaging due to guide star loss 🙂PHD2 and guide star loss due to cloud
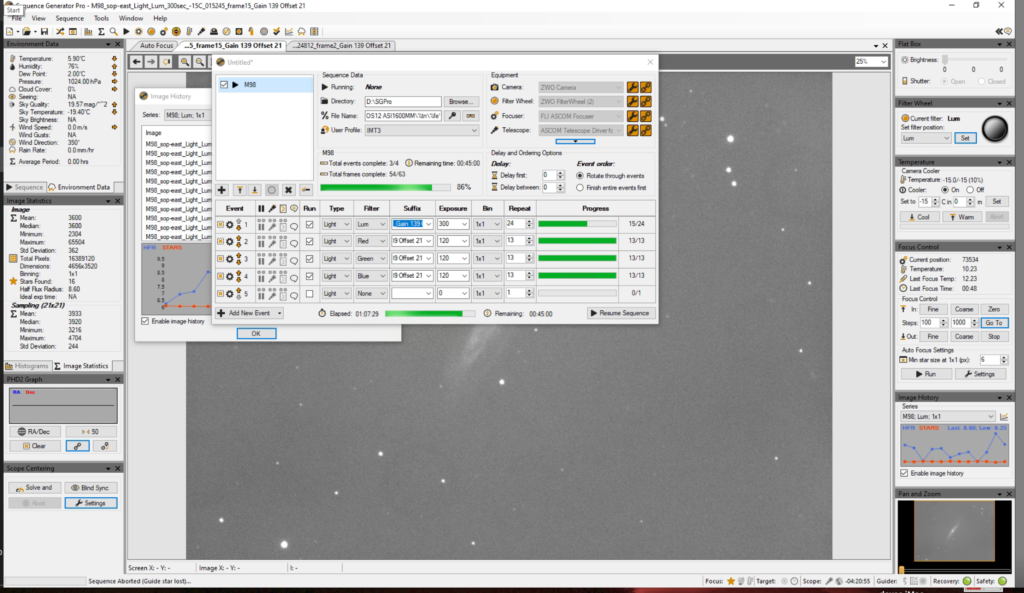
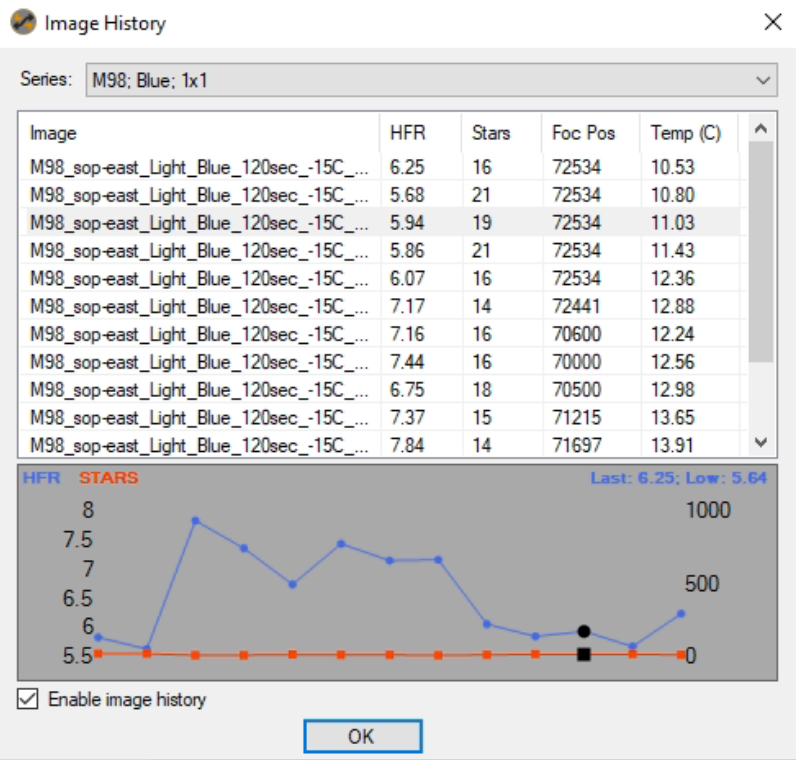
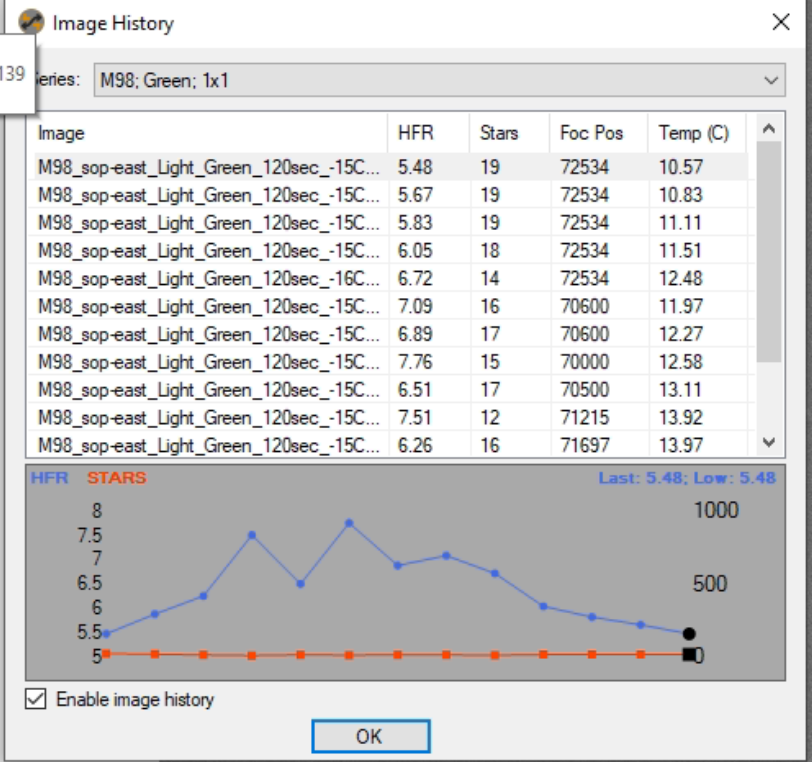
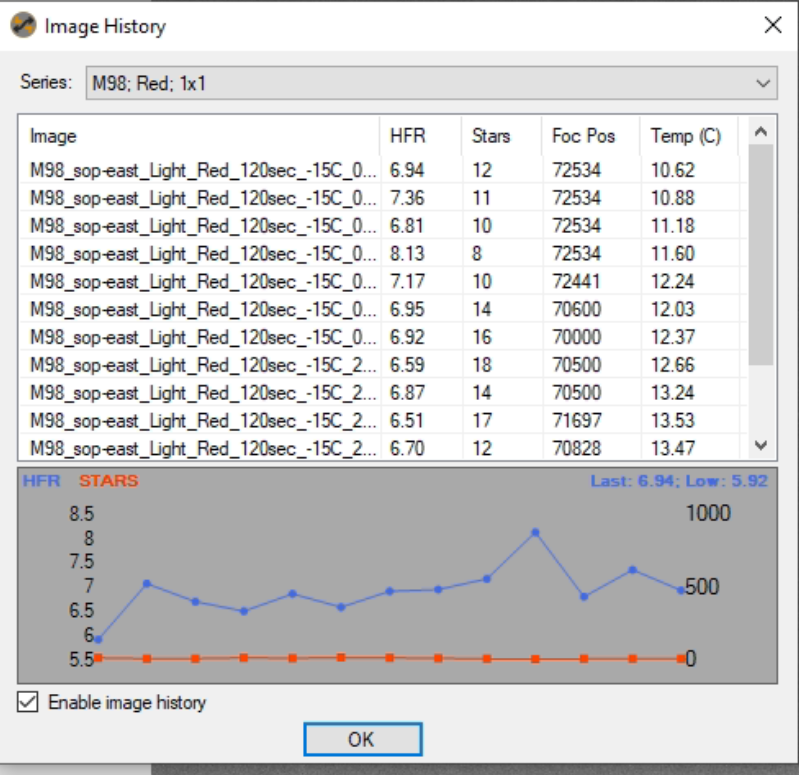
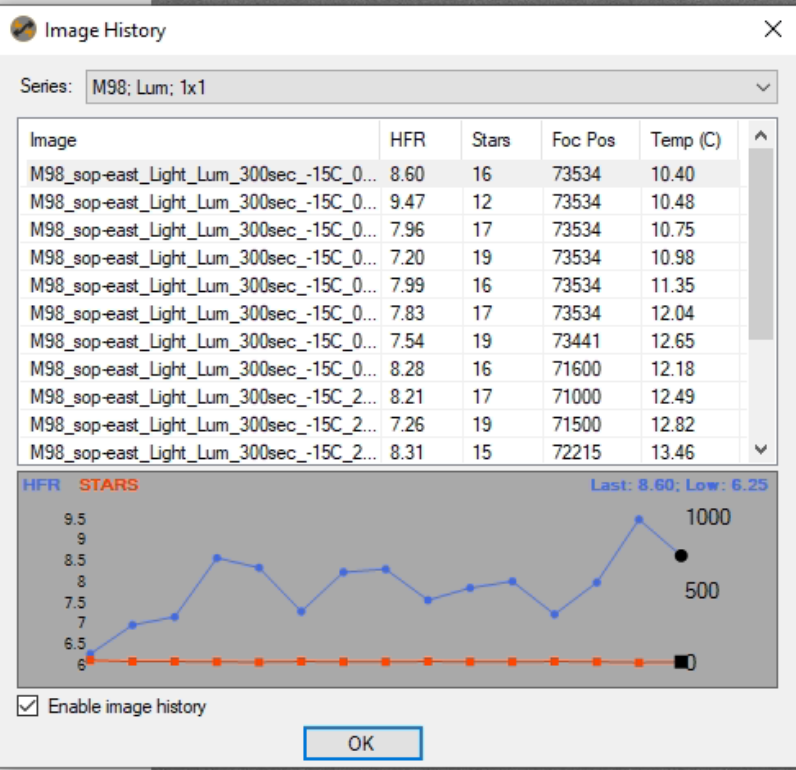
Here is where I got up to so LRGB on M98 for the night with 15 x Luminance and 12 x Red, Green and Blue was the original first image for each was there wrong exposure time, so RGB at 2mins and Luminance at 5mins. Very happy for an evening testing and gathering data at the same time.
Here is a set of image statistics charts for each filter for the HFR changing over the evening whilst I refocused. Next time I will focus once and not refocus and see what happens with the temperature drop.
Final look at the AAG weather station as the cloud sensor which is Infrared makes the dome unsafe and shuts it.
AAG Weather Station now Cloudy
Here is the final view from the ASC
ASC and cloud
and of course to finish the evening off another satellite!
At the IMT we were experiencing stability issues with the ZWO ASI120MC USB3 camera on the MAC/NUC so we decided to move it to it’s own Raspberry Pi4 (4GB) as a cheap experiment.
The Raspberry Pi4 has the advantage of improved networking and connectivity including USB3. One of the downsides of the RPi4 is the increased heat generated by the CPU which is mitigated by housing it in a FLiRC passive case to dissipate the heat and prevent thermal throttling.
Additionally in order to prevent SD card wear and improve the I/O throughput we configured the RPi4 just to boot off the SD card but serve the rest of the file systems from a SSD connected via USB3.
AllSky Camera Software
Using the open-source AllSky Camera project for ASI camera support we gain some advantages. The main advantage is that it’s open source (served via Git), provides an admin and public web portal which is addressed locally as http://allsky.local and the software can be set to start on system startup.
Admin Web Portal
The allskycam software can restart on system reboot but it can also be stopped/restarted via the web admin portal.
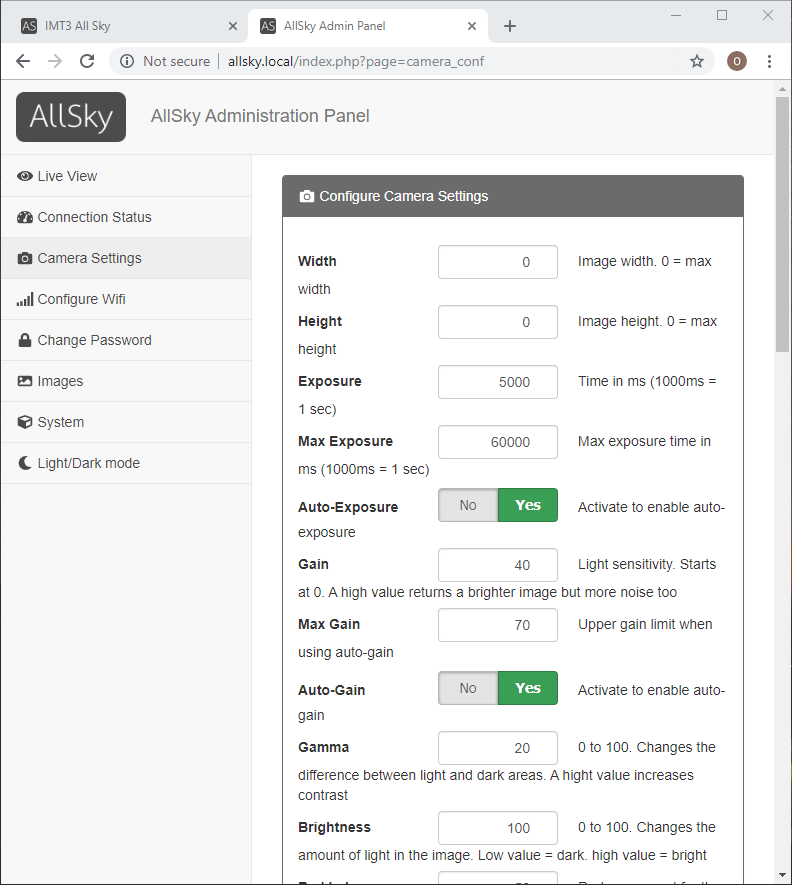
The configuration is simple and the mode/behaviour of the software can be controlled via the GUI or via a settings.json file from the command line.
Admin Portal – Camera Settings
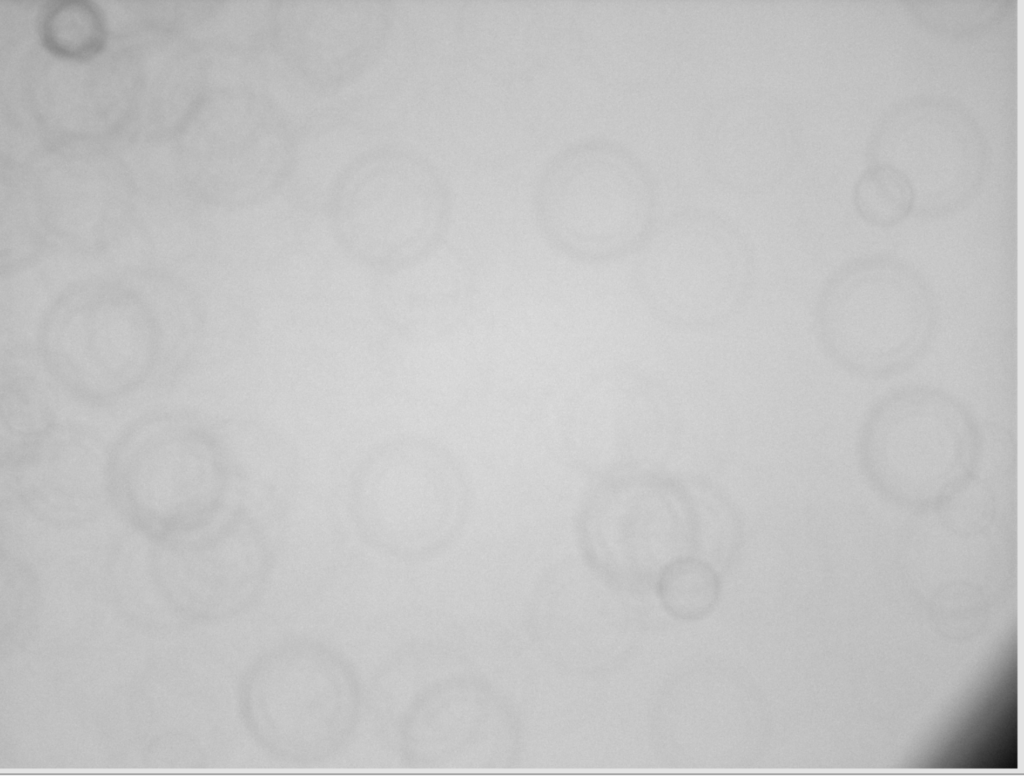
I recommend you take the time to create a dark reference image, again this is done via the GUI panel as long exposure frame will show extensive hot pixels.
RGB24 image hot pixels with no dark applied
Non Admin Web Portal
This is accessed via the address http://allsky.local/allsky-website and provides the latest captured image, a constellation overlay and the ability to view time-lapses and star trails.
Local network web site for non admin users
One of the nice features of the software is it’s ability to create a time-lapse of acquired images for the previous night. The following video shows the debayer issues as well as the dewing of the dome cover.
Time Lapse of evening showing dew issues/grayscale bayer
Bob is due to connect up the resistor ring he’s placed around the camera which hopefully should fix the dome dewing we encountered on the first night.
So it remains for us to fix and implement the following :
Resolve the lack of colour images (RGB24)
Image quality breakup
Resolve dark daytime images
Secure copy latest image/time-lapse to an external public website
Scale VirtualSky constellation overlay (180 degrees) down to 150 degrees
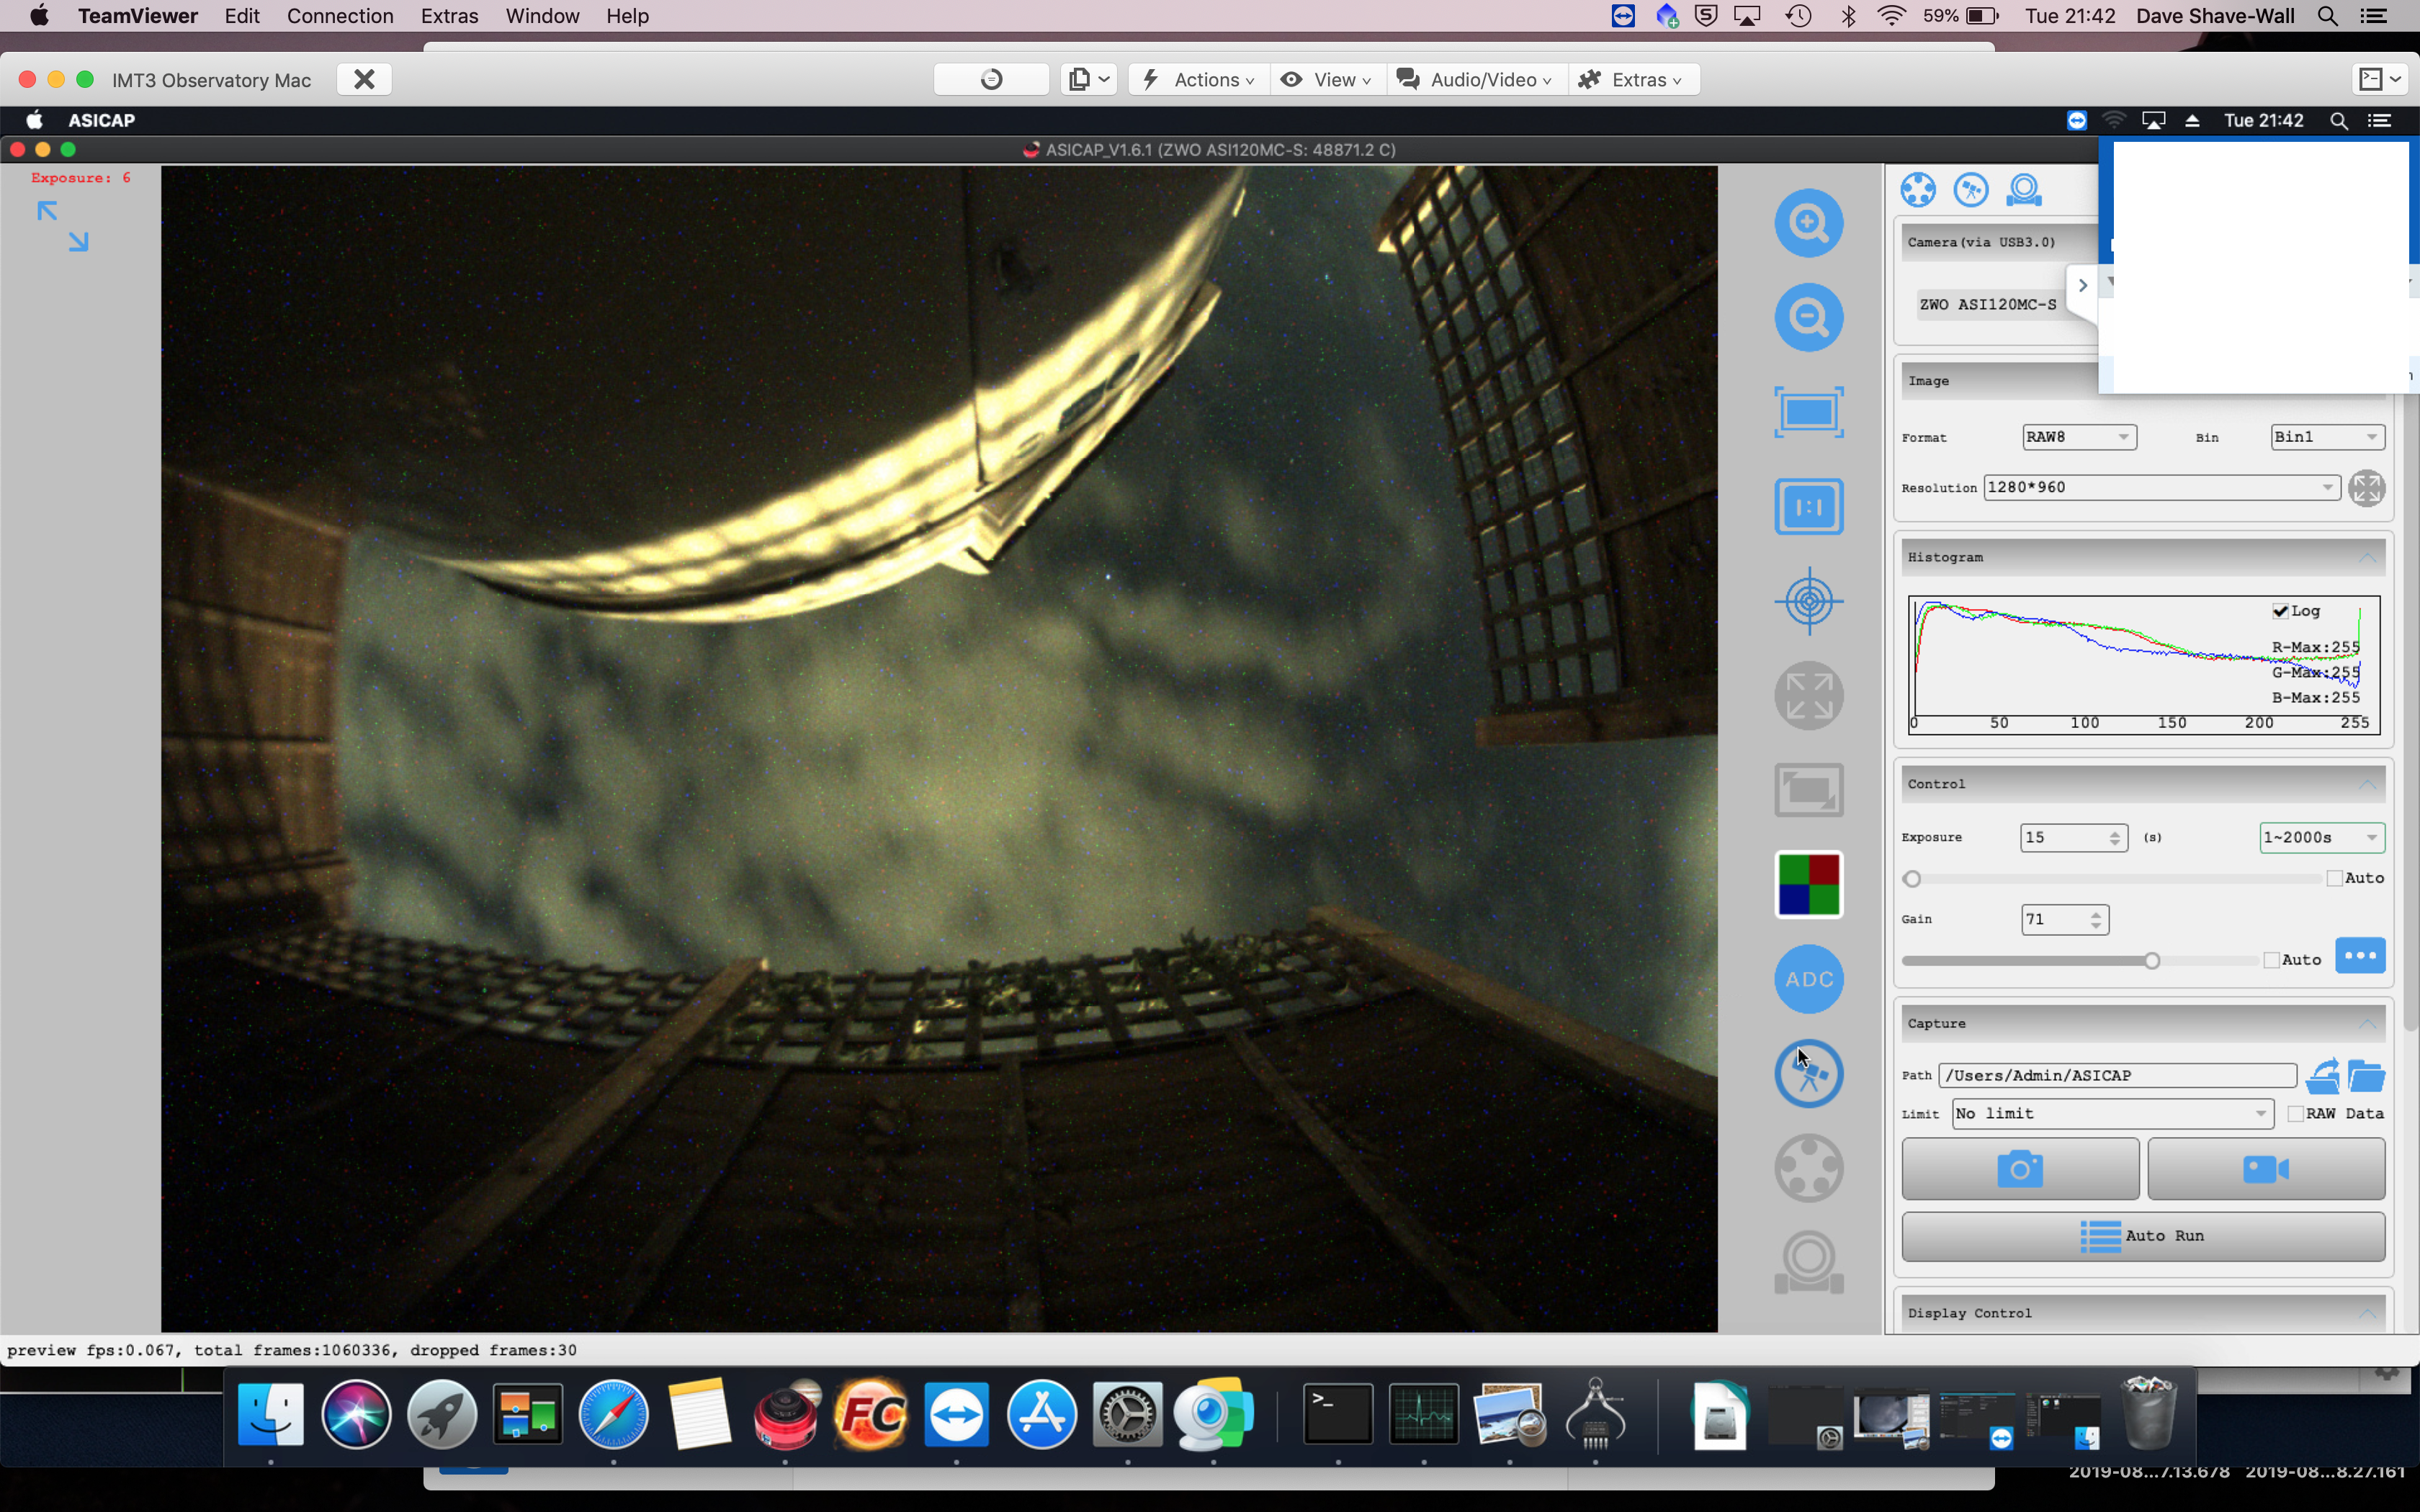
I find I notice some interesting things on the All Sky Camera, which is a USB 3 ZWO ASI120MC-S CMOS camera inside a purpose built casing and clear dome. Firstly I land up with beautiful clouds rolling past. I also noticed the light pollution as I mentioned in a previous post from the bathroom window upstairs. This image is when I had the camera on the ground by the observatory as I was testing the maximum length of powered USB I could get away with before data loss caused issues.
Bathroom light on
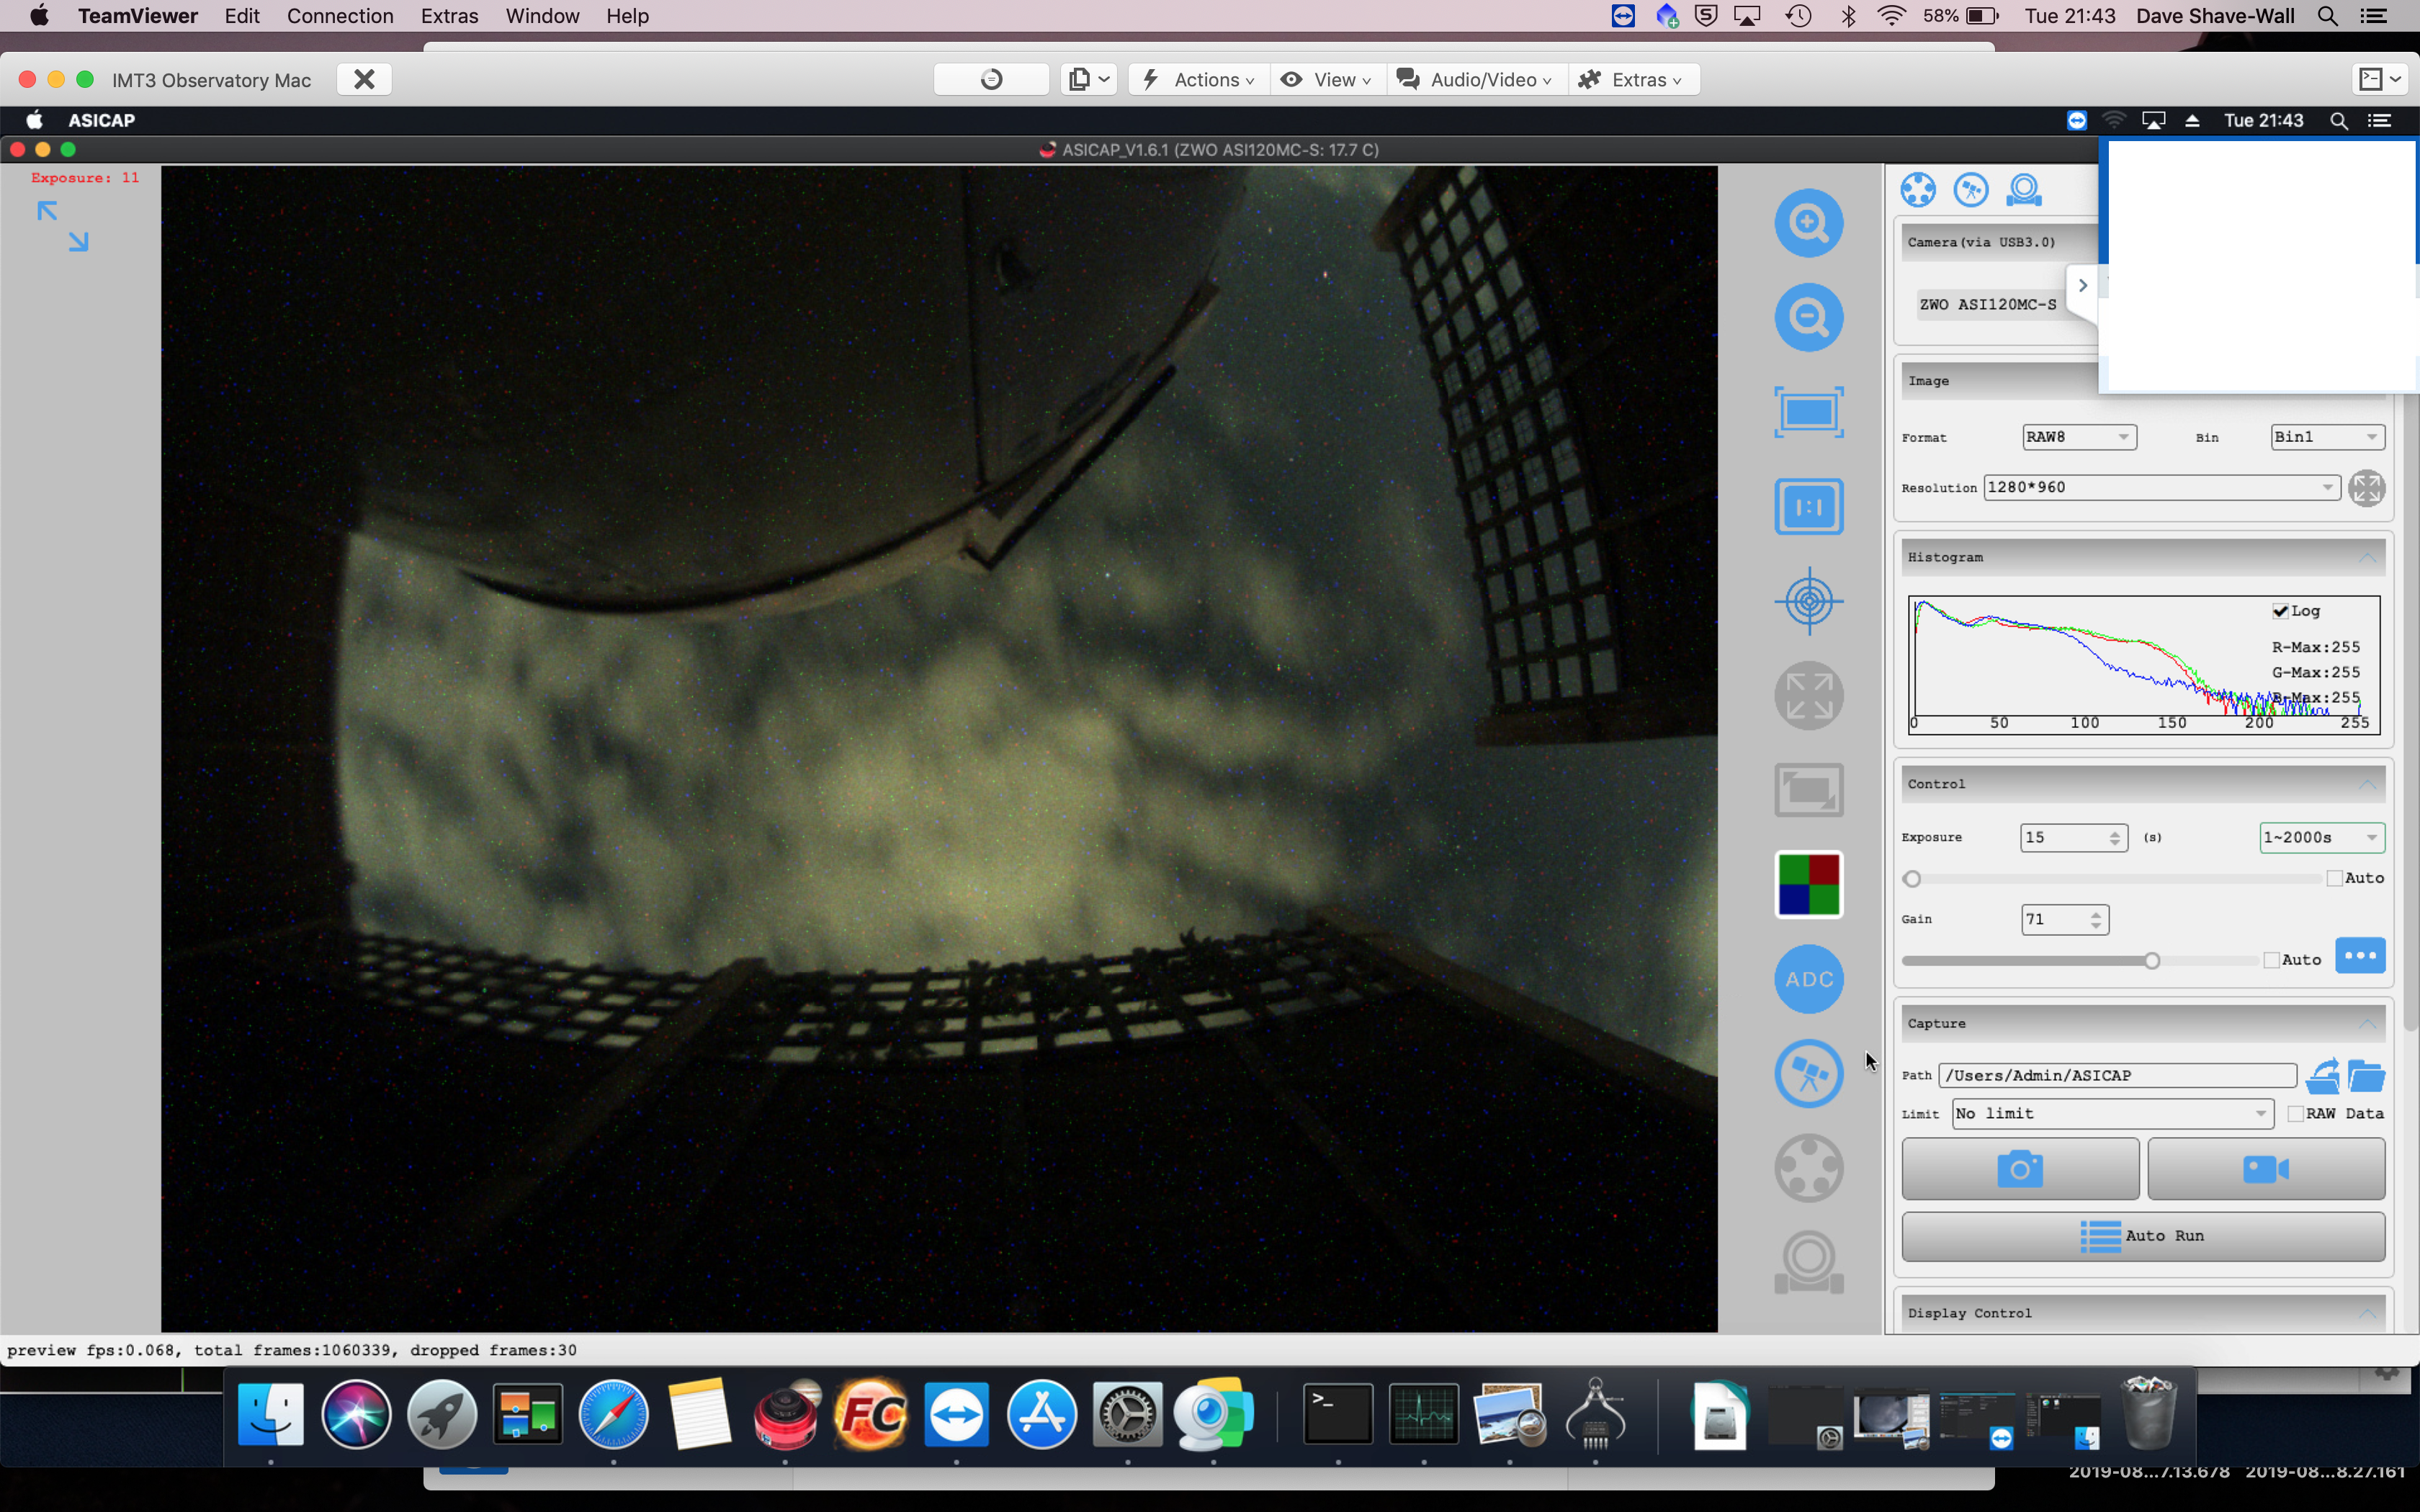
When the light is turned off it is noticeably darker.
Bathroom light off
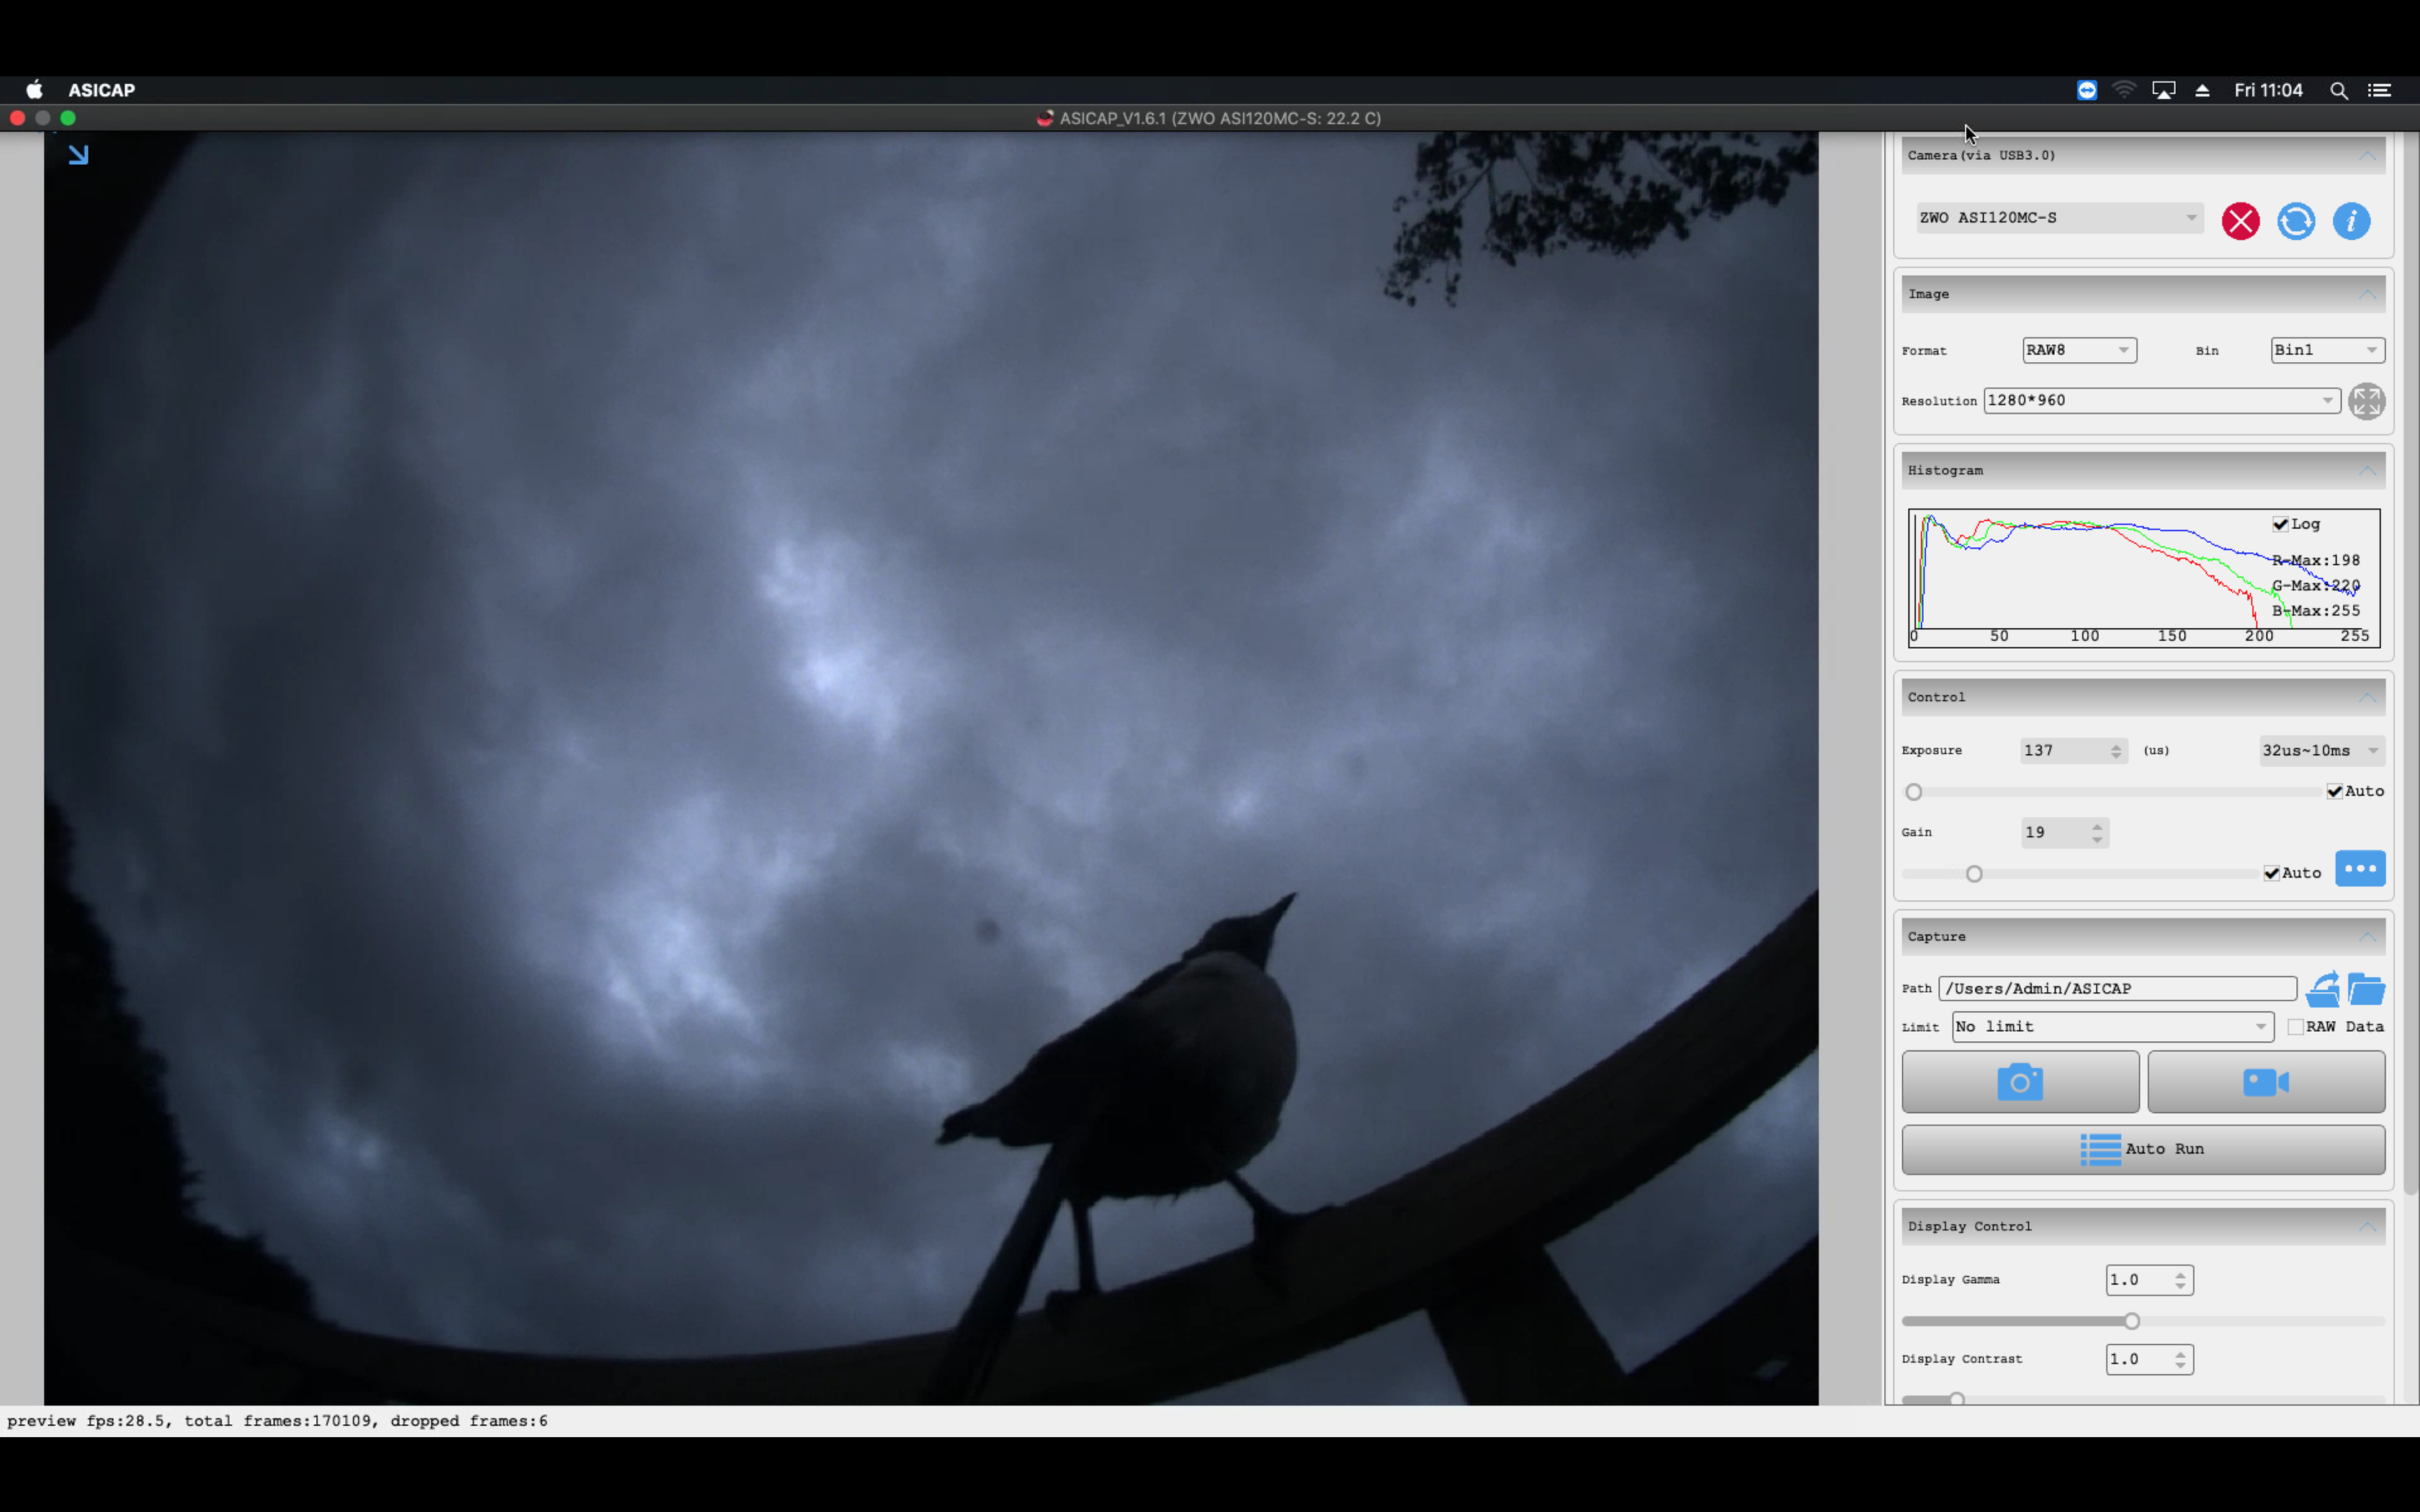
Sometimes I get visitors to the camera.
Daytime visitor
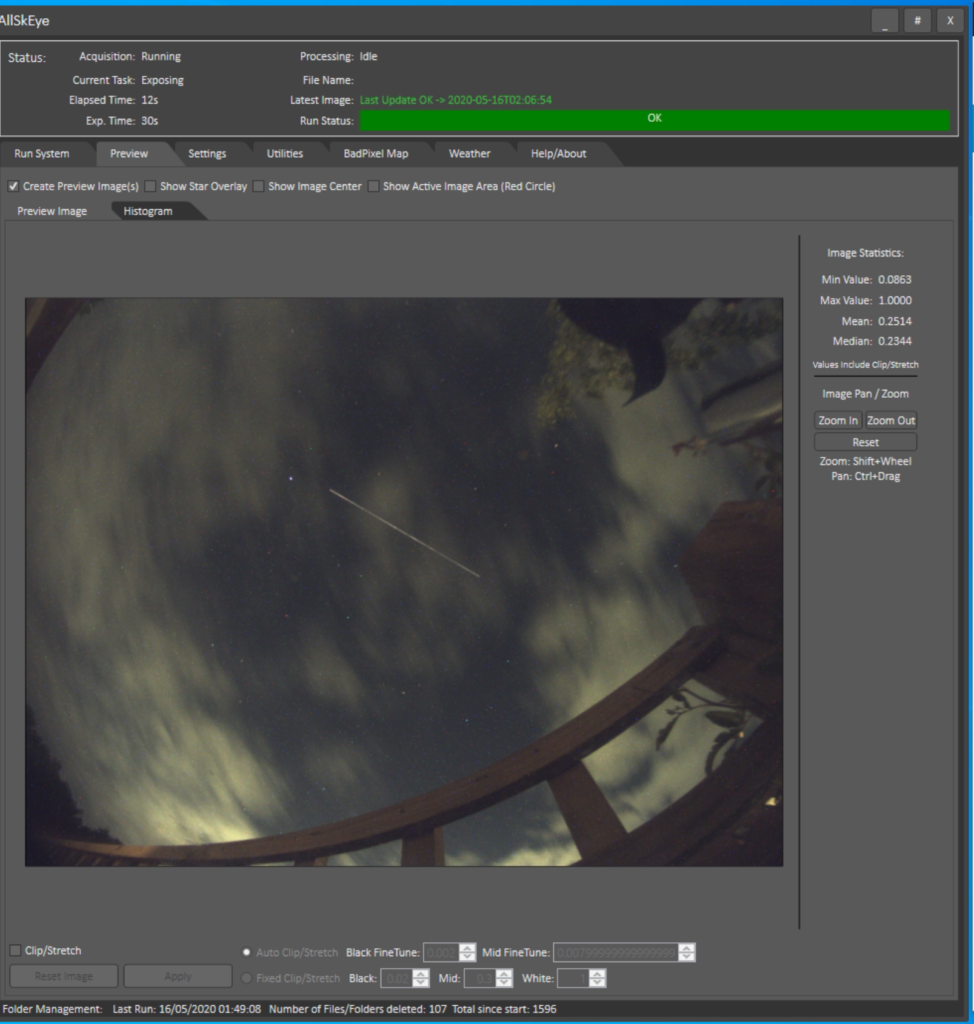
and sometimes I unexpectedly capture a meteor 🙂
Raindrop, Clouds and Meteor
So it transpires I can use a single 3m powered USB cable to the USB hub, I cannot use 2 x 3m powered USB as that causes data loss and hangs and I cannot use a single unpowered cable either.