I have placed new filter, Baader IR-Pass 685nm from Mark Radice on the ZWO tonight and aimed to go after Venus on the Mak180 and capture another phase of the planet. I recorded several sets of data although noticed the filter does produce a somewhat pinky image.
Here is my workflow so I can repeat each night until this is finished.
Open dome – done
cool down – done
turn off dehumidifier – done
turn off fans on scope – done
find home – done
focus – done 60,535 clear
remove existing model – done
slew and sync to nearby star – done
make sure scale is correct -done
make sure image link to all sky database is selected – done
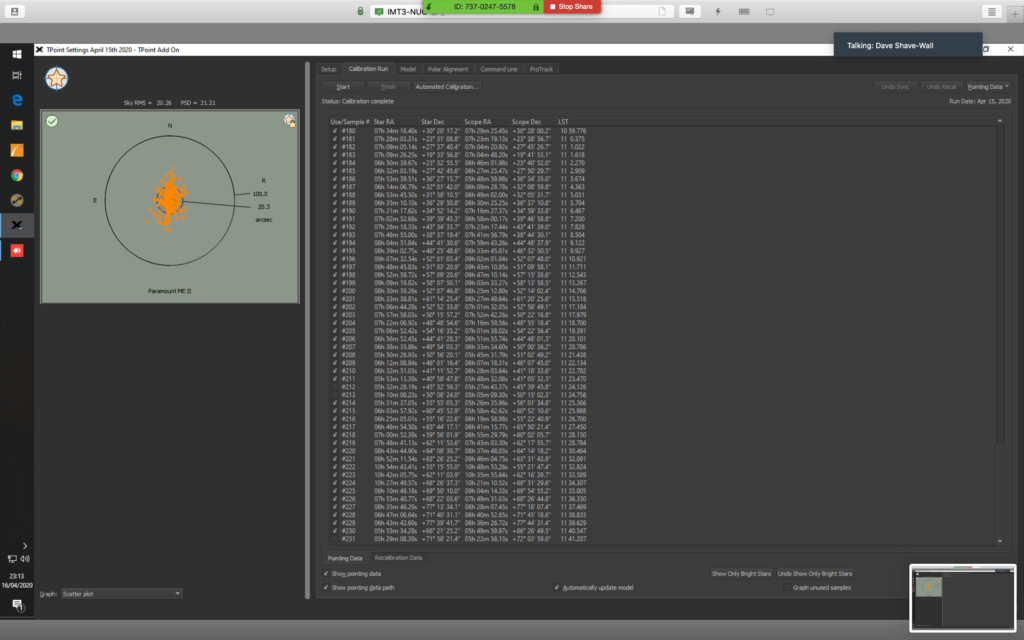
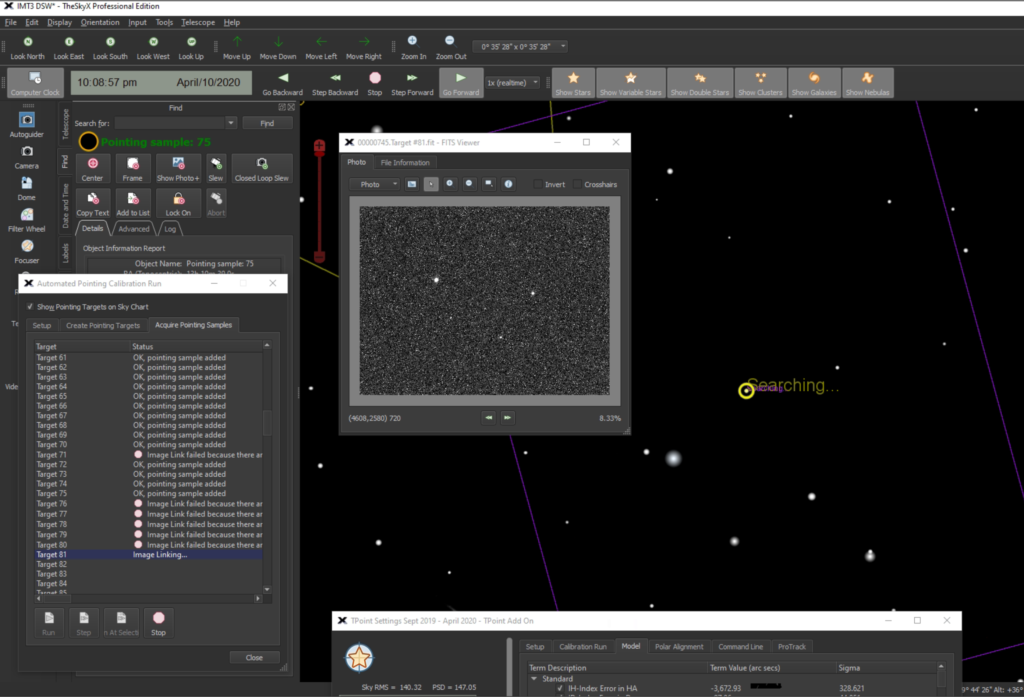
start TPoint run – done @ 21:13
Complete TPoint – 93 points done, paused TPointing at 23:15
Turn on Dehumidifer – done
Note that tonight I found the dome was definitely not lining up with the 12″ OTA. We have noticed this gradually becoming as problem over the past weeks and months. I am not sure if this is a problem with software, hardware, a change in settings or the temperature of the dome in some way has effected this. To this end I will set about a calibration run of the dome tomorrow to see if that can rectify the issue.
Here is my workflow so I can repeat each night until this is finished.
Open dome – done
cool down – done
turn off dehumidifier – done
turn off fans on scope – done
find home – not needed
focus – done 59,659 clear – done
Focus
slew and sync to nearby star – done at 21:06 as not dark enough before then
Not quite dark enough yet
make sure scale is correct -done
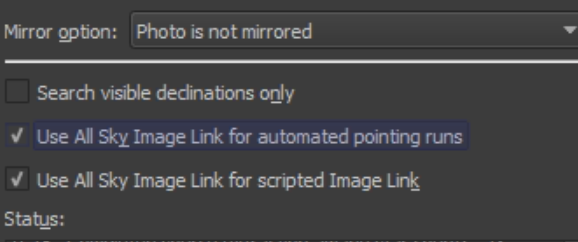
make sure image link to all sky database is selected – done
All Sky Image Link settings
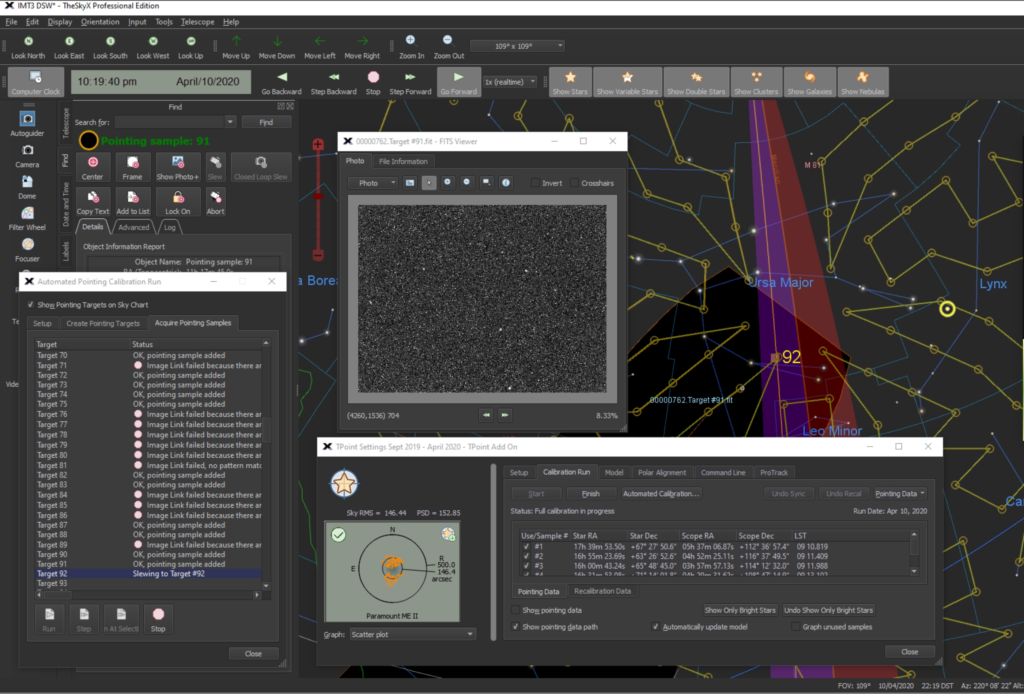
start TPoint run at point 93 – done @ 21:10
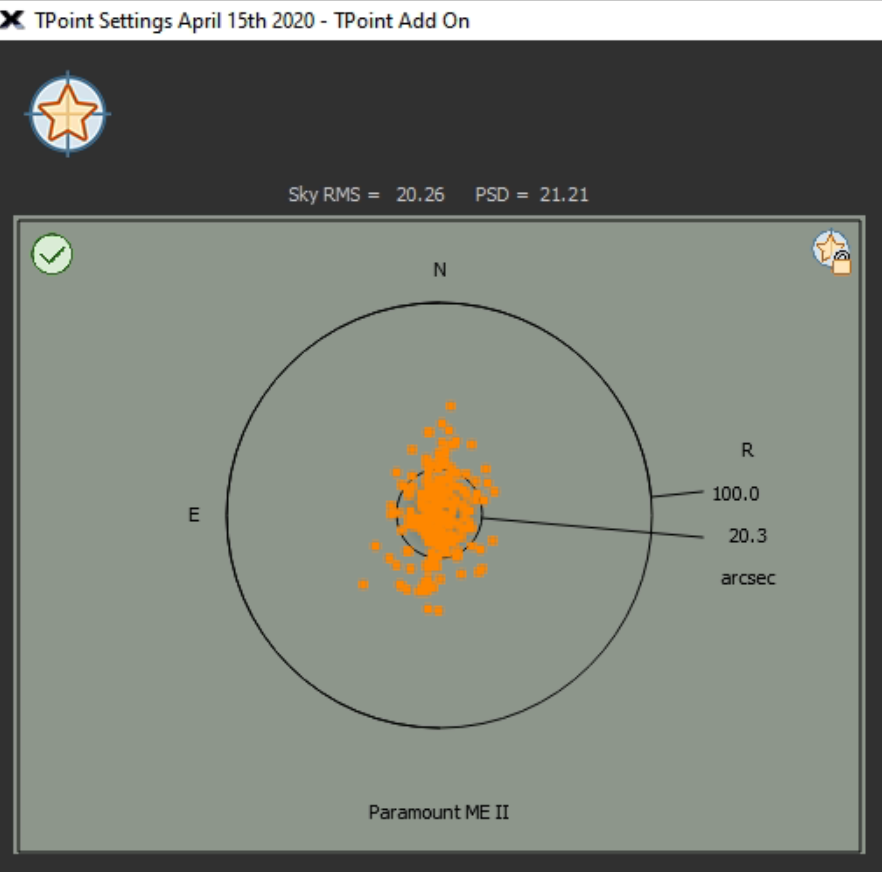
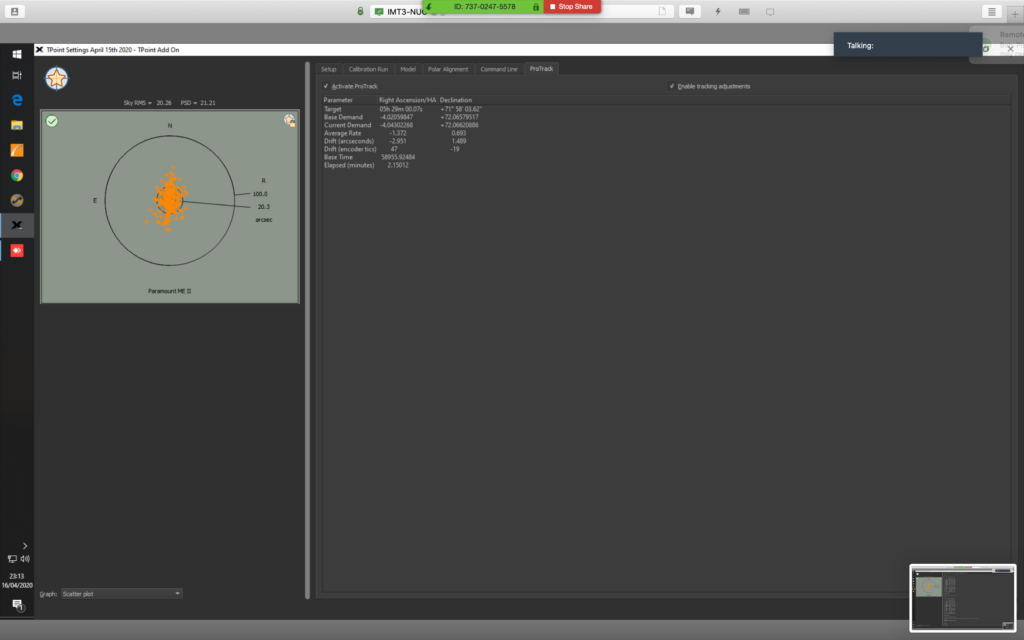
Complete TPoint – 231 points done at 23:46 including checking 5min unguided exposure which was fine
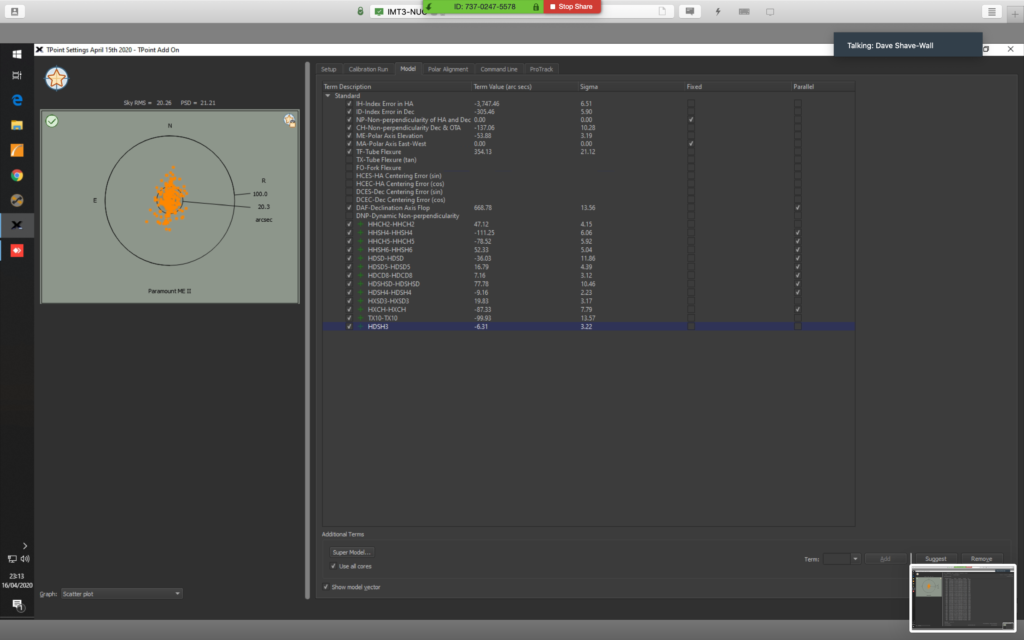
Final TPoint plus Super Model
Turn on Dehumidifer – done
So what did I learn tonight? It was worth doing the TPoint model. The resulting pointing accuracy is much better with objects being almost centre off the chip. Unguided images on the 12″ look good at 5mins, I will try longer when the clouds and rain disappear. That following a documented approach helps as above. The adjustments to the worm and the loose weight helped. That fixing the dome rotation slippage on the encoder today helped.
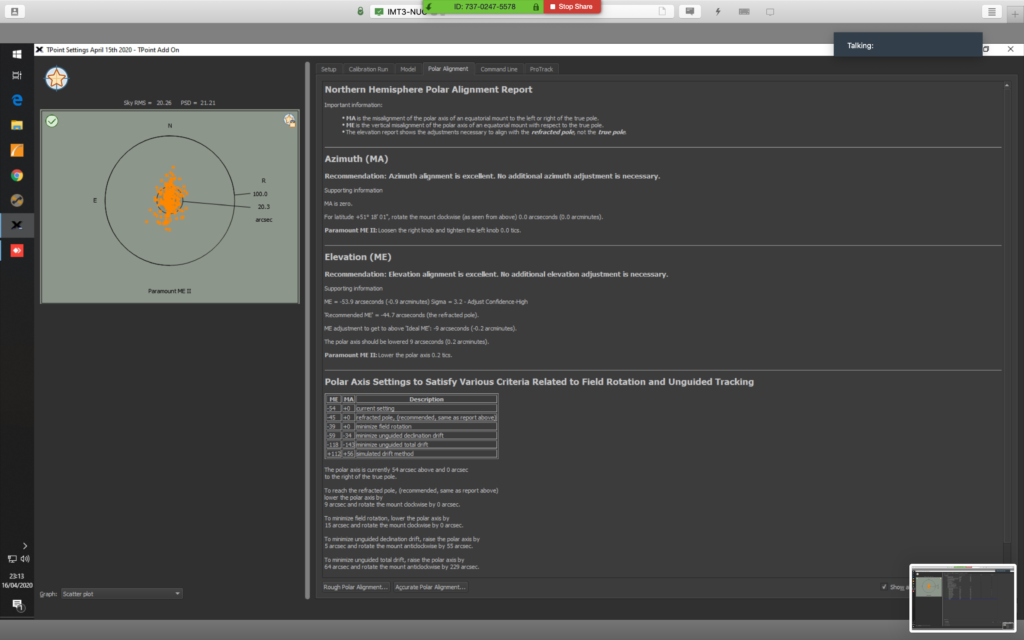
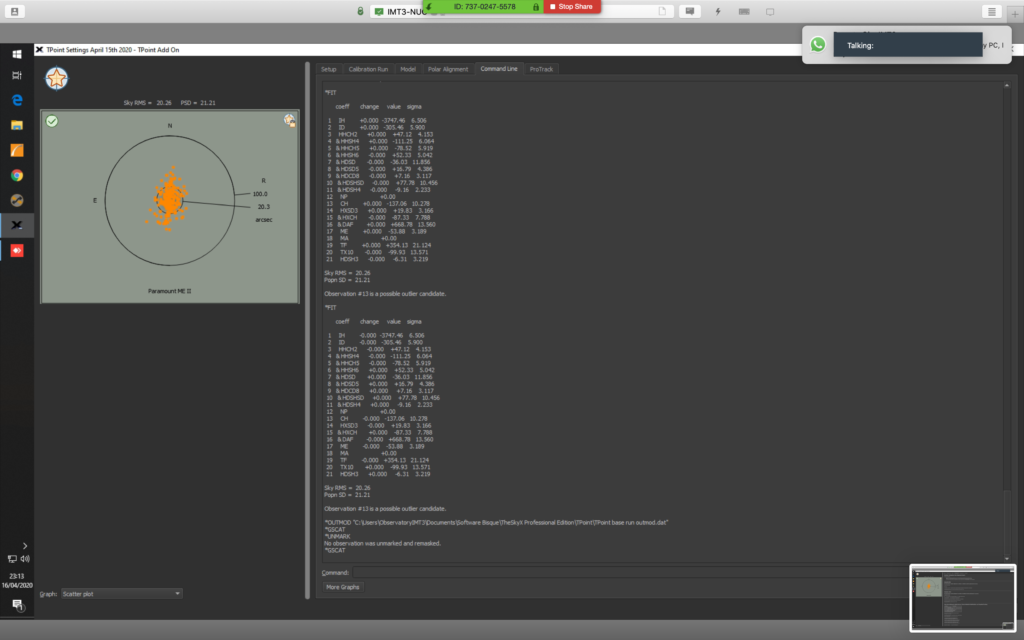
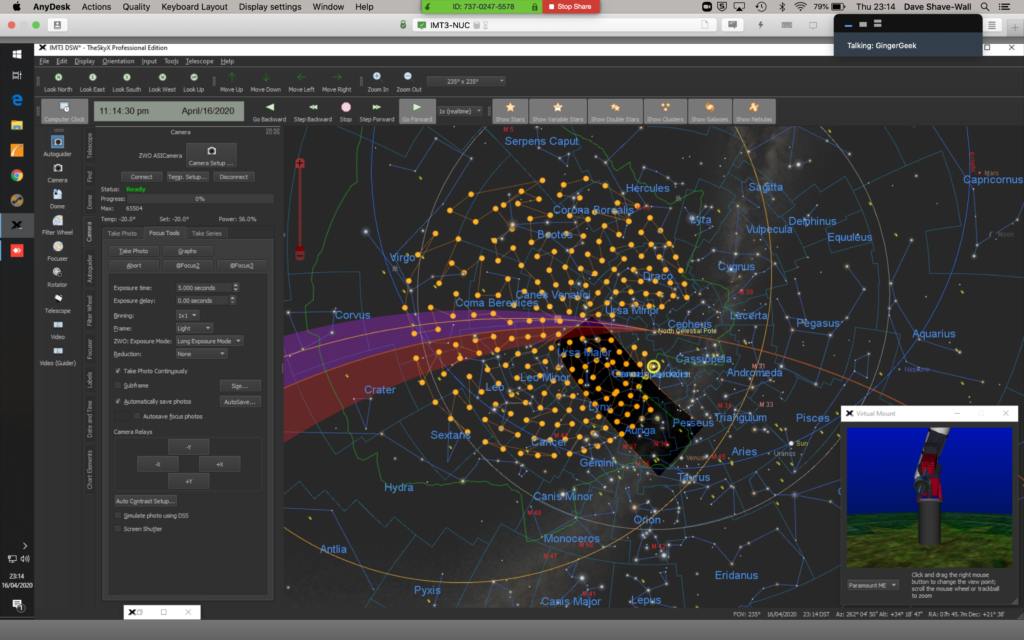
TPoint completion of 231 pointsFinal model appliedPolar alignment reportCommand line viewProtrack onTpoint model on sky2min unguided image through OS12″5min unguided exposure through OS12″
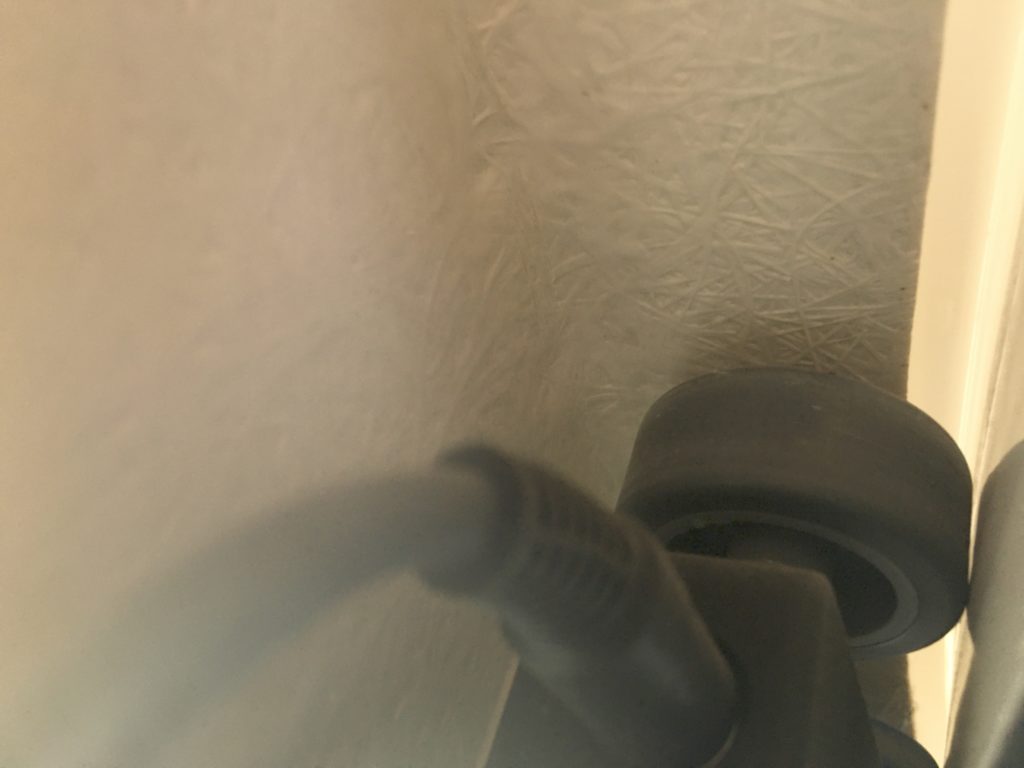
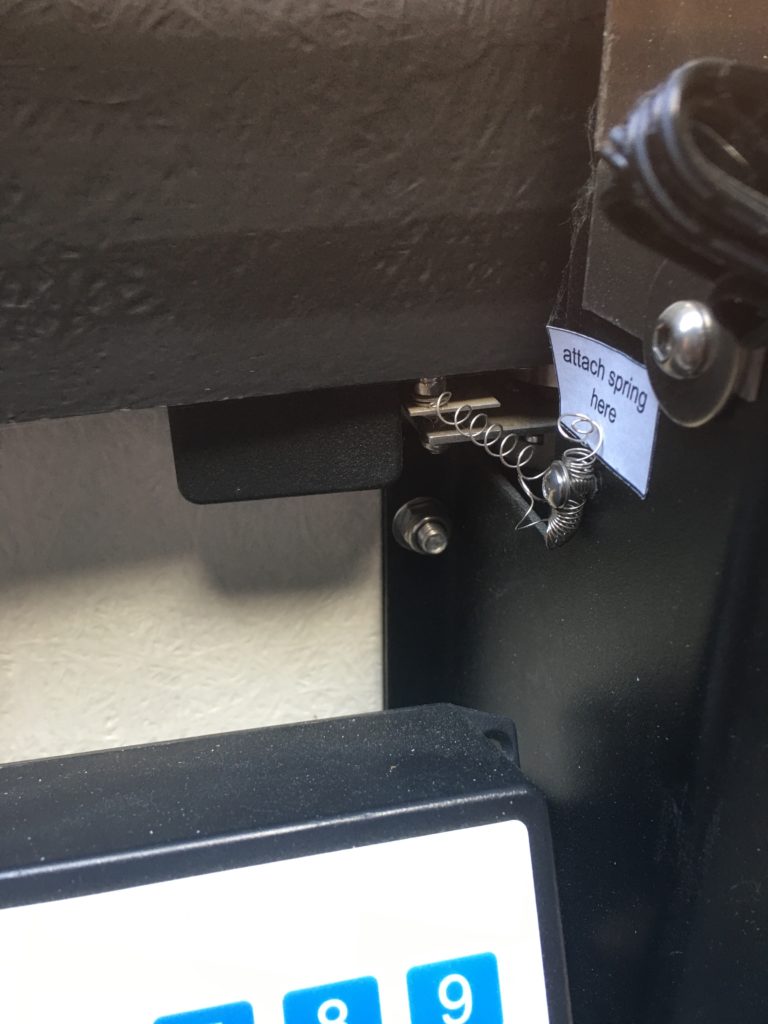
I mentioned above the dome slipping on the encoder, this was because of the small weak spring that is used on the dome, which is not good enough and over the past year has stretched beyond its limit. This means as the dome rotates and the dome shudders due to the joins in the dome not being flush (another issue) and thus the spring is stretched. This meant that some of the time the encoder wheel seen below was not touching the dome and therefore lost around 30-40 degrees. To rectify I have temporarily stretched and tightened the spring which we will replace later with a more suitable one.
Encoder wheelEncoder spring now stretched to fix problem
Tried again to get the TPoint completed tonight but hit with a load of issues which I will try to sort tomorrow. FoV in TSX was wrong. Not plate solving in TSX. Focus potentially an issue. Use of All Sky Image Link for Scripted Image Link needed to be selected from the Image Link –> All Sky tab. Image scale in various places was incorrect again and should be 0.32. Managed to get to 10 points with 3 failed. Clearly something has changed given this worked a week ago. I will attempt a go tomorrow night to resolve. Meanwhile I have left Bob to image. In hindsight we should also be leaving the observatory running all night as when I got up at 4am it was crystal clear and dome was closed as nothing planned, so a default object and scope setting should be used and left running. However, Bob did manage to grab some frames in the clear of M53 until what looks like 3am so that is better than nothing.
Dome has been open a few hours now and the 12″ cooling down with the fans on.
At first the TPoint run was not solving the image, I had to change again the Image scale which was set to 0.01 for the automated TPointing back to 0.32.
Once this was done I started a new TPoint run. The new numbers coming in looked better on the scatter graph, however at about 29 points the mount stalled and the TPoint stopped. So I went out and backed off, turning anti-clockwise the spring screws 1/8 turn on the RA axis. I then restarted the mount, but now it is too late to start again as I have work tomorrow. So I will leave the mount in Bob’s capable hands and head off to bed.
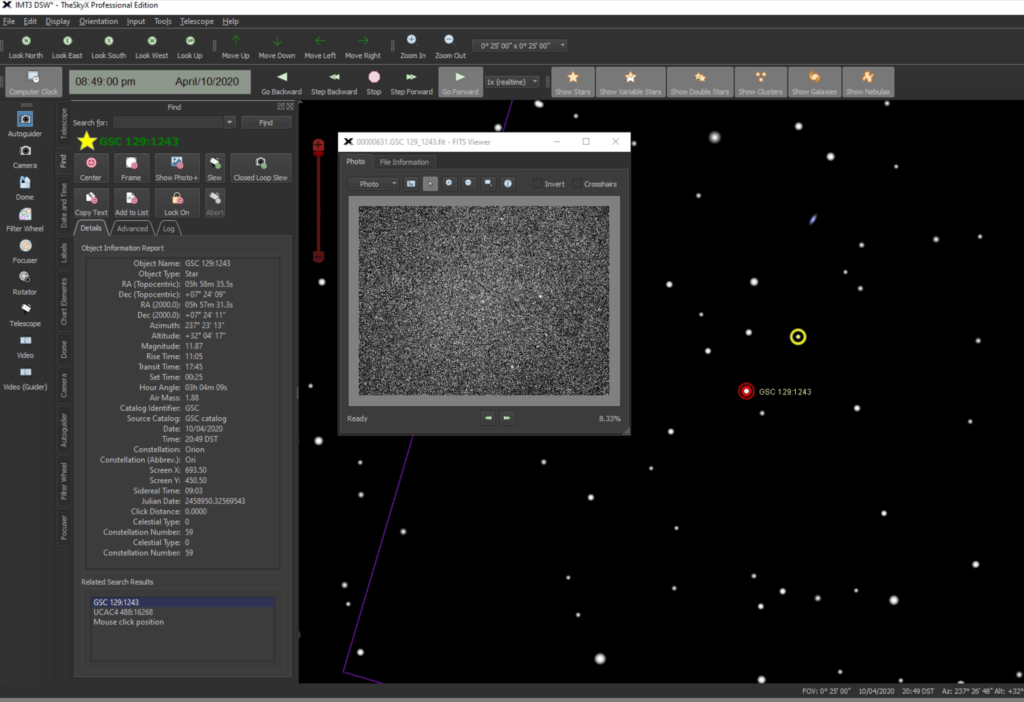
Another night of trying to complete a TPoint run. After opening the dome around 4pm to cool down and turning the fans on the 12″ and pulling back the light shield material we (Bob, GingerGeek and I) @20:49 completed Slew and Sync to test plate solving ability which worked well.
First Solve and Sync works
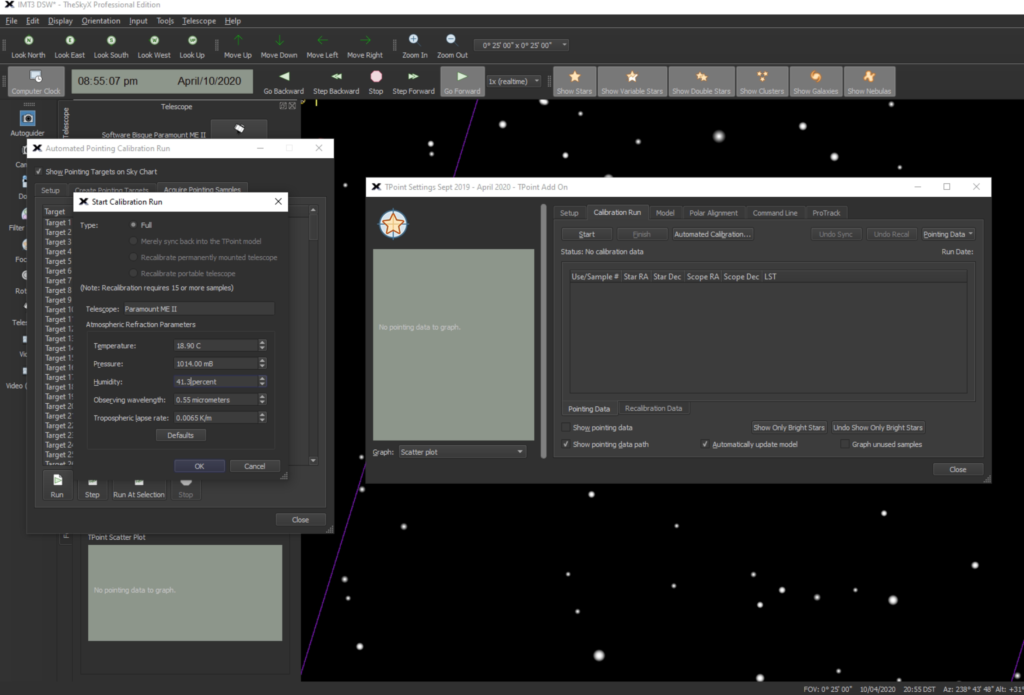
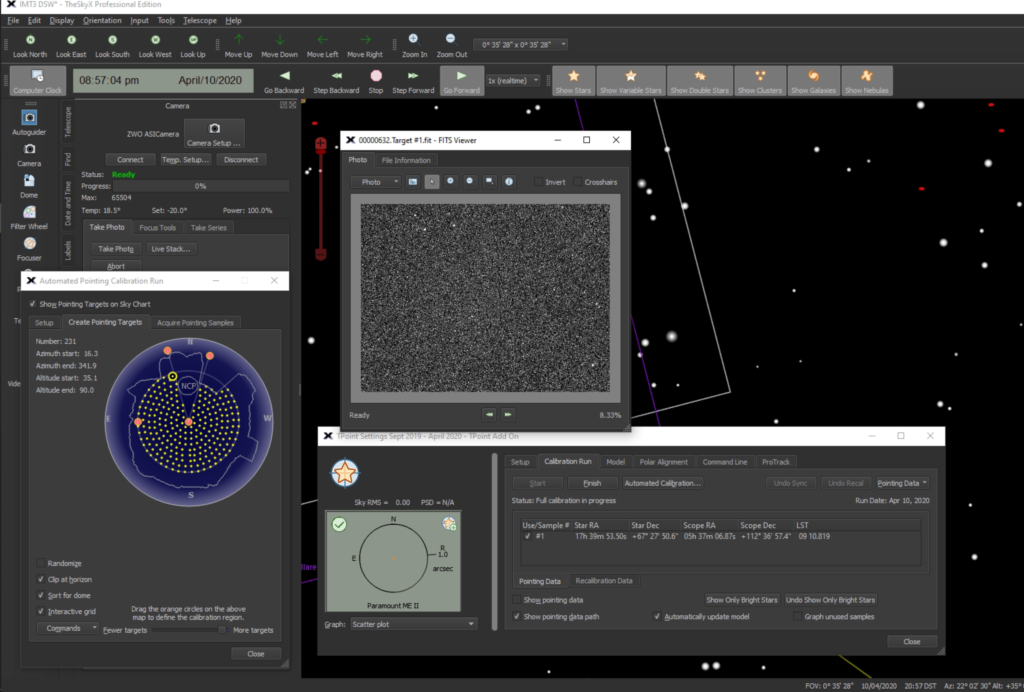
We then started the TPoint run.
Starting TPoint RunFirst point captured out of 231 points
Our first failure was Point 28 @21:21. The following are other failures.
Failed Point 50,51,52,53 @21:42
Failed Point 55 @21:45
Failed Point 60 @21:53
Failed Point 71,76,77,78,79,80,81,84,85,86,89,
TPoint failures
We then performed the first of a few meridian flips back and forth at Point 92
Meridian Flip
At pointing sample 96 we changed from 20s exp to 25s (20 failed at this point) to see if this helped the failure rate, it helped a little. The sky clarity was not great nor was the 12″ pointing correctly through the dome at the Meridian so need to look at this at a future point.
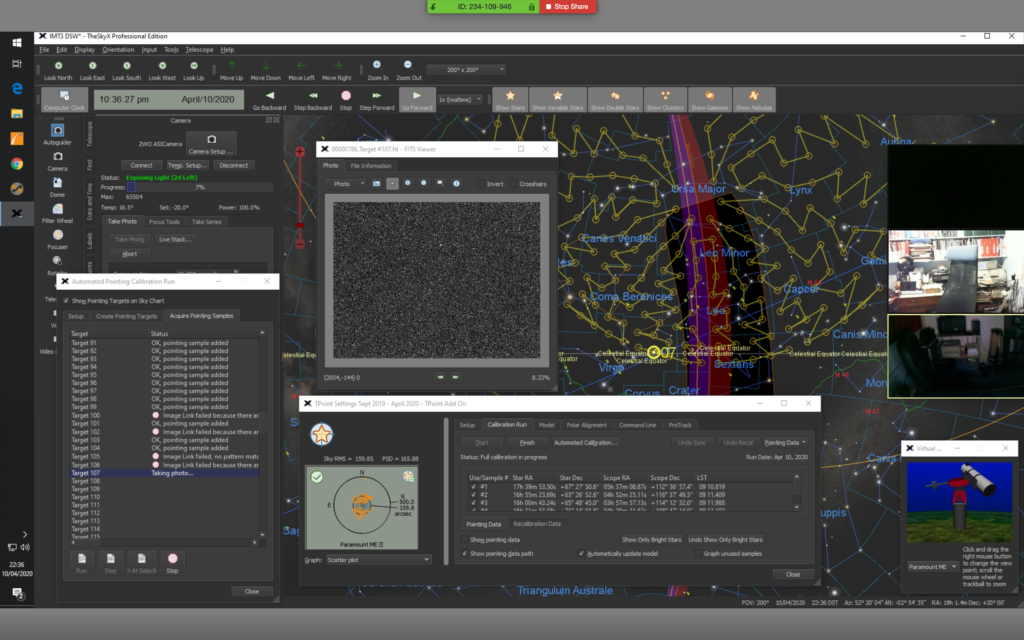
More Tpoints failed as follows. TPoint 100,102,105,106,107 (at this point scope 1/3 obscured by slit!)
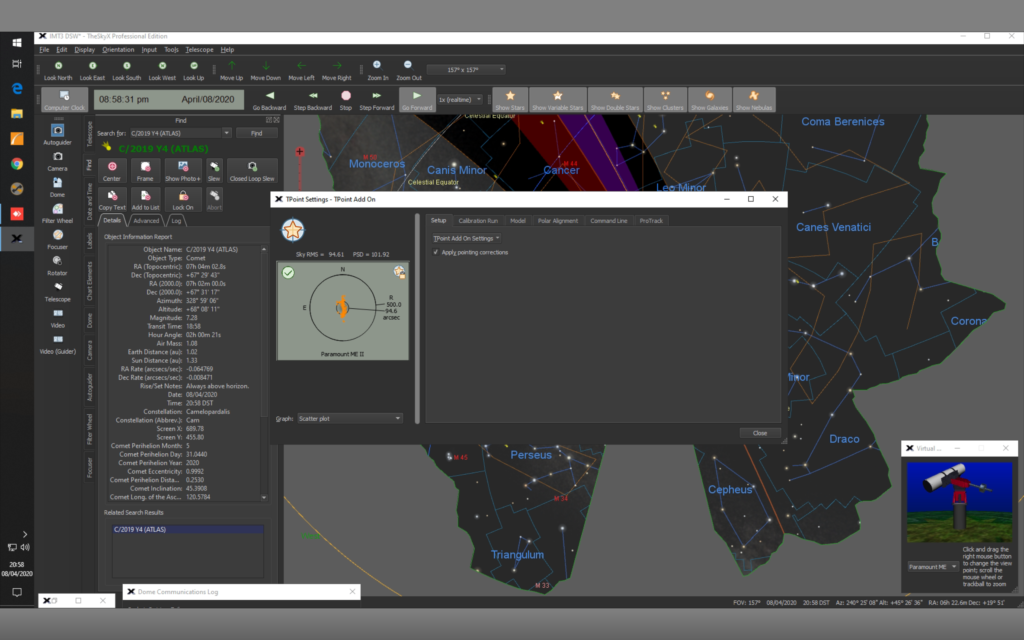
Tonight I set out to perform a TPoint run to improve the values we got last October. However it transpired to be more difficult than I thought. We updated TSX after October to there latest release, this seemed to have changed some of the parameters for plate solving. This meant that every time we took an image in the TSX it would not plate solve and so we could not perform the TPoint run. After the best part of 1 hour I gave up and let Bob take over the scope to play.
Meanwhile I then setup the Mac 180 to image Venus, however, by the time I got round to it and found it in the telescope and thus on the chip it was low down the side of the house opposite by the roof and was bumping around badly due to thermals. I found it difficult to centre the scope on Venus with such a small chip so I may need a more repeatable way of doing this moving forwards. I took a couple of videos just for posterity even though I felt the quality would be poor.
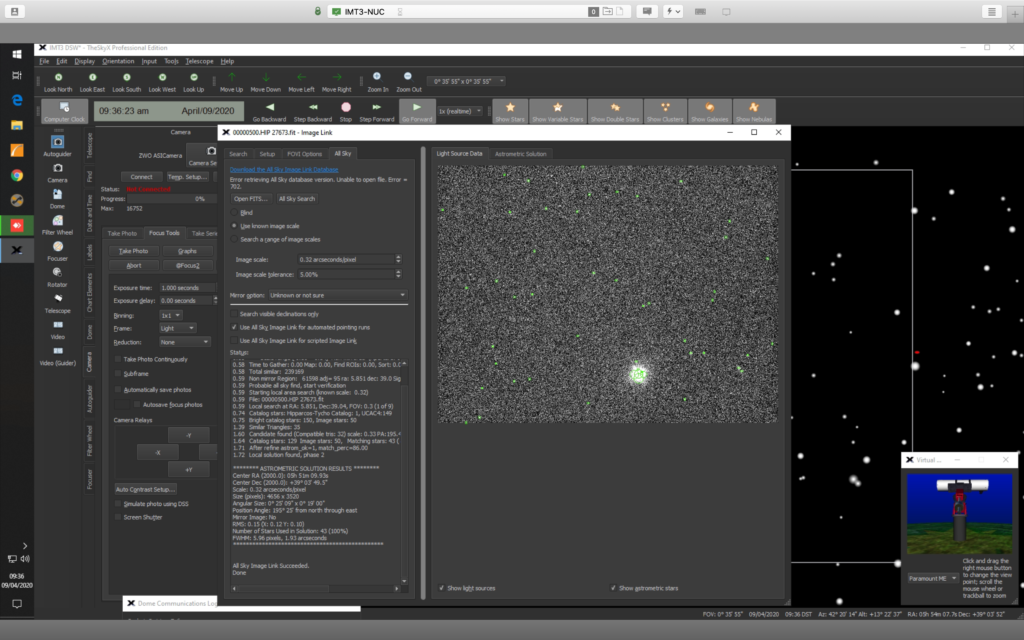
Subsequently the following day I opened up the images take with TSX and also download the All Sky Database that was missing to both the NUC in the dome and my local Mac. I then started to change the settings in Image Link within TSX until I could solve the image.
Solved image using Image Link All Sky Search in TSX
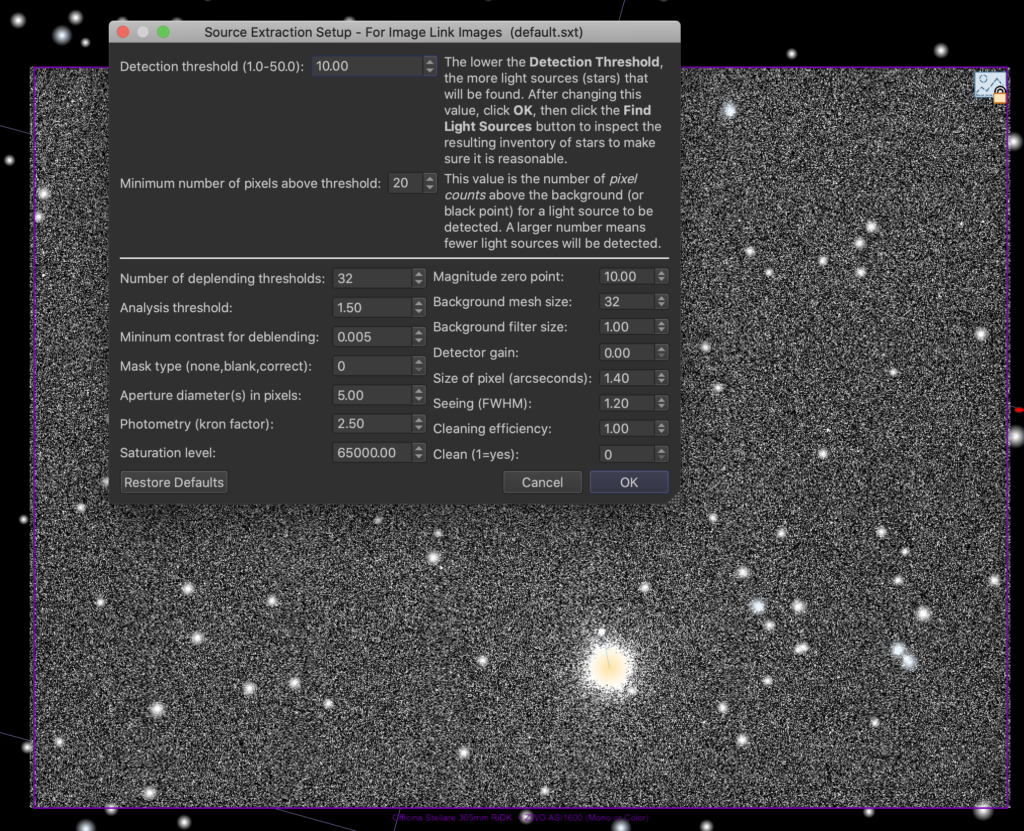
The key parameter transpired to be the Image Scale Tolerance on the All Sky tab setting it to 5% from 1%. Also I changed the Image Scale back to 0.32. On the Setup tab I selected Setup under Source Extraction and changed the detection to 10.0 and the minimum number of pixels to 20.0.
New Source Extraction Settings and solved image
I then tried a second image and that solved in 1 sec too so very happy. I will try to give the TPoint another go tonight as well as Venus on the Mac 180. If TPoint works I will take RGB on the Tak. First solution from the image I solved can be seen below.
TSX Image Link solved
The resulting astrometric solution from TSX is below based on another 60s exposure image is below as text.
******* ASTROMETRIC SOLUTION RESULTS ********

Center RA (2000.0): 07h 14m 12.34s

Center Dec (2000.0): +32° 34' 16.1"

Scale: 0.3250 arcseconds/pixel

Size (pixels): 4656 x 3520

Angular Size: 0° 25' 13" x 0° 19' 04"
Position Angle: 195° 28' from north through east

Mirror Image: No

RMS: 0.88 (X: 0.45 Y: 0.75)

Number of Stars Used in Solution: 40 (100%)

FWHM: 8.98 pixels, 2.92 arcseconds

***********************************************
Things still to resolve
Check out why WSX is loosing connection and shutting the dome
M94 and NGC 3395/3396 are the 2 targets for tonight, some luminance on M94 and RGB on NGC 3395/3396 if I get enough time. I always try to open the dome early to give at least 2-4 hours cooling before I use.
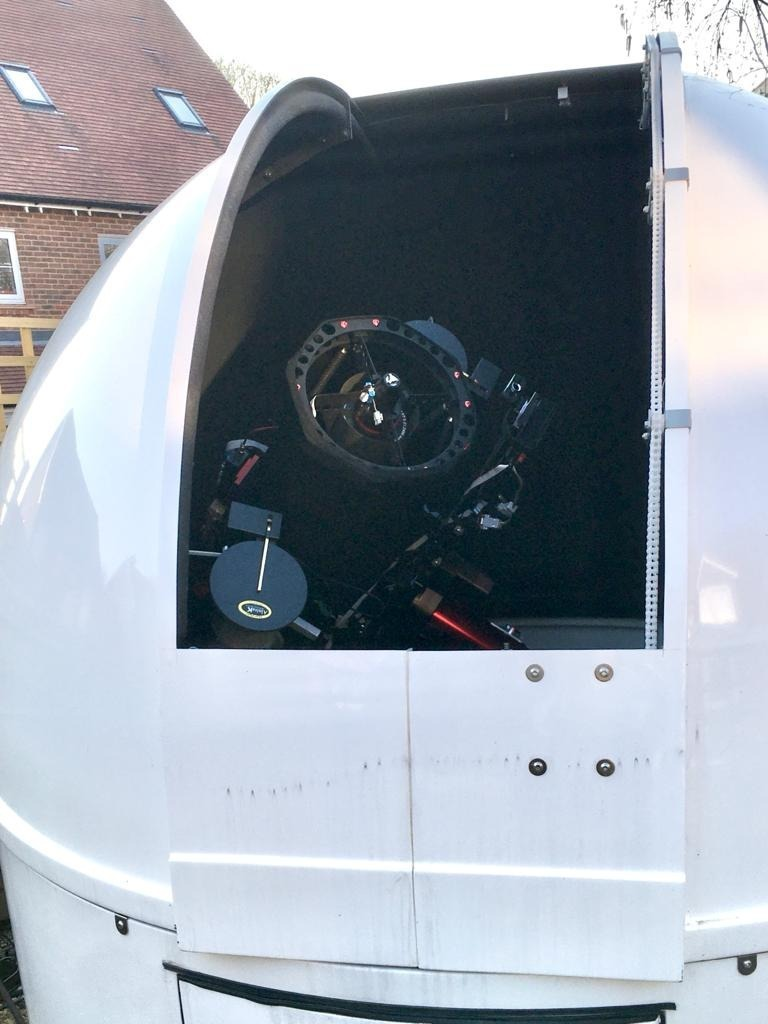
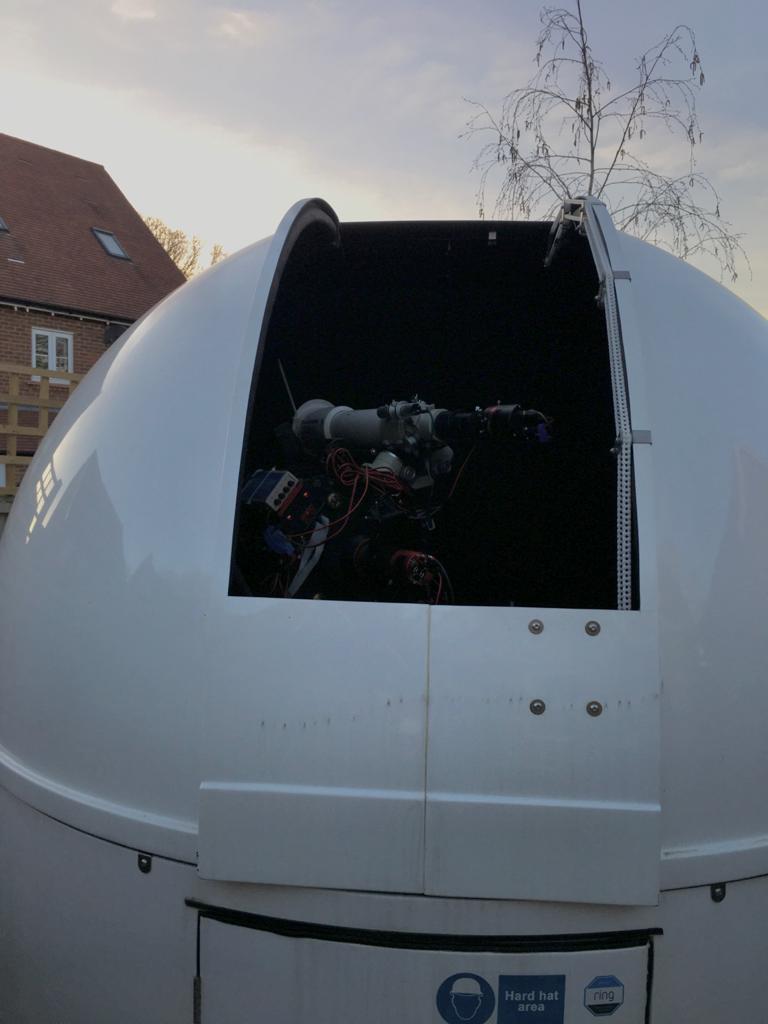
View from the bridge
When I was about to start with autofocus I tried to recenter back on the target but the mount respond and it transpired that the mount thought it was out of balance. I went to the dome and the mount was beeping proving it was out of balance. So I turned the mount off, manually moved the scopes pack to the park position and then turned the mount back on and all was well.
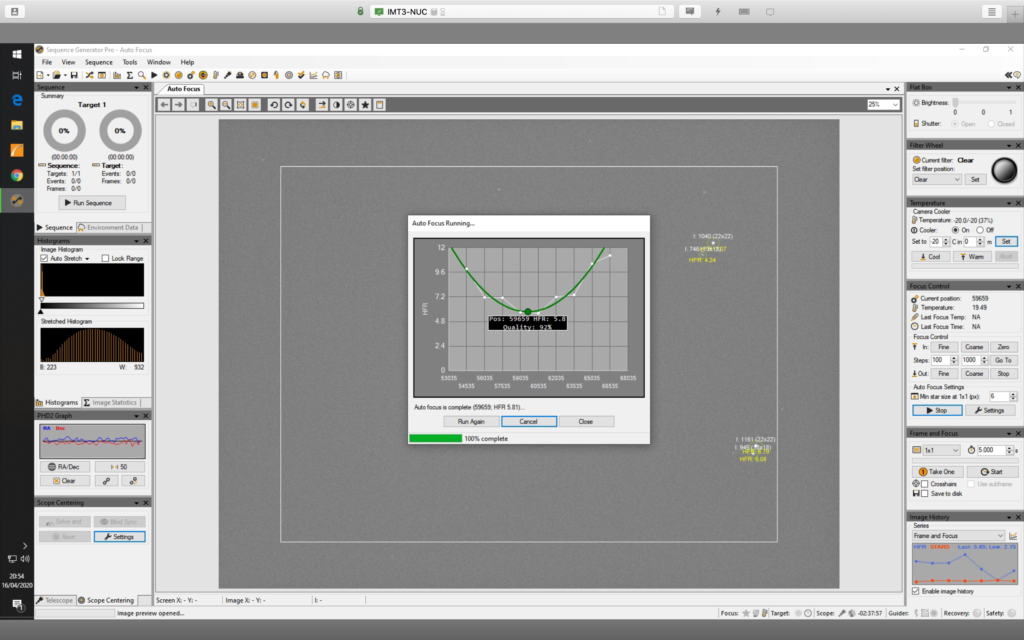
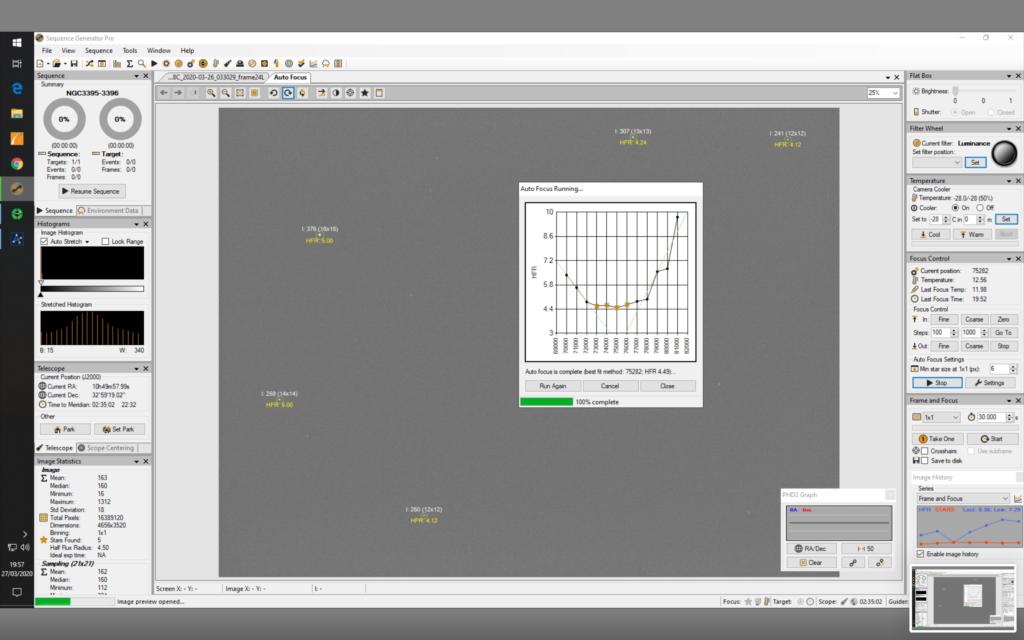
@19:57 I performed the autofocus for the night on Luminance which scammer in at a position of 75282 on the focuser.
1st AutoFocus run
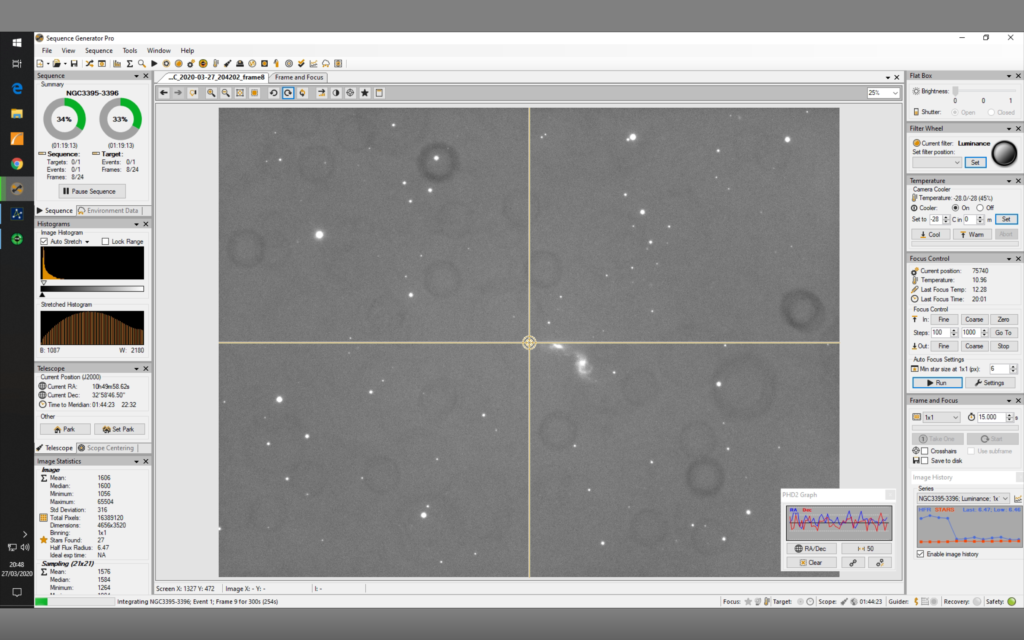
@20:10 I started an imaging run of 24 x NGC 3395/3396 with Luminance filter. Once done I planned on grabbing RGB frames before moving on to M94.
NGC 3395/3396 Luminance
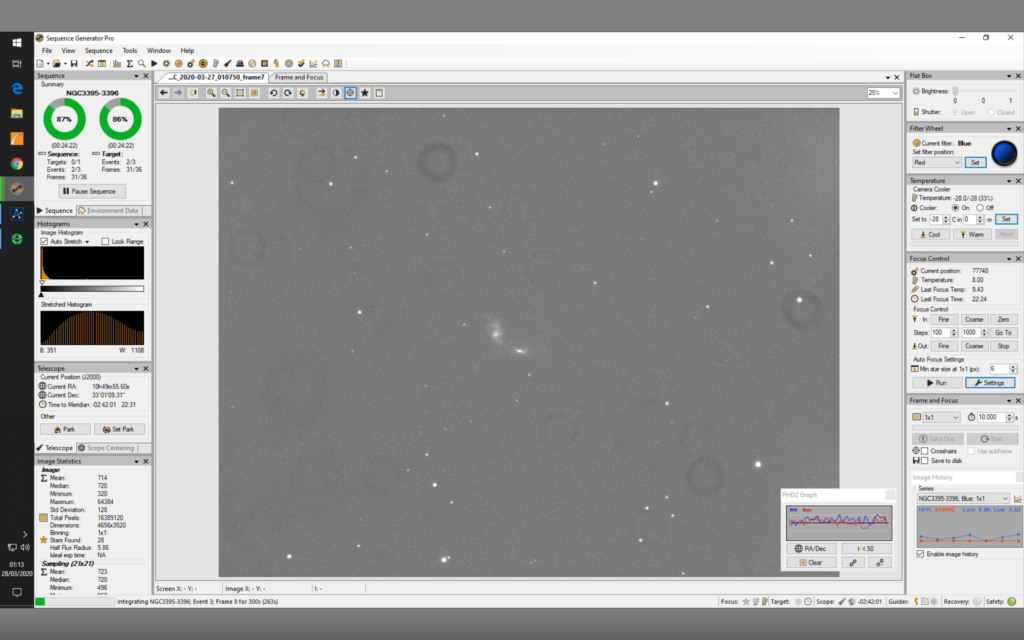
@22:32 I started on the RGB frames for NGC 3395/3396 after refocusing on the Red filter.
Single Blue frame for NGC 3395/3396
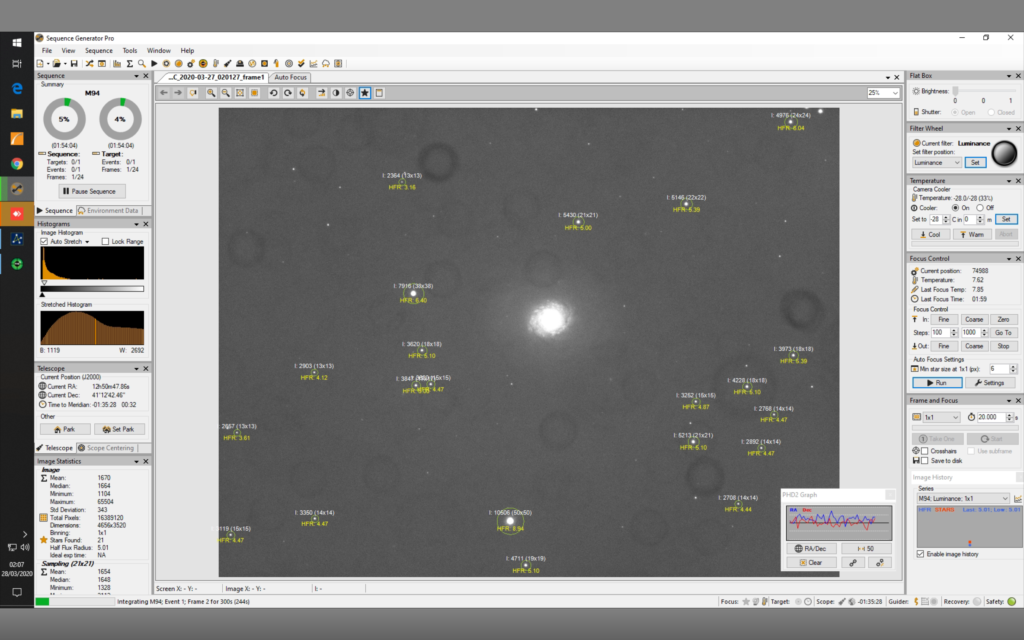
@1:40 I slewed to M94 and changed the filter to Luminance. I performed a refocus and shifted from 77895 to 75884 on Red filter by accident. So we (I had Bob on Zoom by this point) refocused on the Luminance and the new focus position was 74884. So the difference is 1000 for Luminance to Red. I also changed the step size for the focuser temperature compensation from 531 to 431 to see if the HFR is more stable.
A new autofocus on Luminance
I noticed tonight that PHD2 lost the Use Direct Guide check mark twice and thus complained about pulse guide not being supported. I had to stop guiding, disconnect the mount in PHD2 and go into the settings, check the Use Direct Guide and reconnect the mount and start guiding again. Something to look into possibly.
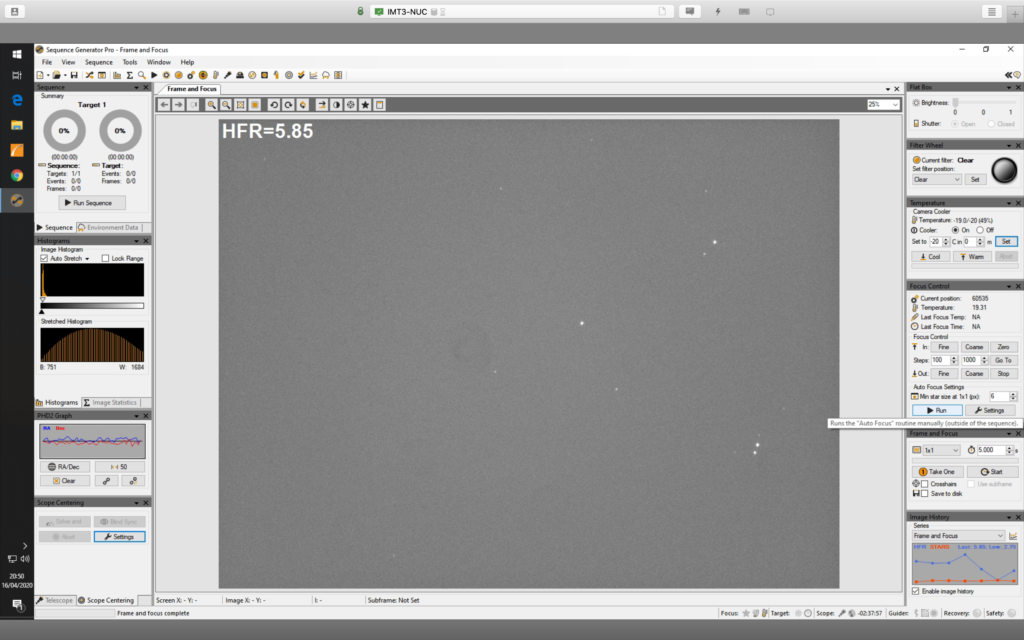
Quick frame and focus 20s of M94 Luminance
@02:07 I went to bed and left the scope gathering another 2 hours of Luminance data on M94.
Addendum …….
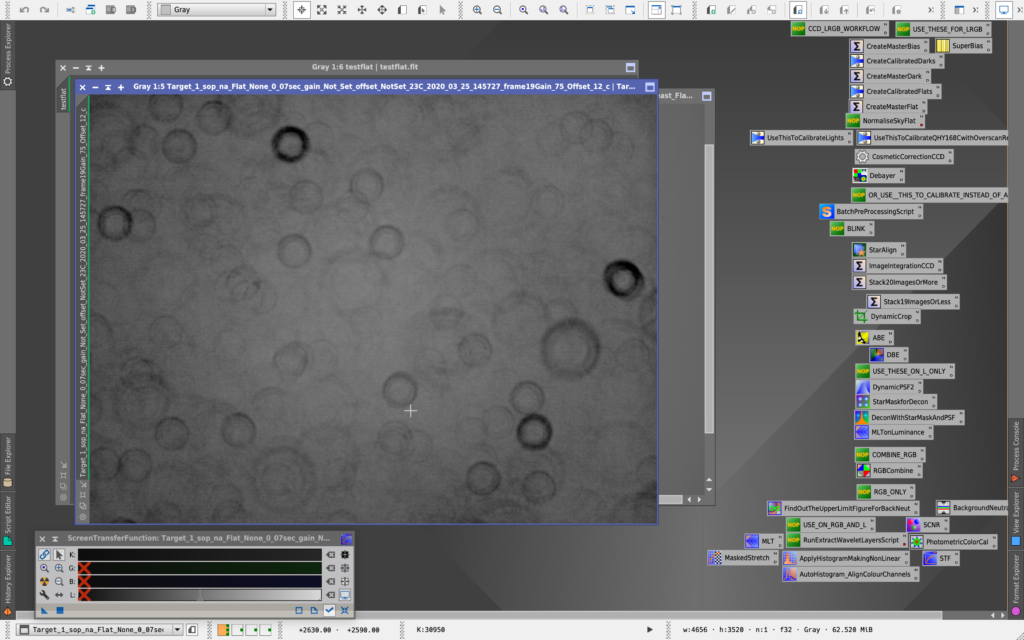
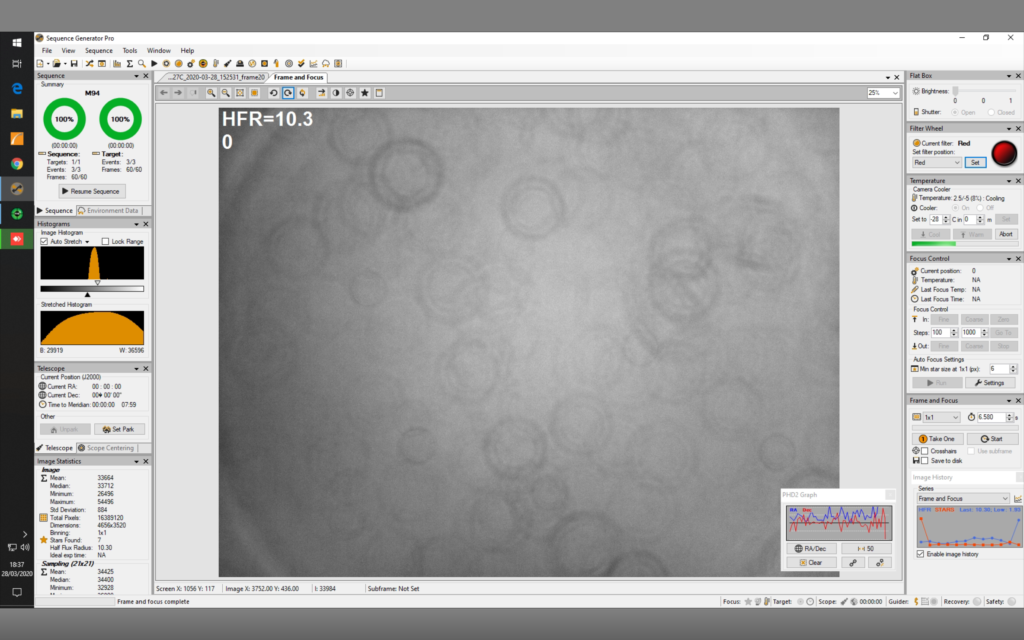
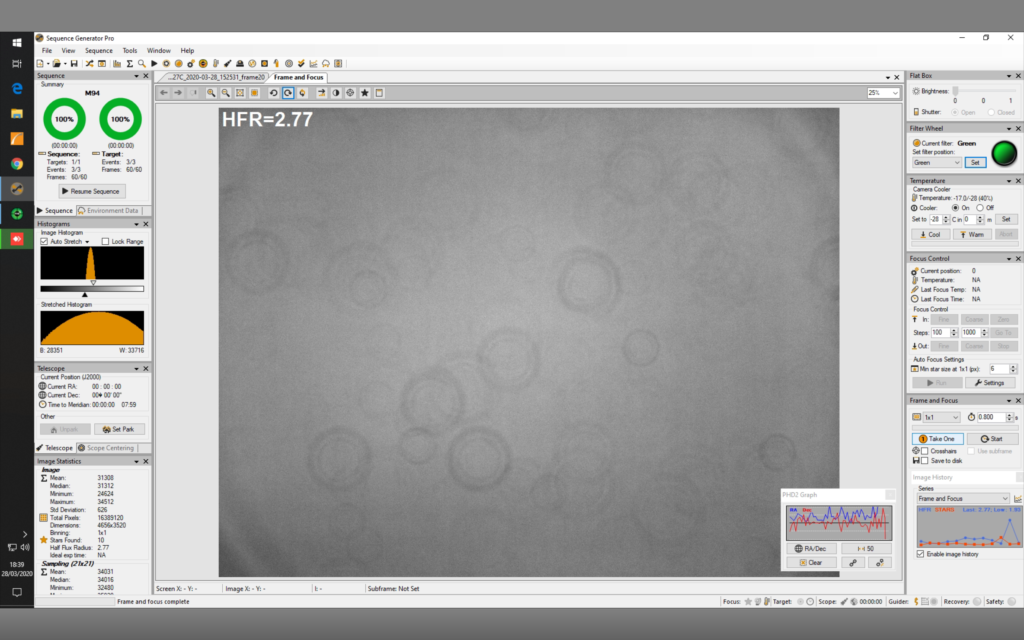
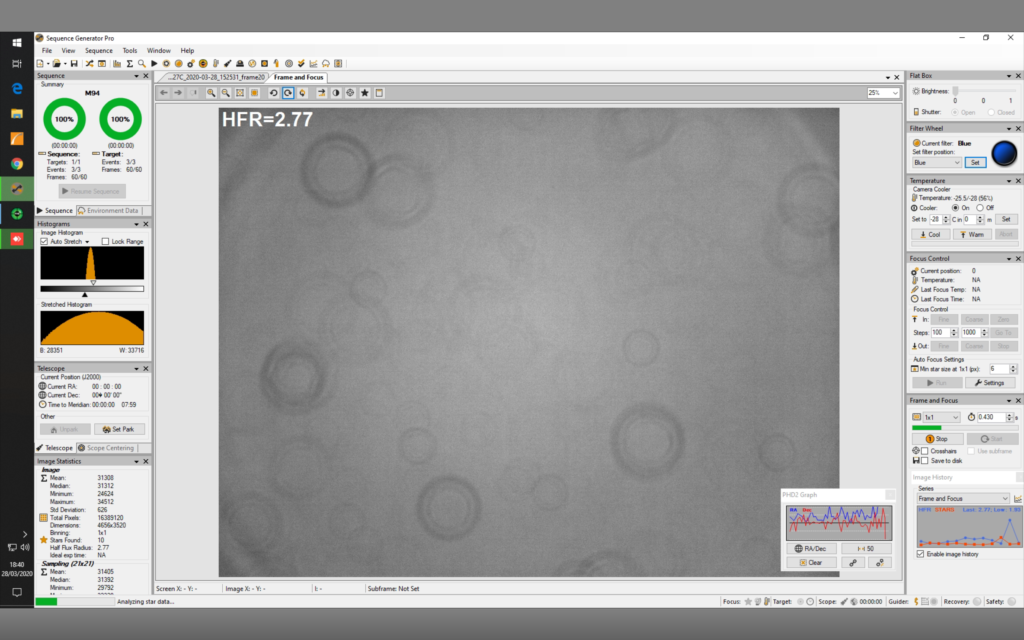
The following day I took the ZWO ASI1600MM CMOS Camera off the back of the 12″ and cleaned the sensor window. What I found was the dark dust doughnuts disappeared and the rest for the doughnuts were actually on the filters.
Before cleaning Flat from Luminance on ASI1600MMFlat from Red after cleaning sensor windowFlat from Green after cleaning sensor windowFlat from Blue after cleaning sensor window
Things to still resolve……..
Check out why WSX is loosing connection and shutting the dome
Fix Slew Here and Centre Here in SGPro that does not work
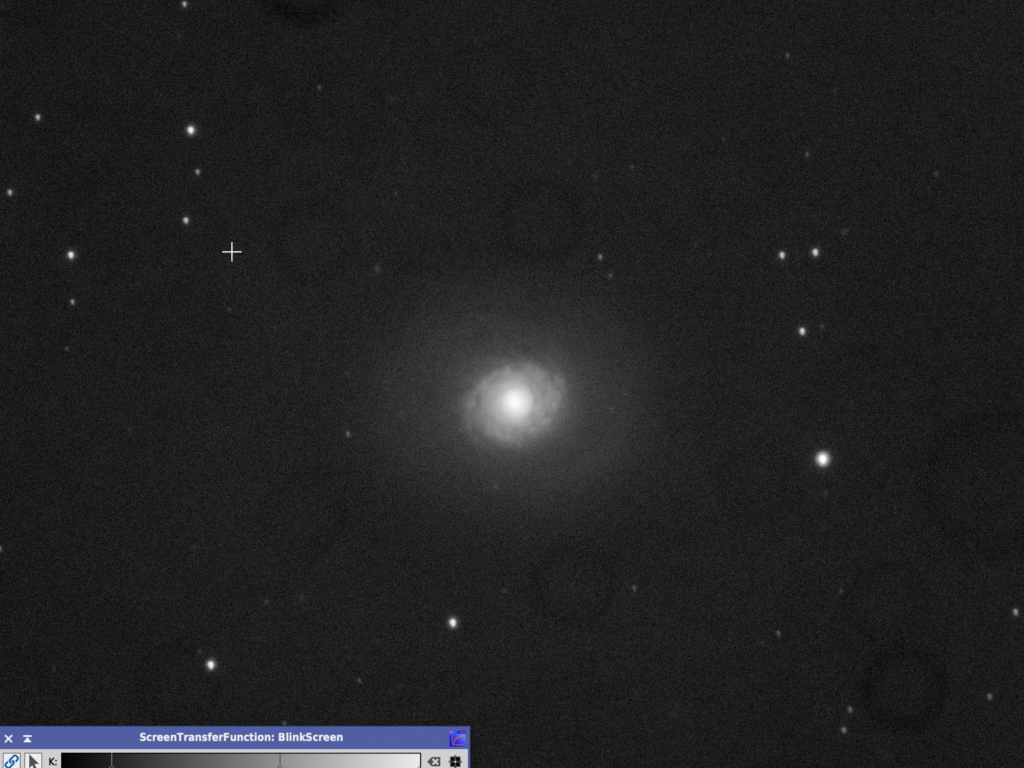
Tonight I plan on setting the 12″ imaging M94, a Messier galaxy in Canes Venatici.
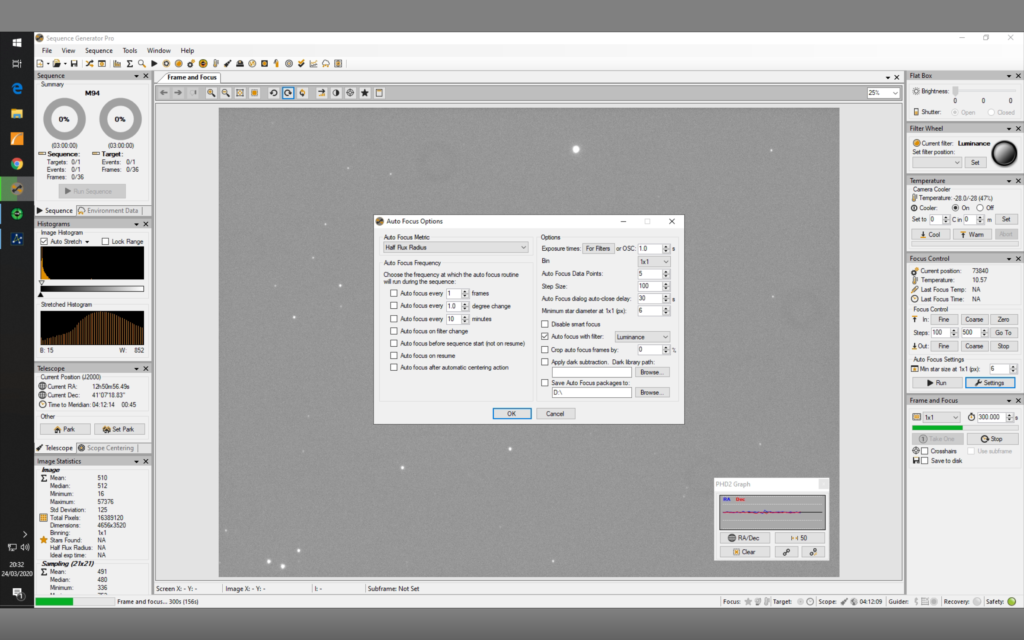
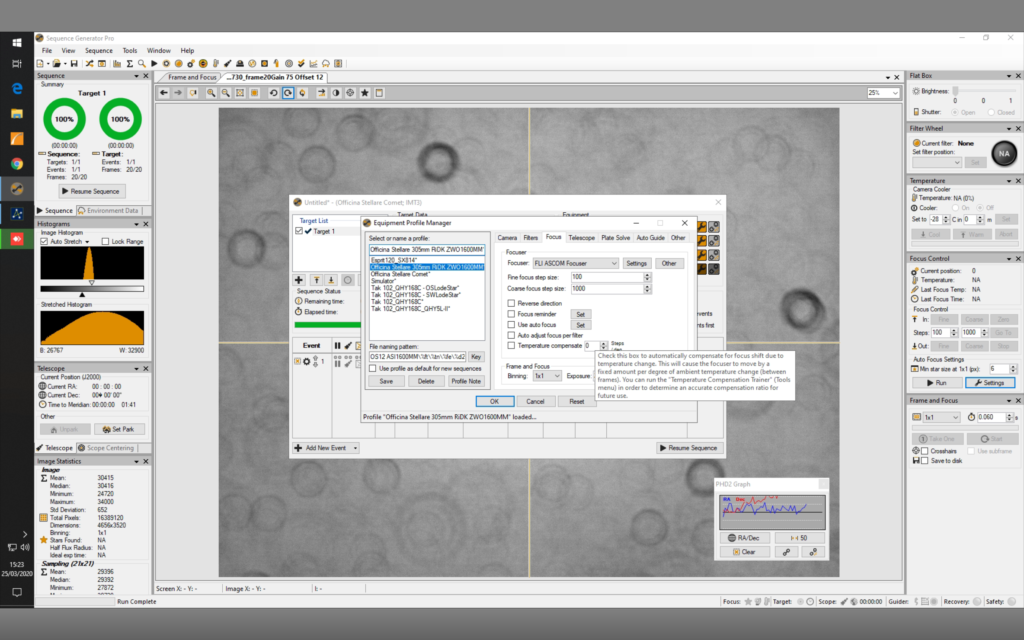
I slewed to nearby star and focused using SGPro after changing a couple of settings in the step size and amount of data points to be used, I set step size to 100 from previous 1000 and data point to 5 from previous 10 and got a much better focus. Focus landed up first time around at 738840
SGPro Autofocus settings changed
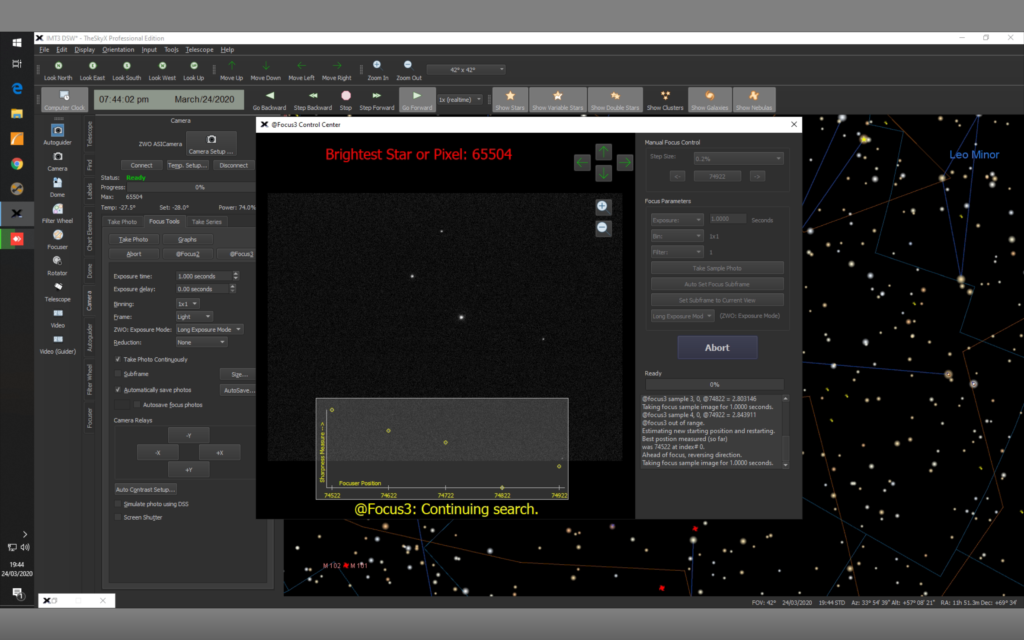
I had tried to get @focus working in TSX but it would fail every time on the galaxy with not enough stars. This meant I could not use TSX to solve and sync to centre M94.
SGPro autofocus
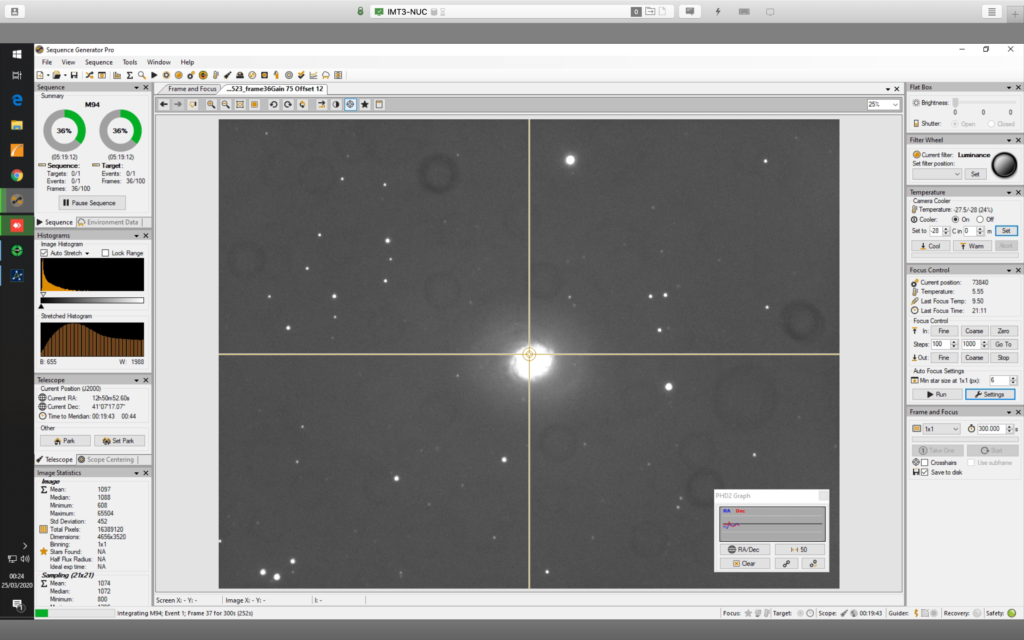
I then tried to centre with SGPro and that also failed so instead I used TSX to connect to the camera and manually moved M94 to the centre of the chip. I ned to get the local plate solver working as it was not running.
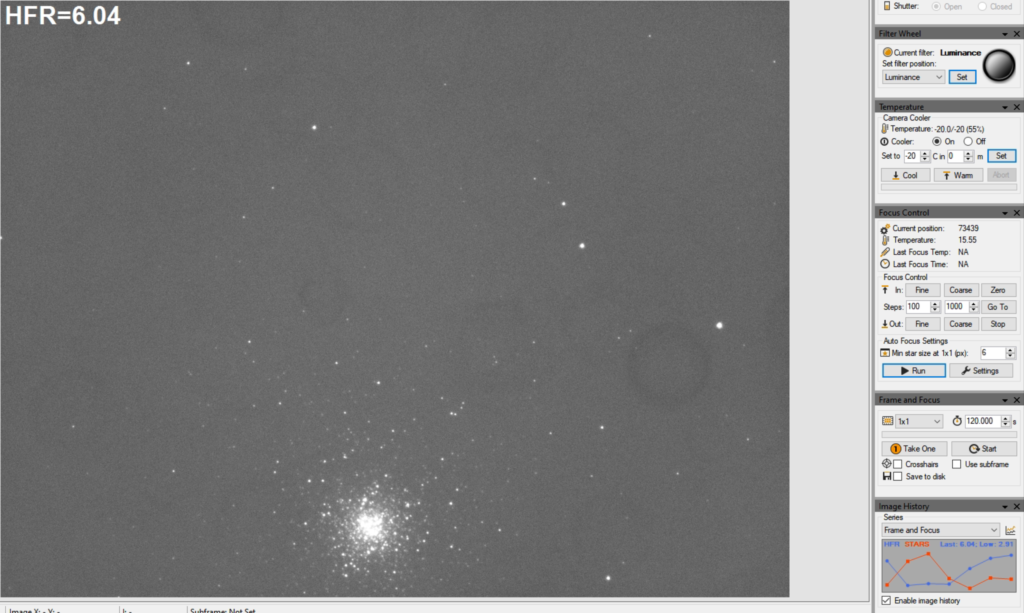
@ 20:32 I took an initial 5min sub to see what the image would be like after setting PHD2 guiding running.
5 min M94 sub
@1:20 and after gathering 3 hours of data I moved to other side of mount so meridian flip. I refocused as it had drifted a lot. I now need to consider setting up focus move for temp as the focus shift is dramatic. I also changed PHD2 Hysteresis setting to 0.20 from 0.10 as the PHD was having problems guiding.
I struggled to find guide star and landed up exposing for 15s and then having to increase, possibly needs recalibrating on this side of the mount. But also I need to find a brighter guide star by moving the mount offsetting the galaxy. The other way is using one of the piggy backed scopes which I may do next time.
@1:43 the dome closed, not sure why, might have been high cloud but probably because the WSX software lost contact with the WSX hardware. I did a reset and reconnected and then it was fine, but as the dome had closed I packed up with 3 hours of Luminance data on M94. I now need to take flats on the morning.
Single 5 min sub stretched in PI
Learning’s for next time……….
Update the SGPro Equipment profile with the changes for step size and data points for autofocus
Make sure the local plate solver is working and online at localhost
Review Anydesk bug that changes mapping of keyboard
Check out why WSX is loosing connection and shutting the dome
Work out how to use temperature compensation for the focuser in SGPro
Flats from the following day at the same focus point
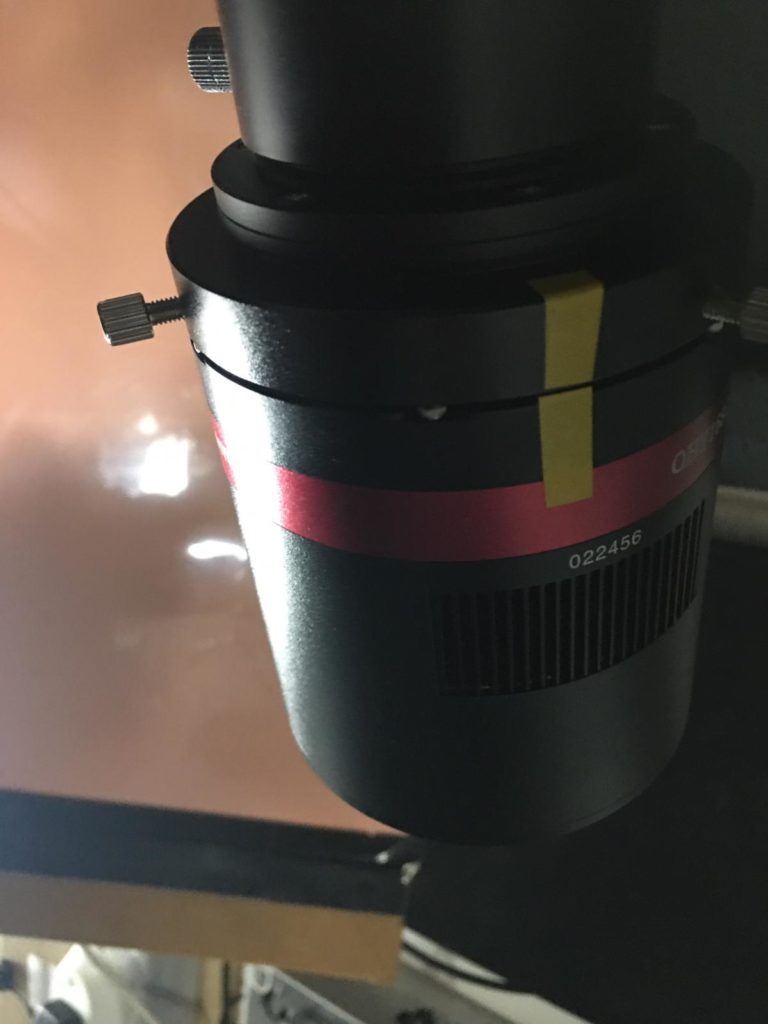
Bob had noticed a lot of dirt on or near the sensor on the QHY168C camera that forms part of the imaging train on the Tak FS102. Today I took the camera off for a little spring clean.
The first thing was to mark the rotation angle of the camera so that it goes back on exactly. 21 degrees is the rotation angle as measured through an actual image.
Taping up position angle on QHY camera
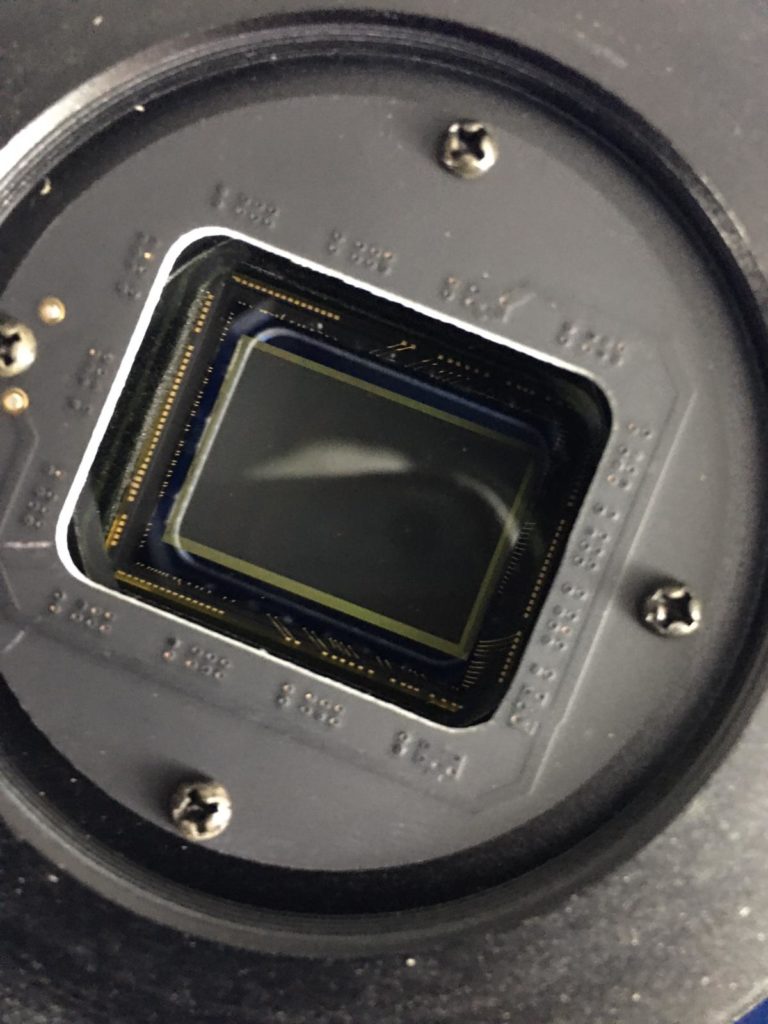
Next I took the camera off loosing the 3 screws holding it in position and then took a look at the CMOS chop glass cover for dirt.
Inspecting QHY168C for dirt on glass cover
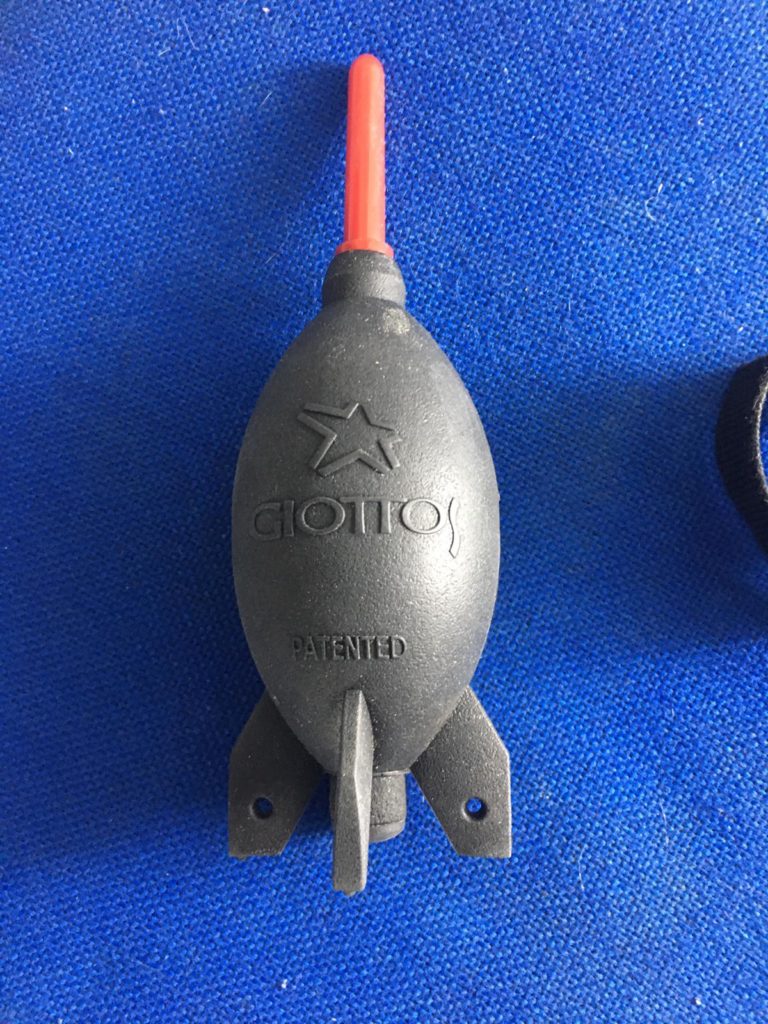
There was really only a couple of pieces of dirt on the cover so I removed them with the blower.
Rocket blower
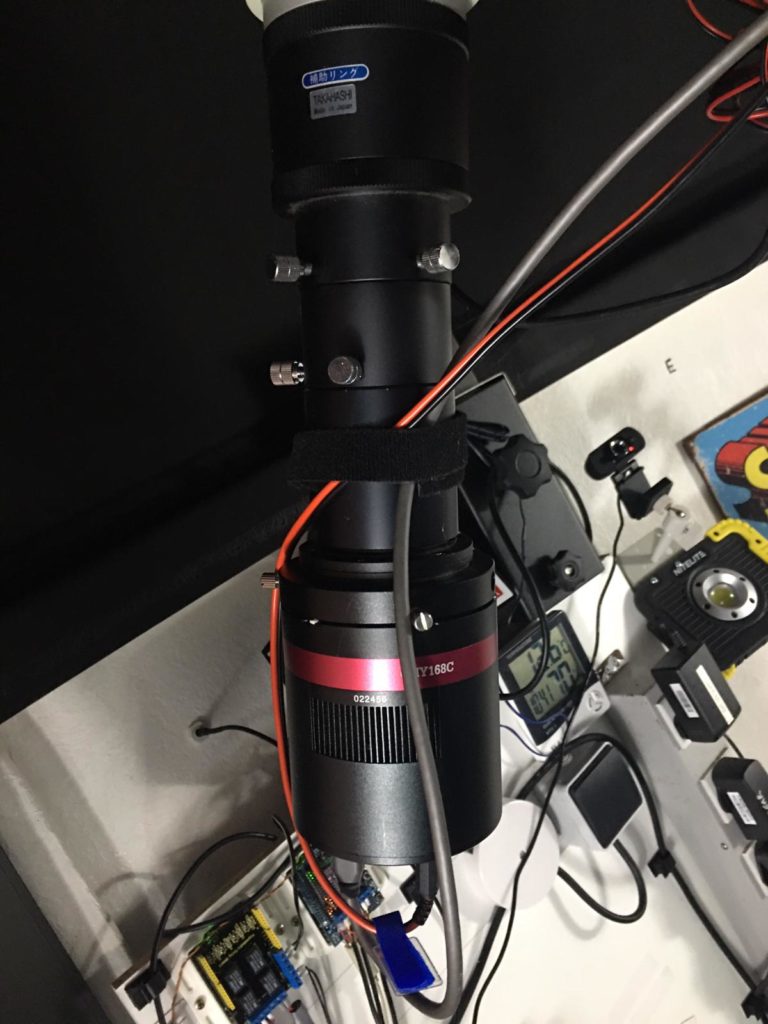
Next I took off the extension tube with which has the glass UV lens inside. At this point I forgot to mark up the position angle when I took the extension tube off. So when I reattached I look at the image train photo to adjust. Hopefully it will be very close and will only require minor adjustment.
Tak FS102 QHY168C imaging train
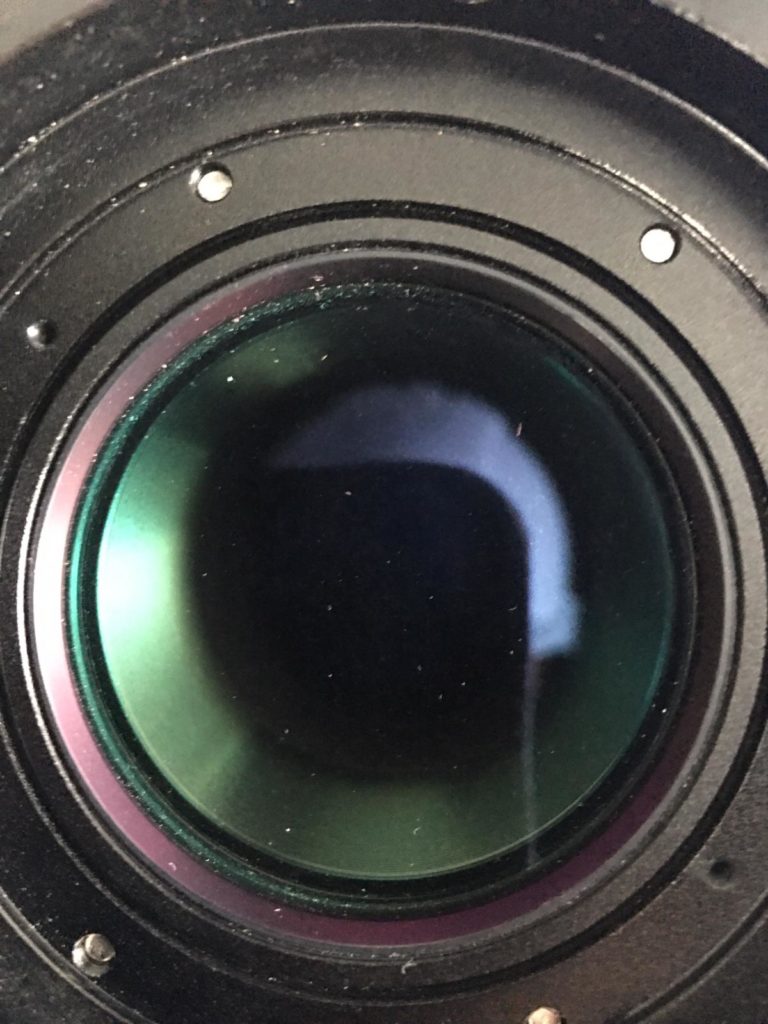
Looking at the UV filter it was instantly visible that there was plenty of dirt and dirt on the glass lens, however it transpired to be on the inside of the lens toward the OTA. O removed the filter to clean with the rocket blower.
UV glass filter dirt and dust
I then reattached the filter, the camera and reset the angle. I followed up by feeling for any play in the Tak OTA bracket that piggy backs it on the OS12″ OTA. I could not feel any. I was checking due to a shift on the FoV when Bob was recently imaging. Again the next time out we will need to readjust.
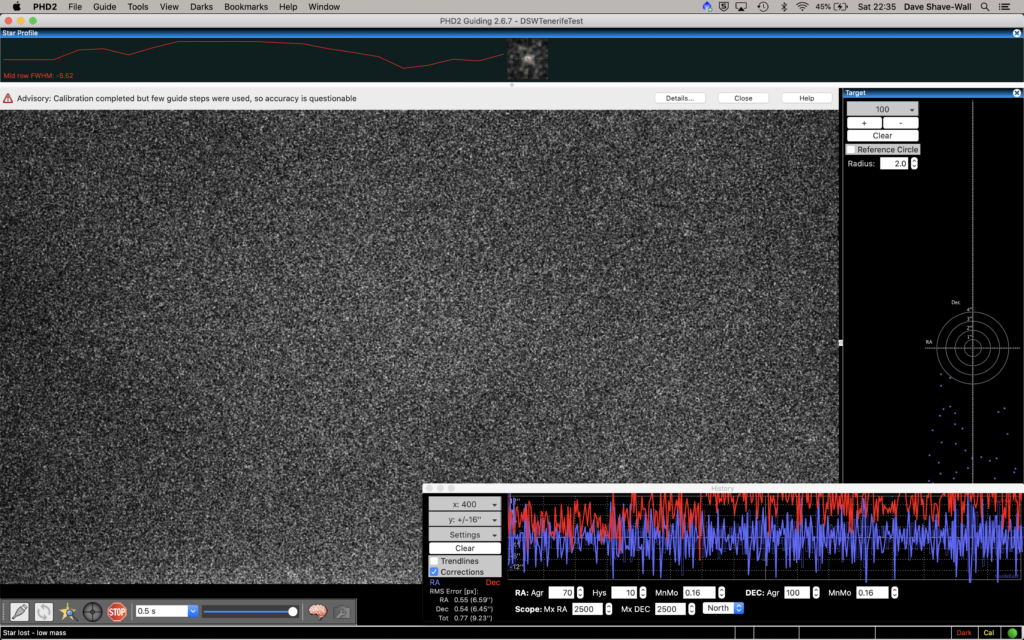
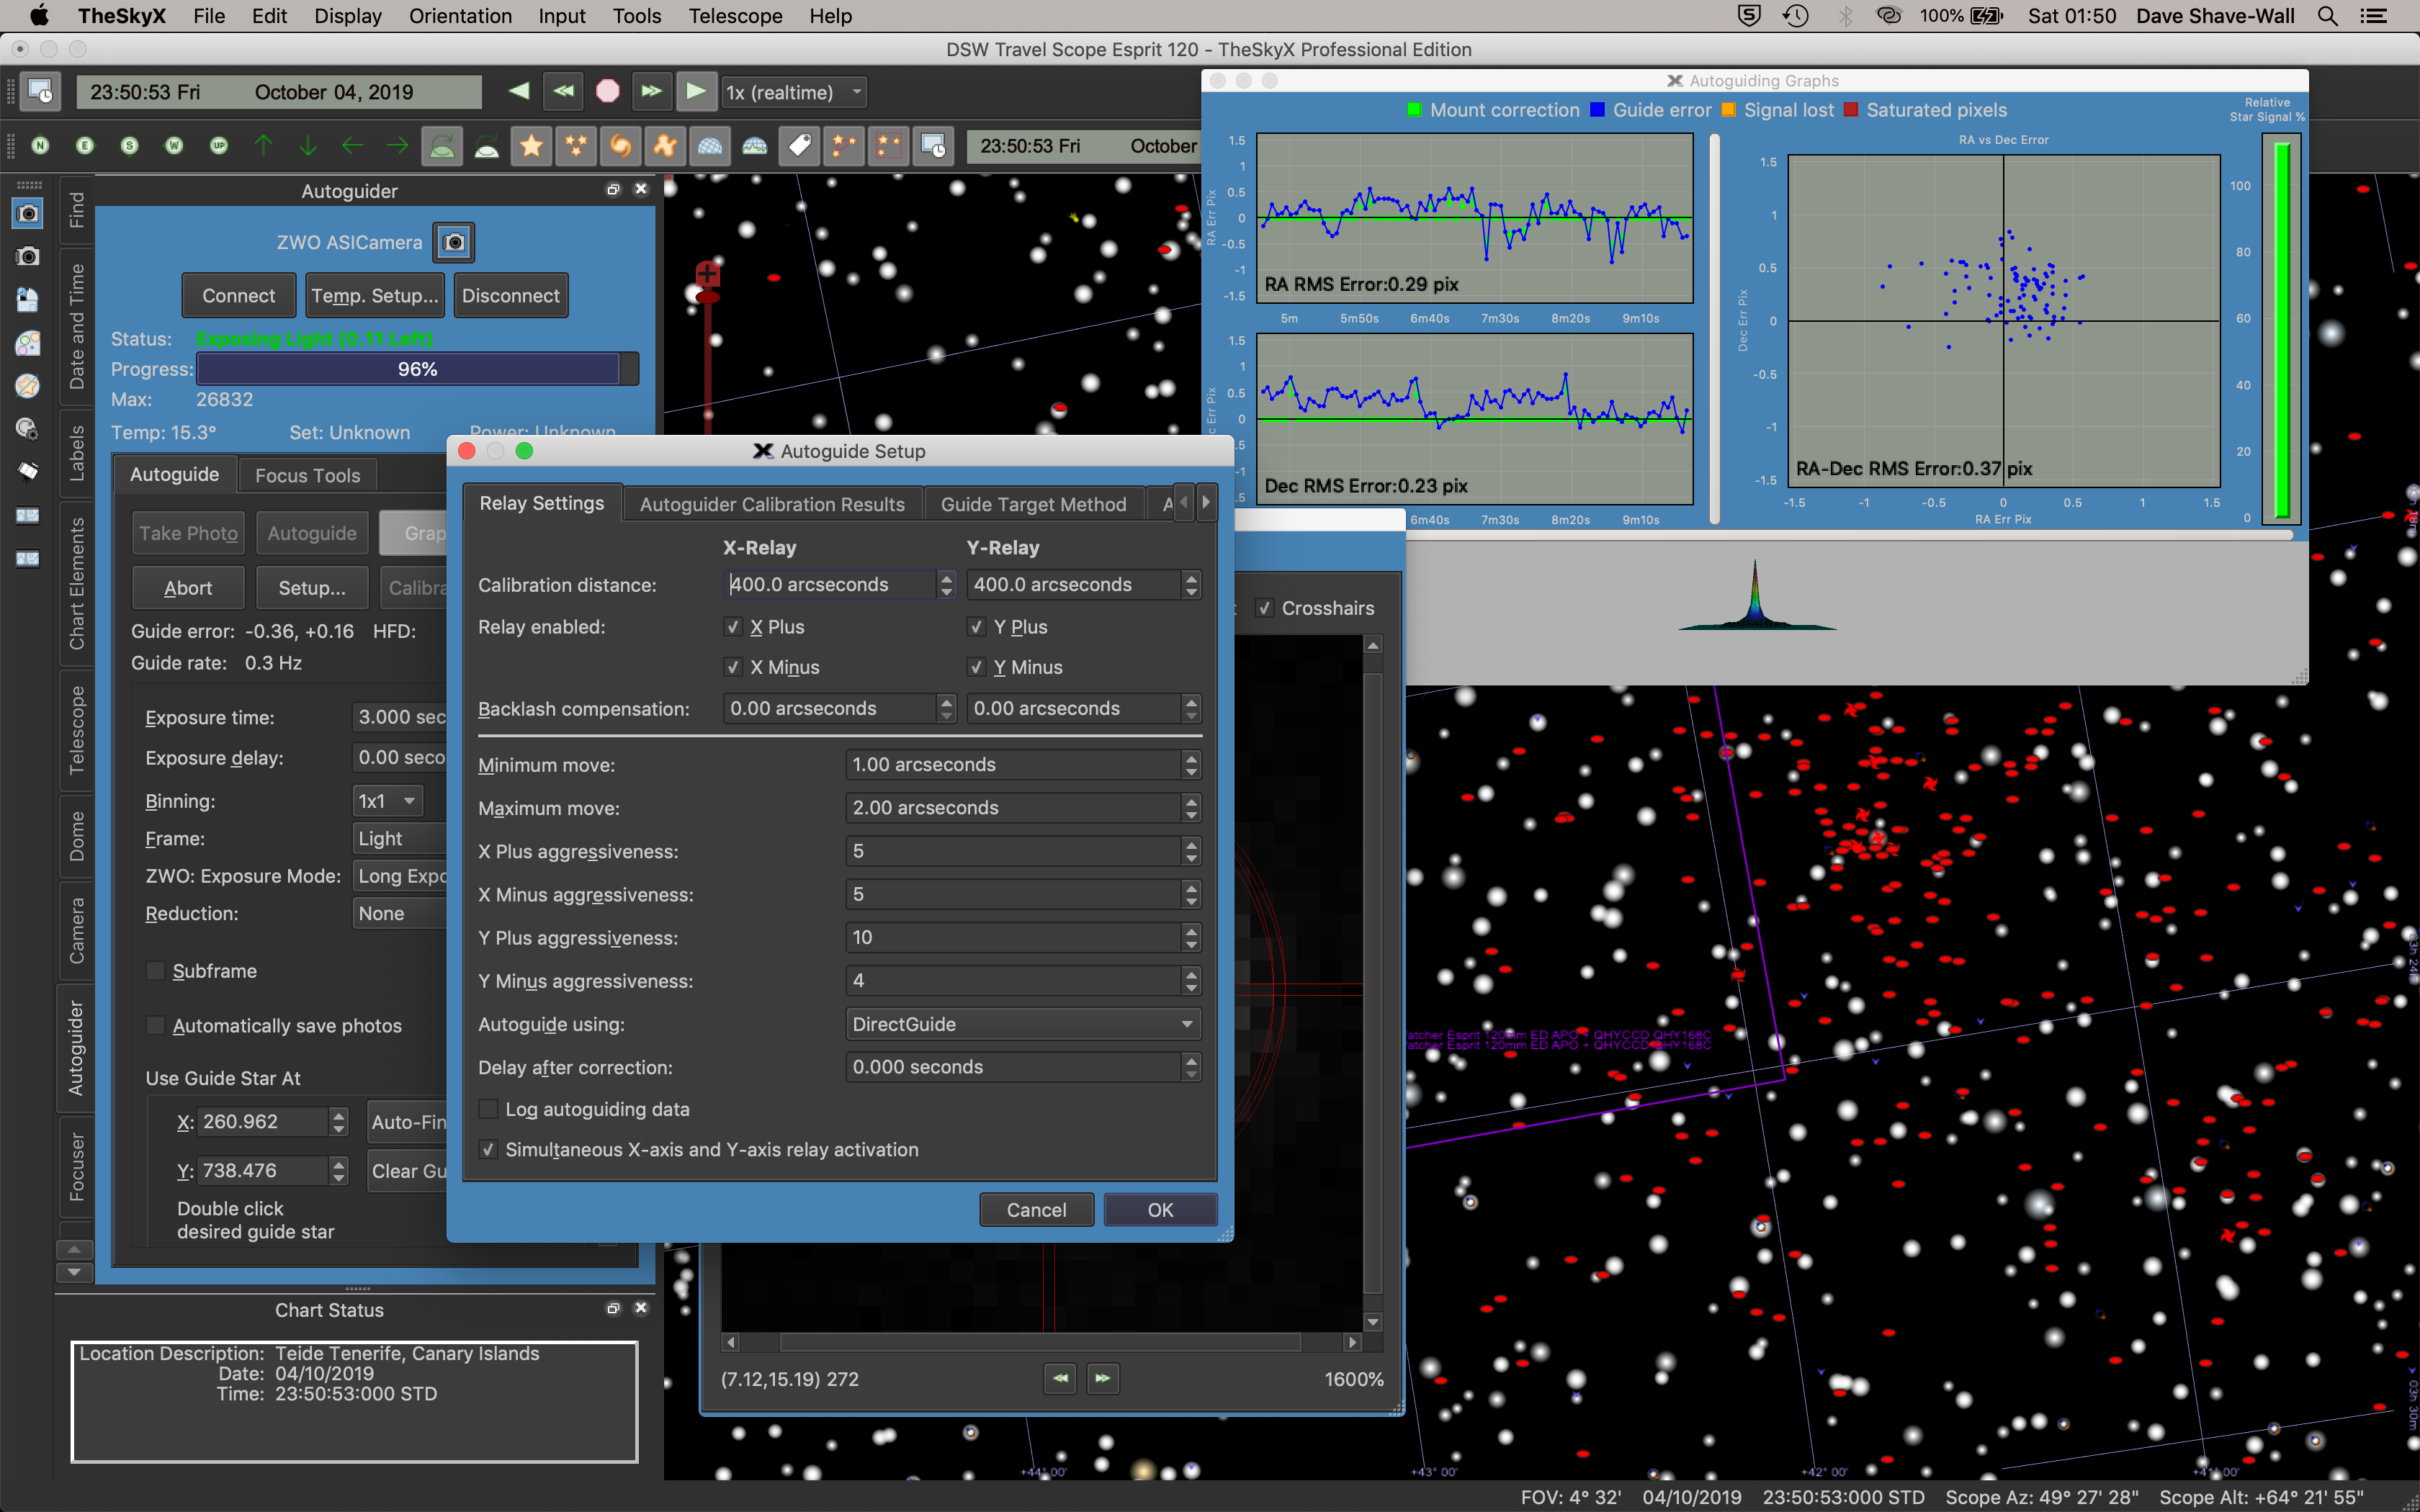
Back out again tonight for a short period to look at guiding again. So with everything setup and a longer USB 2 cable in use I am now sitting in the warm Orangery. I will try again with the PHD2 software to guide and EzCap to acquire images from the QHY168C. I have set the Gain to 7 and Offset to 30 as previously used on my other QHY168C when used in Tenerife.
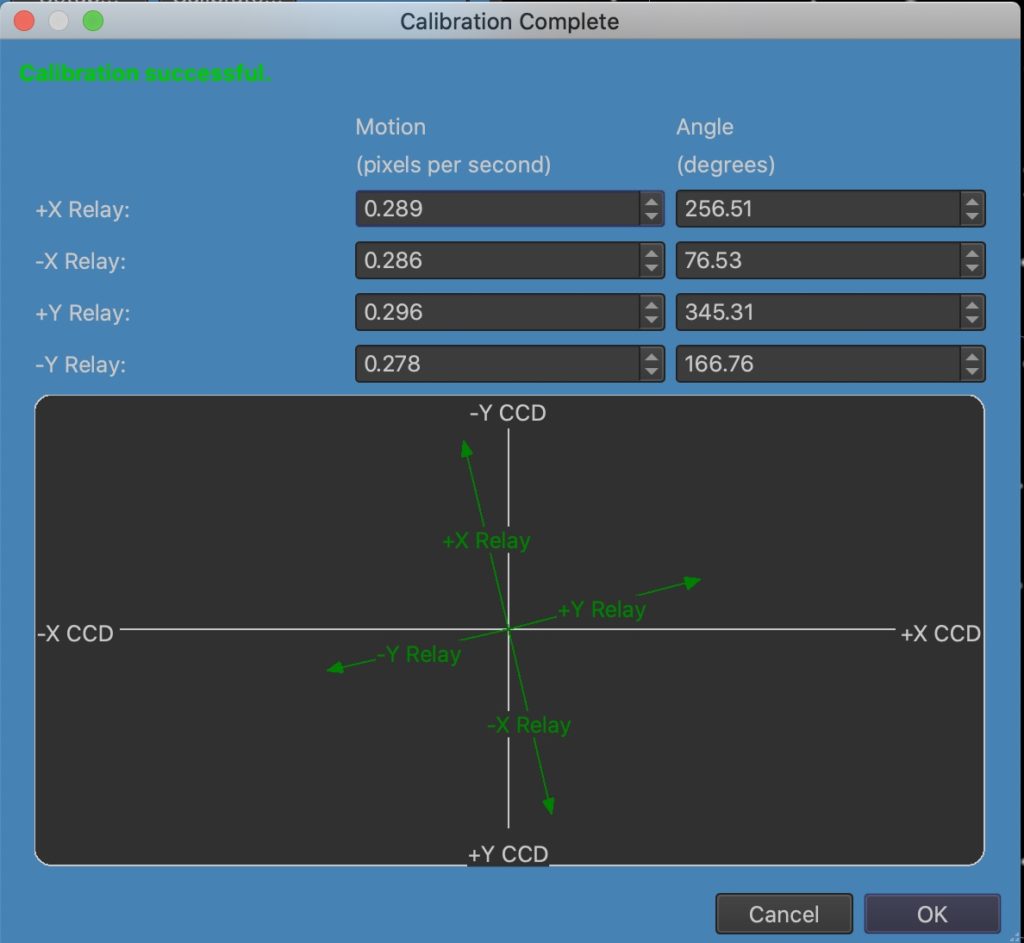
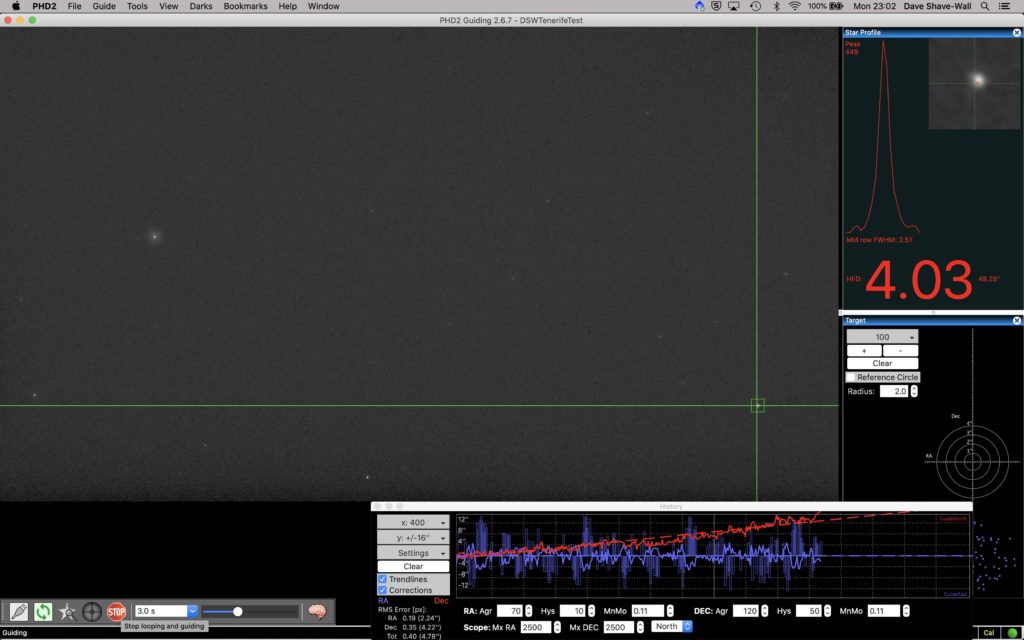
I polar aligned using PoleMaster. Then set about syncing the scope with Betelgeuse. It was only off slightly. The sync worked fine tonight. I then slewed to M35 and started the PHD2 guider software, selected a guide star and calibrated the guider. This worked well first time proving my new step size of 4 using a small ms time for the pulse worked.
Then I started guiding and very quickly realised the same problem as yesterday with DEC drift upwards. No amount of fiddling with the setting such as Hysteresis or Aggressiveness changes the constant upwards drift. I then remembered that I could calibrate the settings as the other night under Guider Assistant. I ran this made the changes but still the upward drift.
I then remembered that on the Paramount MEII in the dome I had to drift align with PHD2 to get it properly polar aligned and that PoleMaster was only good enough for short exposures or rough guiding. So I set about drift aligning.
PHD2 Drift Alignment
The first thing to note is that the polar alignment was out by a fair bit to get the accuracy I require in both azimuth and altitude. I have now adjusted both and the graph seems a lot smoother.
So in all it took me around 1 hour to drift align and just as I was about to test the clouds rolled in!
Tonight I wanted to continue to try and get guiding working, I setup outside on a much calmer night, no real wind tonight. Bob once again is playing with the IMT3.
I setup in the same place on the patio and again fed the USB cable through the window. I used the Polemaster to get the mount in the right position and then slewed to Betelgeuse to see if it was in the centre and it was!
I then slewed to M35 and connected the guider with PHD2. After some back and forth I got it calibrated but it was complaining about the amount of steps being to small for calibration and the guiding was all over the place. The screen brightness was still very white. I solved this by changing the Gain for the camera.
I decided to give TheSky X a go at guiding instead of PHD2. Unfortunatly it was not much better and at one point I could see the downloaded image from the guider then suddenly it disappeared, I had changed nothing but now it was black. Nothing I could do would make it come back including disconnecting. So I went back to PHD2.
I managed to fix the issue in PHD on the amount of Steps being used to calibrate by adjusting the calibration step size down from 5333 to 1300. This increased the steps from 3 to 5. Much better and now I don’t get the error.
PHD2 good calibration
However right now I still cannot get the Dec to behave. Whilst I can take a 5 min image the Dec is wonder up from where it should be and no amount of tweaking the Aggressiveness or Hysteresis changes that.
Furthermore, I decided to take images with The Sky X over EzCap but after 4 images TSX hangs every time……. So I have now given up tonight and will come back out the next cleanser night to resolve the issues.
First time out for a very long time with the travel setup. I need to get the guiding working before the Tenerife holiday in July. I have left Bob to play with the IMT3 whilst I work through the bugs.
The challenge is at first remembering how to set everything up. I found after some effort I was actually missing a cable, it was in the black wheelie case in the garage with the laptop tent and scope daytime cover, but more about that later.
So So after finding a place on the patio where I could feed the USB cable through the Orangery window, I put the Berlebach tripod down and placed the MyT mount on top. I tightened the screws and then placed the Sky-Watcher Esprit 120 ED on top of the Versa Plate. Once in position I balanced the scope then connected the various cables, now all through the mount due to my good friend Bob making up some power connectors for me.
So I tried to guide through PHD2. There was a large wind blowing. On trying to calibrate the scope would not move. After what seemed like an hour I remembered that cable, this was again the ST4 guider cable that is needed on the Mac if you are guiding with PHD2 as there is no ASCOM. So I connected the ST4 cable and it worked.
What I could not achieve tonight was to get the guide graph behaving, it was a mess. The wind was at fault but still there were other issues, not least the slider to control the contrast of the screen was causing anything above 0.5s to become white.
Guiding a mess with PHD2
After many hours I gave up and brought the rig in. I had been using TheSkyX to slew there scope, PHD2 to guide and EzCap to connect to the QHY168C camera and take images. I will try again tomorrow night.
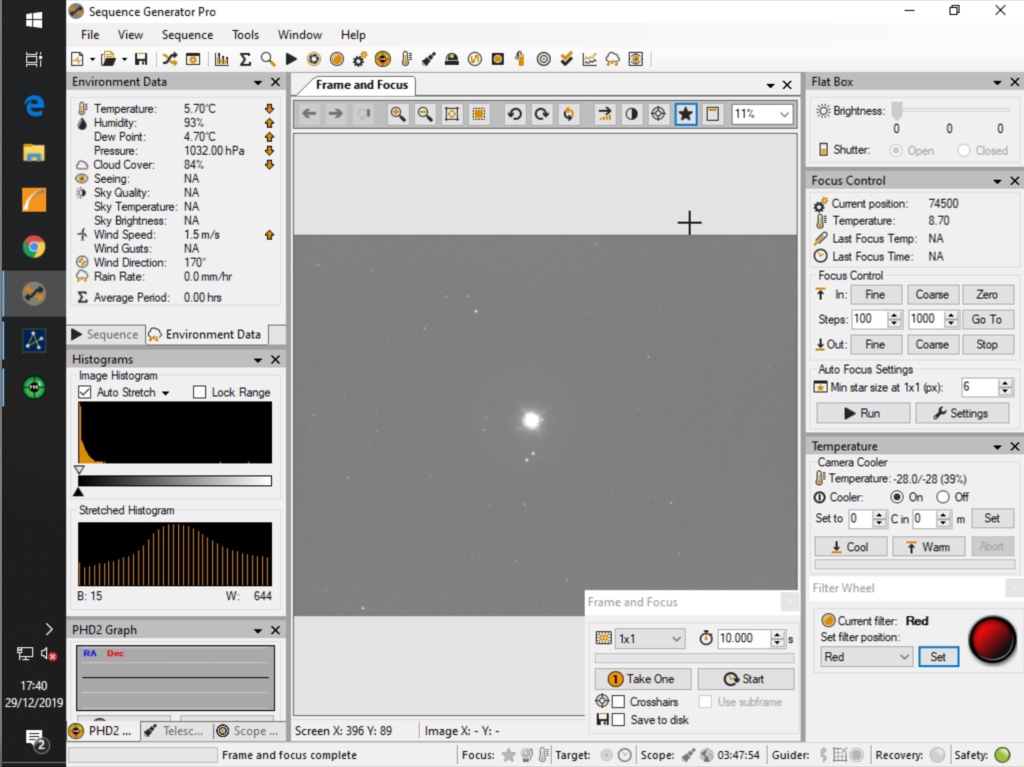
Slightly hazy right now but I have opened the dome up and turned the cooling fans on the 12″. Slewed to Atik, a mag 2.8 star in Perseus and aligned the scope.
Atik mag 2.8 star in Perseus for alignment
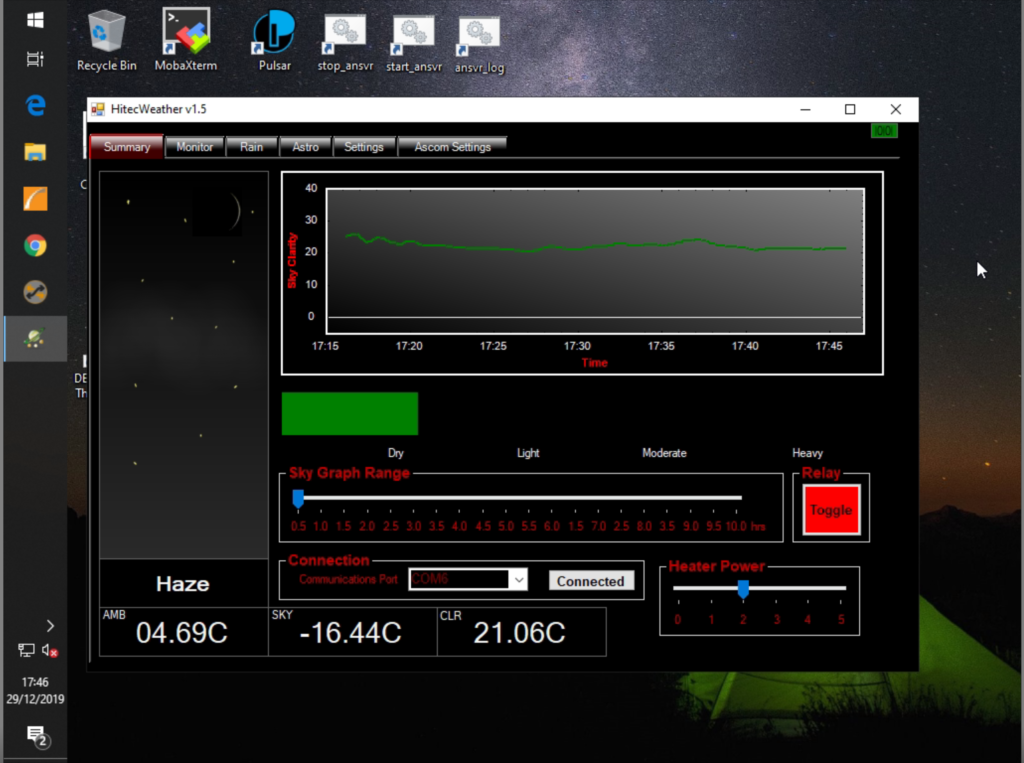
So the star was almost in the centre when I slewed the scope to it, a slight tweak and now synced on it centrally. The Hitec Astro weather station reports slight haze
Hitec Astro Weather Station showing haze
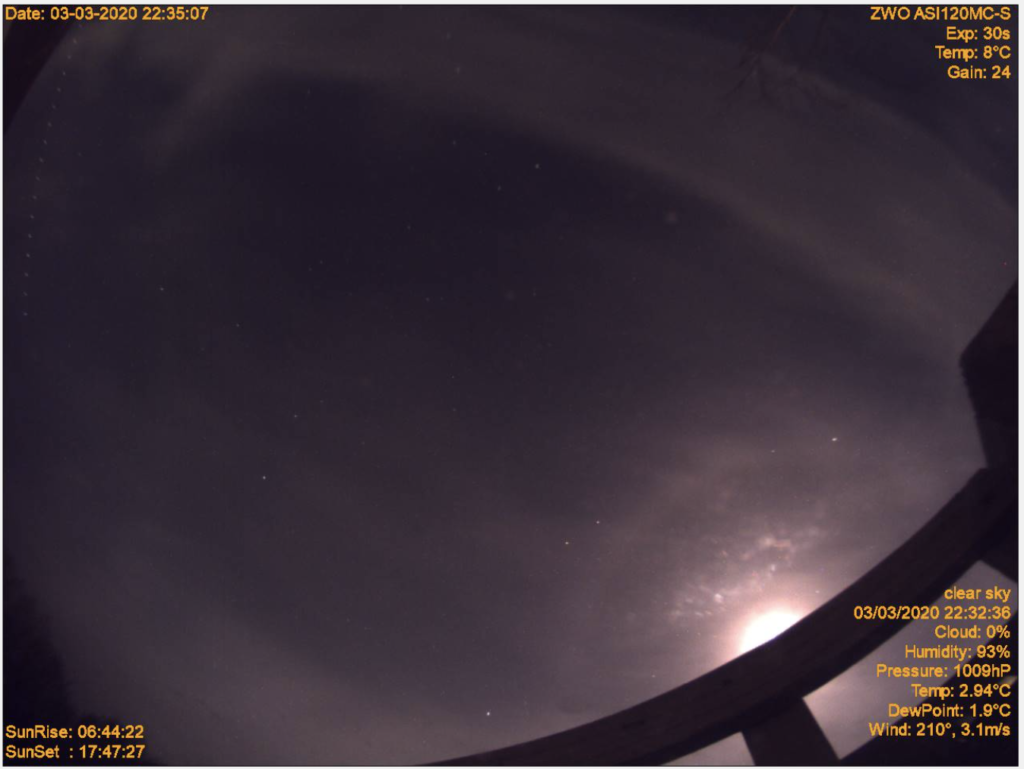
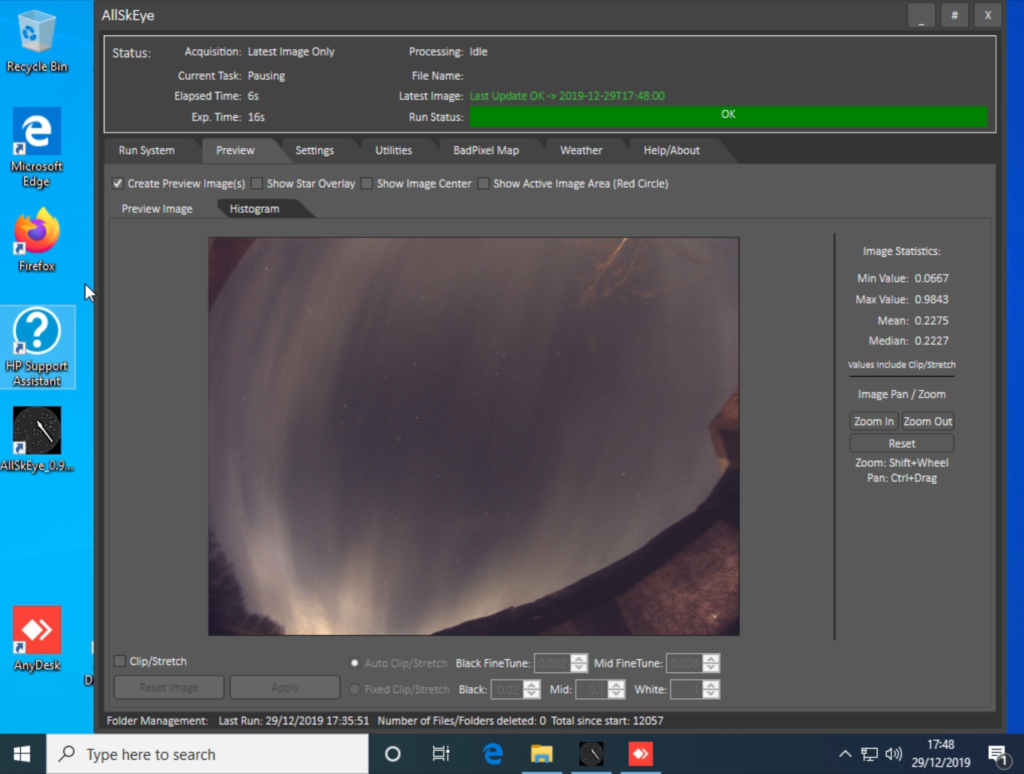
Gingergeek installed a new Intel Windows small form factor computer recently in replacement for the RPi so we could run the AllSkEye software and see if the loss of one of the colour channels was software or hardware. Here is tonights image, which still needs colour calibrating during the day.
At the IMT we were experiencing stability issues with the ZWO ASI120MC USB3 camera on the MAC/NUC so we decided to move it to it’s own Raspberry Pi4 (4GB) as a cheap experiment.
The Raspberry Pi4 has the advantage of improved networking and connectivity including USB3. One of the downsides of the RPi4 is the increased heat generated by the CPU which is mitigated by housing it in a FLiRC passive case to dissipate the heat and prevent thermal throttling.
Additionally in order to prevent SD card wear and improve the I/O throughput we configured the RPi4 just to boot off the SD card but serve the rest of the file systems from a SSD connected via USB3.
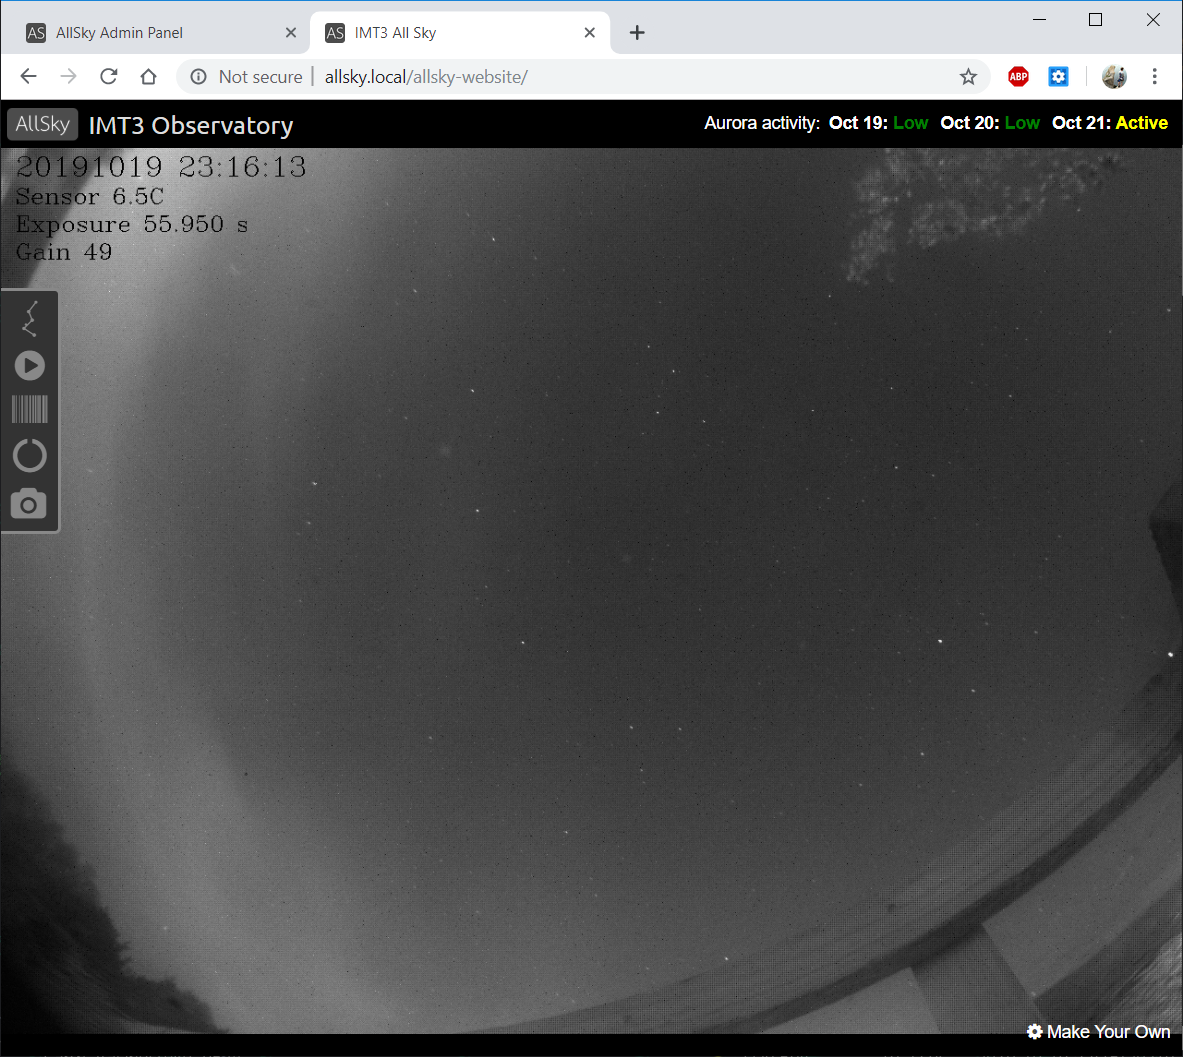
AllSky Camera Software
Using the open-source AllSky Camera project for ASI camera support we gain some advantages. The main advantage is that it’s open source (served via Git), provides an admin and public web portal which is addressed locally as http://allsky.local and the software can be set to start on system startup.
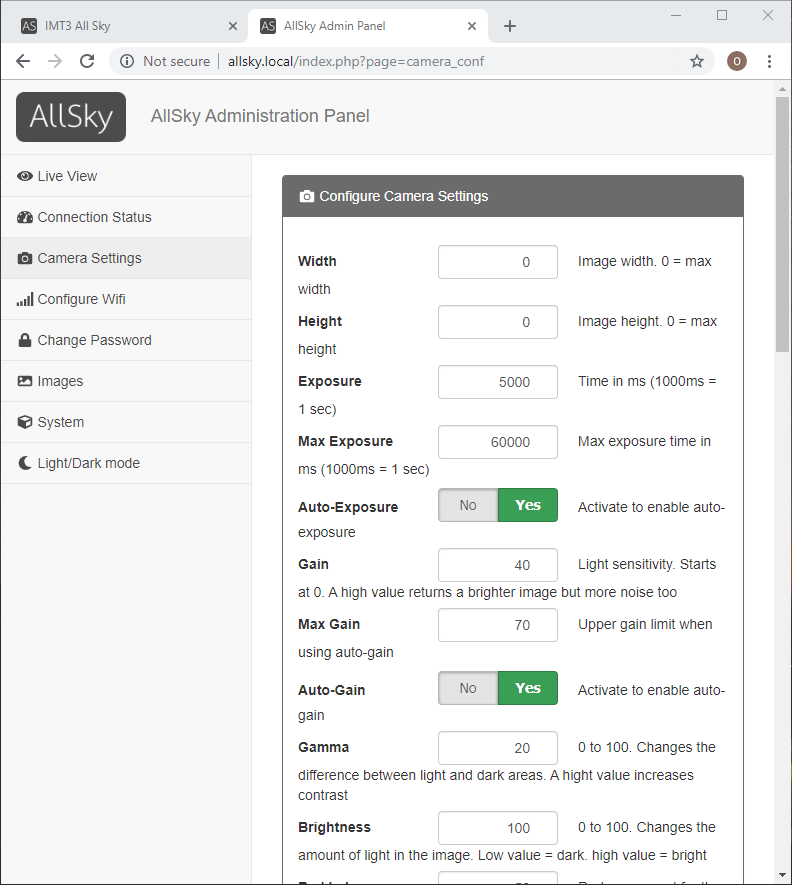
Admin Web Portal
The allskycam software can restart on system reboot but it can also be stopped/restarted via the web admin portal.
The configuration is simple and the mode/behaviour of the software can be controlled via the GUI or via a settings.json file from the command line.
Admin Portal – Camera Settings
I recommend you take the time to create a dark reference image, again this is done via the GUI panel as long exposure frame will show extensive hot pixels.
RGB24 image hot pixels with no dark applied
Non Admin Web Portal
This is accessed via the address http://allsky.local/allsky-website and provides the latest captured image, a constellation overlay and the ability to view time-lapses and star trails.
Local network web site for non admin users
One of the nice features of the software is it’s ability to create a time-lapse of acquired images for the previous night. The following video shows the debayer issues as well as the dewing of the dome cover.
Time Lapse of evening showing dew issues/grayscale bayer
Bob is due to connect up the resistor ring he’s placed around the camera which hopefully should fix the dome dewing we encountered on the first night.
So it remains for us to fix and implement the following :
Resolve the lack of colour images (RGB24)
Image quality breakup
Resolve dark daytime images
Secure copy latest image/time-lapse to an external public website
Scale VirtualSky constellation overlay (180 degrees) down to 150 degrees
So I have arrived in Tenerife and for a few nights only I am up at the MONS observatory, using the plateau (concrete platform with power) outside the dome.
It was dark when I arrived at 20:15 so I am setting up by head torch and given the tripod and mount and scope are all in bits it has taken some time to put it back together.
I setup in the corner where Bob normally sits as thee were a bunch of students using the scopes normally kept in the sheds outside. After setting up I panicked as I had forgot my UK to EU plug ! I asked the lady leading the student outreach and she let me in the MONS and I searched for a plug and found one, despite everything being emptied out due to the MONS having work done to it. However on testing the plug it did not work 🙁
A call to the operator did not produced anything. So I tore down the scope and packed in the car, very disheartened. As I was just about to head off the operator arrived with another plug ! I took my laptop and tried it, but it did not work either. It took a while to work out but of course the power had been turned off from the fuse box and flicking the RCD produced power and so reluctantly I emptied the car and went about setting back up 🙁
By this time it was approaching midnight and I had been at this for some 4 hours. I started the laptop, found I was pointing almost spot on to Polaris, so using my Polemaster it took a few minutes to adjust. I then set about slewing to a nearby object, syncing and then finding a guide star, at this point my troubles where just about to begin. It was now 1am.
So after setting the temperature of the camera to -25℃ and the gain to 7 and offset to 20 I found the scope would not guide. It was bouncing all over the place, some of it was the wind, but some of it was erratic behaviour of the mount, so it seemed like it was overcorrecting. I started to change some of the settings but t no avail. All I could do was to shortened the exposure to around 90 seconds and try and get some data, even if the stars were slightly trailed. I would try to take a longer look at the guiding tomorrow night.
Not so great guiding
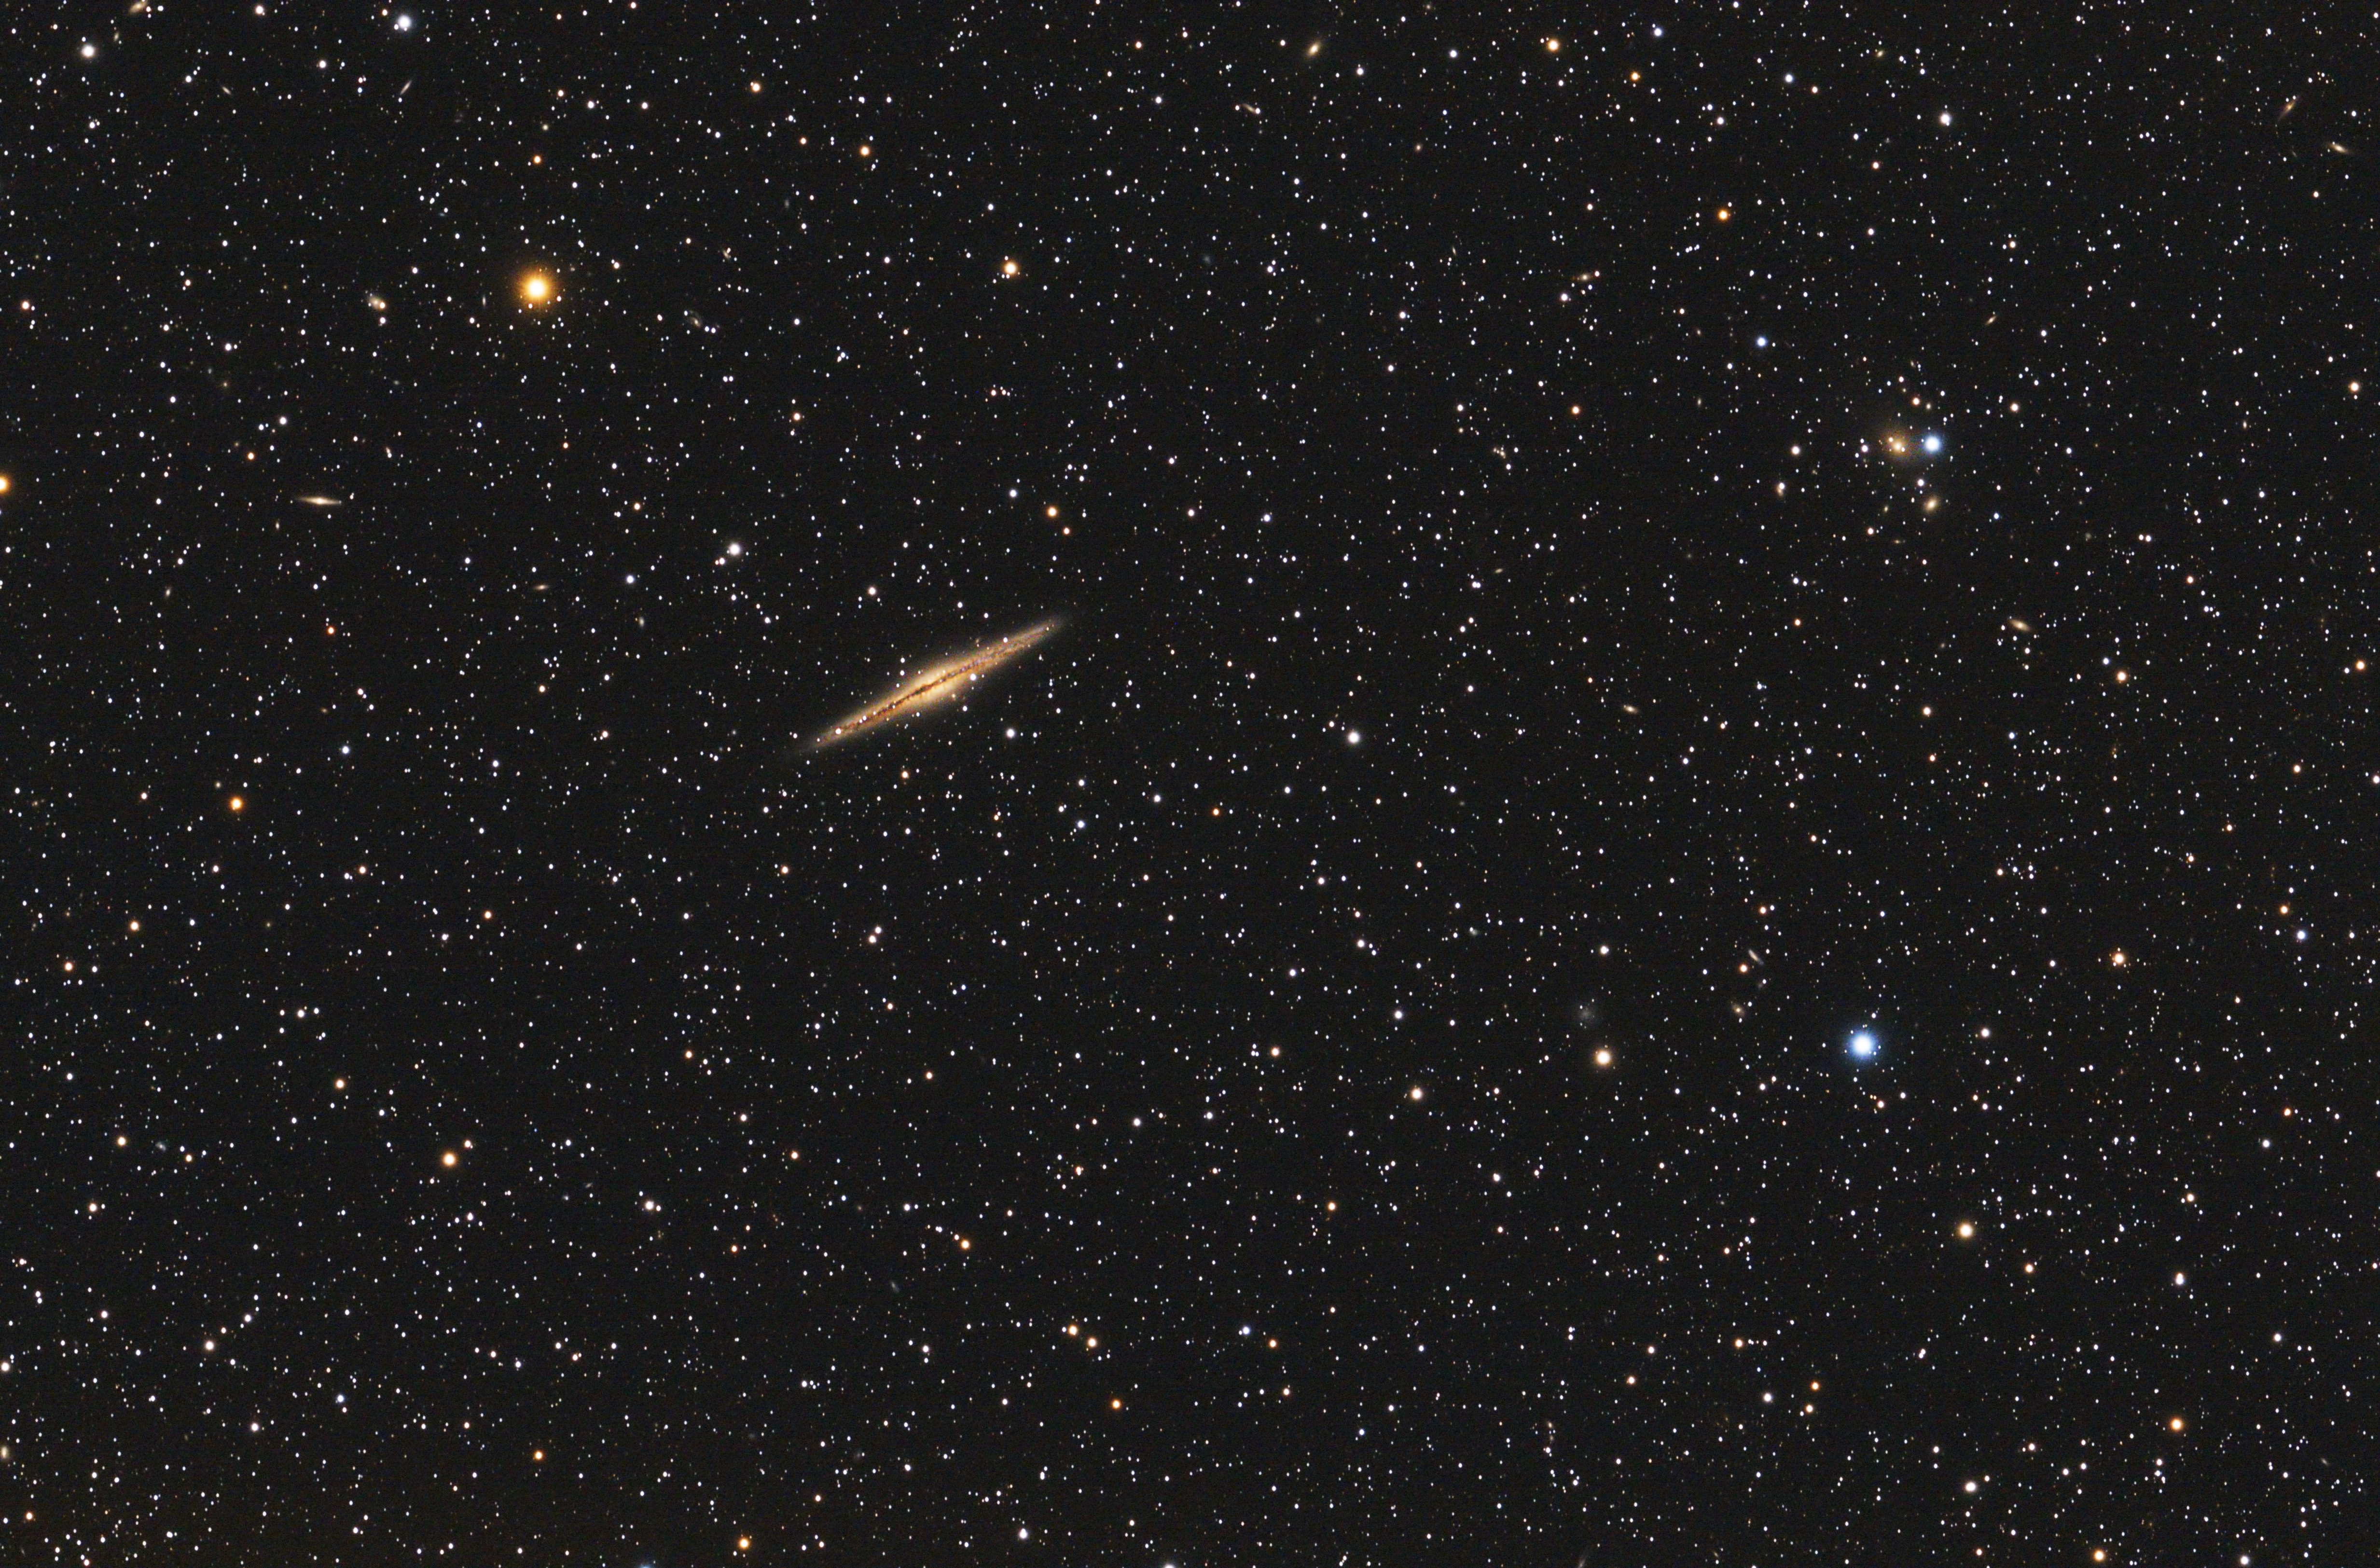
So I slewed to one of the objects I was to target, a galaxy called NGC 891 in Andromeda and started collecting data. All in all I grabbed 44 images before the guider was causing so much of an issue even 90 seconds was too long (processed image below)
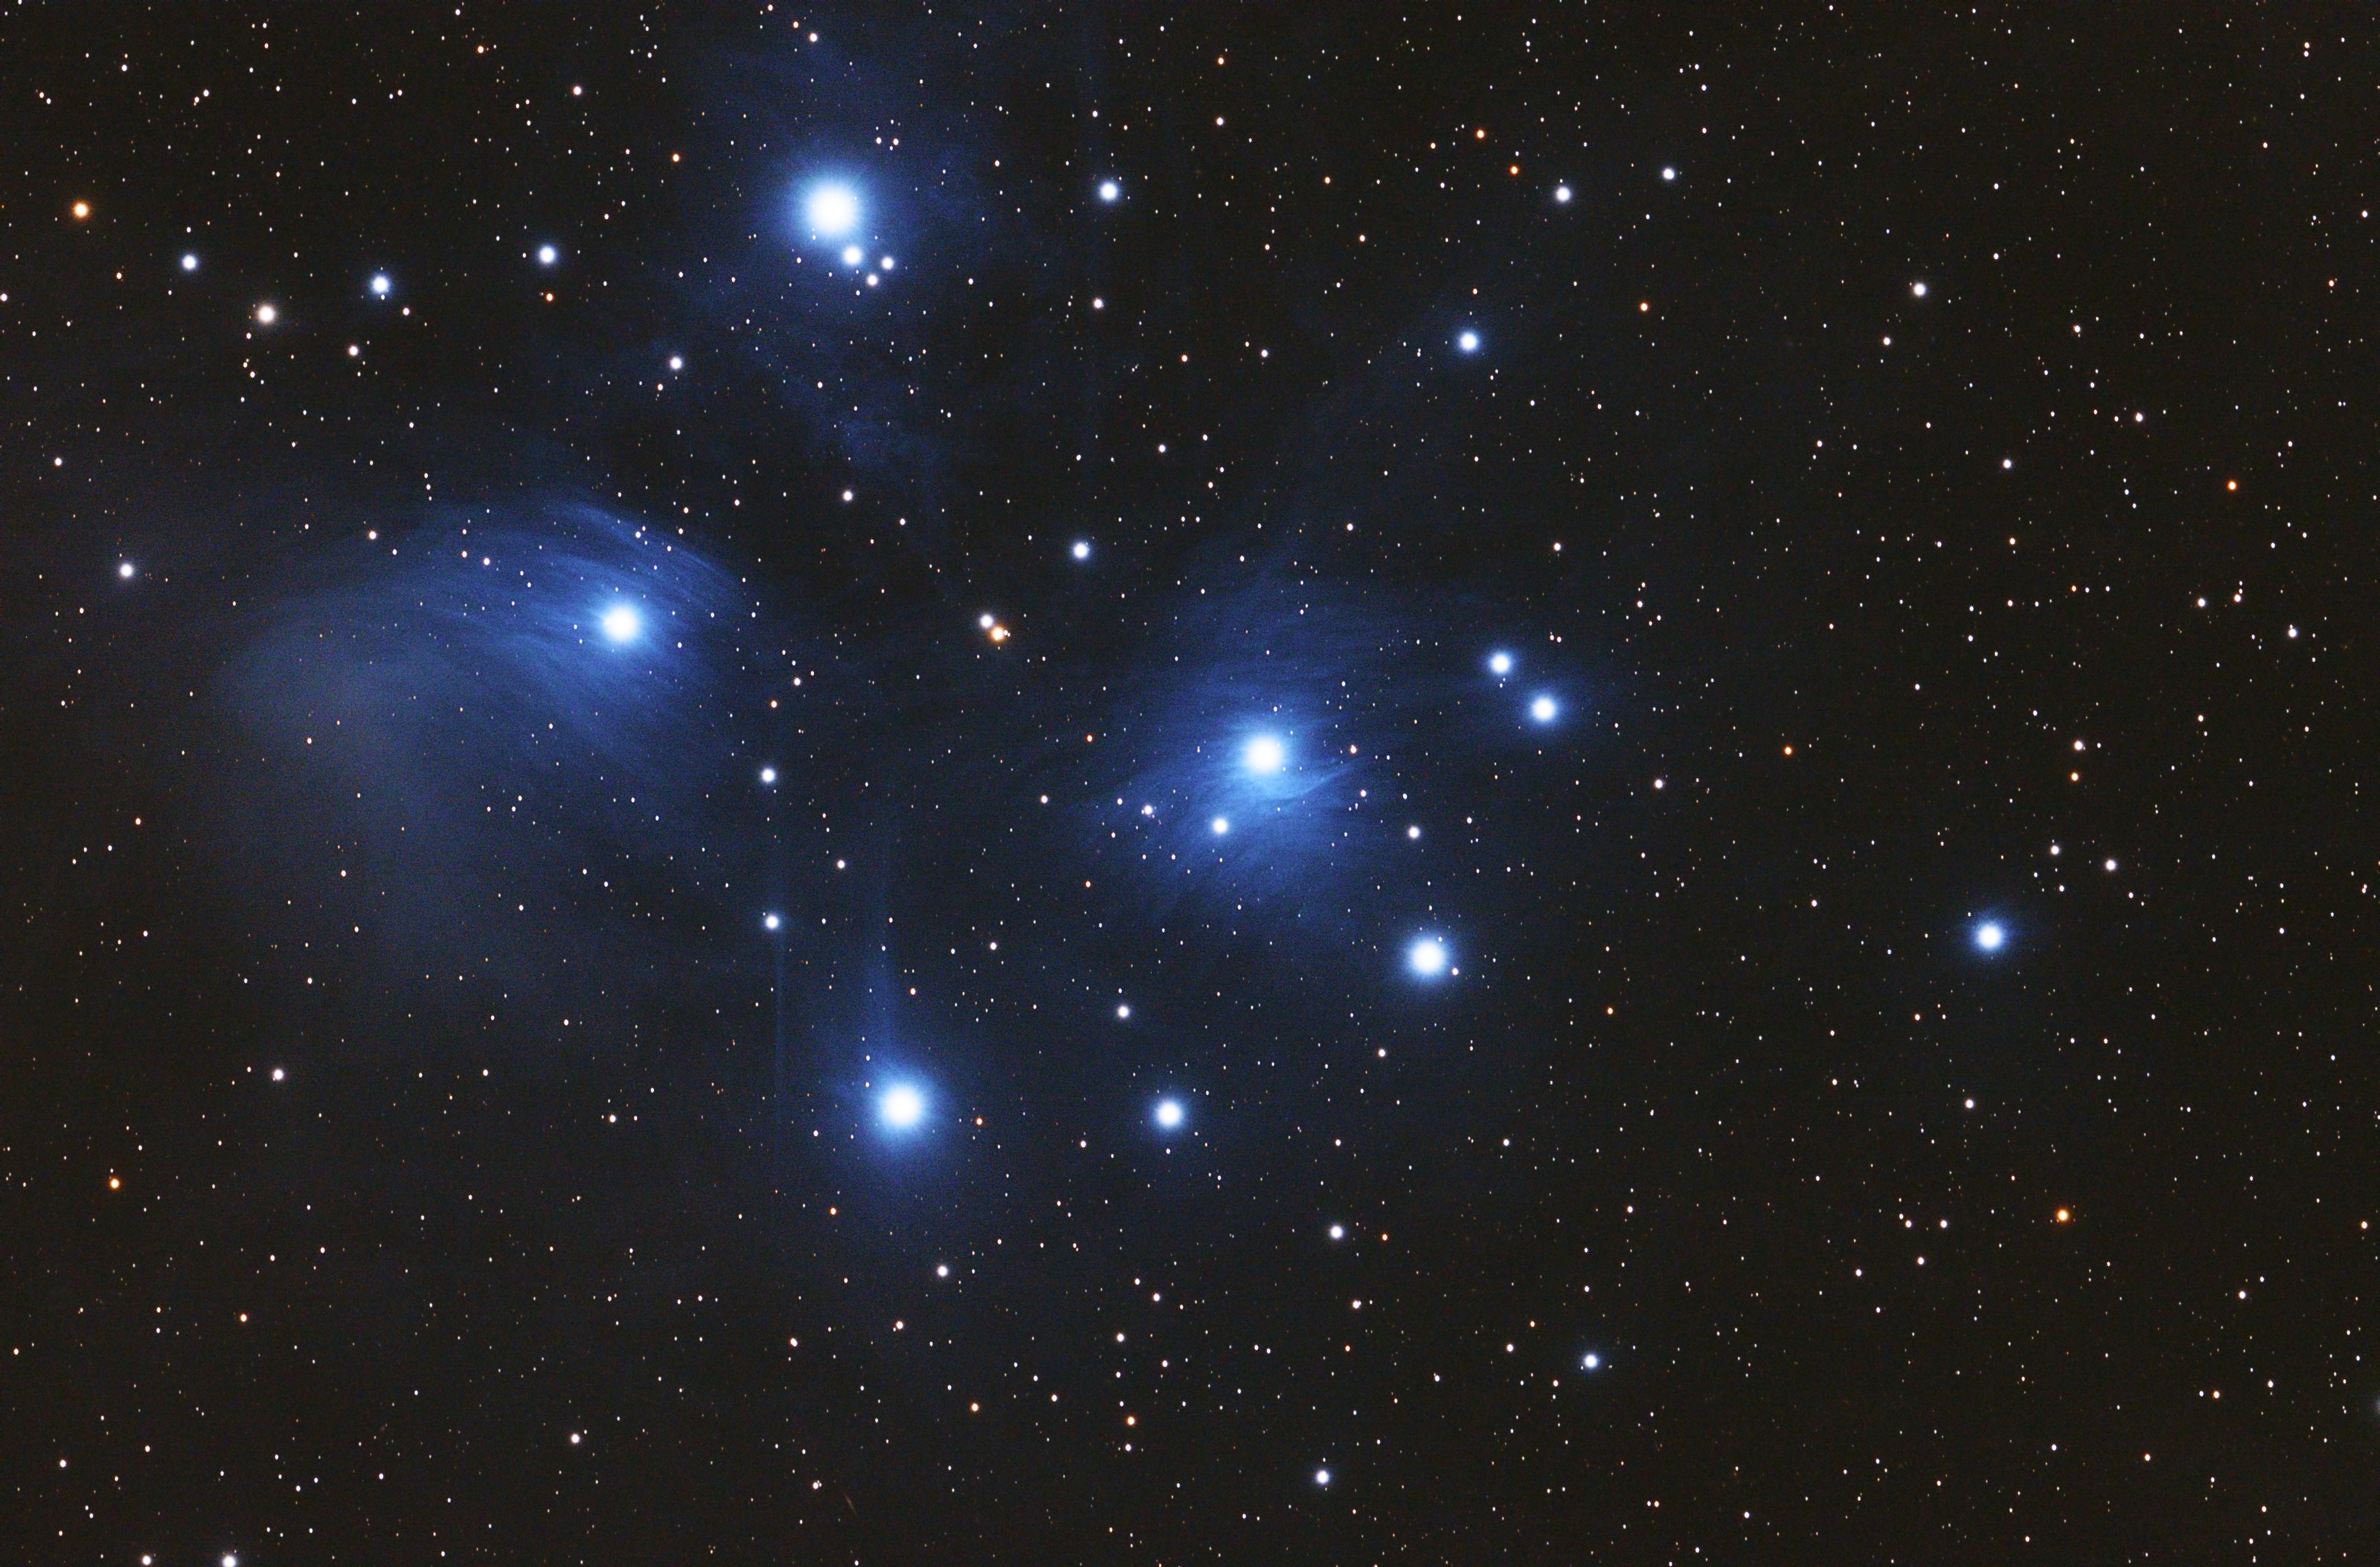
I then slewed to M45 in Taurus but still the guiding problems persisted. I took 4 x 90 second images and then decided to call it a night at around 3:30am.
Now for packing up the scope and the 1 hour 20 minute drive back down the mountain. How I miss observing from Hacienda on La Palma!
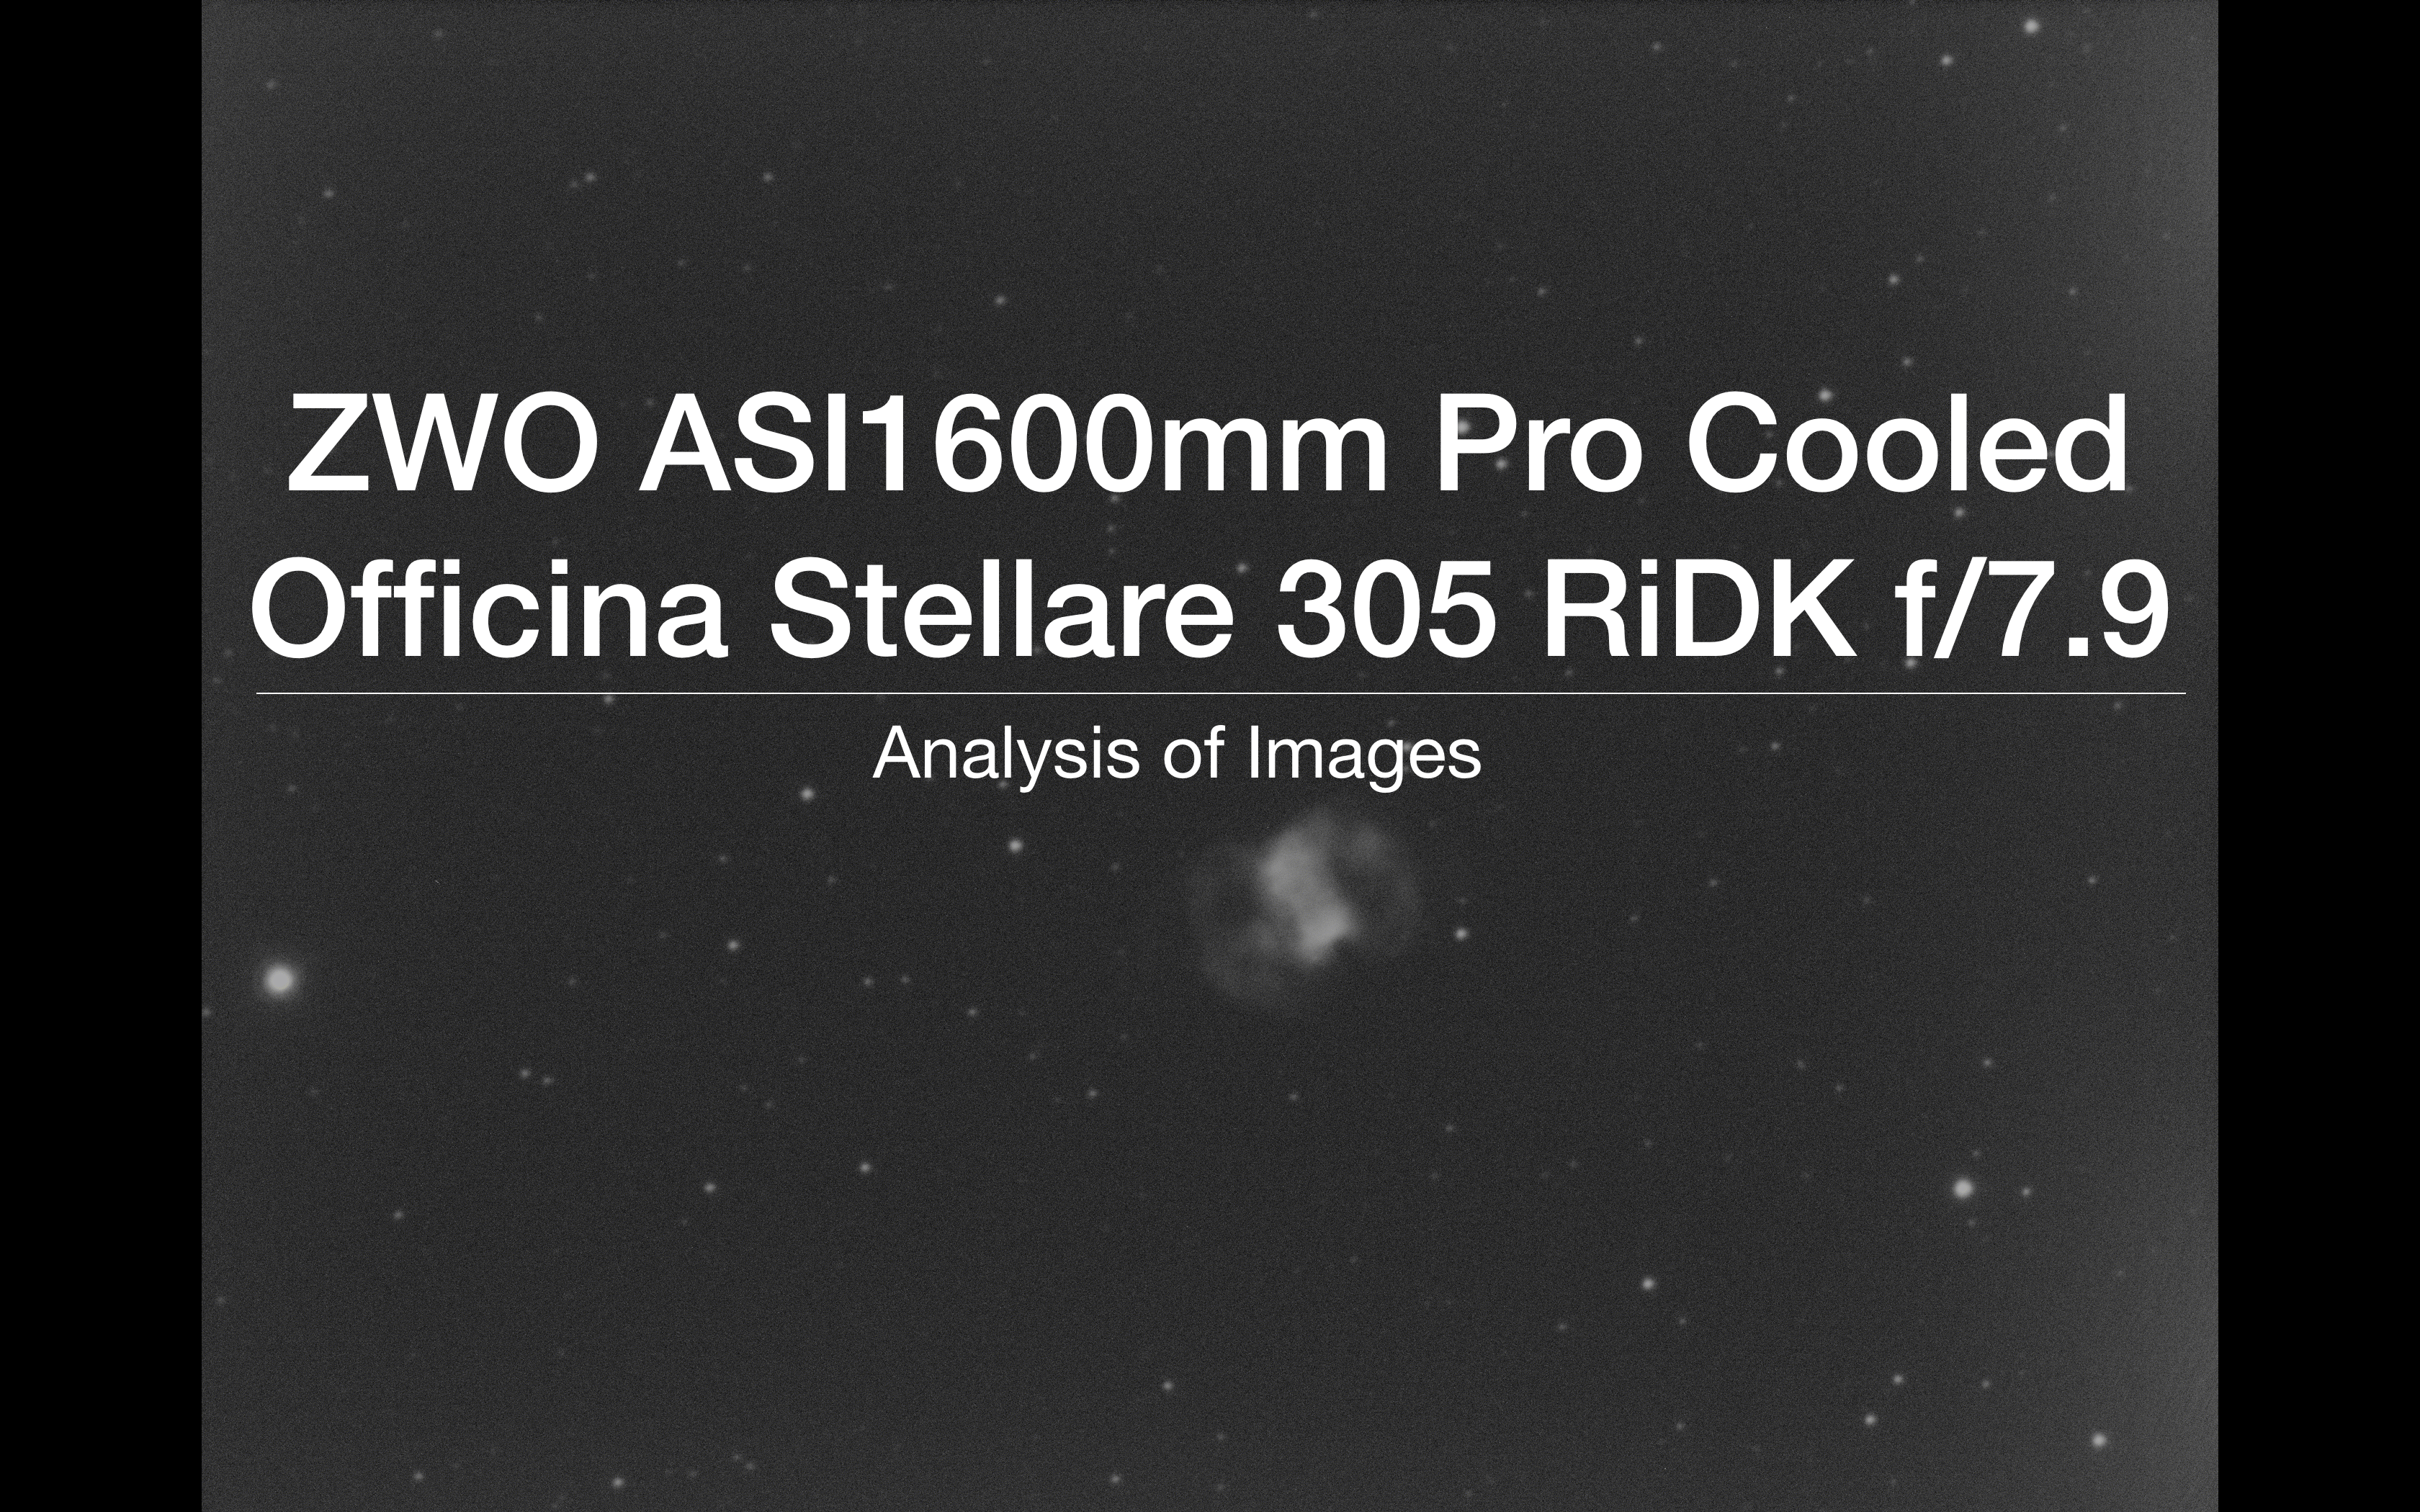
So the main approach here was to start testing the ZWO ASI1600mm on 5min images and decide which is the best Gain and Offset to use. As the object is a planetary nebula I have used my Astrodon 5nm OIII filter to bring out the faintest parts of the nebula. To be thorough, and this will take time, I plan on running the tests for all 7 filters I have.
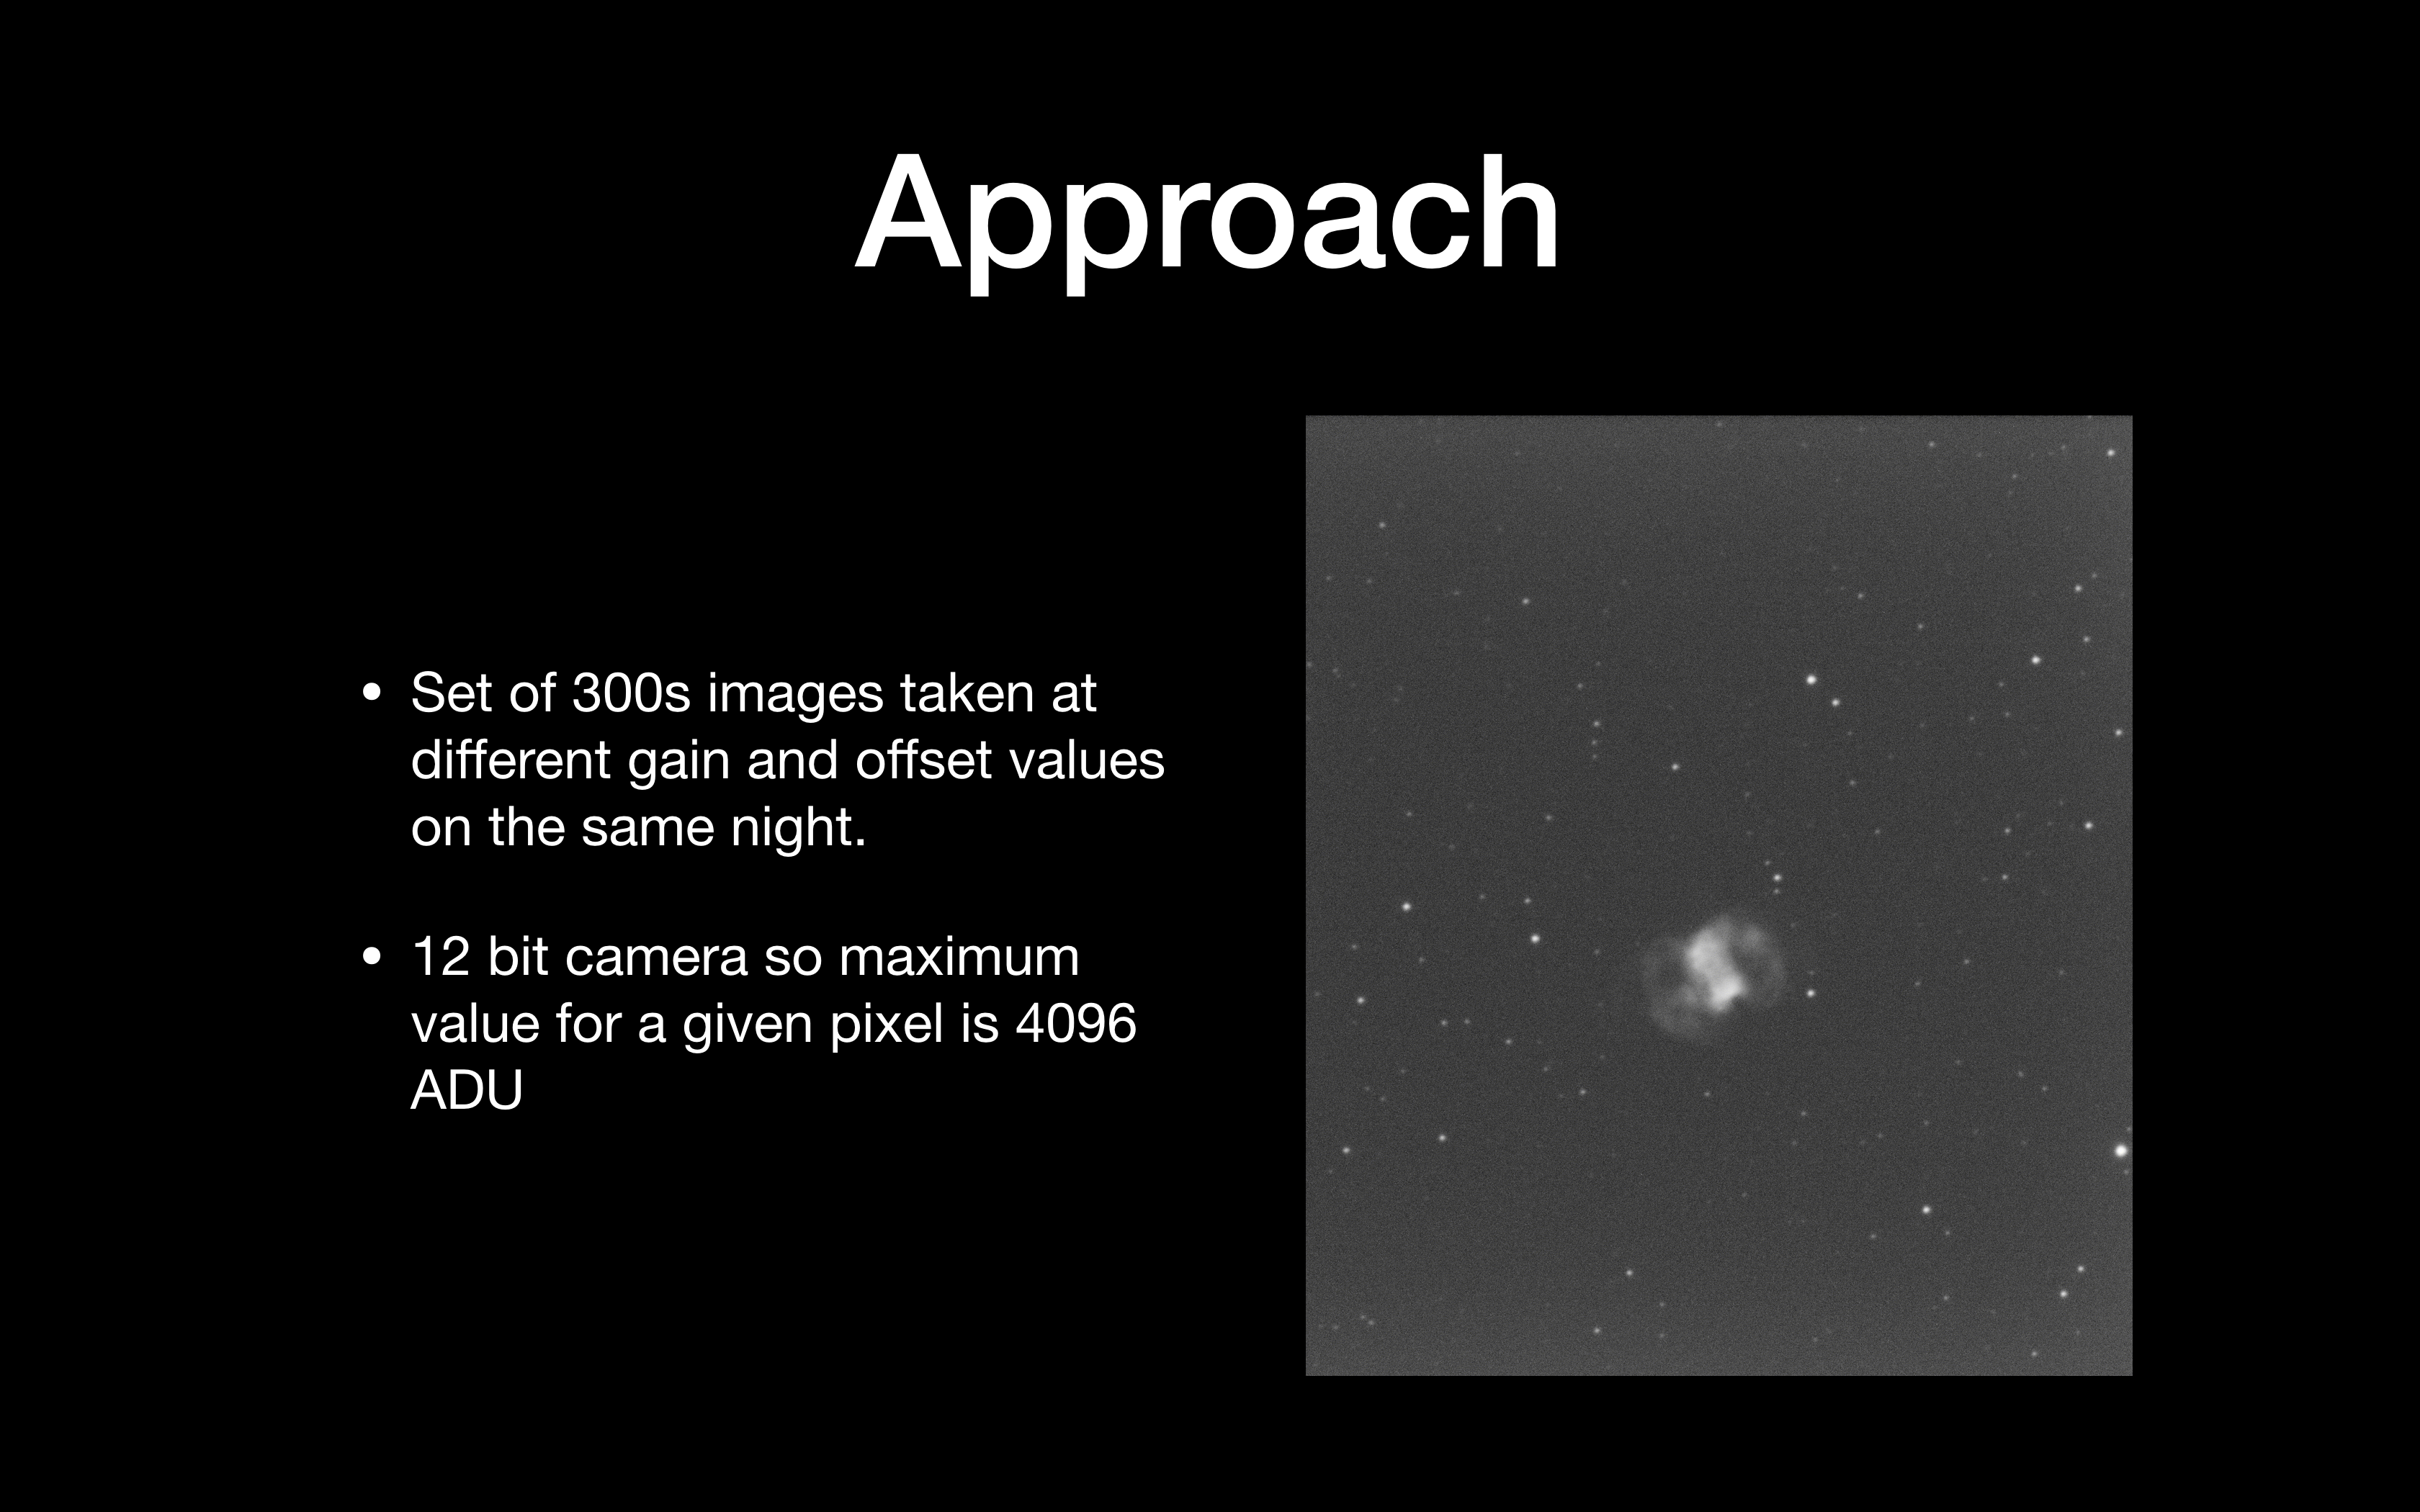
I have done extensive reading on the topic of image analysis and hope to apply here what I have learnt. Given then camera is running 12 bit, I have a maximum pixel value of 4096 which represents saturation and then any further response is non-linear. Once I have completed 5min testing I will try for 10, 15 and 20 mins. I will then perform further testing by taking a sample set of 10 images to stack and see how that compares with similar total exposure times across the frames.
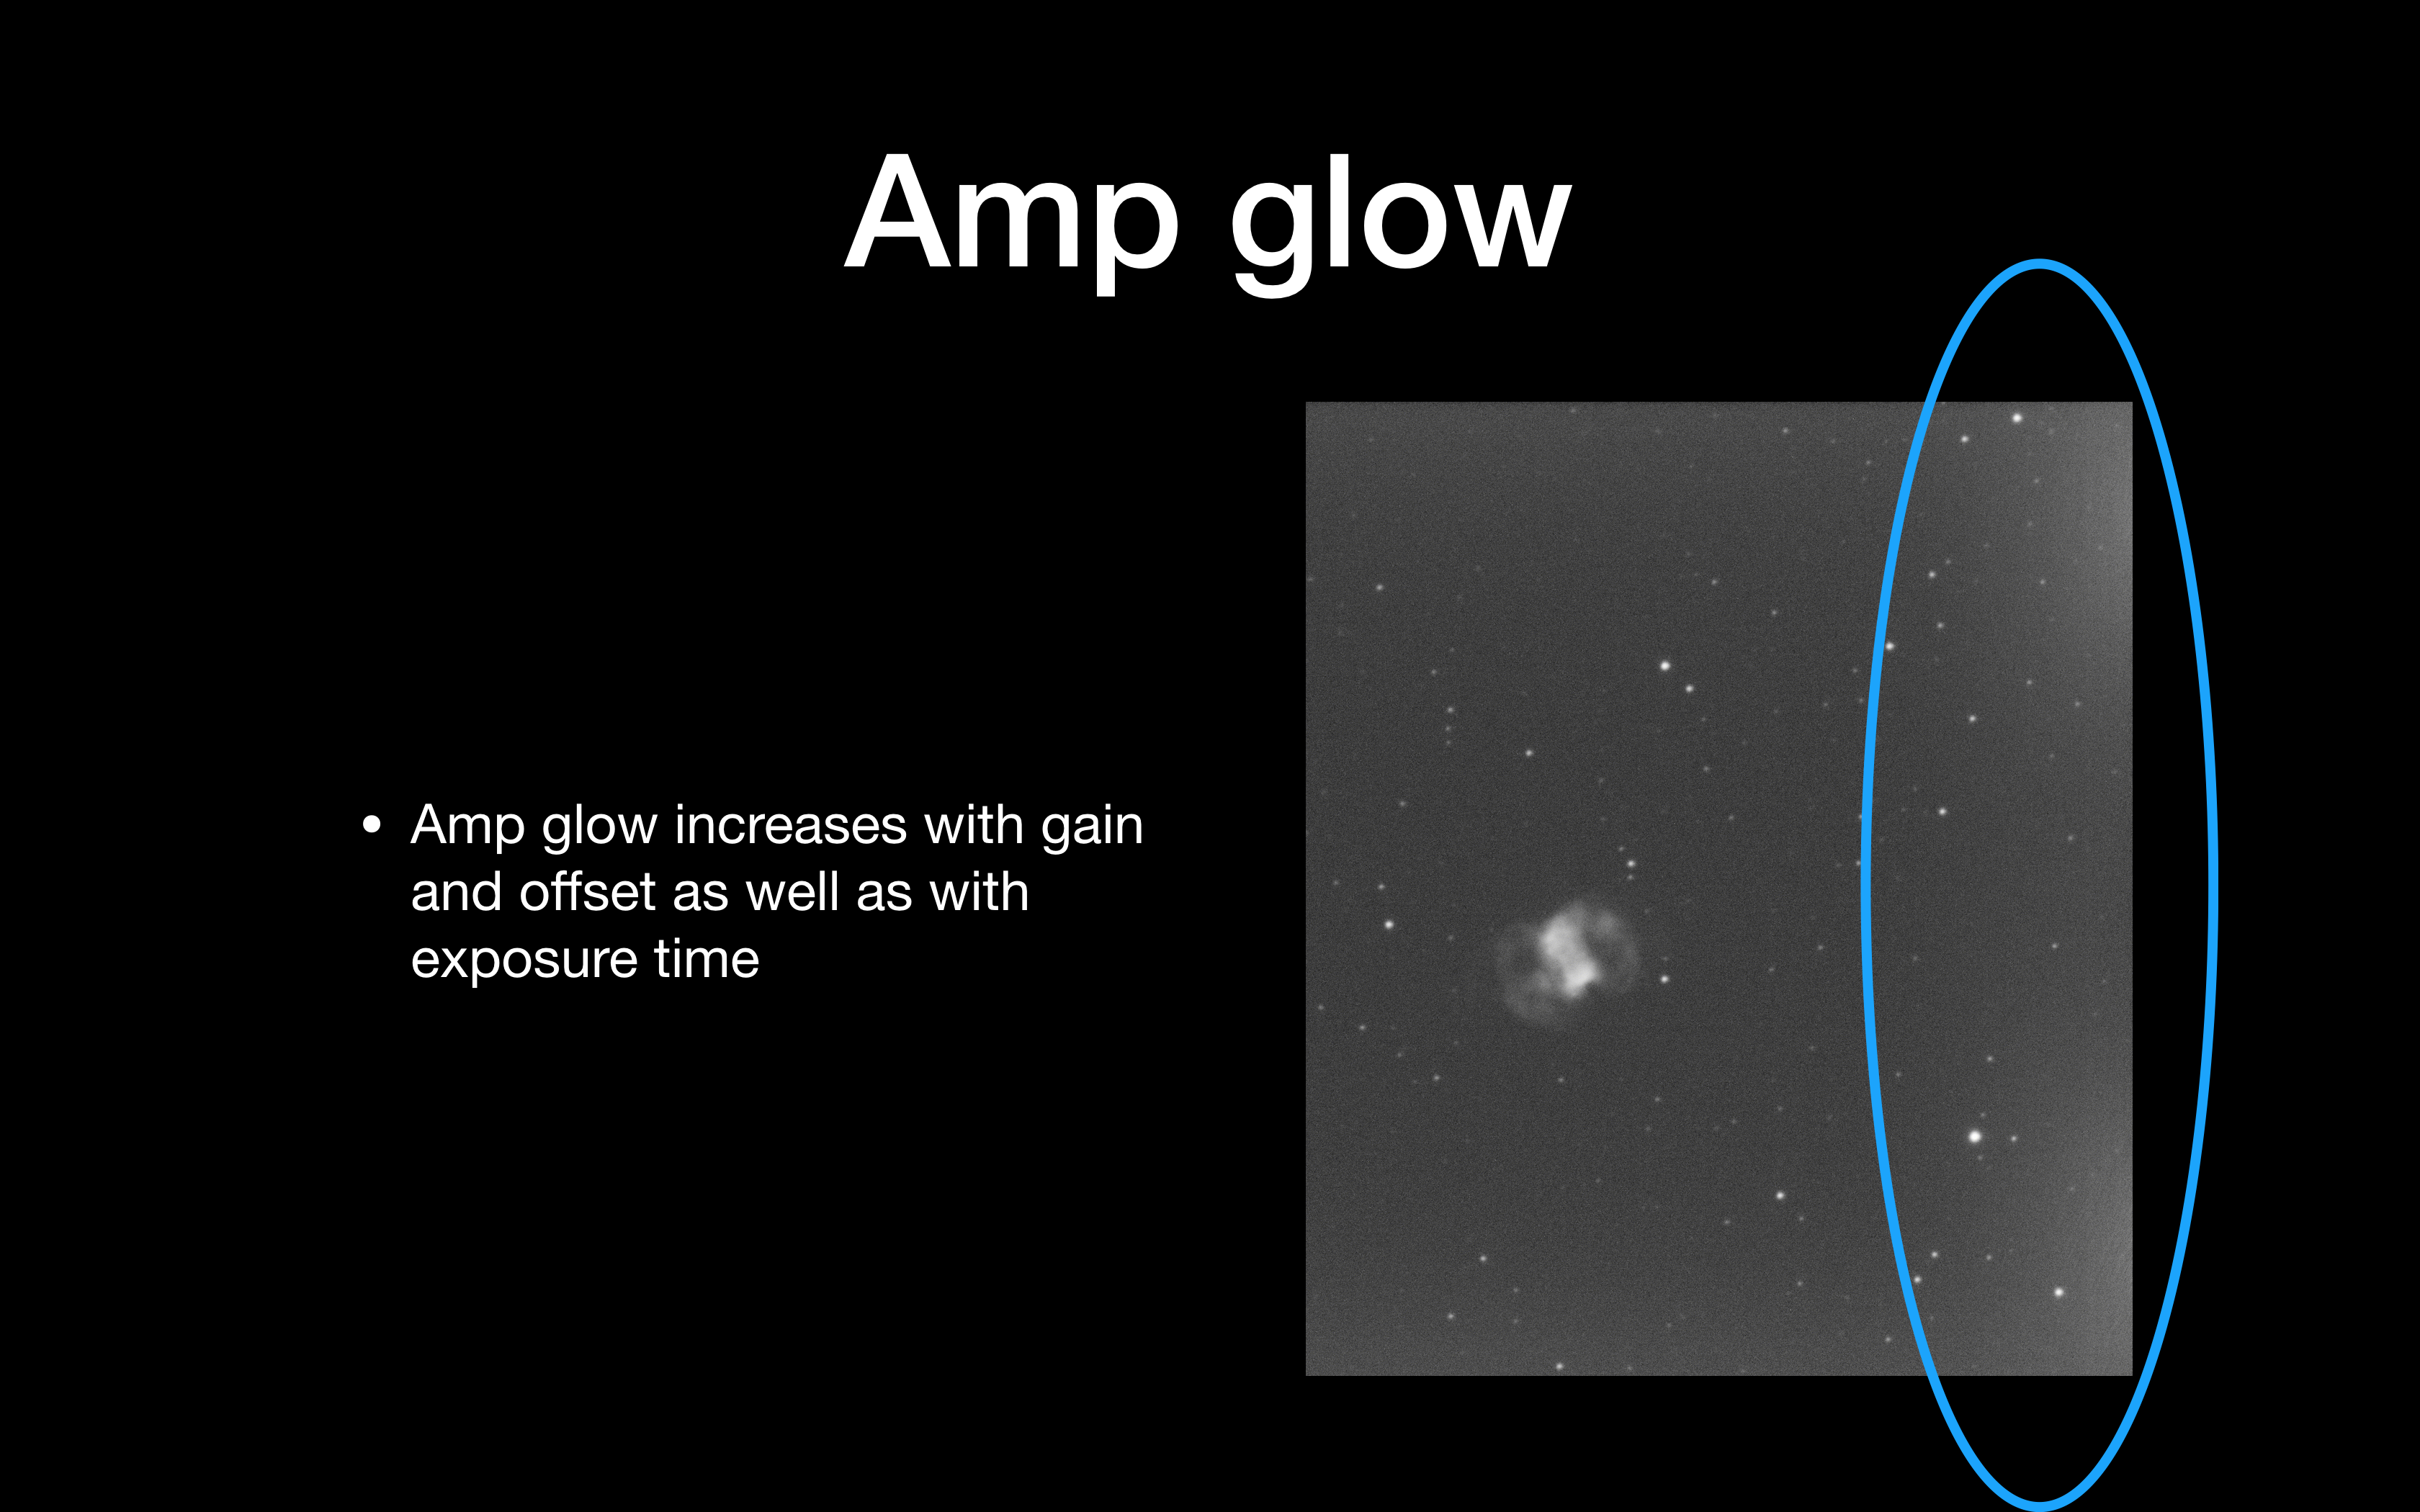
Amp glow is a particular problem with CMOS. Despite the ZWO site suggesting that amp glow is virtually removed in the Pro Cooled camera, it is clearly not, as can be seen in single 5 min subs. The good thing is a dark will remove it effectively. What I need to make sure is that the amount glow does not swamp the image so much that it overpowers the signal from the faint nebula.
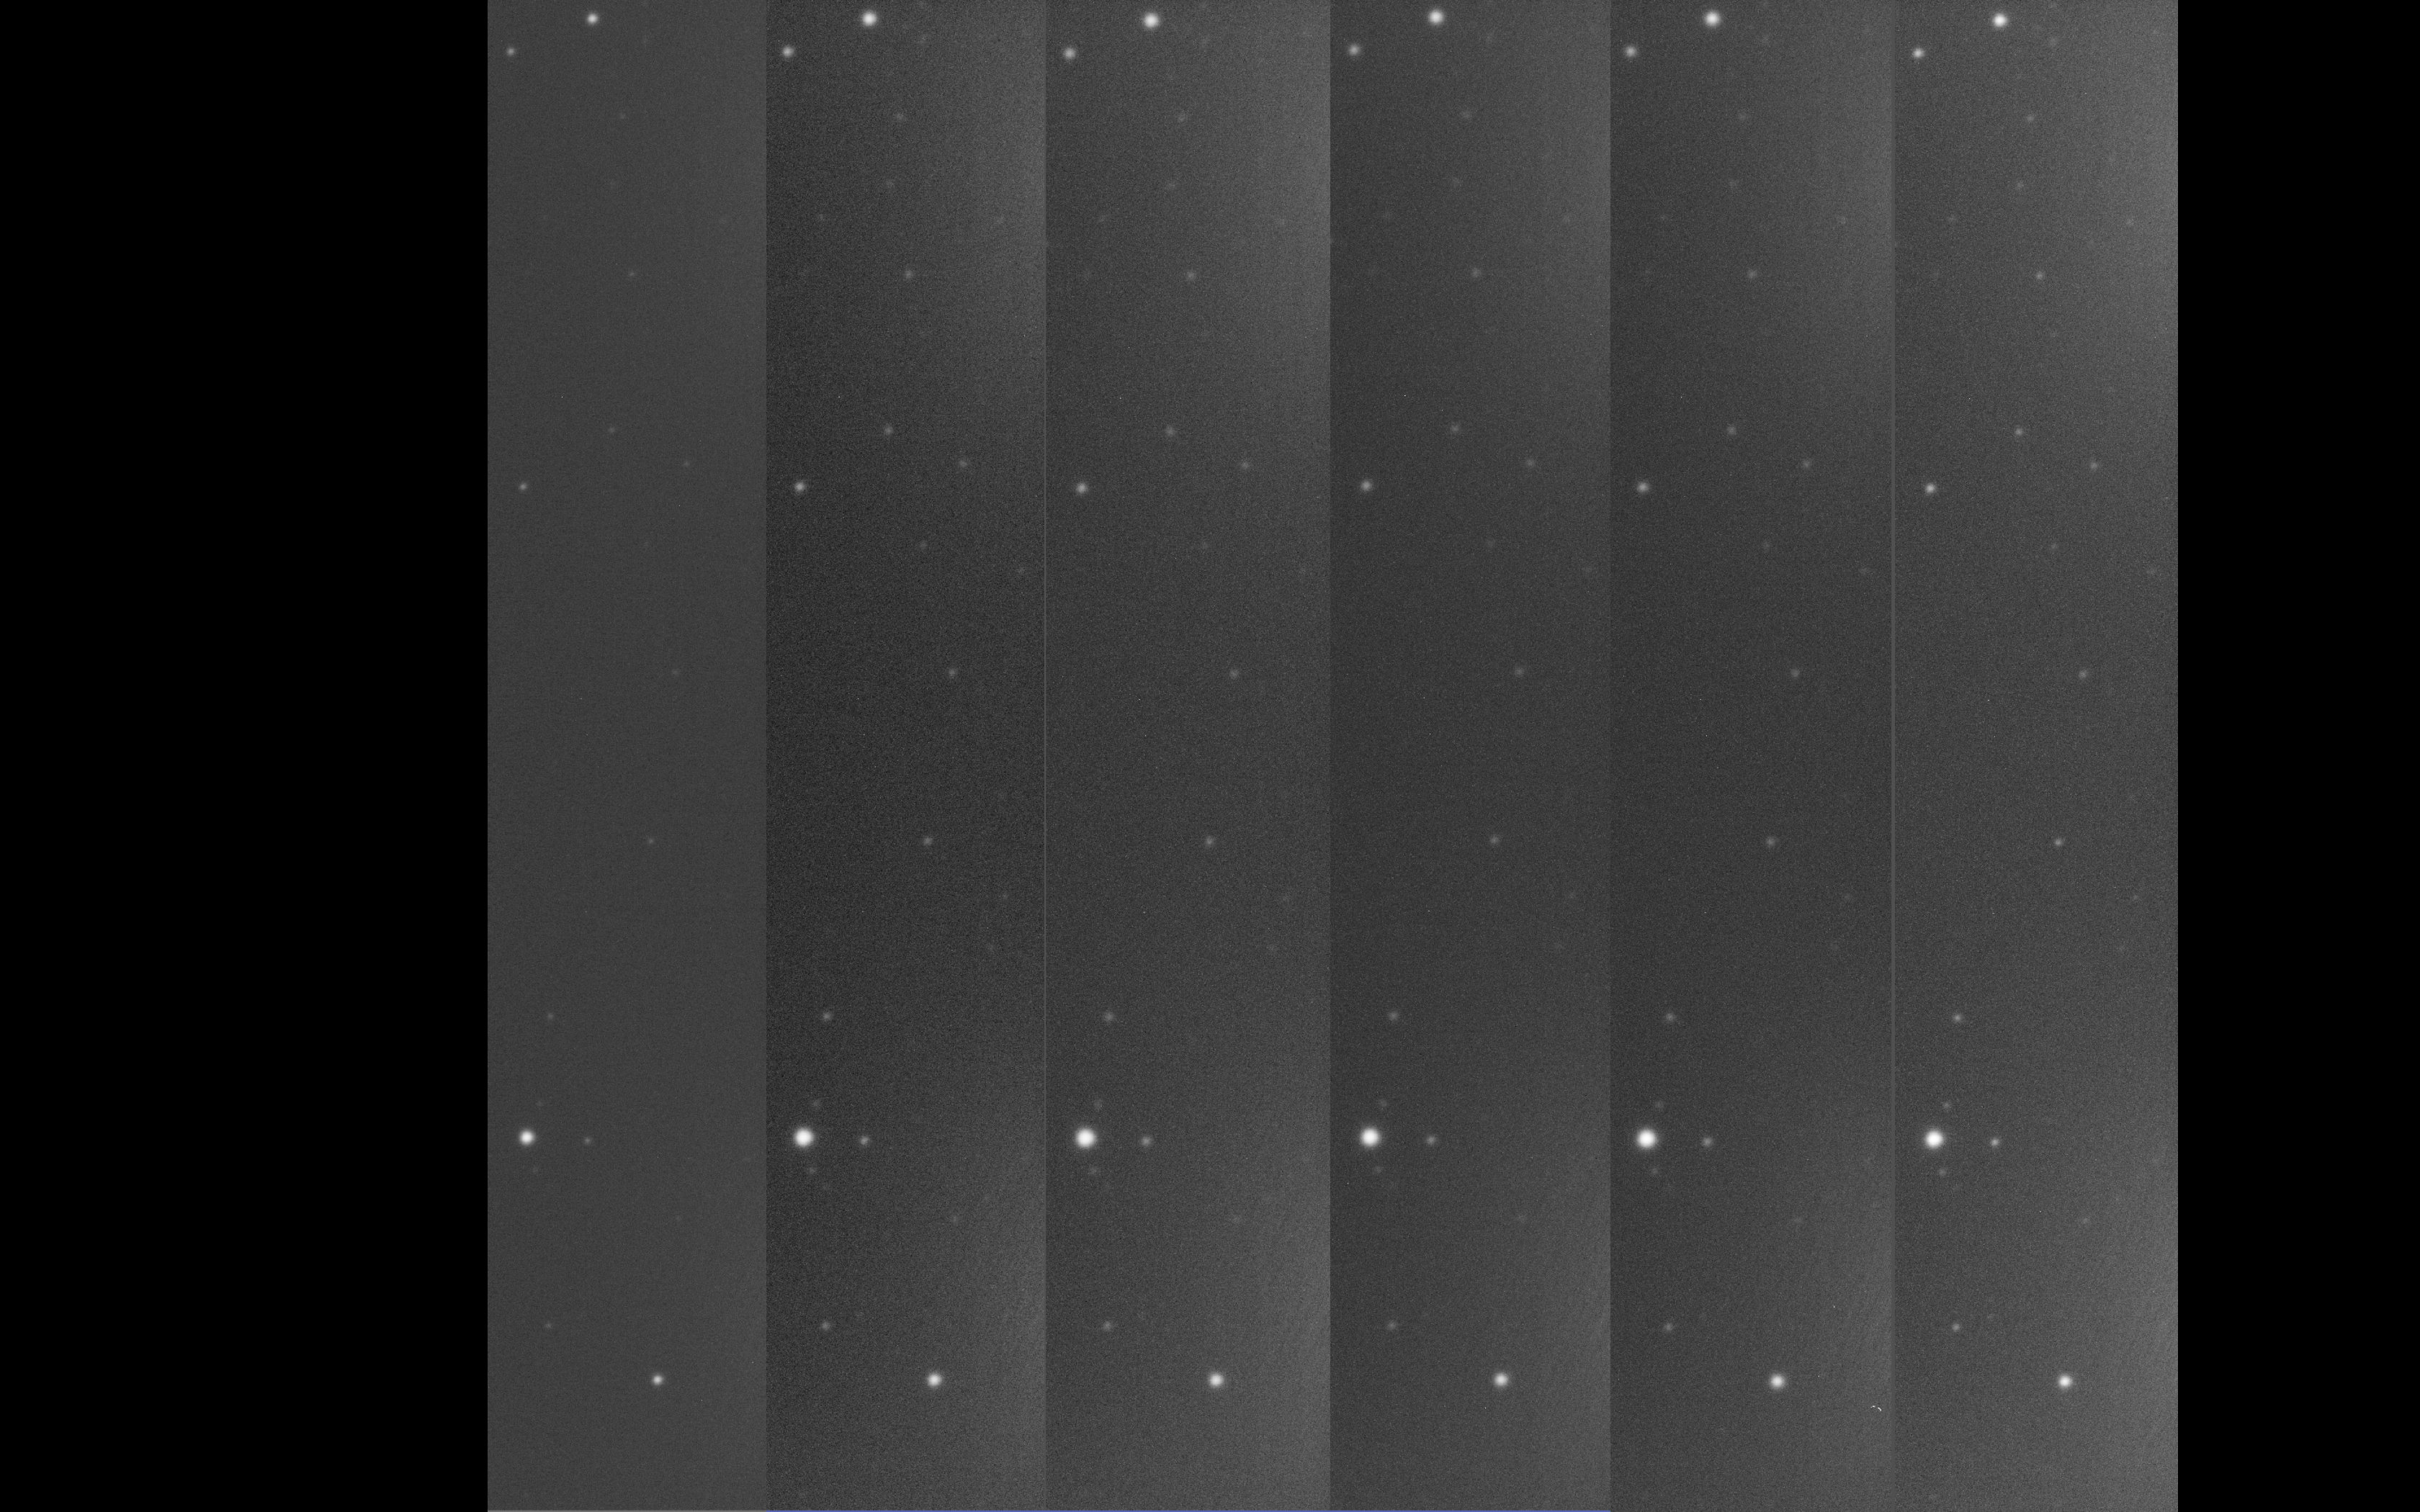
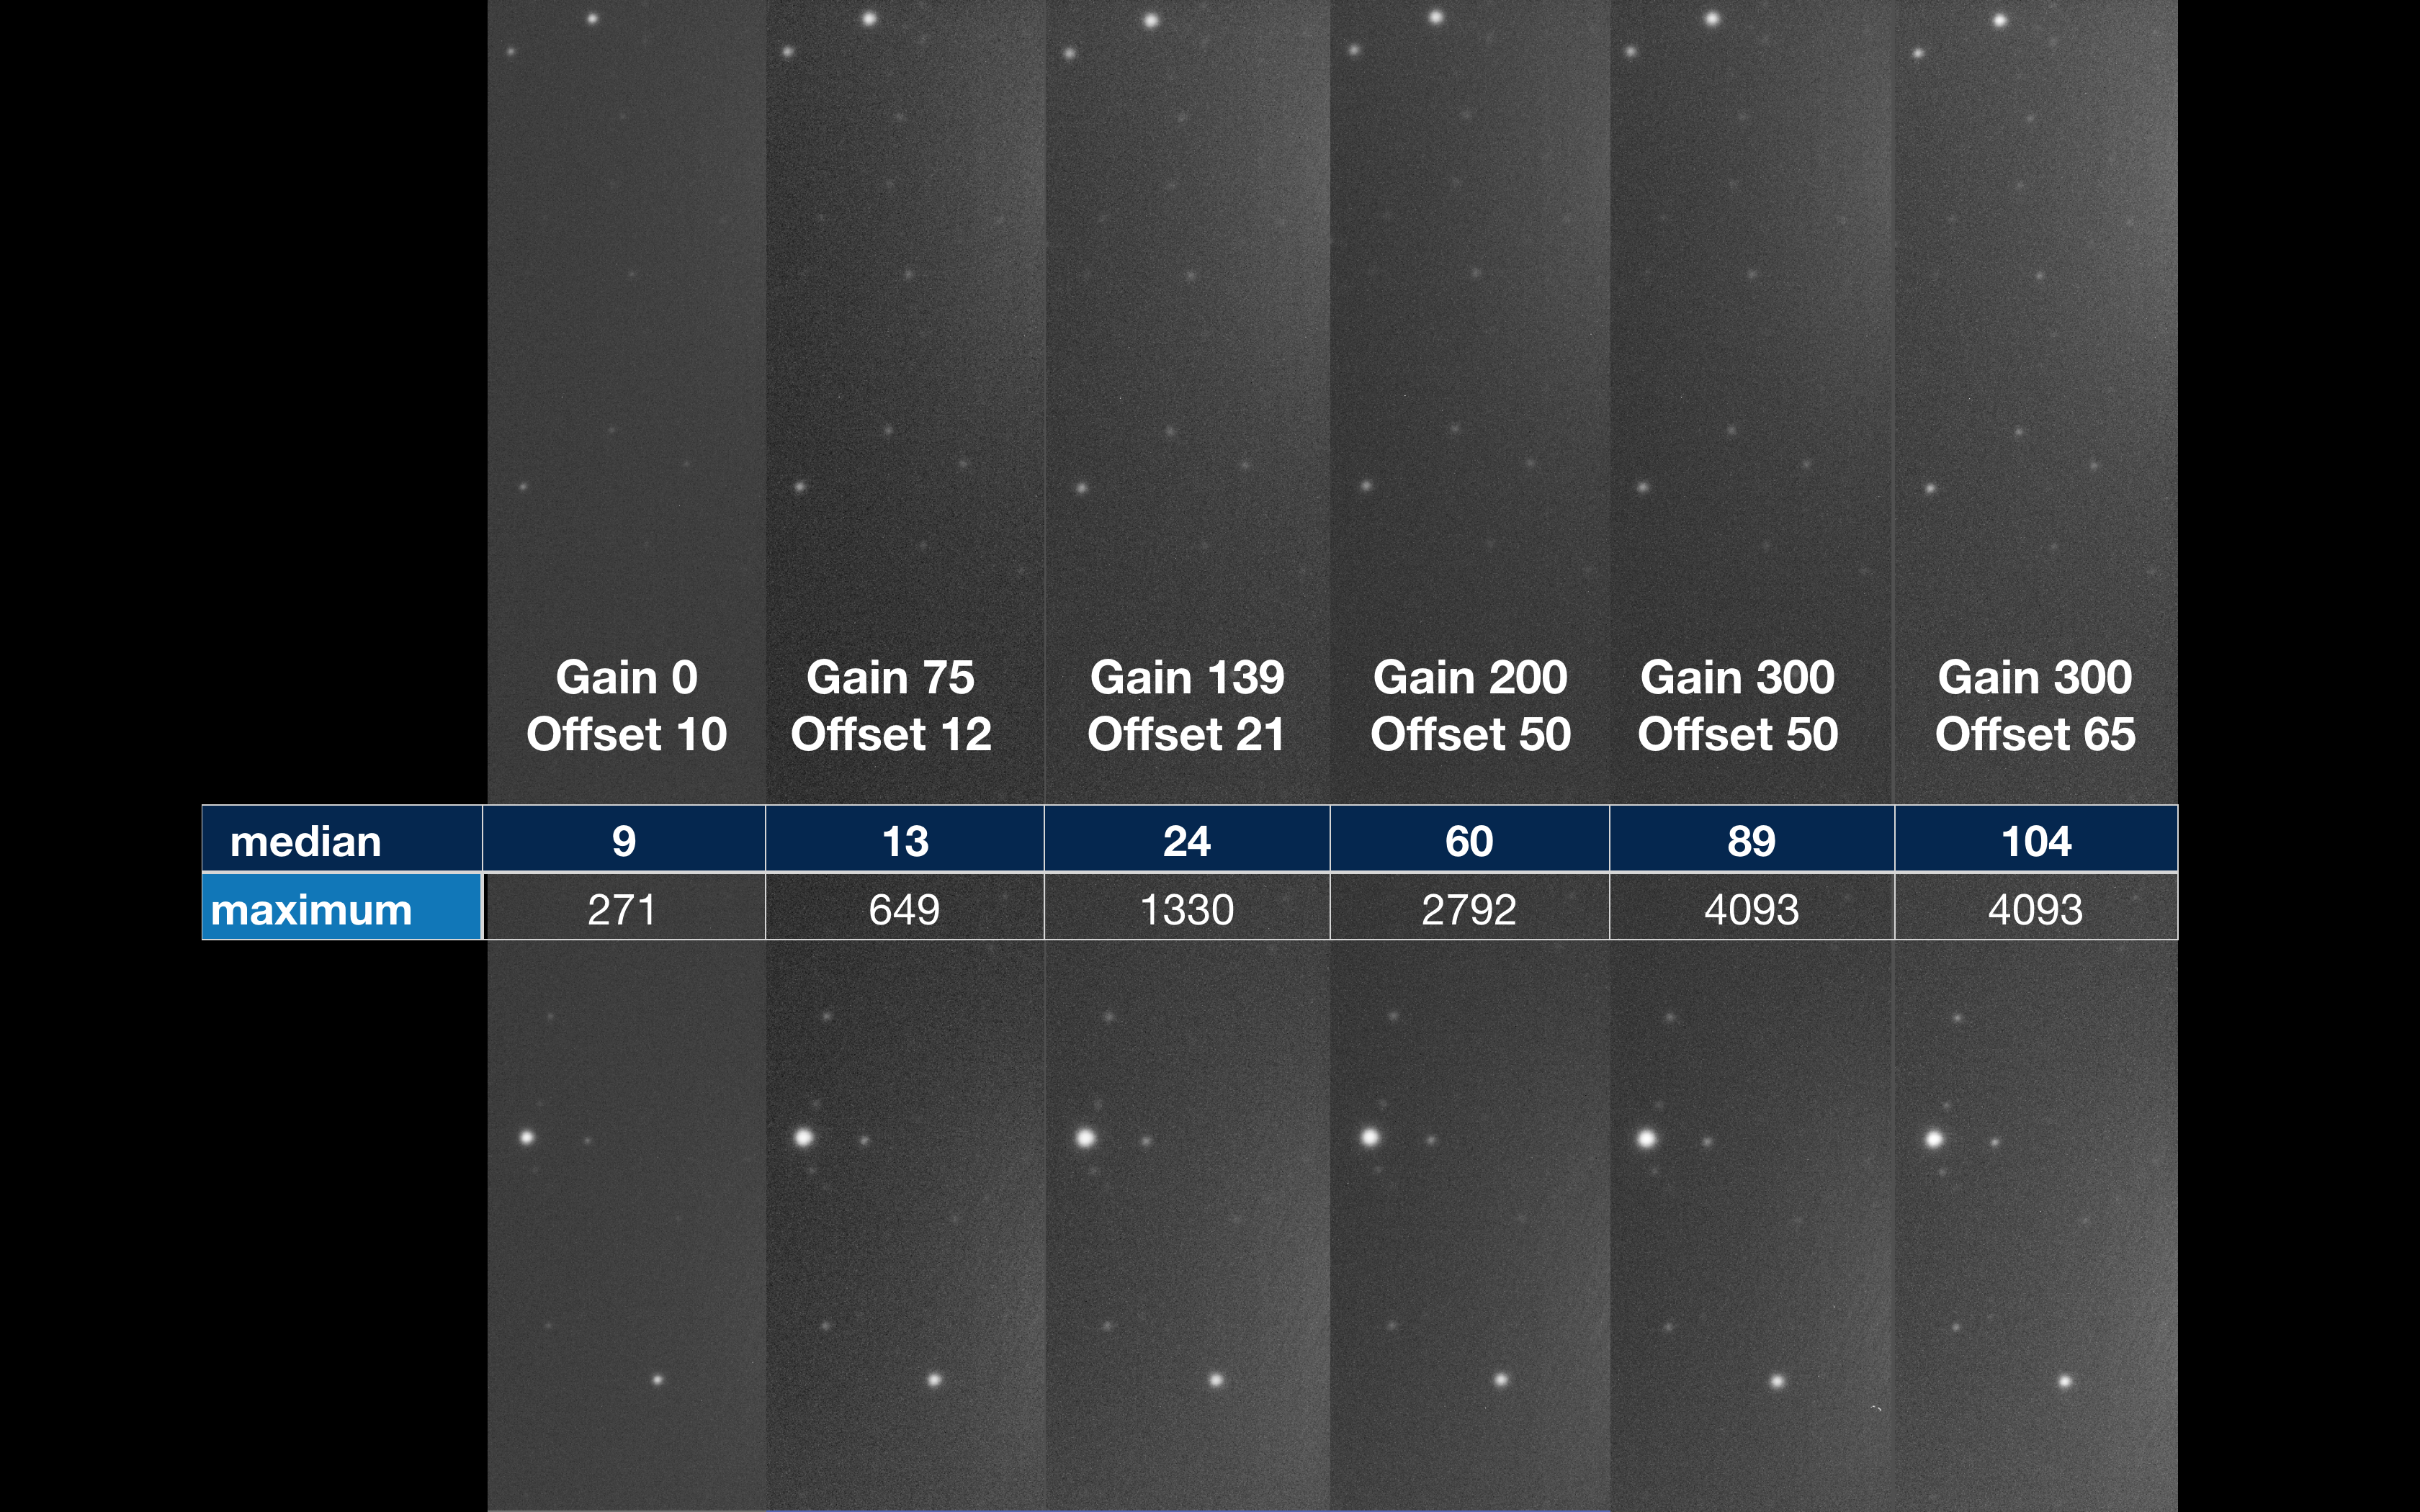
Increasing the gain and offset value from left to right you can see a marked increase in the amp glow. The image slices below are taken from the far right of each frame.
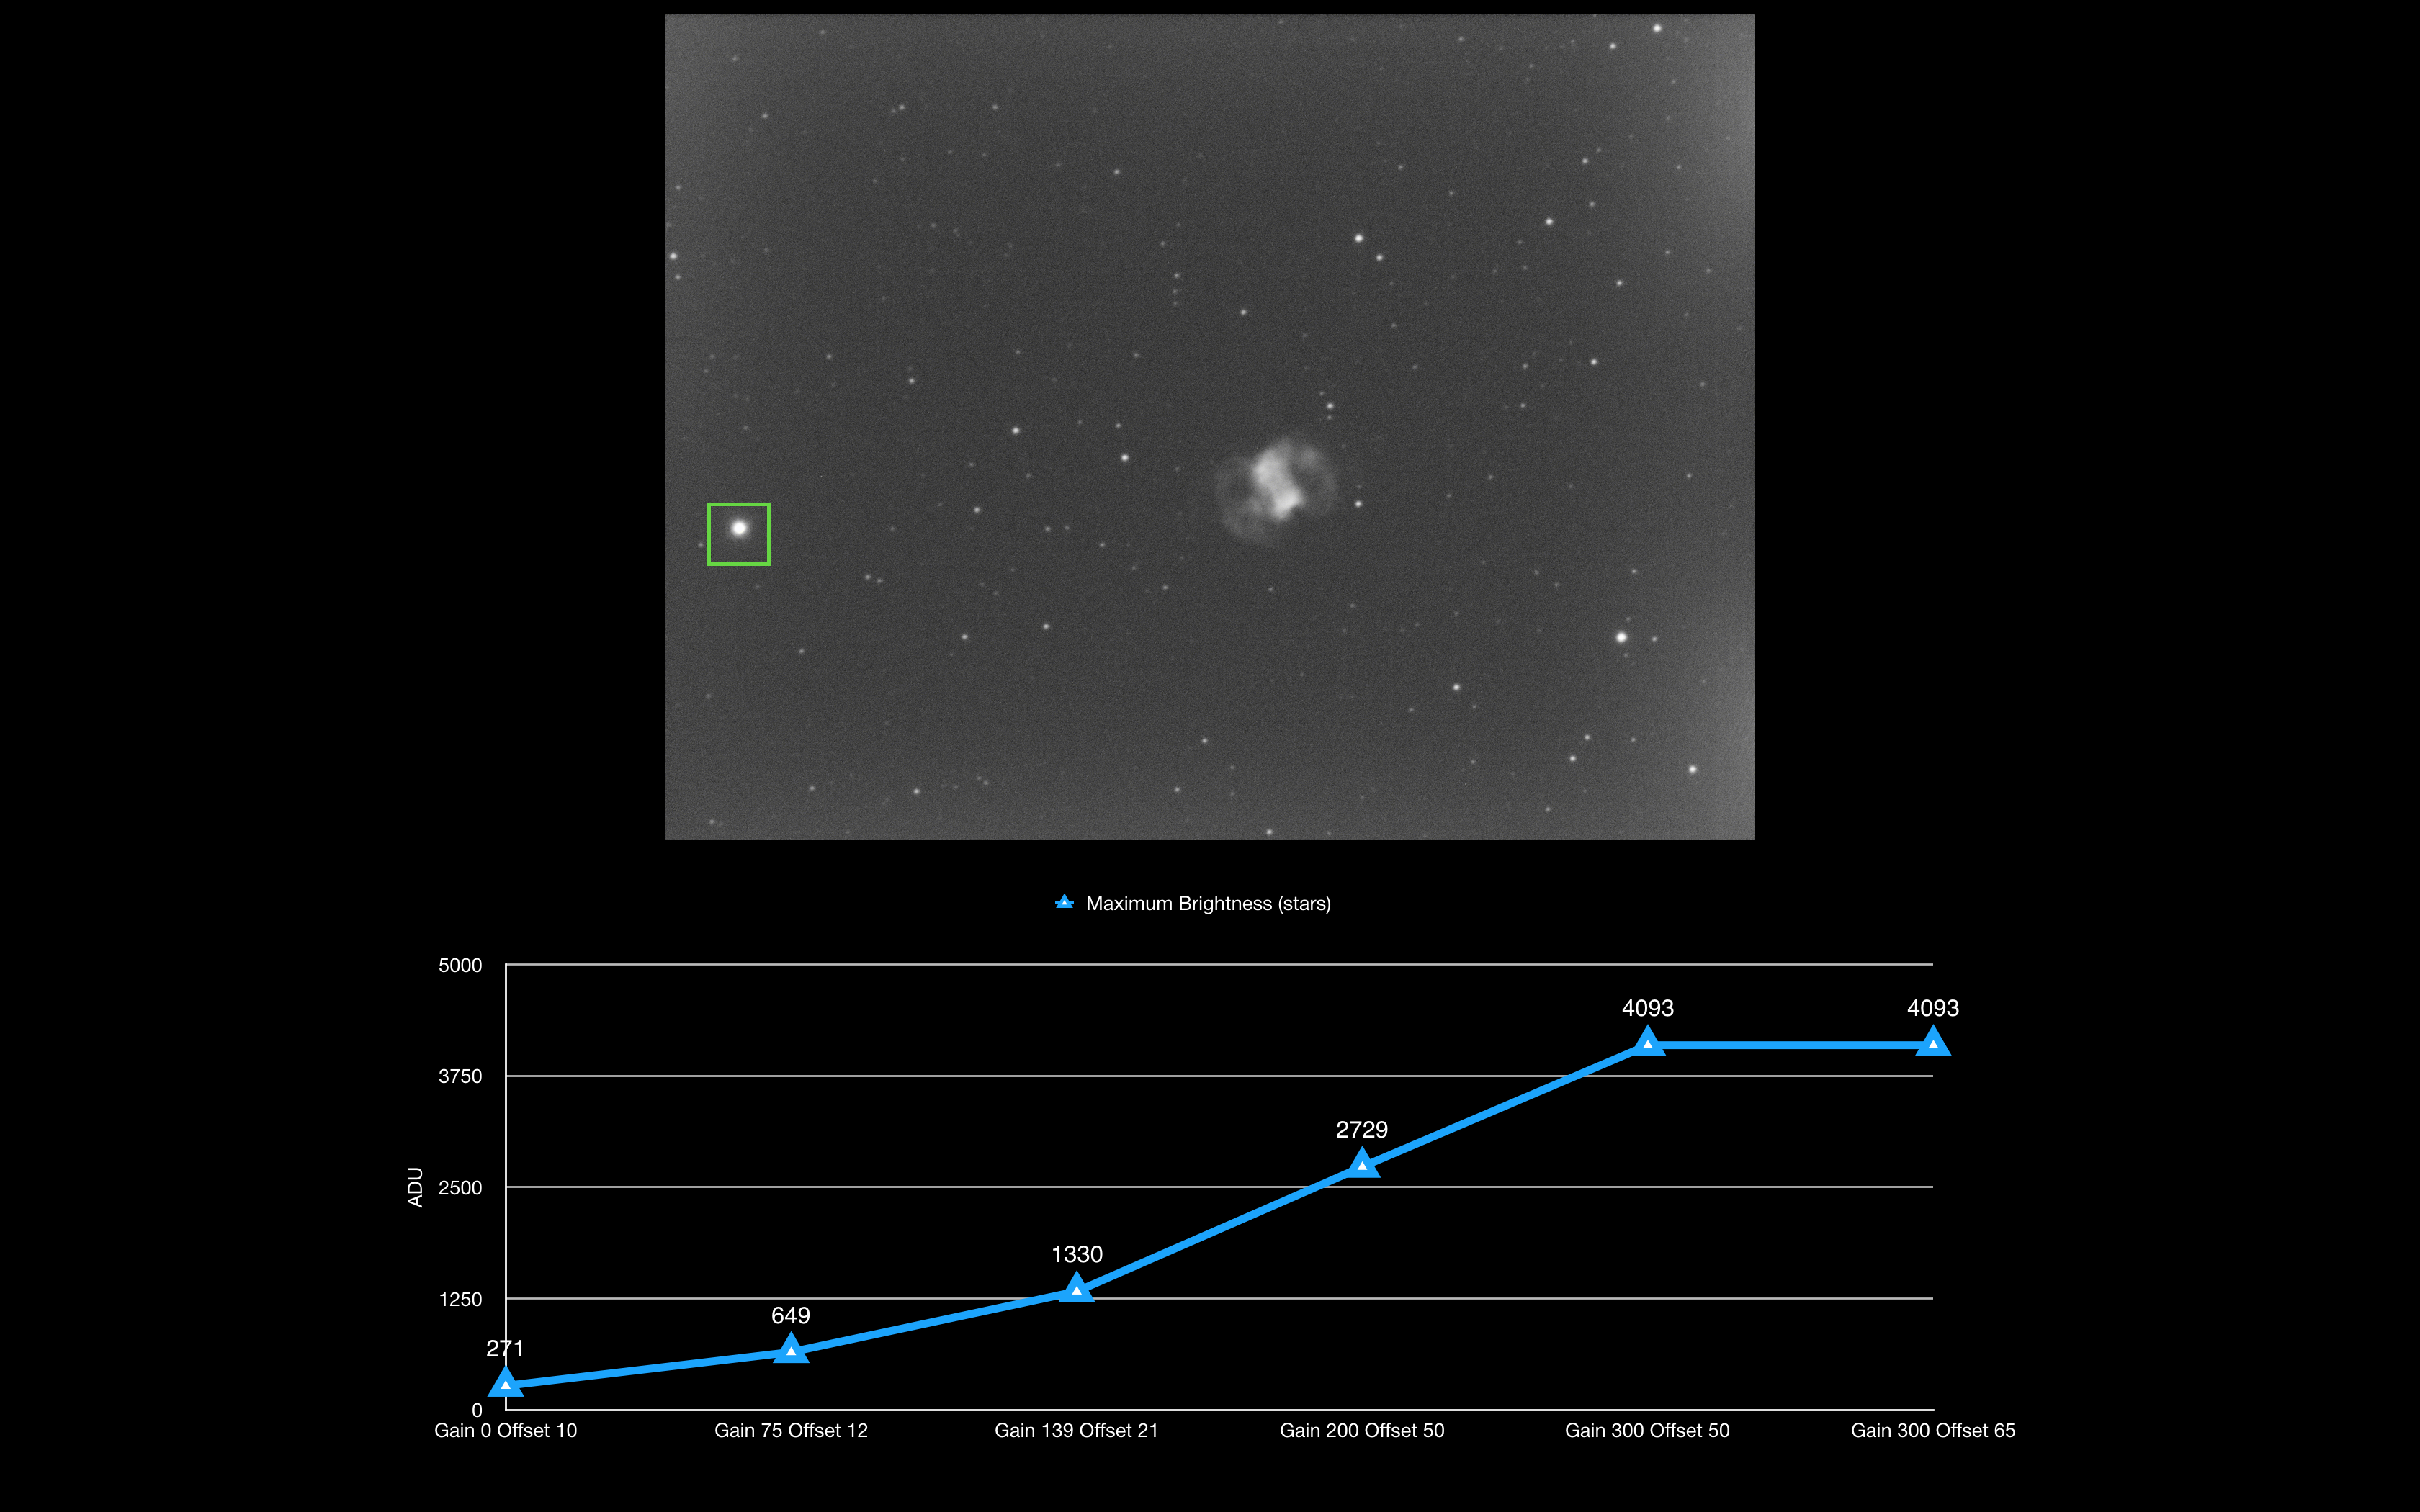
The offset figures in relation to the gain figures have been taken from my reading of various material. The median values are that of the background and the maximum values that of the stars. You can see on this 5min exposure that by the time I reached a gain of 300 one or more of the stars are saturated. In fact the brightest star in this slice is SAO 22510 which is mag 9.53.
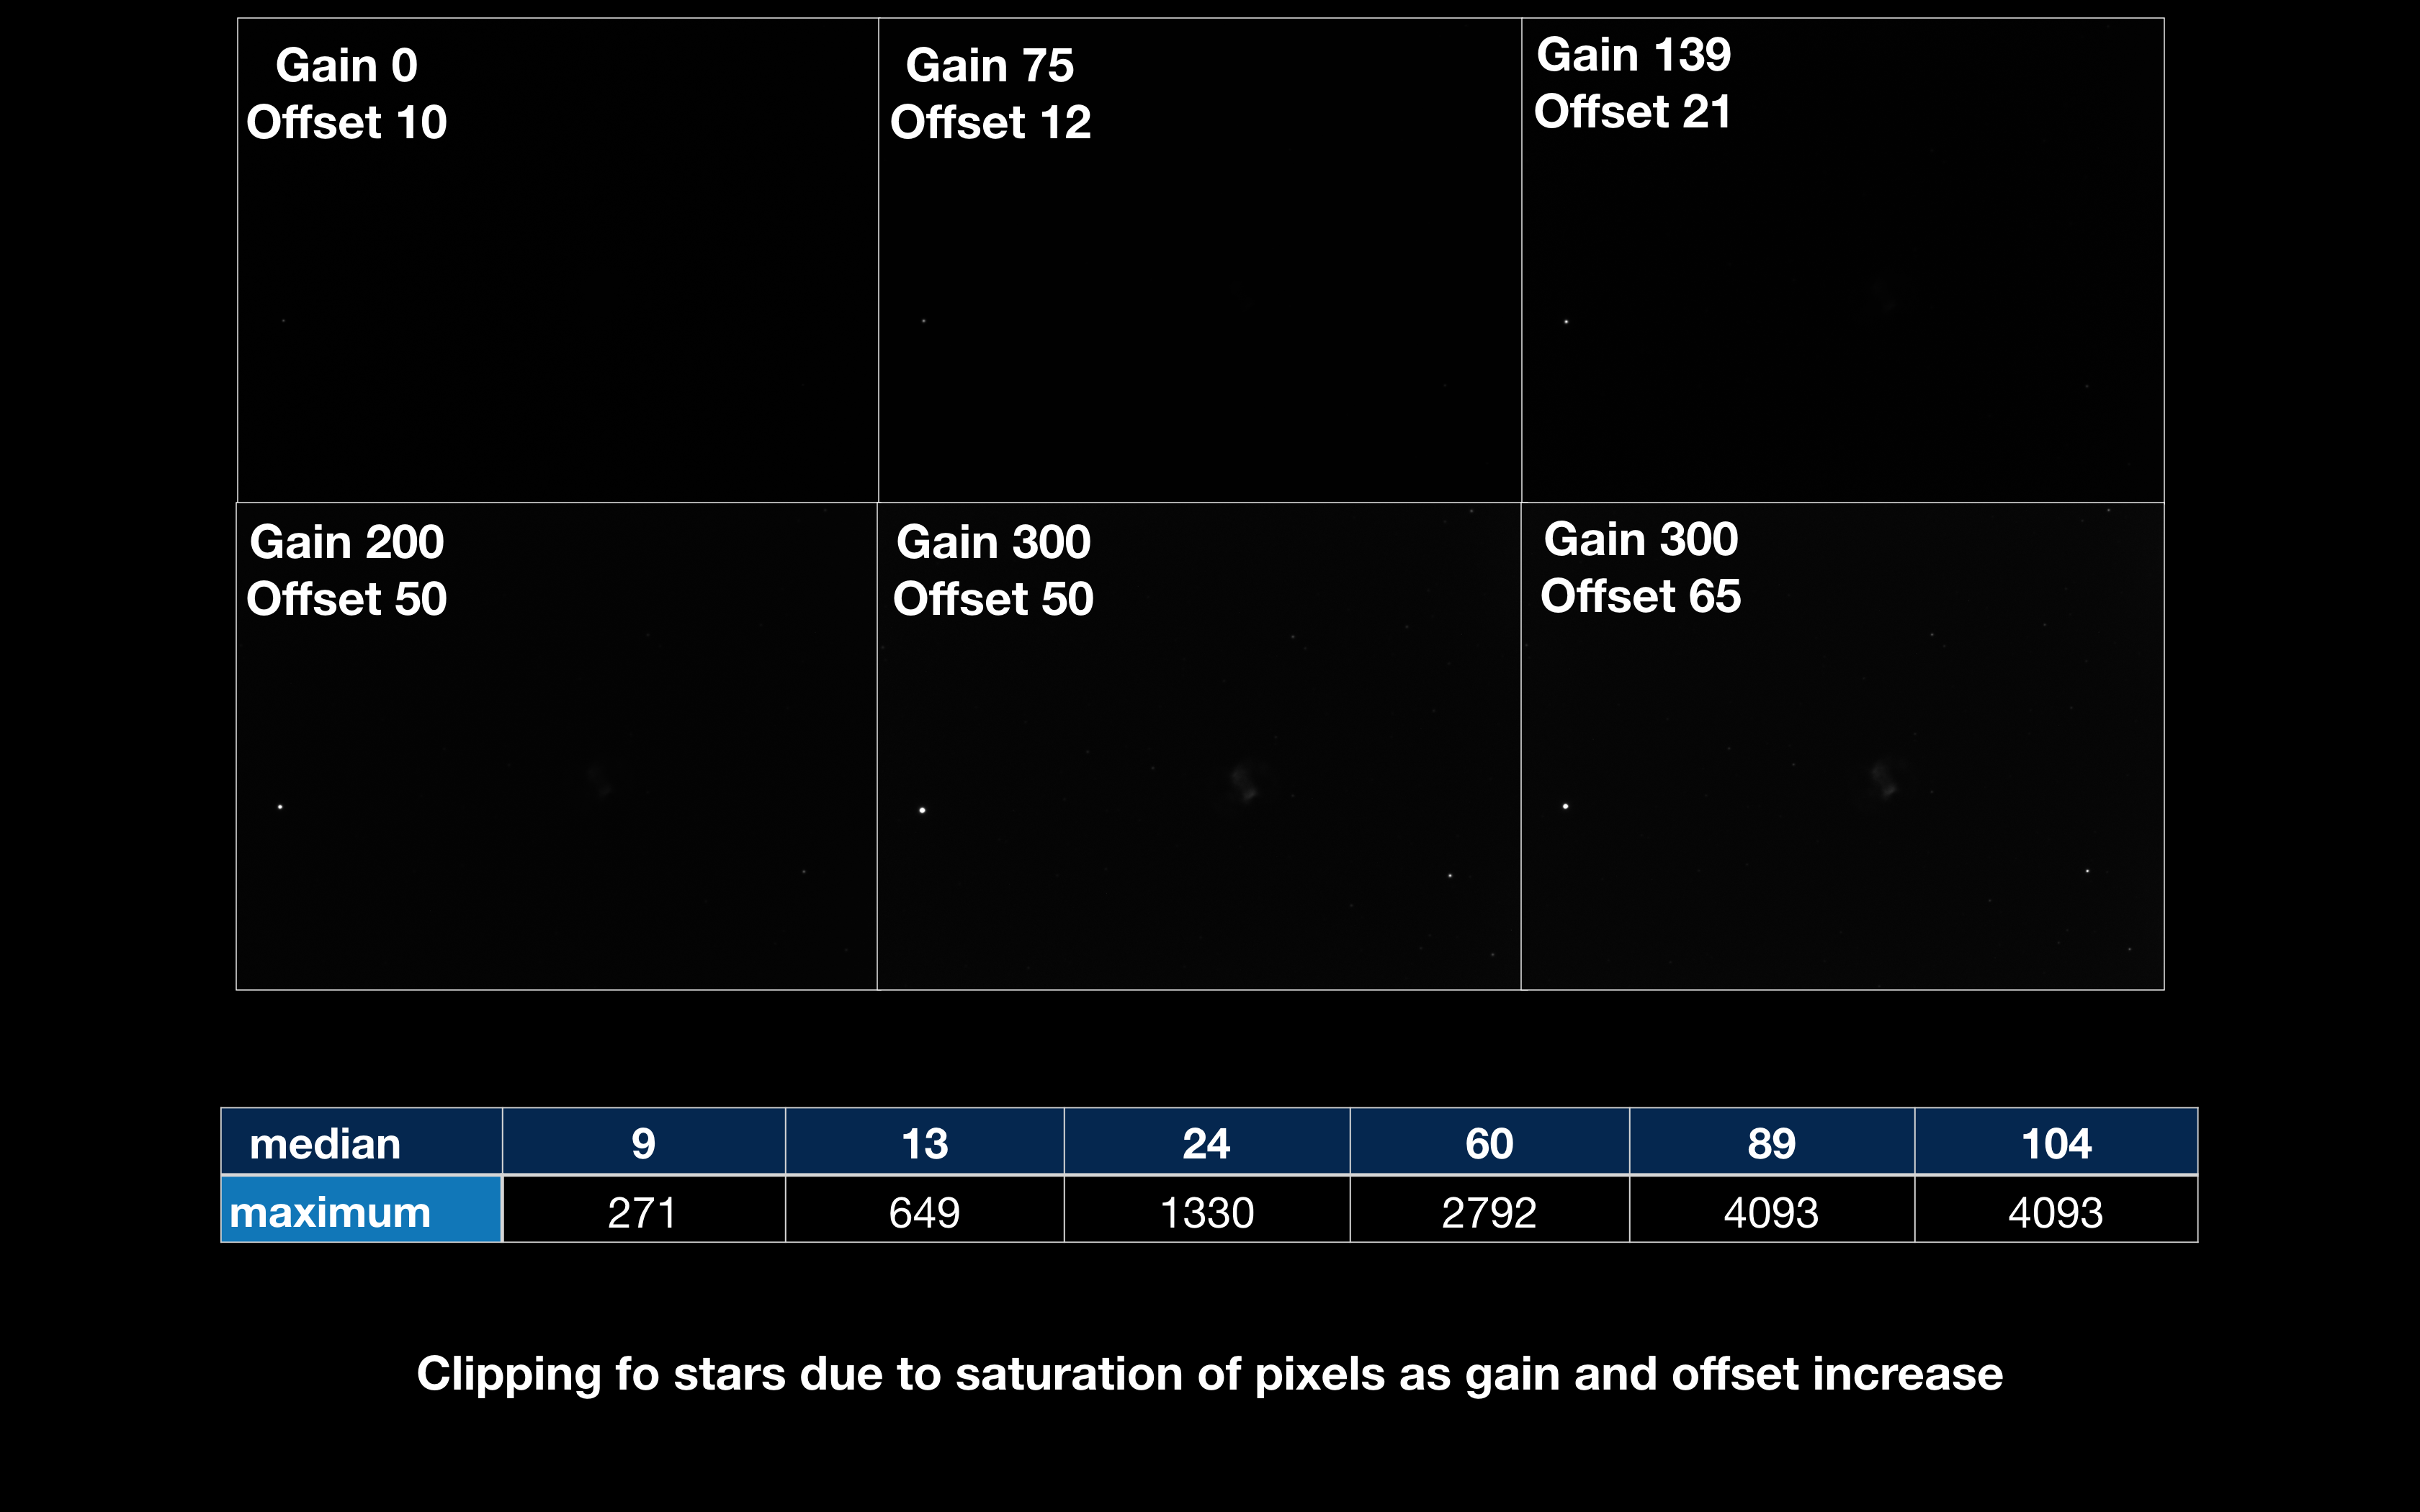
Another way to visualise the saturation effect is looking at the raw unstretched image, whilst a star is visible in the image using gain 139 and 200, on close inspection within PI and looking at the values of the pixels of the star they are not saturated. However gain 300 is. The purpose of this is that an unstretched image is not the defect for telling if parts of the image are saturated as some texts describe, but one can see the increased brightening of the star by gain 300 to know it is a problem.
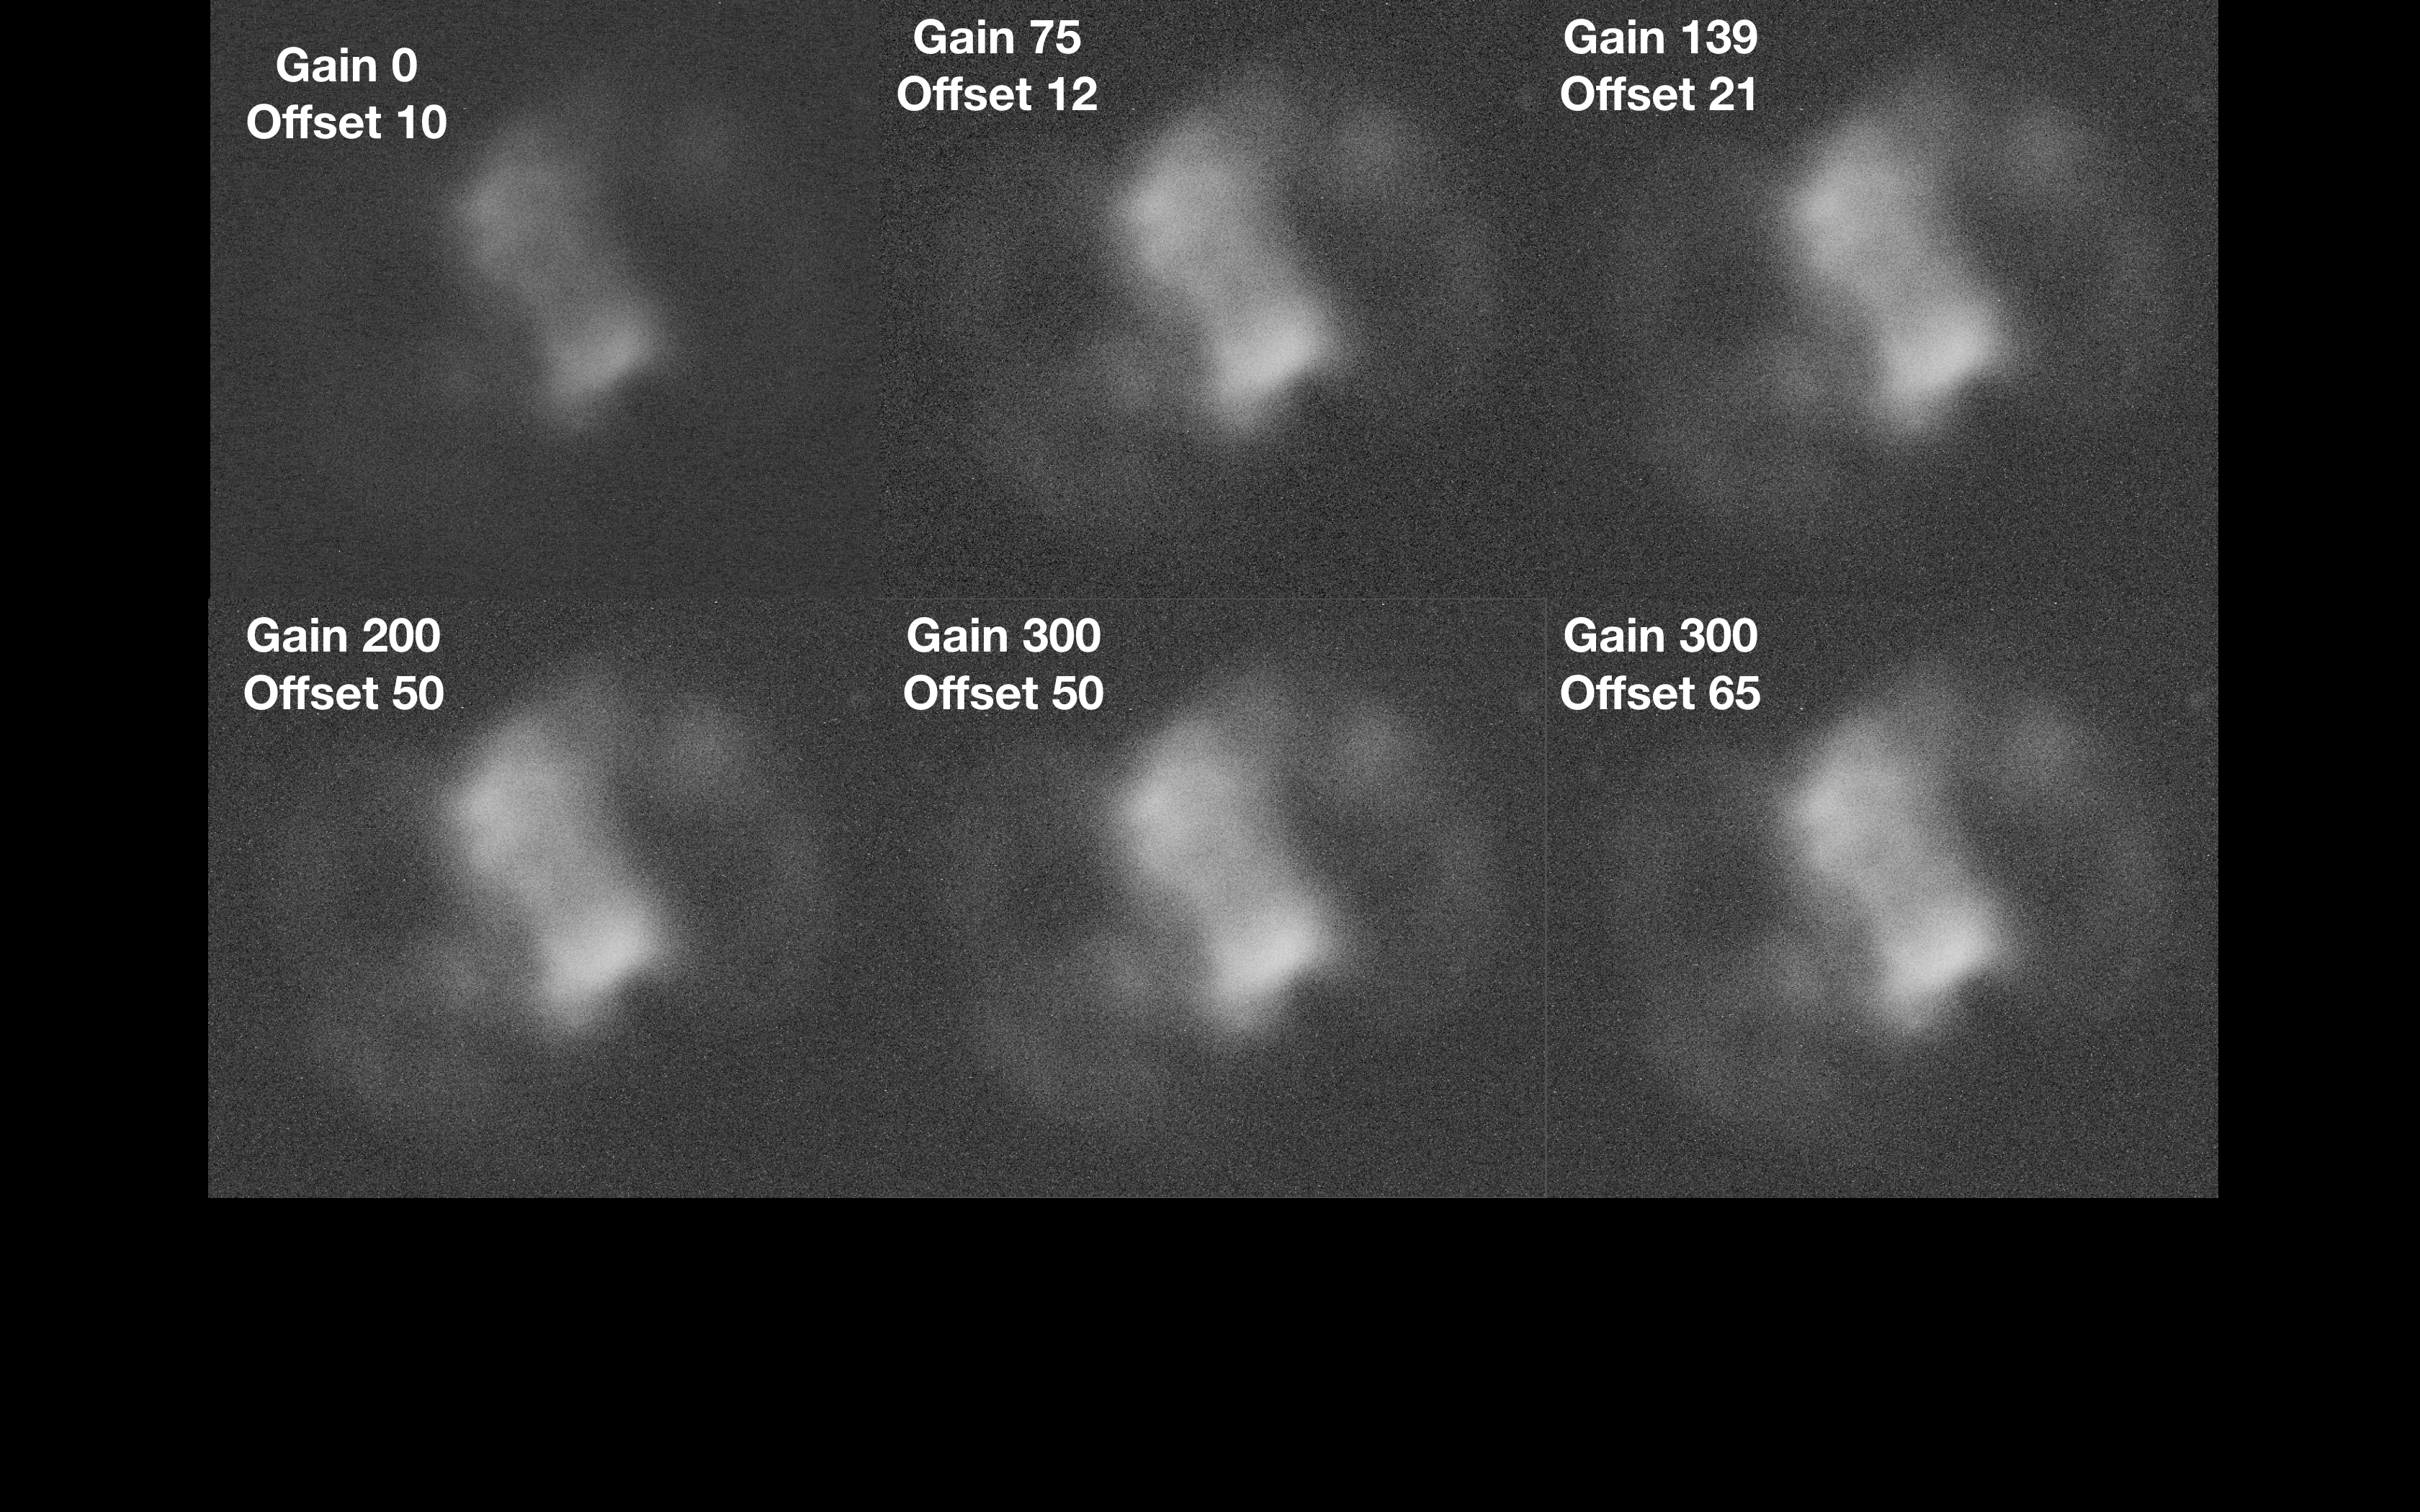
So whilst I have seen the clipping a a few stars at the highest gain I have tested, what about the planetary nebula itself? From the below stretched image one could assume that the brightest part of the nebula was fairly bright and heading towards saturation, but don’t be fooled! Also there is a noticeable increase in the background brightness as the gain increases.
Again as for the amp glow, the aim is to balance the ability to amplify the faintest parts of the nebula without swamping them with the background brightness.
Again here are the values of the settings for gain and offset against the central section of the image.
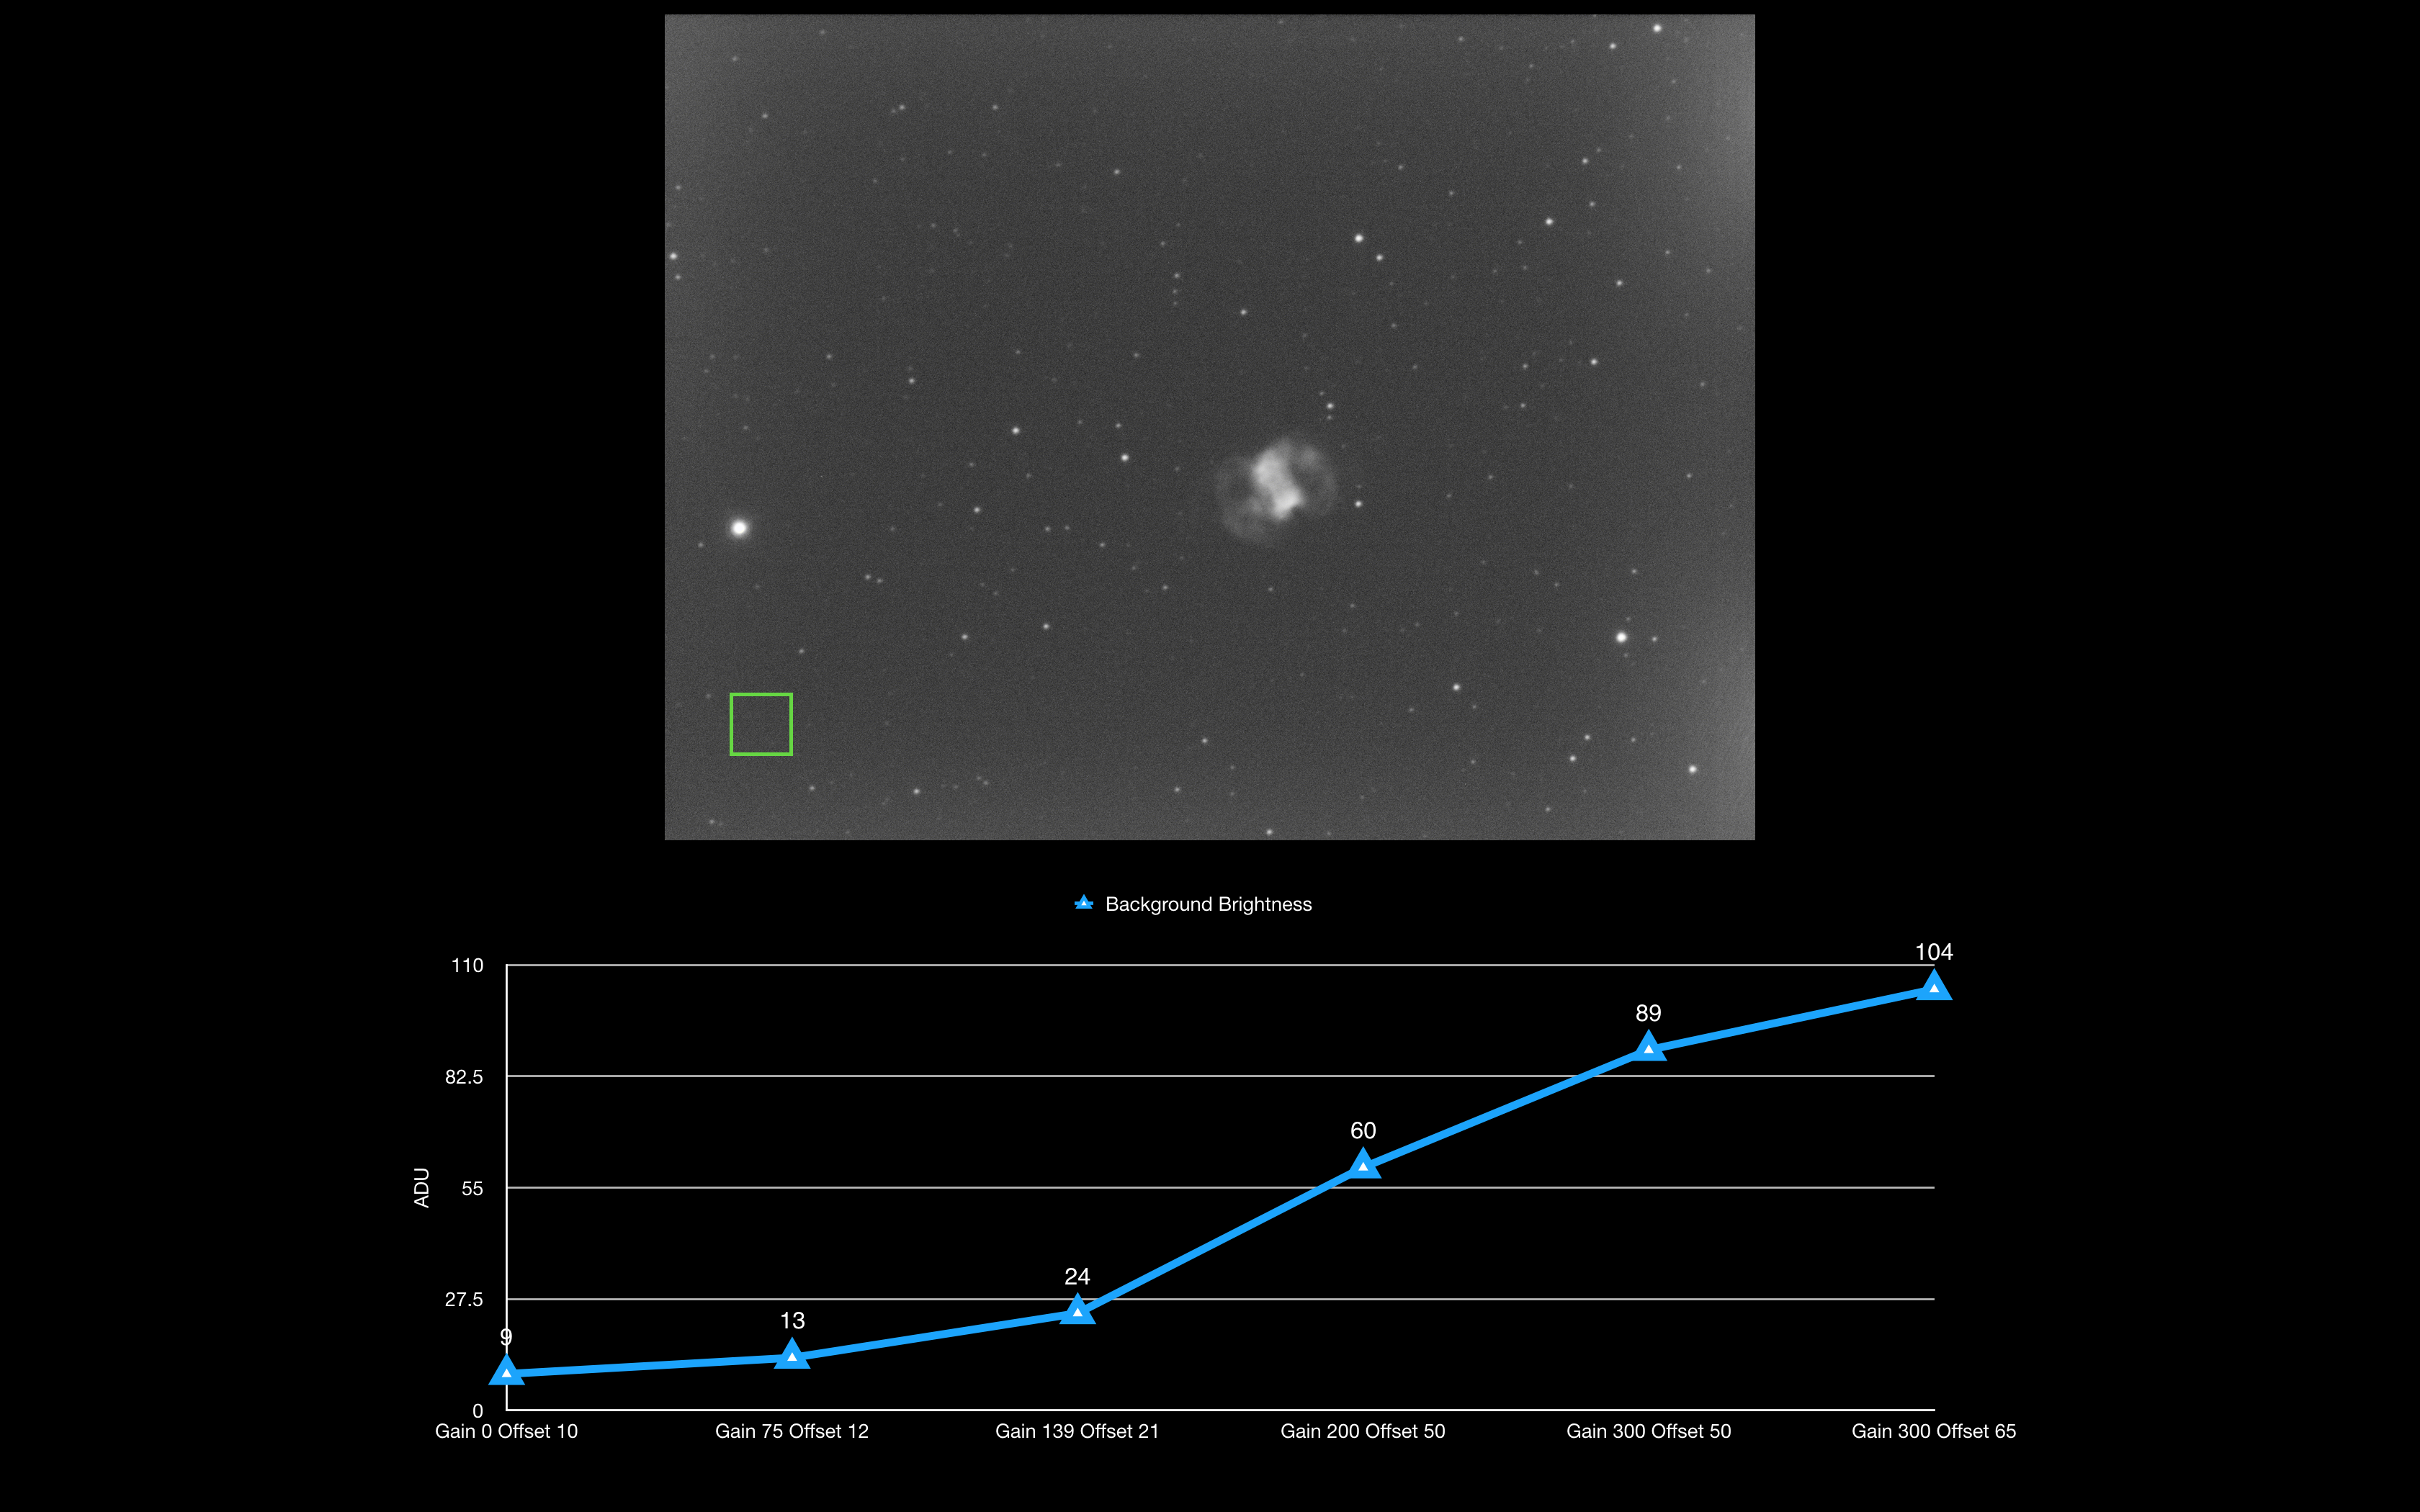
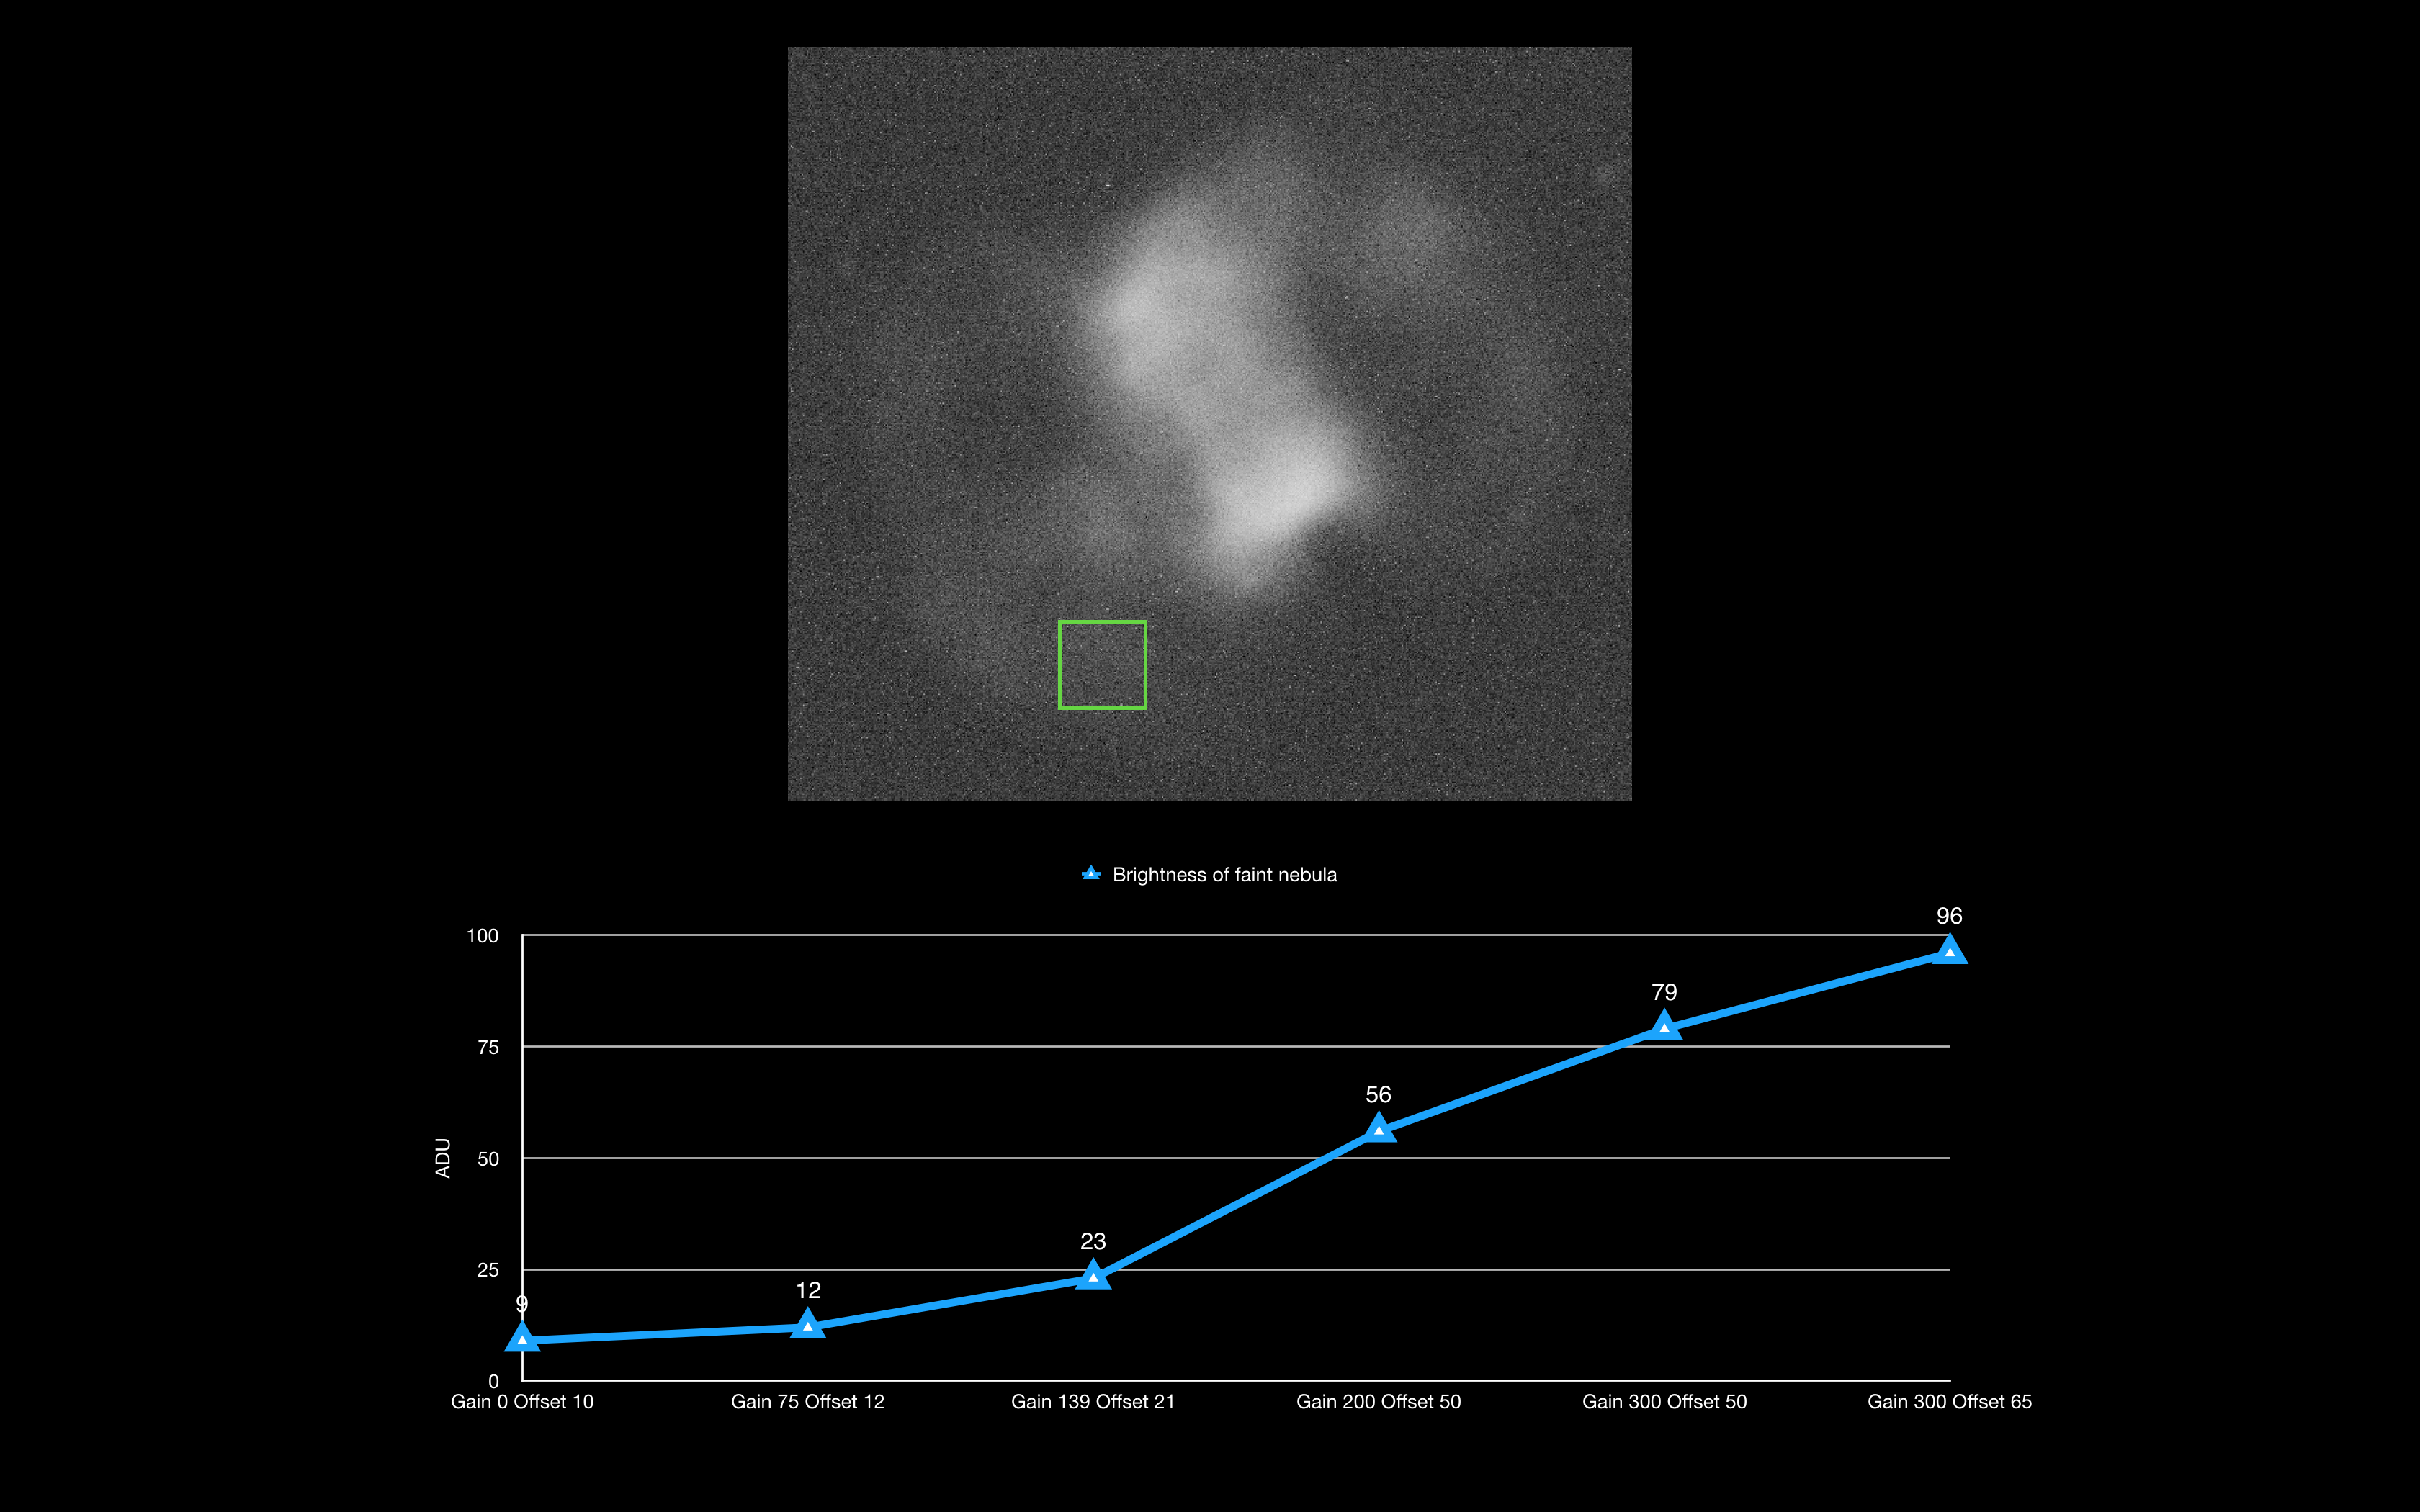
So how bright did the background get? The graph below shows a section of the background free from stars and charts the increase of brightness from a mean figure of 9 ADU with the gain set to 0 and a mean figure of 104 with the gain set to 300. So a large increase but but at least up until gain 200 not a problem, as we will see when we look at the faintest part of the nebula later.
This graph looks at the bright star SAO 22551 (HIP 8063) which is mag 6.66 and the brightest star in the image. Again as previously seen in the right hand slice of the image the star is saturated by gain 300. All figures are the maximum pixel values.
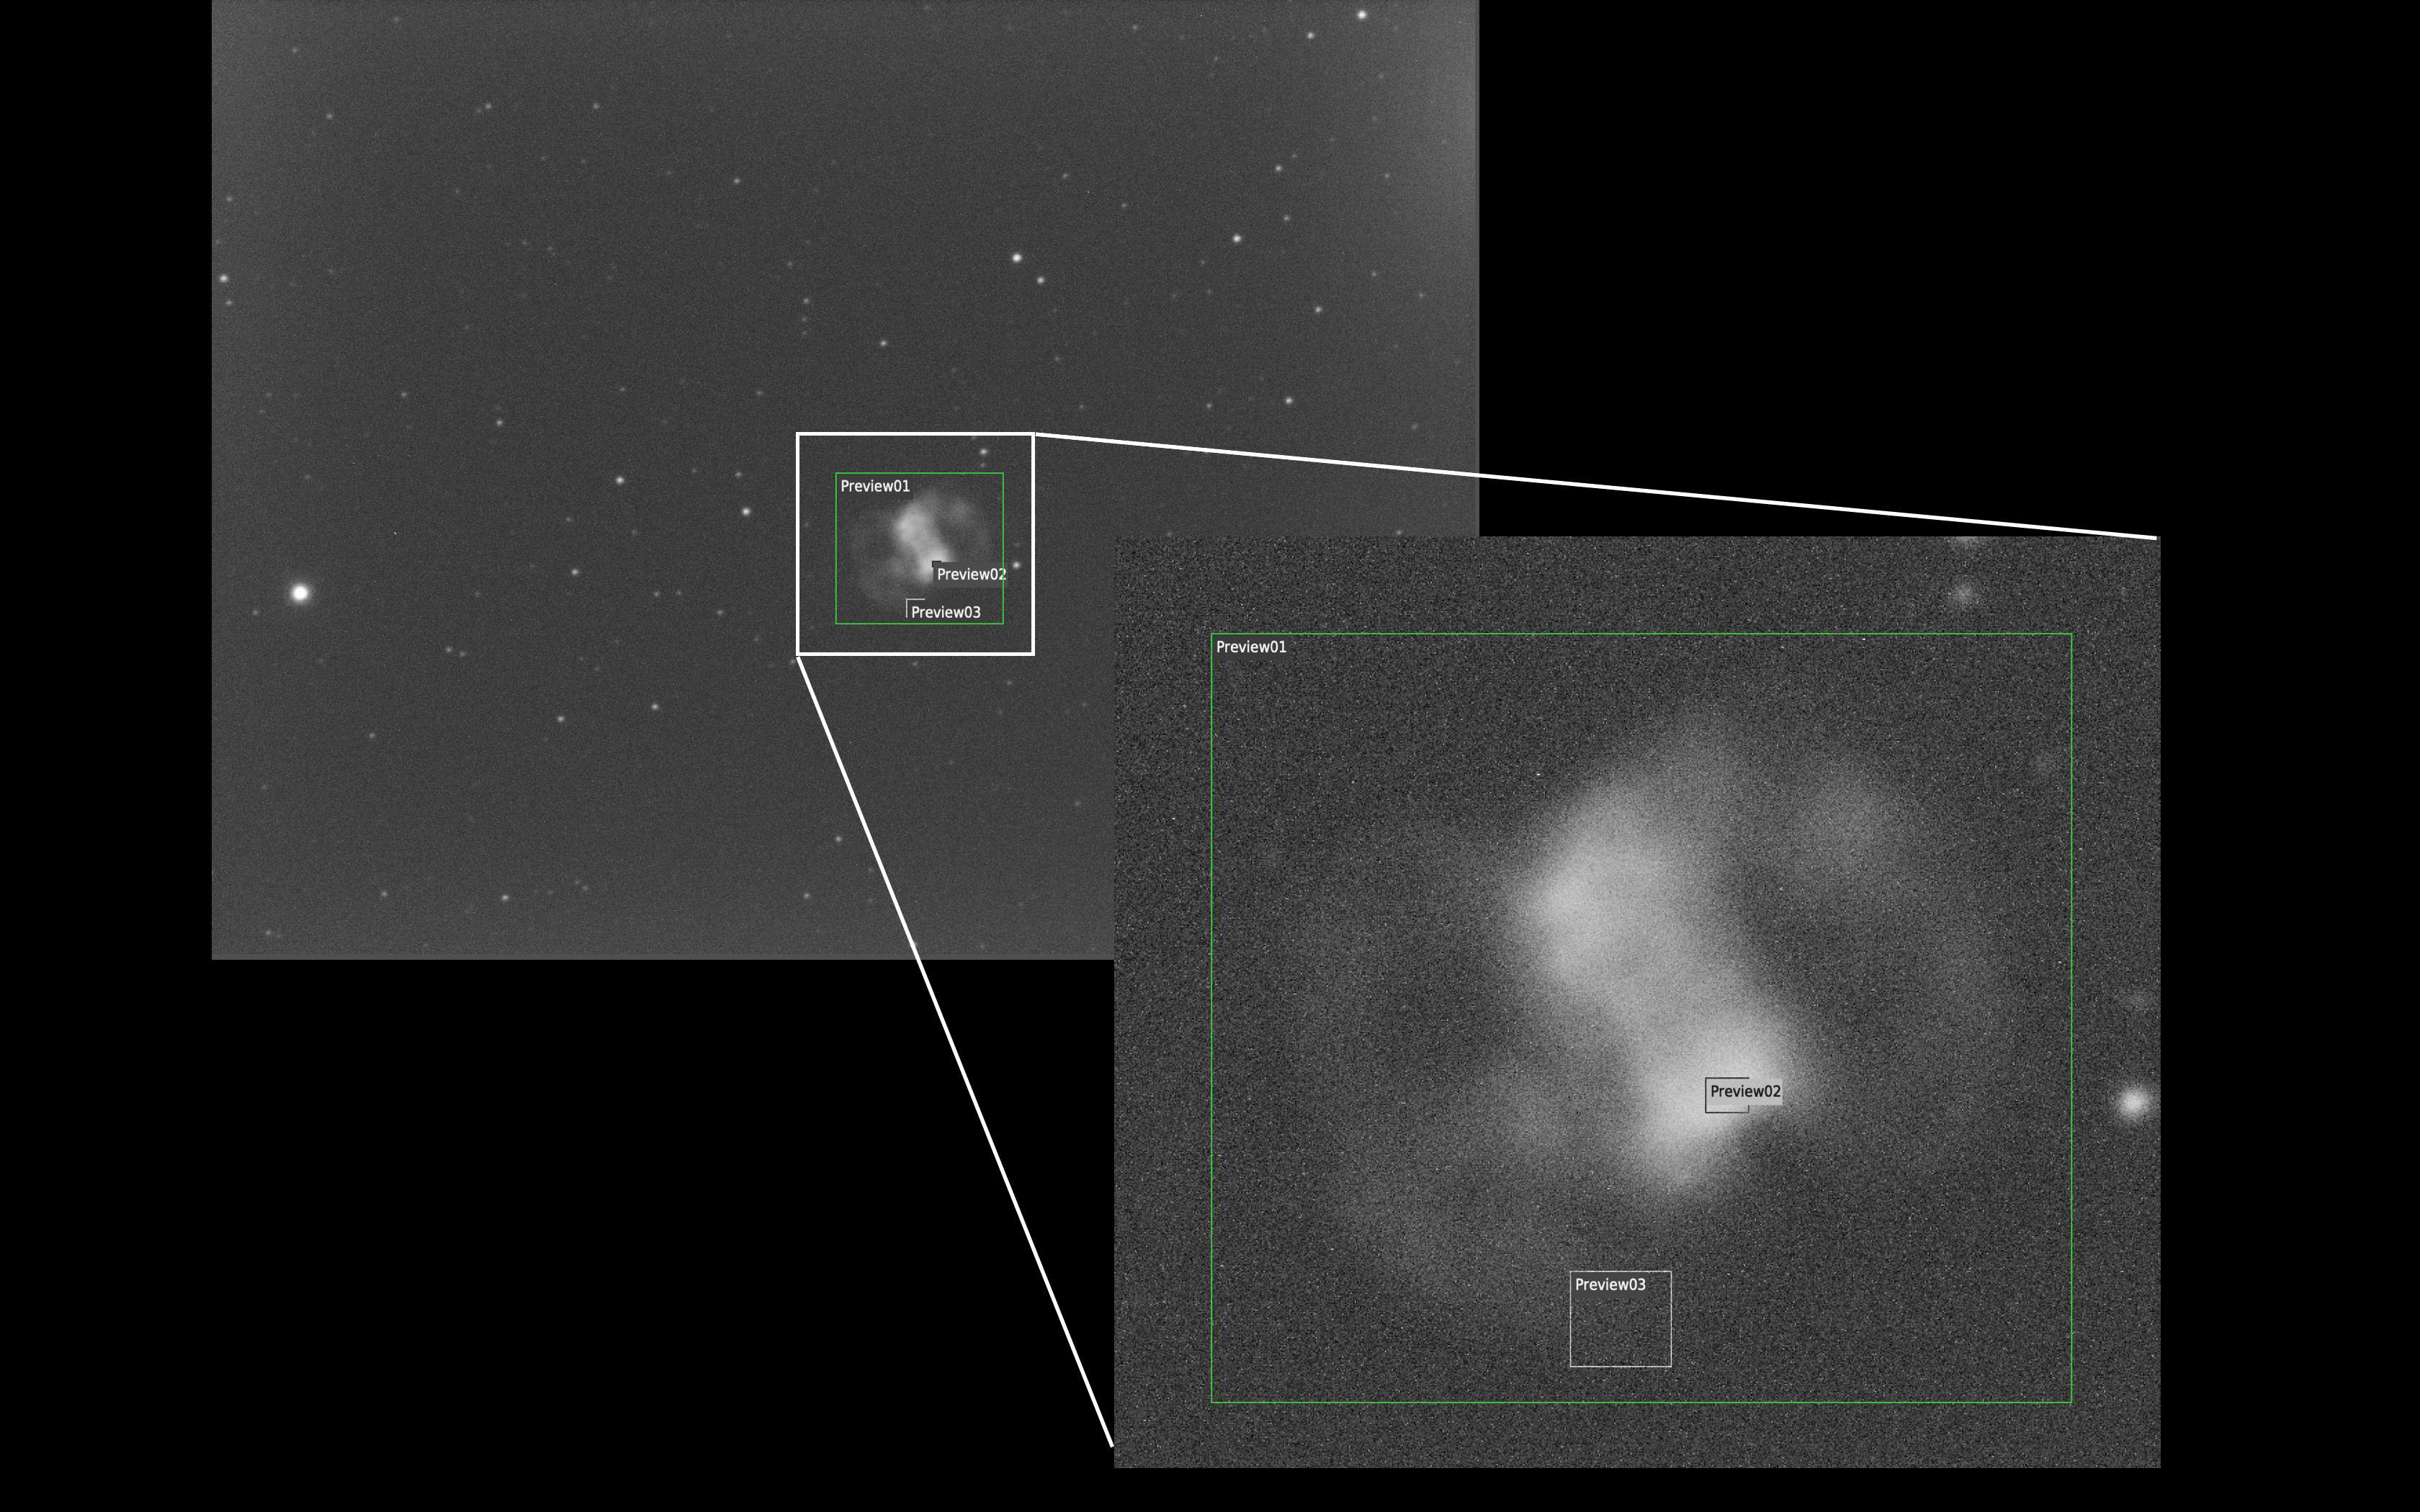
Now let’s focus on the nebula itself and go back to using the mean ADU figures. The picture below shows the section of the nebula I will use for analysis. In particular I focused in on the brightest lobe of the central portion of the planetary nebula and the faintest portion of the left arc.
So looking at the faintest nebula within the left arc we can see that it is not very bright at all and the brightest it gets at gain 300 and offset 65 has a mean figure of 96 ADU. Each and every image at the different gain setting and offset setting is seemingly just below that of the background, which in itself is interesting as the nebula seems to be fainter than the background. So more analysis was needed.
However I then went back and looked at a selection of areas of the background across the image to find that the original background selection to the bottom left of the image was brighter than other areas. Below you can see the image of gain 200 and offset 50, this time with 5 selection boxes. Preview 6 is the nebula as recorded before is mean 56 ADU. Preview 5, so the sky right next door to it has a mean figure of 55, so just below the nebula, hence it is only barely visible. Preview 1 is 54 ADU and Preview 4 is also 54 ADU. So there is brightening on that bottom left corner of the image, so had the nebula fallen at that spot then it would be swapped by the background.
There is only 1 ADU between the nebula and the background adjacent to it at gain 200 offset 50. If we looked at the same to regions in the image of gain 300 and offset 50 then you get a 2 ADU difference. The image with gain 300 and offset 65 gives a 3 ADU difference. So the results show that both gain and offset both help increase the contrast between the background sky and the faintest part of the nebula.
Various previews can be seen to analyse the background vs nebula brightness
The final image below shows the brightest part of the nebula. At gain 300 and offset 65 you see a mean value of 544 ADU which compares to 96 ADU for the faintest part of the nebula and an adjacent background of 93 ADU.
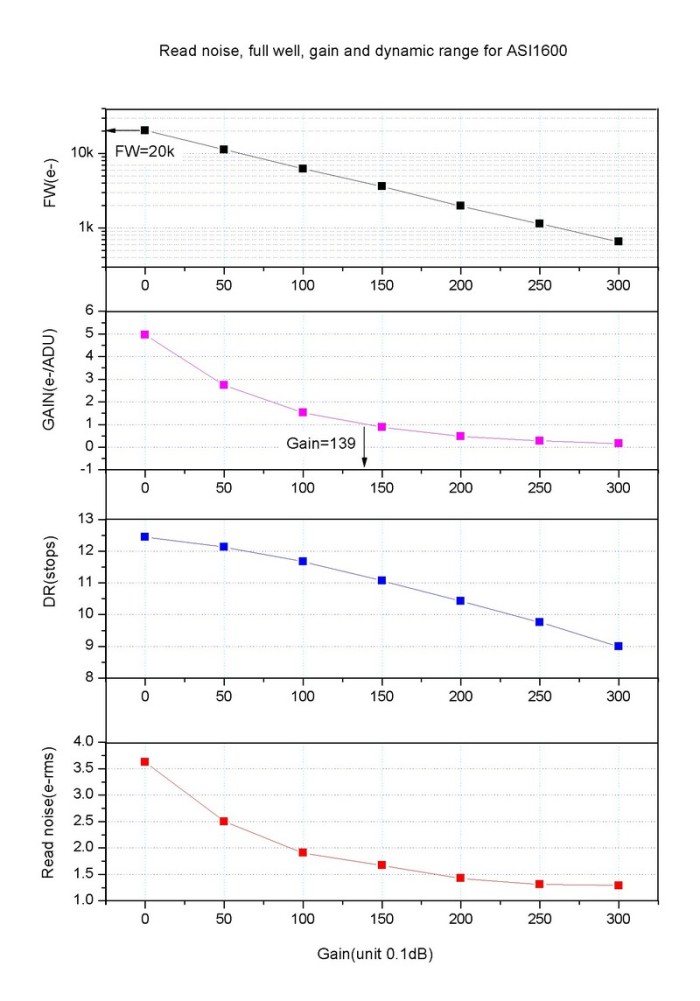
The final piece of information pertains to the camera/chip specification and performance. The graphs below are from the ZWO website and clearly show as expected the more you increase the gain the read noise is lowered but unfortunately so is the full well maximum (the amount of electrons you can store in a pixel) and the lower the dynamic range, which for deep sky objects is a required.
So from this first piece of testing what have we learnt? Whilst there seems to be a good sense for increasing the gain and offset to help with the SNR especially between the background and the faintest part of the nebula, the increase in amp glow, decrease in dynamic range and reduction in the well count are all factors. Stacking as we will see, will undoubtably help the situation without necessarily setting a high gain. You can see why people say use Unity Gain, so the setting where 1 electron on the sensor = 1 ADU potentially gives the best result from a tradeoff point of view.
I have spend over 4 hours today reading about the Gain and Offset settings for the ZWO ASI1600mm Pro Cooled mono CMOS camera I have on the back of the 12″ Officina Stellare 305 RiDK f/7/9 telescope.
ZWO ASI1600mm Pro Cooled on Officina Stellare 305 RiDK
In particular the posts by Jon Rista and the images with a similar setup from Glen Newell have led me to a handful of setting I will now try from my location and on M76, the Little Dumbbell planetary nebula that I had started to image recently. I must also comment that Kayron Mercieca also had some useful information pertaining to testing your camera and OTA imaging train for exposure times. See link here
Discussion on exposure times and setting – Cloud Nights
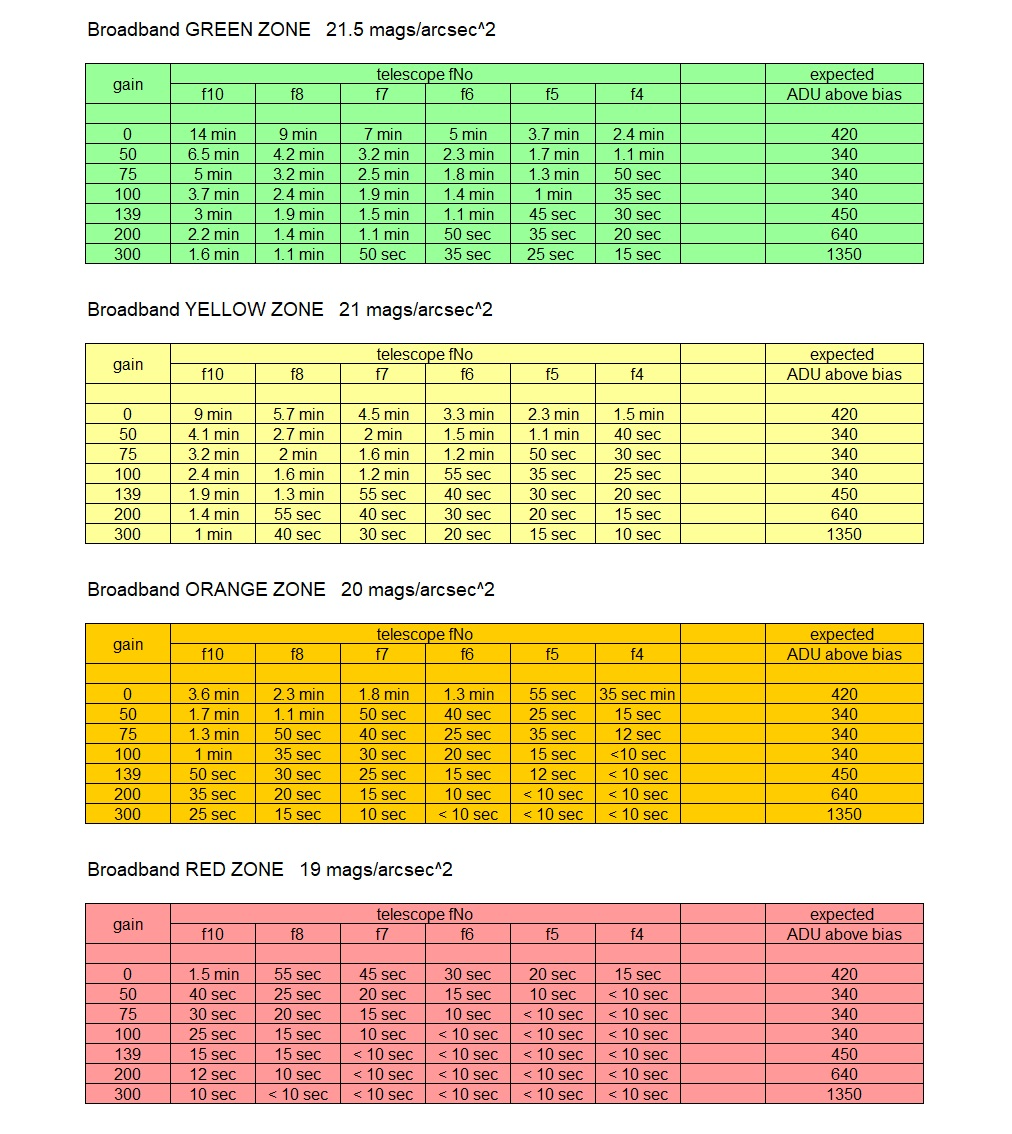
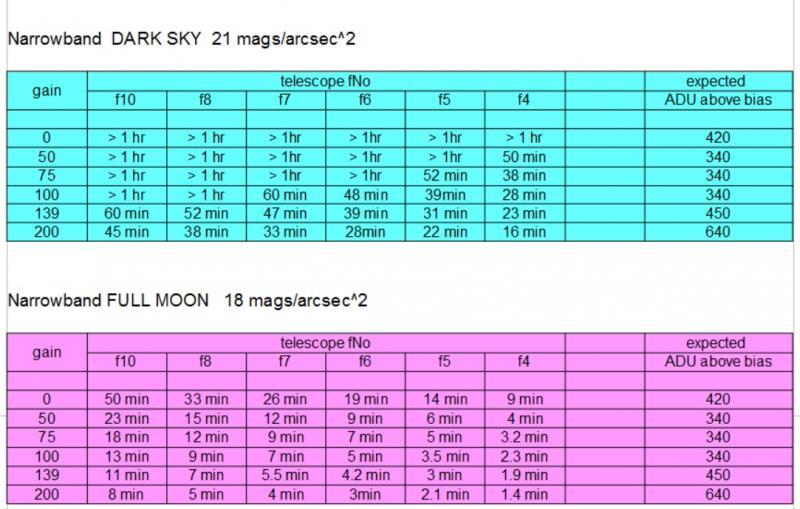
So I have already taken a set of images on the 8th October, 14 of them and they were at a Gain and Offset of 10 (I believe these settings are less than perfect) and an exposure of 1200s, so 20mins through an Astrodon OIII narrowband filter. My location is on a good night in the Orange Zone as per the charts borrowed from the forum discussions and when referring to broadband imaging. For narrow band as per my test here I am between the purple and blue zones.
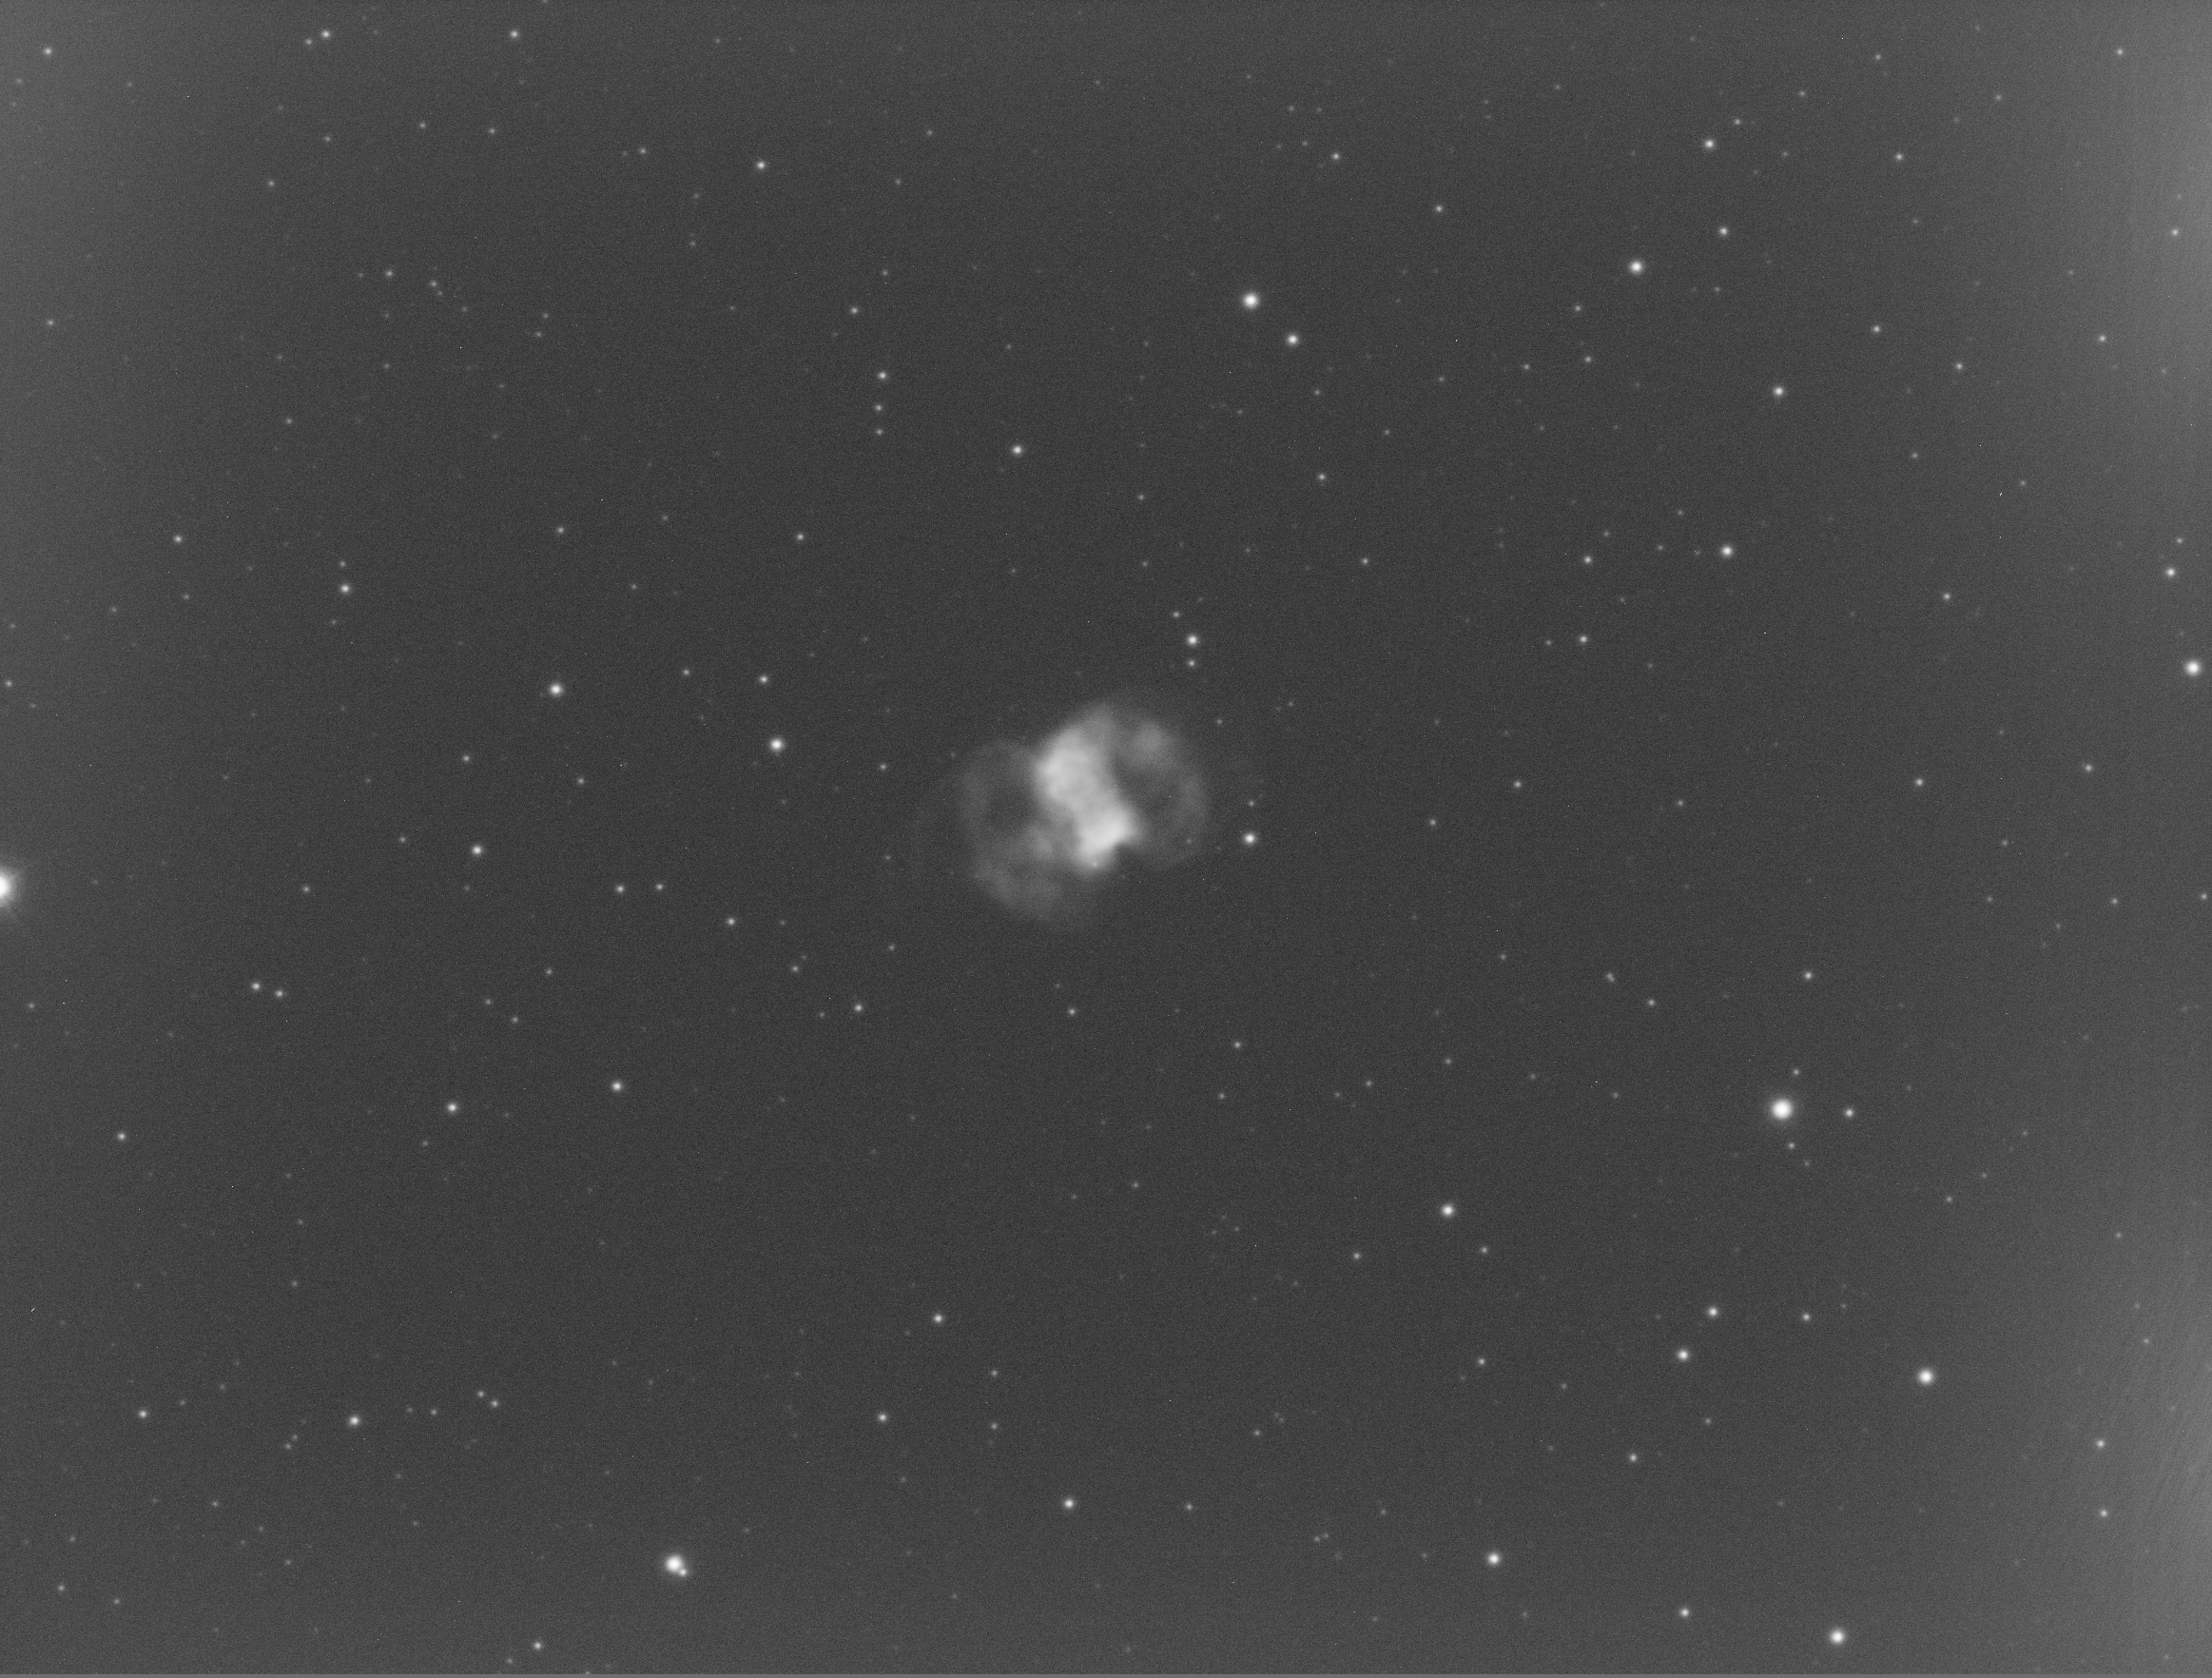
Inspecting the original frames I took you can see slight amp glow from the right of the image, the background has a median of 10 ADU at 12bits. None of the stars are saturated or clipped. The brightest star is 1,854 ADU our of a dynamic range of 0-4,095 ADU. The faintest nebula I can see is 11 ADU so just above the background and the brightest part of the nebula is 77 ADU.
M76 – 1 x 20min OIII Gain 10 Offset 10 – ASI1600mm Pro Cooled
So I will attempt to take a set of images at the following settings across 4 exposure times of 300s, 600s, 900s and 1200s at or after astronomical night at 20:56 onwards if the clouds hold off.
Gain 0 – Offset 10
Gain 75 – Offset 12
Gain 139 – Offset 21
Gain 200 – Offset 50
Gain 300 – Offset 50
Gain 300 – Offset 65
So after several false starts of broken cloud disrupting my ability to keep the dome open, I managed to grab the first 6 frames of 300s as above. Here is an animated GIF of all the images in order of Gain lowest to highest. (Click the image to animate or right mouse click and download)
In my next blog I will look at the analysis of the first 6 frames whilst I take the other frames to compare.
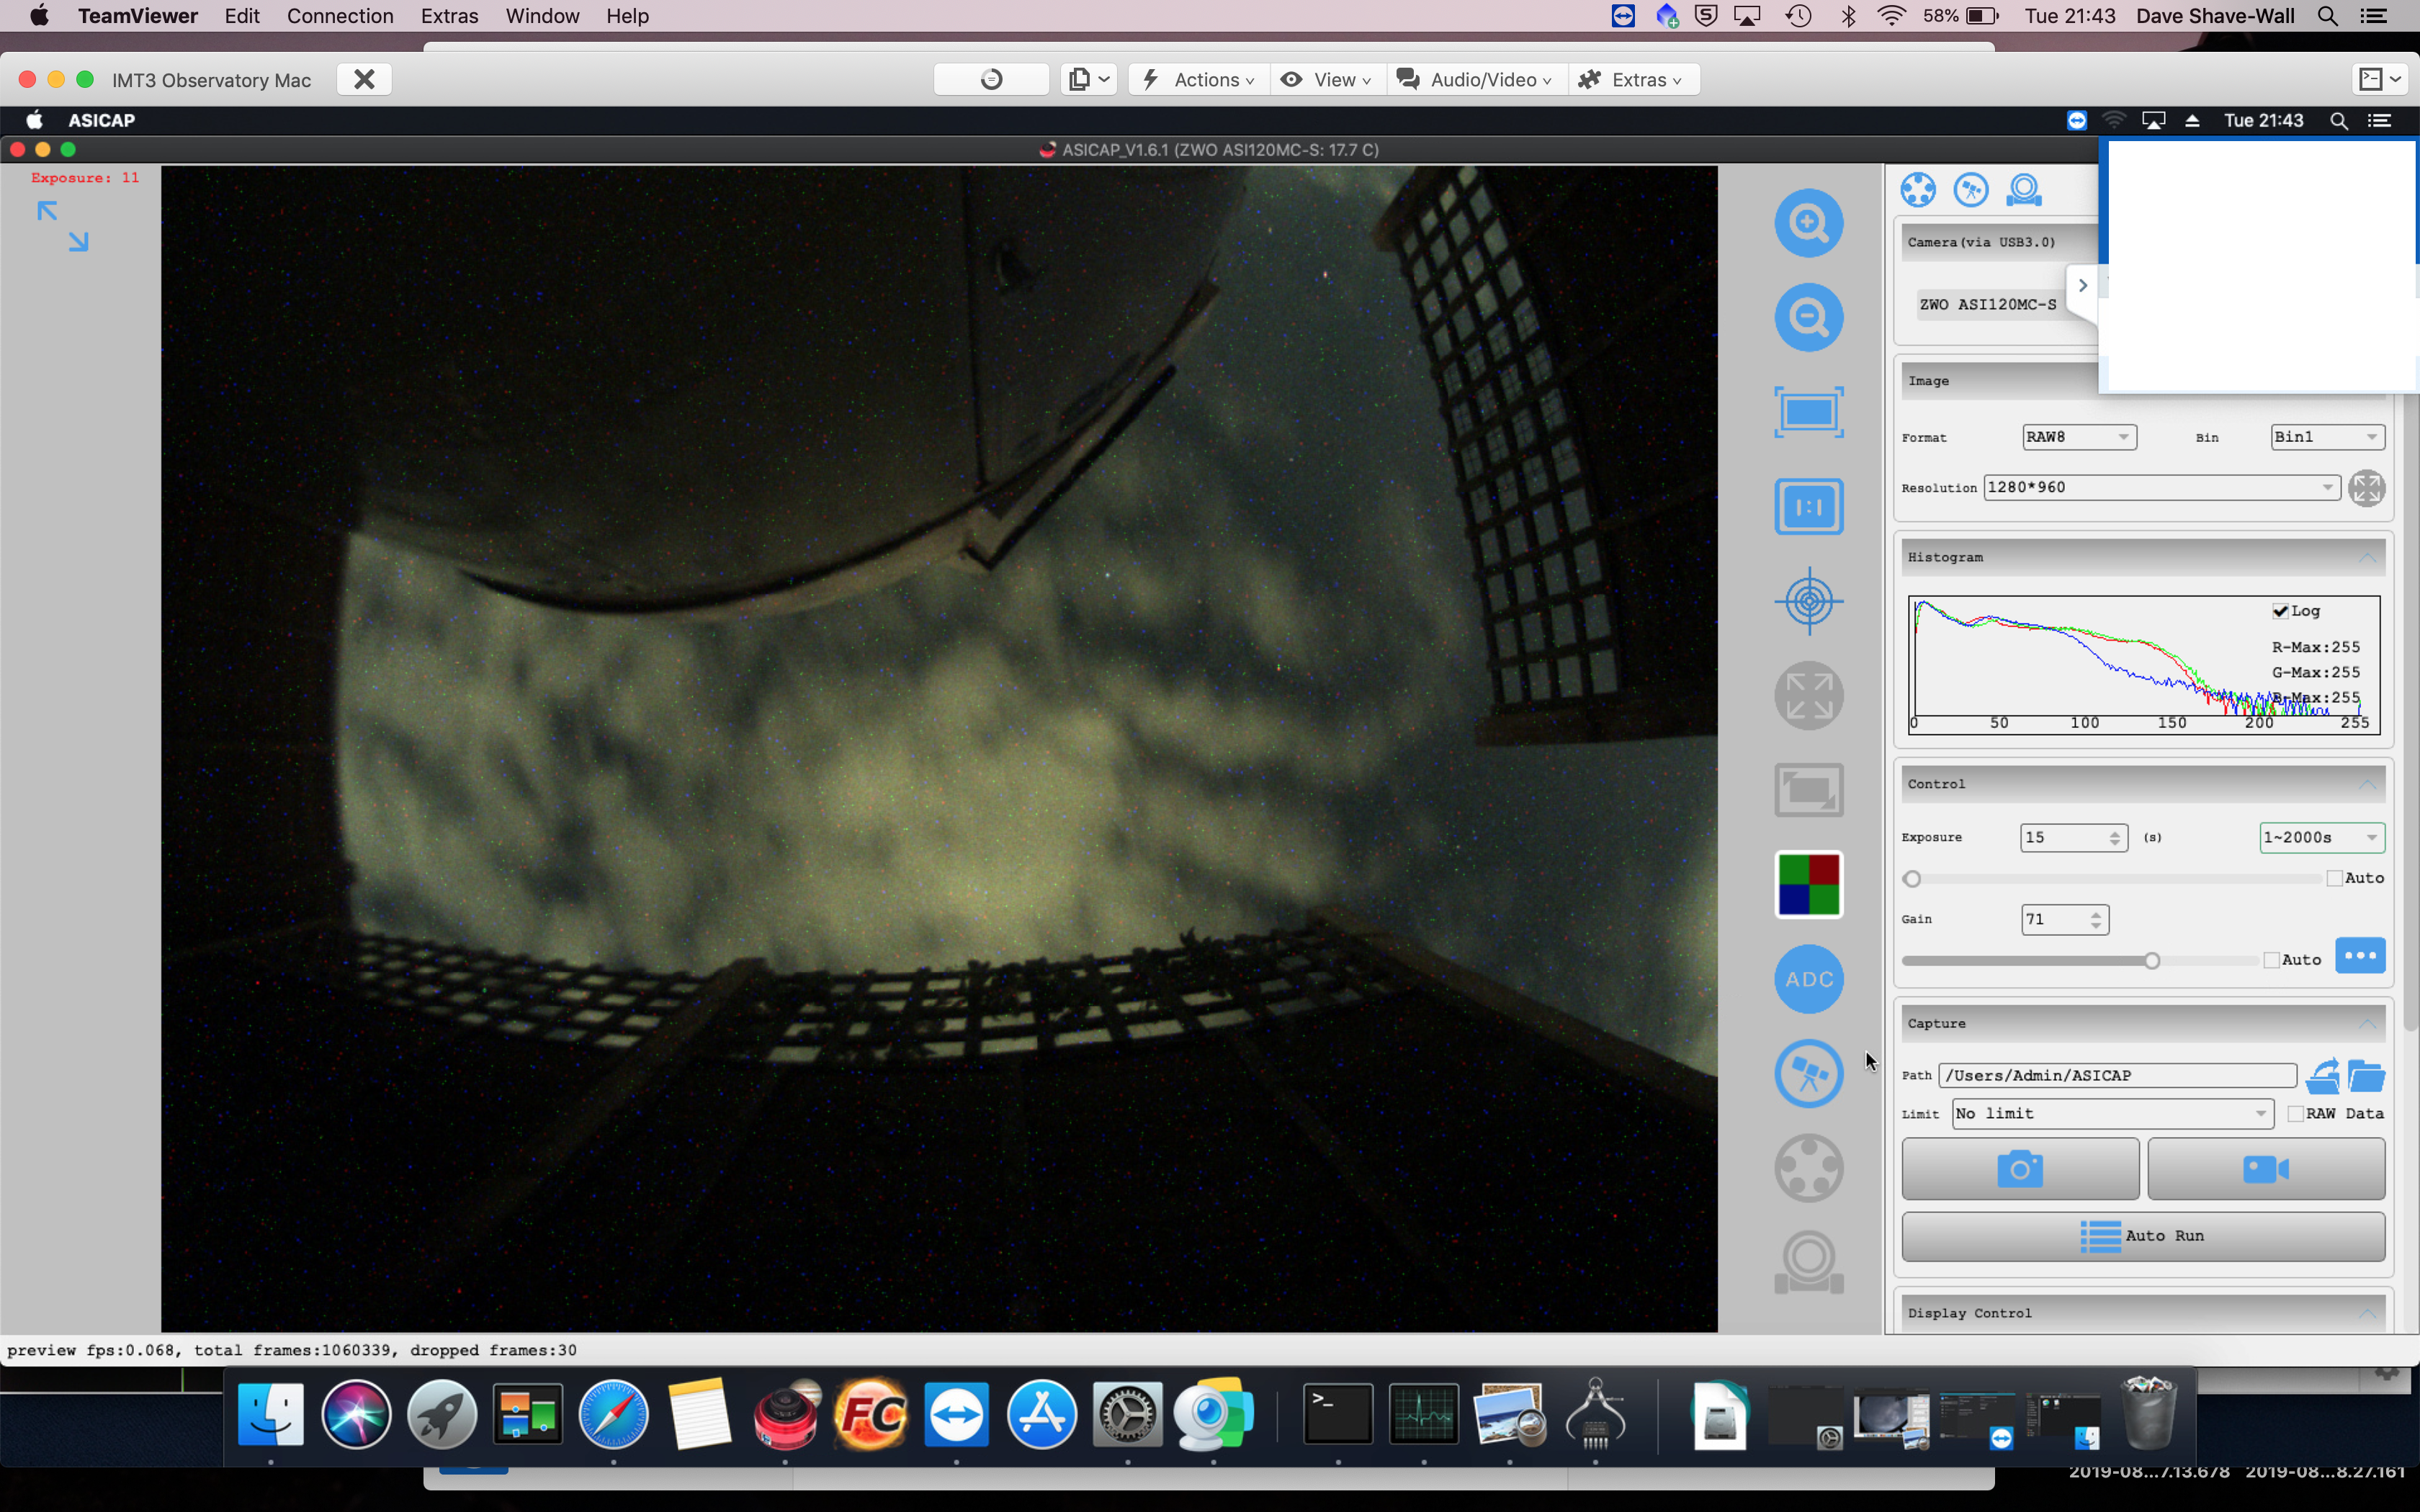
I find I notice some interesting things on the All Sky Camera, which is a USB 3 ZWO ASI120MC-S CMOS camera inside a purpose built casing and clear dome. Firstly I land up with beautiful clouds rolling past. I also noticed the light pollution as I mentioned in a previous post from the bathroom window upstairs. This image is when I had the camera on the ground by the observatory as I was testing the maximum length of powered USB I could get away with before data loss caused issues.
Bathroom light on
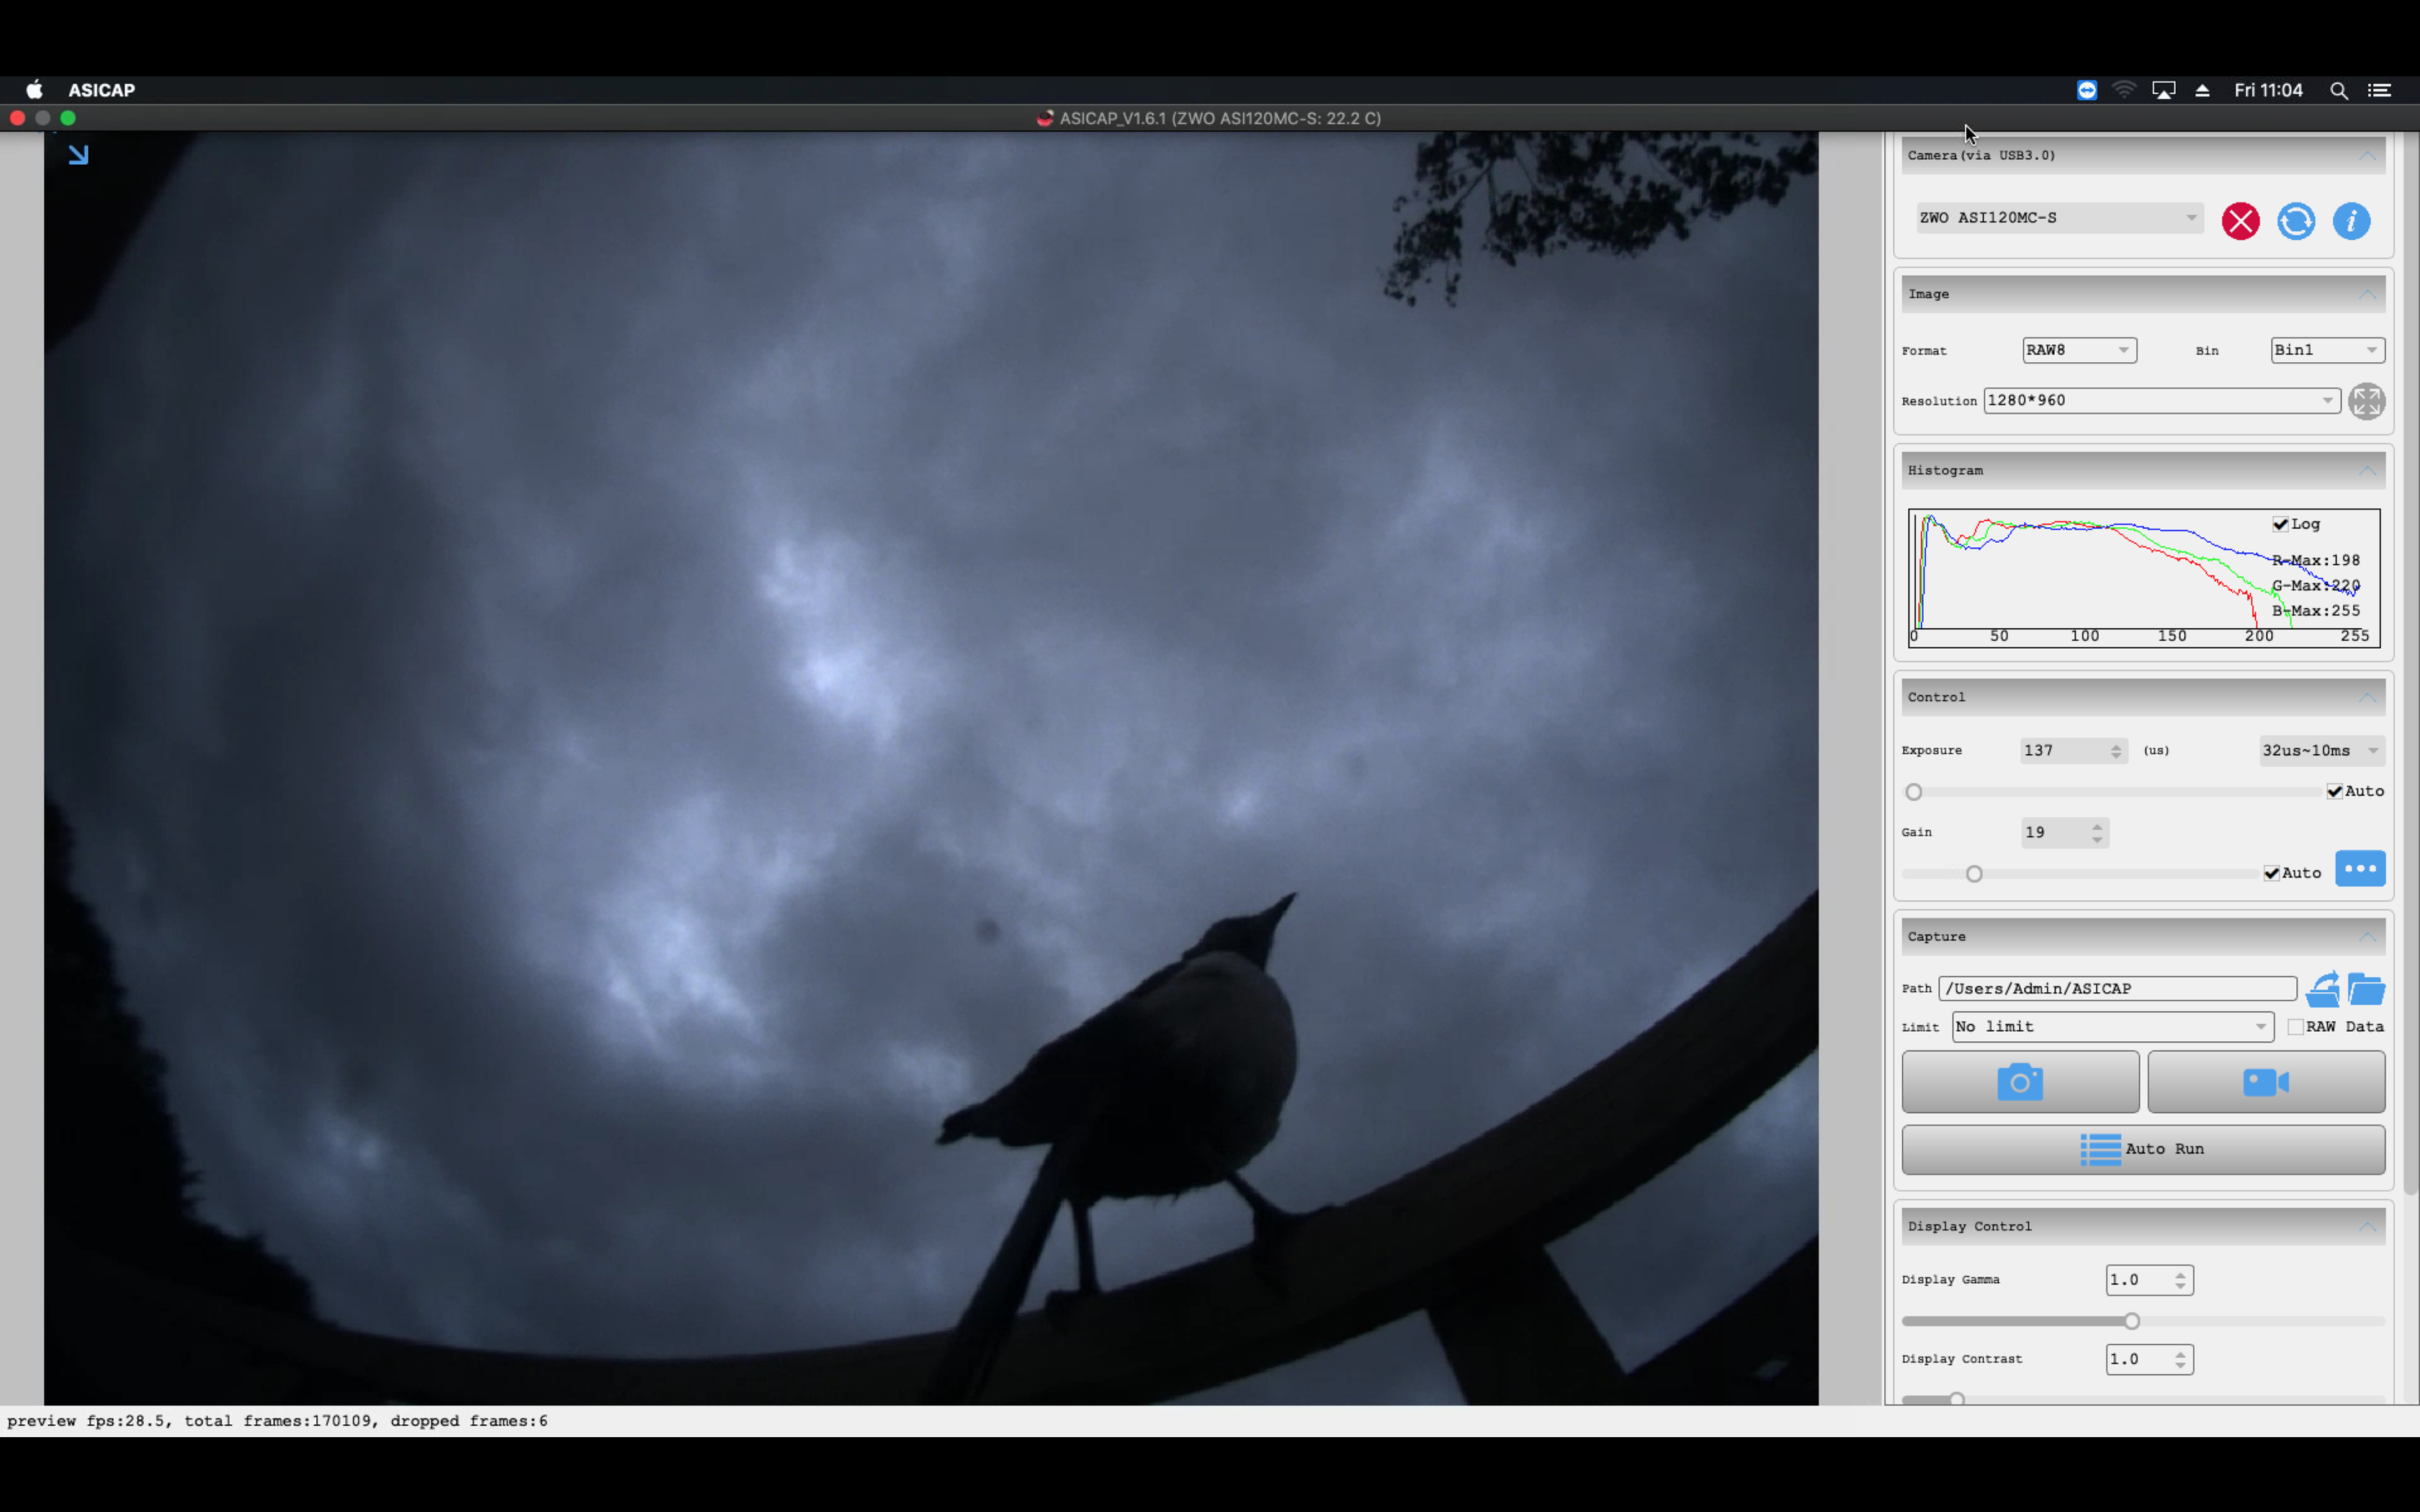
When the light is turned off it is noticeably darker.
Bathroom light off
Sometimes I get visitors to the camera.
Daytime visitor
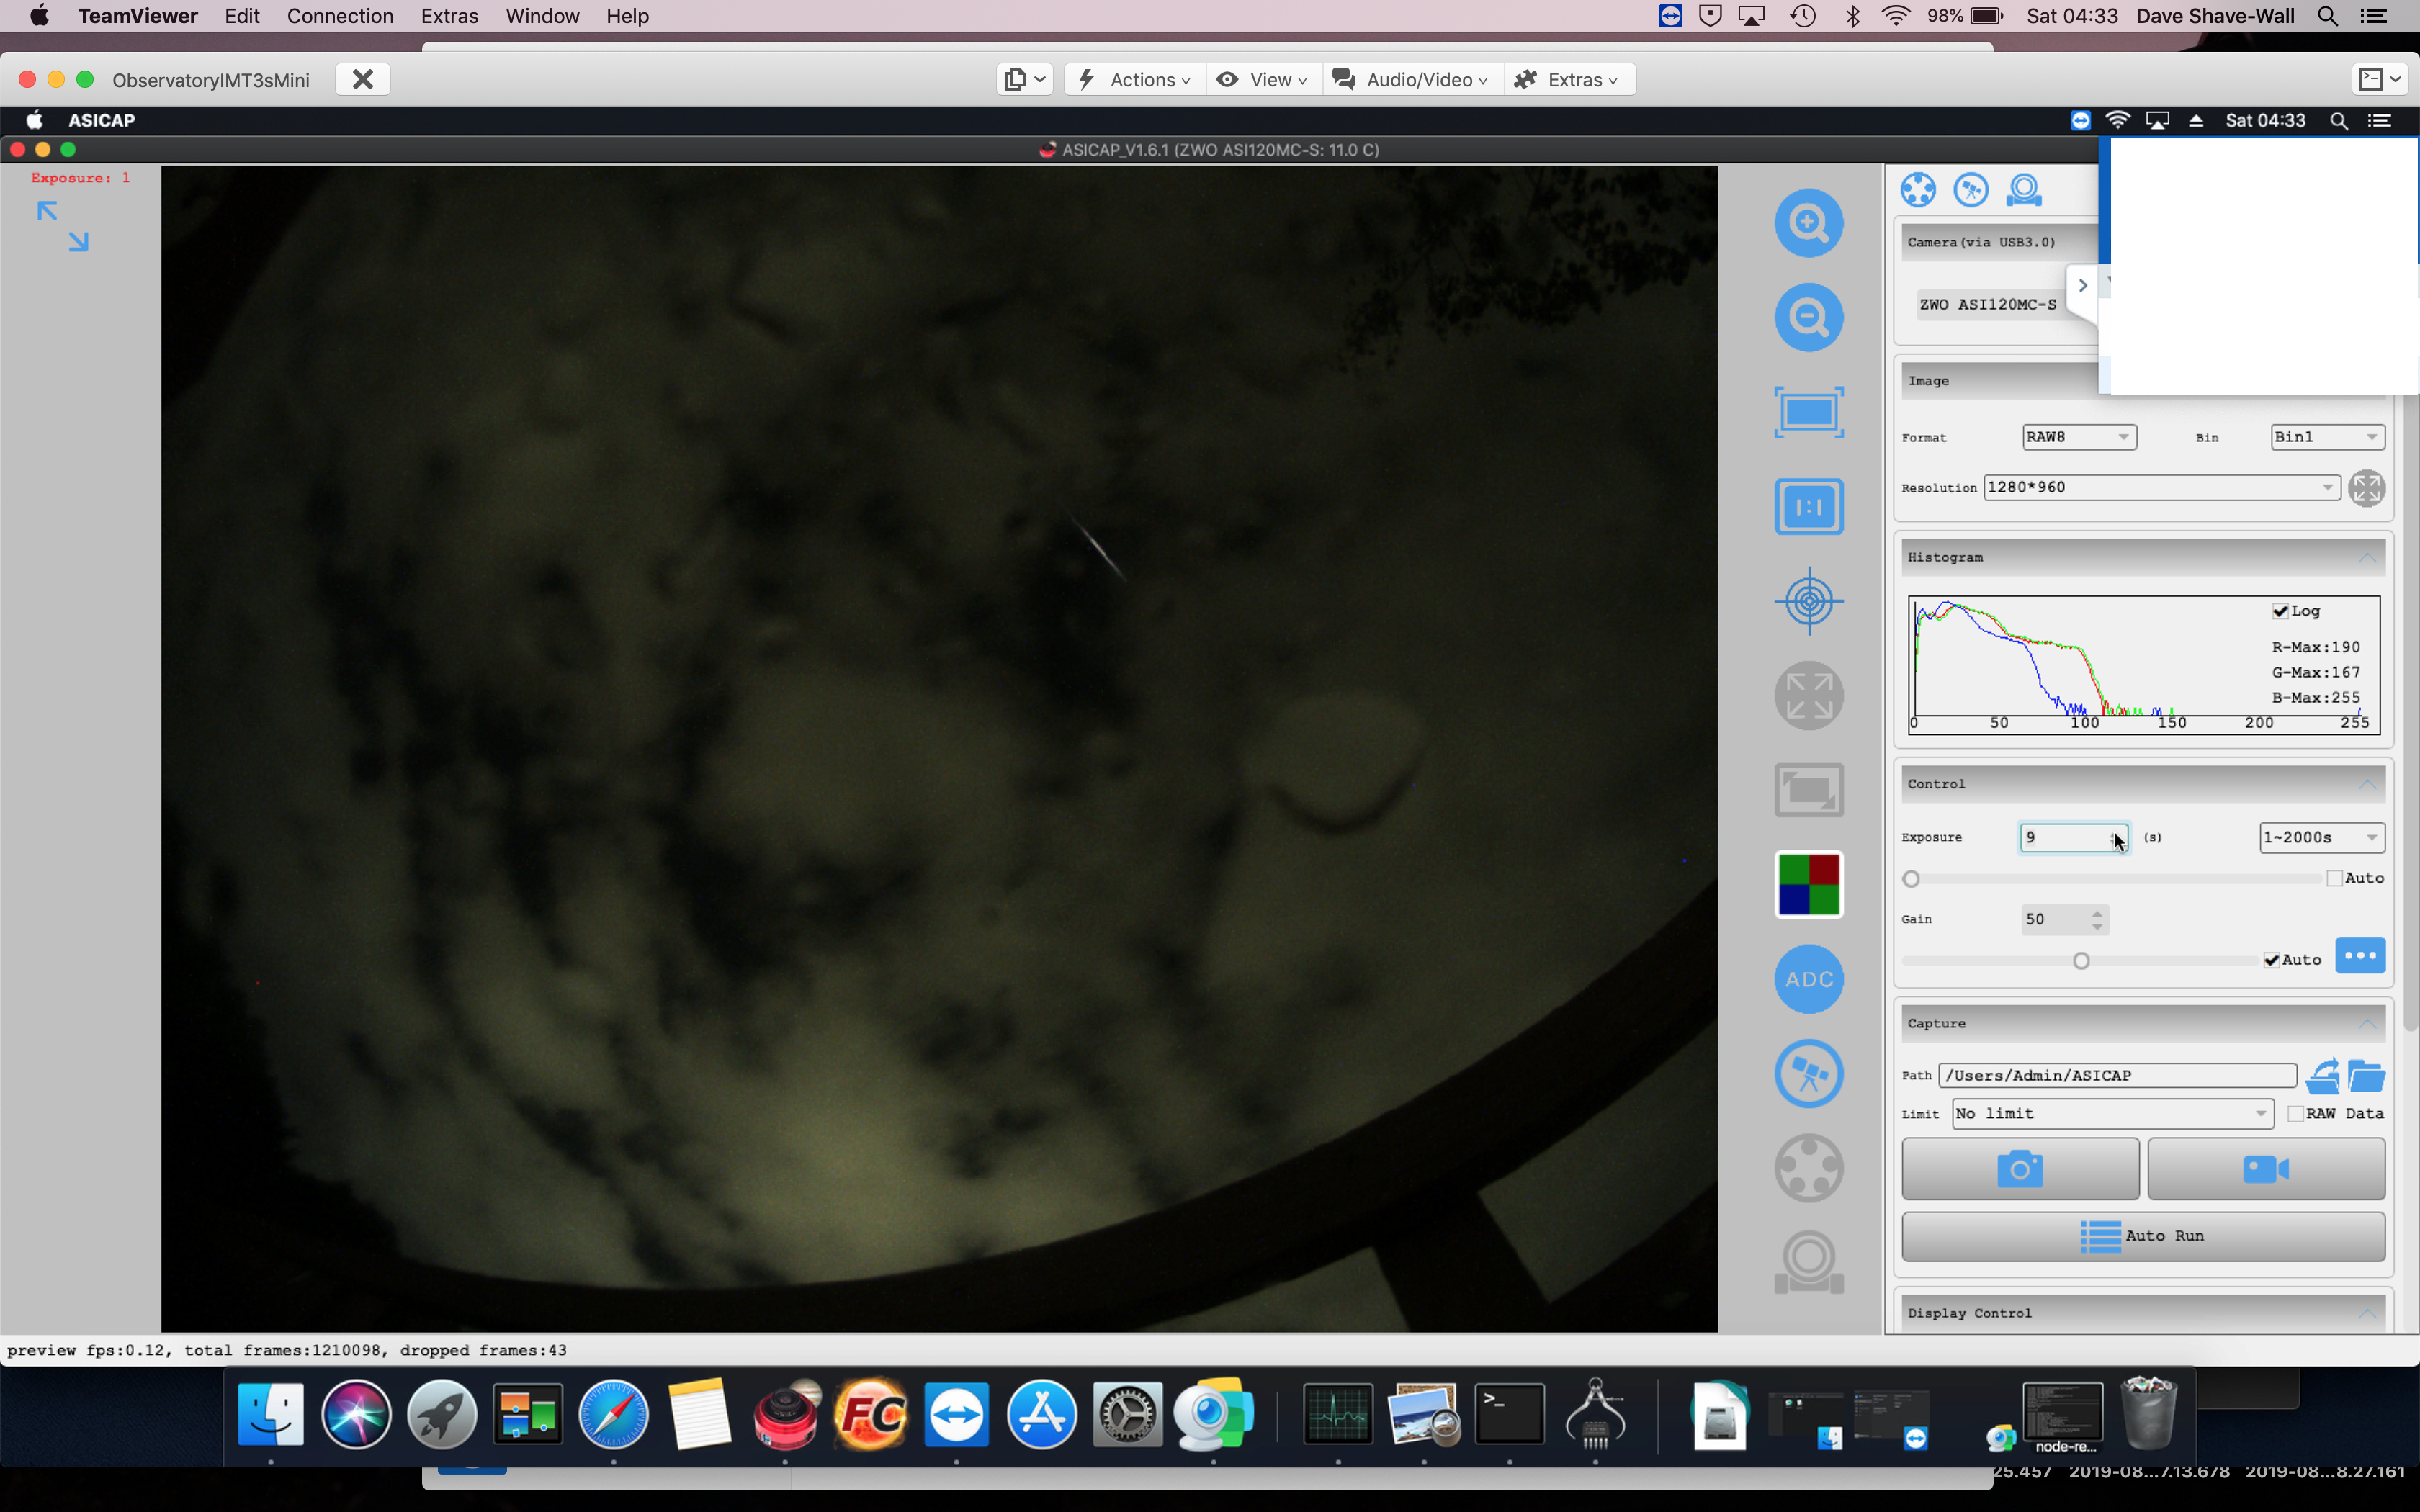
and sometimes I unexpectedly capture a meteor 🙂
Raindrop, Clouds and Meteor
So it transpires I can use a single 3m powered USB cable to the USB hub, I cannot use 2 x 3m powered USB as that causes data loss and hangs and I cannot use a single unpowered cable either.
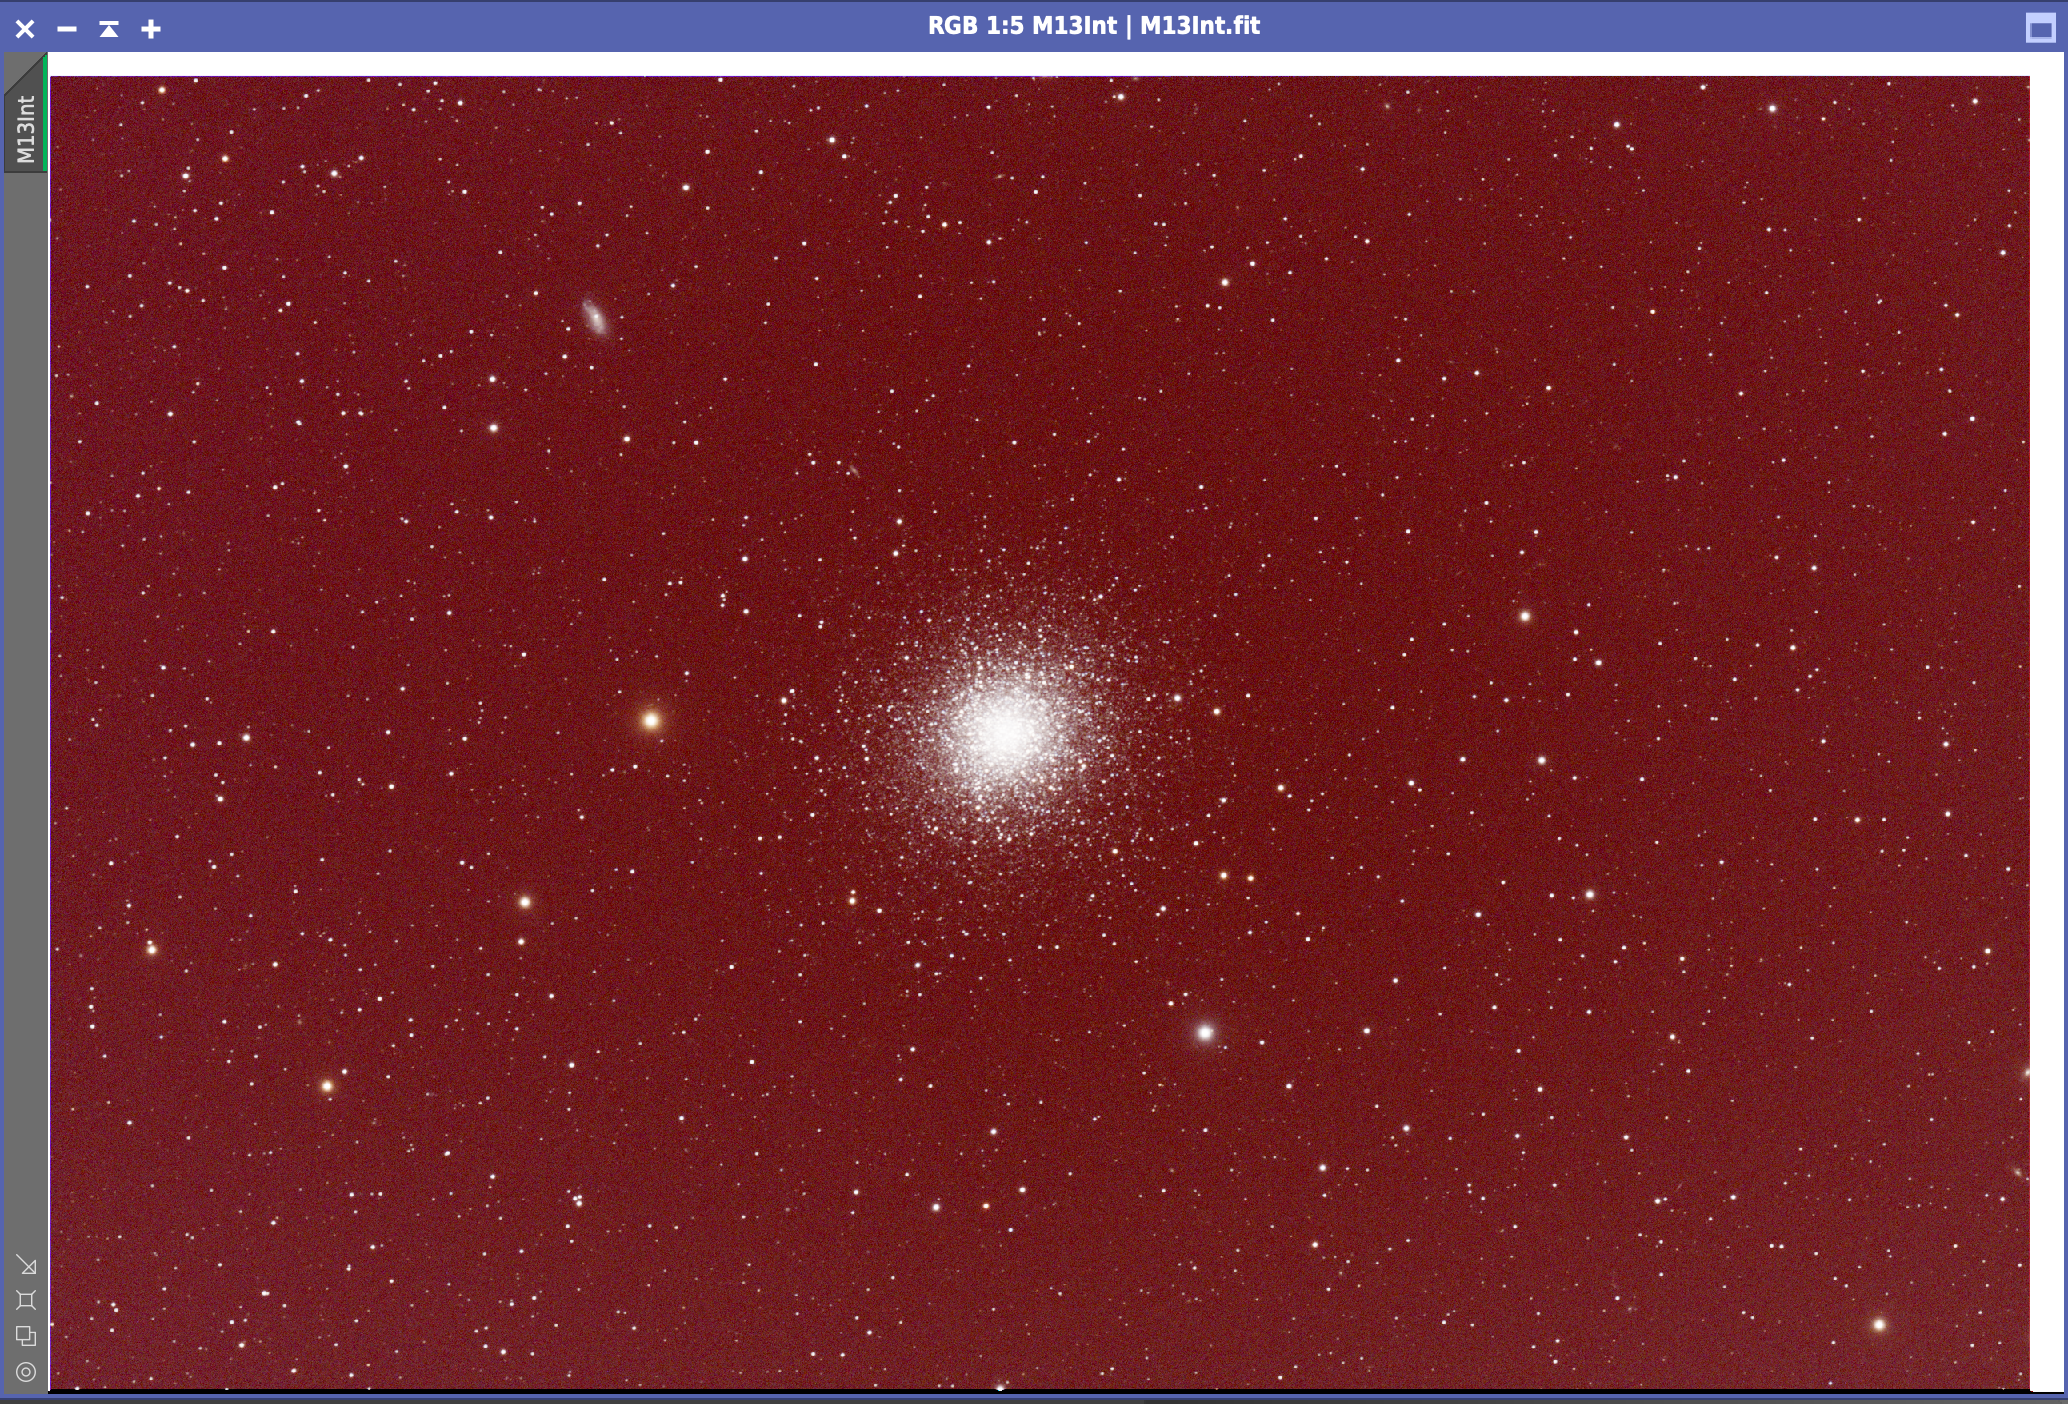
So I managed to go out and quickly bag a few images of M13 to test the travel scope on the night of the 1st to the 2nd September. It was relatively cool and clear. The main aim was could I take images that were not overexposed on stars whilst capturing the fainter stars at the same time. Also I wanted to make sure I could process an image too.
So all in I took 10 x 5 minute exposures but unfortunately I had not read the Skywatcher manual and had not locked up the focus tube. This meant that the first 3 frames were out of focus so I tightened the locking latch and then took the other 7.
On processing the image I noted the black (white) band to the top and right of the image where I had not switched off the setting for Overscan. I could not PixInsight to recognise it properly so I simply pre-processed the image and then cropped it out before processing.
Overscan area present
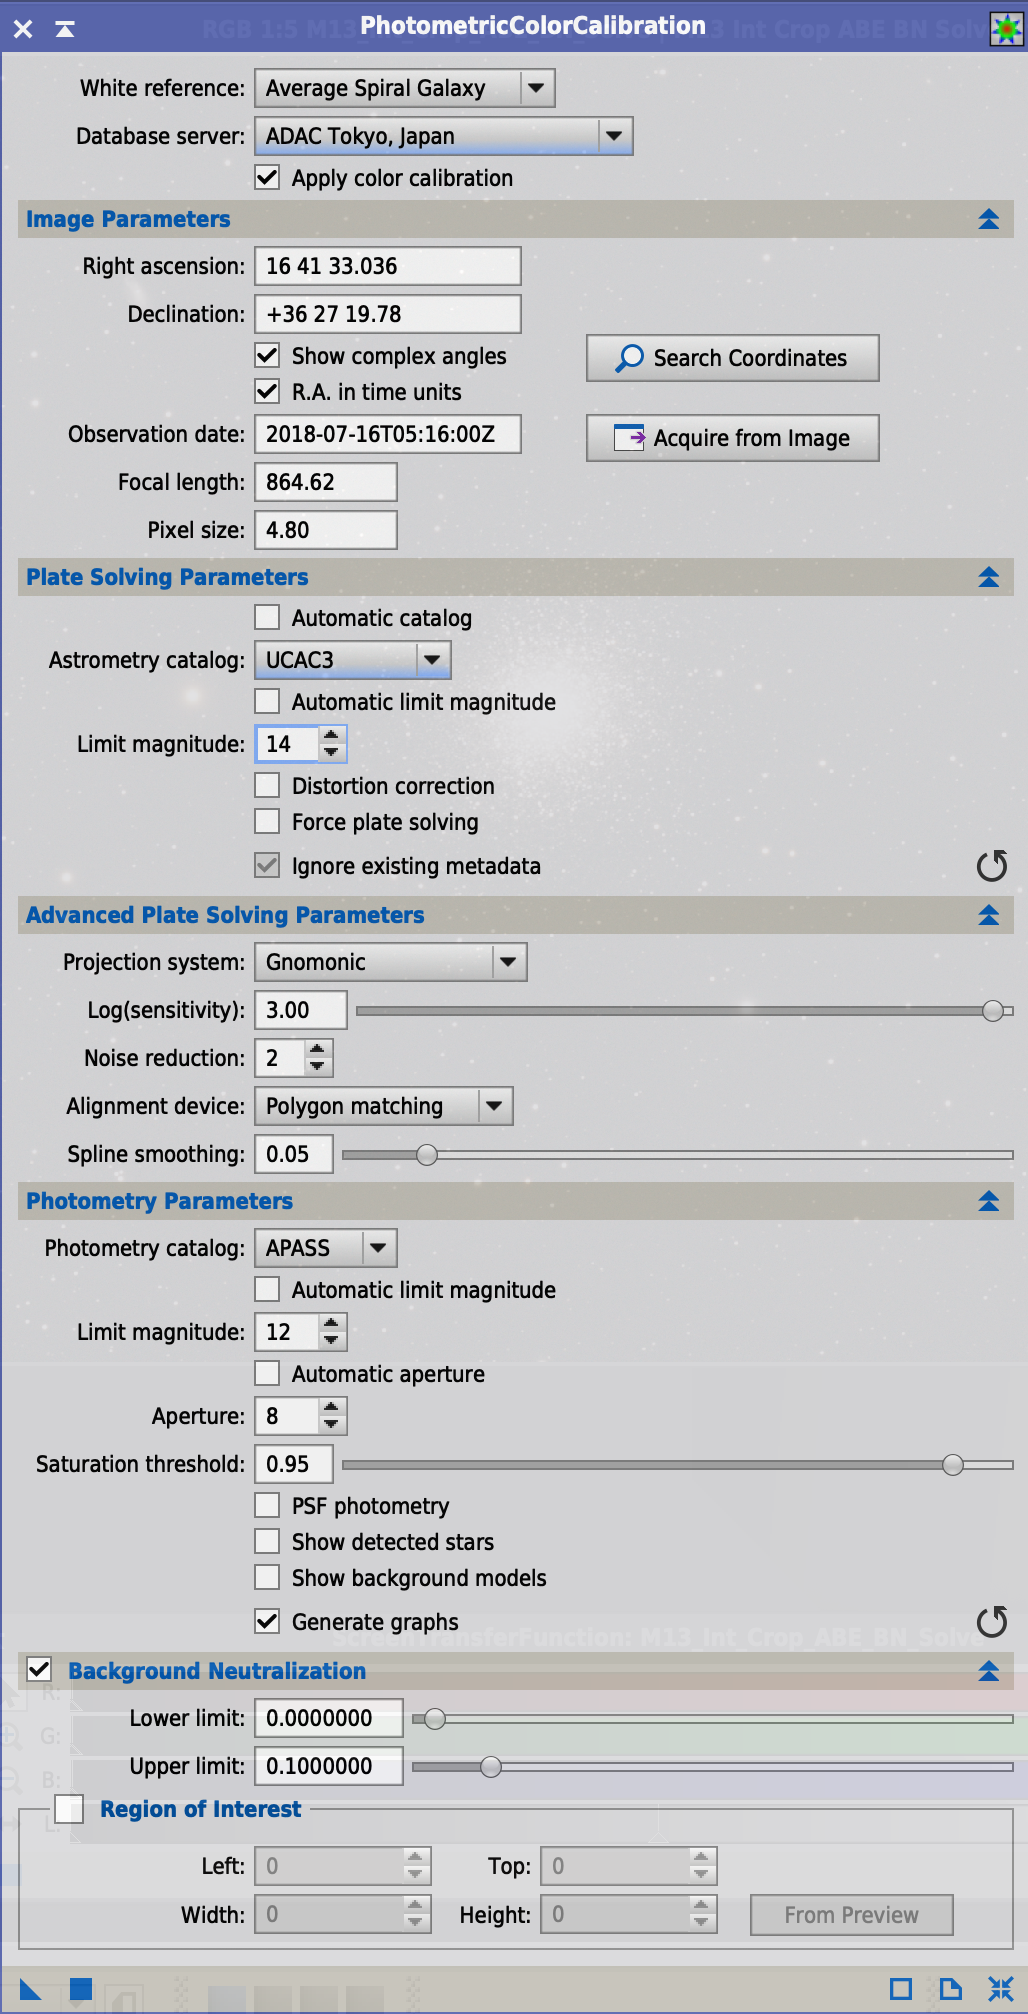
I managed to get Photometric Colour Calibration working which helped get the colour just right. I then processed in my usual way using the following workflow.