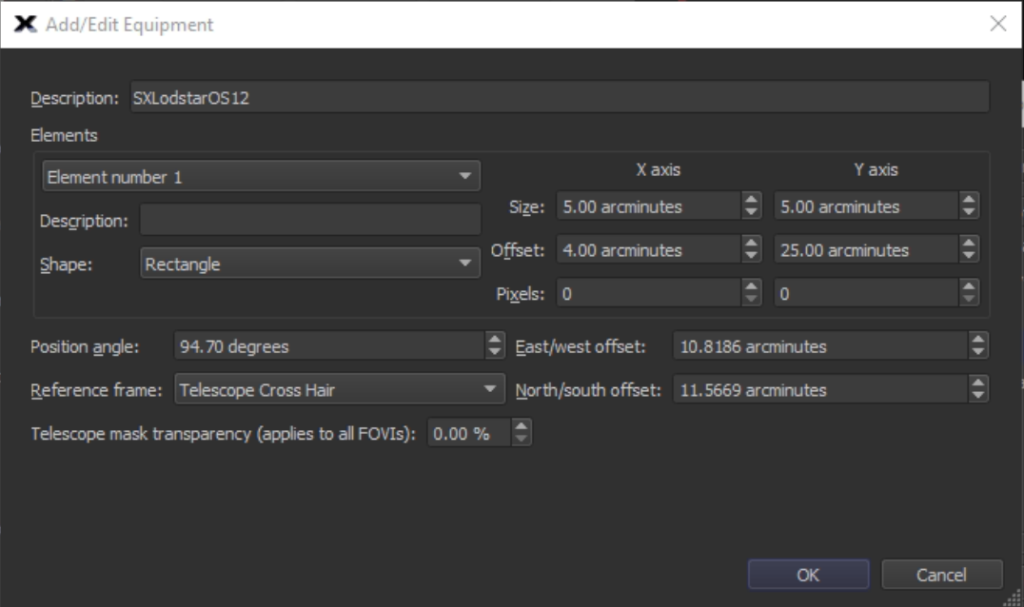
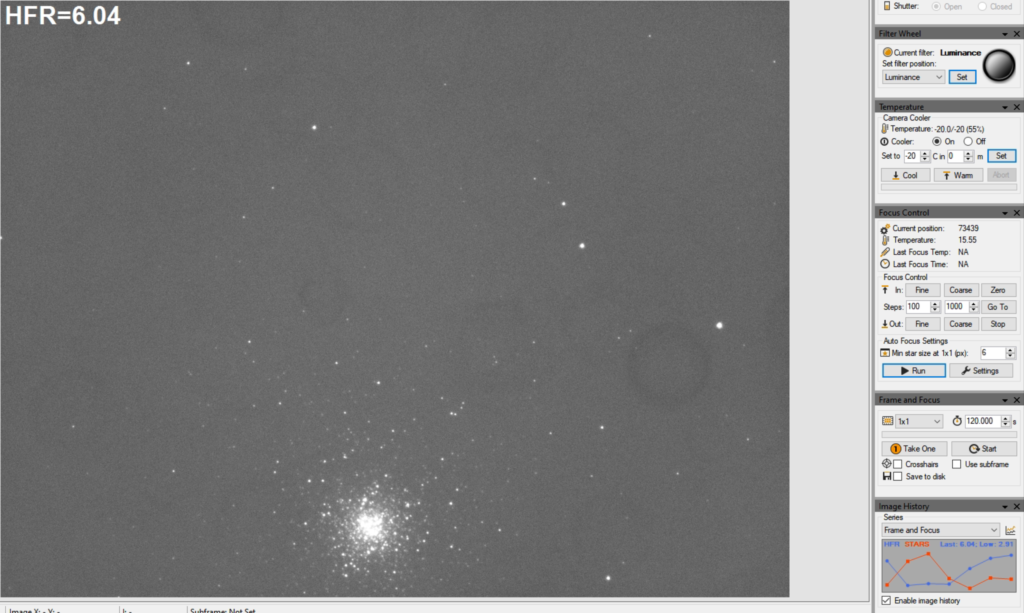
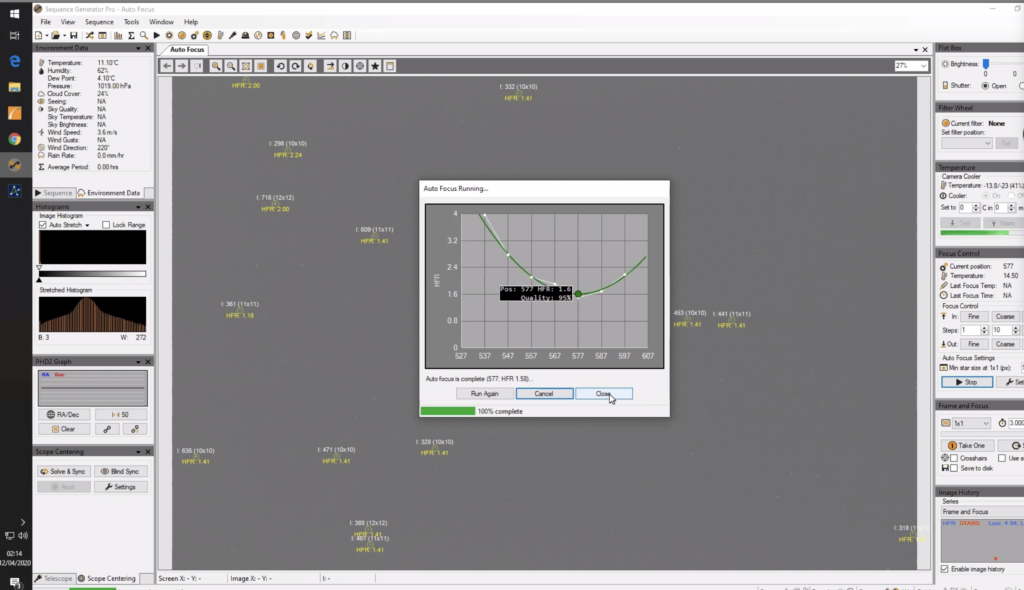
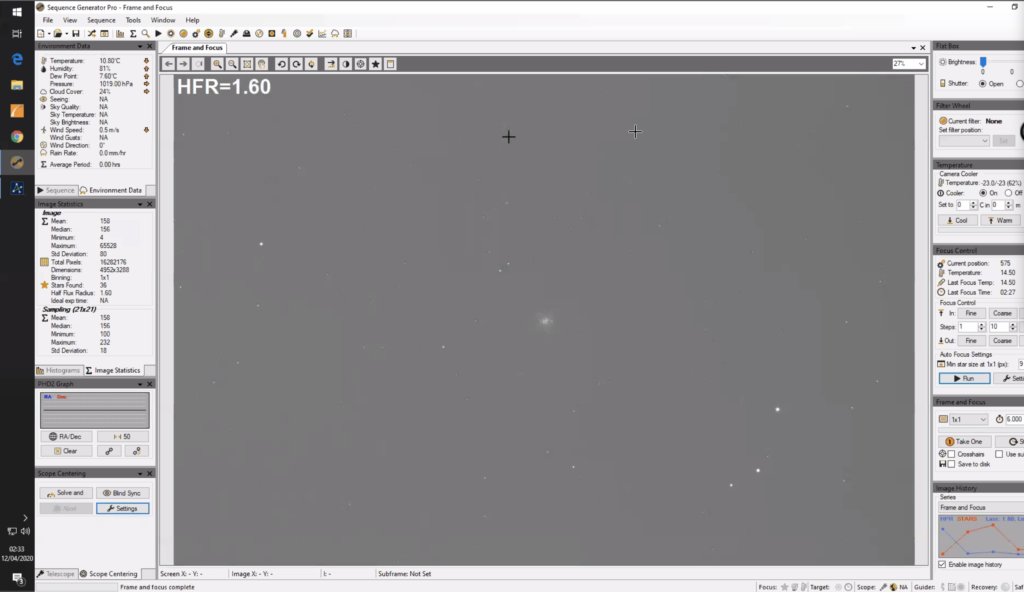
This evening GingerGeek and I simply set out to align the off axis guider of the OS on TSX. We did this buy focusing on the Moon and adjusting the off axis guider for he crater we were seeing. The resulting image is not very good which give rise to a though that the OAG should move it’s position in the imaging train to give better star renditions, the issue is I think it is as far back as it can go due to the filter wheel.
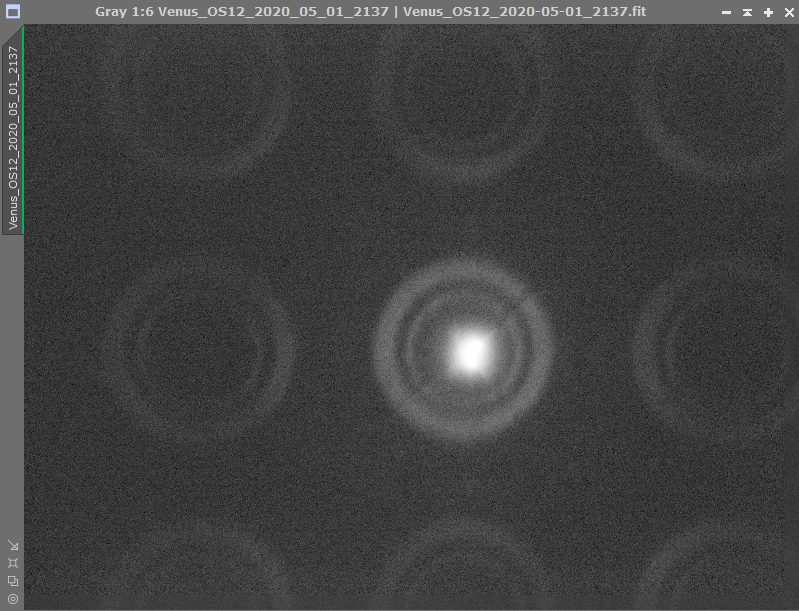
On opening the dome I slewed to Venus hoping to catch it before it disappeared below the horizon. I took a 1s Frame and Focus image just to confirm it was in the centre of the FoV and was puzzled by the resulting image.
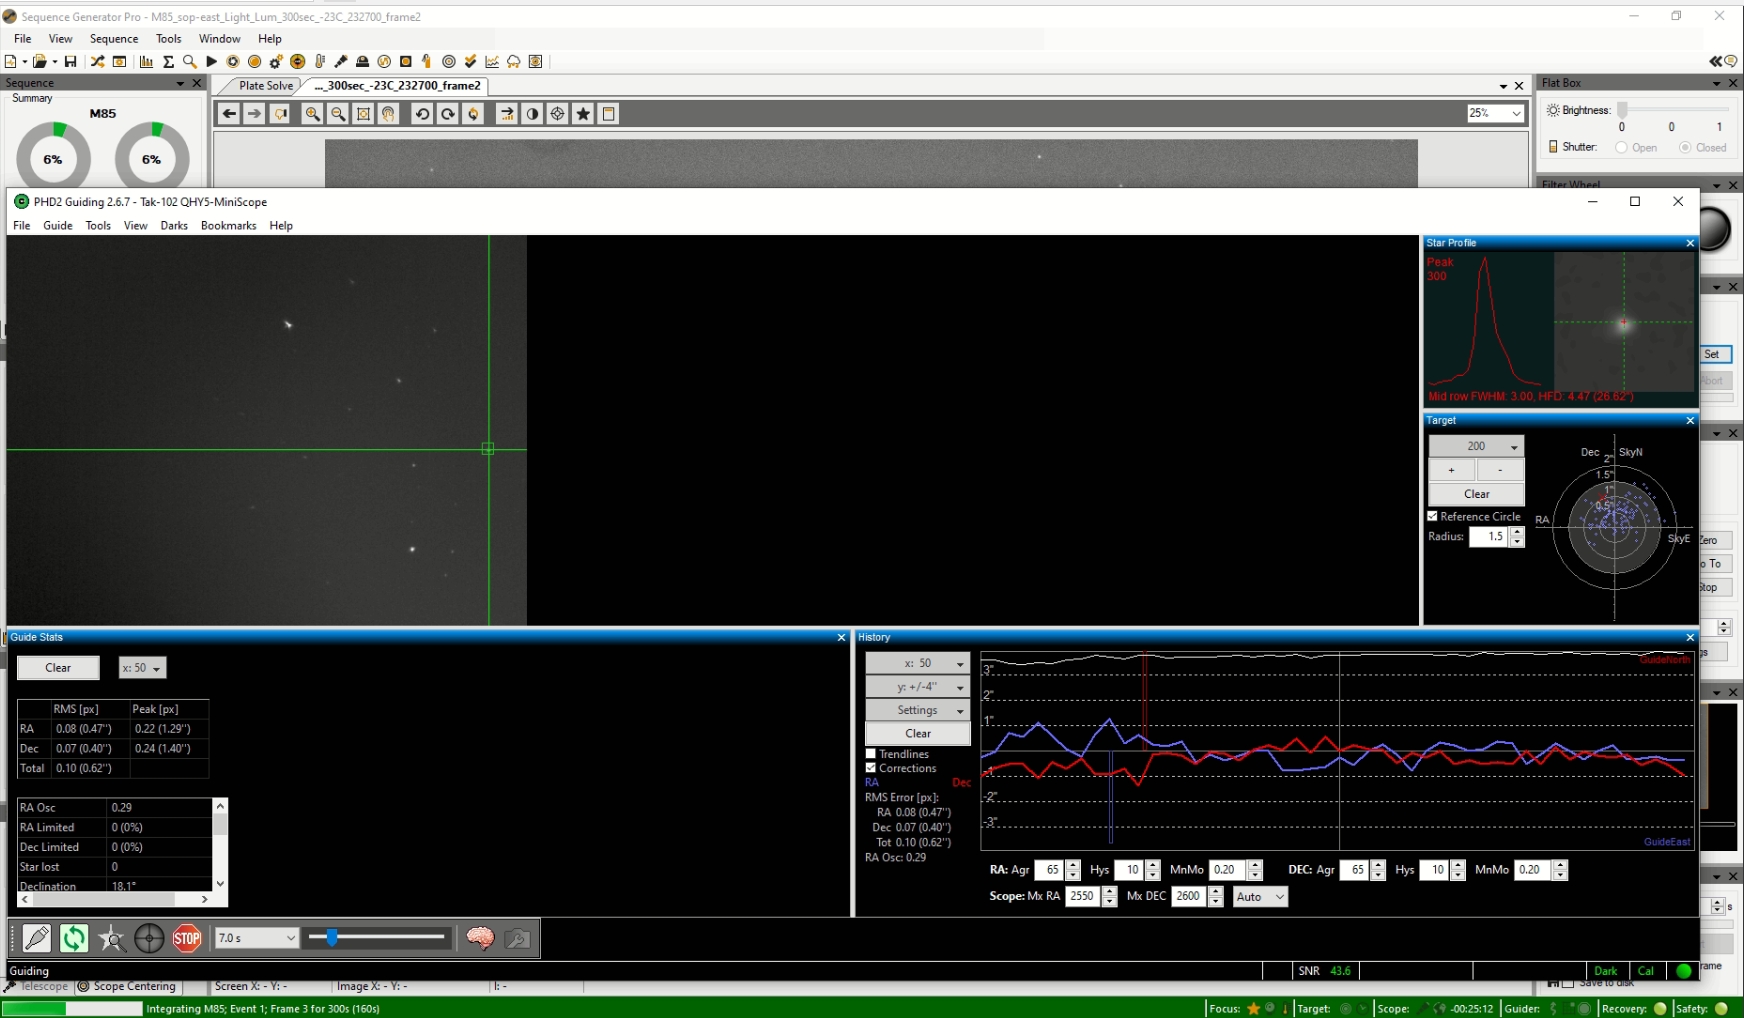
At first I thought the 12″ was still covered so called Dave to check. He didn’t think the cover was in place as the last thing he’d done was to take some Flats. Dave confirmed that the cover was not in place but reported that I might be trying to view Venus through the trellis on the fence so I abandoned Venus and slewed to NGC3628 in Leo as it had just crossed the Meridian and I wanted to try and setup a profile to use my Tak FS-102 as a guide scope for Dave’s OS12″.
Previous attempts at guiding the OS with the QHY5 and MiniGuideScope combination had proved worse than imaging with the mount unguided.
Although I suspected we knew the root cause we hadn’t our research 🙁 which soon became apparent. I found a couple of rules of thumb, the first stated that ‘image scale in arc-seconds x 400 = max exposure time is seconds when guiding with a separate guide scope’.
For the ZWO ASI1600MM (3.8um pixel size) on the OS 12″ (2500mm fl)
((3.8/2500) x 206.265) x 400 = 125s
We can do better than that unguided.
The second ‘rule of thumb’ I found stated that the ‘Guide to Main train pixel ratio should not exceed 10:1.
Unfortunately the QHY5 MiniGuideScope to OS12″ ratio is close to 17.8:1, not good.
The QHY5 + MiniGuideScope scale is (3.75/130) x 206.265 = 5.95 arc-sec / pixel.
The OS 12″ + ZWO ASI1600MM scale is (3.8/2500) x 206.265 = 0.31 arc-sec/pixel.
The Tak FS-102 with the QHY168C scale is (3.75/820) x 206.265 = 0.94 arc-sec/pixel
So if we try the OS 12″ with the Tak as the guide scope the ratio is closer to 2.8:1 which sounds like a better proposition.
I have placed new filter, Baader IR-Pass 685nm from Mark Radice on the ZWO tonight and aimed to go after Venus on the Mak180 and capture another phase of the planet. I recorded several sets of data although noticed the filter does produce a somewhat pinky image.
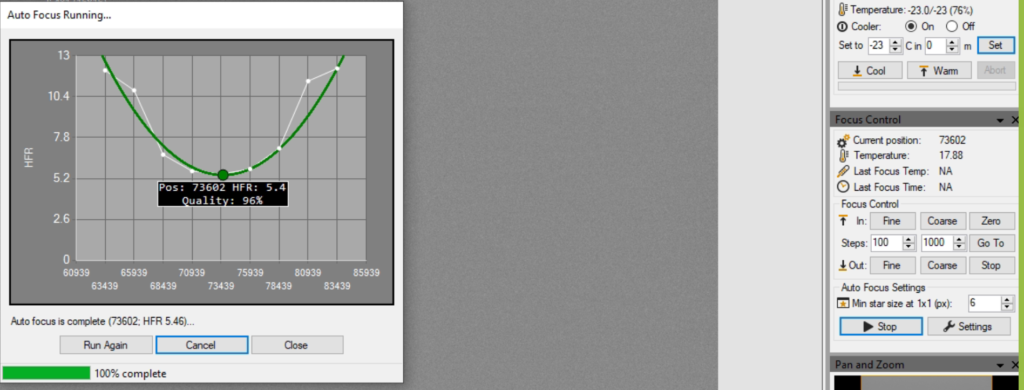
NGC2903, focus point 73,602 for Lum HFR 5.46 Temp 18.13
Focus
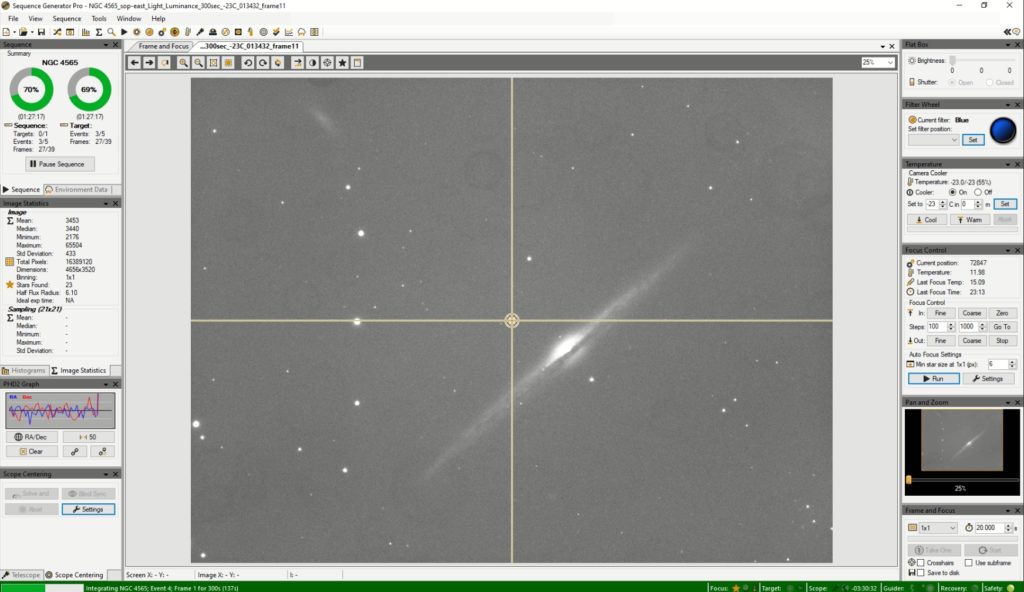
NGC4565 @ 00:59
did not work straight away due to centring issues after reading in old image to plate solve and use as basis for slewing scope with SGPro. Finally just did this with TSX and worked.
@01:29 started Lum sequence for NGC4565 at -23℃ and 300 seconds
Camera -23°C, focus point 74534, temperature 15.81℃
Frame & Focus / Plate Solved / Centred
21:38 Autofocus Run – Failed.
21:50 Integrating M85 Event 1 Frame 1 for 300 seconds Lost guide Star
22:13 Switch Guider to SW Lodestar
Integrating M85 Event 1 frame 1 for 300 seconds. Aborted run as M85 approaching the meridian and guiding graph was not looking good. Guider not calibrated.
Meridian flip to Chertan in Leo, Tak FS-102 now on top of configuration, Esprit below the OS 12″ so will be the better to guide with the QHY5 MiniGuideScope attached to the FS-102.
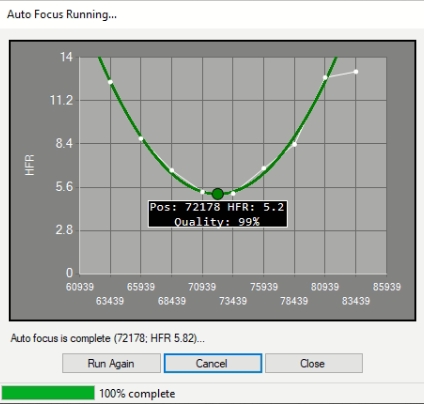
22:51 Slewed to a star field near Chertan for Auto Focus run. Start focuser position 72885, final focuser position 72178 ….. nice graph.
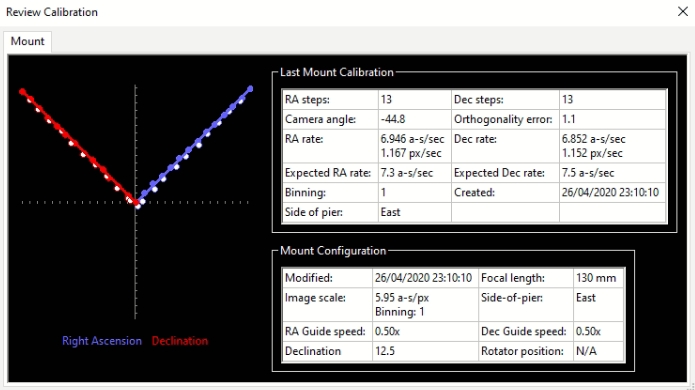
22:56 Calibrated QHY5 MiniGuideScope guider
23:08 Calibration suceeded, guiding.
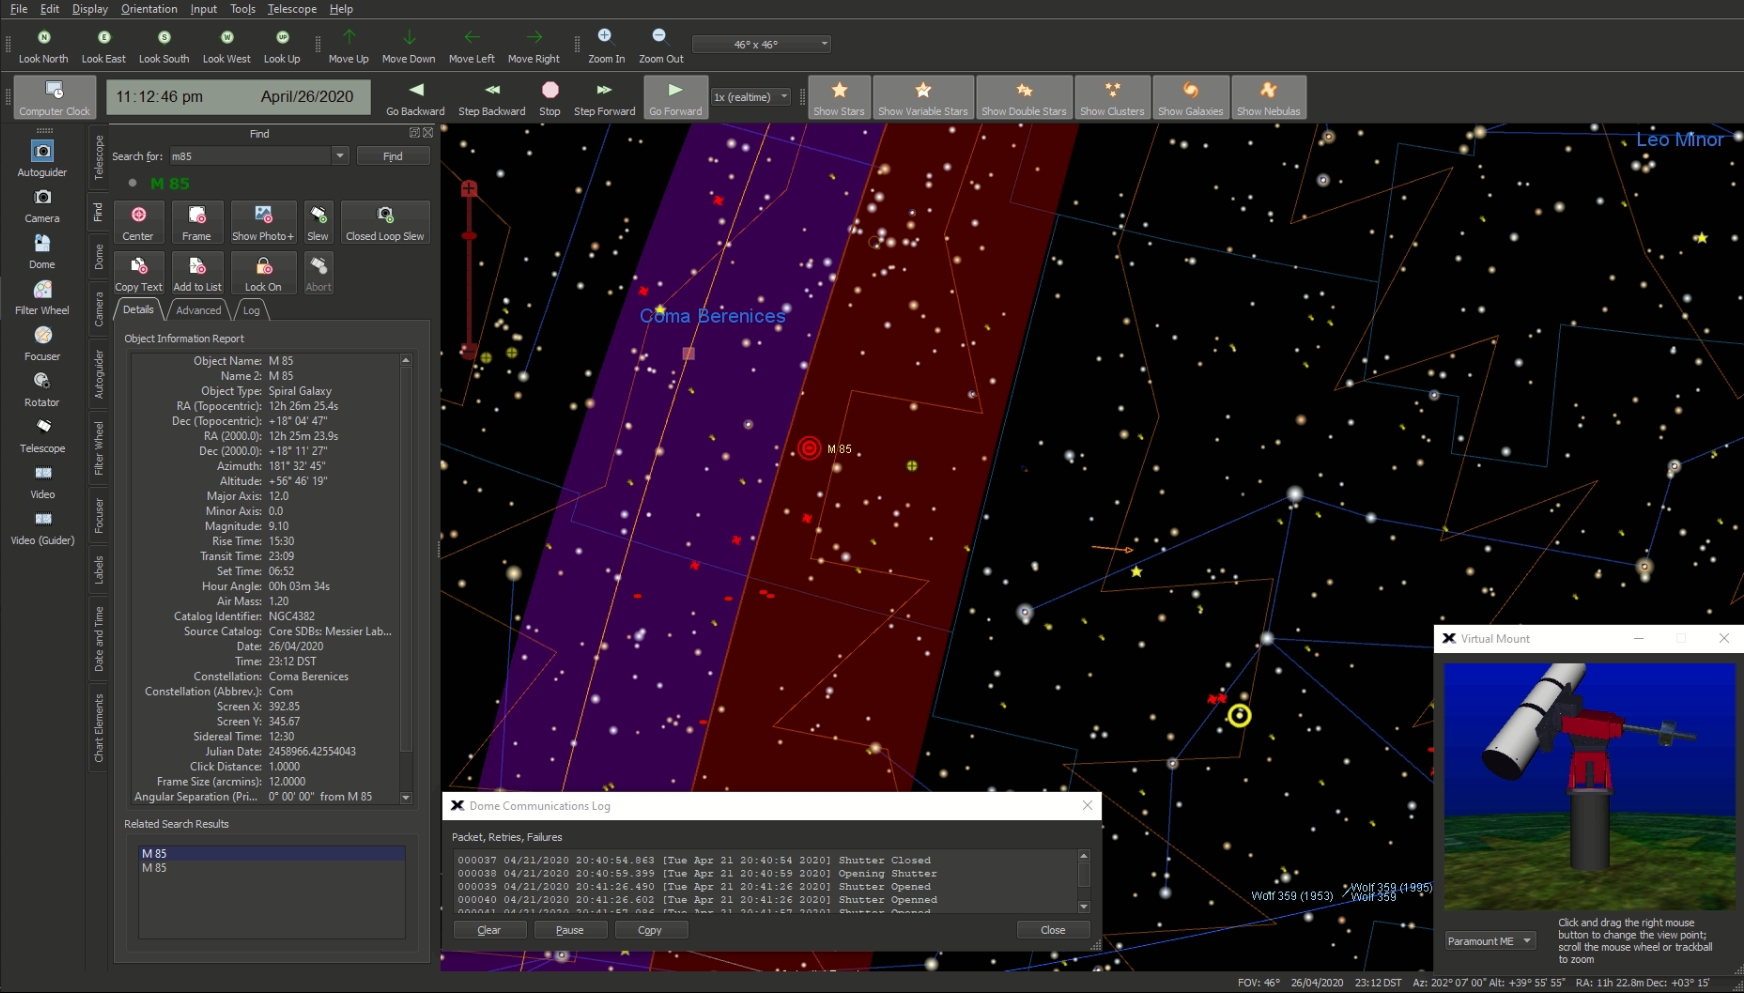
Stoped guider and slewed to M85 which had just crossed the meridian.
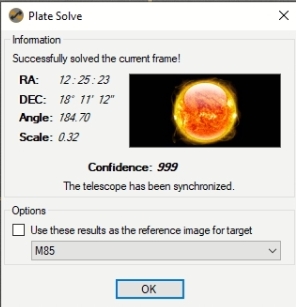
Frame & Focus / Plate Solved / Centred
23:21 Integrating M85 Event 1 Frame 1
23:44 Telescope connection lost due to poor communication
23:48 SGPro reported USB error – lost FLI Focuser. FLI connects Ok in The Sky X.
Fix is to click on the spanner in SGPro for the Focuser and Rescan, Focuser now reconnects.
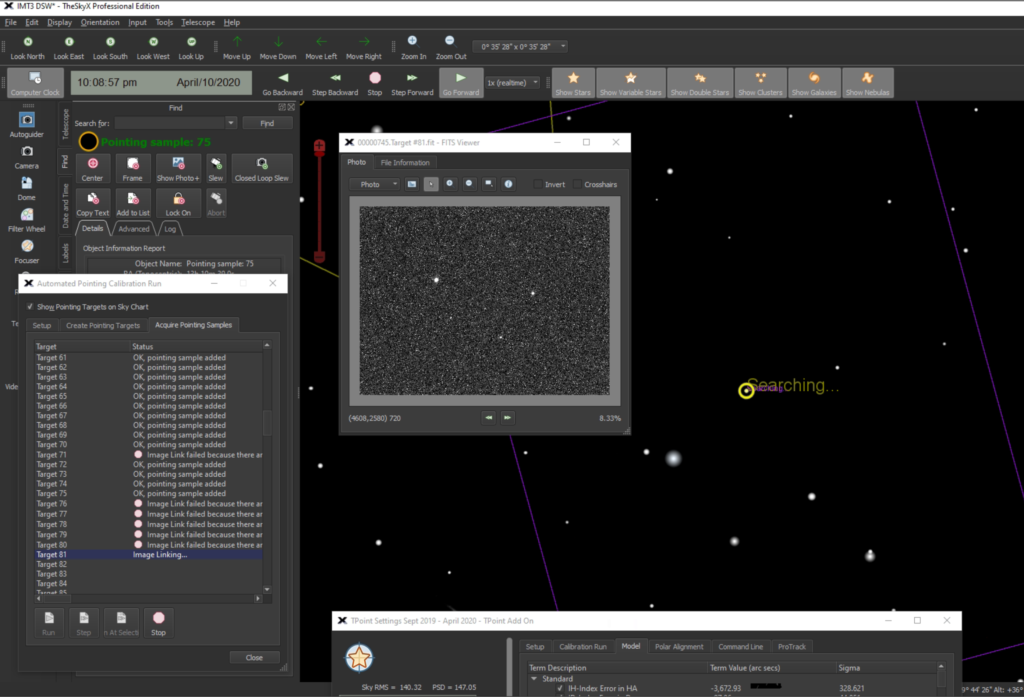
The plan was to capture data of NGC 4565 with the OS RiDK 305mm after the testing I’d done the previous night attempting to determine how long we could go with unguided exposures. As NGC4565 was due to transit at 23:36 I thought I’d wait until I could slew to it without performing a meridian flip so went chasing Comet C/2019 Y4 ATLAS to see what remains of it. However, judging by the horizon it was about to disappear from view but I grabbed a few frames anyway. Unlike previous attempts where it was clearly visible in a 60 seconds exposure I was now exposing for 180 seconds to make out the fuzzy remains.
23:15 Slewing to NGC 4565 would still require a meridian flip so I went to NGC 2903 which I’d looked at recently. set a sequence going to get 30mins of data with 5 minute subs. Auto focus succeeded at the start of the run.
00:05 Slewed to NGC 4565.
Solve and Sync then slewed the framing to try and include NGC 4562 in the FoV.
Plate Solved result for the centre of this frame:
12h36m06.94s Angle 185 25° 57′ 42.16″ Scale 0.325
Started sequence to gather 12x 300 seconds Lum, 6x 300 seconds R, G, B and 6x 600 seconds Ha subs.
SGPro failed to start the Guider and aborted.
PHD2 started manually and 5 frames of Luminance gathered before the guide star was lost and the sequence aborted. Profile does not have ‘Recovery’ set. Need to discuss this with DSW and GingerGeek. While looking at the option found in Tools > Options > Sequence I also noticed that ‘Pause Guiding during autofocus’ is not set.
Mil Dave showed me a procedure he believes is documented in the manual to centre the telescope on a previous image, but this failed to move the mount as expected. I later realized it may have been because we did a ‘Solve and Sync’ followed by a ‘Centre Here’ ( which hasn’t worked for me before). I need to see if I had done a ‘Solve and Sync’ followed by a ‘Slew Here’ whether that would have had the desired effect. Using ‘Slew here’ I was able to reasonably match the coordinates of the original frames (after unsuccessfully trying to ‘Slew to coordinates’ in the Sky).
Update 23Apr20:
Having discussed the above with Dave, I believe we identified where I was going wrong but also discovered some points along the way.
We noticed that the RA and Dec I had recorded from the SGPro Plate solve of the image did not match the numbers recorded in the FITS header of the image and using the SkyX to Slew to the coordinates recorded was off because I hadn’t selected Epoch J2000.0 (used by SGPro) but had used the default Sky ‘Apparent (i.e. current)’ setting for the Equinox.
Additionally, after performing a ‘solve and Sync’ in SGPro, I should have gone to The SkyX and syncronized the Telescope.
Turned off the guided and finally resume a sequence
03:00 Of to bed for me, leaving the sequence to run for a further 1hr30.
Update on viewing with Bob running IMT3 for the night.
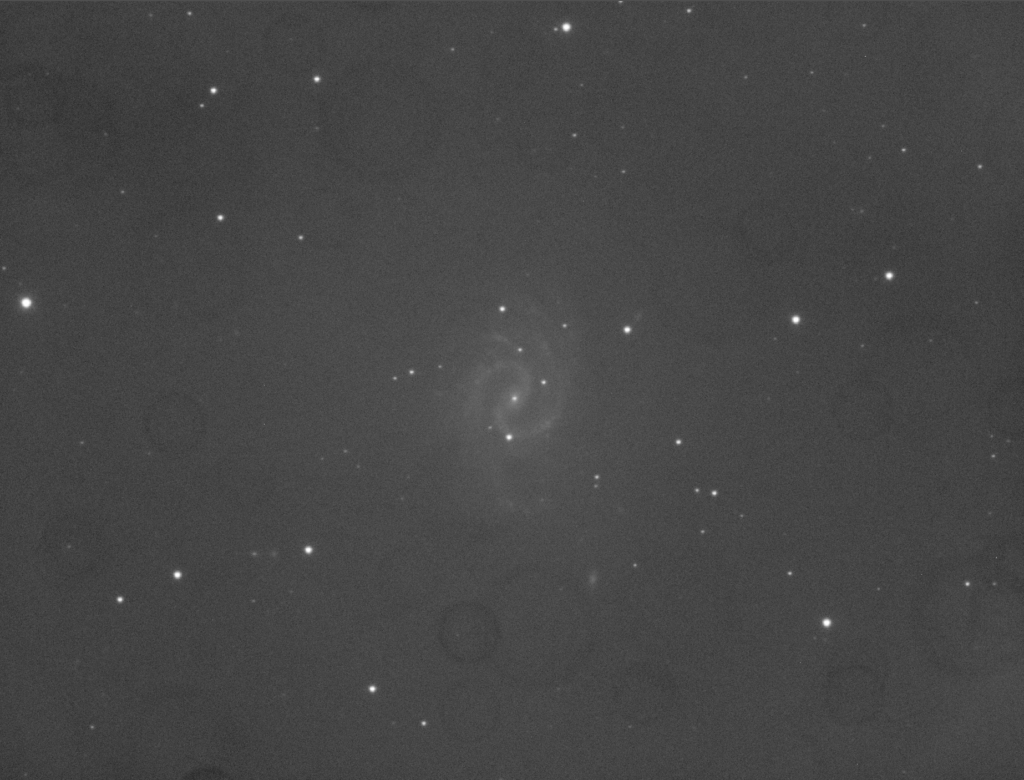
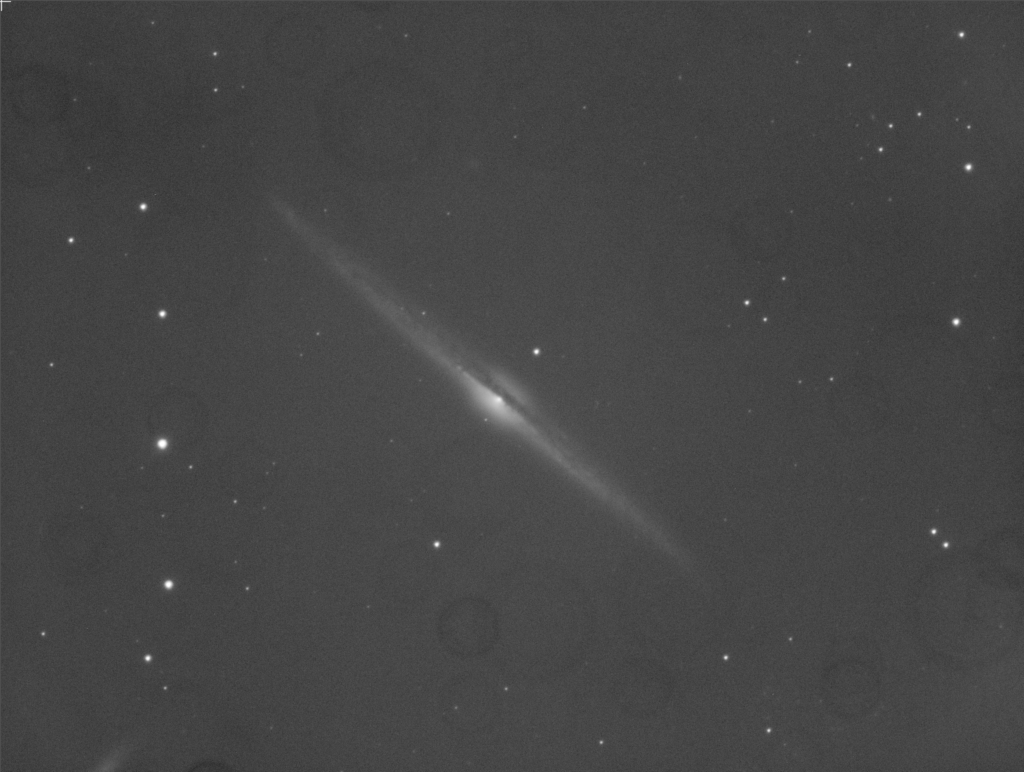
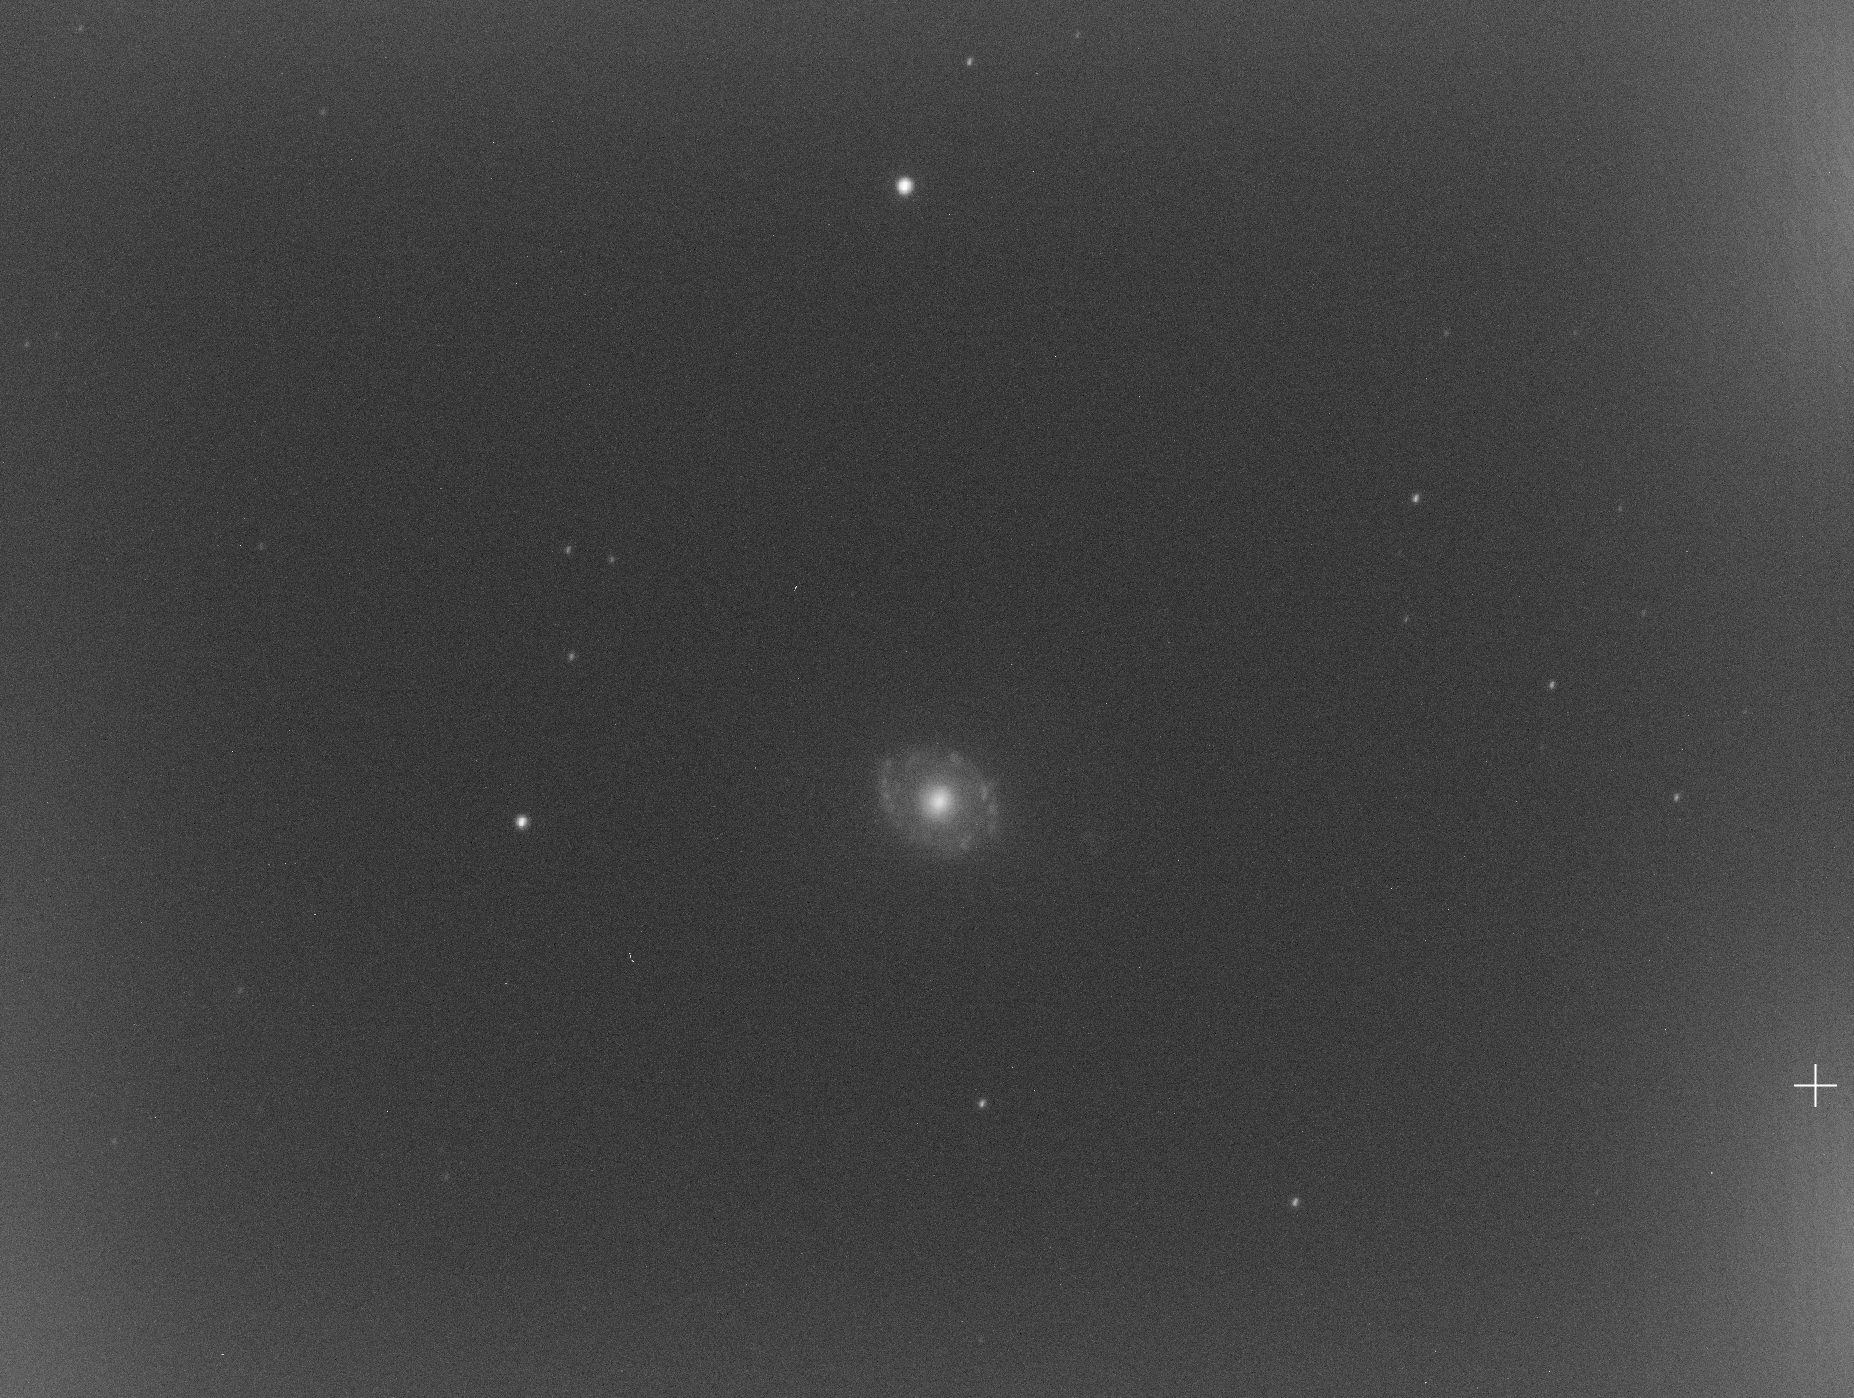
So after joining the BAS Zoom session I asked what others were imaging and got a spiral galaxy NGC4535 from Trevor and the Needle NGC4565 from Mil Dave.
I slewed to NGC4535 which included a meridian flip and found it pretty much in the centre of the fov. Started a sequence of 3, 5, 10, 12, 15, 20 minute subs but aborted after the 15min subs as trailing was evident. Focus could also have been improved.
NGC 4535 720s (unguided) Exposure L
NGC4535 and NGC4565 were approaching the meridian so I did a flip to Praecipua in Leo Minor and then a slew to some nearby fainter stars to do a focus run. Start Focus position was 75542 at a temp of 14.14. After focus run the new focus position was 73335 HFR 4.7 98%.
Now slewed to NGC4565 and set a sequence of 12.5m (750s), 13.5m (810s), 14.5m (870s) subs going trying to establish where the limit is for unguided in these conditions. The first 750s sub was fine but the 810s was just showing a little elongation. I aborted the 870s sub and started a run of 12.5m (750s) subs going to see how consistent the results are … will need to look at these in the morning but I think this is about the limit and would probably back off to just 10m subs to provide a bit of a buffer.
Slew to target and take a test image using Frame and Focus – done
Solve and Sync and then right mouse click on object and Slew Here – done
Setup SGPro Sequence with details – done
Make sure guider connected and calibrate – done
When guiding run sequence – done
Tonight we will take a bunch of Ha images for 4 targets we have been imaging recently with Ha data being provided through the 12″. I have selected the 4 objects in order of passing across the Meridian first. We should aim to get 2hrs of Ha in each, in which case we may need to take the rest tomorrow.
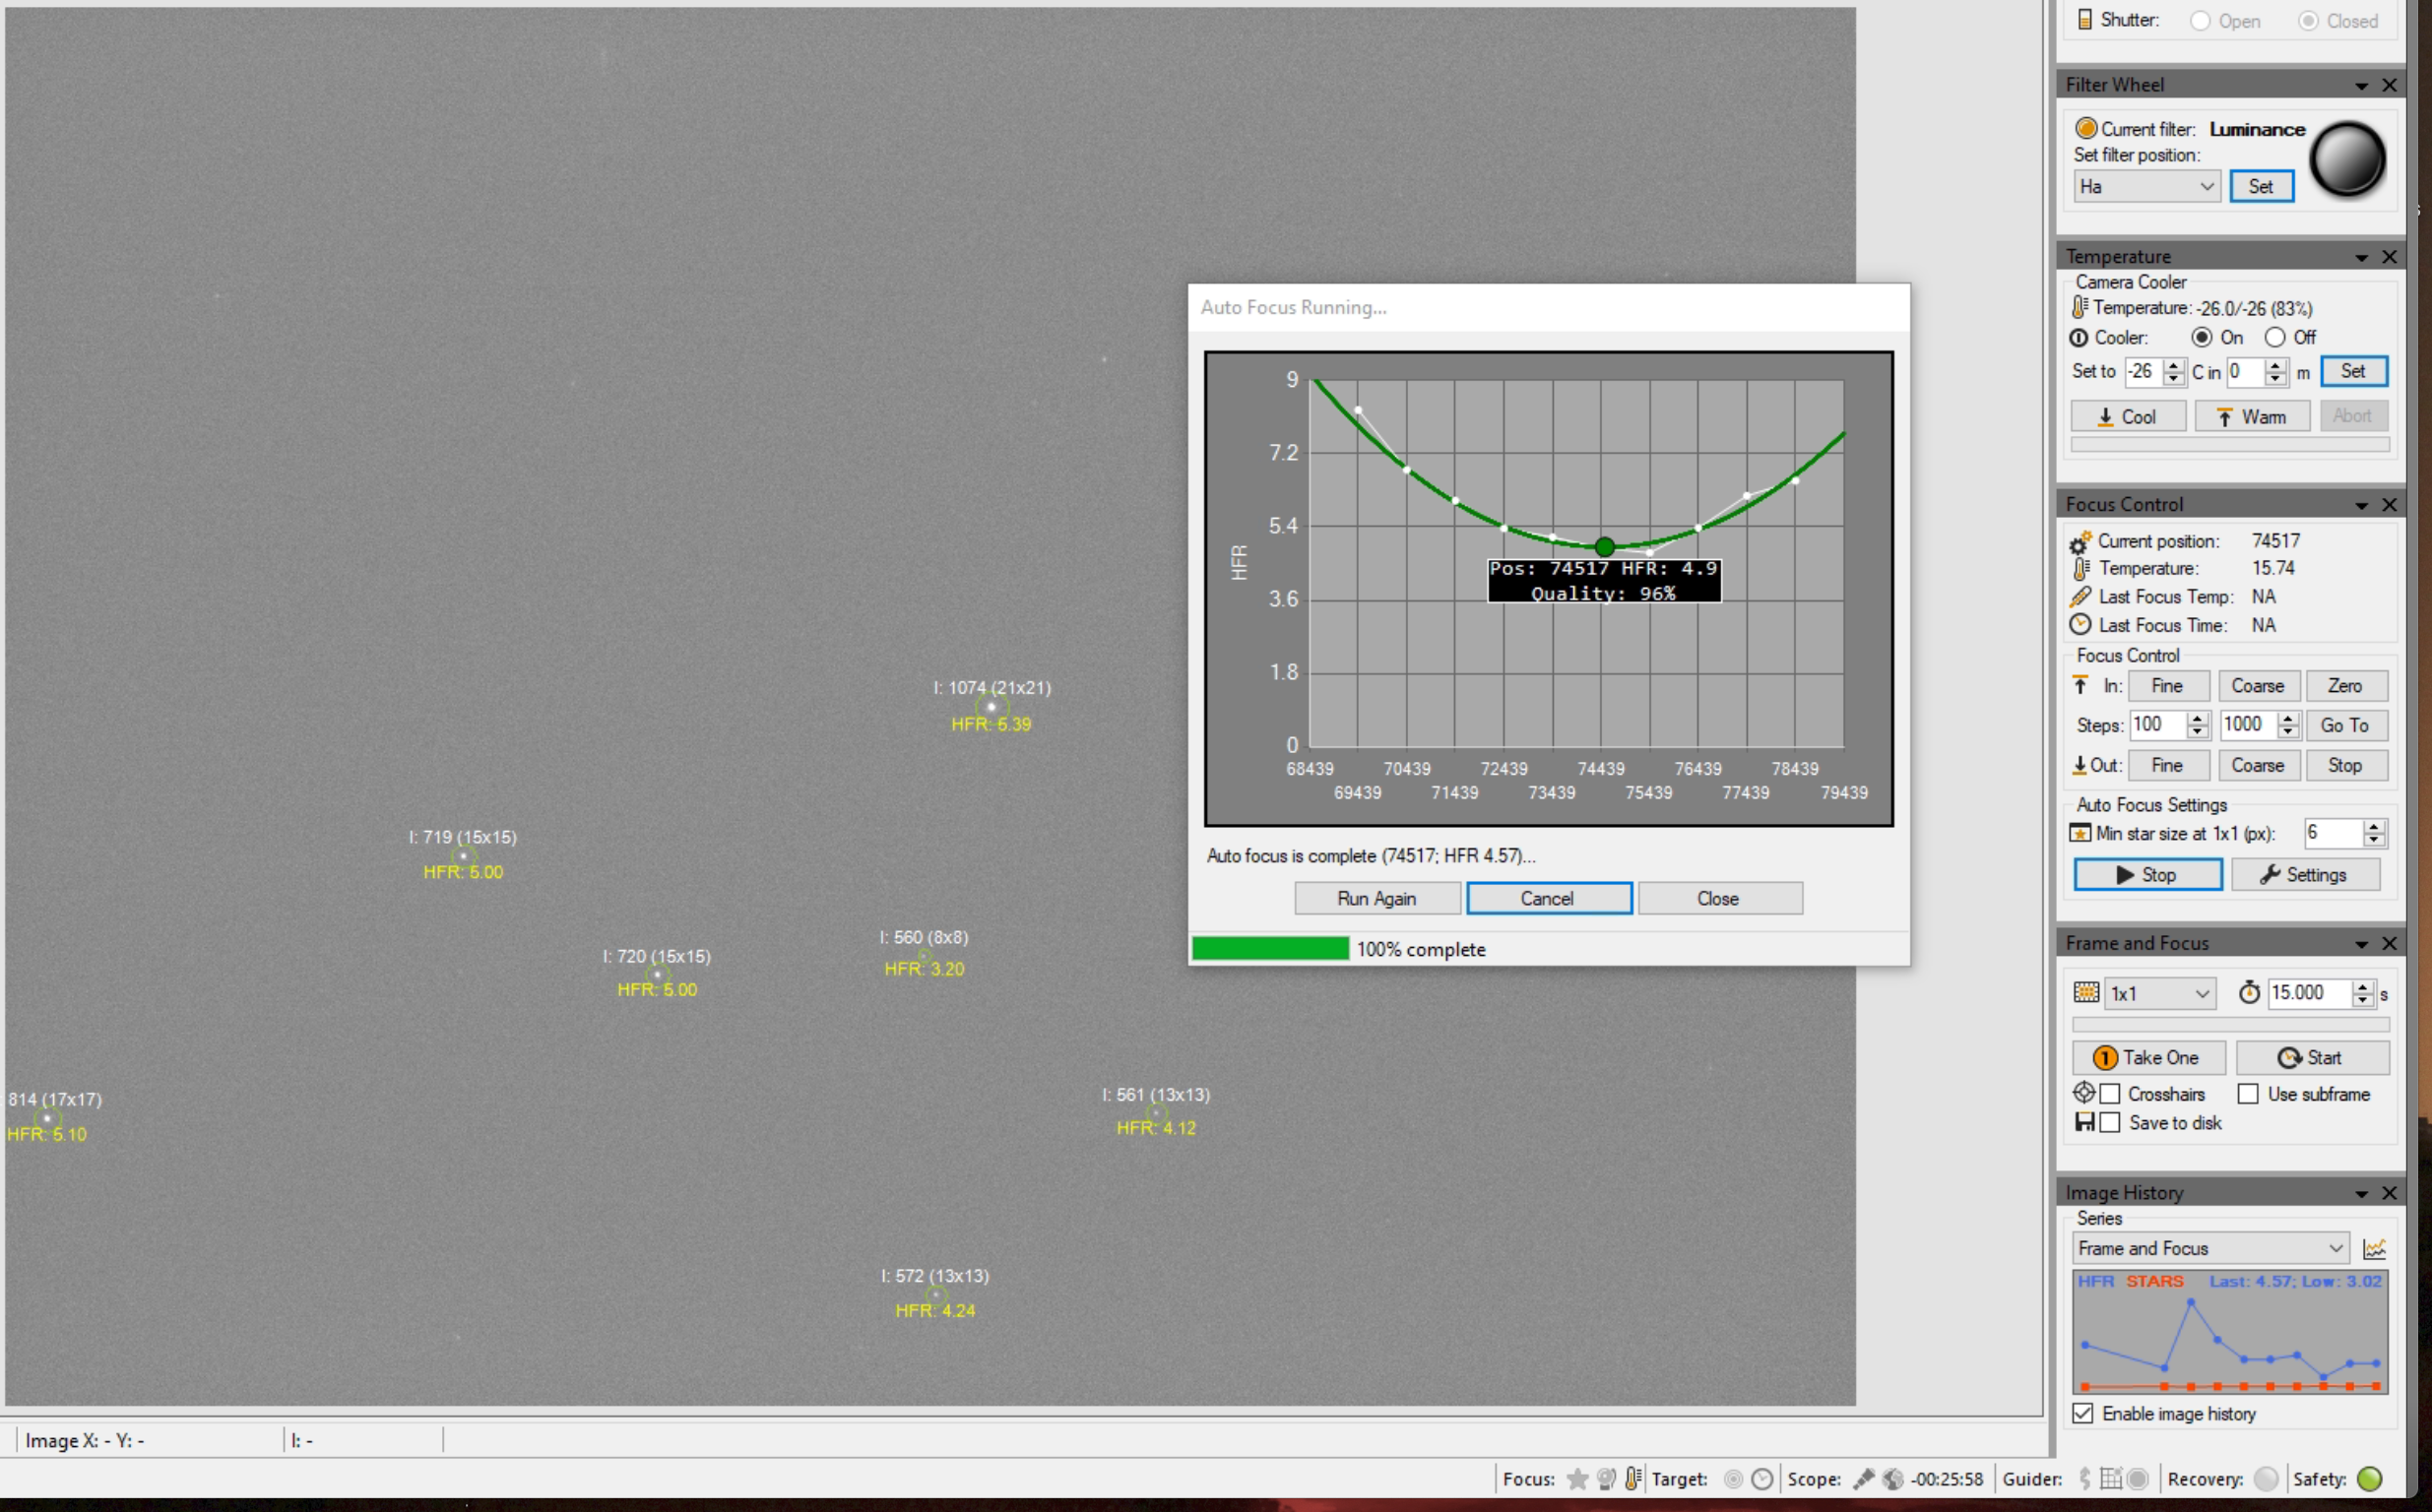
Auto focus run before dark on Ha using 20s subs @ 21:00 focus position is now 74,517 at focuser temp 15.84℃
Autofocus on Ha
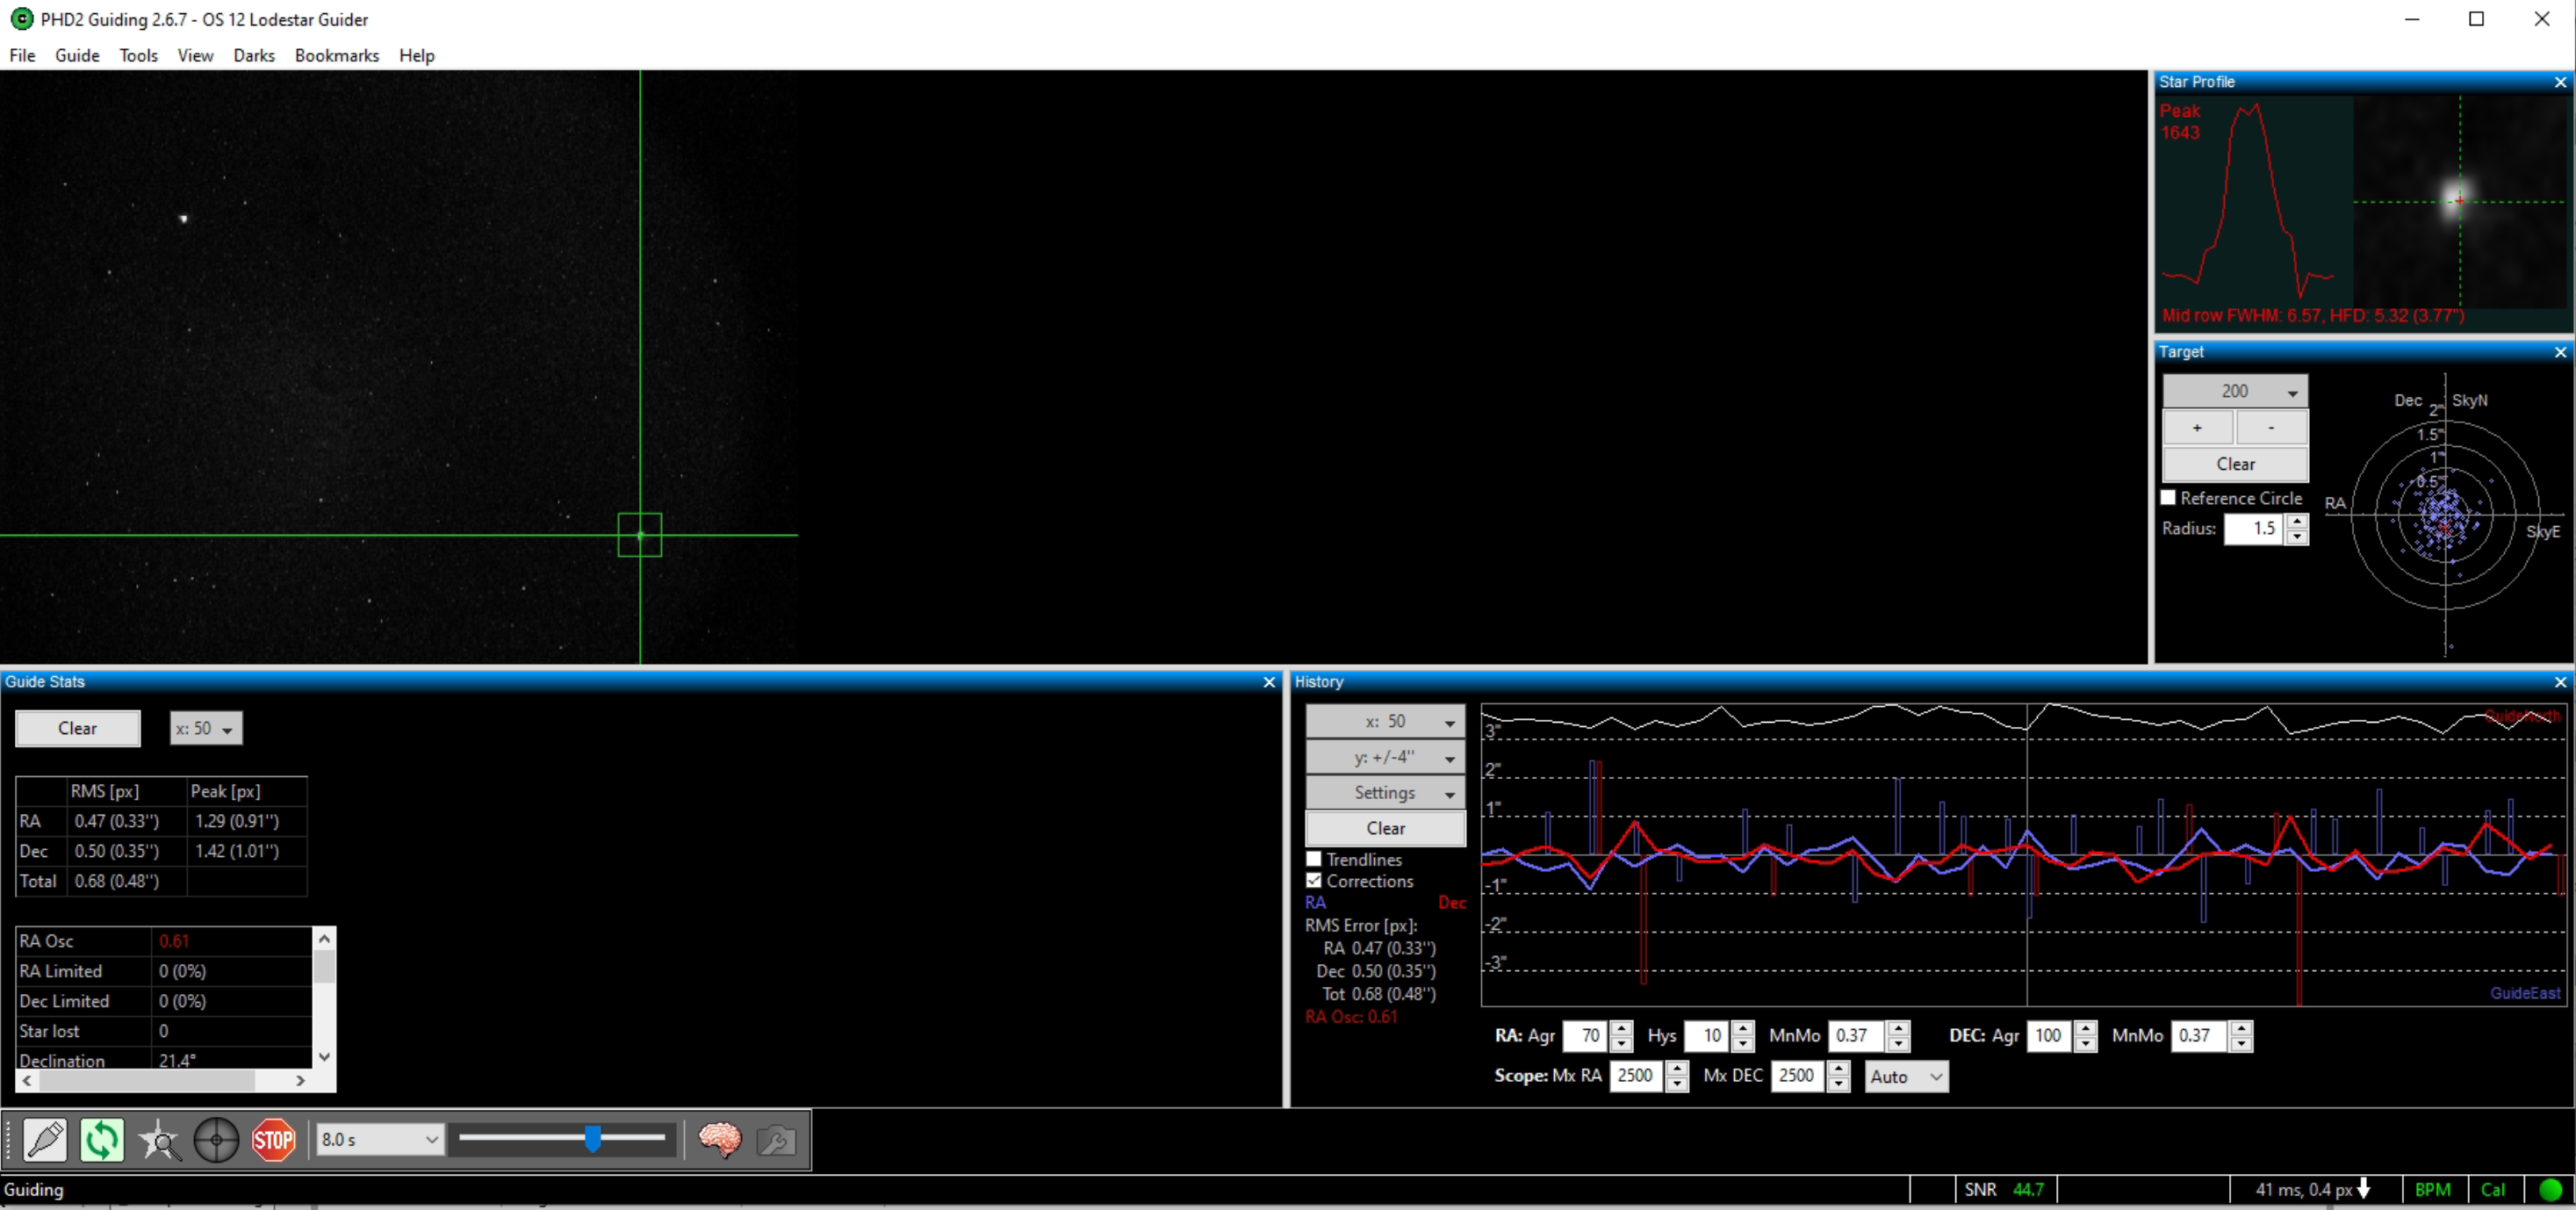
Autoguiding on 10s with one of the 2 stars in the FoV of the guider for OS12.
@21:17 started taking the first image. Noticed quickly the guiding in Dec went up, so stopped and recalibrated guider. Then started guiding on 8 second subs.
Guiding 8s OS12 Lodestar
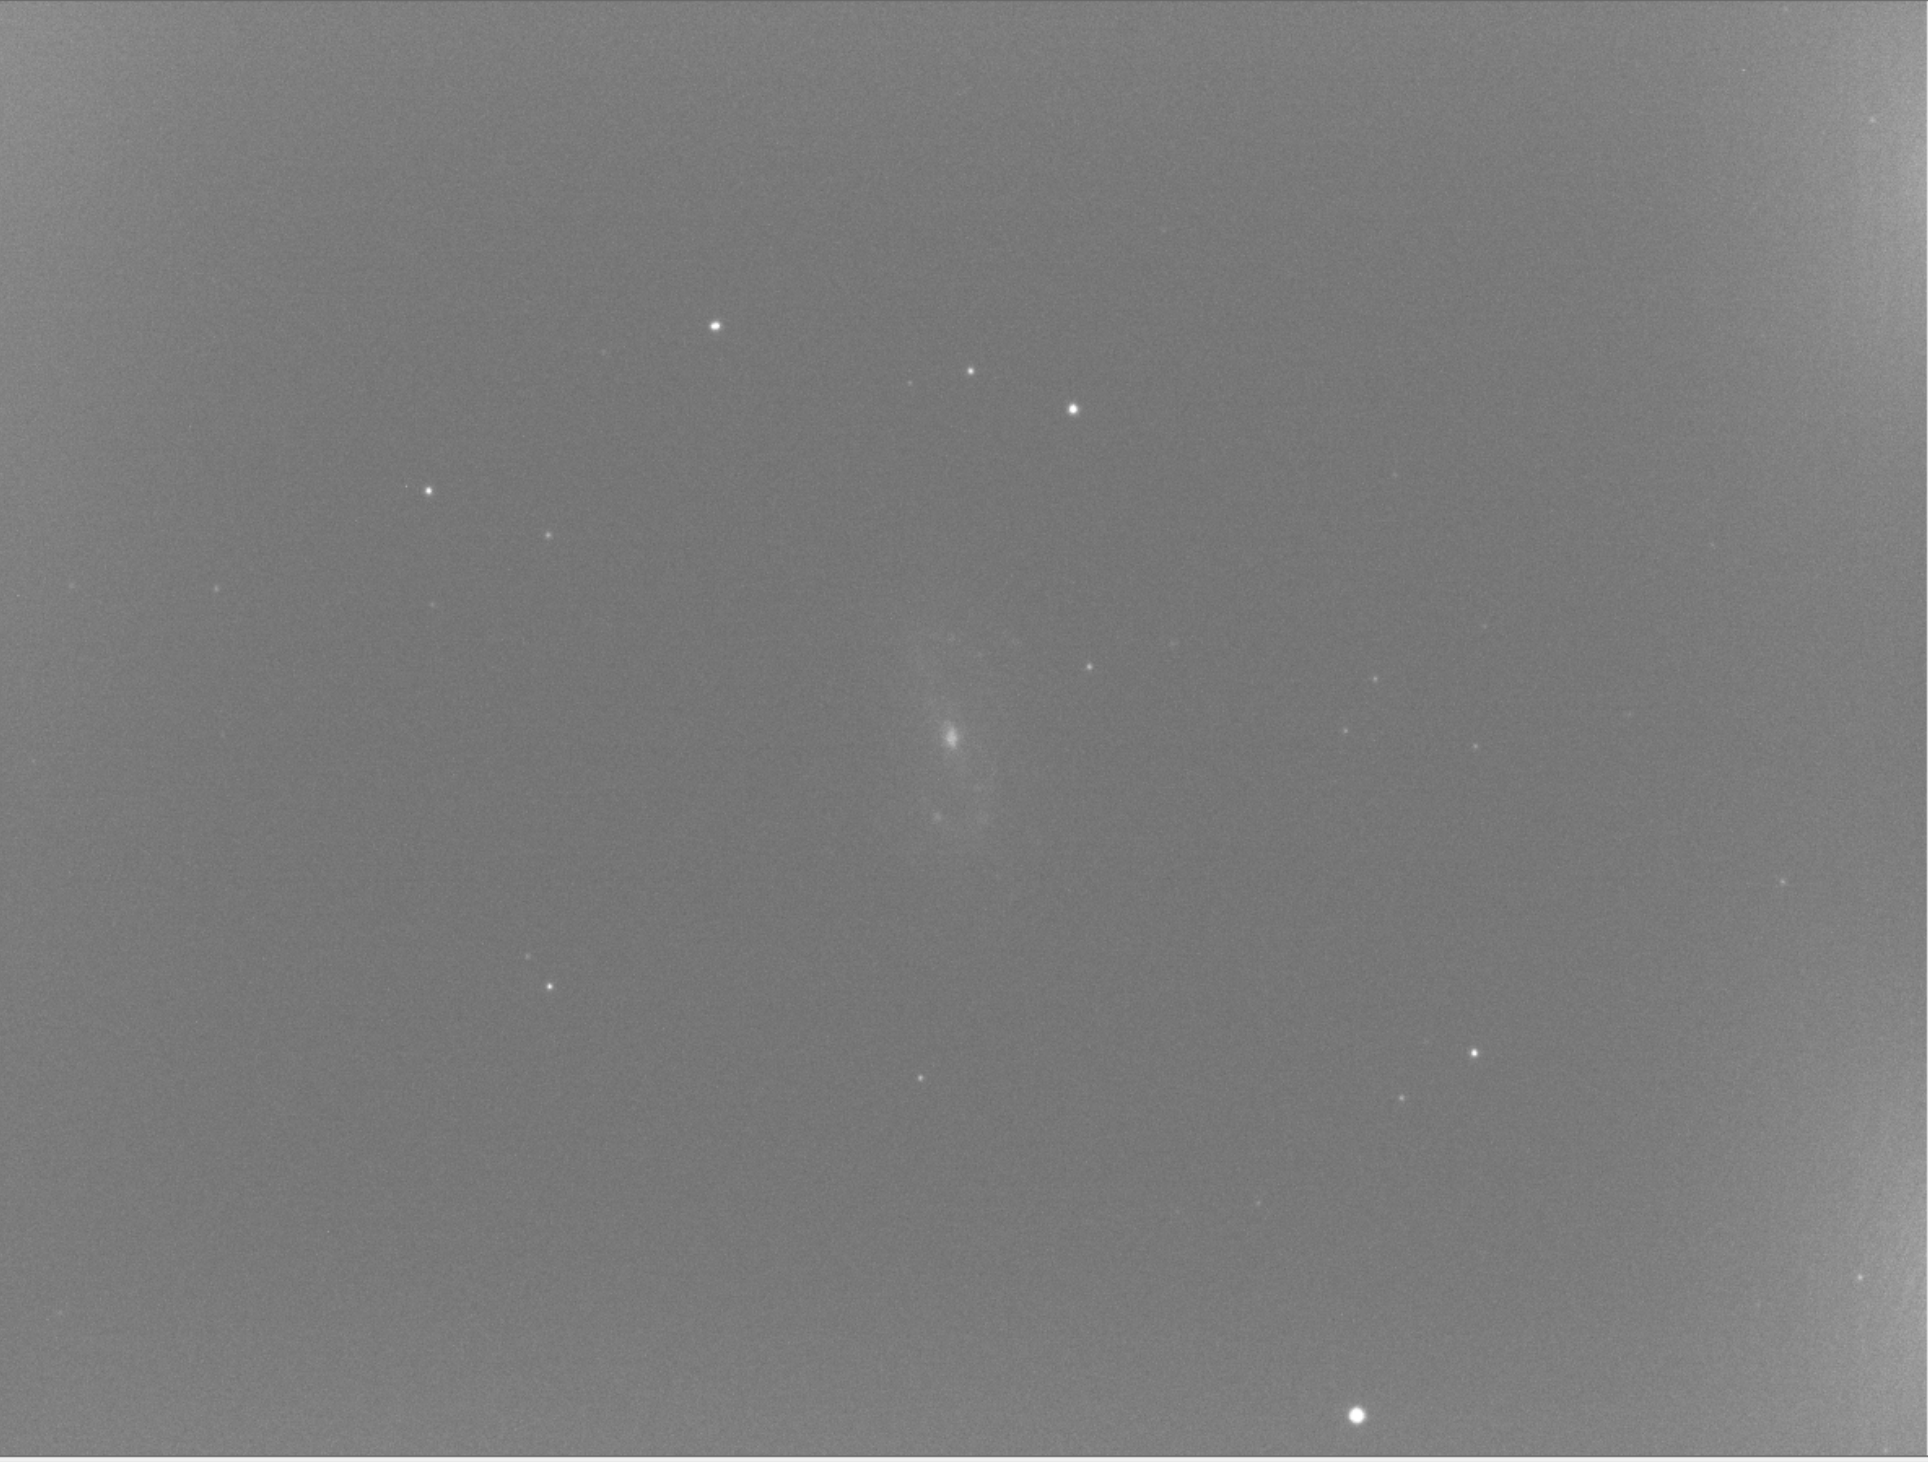
So the sequence is now running and taking frames of the first target in Ha NGC2903 aka H56-1.
H56-1 / NGC2903 Ha 300s
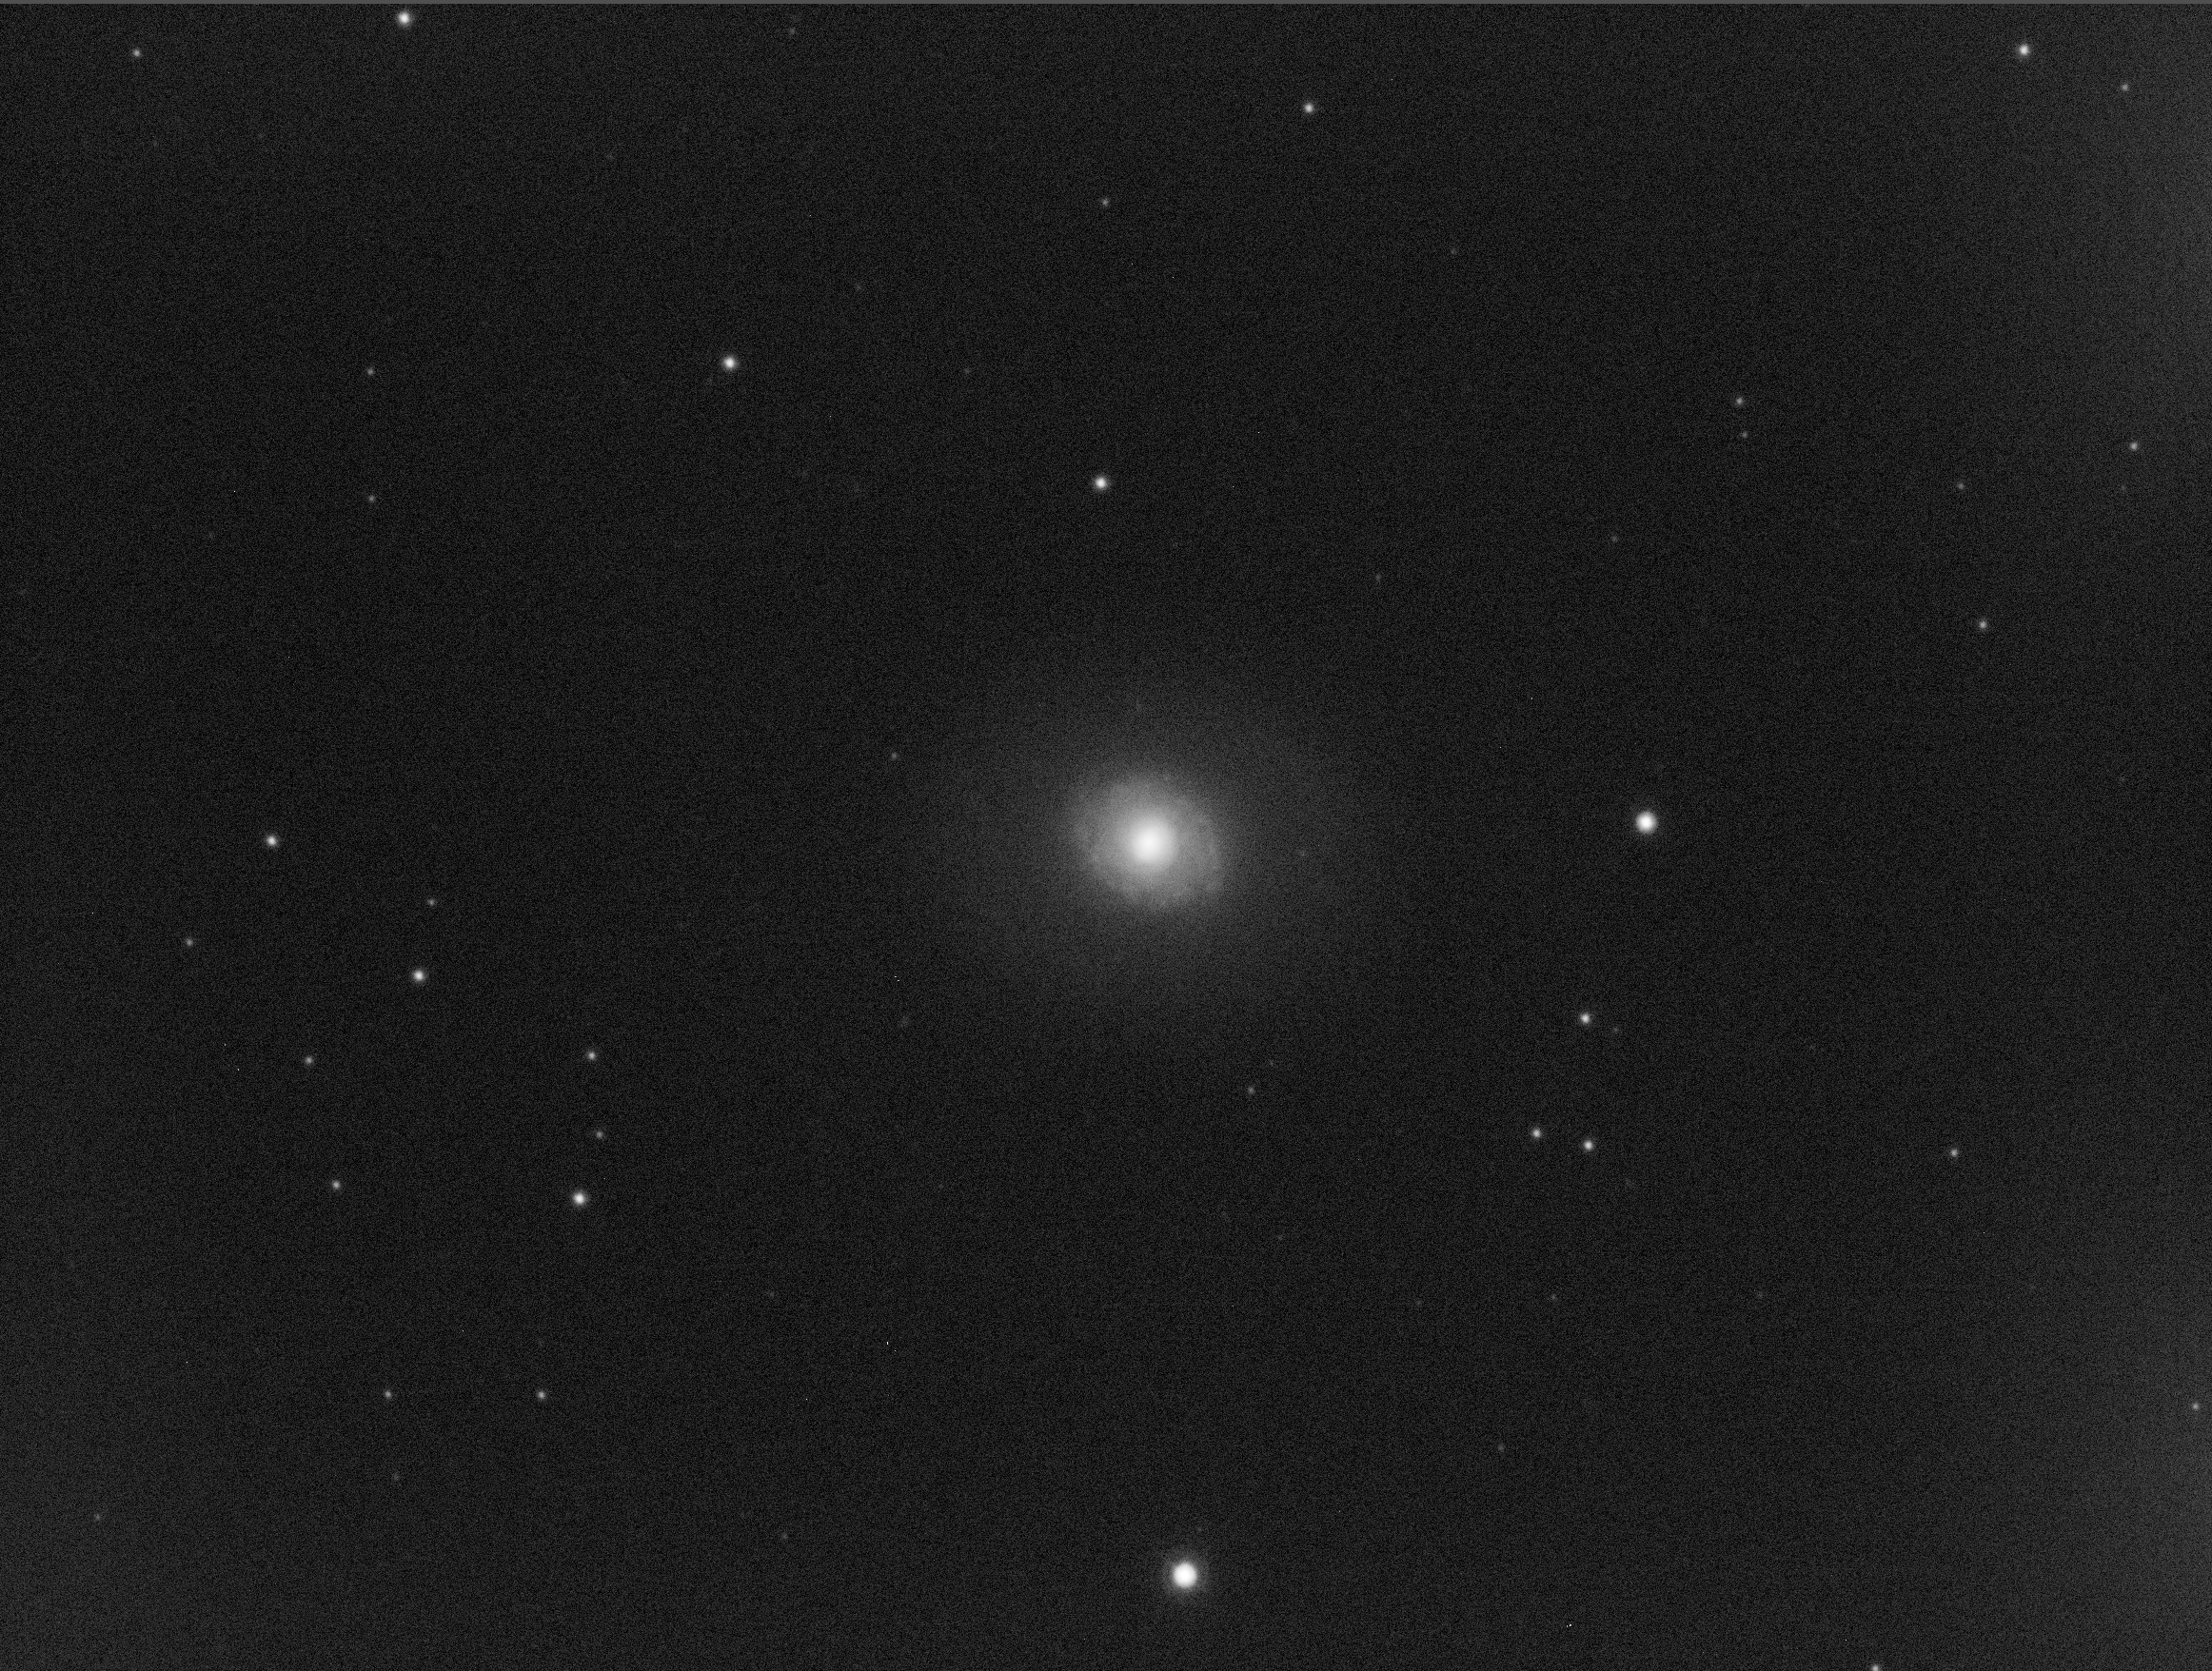
After 12 x 300 seconds on NGC2903 I slewed to NGC3395 and took the first Ha image, but unfortunately it was very dim so not worth pursuing. Instead I have now switched to M94 which is currently on the East side of the Meridian. I will take 24 x 300 seconds Ha with no guiding. It will require a meridian flip in about 90 minutes. I will then leave Bob to complete the Ha on M94 for the rest of the night as M85 does not have any Ha within it.
Bob continued and had a little success, cloud rolled in at 23:46 so frame 9 onwards are no good so we got 8 frames in total for M94, we will continue another night. The shutter was closed as Bob did the meridian flip due to cloud.
I tried to take calibration frames the following day at 7pm when the outside temp was 15.5℃, the inside was 18.5℃ but the ASI camera on the OS12 would not get lower than -25℃. I now concur for with Bob and GingerGeek that we should lower the cooling temp to -20℃ for the remainder of the Spring and Summer returning to closer to -30℃ in the Autumn / Winter. For now I had to wait for the temperature to drop outside and thus inside to cool down the final 1℃ to take the calibration frames. By 20:22 the temp outside had dropped to 12℃ and the internal temp to 15.8℃ which was enough to cool the camera to -26℃.
So first I could not see any USB devices that were plugged in to the USB hub on the mount. A reboot of the mount fixed that problem. Next I could not auto focus, I did not get to the bottom of that so tried to focus manually best I could. Then PHD2 settings were wrong for the OS12 and the associated lodestar guider, the calibration steps were 100 rather than 400, the min move was 0.66 rather than 0.18. I had taken screen shots before on the blog so changed them back, I am not sure why they have changed. I then managed to calibrate the guider on the OS12, given I have taken off the camera to clean the filters the other day.
@22:15 I started imaging RGB on M94 on the OS12.
M94 5min Red
The guiding was not bad after calibration. I set to expose once every 8 seconds on the only guide star in the FoV.
Guiding with PHD2
What I do need to do is set the FoV indicator in TSX for the Lodestar guider to the correct position to help find a guide star. Else I really should try to guide with one of the other scopes. I am now off to bed, I will leave the scope collecting the rest of the green, 2 left and the final 12 blue. Then Bob will take over imaging for the rest of the night.
Bob took over Green which lost the guide star, so he performed a meridian flip, continued on the Green and then took some Blue. Bob then took some HA, OIII, SII at 5 and 10 minutes for a test. The Ha would be useful for the galaxy as an LRGBHa image. Bob turned in at 2:50am.
M94 10min Ha
I also noticed this morning that the Offset was wrong in the ASI camera profile which was called ZWO camera in the dropdown and in fact was set to 50 rather than 21 for this Gain which was correctly set at 139. I have also changed the OSA12 No Guider profile to use the ASI2 camera rather than the ZWO one, not sure the difference. I have adjusted the setting back to 21 so all the OS12 profiles now use Gain 139 Offset 21 as their standard. If we want the other 2 setting that need changing for each time we run, along with subsequent darks and flats etc would be Gain 0 Offset 10 and Gain 75 Offset 12. For the moment the Darks and Flats etc from last night are Offset 50 so we can only use for last nights images.
Here is my workflow so I can repeat each night until this is finished.
Open dome – done
cool down – done
turn off dehumidifier – done
turn off fans on scope – done
find home – done
focus – done 60,535 clear
remove existing model – done
slew and sync to nearby star – done
make sure scale is correct -done
make sure image link to all sky database is selected – done
start TPoint run – done @ 21:13
Complete TPoint – 93 points done, paused TPointing at 23:15
Turn on Dehumidifer – done
Note that tonight I found the dome was definitely not lining up with the 12″ OTA. We have noticed this gradually becoming as problem over the past weeks and months. I am not sure if this is a problem with software, hardware, a change in settings or the temperature of the dome in some way has effected this. To this end I will set about a calibration run of the dome tomorrow to see if that can rectify the issue.
Here is my workflow so I can repeat each night until this is finished.
Open dome – done
cool down – done
turn off dehumidifier – done
turn off fans on scope – done
find home – not needed
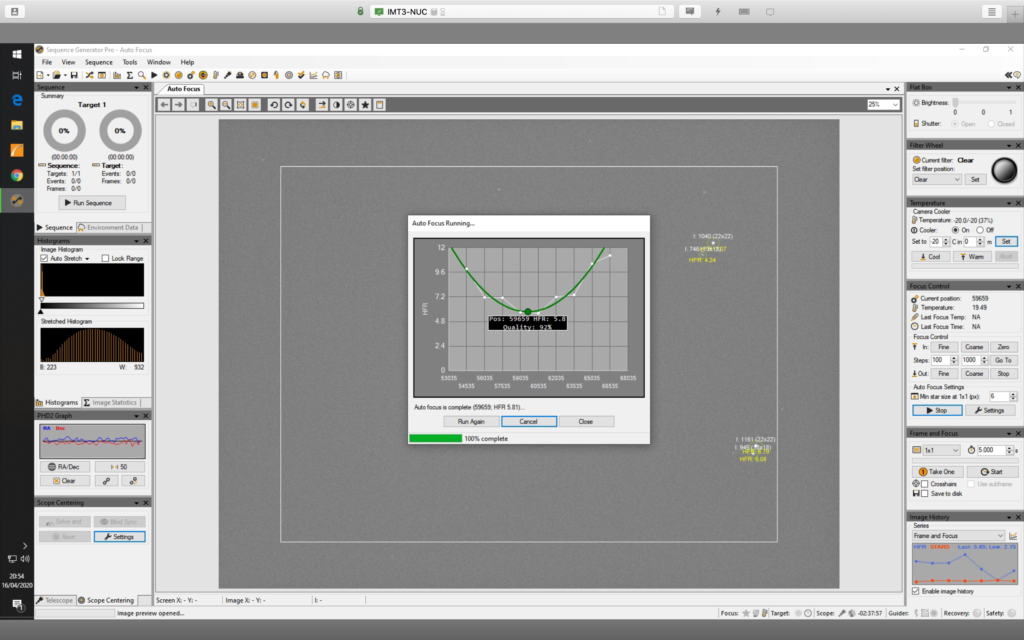
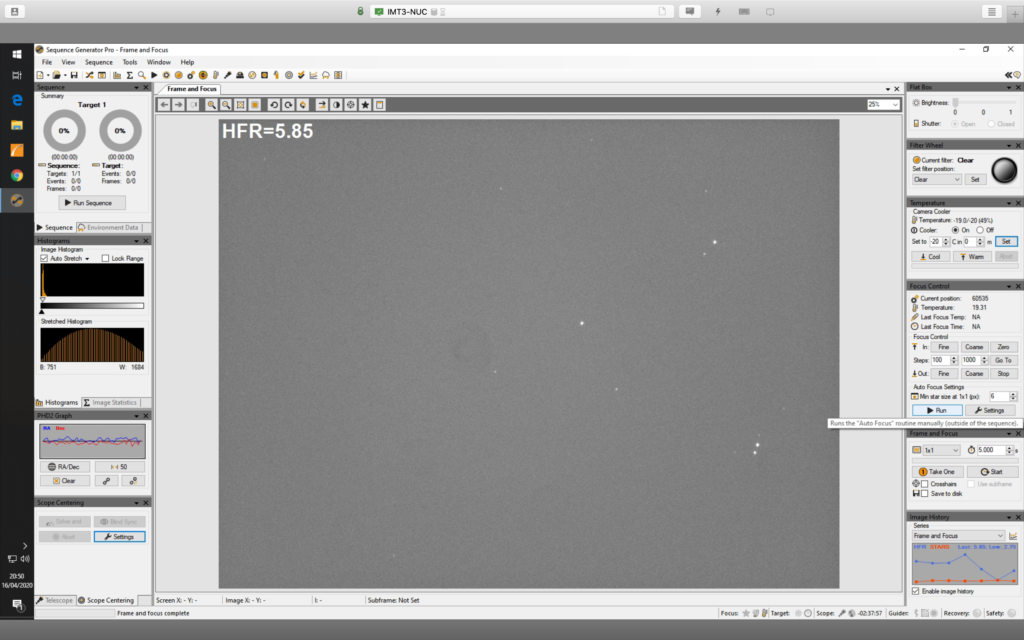
focus – done 59,659 clear – done
Focus
slew and sync to nearby star – done at 21:06 as not dark enough before then
Not quite dark enough yet
make sure scale is correct -done
make sure image link to all sky database is selected – done
All Sky Image Link settings
start TPoint run at point 93 – done @ 21:10
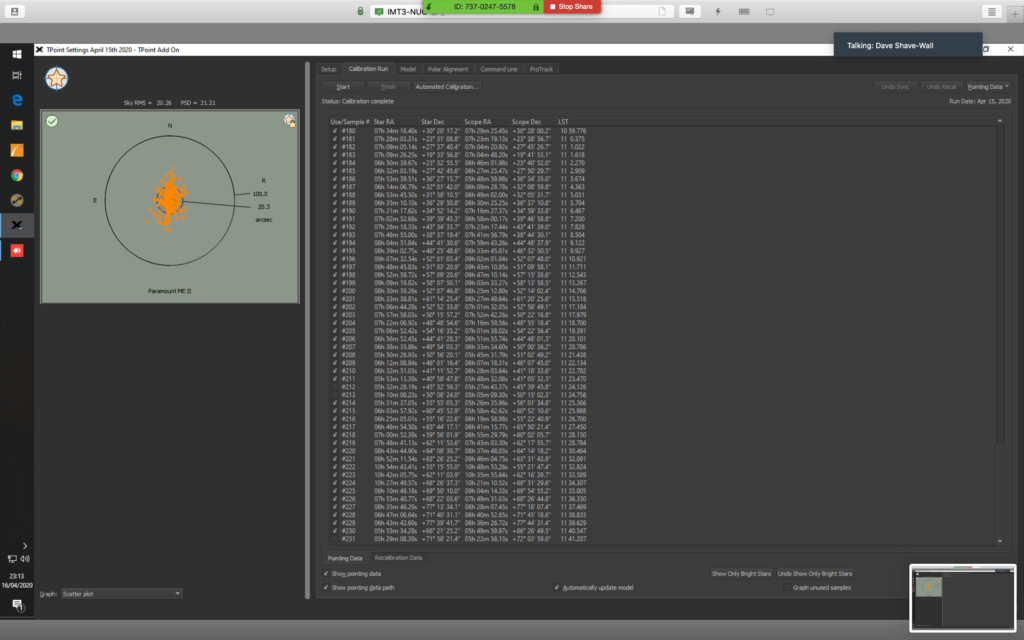
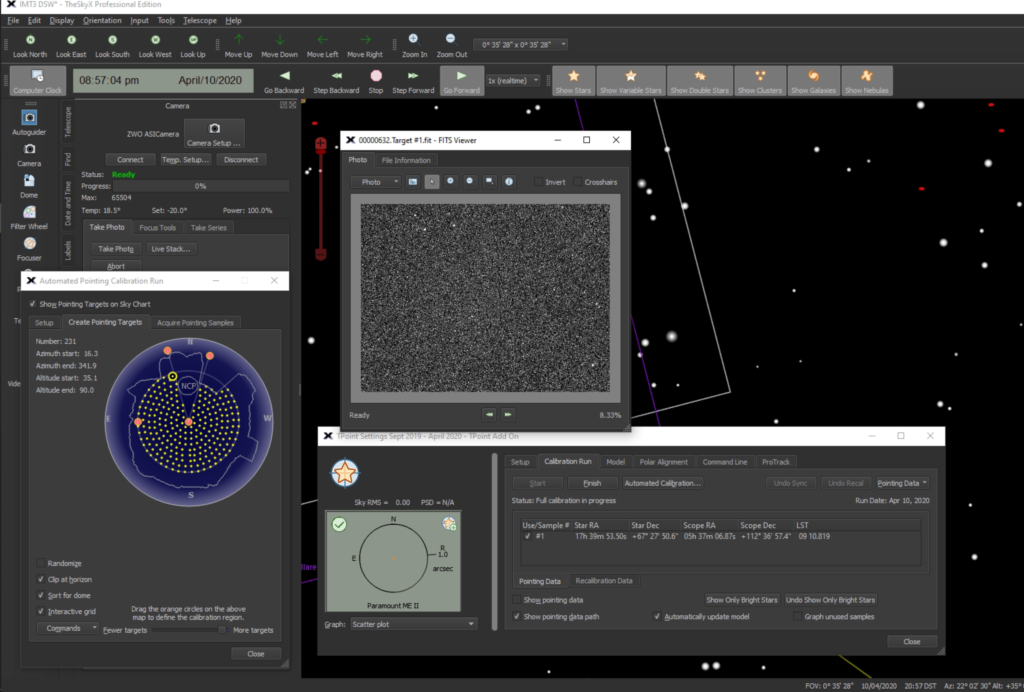
Complete TPoint – 231 points done at 23:46 including checking 5min unguided exposure which was fine
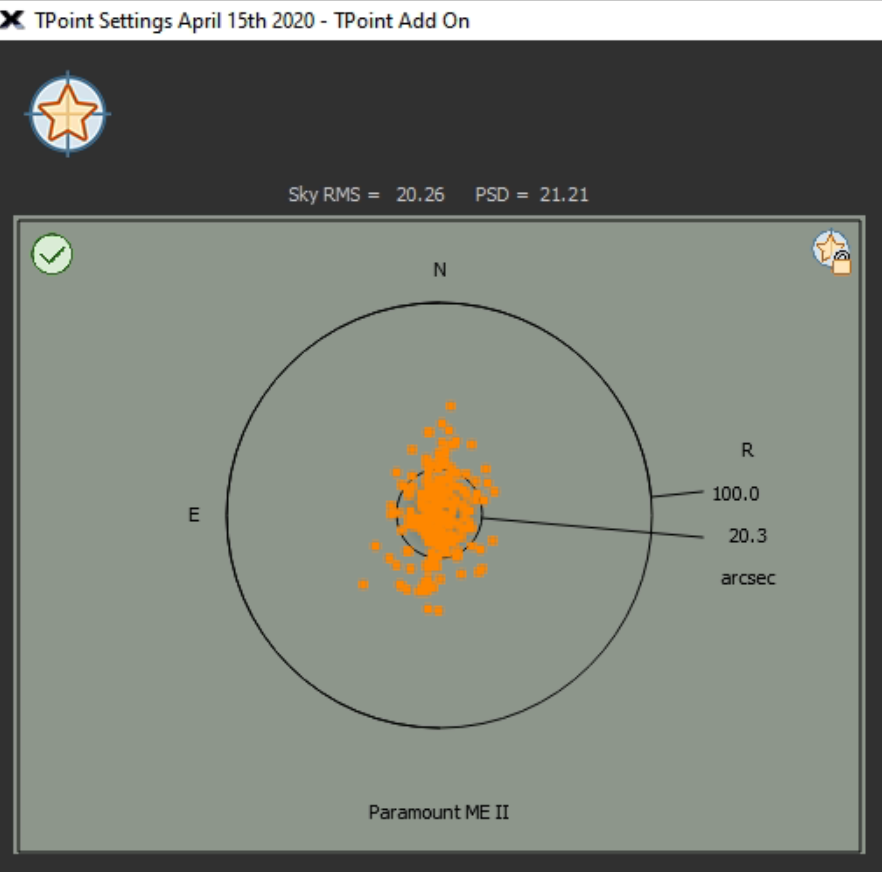
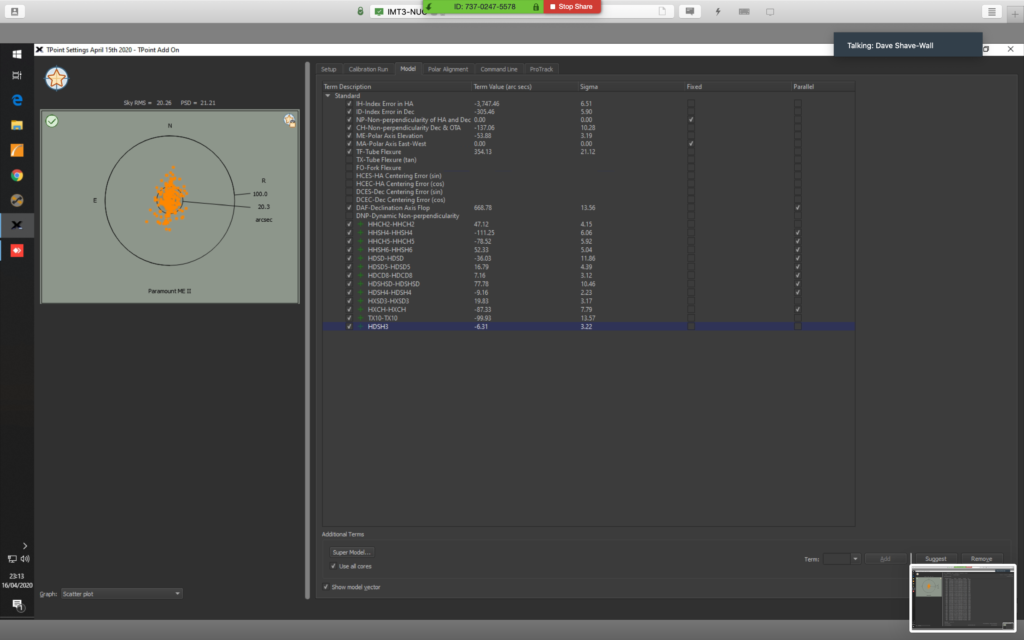
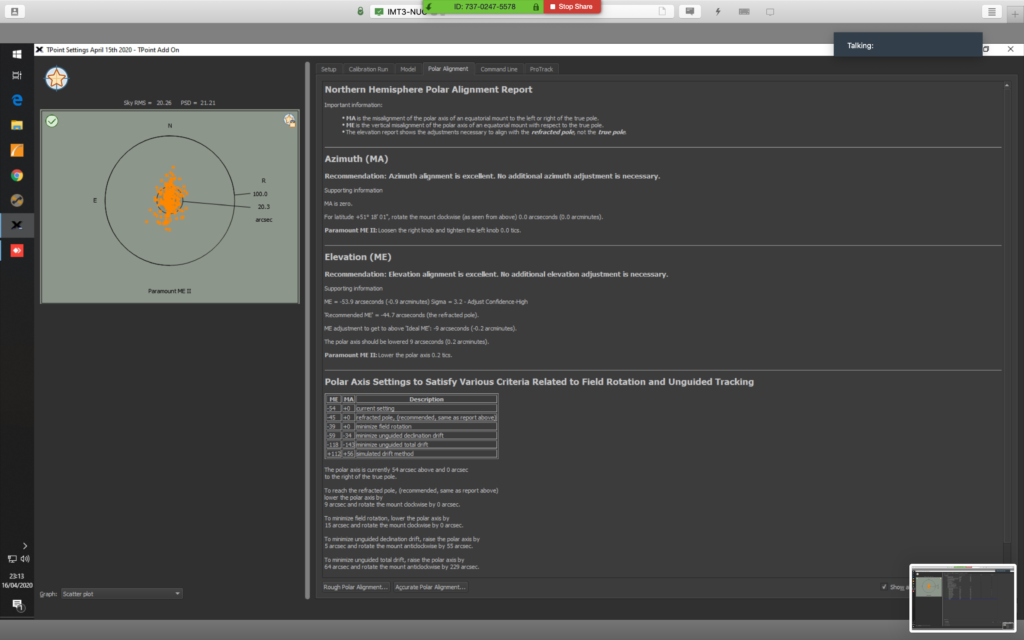
Final TPoint plus Super Model
Turn on Dehumidifer – done
So what did I learn tonight? It was worth doing the TPoint model. The resulting pointing accuracy is much better with objects being almost centre off the chip. Unguided images on the 12″ look good at 5mins, I will try longer when the clouds and rain disappear. That following a documented approach helps as above. The adjustments to the worm and the loose weight helped. That fixing the dome rotation slippage on the encoder today helped.
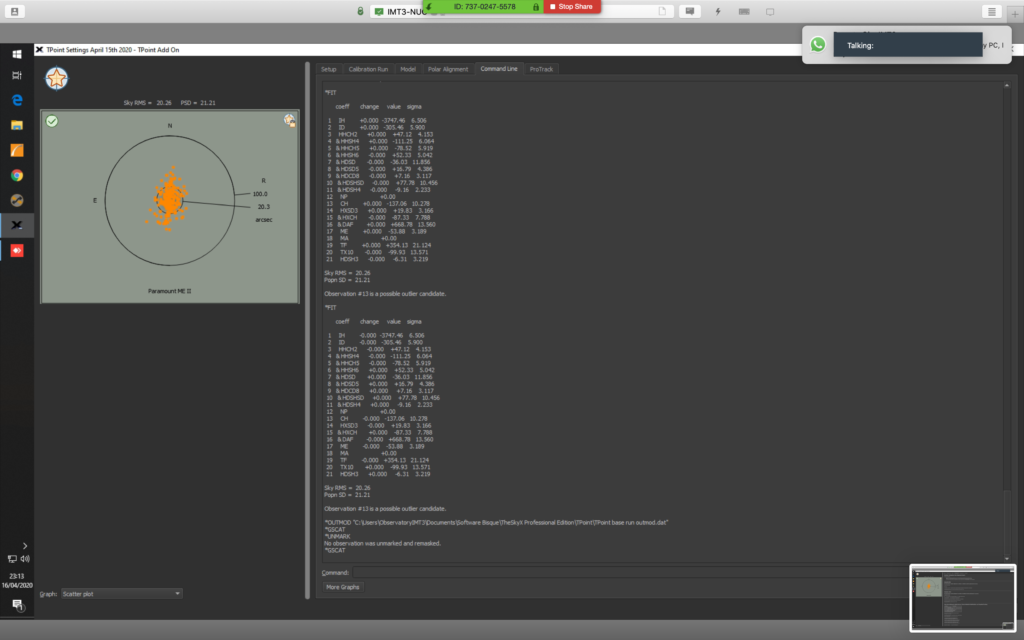
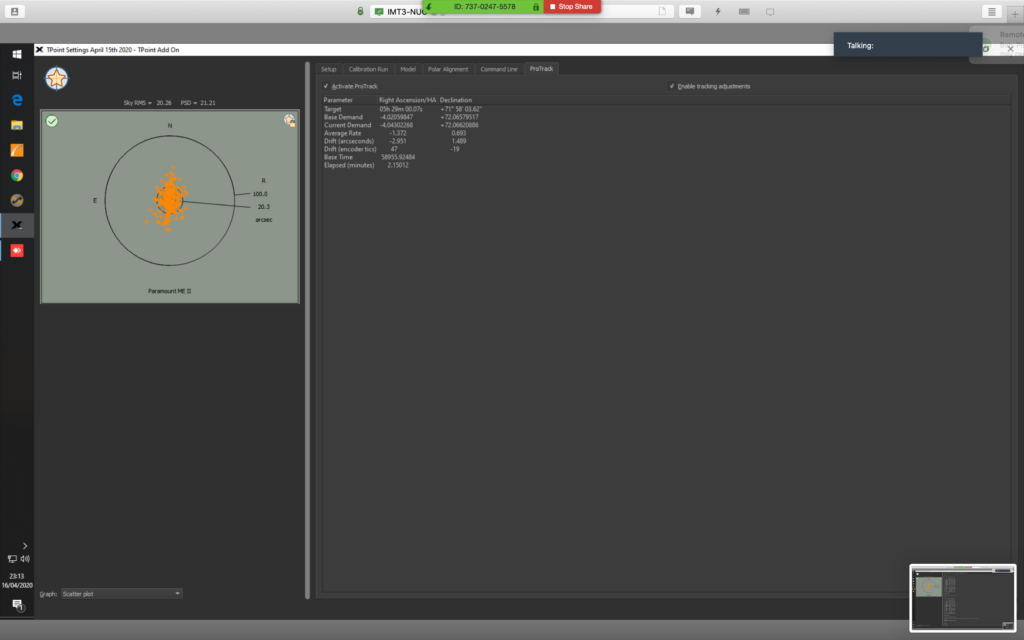
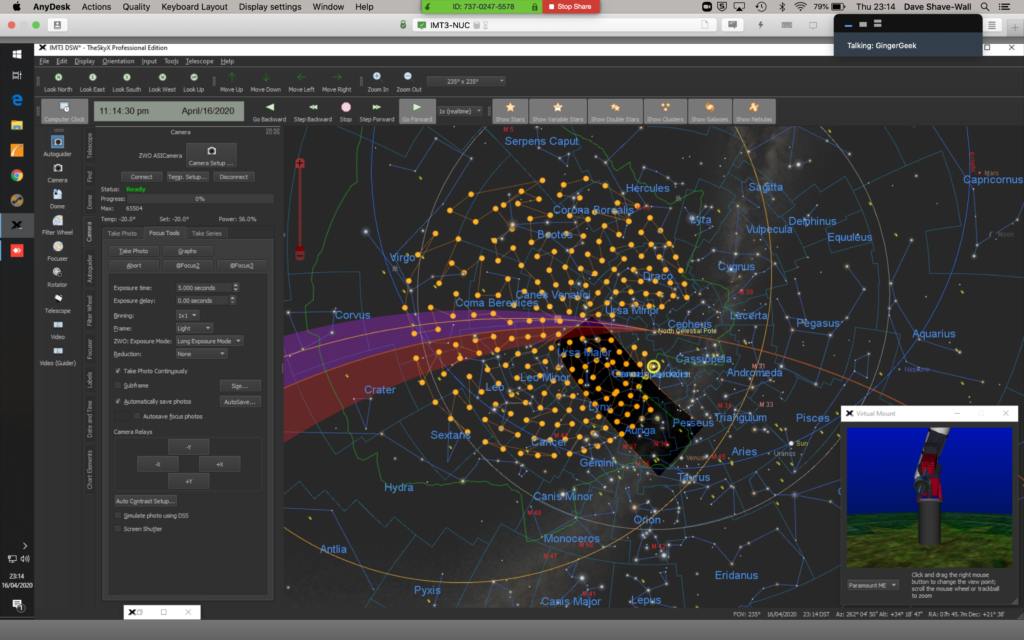
TPoint completion of 231 pointsFinal model appliedPolar alignment reportCommand line viewProtrack onTpoint model on sky2min unguided image through OS12″5min unguided exposure through OS12″
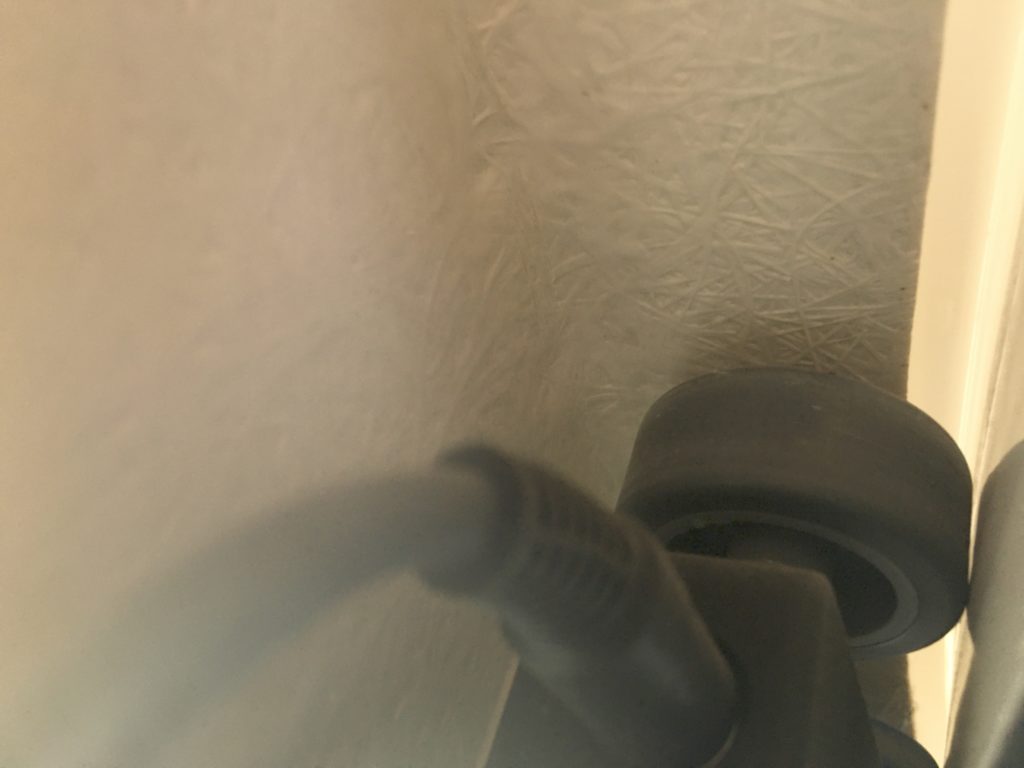
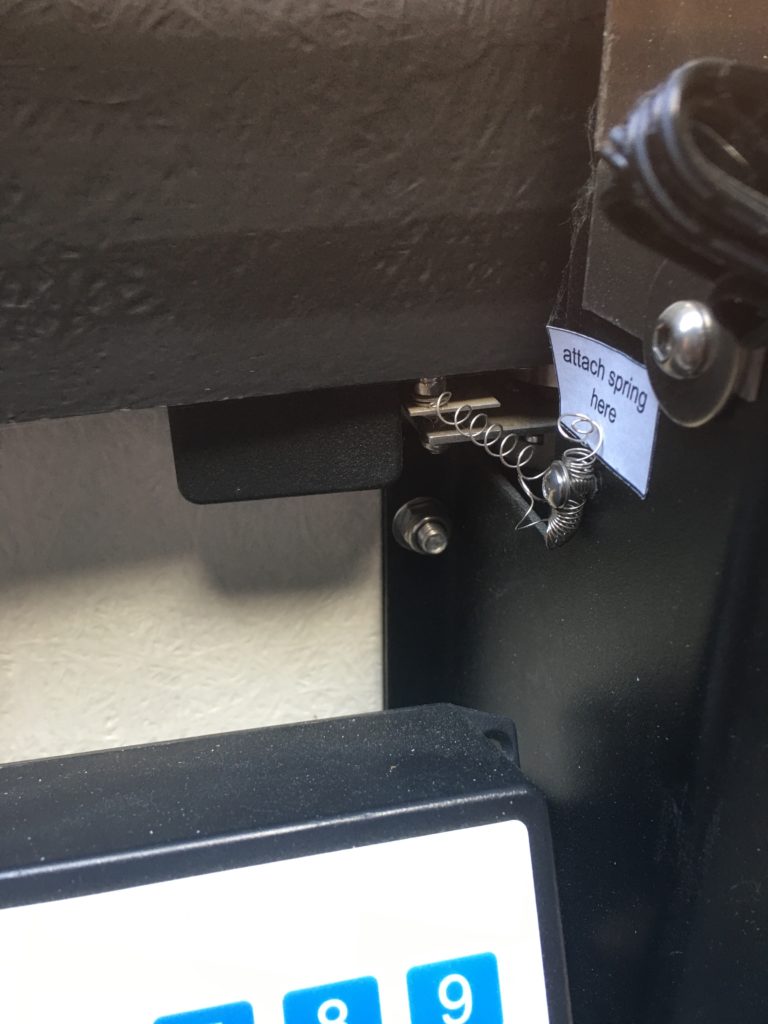
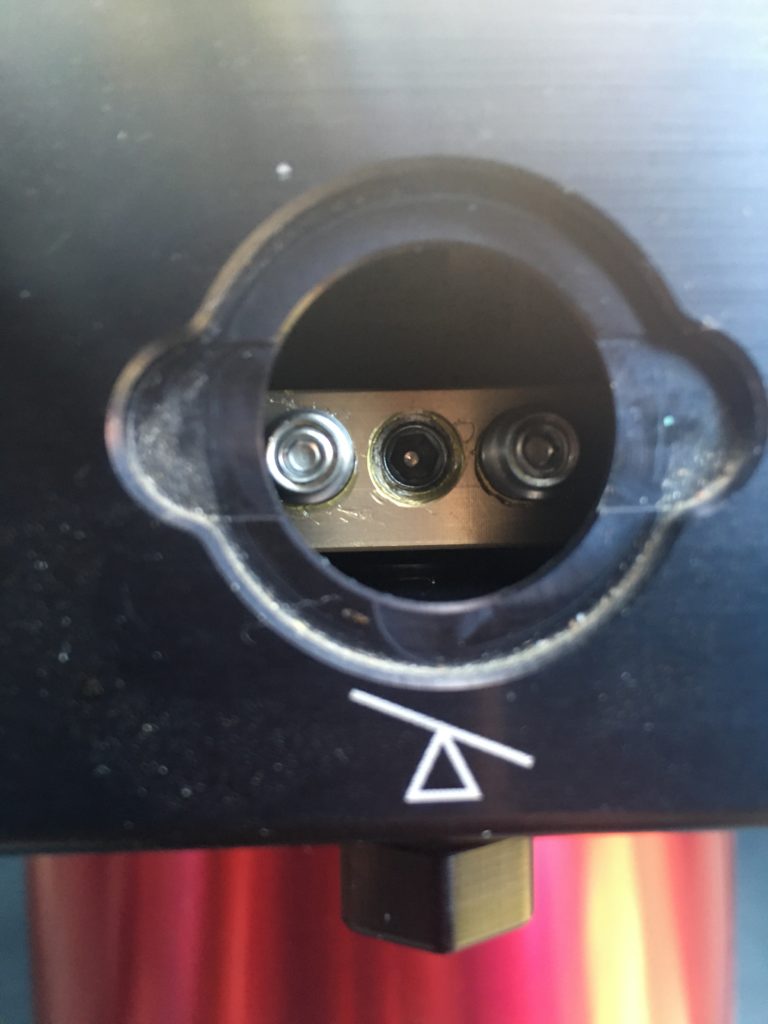
I mentioned above the dome slipping on the encoder, this was because of the small weak spring that is used on the dome, which is not good enough and over the past year has stretched beyond its limit. This means as the dome rotates and the dome shudders due to the joins in the dome not being flush (another issue) and thus the spring is stretched. This meant that some of the time the encoder wheel seen below was not touching the dome and therefore lost around 30-40 degrees. To rectify I have temporarily stretched and tightened the spring which we will replace later with a more suitable one.
Encoder wheelEncoder spring now stretched to fix problem
Tried again to get the TPoint completed tonight but hit with a load of issues which I will try to sort tomorrow. FoV in TSX was wrong. Not plate solving in TSX. Focus potentially an issue. Use of All Sky Image Link for Scripted Image Link needed to be selected from the Image Link –> All Sky tab. Image scale in various places was incorrect again and should be 0.32. Managed to get to 10 points with 3 failed. Clearly something has changed given this worked a week ago. I will attempt a go tomorrow night to resolve. Meanwhile I have left Bob to image. In hindsight we should also be leaving the observatory running all night as when I got up at 4am it was crystal clear and dome was closed as nothing planned, so a default object and scope setting should be used and left running. However, Bob did manage to grab some frames in the clear of M53 until what looks like 3am so that is better than nothing.
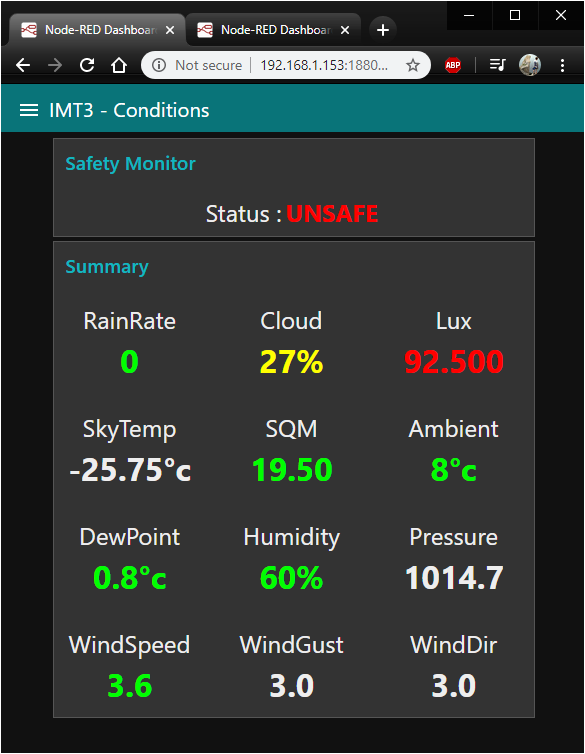
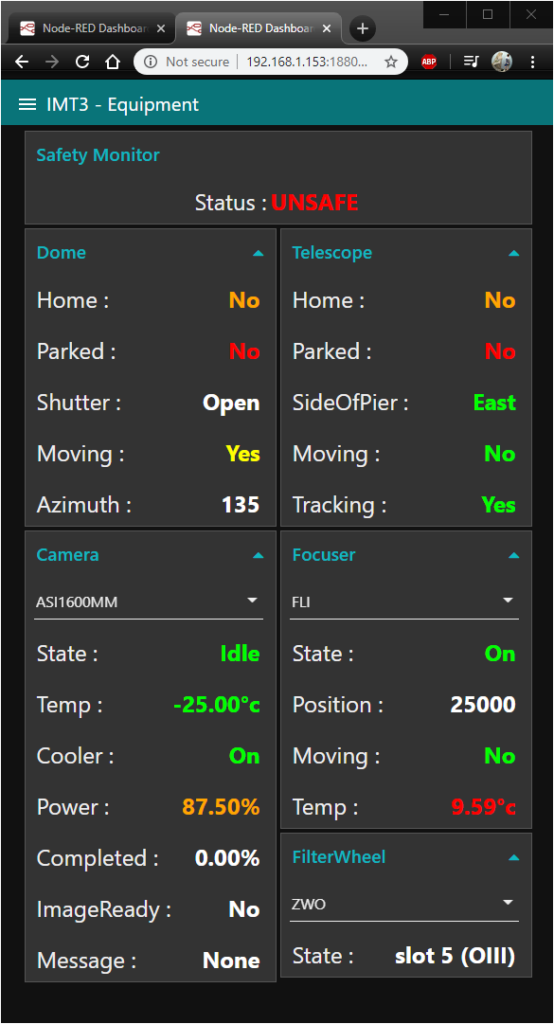
During one of our video sessions whilst watching the T-point run, Chief TOSA Dave mentioned about how it would be nice to see status information of observatory operations in a simple web page.
Since I’d never used Node-Red but had used ASCOM Alpaca via Python I thought this may be the time to learn something new. As I was designing this for Dave I decided to keep the layout, presentation simple along with colour coding in the spirit of Fisher Price toys.
The safety monitor is always visible across all tabs, the colour changes depending on the threshold levels we decide on.
ASCOM Alpaca Weather Conditions
Likewise the main equipment tab displays the equipment status and allows us to select which camera, focuser or filter wheel to monitor.
ASCOM Equipment Status
This project is still very much a work in progress but there is many different ways that the same thing can be accomplished.
Dome has been open a few hours now and the 12″ cooling down with the fans on.
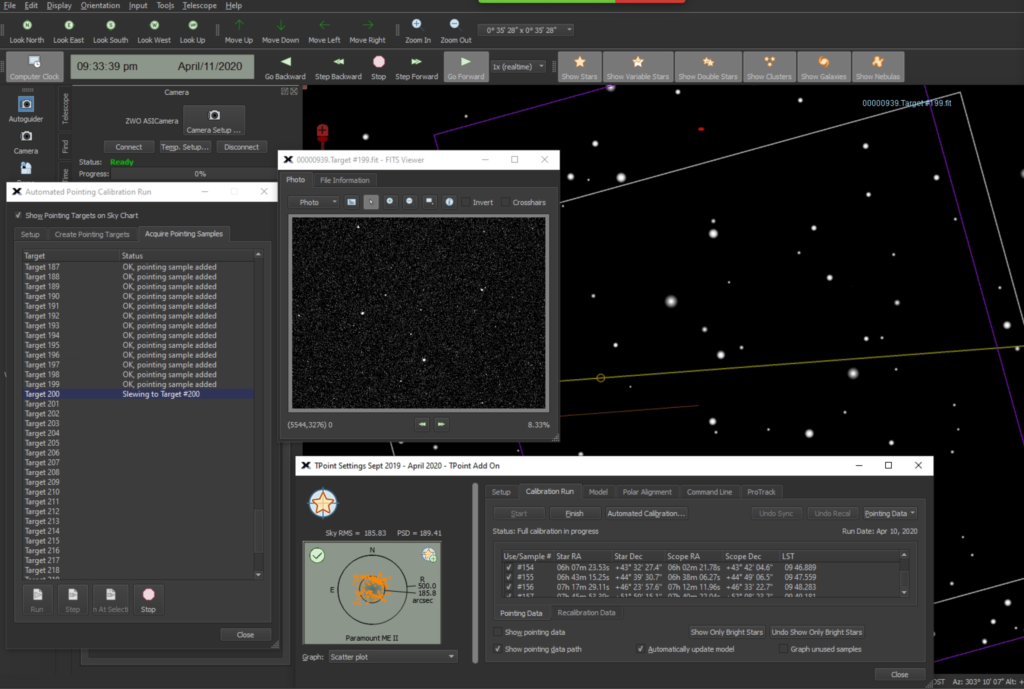
At first the TPoint run was not solving the image, I had to change again the Image scale which was set to 0.01 for the automated TPointing back to 0.32.
Once this was done I started a new TPoint run. The new numbers coming in looked better on the scatter graph, however at about 29 points the mount stalled and the TPoint stopped. So I went out and backed off, turning anti-clockwise the spring screws 1/8 turn on the RA axis. I then restarted the mount, but now it is too late to start again as I have work tomorrow. So I will leave the mount in Bob’s capable hands and head off to bed.
Started TPointing at Point 153, at 22:00 got to Point 231 which gave us 192 confirmed points.
Tpointing
Then went back and did the following points
Point 28 (DONE)
Point 50-55 (DONE)
Point 60 (DONE)
71-92 (DONE)
100-153
101-106 (DONE)
Failed – 107, 108, 112, 113, 130-132,134
Not tried – 100,109-110, 114-118
Completed – 111, 119-129,133,135-152
We had some cloud around 22:45 until 23:29
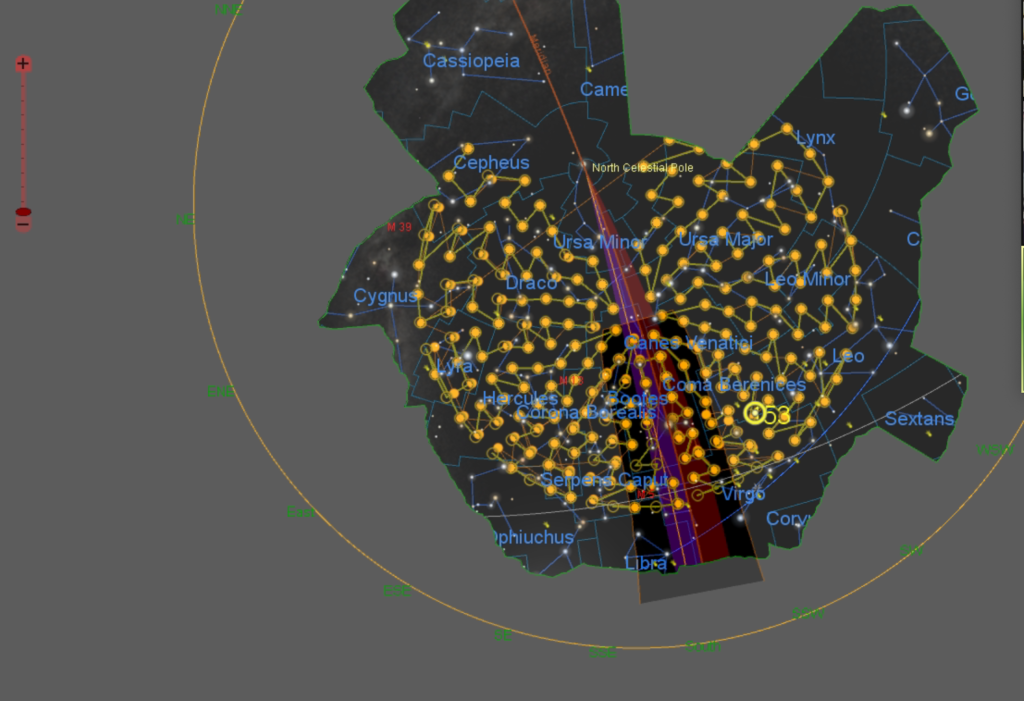
TPoint visual
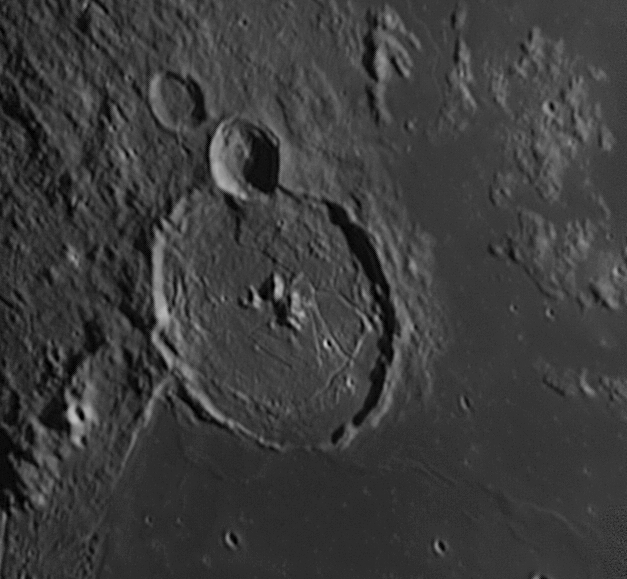
Throughout this time I processed some Lunar images on the Windows laptop with AutoStakkert from the previous few nights of imaging through the Mak 180. I have noticed you cannot open anything larger than 4GB file size !!
Gassendi crater
@1:52am TPoint finished
@2:09 GingerGeek took over to look at focuser positions and backlash and autofocus on the Takahashi FSQ102.
Autofocus
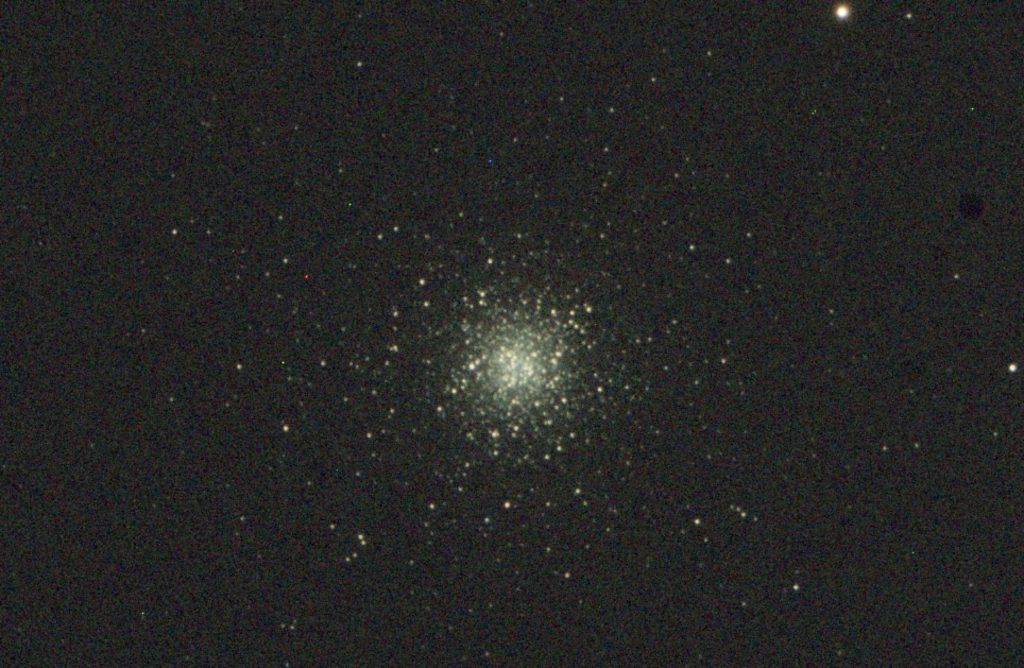
Then we started to image M53 on the Tak for RGB data to add to the Luminance data we already have from GingerGeek’s data on the Esprit 120ED.
M53 Frame and Focus test
Tomorrow I will need to look at the TPoint model to refine it!
Addendum ……
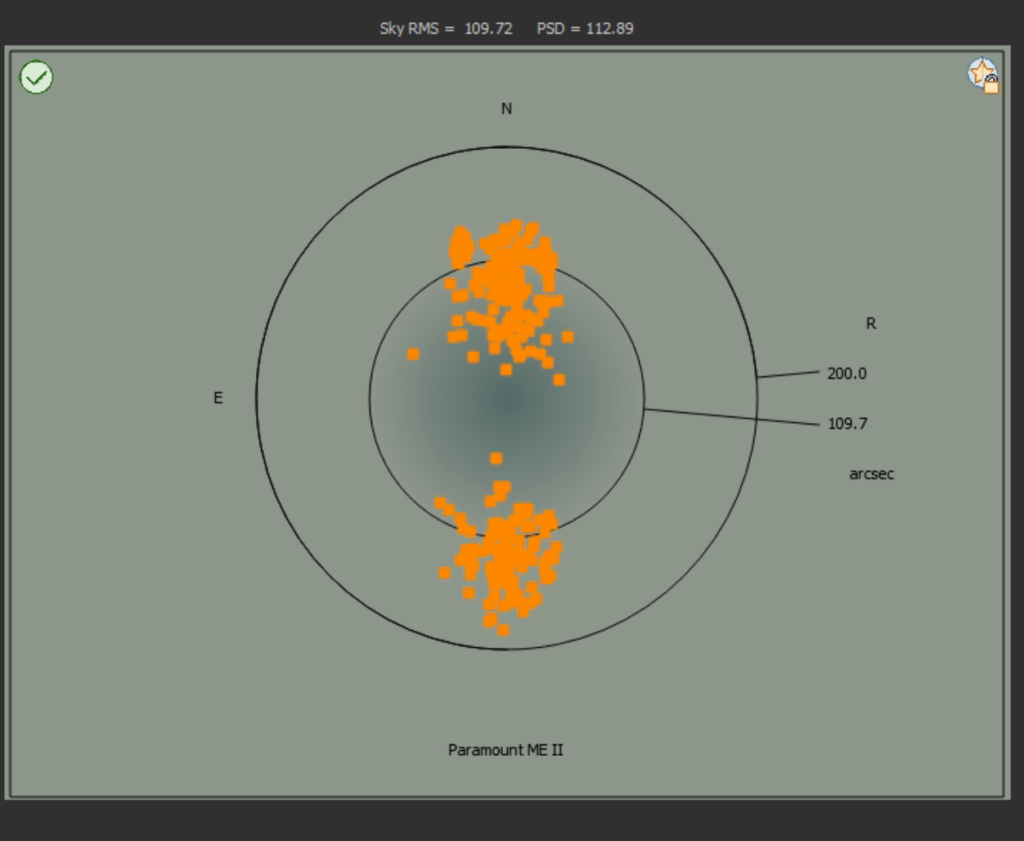
So I took a look at the TPoint model and could not get it below 109 inner circle and 200 outer circle without removing a lot of points. So I posted question on the Bisque Sky X forum.
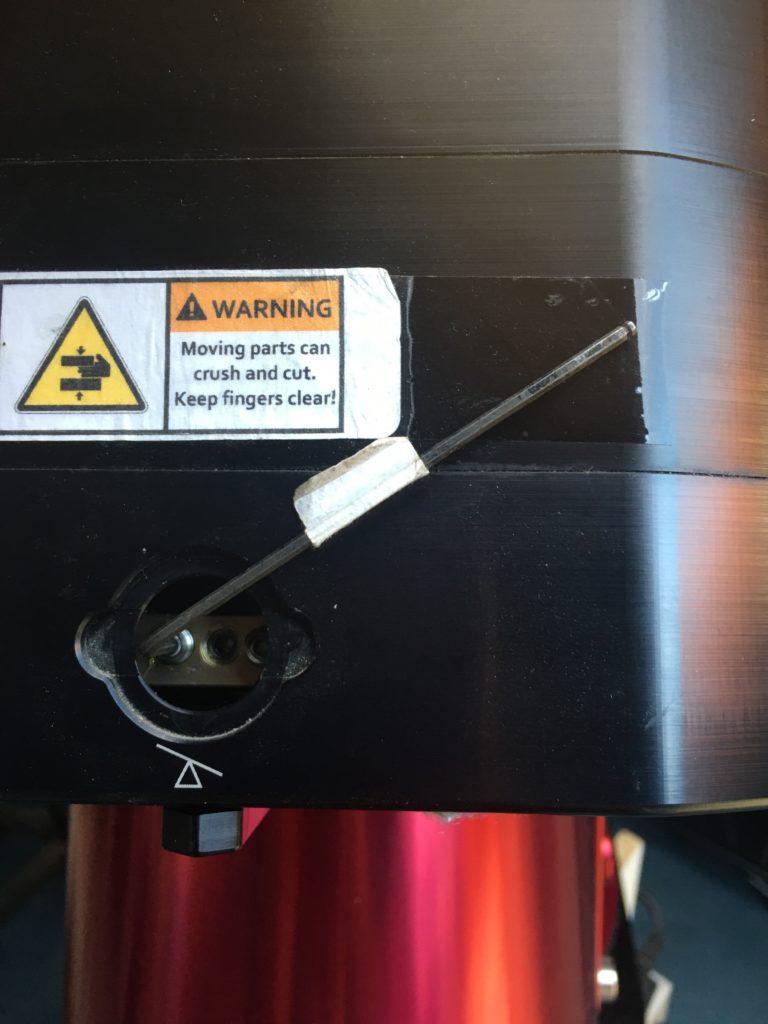
They came back and stated there is something loose in my imaging train or the mount. There is nothing wrong with my imaging train so instead I performed adjustments on the worm gear as they suggested. I will now need to re-TPoint to see if this makes a difference.
Worm adjustmentSpring screws left and right and Cam Stop screw in the middle
Another night of trying to complete a TPoint run. After opening the dome around 4pm to cool down and turning the fans on the 12″ and pulling back the light shield material we (Bob, GingerGeek and I) @20:49 completed Slew and Sync to test plate solving ability which worked well.
First Solve and Sync works
We then started the TPoint run.
Starting TPoint RunFirst point captured out of 231 points
Our first failure was Point 28 @21:21. The following are other failures.
Failed Point 50,51,52,53 @21:42
Failed Point 55 @21:45
Failed Point 60 @21:53
Failed Point 71,76,77,78,79,80,81,84,85,86,89,
TPoint failures
We then performed the first of a few meridian flips back and forth at Point 92
Meridian Flip
At pointing sample 96 we changed from 20s exp to 25s (20 failed at this point) to see if this helped the failure rate, it helped a little. The sky clarity was not great nor was the 12″ pointing correctly through the dome at the Meridian so need to look at this at a future point.
More Tpoints failed as follows. TPoint 100,102,105,106,107 (at this point scope 1/3 obscured by slit!)
Tonight I set out to perform a TPoint run to improve the values we got last October. However it transpired to be more difficult than I thought. We updated TSX after October to there latest release, this seemed to have changed some of the parameters for plate solving. This meant that every time we took an image in the TSX it would not plate solve and so we could not perform the TPoint run. After the best part of 1 hour I gave up and let Bob take over the scope to play.
Meanwhile I then setup the Mac 180 to image Venus, however, by the time I got round to it and found it in the telescope and thus on the chip it was low down the side of the house opposite by the roof and was bumping around badly due to thermals. I found it difficult to centre the scope on Venus with such a small chip so I may need a more repeatable way of doing this moving forwards. I took a couple of videos just for posterity even though I felt the quality would be poor.
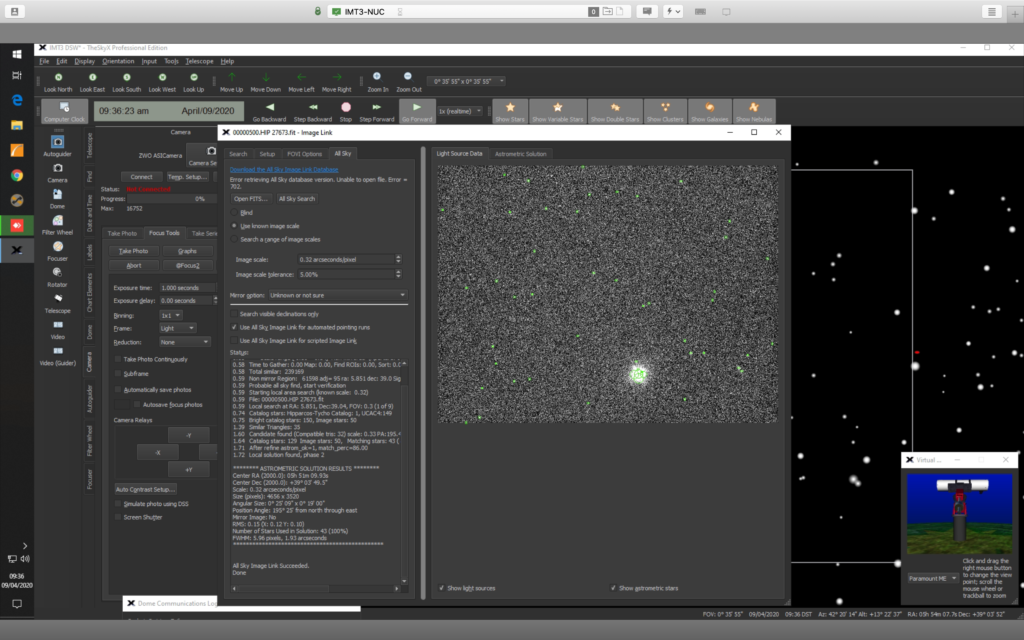
Subsequently the following day I opened up the images take with TSX and also download the All Sky Database that was missing to both the NUC in the dome and my local Mac. I then started to change the settings in Image Link within TSX until I could solve the image.
Solved image using Image Link All Sky Search in TSX
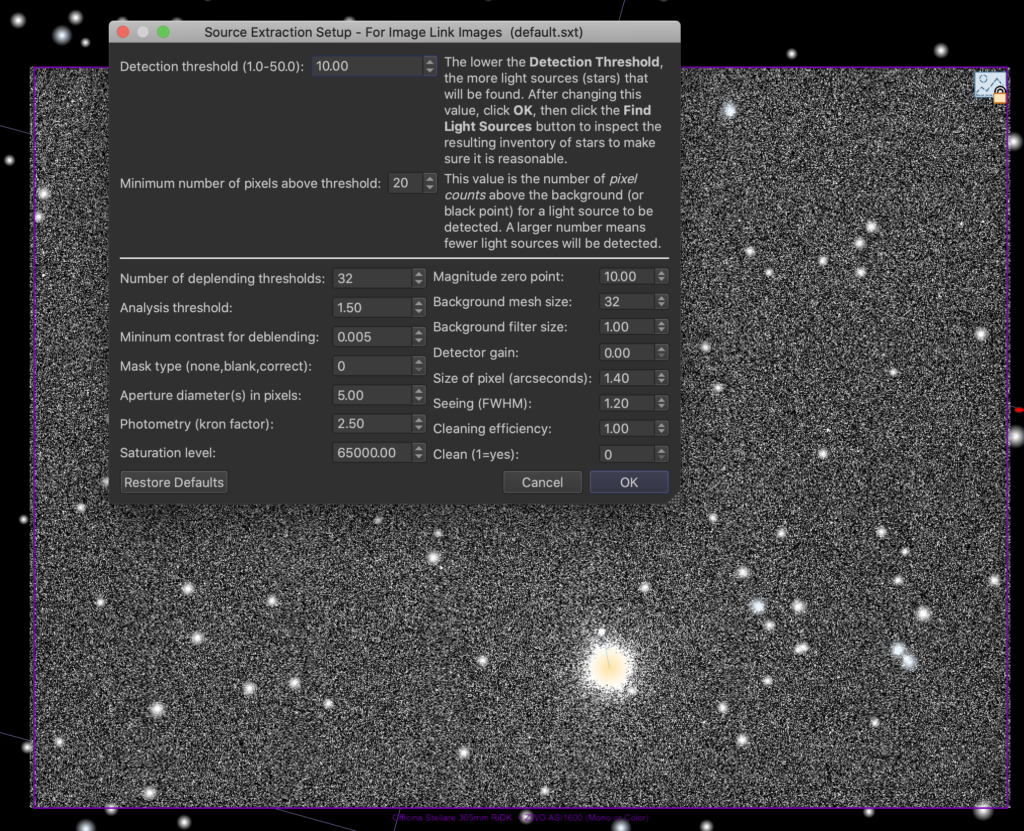
The key parameter transpired to be the Image Scale Tolerance on the All Sky tab setting it to 5% from 1%. Also I changed the Image Scale back to 0.32. On the Setup tab I selected Setup under Source Extraction and changed the detection to 10.0 and the minimum number of pixels to 20.0.
New Source Extraction Settings and solved image
I then tried a second image and that solved in 1 sec too so very happy. I will try to give the TPoint another go tonight as well as Venus on the Mac 180. If TPoint works I will take RGB on the Tak. First solution from the image I solved can be seen below.
TSX Image Link solved
The resulting astrometric solution from TSX is below based on another 60s exposure image is below as text.
******* ASTROMETRIC SOLUTION RESULTS ********

Center RA (2000.0): 07h 14m 12.34s

Center Dec (2000.0): +32° 34' 16.1"

Scale: 0.3250 arcseconds/pixel

Size (pixels): 4656 x 3520

Angular Size: 0° 25' 13" x 0° 19' 04"
Position Angle: 195° 28' from north through east

Mirror Image: No

RMS: 0.88 (X: 0.45 Y: 0.75)

Number of Stars Used in Solution: 40 (100%)

FWHM: 8.98 pixels, 2.92 arcseconds

***********************************************
Things still to resolve
Check out why WSX is loosing connection and shutting the dome
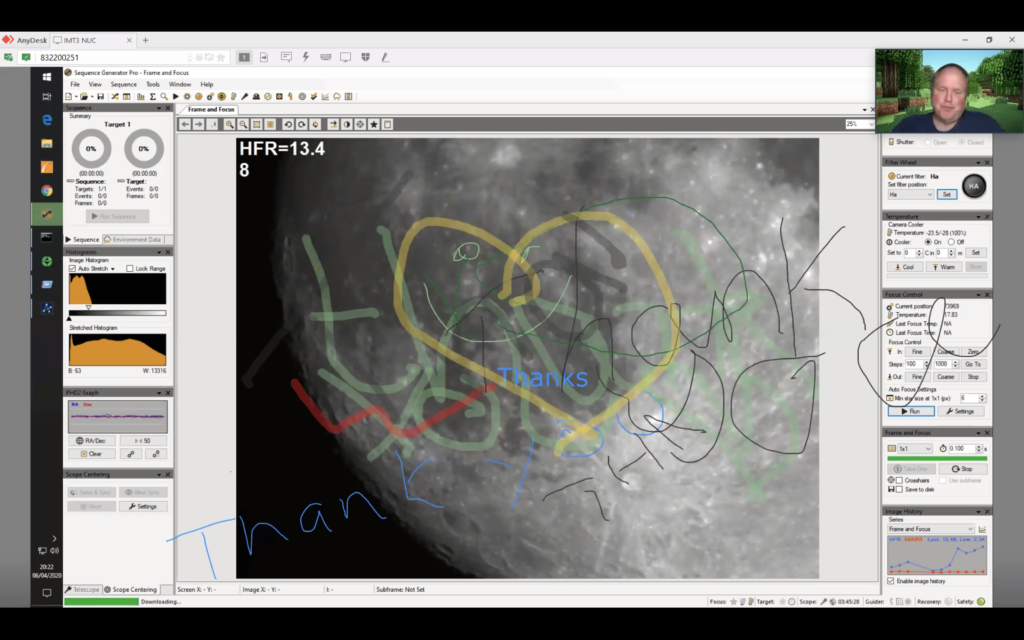
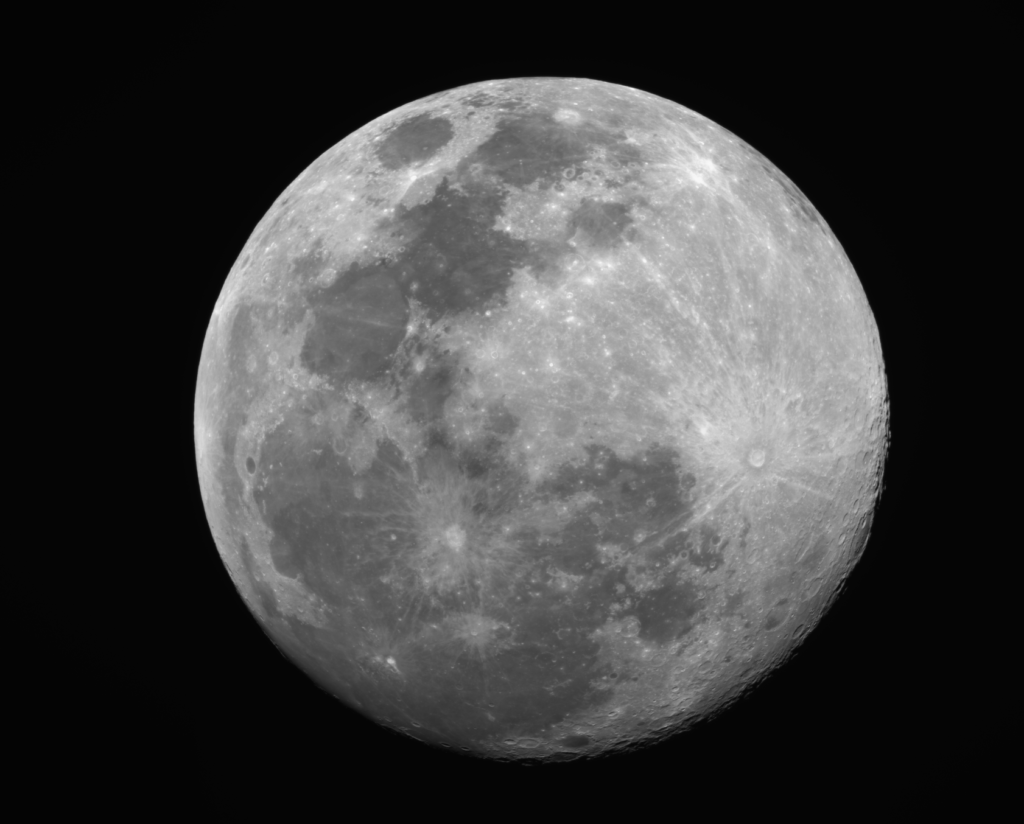
Chineham Scouts say ‘Thank you’ on Zoom session whilst viewing the Moon
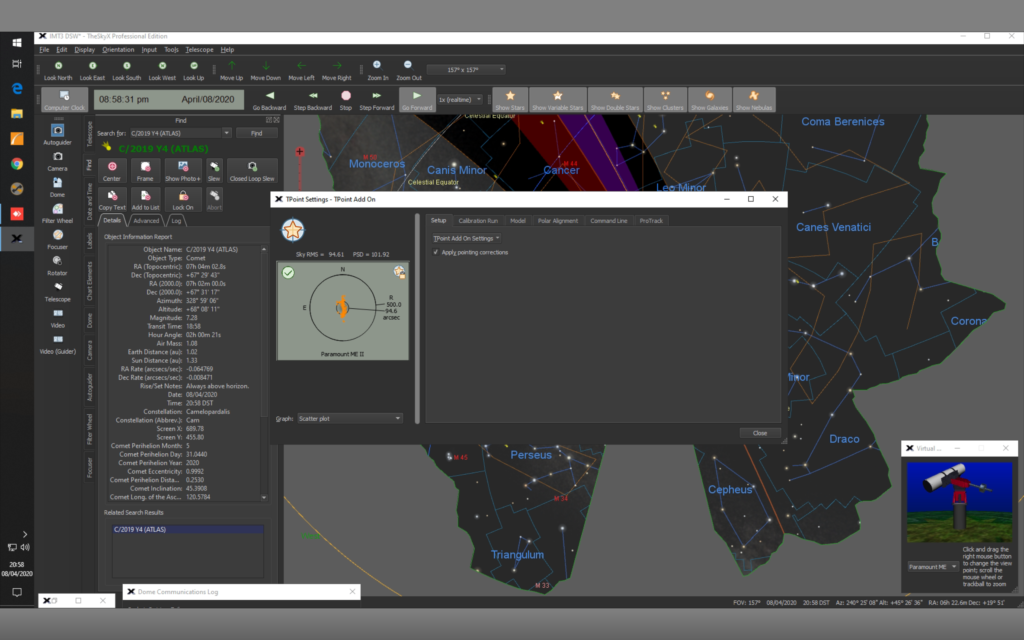
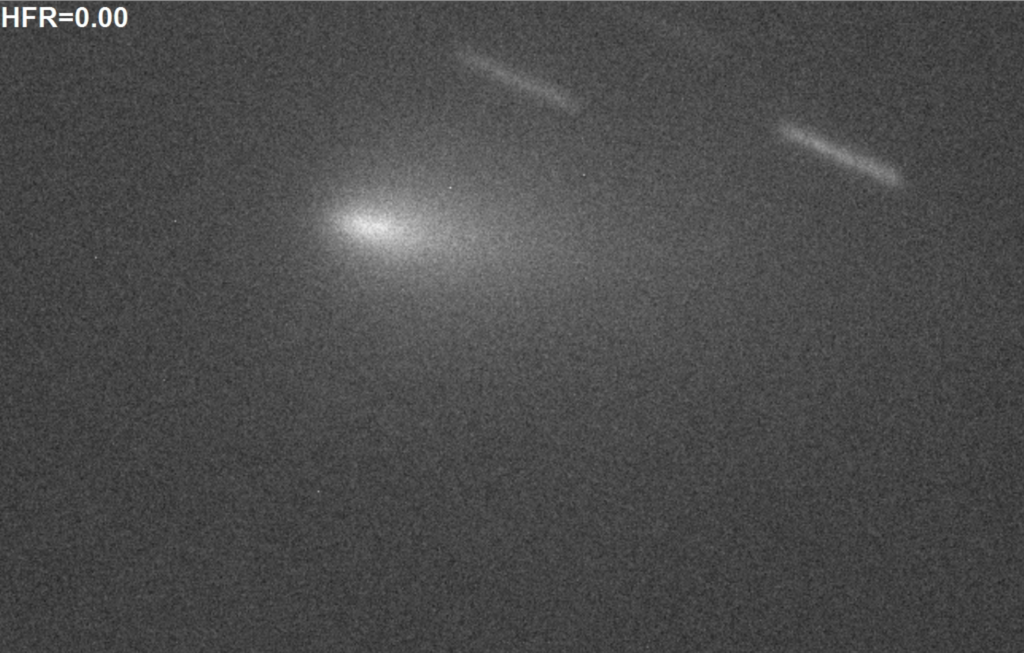
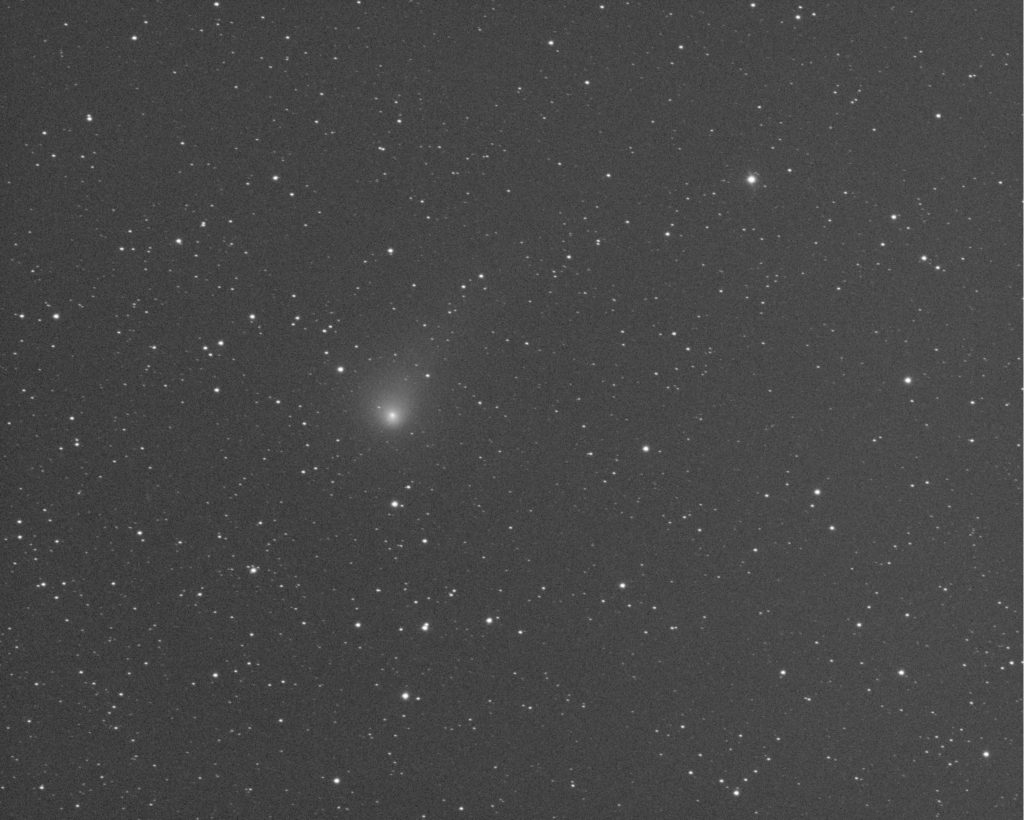
After helping with a BAS Outreach event using Zoom to share images from IMT3 of Venus and the Moon with 1st Chineham Cub Scouts (to help them acheive their Astronomy Badge) I joined Dave and GingerGeek for a joint observing session chasing Comet C/2019 Y4 (ATLAS) with Dave’s 12″ OS.
Comet C/2019 Y4 ATLAS through 12″
I continued to observe after both Dave and GingerGeek called it a night, my aim was to get some data from the Esprit 120 of C/2019 Y4 (ATLAS) as the previous nights run had been terminated when the clouds rolled in.
Quick 10min Exposure through Esprit 120 Comet C/2019 Y4 ATLAS
I set up another Profile in SGPro for GingerGeeks Esprit 120, adding his Lodestar Guider. C/2019 Y4 (ATLAS) was too far from the equator for the Calibration of the guider in PHD2, so I slewed to Bogardus in Auriga, cleared the calibration data for the Lodestar and re-calibrated it. I was then able to get two 10 minute guided exposures with the mount tracking at Sidereal rate before the comet disappeared from view below the roof line of a neighbouring house.
Having lost Comet Atlas for the night, I checked Heavens-Above for other candidates and found C/2019 Y1 (ATLAS) was about to drop below the horizon, but C/2017 T2 PANSTARRS was reasonably well placed, albeit a bit low, and only a short slew from where the telescope was already pointing. After slewing to PANSTARRS and a 5arcminute JOG Up, Left, Down, Right and Down I had it reasonably centred in the FoV. The first 10 minute exposure had star trails, thought I was guiding but found the Mount was still tracking at ‘Custom rates’. The next 10 minute exposure also had stars trailing even though the PHD2 Graph looked fine. I then discovered that with the SGPro profile changes I’d made I hadn’t connected to the ASCOM Telescope Driver for TheSky. The next 10 minute exposure was not much better as by now I’m imaging down in the weeds 🙁 . Time to find a new target … as it is up and really bright drowning out most objects I slewed to the Moon for a few final shots of the evening.