The first thing to do were Flats for Ha first for the previous night but also for use tonight. I completed this at 22:15
At 22:31 I performed focus run on Luminance which came in at position 59841 with HFR 4.77.
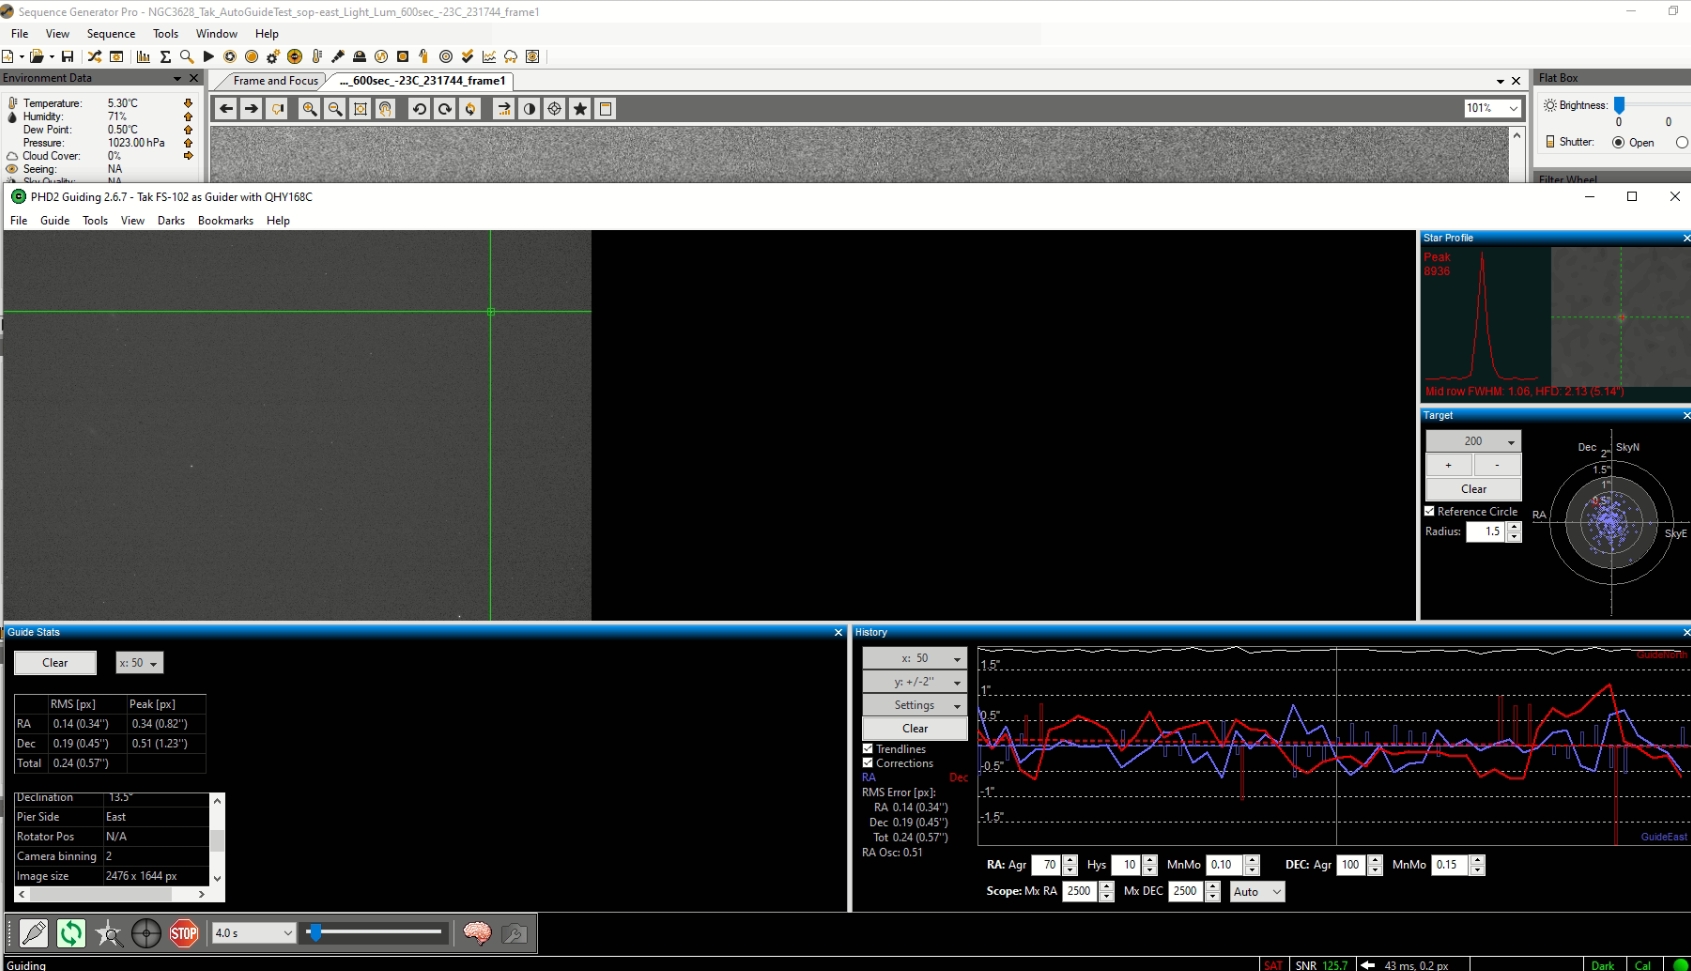
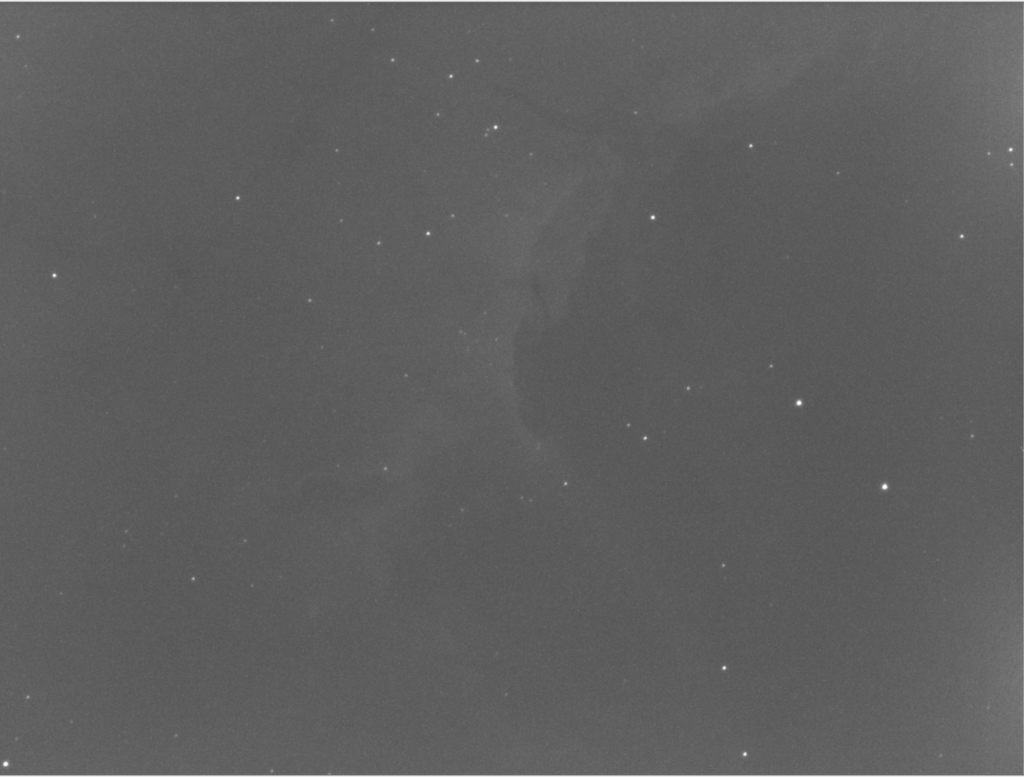
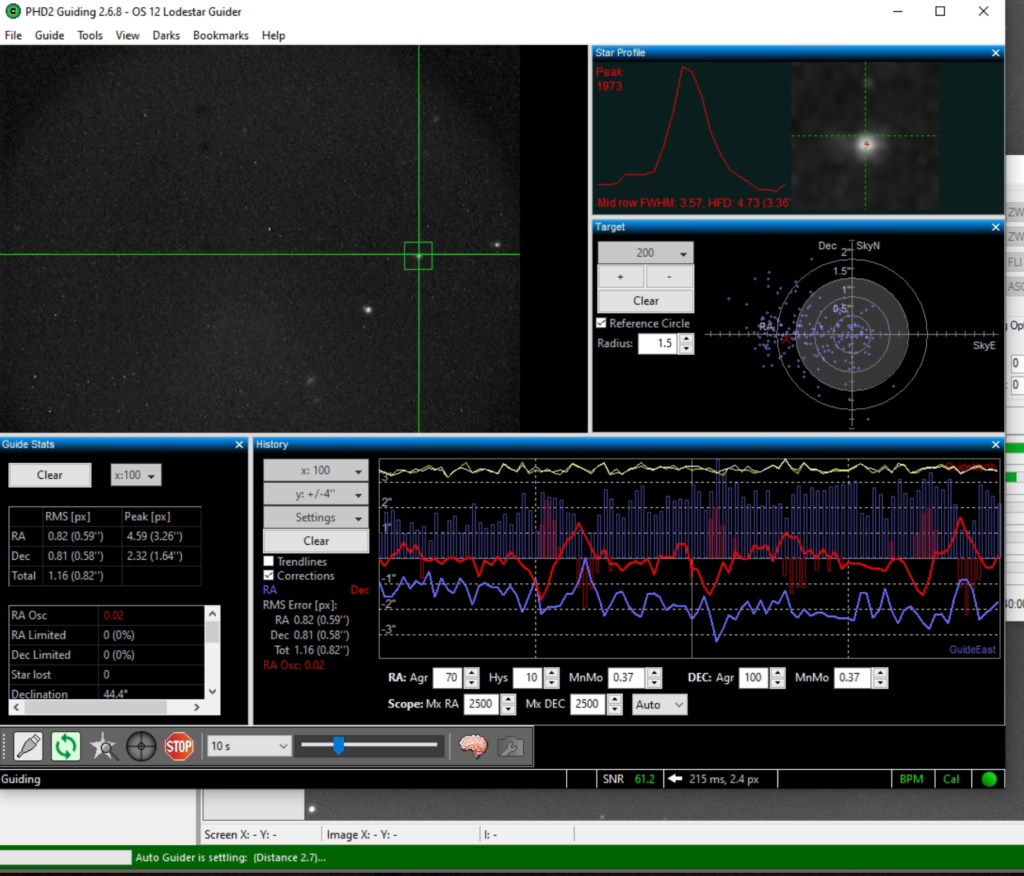
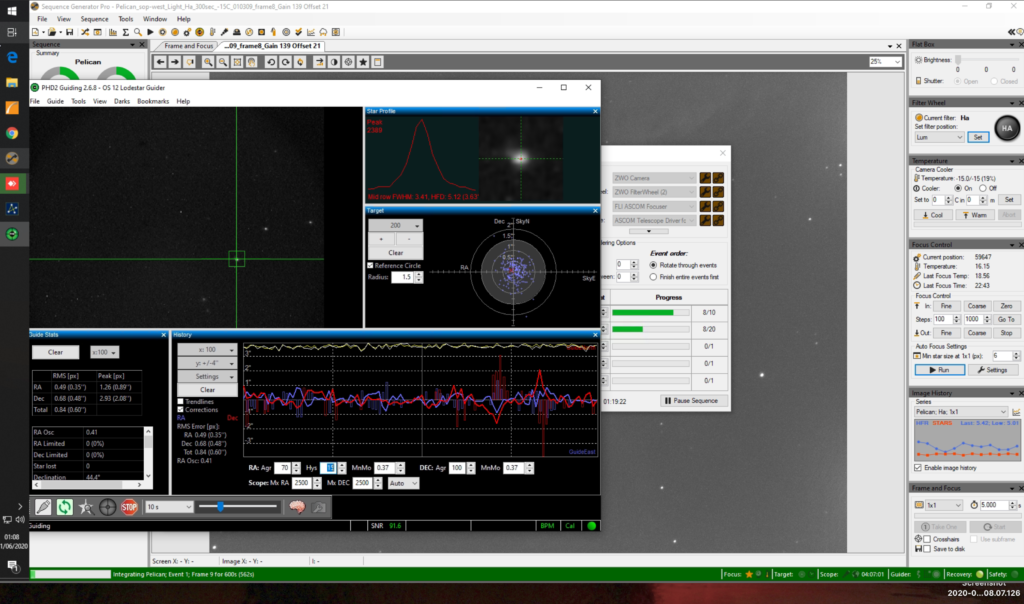
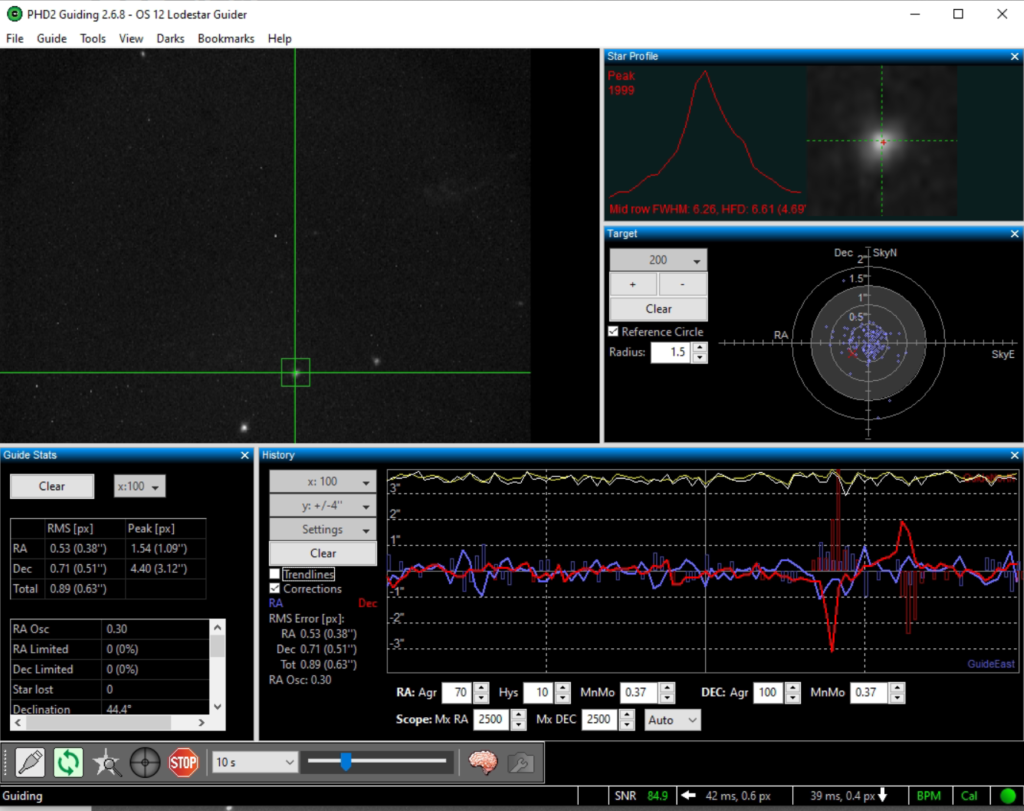
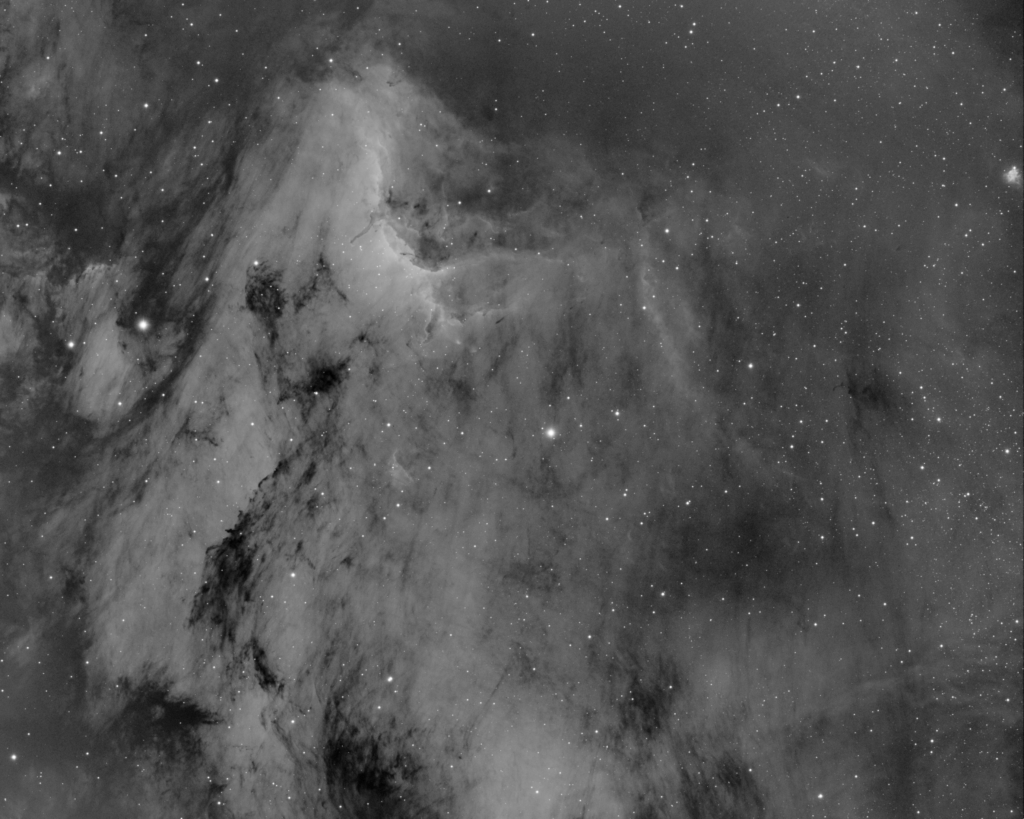
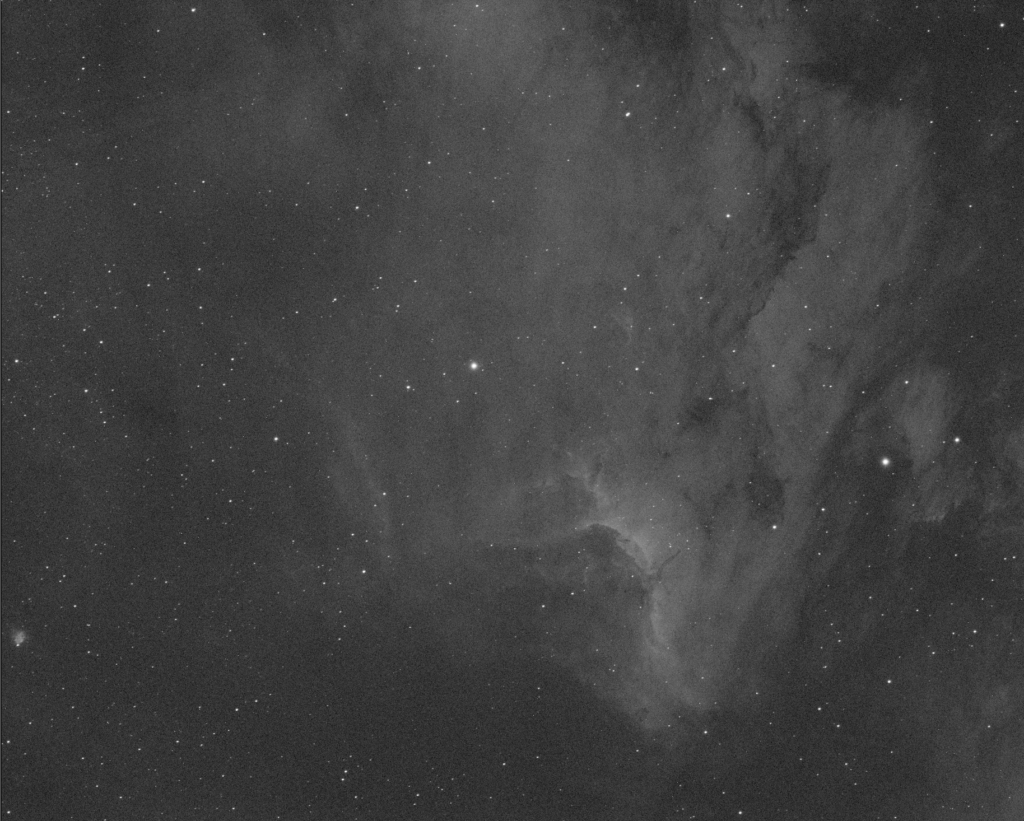
I started an image run as soon as the Pelican Nebula (IC5067) was above the neighbours house. I have set a run of 10 x 600s and 20 x 300s Ha subs guided with the new PHD2 settings to prove the 12″ now works from 1 night to another. Then we can try the Esprit on the next clear night. The guiding at first looked okay.
Good initial guiding
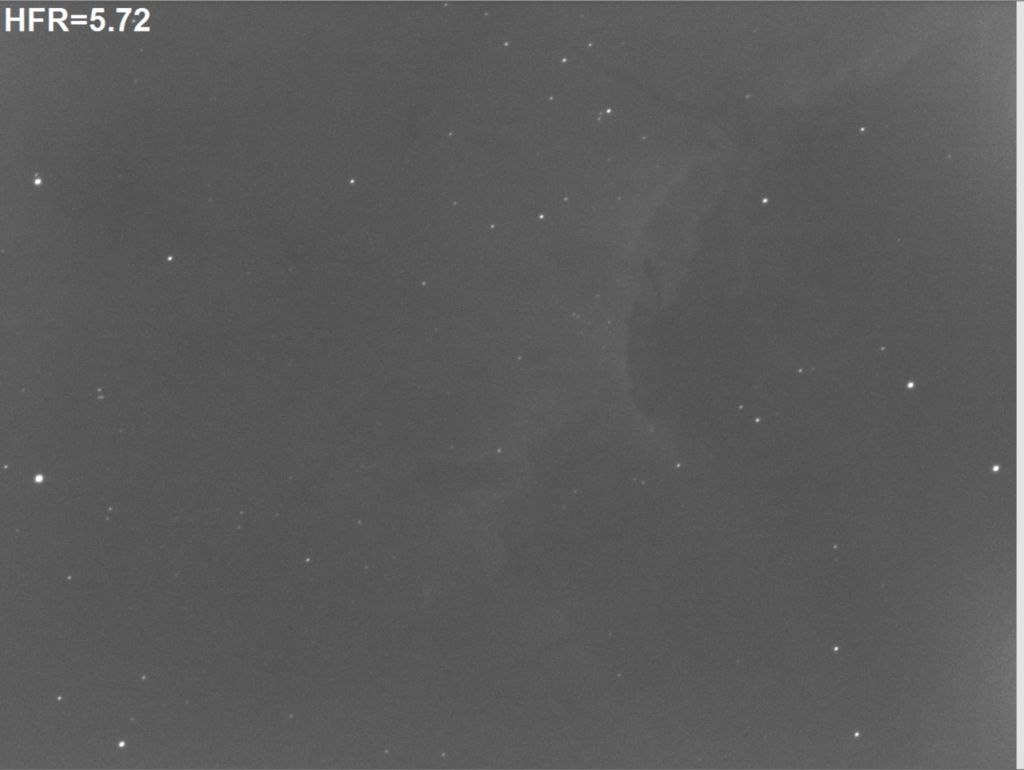
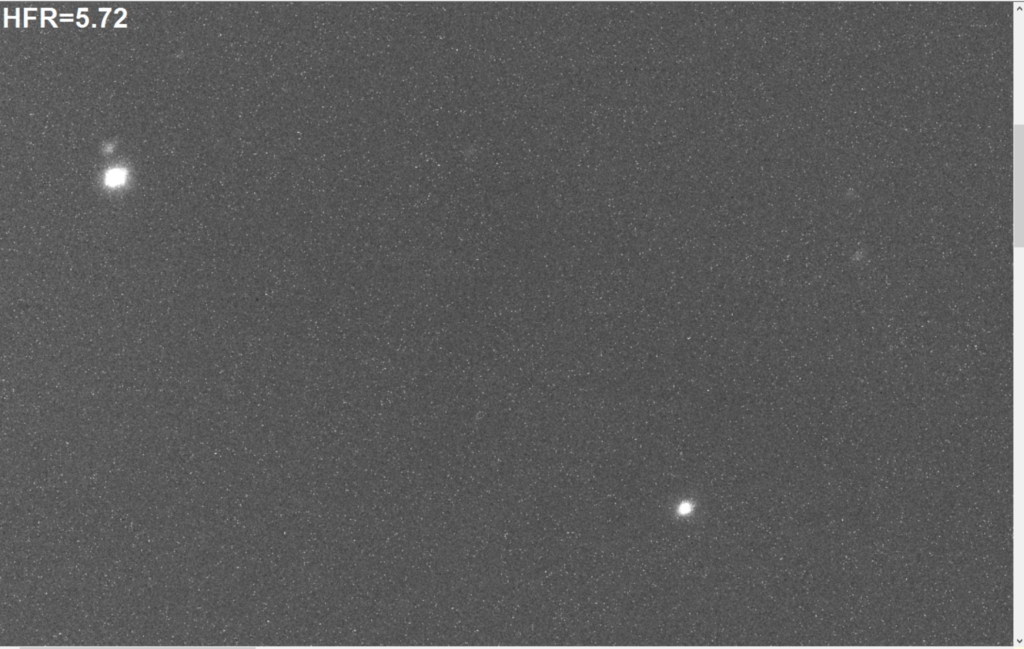
The resulting image looked very good too
300s Ha guided Pelican300s Ha guided zoomed no trailing600s Ha Pelican guided600s guided zoomed no trailing
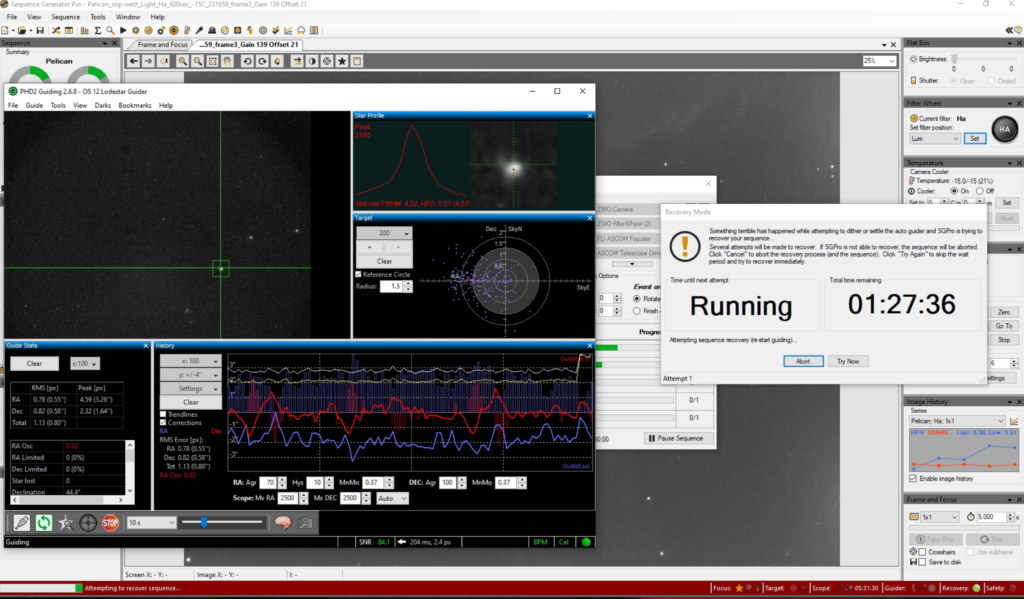
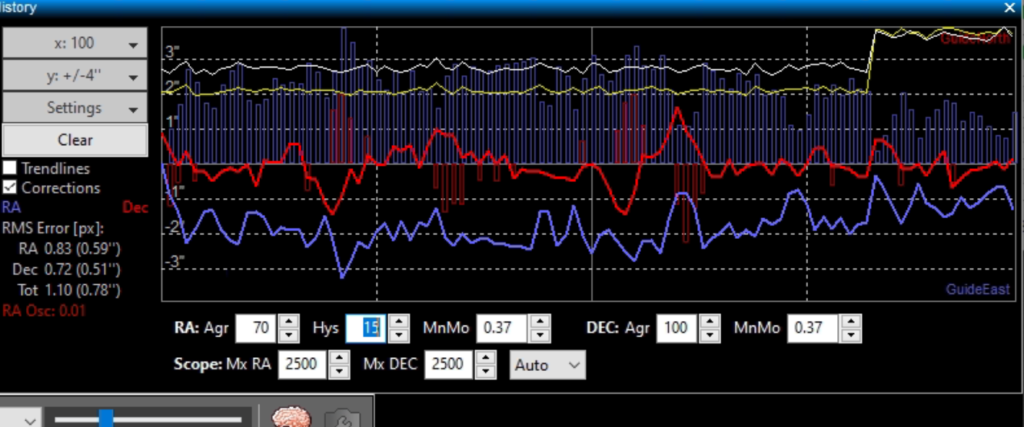
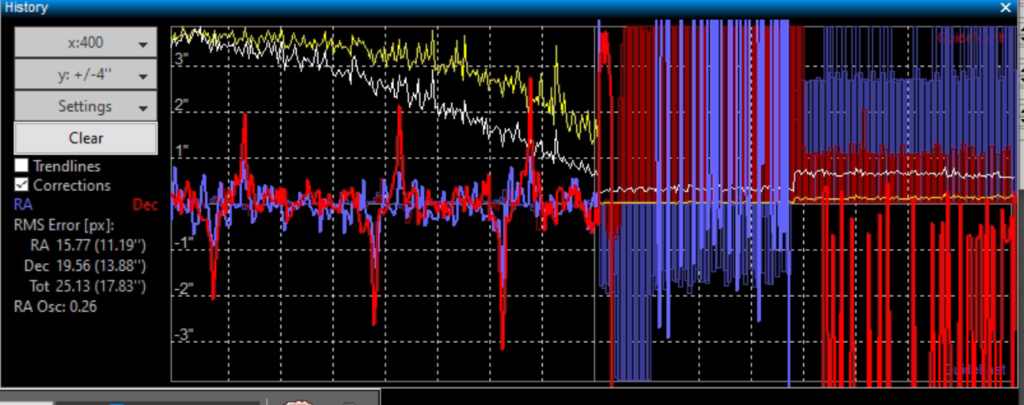
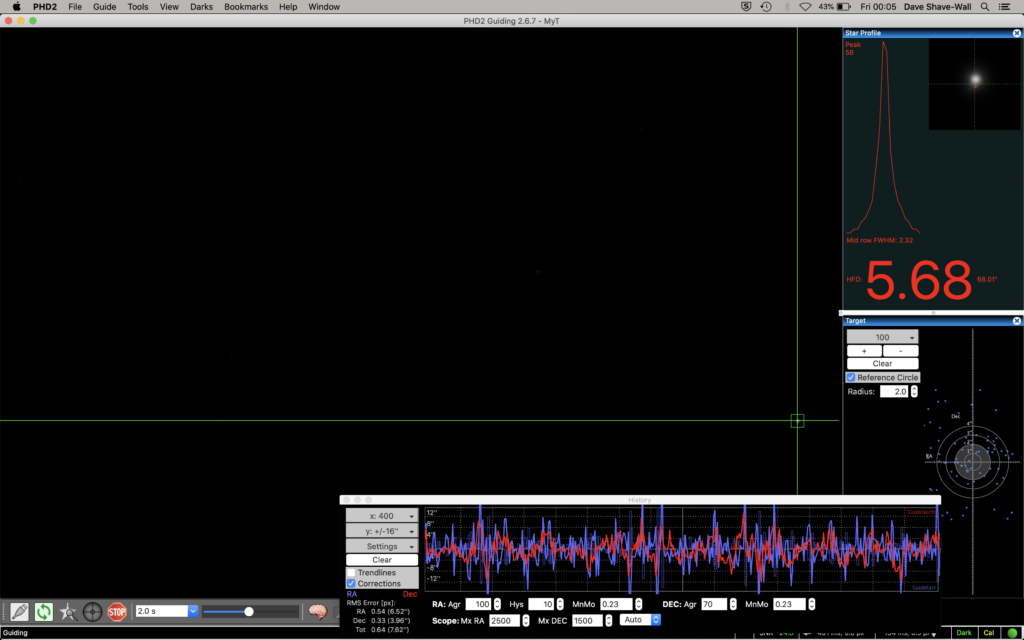
After about 5 frames I suddenly ran into a problem the guiding looked like this
There were large movements in the Dec and the RA would not return to centre. Soon enough SGPro stopped imaging and tried to settle the guider and then further complained about not being able to settle. So I temporarily changed the Hysterisis from 10 to 15 to see if this would get the star back. It did, well just.
The RA axis returns to the centre after quite some time. Is this possibly seeing related or is there something mechanical amiss with the setup?
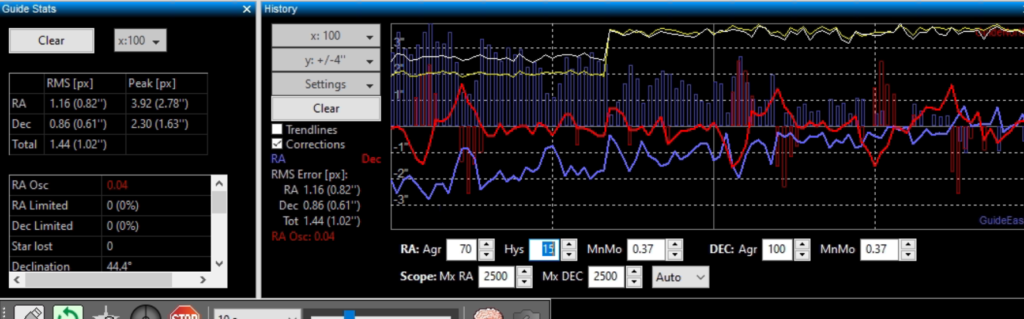
I did notice the problem one more and then went off to bed left it running 01:09 leaving the possible bump in the worm to resolve itself.
bump in the worm?
Addendum – So got up this morning and the scope had continued its travel across the heavens. I looked at SGPro and it finished the sequence without any problem. I then looked at PHD2 and expanded the time to include the maximum span possible as it had been trying to guide after loosing the star (I have check boxed Enable Star Mass Detection in the hope this fixes it) and I noticed a problem, which is the recurring South then North oscillation which I now need to investigate as that is the cause of loosing an image due to the star moving. It looks for all the world to be on the worm gear. I will set about measuring the PEC tonight and see if I can see it. It may of course be from when I adjusted the work due to another problem I had and it may not be quite right. I will also ask on the forum.
I opened the dome at 5pm. I wanted to try tonight to sort guiding via PHD2 again on the 12″ this evening and then on Esprit120 if enough time allowed.
I changed the PHD2 Profile for 12″ from 6 calibration steps to 12. Performed calibration. Started test guiding in West at +47 Alt. Tried 300 seconds exposure x2 all good
I Slewed back to the East and to Pelican Nebula. Set the Reverse Dec Output After Meridian Flip tick box again ! It then re-calibrated for this side of the mount.
I have also changed the assume Dec orthogonal to the RA axis.
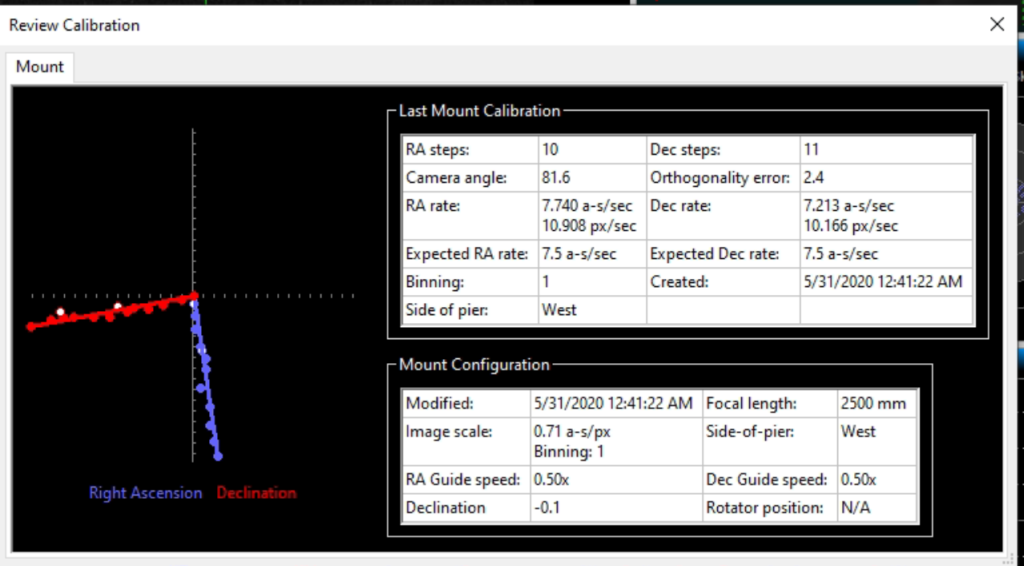
I reran the calibration a number of times until there was no longer an error at the end of the calibration. There was also trailing of stars. Some of the problem seems to have been an incorrect calibration, we need the RA and DEC rates to be very close indeed. Some of ours this evening were 1.5 arcsec difference. The good calibration we finally settled on was 0.5 arcsec difference. The other change was I went out and tightened up the grub screw holding the Lodestar guider on the prism tube that goes into the OAG body, this was loose and I could move the back end of the guider around. This was due to changing the OAG position recently and clearly not tightening the grub screw in enough.
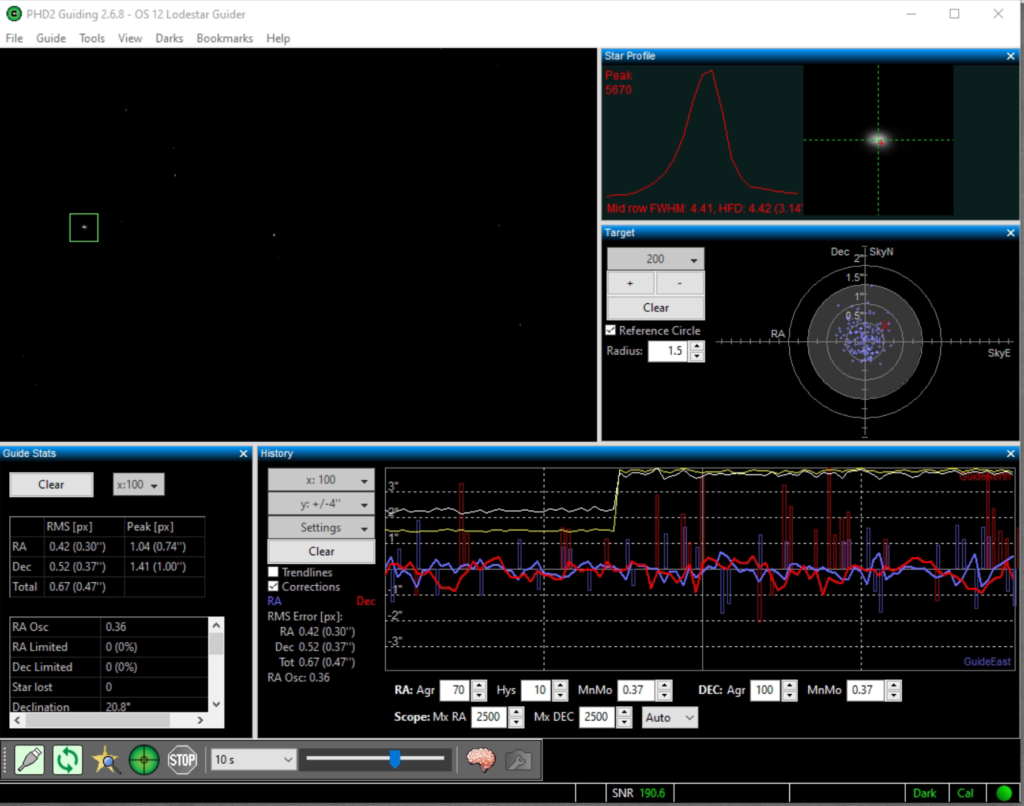
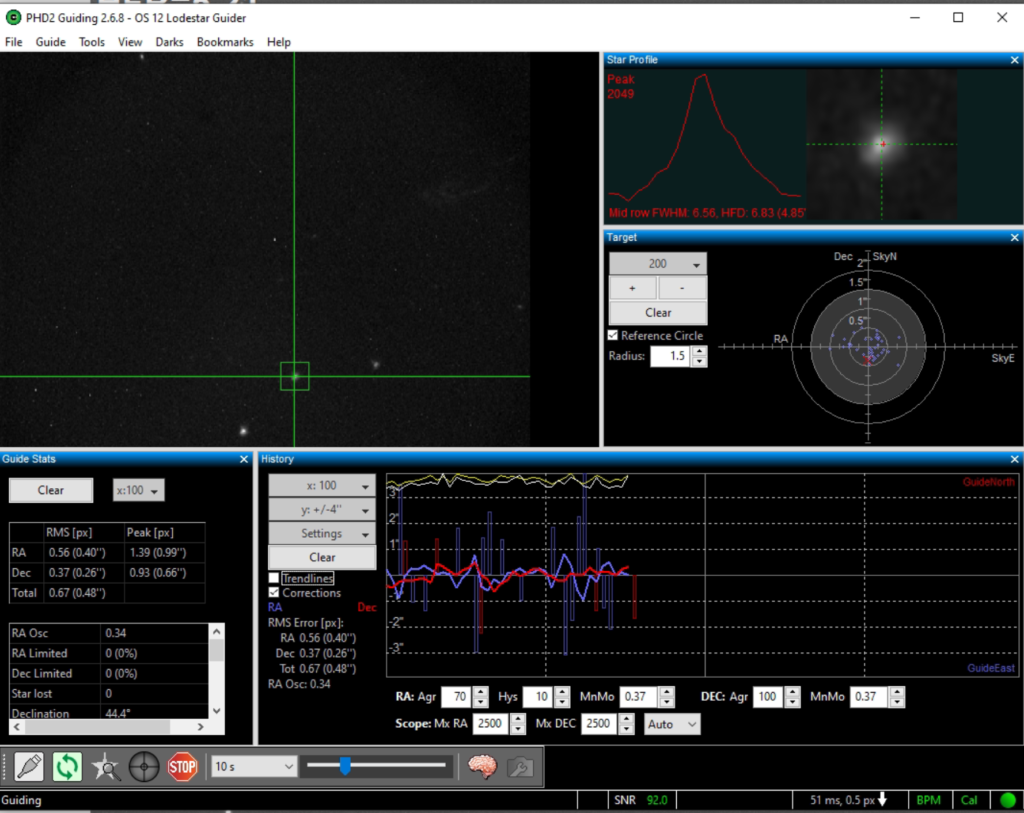
Good calibrationGood guiding after good calibration
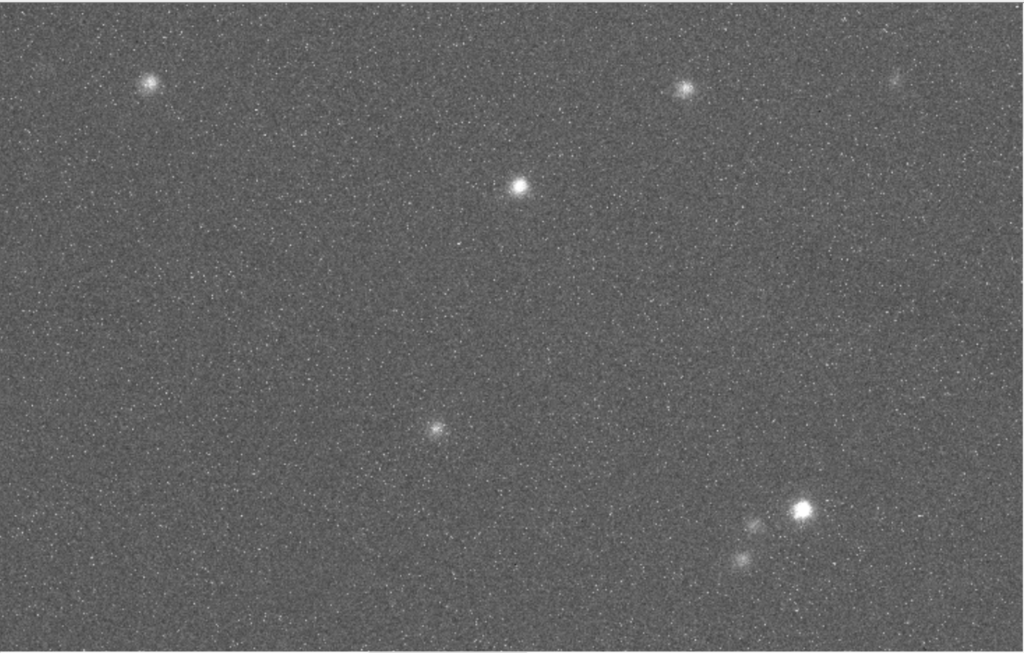
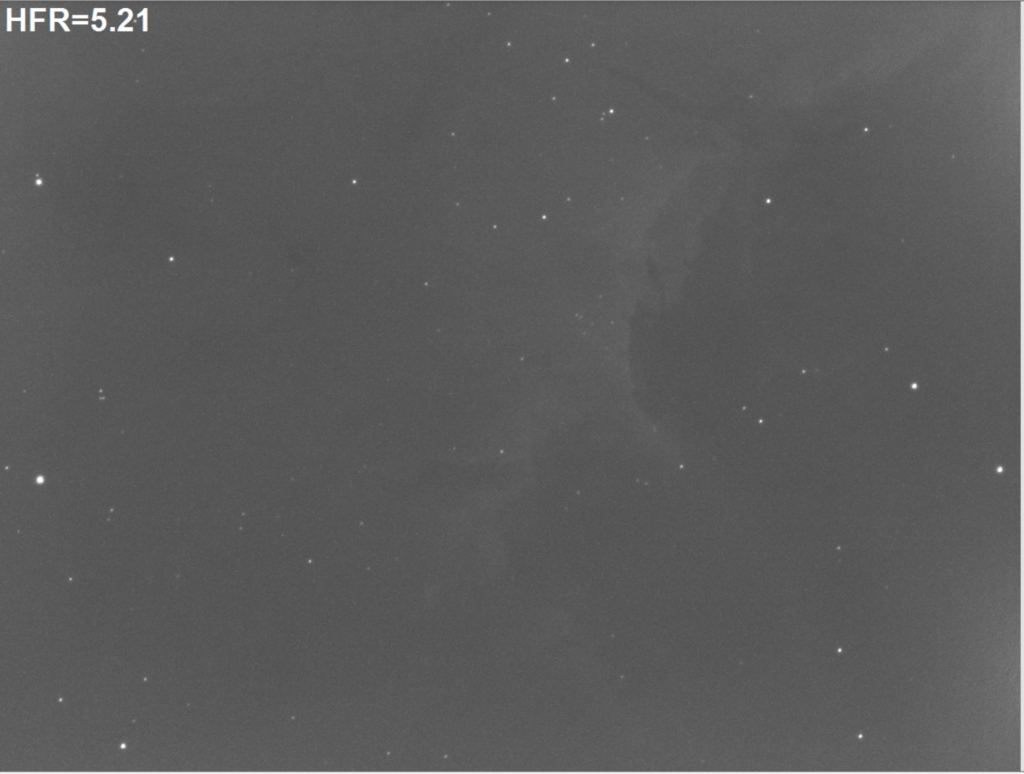
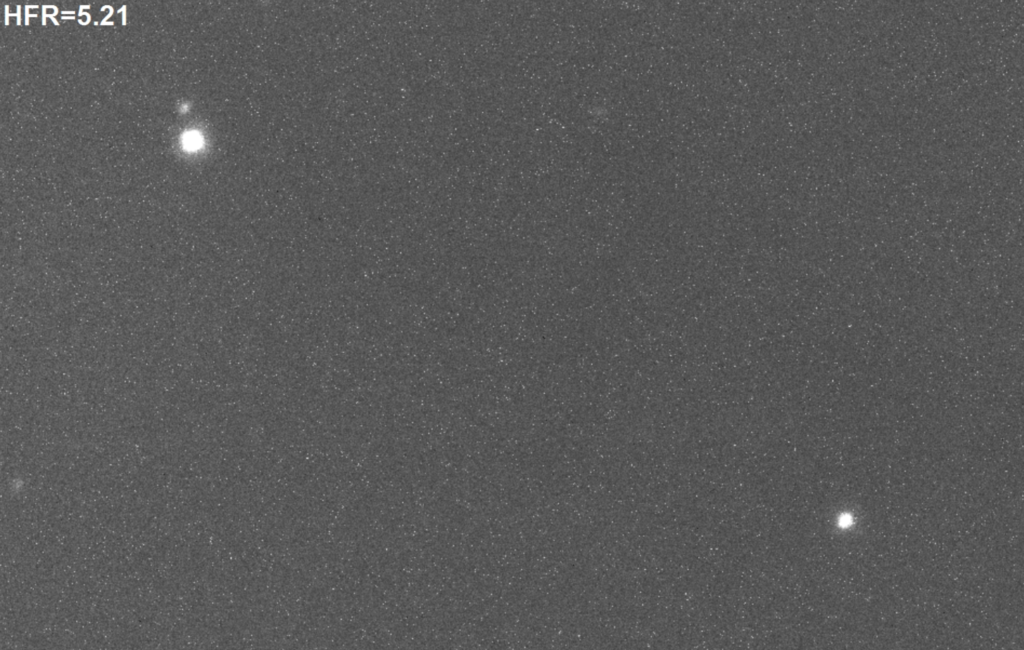
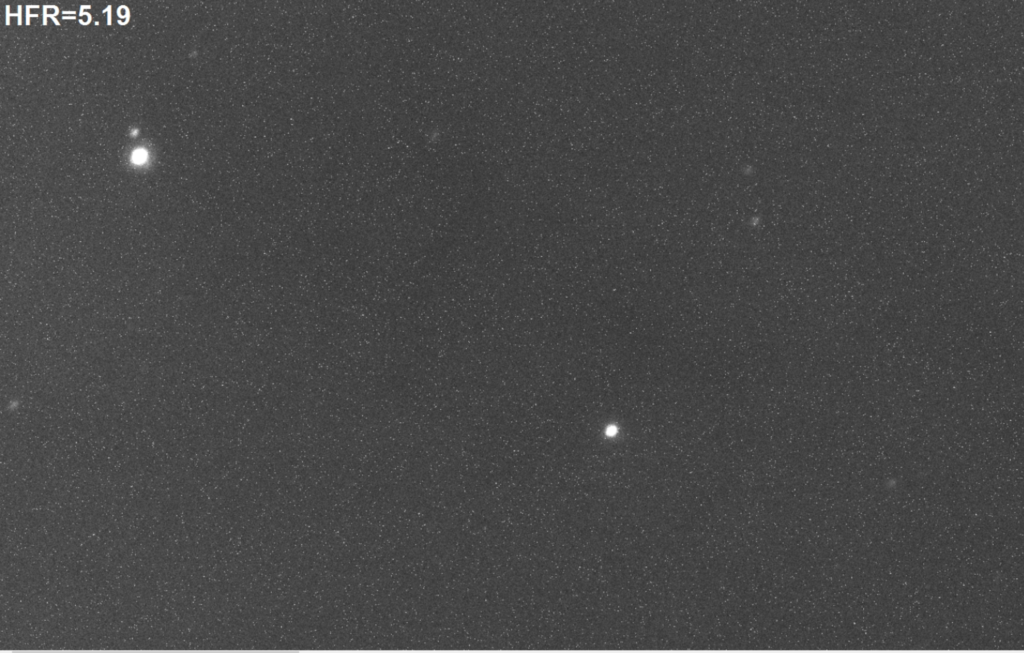
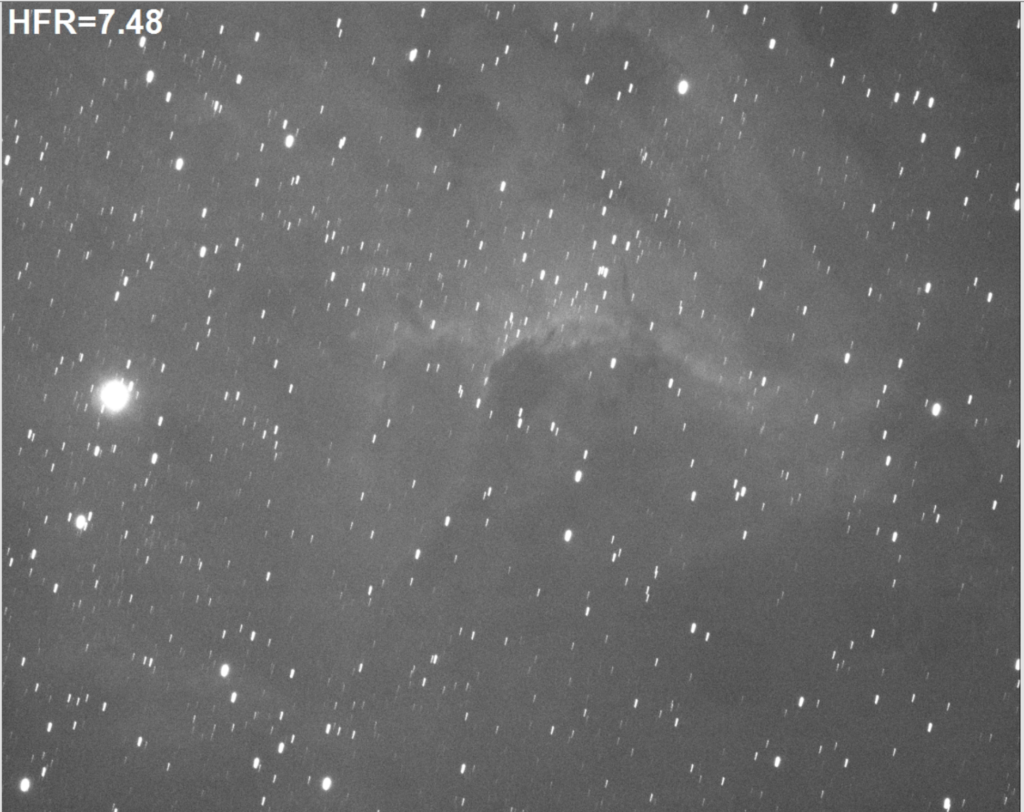
I then refocused on Lum and then switched to Ha. This is the image after 300s with a much better HFR of 5.21
Pelican 300s in focus with no trailed starsClose up of stars from 300s image
When I had a bump in the seeing (assumed) the PHD2 graph looked like this
PHD2 graph bump in seeing
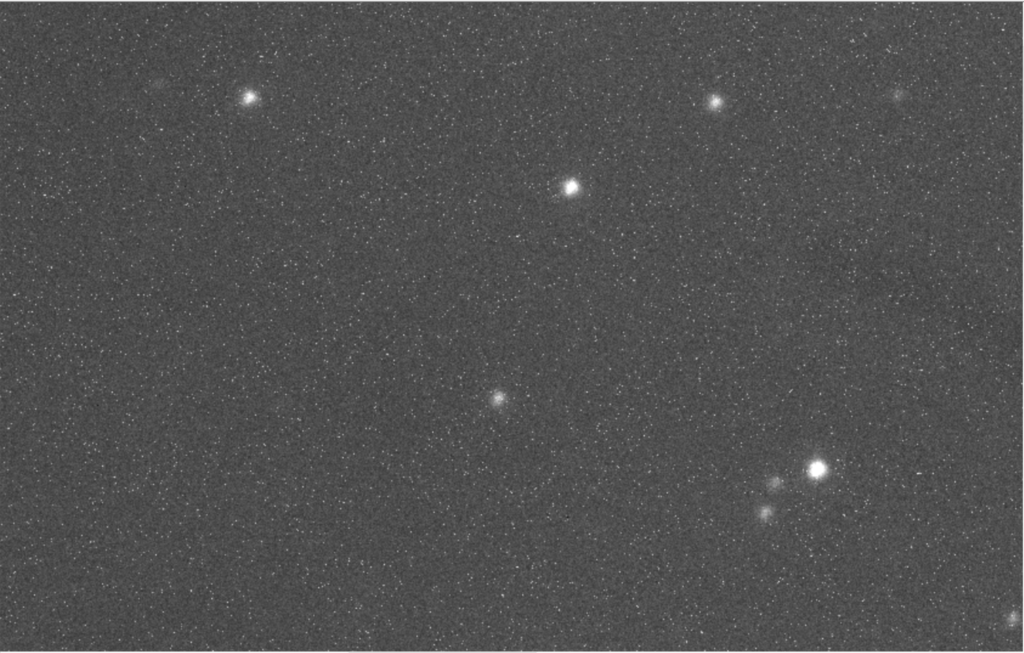
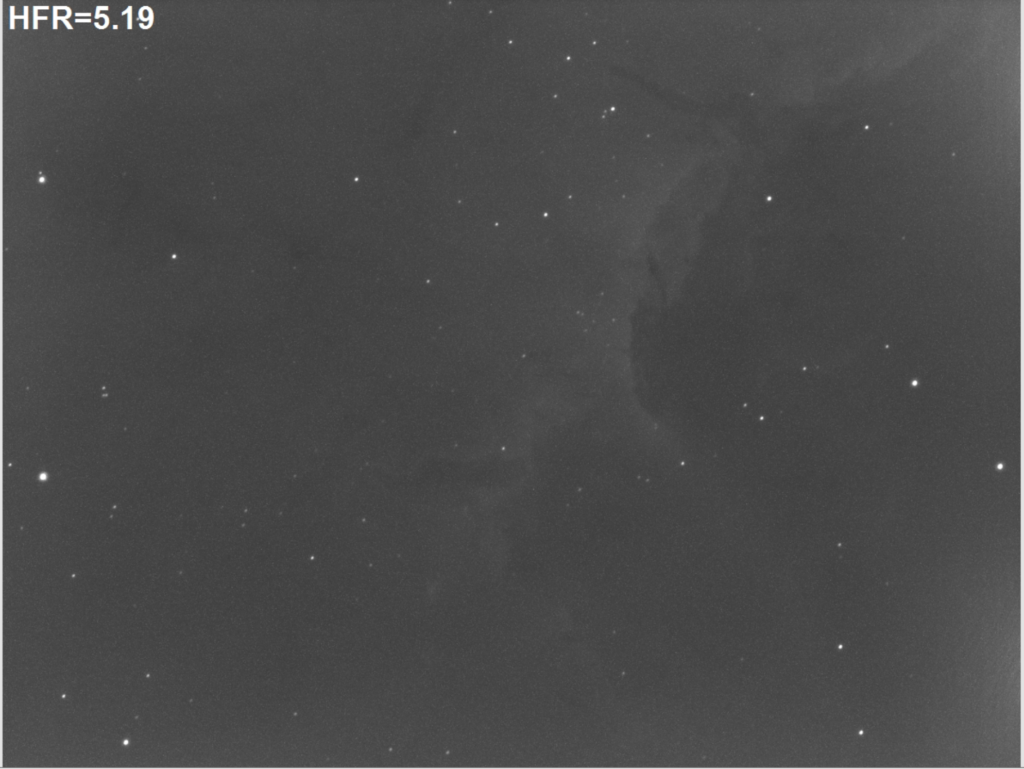
the resulting image of 300s I was in the middle of looked like this :
Image effected by seeing and bump in PHD2 graph
and zoomed in you can see the problem.
Trailed stars due to that seeing bump
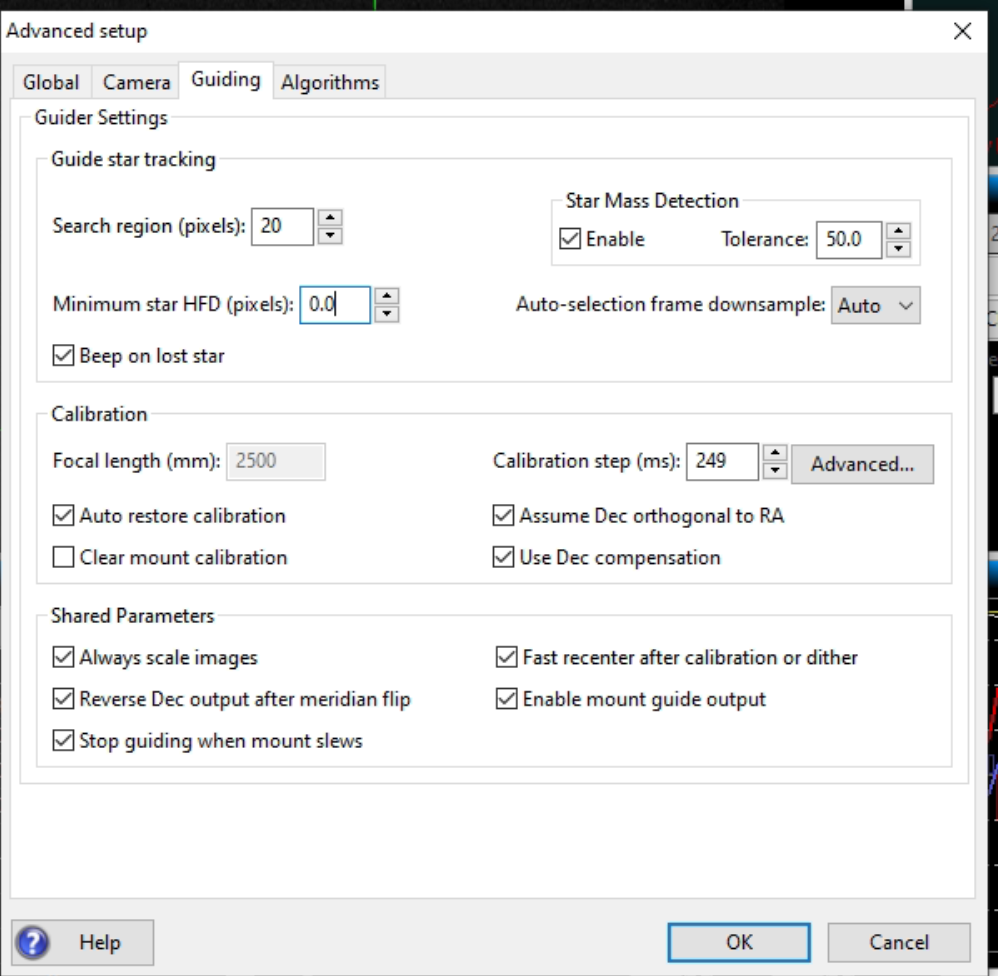
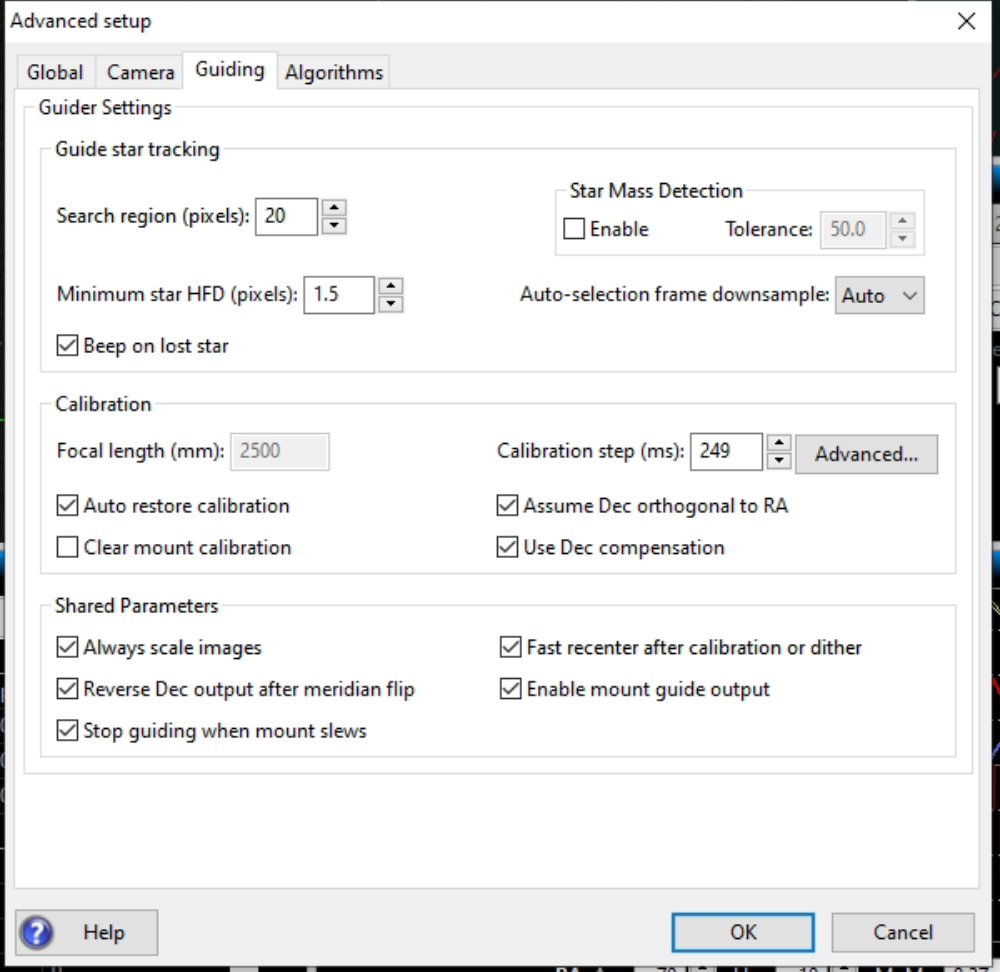
Watching Chris Woodhouse’s excellent YouTube video on PHD2 guiding he has also set the min star size to stop it picking up a hot pixel, something we have seen this evening. He has also disabled Star Mass Detection, which stops PHD restarting if it if it thinks another star has been picked even though it may not have, both of these under the brain and guiding tab.
Settings before the changeMinimum star HFD and Star Mass Detection changes
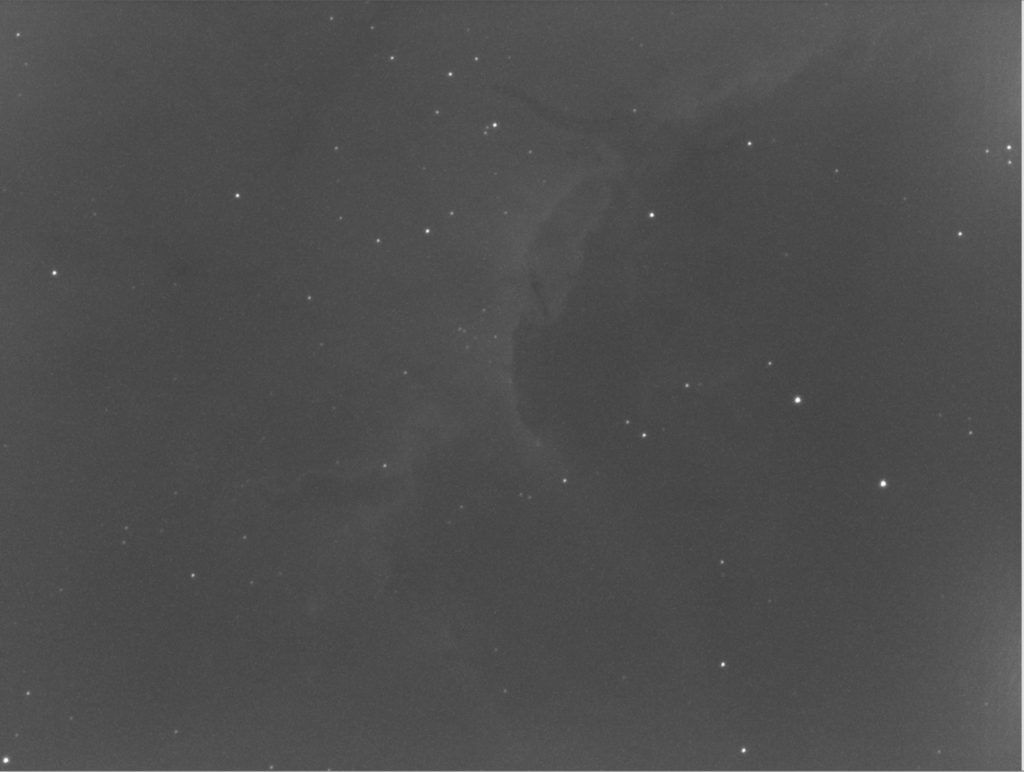
It’s now 2:51am, the sky is brightening but the seeing has settled, the mount is behaving and I am taking 600s Ha images of the Pelican Nebula without any trailing of stars. The odd spike sees a jump up to 3 arcsecs occasionally.
600s Pelican in Ha with good guidingClose up view of stars at 600s
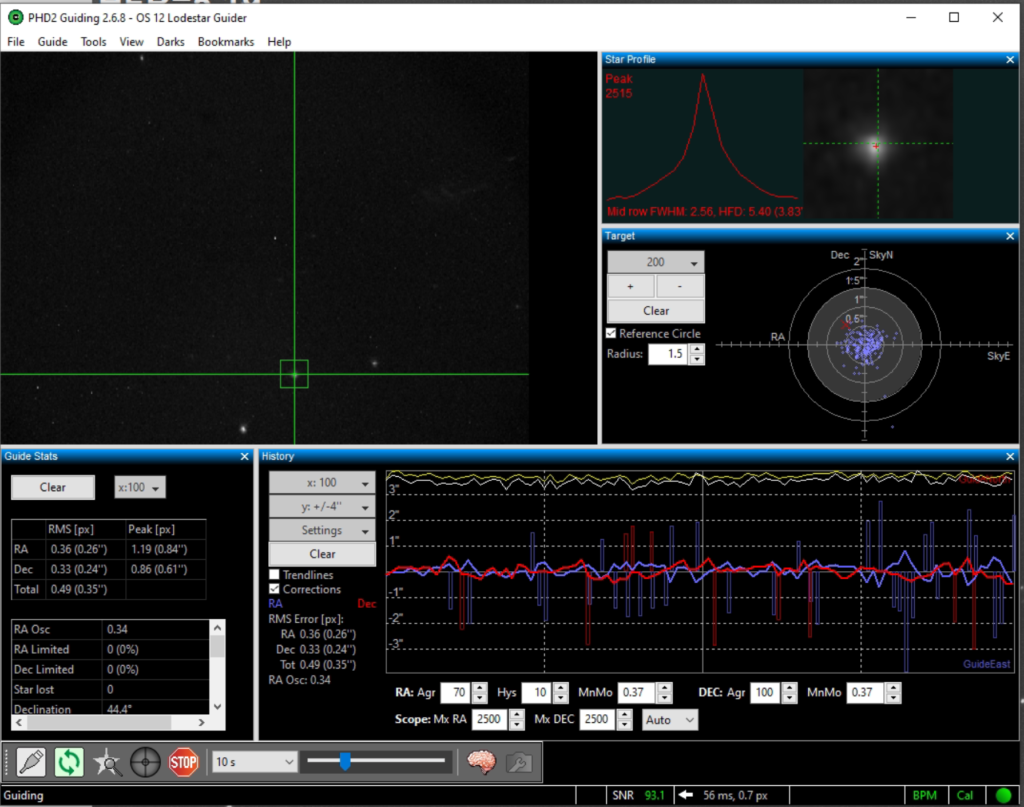
The guiding graph below shows a really good small RMS below 1 which is key.
PHD good guiding below 1 RMS
So by 3:19am the sky is really getting bright and showing on the SQM as 18.6 and dropping fast. I have stopped guiding and imaging and will now head to bed. The final focus position for Ha was 59925 so I can grab flats tomorrow! I will then take a look at the Esprit120 tomorrow night.
Esprit 120 FHR was 1.99 for Lum and 2.54 on the Ha
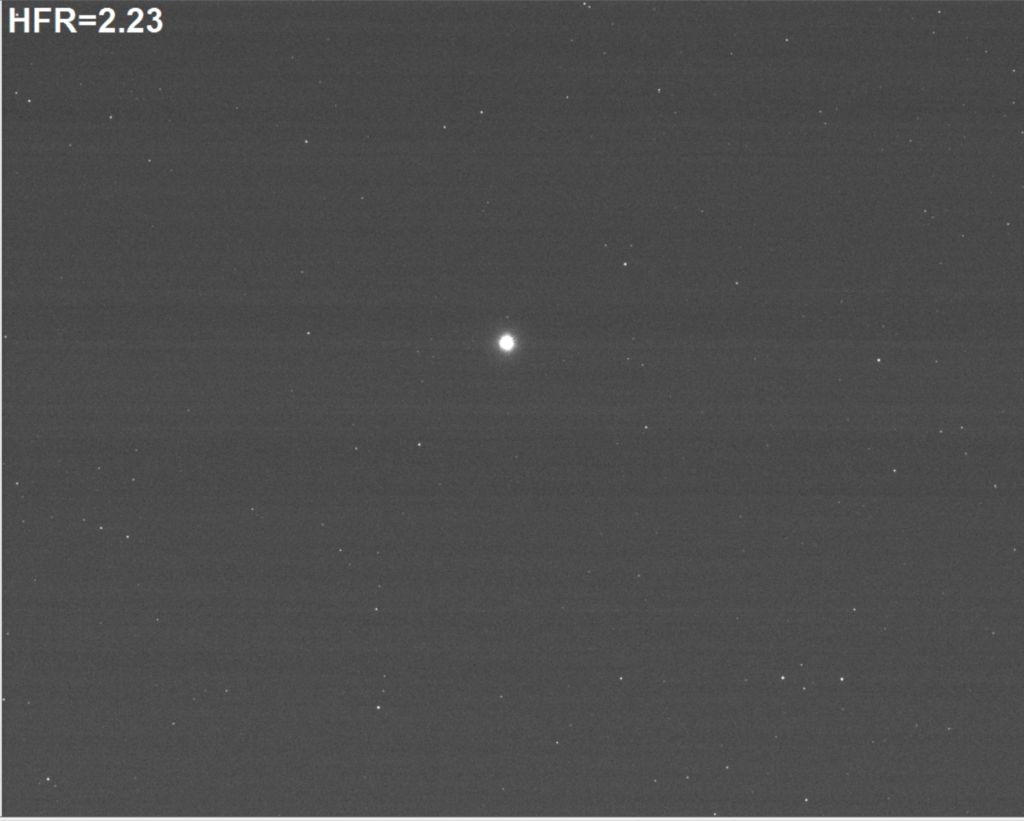
Focused on Deneb , 30 seconds exposure produced HFR 2.23
Deneb – 30 seconds in Ha
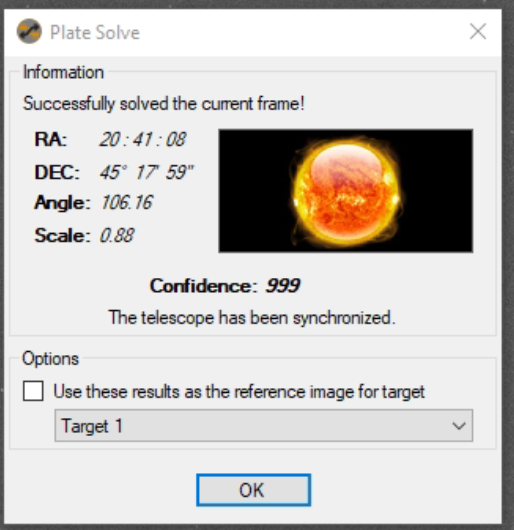
Solve and Sync
Solve and sync completed on Deneb in Ha
The focus point for Ha was 6217
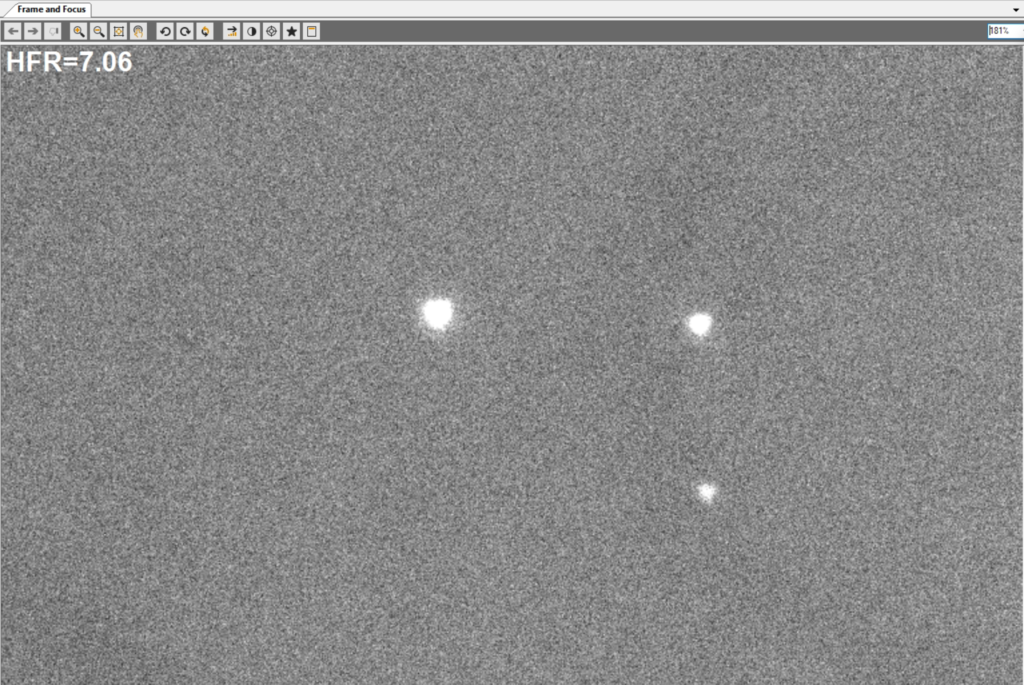
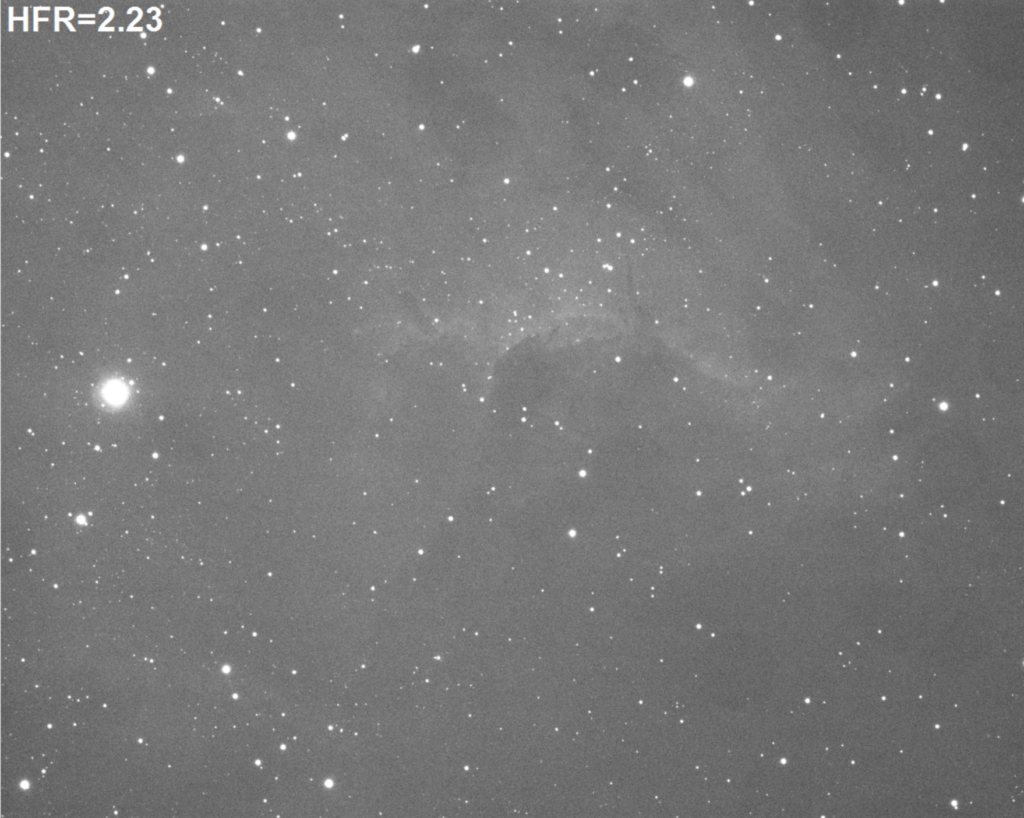
Now for a quick frame and focus, 30 seconds exposure
30 seconds Ha on Pelican as Frame and Focus test
That looked good, next up was to see if we can image for 5 minutes unguided and see what the resulting image looked like
300s Ha Pelican
Again the resulting image looked very good and no star trails
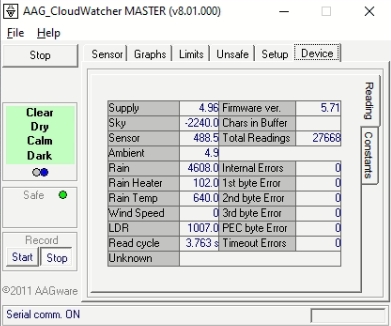
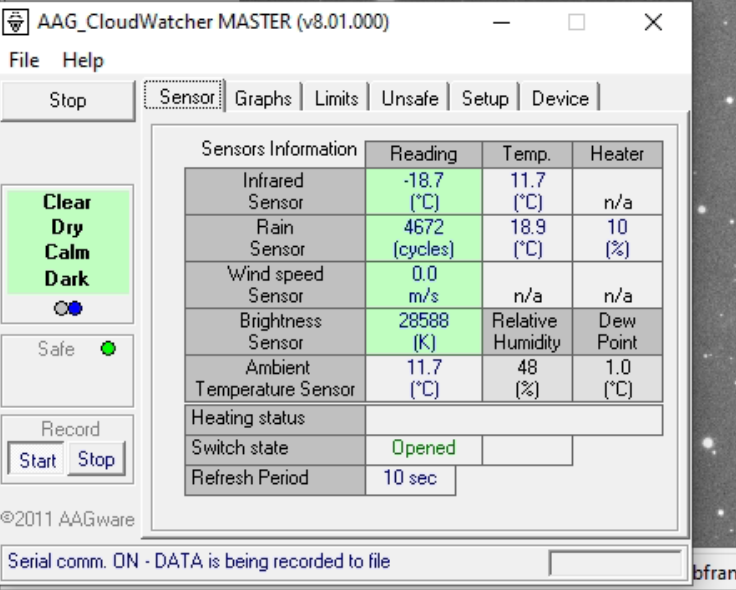
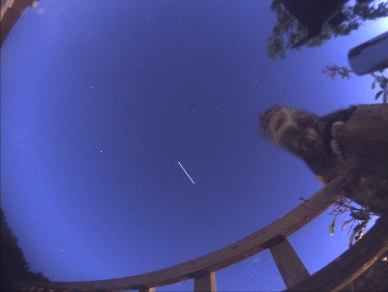
Clear skies with -18℃ measured by the Infrared sensor on the AAG Cloud-Watcher.
AAG Infrared sensor read -18c so zero clouds
I then tried a 10min image but got clear trailing.
Star trailing at 10 minute exposure
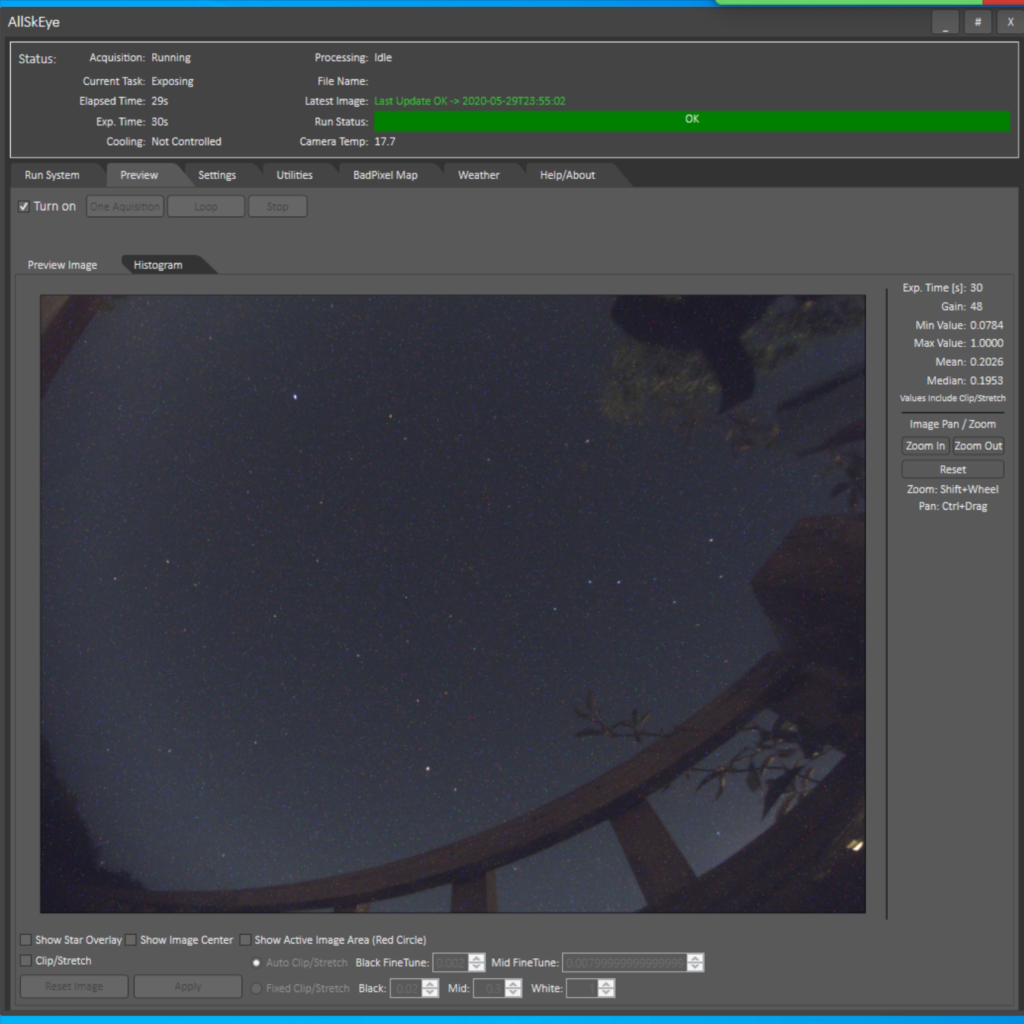
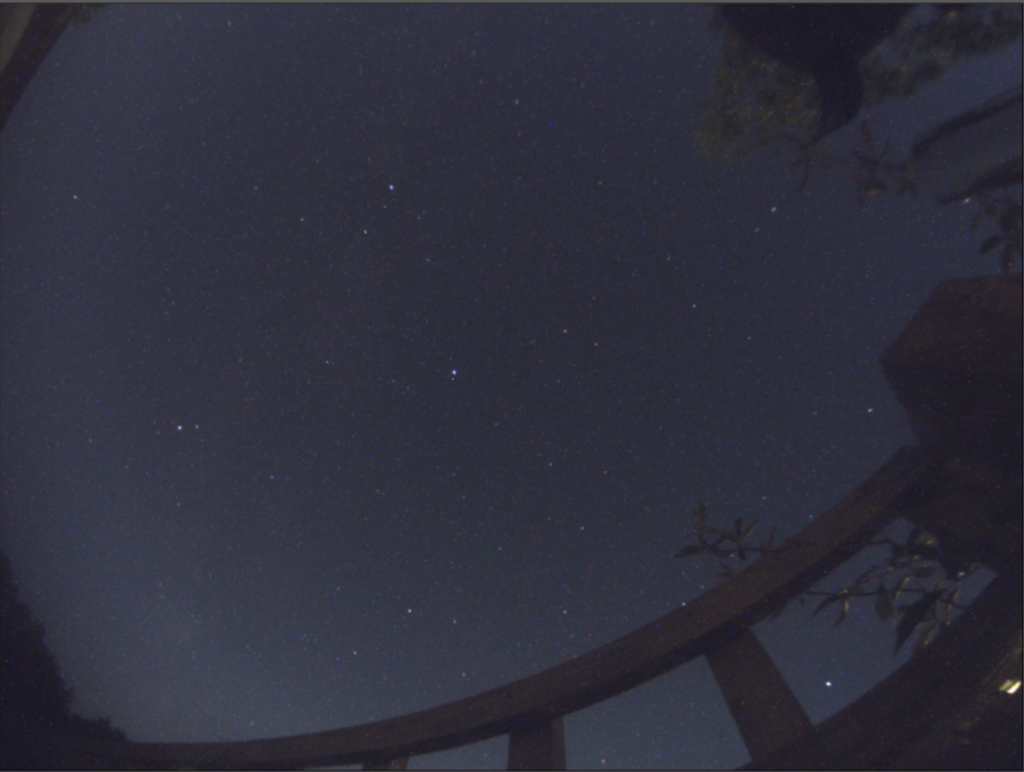
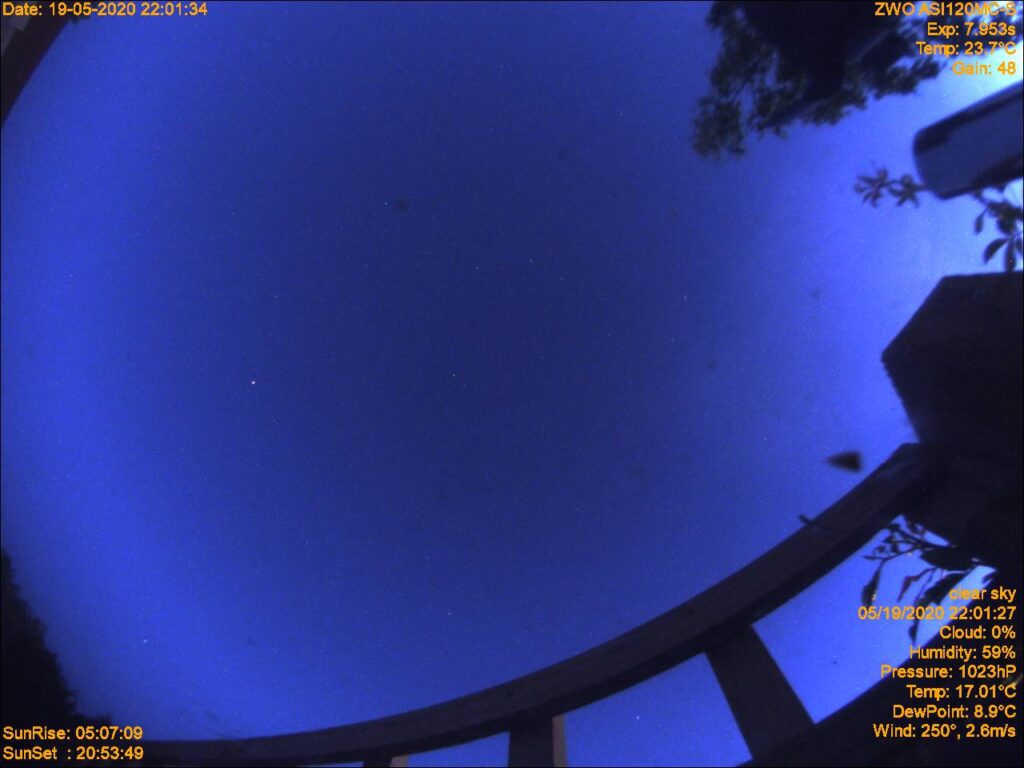
So I set the guiding up with PHD2, went out to the dome and created a dark library as this was not done. I then set about training the guider and then set it running, initially with a 4 second exposure. The resulting guide graph looked a bit bumpy. The ASC looked very clear this evening which was the first time in a while. You could see stars to the left hand edge of the image which is normally obscured by cloud.
ASC Clear skies
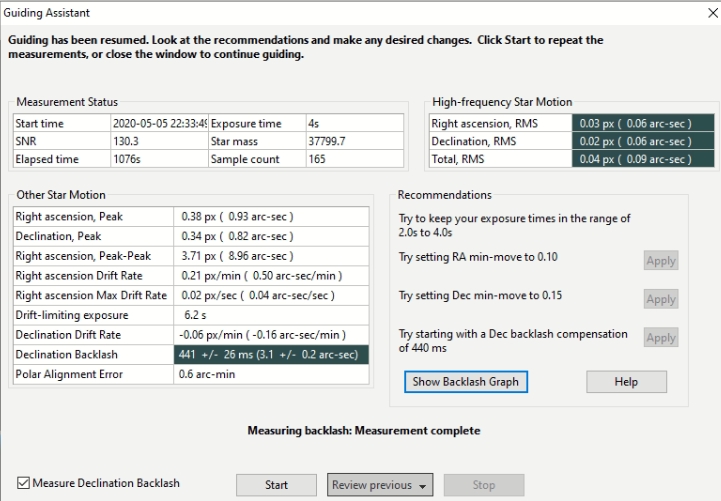
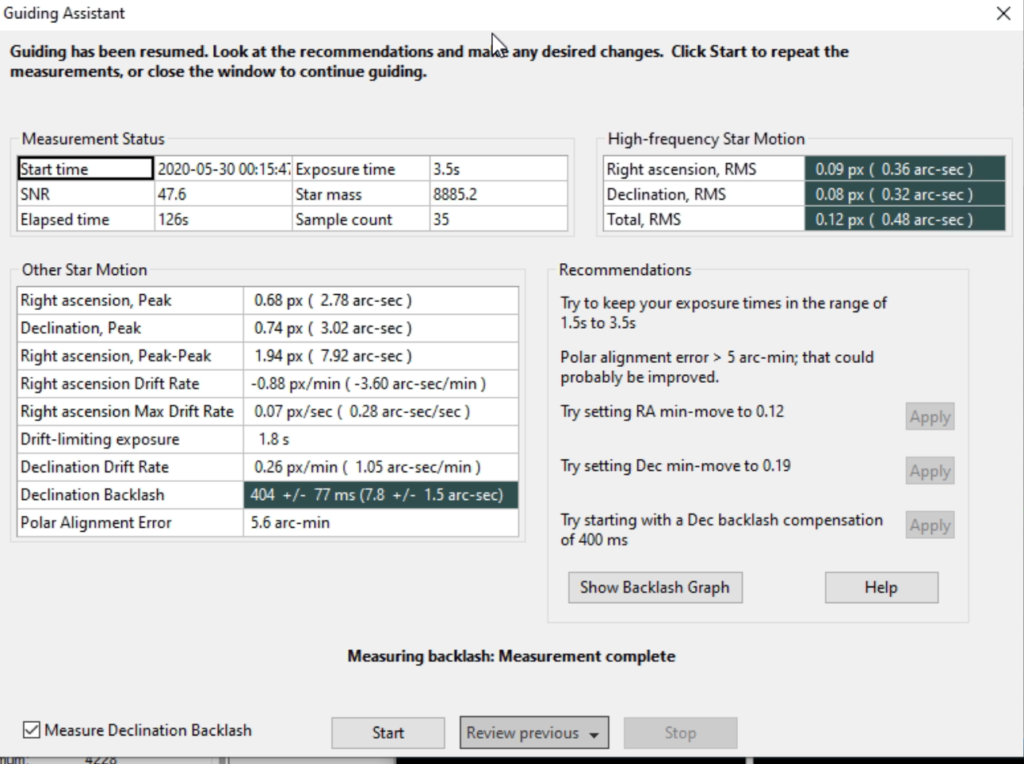
We decided to run the guiding assistant in PHD2 and see if there were any changes that needed to be made. It came up with some suggestions including redoing the calibration and changing the calibration step size from 1600 to allow more steps in the calibration, in this case I changed to 1200 to try and go from 3 steps per axis to 8, however I got to 6 steps and this seemed good enough. When I then reran the guiding assistant I no long got the error about calibration. I did have a few suggestions as seen below which I applied.
Guiding Assistant recommendations
So the changes made still have not allowed 10mins images, they are still trailed. So that I do not waste any further time this evening I captured 5 minute images instead of 10 minutes and I will relook at the guiding next week when the Moon get brigheter.
At 1:38 we gave up on guiding and switched to 12″, Autofocus on Lum, 63384 HFR 5.4. Took some 5 minute and a single 10 minute frame guided, scope trailing ?
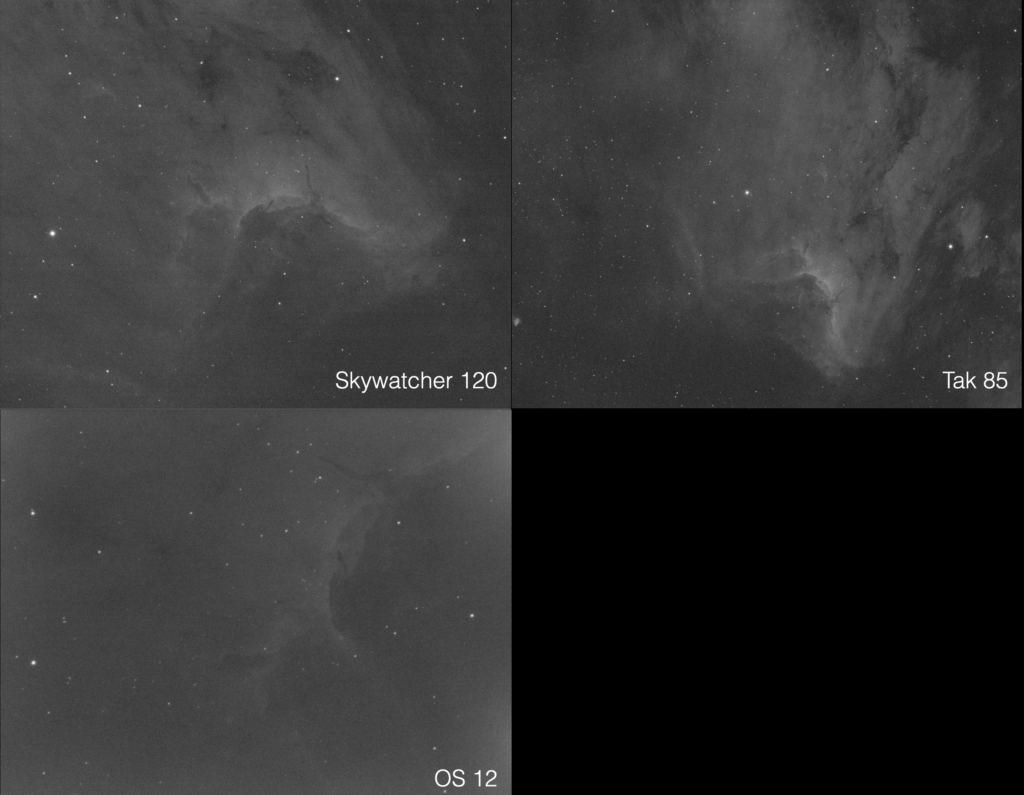
There were three scopes on the Pelican Nebula (IC5070/IC5067) tonight as GingerGeek was imaging with the Tak FSQ85 from his back garden.
3 Different image scales from tonight
Finished to go to bed at 2:56 am, GingerGeek finished the session by taking flats, warming up the CCD and bringing the scope indoors just after 3am.
Rough stack of Ha (5nm) 10×600 seconds, -15℃ From the FSQ85
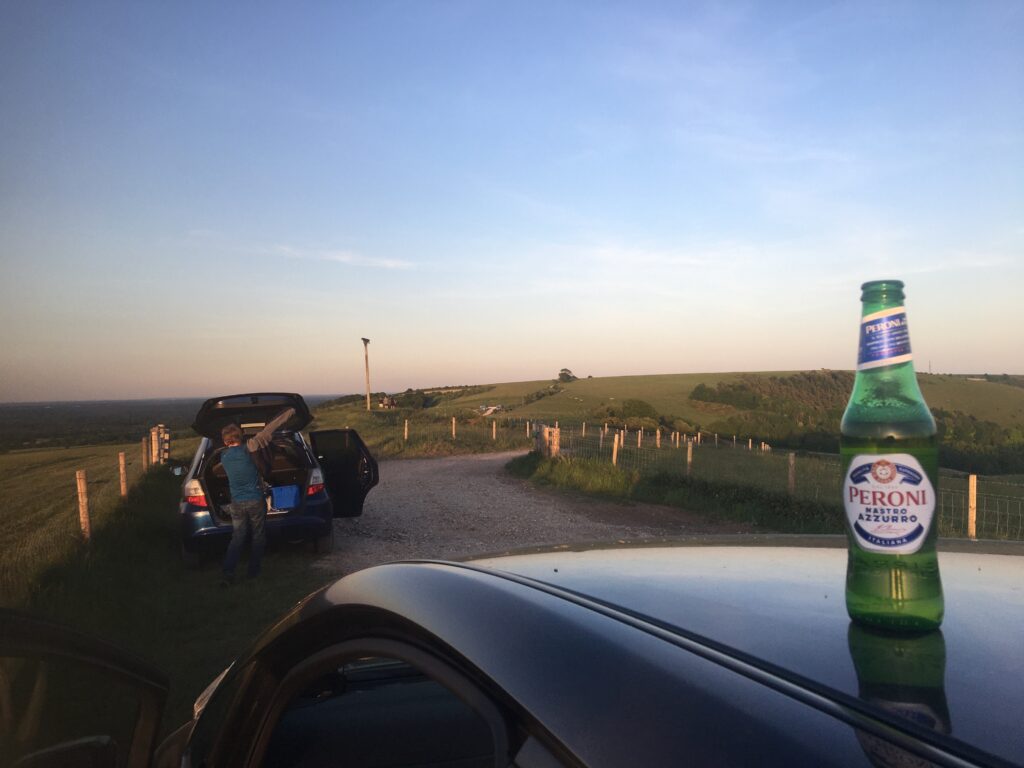
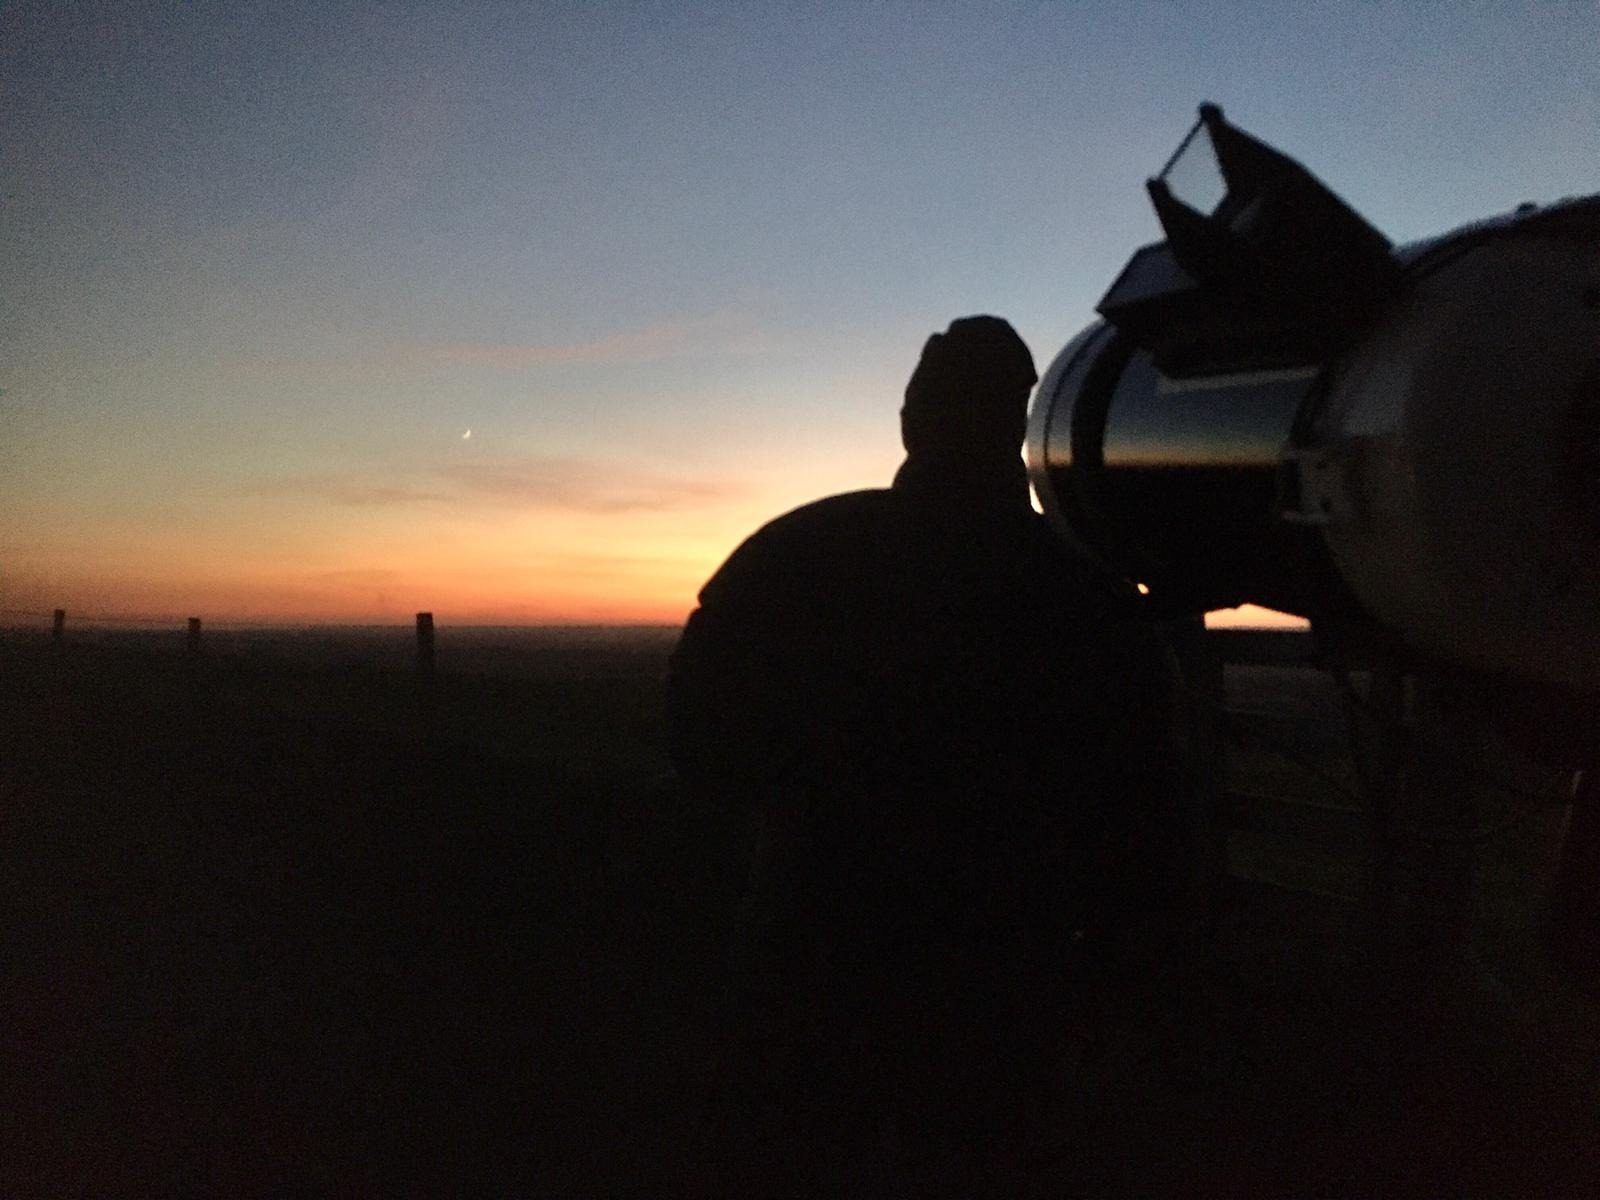
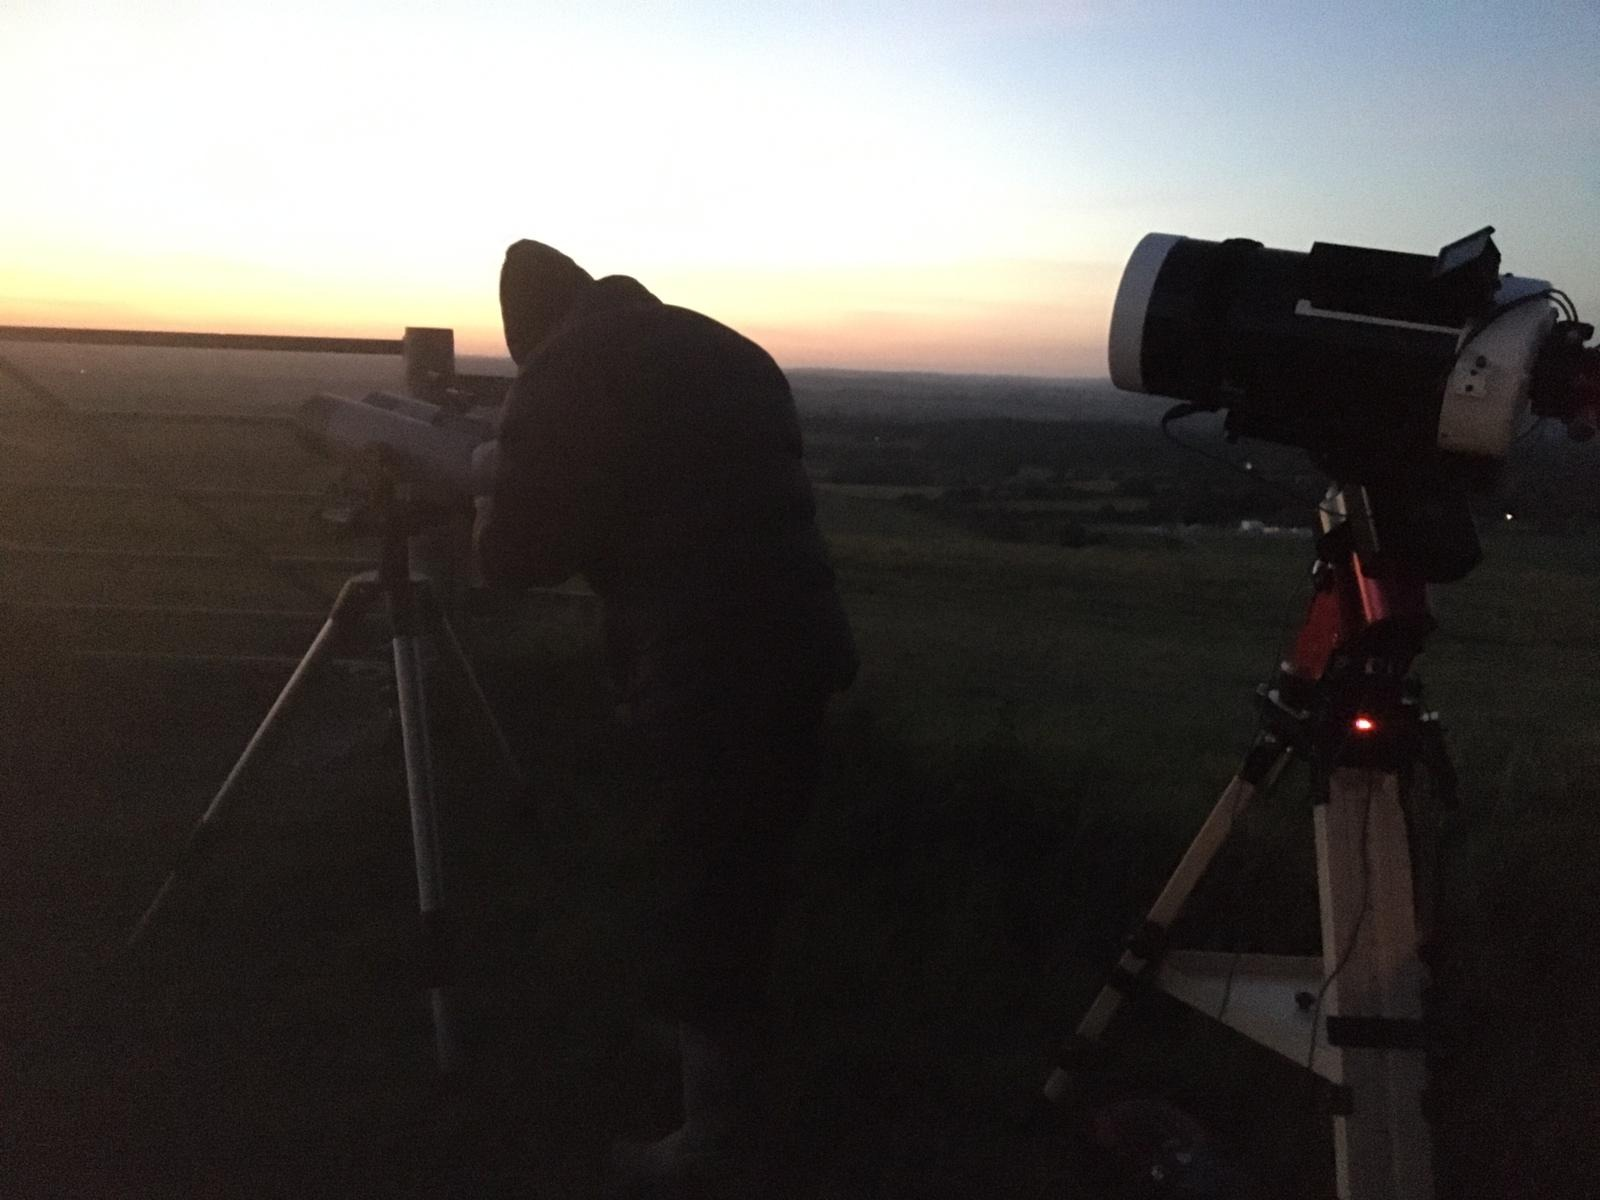
Another visit to Combe Gibbet tonight with another astronomer, GingerGeek. After forcing him to leave the comfort and safety of his own home, where his girlfriend gives him tea, coffee and beer and with the luxury of mains electricity, he joined me at the very dark, very blustery sight near 1,000 ft up in the North Downs of Berkshire, formally Hampshire, they moved the line!
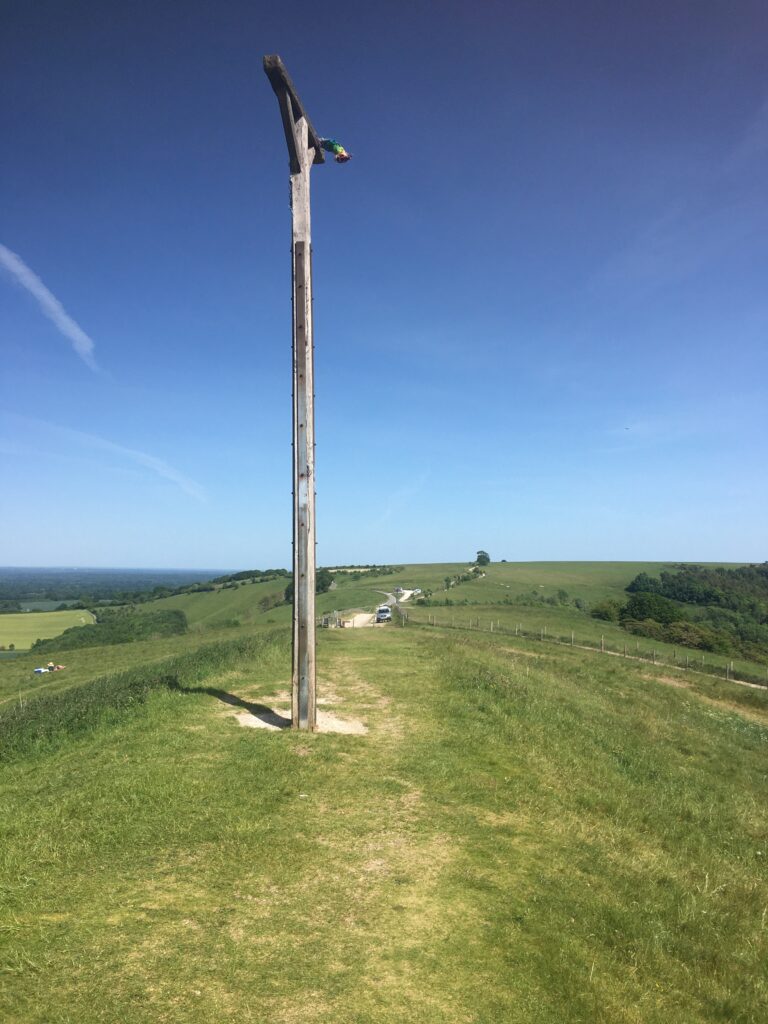
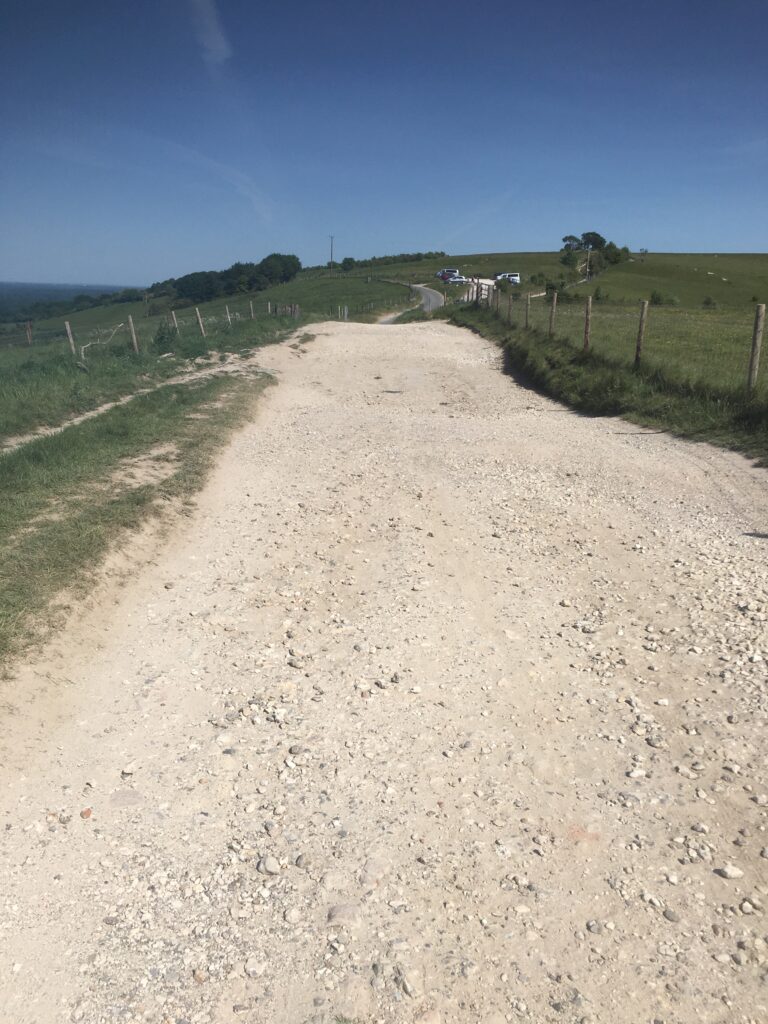
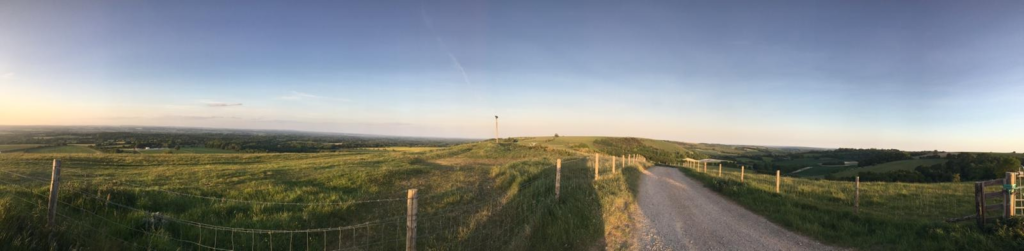
We left at 7:30pm and after the 50min trip arrived at the long road up to and past the Gibbet, which is really not much of a road at all.
Not a road, looking down the bottom part of the track
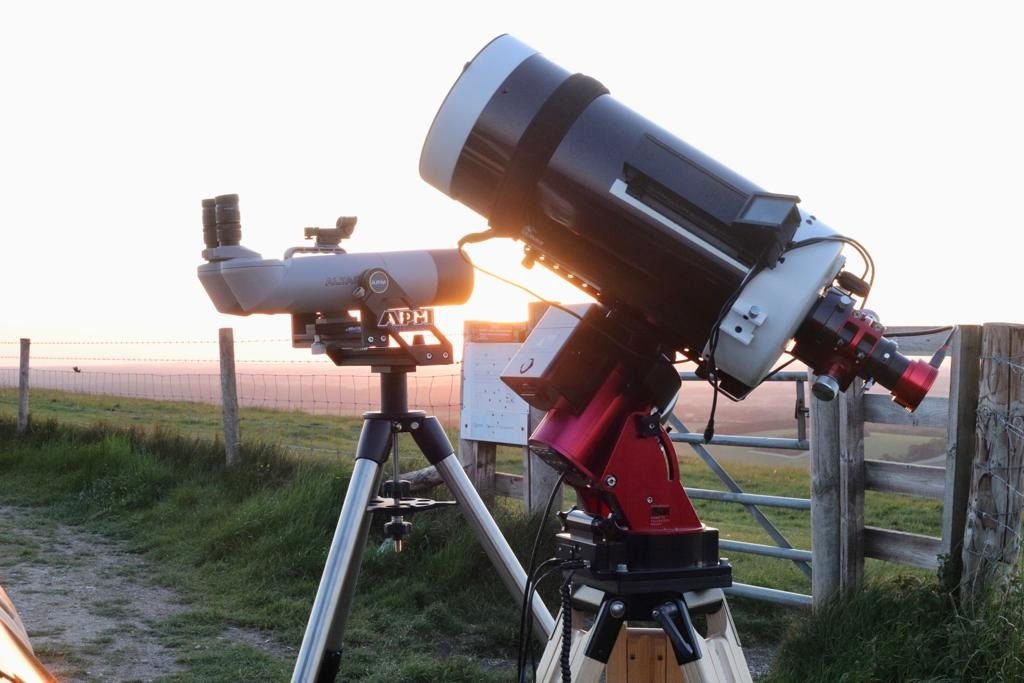
We drove carefully to the top, both parked our cars and set about setting up for the evening. GingerGeek had his Tak FSQ85 on his CEM 60 iOptron mount whilst I setup my usual array of large 4″ binoculars and at first the Mak 180 on the Paramount MyT. Later I would swap to the Esprit 120ED. To celebrate the outing, little geek had brought some beer 🙂
Beer O’Clock!
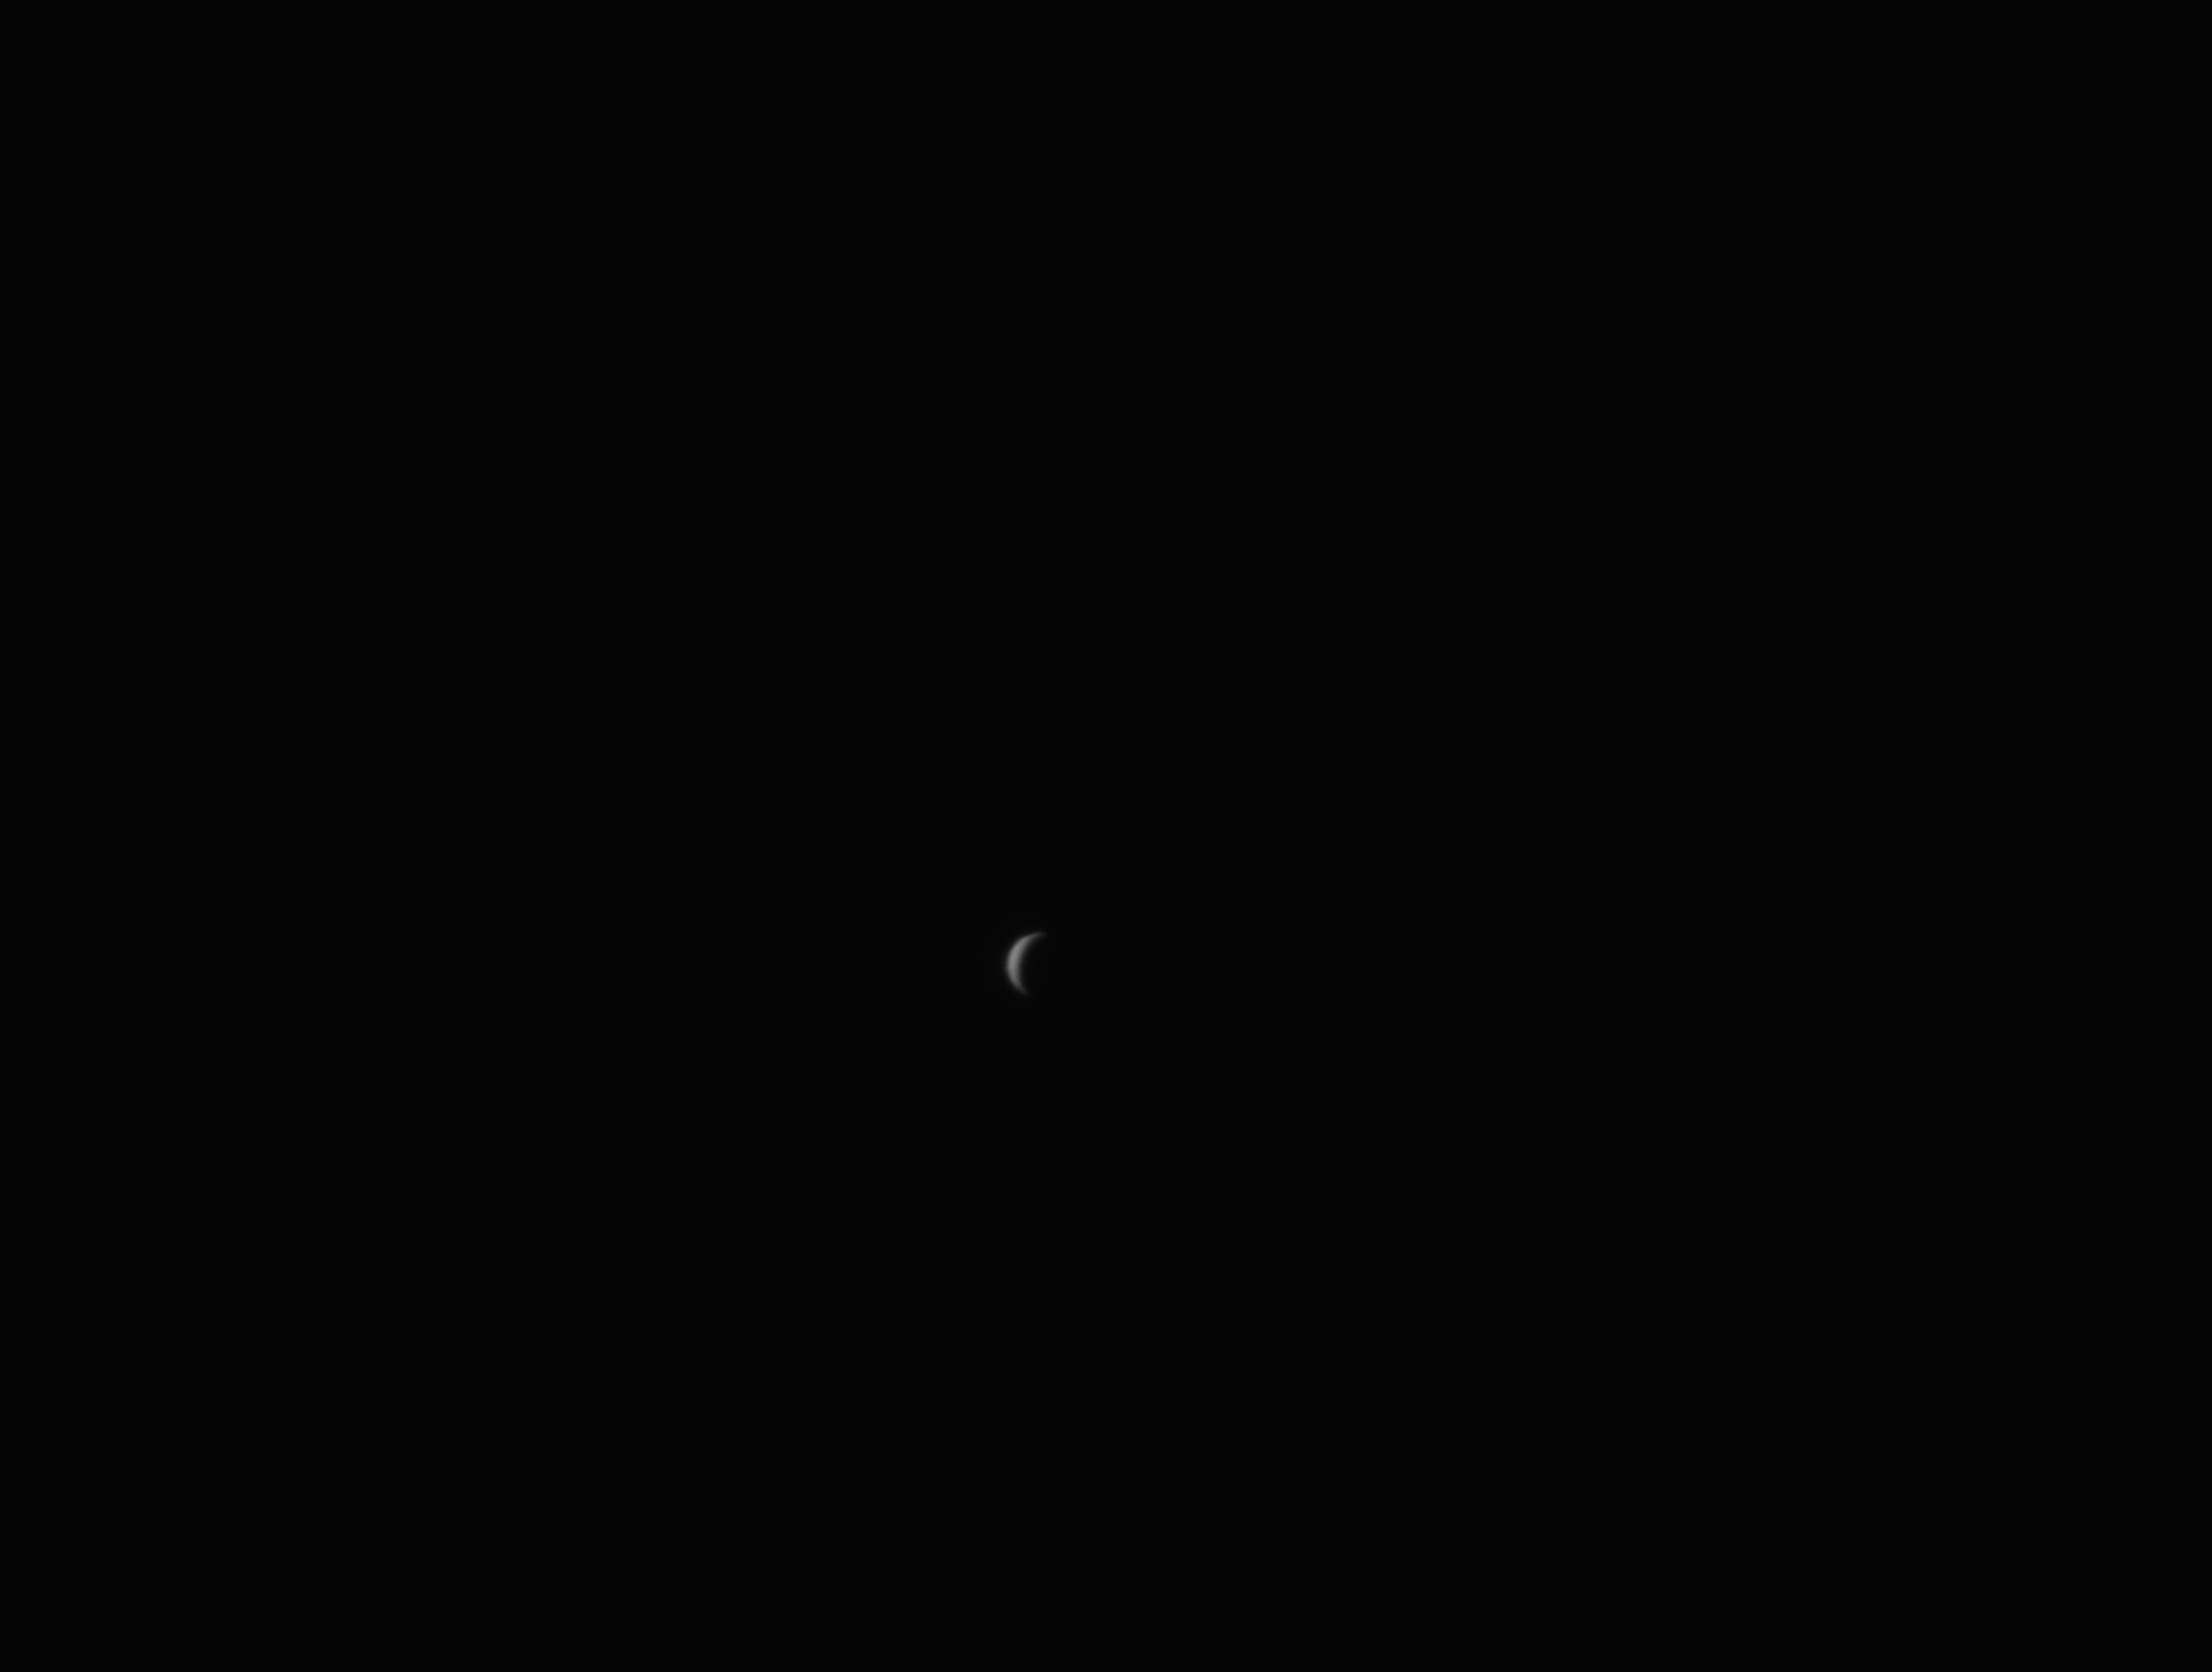
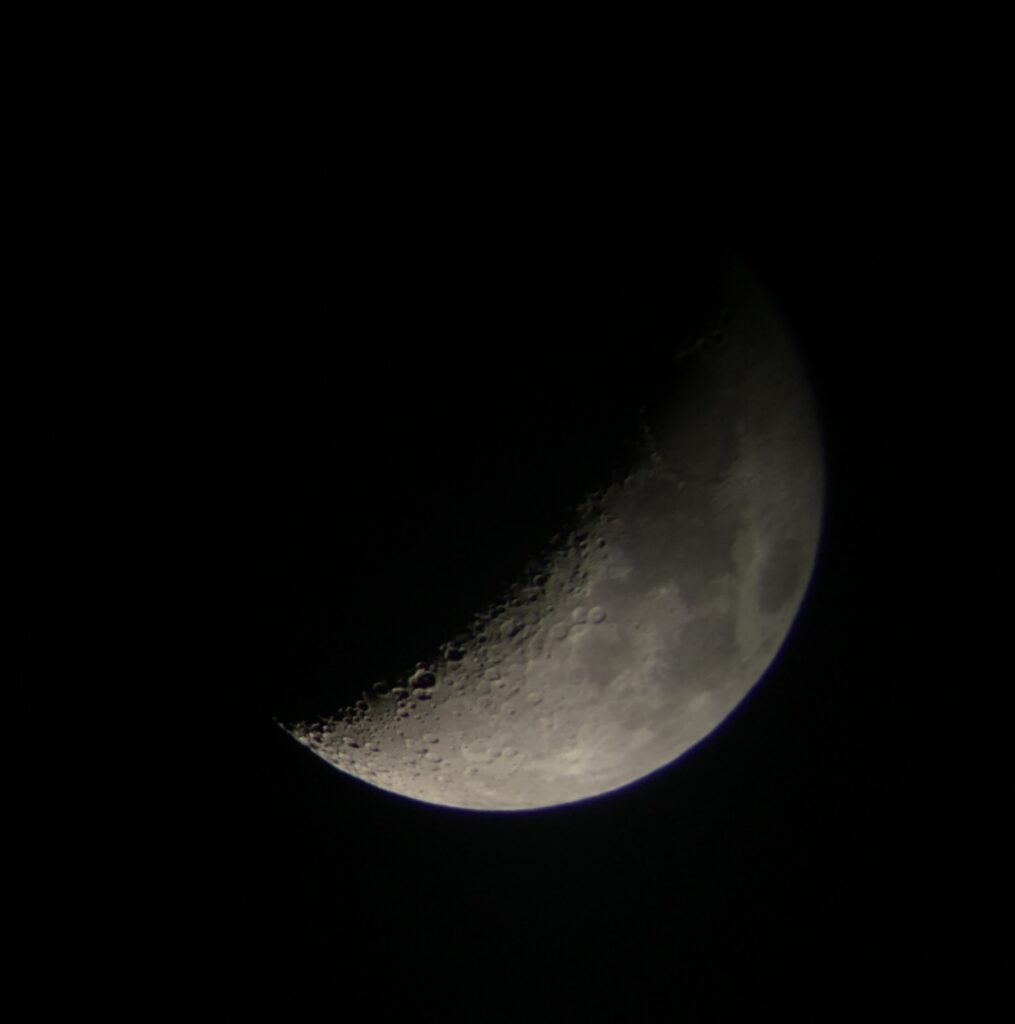
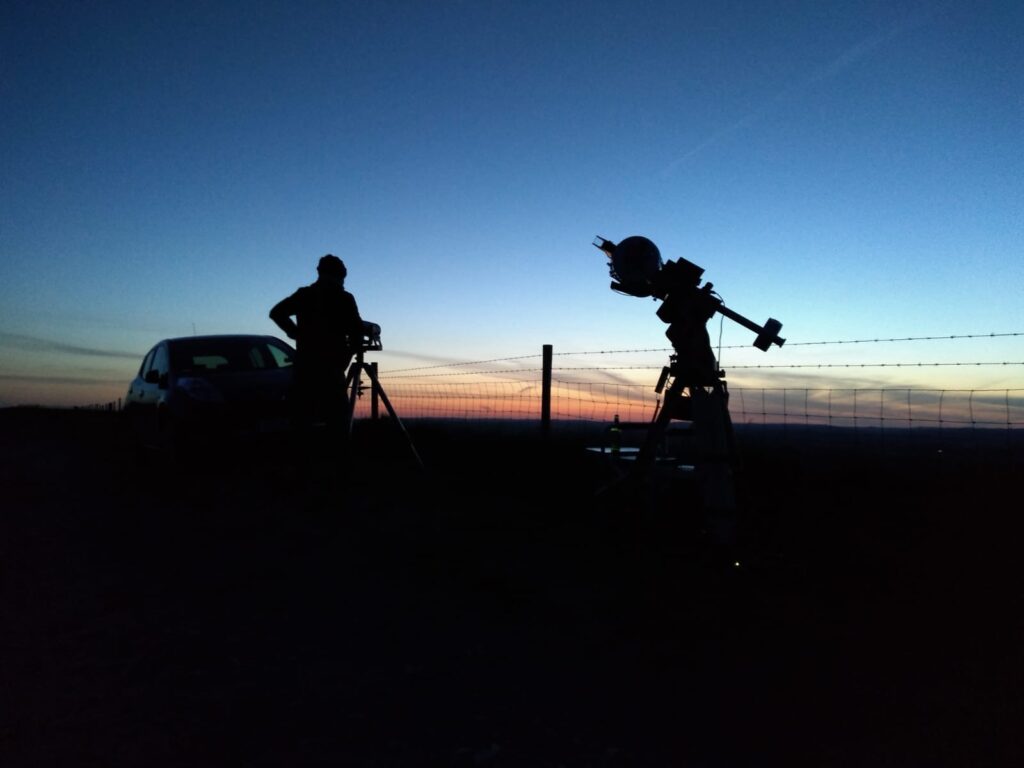
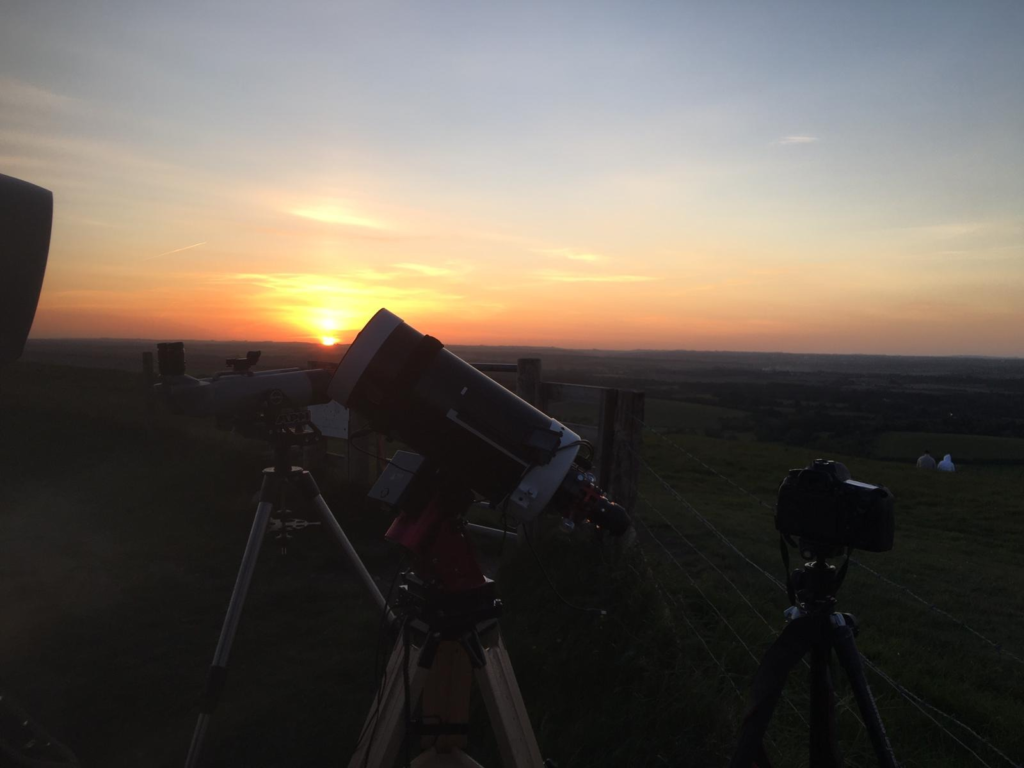
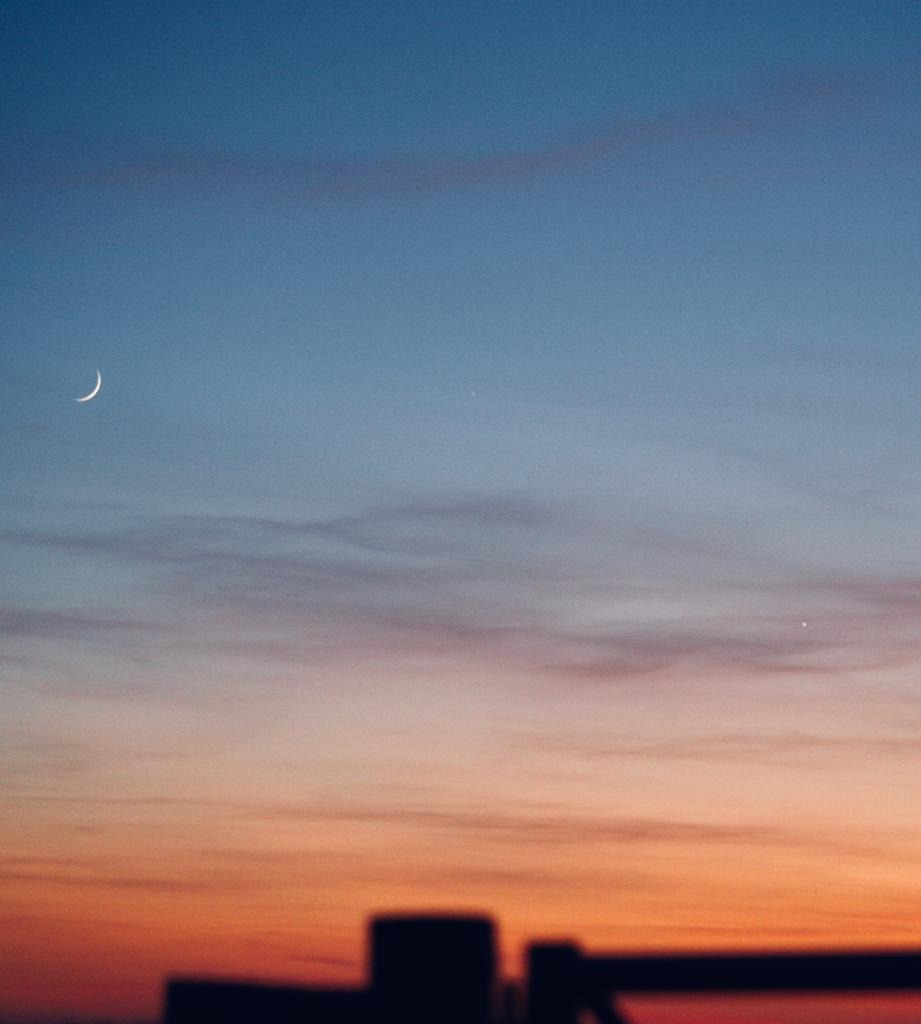
The Sun soon started to set, the day trippers hung around to watch the sunset and then were gone. I started looking at the Moon through the Altair Astro binoculars which is just a wonderful sight. A Camera cannot capture the experience of seeing the Moon with its Earthshine and in full as the FoV is 1 degree in the binoculars was a wonderful framing.
Moon through binos taken afocal with iPhone 6sPlus
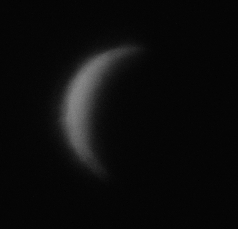
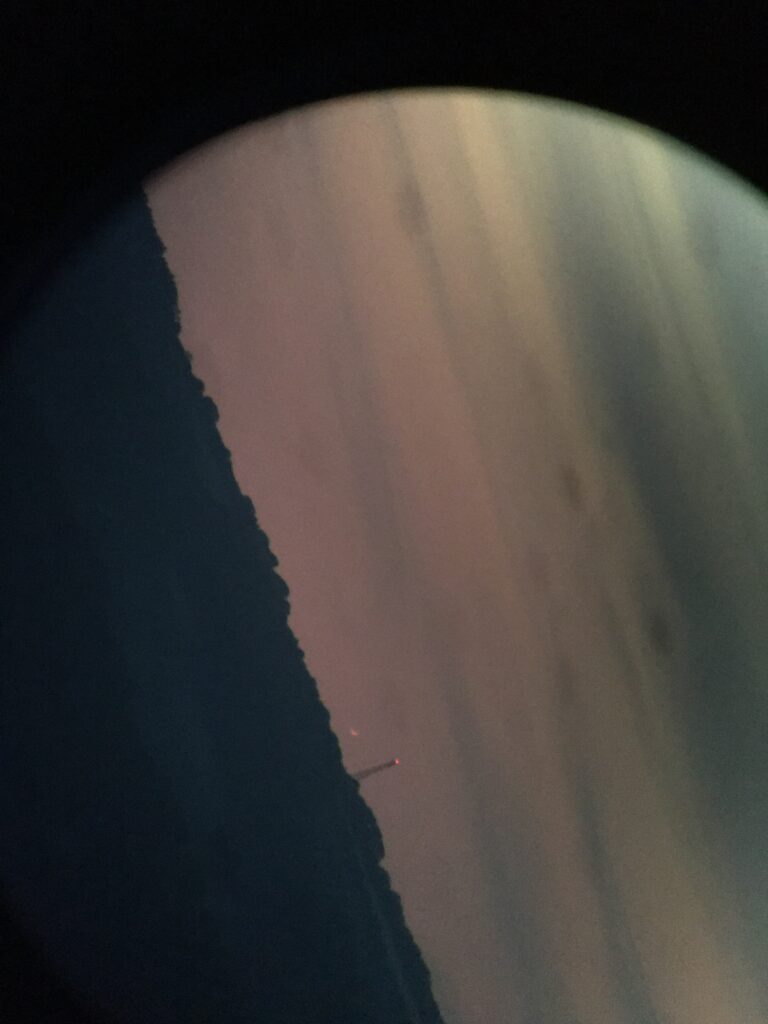
Next up was Venus before it sets, it is amazing just how bright it still is given its phase. I found in the binoculars eventually as it was hidden behind that cloud band in the distance. I then tried to get it in the Mak180, when a few new things happened. Firstly I could not slew to it as I had yet to polar align, so I had to place the scope in the right place. At the focal length of the Mak180, some 2.7m it is difficult to find something faint behind cloud just by pointing. I eventually gave up. I then noticed my laptop power had diminished by nearly 30% over about 20-25 minutes, this was due to Firecapture just hogging the USB bus capturing 100’s fps. So I was going to start the night short on juice! So I turned Firecapture off whilst I went to find Mercury in the binoculars.
Venus through 4″ binos taken afocal with iPhone 6sPlus
Mercury was a challenge, so much so I could not find it, I put that down to that not well placed cloud band. Meanwhile I pointed the Mak180 at the Moon to have a look, but by the time I had finished I the laptop was done to 53% !!!! Not so good.
So it was time to chat to GingerGeek (GG) before I put the Esprit 120 on the mount. GG was having lots of problems setting up. Firstly he had swapped the rings on the mount for the Tak that day and was struggling to balance the scope. It was so bad the scope kept dropping nose first then camera first and then either way depending on its orientation. Eventually, after much cursing, actually a lot of cursing, GG settled for the imbalance and continued to setup, unfortunately not before he knocked his beer over in his boot of the car ? fortunately I did not laugh too much ??
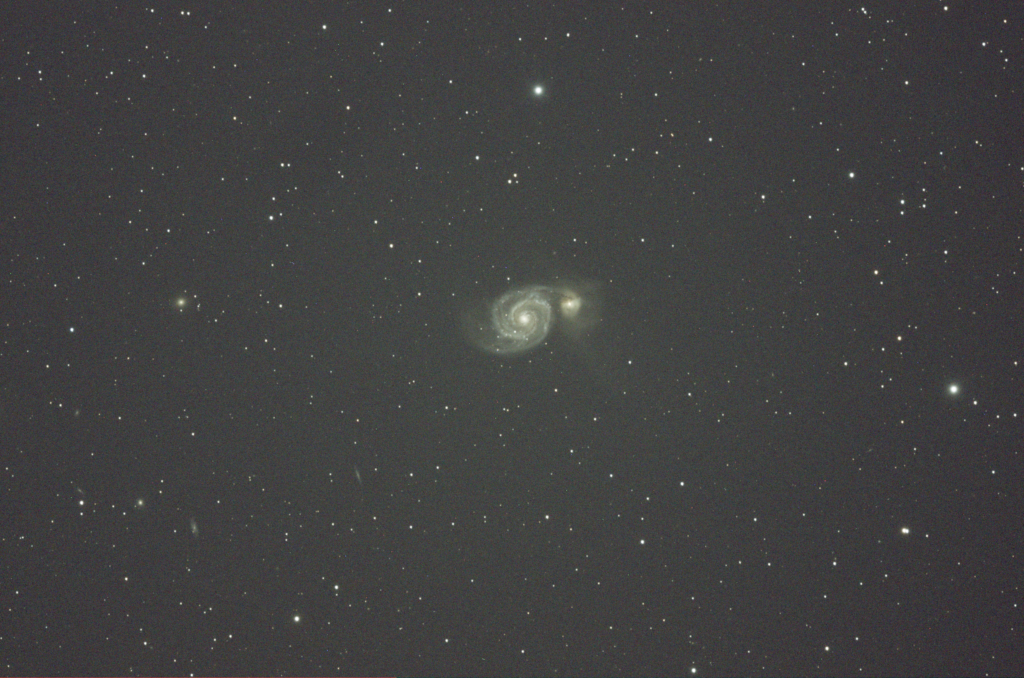
I went back to my setup, placed the Esprit on the mount and then set about getting focus with Ezcap, the software that comes with the ZWO camera. I do find the software very straight forwards and does what it says on the tin as it were. I then slewed to one of the open clusters I wanted to image and realised it resided in the North and that the twilight was still very much apparent so not suitable for imaging. Instead I settled for M51 high up as to the West was the Moon.
M51 300s Image uncalibrated
It is a lovely image at 5 minutes, I could see instantly at least 4 other galaxies and the colour of the main Messier galaxy was very pleasing. I look forward to processing the resulting subs. I set the timer for 1 hour (12x300secs) and went back off for veggie soup, cheese rolls, brownies and coffee that GG had kindly brought along.
crop of uncalibrated 300s M51
GG at this point was having issues focusing for his 5 minutes shot of the Pelican in Ha, he had made some other changes to the software before heading up the hill too which was confounding him. After some more time he finally had focus and started to image. However whilst a few of the images were okay, the resulting imbalance and gusts of wind made it difficult to keep pin sharp images. It should also be notes at this point that GG and I were running from the same car battery, although GG was only running the camera from it, the mount was running from his Lithium battery.
Stunning Pelican Nebula – 300s Ha uncalibrated
At just before 1am the inverter connected to the spare car battery turned off due to loading and power. Everything stopped for both of us ??? however GGs mount kept running due to the Lithium battery. I closed down my setup and allowed GG to reset his camera and reconnect, he then went on to start imaging, however the resulting image had moved significantly and GG decided to give up. So we spend the next 40 minutes packing up. Whilst this was going on we looked at Saturn and Jupiter through the binoculars which was a wonderful sight. Now for the 50 minute drive home to unload the car just before dawn, although by 2am it was clearly getting lighter.
Guiding graph on Esprit 120 Paramount MyT last night, all over the place with wind
The SQM for the site last night was 20.91 although the Moon was very bright. The site is also very dusty, and my laptop was covered in the morning. Another incident was that I inadvertently unscrewed the cover from the guider as I transferred from one scope to another and the glass cover fell out, I now have dust and dirt on the sensor to clean. It is not a great design by ZWO for the ASI290MC as it really needs a locking grub screw to top that happening or a reverse thread.
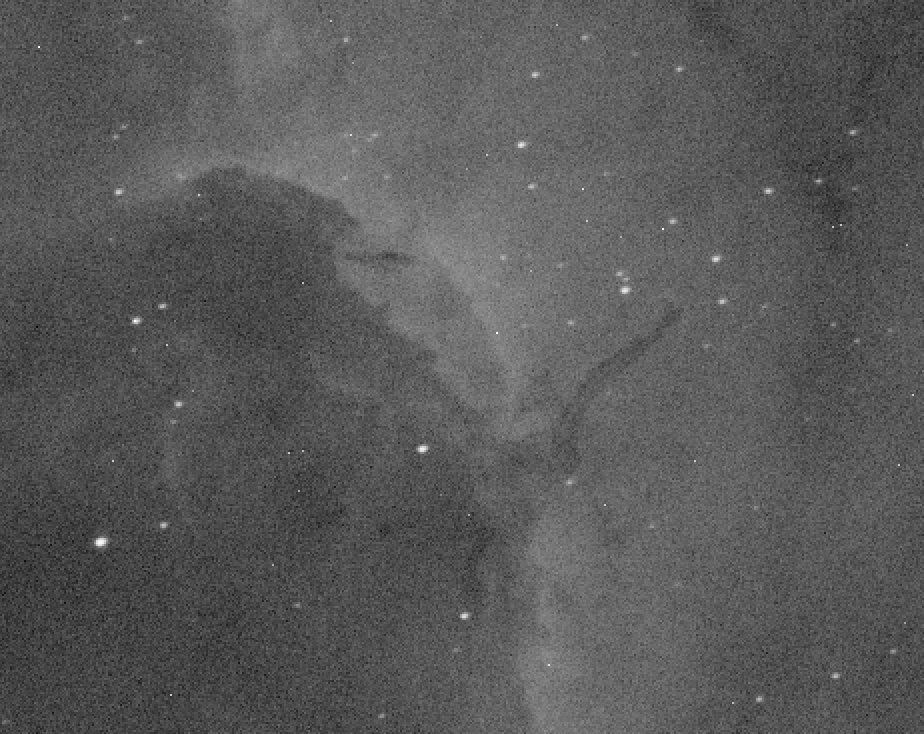
Herbig-Haro object at the end of the long feature can just be seen.
GGs image has set us on a little project to image the HH 555 bipolar jet at the end of the major turn of gas in the Pelican Nebula. We will attempt over the next few nights to get an image from both the Esprit 120 ED Pro from the IMT3 dome in Ha and also from the OS 12″ to see what it looks like compared to the Tak FSQ85. Another good social distancing astronomy session ? goodnight.
I thought I ought to document this so that I remember this is now the new normal for making a flat master for my CMOS camera, the ZWO ASI1600MM. The problem I found again after not processing images for some time, was that the normal way of processing without Flat Darks produces a master flat with embossed, so raised doughnuts across the image.
Batchpreprocessing – > Darks tab -> Optimization Threshold -> move from 3 to 10 – > this removes the dark entirely and also removes the amp glow but introduces loads of noise so clearly not right at all. So I contacted my friend Dave Boddington who is a bit of an expert on this topic and he gave me some good advice that has of course worked.
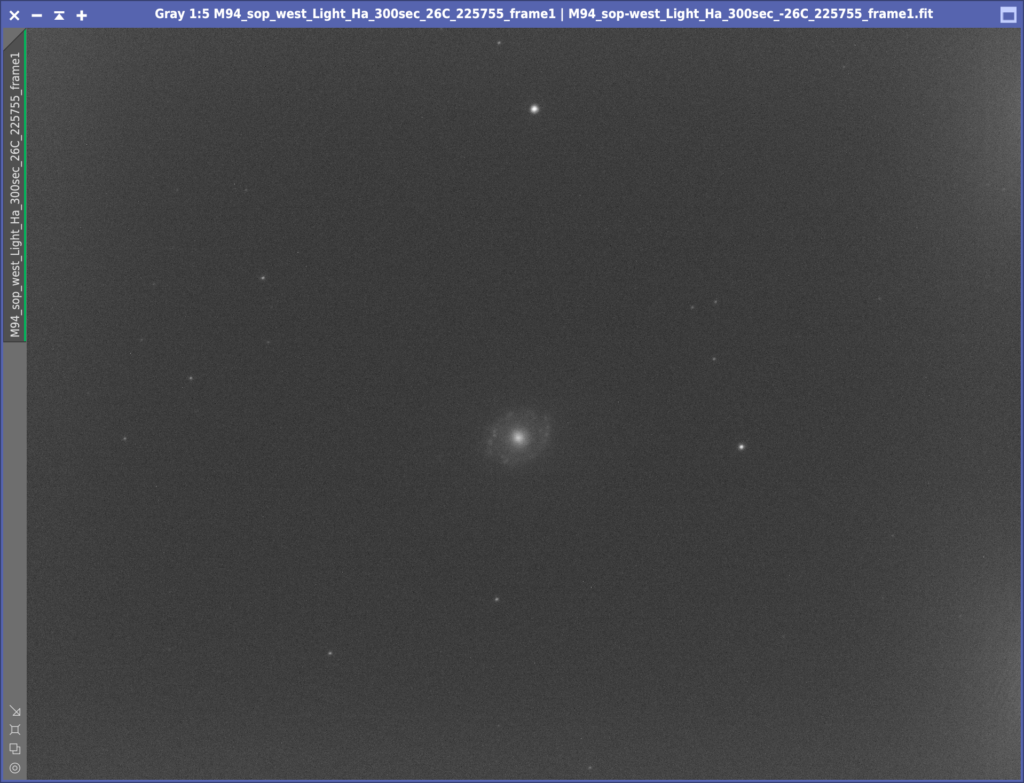
So first let’s detail what I am calibrating. On the 20th April 2020 I took a set go Ha frames of M84, these were 300s exposure and with a Gain of 193 and I believe an Offset of 21, however we had some changes over the previous week so driver the Offset is no longer stored in the FITS header. It was when we were using the ZWO native driver. The temperature of the cooler was set to -26℃. I have 8 of these frames.
M94 300s light
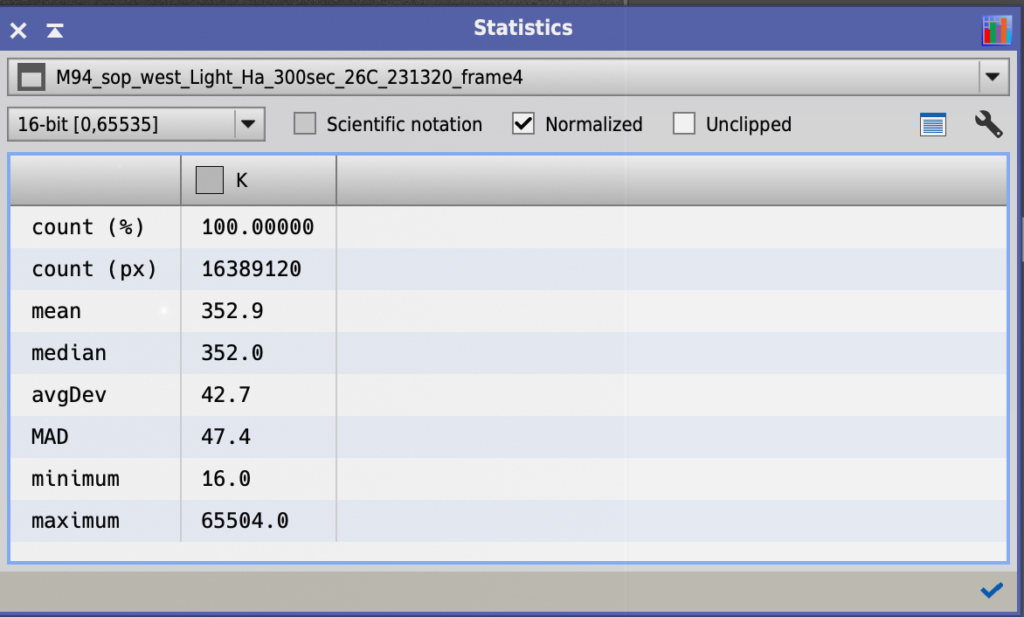
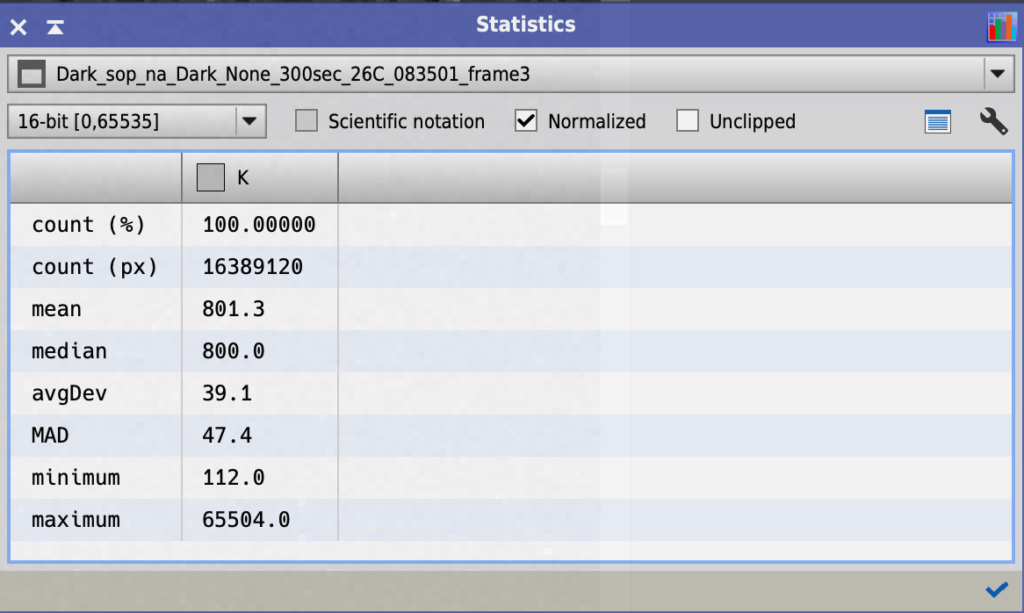
I also have a set of 10 darks at the same settings. However when using the Statistics tool Dave noticed the Mean of the image was 800 and the Mean of the Ha frame was 353. This is in a 16 bit notation. The camera however is a 12 bit camera and this means the Mean for the dark is 50 and the Mean for the Ha is 22, so a difference of 28 in 12 bit and 447 in 16 bit. I will come back to this later.
Mean of Ha 300s lightMean of Dark 300s
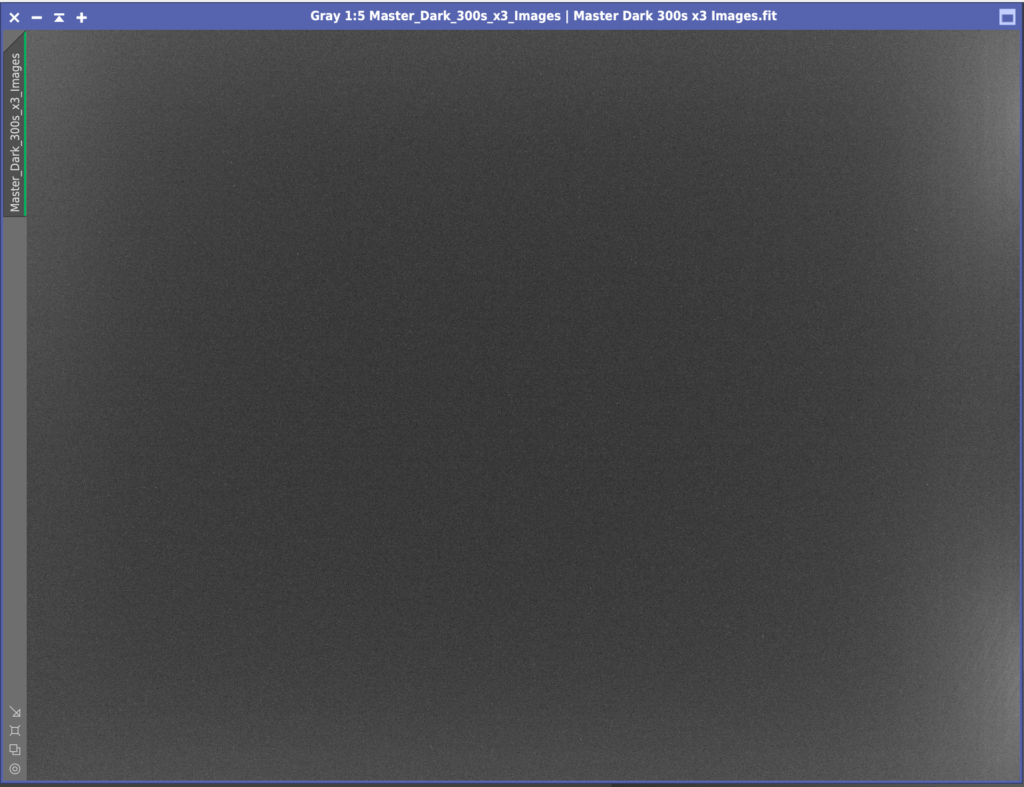
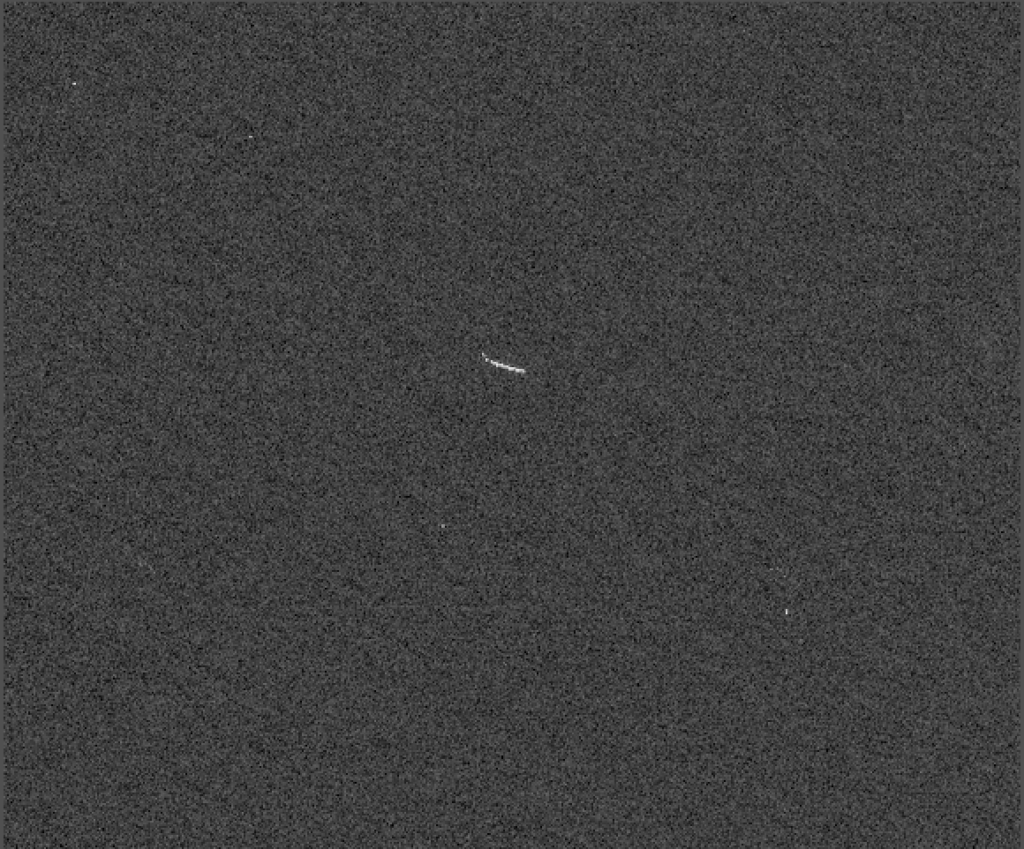
First I created a Master Dark for the Ha frames using the normal ImageIntegration settings. I did not calibrate darks with Bias as you do not need bias with a CMOS cooled camera. Next I created a Master Flat Dark for the Flat frames using the same ImageIntegration settings.
Single 300s Dark with hot pixels and amp glow
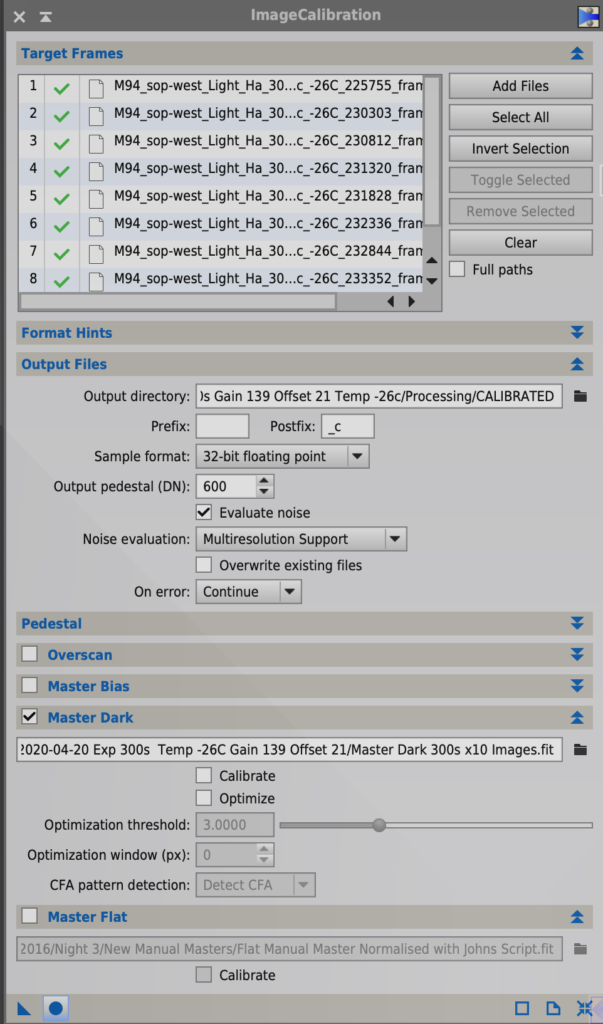
Then I found the Ha images did not need to have the flats applied so I skipped that step for the narrowband images. Next I Calibrated the Ha lights with ImageCalibration and because of that discrepancy above which looks like it was induced by having the Offset for the darks set to 12 and the Offset for the lights set to 21 I added 600 as suggested by Dave Boddington to the Output Pedestal in the Output files section of ImageCalibration. I made sure Evaluate Noise was ticked and that both Calibrate and Optimise were unticked in the Master Dark section. Master Bias was unticked and so was Master Flat for the narrow band images as mentioned.
Calibrating Ha lights with Master Dark
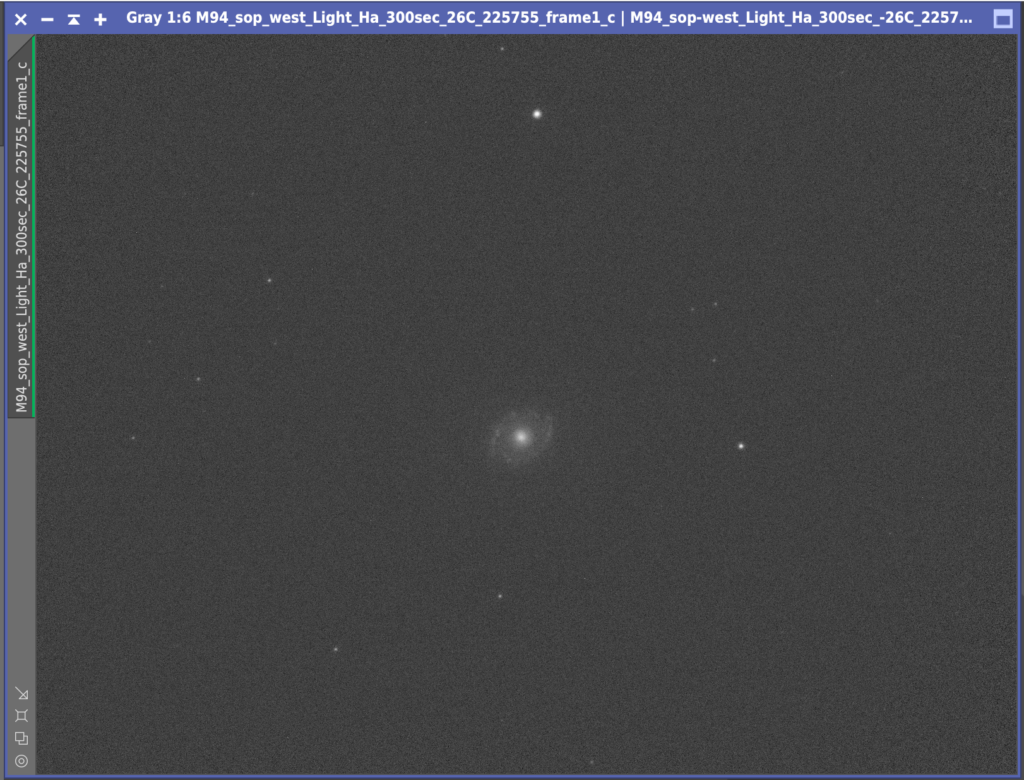
This created a clean set of calibrated Ha lights that did not require flats to be applied.
Calibrated 300s Ha light with Master Dark
Next I had some issues in Star Aligning the frames. The error I received was ‘Unable to find an initial set of putative star pair matches’, due to the frames being very sparsely filled with stars and the background being quite light compared to the stars. A quick look on the PI forum showed increasing the Noise Reduction in the Star Detection section from 0 to 4 sorted the issue, with all but 1 frame being aligned. I was then down to 7 x 300s Ha lights. The final frame was very light due to cloud.
7 x 300s Ha Calibrated with Darks, Aligned and stacked
I then integrated these 7 frames together. I had a challenge with trying to get the hot pixels in a few areas to disappear using Cosmetic Correction and pixel rejection during stacking so I will remove these after by hand before combining into the larger set
hot pixels not removed
So in essence what I have learnt is that I need to have really clean filters and camera glass. That all the doughnuts are on the those surfaces and not anywhere else. That the flats must be between 22k and 26k for the CMOS cameras, although this has some tolerance either way. That I need to set the camera to the right Gain, Offset and Temp as the lights and that I need the right flats for the right lights!
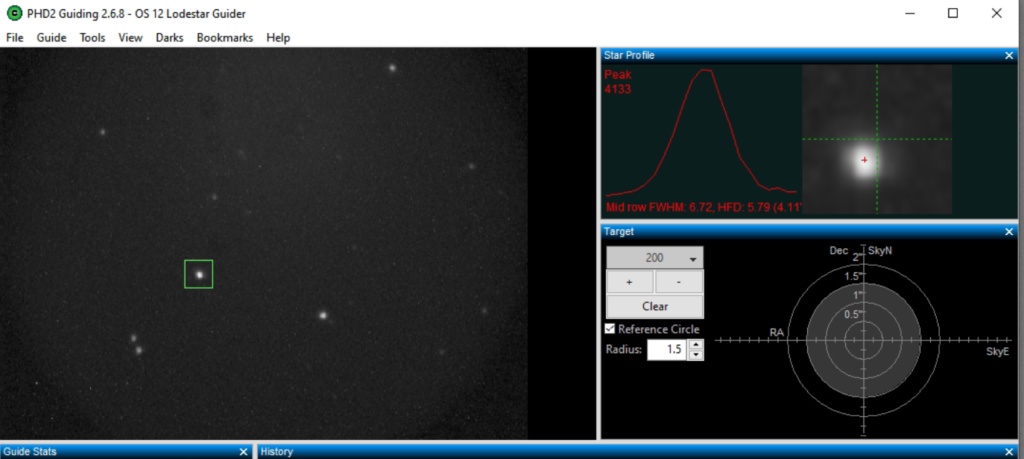
Opened dome at 4pm to start cooling the 12″, but actually started to play by looking at guider on the 12″ at 9pm. The guider had never really produced round stars and I suspected this was due to it not being pushed all the way in, far enough to be in the sweet spot for focus.
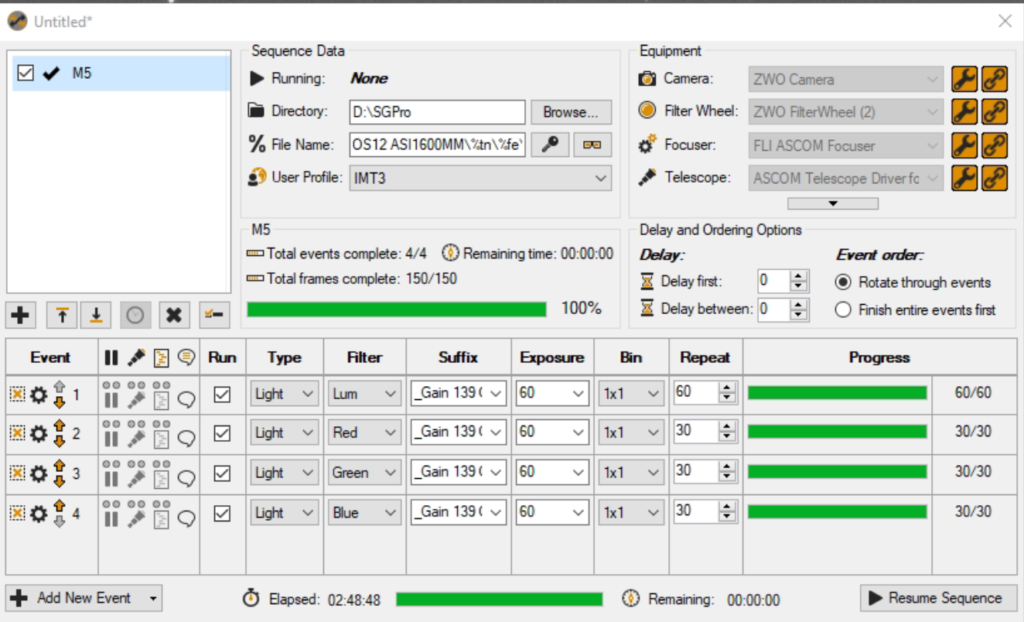
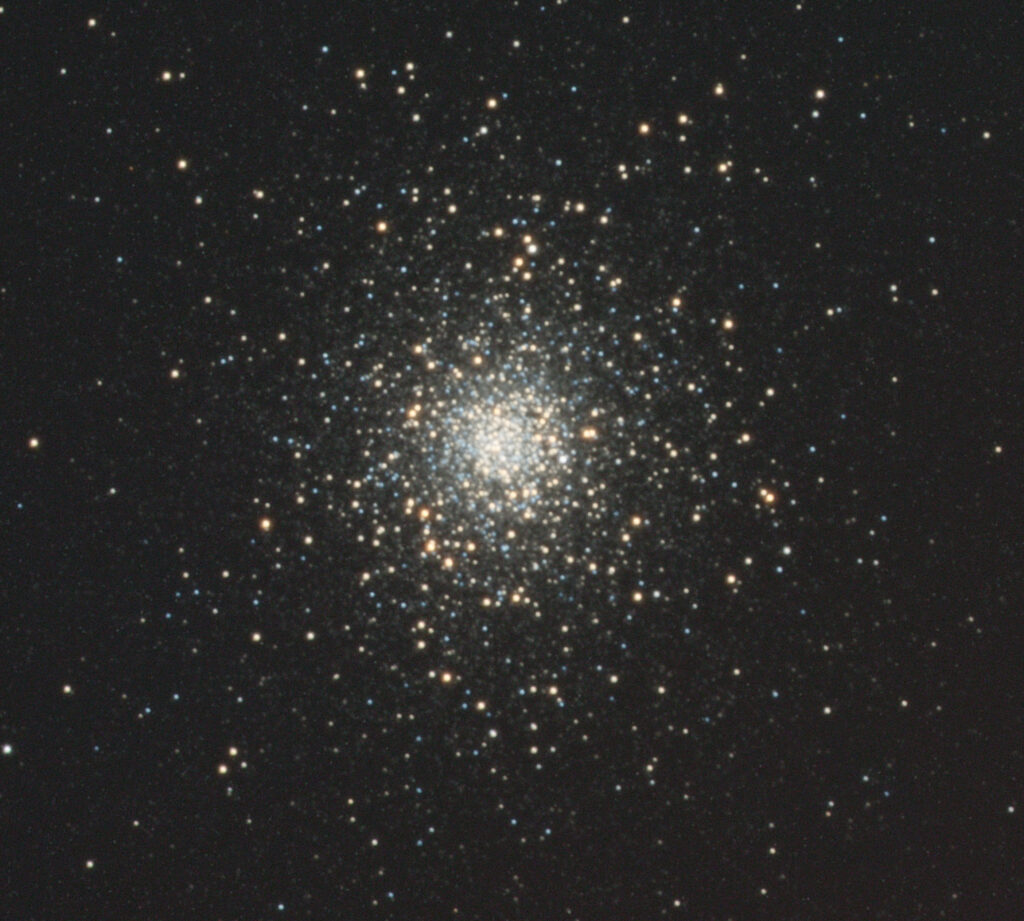
So I took off and adjusted with a spacer of which I had many in different thicknesses. I found the ideal one to fit that would allow the filter wheel Now round stars. Given high cloud I have set running on M5 LRGB, 60 x 60 seconds L / 30 x 60s RGB. Not guiding. Gain 139 Offset 21. Cooler -15. to rotate far enough that it did not fowl the guide camera, which until now it had. Now this was done, it was time to test.
Round guider stars
The images were much better, the stars tight and round. I also changed the rotation of the guider so that its chip was square to the rectangular whole in the light pickoff shaft.
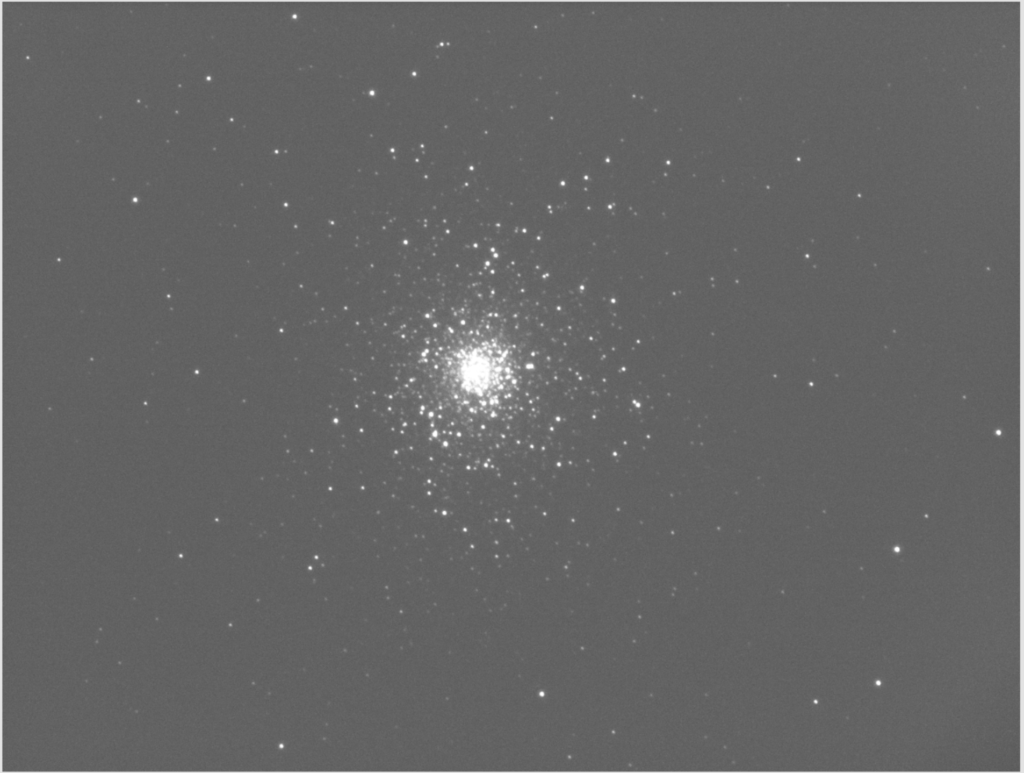
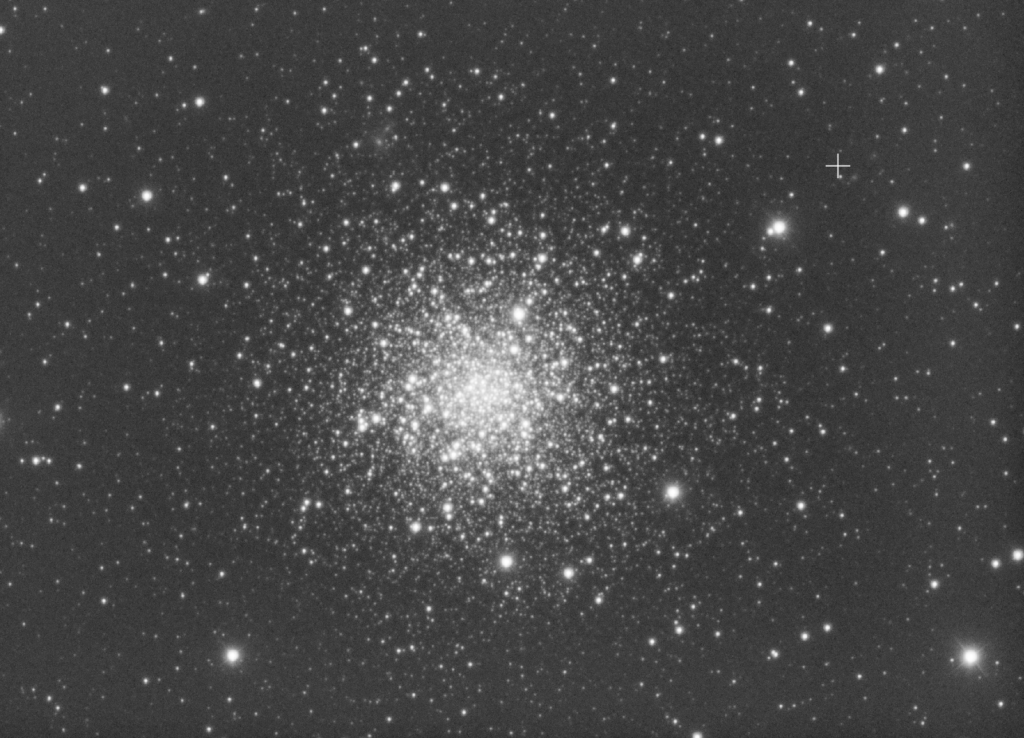
Stretched M5
So now that was achieved I went off to image M5, but without the guider as I could not find a guide star……..typical. I chose M5 as we have some frames from a previous night in May but focus was not as good as tonight and the ADU was too high. I left the scope running 60 x Luminance and 30 x RGB and went to bed.
Images captured for M5
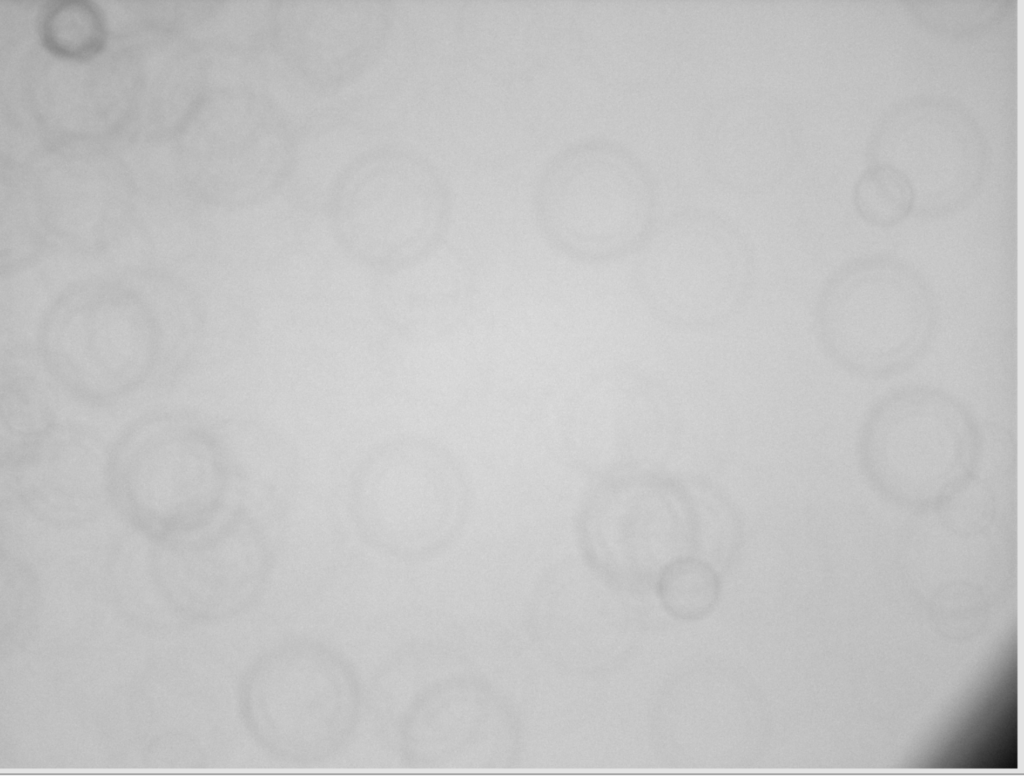
Addendum. The dome shut when the Sun started to rise which is fantastic and working as designed. What is not is the AAG must have hung and although I could see in Windows Task Manager it was nowhere to be seen, not in the icon tray or open as a window. Also I forgot to keep the dome log open in TSX so could not see the time stamp of closure. I will have a check list for the next night out. Also I now realise the pick off mirror obscuring the corner of the camera chip for the main camera so I need to either move where the light is picked off from or move the mirror out slightly without effecting the focus.
OAG Pick off mirror obscuring main camera in corner
I have also now started to process the image and on close inspection to the frames I can see the cloud moving across in the Red channel. Here is the results for the processed image.
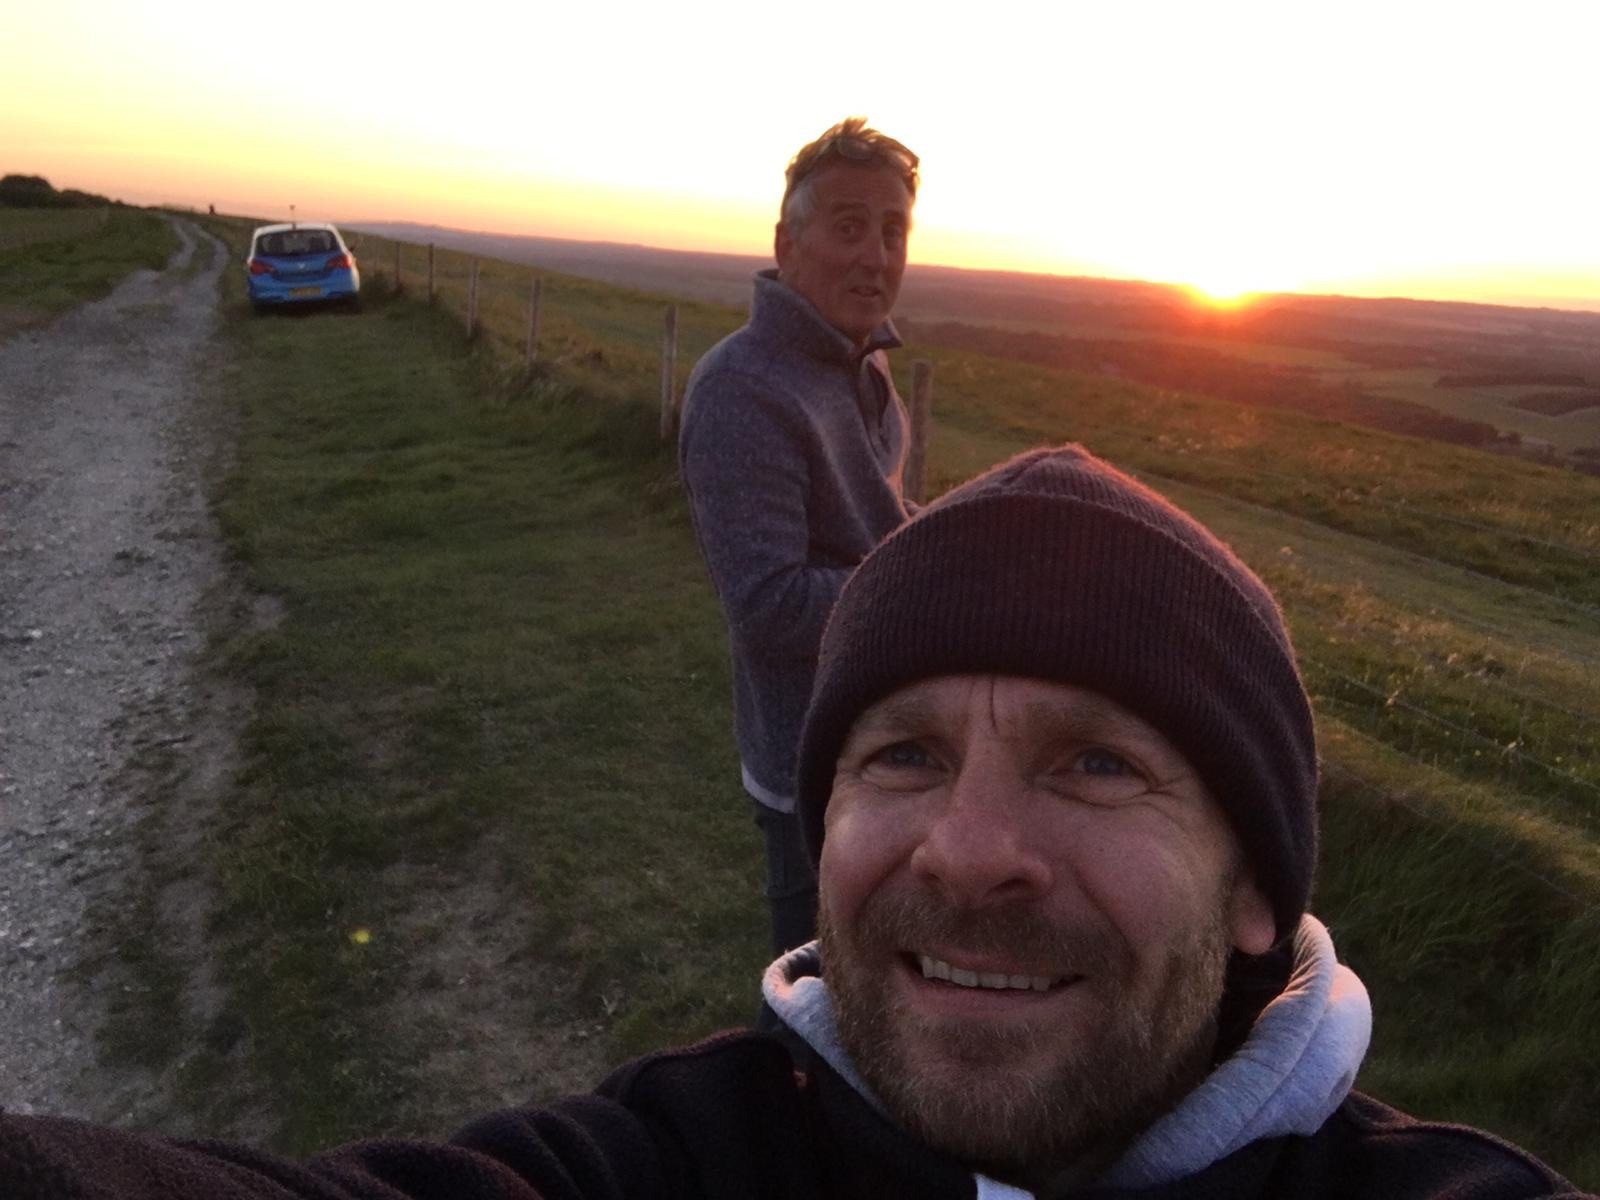
So back off to Combe Gibbet again tonight for hopefully a full night until dawn and with a coat. I met with my friend Alan for once again some social distancing astronomy. Again Alan had a much better 4×4 car to get up to the gibbet than my little electric Nissan Leaf, however once again I managed to make it there.
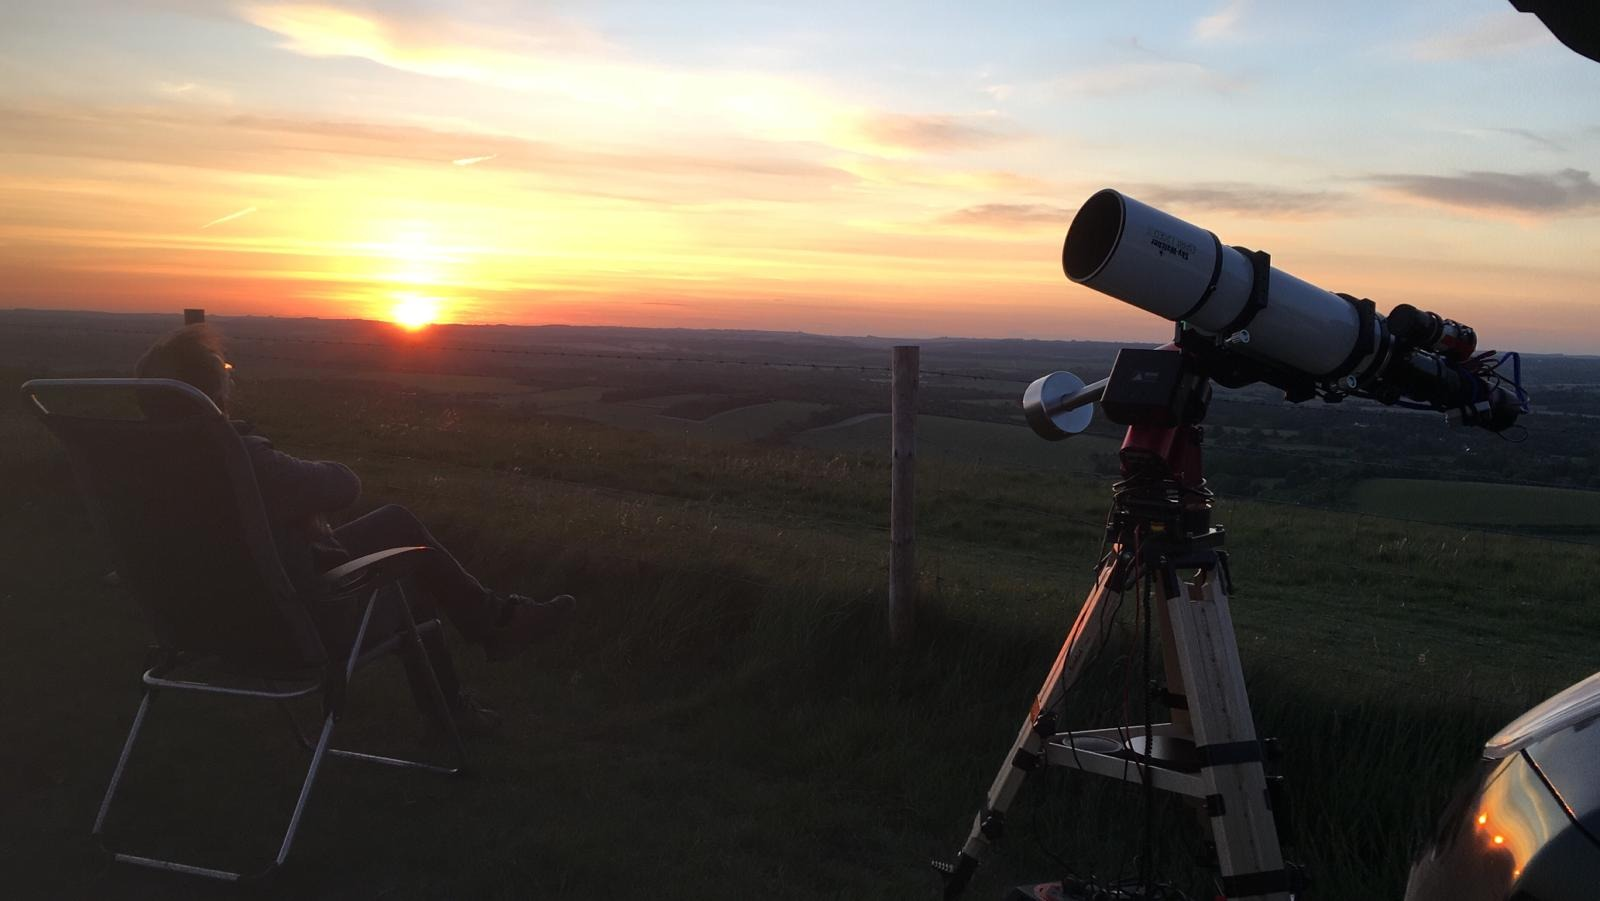
Sunsetting with Esprit 120 and Alan in his chair
After setting up, it quickly became apparent that I forgot the guide camera as it was still attached to the Mak180 that I thought I would leave at home tonight ?
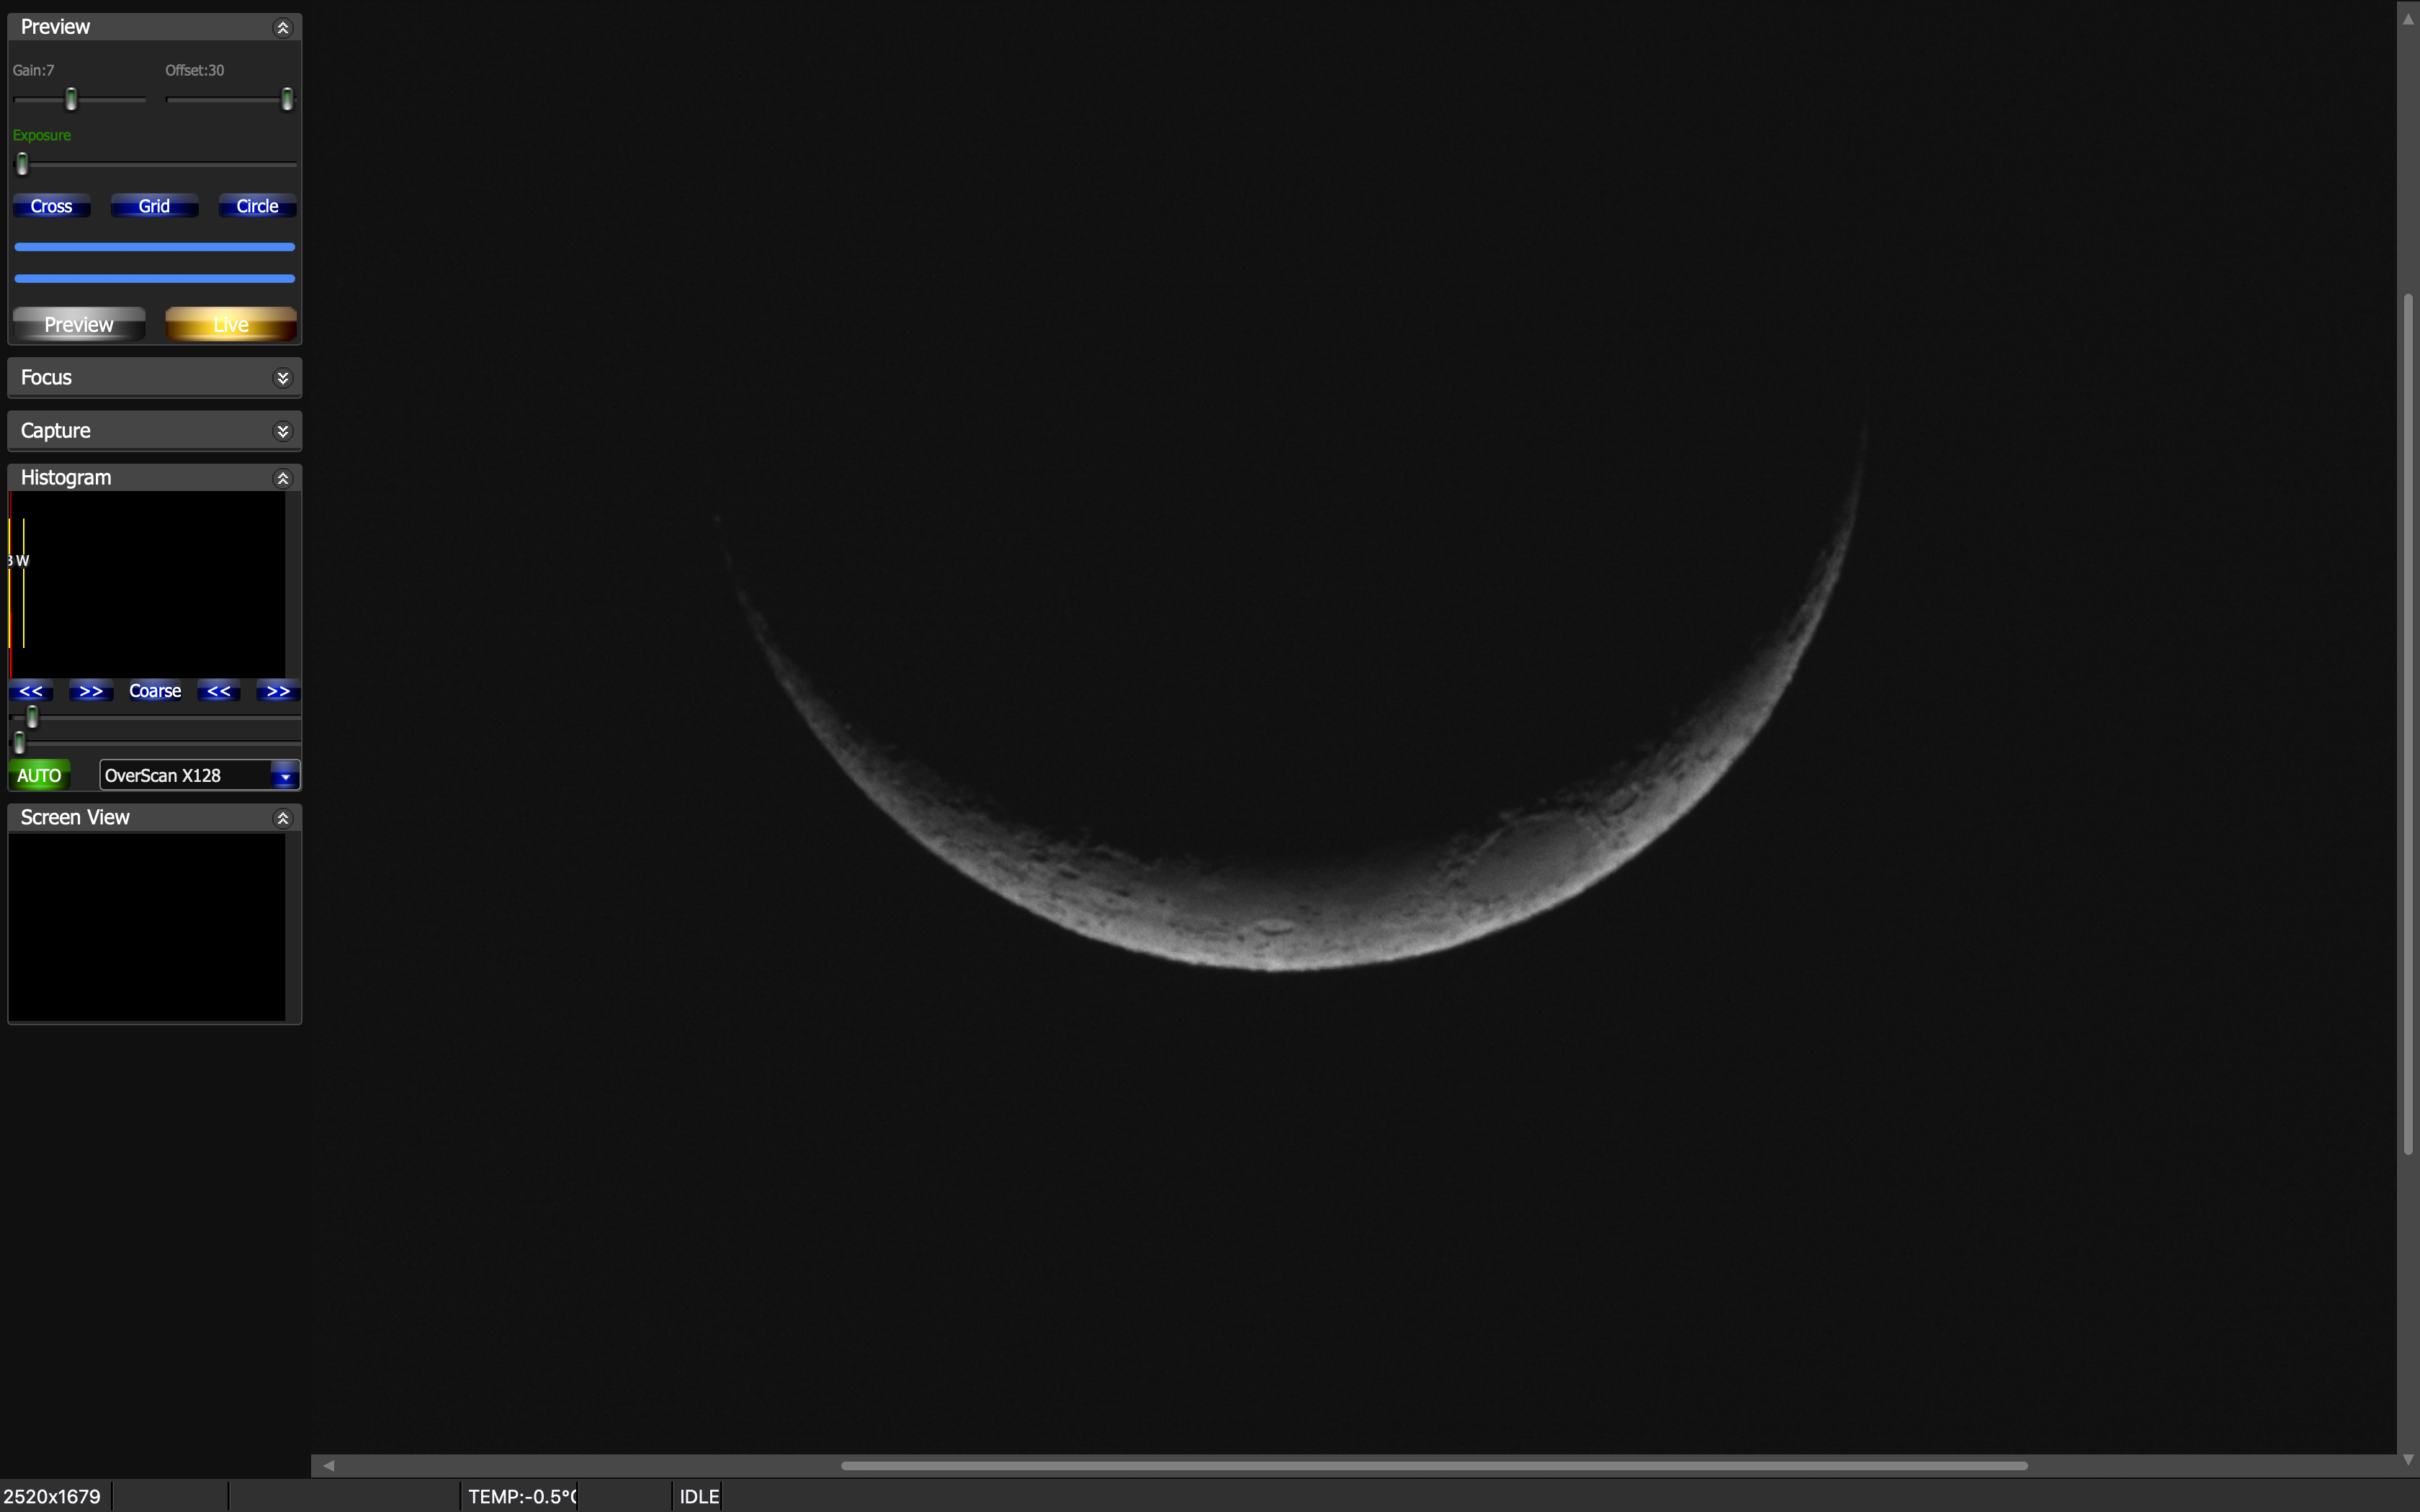
Quick look and focus on the Moon
So despite the slight setback I polar aligned on the uneven ground and managed to get the scope pointing in the right direction. It took me a while to work out why it was not pointing at the objects when slewing with a perfect alignment, then I realised I had the location set incorrectly. A quick look at my GPS on my phone and I input the coordinates into The SkyX and the target was nearly spot on. I adjusted, performed a sync and then was able to slew continuously thought the night with the object in the FoV.
As I was challenged with no guider I could only take 2 minute images and if in the West low down then 1min. So I stetted for those 2 exposures along with 30 seconds for one particular object.
Below are the lost of targets I went after and imaged. I tried to get 15-20 minutes in total for each. We had some early night high cloud, the wind had again dyed down after sunset and although cold, we were both wrapped up warm, although later in the night Alan became cold so wrapped himself up in the dog blanket from the car ?
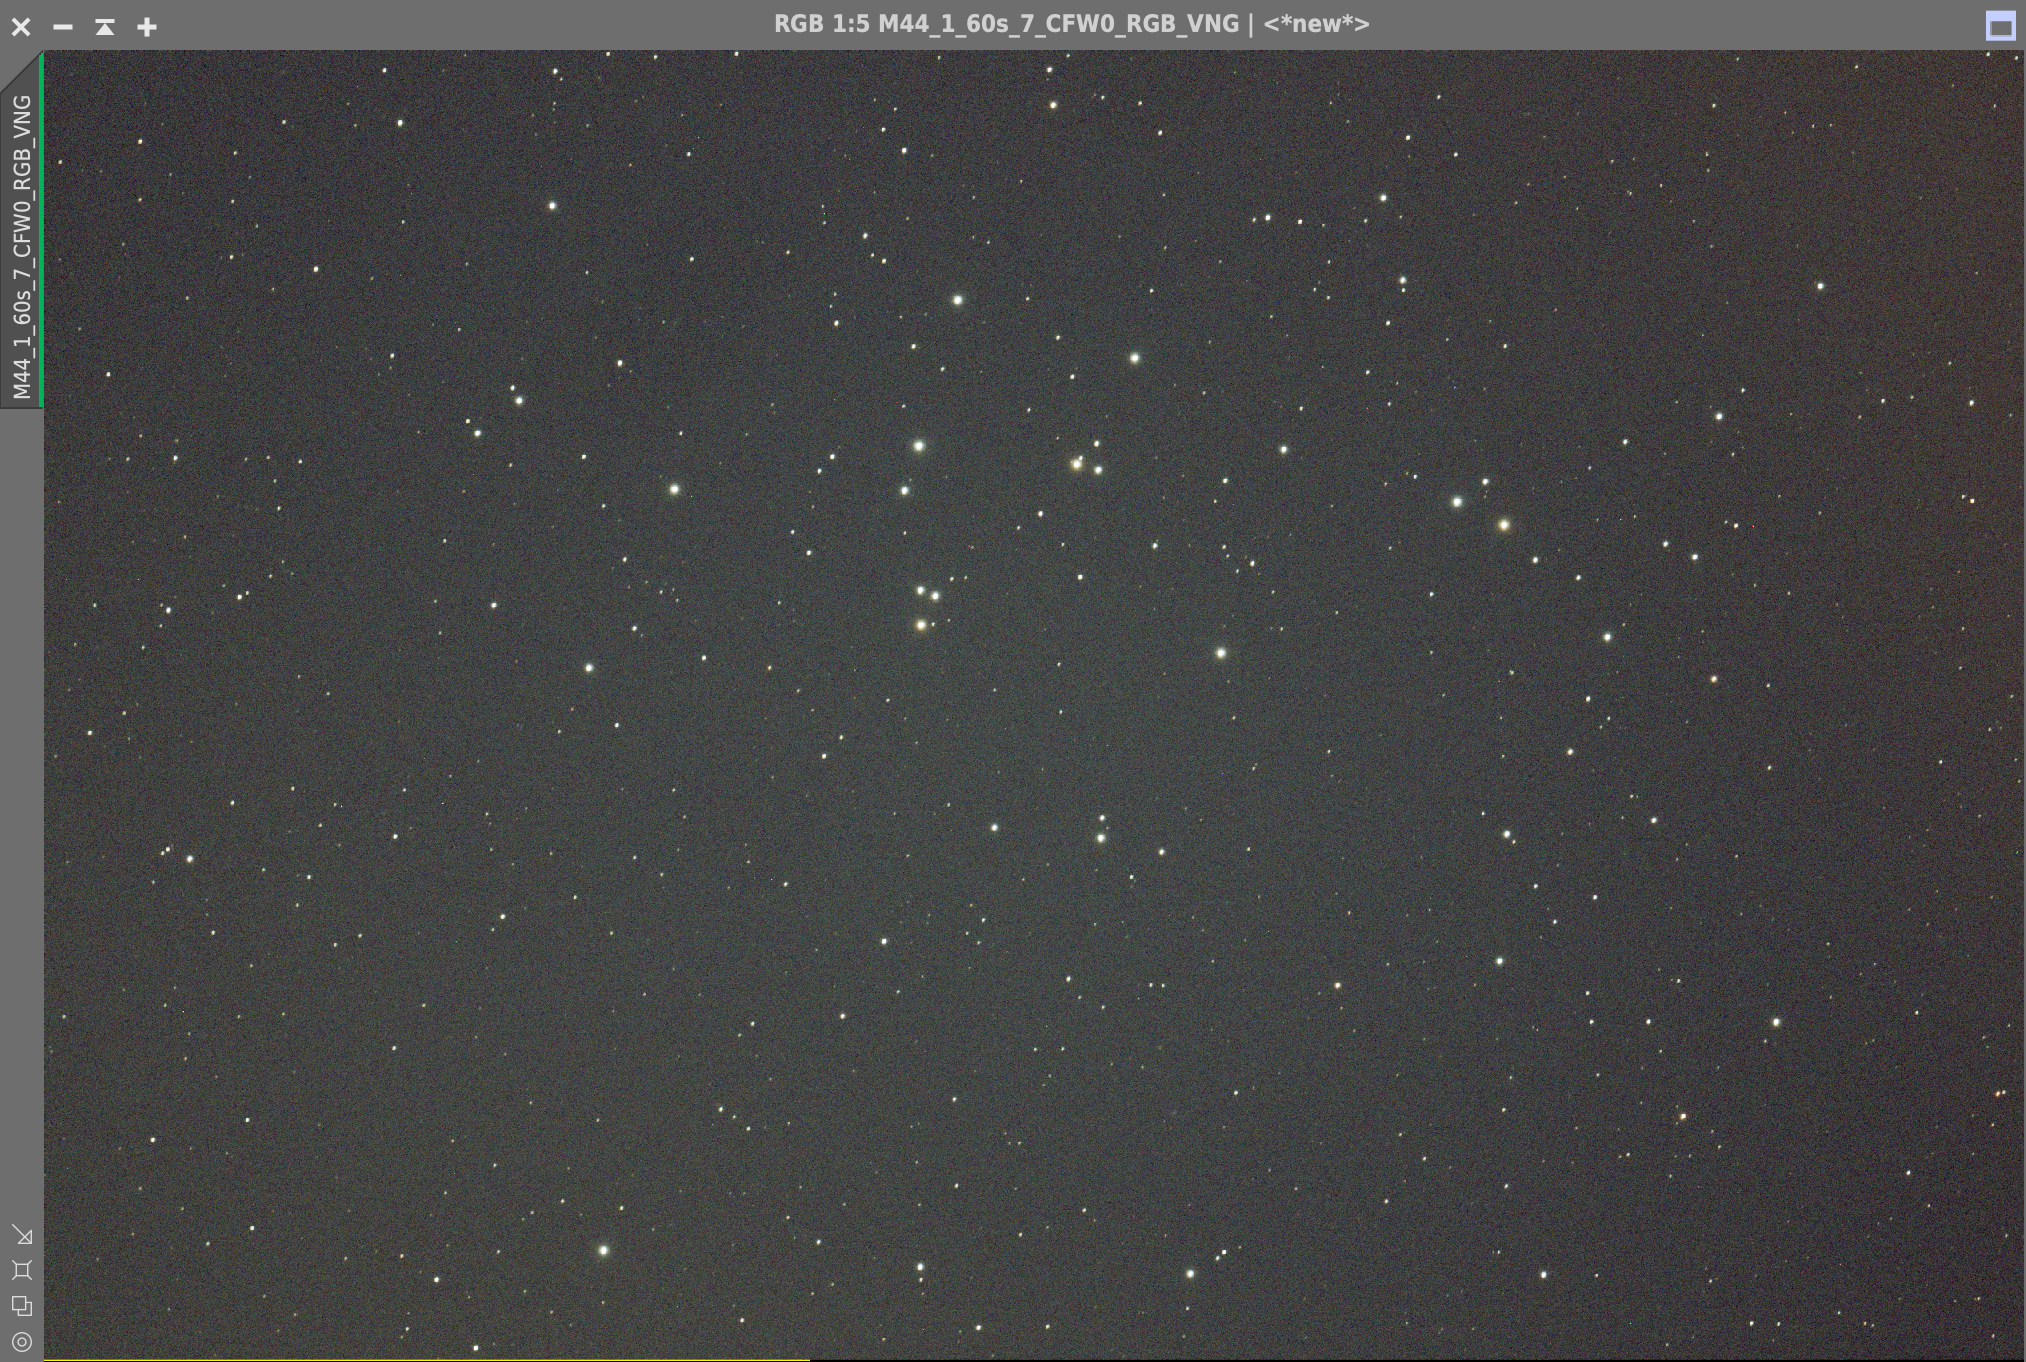
First up was M44 Beehive Open Cluster, which filled the view nicely so I took 20 x 60 seconds, careful not to saturate the stars. The QHY168C camera was set to Gain 7 and Offset 30 with a temperature of -20℃.
M44 60s
I then tried SH2-129 emission nebula but no luck, it was not registering at all at such short an exposure. I had a similar issue with SH2-155 Cave nebula. Both of these I will try again when I have my guider.
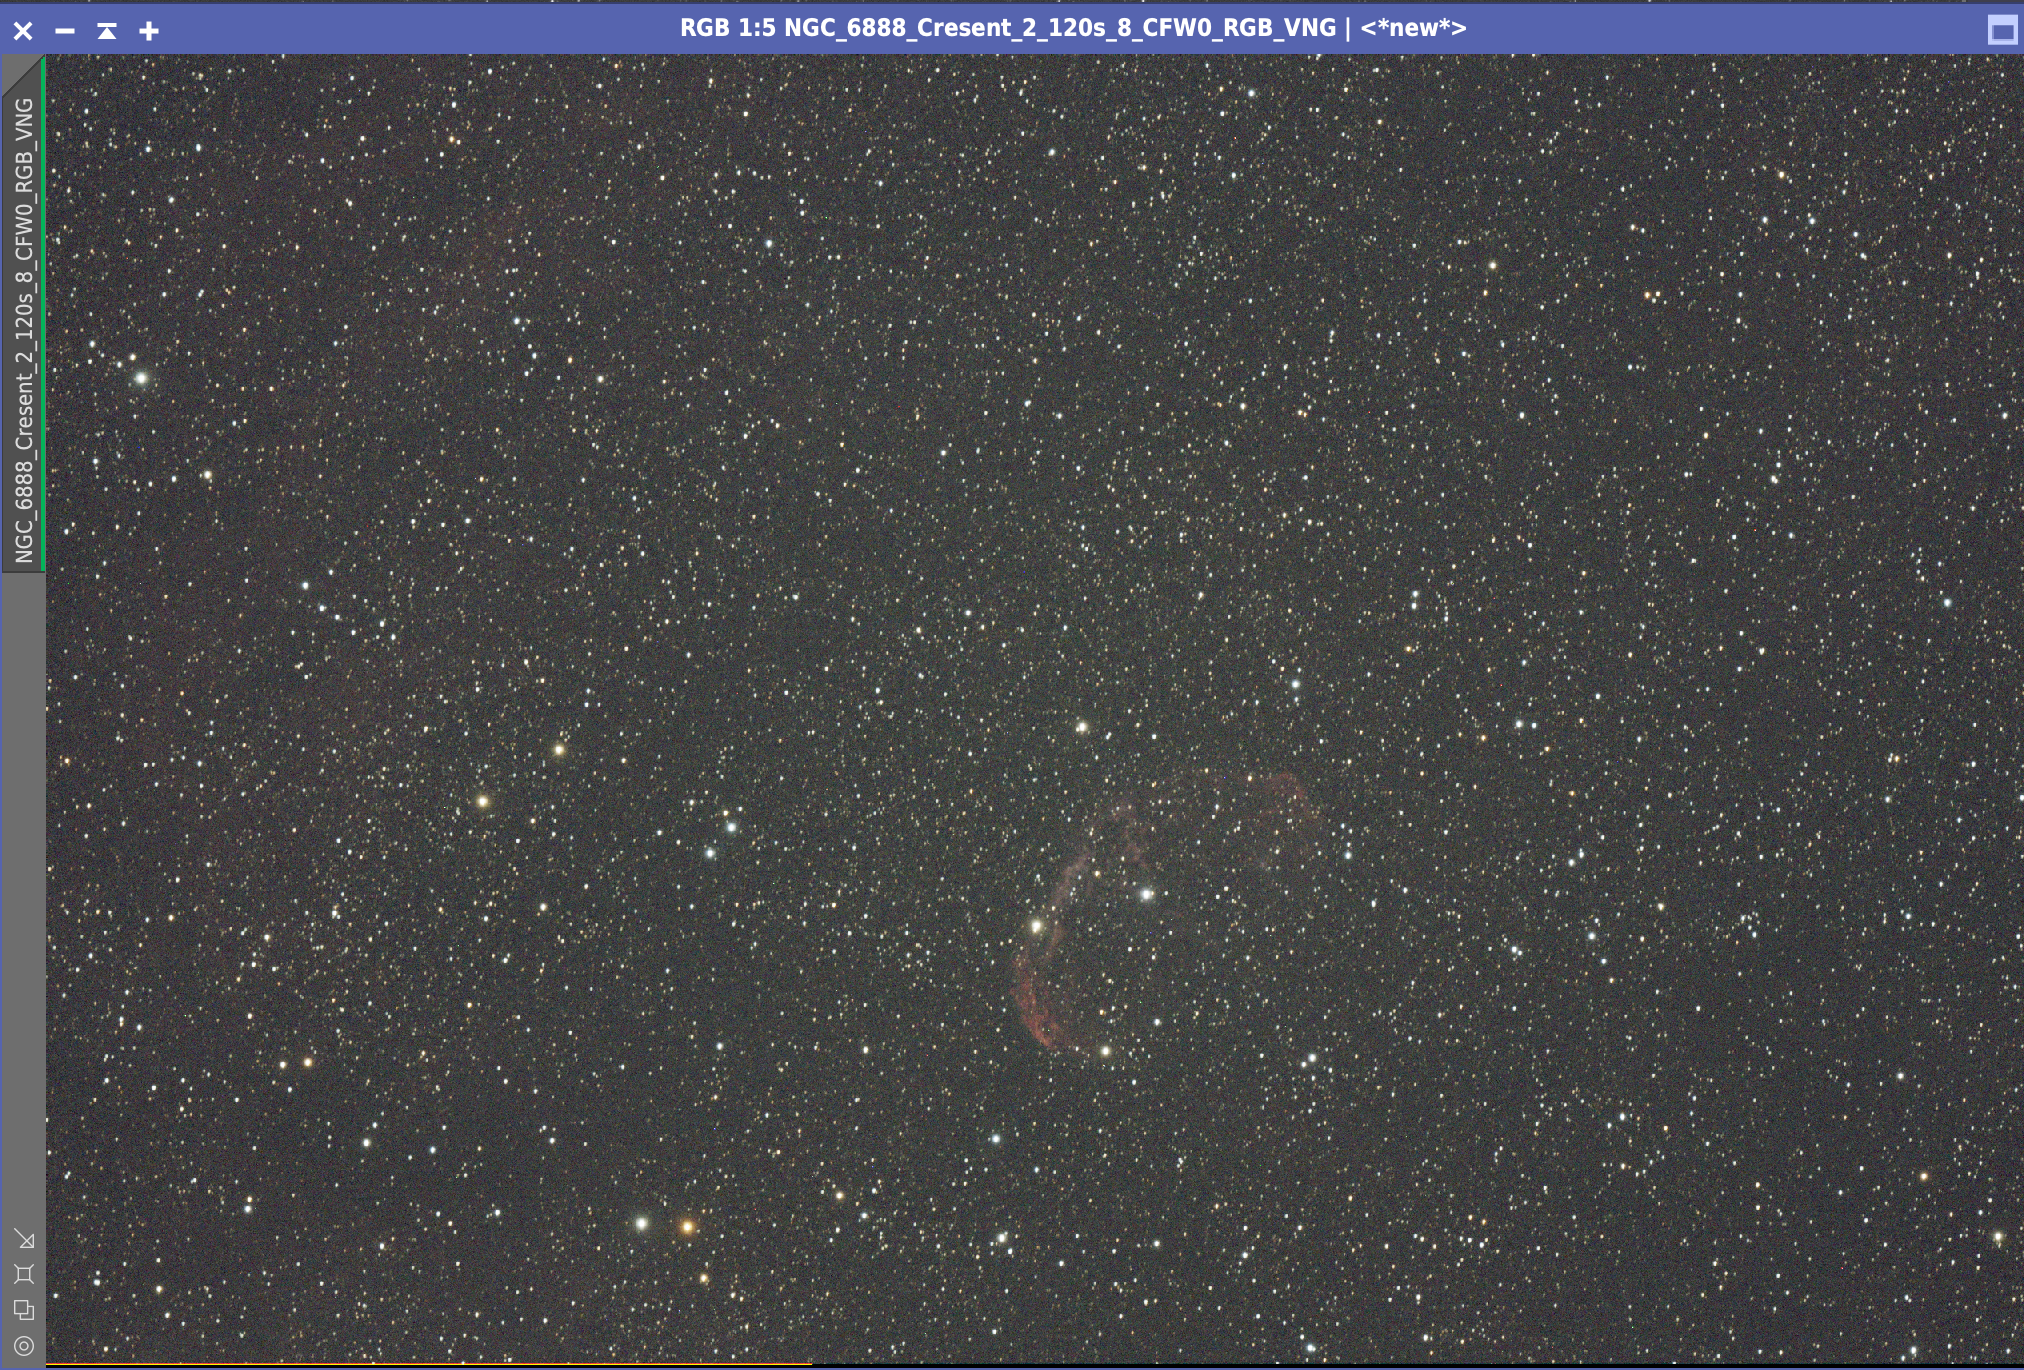
I then slewed to NGC 6888 Crescent nebula and took 20 subs of 120 seconds.
NGC 6888 Crescent 120s
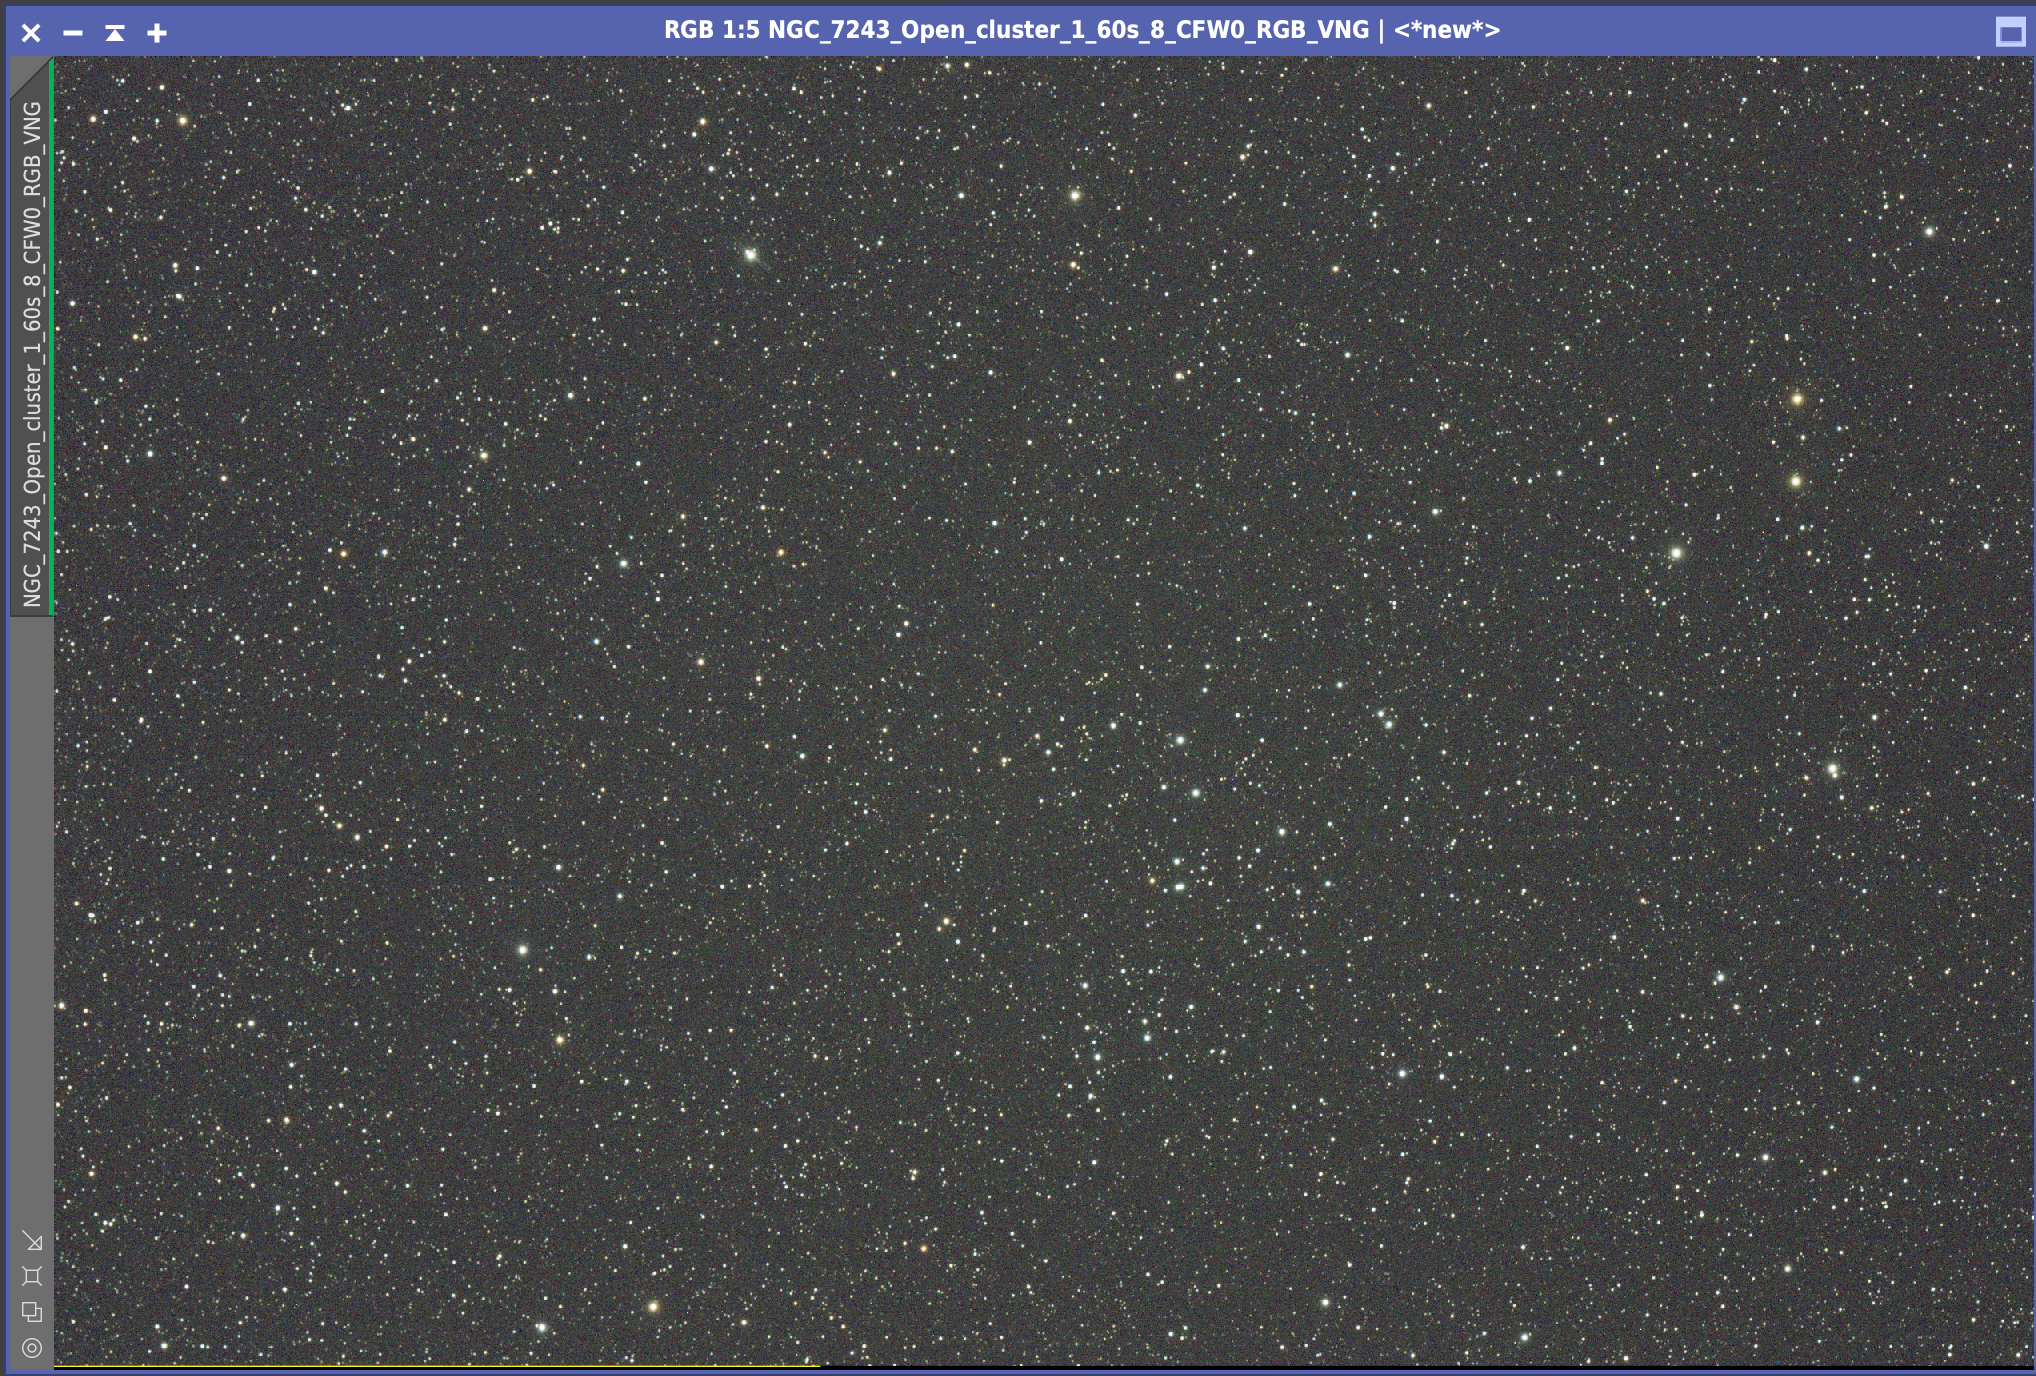
Next tried to image Trio in Leo M65, M66 and the NGC but I realised I had already imaged, although not processed and the image trailed at 1 minute due to its westerly location. So instead I headed for NGC 7243, a lovely Open Cluster in Lacerta and part of the Herschel 400 at 60 second exposure.
NGC 7243
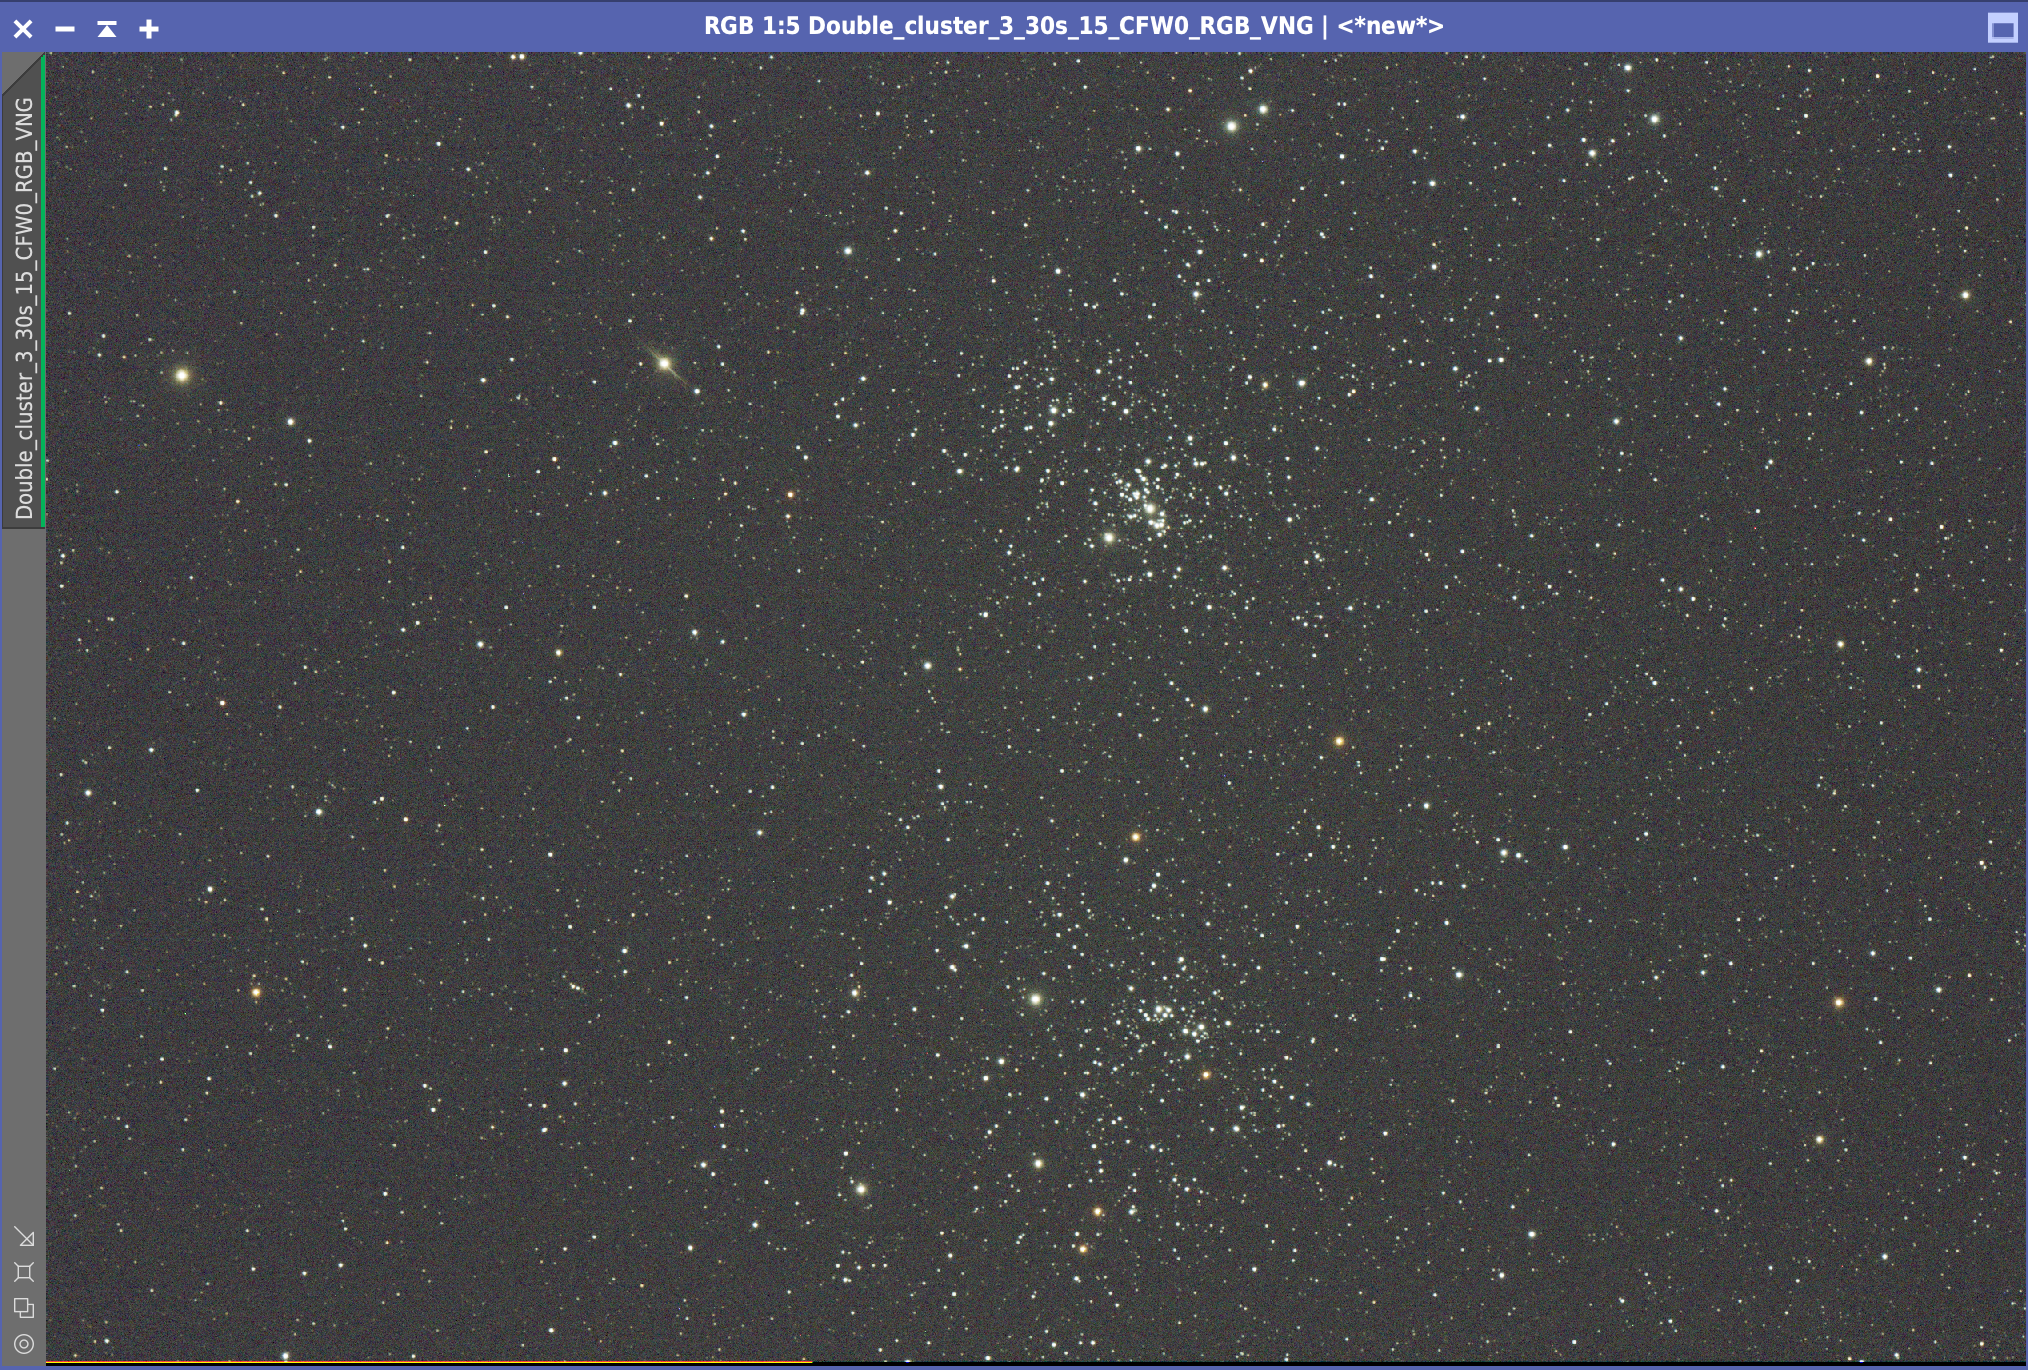
Next I looked at the double cluster in Perseus and decided to quickly take a few images with the Esprit 120 ED even though it was not on my original target list. Due to its bright stars I took 40 x 30 seconds.
Doublers Cluster in Perseus
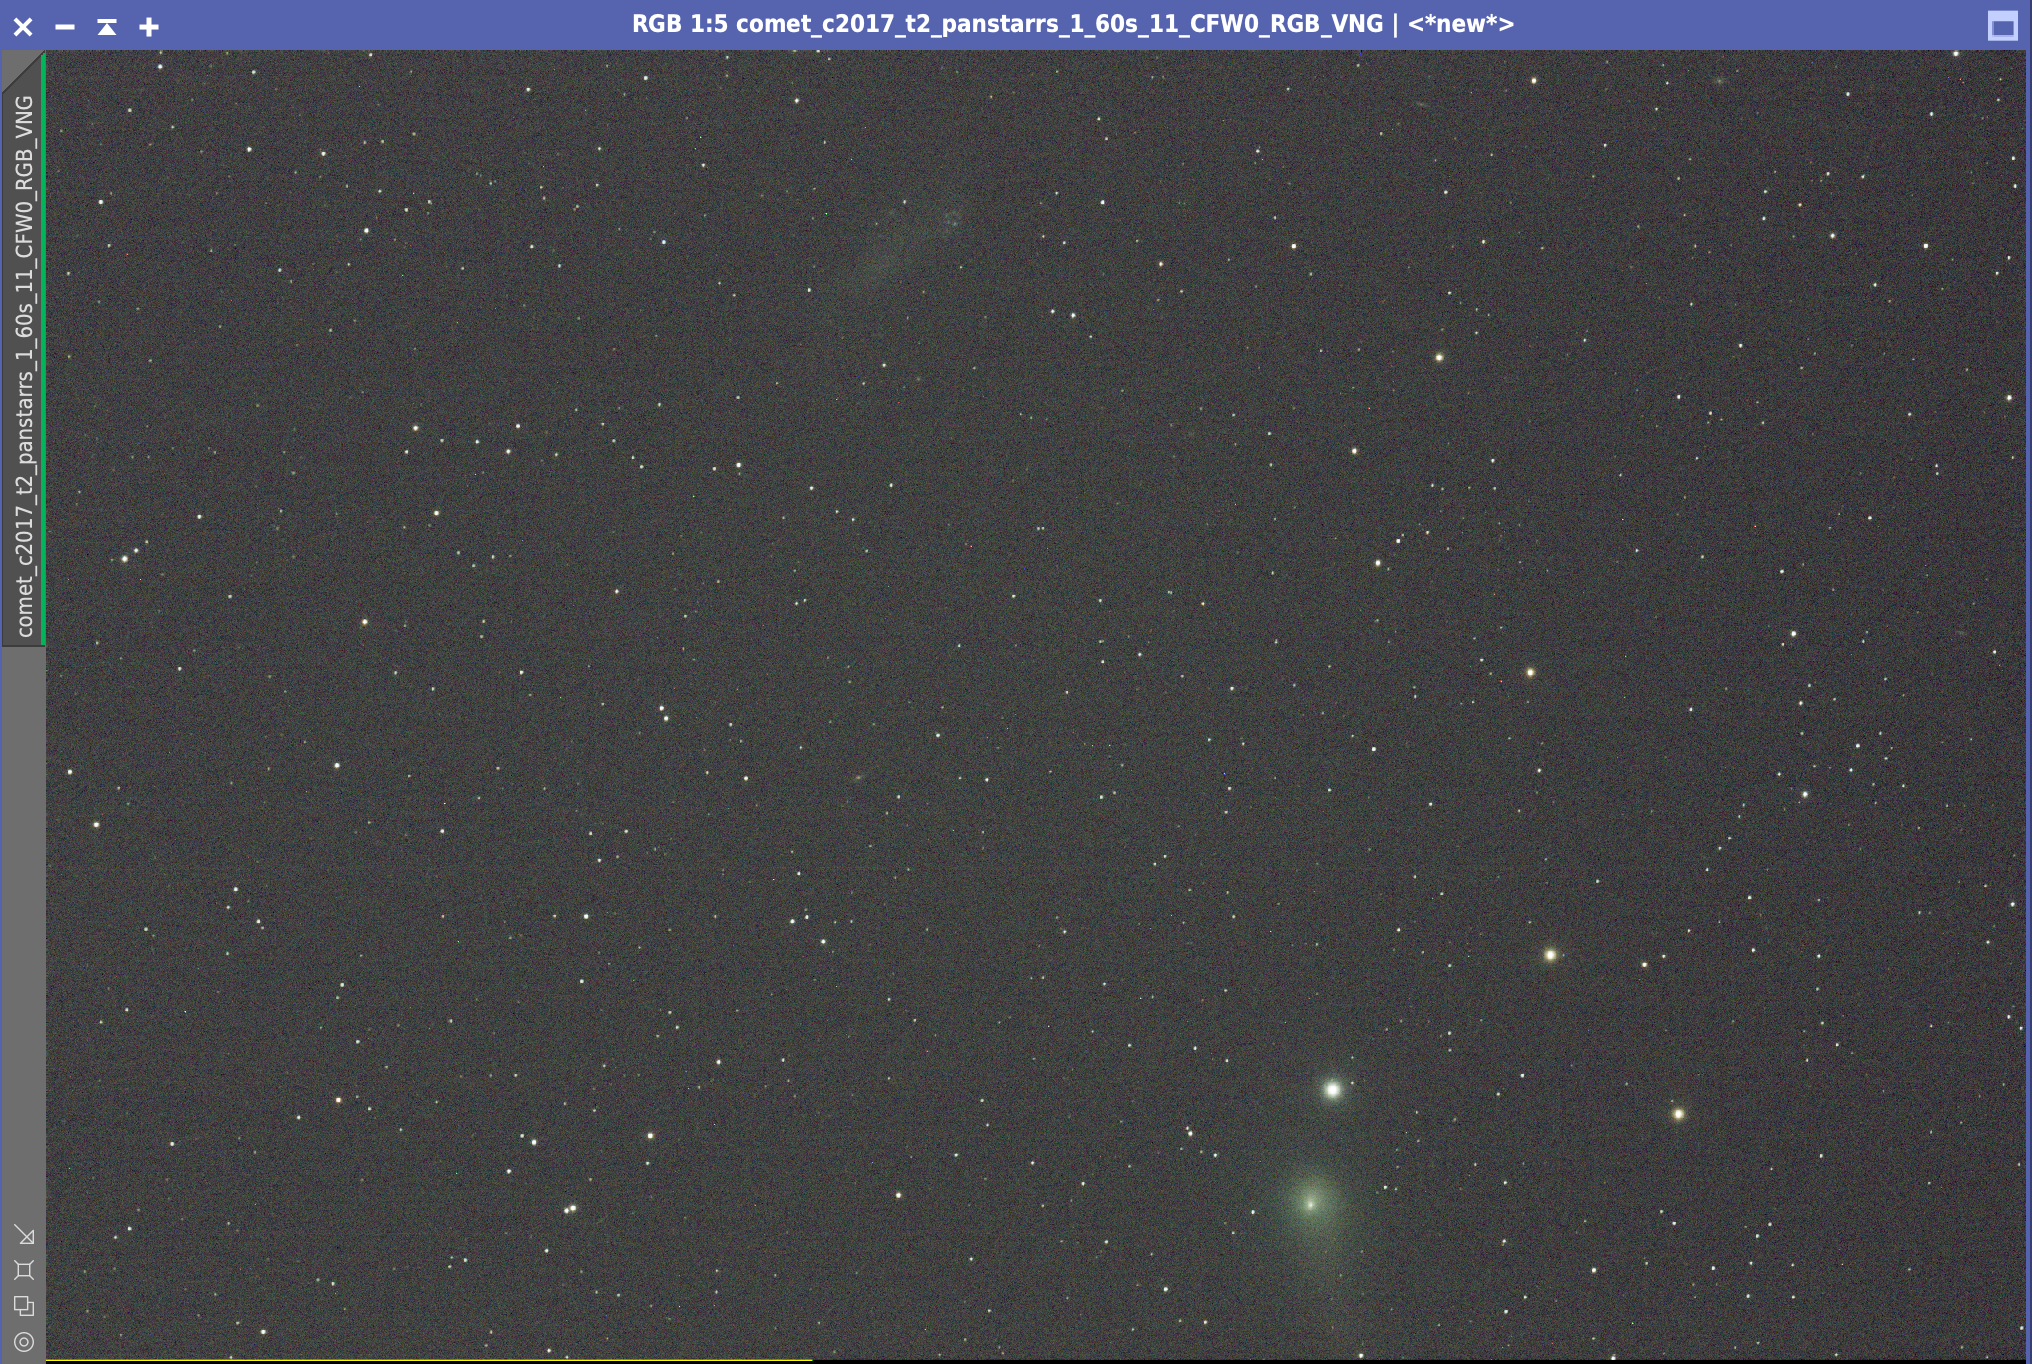
Now it was time to grab an image of Comet c/2017 T2 PANSTARRS which was located near a galaxy called the Coddington Nebula. I purposely got the comet at the very edge of the frame to get the galaxy in, although I noticed the tail was pointing in the opposite direction than shown on Sky Safari.
Comet C/2017 T2 PANSTARRS and Coddington Nebula
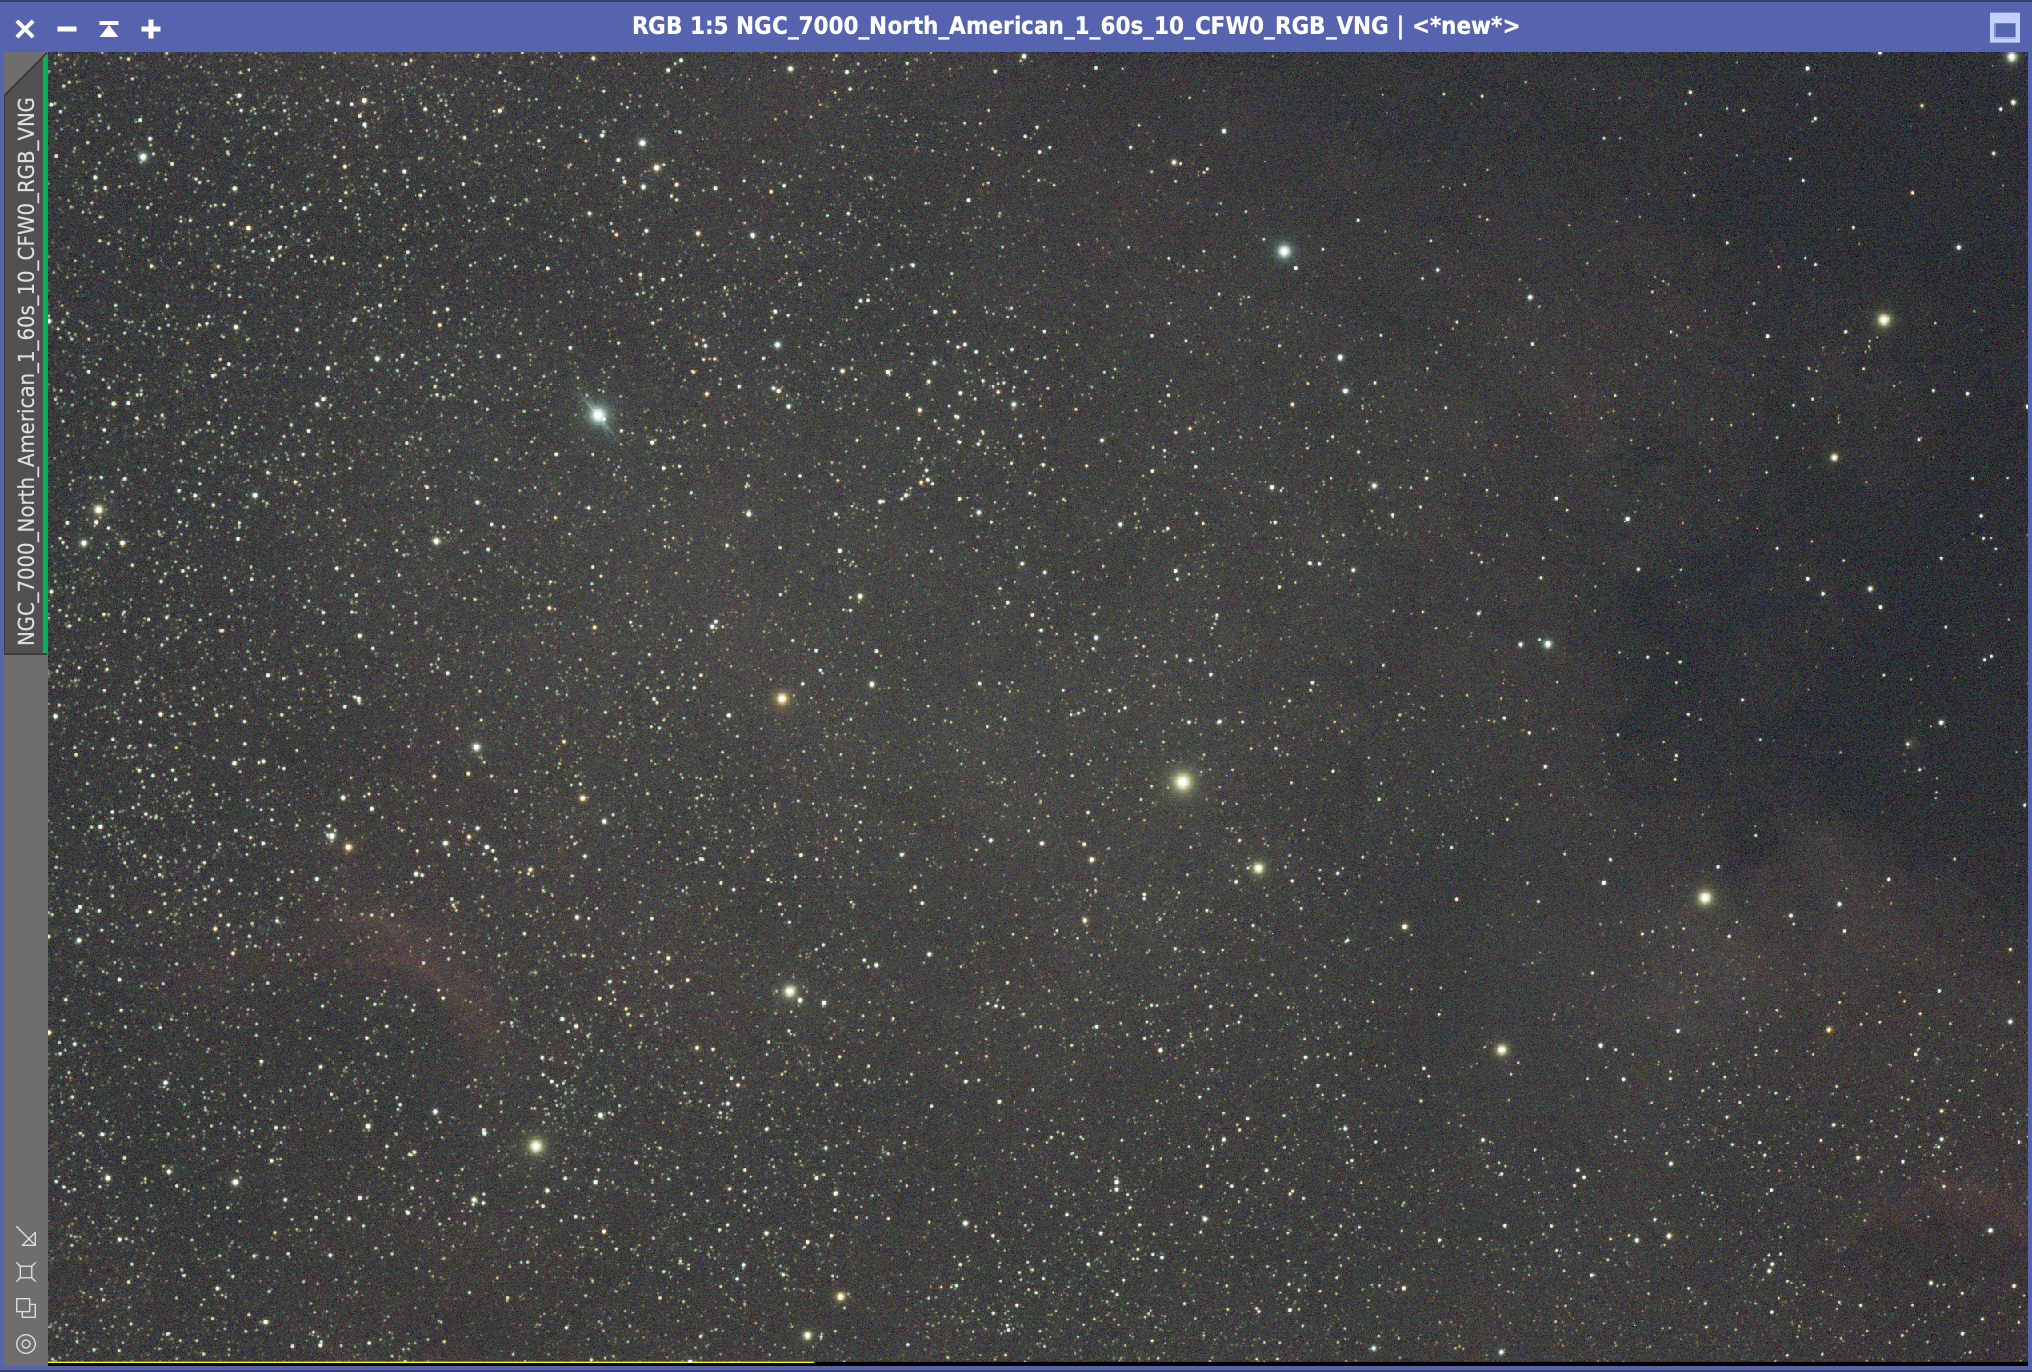
The night wass really dark, even though it is not true astronomical darkness, the location really helps. The image quality is also much better. I slewed to NGC 7000 the North American nebula that Alan was also imaging. Again 60 seconds was probably not long enough so I need to come back to this object when I get my guide camera fitted.
NGC 7000 North American Nebula 60s
Finally just as dawn was approaching and the light was clearly increasing, I took a few images of Comet C/2020 F8 SWAN to see if I could see it. Was was apparent was it was super faint even at 60 seconds !
Comet C/2020 F8 SWAN
So as dawn approached, Alan and I took flats, darks and flat darks.
During the night we viewed through the 4″ binoculars the Moon, Venus, Mercury, Double cluster, M39 Open cluster, M57 Ring Nebula, Alberio, M56 Globular Cluster, Saturn and Jupiter. Unfortunately I packed up the binoculars before I remembered Mars was up ! So packed up the car, ands drove very tired 50 minutes home.
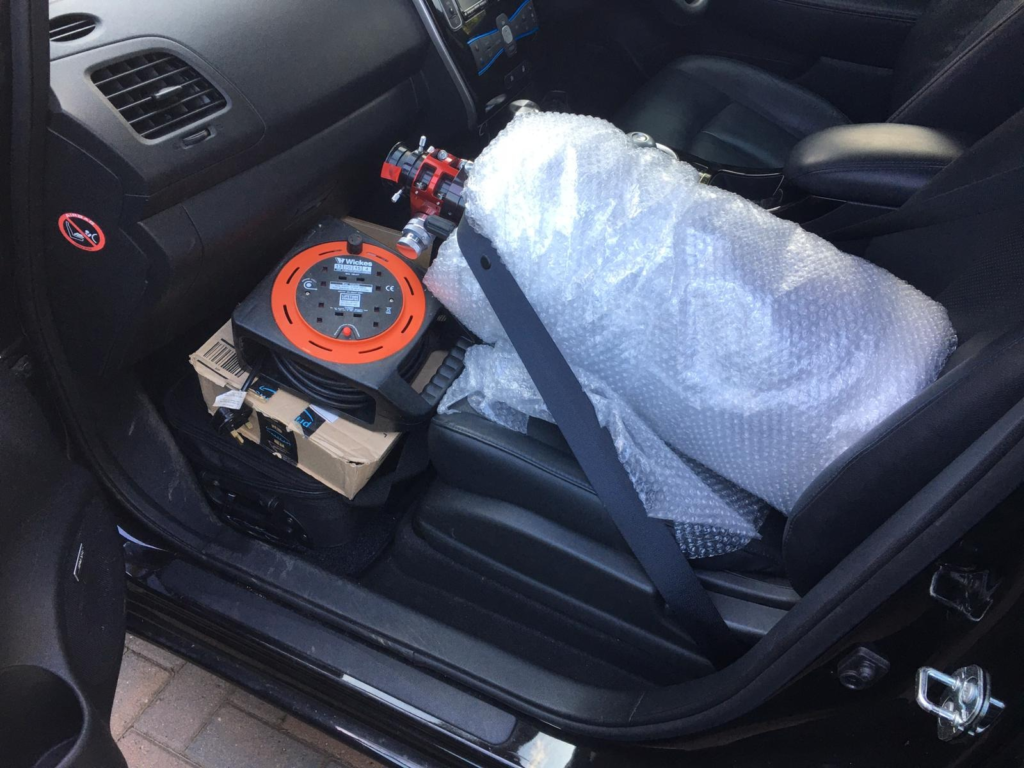
Tonight I traveled 50mins and 26 miles to Combe Gibbet, a high point for us in the South of England called the North Downs in Berkshire, which at 940ft above sea level places it in the wind, so it is cold but affords a distance from many towns, so it is dark. The is indeed a Gibbet at the top if one should want to take a hanged man or woman and display them for all the surrounding villages to see ? very barbaric, but part of our history.
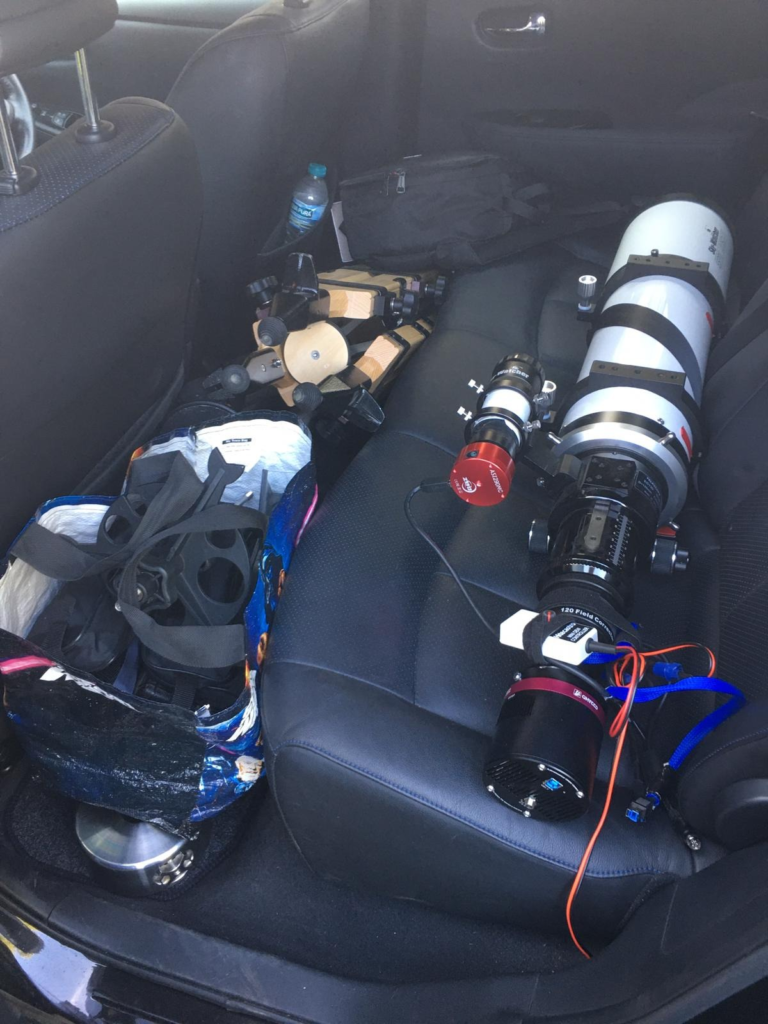
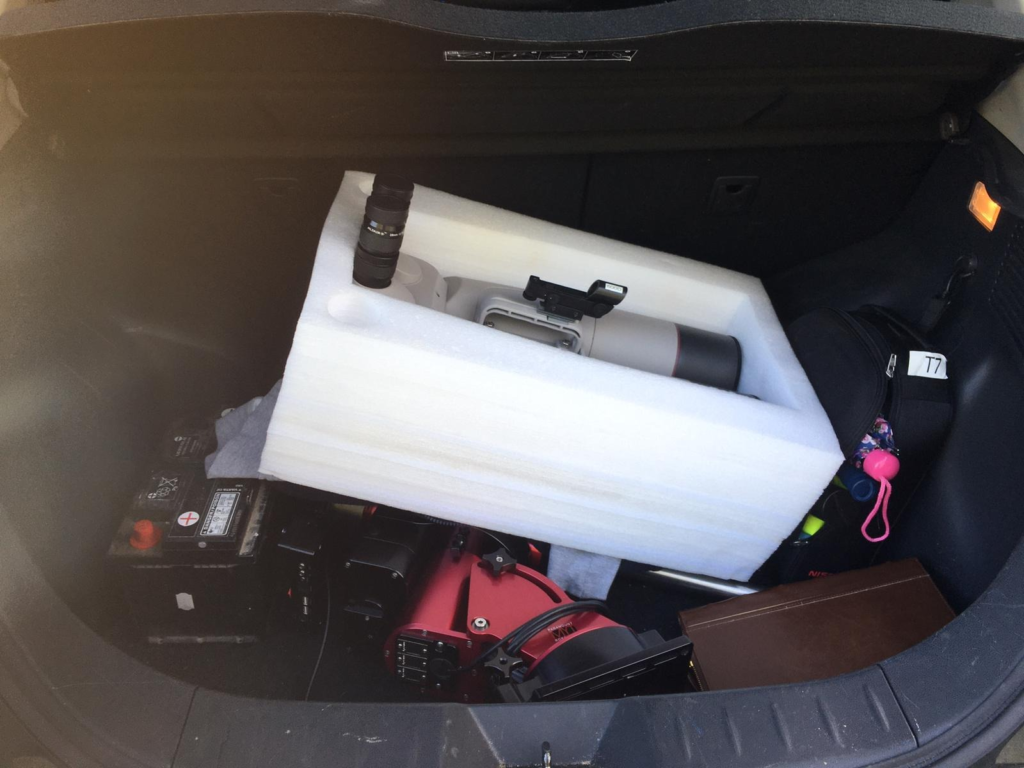
The car was packed with various astronomy gear, the Mak180 for Lunar and planets.
Mak180
The Esprit 120 ED Pro.
Esprit 120 ED Pro
And of course the Altair Astro 4″ binoculars with my Paramount MyT mount.
Altair 4″ Binos and Paramount MyT
I met a a social distance my friend Lawrence who was in a much better car than myself more suitable for the off-road terrain of getting to and just past the gibbet. Lawrence brought his trusty binoculars and his deck chair. Meanwhile I setup the 4″ Altair binoculars, the Mak180 OTA on the Paramount MyT and my Canon 6D on a tripod.
All set for tonightSun setting
As the Sun set from this location we spied Venus first and took a look through the binos.
Moon, Mercury and Venus
I captured some frames in the Mak180 with the ZWO 294MC camera. We then moved to the sliver of a Moon 2.8% illuminated and 1.6 days old. I placed the Mak180 on this for a few frames also. Lastly we moved the binos to Mercury, which is unbelievably small. Very faint in the twilight sky and surprisingly faint in the binos. I once again slewed the Mak180 and captured some 4GB files.
Lawrence looking at the Moon
We then went a hunting for comet C/2020 F8 SWAN but it did not appear in the star field where it should be despite being able to see Mag 8.9 star. The comet was purportedly magnitude 5.8 but this was not the case. I checked my ephemeris on both SkySafari and The SkyX and I wass definetly in the right part of the sky and confirmed the star paterns from my star hoping, but alas no comet.
Lawrence looking at Mercury
So although the wind was now dying down both Lawrence and I were cold so at just gone midnight we packed up and set off home. I must remover by coat tomorrow!
Addendum, I had read an article the following day that the comet may have broken up but I cannot yet confirm this.
It is the hope today that the wind will die down and the clouds will clear, allowing us to go after the elusive comet C/2017 T2 PANSTARRS which will be next to M81 and M82 and should nicely fit in the Tak FS102.
I took a set of darks for the Tak whilst waiting for darkness, then I started to image M101, however very quickly it clouded over and shut the dome.
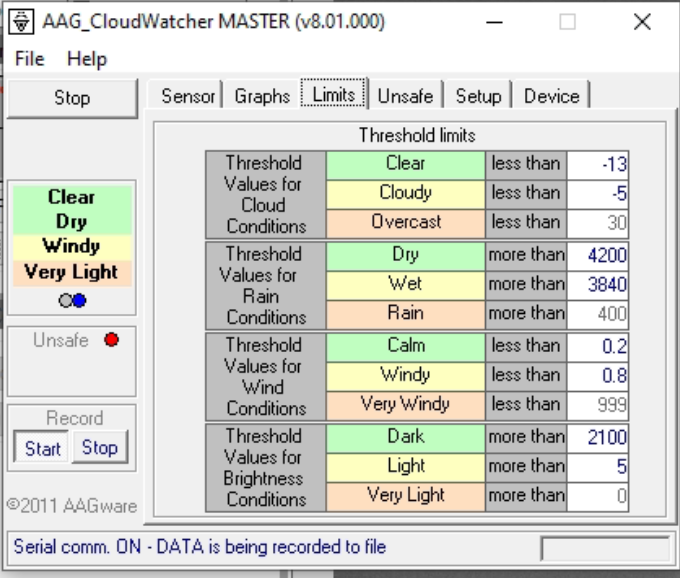
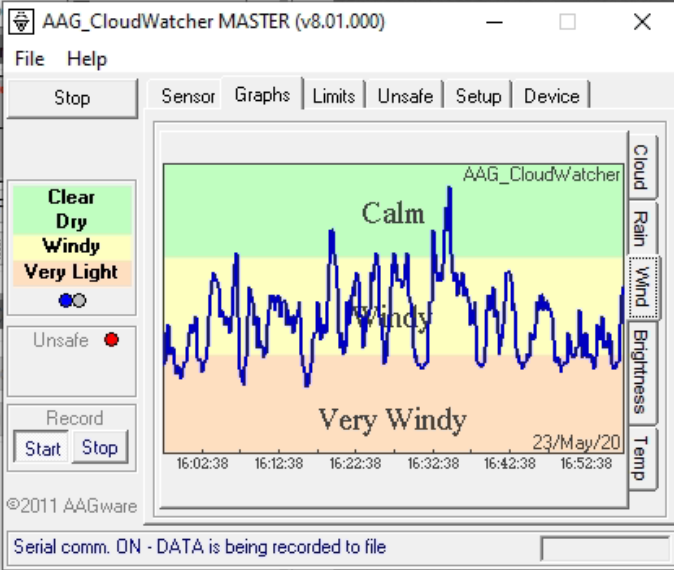
Today has been wet, windy and cloudy, which for once is a blessing! Why I hear you ask? Well simply put, to calibrate the hell out of the AAG one needs inclement weather and today has provided that in spades 🙂
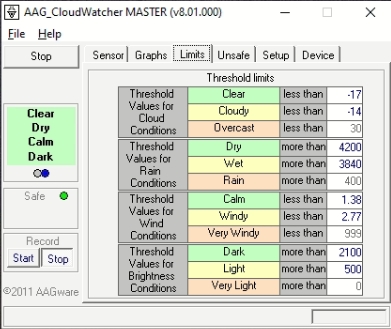
So after monitoring the AAG all day here are the final settings. I have changed the limits for the wind only today, but I have extended the time period for the graph from 10mins to 1 hour. The wind has recorded over 1.1 m/s which may not seem a lot but at times has blown garden furniture around and the bins.
A gusty night, tried M101 but after a few frames it was cloudy. Used the Tak FS102 taking 5 minutes unguided as M101 was at the meridian. Gain 7 and Offset 30 which worked well but this is a faint galaxy.
I was joined by Bob remotely and also tried to get Venus alongside Mercury as they were close together, in the Esprit 120ED on the travel setup and Bob tried through the Tak in IMT3. However I could not locate in the Esprit on the travel setup due to cloud then the roof of the neighbours house. Bob on the other hand could fit either Mercury or Venus in but not both due to the rotation of the camera. It is currently sat at 118 degrees whereas the OS is set to 187. Once both cameras have been cleaned we will set these along with the Esprit on the Paramount MEII to the same field rotation.
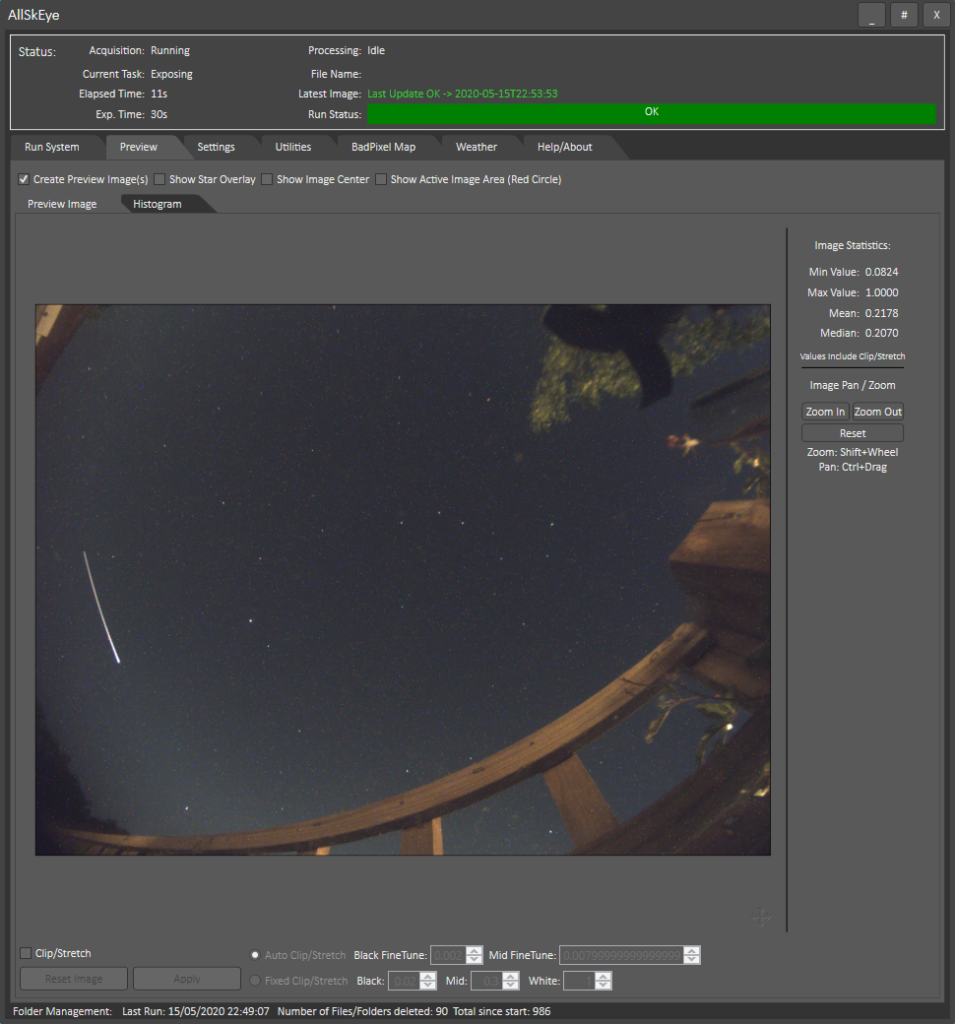
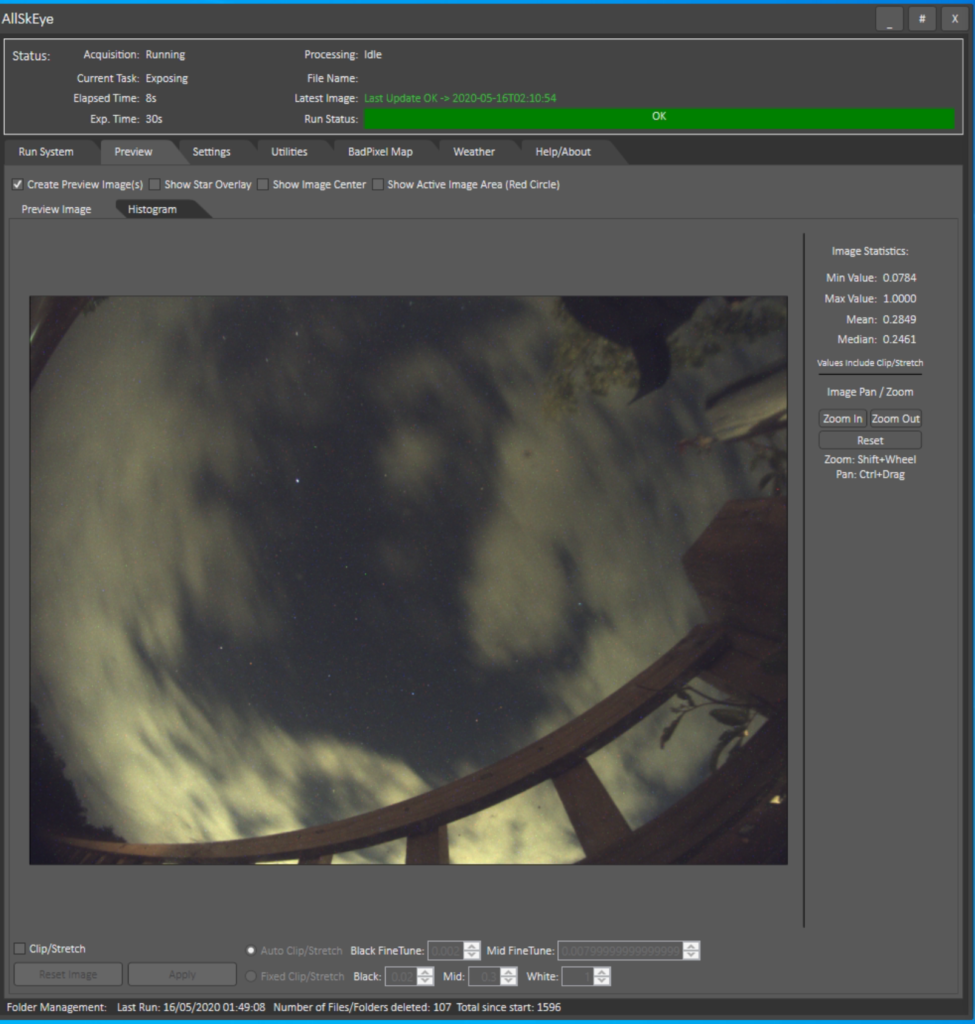
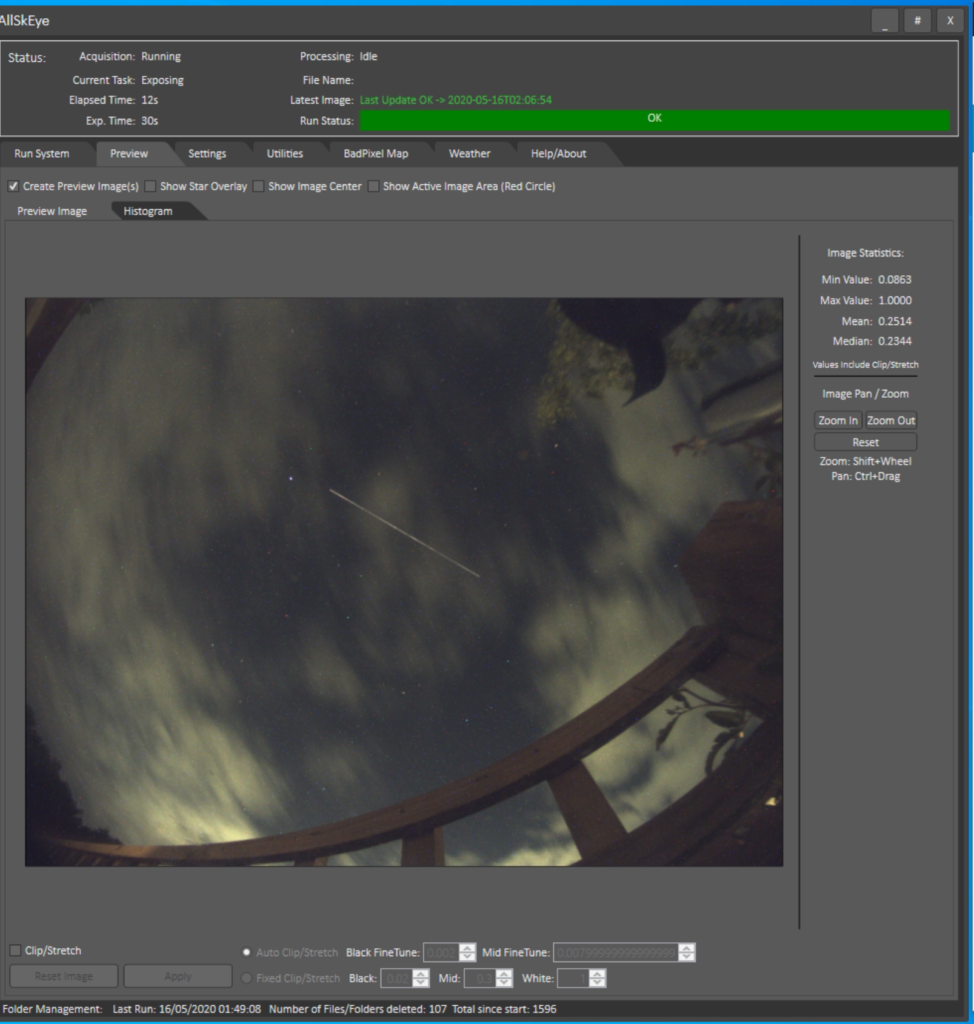
So for a short period of time we had settled on using AllSkyEye. Recently we noticed that the author had issued a Kerogram and stretched horizon generate of the latest image but only available in a new Pro Edition.
The Pro edition was only £20 for a 3 user license, the author gives this purchase as a donation to the charity of his choice – good man ! So now we have AllSkyEye Pro in use at the IMT2 and IMT3 domes.
Latest Image with custom text overlays
Latest Image Horizon Projection
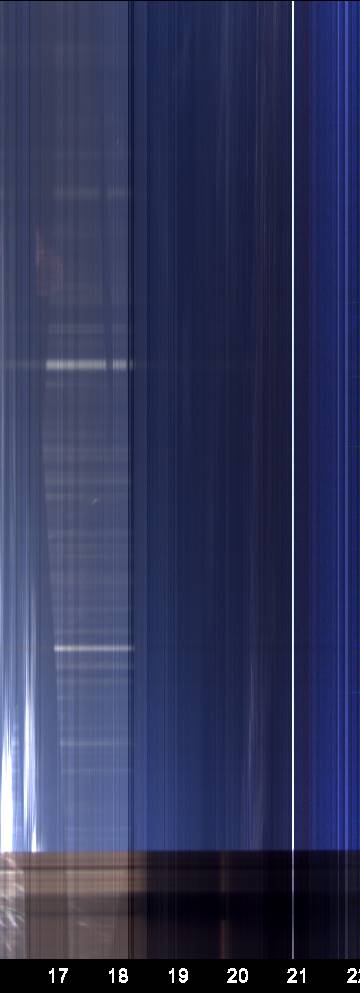
A Keogram is an image composed of slices taken from images in a sequential time order.The slices (which are always taken from the same location and with the same shape) are stitched together to form an image displaying a timeline of the selected part of the image as shown below.
Keogram
We still have the dark map to take to remove the hot pixels from the image but at the moment it gives us a nice view remotely before we decide to open the dome – that’s if the AAG Cloudwatcher limits agree and it thinks it’s safe to do so of course !
Bob noticed we had our local security guard aka Fluffy watching over his night’s imaging and turning to watch an ISS pass.
Fluffy stands guard at the weather station as the ISS passes over
Just setting up for an imaging run and to test imaging without temp compensation to see if the 12″ keeps focus without it. I started by myself then was joining by GingerGeek and then Bob.
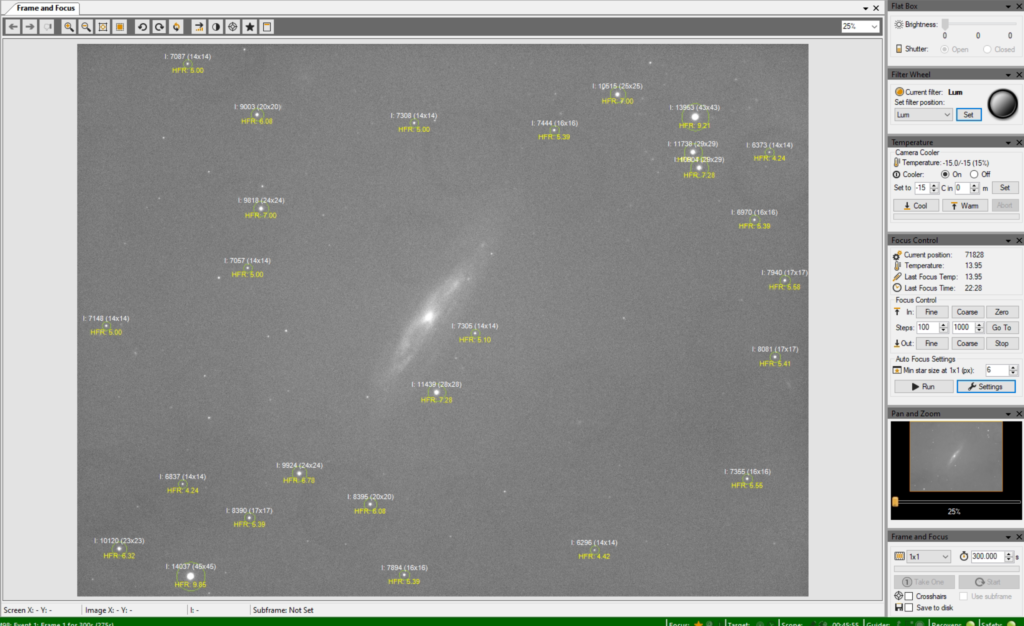
Performed a SGPro autofocus run on Mag 7 star produced focus position of 71,828 @ 4.6 HFR at 14.47℃.
1st autofocus runResulting M98 image from 1st autofocus run
The resulting image was good with good star shapes. Although I suspected at this point the seeing was not excellent.
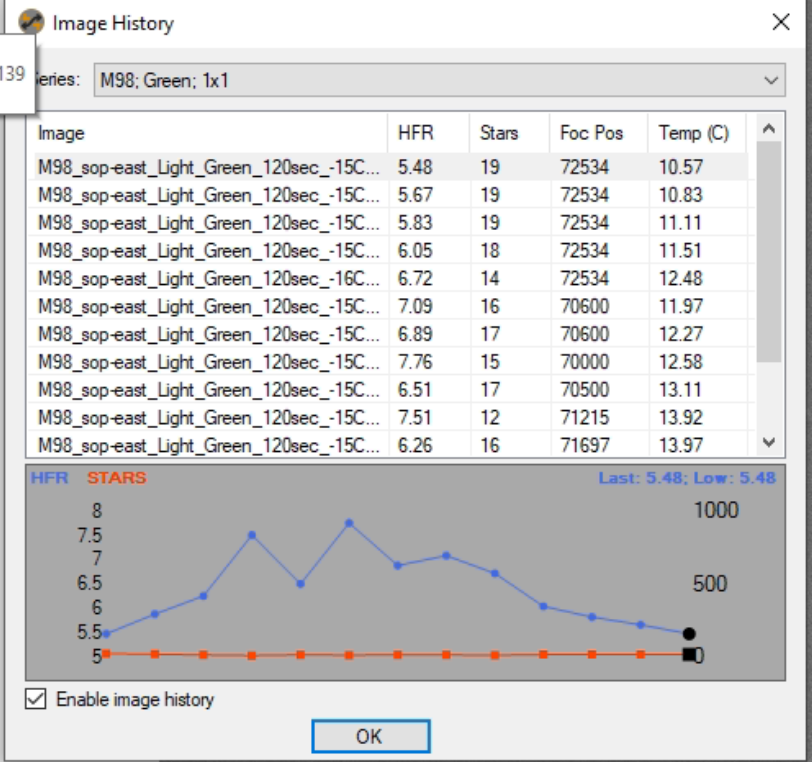
I let the sequence run for a bit imaging M98 through LRGB and then decided the HFR was gradually getting larger so I performed a 2nd Autofocus run which came in at position 72,215 HFR 5.7 at 13.97℃.
Again I let the sequence continue for at least 4 images and the performed another Autofocus run, note all the time this was on M98 and not slewing away to another star. This came in at focus position 72,697 @HFR 5.7 at 13.82℃.
I continued this routine again and performed another Autofocus run on M98 focus position 73,441 HFR 5.4 at 12.98℃.
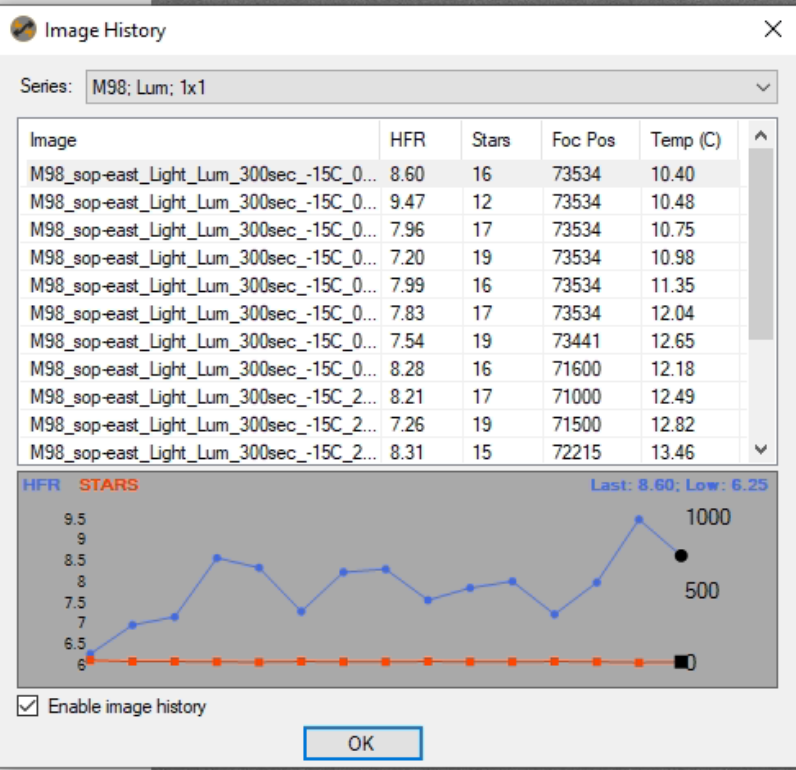
I then decided, due to struggling to get a good HFR on focus runs to see if the autofocus was introducing an issue so I changed the autofocus setting from 9 data points to 11 data points to try and get fuller deeper curve. The resulting curve was better and more complete on both sides of the U shape. I then imaged further and then attempted an autofocus with the settings change for the step size from 2500 to 1500 and data points from 11 to 15. This was because I felt we always have a flatfish bottom to the autofocus which at this focal length of 2.5m shows the quality of the seeing with a narrower flat bottom being better seeing. The new autofocus came in at position 73,534 HFR 5.1 at 12.66℃. Meanwhile we kept noticing satellites going across the ASC which I now believe are potentially StarLink so very annoying.
ASC with Satellite
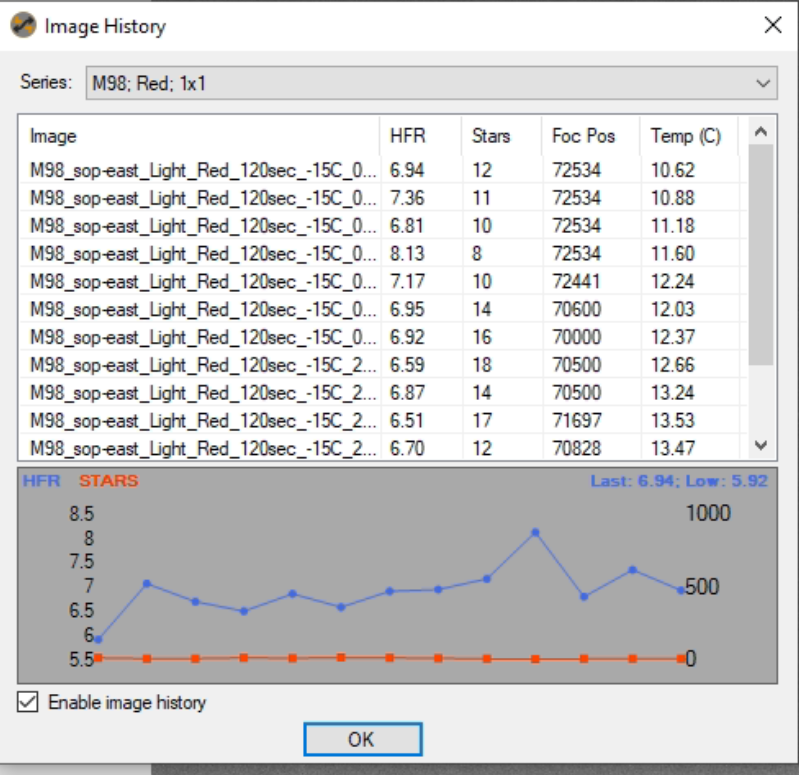
The new autofocus settings seem to work better. Anything less than 1500 step size would be less than the seeing, as proved tonight so I may find that 2000 is ideal, a test for another night. Also noted that Red filter was showing the worst HFR changes due to seeing and humidity was around 75%, again worthy of note to see how good the seeing is. The guiding was all over the place tonight, again another indicator of poor seeing. So all these things are not poor setup or poor software but poor seeing!
This I believe was the ISS going over captured in the ASC.
ASC and ISS
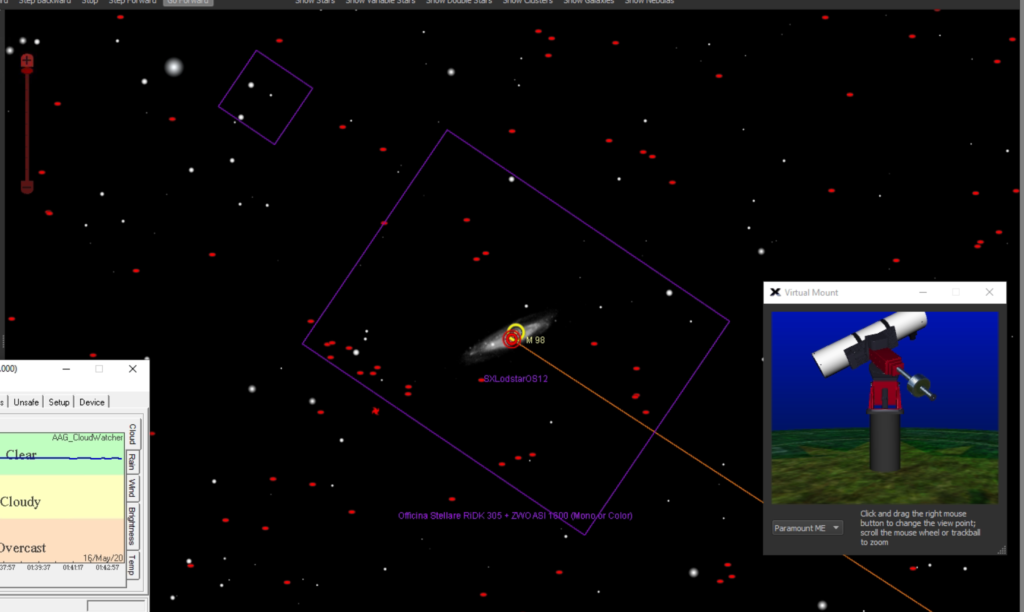
I was really pleased GingerGeek and I had spent time a week or so ago when the Moon was around working out the location of the Field of View (FoV) indicator on TSX, it makes it much easier to find a guide star, although tonight M98 had a couple strategically placed which was great.
FoV for Off Axis Guider and the OS main camera
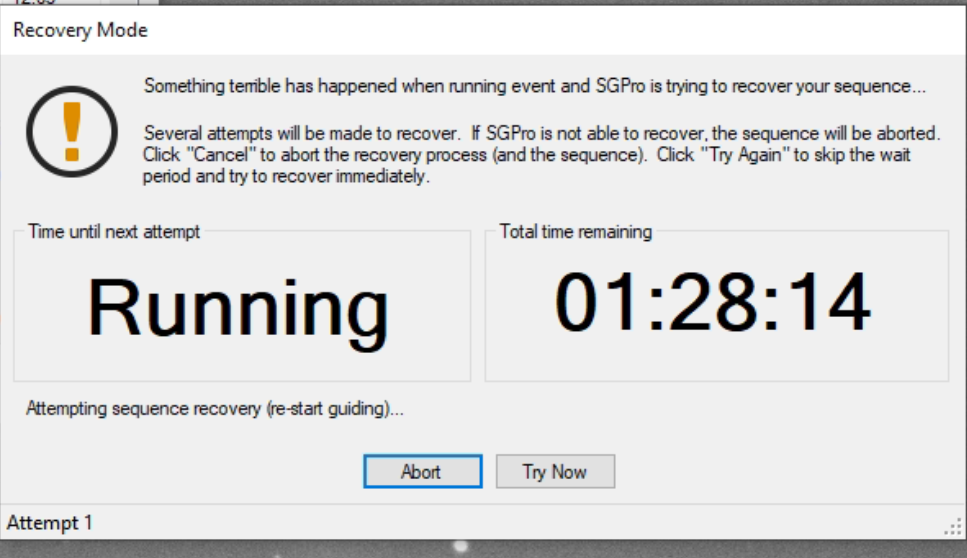
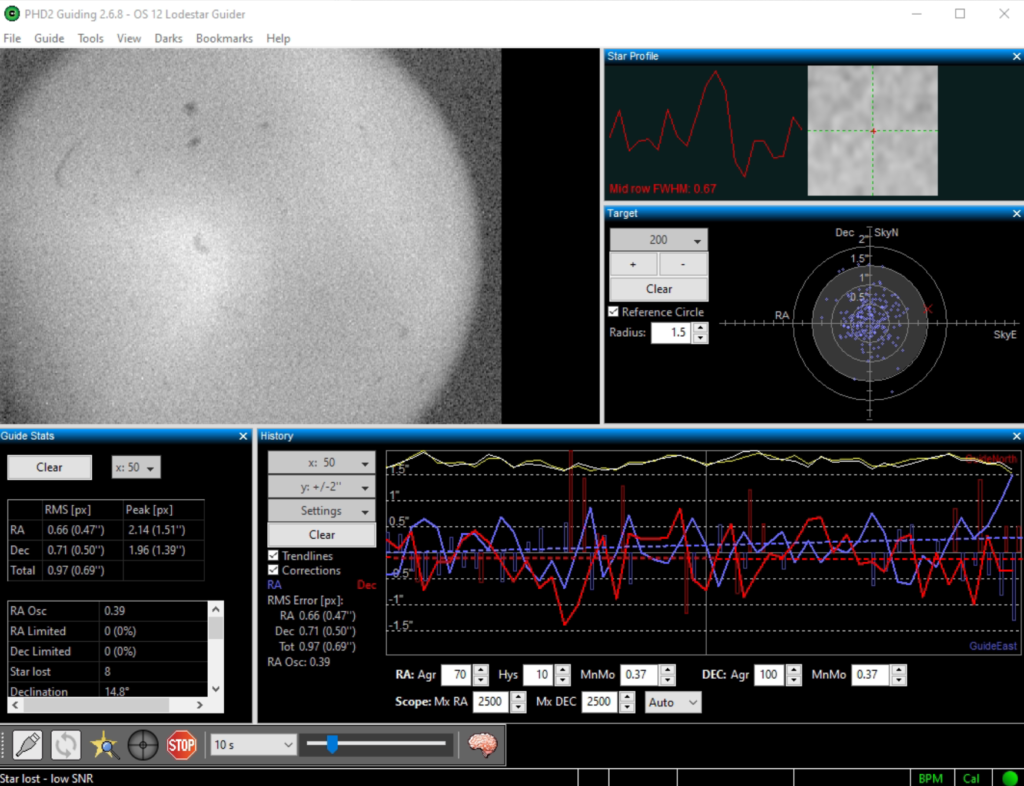
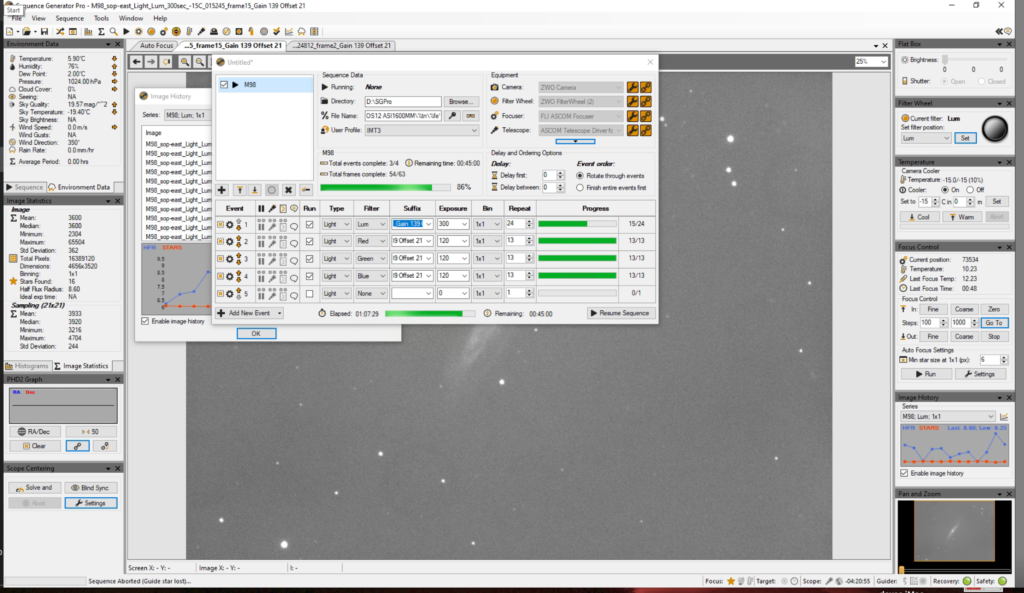
By 2pm the cloud had started to appear, first at South Winston with Steve’s setup, then at Mil Dave’s at Tadley and finally here some 15 minutes later. The guide star was lost by PHD and SGPro in a well ordered fashion did what it is really good at and stopped imaging.
SGPro can’t continue imaging due to guide star loss 🙂PHD2 and guide star loss due to cloud
Here is where I got up to so LRGB on M98 for the night with 15 x Luminance and 12 x Red, Green and Blue was the original first image for each was there wrong exposure time, so RGB at 2mins and Luminance at 5mins. Very happy for an evening testing and gathering data at the same time.
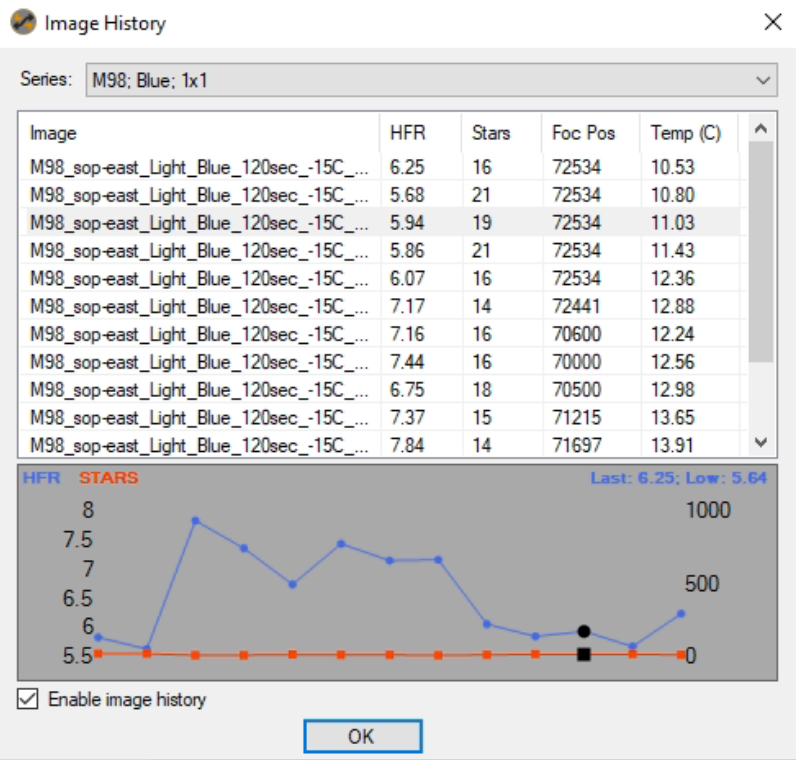
Here is a set of image statistics charts for each filter for the HFR changing over the evening whilst I refocused. Next time I will focus once and not refocus and see what happens with the temperature drop.
Final look at the AAG weather station as the cloud sensor which is Infrared makes the dome unsafe and shuts it.
AAG Weather Station now Cloudy
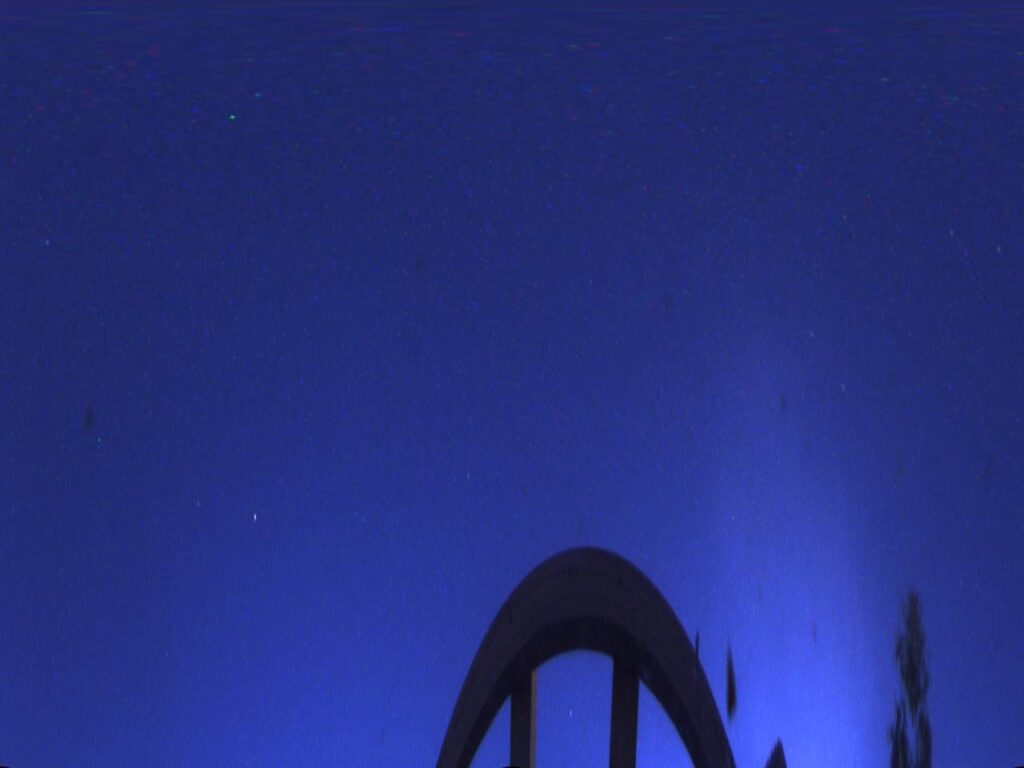
Here is the final view from the ASC
ASC and cloud
and of course to finish the evening off another satellite!
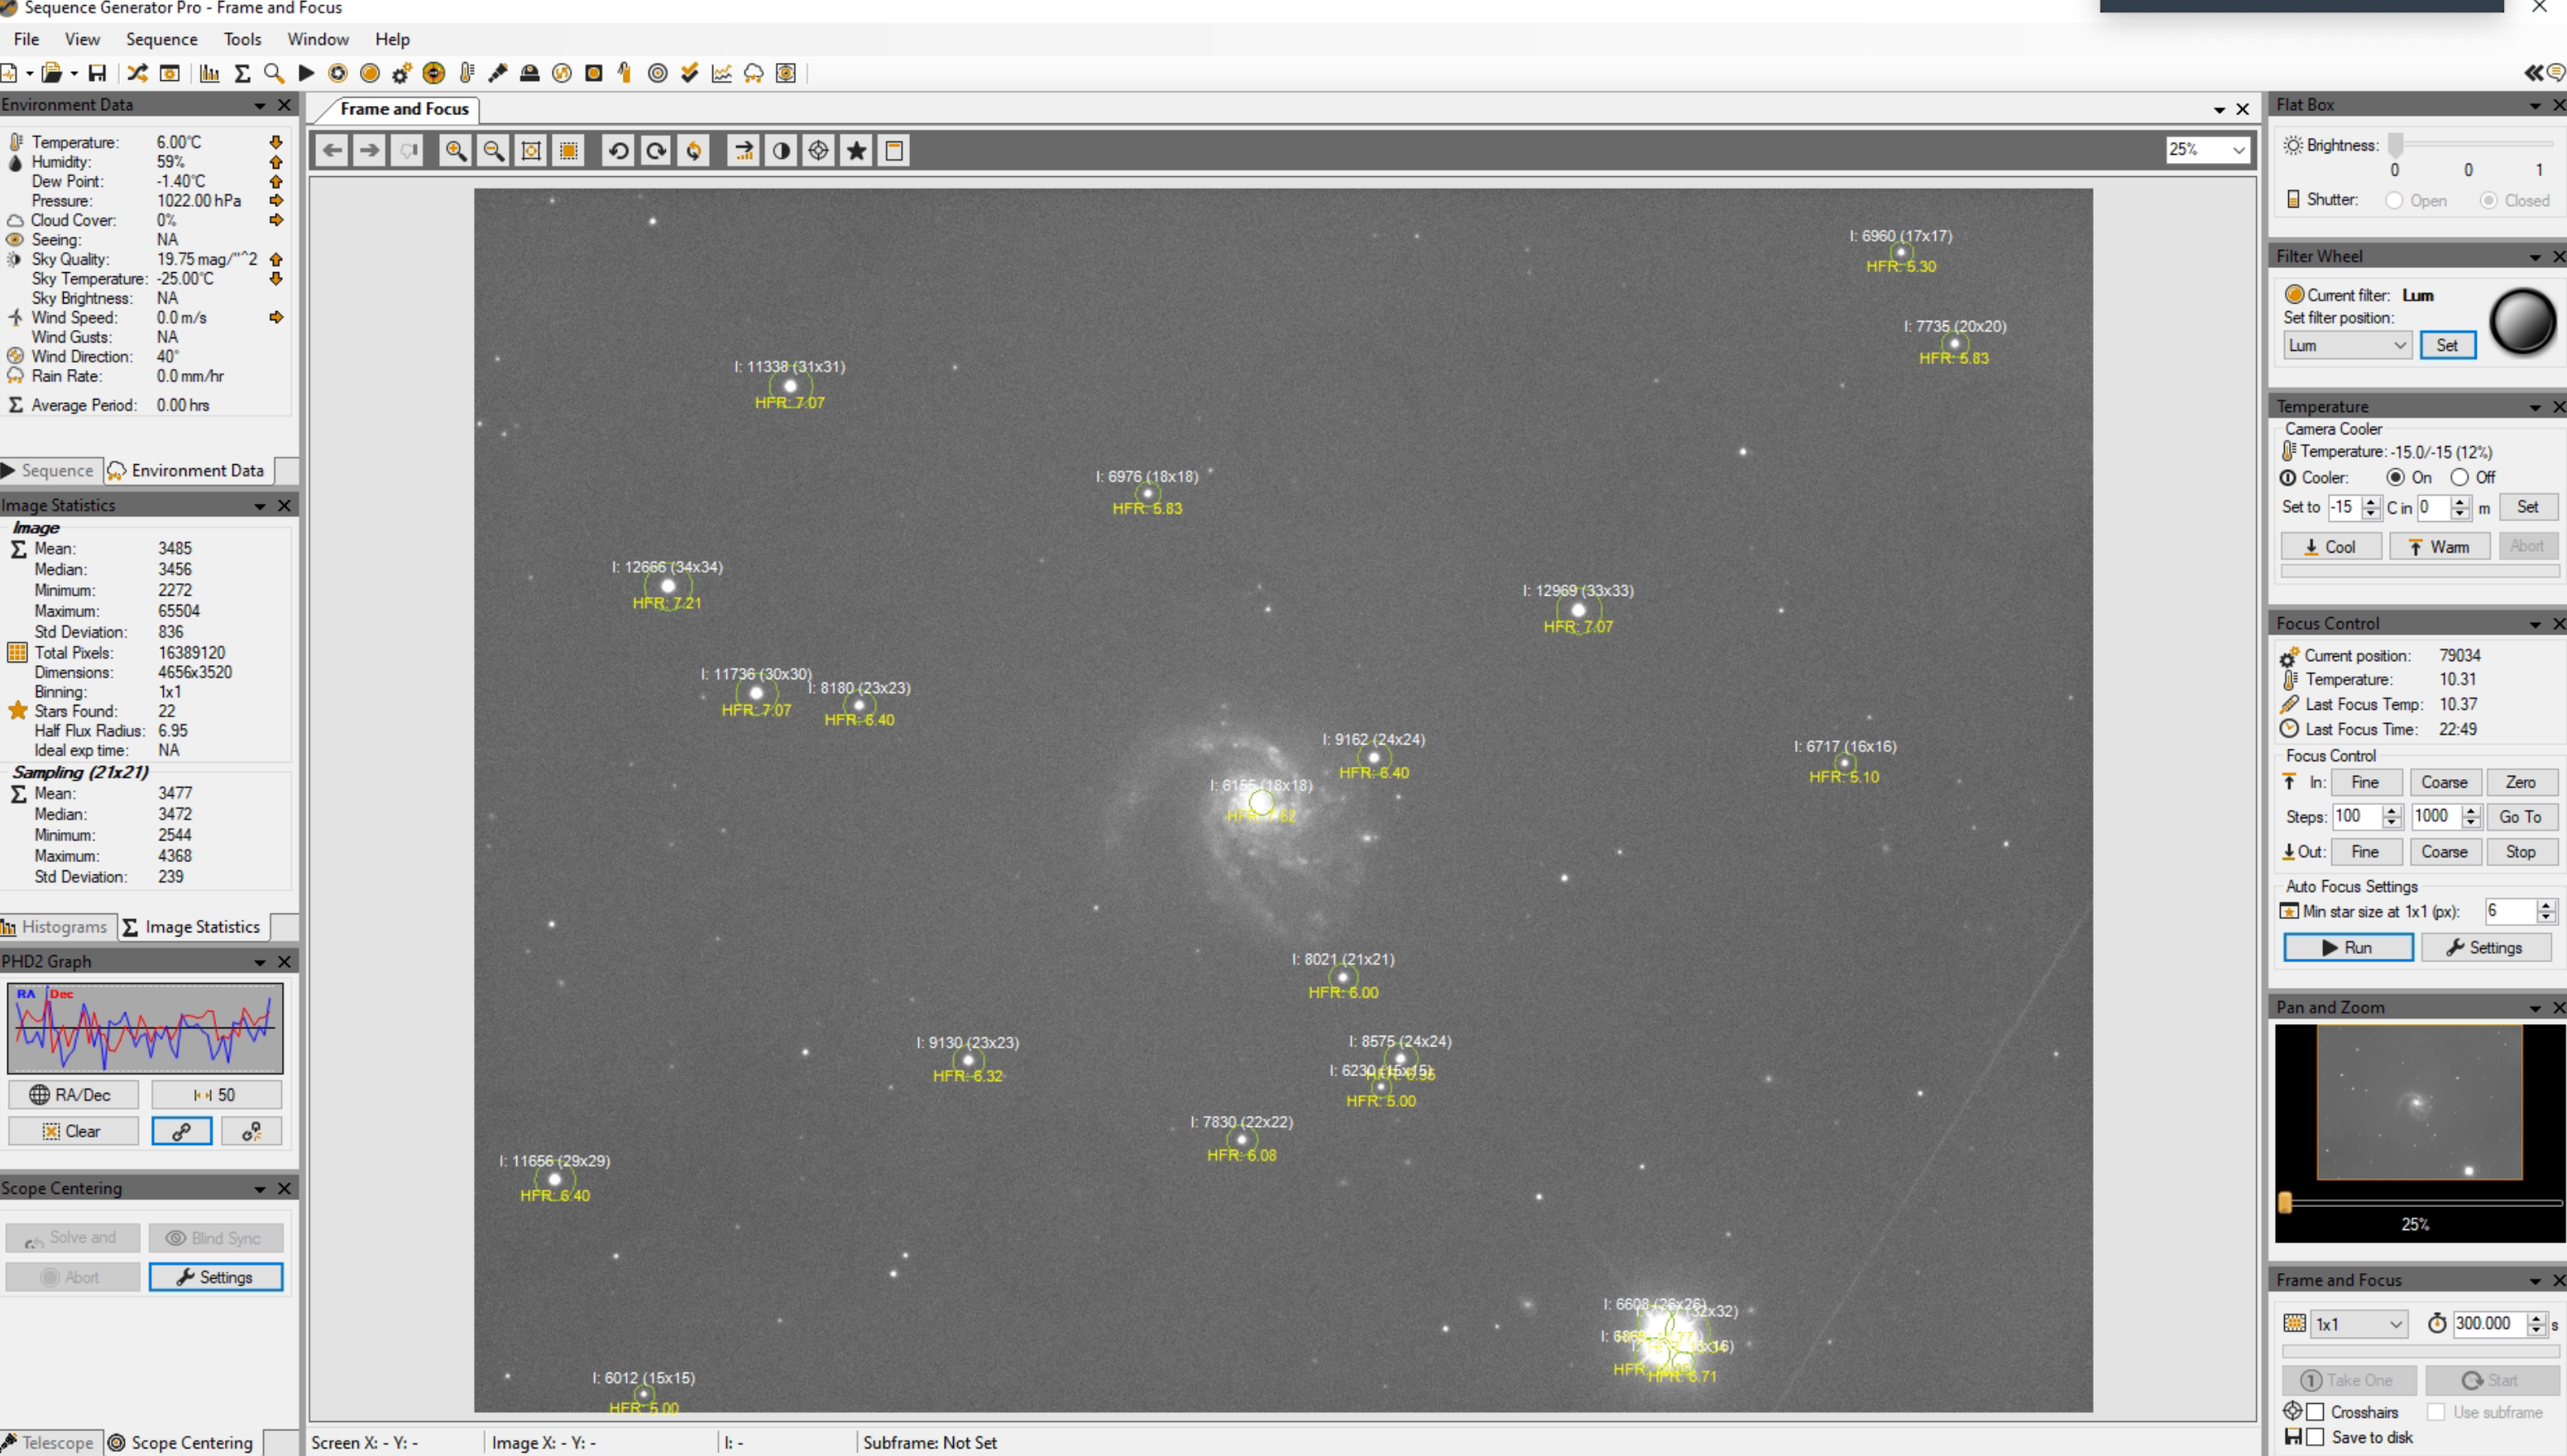
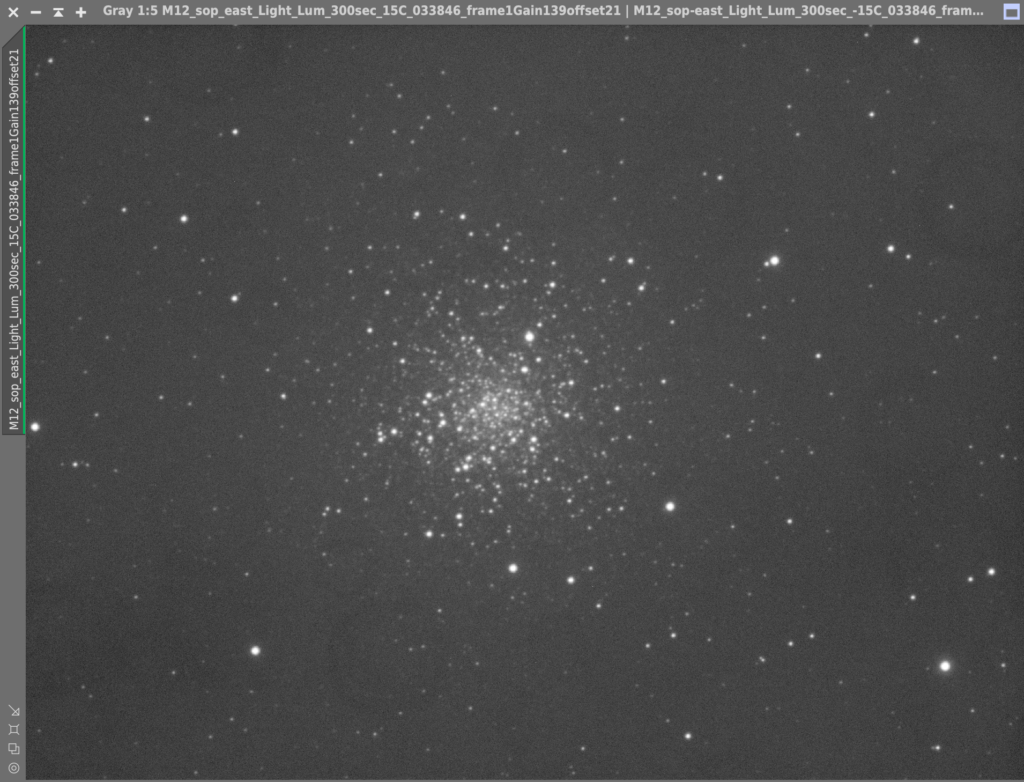
Imaging M99 and Bob did M12 later. Some of the luminance for M12 will need to be thrown as it was too bright, however the RGB data is good. We managed to bag 24 x 5 minutes luminance for M99 and a set of 12 x 2 minutes RGB.
M99 Quick frame and FocusM12 5 minutes Luminance
This is a stacked version of the Luminance data.
M12 Luminance stack
This is the final imaged that I then processed for M12 on 5th December 2021! This was a combination of 62 x 1min Luminance and 7 x 1min for RGB channels. I need to bring out more of the data from the luminance in retrospect.
22:05 Frame and focus on 9.26 and 7.64 magnitude stars used before moving to M61 to capture some Lum frames for calibration of flats to solve the doughnut embossing.
22:18 Slewed to M61, performed Solve ‘n’ sync, slew here for centring the object, ran four Luminance subs of 300 seconds each (Bin1x1) at Gain 139 and Offset 21. This was completed by 22:38.
22:45 Chief TOSA then warmed up the CMOS camera, set the filter wheel to the empty slot position, powered off and disconnected the camera and filter wheel. This was so the ASI1600MM and filter wheel could be detached and a blanking filter installed into the empty filter wheel slot position without having to open up the filter wheel. The idea is that we move to the blank filter position when taking Dark subs to prevent light leakage on the Officina Stellare 12-inch.
22:55 Everything was back online and the SGPro profiles were modified to reflect the new blank filter location.
23:13 Unfortunately a dust mote was introduced onto the CMOS sensor window so we sent Chief TOSA back out to the dome to do the job properly this time 🙂 This meant parking the mount, warming up the camera, powering off the camera, remove it, clean the sensor and reattach the camera.
23:24 All reassembled and powered back on, slewed to NGC 4147 (Globular cluster) ready for a a 60 second Lum filter test which showed that a decent cleaning job had been done ….. about time too !
23:40 As it was getting hazy/cloudy it was decided to collect some calibration frames, in this case 25×10 minute dark subs at Gain 39 Offset 21 using the new blank filter.
23:50 We logged off from the remote session and left the dark frame sequence running until it was due to finish in the early morning.
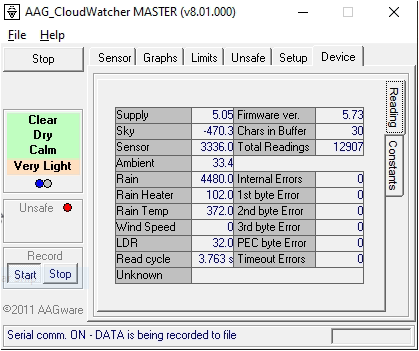
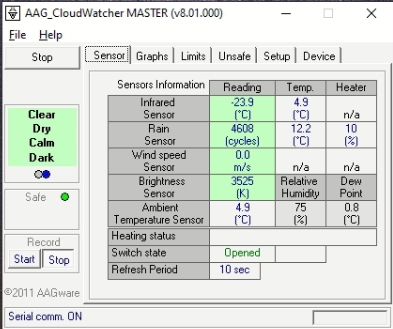
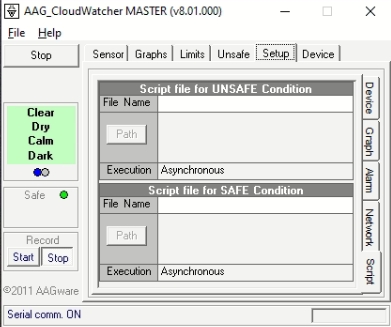
We recently decided to replace our existing weather station with one that had better ASCOM integration. I had previously looked at the AAG CloudWatcher but at the time felt it offered more than we need but that turned out to not be the correct choice.
We ordered the AAG with an internal humidity sensor, the optional anemometer, mounting kit and 10 meter communications cable. Due to the ongoing human malware situation it took two weeks for it to arrive from Spain and was delivered to the IMT3 chief TOSA.
Once the new PSU arrived the Chief TOSA then set about removing the existing weather station and installing the AAG cloudwatcher.
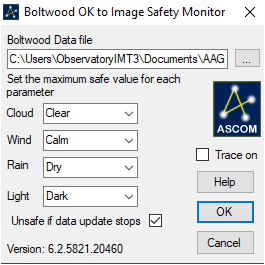
All Sky Camera, AAG CloudWatcher, Unihedron SQM and another rain sensor
This also meant connecting the safety relay circuit wires to the Pulsar Dome, installing the AAG software, downloading the ASCOM boltwood driver and configuring SGPro. Within SGPro we have set the safety status set to be “OK to image” where the required conditions are more stringent than the conditions for the dome to open. The reason being that we want the dome to open as the light begins fade and allow the scopes to cool down but not be okay to image until it is dark.
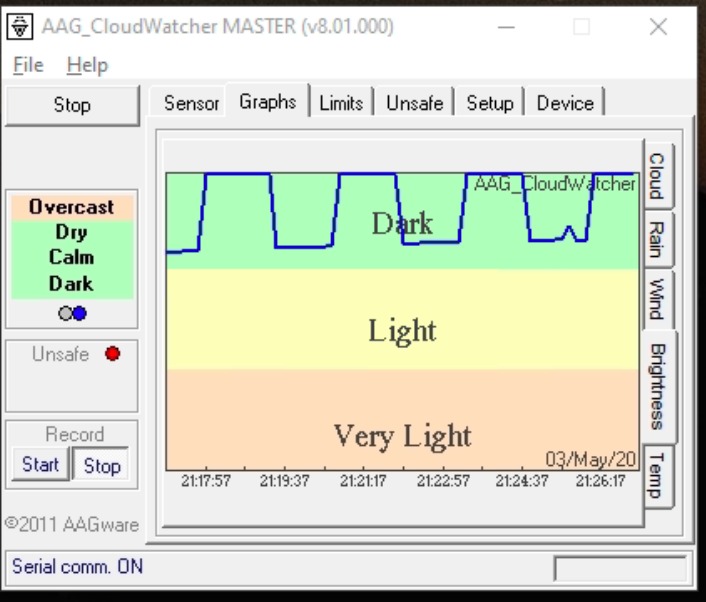
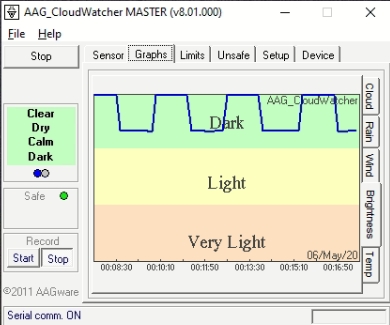
On the first night of operation we ran into a problem. Unlike the other sensor readings and graphs we would see the temperature and cloud readings have an expected shape but the sky brightness sensors kept going up and down at a regular interval then gave the graph a saw-tooth shape.
Unfortunately this resulted in the safety status going on and off until we overrode it. We sent a quick email to Lunatico reporting the symptoms and asking for advice. It didn’t take long for Jaime to reply informing us that another customer reported the same issue and asked for a few days to investigate.
Good to his word we received an email from Jaime explaining the issue and asking if we could perform a firmware upgrade. Now due to the current lockdown restrictions this meant that I had to co-ordinate over the phone with the resident Chief TOSA to physically disconnect and reconnect the power whilst I remotely set the firmware update. The initial issues encountered were due to PEBCAK (Problem Exists Between Chair And Keyboard) as I had not read the documentation correctly !
New Firmware 5.73 loaded
That evening we watched and the Sky Brightness line graph was now as expected and not looking like a cog shaped wheel. Well done Jaime@Lunatico.es for the quick response and fix, Chief TOSA was a happy dome dwarf again and that’s what counts !
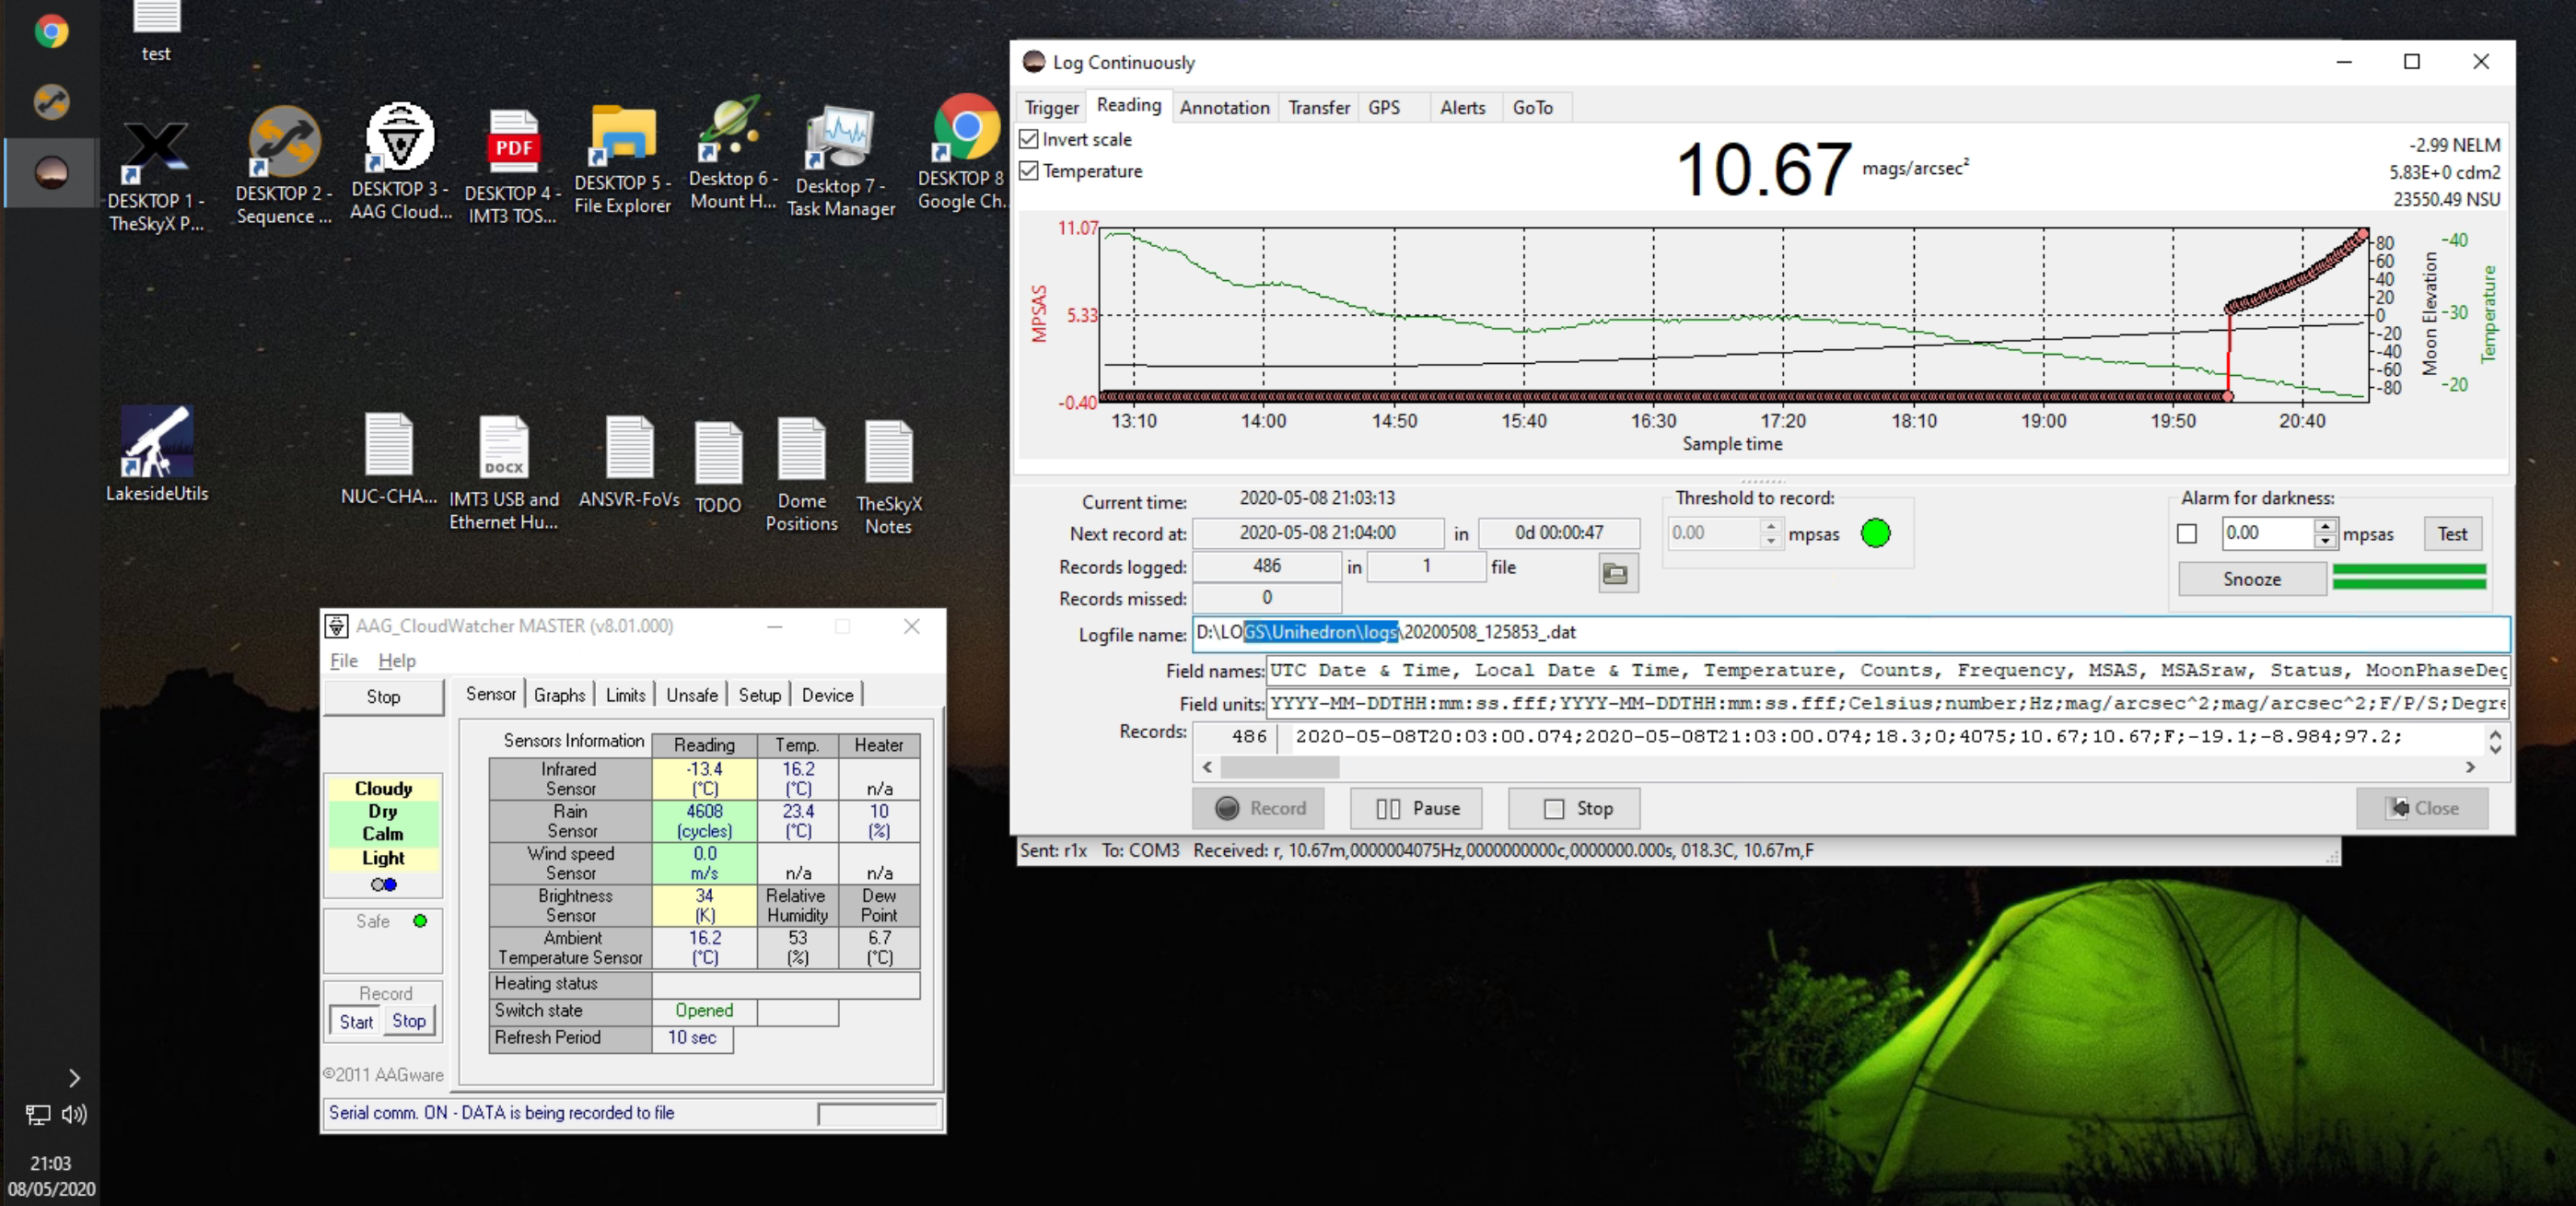
At the moment we are trying to get the cloud sensor to be more accurate to what we visually observe, this is an ongoing effort. We decided to record the AAG Sky Brightness sensor readings at various times and compare with our SQM readings :
Event
SQM
AAG Brightness Value
Civil Darkness
13.08
949
Chief TOSA setting OK to open
13.89
2100
Nautical Darkness
18.92
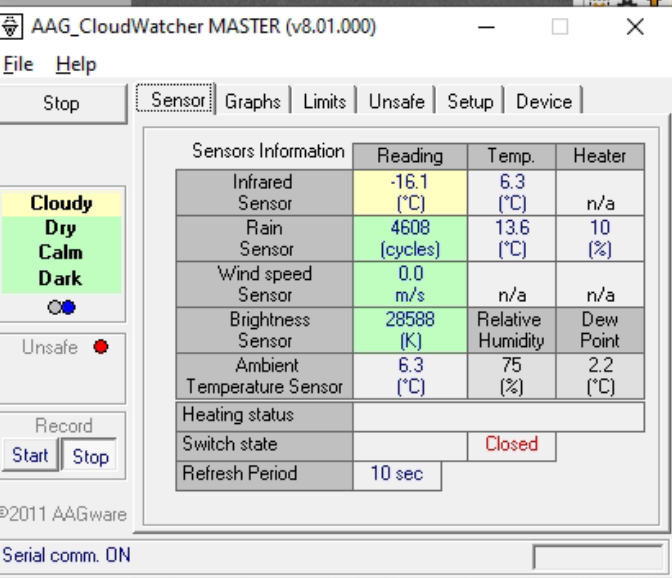
28588
Astronomical Darkness
19.03
28588
Using the above values it looks like we could reduce our chosen threshold level of 2100 to 1000 in order to allow the dome to open and the scopes to cool down. The Sky Brightness does not appear to change beyond Nautical Darkness. We are now investigating the correct value for the early morning from the AAG logs. This is so we know what the Sky Brightness value should be at which to stop imaging and close the dome in the early morning when unattended.
We still have at lot to configure and read up about using the AAG CloudWatcher but at the moment our initial experience is a positive one. Obviously we will be chatting to Lunatico about our level settings and make some suggestions regarding the software.
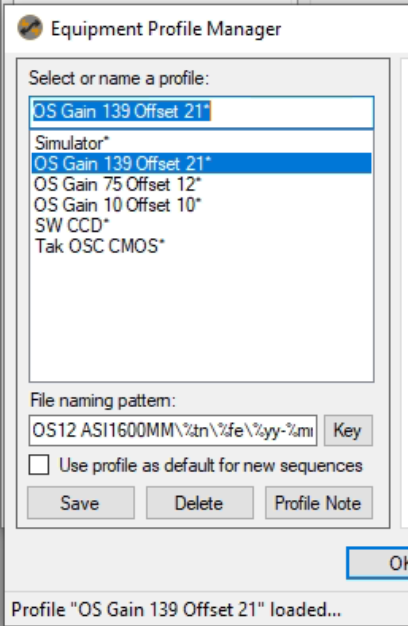
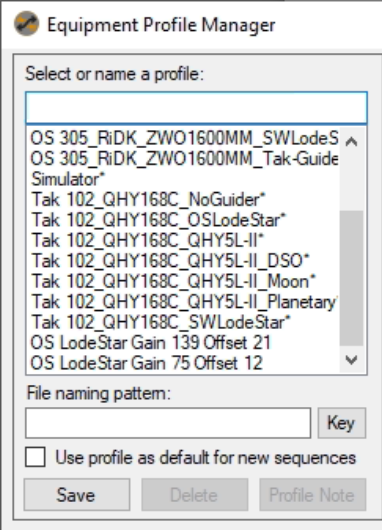
Bob, GingerGeek and I rationalised the SGPro Profiles and created a smaller set to account for the fact we could now dynamically change the guider in SGPro and also simplify the Gain, Offset and the sensor set temperature within the profiles.
Before we did this GingerGeek recorded the Brightness value from the AAG weather station and the SQM reading as nautical twilight occurred
AAG and SQM readings at Nautical Twilight
We agreed on the following basic parameters for imaging. 3 profiles for the OS OTA at 3 different Gains and Offsets. 1 profile for the Tak with the need to change the parameters of the camera to one of the 3 correct Gain and Offsets now documented in the TOSA manual. Finally 1 profile for the Tak and as it is a CCD then there is no Gain or Offset. We also agreed the premise of exposure times for the 3 OTAs to make calibration frames simpler – 1, 2 minute for RGB on the OS, 5 minutes for Luminance and 10 minutes for narrowband. For the Tak as it is a OSC we agreed on 1, 2 and 5 minutes. For the Sky-Watcher Esprit 1, 2 and 5 minutes for Luminance and 10 minutes for narrowband. We also agreed on the temperature of the scopes to be run at as suggested by Dave Boddington, we have gone for semi-simple. So for the OS and Esprit we will image at -15℃ in Summer and -25℃ in Winter. For the Tak we will image at -20℃ all year round. Note the new Flats are at the new lower 23k ADU setting.
New set of simplified profiles
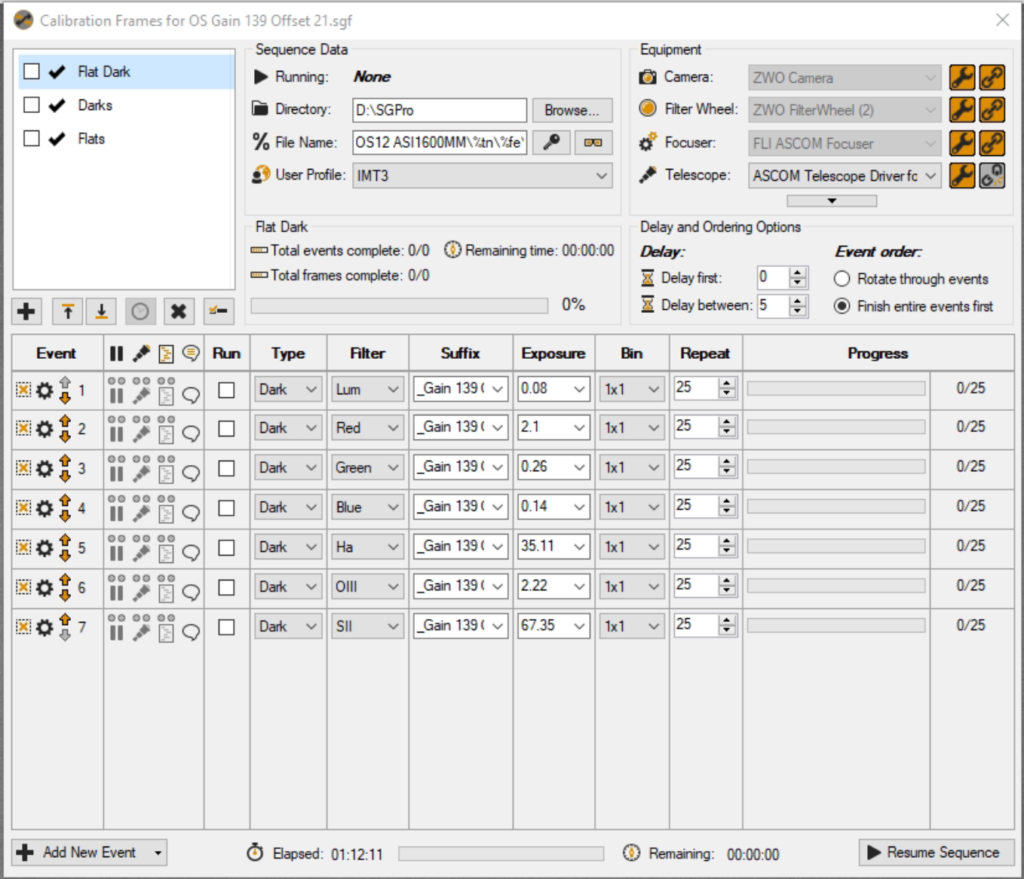
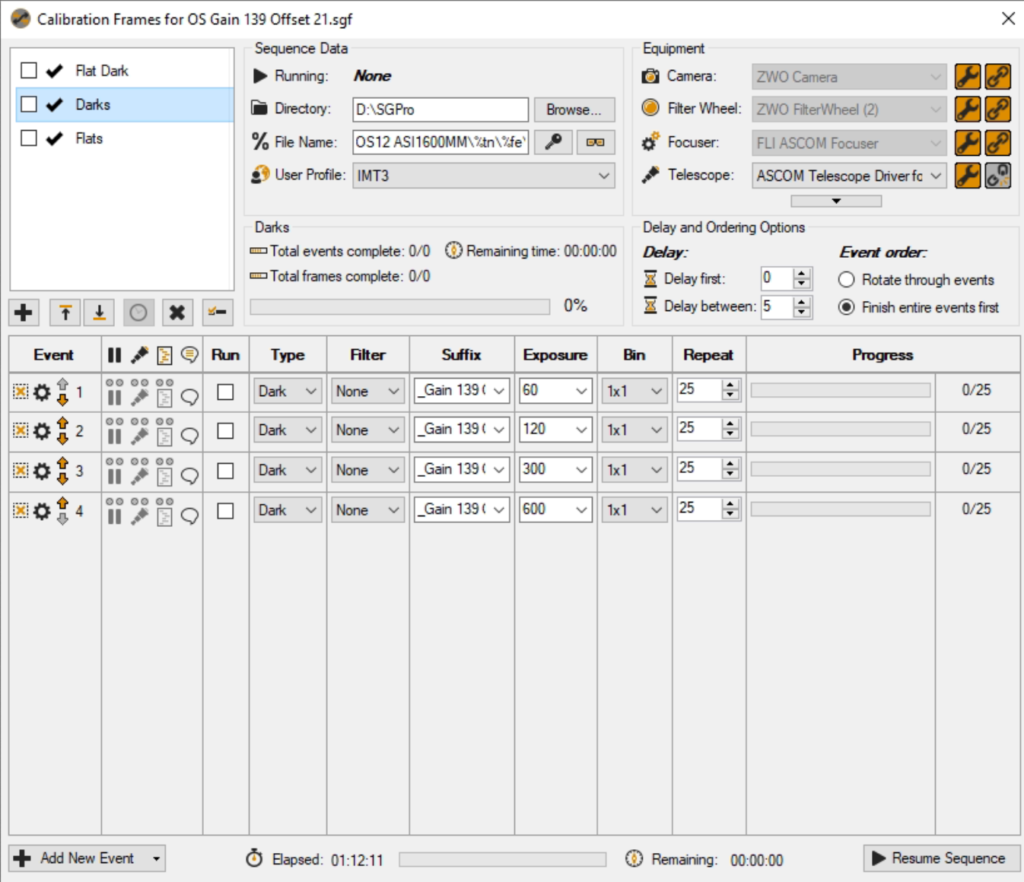
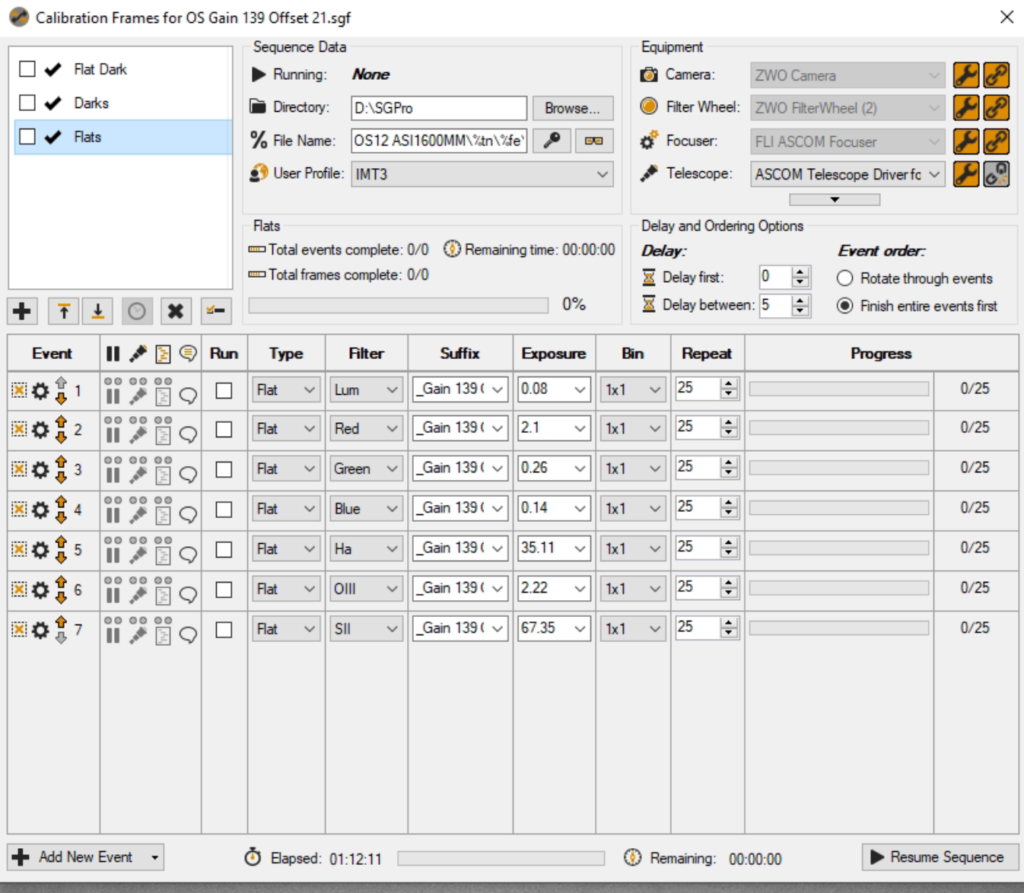
So now all the profiles were changed and setup, we set a sequence running for OS Gain 139 Offset 21 for Flat Darks and Darks 1, 2 and 5 minutes. We will need to do 10 minutes tomorrow night. The Flats incidentally for this set of calibration frames was then completed the following morning by 11am before the Sun got too high and the camera failed to cool to -15℃.
Flat Darks for new profileDarks for new profileFlats for new profile
Finally I saved the sequence as calibration frames for OS Gain 139 Offset 21 so that it is now easy to pull this up and redo if needed. I also took Bob’s advice and separated out the Flat Darks, Darks and Flats into different tasks. So tomorrow nights job is narrowband darks using this gain and offset followed by starting the new run for gain 75 and offset 12.
Opened dome early switching the safety for the brightness on the new AAG. The first thing to do tonight was to calibrate a little but more the infrared sensor which informs the cloud coverage. This was suggesting it was Cloudy, borderline Overcast and given it was very clear with a hint at wisps of cloud I adjusted the couple of figures for the sensor, from -17 for Clear to -14 and from -14 for Cloudy to -12.
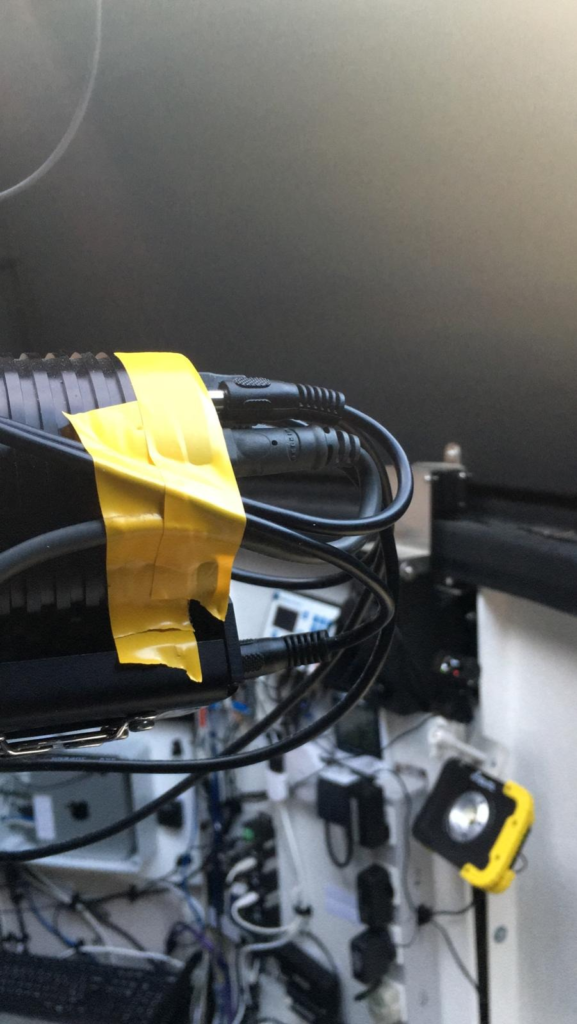
I then set about taping up the USB and power for the SX camera on the Esprit. This is because the connectors supplied are clearly not in tolerance as I have tried many cables and they call fall out. The tape should suffice for the moment and now the camera reconnects to the NUC computer running SGPro.
Tape for USB cable
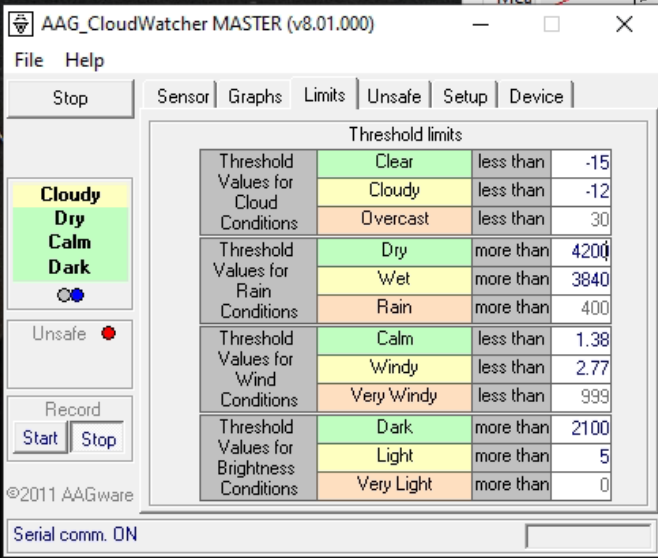
GingerGeek and I started to have a look at the sky around 9pm. The sky was not totally clear with some wisps of cloud. We tried to get to a point where we could test guiding the 12″ through the Esprit, however as ever the clouds rolled in. However, during setting up the SX814 camera on the Esprit as the guider and performing a darks calibration run we got an error on the USB bus again (we get lots of USB errors) which not only kicked out the SX814 but also the AAG weather station. The problem was it almost killed the AAG software and we had to cancel the process running to resolve. This meant we lost all the settings in the AAG so we have tried to rebuild as per the new screen shots below.
AAG Weather Station New Settings
So instead we re-ran the Flats Calibration Wizard for the OS with the camera set to Gain 139 Offset 21 and also another run at Gain 75 Offset 12. The reason for re-running is that I suspect the flats we have are ever so slightly over exposed at 30-32k rather I prefer them to be at 22-23k.
We also created 2 new profiles that were simply named so we can see them in the list and simplify the naming convention and amount of profiles needed. We will choose the guider on the night within one of the two profiles created. We will also look to review and simply the other profiles for the two additional OTAs tomorrow and delete the remains profiles given the large number we now have.
The plan for the night (to try using the Esprit120 as the guider for the OS 12″ if it is on the West side of the Mount) was scuppered as we couldn’t connect to GingerGeek’s SX814 camera. GingerGeek checked in device manager and COM7 is missing so we suspect the USB cable has dropped out again.
Following on the the news earlier in the day of the SN in M61, I slew to it and grabbed some 300s unguided subs ( which also proves that it is the guiding that is moving the mount unnecessarily … but we knew that already !). Thare was a suggesting on the evenings group Zoom call that the drift might be due to ‘Cone Error’, but I found several posts stating that ‘Cone error does not affect guiding’. After M61 dropped into the weeds I slewed to M3 and grabbed some Luminance frames shutting down very tired at around 4am.
Our TOSA Manual needs updating now that we have replaced the HiTechAstro Deluxe Cloud Sensor with the Lunático AAG CloudWatcher cloud detector.
New Screens to get familiar with:
.
.
.
.
.
.
Initially I was unable to open the shutter of the dome. Thinking I’d forgotten to reset the HiTechAstro relay I soon realised I had to figure out why the AAG_Cloudwatcher software was reporting Unsafe. GingerGeek spotted that the Brightness level looked like a sawtooth and should settle after a few minutes, which it appeared to do and the dome shutter opened successfully.
Following on from my previous observing session on 1st May when clouds interrupted play just as I was completing a Guiding Assistant run in PHD2, I started tonight’s session with a quick look at Venus before it set below our horizon and then had another go at running the Guiding Assistant in PHD2 for the OS 12″ / Tak FS-102 combination, with the Tak as the guider for the Officina Stellare.
Venus in Ha (because it’s so bright).
Crop
As the Tak has an Alnitak Flip Flat attached to it I added it to the profile I’ve created for the OS12 and Tak combination so that the panel can be opened to allow light through to the camera 🙂
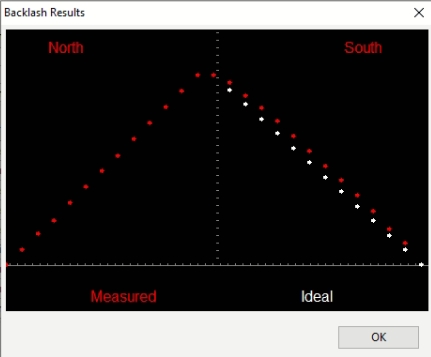
Guiding Assistant completed successfully and values applied for RA MnMo, Dec MnMo and Dec Backlash compensation.
.
Y scale = 2, Target Radius = 1.5
Sequence running for 2, 5, 7, 10, 12 and 15minutes.
2, 5,& 7 minutes exposures ok but trailing beginning to show at 10 minutes, quite evident at 12 minutes and very evident at 15 minutes.
Added 8 and 9 minutes to sequence, but both of these show signs of stars trailing.
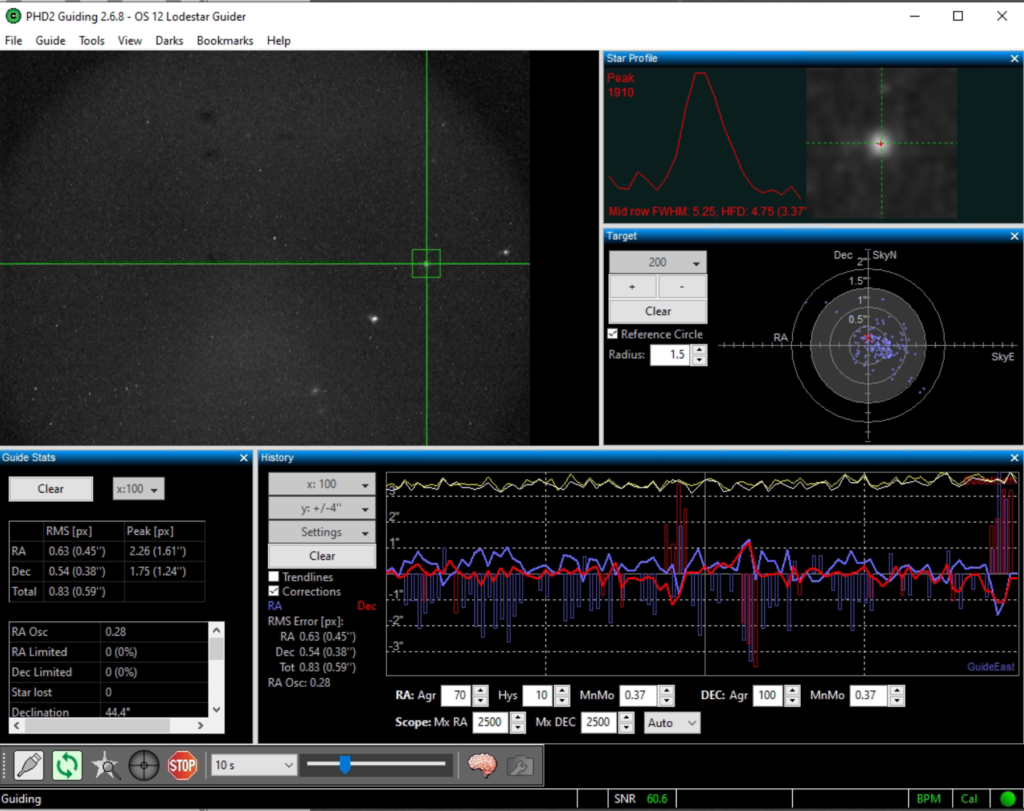
Started a sequence of 24 x 5 minute exposures.
Aborted at frame 20 as the NGC3628 was now below the horizon.
The image has drifted and NGC 3628 has not remained fixed in the frame, so we still have issues with guiding as that is almost certainly the source of the drift.
02:22 Slew to M5, just off centre.
Slew to HIP 74975 to centre and focus.
De-selected guider.
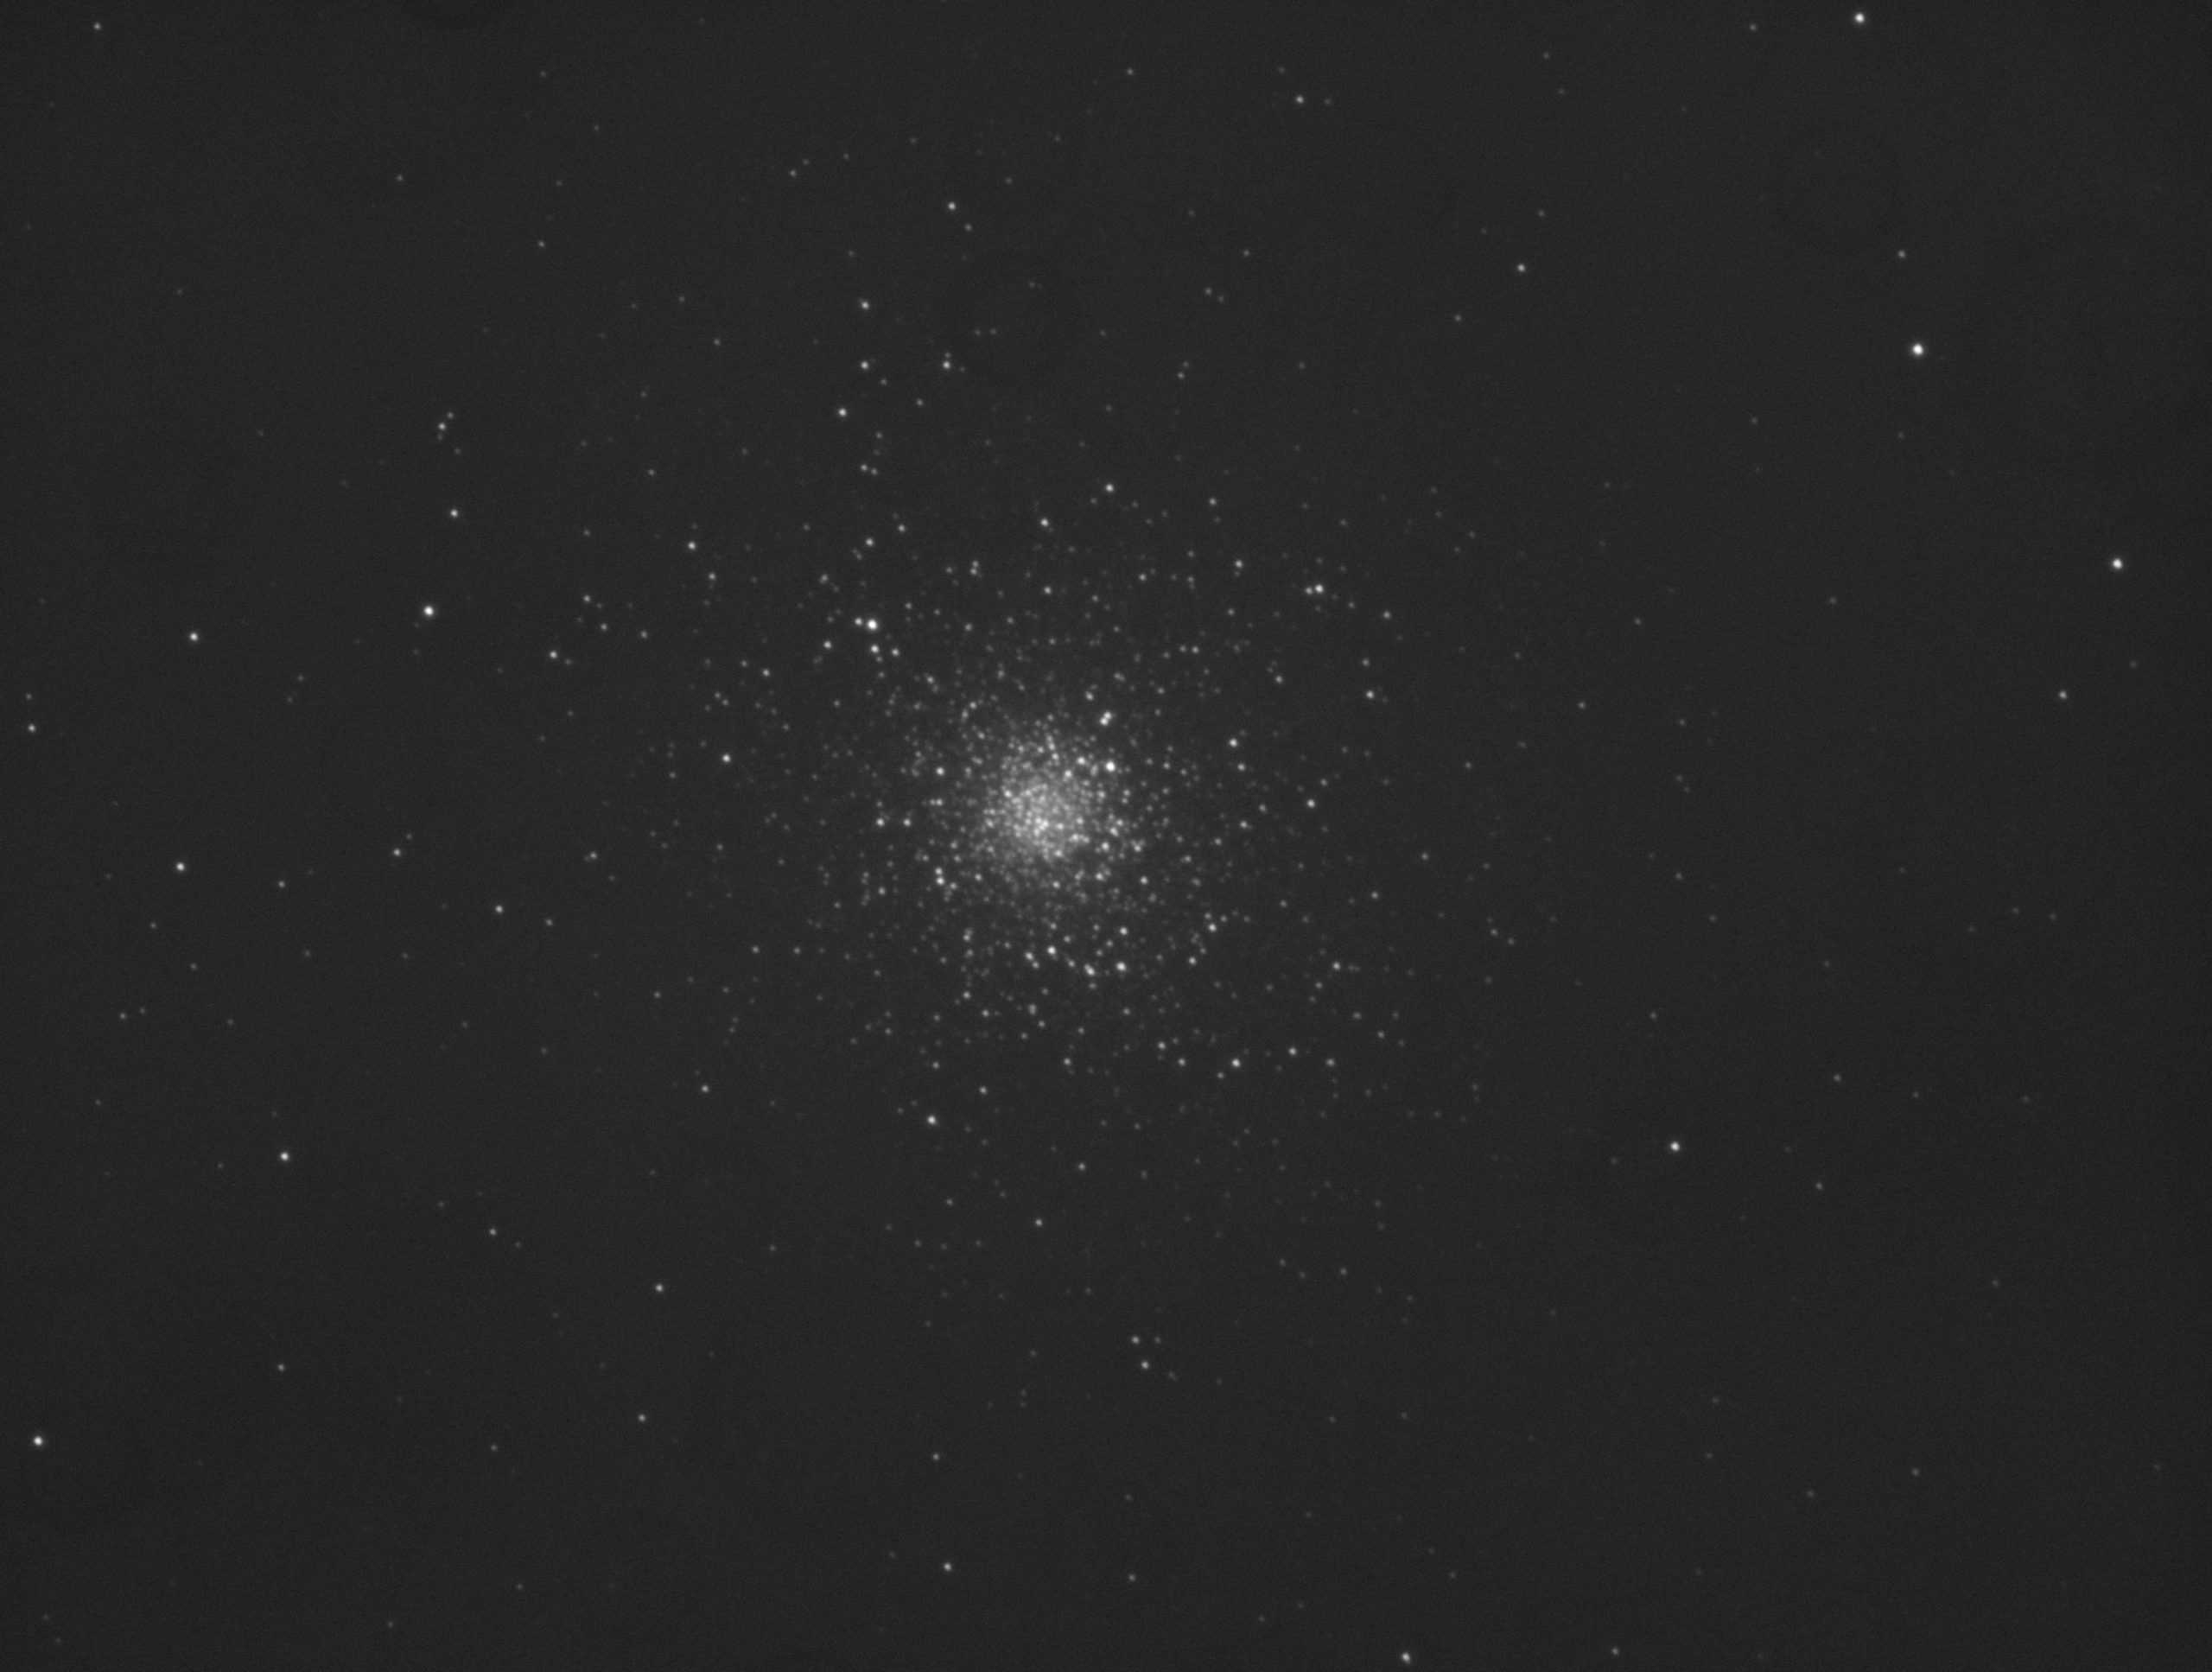
02:57 Slewed to M5 and started a sequence of 24 x Lum and 8 x R,G,B 120s frames.
Sample Luminance frame:
04:08 SQM graph has started to droop. Was 18.2 before 4am, now down to 18


 .
.