So the evening started well, I had logged into IMT3, got the dome ready, TheSkyX/SGPro software was up and running, CMOS camera was cooled and I was already syncing on a bright star even though it was still twilight.
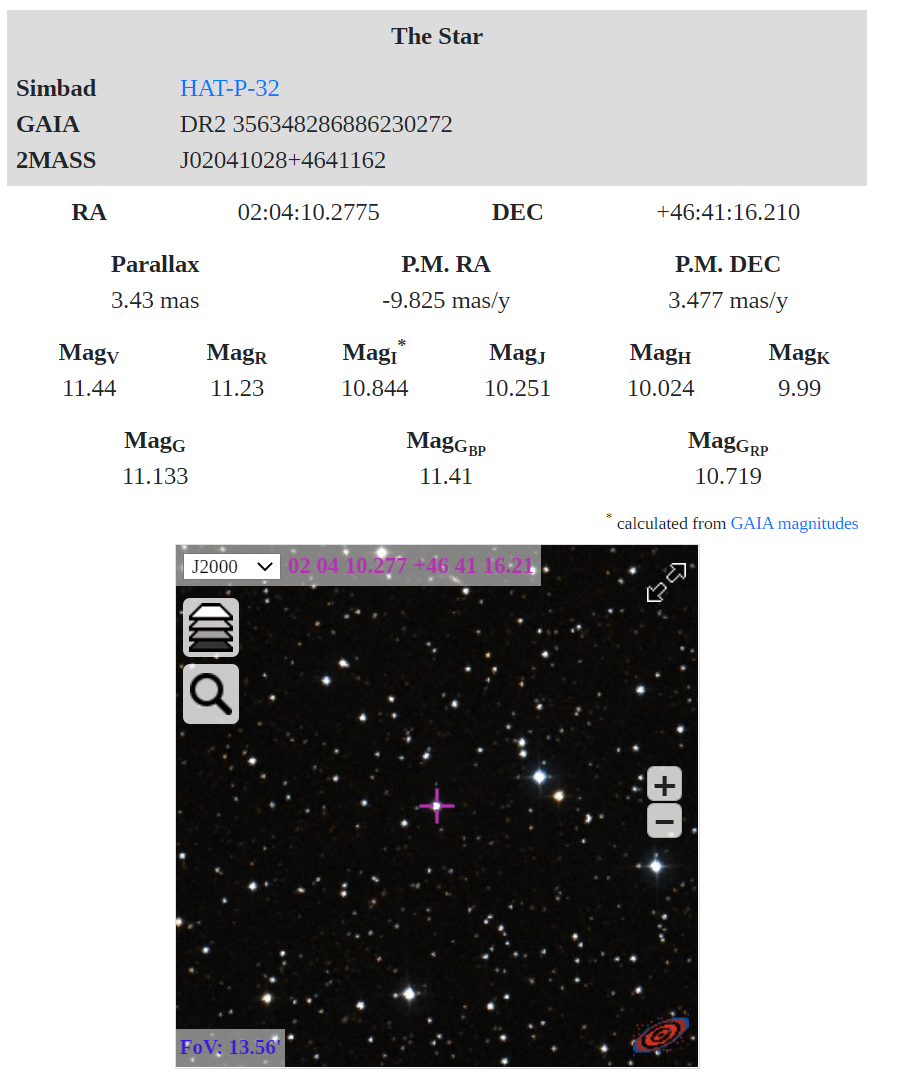
Dave and I had chatted the previous night and had settled on HAT-P-32b in the constellation of Andromeda. The reason was due to the target position in the sky, the time of rising and setting was before the rise of the sun so we could get a full ingress and egress and no meridian flip was required.
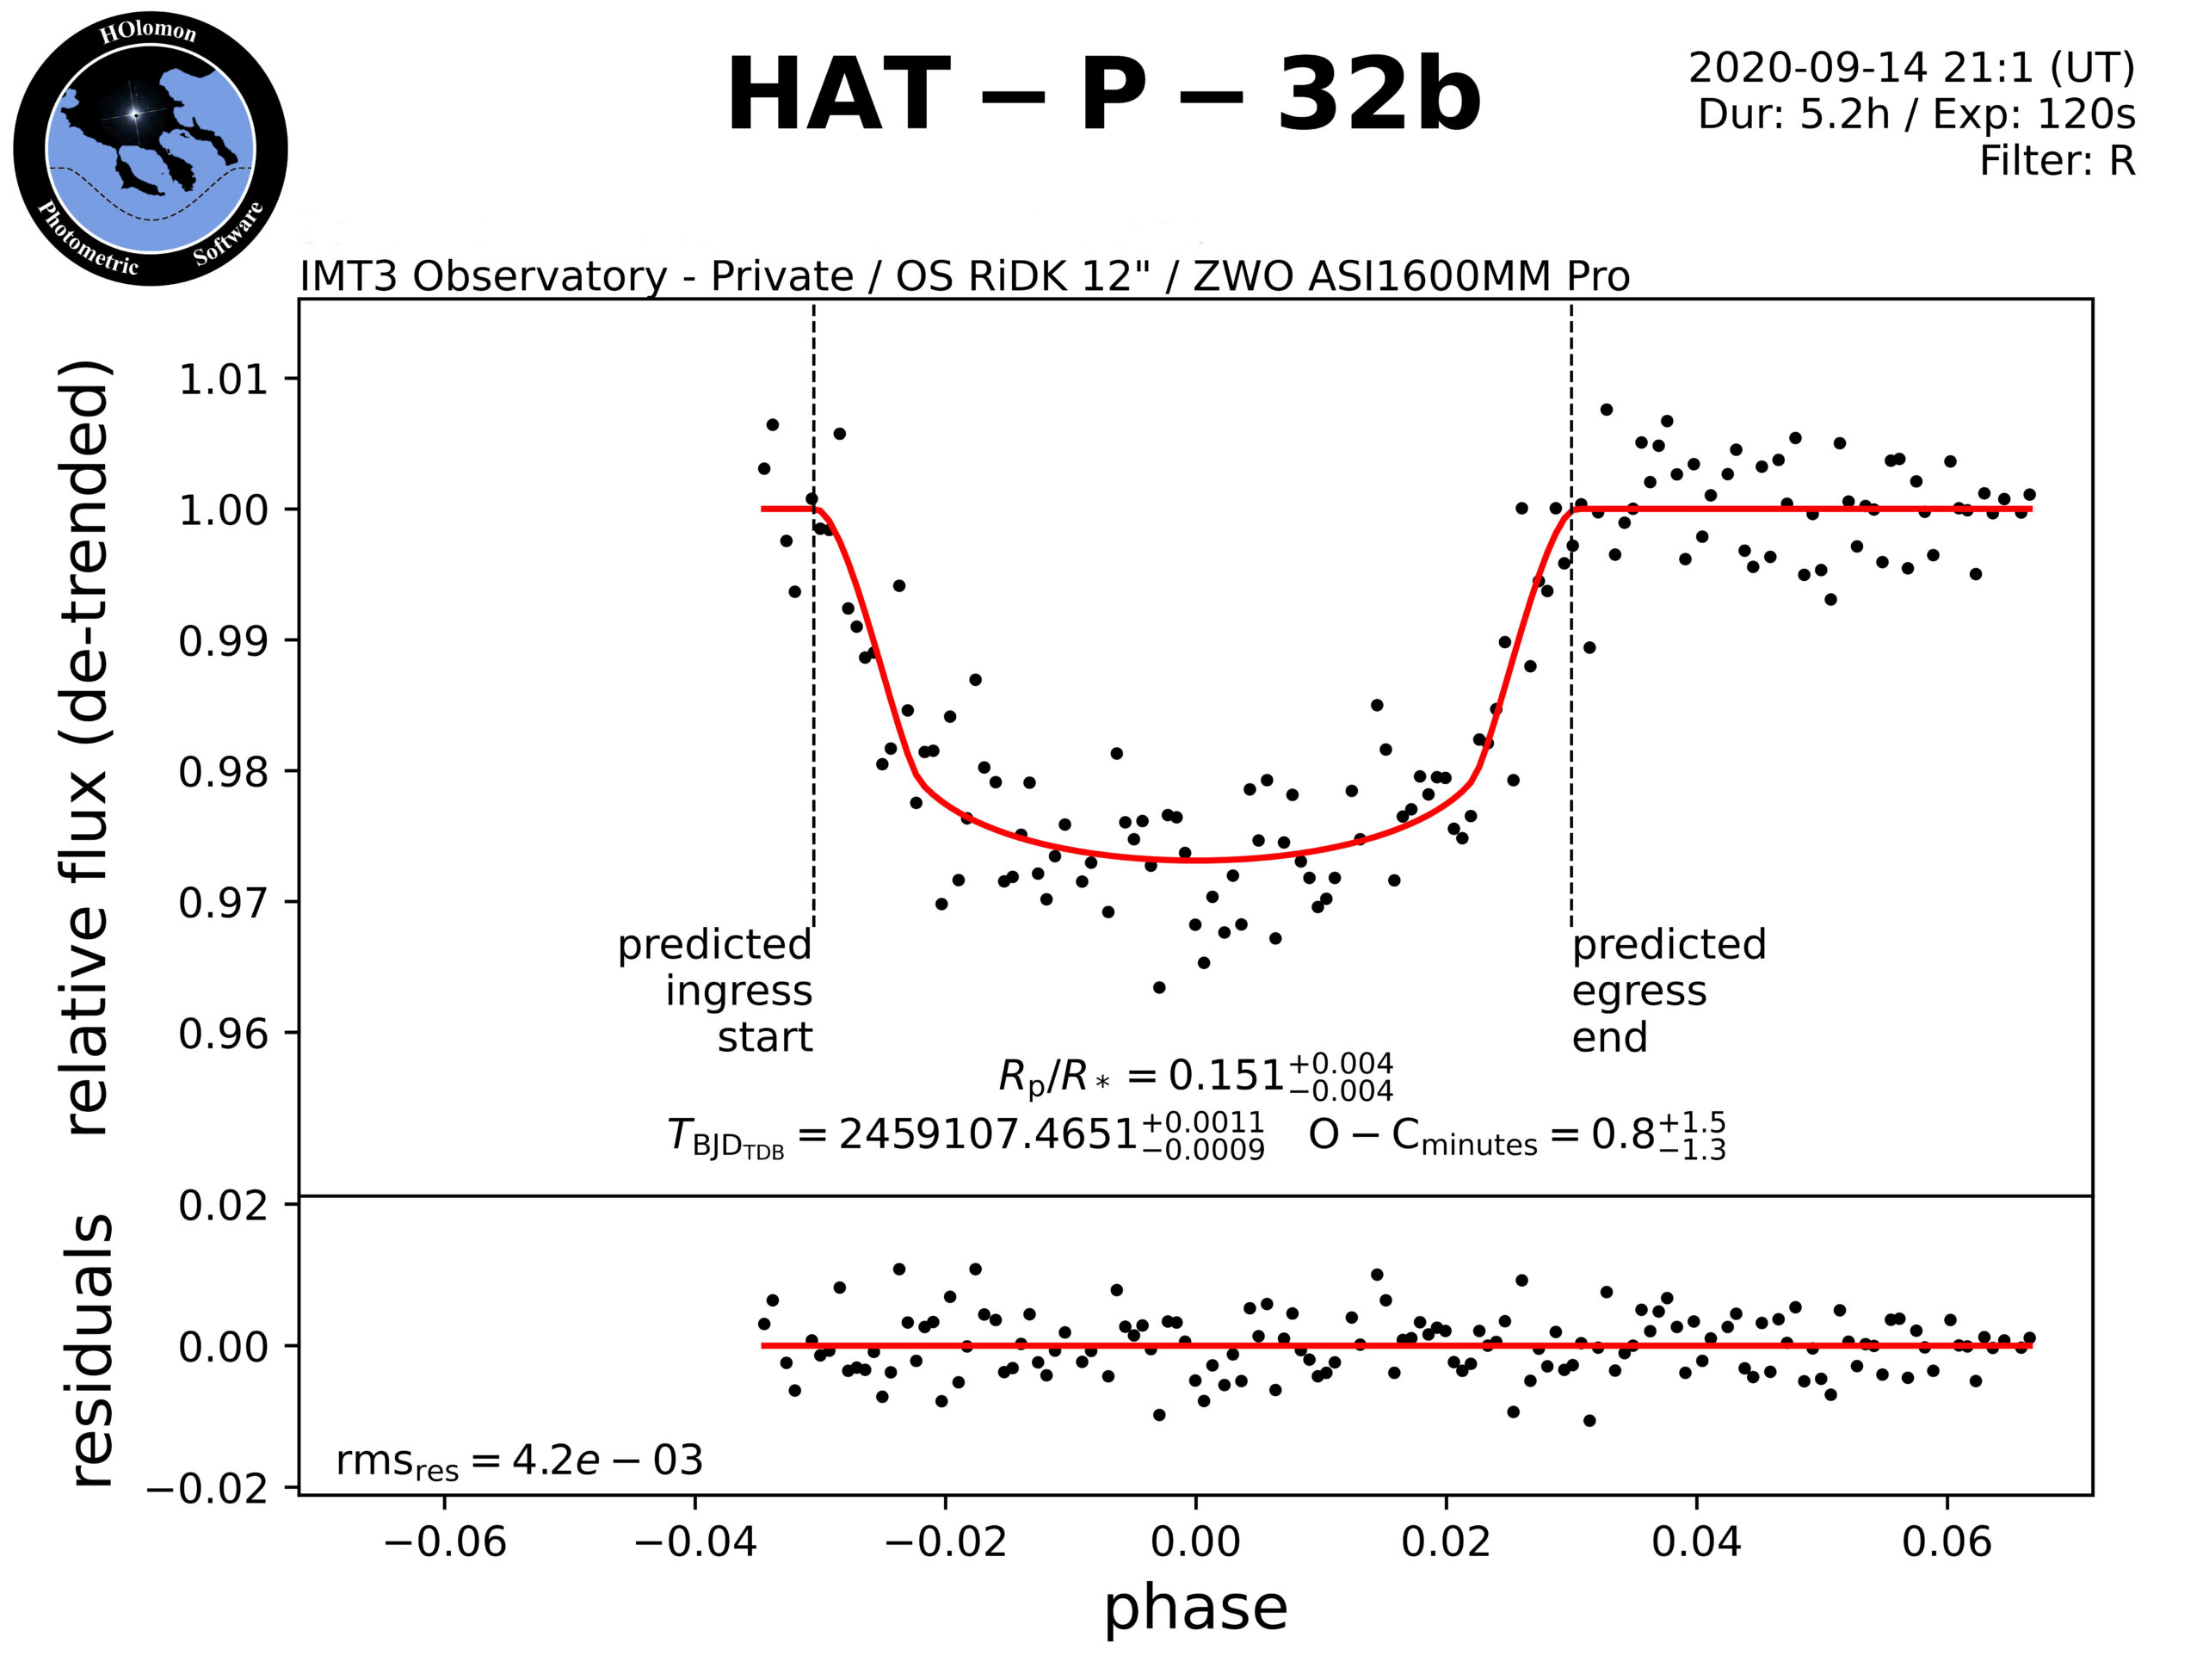
Then the gremlins started to play havoc with our efforts and I was having major issue with guiding to the point that I was going to give up as the issues were eating into the desired 1 hour egress monitoring time period. Dave joined the session to help resolve the issue and we managed to start imaging about 10 minutes before the start of the transit.
Dave had to go to bed due to work commitments but I was determined to get the full set of observation and run it through the HOPS analysis software. It was an uneventful night interspaced with music, movies and hot cups of tea.
Once I had transferred the data over the internet to my server, performed the analysis and sent the result to Dave it was 5:30am so I crawled into bed around 6am.
Bob, Dave and GingerGeek playing with the Tak 102 this evening and just image for 2 minutes on various targets.
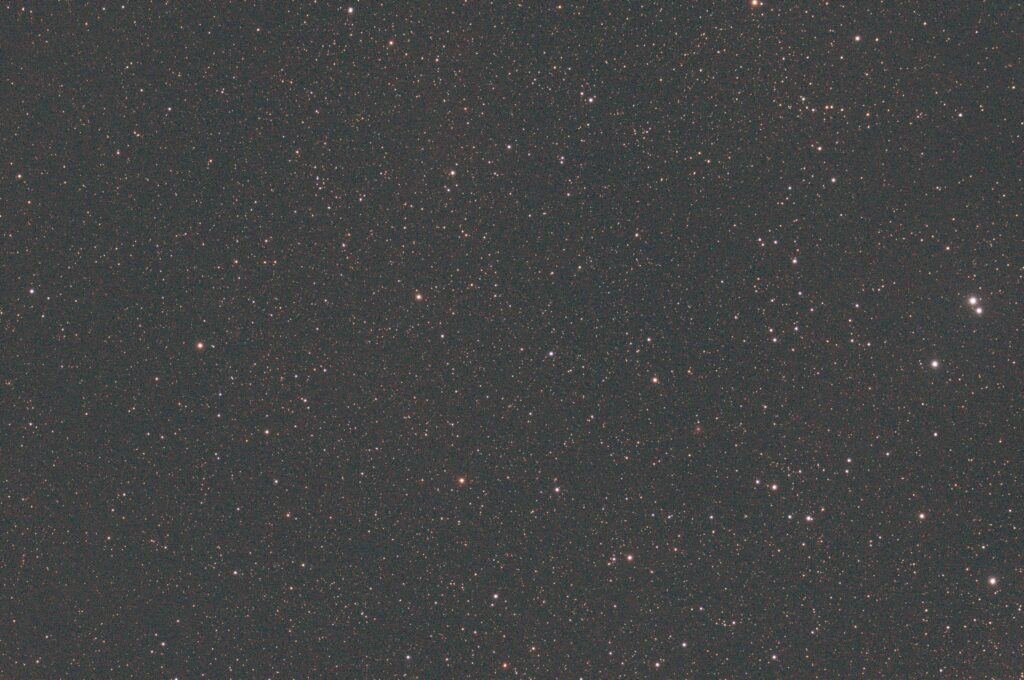
Slewed to the Double Cluster first.
Focus position was 564 from the last time we used it a long time, it is now 578.
Took a 2 minute exposure
Double Cluster
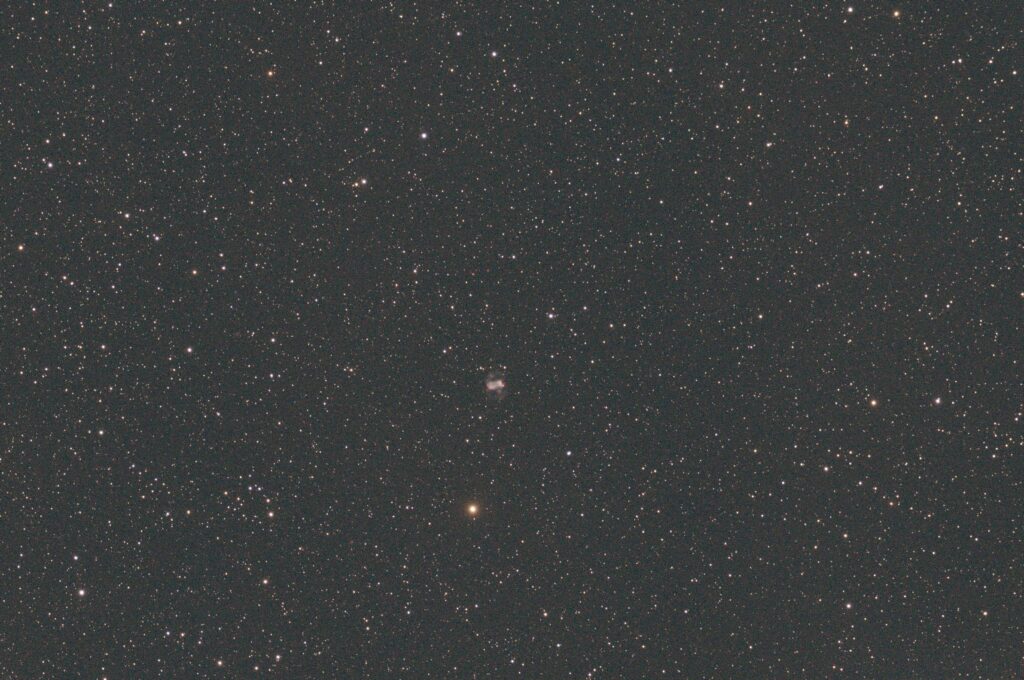
Slewed to M75 the Little Dumbell. Needed to take a 5 min exposure to see
M76 Little Dumbell
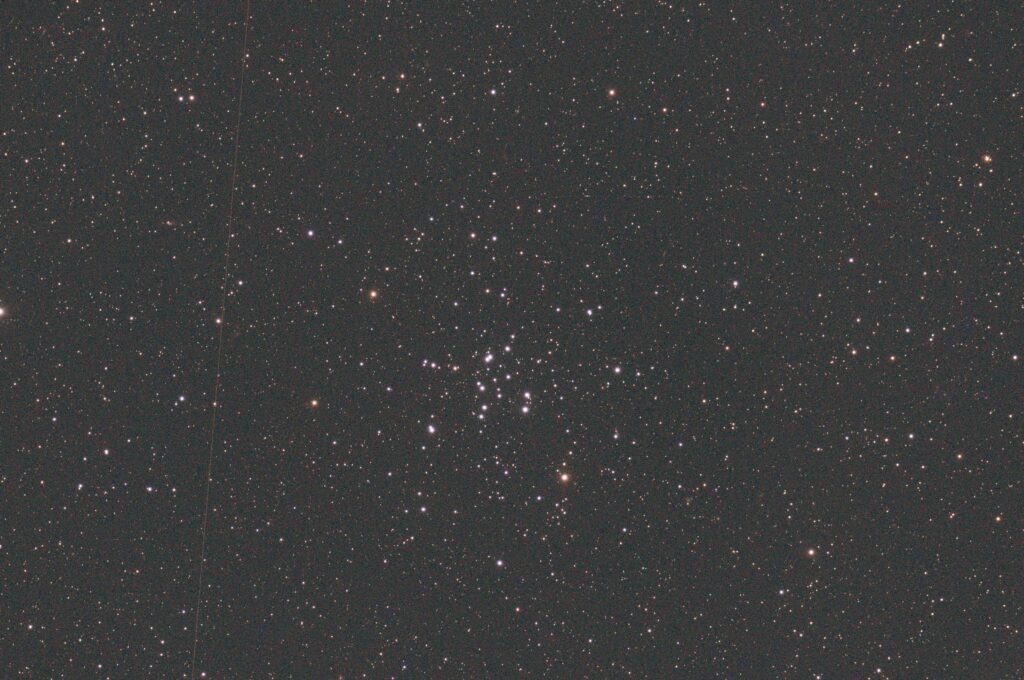
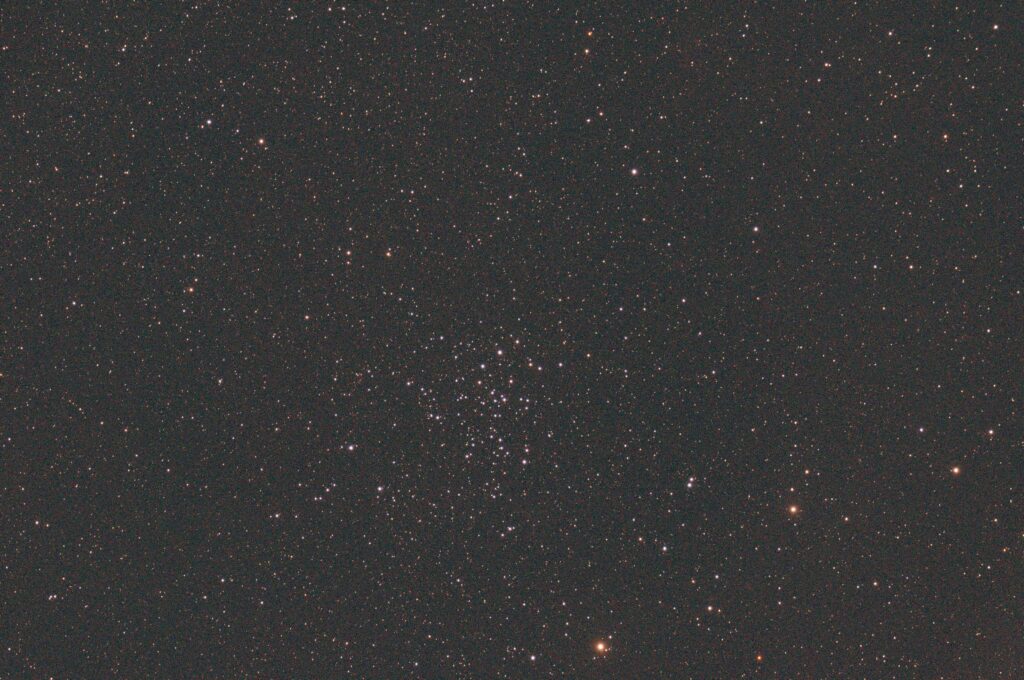
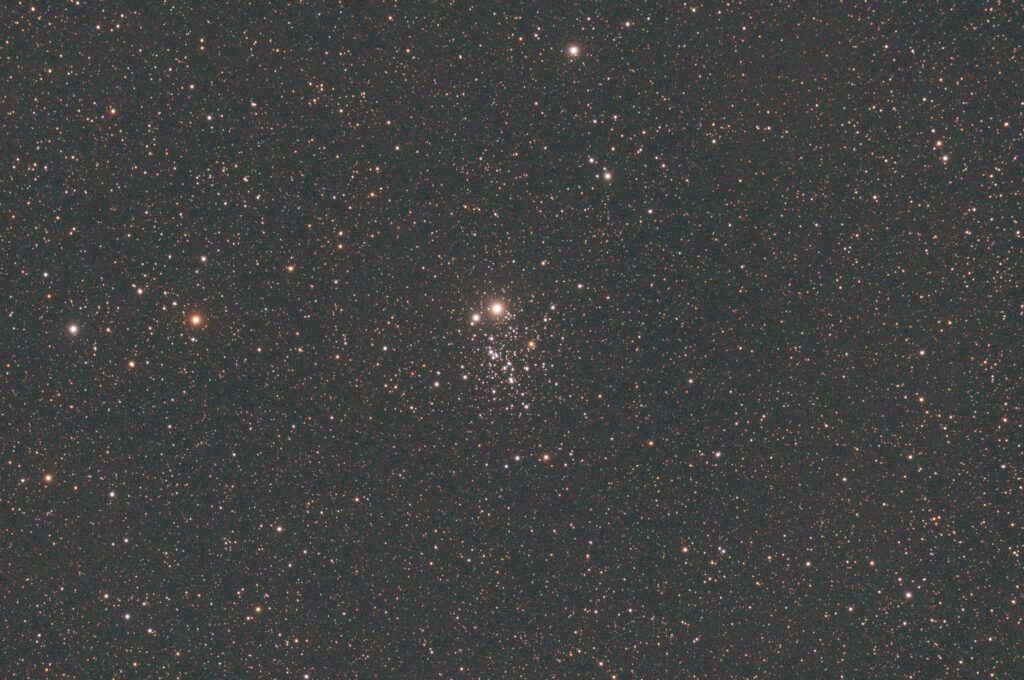
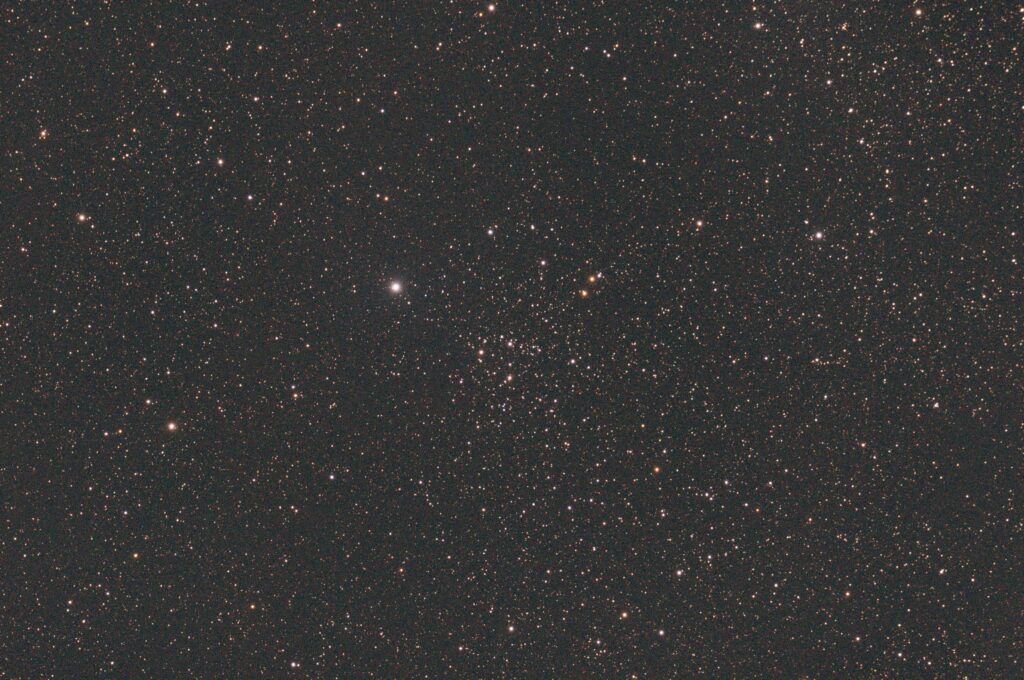
Slewed to M34 Open Cluster.
M34 Open Cluster
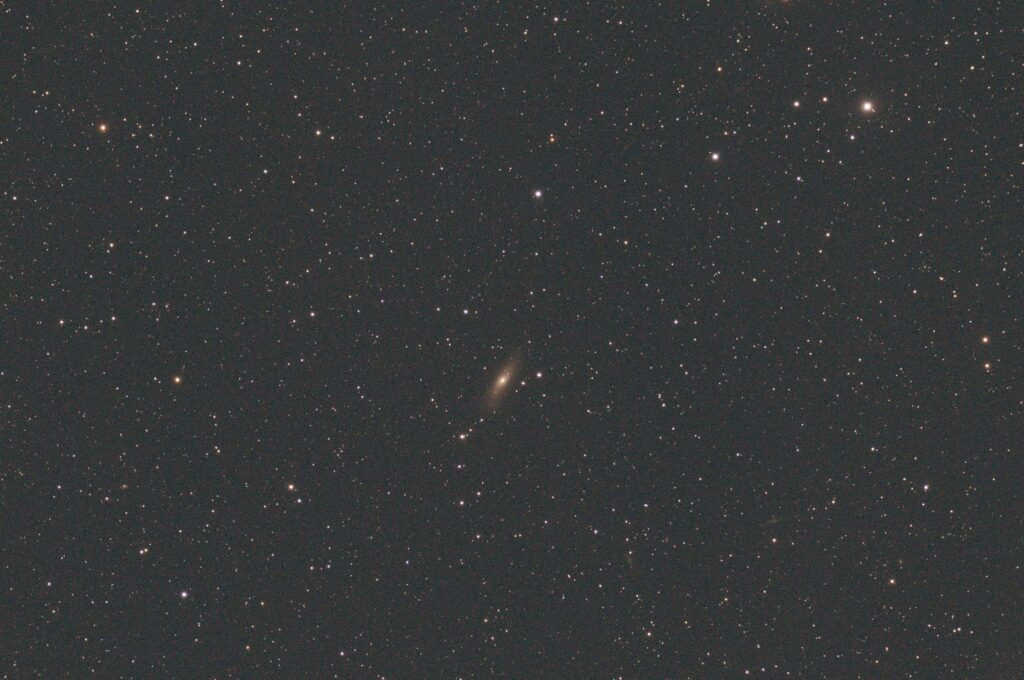
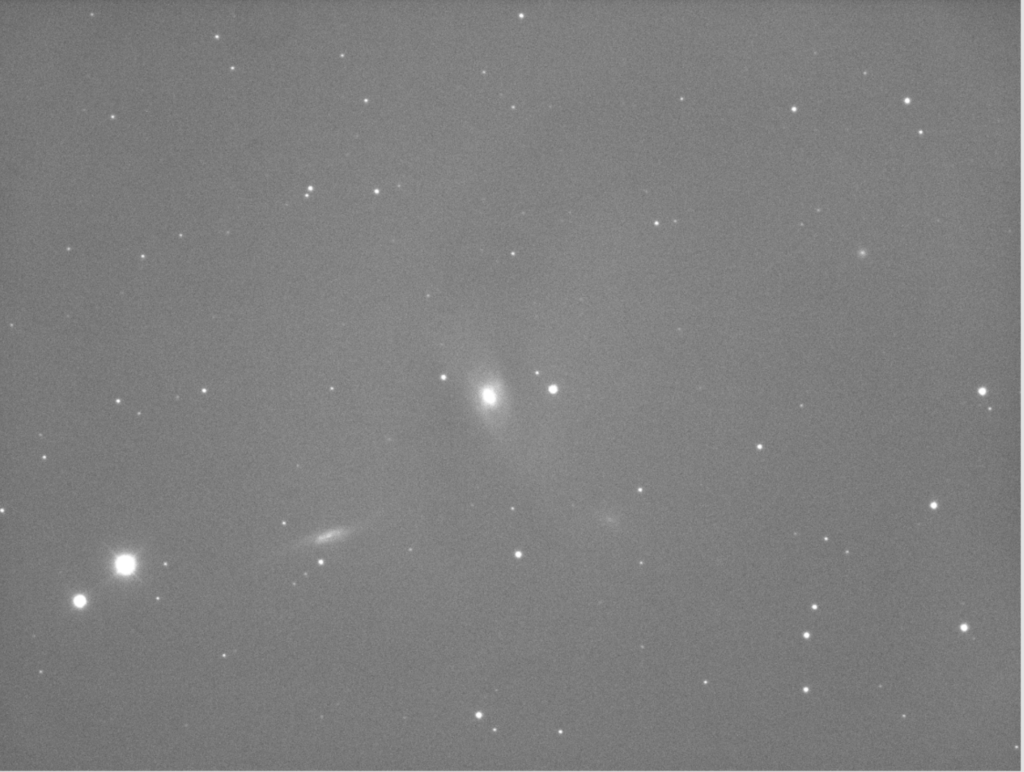
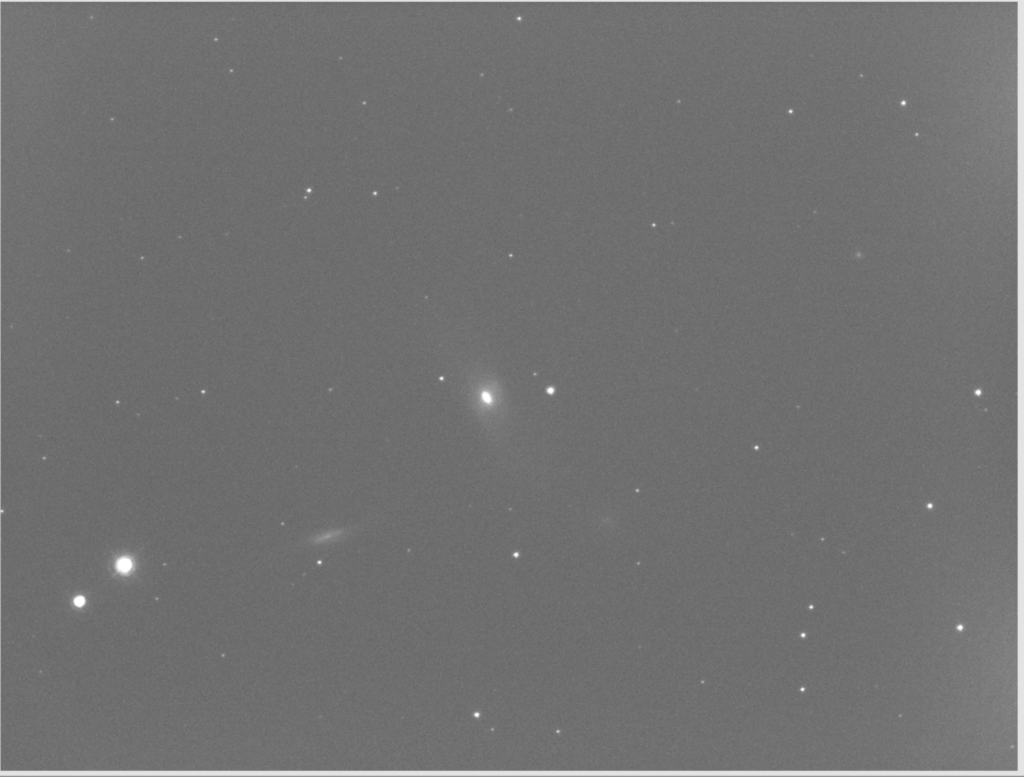
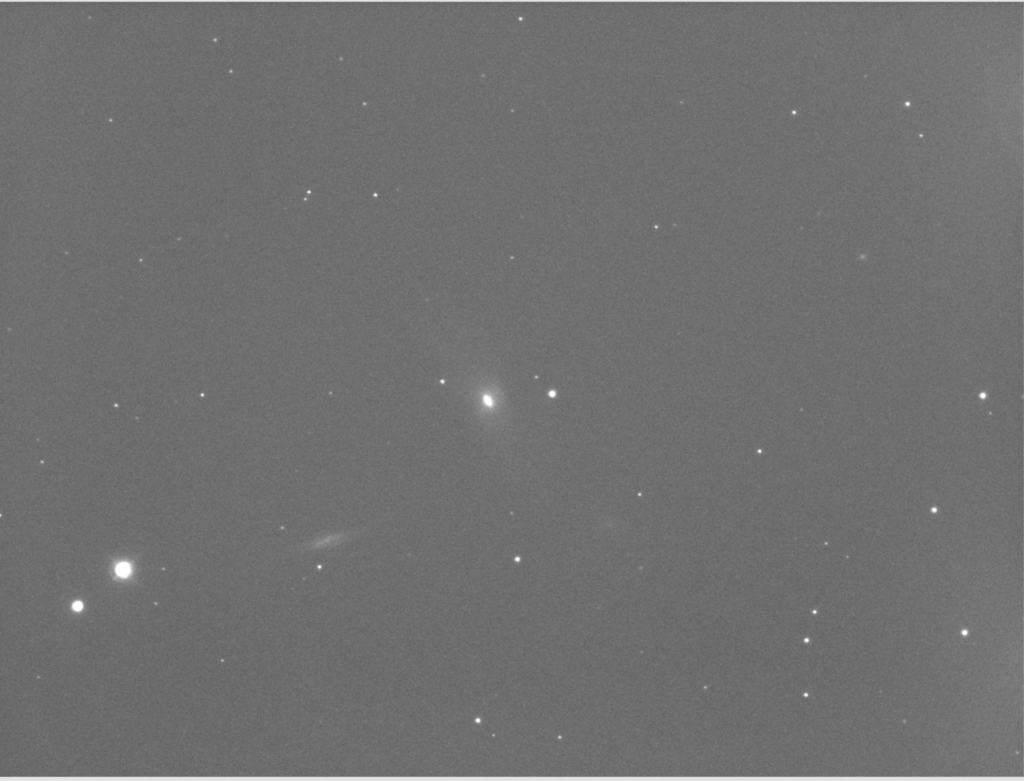
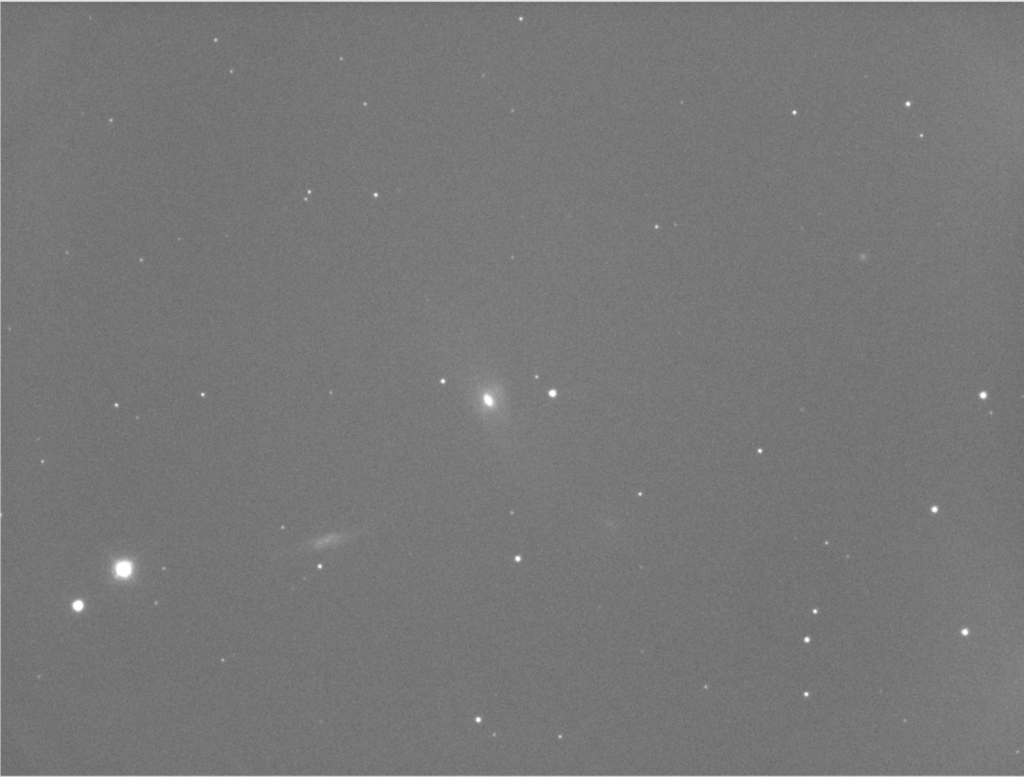
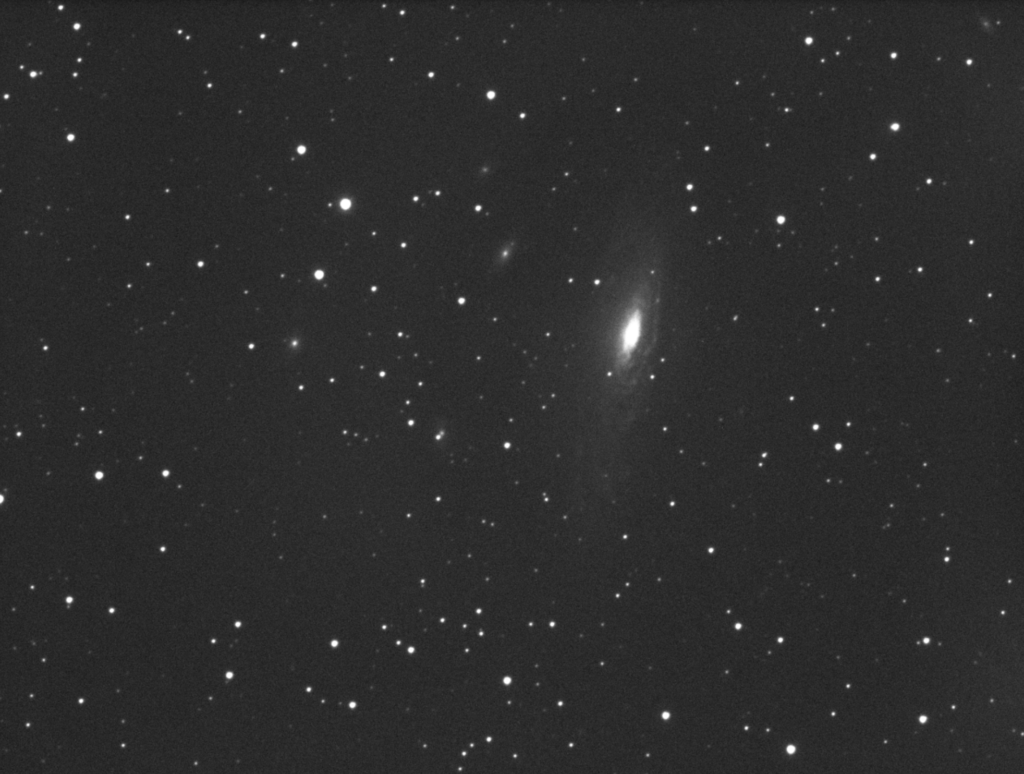
Slewed to NGC 1023 a barred spiral galaxy. Took 5mins exposure at 22:12.
NGC 1023 Galaxy
GingerGeek went off to bed whilst Dave and Bob continued.
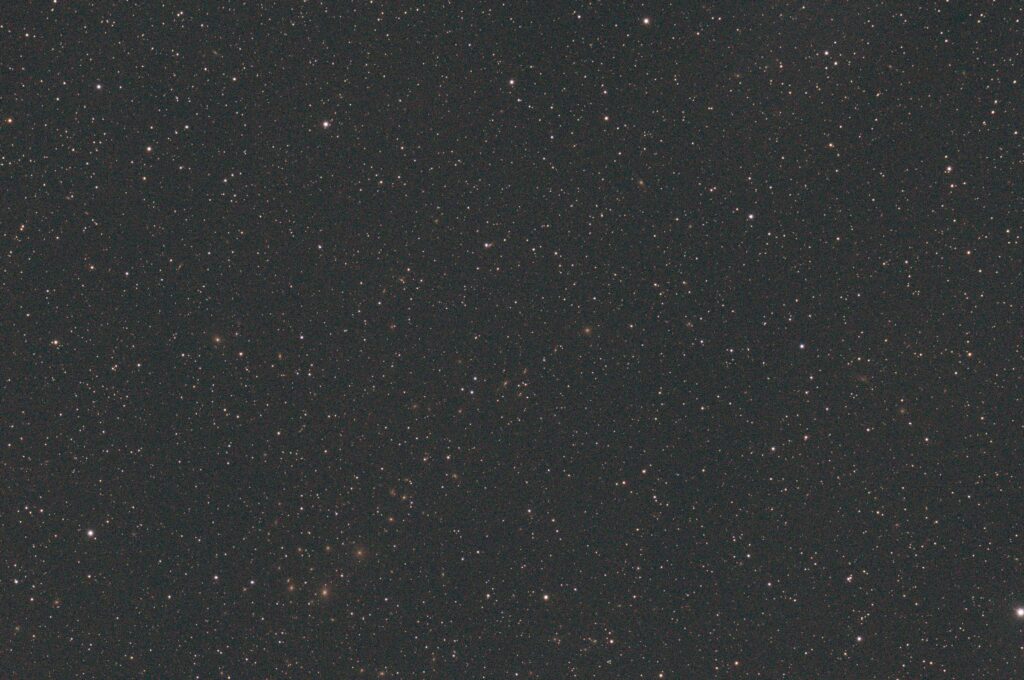
Slewed to NGC 1260 a lenticular galaxy in Perseus.
NGC 1260 Galaxy
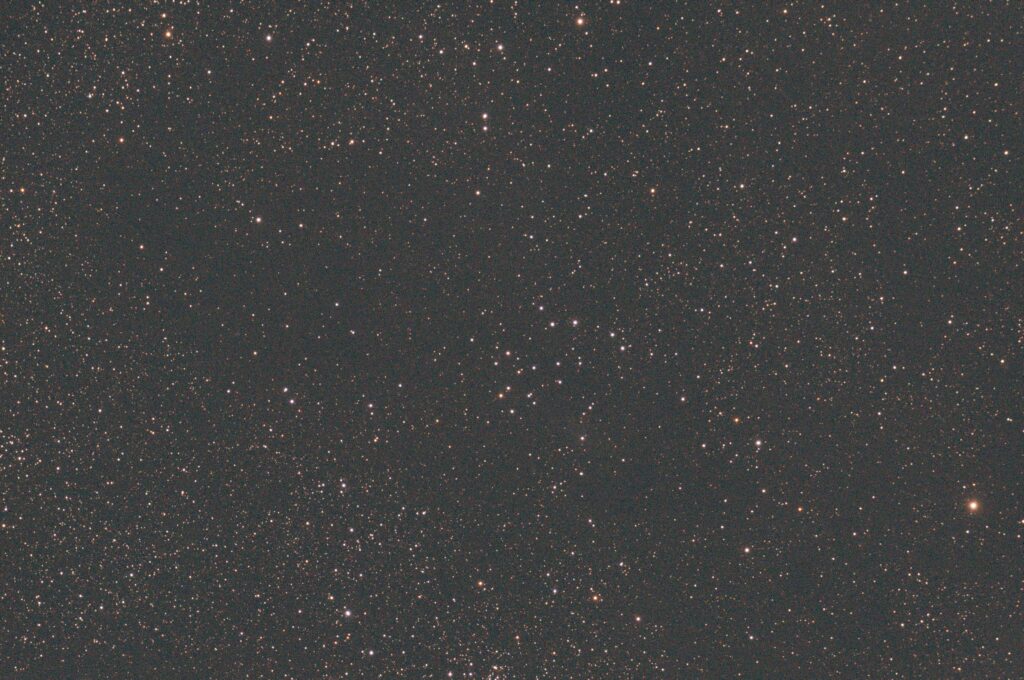
Slewed to NGC 1545 an open cluster but it was behind the house.
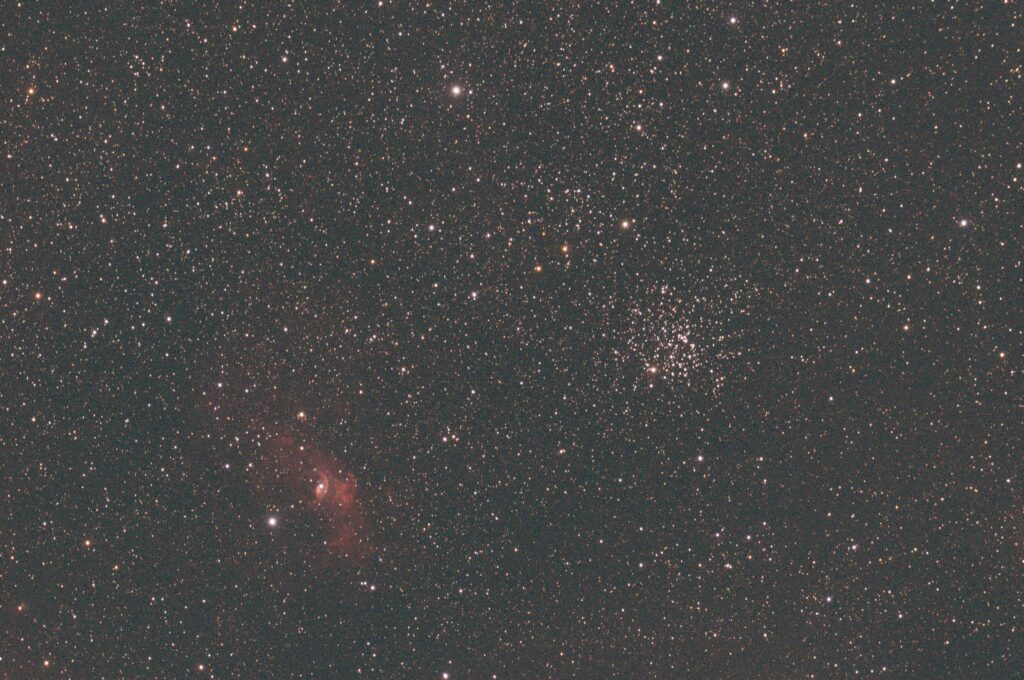
Slewed to IC 1848 the Soul nebula.
IC 1848 Soul Nebula
Slewed to Heart nebula.
IC 1805 Heart Nebula
Slewed to IC 1831 an HII cloud.
IC 1831 Nebula
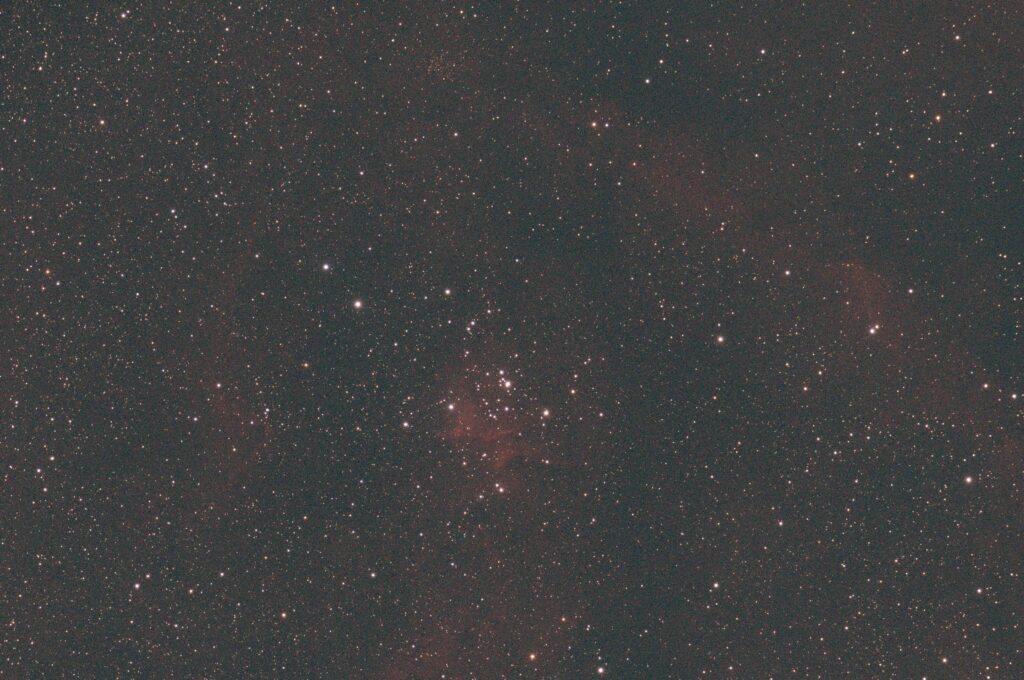
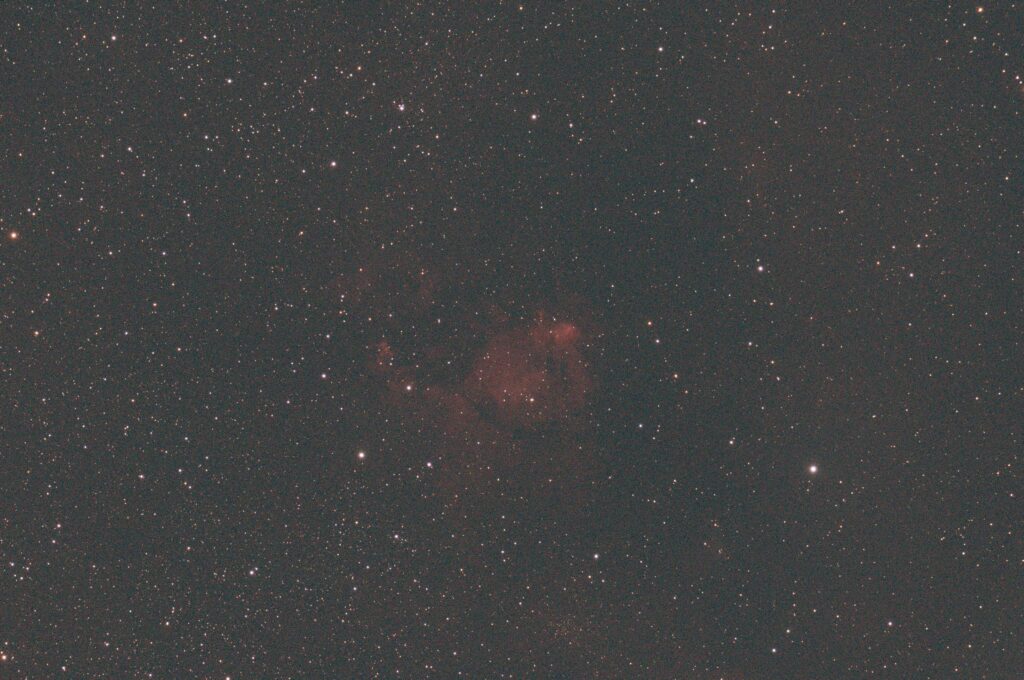
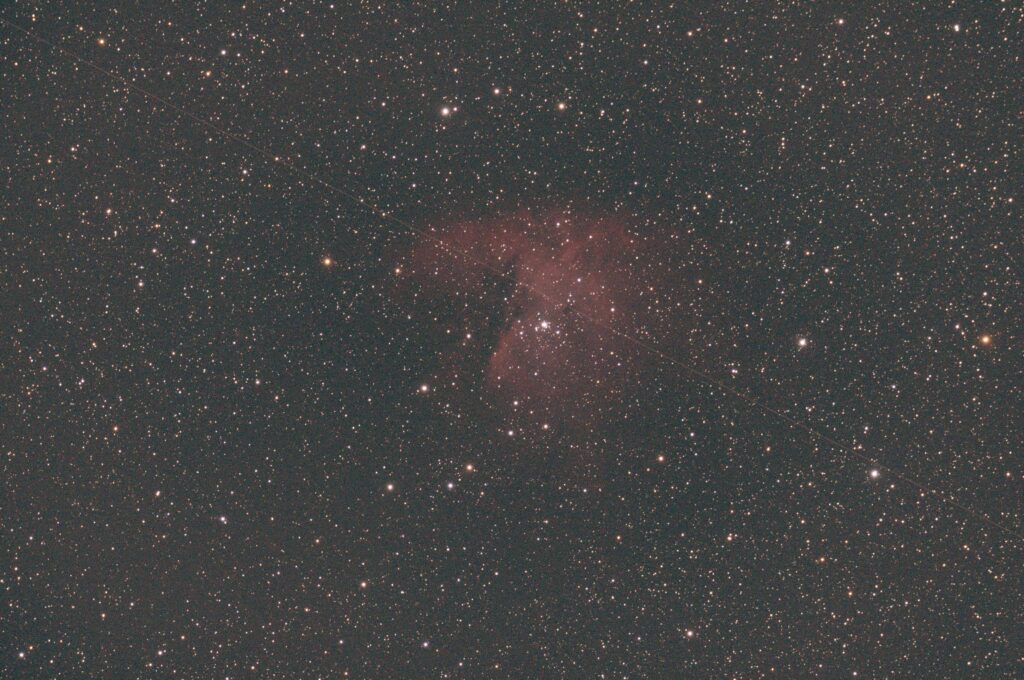
Slewed to IC 1795 nebula.
IC 1795 Nebula
We found at this point that some of the images were trailing at 2 minutes in the East so we started to use guiding.
Slewed to NGC 1245 open cluster. [not imaged]
Slewed to NGC 1220 open cluster. [not imaged]
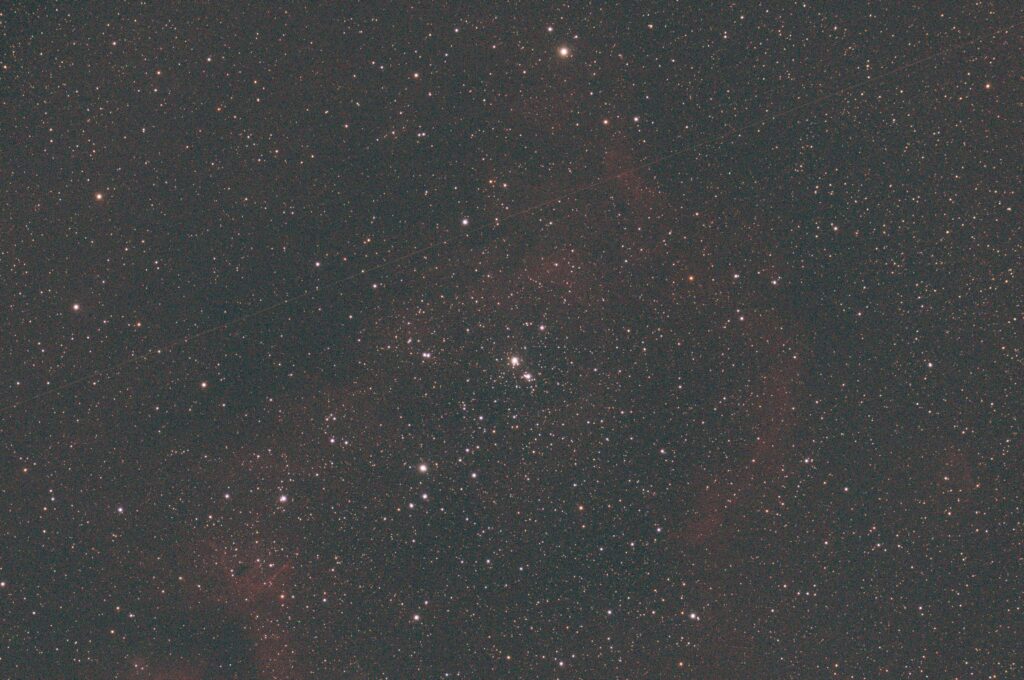
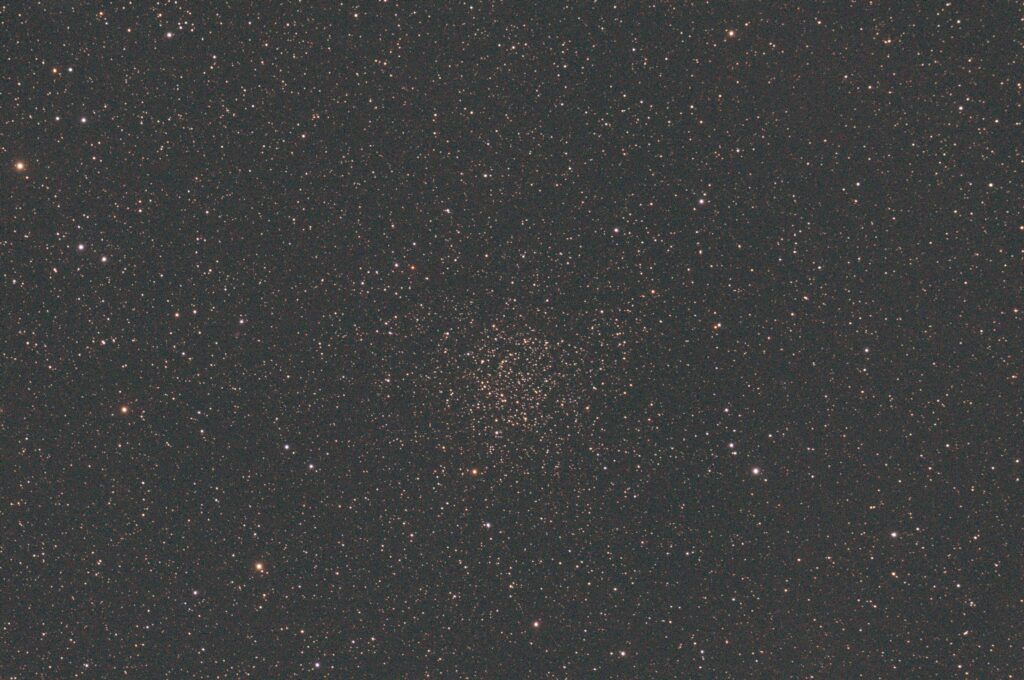
Slewed to NGC 1528 open cluster at 23:37
NGC 1528
Dave went off to bed whilst Bob continued.
Slewed to IC 1795 Nebula.
IC 1795 Nebula
Slewed to IC 1831 Nebula.
IC 1831 Nebula
Bob then slewed back to a number of the objects as they had trailed including, IC 1805 Heart Nebula, IC1848 Soul Nebula, IC 1260, NGC 1023 barred spiral, M34, M76, Double Cluster
Session period 19:00 – 01:18, transit start ~23:06 and end ~02:37
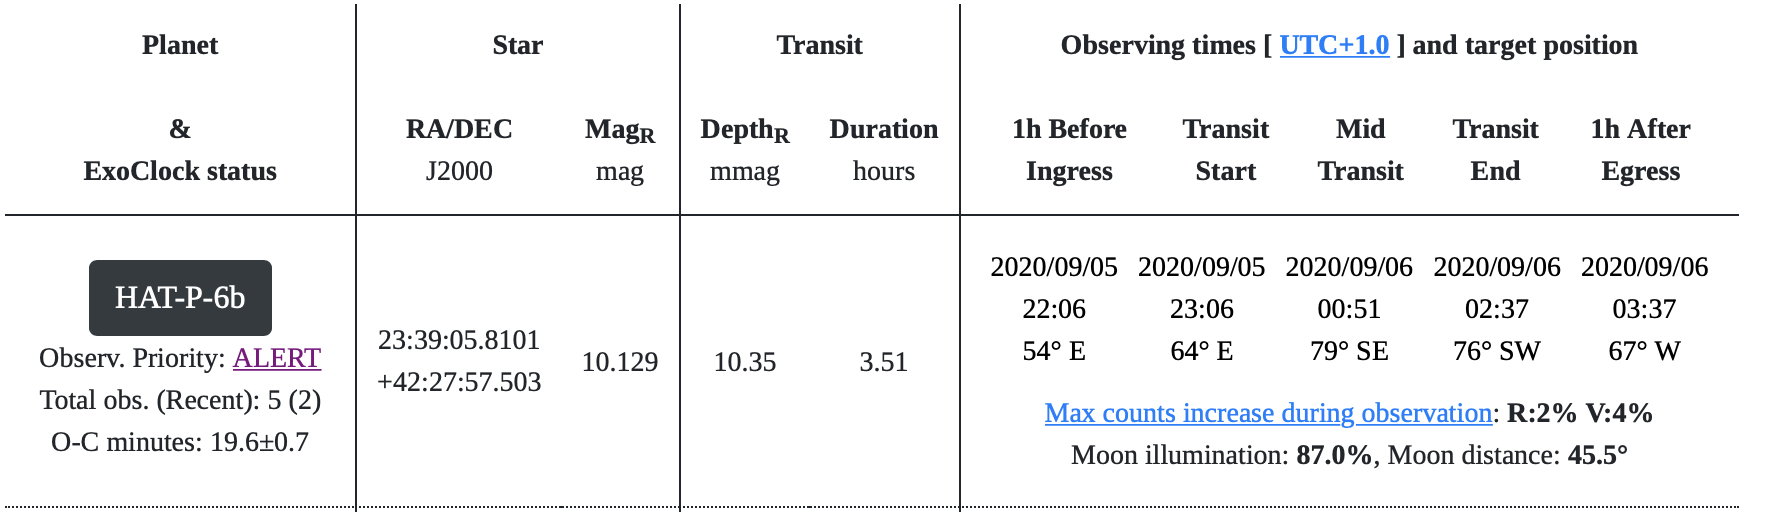
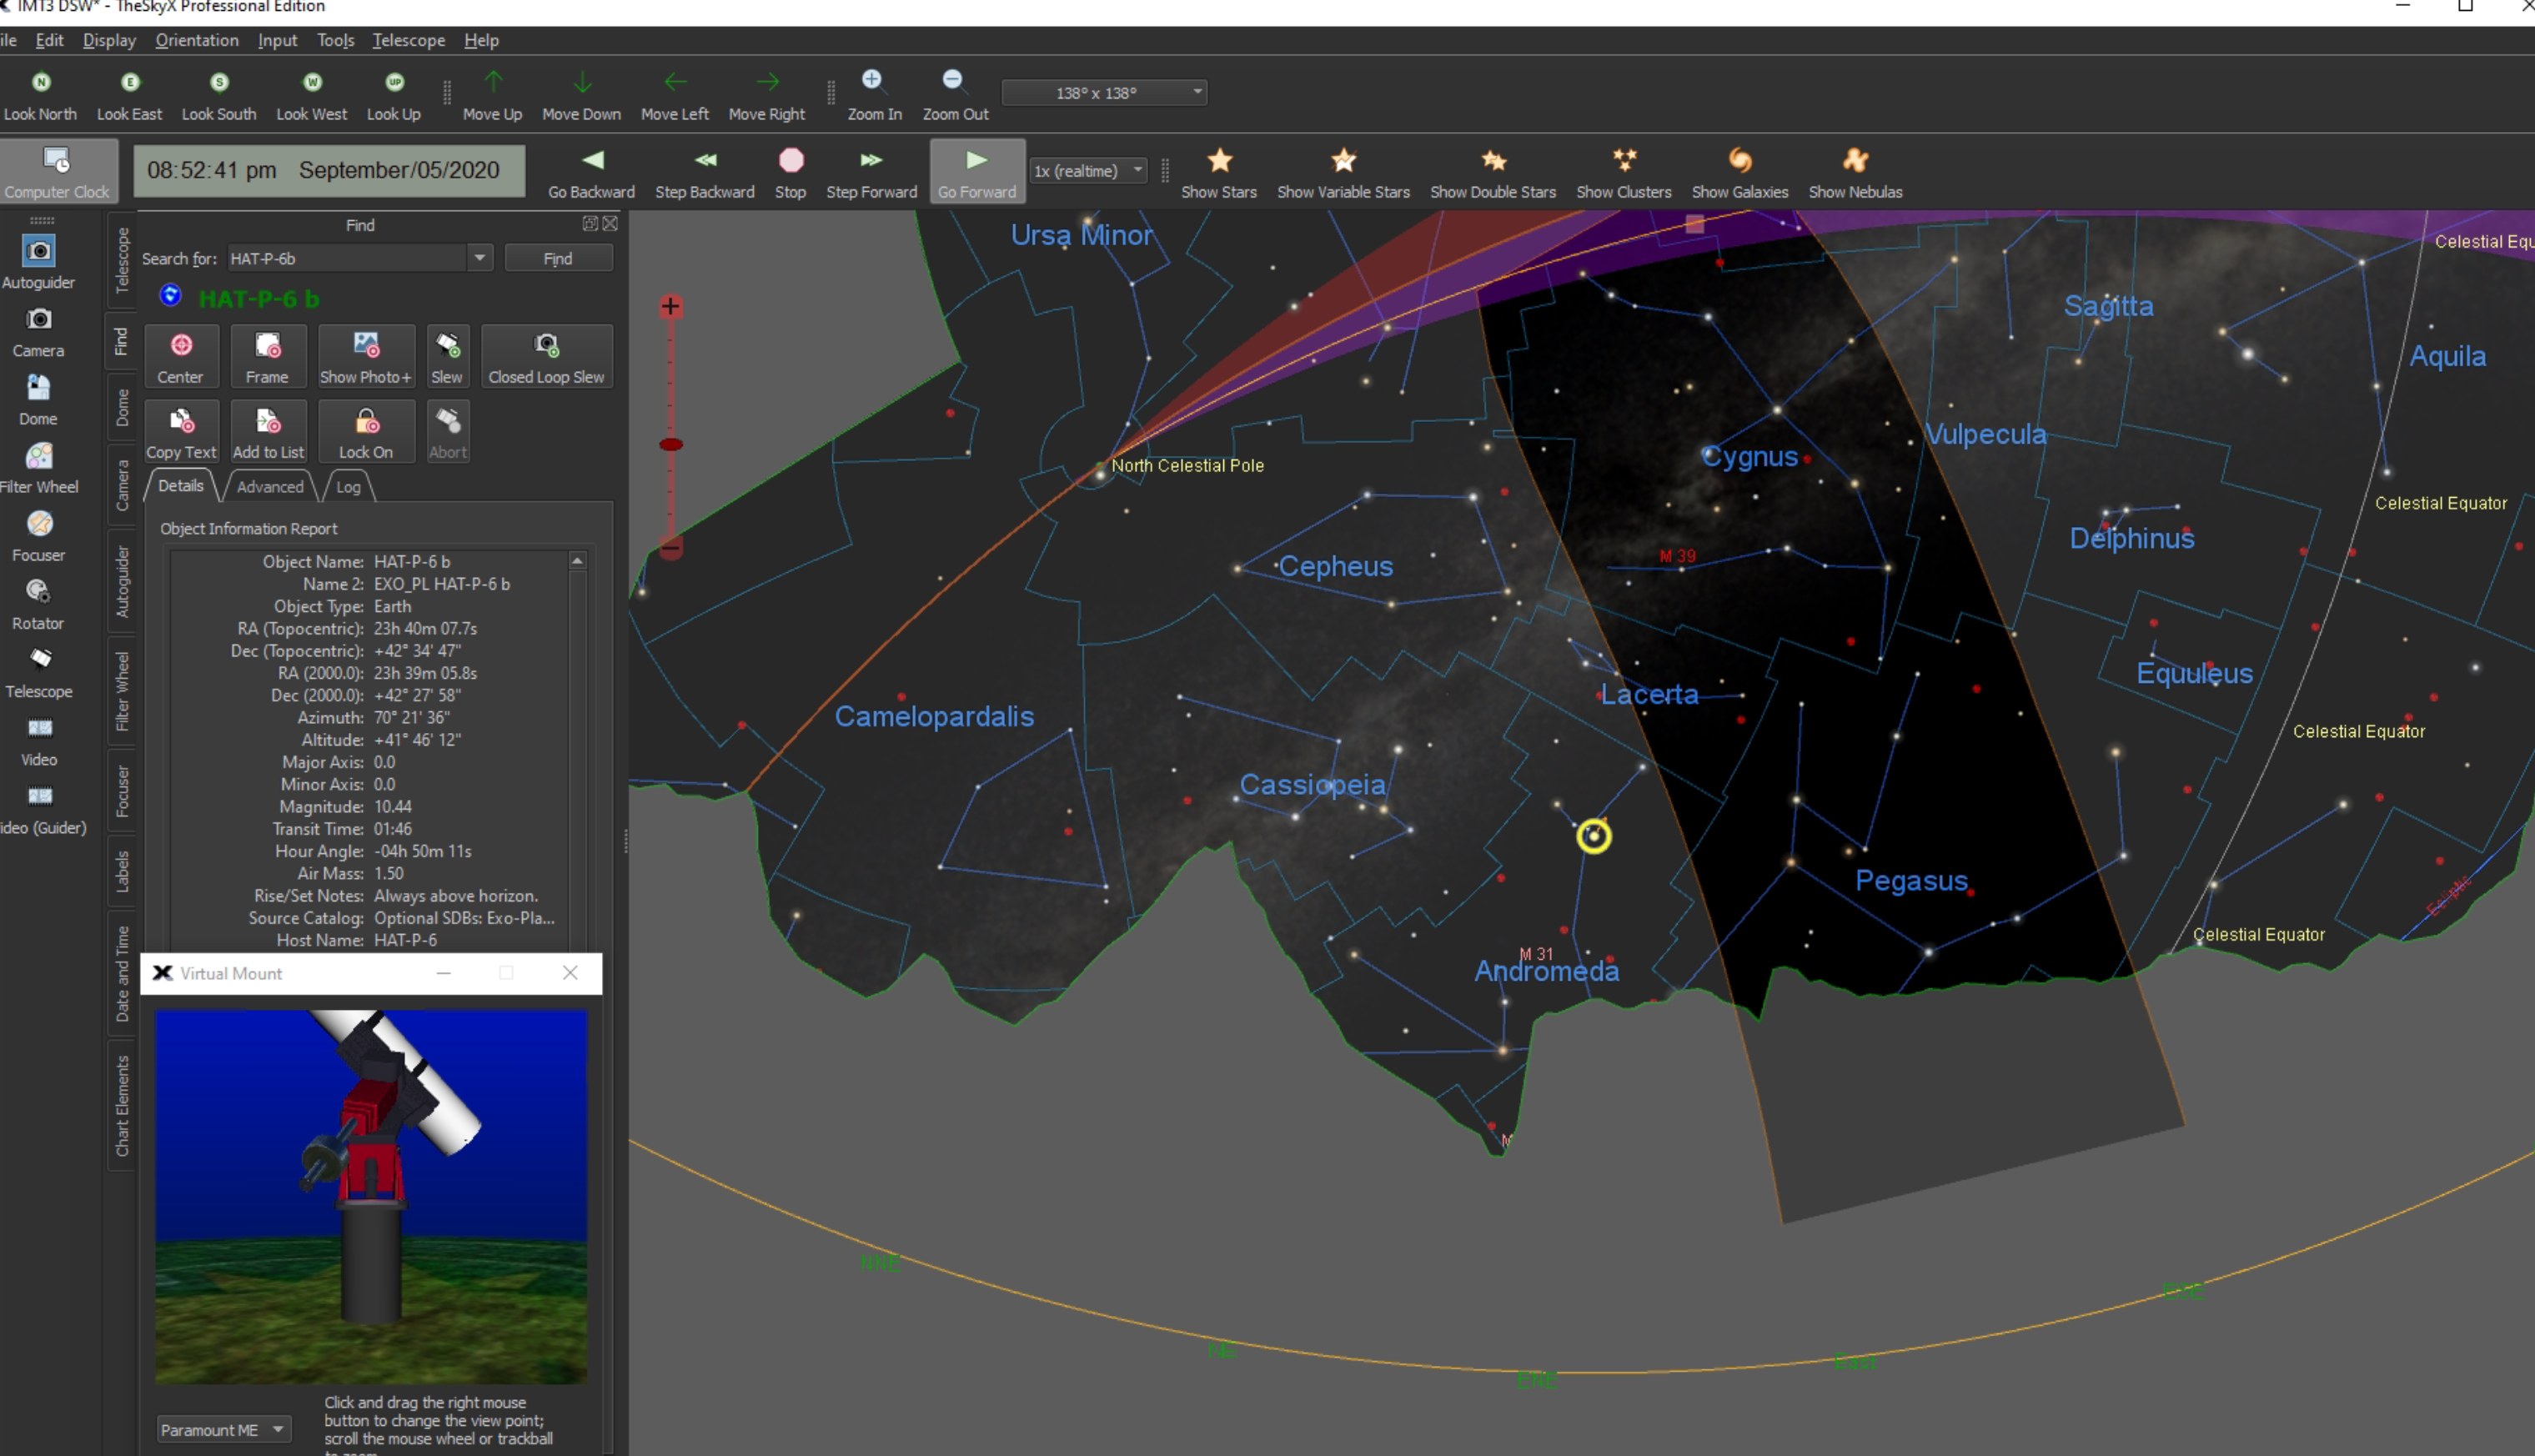
Before I move house, we are going to try and grab another exoplanet or two or possibly three…..we’ll see. Tonight whilst it is currently clear and due to cloud over by 1am, we will go for HAT-P-6b that is on alert from Exoclock.
Exoclock Exoplanet on Alert tonight
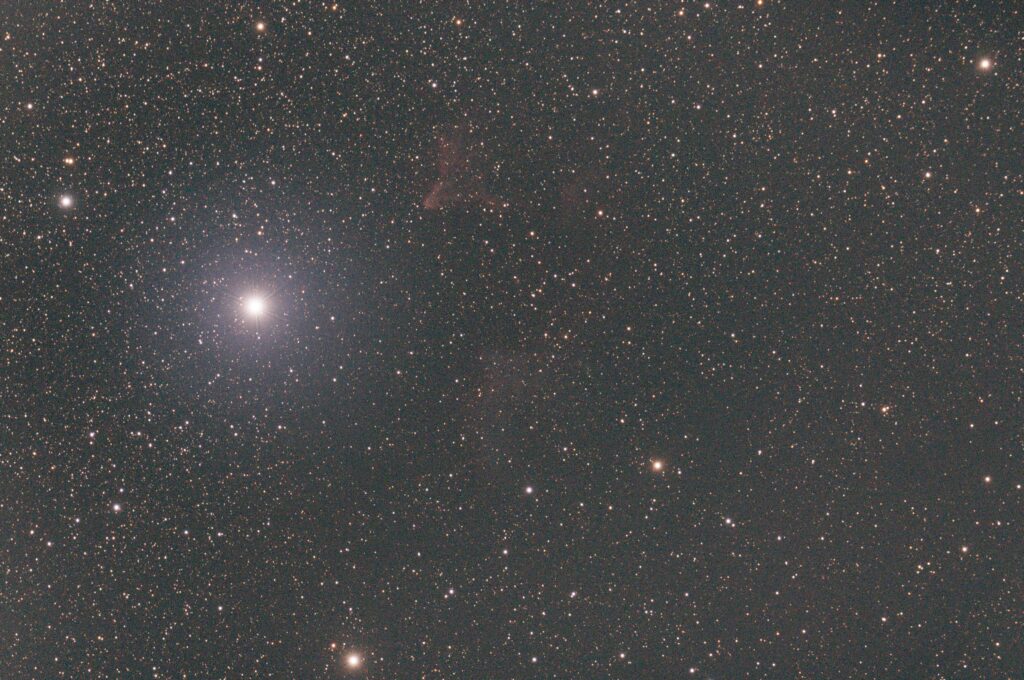
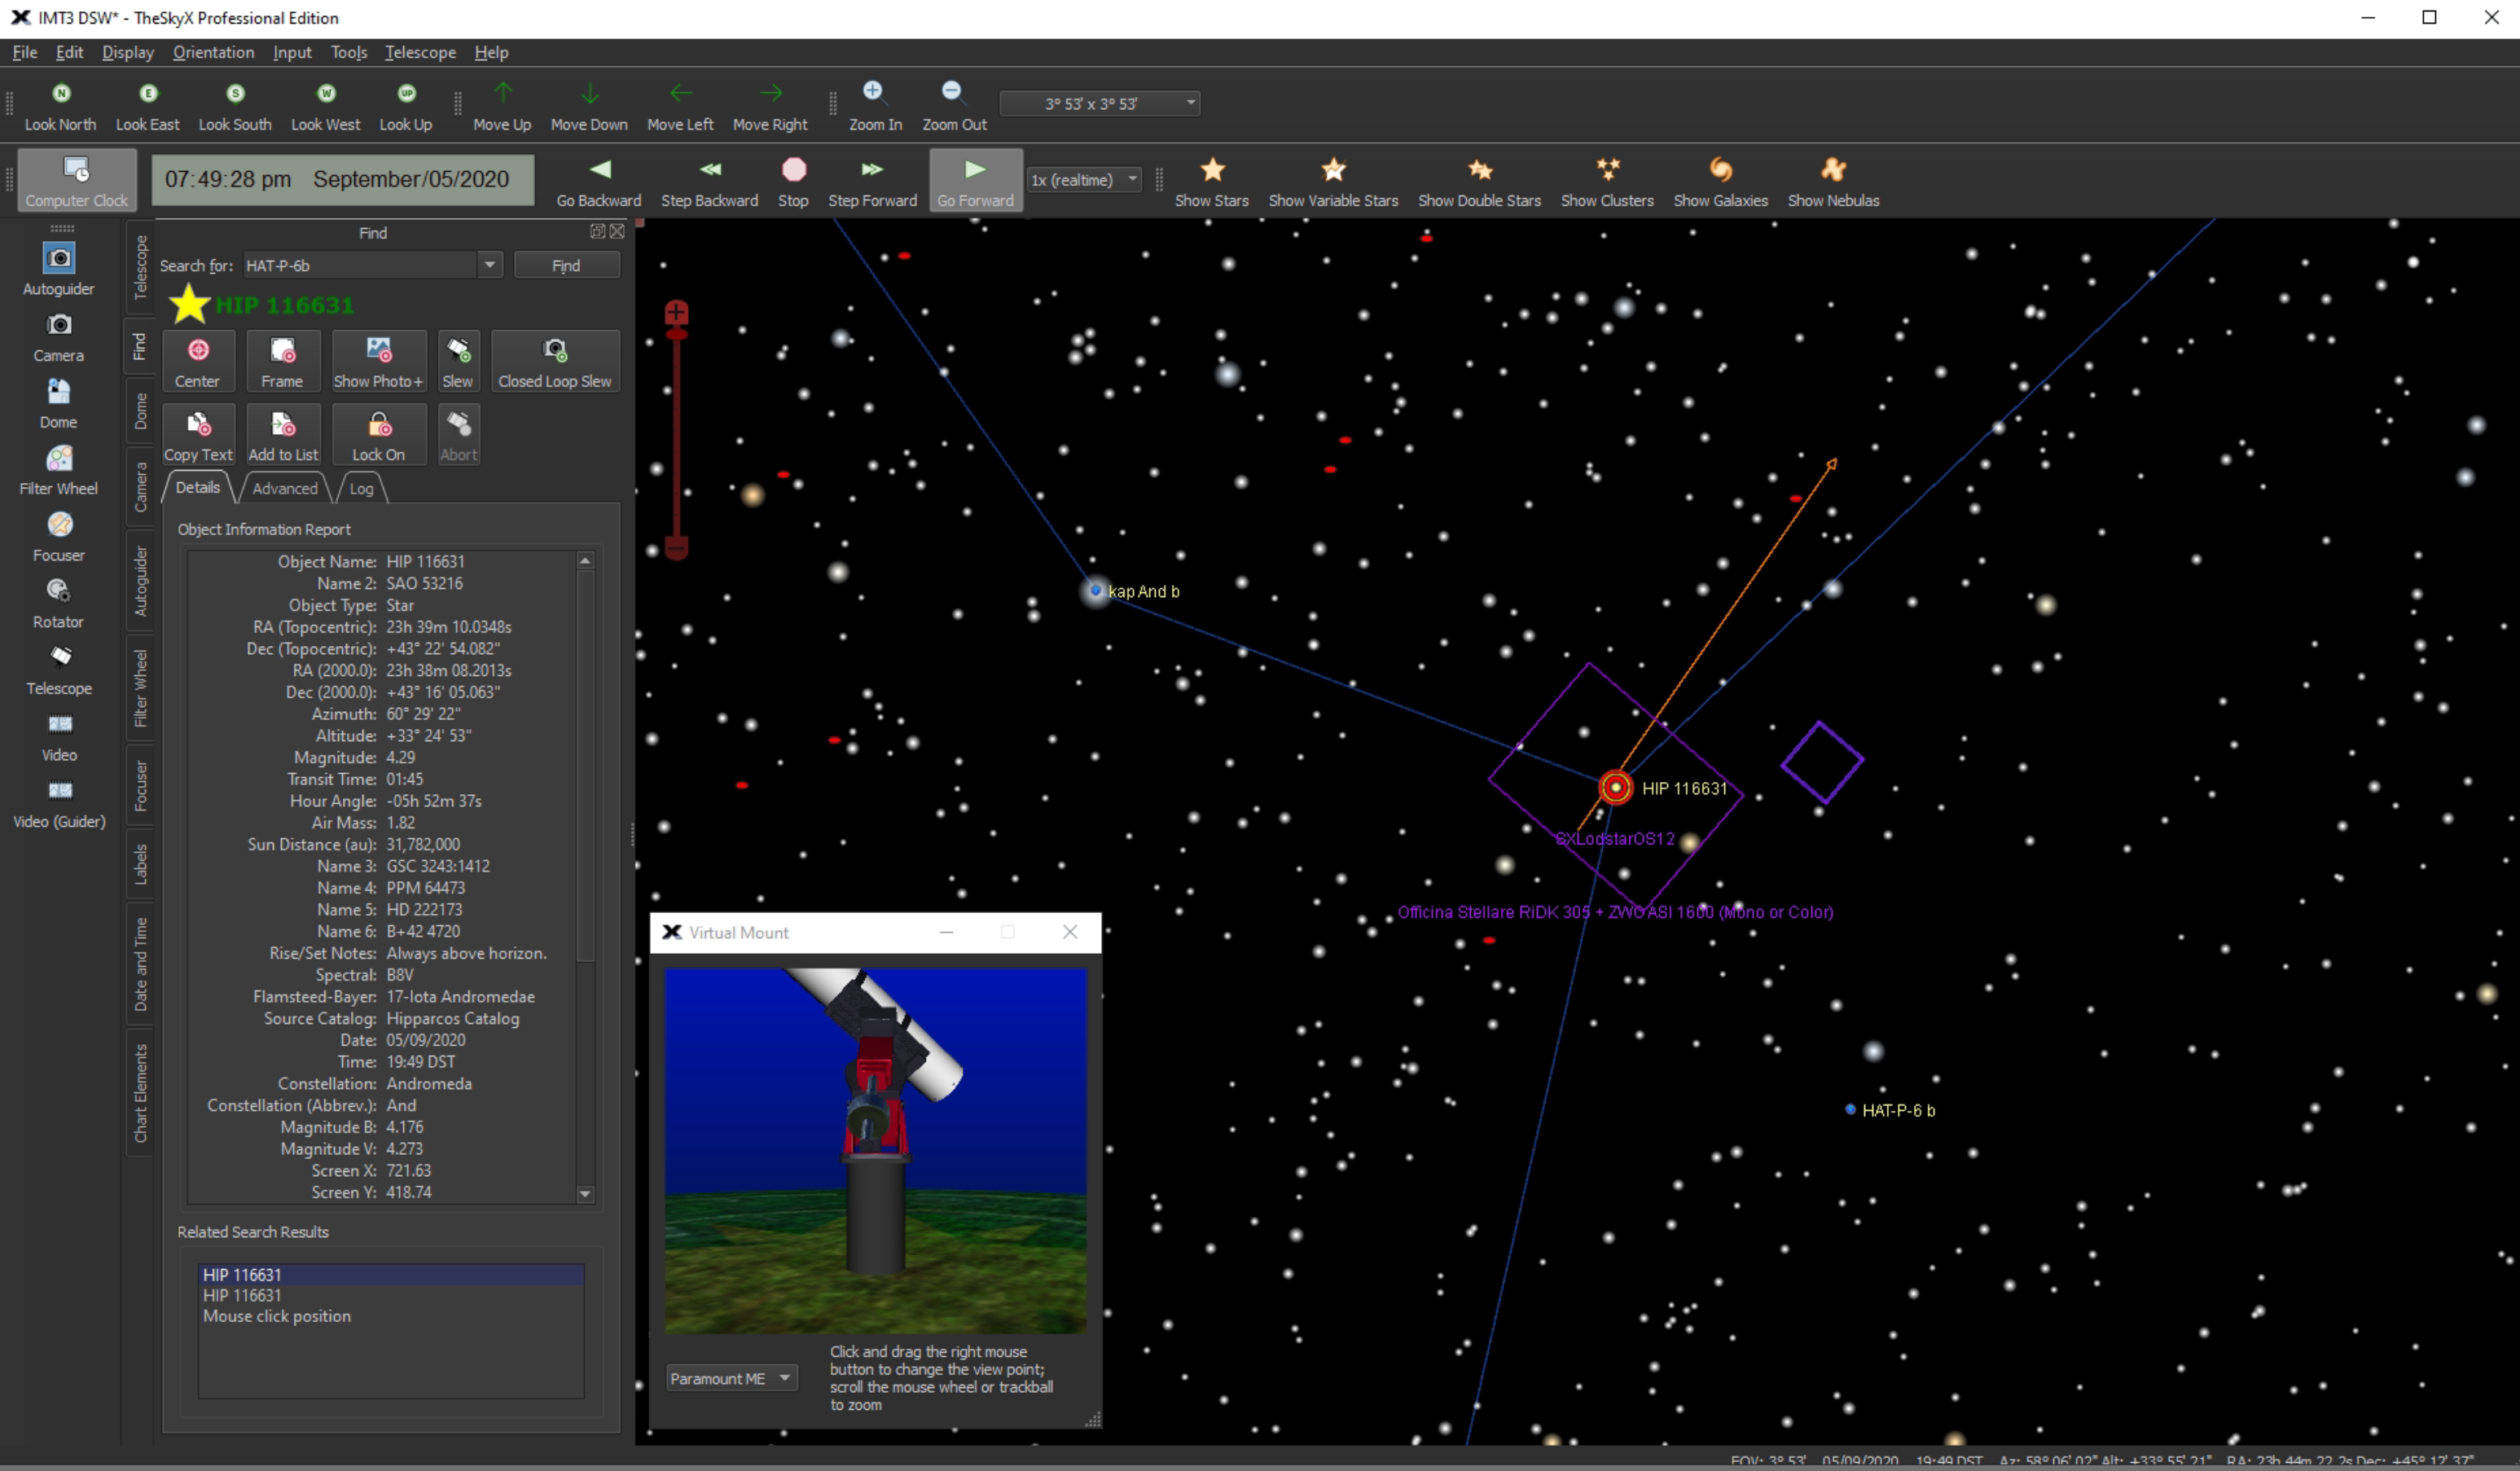
The transit end time is after it is due to cloud over but we may be able to get the start of the transit and some useful data to possibly half way through. So I have opened the dome, started to cool the 12″ down and slewed to a magnitude 4.29 star in the vicinity of Andromeda called HIP 116631 also known as 17 Iota Andromedae in the Flamsteed catalogue so that I can slew and centre on the object when it gets dark.
HIP 116631
I’ve now manually centred the star due to the brightness of the sky still and synced in The Sky X
Manually centredHIP 116631 in relation to HAT-P-6b
I’m now waiting for a bit more darkness to perform the first focus run.
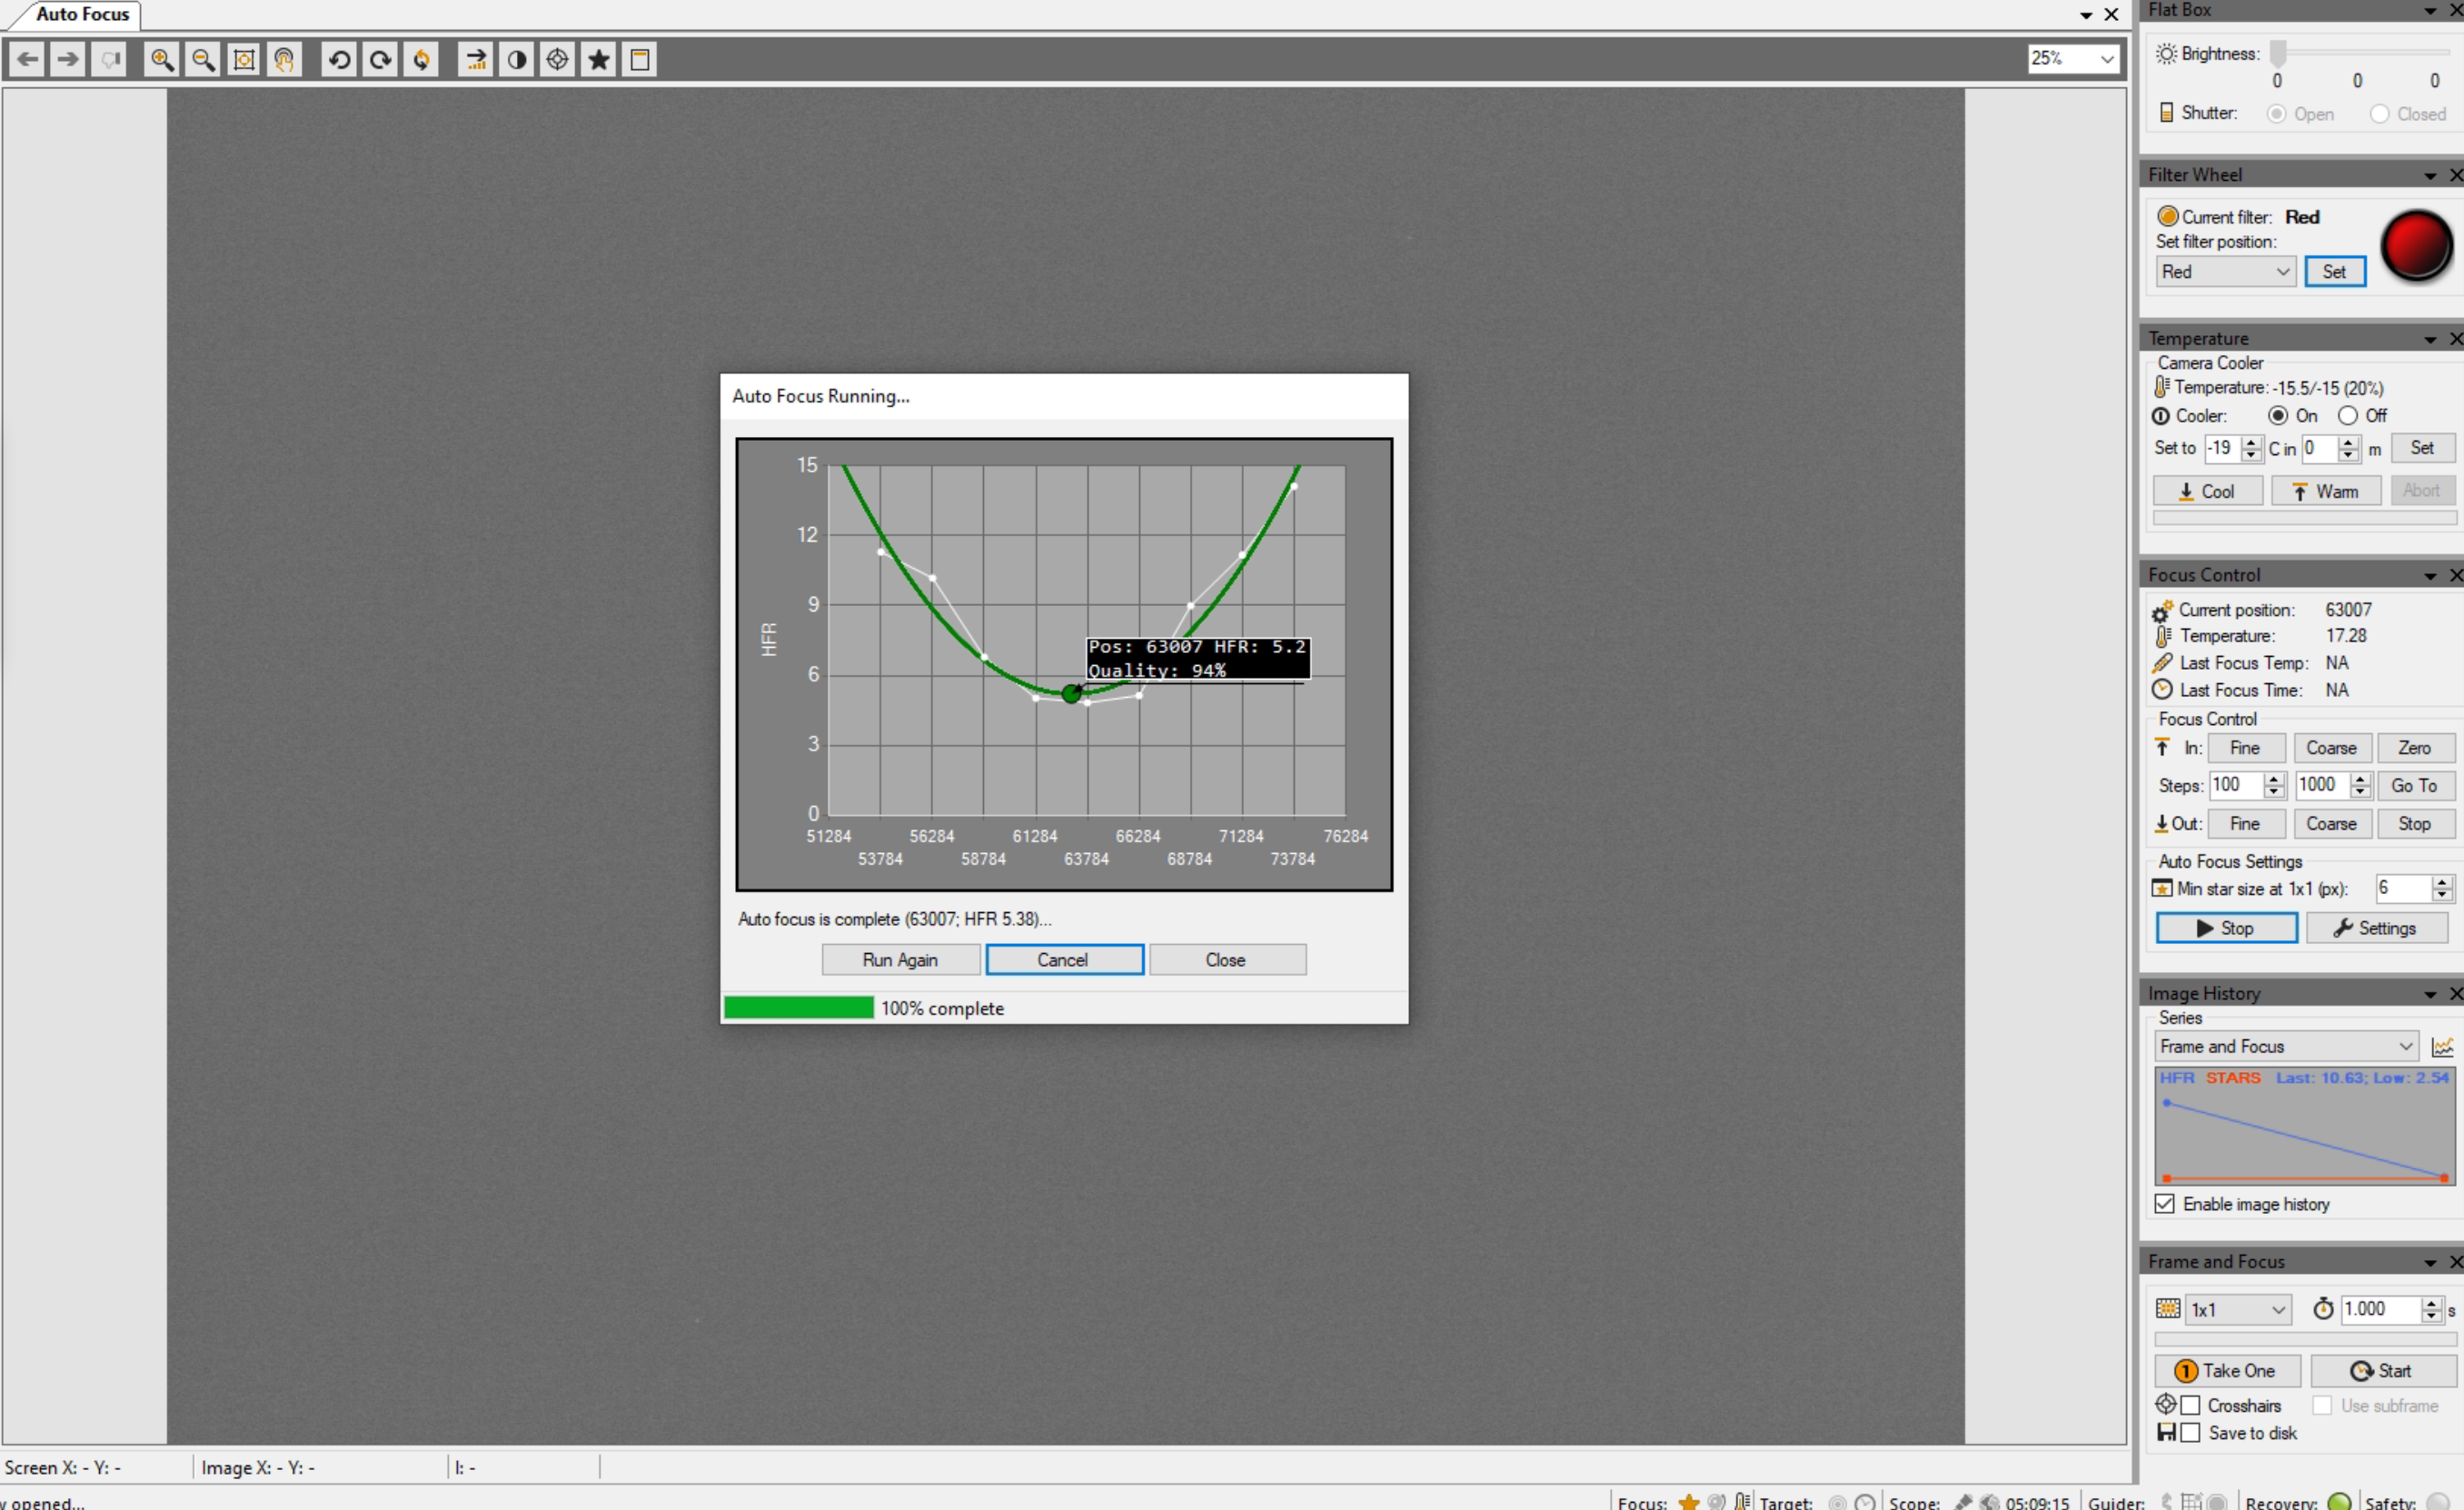
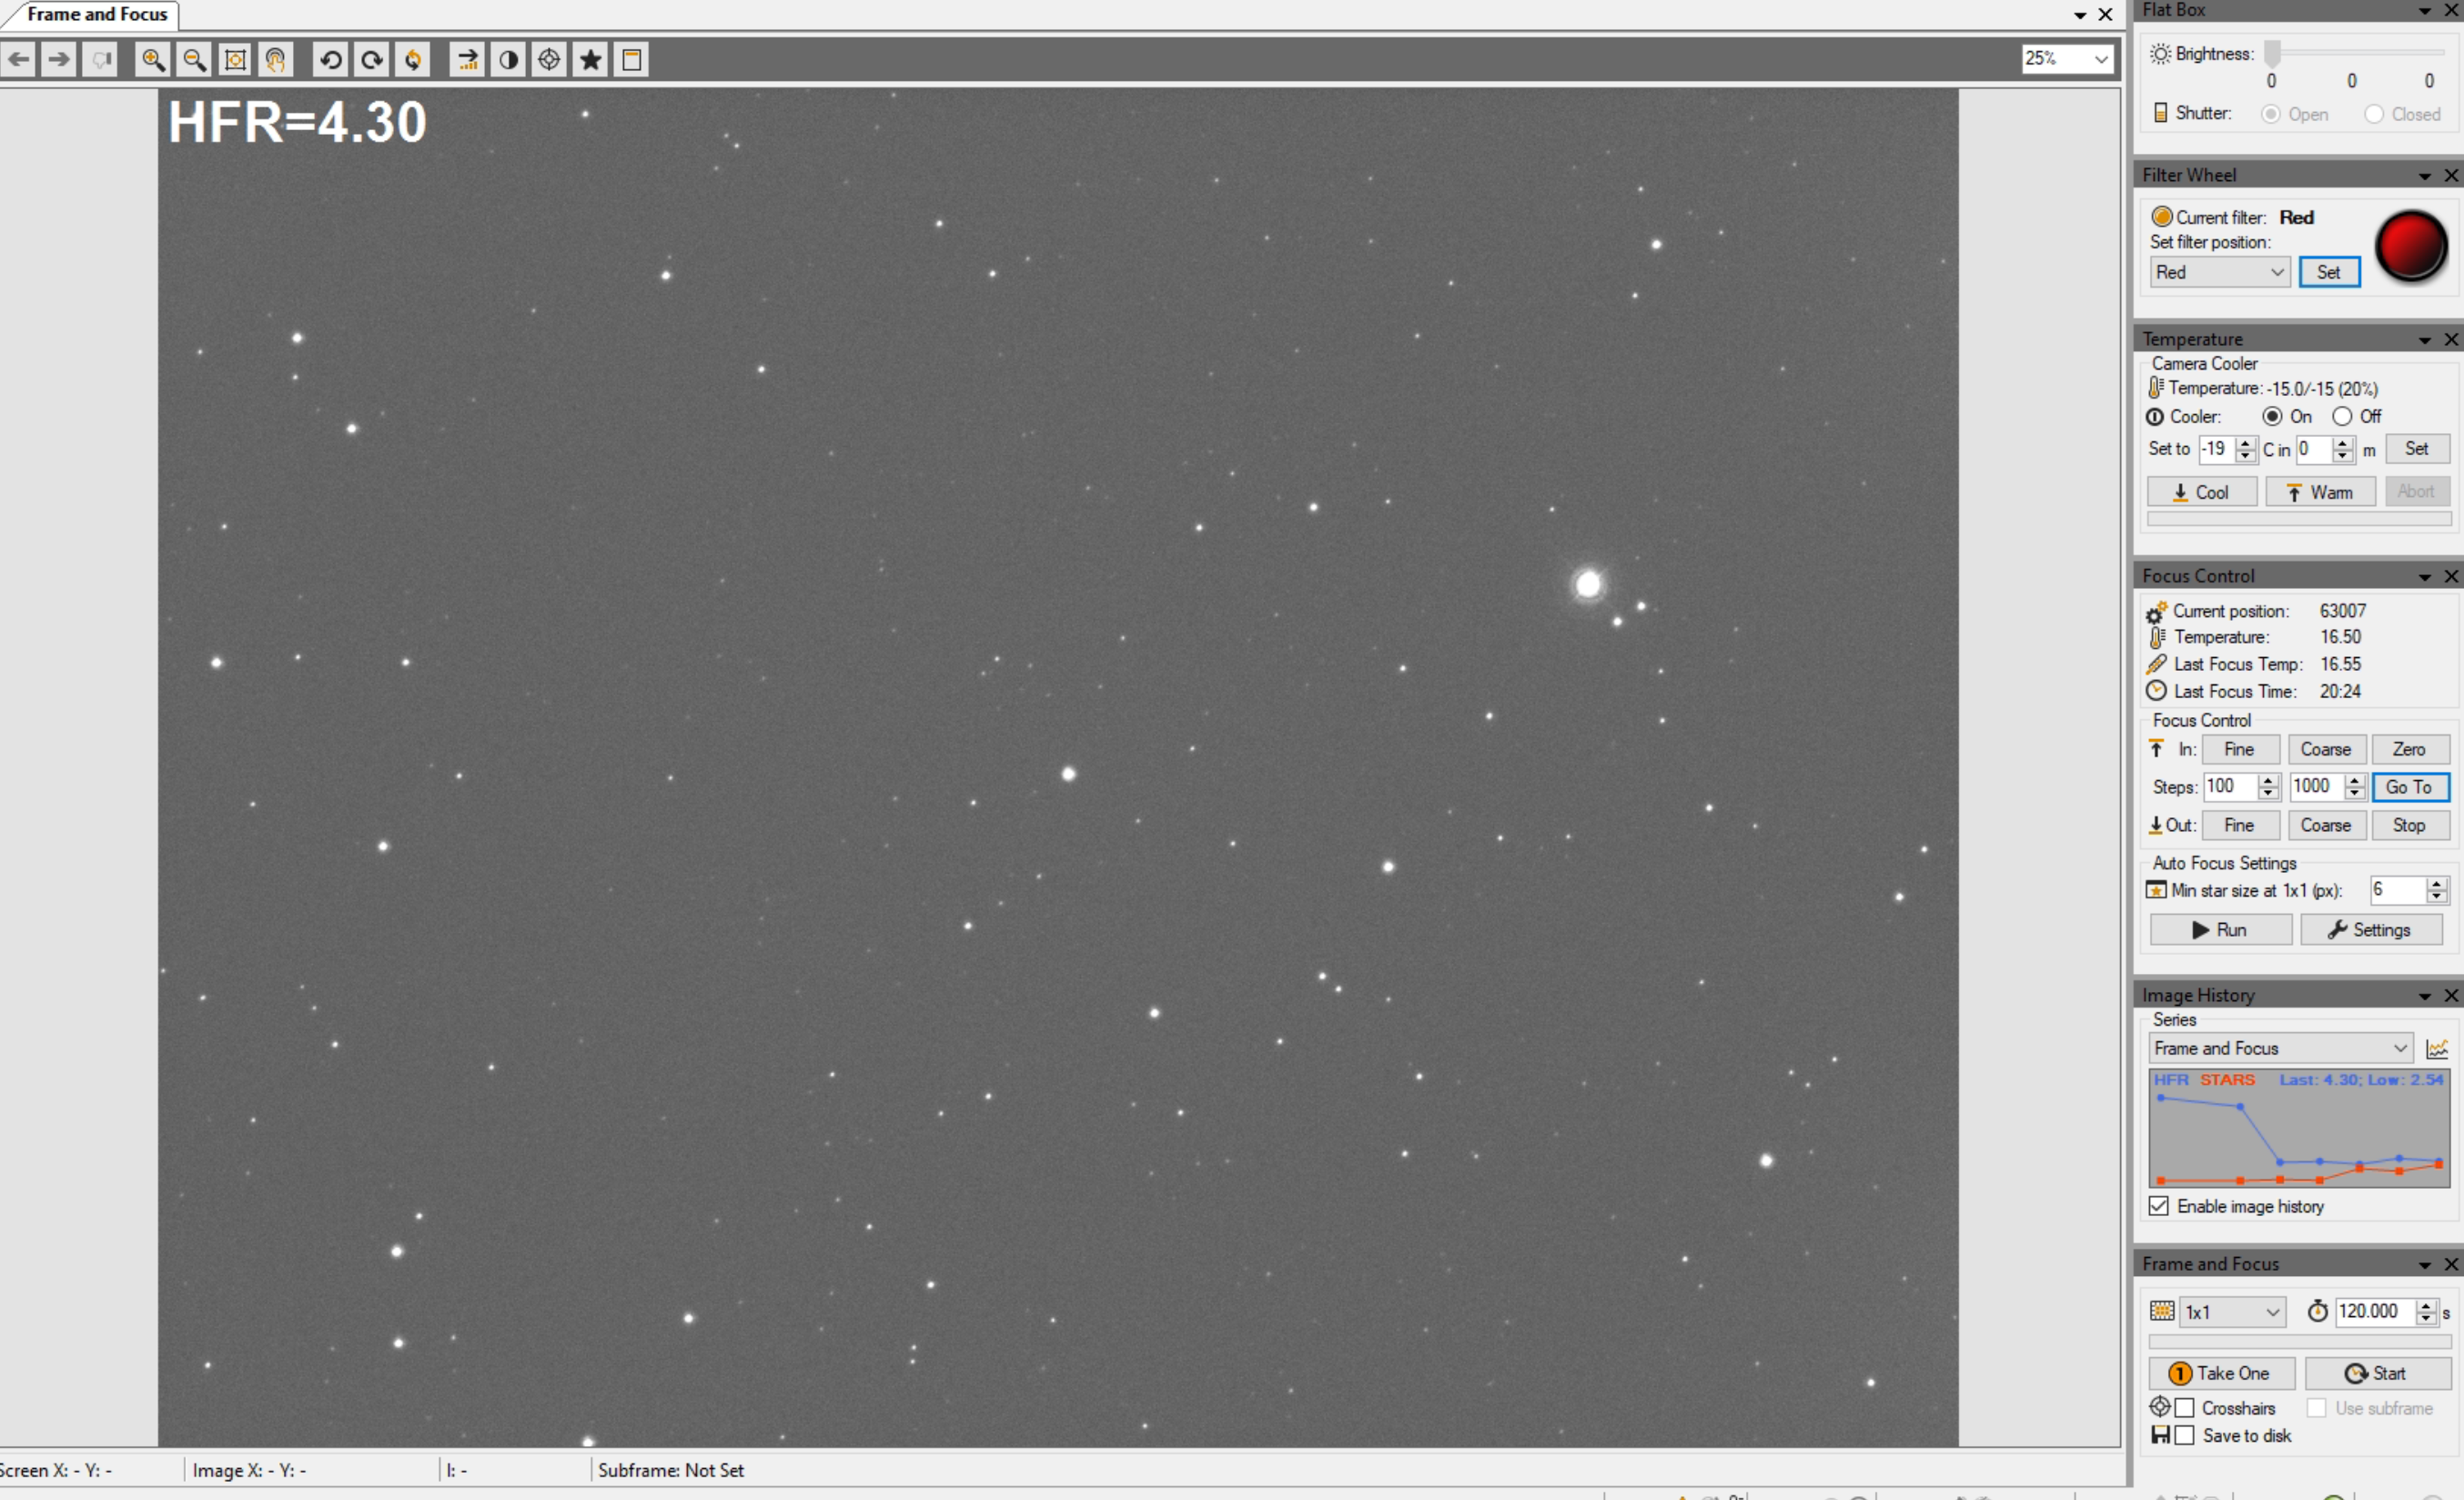
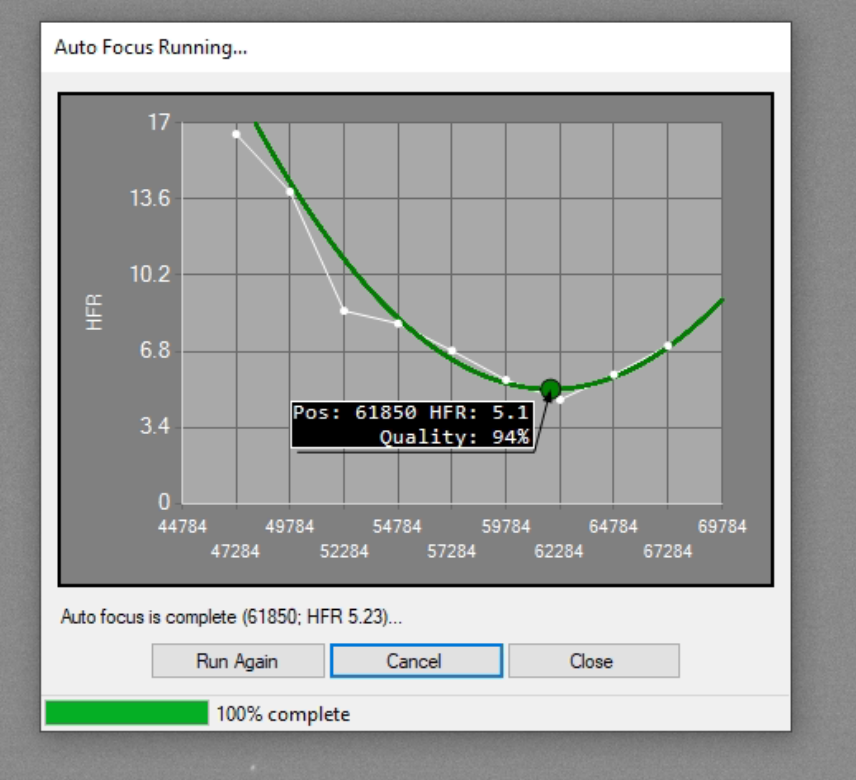
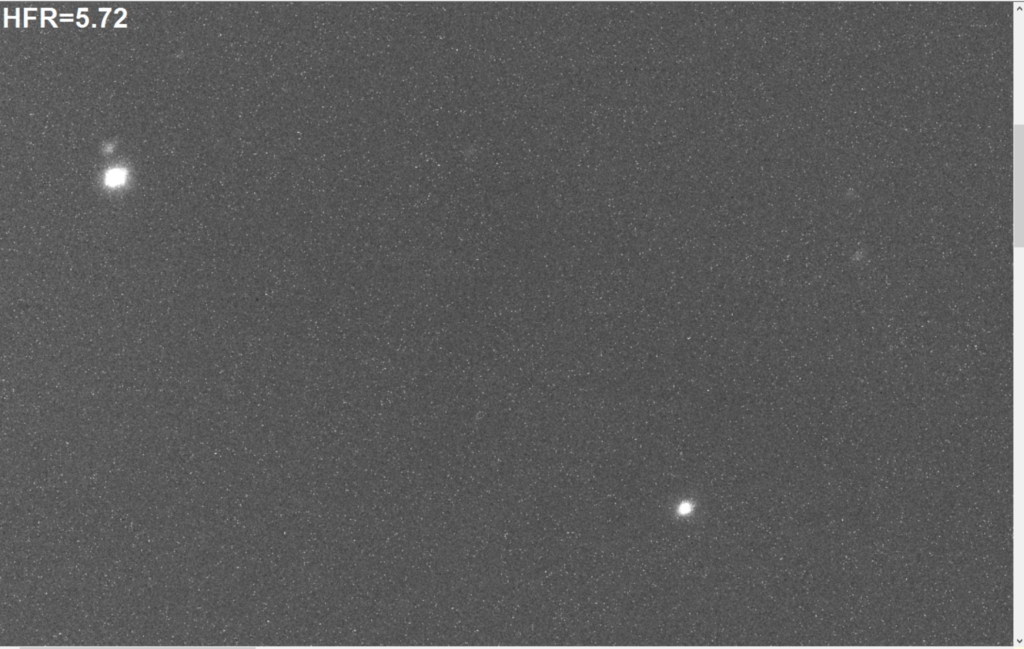
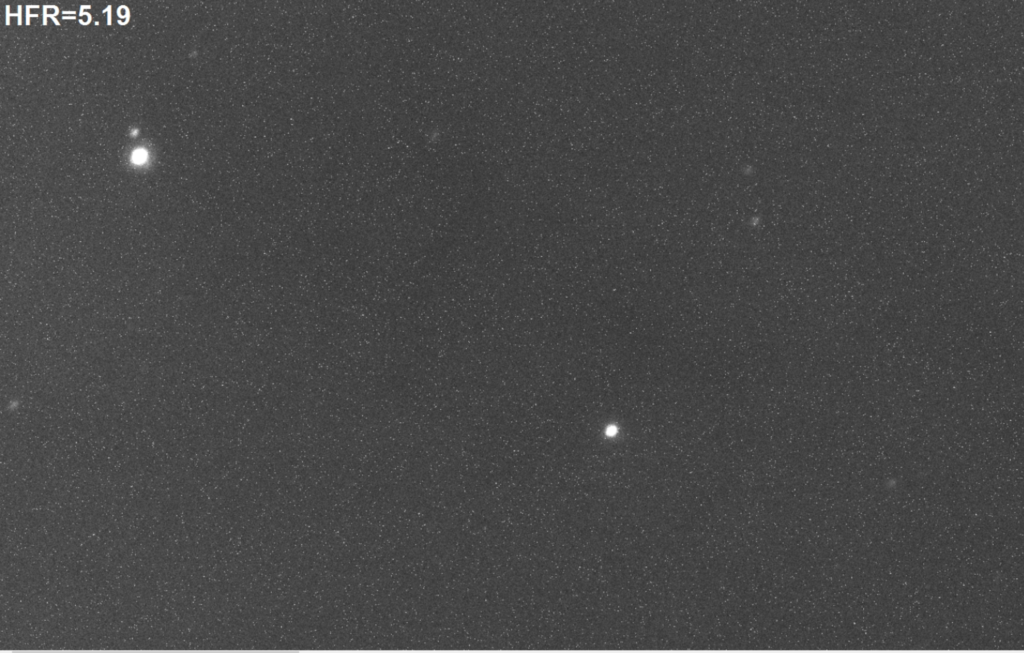
At 20:31 I performed a focus run on the mag 4.29 star with the red filter and got position 63007 @ HFR 5.2 and temperature at the focuser of 17.28℃.
Focus run on red filter
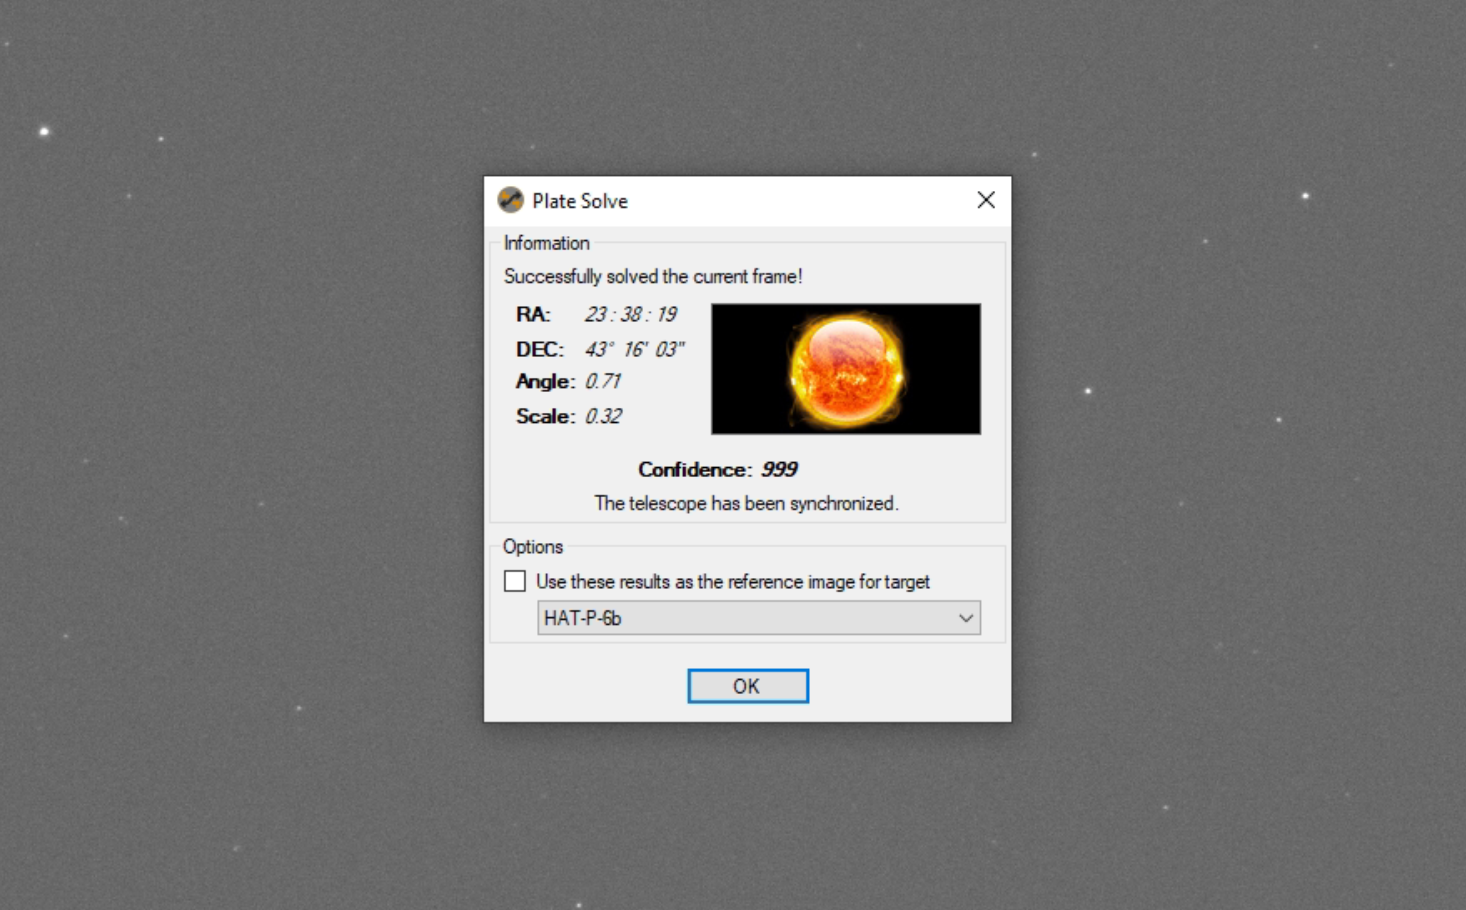
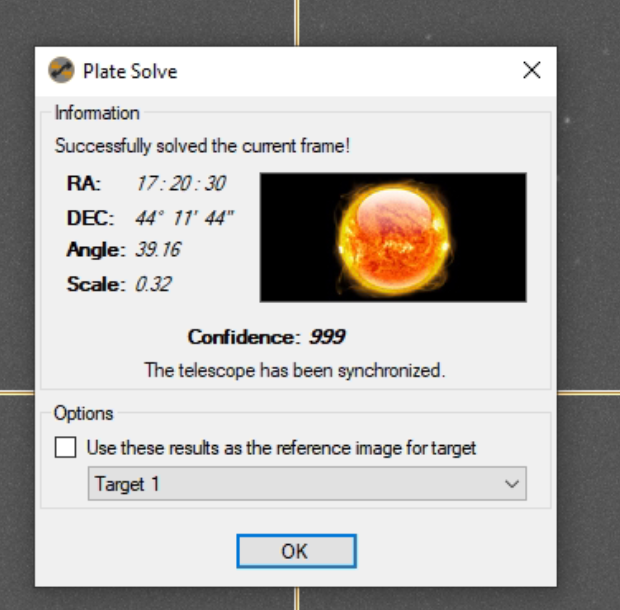
I have performed another solve and sync as I had left the scope running for a while without guiding and the star had moved slightly.
Solve and Sync on target
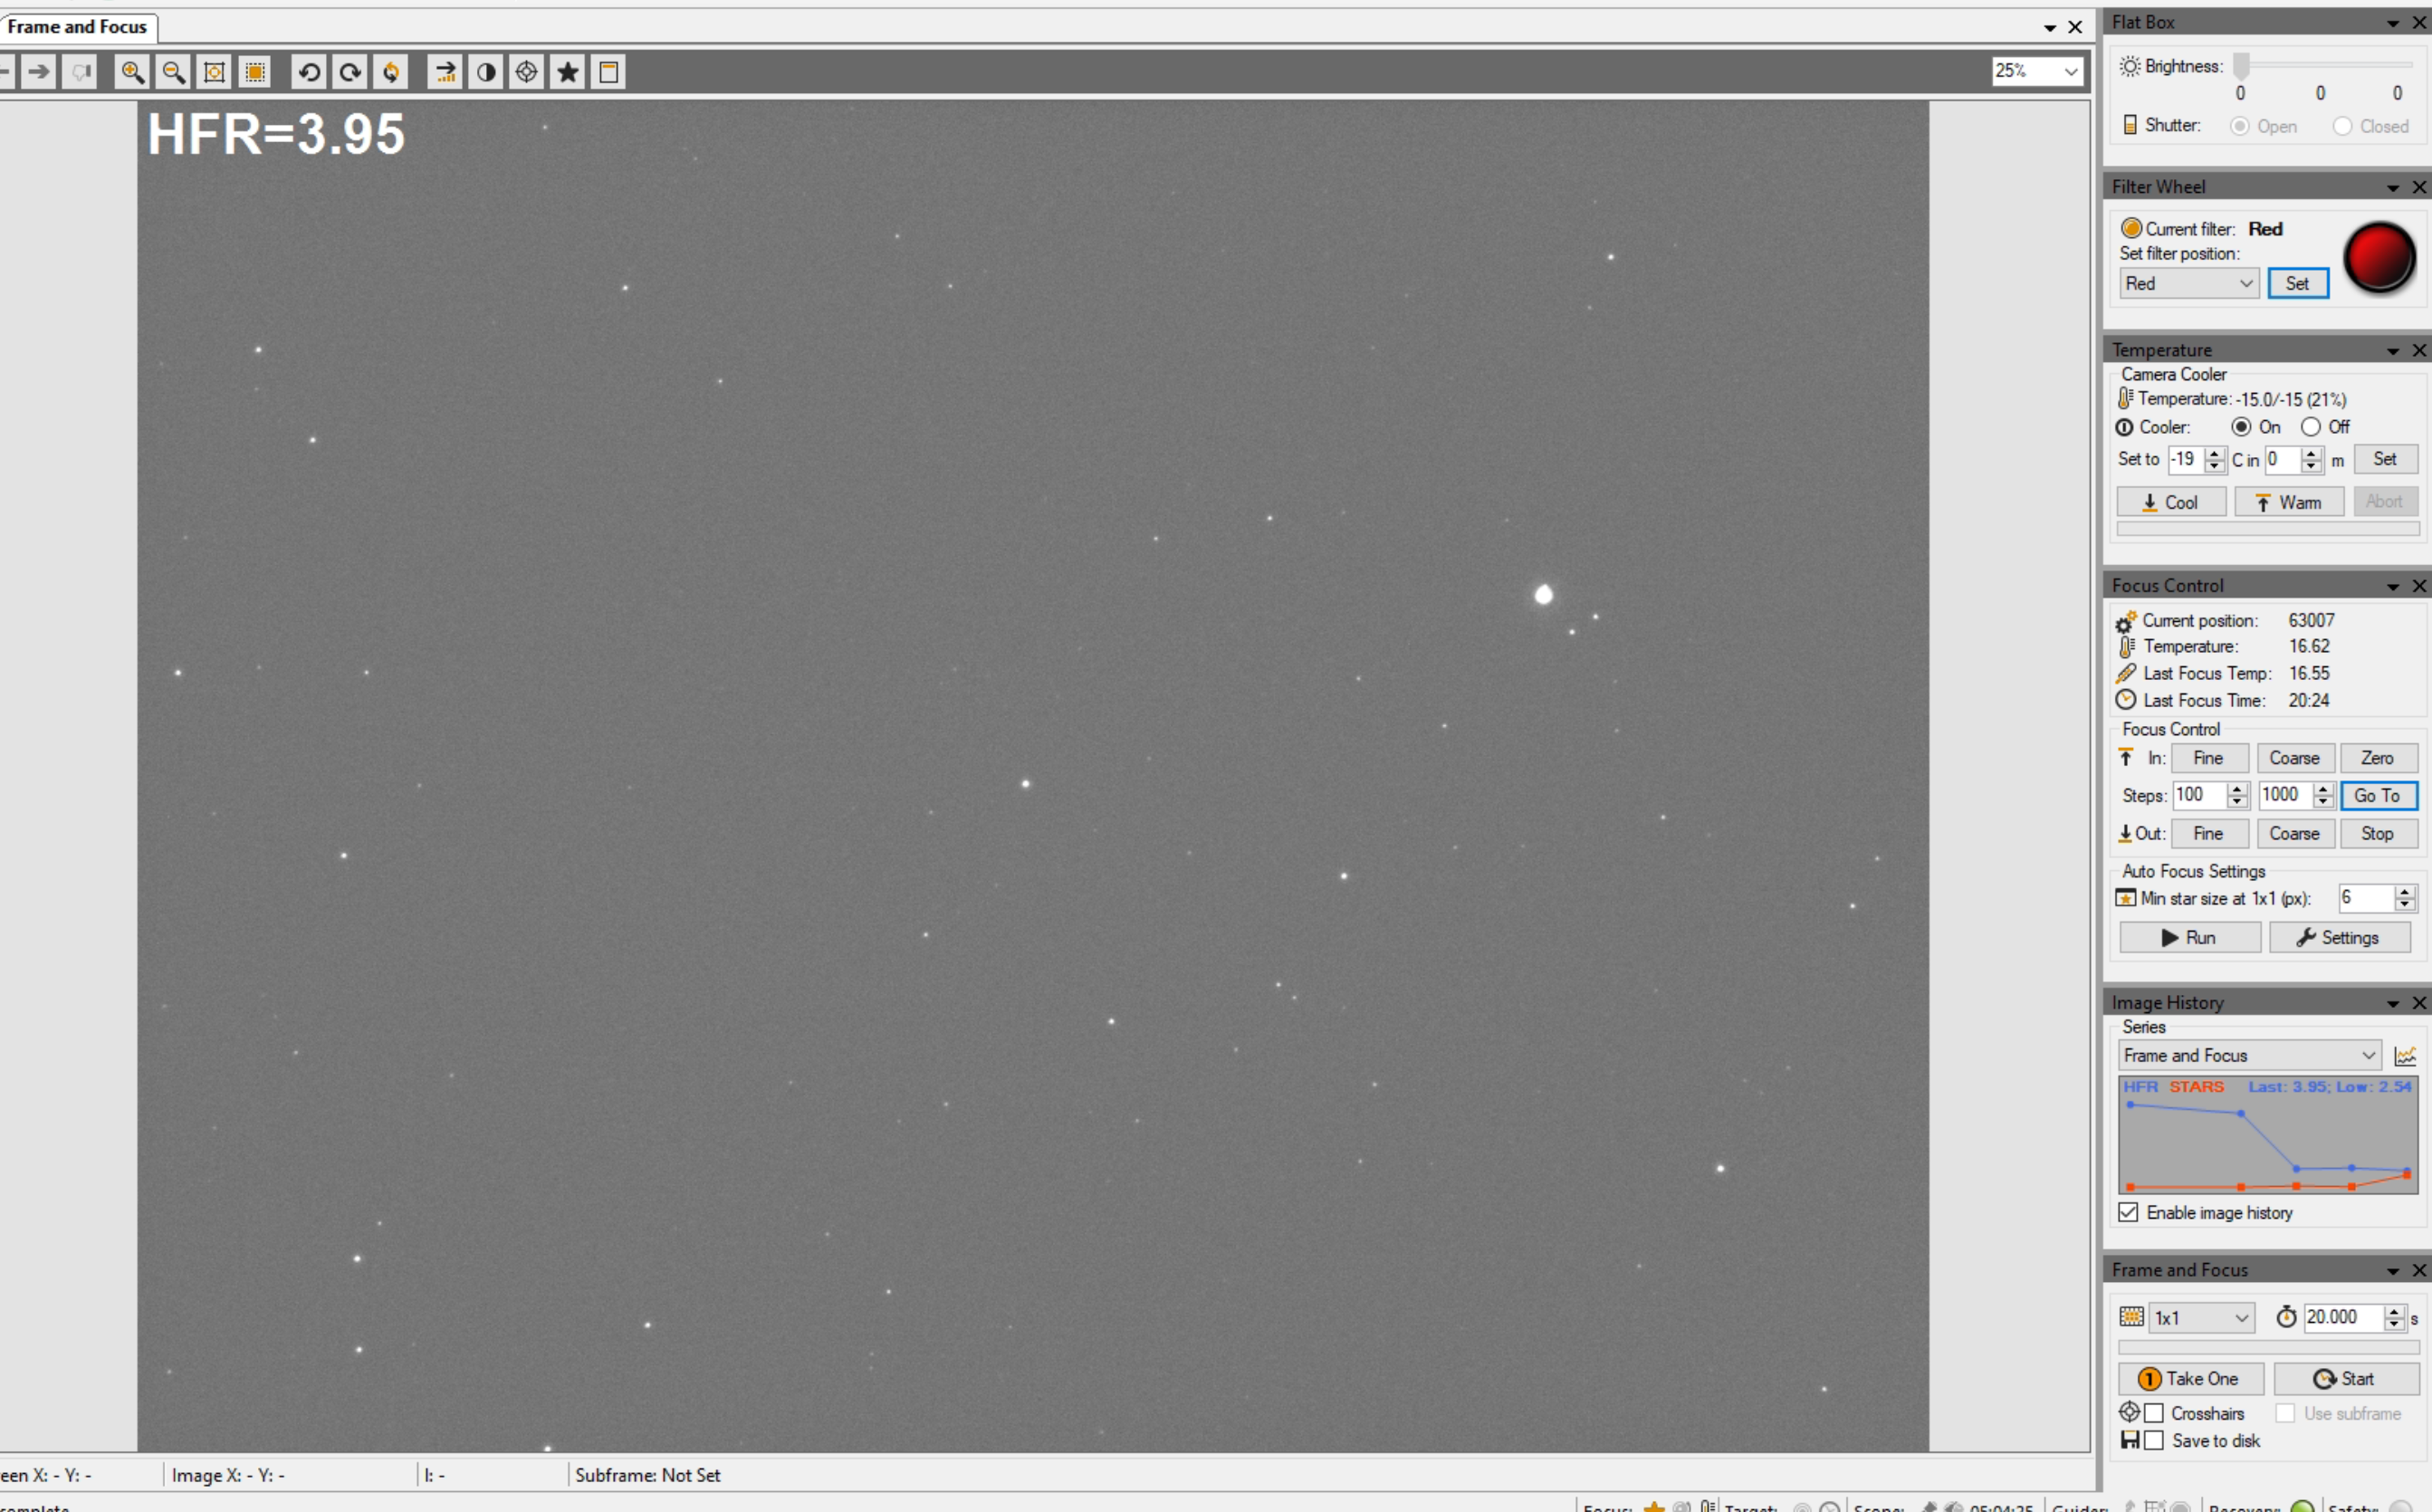
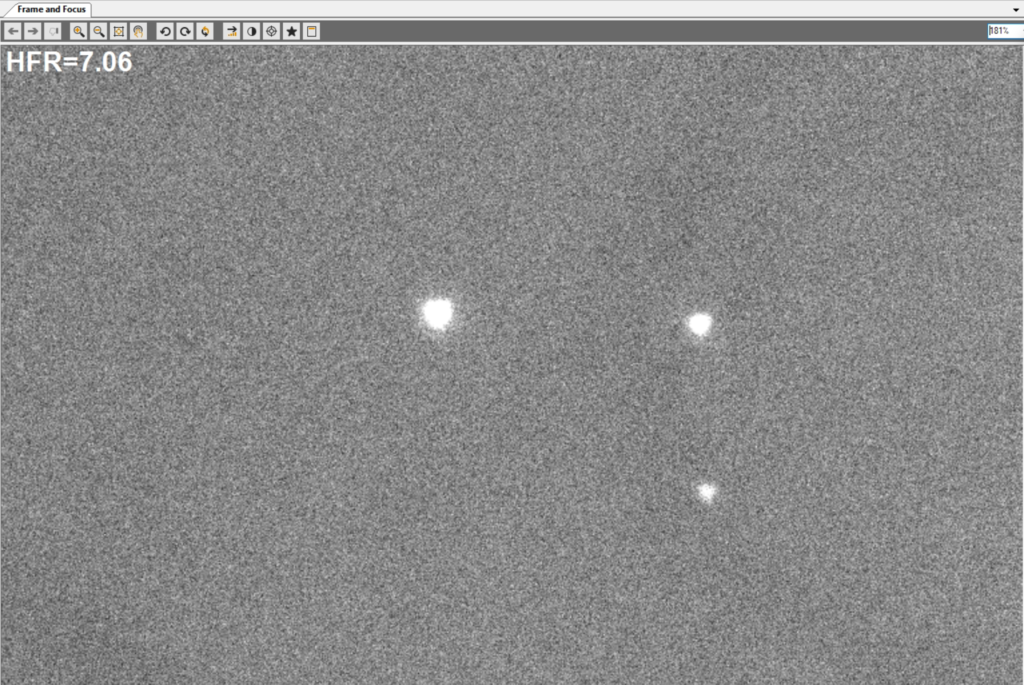
I have now taken a quick 20 second exposure of the target to confirm it was the right star as per the star chart from the Exoclock website and it was.
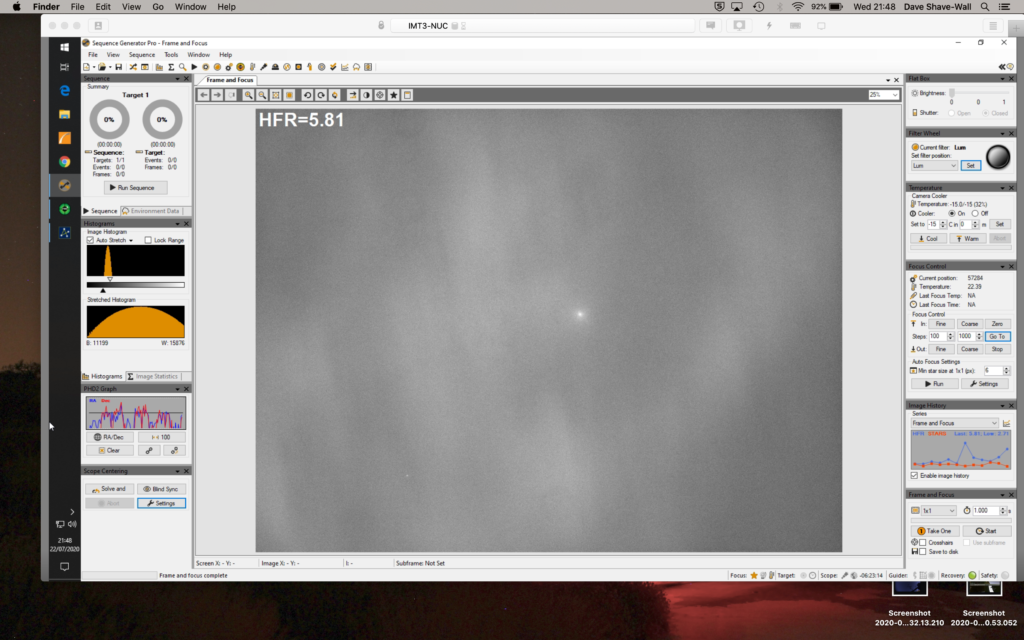
20s exposure of HAT-P-6b
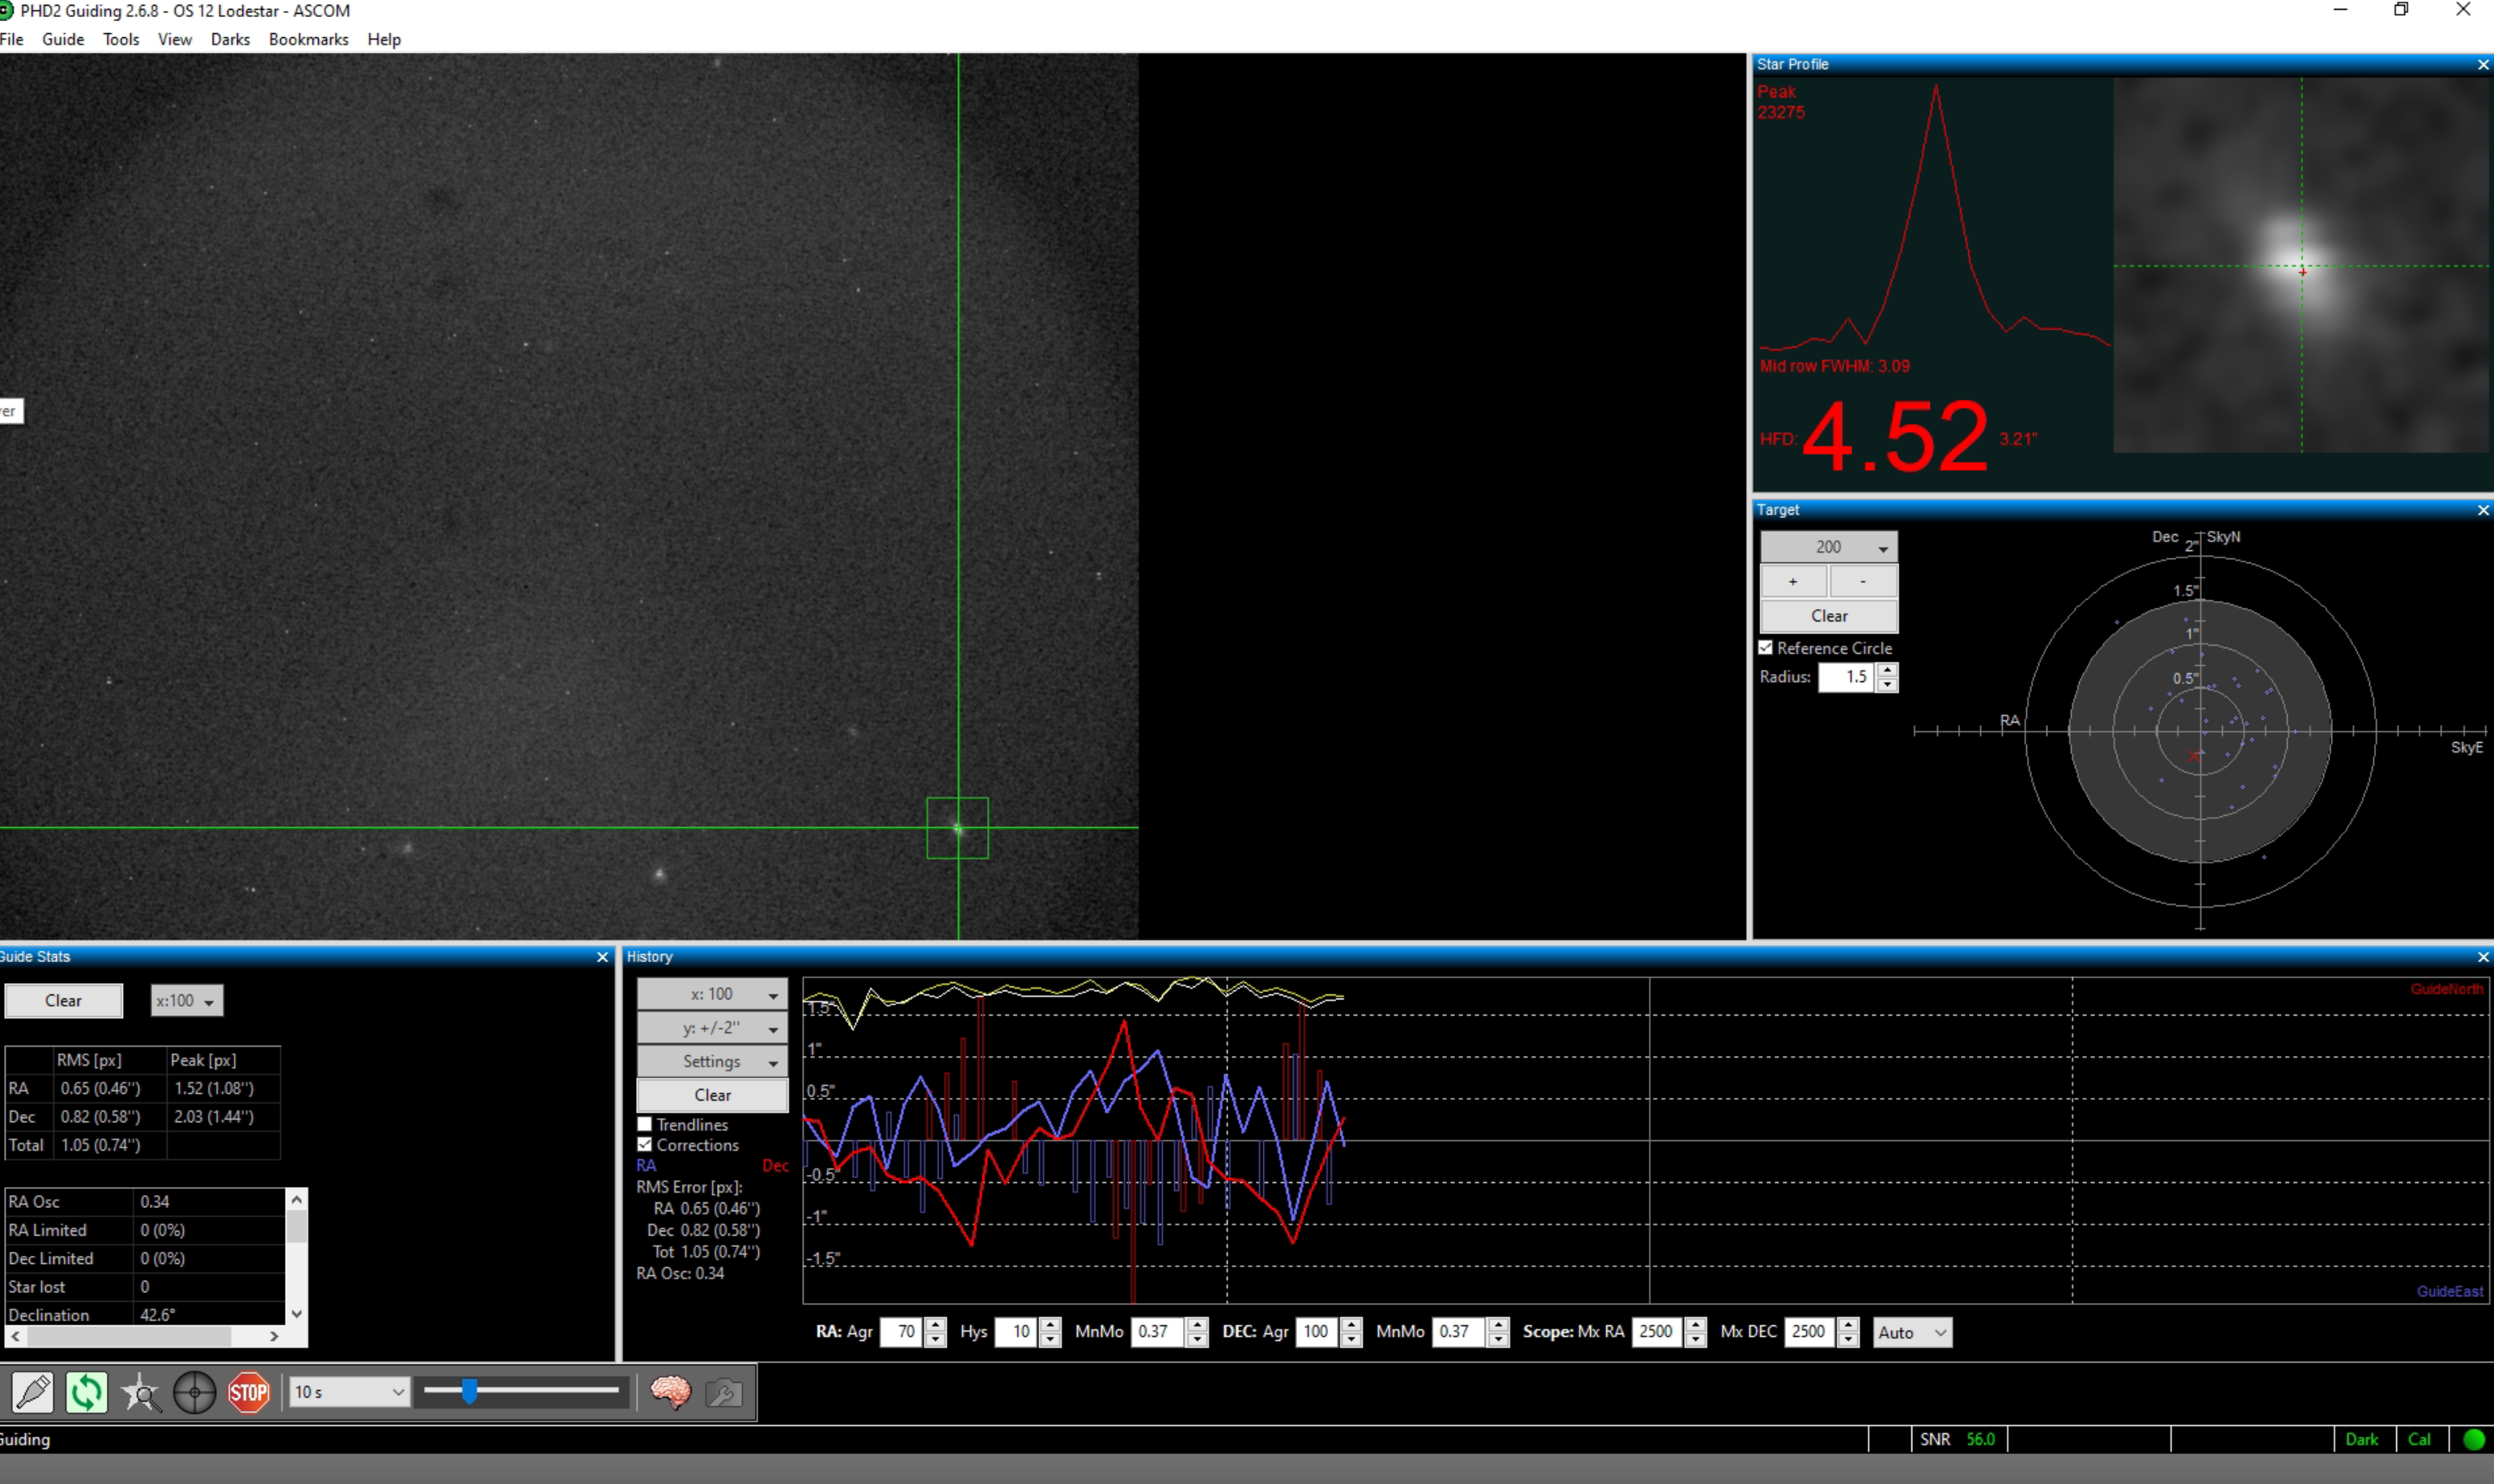
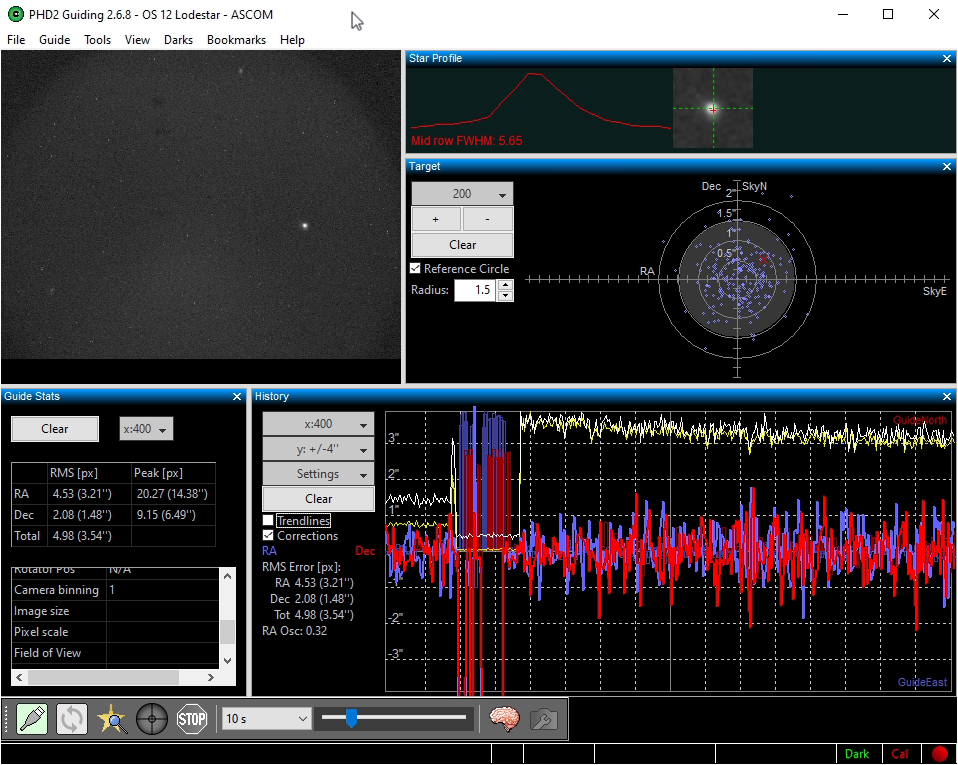
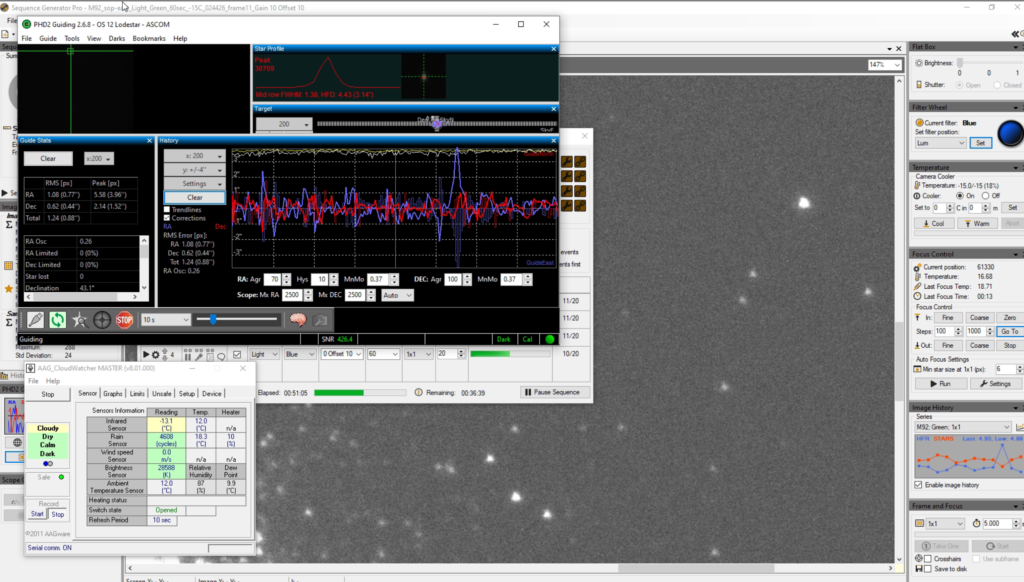
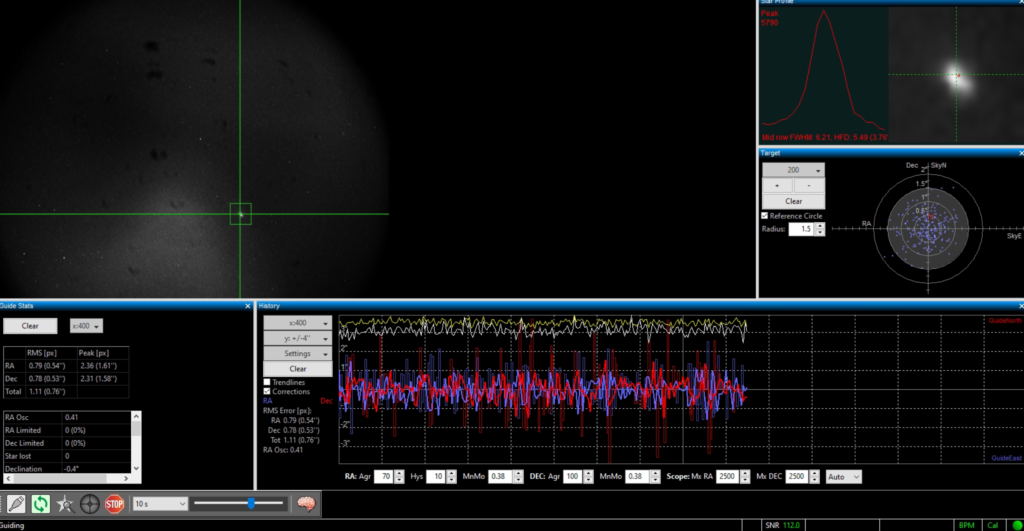
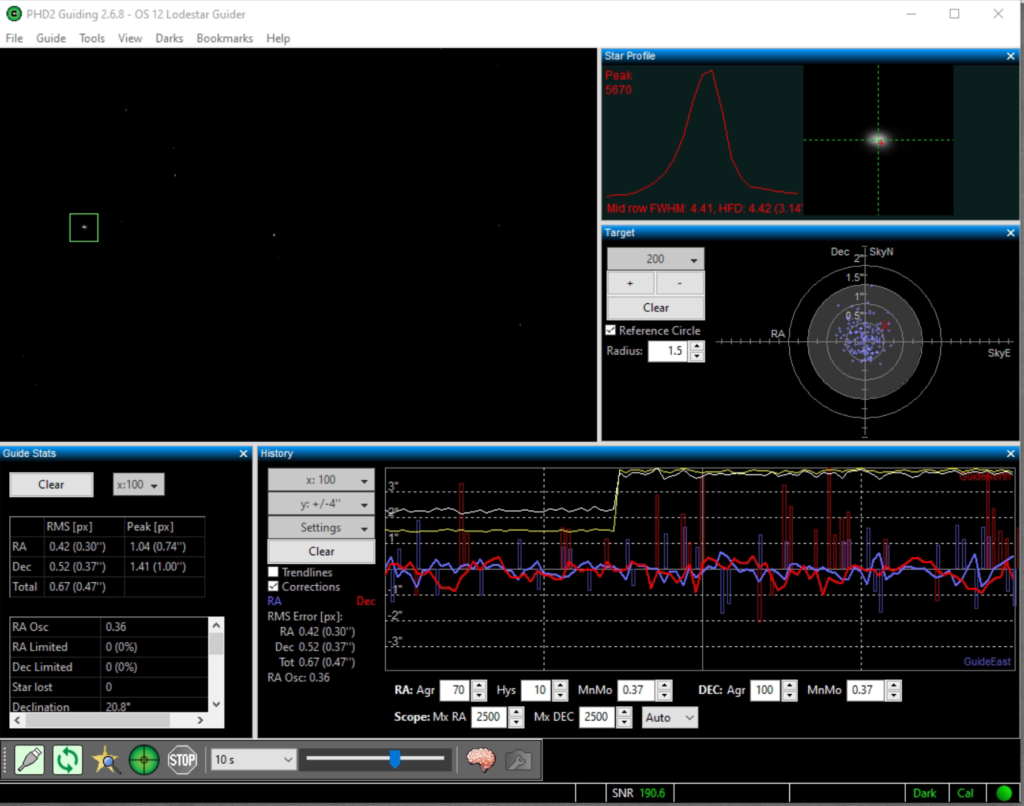
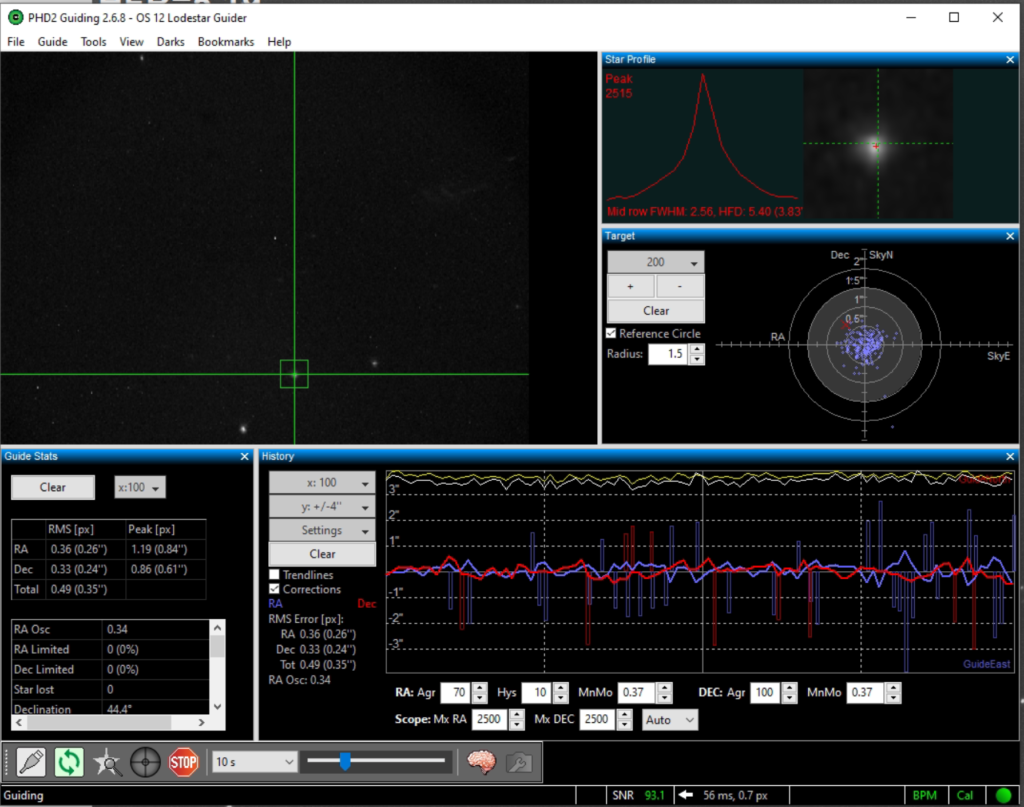
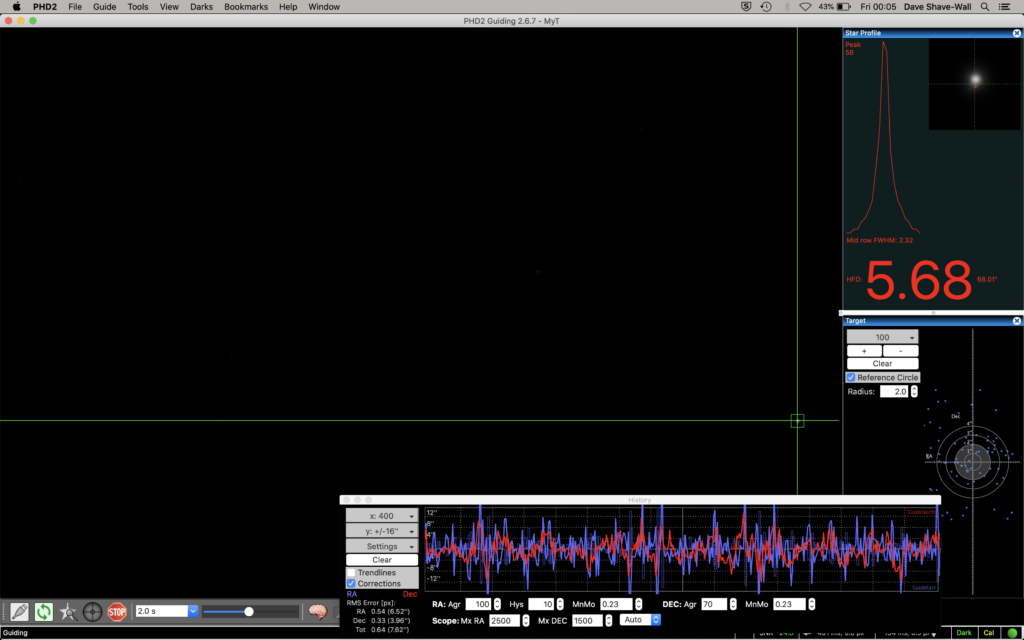
I have started guiding on a nearby star with PHD2.
Guiding
HAT-P-6b rising from the East as can be seen in TSX.
HAT-P-6b rising in the East
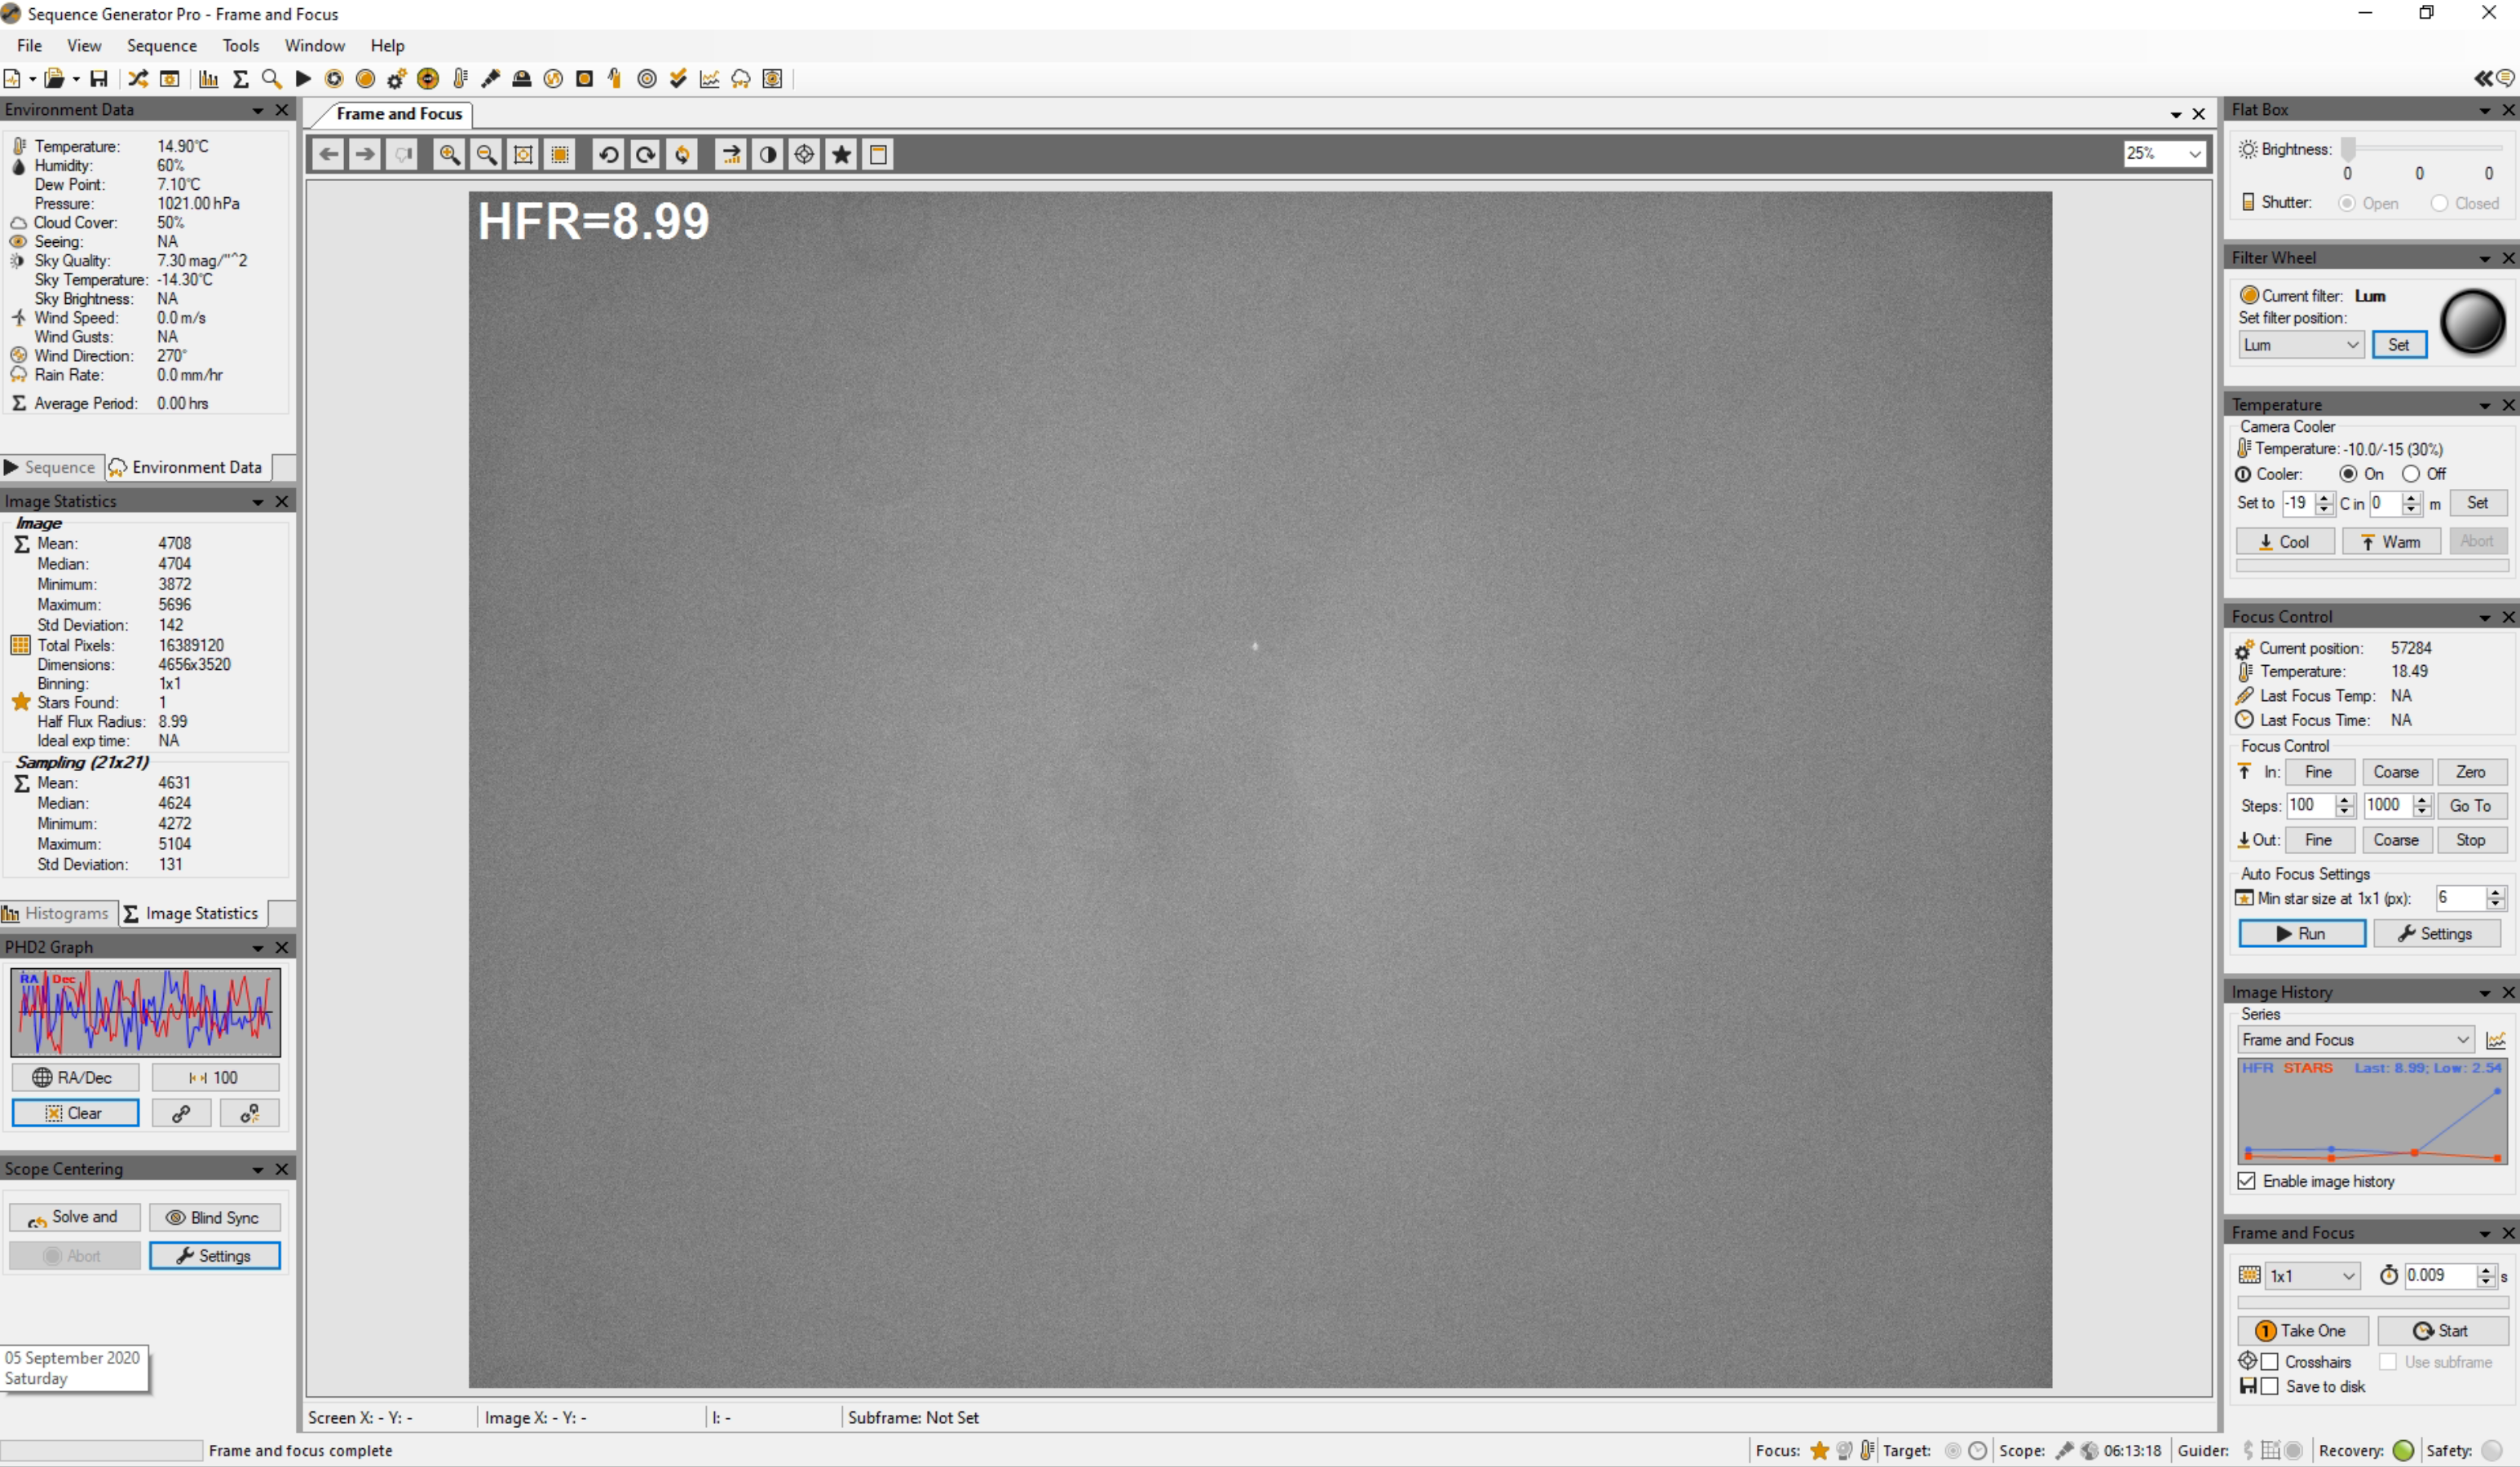
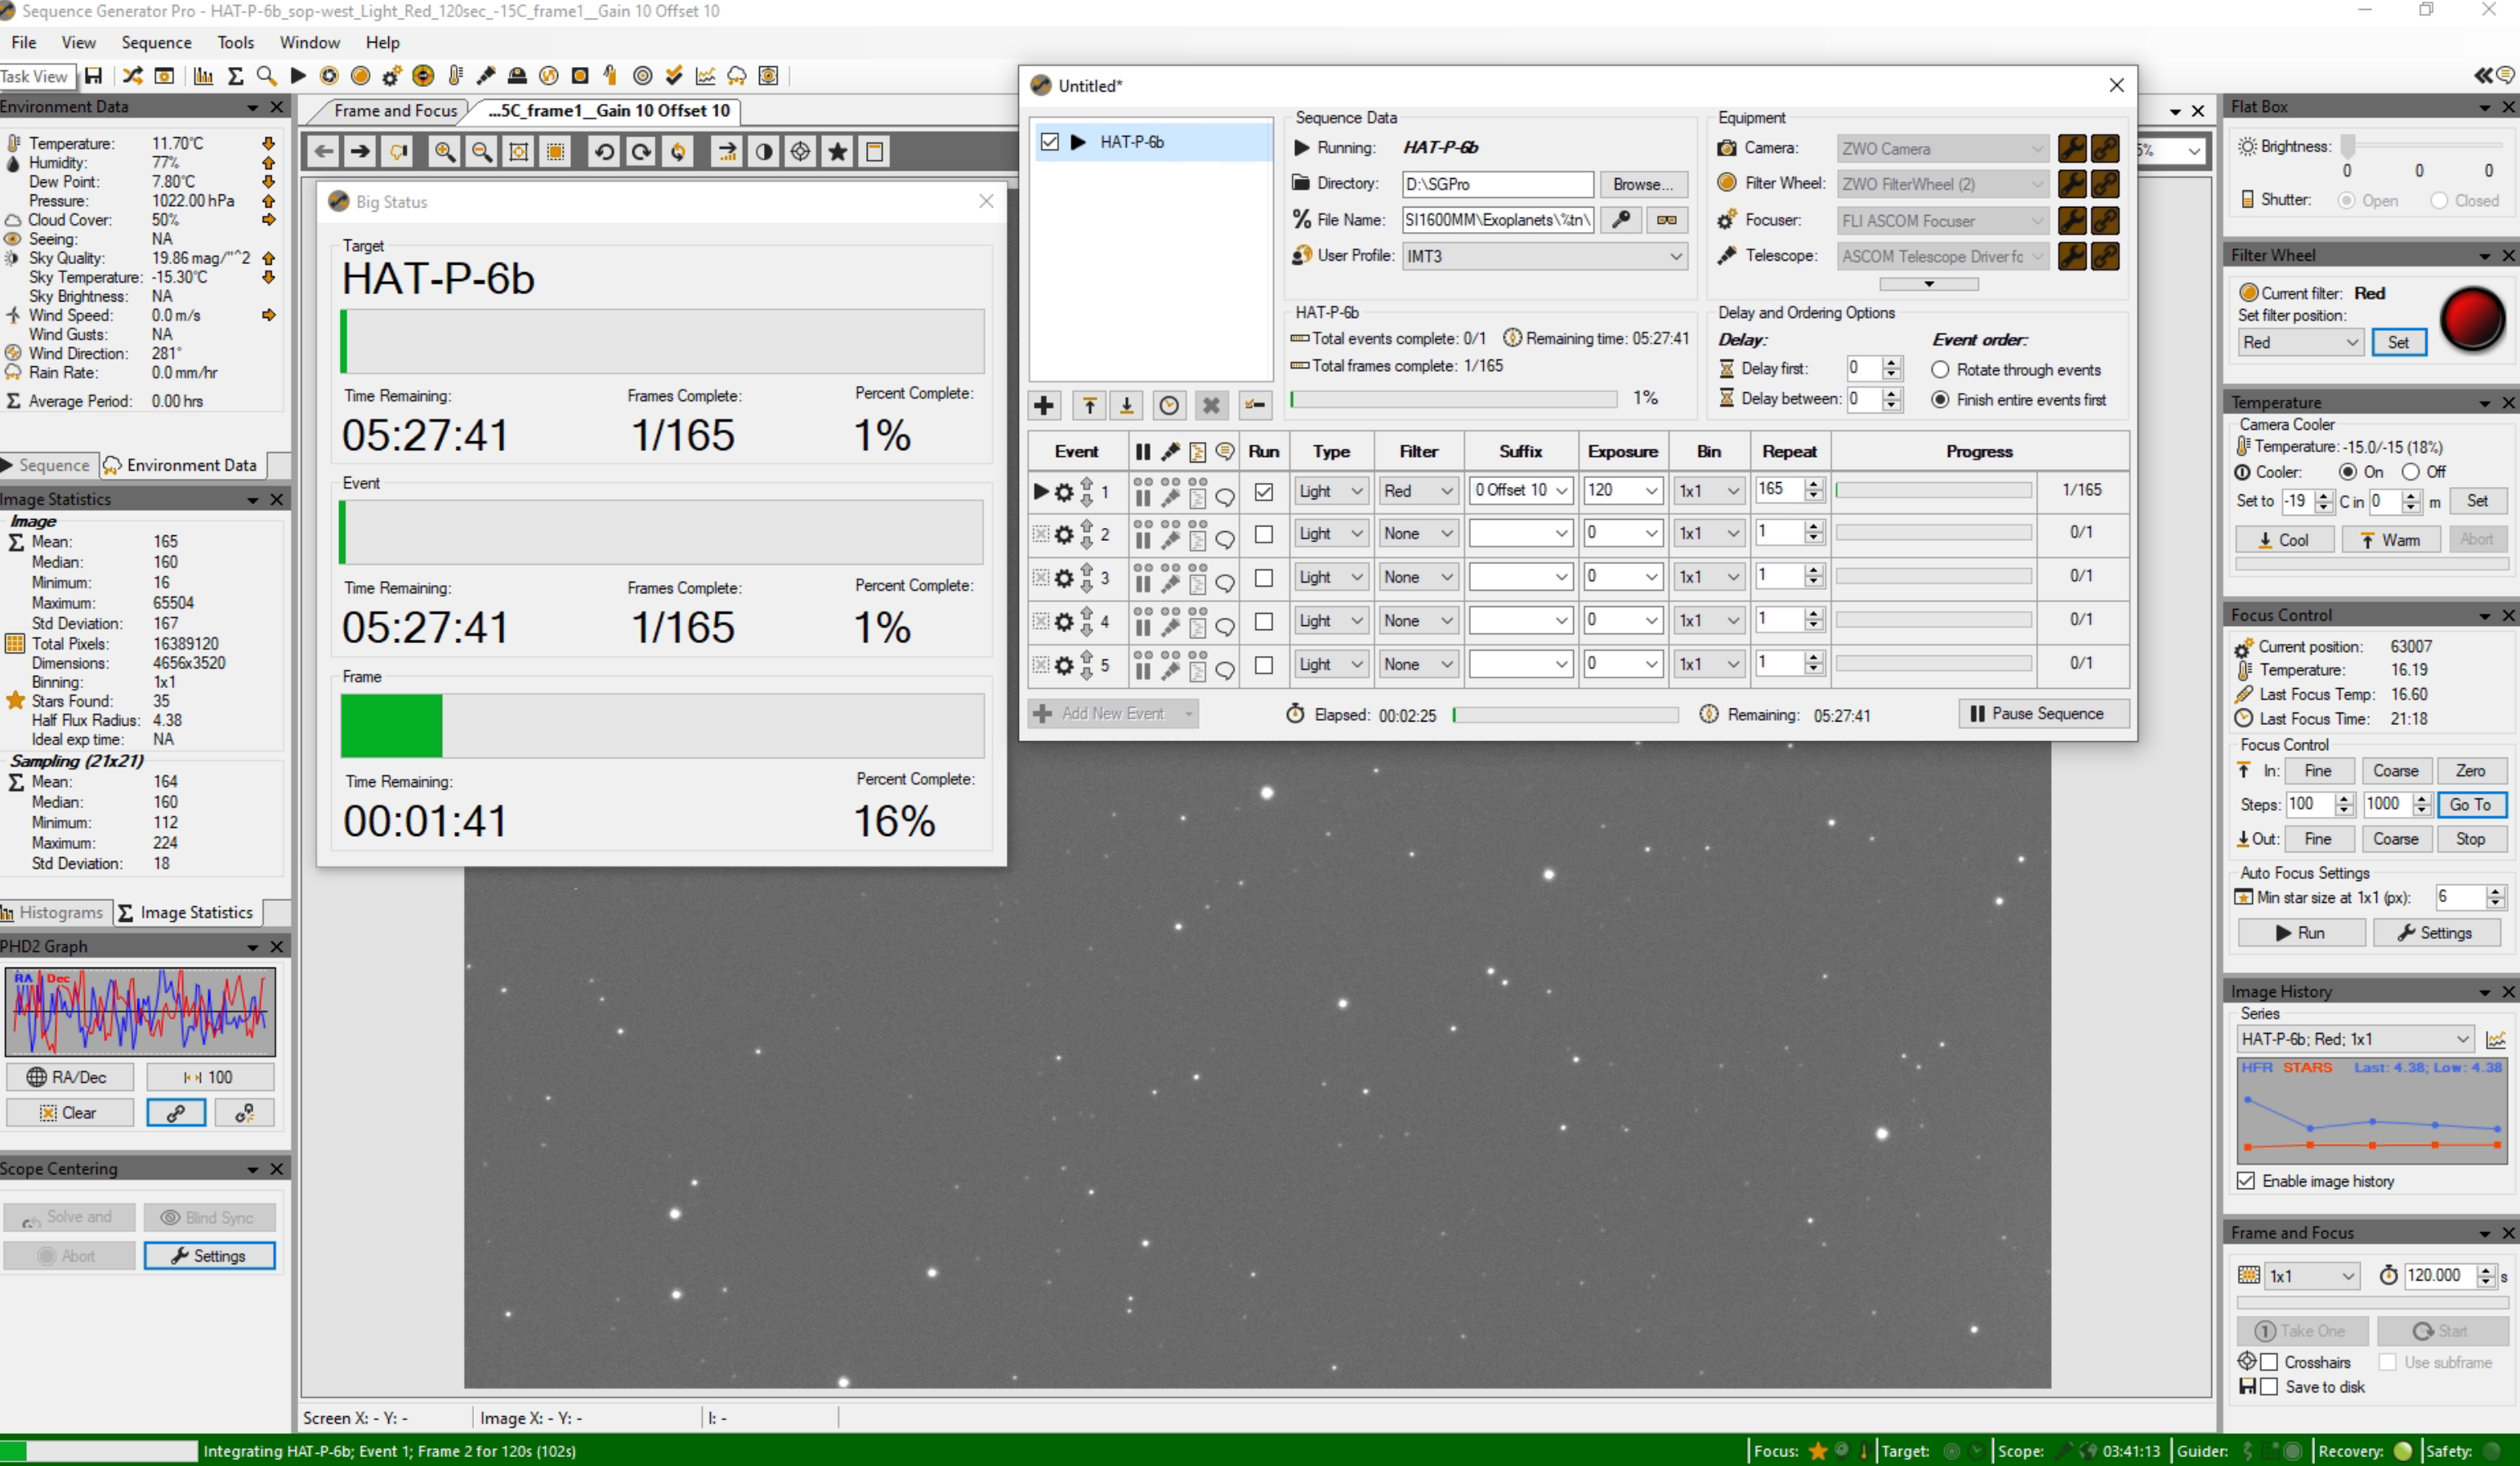
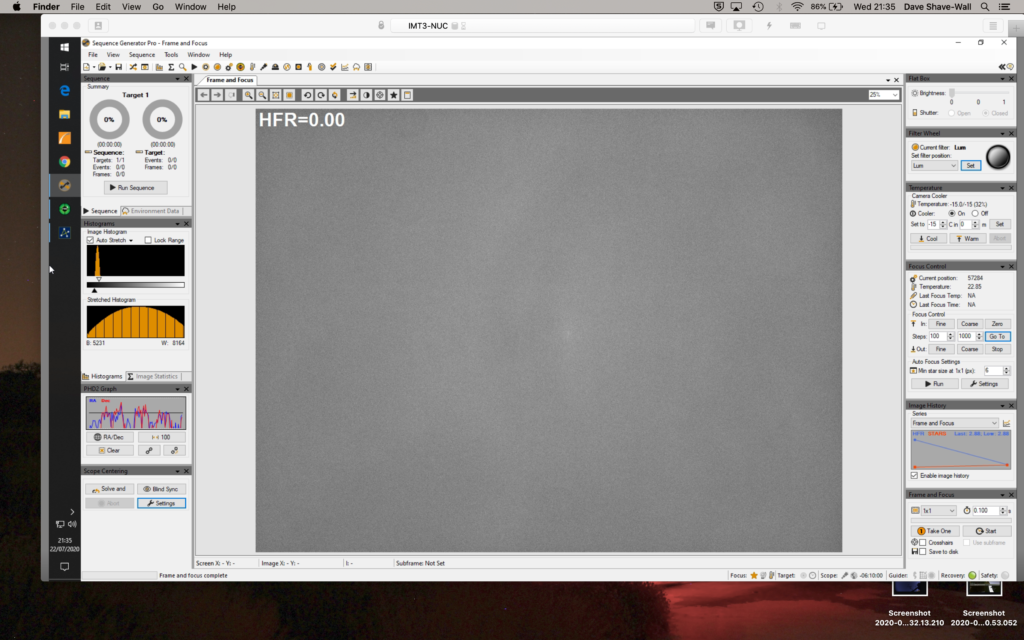
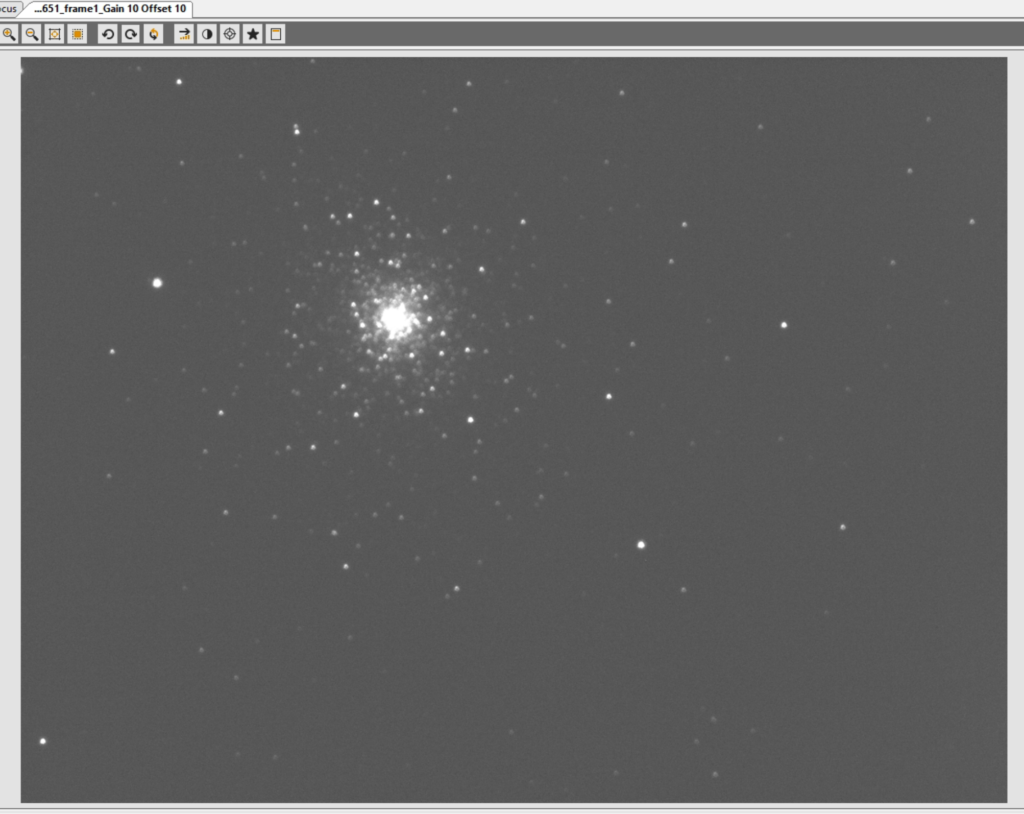
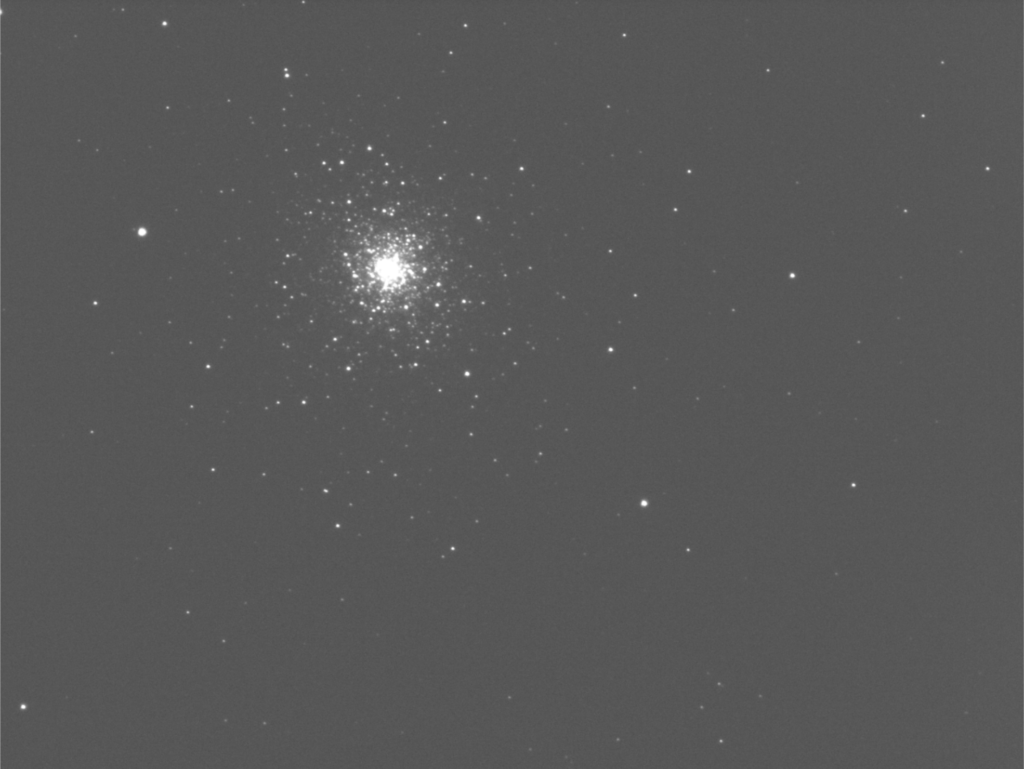
So here is a 2 minute exposure of the target. I tried 60 second but given I am running Gain 10 Offset 10 the maximum pixel count for the centre of the star was 1,648 out of 65k. So a 2 minute exposure produces 9,488 which is still low but I will continue on the low side for now. 1 hour before the transit is in about 45 minutes so I will wait then start gathering data.
2 minute exposure of HAT-P-6b
So we’ve started and set to run for 5.5 hours, this means a a meridian flip in 4 hours time so I will need to stay up until 2am, perform the flip then head back to bed.
First image down
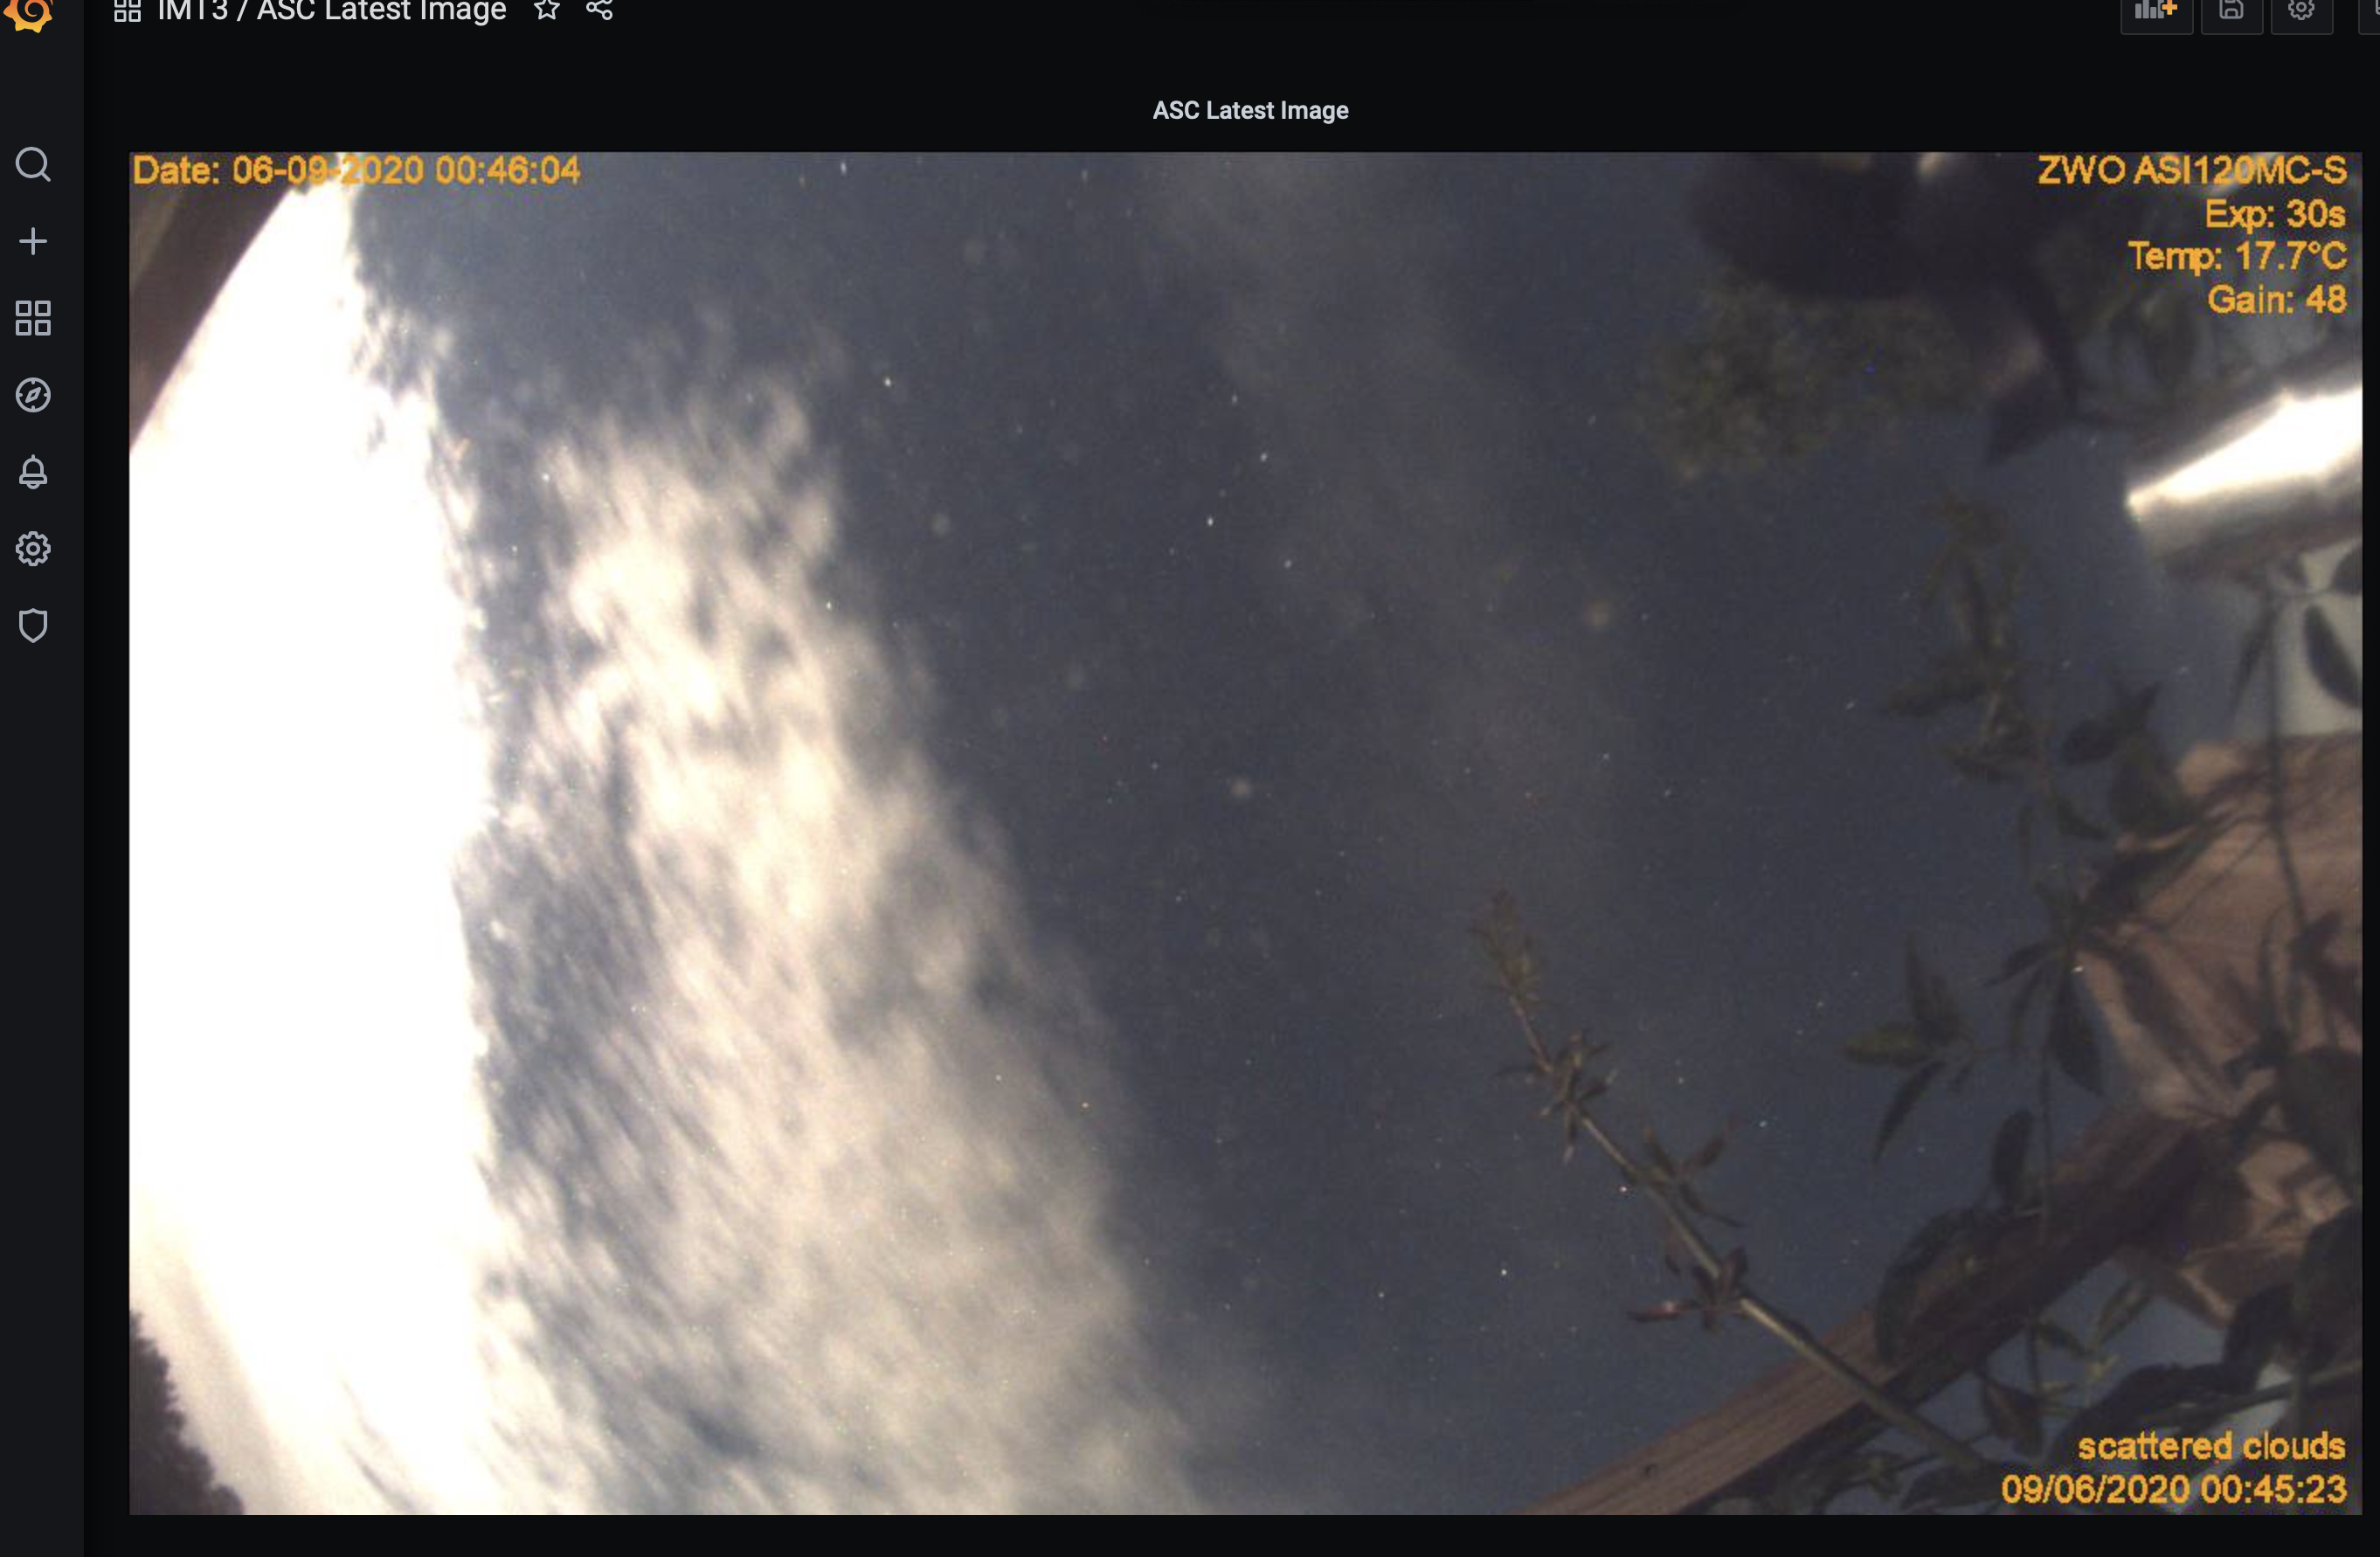
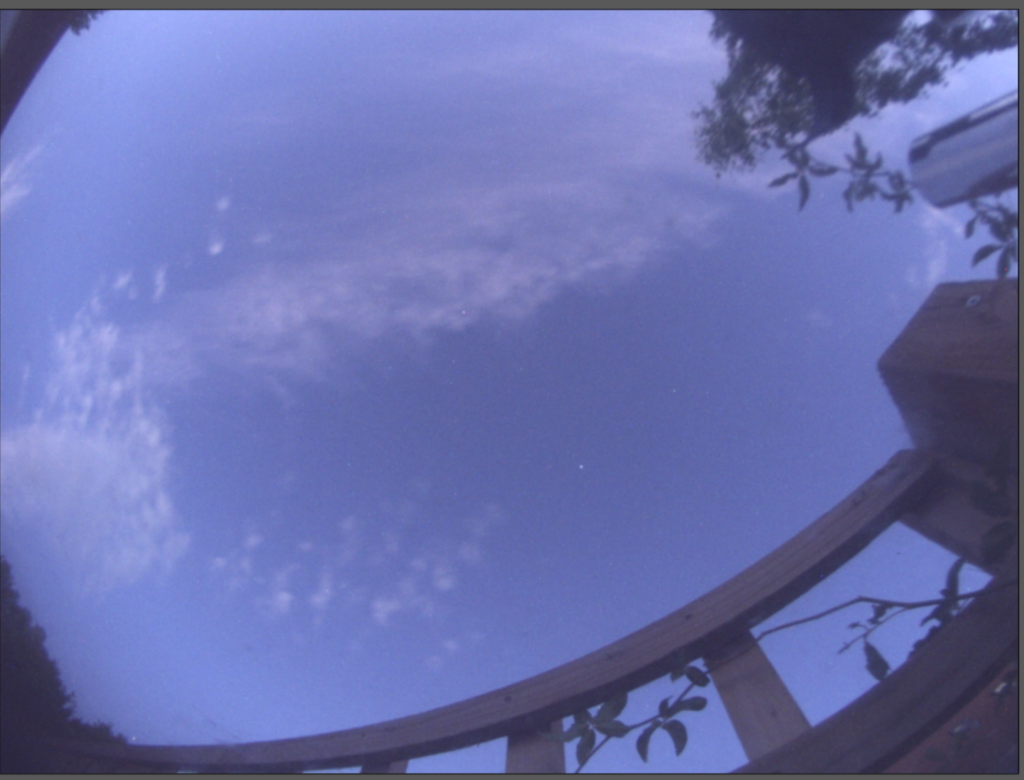
The clouds have started to roll in, however so far we have been lucky and our star and planet are just outside the bank of cloud …… but for how long?
Cloud
So it finally clouded over around 1am although the data for the past 20 minutes is suspect, so I hope we at least have the first half of the transit.
Session period 21:00 – 23:57, transit start ~21:16 and end ~00:05
Started with Lum autofocus at 21:17 but on changing to the Red filter the HFR rose to 8.5 so refocused on Red at 21:20, position 60789, HFR 3.97 at 21℃. The change in HFR was more likely the warm sky and seeing conditions.
Restarted imaging at 21:39 at new Gain 10 and Offset 10 with a 15 second exposure to get the exposure down well below the 65k max to around 35k. The target star is a magnitude +7.69 so the initial Gain 139 Offset 21 and even Gain 75 Offset 12 were too high even at 10 seconds exposure.
We started with no delay in between the exposures until the start of the transit, then decided due to the large amount of data (35GB) being collected we should put a delay in which we did of 60 seconds. In hindsight we should be placed a smaller delay period in 15-30 seconds to allow us to gather more data points for the transit period. We have emailed the ESA team to start a conversation on planning exposure/delay settings for transits.
We then finished was forced to finish before the projected transit was completed when the clouds rolled in, and took Dark, Bias and Flats frame at Gain 10, Offset 10 ready for the analysis software.
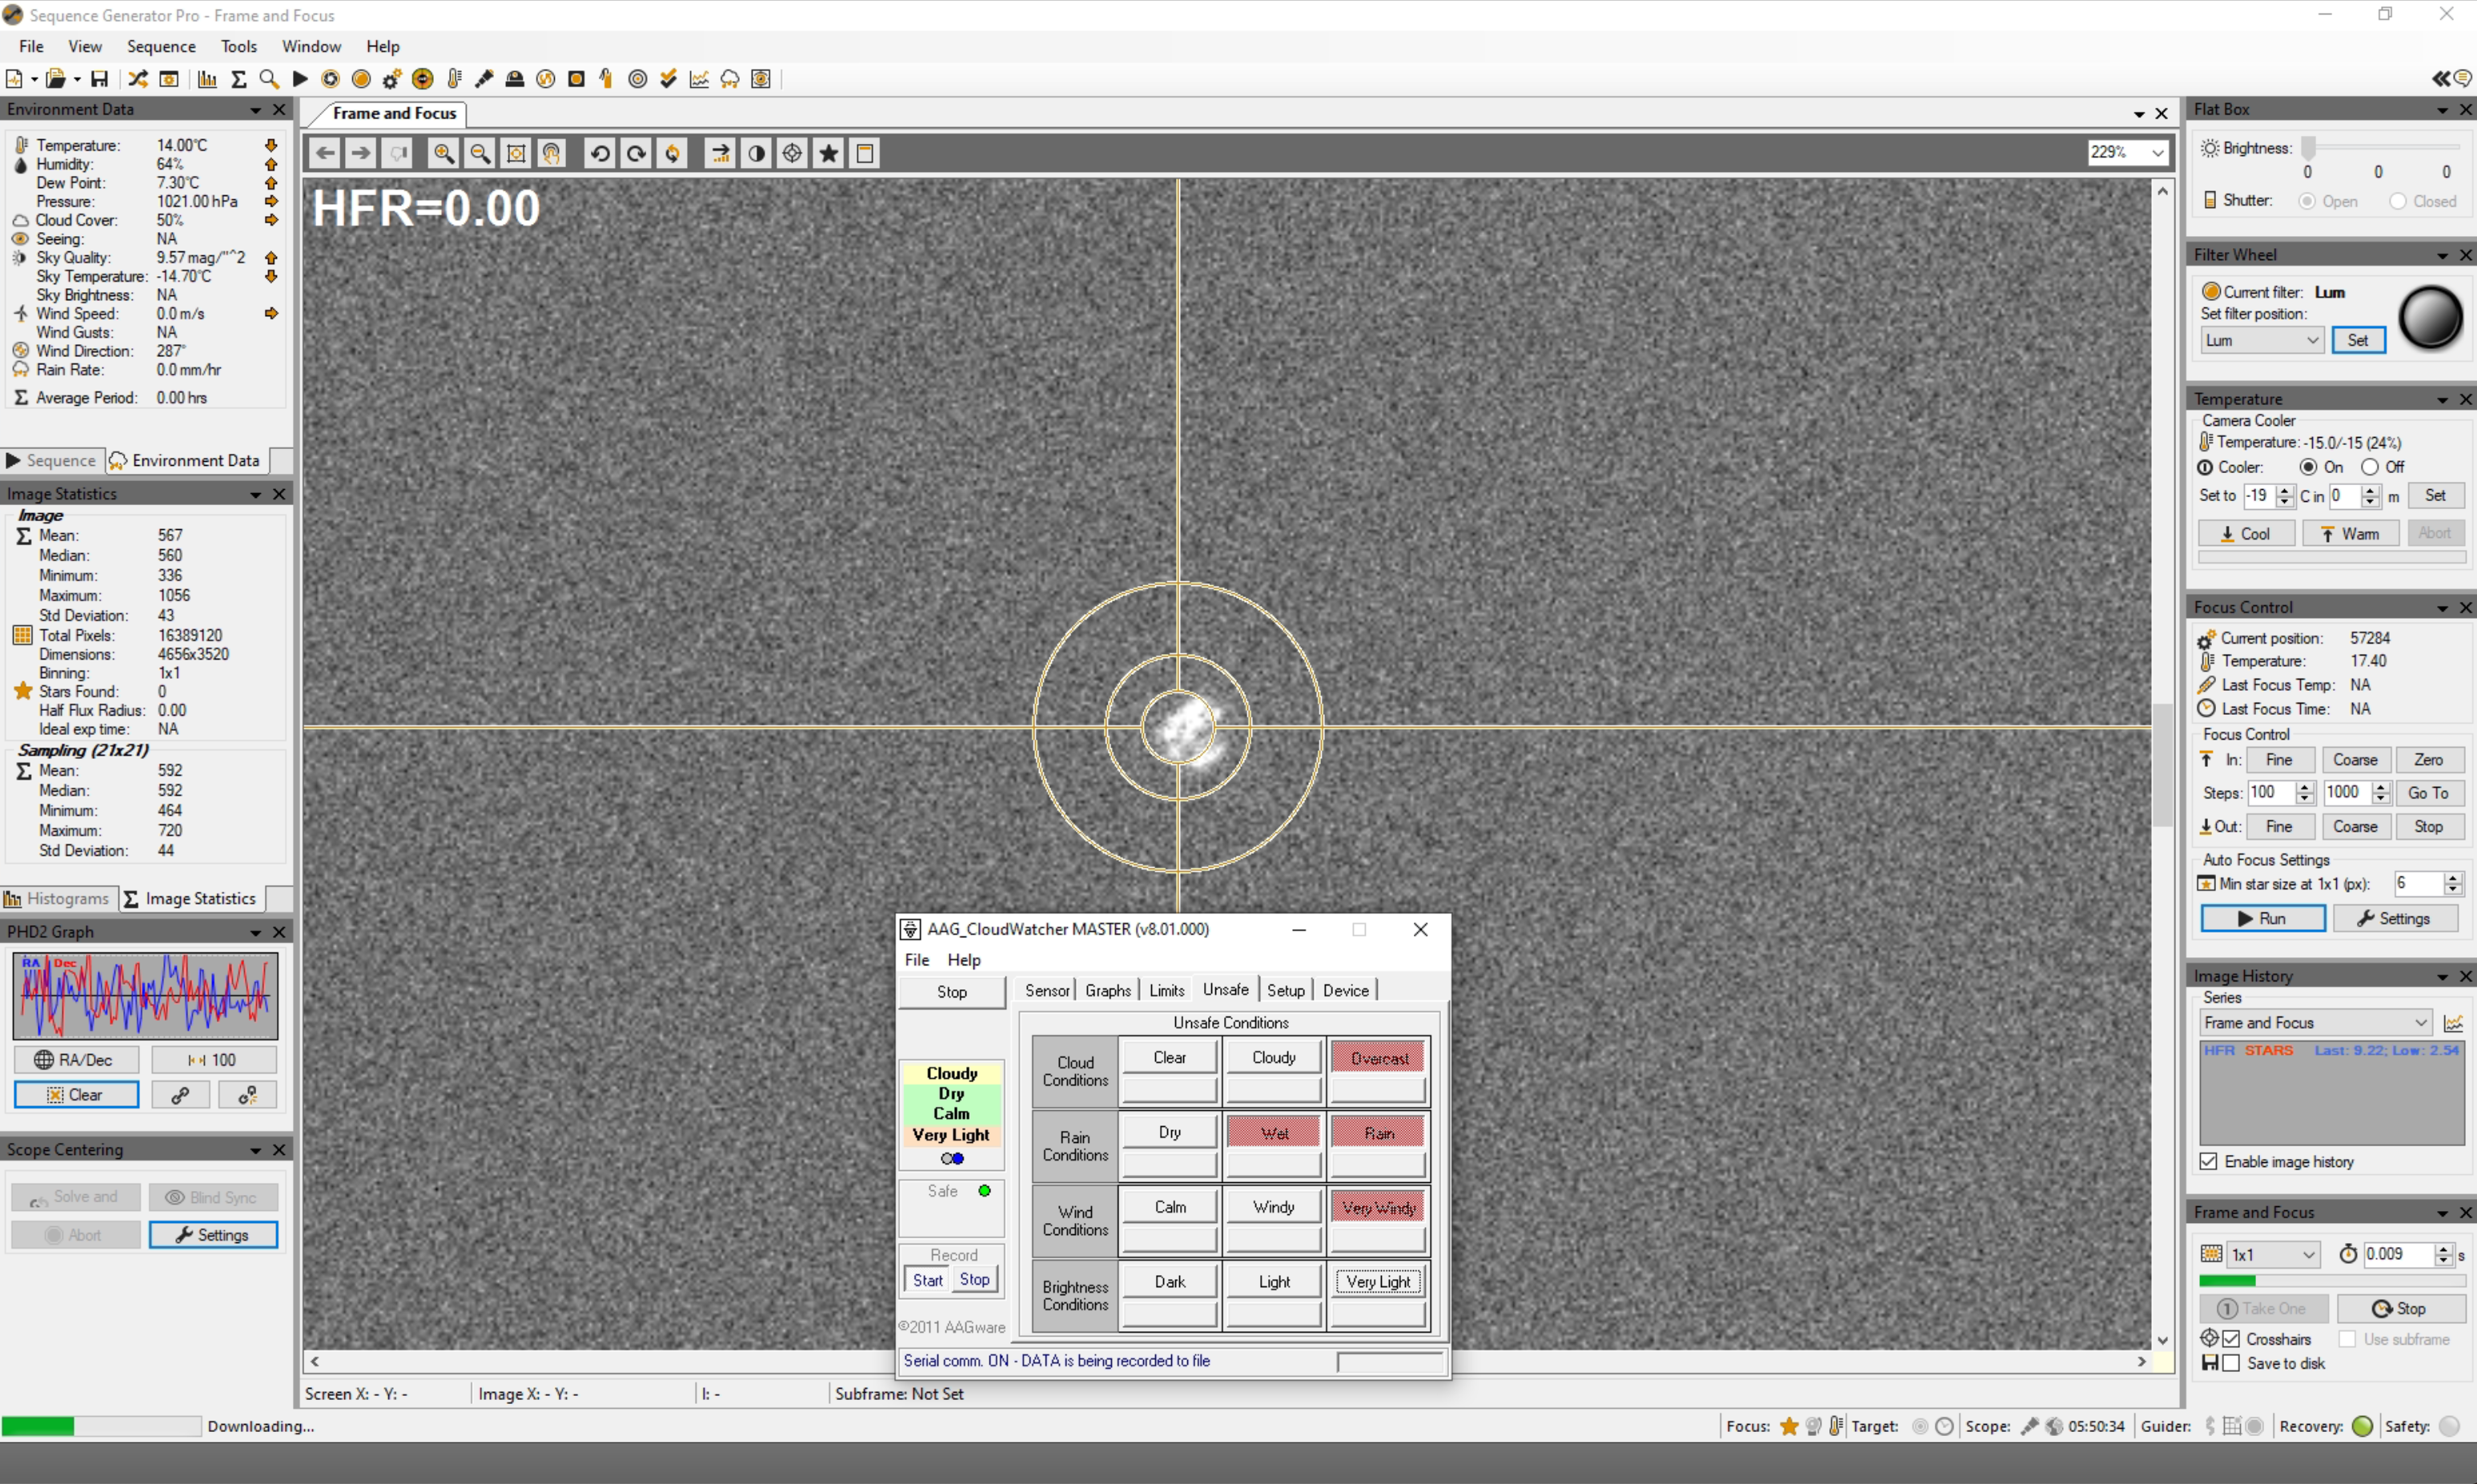
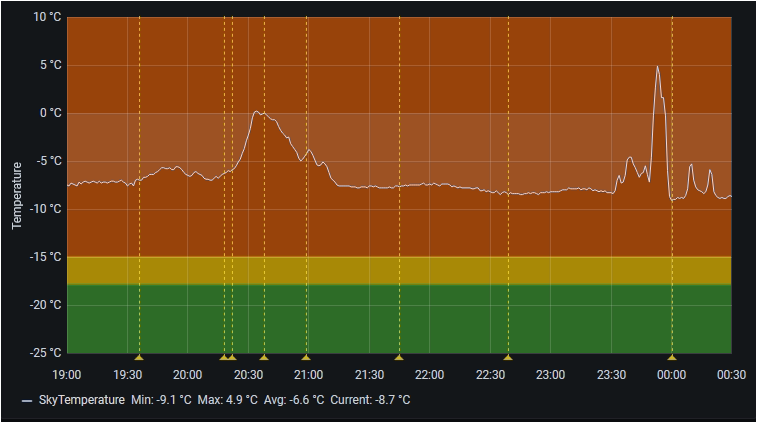
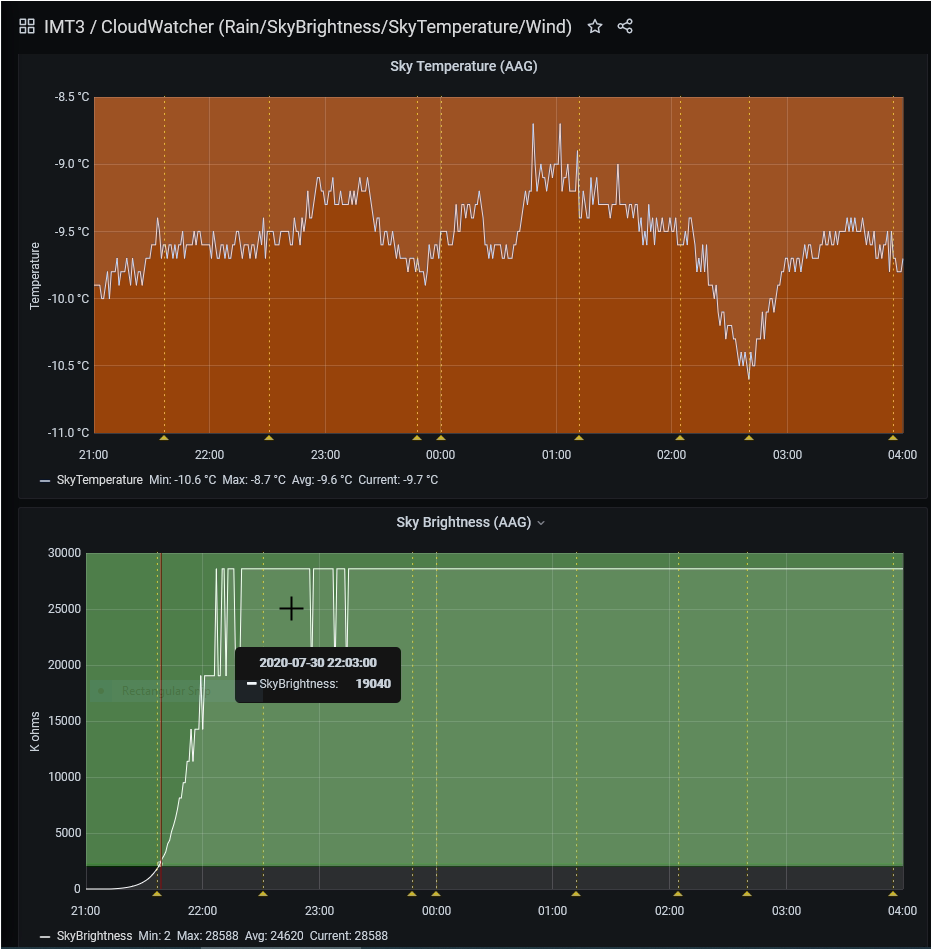
After reviewing the data and the monitoring graphs it is obvious that the less than desirable Sky Temperature showed it was not truly clear. Below is the effect of high haze and cloud passing across the sky during our observation session. It should be noted that we have not had sky with a reading <= -18℃ since mid July.
Not a truly clear sky during the transit
How much impact this has on the observation and measurements we will discuss with the Exoplanet team.
22:00 – 01:44 (GingerGeek came over and Bob was remote)
So the original plan was to perform another exoplanet observation and improve/learn from our previous experiences. However the weather did not look like it was going to be accommodating so we decided to change plans.
At first we planned to take a shot of Pluto and then go back to it later on in the month to see how far it had moved but it was low and below the the IMT3 visible horizon.
Next up was to continue imaging Messier objects for Dave’s Messier Marathon collection. We settled on M14 and had created and started an imaging sequence but again the clouds rolled in putting a stop once more to some constructive imaging.
So we then decided to track an asteroid for as long as we could before the clouds stopped us. Once Dave had loaded the asteroid database into TheSkyX we then choose one close by to the previously planned Exoplanet. The asteroid 85275 1994 LY (magnitude 14.01) was in the constellation of Ophiuchus.
We turned off PHD autoguiding and mount control in the SGPro control panel as we were going to be using mount tracking on the asteroid instead of sidereal.
Autofocus using Luminance filter – 60,389 position, HFR 5.0, Temp 24.94℃. We started at 22:46 and took a series of 30 second images until the cloud cover stopped us. Dave then used the Pixinsight blink script to stitch the resulting FITS->PNG images into a movie, then looped the short AVI, added titles and music in iMovie (best viewed full screen and in HD).
@ 19:00 Opened dome in order to cool the dome and scope down.
@ 21:00 GingerGeek arrives, wine is poured and we took 5 x darks, flats and bias for both the last run and tonight. The flats (red) were 3 seconds exposure to get 2/3 well depth required for this.
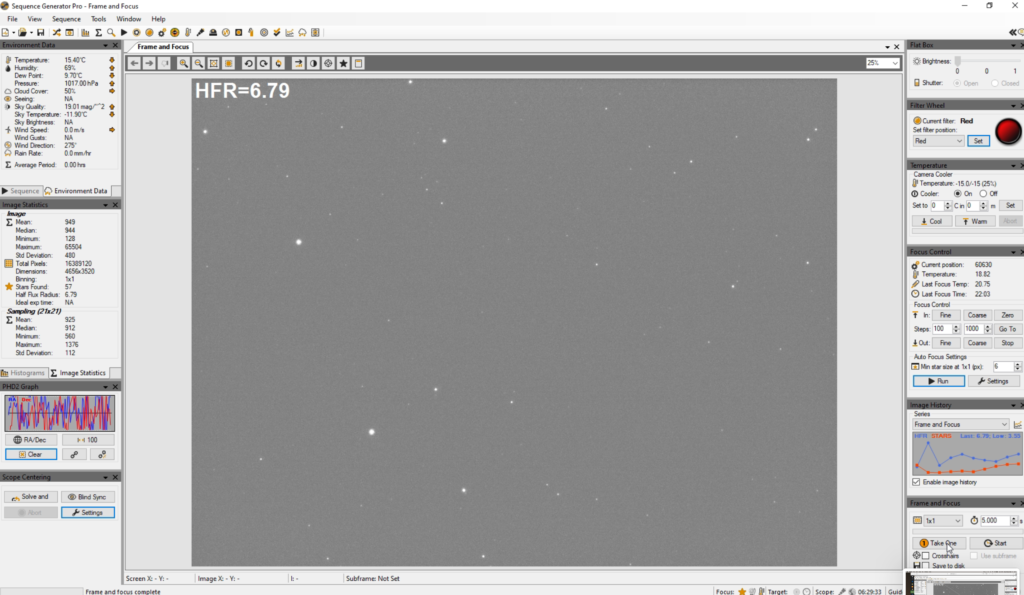
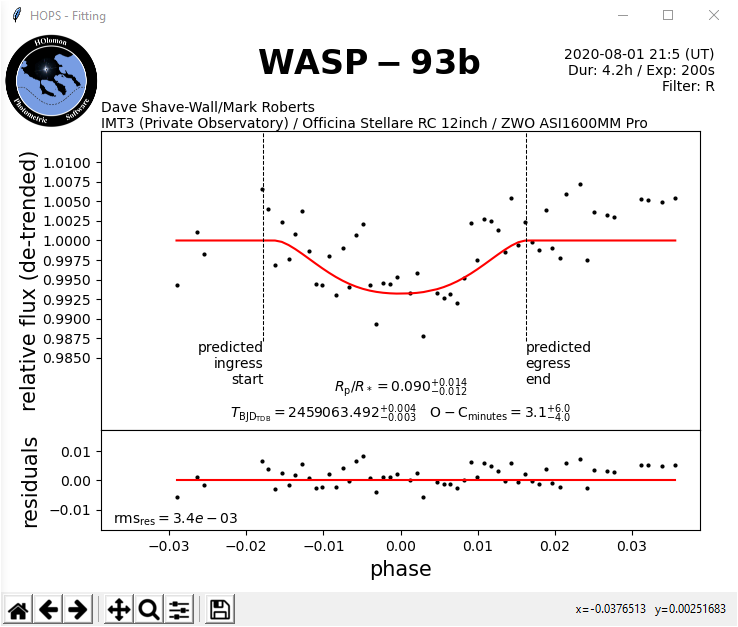
@ 21:44 Slewed to WASP-93b before we set about focusing on a nearby magnitude 5 star using the Red filter. Starting focus position was 58841@19.42℃.
@ 22:06 After failing to focus using the Red filter we resorted to using the Luminance filter to auto focus and achieved a excellent fit (focus position 61630, HFR 4.95 @20.83℃).
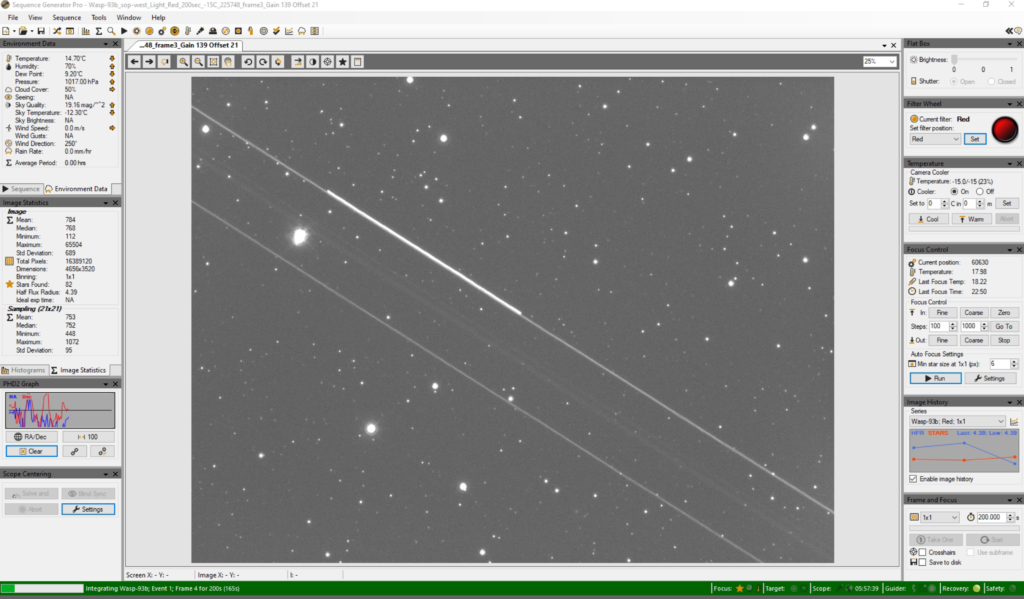
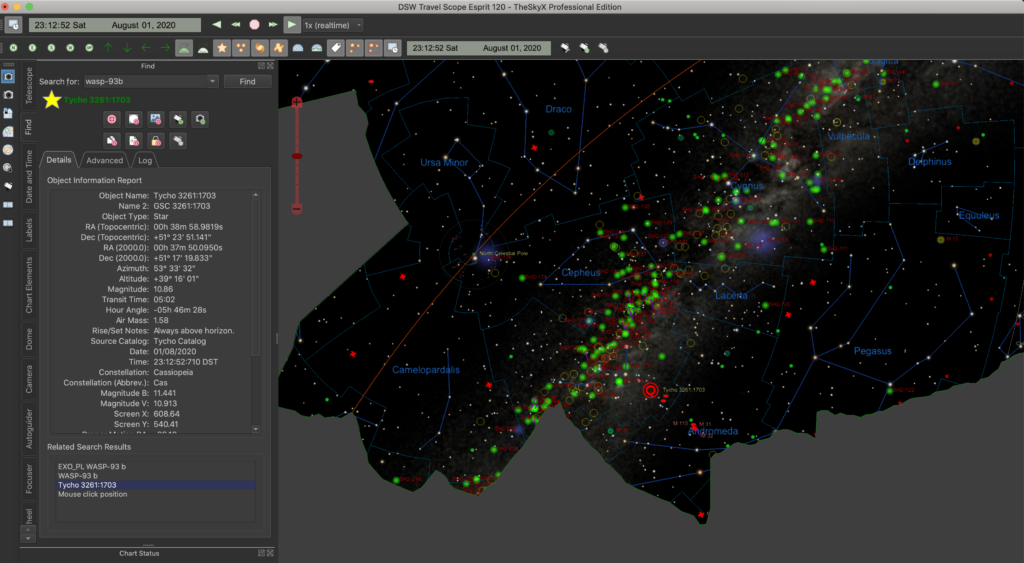
When we swapped back to the Red filter, SGPro then moved the filter offset to focuser position 60630. We slewed back to WASP-93b (GSC:3261:1703) and found a guide star just off centre of the star field with the exoplanet target.
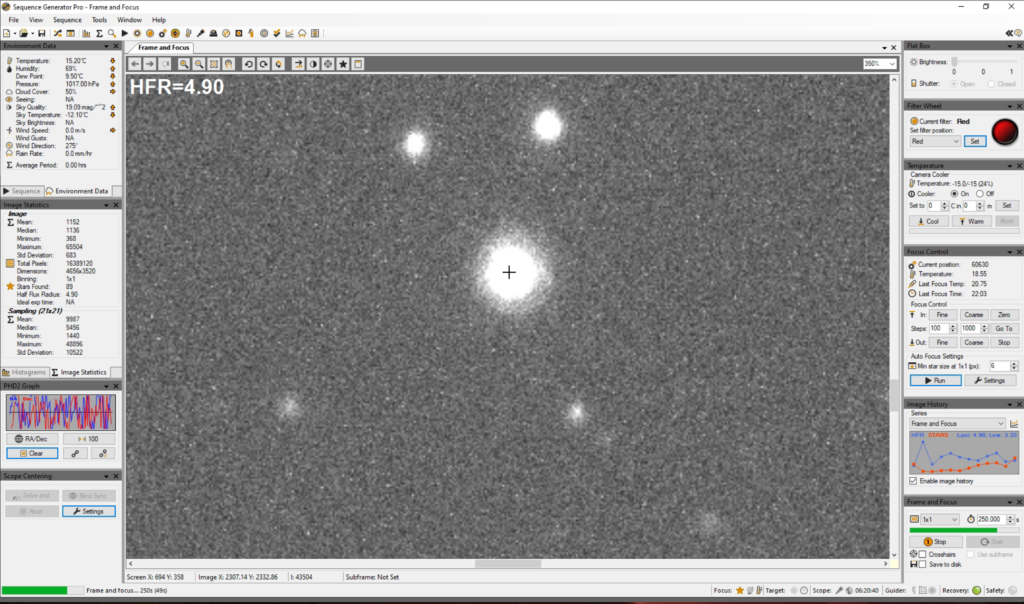
Started to take exposures to find the brightest value of the centre pixel of the star and make sure it was 2/3 full well depth and thus 33,000 ADU (even though it is a 12-bit camera SGPro is set to 16-bit for ease of use. Eventually this was achieved at around 200 second exposure.
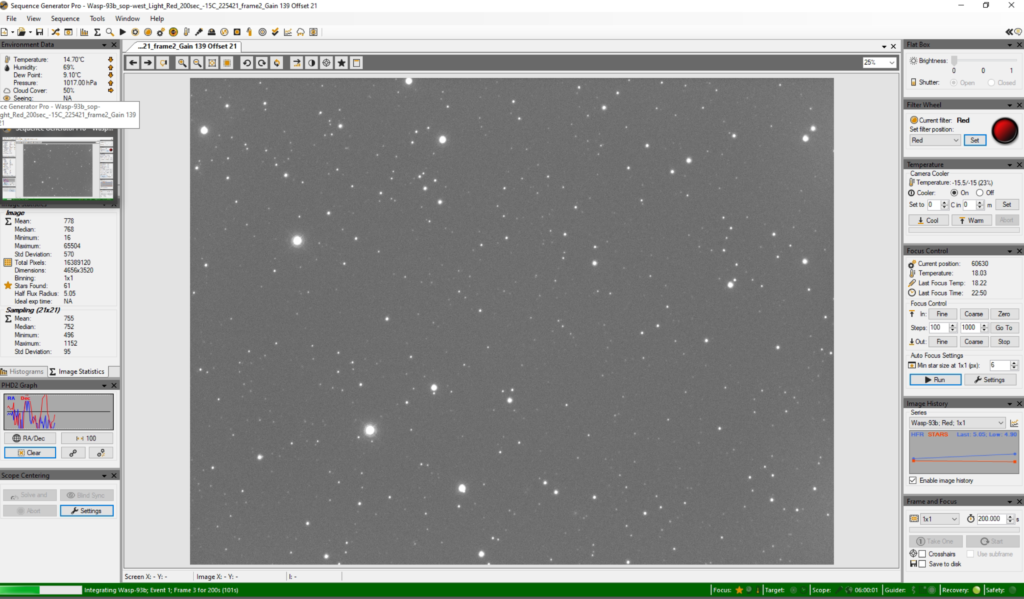
@ 22:51 Started imaging, 18.21℃ was measured at the focuser.
Frame and focus of starfieldTarget star for Exoplanet measurements Local conditions200s exposure of starfield
Started around 21:15, Guiding by 22:02, Capture started 22:22, Finished at 03:31.
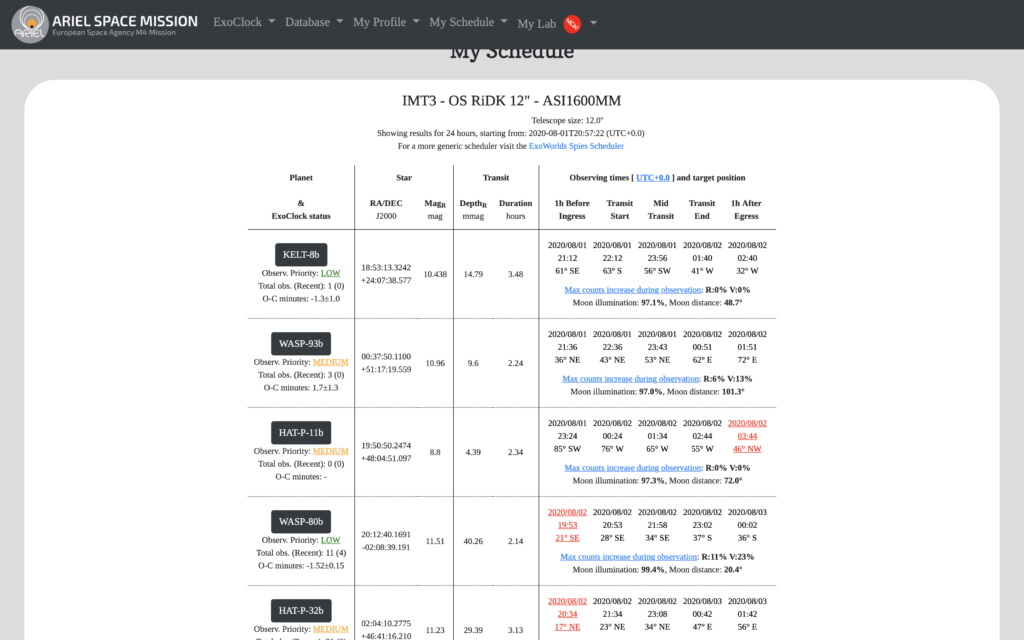
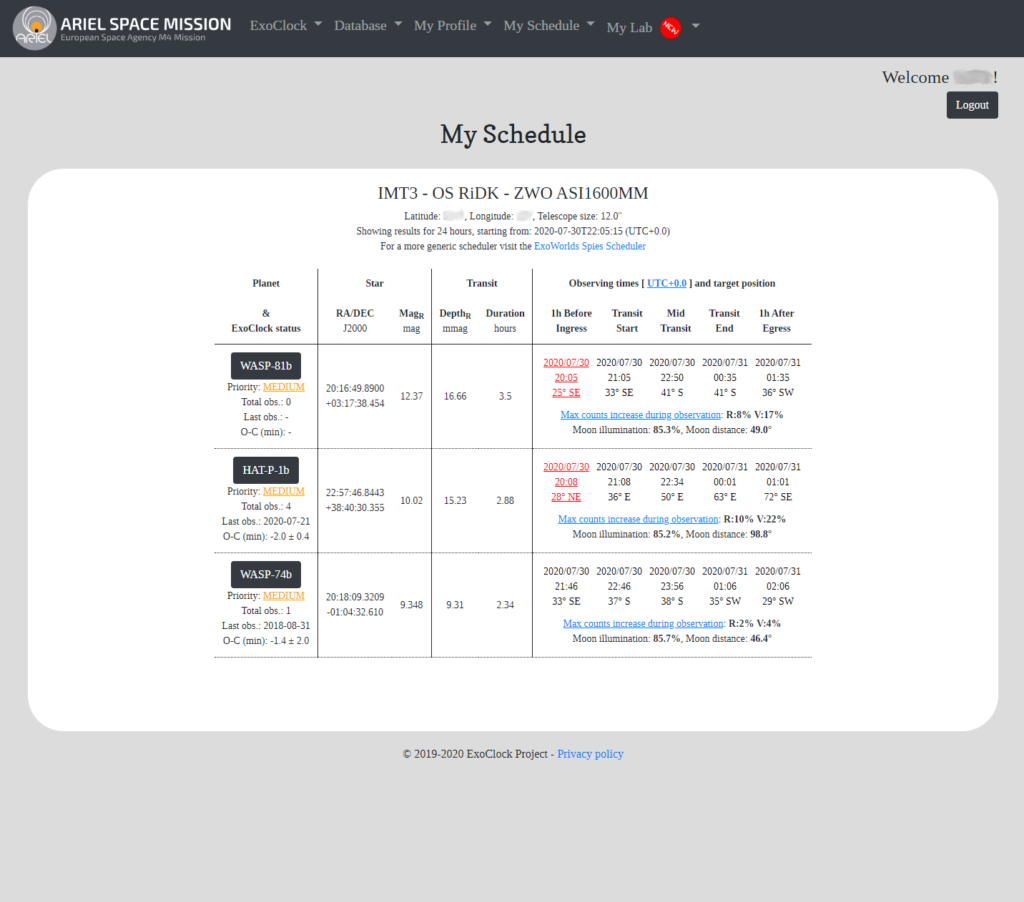
Dave and I are part of the amateur exoplanet monitoring effort for the ESA Ariel mission. We decided that we would allocate some time to try and provide observing data towards the project whenever we could.
Part of this requires some forward planning such as looking at the upcoming transit visible and their associated time. This is due to the altitude of the object, the ingress and the egress times of the projected transit.
Prior to this we had discussed in advance which object to target for the chosen evening. All the hard work of choosing objects is done by the Exospies project website as they list the candidates they need data for via a schedule. So it’s a simple task for use to go through the list and work out what fits best for us.
Unfortunately whilst opening the dome to cool down I decided to review the schedule but I was hit with a server 500 error from the website. In a panic that I might miss the start of the event I scoured the internet for alternate exoplanet transit time websites and found the excellent Exoplanet Transit Database of the Czech Astronomical Society.
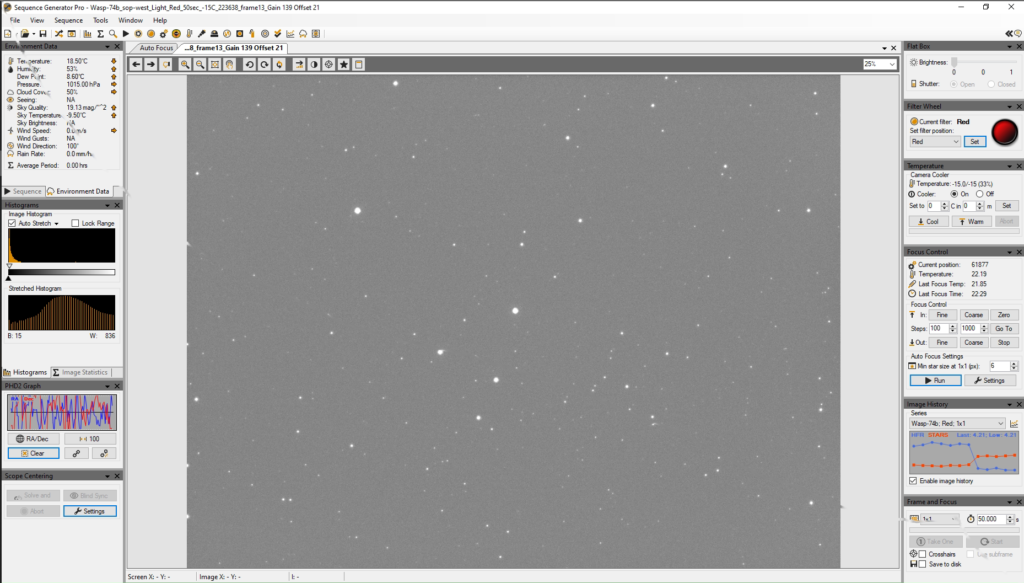
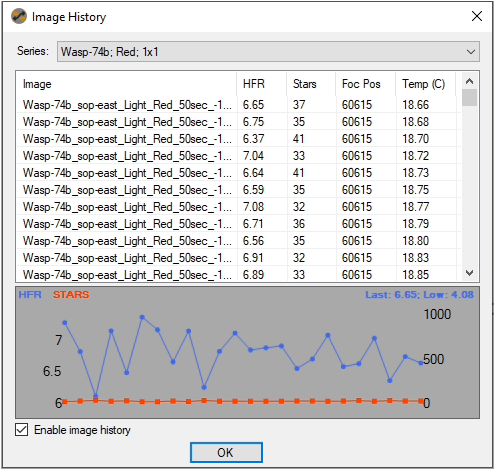
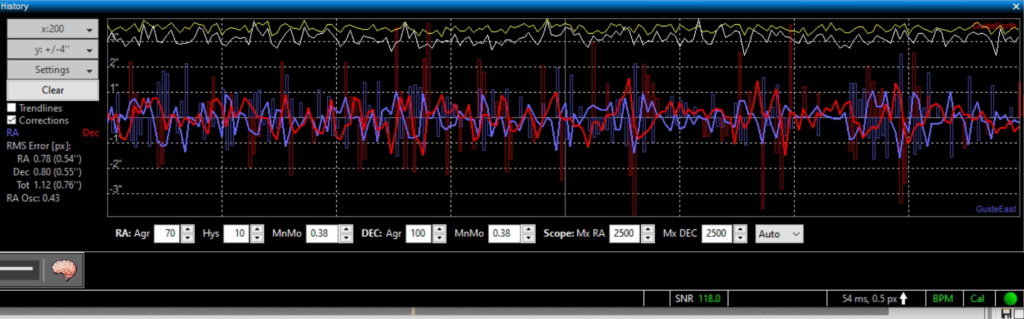
I had issues with focus drift all night due to the temperature fluctuations but at a recent Zoom session it was discussed that images can be out of focus with no detrimental effect on the measurements :
SGPro Image History
I was unable to auto focus successfully maybe due to the low altitude and seeing. I also discovered that temperature compensation was enabled so we probably need to remeasure the temperature compensation coefficients so the focus deltas are better between the par focal filters.
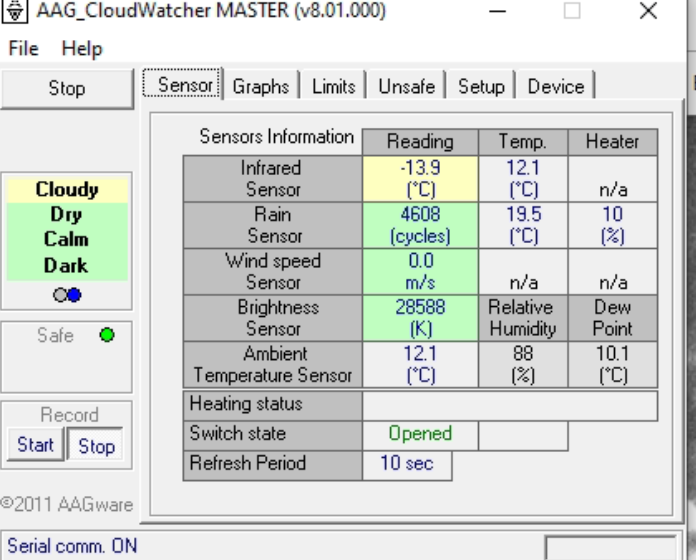
The object was at a relative low altitude, the outside temperature was warm and although the skies appeared clear our AAG CloudWatcher sensors via the Grafana dashboard told a different story. For us a truly clear sky is anything equal or lower than -18℃.
Sky Temperature – it was clear but it wasn’t !
Sky Temperature – T’was warm !
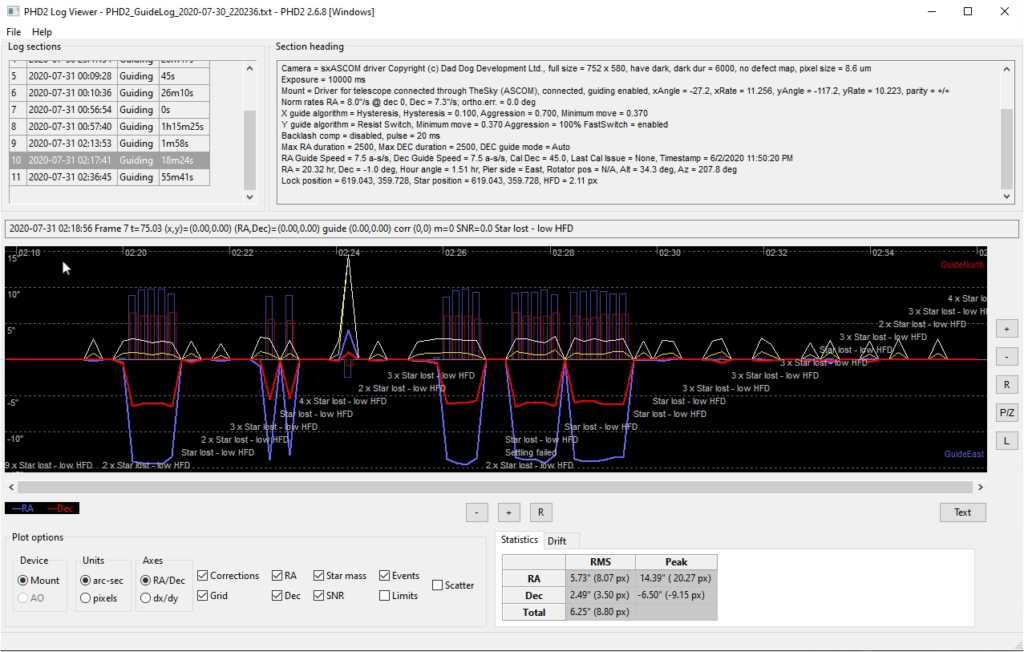
After performing a meridian flip, resumed the guiding I started to feel tired so I set my alarm for 3am and went to bed. Unfortunately there appeared to be a guiding issue at some point shortly I went to bed.
Guiding issues shortly after meridian flip
This was investigated using the phdLogViewer and shown to be a loss of guide star and didn’t recover for around 18 minutes.
The guiding issue also caused the image to shift so the target and reference stars moved. We need this in frame in order to run the frames through the provided HOPs data analysis program which hopefully won’t have a problem in reading them. That’s an exercise for this weekend and hopefully we will have enough data to yield a decent light curve that we can submit.
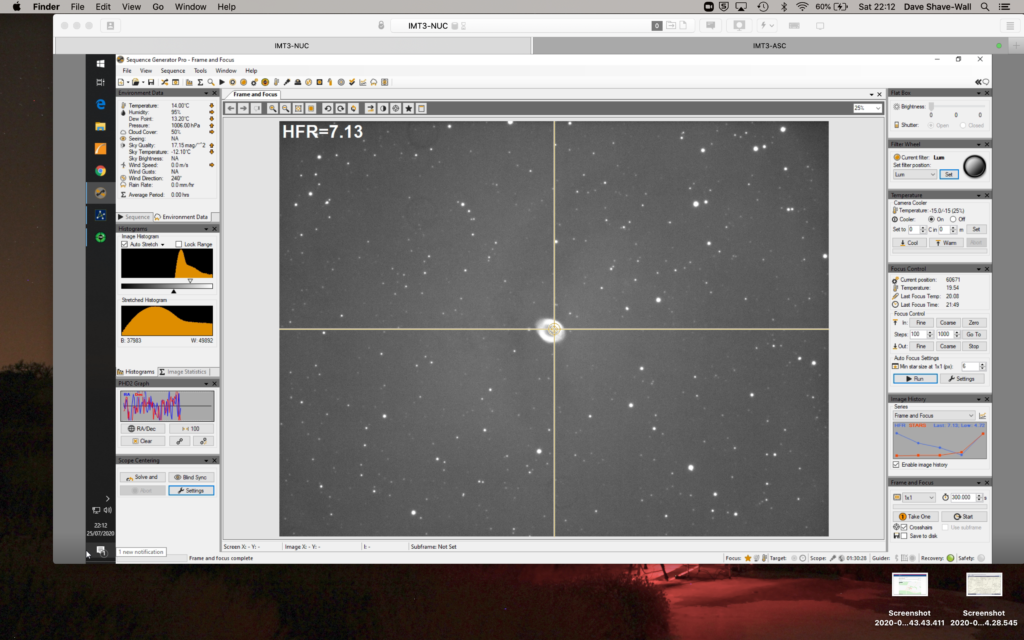
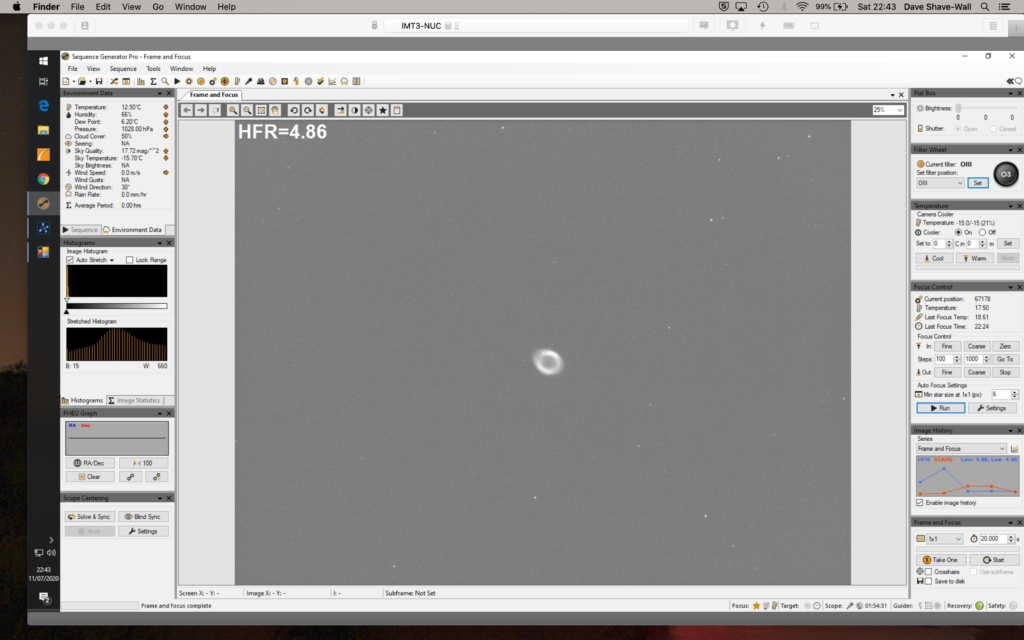
GingerGeek and I were out imaging tonight. The sky unexpectedly cleared and we thought given the impending move of IMT3 to another site that we would try to gather some more data on M57, specifically LRGB and some additional Ha on the 12″.
We ran Autofocus on Luminance which gave 60,671 at 20.64℃ and HFR 6.5. We then started to image and after a few frames the temperature started to drop. In the main this is because we opened the dome last minute rather than a minimum of 2 hours before we used it so the dome was warm and now cooling down the optical train shifts.
M57 quick frame and focus
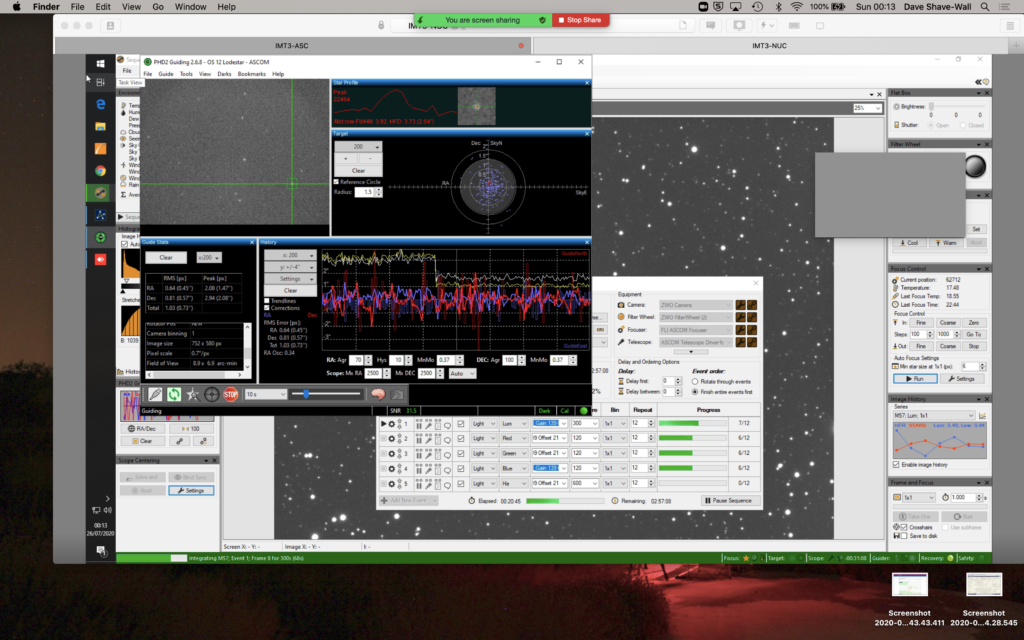
We refocused to 62,712 on luminance at 19.10 with an of HFR 5.15. We then ran the image acquisition and below is a screenshot of the guiding, which looked like it was going to cause an issue but it was ok. If it had then it would have been the local fog rather than anything on the mount. At midnight we performed a Meridian flip nice and early which afforded us to leave the observatory running and go to bed. Notice the graph below, the yellow line drops as we performed the meridian flip, this is due to the dome now shielding against next doors light !!!!!!!
Guiding ok, notice the drop in the graph
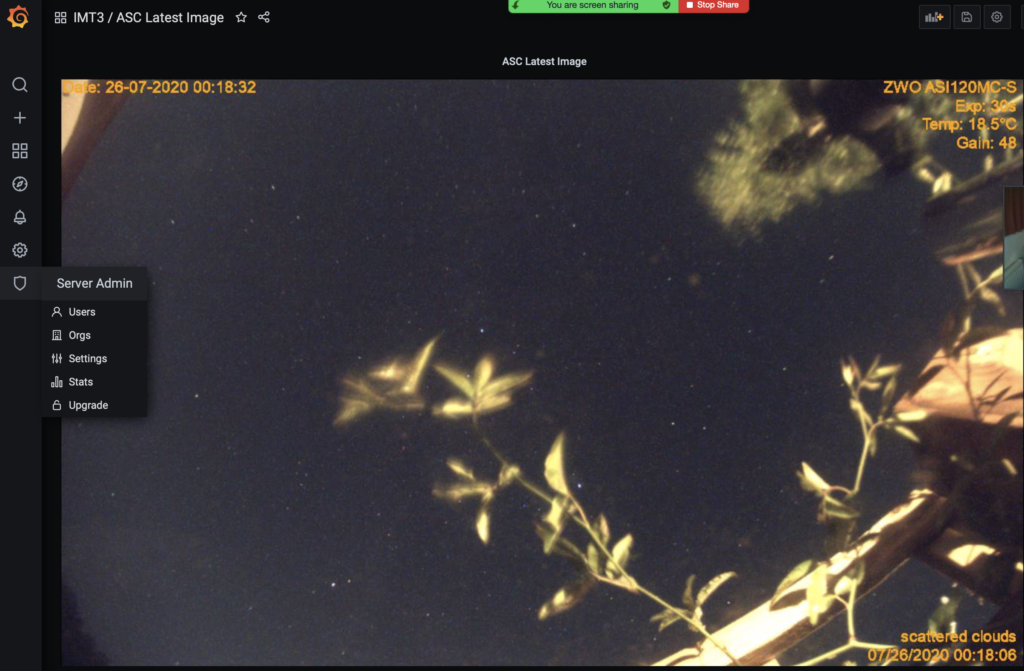
The neighbours light continue to be a pain as can be seen here, I really cannot wait to move the observatory to it’s new dark site.
LIGHT!!!!!
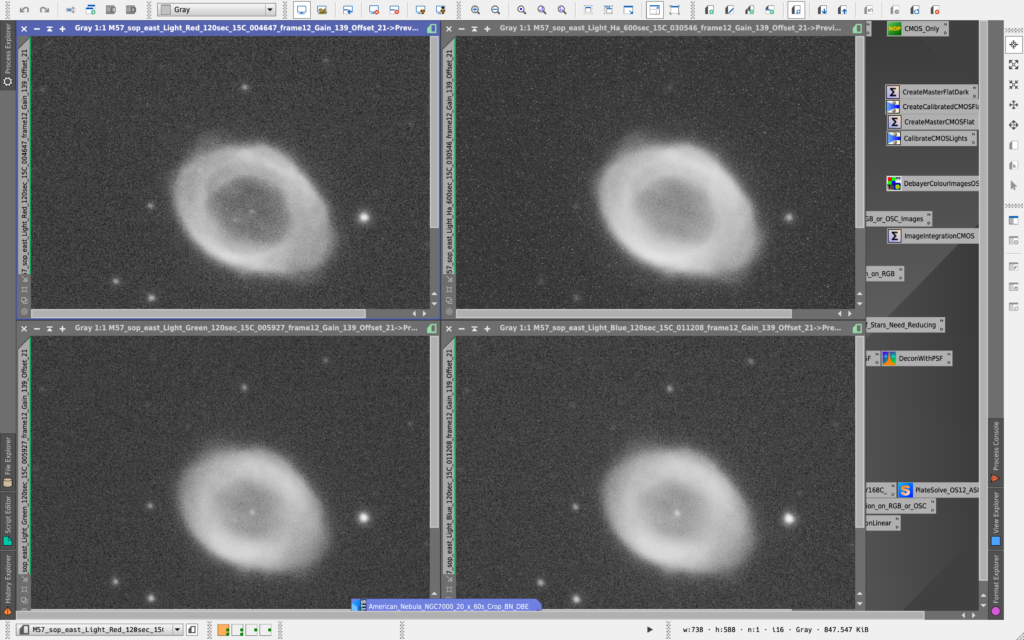
Finally managed to capture LRGB and Ha, below the RGB and Ha frames can be seen in PI. Note the central star is not visible in the Ha frame,
RGB and Ha raw frames
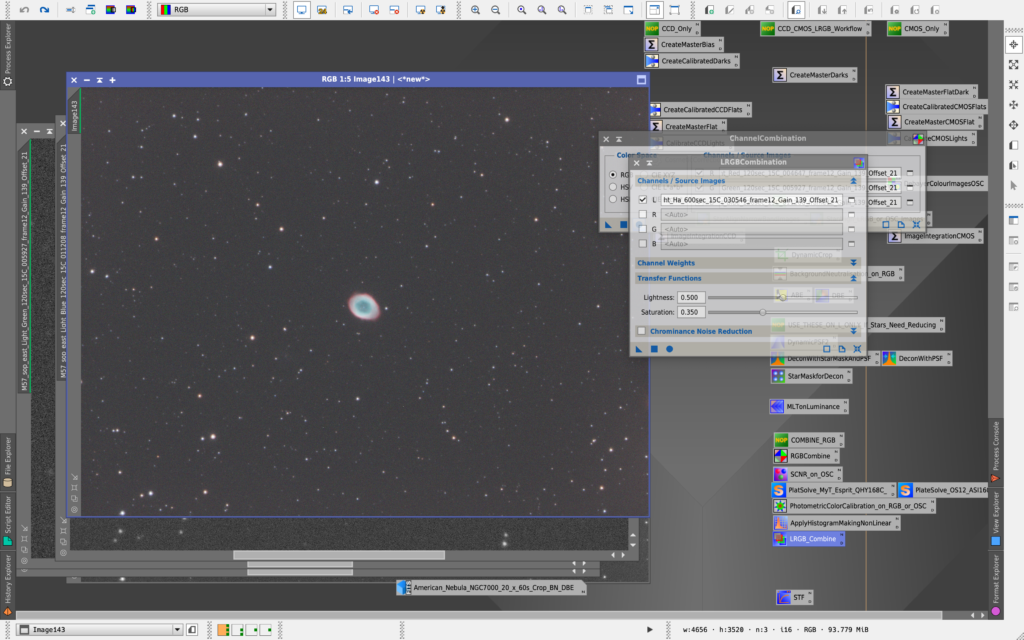
Finally I stacked 1 of each colour without calibration to see what it would look like.
RGB quick single stack no calibration
So we left the observatory imaging, I had a quick peek outside around 12:30am and there was water running off the dome and the outside windows of the orangery! The Observatory ran until the dome shut at 3:58am (it woke me up) when the light levels started to rise.
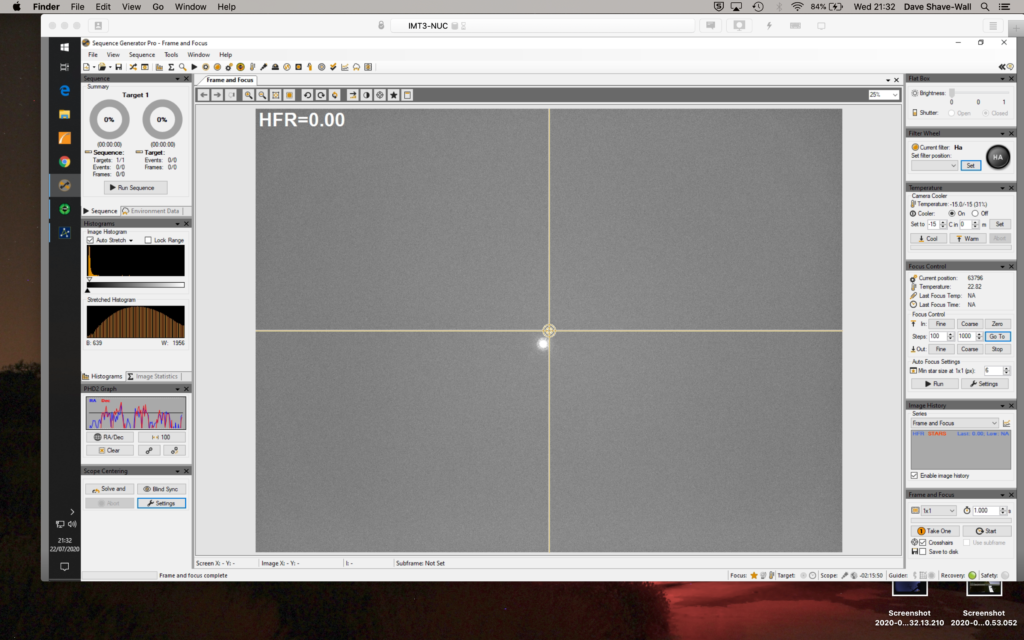
I opened the dome at 8:30pm and then went off to do some more work. A few calls later and it was time to come back and see if I could grab comet C/2020 F3 NEOWISE which had now moved further West and further in altitude over the past week, meaning it should be visible from the dome. Below is Arcturus as I performed a quick sync.
Arcturus
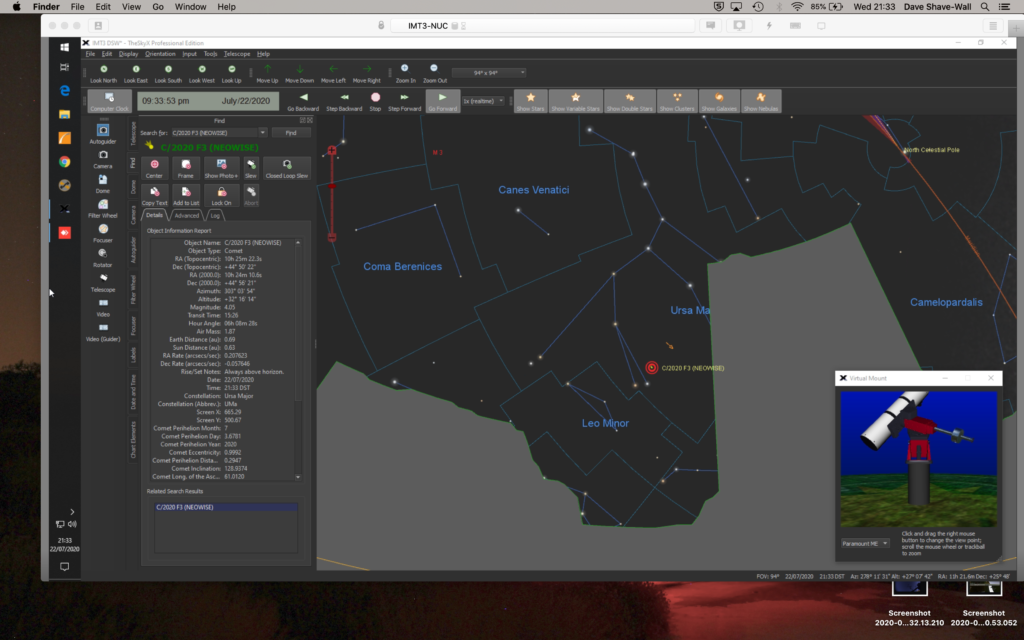
Below you can see Arcturus on The Sky X with the dome slit showing and the obstructions from the horizon also present.
TSX
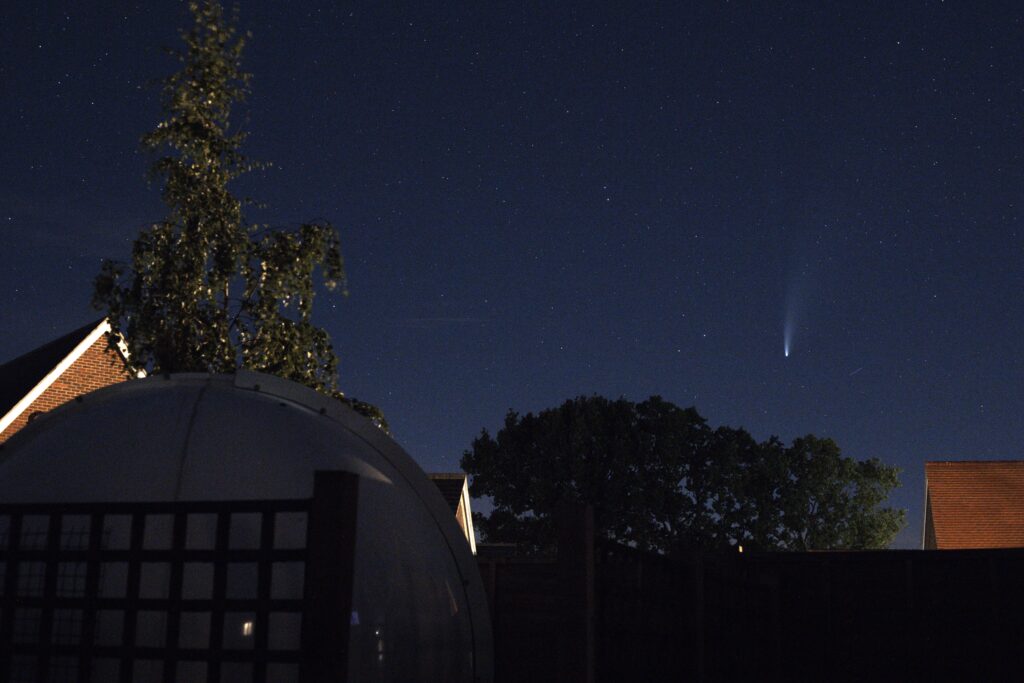
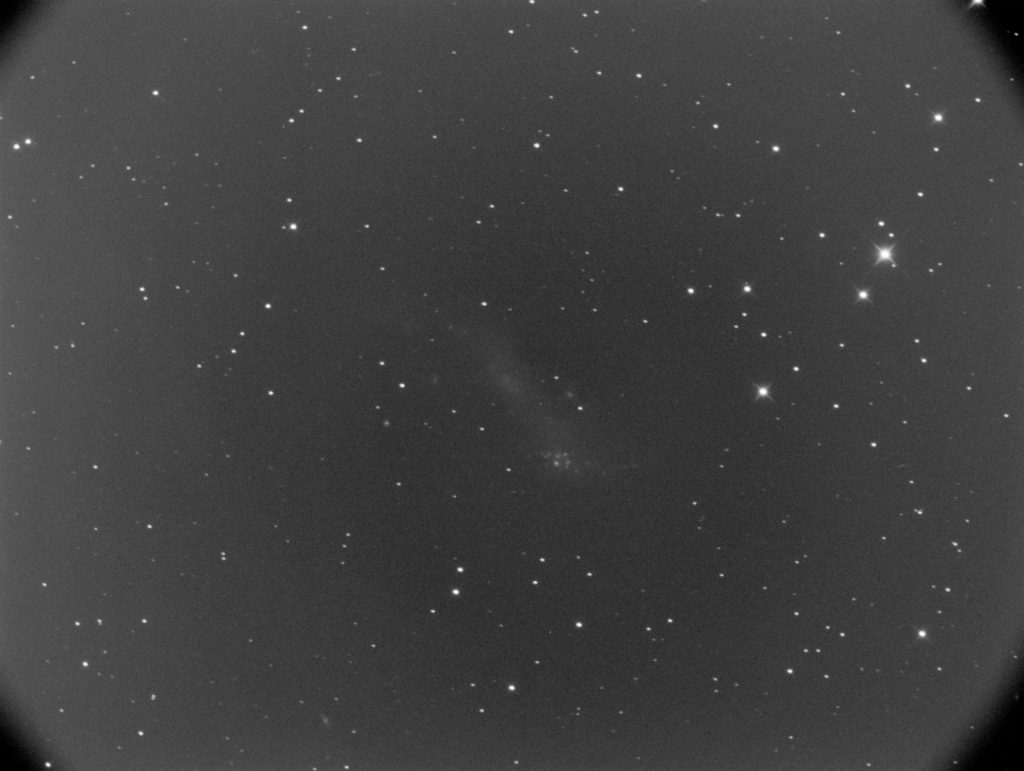
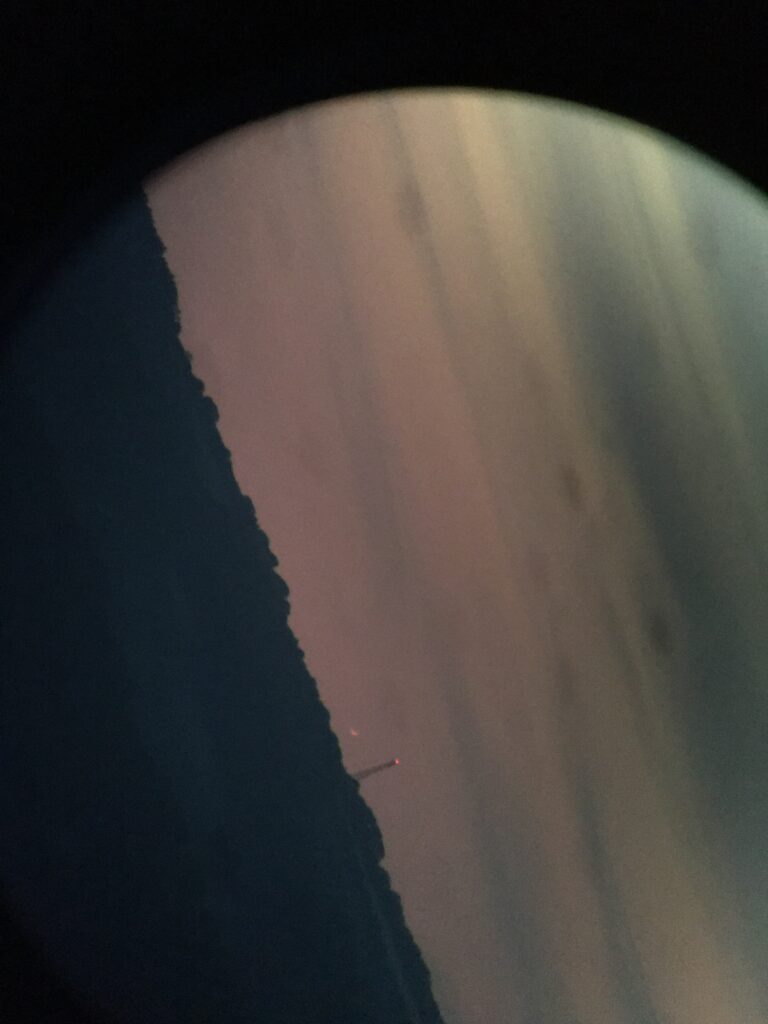
Comet NEOWISE can be seen just above next doors tree.
NEOWISE
A quick peek with the camera and I could just make out the comet.
Quick peek of the comet but clouds
Clearly more clouds rolled in which is typical
More clouds!
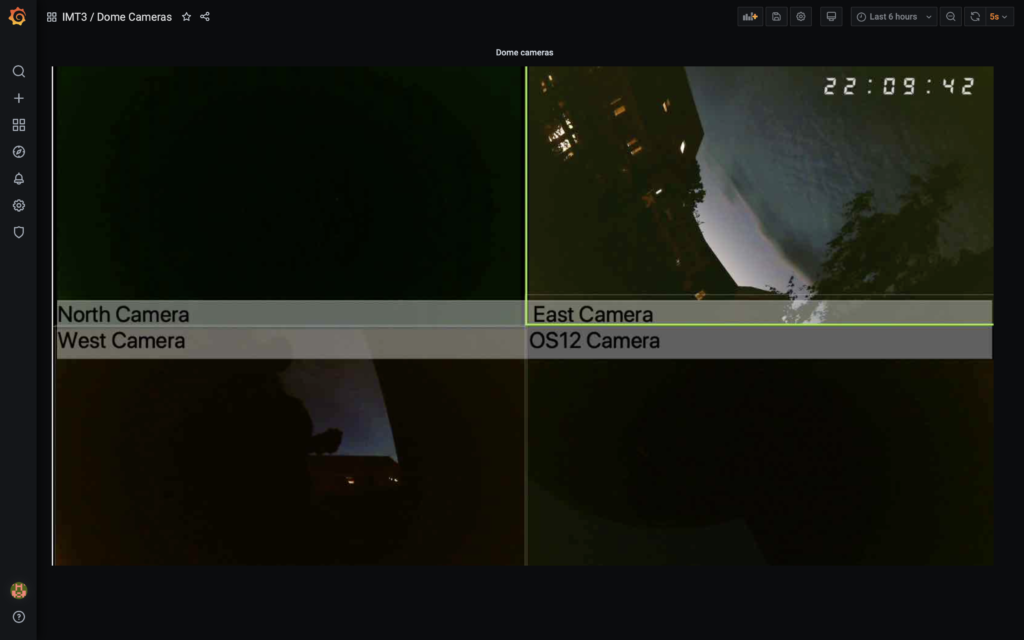
Looking at the cameras in the dome I could see the cloud bank of cloud (picture top right)
Cloud bank approaching
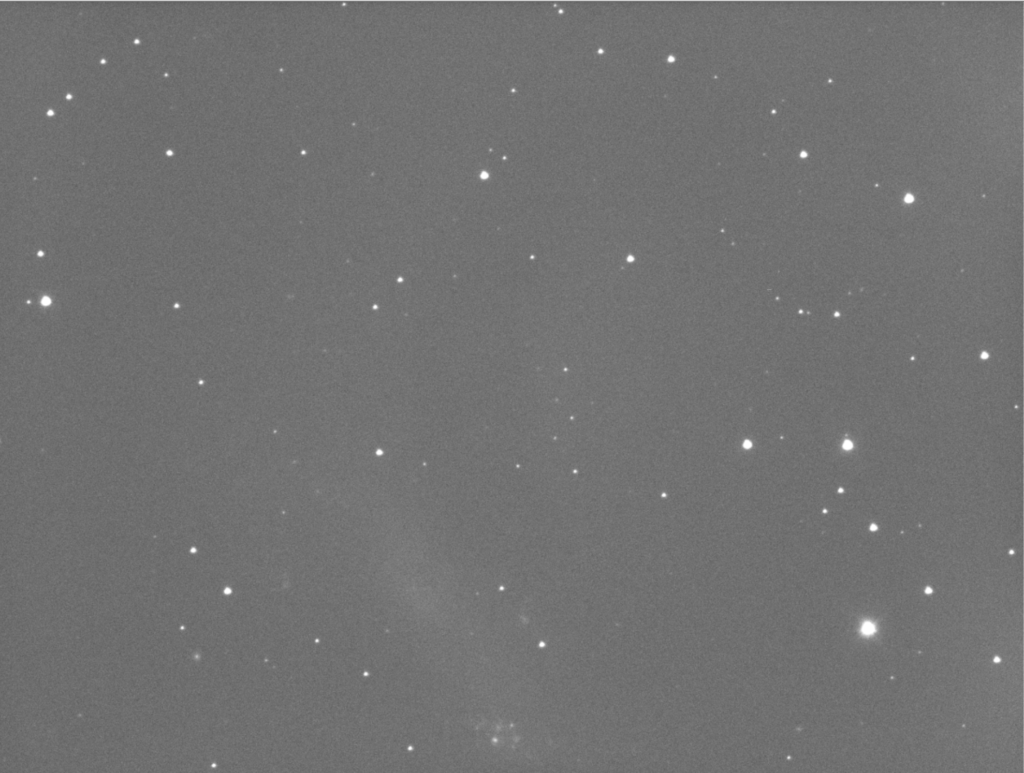
Fortunately the comet could be seen at the back of the cloud bank.
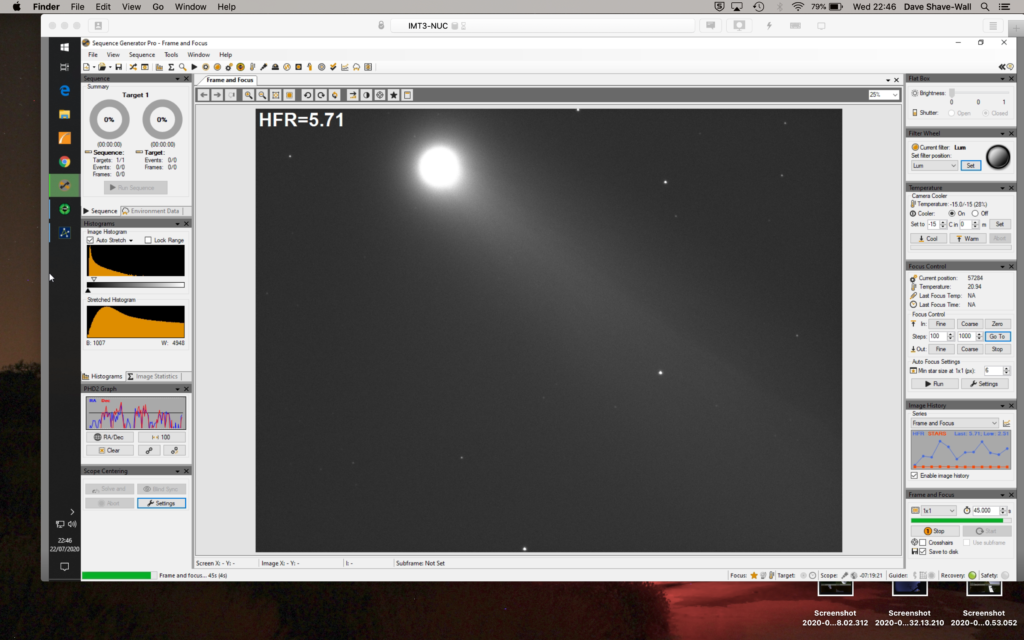
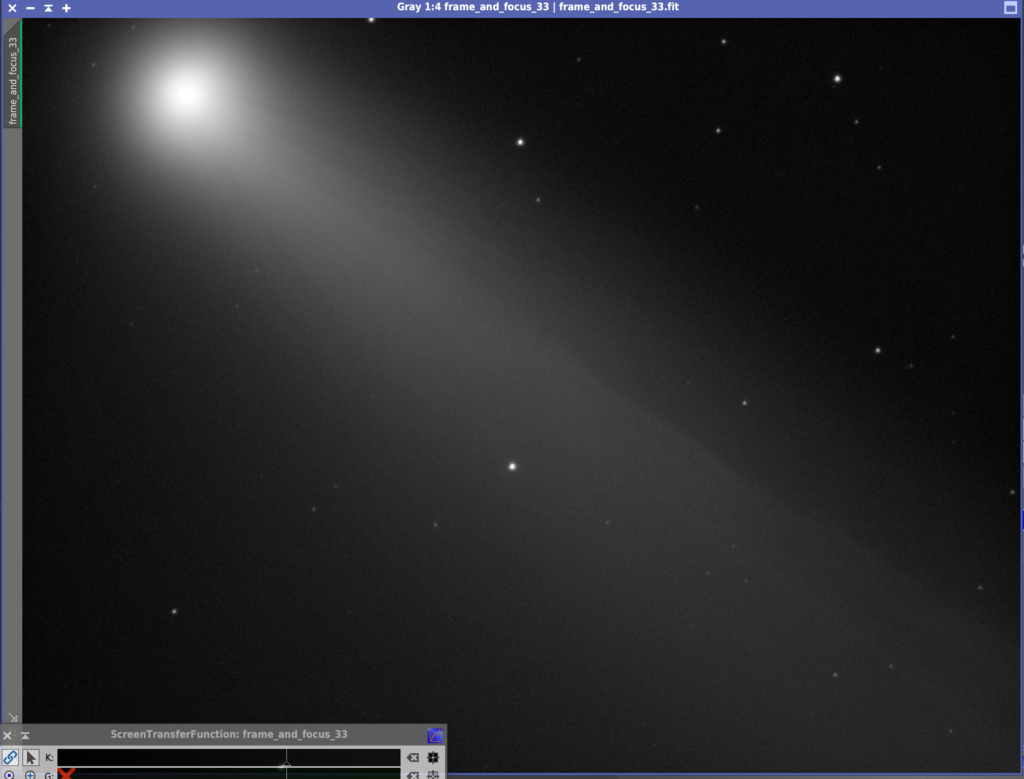
45 second exposure of Comet C/2020 F3 NEOWISE
So I set about quickly taking some images before the comet disappeared behind the tree.
90 second exposure of Comet C/2020 F3 NEOWISE
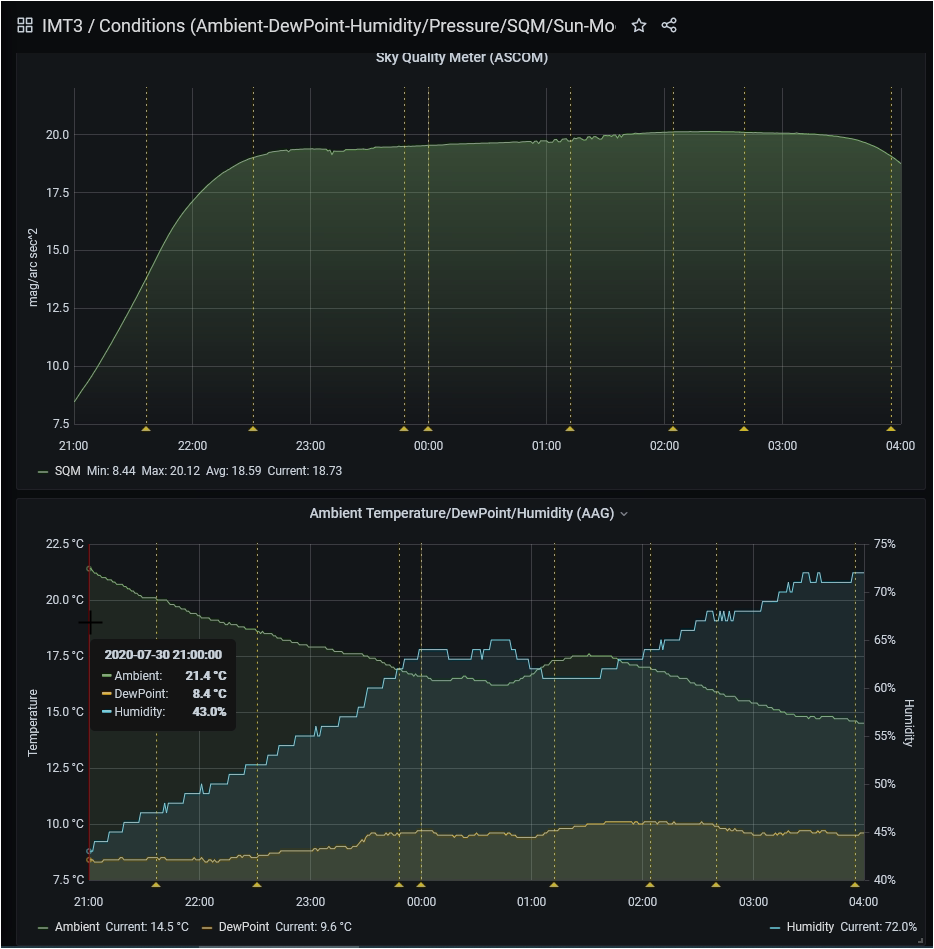
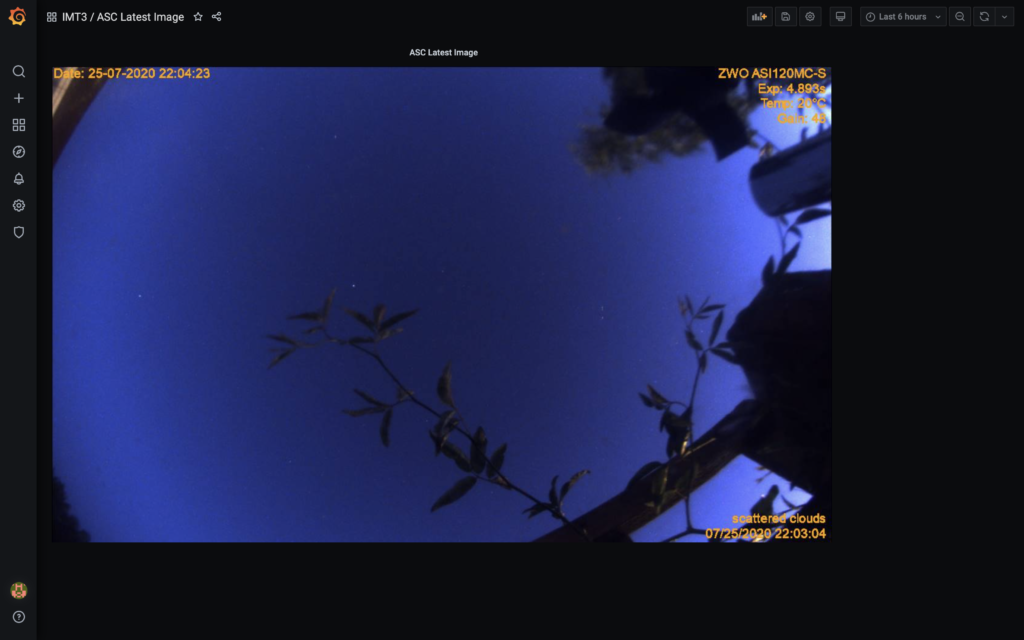
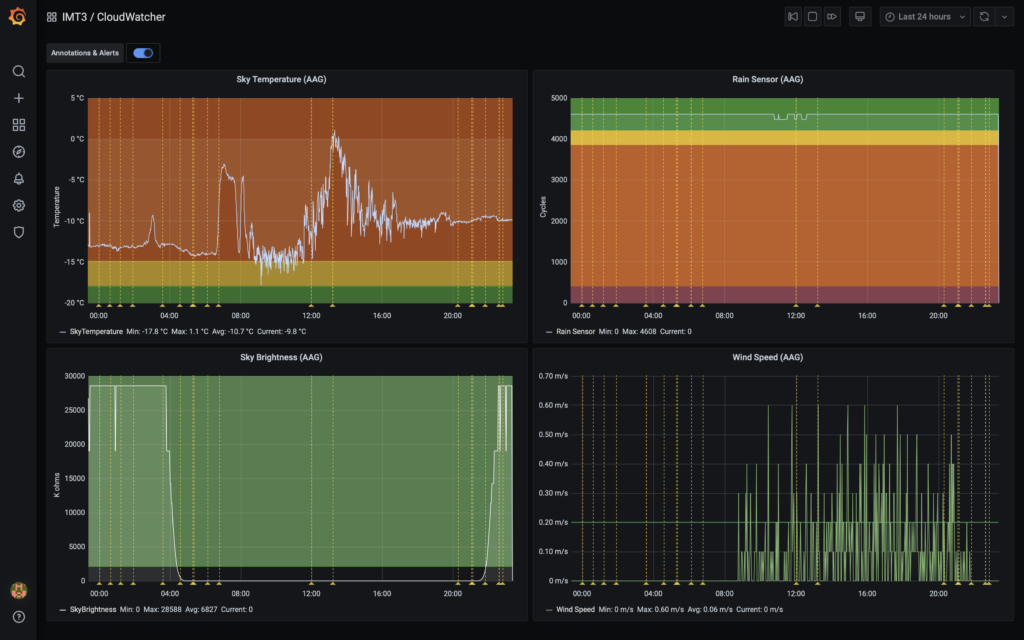
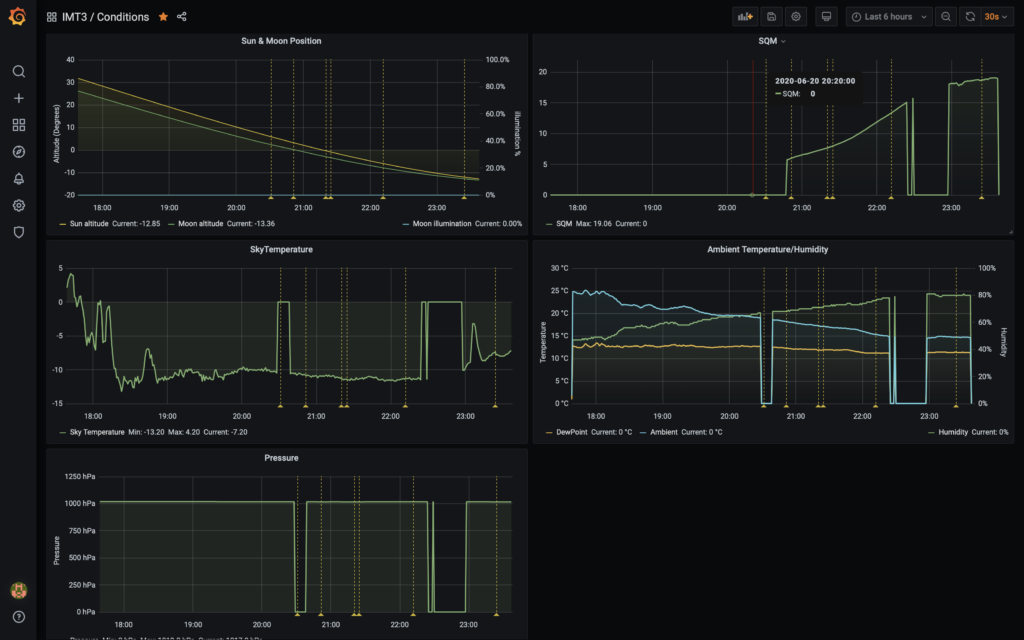
The other useful thing tonight was using the monitoring GingerGeek put together. Below are a selection of shots from the website.
IMT3 Conditions
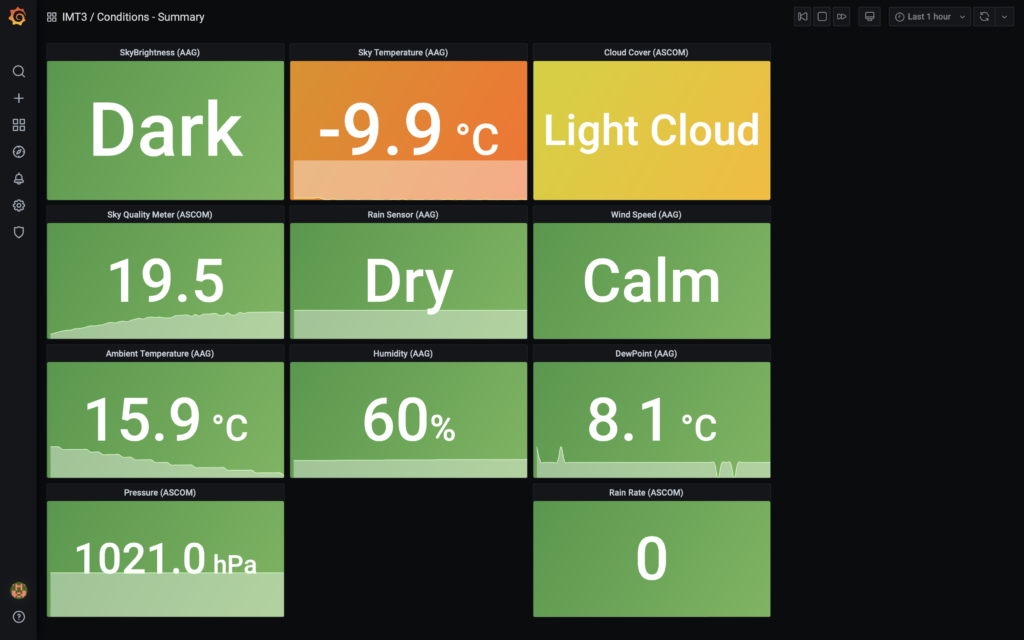
The chart below shows the light cloud cover and the sky temperature is representative of the sky clarity and relates to cloud coverage too. The scale is inverted to -18℃ is a cloudless beautifully clear night sky, which tonight was not!
IMT Conditions Summary – Fisherprice style 🙂
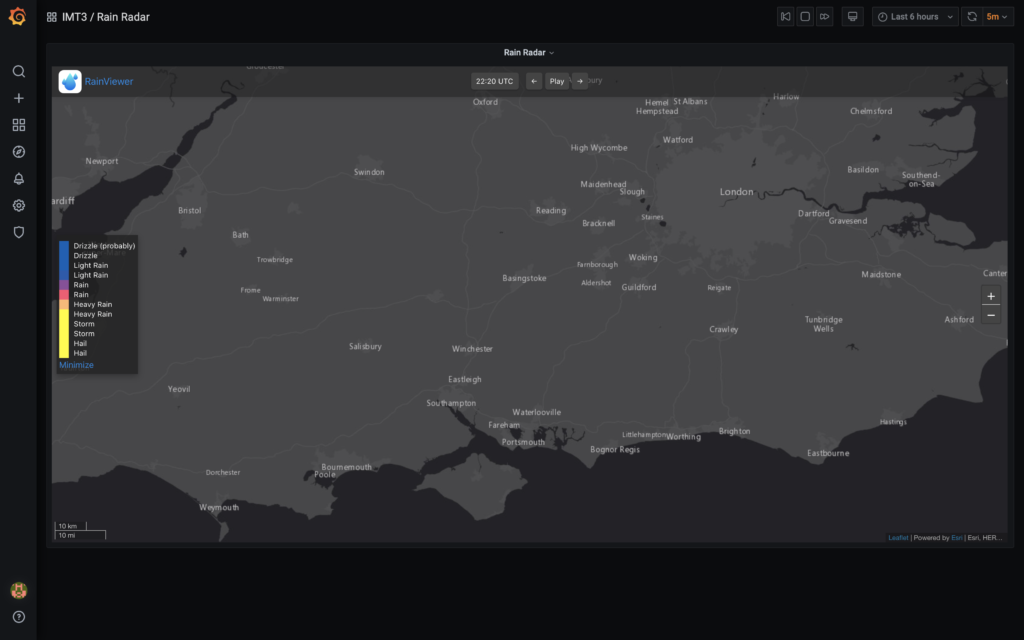
At least there was no rain 🙂
IMT3 Rain Radar
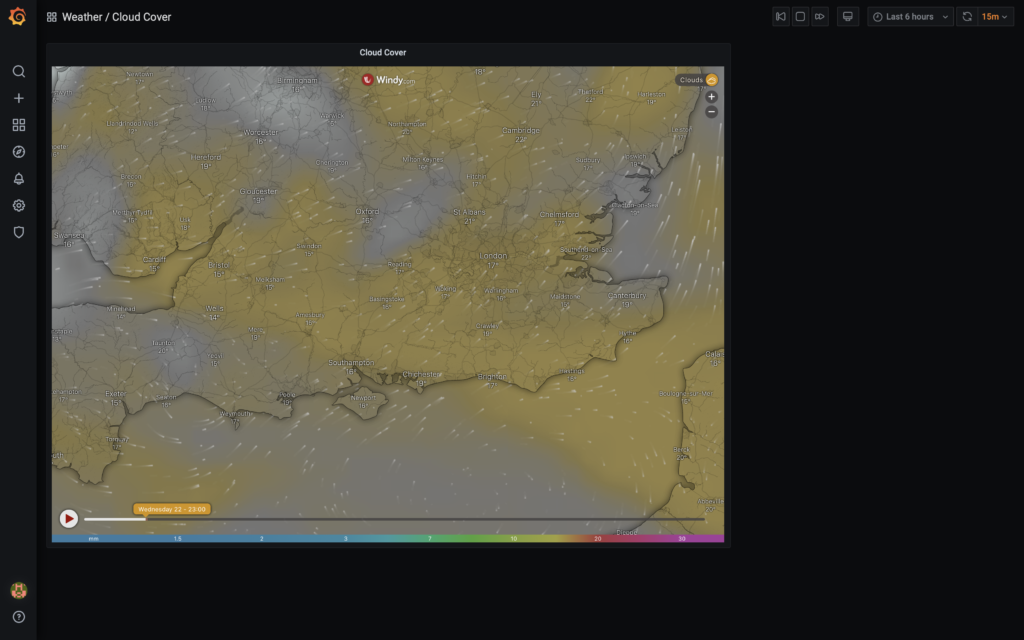
This image below shows the cloud bank just North West of Reading that was a problem.
IMT3 Cloud Cover
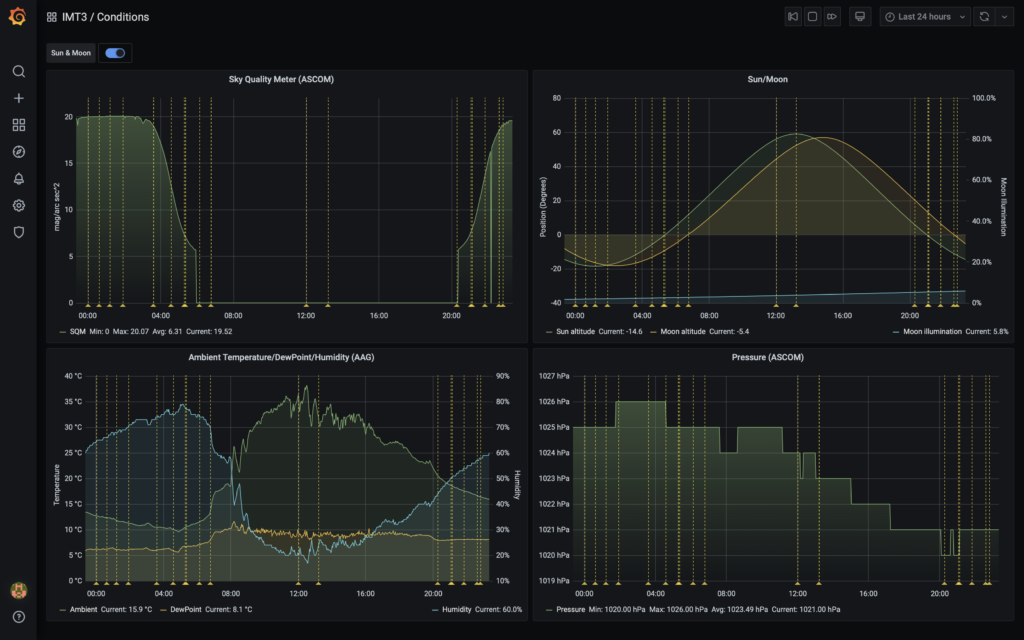
This next chart is from the data produced by the AAG CloudWatcher weather station. Note the sky temperature is nowhere near the -18℃ to be clear.
IMT3 AAG Cloudwatcher weather station
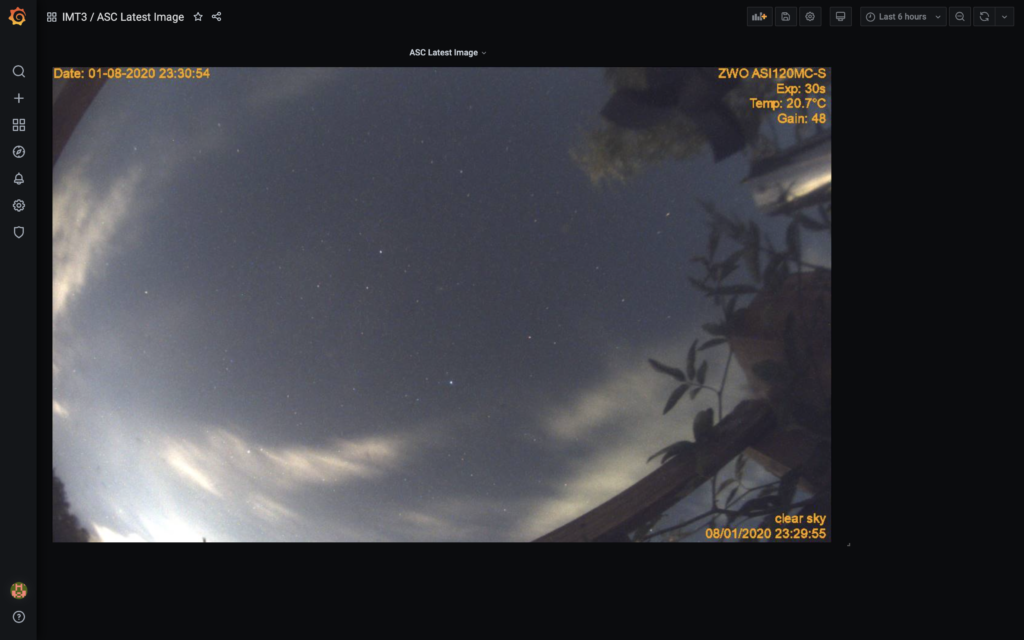
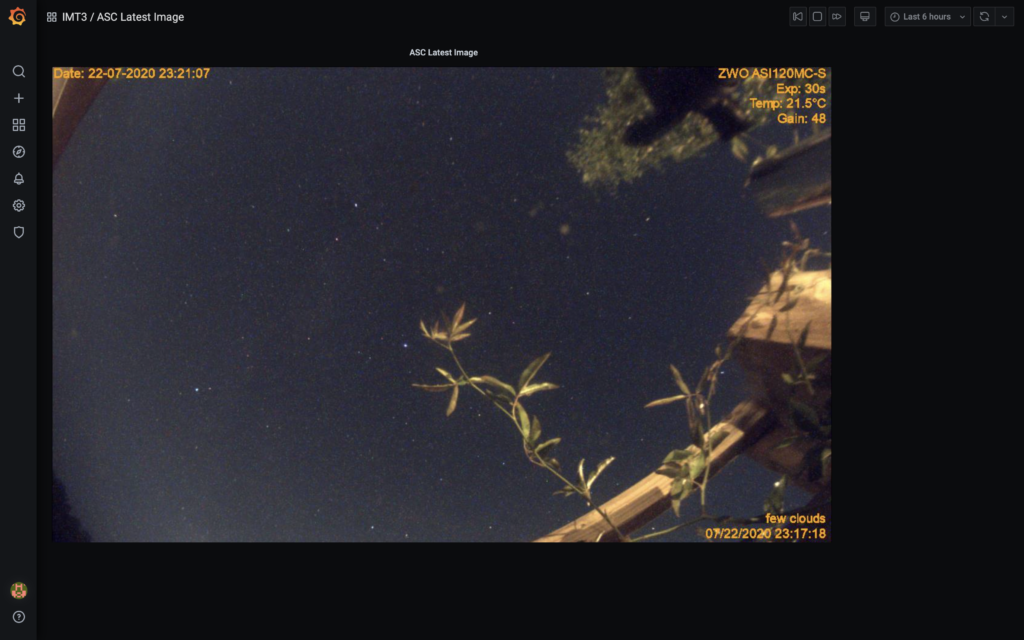
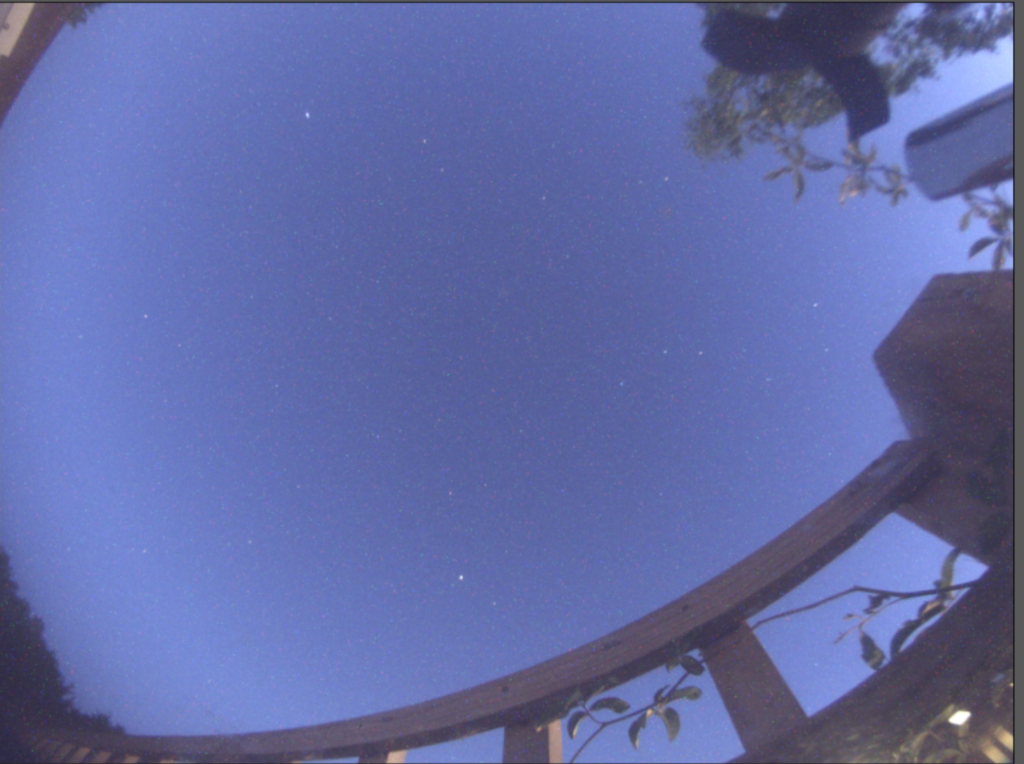
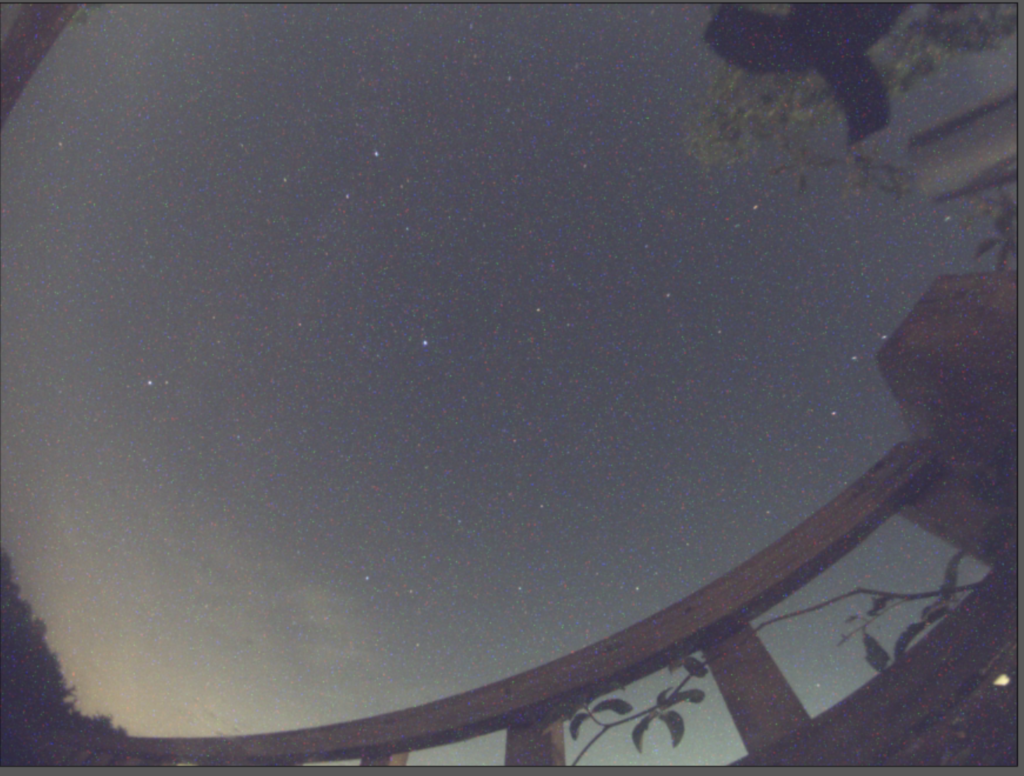
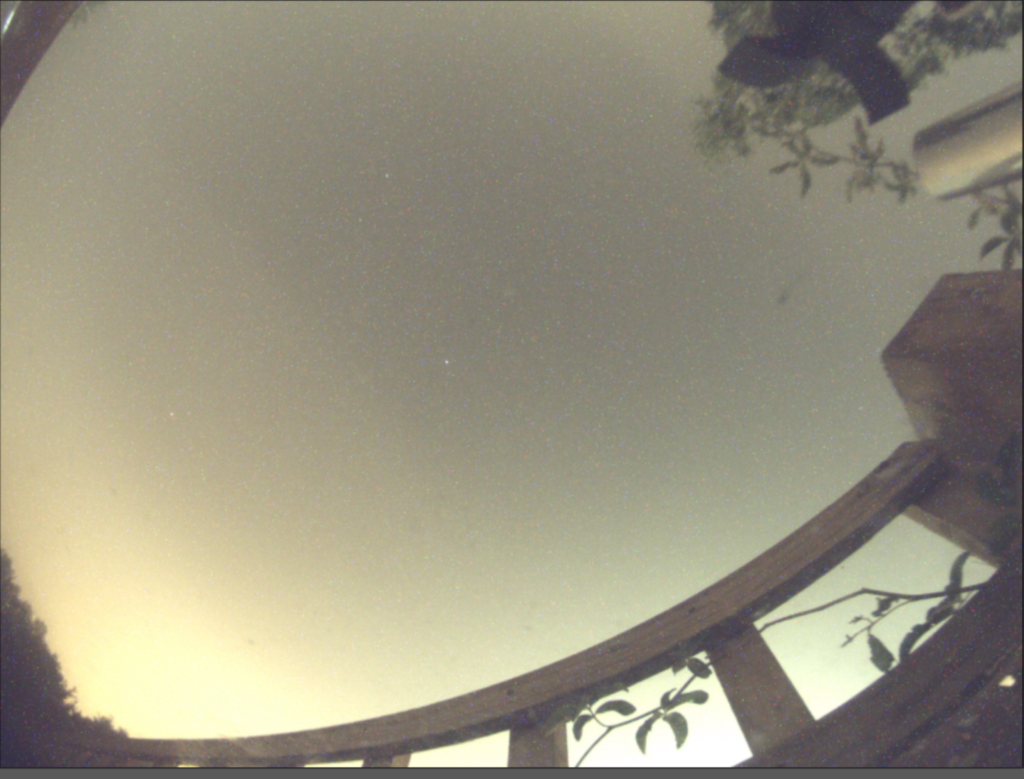
And finally the all sky cam just as I packed up showing the clouds clearing
Tonight I thought I would take some more images of M57 through the 12″ in OIII and then Ha. I first got the OIII filter focused at position 62,500 with a temperature of 22.42℃, I took 10 more images at 600 seconds.
Guiding was good even though there was high level cloud, seeing was good
Ha was then started at 00:44 after meridian flip. I spent some time looking at comet C/2020 F3 NEOWISE through 100mm binoculars with Helen, Ezri and her boyfriend Luke. Then we took some photos with the 50mm lens on the 6D.
Comet C/2020 F3 NEOWISE
I went to bed at 2am and left it running. In the morning I noticed I had 10 good images then the image moved due to guiding problems due to cloud.
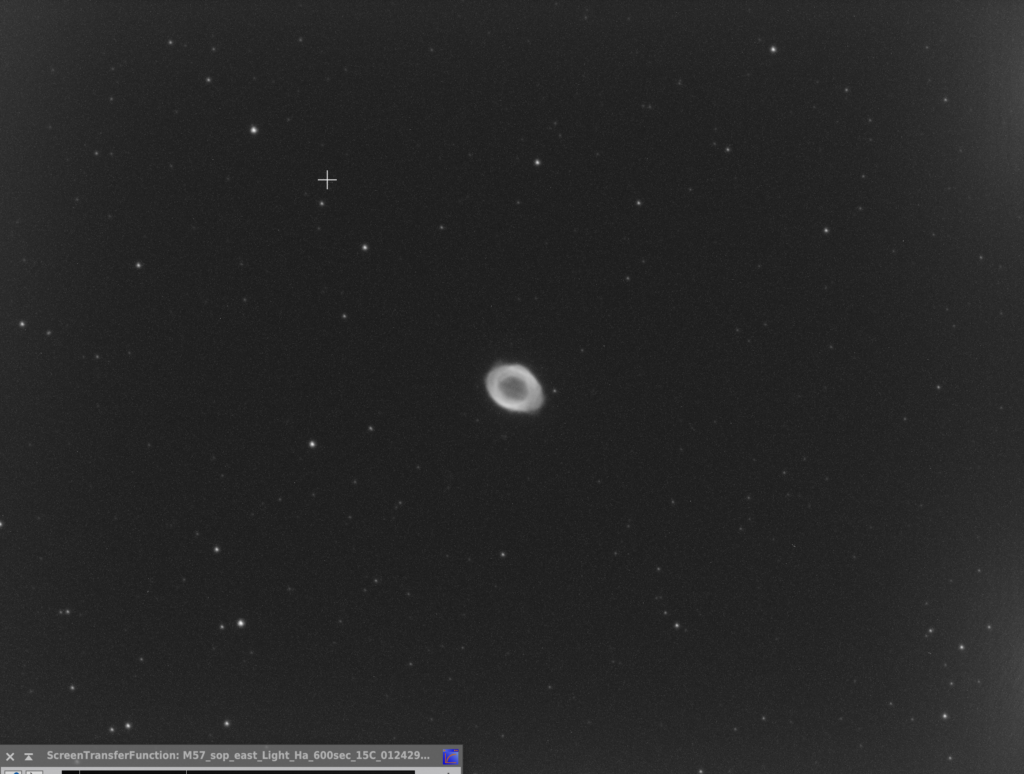
GingerGeek and I decided to go after M57 the planetary nebula in Lyra. I had seen a lovely photo on Flickr with the outer Ha/OIII halo showing which resembled a splat of paint, taken with 9 x 1200 seconds Ha, 3 x 1200 seconds OIII and 9 x 600 seconds luminance. So we decided to go try. It would also add to my ongoing collection of Messier objects.
M57 in OIII
The resulting image of M57 was rather small as can be seen above. We initially set an autofocus run on Ha which came in at 67,213. We then focused on OIII at 67,178. After a few frames we noticed that the focus point had shifted ever-so, thus we refocused at 23:33 for OIII and to a position of 63,610.
The OIII focus exposure length was 20 seconds on a magnitude 4 star which completed very nicely. By the time we had gathered OIII for 9 x 600 seconds the clouds rolled in. We took Flats. GingerGeek ran the whole session remotely whilst I directed 🙂
Tonight GingerGeek came over for a bit of social distancing friendly astronomy along with a bottle of Malbec wine. The idea was to calibrate the AAG, specifically when it goes from Very Bright to Light to Dark and at those points what the SQM value is along with the Sun’s position below the horizon. The AAG needs to get to 2100 which is dark, light is 5 and very light is 0.
The first time we noticed the values starting to change on the AAG brightness when it moved from its continuous reading throughout the day was at 21:47 when the Sun was -3.45 degrees below the horizon and the SQM was 10.15.
Within seconds the AAG read 9 and was already on Light vs Very Light and the Sun was now -3.54 degrees below the horizon and the SQM read 10.28.
It took almost half an hour for the AAG to get to dark. At 22:16 the AAG finally reached 2100, the SQM was at 13.97 and Sun was at -6.52 degrees below the horizon.
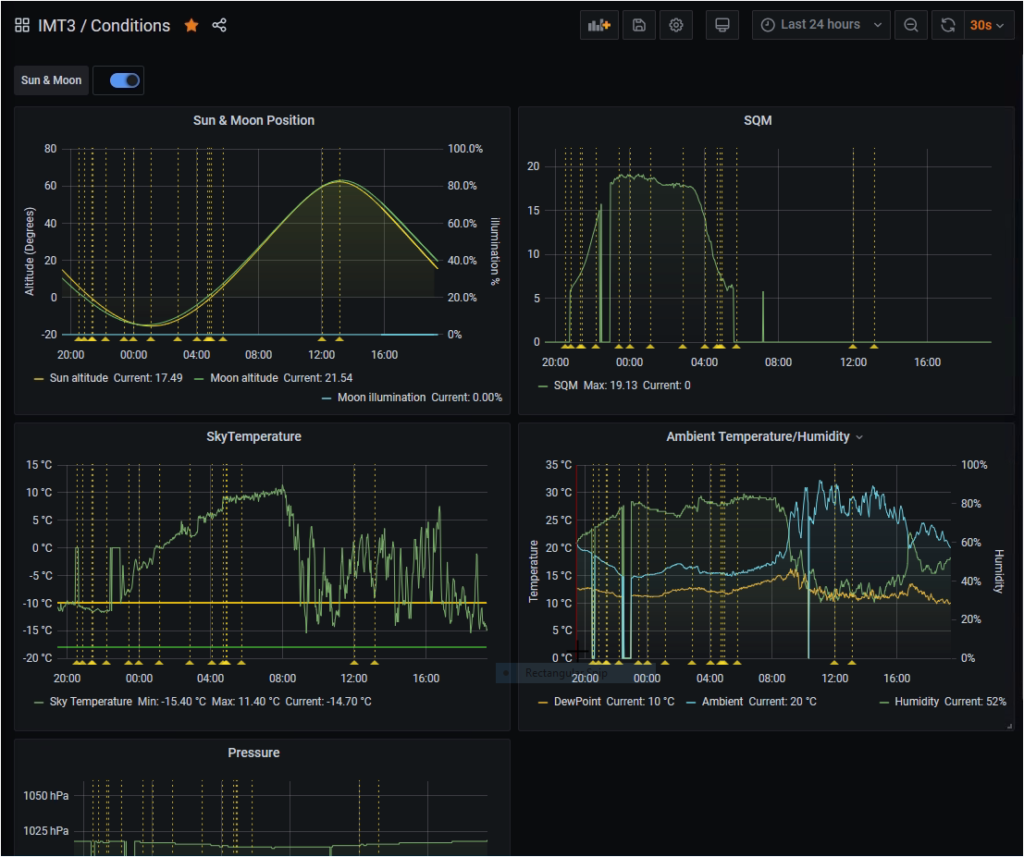
GingerGeek had also developed a new server for IMT3 to visualise some of the data from the observatory. The Grafana dashboard charts below show the data along with the Sun altitude.
New IMT3 Grafana dashboard
Looking at the last 24 hours shows the effect of the light nights on the SQM. The raised values after 4am went the value should be reducing or zero is the effect of a cat or bird covering the sensor. Also worthy of note is the sky temperature which shows the effect of cloud as the SkyTemperature increases. A truly clear sky would yield a value of -18℃ or better.
Shows the entire night
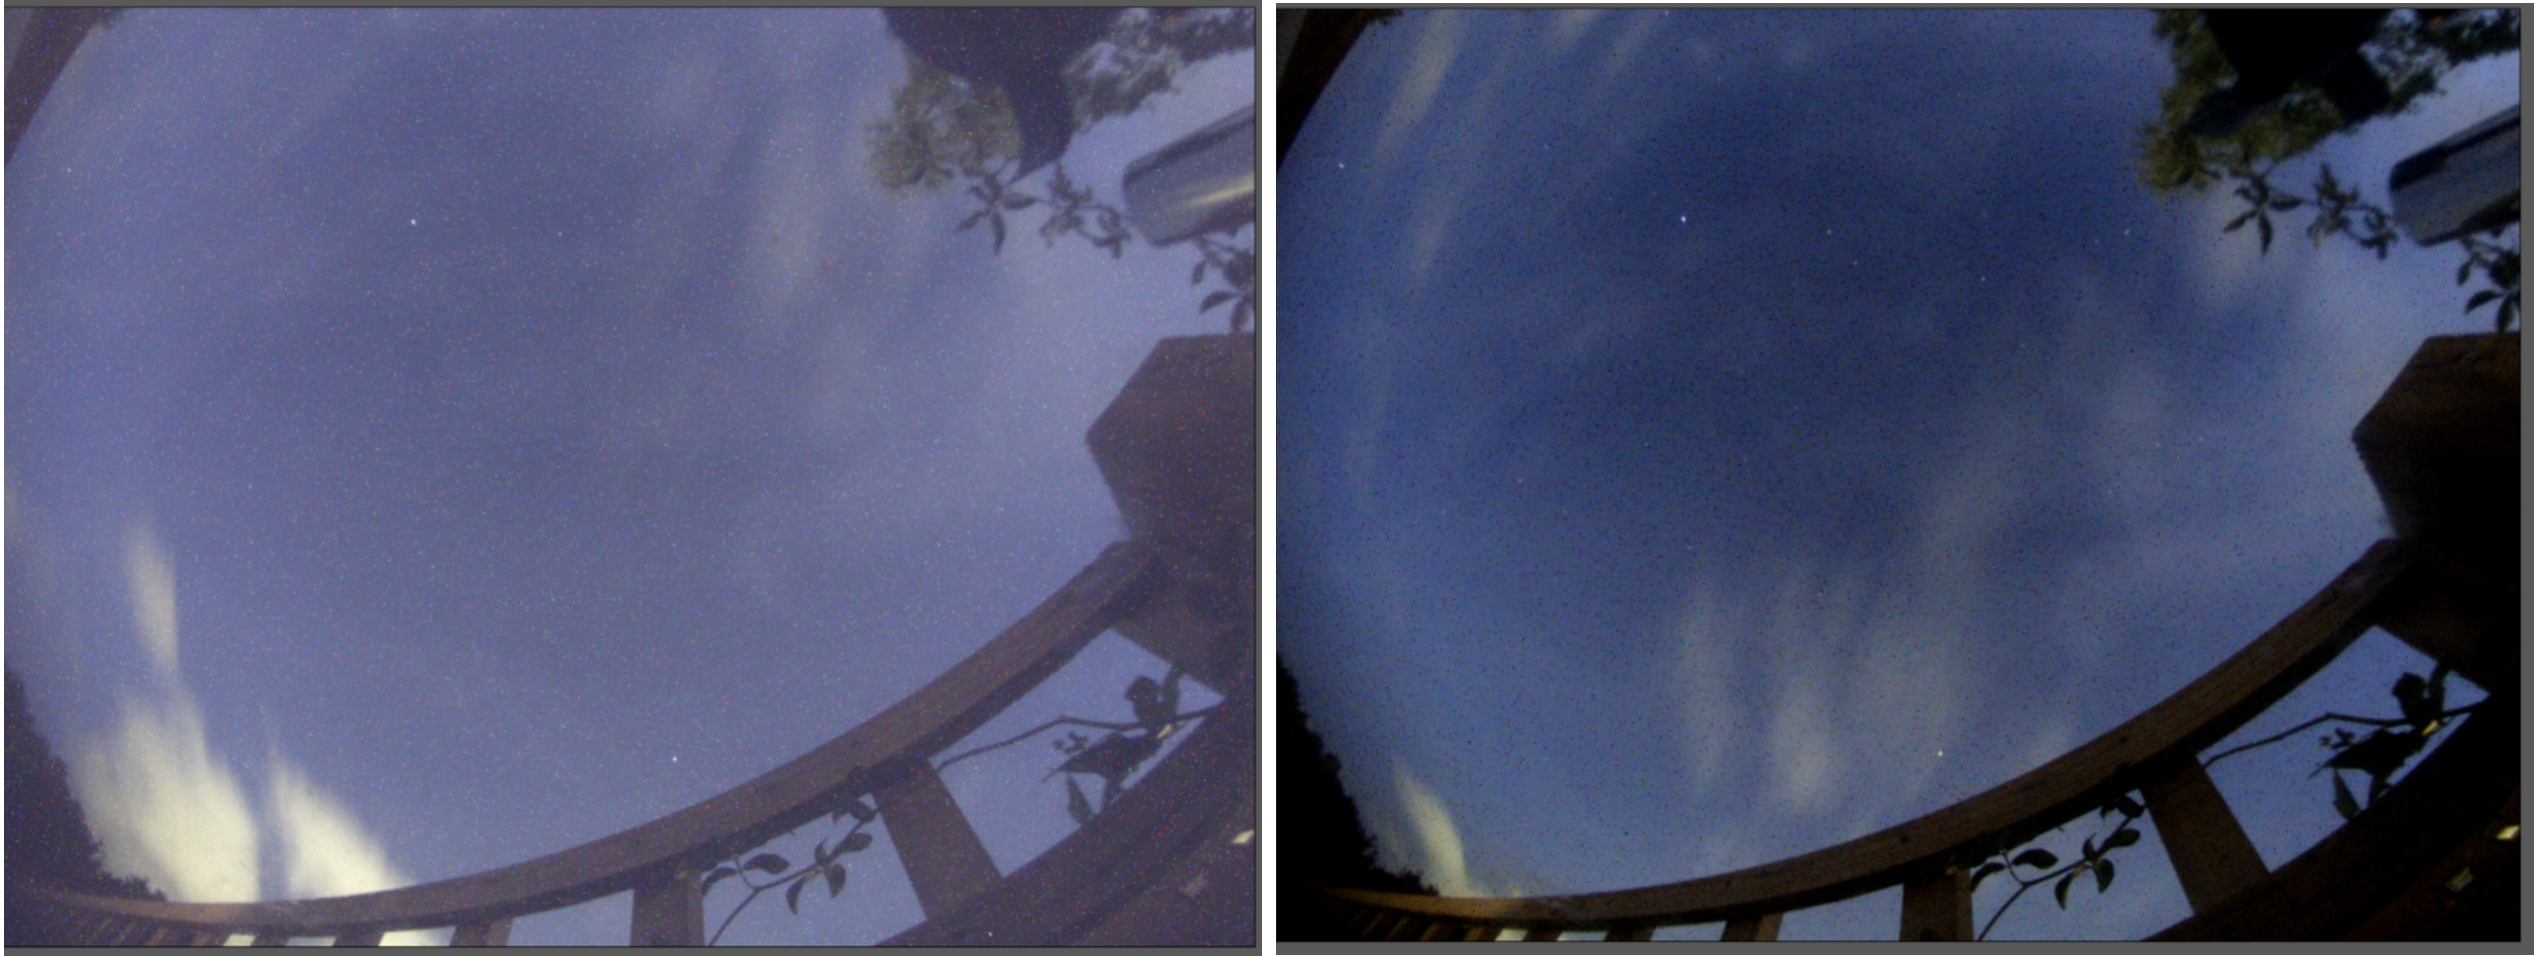
We also took darks on the ASC and applied them since we had never bothered to do it before. The shot below shows the before and after effect of applying the dark/bad pixel map. The whole image looks a lot cleaner and darker, although there seems to be some negative representation going on with dark pixels.
Before and after applying darks
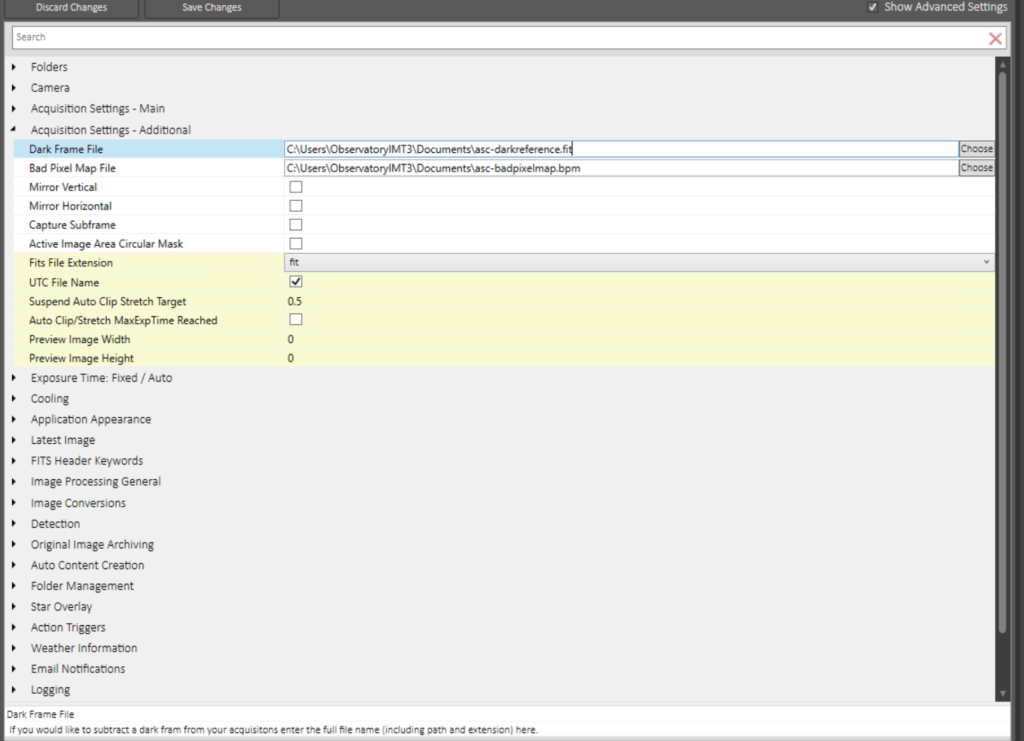
The setting that needed to be changed in the ASC software took GingerGeek a while to find.
ASC Setting to apply darks
During the daytime the ASC looked awful but remote the darkframe reference file and just applying the badpixel map seem to be better. Tonight’s set of images will show if this is better or not.
The only other odd thing that happened tonight was the dome closed without the safety setting it off. Not sure why yet ……
So I opened the dome late this evening as it was not due to be clear. However an opening in the cloud meant I could test guiding again on the 12″, especially whilst it was light in the late Spring weeks.
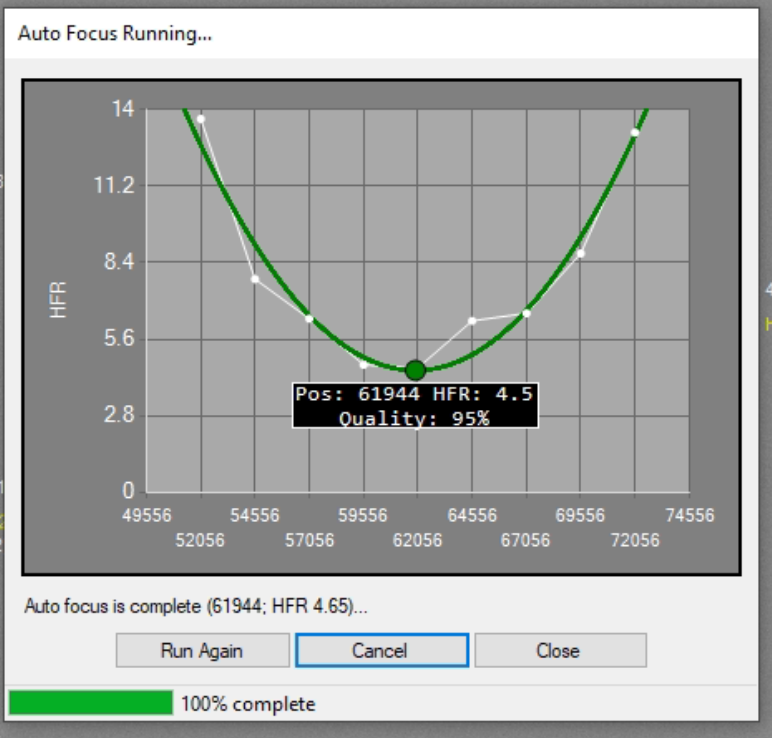
The first job was as always to focus which brought me to a reading of 61944 at 19.83℃.
Focus run
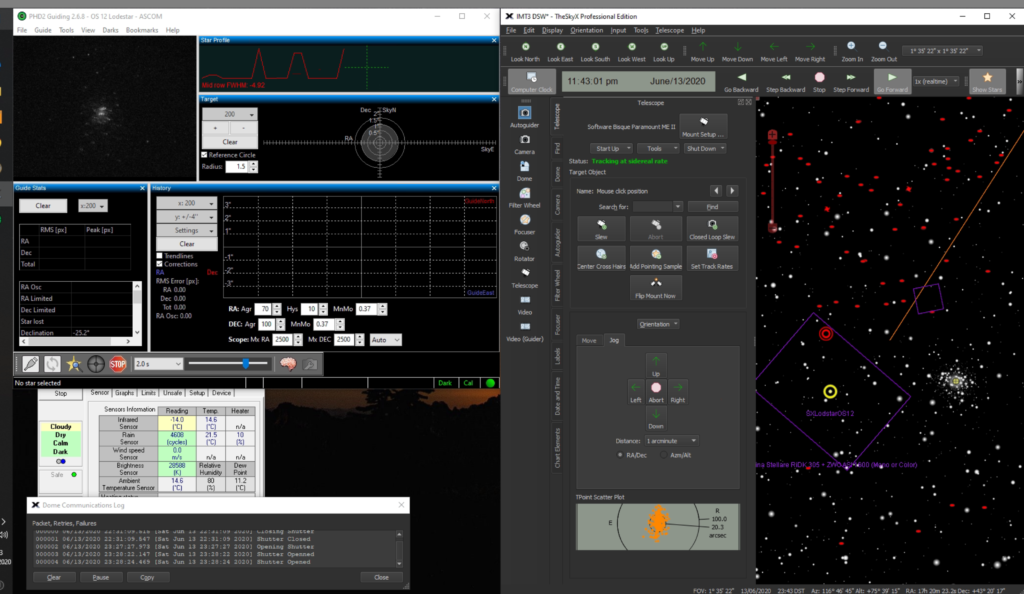
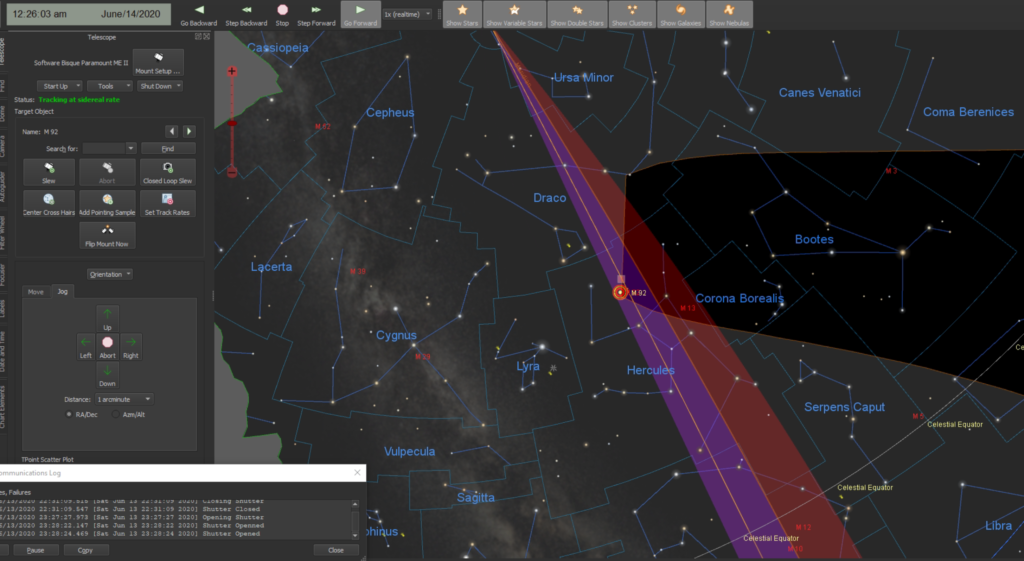
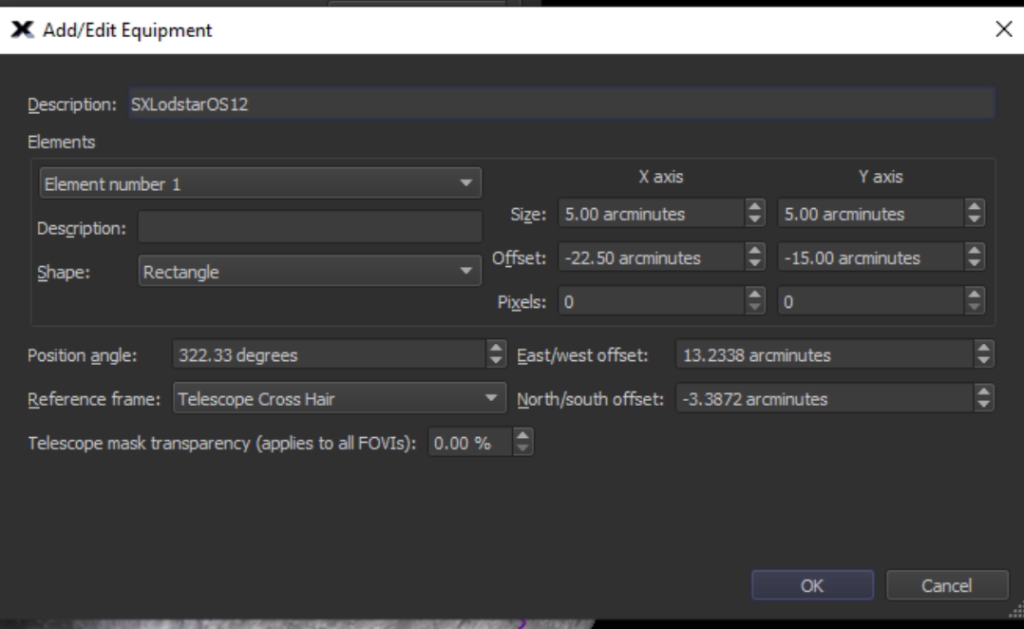
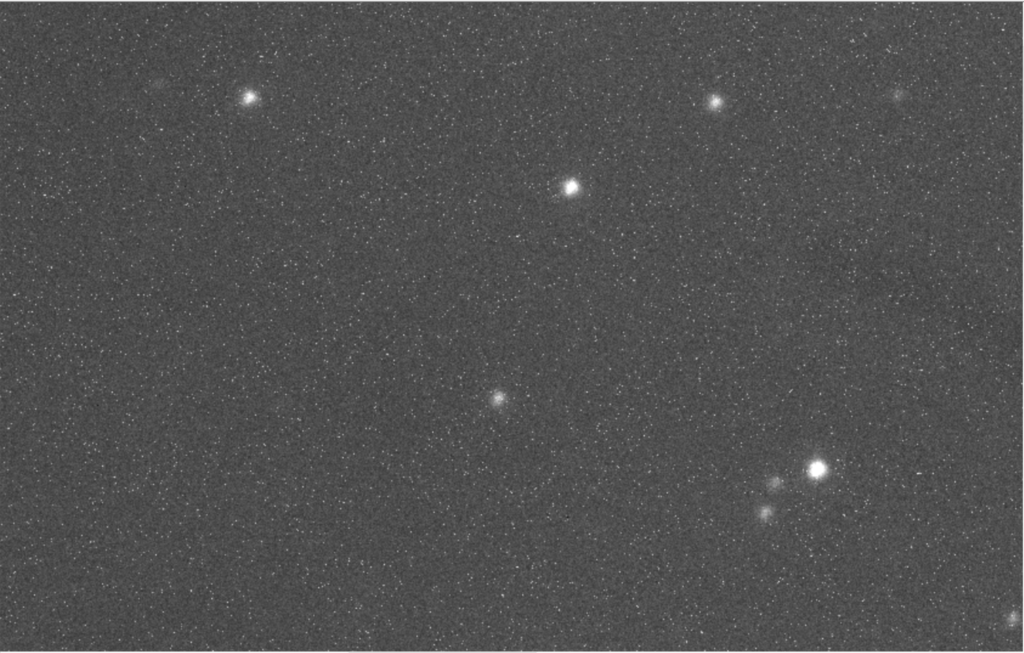
Another small job was to sort the guider FoV out. I went ahead and used M92 to align the guider.
Aligning guider FoV using M92
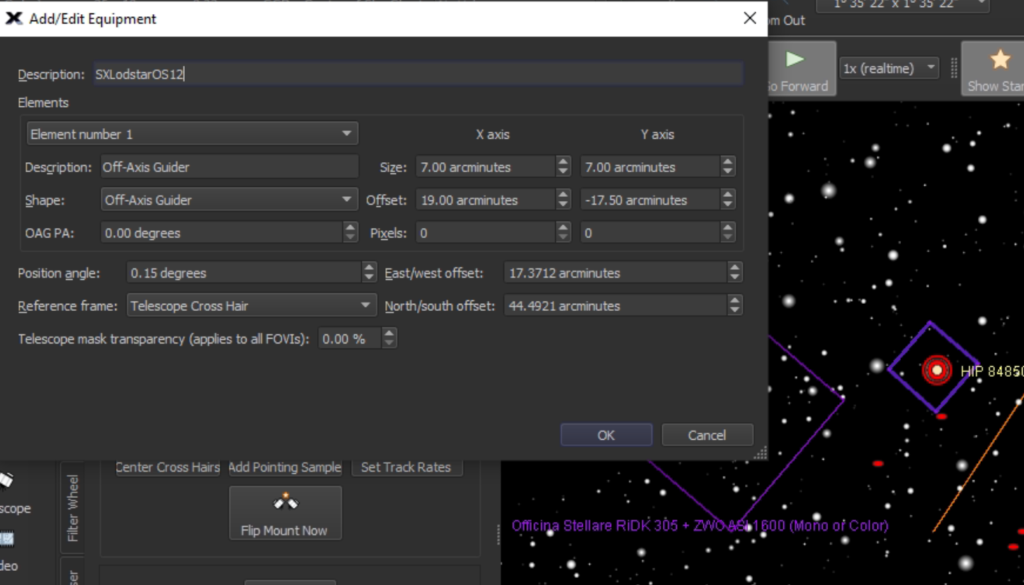
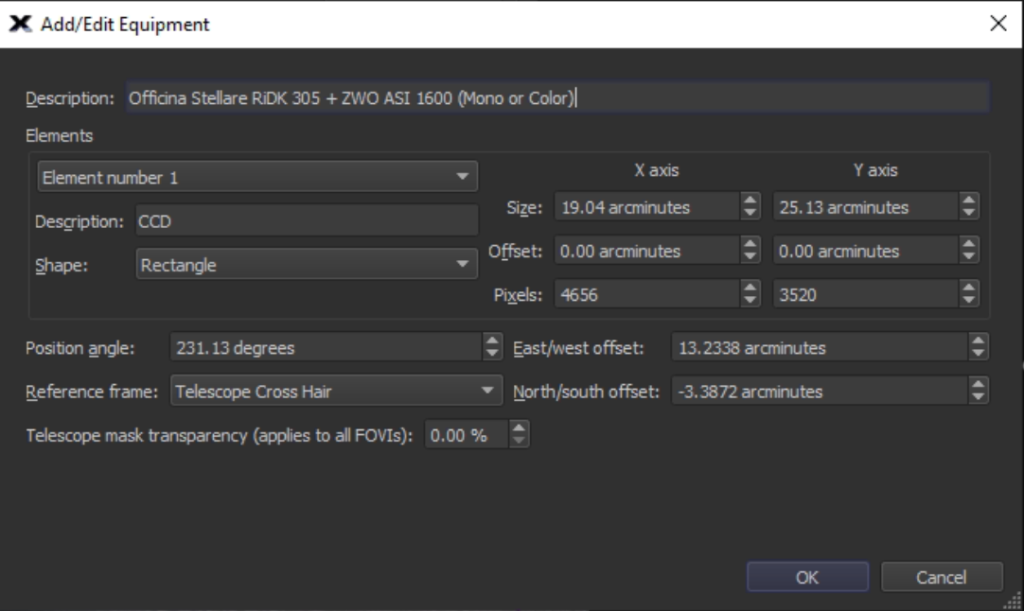
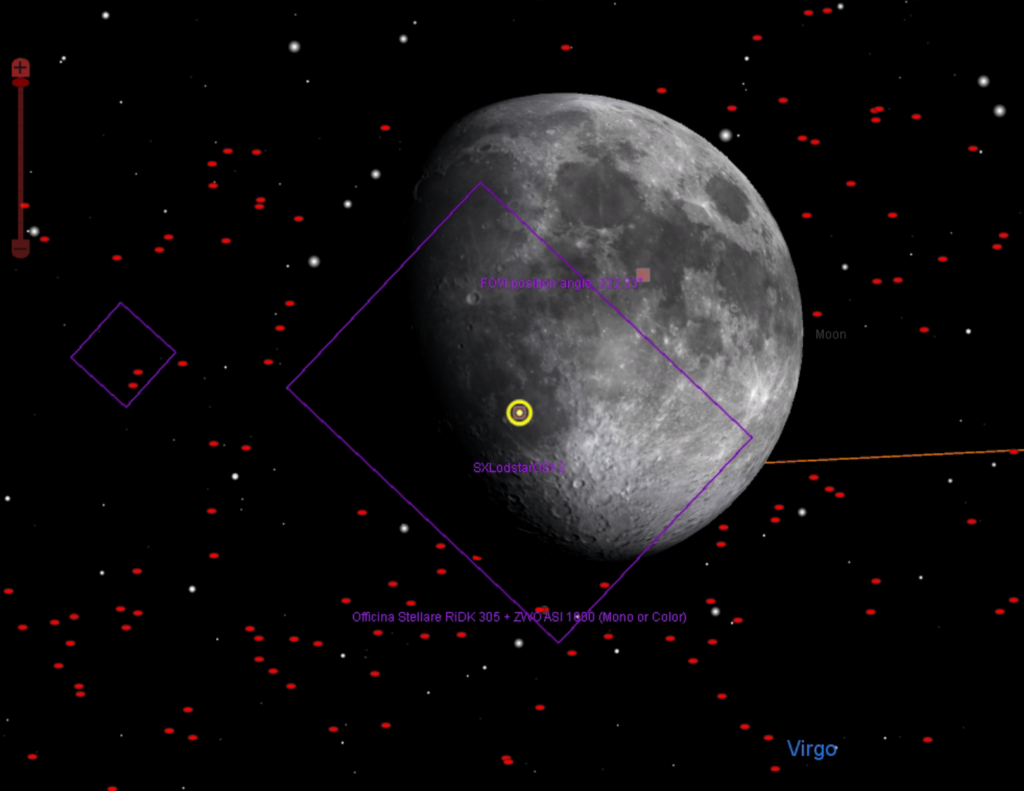
The final FoV settings are here for completness.
FoV for guider
Set AS1600 to Gain and Offset 10 due to cluster being very bright and I needed to set a standard of 60 seconds minimum exposure. Gain 139 and Offset 21 gas saturated unless I selected 15 seconds, Gain 75 and Offset 12 saturated at 30 seconds so hence 10 and 10 which came in about 58k ADU.
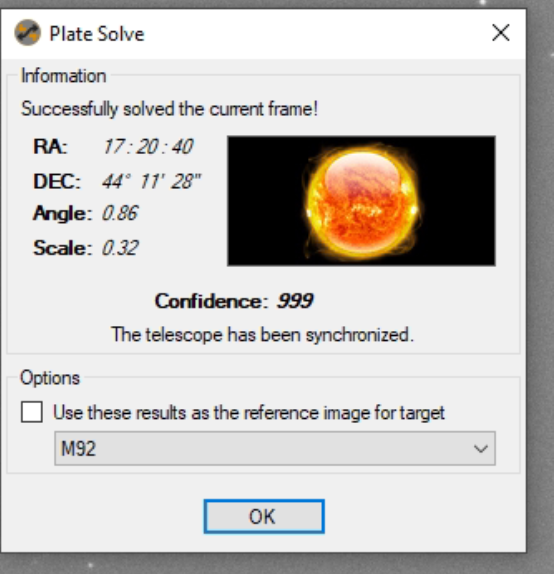
I then performed a slew to a nearby star so I could centre the scope, there platsolve completed successfully and I updated TSX and the FoV for the 12″ with the new angle.
Platesolve
The first image of 60 seconds came down and was out of focus, I then realised changing the profile SGPro forgot the autofocus setting, so I had to stop the run, delete the images and set the original focus point then rerun.
M92 out of focusM92 in focus
Next I ran a few images but then to my horror I had the same guiding issue, where the star moves being dragged up and down in a periodic way. I slewed elsewhere and tried again and the problem did not occur. I was near M92 and just East of the Meridian and quite high up. Not sure why that is a problem.
Near the Meridian
I could not resolve, I waited a while then performed a meridian flip and low and behold the problem went away, again not sure why. I still have this terrible noise coming from the RA motor/gear area. I decided to bite the bullet and take off various caps on the scope listening and looking inside. I decided it was not after all, the through the mount cabling but coming from the RA gear itself, so I looked for the MEII guide for removing the worm block and then followed the instructions to take off the RA cover.
RA gearing and belt noise
This gave me instant feedback on what the issue was, the belts driving the axis were making a noise. On looking through forums on Bisque.com I found a few people with similar issues and needing to grease the belts, they were told Lubriplate was a good grease. This is an American grease so I will find a similar here and then apply, I will ask Bob first for his suggestion.
So the night wore on and the LRGB frames of M92 I thought I would take whilst testing guiding progressed. At one point the imaging stopped due to cloud. I just caught the dome before it closed to change the safety sensor due to cloud. When it cleared it never really cleared, with the sky temperature reading about -14℃.
Not very clear
Nearing the end of the imaging session, I had caught about 15 frames of each of the filters.
Good guiding and imaging
The guider was behaving mostly with he odd funny jolt. By 3:30 am the sky was lightening very quickly.
3:30am and bright
By this time I had stopped guiding and imaging. I closed the dome, slewed the scope to the flat panel and proceeded to take a set of LRGB flats for Gain 10 Offset 0 and also Gain 139 and Offset 21 as request from the previous nights imaging.
It was unexpectedly clear this evening so I opened the dome late, so no cooling down.
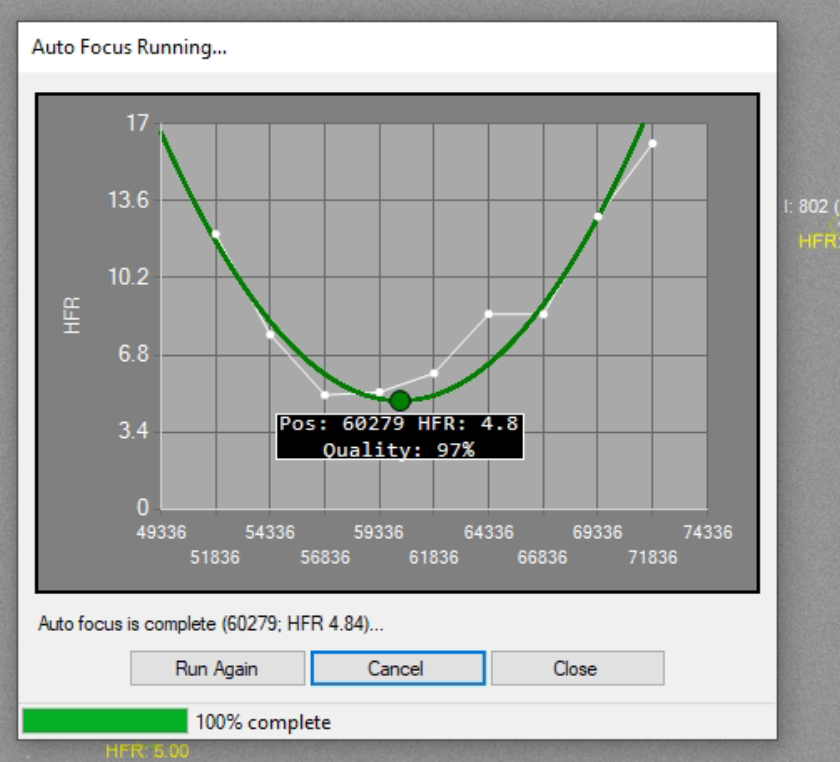
Focus 60,279 Lum filter at 19.93℃
Autofocus run
Slewed to Arp 286 as I had seen on Flickr and wanted to see what it looked like in 12″. I noted I needed a new set of Darks for the Lodestar off axis guider after we had changed the driver recently, so I set about taking those with PHD2.
autoguider darks
The problem I then saw was no guide star in the FoV! I really need a rotator!!!!!
So I will image without the guider. The first image jumped as I realised the auto-guider was still on and trying to track nothing sending the mount this way and that. So I disabled and set about running 3 x LRGB for 300 seconds a piece
The first image was Luminance and looked ok, although bright due to high level cloud and no astronomical darkness this time of year. I also noted the mark on the filter caused by the LensPen! I won’t use that again. However I do expect that to come out with the flat so not too bothered. Also I could go clean it I just don’t want more dust on the filter so will leave until I have a reason to take the camera off again.
Arp 285 Luminance 300 seconds
For reference here is the luminance flat.
Luminance Flat showing Lenspen mark
Next up was Red filter for 300 seconds
Arp 286 Red 300 seconds
Then Green filter
Arp 286 Green 300 seconds
Then finally Blue filter.
Arp 286 Blue 300 seconds
So I left it to run for 3 x 300 seconds each filter. Meanwhile Mil Dave came online and opened his dome and we decided to go for a joint target to see how they compare. Given Arp 286 was below Dave’s hedge I mentioned the Coddington Nebula IC2574 which is actually a galaxy, being the object in my latest image from the travel rig with the Esprit120 and the comet passing. It has some interesting star clusters in it. We agreed on luminance and 300 seconds. Here is Dave’s result ….
Coddington Nebula by Mil Dave
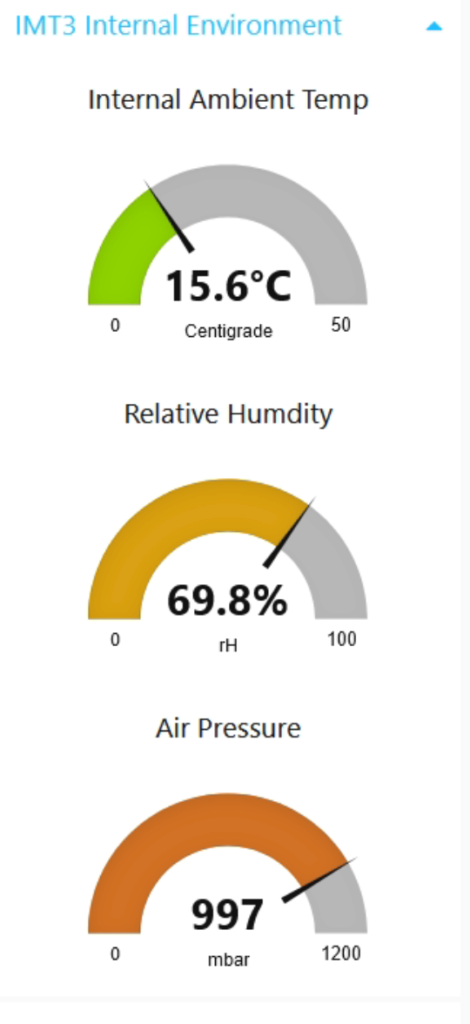
Meanwhile the humidity kept rising
IMT3 environment gauges
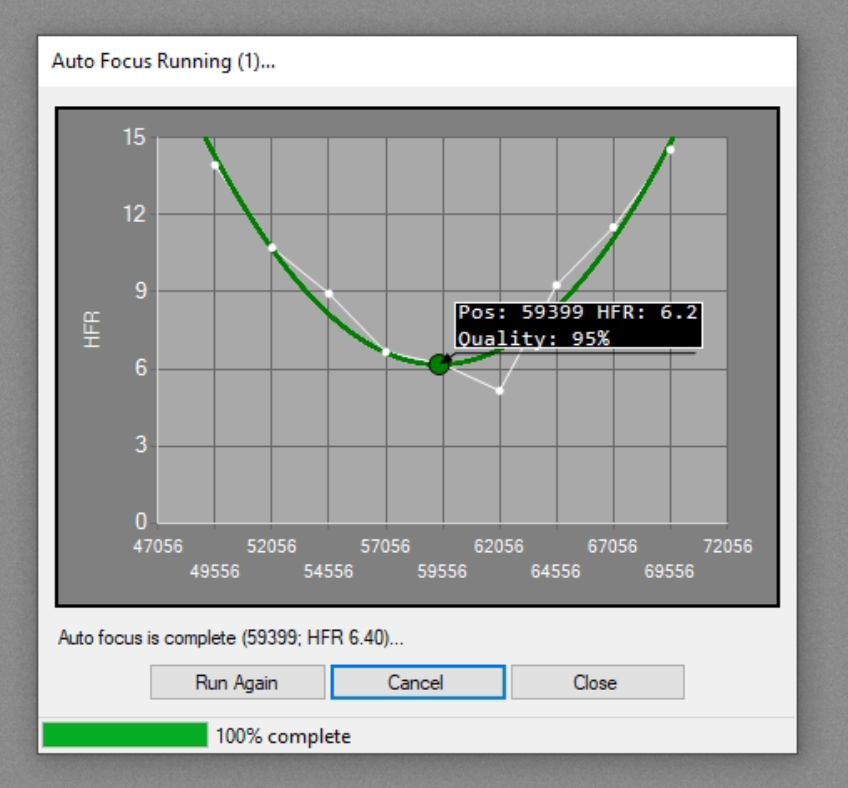
At just gone midnight I finished the short run on Arp 286 and slewed to Coddington to catch up with Mil Dave. First I did a quick refocus as the temperature had dropped about 2℃ since I started.
refocus but note the point at 62,056
The refocus put me near but not near enough so I changed to 62,056 for a better HFR which worked. Then I went on to do Coddington and here is my result.
Coddington behind the tree from 12″
I had problems with unguided exposure, then had a problem finding a guide star, then the object was behind a tree!
So next I slewed to Mil Dave’s choice of object, here is Mil Dave’s image
Arp 214
I managed to find a guide star straight away and grabbed this
Arp 214
Notice my screen stretch is different hence the bright background. It is just a quick screen grab off the NUC. My turn to pick now, so went for several objects but all behind offending hedges at Mil Dave’s house. So I sent Dave off to choose one. He came back shortly with Arp 278. So off we set. Here is mine.
Arp 278
and of course Mil Daves….but no, he forgot to save it 🙁
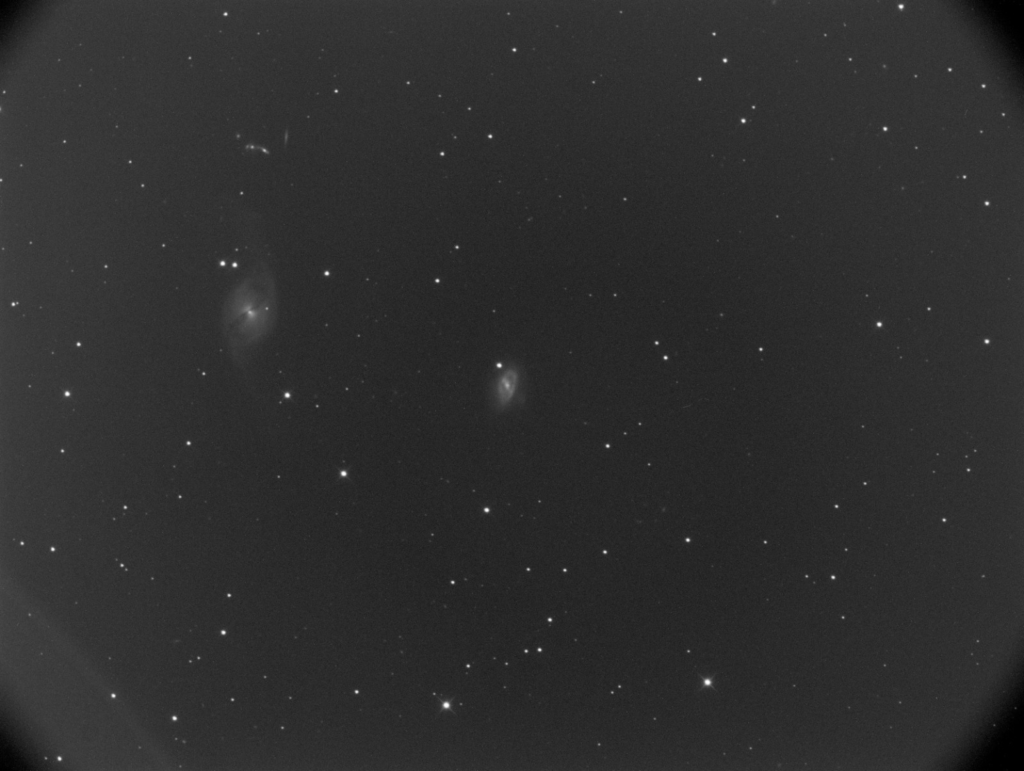
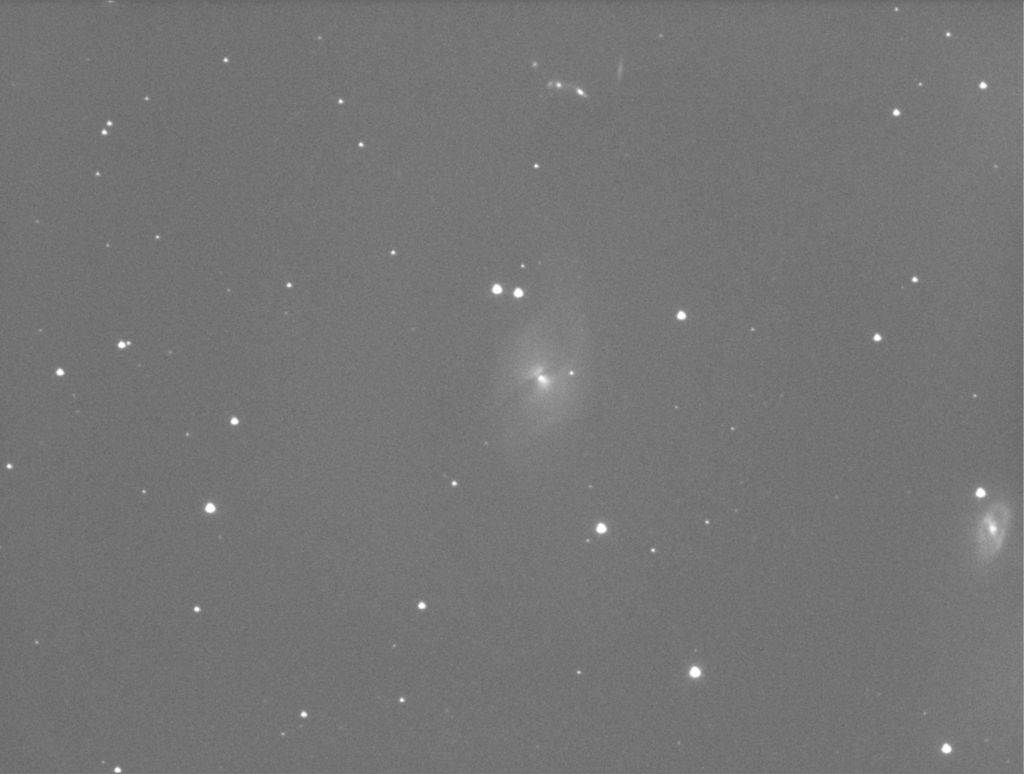
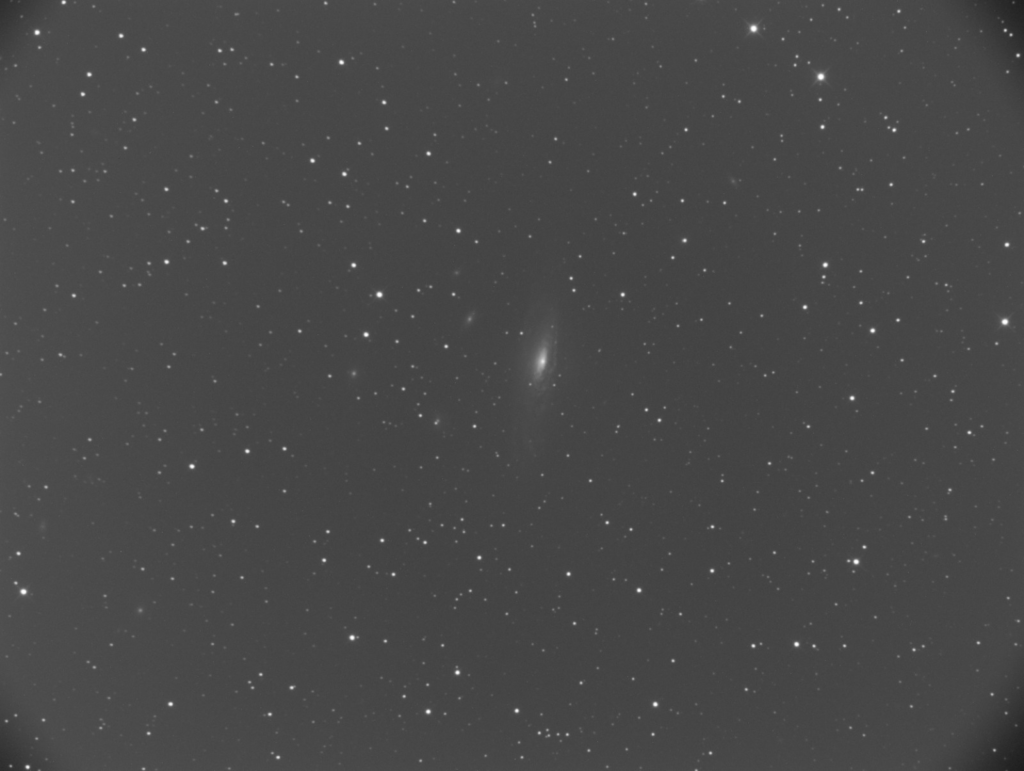
So my object next, I selected one nearby to save the rather long dome rotation I just did, and the resulting loud noise when it jammed! I need to look at that. Meanwhile Mil Dave trundled his round manually. So I choose NGC 7331, also known as C30 and Herschel H53-1, so also on my list for the Herschel 400. This is what I got.
NGC 7331 12″
Meanwhile the cloud from the South East started to creep in and my daughter, who just came in even at this hour of 1:36 said it was foggy outside.
ASC Cloud coming
Dave’s grabbed the NGC 7331 below.
NGC 7331 Mil Dave
I was about to suggest a Sharpless object when the clouds rolled in enough for me to shut the dome. It was reading -4.8℃ sky temperature and the limit was less than 30 for overcast, so I manual overrode.
ASC Clouds
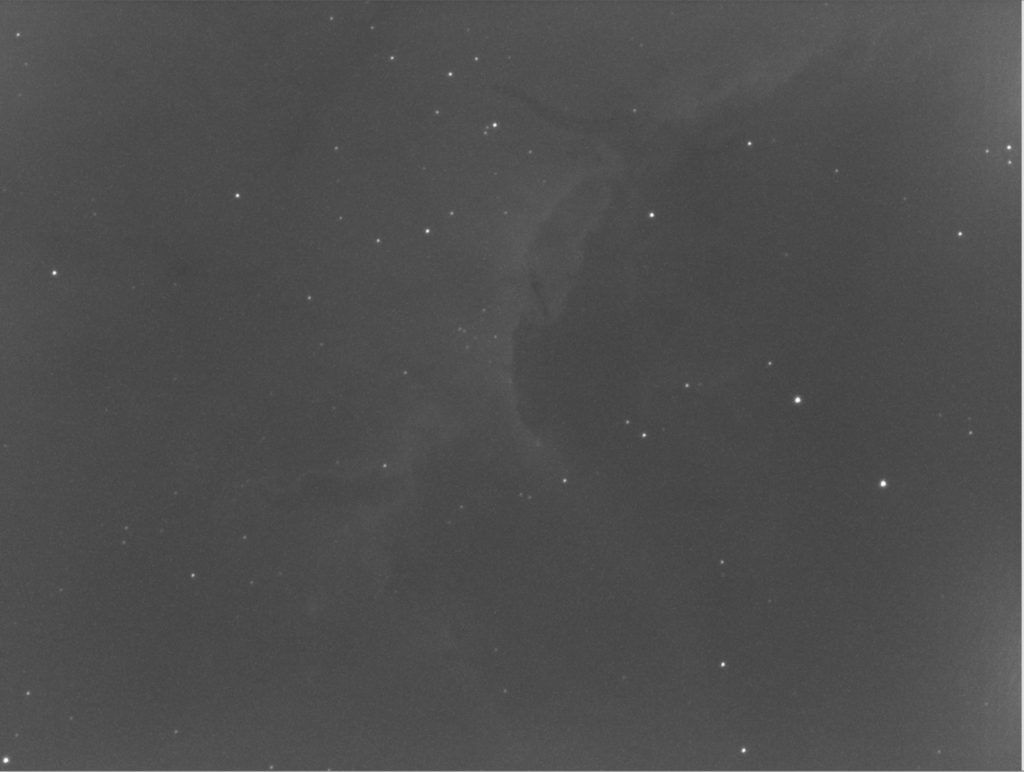
Just before it shut this is the image I got of SH2-126 which is impossible to see since it probably needs the Ha filter rather than luminance.
SH2-126 300s 12″ Luminance
Well a good night all round, given we thought it was going to be cloudy it was nice to come out and play with Mil Dave and go hunting faint fuzzies, so a goodnight from me and a goodnight from him ?
Now guiding on star to West side of mount around 0 degrees Dec and near the Meridian to see if problem reoccurs, graph looks ok but there is a slight regular pattern of error.
Slewed to M92 which is a glob currently at Alt +74, Dec 43 and on the East side of the mount where I had issues last night. I plate solved the image.
The auto focus run looked good
Found guide star by moving M92 slightly off centre. Now guiding. All looked good for a short while. So each section of PHD2 graph is 25 points, so when you have 100 points selected there are 4 sections of the graph. This mean each section/column represents own my case 250 seconds as I expose for 10 seconds, so just over 4 minutes per section. So the errors I saw last night were about 12mins apart. This cannot be the work gear as it has a cycle of 2min 29sec. This is from the latest Paramount manual for the MEII.
Tracking at the sidereal rate, one revolution of the worm takes 149.6 seconds (2 minutes 29 seconds).
The right ascension gear has 576 teeth.
The declination gear has 475 teeth.
The error I am seeing is about 4mins. I cannot continue imaging as every few frames are trailed.
The first thing to do were Flats for Ha first for the previous night but also for use tonight. I completed this at 22:15
At 22:31 I performed focus run on Luminance which came in at position 59841 with HFR 4.77.
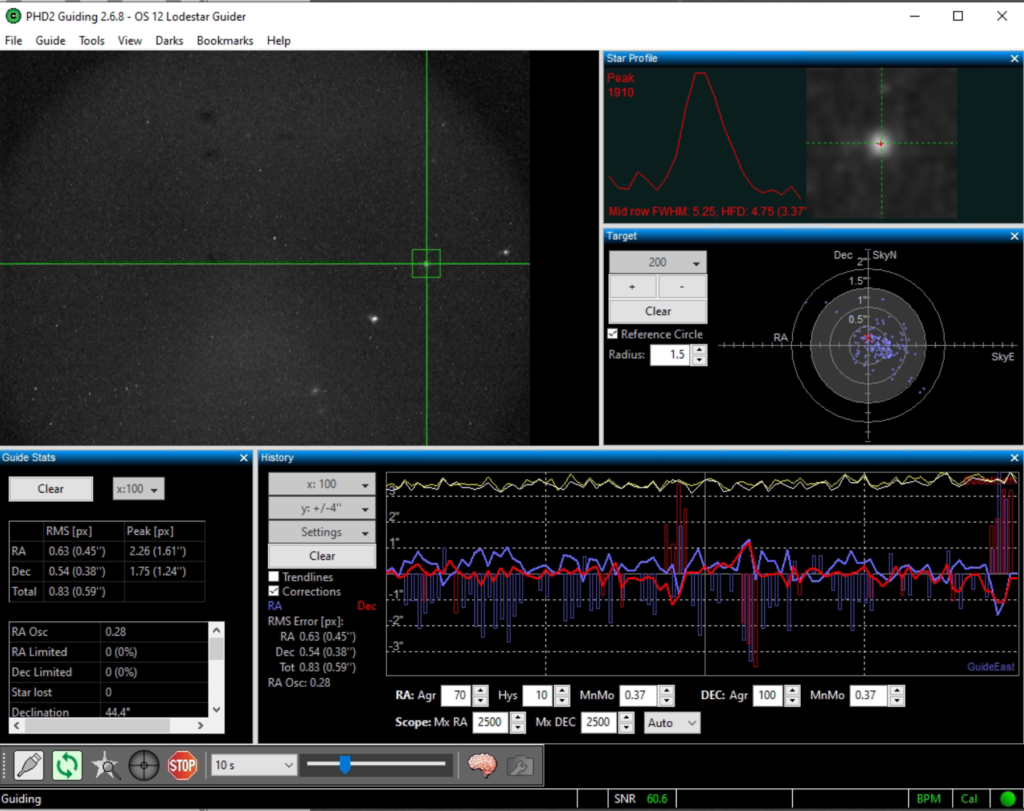
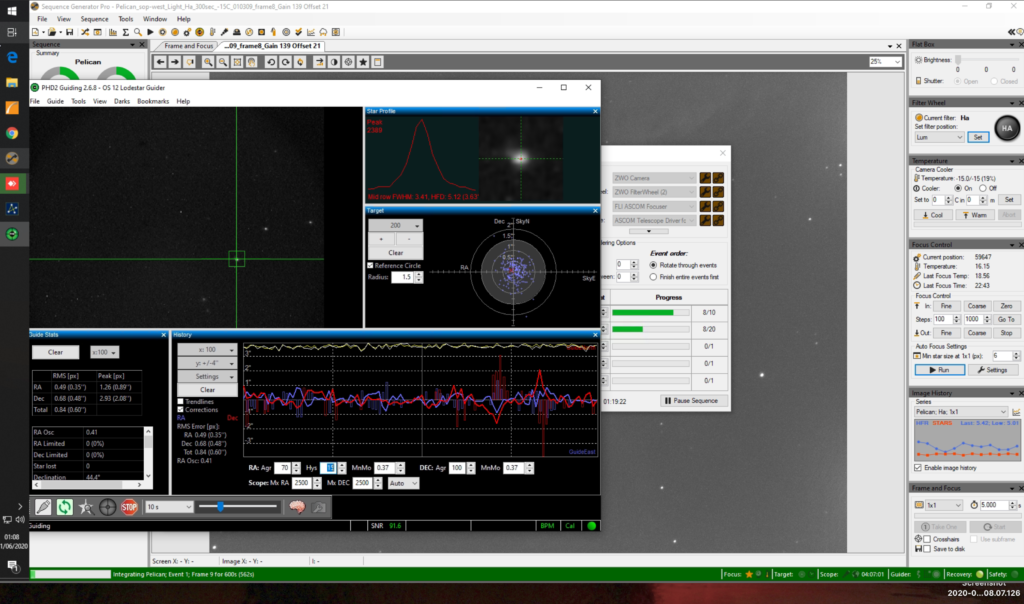
I started an image run as soon as the Pelican Nebula (IC5067) was above the neighbours house. I have set a run of 10 x 600s and 20 x 300s Ha subs guided with the new PHD2 settings to prove the 12″ now works from 1 night to another. Then we can try the Esprit on the next clear night. The guiding at first looked okay.
Good initial guiding
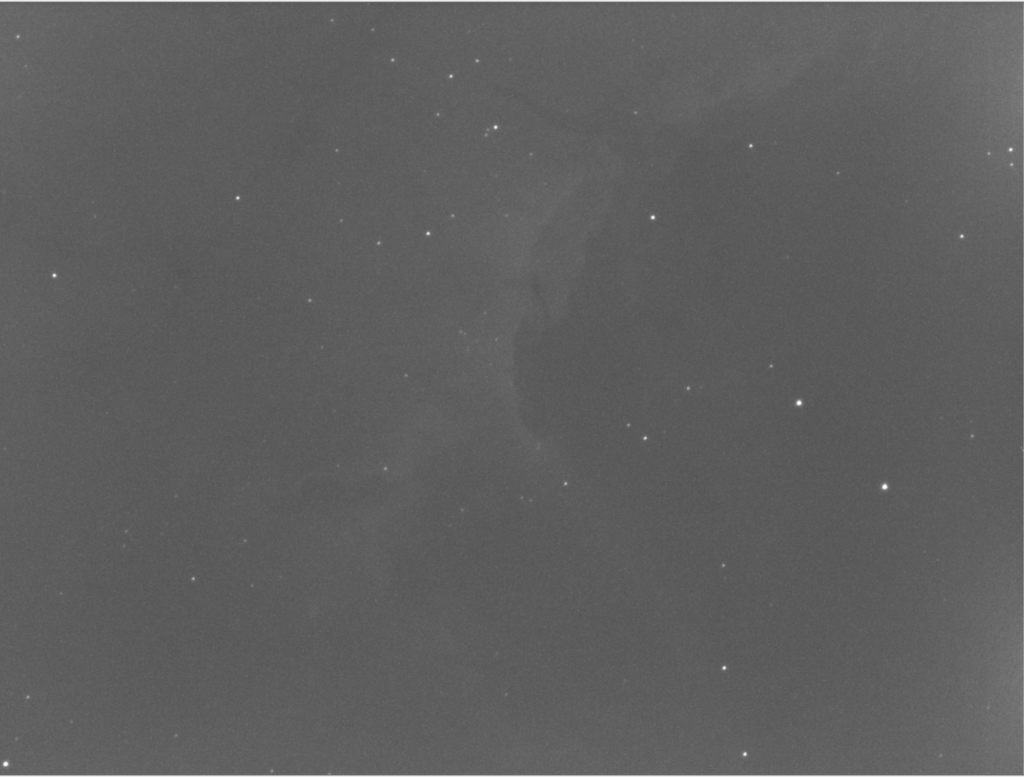
The resulting image looked very good too
300s Ha guided Pelican300s Ha guided zoomed no trailing600s Ha Pelican guided600s guided zoomed no trailing
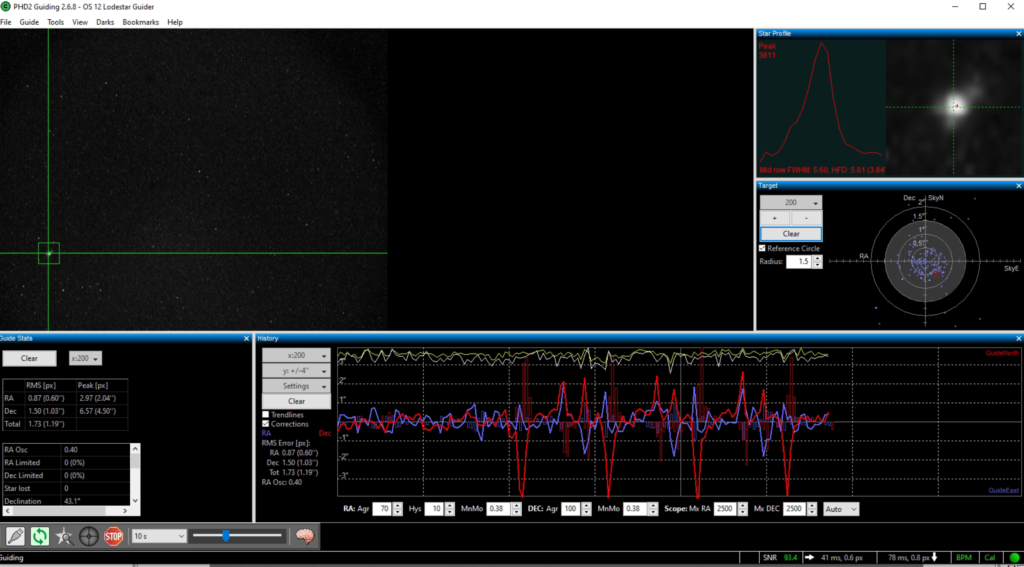
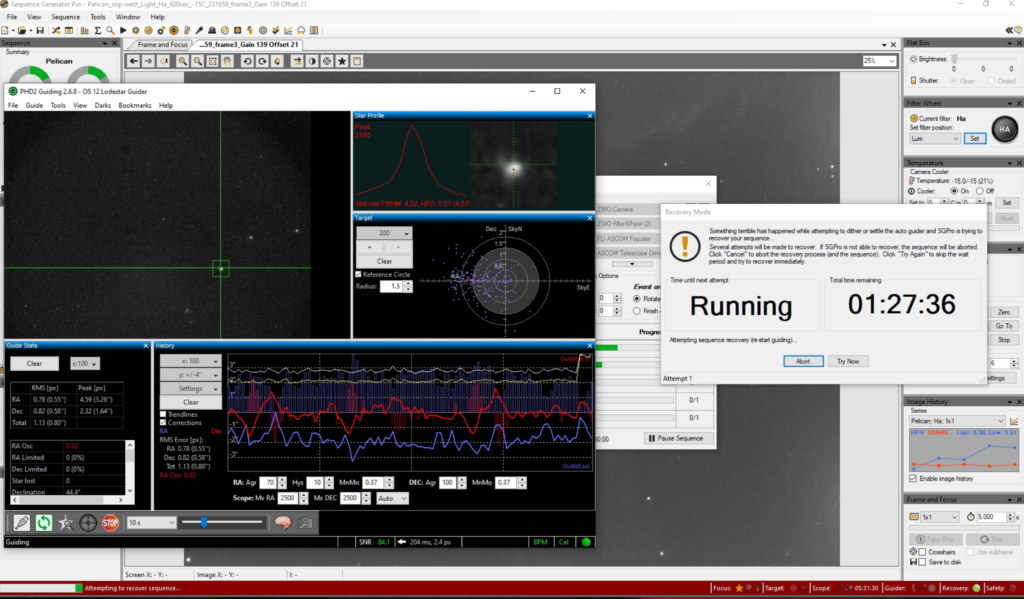
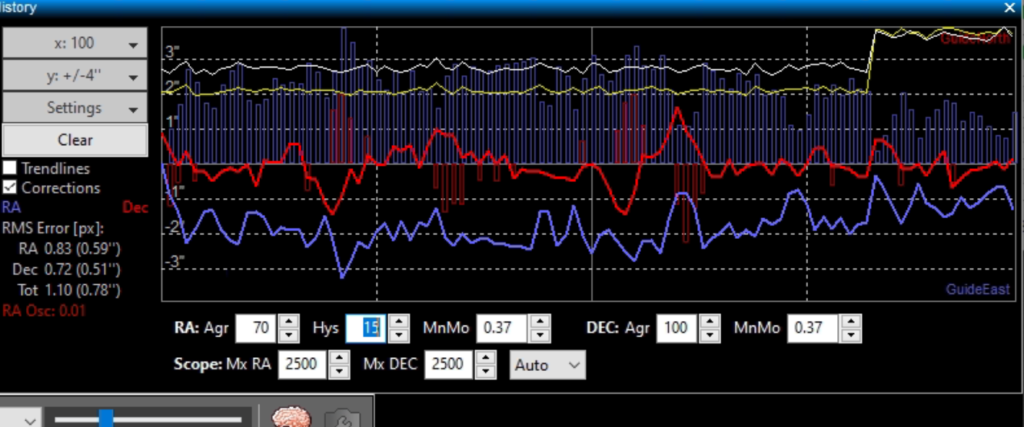
After about 5 frames I suddenly ran into a problem the guiding looked like this
There were large movements in the Dec and the RA would not return to centre. Soon enough SGPro stopped imaging and tried to settle the guider and then further complained about not being able to settle. So I temporarily changed the Hysterisis from 10 to 15 to see if this would get the star back. It did, well just.
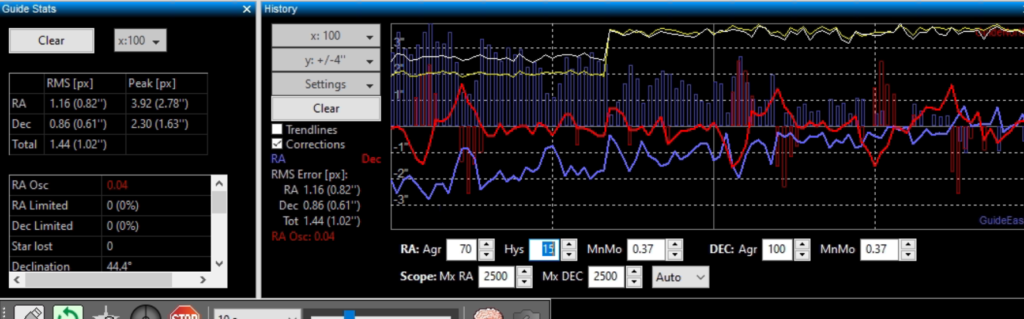
The RA axis returns to the centre after quite some time. Is this possibly seeing related or is there something mechanical amiss with the setup?
I did notice the problem one more and then went off to bed left it running 01:09 leaving the possible bump in the worm to resolve itself.
bump in the worm?
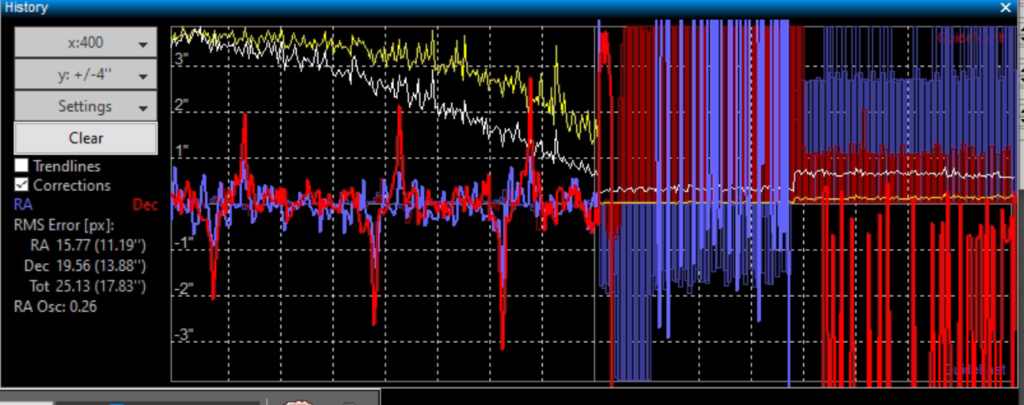
Addendum – So got up this morning and the scope had continued its travel across the heavens. I looked at SGPro and it finished the sequence without any problem. I then looked at PHD2 and expanded the time to include the maximum span possible as it had been trying to guide after loosing the star (I have check boxed Enable Star Mass Detection in the hope this fixes it) and I noticed a problem, which is the recurring South then North oscillation which I now need to investigate as that is the cause of loosing an image due to the star moving. It looks for all the world to be on the worm gear. I will set about measuring the PEC tonight and see if I can see it. It may of course be from when I adjusted the work due to another problem I had and it may not be quite right. I will also ask on the forum.
I opened the dome at 5pm. I wanted to try tonight to sort guiding via PHD2 again on the 12″ this evening and then on Esprit120 if enough time allowed.
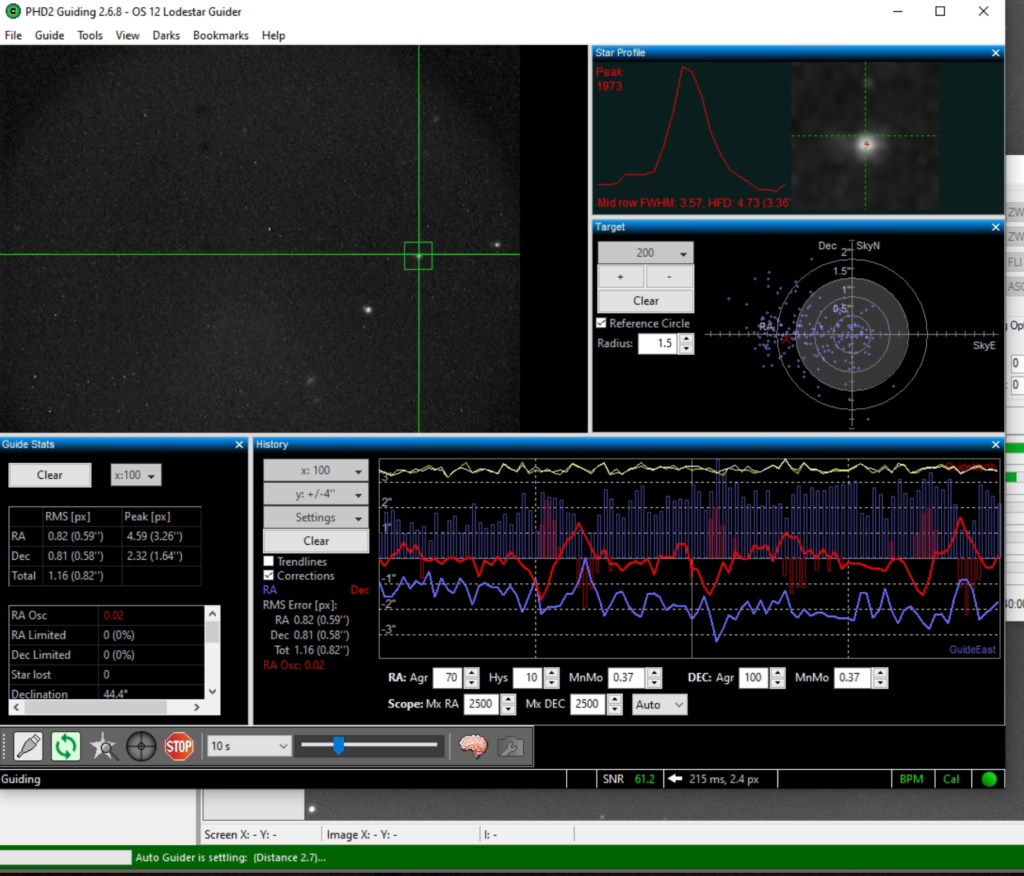
I changed the PHD2 Profile for 12″ from 6 calibration steps to 12. Performed calibration. Started test guiding in West at +47 Alt. Tried 300 seconds exposure x2 all good
I Slewed back to the East and to Pelican Nebula. Set the Reverse Dec Output After Meridian Flip tick box again ! It then re-calibrated for this side of the mount.
I have also changed the assume Dec orthogonal to the RA axis.
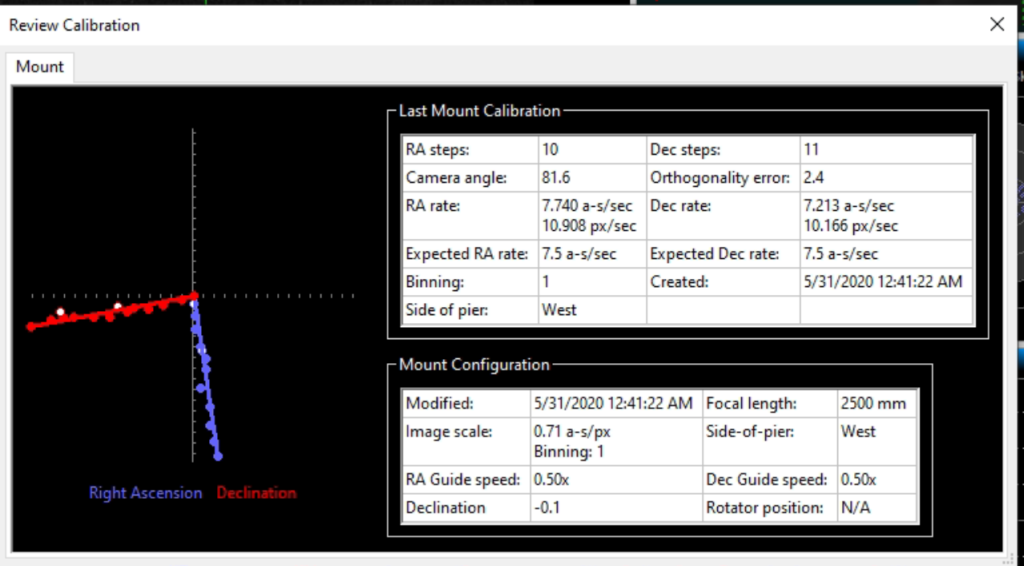
I reran the calibration a number of times until there was no longer an error at the end of the calibration. There was also trailing of stars. Some of the problem seems to have been an incorrect calibration, we need the RA and DEC rates to be very close indeed. Some of ours this evening were 1.5 arcsec difference. The good calibration we finally settled on was 0.5 arcsec difference. The other change was I went out and tightened up the grub screw holding the Lodestar guider on the prism tube that goes into the OAG body, this was loose and I could move the back end of the guider around. This was due to changing the OAG position recently and clearly not tightening the grub screw in enough.
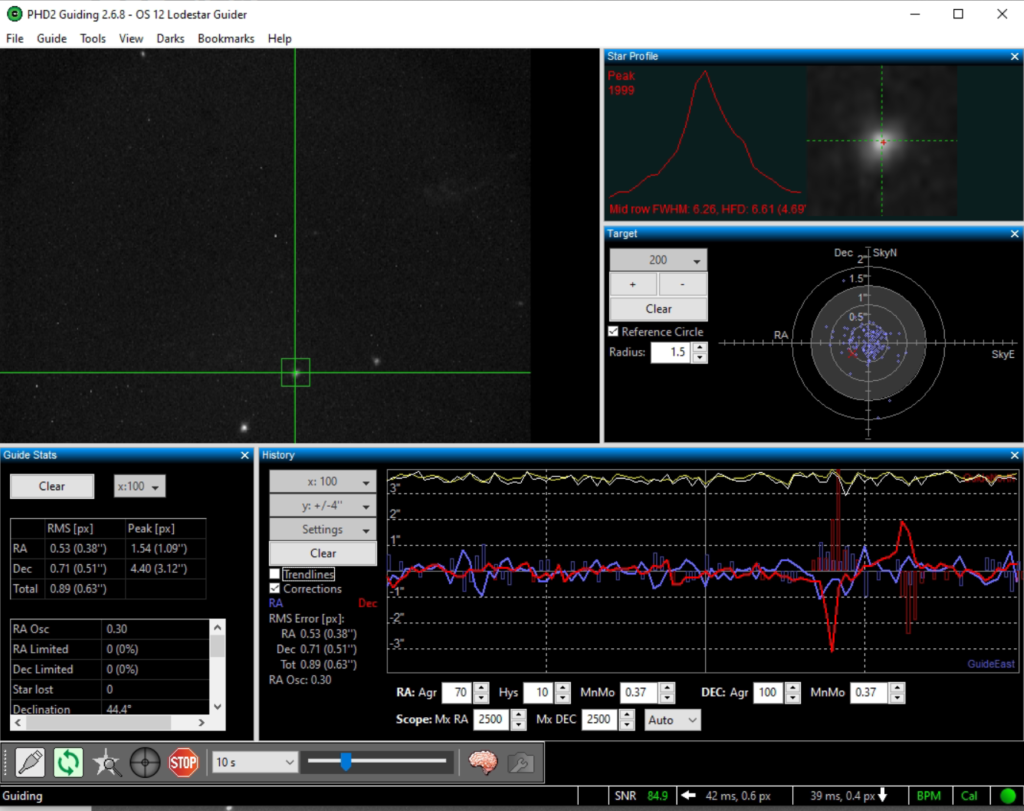
Good calibrationGood guiding after good calibration
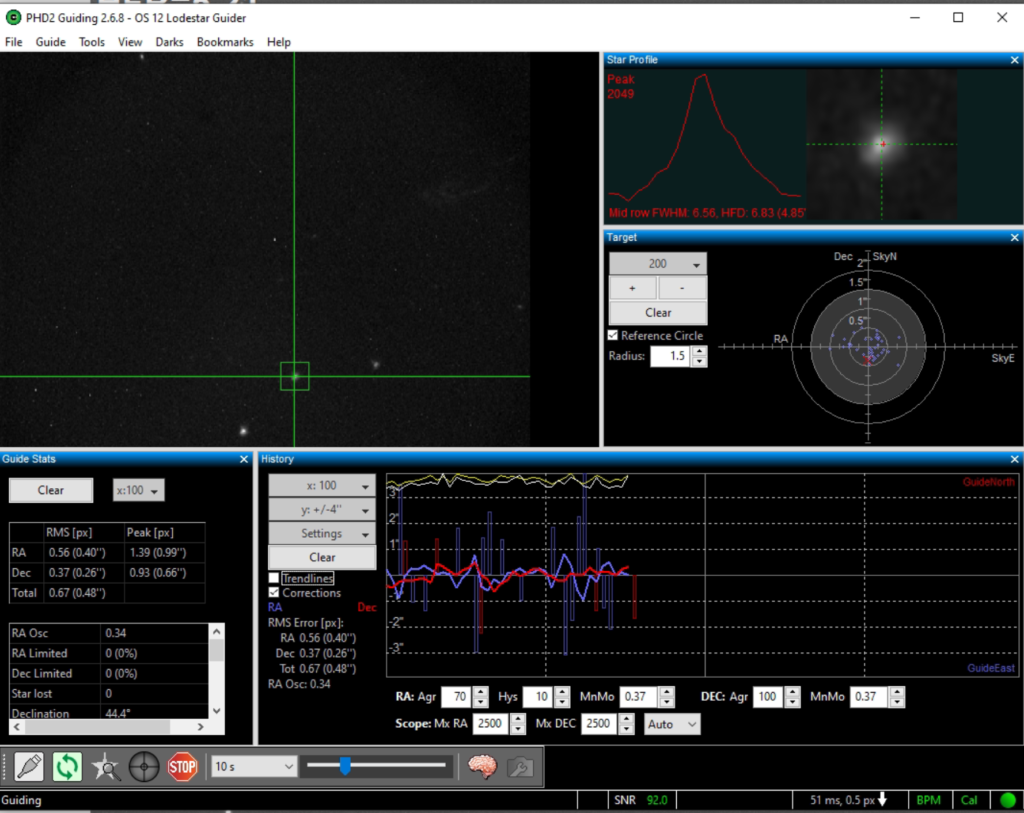
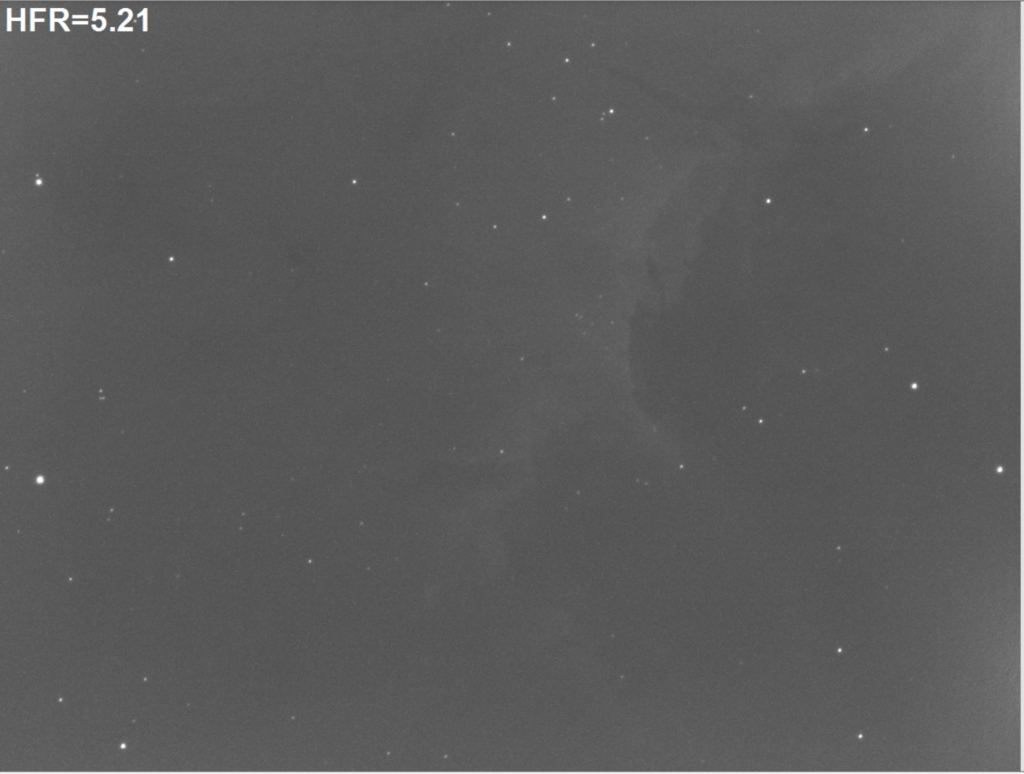
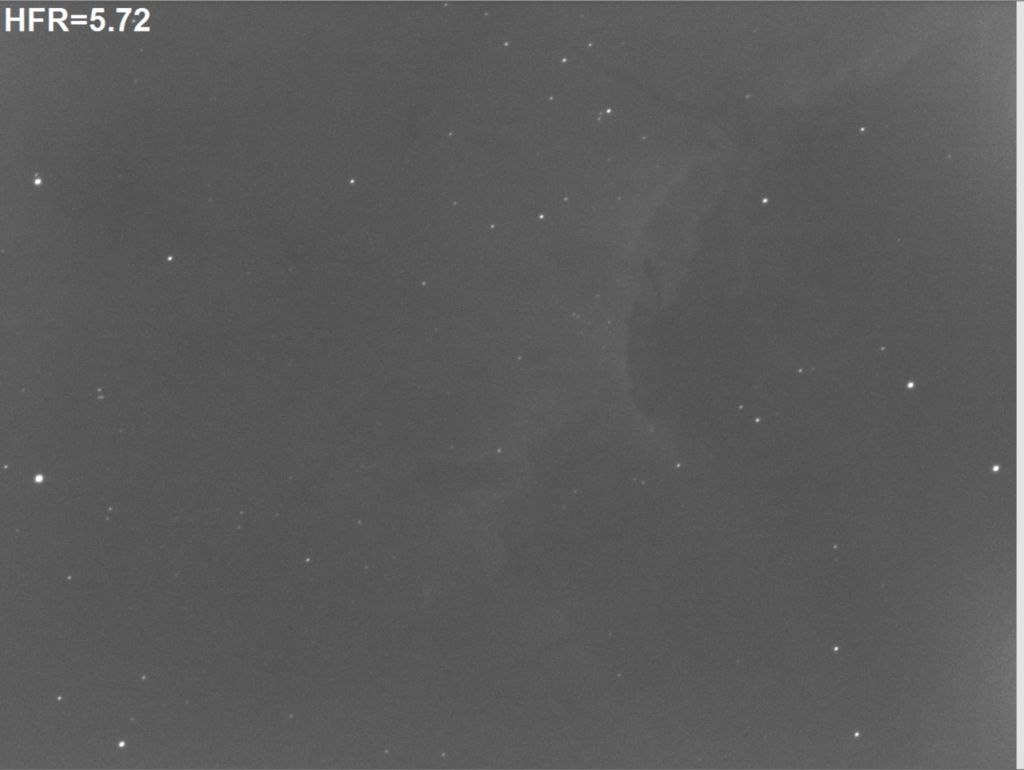
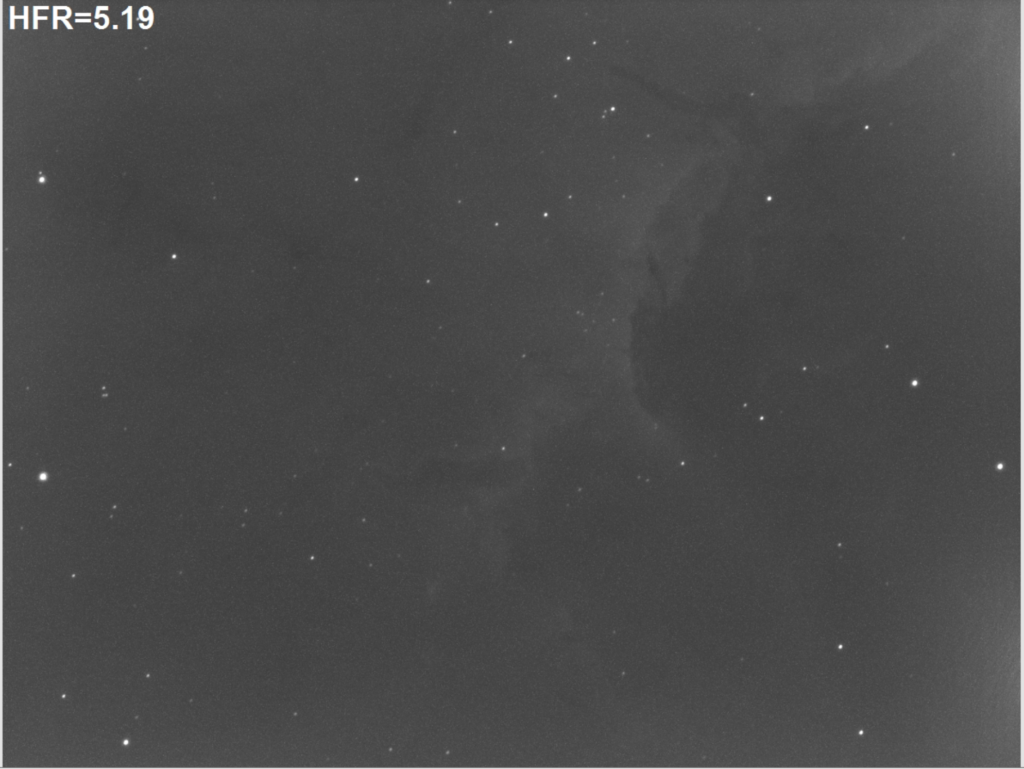
I then refocused on Lum and then switched to Ha. This is the image after 300s with a much better HFR of 5.21
Pelican 300s in focus with no trailed starsClose up of stars from 300s image
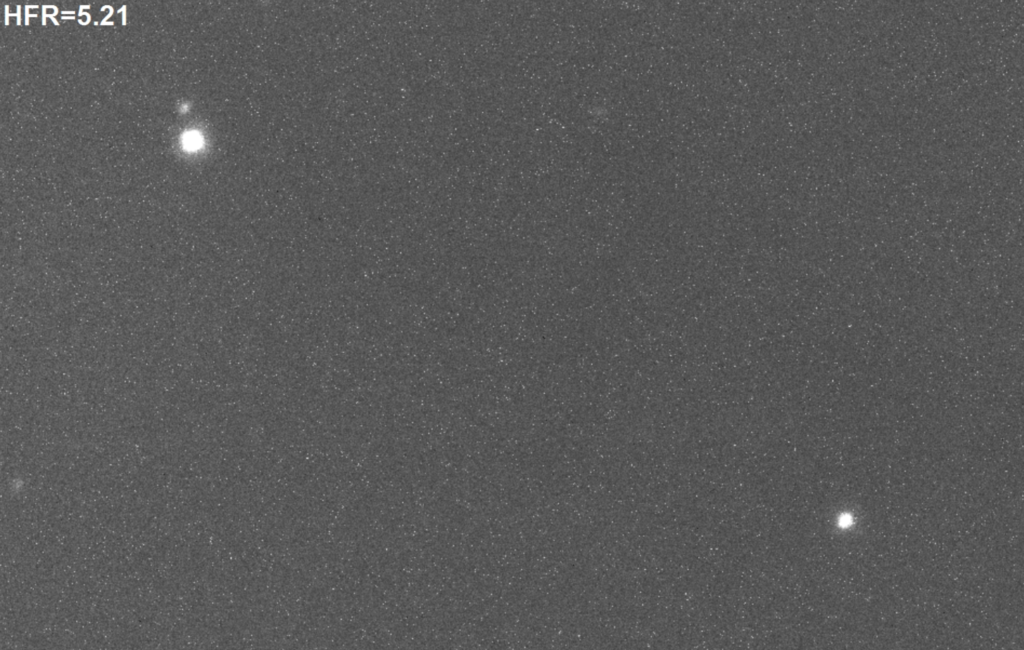
When I had a bump in the seeing (assumed) the PHD2 graph looked like this
PHD2 graph bump in seeing
the resulting image of 300s I was in the middle of looked like this :
Image effected by seeing and bump in PHD2 graph
and zoomed in you can see the problem.
Trailed stars due to that seeing bump
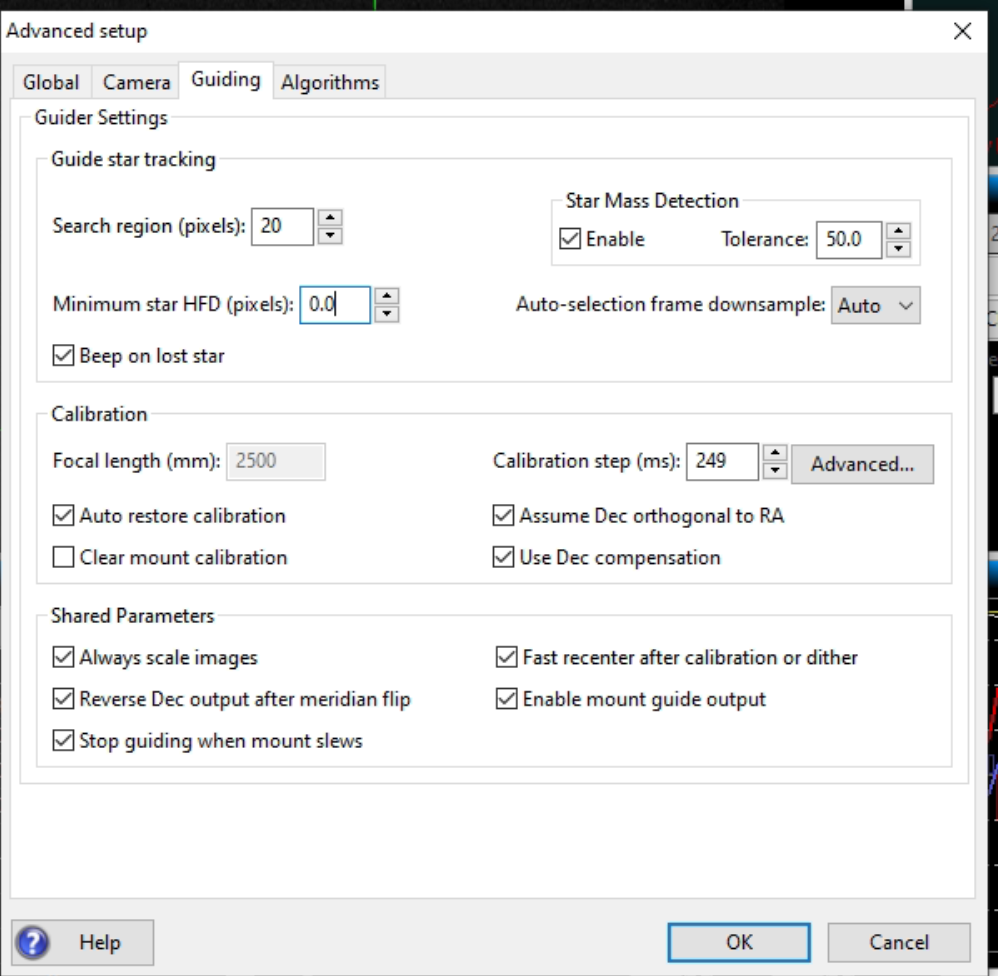
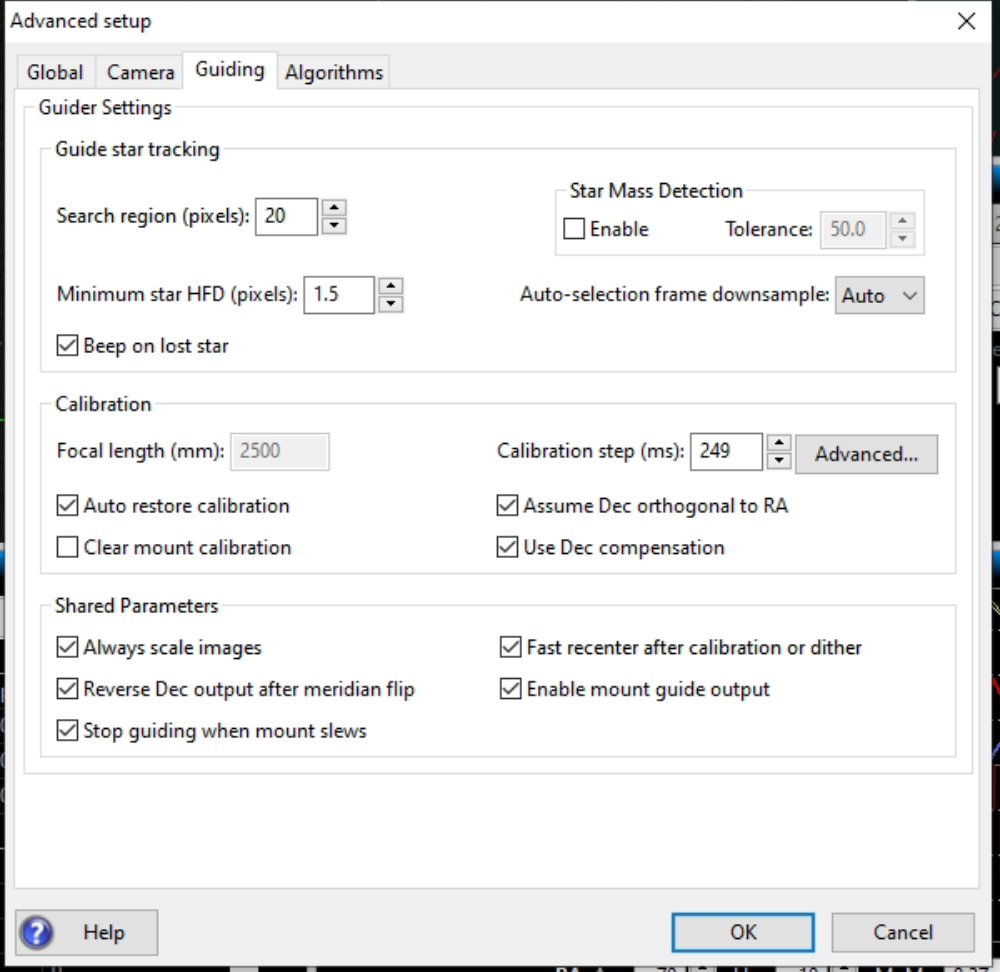
Watching Chris Woodhouse’s excellent YouTube video on PHD2 guiding he has also set the min star size to stop it picking up a hot pixel, something we have seen this evening. He has also disabled Star Mass Detection, which stops PHD restarting if it if it thinks another star has been picked even though it may not have, both of these under the brain and guiding tab.
Settings before the changeMinimum star HFD and Star Mass Detection changes
It’s now 2:51am, the sky is brightening but the seeing has settled, the mount is behaving and I am taking 600s Ha images of the Pelican Nebula without any trailing of stars. The odd spike sees a jump up to 3 arcsecs occasionally.
600s Pelican in Ha with good guidingClose up view of stars at 600s
The guiding graph below shows a really good small RMS below 1 which is key.
PHD good guiding below 1 RMS
So by 3:19am the sky is really getting bright and showing on the SQM as 18.6 and dropping fast. I have stopped guiding and imaging and will now head to bed. The final focus position for Ha was 59925 so I can grab flats tomorrow! I will then take a look at the Esprit120 tomorrow night.
Esprit 120 FHR was 1.99 for Lum and 2.54 on the Ha
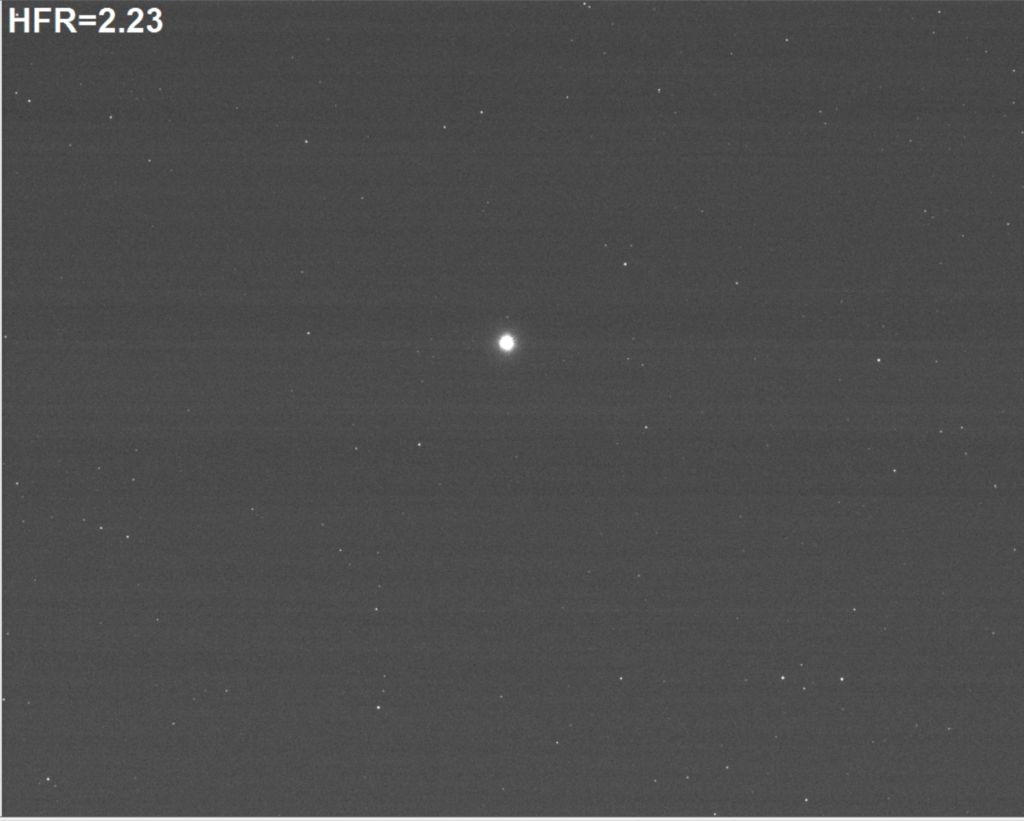
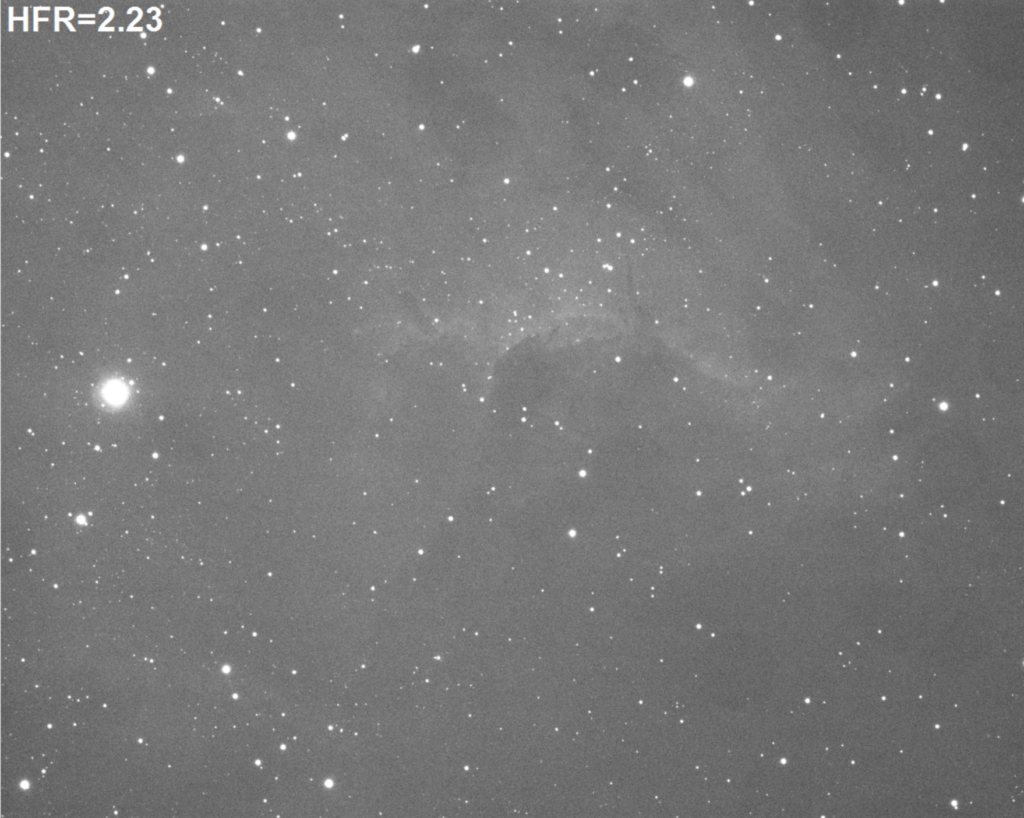
Focused on Deneb , 30 seconds exposure produced HFR 2.23
Deneb – 30 seconds in Ha
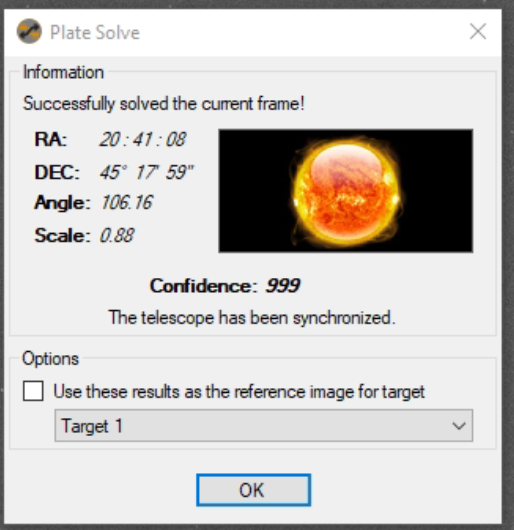
Solve and Sync
Solve and sync completed on Deneb in Ha
The focus point for Ha was 6217
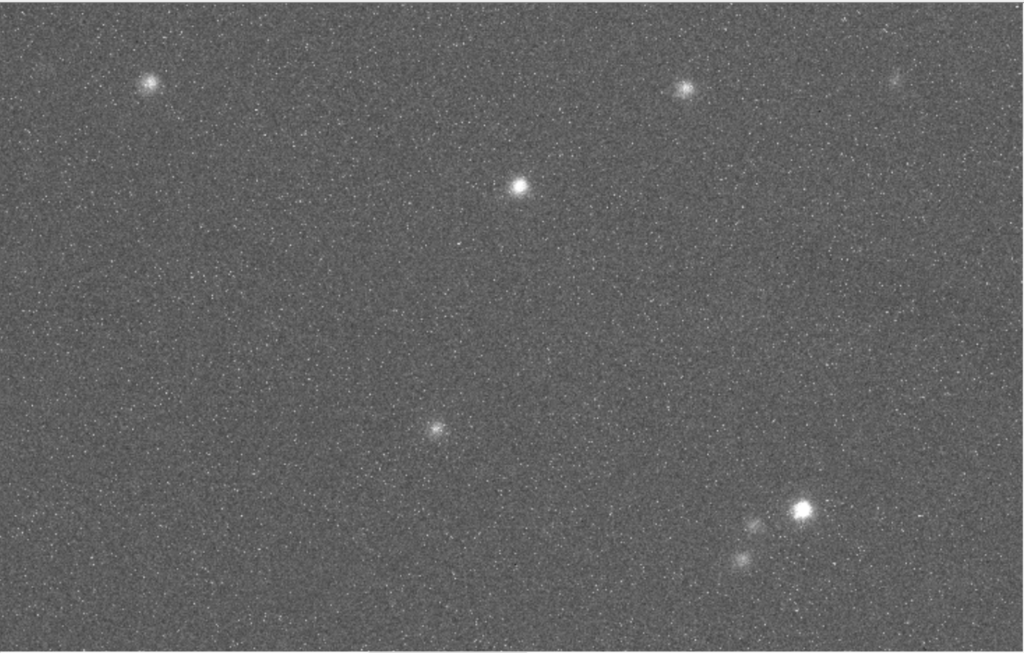
Now for a quick frame and focus, 30 seconds exposure
30 seconds Ha on Pelican as Frame and Focus test
That looked good, next up was to see if we can image for 5 minutes unguided and see what the resulting image looked like
300s Ha Pelican
Again the resulting image looked very good and no star trails
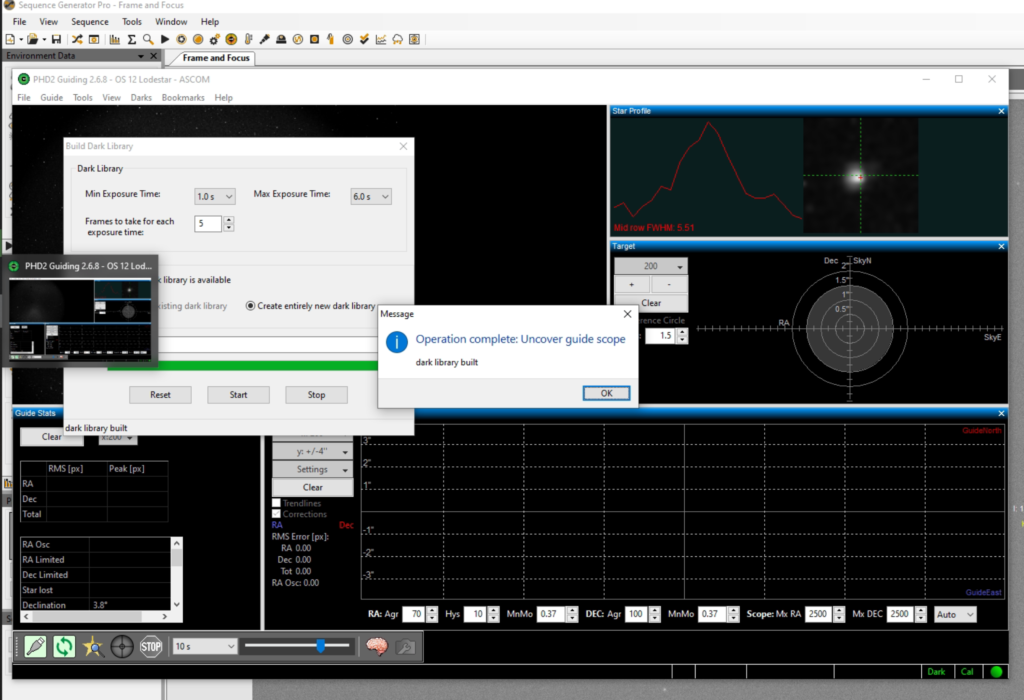
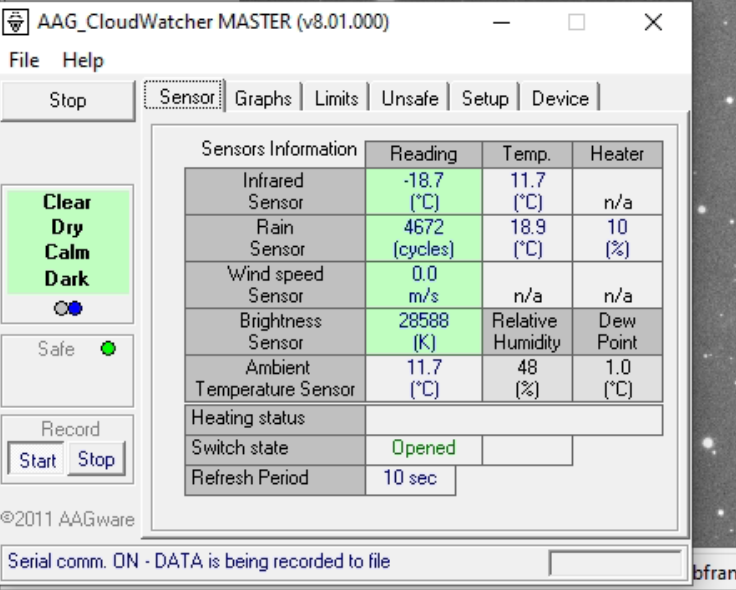
Clear skies with -18℃ measured by the Infrared sensor on the AAG Cloud-Watcher.
AAG Infrared sensor read -18c so zero clouds
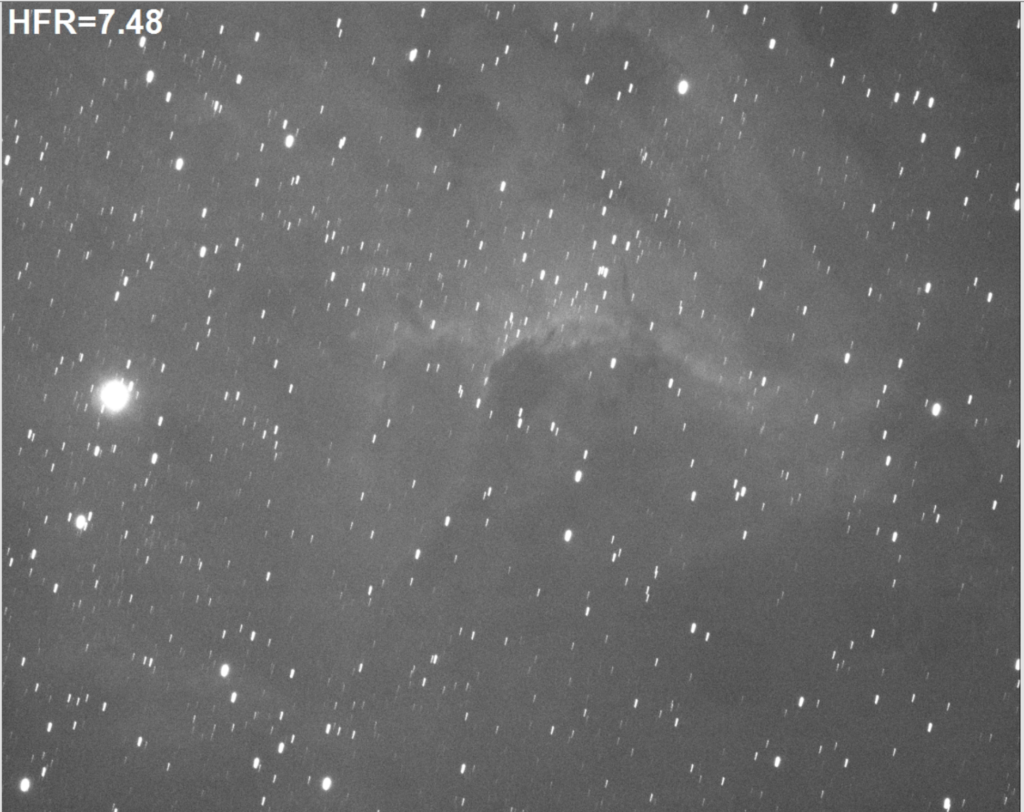
I then tried a 10min image but got clear trailing.
Star trailing at 10 minute exposure
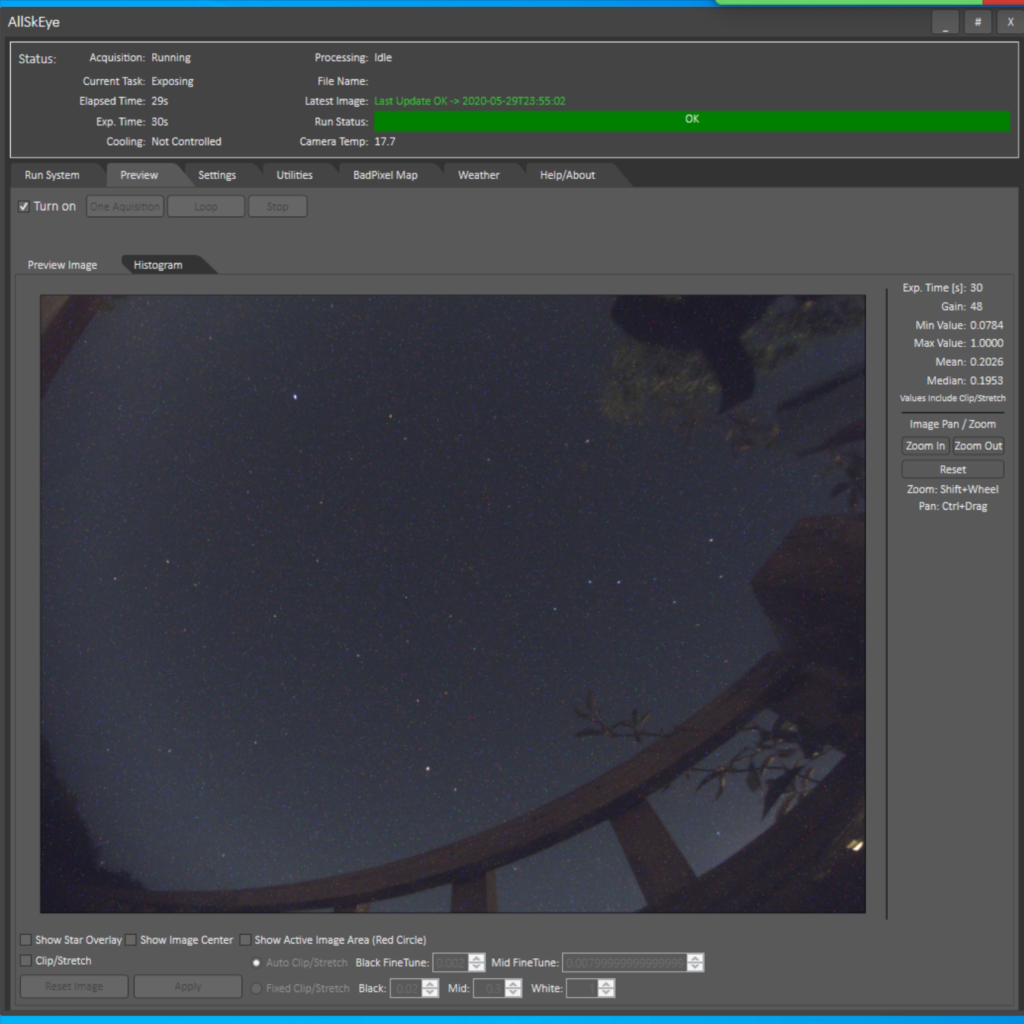
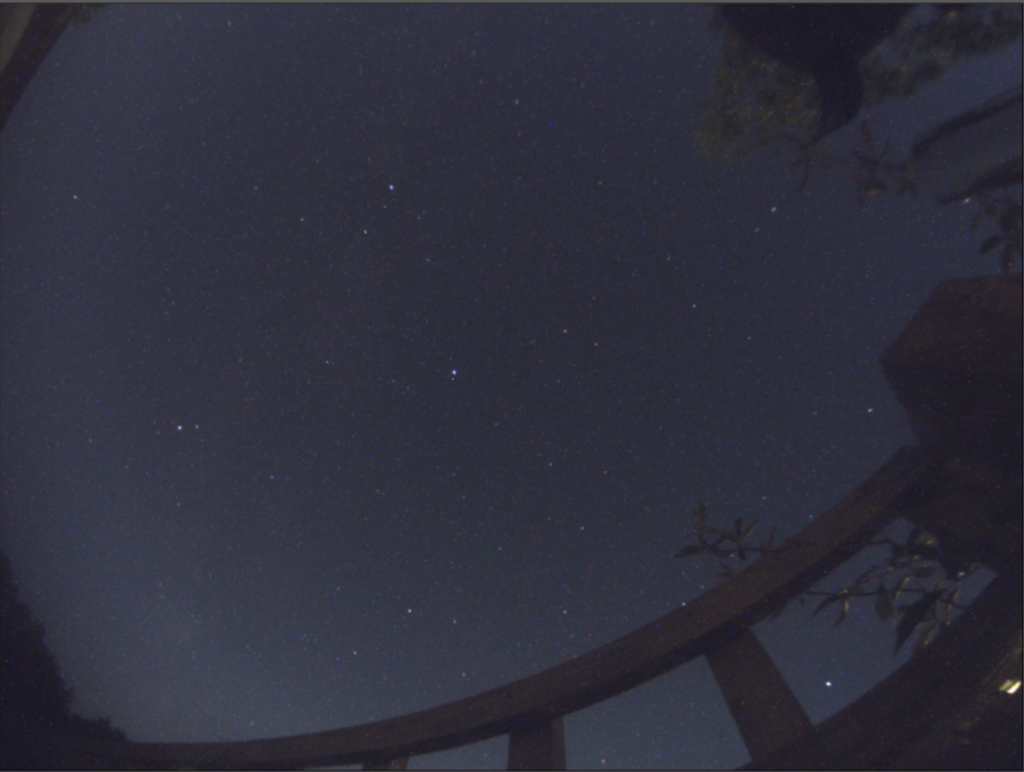
So I set the guiding up with PHD2, went out to the dome and created a dark library as this was not done. I then set about training the guider and then set it running, initially with a 4 second exposure. The resulting guide graph looked a bit bumpy. The ASC looked very clear this evening which was the first time in a while. You could see stars to the left hand edge of the image which is normally obscured by cloud.
ASC Clear skies
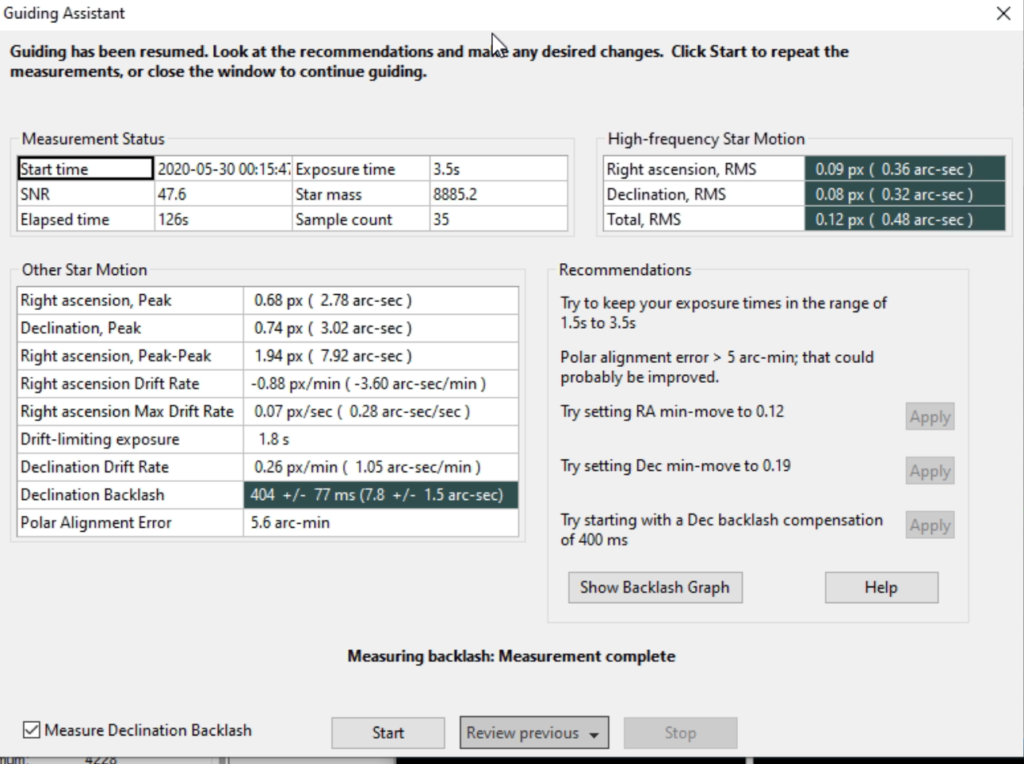
We decided to run the guiding assistant in PHD2 and see if there were any changes that needed to be made. It came up with some suggestions including redoing the calibration and changing the calibration step size from 1600 to allow more steps in the calibration, in this case I changed to 1200 to try and go from 3 steps per axis to 8, however I got to 6 steps and this seemed good enough. When I then reran the guiding assistant I no long got the error about calibration. I did have a few suggestions as seen below which I applied.
Guiding Assistant recommendations
So the changes made still have not allowed 10mins images, they are still trailed. So that I do not waste any further time this evening I captured 5 minute images instead of 10 minutes and I will relook at the guiding next week when the Moon get brigheter.
At 1:38 we gave up on guiding and switched to 12″, Autofocus on Lum, 63384 HFR 5.4. Took some 5 minute and a single 10 minute frame guided, scope trailing ?
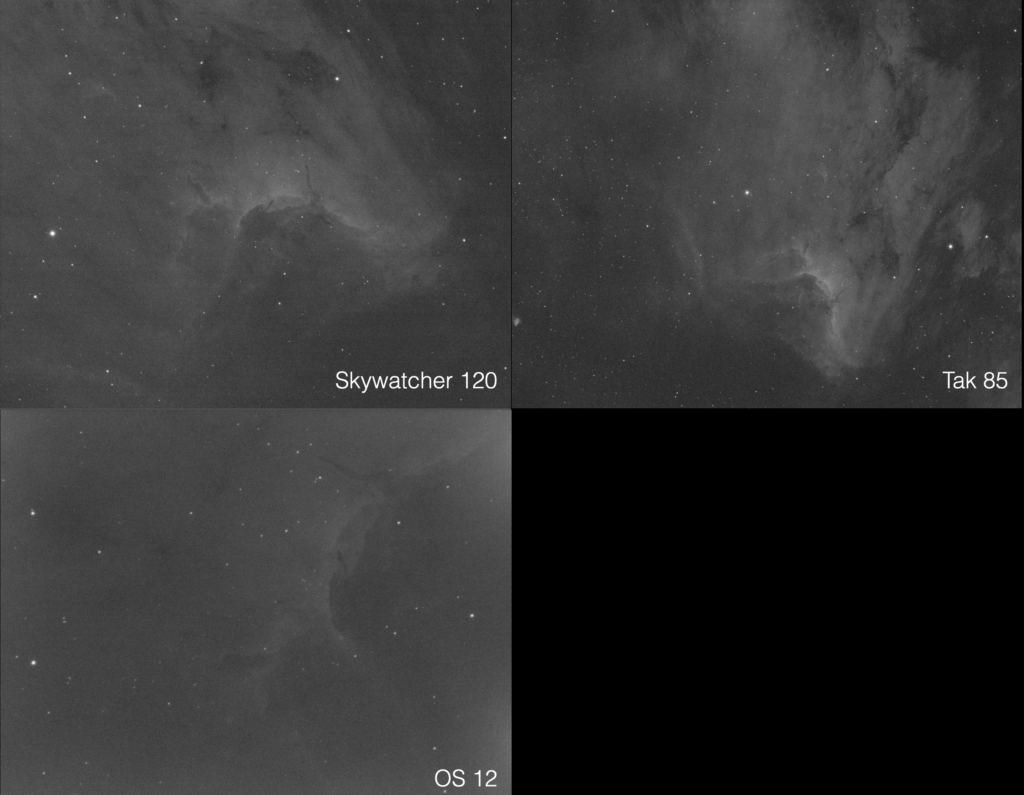
There were three scopes on the Pelican Nebula (IC5070/IC5067) tonight as GingerGeek was imaging with the Tak FSQ85 from his back garden.
3 Different image scales from tonight
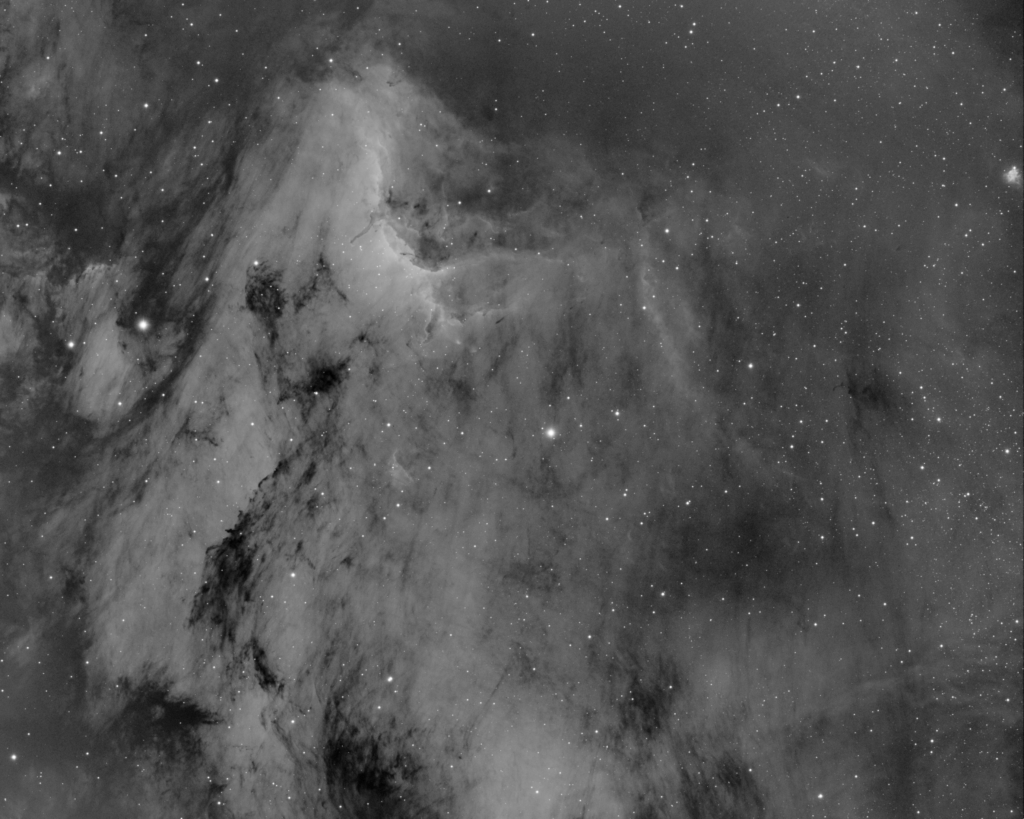
Finished to go to bed at 2:56 am, GingerGeek finished the session by taking flats, warming up the CCD and bringing the scope indoors just after 3am.
Rough stack of Ha (5nm) 10×600 seconds, -15℃ From the FSQ85
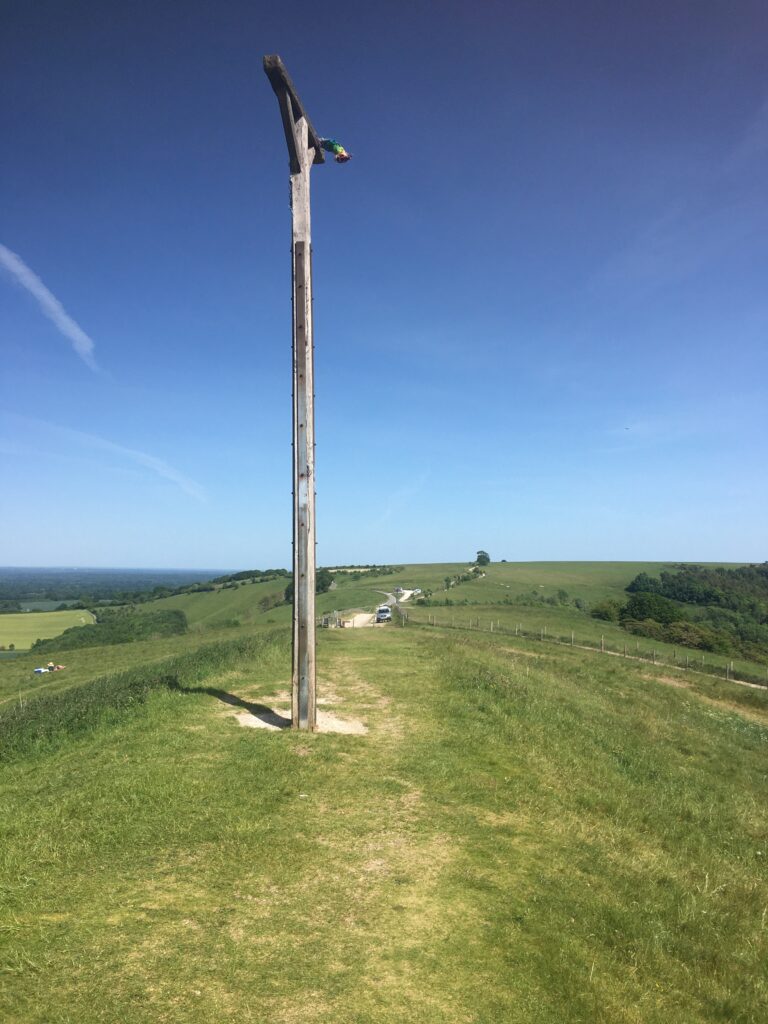
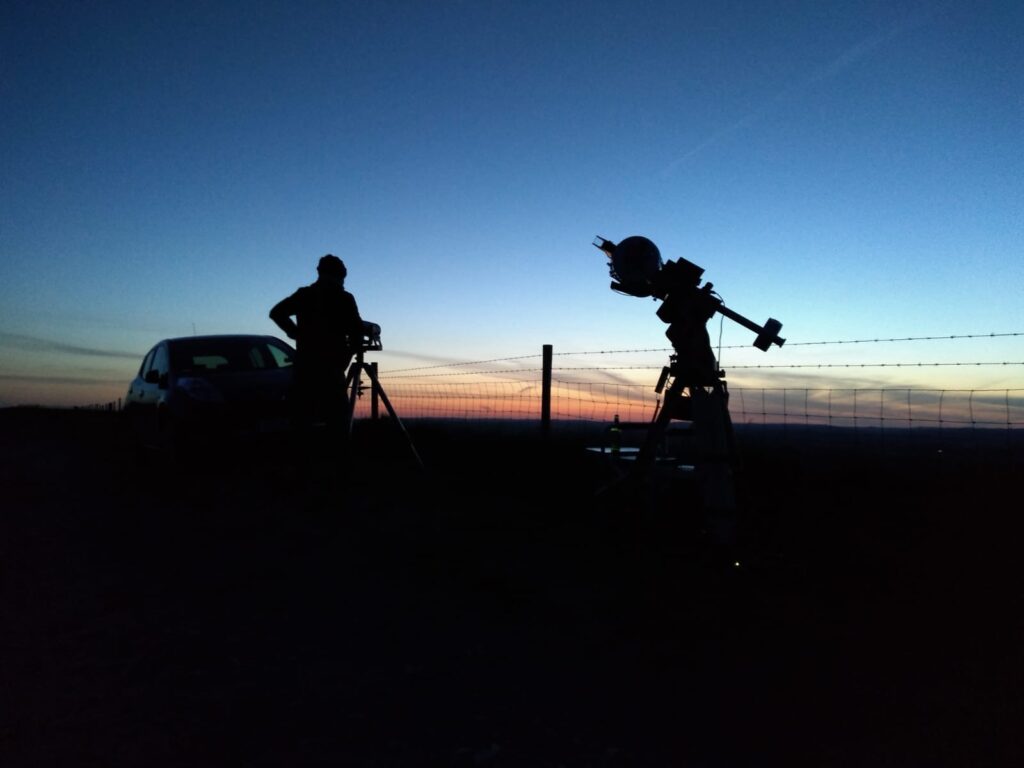
Another visit to Combe Gibbet tonight with another astronomer, GingerGeek. After forcing him to leave the comfort and safety of his own home, where his girlfriend gives him tea, coffee and beer and with the luxury of mains electricity, he joined me at the very dark, very blustery sight near 1,000 ft up in the North Downs of Berkshire, formally Hampshire, they moved the line!
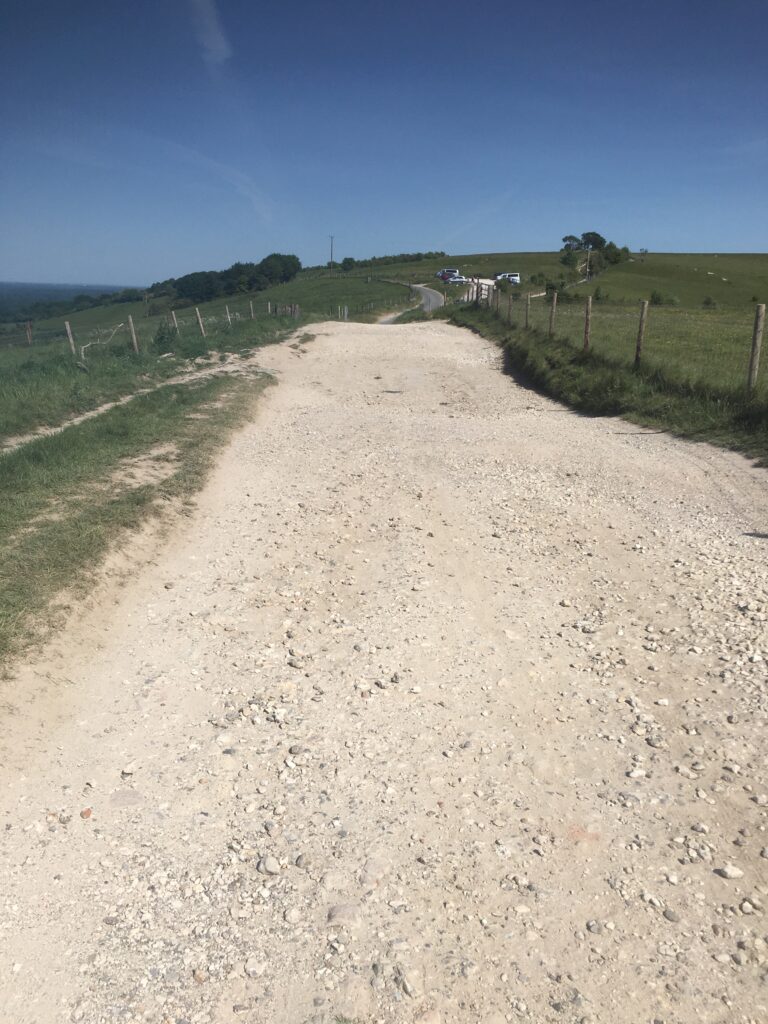
We left at 7:30pm and after the 50min trip arrived at the long road up to and past the Gibbet, which is really not much of a road at all.
Not a road, looking down the bottom part of the track
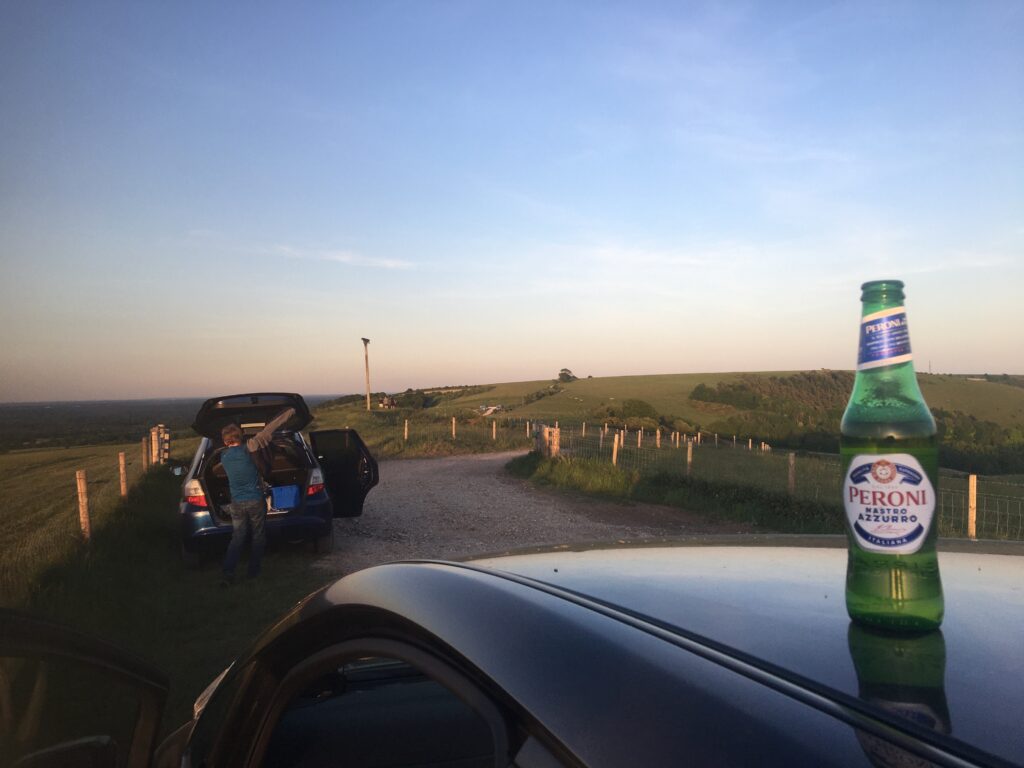
We drove carefully to the top, both parked our cars and set about setting up for the evening. GingerGeek had his Tak FSQ85 on his CEM 60 iOptron mount whilst I setup my usual array of large 4″ binoculars and at first the Mak 180 on the Paramount MyT. Later I would swap to the Esprit 120ED. To celebrate the outing, little geek had brought some beer 🙂
Beer O’Clock!
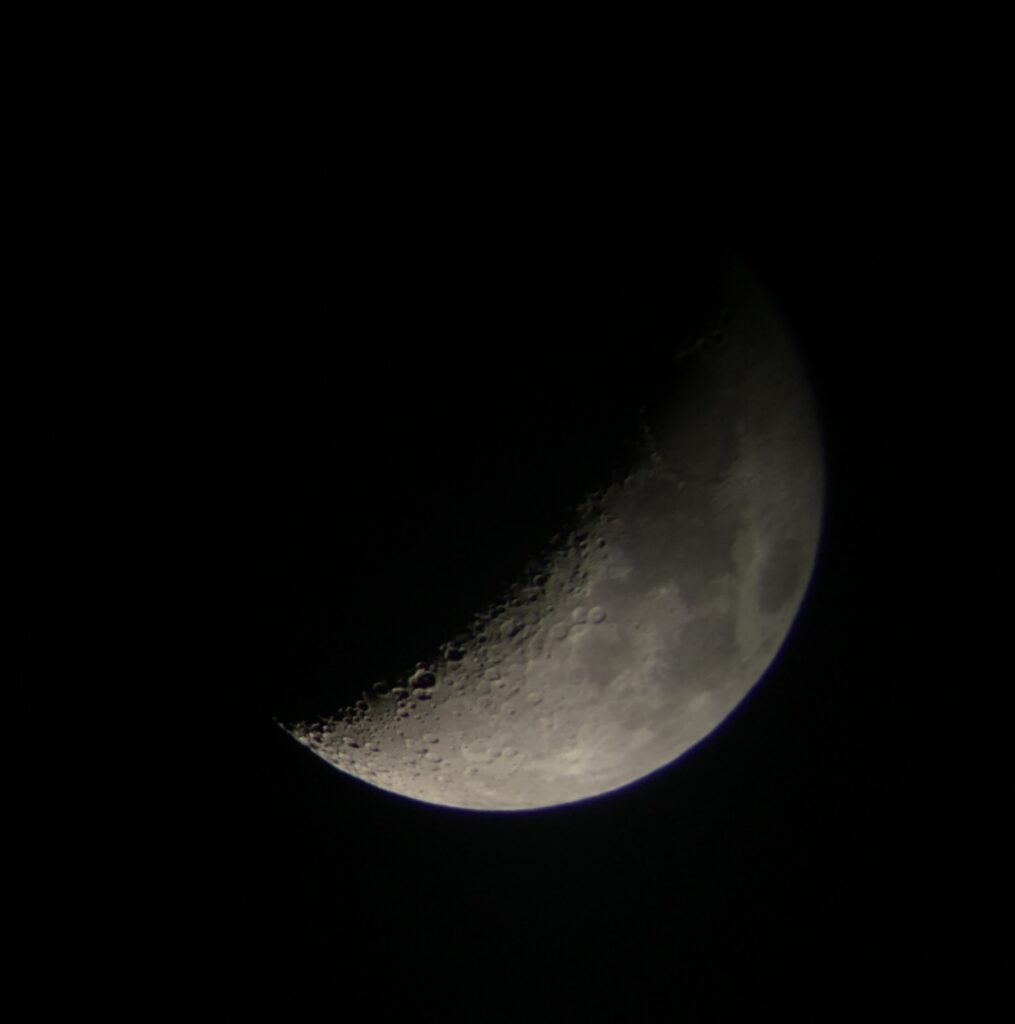
The Sun soon started to set, the day trippers hung around to watch the sunset and then were gone. I started looking at the Moon through the Altair Astro binoculars which is just a wonderful sight. A Camera cannot capture the experience of seeing the Moon with its Earthshine and in full as the FoV is 1 degree in the binoculars was a wonderful framing.
Moon through binos taken afocal with iPhone 6sPlus
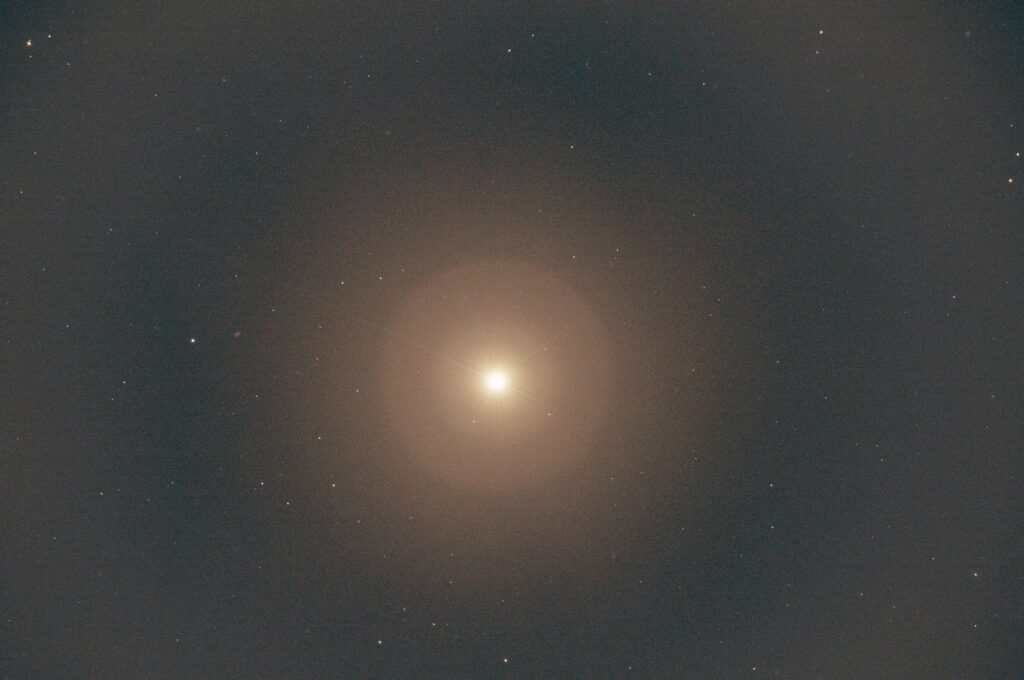
Next up was Venus before it sets, it is amazing just how bright it still is given its phase. I found in the binoculars eventually as it was hidden behind that cloud band in the distance. I then tried to get it in the Mak180, when a few new things happened. Firstly I could not slew to it as I had yet to polar align, so I had to place the scope in the right place. At the focal length of the Mak180, some 2.7m it is difficult to find something faint behind cloud just by pointing. I eventually gave up. I then noticed my laptop power had diminished by nearly 30% over about 20-25 minutes, this was due to Firecapture just hogging the USB bus capturing 100’s fps. So I was going to start the night short on juice! So I turned Firecapture off whilst I went to find Mercury in the binoculars.
Venus through 4″ binos taken afocal with iPhone 6sPlus
Mercury was a challenge, so much so I could not find it, I put that down to that not well placed cloud band. Meanwhile I pointed the Mak180 at the Moon to have a look, but by the time I had finished I the laptop was done to 53% !!!! Not so good.
So it was time to chat to GingerGeek (GG) before I put the Esprit 120 on the mount. GG was having lots of problems setting up. Firstly he had swapped the rings on the mount for the Tak that day and was struggling to balance the scope. It was so bad the scope kept dropping nose first then camera first and then either way depending on its orientation. Eventually, after much cursing, actually a lot of cursing, GG settled for the imbalance and continued to setup, unfortunately not before he knocked his beer over in his boot of the car ? fortunately I did not laugh too much ??
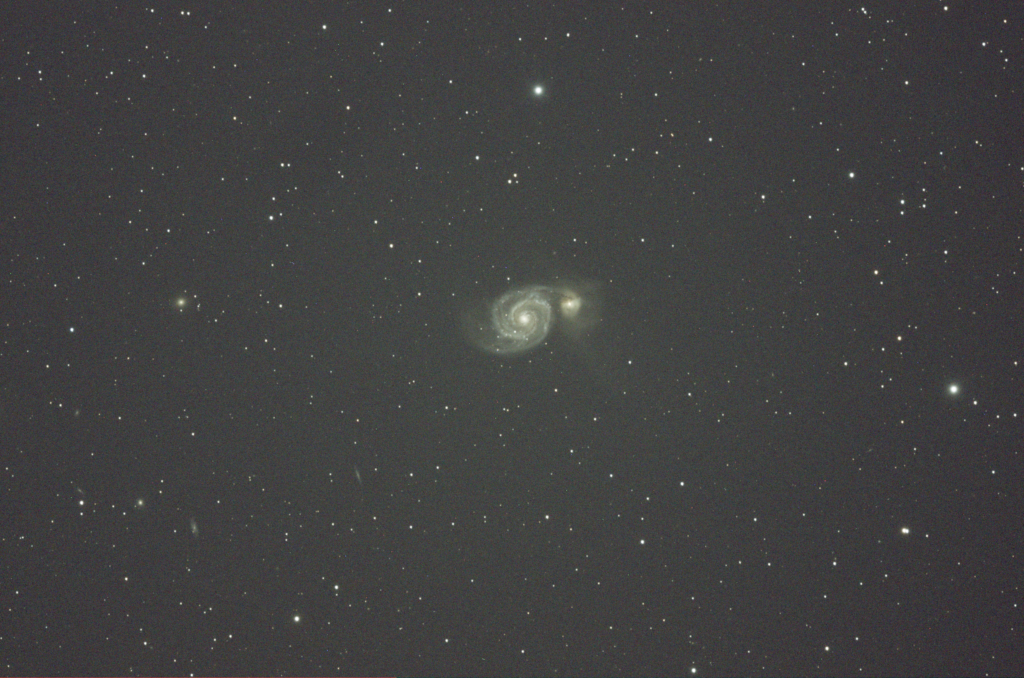
I went back to my setup, placed the Esprit on the mount and then set about getting focus with Ezcap, the software that comes with the ZWO camera. I do find the software very straight forwards and does what it says on the tin as it were. I then slewed to one of the open clusters I wanted to image and realised it resided in the North and that the twilight was still very much apparent so not suitable for imaging. Instead I settled for M51 high up as to the West was the Moon.
M51 300s Image uncalibrated
It is a lovely image at 5 minutes, I could see instantly at least 4 other galaxies and the colour of the main Messier galaxy was very pleasing. I look forward to processing the resulting subs. I set the timer for 1 hour (12x300secs) and went back off for veggie soup, cheese rolls, brownies and coffee that GG had kindly brought along.
crop of uncalibrated 300s M51
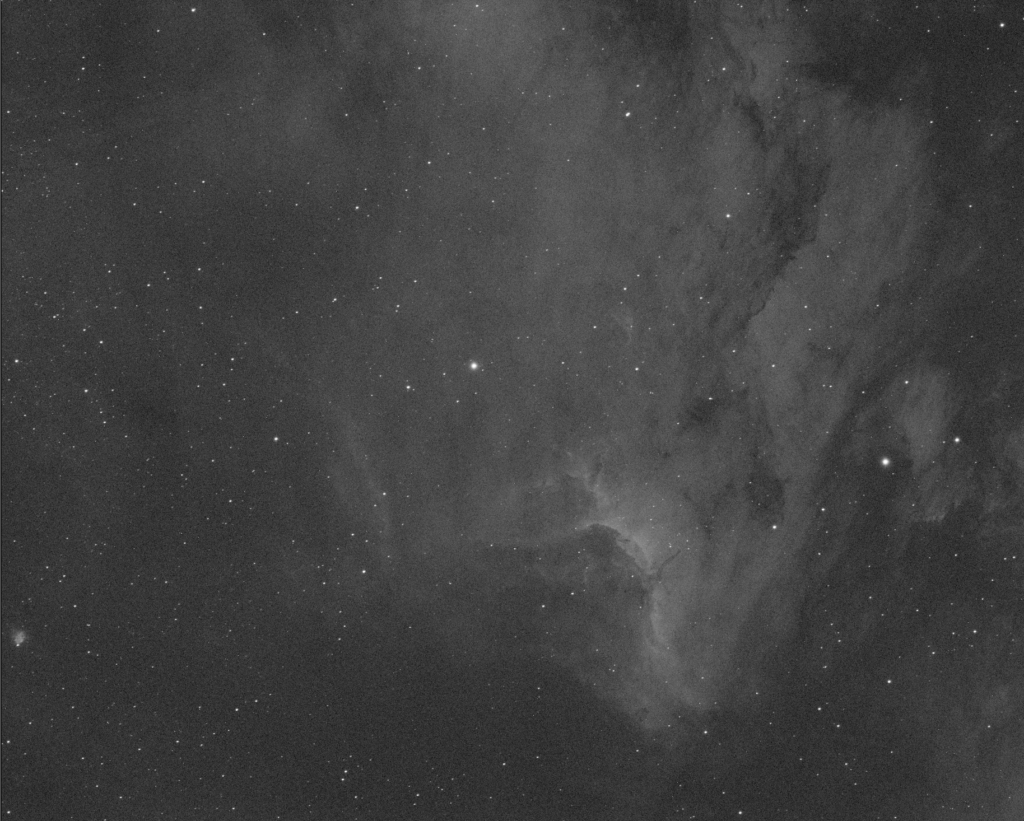
GG at this point was having issues focusing for his 5 minutes shot of the Pelican in Ha, he had made some other changes to the software before heading up the hill too which was confounding him. After some more time he finally had focus and started to image. However whilst a few of the images were okay, the resulting imbalance and gusts of wind made it difficult to keep pin sharp images. It should also be notes at this point that GG and I were running from the same car battery, although GG was only running the camera from it, the mount was running from his Lithium battery.
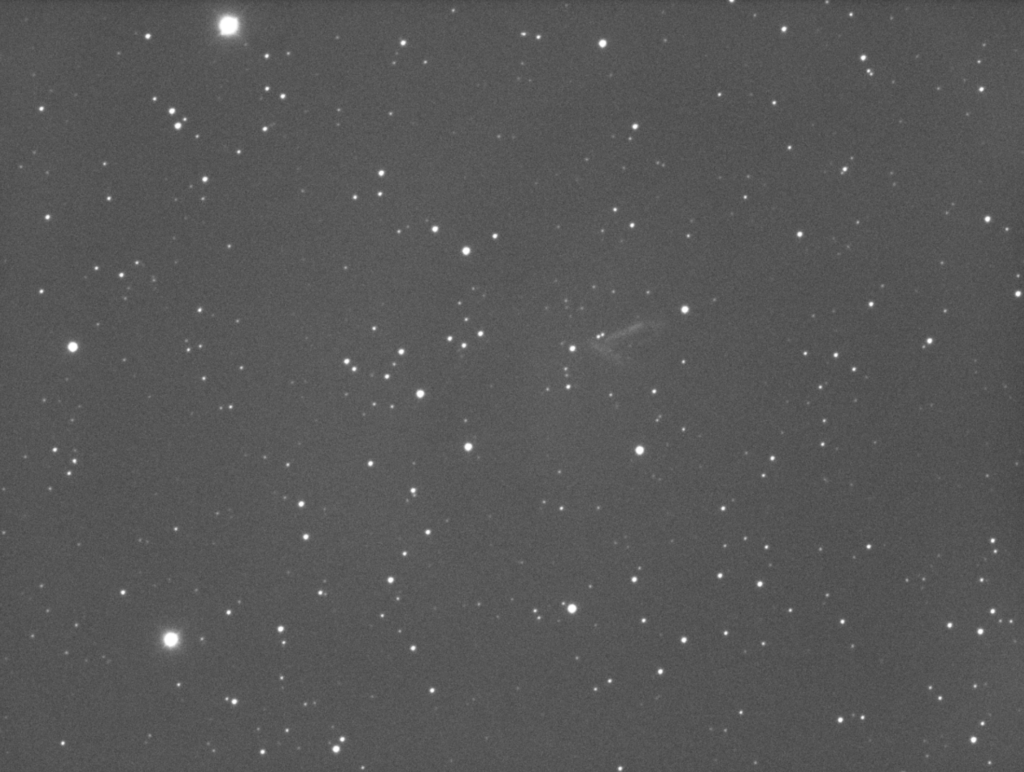
Stunning Pelican Nebula – 300s Ha uncalibrated
At just before 1am the inverter connected to the spare car battery turned off due to loading and power. Everything stopped for both of us ??? however GGs mount kept running due to the Lithium battery. I closed down my setup and allowed GG to reset his camera and reconnect, he then went on to start imaging, however the resulting image had moved significantly and GG decided to give up. So we spend the next 40 minutes packing up. Whilst this was going on we looked at Saturn and Jupiter through the binoculars which was a wonderful sight. Now for the 50 minute drive home to unload the car just before dawn, although by 2am it was clearly getting lighter.
Guiding graph on Esprit 120 Paramount MyT last night, all over the place with wind
The SQM for the site last night was 20.91 although the Moon was very bright. The site is also very dusty, and my laptop was covered in the morning. Another incident was that I inadvertently unscrewed the cover from the guider as I transferred from one scope to another and the glass cover fell out, I now have dust and dirt on the sensor to clean. It is not a great design by ZWO for the ASI290MC as it really needs a locking grub screw to top that happening or a reverse thread.
Herbig-Haro object at the end of the long feature can just be seen.
GGs image has set us on a little project to image the HH 555 bipolar jet at the end of the major turn of gas in the Pelican Nebula. We will attempt over the next few nights to get an image from both the Esprit 120 ED Pro from the IMT3 dome in Ha and also from the OS 12″ to see what it looks like compared to the Tak FSQ85. Another good social distancing astronomy session ? goodnight.
I thought I ought to document this so that I remember this is now the new normal for making a flat master for my CMOS camera, the ZWO ASI1600MM. The problem I found again after not processing images for some time, was that the normal way of processing without Flat Darks produces a master flat with embossed, so raised doughnuts across the image.
Batchpreprocessing – > Darks tab -> Optimization Threshold -> move from 3 to 10 – > this removes the dark entirely and also removes the amp glow but introduces loads of noise so clearly not right at all. So I contacted my friend Dave Boddington who is a bit of an expert on this topic and he gave me some good advice that has of course worked.
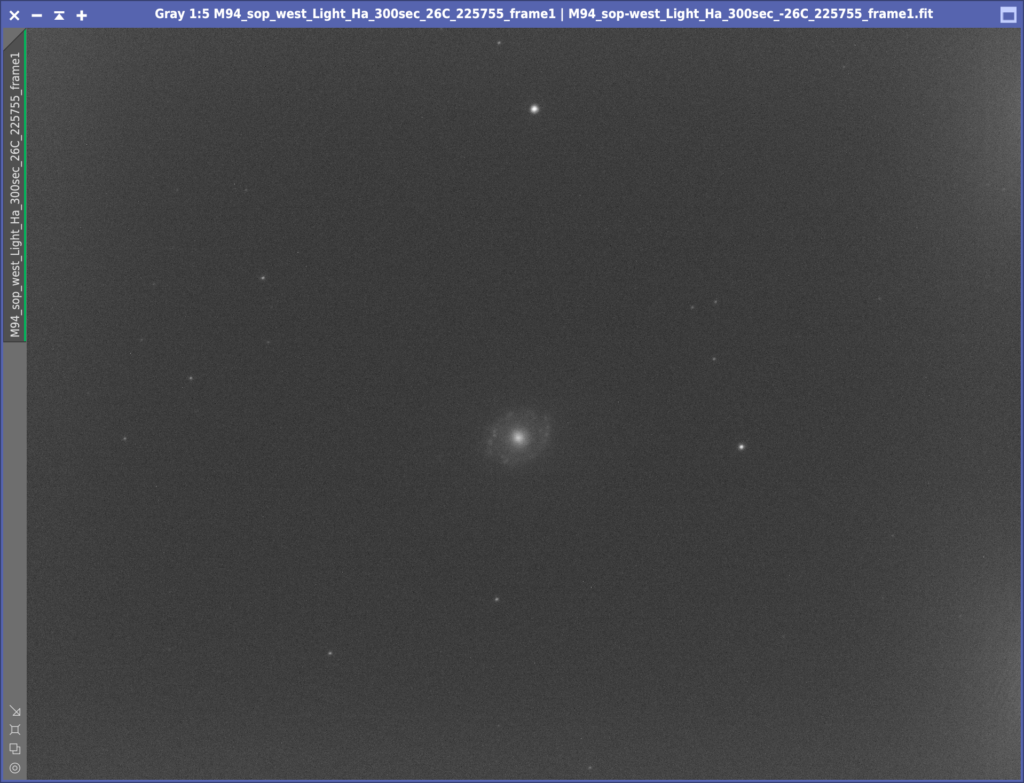
So first let’s detail what I am calibrating. On the 20th April 2020 I took a set go Ha frames of M84, these were 300s exposure and with a Gain of 193 and I believe an Offset of 21, however we had some changes over the previous week so driver the Offset is no longer stored in the FITS header. It was when we were using the ZWO native driver. The temperature of the cooler was set to -26℃. I have 8 of these frames.
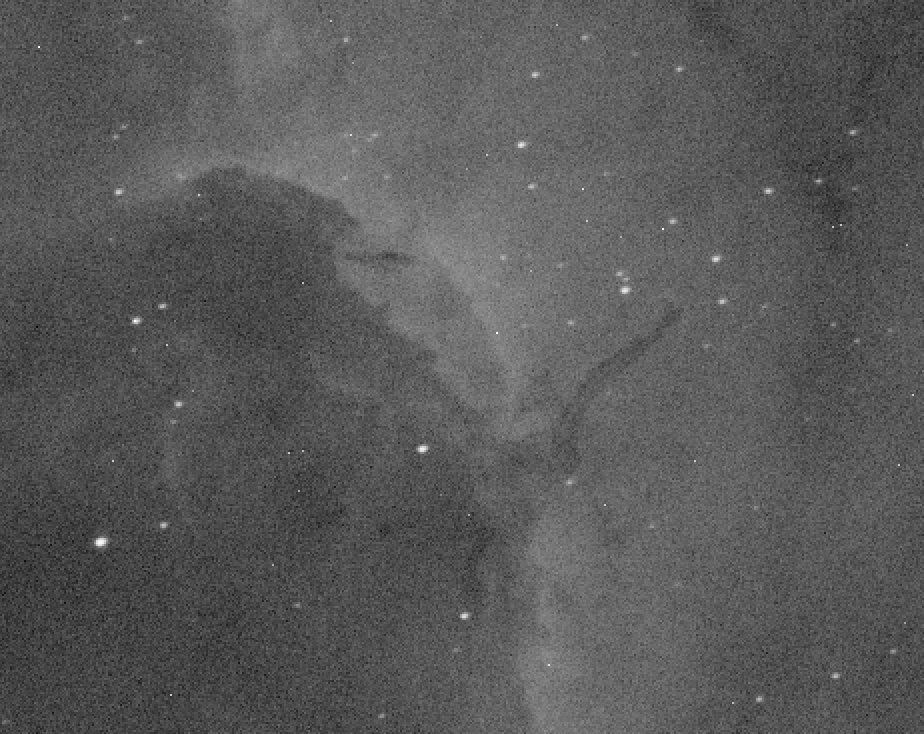
M94 300s light
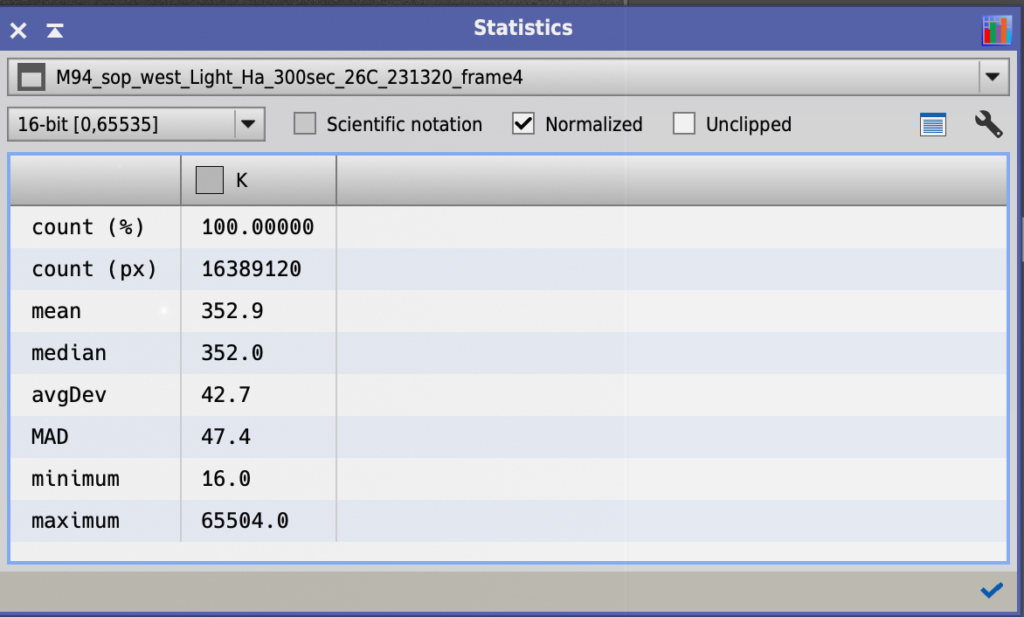
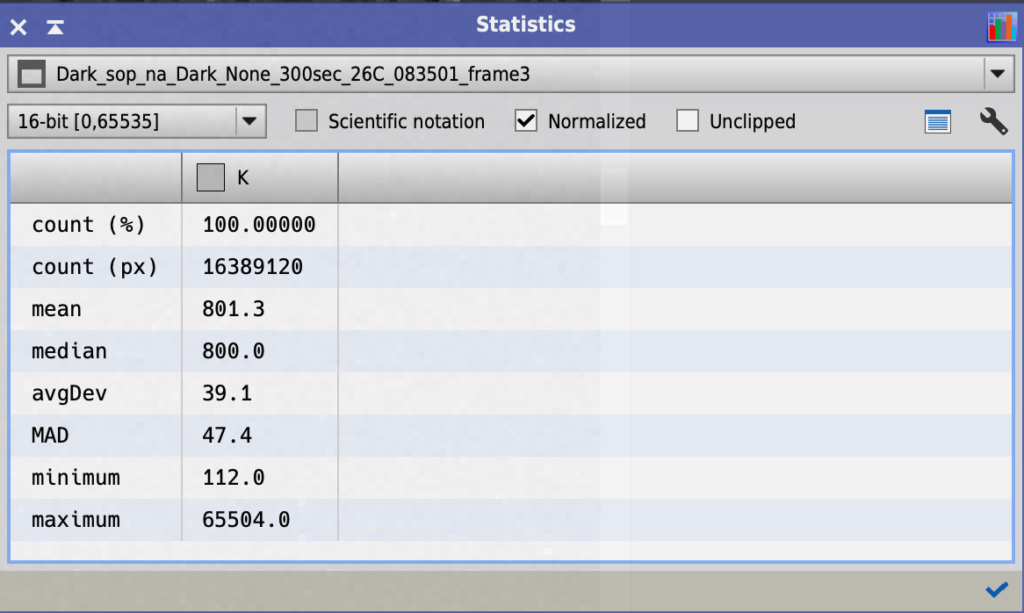
I also have a set of 10 darks at the same settings. However when using the Statistics tool Dave noticed the Mean of the image was 800 and the Mean of the Ha frame was 353. This is in a 16 bit notation. The camera however is a 12 bit camera and this means the Mean for the dark is 50 and the Mean for the Ha is 22, so a difference of 28 in 12 bit and 447 in 16 bit. I will come back to this later.
Mean of Ha 300s lightMean of Dark 300s
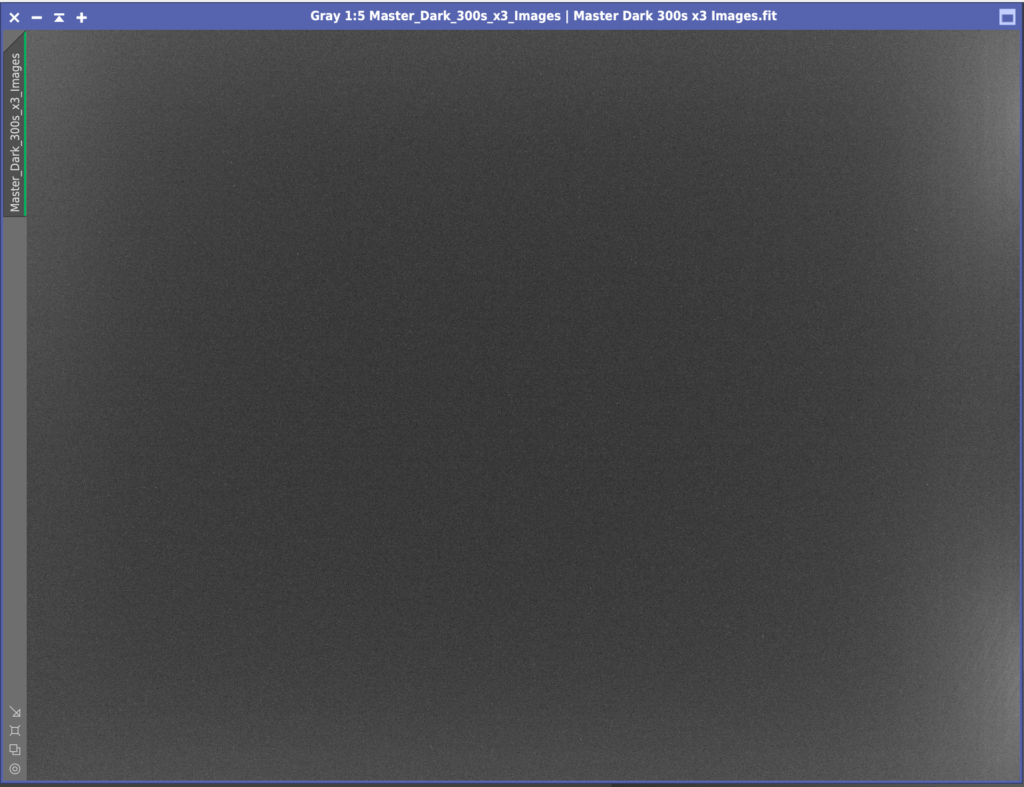
First I created a Master Dark for the Ha frames using the normal ImageIntegration settings. I did not calibrate darks with Bias as you do not need bias with a CMOS cooled camera. Next I created a Master Flat Dark for the Flat frames using the same ImageIntegration settings.
Single 300s Dark with hot pixels and amp glow
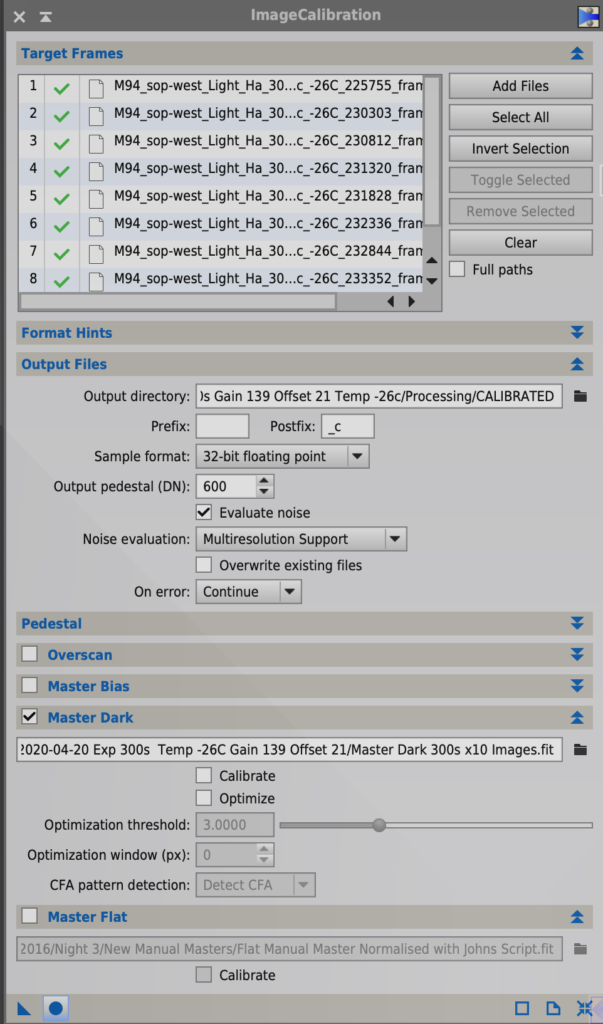
Then I found the Ha images did not need to have the flats applied so I skipped that step for the narrowband images. Next I Calibrated the Ha lights with ImageCalibration and because of that discrepancy above which looks like it was induced by having the Offset for the darks set to 12 and the Offset for the lights set to 21 I added 600 as suggested by Dave Boddington to the Output Pedestal in the Output files section of ImageCalibration. I made sure Evaluate Noise was ticked and that both Calibrate and Optimise were unticked in the Master Dark section. Master Bias was unticked and so was Master Flat for the narrow band images as mentioned.
Calibrating Ha lights with Master Dark
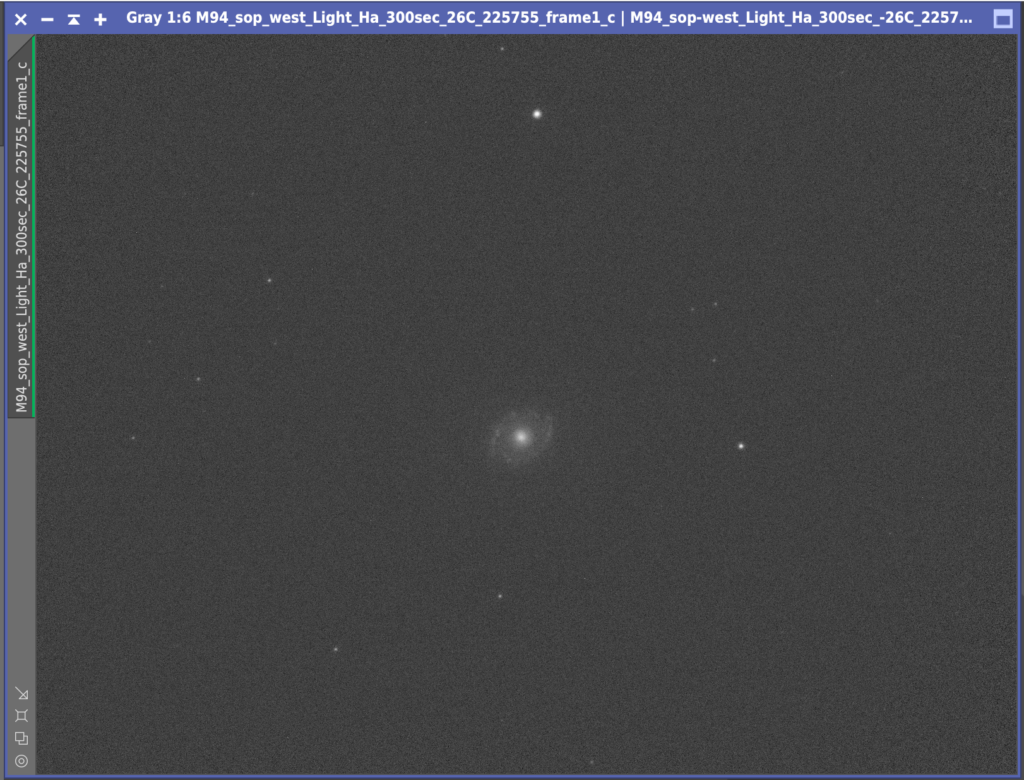
This created a clean set of calibrated Ha lights that did not require flats to be applied.
Calibrated 300s Ha light with Master Dark
Next I had some issues in Star Aligning the frames. The error I received was ‘Unable to find an initial set of putative star pair matches’, due to the frames being very sparsely filled with stars and the background being quite light compared to the stars. A quick look on the PI forum showed increasing the Noise Reduction in the Star Detection section from 0 to 4 sorted the issue, with all but 1 frame being aligned. I was then down to 7 x 300s Ha lights. The final frame was very light due to cloud.
7 x 300s Ha Calibrated with Darks, Aligned and stacked
I then integrated these 7 frames together. I had a challenge with trying to get the hot pixels in a few areas to disappear using Cosmetic Correction and pixel rejection during stacking so I will remove these after by hand before combining into the larger set
hot pixels not removed
So in essence what I have learnt is that I need to have really clean filters and camera glass. That all the doughnuts are on the those surfaces and not anywhere else. That the flats must be between 22k and 26k for the CMOS cameras, although this has some tolerance either way. That I need to set the camera to the right Gain, Offset and Temp as the lights and that I need the right flats for the right lights!