
Getting Started with Node-RED
https://nodered.org/docs/getting-started/ is as good as anywhere to get started. There are also plenty of YouTube clips to watch, so I won’t repeat too much here.
I chose to run Node-RED locally on my Windows 10 laptop so my first step was to download and install a supported prerequisite version of Node.js which will also include npm (Node Package Manager).
npm is the worlds largest Software Registry containing over 800,000 code packages. It is free to use and Open-source developers use npm to share their software.
npm includes a CLI (Command Line Client) that we will use to download and install software.
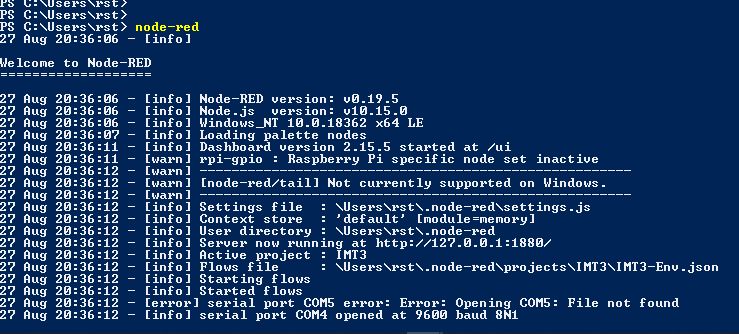
Having installed Node.js open Windows PowerShell to execute the npm cli command to install Node-RED
npm install -g --unsafe-perm node-red
The command installs Node-RED as a global module along with its dependencies.
Once installed as a global module we can use the node-red command to start Node-RED in a terminal. Ctrl-C or closing the terminal window will stop Node-RED.
You can then access the Node-RED editor by pointing your browser at http://localhost:1880/
To access the Node-RED Dashboard point your browser at http://localhost:1881/
By default, Projects are disabled 🙁 , so brush up on your Vi skills* as we need to go and edit settings.js file located in the .node-red directory. *other editors are available.
Just remember to press escape key, colon, w q bang when done! … now where did I drag that up from, I hadn’t used Vi in years!
After an initial foray into Node-RED, I realised I would need to use Projects within Node-RED. A pre-req for this is Git. With that installed I was good to create my first Project.
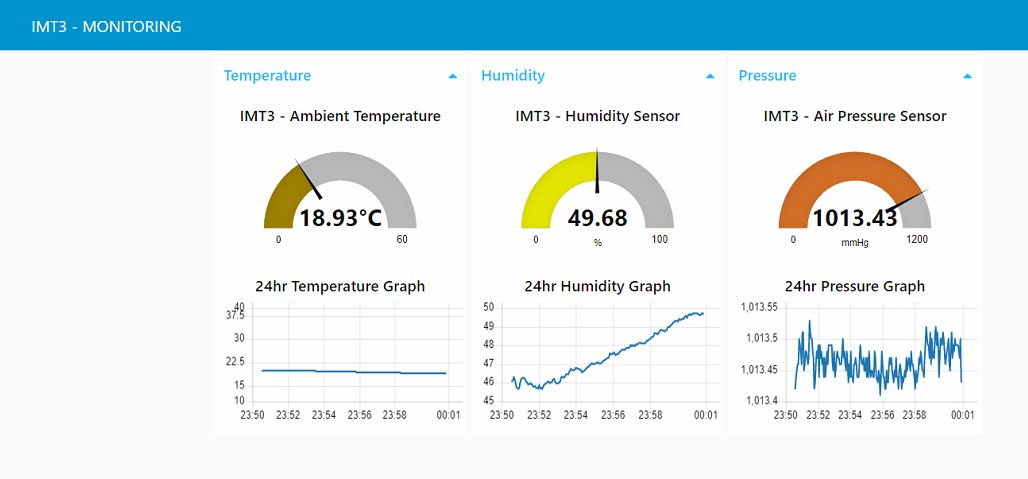
I was surprised how quickly I was able get some meaningful results and was soon using npm to add nodes from the Node-RED library for the Dashboard, Arduino and much more. It wasn’t long before I had my first Dashboard displaying the output of the BME280 sensor which looked like the following:
An early comment from our dear friend Mil Dave asked “What’s the Dew Point“? … thanks Dave !
Google to the rescue, however the Dewpoint calculation formulae found on the web look pretty scary. Fortunately a search of the Node-RED library found a flow with a dewpoint function defined that I was able to adapt to my flow. A snapshot of the flow follows as it is now beginning to take shape and looks like this:

The green debug nodes are useful to follow the message as they progress through the flow, the debug output can be displayed in the debug window, the system console or as node status appearing just below the debug node
The data from the Arduino arrives on the Serial node which is configured for the com port the Arduino is connected to. I’ve found it easier to determine the relevant com port from the Arduino IDE rather than via control panel and device manager. Also the ‘Get board info’ from the IDE has prove very useful when running Node-RED on MAC OS.
Double clicking any node will open up an Edit window to let you configure each node
Connected to the Serial node is a Split Node. This splits the incoming message into a sequence of messages and is setup to split the message when it finds a comma.
The message is passed to the next node which is a function node which contains some Javascript to give a variable name to each of the values received from the Arduino.
var newMsg = {};
var Sensor = {
    S1C: 0,
    S1F: 0,
    S2C: 0,
    S2F: 0,
    BT: 0,
    BH: 0,
    BP: 0,

};

context.data = context.data || {};

switch(msg.parts.index){
    case 0:
        context.data.S1C = parseFloat(msg.payload);
        msg = null;
        break;

    case 1:
        context.data.S1F = parseFloat(msg.payload);
        msg = null;
        break;

    case 2:
        context.data.S2C = parseFloat(msg.payload);
        msg = null;
        break;

    case 3:
        context.data.S2F = parseFloat(msg.payload);
        msg = null;
        break;

   case 4:
        context.data.BT = parseFloat(msg.payload);
        msg = null;
        break;

    case 5:
        context.data.BH = parseFloat(msg.payload);
        msg = null;
        break;

    case 6:
        context.data.BP = parseFloat(msg.payload);
        msg = null;
        break;
}

AllData = context.data.S1C &&
          context.data.S1F &&
          context.data.S2C &&
          context.data.S2F &&
          context.data.BT &&
          context.data.BH &&
          context.data.BP;


if(AllData){

    Sensor = context.data;
    newMsg = { payload: context.data,
    topic: 'DS18B20' };
    context.data = null;
    return newMsg;
}
else
    return msg;
The next Function node Splits these seven values and presents them on a separate output of the node which can then be connected to individual Dashboard Gauges.
var msgS1C = {payload: (msg.payload.S1C).toFixed(2)};
var msgS1F = {payload: (msg.payload.S1F).toFixed(2)};
var msgS2C = {payload: (msg.payload.S2C).toFixed(2)};
var msgS2F = {payload: (msg.payload.S2F).toFixed(2)};
var msgBT = {payload: (msg.payload.BT-1.4).toFixed(1)};
var msgBH = {payload: (msg.payload.BH).toFixed(1)};
var msgBP = {payload: (msg.payload.BP).toFixed(0)};

return [msgS1C, msgS1F, msgS2C, msgS2F, msgBT, msgBH, msgBP];
Having split these values out, the Temperature and Humidity values need to be recombined by the Join node so they can be passed to the Dew Point function node.
var newMsg = {};
var parts = msg.payload.split(",");
var Th = parseFloat(parts[0]);
var Hu = parseFloat(parts[1]);

var temp = -1.0*Th;
es = 6.112*Math.exp(-1.0*17.67*temp/(243.5 - temp));
ed = Hu/100.0*es;
eln = Math.log(ed/6.112);
td = -243.5*eln/(eln -17.67);

var Dp = td.toFixed(1);

newMsg = {payload: Dp,
     topic: "DewPoint"};

return newMsg;
The DewPoint is now passed to a Dashboard Gauge node and displayed. The Dashboard currently looks like this:
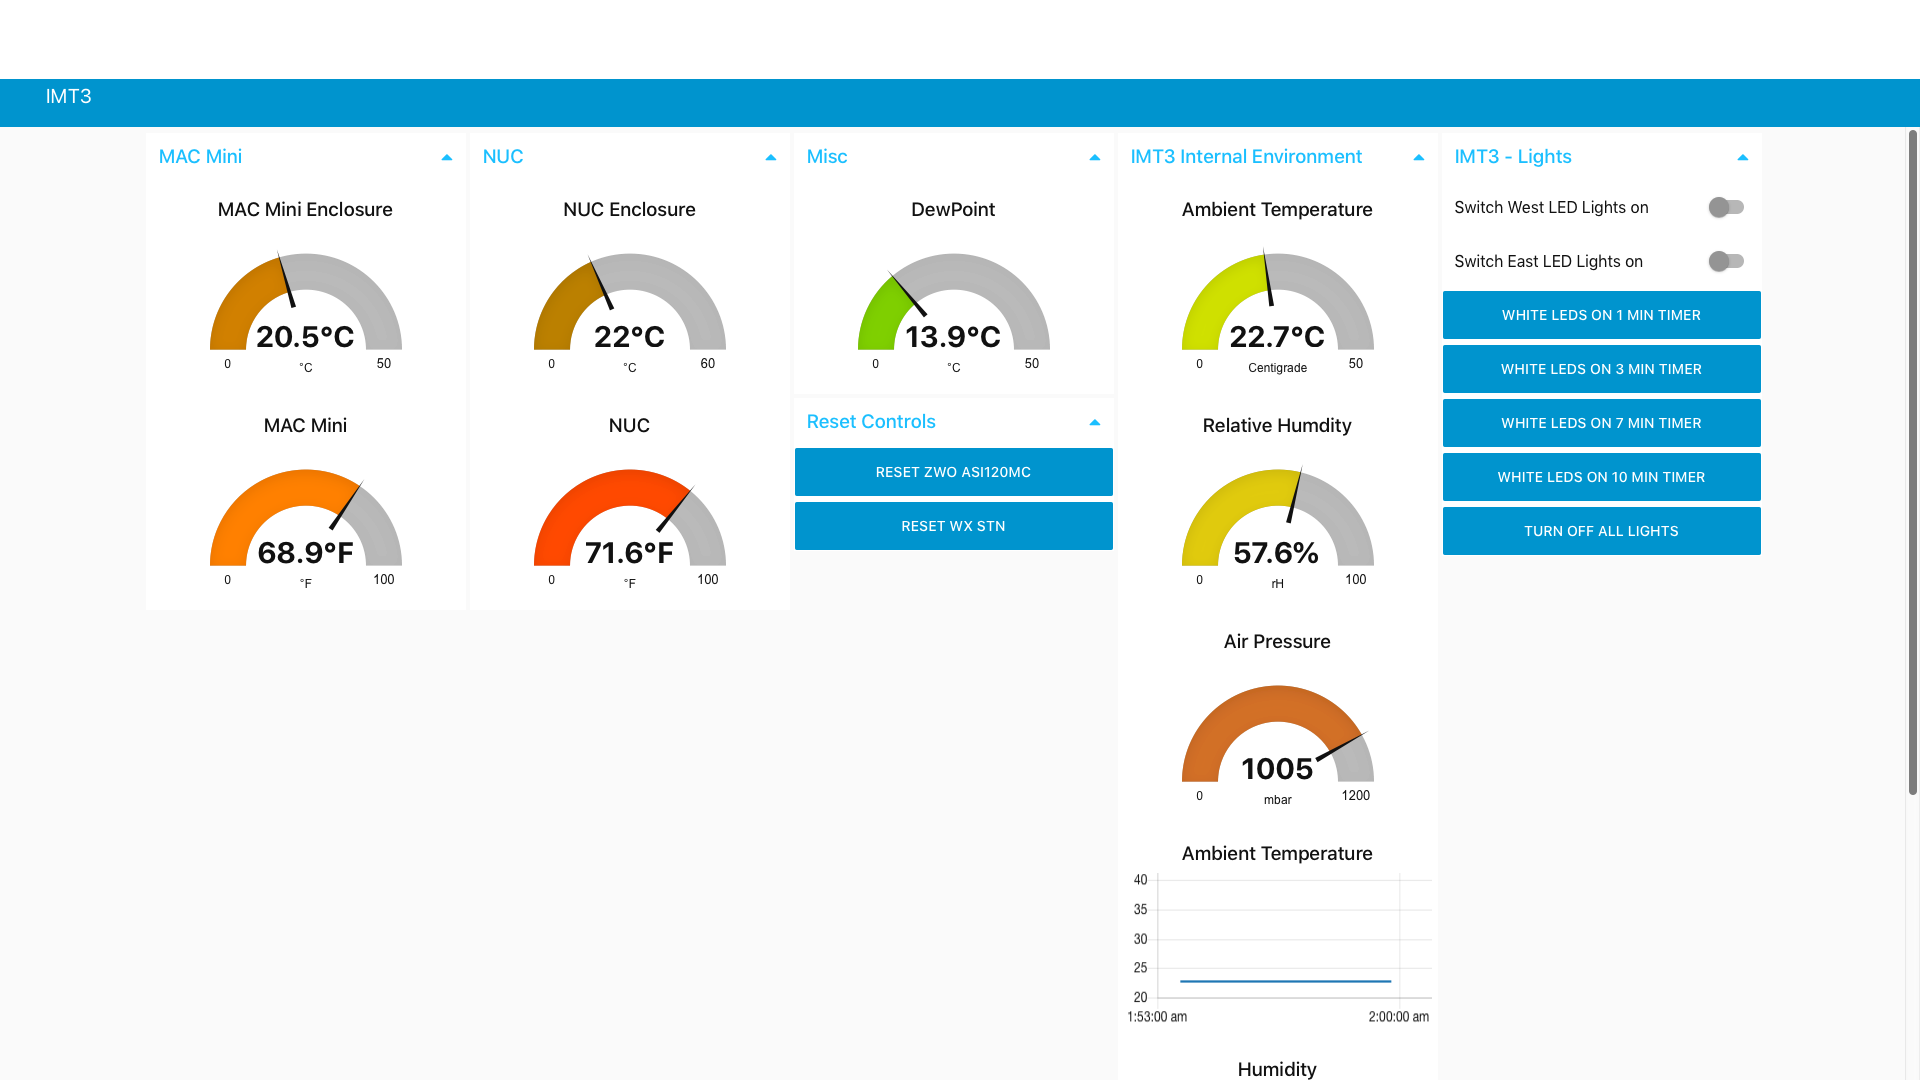
In Pt.3 we’ll take a look at the flow that controls the Arduino with the 4-Relay Shield that allows us to remotely reset the All Sky Camera, HiTechAstro Wx Stn and control a pair of LED lights to illuminate the rig so we can use ManyCam to monitor the web cams installed in the observatory.
The following is the current Node-RED flow running on the IMT3 MAC Mini
[{"id":"485a96ea.056dd8","type":"tab","label":"Keyestudio 4Relay Shield","disabled":false,"info":""},{"id":"4d3e5207.bd89ec","type":"tab","label":"BME280+DS18B20 Sensing Temp Hum Pa","disabled":false,"info":""},{"id":"db09c4dd.5e1178","type":"ui_group","z":"485a96ea.056dd8","name":"IMT3 - Lights","tab":"ab95e945.1f76e8","disp":true,"width":"6","collapse":true},{"id":"516a9fe4.282a2","type":"ui_group","z":"485a96ea.056dd8","name":"IMT3 - All Sky Camera","tab":"ab95e945.1f76e8","disp":true,"width":"6","collapse":true},{"id":"eb5b4cc2.854a6","type":"ui_group","z":"485a96ea.056dd8","name":"IMT3 - Wx Stn","tab":"ab95e945.1f76e8","disp":true,"width":"6","collapse":true},{"id":"49f0ffe8.38f2c","type":"ui_tab","z":"485a96ea.056dd8","name":"IMT3","icon":"dashboard","order":2,"disabled":false,"hidden":false},{"id":"2acc722b.5e03fe","type":"arduino-board","z":0,"device":"COM3"},{"id":"fce2366f.4a0348","type":"arduino-board","z":0,"device":"COM16"},{"id":"db4cc1fa.86c96","type":"ui_base","theme":{"name":"theme-light","lightTheme":{"default":"#0094CE","baseColor":"#0094CE","baseFont":"-apple-system,BlinkMacSystemFont,Segoe UI,Roboto,Oxygen-Sans,Ubuntu,Cantarell,Helvetica Neue,sans-serif","edited":true,"reset":false},"darkTheme":{"default":"#097479","baseColor":"#097479","baseFont":"-apple-system,BlinkMacSystemFont,Segoe UI,Roboto,Oxygen-Sans,Ubuntu,Cantarell,Helvetica Neue,sans-serif","edited":false},"customTheme":{"name":"Untitled Theme 1","default":"#4B7930","baseColor":"#4B7930","baseFont":"-apple-system,BlinkMacSystemFont,Segoe UI,Roboto,Oxygen-Sans,Ubuntu,Cantarell,Helvetica Neue,sans-serif"},"themeState":{"base-color":{"default":"#0094CE","value":"#0094CE","edited":false},"page-titlebar-backgroundColor":{"value":"#0094CE","edited":false},"page-backgroundColor":{"value":"#fafafa","edited":false},"page-sidebar-backgroundColor":{"value":"#ffffff","edited":false},"group-textColor":{"value":"#1bbfff","edited":false},"group-borderColor":{"value":"#ffffff","edited":false},"group-backgroundColor":{"value":"#ffffff","edited":false},"widget-textColor":{"value":"#111111","edited":false},"widget-backgroundColor":{"value":"#0094ce","edited":false},"widget-borderColor":{"value":"#ffffff","edited":false},"base-font":{"value":"-apple-system,BlinkMacSystemFont,Segoe UI,Roboto,Oxygen-Sans,Ubuntu,Cantarell,Helvetica Neue,sans-serif"}},"angularTheme":{"primary":"indigo","accents":"blue","warn":"red","background":"grey"}},"site":{"name":"Node-RED Dashboard","hideToolbar":"false","allowSwipe":"true","lockMenu":"false","allowTempTheme":"true","dateFormat":"DD/MM/YYYY","sizes":{"sx":32,"sy":32,"gx":6,"gy":6,"cx":6,"cy":6,"px":0,"py":0}}},{"id":"6954d733.e81b68","type":"ui_group","z":"","name":"Pressure","tab":"","order":1,"disp":true,"width":"6","collapse":true},{"id":"5d6c56a8.ca5f78","type":"ui_group","z":"","name":"Reset Controls","tab":"","order":1,"disp":true,"width":"6","collapse":false},{"id":"ee3a92d7.e92d7","type":"serial-port","z":"","serialport":"COM16","serialbaud":"9600","databits":"8","parity":"none","stopbits":"1","waitfor":"","newline":"\\n","bin":"false","out":"char","addchar":"","responsetimeout":"10000"},{"id":"d2404ee2.c4a07","type":"ui_group","z":"","name":"Humidity","tab":"","order":2,"disp":true,"width":"6","collapse":true},{"id":"7347531.83debac","type":"ui_group","z":"","name":"Pressure","tab":"","order":3,"disp":true,"width":"6","collapse":true},{"id":"afbeacf6.bf67f","type":"serial-port","z":"","serialport":"COM10","serialbaud":"9600","databits":"8","parity":"none","stopbits":"1","waitfor":"","newline":"\\n","bin":"false","out":"char","addchar":"false","responsetimeout":"10000"},{"id":"b645ca7c.5c5078","type":"ui_spacer","name":"spacer","group":"83c91351.079c7","order":7,"width":1,"height":1},{"id":"e04b5df3.8023f","type":"mqtt-broker","broker":"localhost","port":"1883"},{"id":"92218788.cc54e8","type":"serial-port","z":"","serialport":"COM5","serialbaud":"9600","databits":"8","parity":"none","stopbits":"1","waitfor":"","newline":"\\n","bin":"false","out":"char","addchar":"","responsetimeout":"10000"},{"id":"afd985bb.b6f418","type":"serial-port","z":"","serialport":"COM4","serialbaud":"9600","databits":"8","parity":"none","stopbits":"1","waitfor":"","newline":"\\n","bin":"false","out":"char","addchar":"","responsetimeout":"10000"},{"id":"93ad4e89.caa2f","type":"ui_group","z":"","name":"Pressure/Temperature","tab":"","disp":true,"width":"12","collapse":false},{"id":"cb031b5a.f51aa8","type":"ui_group","z":"","name":"IMT Monitoring","tab":"","disp":true,"width":"6","collapse":false},{"id":"b5dfb3de.d7e15","type":"ui_group","z":"","name":"Group 1","tab":"","order":4,"disp":true,"width":"6","collapse":false},{"id":"24e8044f.8b1a6c","type":"ui_spacer","name":"spacer","group":"5d6c56a8.ca5f78","order":1,"width":1,"height":1},{"id":"389727bb.3ad738","type":"ui_group","z":"","name":"Reset Controls","tab":"49f0ffe8.38f2c","order":5,"disp":true,"width":"6","collapse":true},{"id":"13d4a243.10dcde","type":"ui_group","z":"","name":"Lighting Controls","tab":"49f0ffe8.38f2c","order":4,"disp":true,"width":"6","collapse":true},{"id":"a776141c.b812f8","type":"ui_spacer","name":"spacer","group":"13d4a243.10dcde","order":3,"width":1,"height":1},{"id":"213ca1a5.2ba5de","type":"ui_group","z":"","name":"BME280 Sensor","tab":"49f0ffe8.38f2c","order":3,"disp":true,"width":"6","collapse":true},{"id":"6168a559.a55b3c","type":"ui_group","z":"","name":"BME280 Temp","tab":"","order":4,"disp":true,"width":"6","collapse":false},{"id":"6339fdd1.0da1c4","type":"ui_group","z":"","name":"BME280 - Temp","tab":"","order":4,"disp":true,"width":"6","collapse":true},{"id":"a0396508.e34c88","type":"ui_group","z":"","name":"Nuc Enclosure","tab":"49f0ffe8.38f2c","order":2,"disp":true,"width":"6","collapse":false},{"id":"7dd8b7bb.d7caf8","type":"ui_group","z":"","name":"MAC Mini","tab":"49f0ffe8.38f2c","order":1,"disp":true,"width":"6","collapse":true},{"id":"832ac20d.e8697","type":"comment","z":"485a96ea.056dd8","name":"Arduino with keystudio 4 relay shield on Com16","info":"Bob T - 15July2019\n\nKeyestudio 4 card shield to control LED lights, \nHiTechAstroDeluxe weather station and \nZWO ASI120MC All Sky Camera ","x":380,"y":60,"wires":[]},{"id":"32d3029b.04bf6e","type":"inject","z":"485a96ea.056dd8","name":"Off","topic":"","payload":"false","payloadType":"bool","repeat":"","crontab":"","once":false,"onceDelay":0.1,"x":125,"y":233,"wires":[["dc4c22db.8f295"]]},{"id":"dc4c22db.8f295","type":"delay","z":"485a96ea.056dd8","name":"de-bounce","pauseType":"rate","timeout":"5","timeoutUnits":"seconds","rate":"1","nbRateUnits":"1","rateUnits":"second","randomFirst":"1","randomLast":"5","randomUnits":"seconds","drop":true,"x":310,"y":243,"wires":[["a613d3b3.48ad","dacf1794.cdaf98"]]},{"id":"a328ae9b.ccca9","type":"inject","z":"485a96ea.056dd8","name":"On","topic":"","payload":"true","payloadType":"bool","repeat":"","crontab":"","once":false,"onceDelay":0.1,"x":125,"y":263,"wires":[["dc4c22db.8f295"]]},{"id":"a613d3b3.48ad","type":"arduino out","z":"485a96ea.056dd8","name":"ZWO ASI120MC USB reset","pin":"7","state":"OUTPUT","arduino":"2acc722b.5e03fe","x":525,"y":278,"wires":[]},{"id":"a2f0bb4f.f498e8","type":"inject","z":"485a96ea.056dd8","name":"Off","topic":"","payload":"false","payloadType":"bool","repeat":"","crontab":"","once":false,"onceDelay":0.1,"x":130,"y":463,"wires":[["5cf13b52.04e544"]]},{"id":"310eb06c.aaa6e","type":"inject","z":"485a96ea.056dd8","name":"On","topic":"","payload":"true","payloadType":"bool","repeat":"","crontab":"","once":false,"onceDelay":0.1,"x":130,"y":493,"wires":[["5cf13b52.04e544"]]},{"id":"15c8ff0d.57b2b1","type":"inject","z":"485a96ea.056dd8","name":"Off","topic":"","payload":"false","payloadType":"bool","repeat":"","crontab":"","once":false,"onceDelay":0.1,"x":125,"y":578,"wires":[["ec59f57e.ea8d18"]]},{"id":"e3cfa58e.302168","type":"inject","z":"485a96ea.056dd8","name":"On","topic":"","payload":"true","payloadType":"bool","repeat":"","crontab":"","once":false,"onceDelay":0.1,"x":125,"y":608,"wires":[["ec59f57e.ea8d18"]]},{"id":"fb823e1b.0ebd","type":"inject","z":"485a96ea.056dd8","name":"Off","topic":"","payload":"false","payloadType":"bool","repeat":"","crontab":"","once":false,"onceDelay":0.1,"x":110,"y":760,"wires":[["be20e01d.52cbd"]]},{"id":"fc39430.0c43ac","type":"inject","z":"485a96ea.056dd8","name":"On","topic":"","payload":"true","payloadType":"bool","repeat":"","crontab":"","once":false,"onceDelay":0.1,"x":110,"y":790,"wires":[["be20e01d.52cbd"]]},{"id":"5cf13b52.04e544","type":"delay","z":"485a96ea.056dd8","name":"de-bounce","pauseType":"rate","timeout":"5","timeoutUnits":"seconds","rate":"1","nbRateUnits":"1","rateUnits":"second","randomFirst":"1","randomLast":"5","randomUnits":"seconds","drop":true,"x":315,"y":478,"wires":[["98563994.c5b588","55b1d5a1.8c01bc"]]},{"id":"ec59f57e.ea8d18","type":"delay","z":"485a96ea.056dd8","name":"de-bounce","pauseType":"rate","timeout":"5","timeoutUnits":"seconds","rate":"1","nbRateUnits":"1","rateUnits":"second","randomFirst":"1","randomLast":"5","randomUnits":"seconds","drop":true,"x":310,"y":593,"wires":[["ae521b10.9b50e8","8957d695.00a448"]]},{"id":"be20e01d.52cbd","type":"delay","z":"485a96ea.056dd8","name":"de-bounce","pauseType":"rate","timeout":"5","timeoutUnits":"seconds","rate":"1","nbRateUnits":"1","rateUnits":"second","randomFirst":"1","randomLast":"5","randomUnits":"seconds","drop":true,"x":310,"y":790,"wires":[["d24c85c8.bf2c38","c2d7a57d.cf3388"]]},{"id":"98563994.c5b588","type":"arduino out","z":"485a96ea.056dd8","name":"reserved for Wx Stn reset","pin":"6","state":"OUTPUT","arduino":"2acc722b.5e03fe","x":580,"y":478,"wires":[]},{"id":"ae521b10.9b50e8","type":"arduino out","z":"485a96ea.056dd8","name":"reserved for RED LED lighting","pin":"5","state":"OUTPUT","arduino":"2acc722b.5e03fe","x":595,"y":593,"wires":[]},{"id":"d24c85c8.bf2c38","type":"arduino out","z":"485a96ea.056dd8","name":"White LED Lighting","pin":"4","state":"OUTPUT","arduino":"2acc722b.5e03fe","x":570,"y":790,"wires":[]},{"id":"c2d7a57d.cf3388","type":"debug","z":"485a96ea.056dd8","name":"","active":true,"tosidebar":false,"console":false,"tostatus":true,"complete":"payload","x":550,"y":845,"wires":[],"inputLabels":["LED"]},{"id":"dacf1794.cdaf98","type":"debug","z":"485a96ea.056dd8","name":"","active":true,"tosidebar":true,"console":true,"tostatus":true,"complete":"payload","x":650,"y":218,"wires":[]},{"id":"1363d217.e375ae","type":"ui_switch","z":"485a96ea.056dd8","name":"Switch Relay4","label":"Switch White LEDs on","tooltip":"","group":"13d4a243.10dcde","order":1,"width":0,"height":0,"passthru":true,"decouple":"false","topic":"","style":"","onvalue":"true","onvalueType":"bool","onicon":"","oncolor":"","offvalue":"false","offvalueType":"bool","officon":"","offcolor":"","x":120,"y":850,"wires":[["be20e01d.52cbd"]]},{"id":"96a29cbe.85d93","type":"ui_switch","z":"485a96ea.056dd8","name":"Switch Relay3","label":"Switch RED LEDs on","tooltip":"","group":"13d4a243.10dcde","order":2,"width":0,"height":0,"passthru":true,"decouple":"false","topic":"","style":"","onvalue":"true","onvalueType":"bool","onicon":"","oncolor":"","offvalue":"false","offvalueType":"bool","officon":"","offcolor":"","x":120,"y":658,"wires":[["ec59f57e.ea8d18"]]},{"id":"55b1d5a1.8c01bc","type":"debug","z":"485a96ea.056dd8","name":"","active":true,"tosidebar":true,"console":true,"tostatus":true,"complete":"payload","x":550,"y":428,"wires":[]},{"id":"8957d695.00a448","type":"debug","z":"485a96ea.056dd8","name":"","active":true,"tosidebar":true,"console":true,"tostatus":true,"complete":"payload","x":545,"y":658,"wires":[]},{"id":"4b9ea92f.a5e9e8","type":"ui_button","z":"485a96ea.056dd8","name":"","group":"389727bb.3ad738","order":1,"width":0,"height":0,"passthru":false,"label":"Reset ZWO ASI120MC","tooltip":"Press to reset camera, power will be turned off for 7 seconds","color":"","bgcolor":"","icon":"","payload":"true","payloadType":"bool","topic":"","x":170,"y":113,"wires":[["aaf4a028.f0347","54152099.11ec1"]]},{"id":"aaf4a028.f0347","type":"debug","z":"485a96ea.056dd8","name":"","active":true,"tosidebar":true,"console":false,"tostatus":true,"complete":"payload","x":640,"y":113,"wires":[]},{"id":"54152099.11ec1","type":"trigger","z":"485a96ea.056dd8","op1":"1","op2":"0","op1type":"num","op2type":"str","duration":"7","extend":false,"units":"s","reset":"","bytopic":"all","name":"","x":345,"y":158,"wires":[["b47fba95.880ac8","dc4c22db.8f295"]]},{"id":"b47fba95.880ac8","type":"debug","z":"485a96ea.056dd8","name":"","active":true,"tosidebar":false,"console":false,"tostatus":true,"complete":"payload","x":640,"y":158,"wires":[]},{"id":"8c8ddd2.3ba6a2","type":"inject","z":"485a96ea.056dd8","name":"","topic":"","payload":"true","payloadType":"bool","repeat":"","crontab":"","once":false,"onceDelay":0.1,"x":125,"y":158,"wires":[["54152099.11ec1"]]},{"id":"17a45757.0f3839","type":"ui_button","z":"485a96ea.056dd8","name":"","group":"389727bb.3ad738","order":1,"width":0,"height":0,"passthru":false,"label":"Reset Wx Stn","tooltip":"Press to reset Weather Station, power is removed for 7 seconds","color":"","bgcolor":"","icon":"","payload":"","payloadType":"str","topic":"","x":140,"y":338,"wires":[["ae8f9b64.17ad08"]]},{"id":"ae8f9b64.17ad08","type":"trigger","z":"485a96ea.056dd8","op1":"1","op2":"0","op1type":"str","op2type":"str","duration":"7","extend":false,"units":"s","reset":"","bytopic":"all","name":"","x":465,"y":338,"wires":[["5cf13b52.04e544"]]},{"id":"35c5f11a.a6fd2e","type":"inject","z":"485a96ea.056dd8","name":"","topic":"","payload":"true","payloadType":"bool","repeat":"","crontab":"","once":false,"onceDelay":0.1,"x":110,"y":383,"wires":[["ae8f9b64.17ad08"]]},{"id":"ce4ad2aa.33a02","type":"trigger","z":"485a96ea.056dd8","op1":"1","op2":"0","op1type":"str","op2type":"str","duration":"7","extend":false,"units":"min","reset":"","bytopic":"all","name":"","x":360,"y":907,"wires":[["be20e01d.52cbd"]]},{"id":"7bdfc101.255ec","type":"ui_button","z":"485a96ea.056dd8","name":"","group":"13d4a243.10dcde","order":5,"width":0,"height":0,"passthru":false,"label":"White LEDs on Timer","tooltip":"","color":"","bgcolor":"","icon":"","payload":"true","payloadType":"bool","topic":"","x":135,"y":907,"wires":[["ce4ad2aa.33a02"]]},{"id":"7432b57b.2b4fac","type":"serial in","z":"4d3e5207.bd89ec","name":"","serial":"afd985bb.b6f418","x":65,"y":255,"wires":[["fbe3b723.be8138","d6674162.0d89a"]]},{"id":"d968c054.e6532","type":"function","z":"4d3e5207.bd89ec","name":"","func":"var newMsg = {};\nvar Sensor = {\n // NData: 0, \n Temp: 0,\n Humid: 0,\n Pressure_BME280 : 0,\n\n// Time: new Date().toString()\n};\n\ncontext.data = context.data || {};\n\nswitch(msg.parts.index){\n case 0:\n context.data.NData = parseFloat(msg.payload);\n msg = null;\n break;\n case 1:\n context.data.Temp = parseFloat(msg.payload);\n msg = null;\n break;\n case 2:\n context.data.Humid = parseFloat(msg.payload);\n msg = null;\n break;\n \n case 3:\n context.data.Pressure_BME280 = parseFloat(msg.payload);\n msg = null;\n break;\n \n\n}\n\n//AllData = context.data.NData &&\nAllData = context.data.Temp &&\n context.data.Humid &&\n context.data.Pressure_BME280;\n \n \n // context.data.Altitud_BMP;\n\nif(AllData){\n // var time = Date();\n // context.data.Time = time.toString();\n Sensor = context.data;\n newMsg = { payload: context.data,\n topic: 'Frame Sensor' };\n context.data = null;\n return newMsg;\n}\nelse\n return msg;\n","outputs":1,"noerr":0,"x":455,"y":255,"wires":[["e6be691e.67eed8","f1854d0d.daac6"]]},{"id":"bffe4a25.88d4d8","type":"debug","z":"4d3e5207.bd89ec","name":"","active":true,"tosidebar":false,"console":false,"tostatus":true,"complete":"payload","x":520,"y":120,"wires":[]},{"id":"d6674162.0d89a","type":"split","z":"4d3e5207.bd89ec","name":"","splt":" ","spltType":"str","arraySplt":"3","arraySpltType":"len","stream":false,"addname":"","x":320,"y":255,"wires":[["d968c054.e6532","bffe4a25.88d4d8"]]},{"id":"e6be691e.67eed8","type":"json","z":"4d3e5207.bd89ec","name":"","property":"payload","action":"str","pretty":true,"x":605,"y":255,"wires":[["8c80d979.2751c8"]]},{"id":"8c80d979.2751c8","type":"debug","z":"4d3e5207.bd89ec","name":"","active":true,"tosidebar":false,"console":false,"tostatus":true,"complete":"payload","x":670,"y":360,"wires":[]},{"id":"fbe3b723.be8138","type":"debug","z":"4d3e5207.bd89ec","name":"","active":true,"tosidebar":false,"console":false,"tostatus":true,"complete":"payload","x":195,"y":135,"wires":[]},{"id":"f1854d0d.daac6","type":"debug","z":"4d3e5207.bd89ec","name":"","active":true,"tosidebar":false,"console":false,"tostatus":true,"complete":"payload","x":565,"y":180,"wires":[]},{"id":"36f134f3.b00a8c","type":"debug","z":"4d3e5207.bd89ec","name":"","active":true,"tosidebar":false,"console":false,"tostatus":true,"complete":"payload","targetType":"msg","x":265,"y":345,"wires":[]},{"id":"44c5c387.ca6b1c","type":"serial in","z":"4d3e5207.bd89ec","name":"DS18B20","serial":"afd985bb.b6f418","x":75,"y":420,"wires":[["36f134f3.b00a8c","8e7bff44.7351a"]]},{"id":"8e7bff44.7351a","type":"split","z":"4d3e5207.bd89ec","name":"","splt":",","spltType":"str","arraySplt":"6","arraySpltType":"len","stream":false,"addname":"","x":260,"y":435,"wires":[["42fc1749.2fb2d8","a21c2add.952cd8"]],"inputLabels":["1"],"outputLabels":["3"]},{"id":"42fc1749.2fb2d8","type":"debug","z":"4d3e5207.bd89ec","name":"","active":true,"tosidebar":false,"console":false,"tostatus":true,"complete":"payload","targetType":"msg","x":630,"y":440,"wires":[]},{"id":"a21c2add.952cd8","type":"function","z":"4d3e5207.bd89ec","name":"Payload Object Sensor","func":"var newMsg = {};\nvar Sensor = {\n S1C: 0, \n S1F: 0,\n S2C: 0,\n S2F: 0,\n BT: 0,\n BH: 0,\n BP: 0,\n\n// Time: new Date().toString()\n};\n\ncontext.data = context.data || {};\n\nswitch(msg.parts.index){\n case 0:\n context.data.S1C = parseFloat(msg.payload);\n msg = null;\n break;\n case 1:\n context.data.S1F = parseFloat(msg.payload);\n msg = null;\n break;\n case 2:\n context.data.S2C = parseFloat(msg.payload);\n msg = null;\n break;\n \n case 3:\n context.data.S2F = parseFloat(msg.payload);\n msg = null;\n break;\n \n case 4:\n context.data.BT = parseFloat(msg.payload);\n msg = null;\n break;\n \n case 5:\n context.data.BH = parseFloat(msg.payload);\n msg = null;\n break;\n \n case 6:\n context.data.BP = parseFloat(msg.payload);\n msg = null;\n break;\n\n\n}\n\nAllData = context.data.S1C &&\n context.data.S1F &&\n context.data.S2C &&\n context.data.S2F &&\n context.data.BT &&\n context.data.BH &&\n context.data.BP;\n \n \n // context.data.Altitud_BMP;\n\nif(AllData){\n //var time = Date();\n // context.data.Time = time.toString();\n Sensor = context.data;\n newMsg = { payload: context.data,\n topic: 'DS18B20' };\n context.data = null;\n return newMsg;\n}\nelse\n return msg;\n\n\n","outputs":1,"noerr":0,"x":400,"y":525,"wires":[["ea728815.3b1928","bf04c7ef.157d88"]]},{"id":"ea728815.3b1928","type":"debug","z":"4d3e5207.bd89ec","name":"","active":true,"tosidebar":true,"console":false,"tostatus":true,"complete":"payload","targetType":"msg","x":655,"y":525,"wires":[]},{"id":"bf04c7ef.157d88","type":"function","z":"4d3e5207.bd89ec","name":"Split Data","func":"var msgS1C = {payload: (msg.payload.S1C).toFixed(2)};\nvar msgS1F = {payload: (msg.payload.S1F).toFixed(2)};\nvar msgS2C = {payload: (msg.payload.S2C).toFixed(2)};\nvar msgS2F = {payload: (msg.payload.S2F).toFixed(2)};\nvar msgBT = {payload: (msg.payload.BT).toFixed(2)};\nvar msgBH = {payload: (msg.payload.BH).toFixed(2)};\nvar msgBP = {payload: (msg.payload.BP).toFixed(2)};\n\n//var msgS1C = {payload: (msg.payload.S1C).toFixed(2)};\n//var msgS1F = {payload: (msg.payload.S1F).toFixed(2)};\n//var msgS2C = {payload: (msg.payload.S2C).toFixed(2)};\n//var msgS2F = {payload: (msg.payload.S2F).toFixed(2)};\n//var msgBT = {payload: (msg.payload.BT).toFixed(2)};\n//var msgBH = {payload: (msg.payload.BH).toFixed(2)};\n\n\n//var msgbme280_h = {payload: (msg.payload.bme280_h).toFixed(1)};\n//var msgbme280_p = {payload: (msg.payload.bme280_p).toFixed(1)};\n\nreturn [msgS1C, msgS1F, msgS2C, msgS2F, msgBT, msgBH, msgBP];\n//return [msgS1C, msgS1F, msgS2C, msgS2F, msgbme280_t, msgbme280_h, msgbme280_p];\n\n\n\n\n\n//var msgTemp = {payload: msg.payload.Temp};\n//var msgTemp = {payload: (msg.payload.Temp).toFixed(1)};\n//var msgHumid = {payload: msg.payload.Humid};\n//var msgHumid = {payload: (msg.payload.Humid).toFixed(1)};\n//var msgTemp_DS = {payload: msg.payload.Temp_DS};\n//var msgTemp_BMP = {payload: msg.payload.Temp_BMP};\n//var msgPressure_BME = {payload: (msg.payload.Pressure_BME280).toFixed(0)};\n//var msgPressure_BME = {payload: (msg.payload.Pressure_BME280/100000).toFixed(2)};\n//var msgAltitud_BMP = {payload: msg.payload.Altitud_BMP};\n\n//return [msgTemp_DHT11];\n//return [msgTemp, msgHumid, msgPressure_BME];\n//return [msgTemp_DHT11, msgHumid_DHT, msgTemp_DS, msgTemp_BMP, msgPressure_BMP, msgAltitud_BMP ];","outputs":7,"noerr":0,"x":255,"y":750,"wires":[["5a7a2a2.9de7ed4","74244174.a7498"],["1df94d4f.96f153","bc09270c.1c3d38"],["83e8c937.e86d18","b9e2e2e3.e5de6"],["4dc159a8.536488","b3d40b.af729bf8"],["7bf4618d.9e1e2","edca722d.9bc12"],["24655be.0e446a4","76e9dff9.ffc88"],["5e28cc59.1975a4","214f5175.b812fe"]]},{"id":"5a7a2a2.9de7ed4","type":"debug","z":"4d3e5207.bd89ec","name":"","active":true,"tosidebar":false,"console":false,"tostatus":true,"complete":"payload","targetType":"msg","x":550,"y":615,"wires":[]},{"id":"1df94d4f.96f153","type":"debug","z":"4d3e5207.bd89ec","name":"","active":true,"tosidebar":false,"console":false,"tostatus":true,"complete":"payload","targetType":"msg","x":535,"y":720,"wires":[]},{"id":"83e8c937.e86d18","type":"debug","z":"4d3e5207.bd89ec","name":"","active":true,"tosidebar":false,"console":false,"tostatus":true,"complete":"payload","targetType":"msg","x":535,"y":810,"wires":[]},{"id":"4dc159a8.536488","type":"debug","z":"4d3e5207.bd89ec","name":"","active":true,"tosidebar":false,"console":false,"tostatus":true,"complete":"payload","targetType":"msg","x":480,"y":930,"wires":[]},{"id":"74244174.a7498","type":"ui_gauge","z":"4d3e5207.bd89ec","name":"Mac Mini Enclosure","group":"7dd8b7bb.d7caf8","order":1,"width":0,"height":0,"gtype":"gage","title":"MAC Mini Enclosure","label":"","format":"{{value}}°C","min":0,"max":"50","colors":["#008000","#ff8000","#ff0000"],"seg1":"","seg2":"","x":540,"y":675,"wires":[]},{"id":"bc09270c.1c3d38","type":"ui_gauge","z":"4d3e5207.bd89ec","name":"DS18B20","group":"7dd8b7bb.d7caf8","order":2,"width":0,"height":0,"gtype":"gage","title":"MAC Mini","label":"","format":"{{value}}°F","min":0,"max":"100","colors":["#008000","#ff8000","#ff0000"],"seg1":"","seg2":"","x":475,"y":768,"wires":[]},{"id":"b9e2e2e3.e5de6","type":"ui_gauge","z":"4d3e5207.bd89ec","name":"NUC Enclosure","group":"a0396508.e34c88","order":1,"width":0,"height":0,"gtype":"gage","title":"NUC Enclosure","label":"","format":"{{value}}°C","min":0,"max":"60","colors":["#008000","#ff8000","#ff0000"],"seg1":"","seg2":"","x":515,"y":870,"wires":[]},{"id":"b3d40b.af729bf8","type":"ui_gauge","z":"4d3e5207.bd89ec","name":"DS18B20","group":"a0396508.e34c88","order":1,"width":0,"height":0,"gtype":"gage","title":"NUC","label":"","format":"{{value}}°F","min":0,"max":"100","colors":["#008000","#ff8000","#ff0000"],"seg1":"","seg2":"","x":510,"y":990,"wires":[]},{"id":"7bf4618d.9e1e2","type":"debug","z":"4d3e5207.bd89ec","name":"","active":true,"tosidebar":false,"console":false,"tostatus":true,"complete":"payload","targetType":"msg","x":480,"y":1060,"wires":[]},{"id":"24655be.0e446a4","type":"debug","z":"4d3e5207.bd89ec","name":"","active":true,"tosidebar":false,"console":false,"tostatus":true,"complete":"payload","targetType":"msg","x":470,"y":1140,"wires":[]},{"id":"5e28cc59.1975a4","type":"debug","z":"4d3e5207.bd89ec","name":"","active":true,"tosidebar":false,"console":false,"tostatus":true,"complete":"payload","targetType":"msg","x":460,"y":1220,"wires":[]},{"id":"edca722d.9bc12","type":"ui_gauge","z":"4d3e5207.bd89ec","name":"bme280-t","group":"213ca1a5.2ba5de","order":1,"width":0,"height":0,"gtype":"gage","title":"Ambient Temperature","label":"Centigrade","format":"{{value}}°C","min":0,"max":"50","colors":["#00b500","#e6e600","#ca3838"],"seg1":"","seg2":"","x":570,"y":1100,"wires":[]},{"id":"76e9dff9.ffc88","type":"ui_gauge","z":"4d3e5207.bd89ec","name":"bme280-rH","group":"213ca1a5.2ba5de","order":2,"width":0,"height":0,"gtype":"gage","title":"Relative Humdity","label":"rH","format":"{{value}}%","min":0,"max":"100","colors":["#00b500","#e6e600","#ca3838"],"seg1":"","seg2":"","x":620,"y":1200,"wires":[]},{"id":"214f5175.b812fe","type":"ui_gauge","z":"4d3e5207.bd89ec","name":"bme280-p","group":"213ca1a5.2ba5de","order":3,"width":0,"height":0,"gtype":"gage","title":"Air Pressure","label":"mmHg","format":"{{value}}","min":0,"max":"1200","colors":["#00b500","#e6e600","#ca3838"],"seg1":"","seg2":"","x":610,"y":1300,"wires":[]},{"id":"6b6b4cd9.5a4f54","type":"ui_button","z":"485a96ea.056dd8","name":"","group":"13d4a243.10dcde","order":4,"width":0,"height":0,"passthru":false,"label":"RED LEDs on Timer","tooltip":"","color":"","bgcolor":"","icon":"","payload":"true","payloadType":"bool","topic":"","x":140,"y":700,"wires":[["ec59f57e.ea8d18"]]}]