M101 SuperNova (27th-28th May)

DSW invited me over to the IMT3 observatory for an imaging weekend to image M101 and the recent supernova2023ixf discovery. DSW was using the 12inch RDK and I decided to put the FSQ85 on the Pegasus NYX-101 to test out the setup ready for our Tenerife trip to Mount Teide.

I ran the QHY268C at high gain mode, gain 56, offset 30 and -20℃. I finally managed to cure the noise banding I was experiencing on the QHY268C but using a fully shielded high quality USB3 short length cable that I run from direct to a Pegasus UPBv2 that sits on top of the scope.

Although it’s mid summer and the Moon was bright and approaching full the phase, the sky conditions on the first night appeared to be okay at first sight. Before processing I decided to check on data quality via the blink module in PixInsight it was obvious that they were a lot of unusable subs due to high cloud and using them would have ruined the quality of any resulting stacked image.

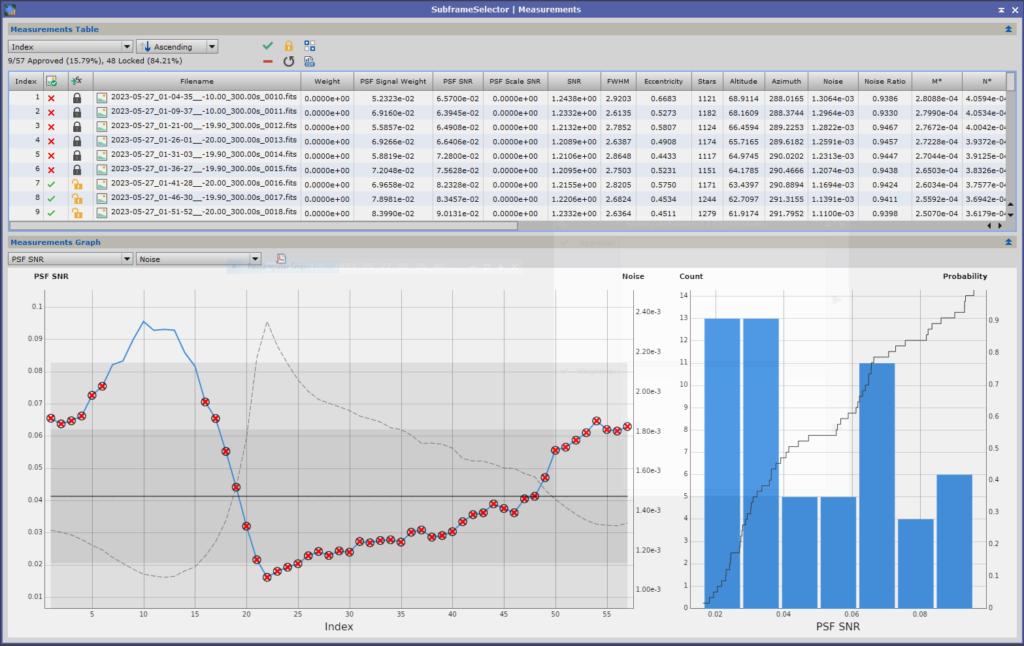
Running the data stack of raw images through the PixInsight Subframe Selector to analyse the PSF SNR versus noise it clearly shows that I could only use 7 frames (35 minutes) didn’t drop below 0.08 from night one whilst all the data from night two should go straight into the bin along with most of night one 🙁

Pixinsight SubFrameSelector

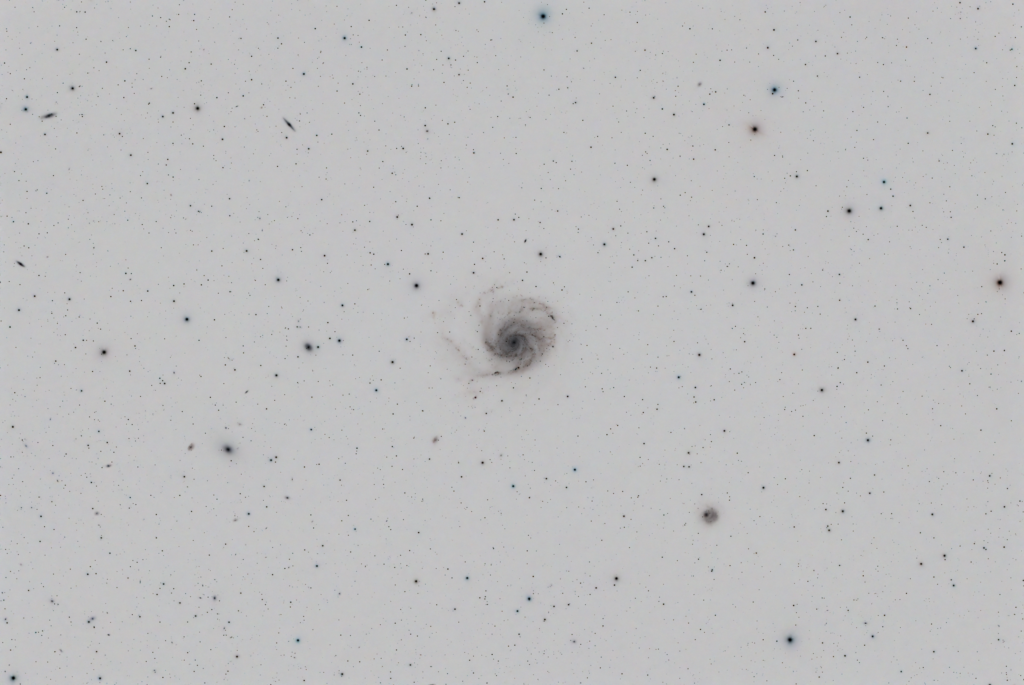
Given I don’t have enough data to do the end result justice due to my poor PixInsight skills I decided to invert the images – I really should subscribe to Adam Block Studios (Shout out !)

Inverted image of M101, supernova 2023ixf and surrounding area

Running the AnnotateImage Script labels the various galaxies in the image which I enjoy looking up to see which type they are, magnitude and how far away they are.

Annotated FoV for area around M101, supernova is not labelled

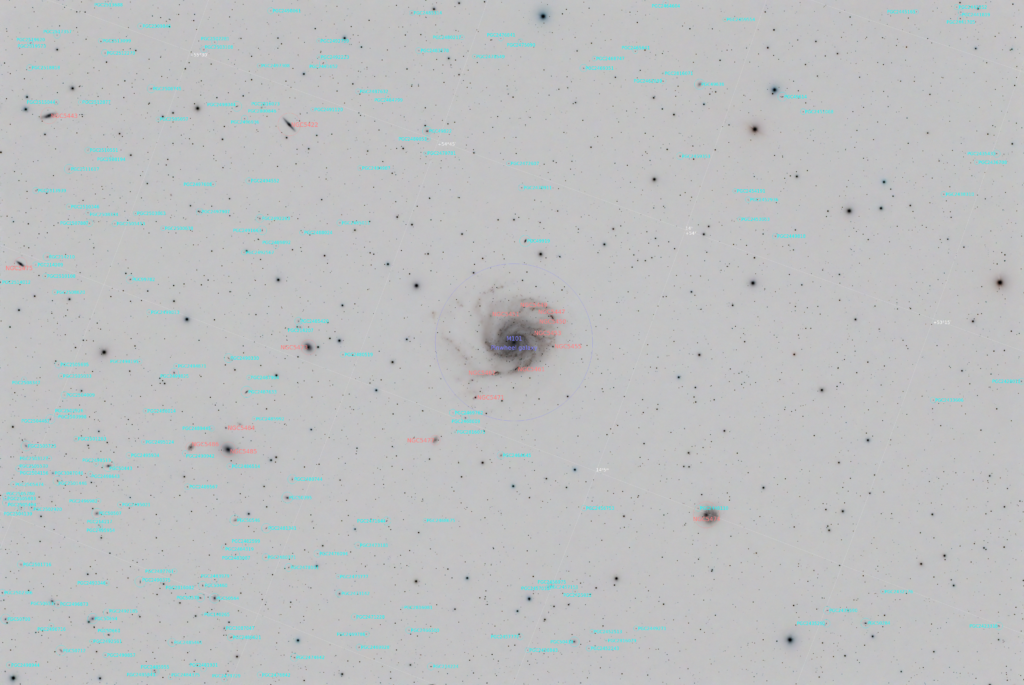
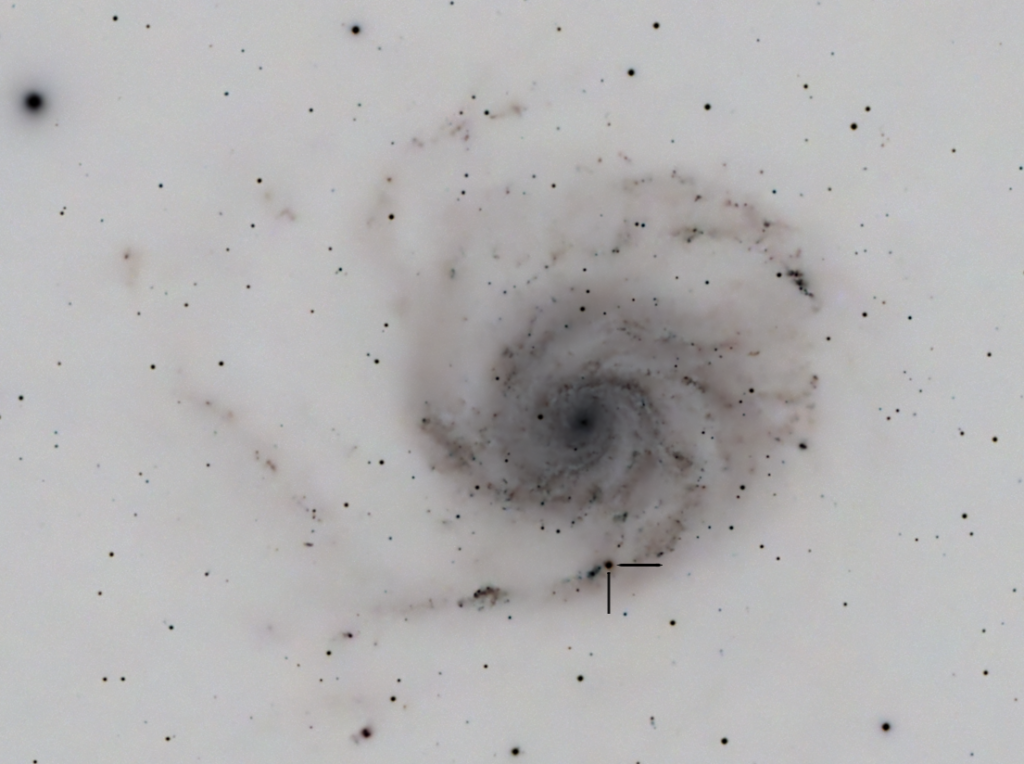
Zooming in to M101 to see the Supernova better, it is located to the right of NGC5461 and indicated by the two arrows.

M101 with SN2023ixf indicated by the arrows

Light Curve

The AAVSO have a light curve plotted from measurements submitted by amateurs, just enter “SN 2023ixf” and submit here. It was still around 11th magnitude on 18th June but there does appear to be a slight decline in the brightness curve.

FSQ85 Flattener & QHY286C CMOS

I’ve taken the plunge and dipped my toe into the CMOS world. Since I didn’t have any OSC experience I chatted with DSW (has a QHY186c) and decided on the QHY286C. This I purchased from Bern at ModernAstronomy who has always provided excellent service.

The issue with APS-C sensors when coupled with the Takahashi FSQ85 is that the edges start to show signs of star elongation, I already see this on my Atik460. This can be corrected with the FSQ-85 flattener (ordered from FirstLightOptics) which has the effect of slightly increasing the focal length but also reduces the back focus from the native 197.5mm to 56mm.

Effective Focal Length455mm (f/5.4)
Image Circle Diameter44mm
Metal Back Focus56mm
FSQ-85 EDX with Flattener 1.01x

This means that I can’t use my existing Atik OAG->Atik EFW2 and Atik460 because it’s total distance is 59mm (22mm+24mm+13mm) so it’s out by 2mm even once you include the filter effect on the back focus. Note – This is also true for my Starlight Xpress configuration.

I do not understand why Atik could not have got to within the 55-56mm range by shaving off a mm here and there 🙁 I may need to replace all Atik gear when I convert to mono CMOS or replace the OAG with a guide scope.

So onto the QHY268C, the OSC CMOS unfortunately has a CAA tilt adapter instead of a direct thread connection. This wastes 11mm of precious back focus giving a total distance of 23.5mm whereas the recently released QHY286M CMOS has a 12.5mm back focus !!!!

Also the QHY268C does not have an IR/UV cut filter in place so you need to buy an additional filter and holder and add that to the cost and factor in the adapter and distance needed …. I’m starting to regret this purchase more and more !

Source – QHYCCD.com

Back to the Takahashi Flattener (TKA37852), the back focus is 56.2mm but we add on the filter thickness as it changes the light path (2mm/3=0.66mm) so ~57mm (56.9mm), the imaging train is as follows :


Adapter
Distance (mm)Accumulated Distance (mm)Connector
OU03122M54(M) -> M54(M)
QHY 02077046M54(F)
QHY Spacers14.420.4screw
QHY OAG-M1030.4screw
QHY 0200552.532.9screw
inc filter0.633.5
QHY CAA adapter639.5screw
QHY268C CMOS17.557screw
FSQ85 Flattener to QHY268C imaging train

The combined weight is 1365g so I may need to adjust the balance of the scope a little as it heavier than my Atik460/EFW2/OAG setup at 1080g.

Completed – Imaging train ready for first light

I may have to adjust the spacers a little but I won’t know until I have received a 2-inch Optolong L-Pro light pollution filter which is currently on back order from FLO.

Transmission chart for Optolong L-Pro

QHY268M

The recently released mono version of the QHY268 looks like it has a proper screw face plate with a more acceptable back focus of 12.5mm. This is more reasonable and would allow me to couple a filter wheel and OAG as well not requiring a IR/UV cut filter.

Like SyedT on StarGazersLounge I could go back to using a guide scope and ditch the OAG and then the imaging train could incorporate a rotator :

ComponentDistance (mm)
QHY268M CMOS12.5
QHYCFW3M-US17.5
M54 (M) to M54 (M) adapter2
Pegasus Falcon Rotator18
M54 extension ring5
M54 (M) to M54 (M)2
Total57
FSQ85 Flattener/QHY268M Imaging Train – Credit SyedT

I was thinking of a rotator for the remote Esprit120 which has a generous back focus of 76mm so I should have no problems there but that will be another adventure for the future !