So whilst Dave was in his garden using the binoculars and failing down holes in the process I was setting up to relearn how to take images ….. it’s been that long and the weather hasn’t helped.
So all was going well except that the Moon was bright and right near the winter nebulas. Even how bright the moon was I decided to use the time and practice using the Monkey Head Nebula as my target.
The tripod was levelled and the iOptron CEM60 polar aligned, the scope was balanced, the Atik460 CCD was cooled (-25℃), OpenPHD calibrated, the plate solver completed and the successfully sync’d and . The first step was to autofocus on a decent bright set of stars before the imaging run.
That was when the night was over ! SGPro set about running it’s autofocus but strange things were happening. SGPro was reporting that the LakeSide Astro focuser position was changing but the star HFR profile was not changing and the V curve remained flat. Since the focuser position was “changing” I did not think to go out into the garden with a red torch for an hour.
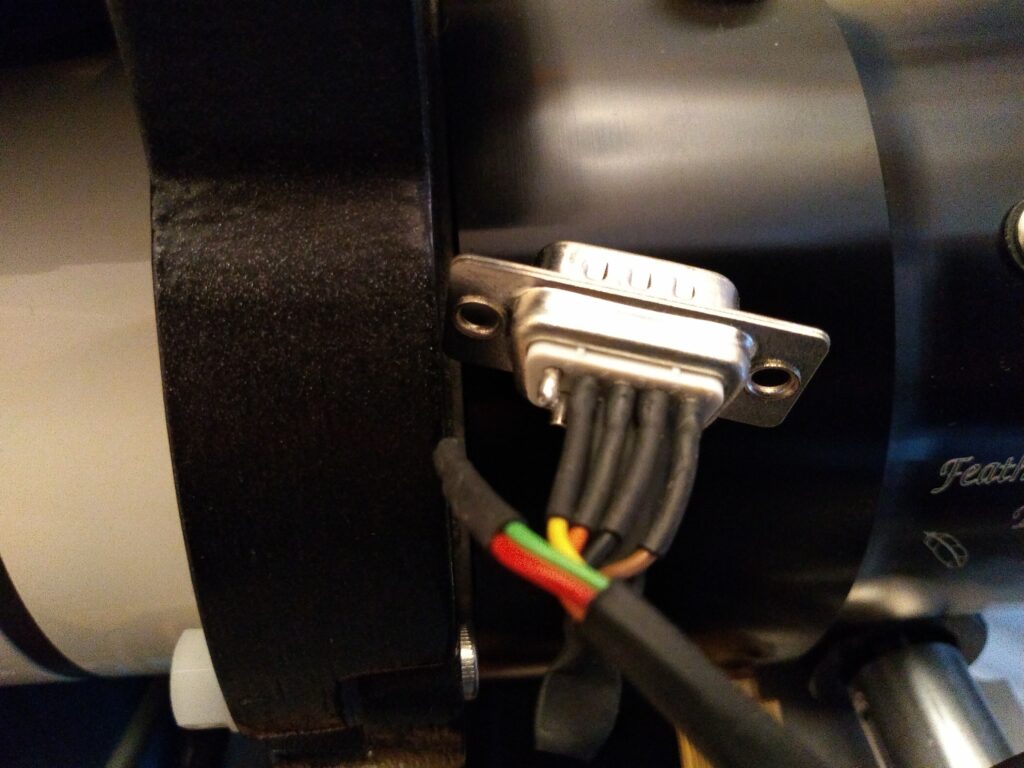
Upon inspection it was fairly obvious why it wasn’t working and inside the issue was proved to be a disconnected wire on the motor port.
Hmm …. I wonder what the issue could be !
I thought it would be prudent to double check which of the two spare connectors the wire came from and indeed it is the top one.
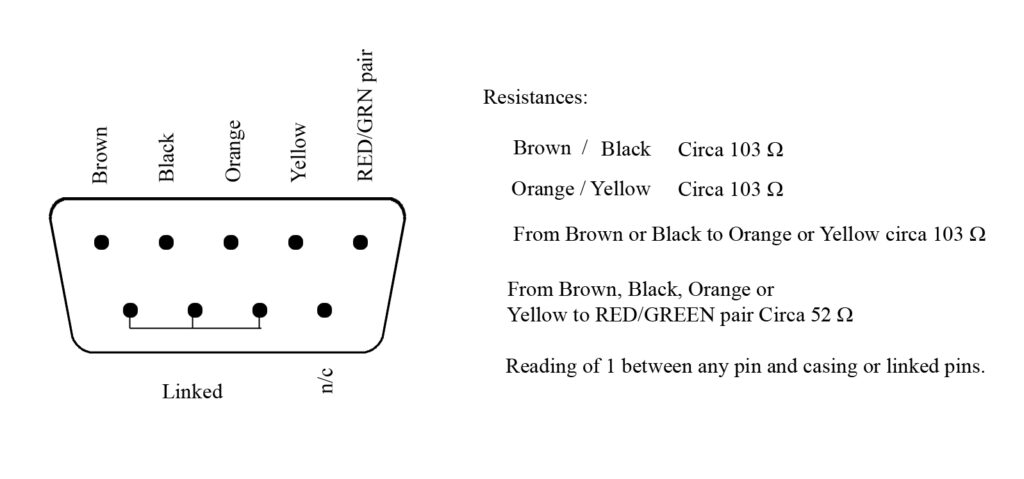
Removing the heat shrink outer and you can see that there is barely any wire left since the majority of it was left in the solder when it broke off. This will require a wire extension and the old solder with the remains of the wire removed first before new solder being reapplied.
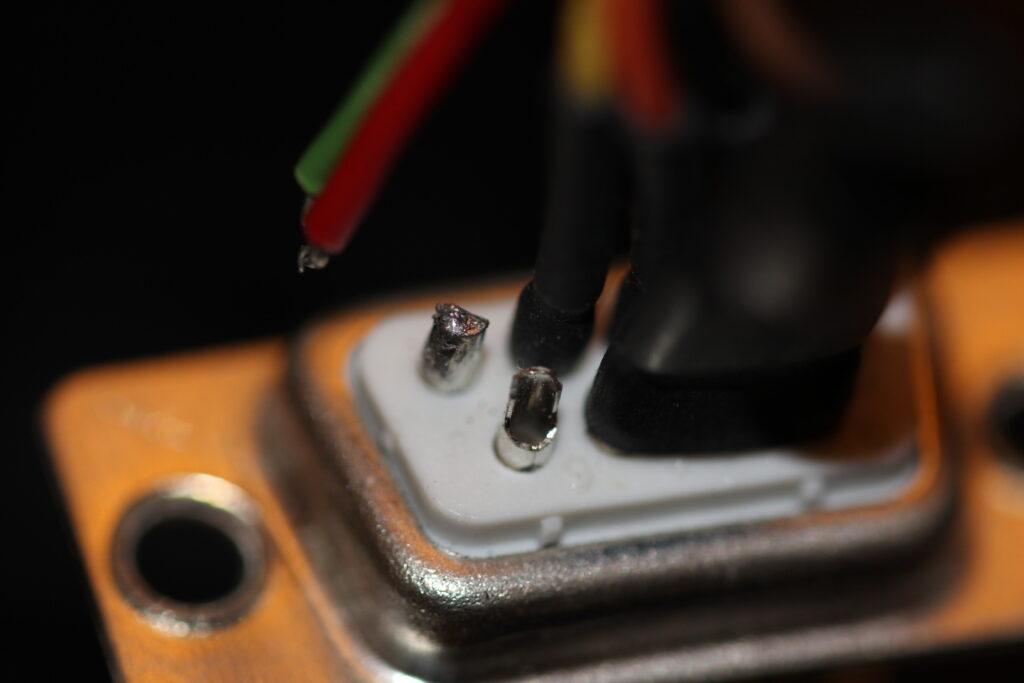
View of full cup connector with solder and empty cup connector
So since I’m really bad at soldering and I was worried about having to replace the whole unit (£90) I asked a friend who is fairly handy at this to perform the fix for me.
So during the ongoing Human Malware situation we have been concentrating on imaging asteroids, comets and more recently performing exoplanet measurements on the 12inch RC than long exposure deep sky astrophotography.
Astronomy is one those hobbies that is for most part is sole activity for the dark early hours of the morning and these days is usually done remotely. It was therefore disappointing that when one of the team went to use the Sky-Watcher Esprit 120ED for a night of astrophotography and found that he was unable to open the Optec Alnitak Flip-Flat. As the lockdown and travel restrictions progressed due to the initial wave of the human malware situation the issue was soon forgotten as we continued our focus to performing exoplanet observations on the 12inch RC for the ESA Ariel Mission.
Now that IMT3 has been decommissioned ready for it to be reborn as IMT3b at it’s new rural darker sky site I decided to take the opportunity to retrieve the FlipFlat and diagnose the issue at home on my desk.
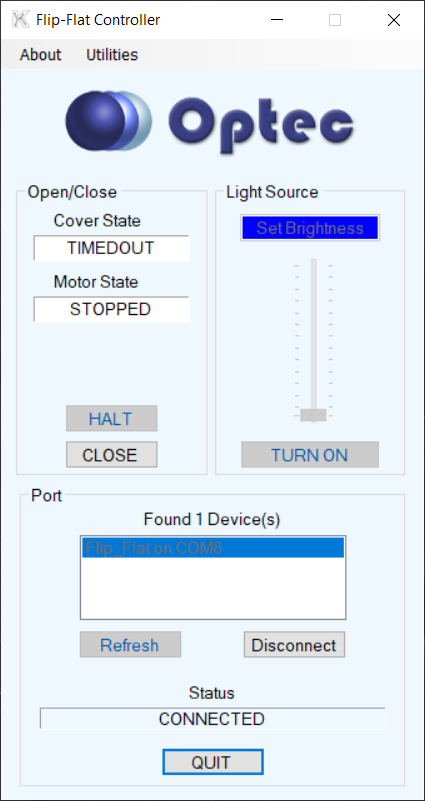
Using the Alnitak controller software, I could hear the motor running but it never seemed to complete the close or open. All it continued to display was the TIMEDOUT message as shown below.
Timing out !
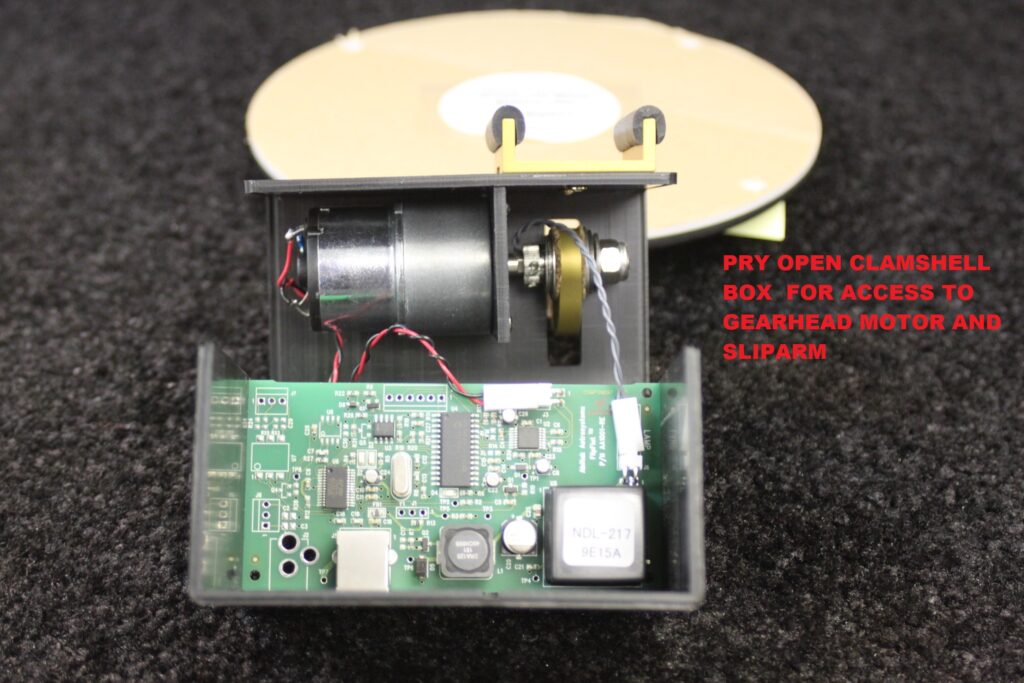
I sent an email off to the vendor I purchased it from but after a month I got no reply. In the hope I would not be left with an expensive paperweight I reached out to Optec. After quite a few weeks of getting no reply I was pleasantly surprised to receive a message from Jeff Dickerman (President) of Optec. Jeff apologised for not responding earlier and offered to help resolving the issue. The error message seemed to be a known issue and it was generally an easy resolution which required taking the box apart. Jeff sent me instructions on how to take the unit apart and fix the problem.
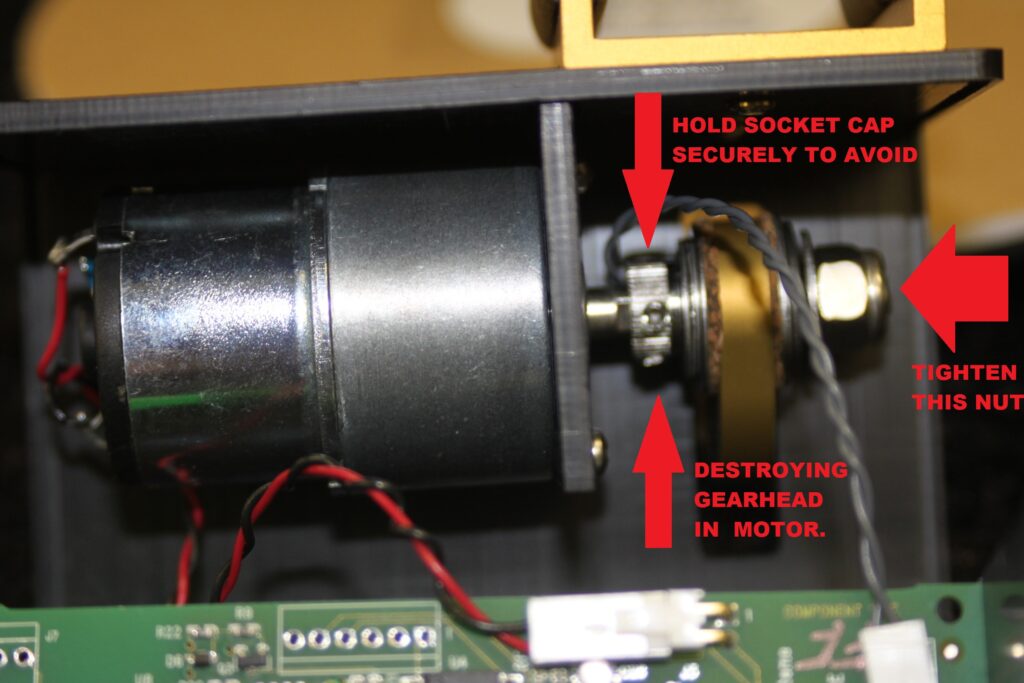
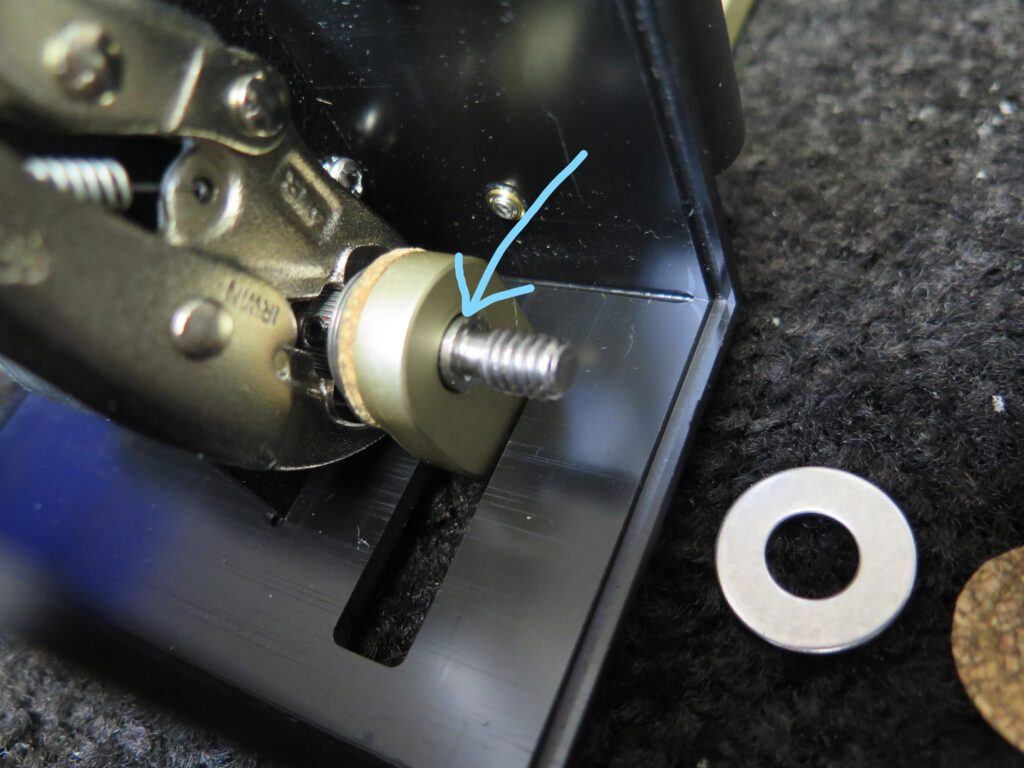
You’ll see the motor is attached to an internal wall with a modified shoulder screw and stack of Belleville washers. These spring washers are used to allow the arm to slip when someone grabs the lamp and physically tries to force the cover closed. Unfortunately they can also allow the arm to slip during an open or close operation which leads to that dreaded “TIMED OUT” message. Optec have redesigned the stack a bit to eliminate this issue going forward.
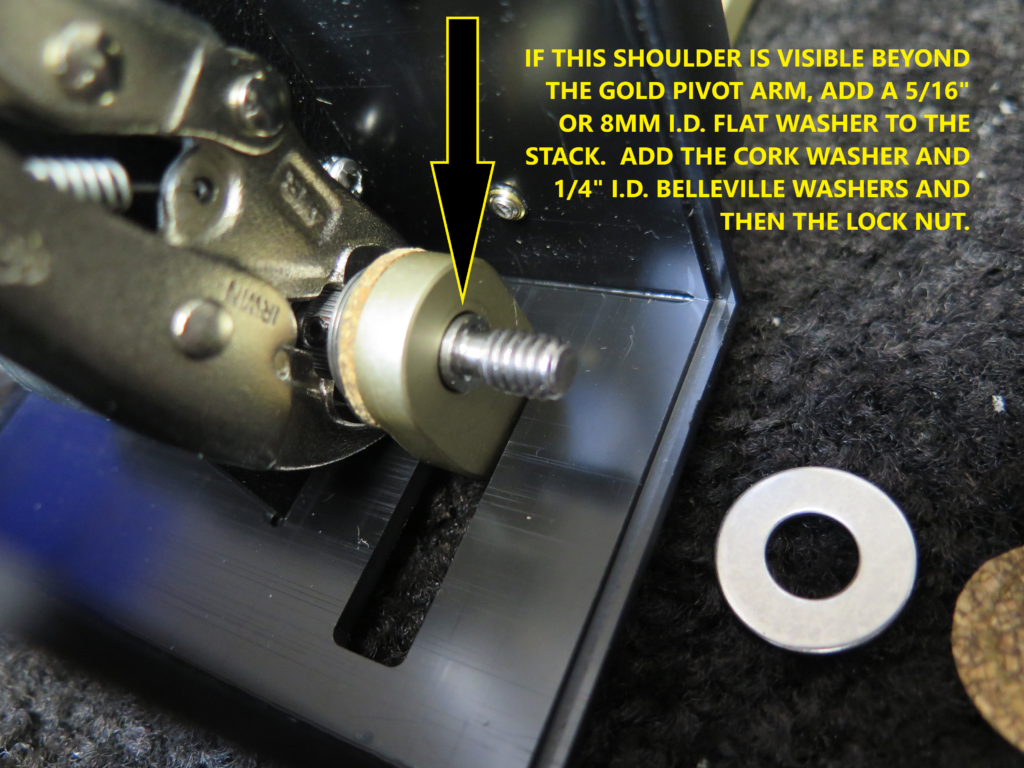
To correct, you might be able to adjust the washer stack by removing the lock nut and sliding off the washer stack to the pivot arm. Check carefully to see if the shoulder screw protrudes beyond the pivot arm. If so, rather than installing the cork washer next, install a 5/16” ID washer first to cover the exposed shoulder. Next add the cork washer and stack of Belleville washers. Finally screw the lock nut back in place and tighten while holding the shoulder screw near the motor (this is important to avoid breaking the internal motor gears).
Step 1 – Pry open clamshell
Step 2 – Shows what to secure
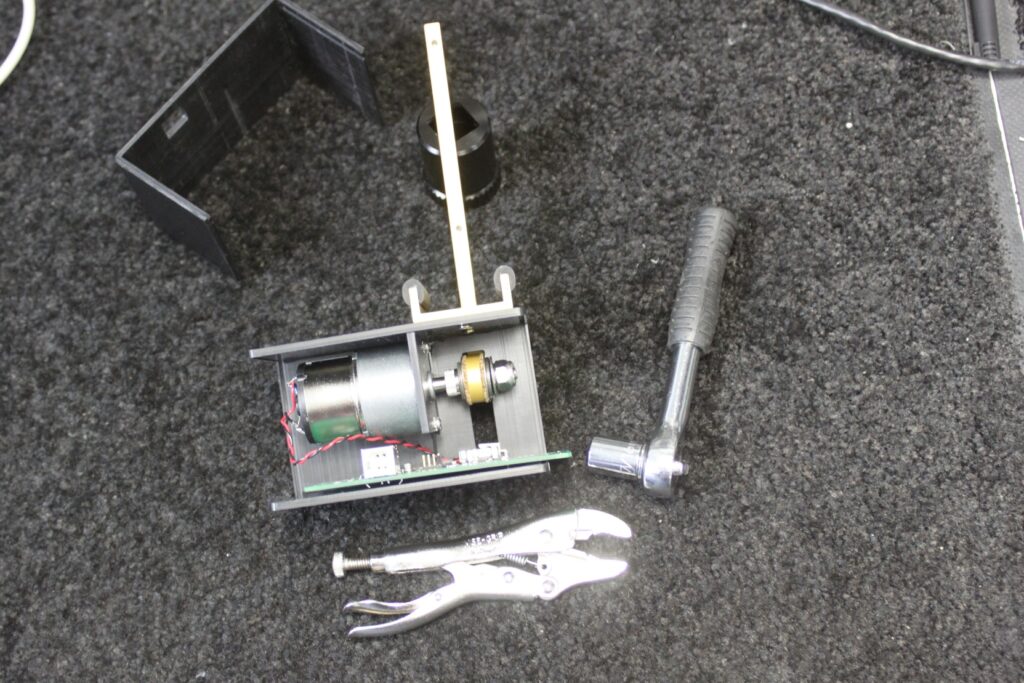
Step 3 – Tools needed
Step 4 –
Step 5 – Check shoulder visibility
Step 5a – Shoulder
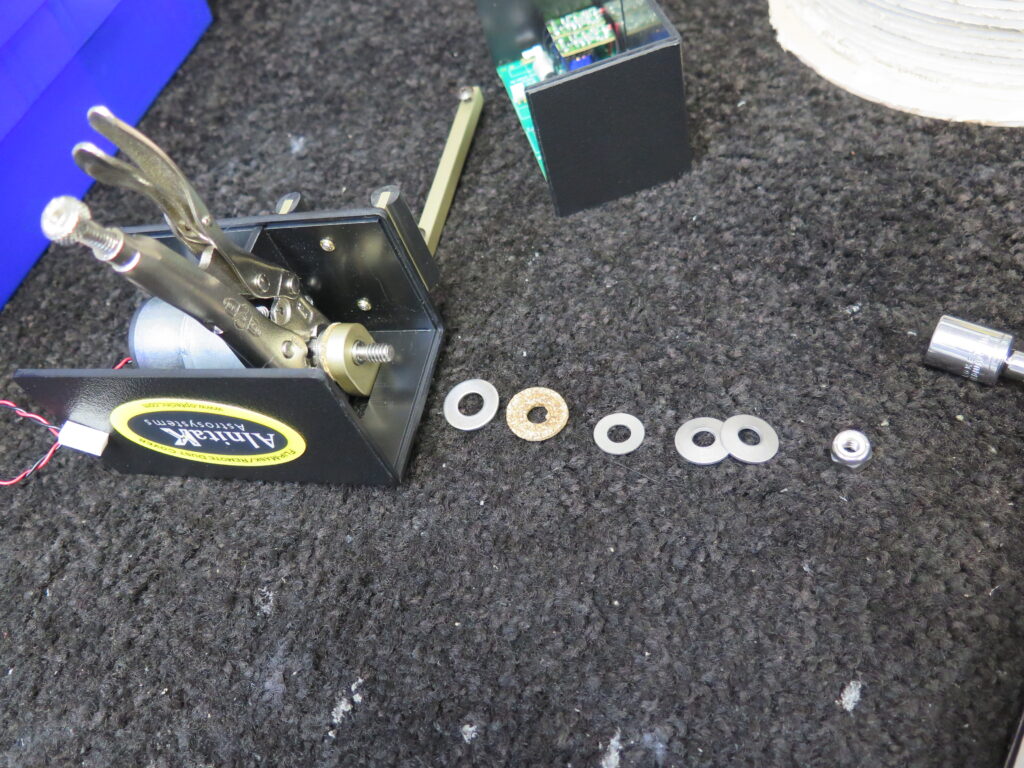
Step 6 – Washer Stack
In the end I decided to courier the unit back to Optec for repair as I did not want to render my unit completely useless in case I made a mistake.
I’m extremely grateful to Jeff, Tina and the team at Optec for all there help, patience and understanding. I’m a very happy customer and the flip-flat will be rejoining the Esprit120 when the IMT relocation is complete at it’s new rural location. I can then do a Homer Simpson and annoy Dave with “Flap goes open, flap goes shut, flap goes open ……”
So for a short period of time we had settled on using AllSkyEye. Recently we noticed that the author had issued a Kerogram and stretched horizon generate of the latest image but only available in a new Pro Edition.
The Pro edition was only £20 for a 3 user license, the author gives this purchase as a donation to the charity of his choice – good man ! So now we have AllSkyEye Pro in use at the IMT2 and IMT3 domes.
Latest Image with custom text overlays
Latest Image Horizon Projection
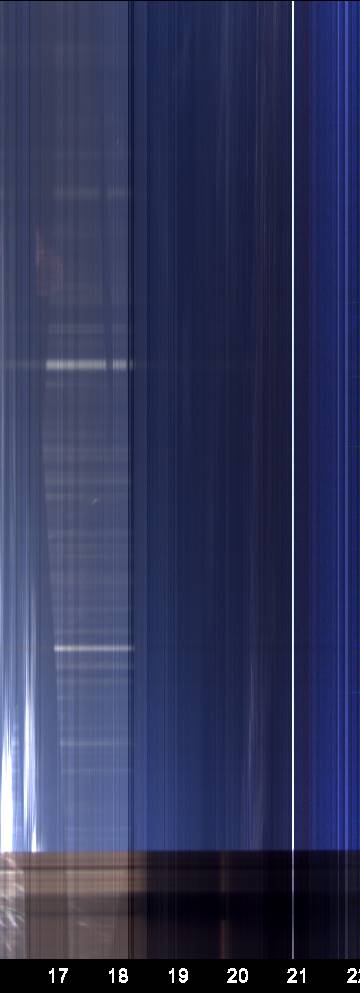
A Keogram is an image composed of slices taken from images in a sequential time order.The slices (which are always taken from the same location and with the same shape) are stitched together to form an image displaying a timeline of the selected part of the image as shown below.
Keogram
We still have the dark map to take to remove the hot pixels from the image but at the moment it gives us a nice view remotely before we decide to open the dome – that’s if the AAG Cloudwatcher limits agree and it thinks it’s safe to do so of course !
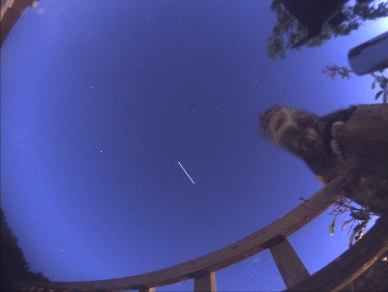
Bob noticed we had our local security guard aka Fluffy watching over his night’s imaging and turning to watch an ISS pass.
Fluffy stands guard at the weather station as the ISS passes over
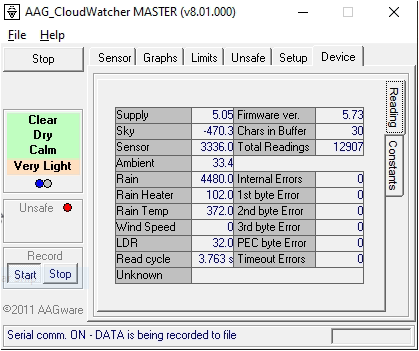
We recently decided to replace our existing weather station with one that had better ASCOM integration. I had previously looked at the AAG CloudWatcher but at the time felt it offered more than we need but that turned out to not be the correct choice.
We ordered the AAG with an internal humidity sensor, the optional anemometer, mounting kit and 10 meter communications cable. Due to the ongoing human malware situation it took two weeks for it to arrive from Spain and was delivered to the IMT3 chief TOSA.
Once the new PSU arrived the Chief TOSA then set about removing the existing weather station and installing the AAG cloudwatcher.
All Sky Camera, AAG CloudWatcher, Unihedron SQM and another rain sensor
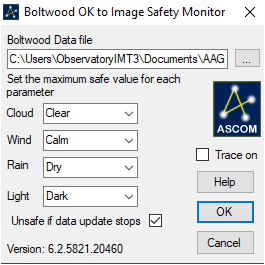
This also meant connecting the safety relay circuit wires to the Pulsar Dome, installing the AAG software, downloading the ASCOM boltwood driver and configuring SGPro. Within SGPro we have set the safety status set to be “OK to image” where the required conditions are more stringent than the conditions for the dome to open. The reason being that we want the dome to open as the light begins fade and allow the scopes to cool down but not be okay to image until it is dark.
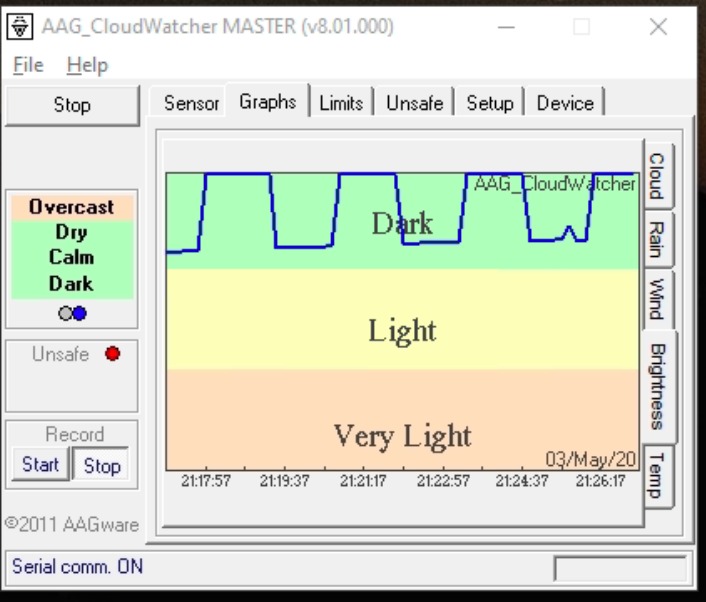
On the first night of operation we ran into a problem. Unlike the other sensor readings and graphs we would see the temperature and cloud readings have an expected shape but the sky brightness sensors kept going up and down at a regular interval then gave the graph a saw-tooth shape.
Unfortunately this resulted in the safety status going on and off until we overrode it. We sent a quick email to Lunatico reporting the symptoms and asking for advice. It didn’t take long for Jaime to reply informing us that another customer reported the same issue and asked for a few days to investigate.
Good to his word we received an email from Jaime explaining the issue and asking if we could perform a firmware upgrade. Now due to the current lockdown restrictions this meant that I had to co-ordinate over the phone with the resident Chief TOSA to physically disconnect and reconnect the power whilst I remotely set the firmware update. The initial issues encountered were due to PEBCAK (Problem Exists Between Chair And Keyboard) as I had not read the documentation correctly !
New Firmware 5.73 loaded
That evening we watched and the Sky Brightness line graph was now as expected and not looking like a cog shaped wheel. Well done Jaime@Lunatico.es for the quick response and fix, Chief TOSA was a happy dome dwarf again and that’s what counts !
At the moment we are trying to get the cloud sensor to be more accurate to what we visually observe, this is an ongoing effort. We decided to record the AAG Sky Brightness sensor readings at various times and compare with our SQM readings :
Event
SQM
AAG Brightness Value
Civil Darkness
13.08
949
Chief TOSA setting OK to open
13.89
2100
Nautical Darkness
18.92
28588
Astronomical Darkness
19.03
28588
Using the above values it looks like we could reduce our chosen threshold level of 2100 to 1000 in order to allow the dome to open and the scopes to cool down. The Sky Brightness does not appear to change beyond Nautical Darkness. We are now investigating the correct value for the early morning from the AAG logs. This is so we know what the Sky Brightness value should be at which to stop imaging and close the dome in the early morning when unattended.
We still have at lot to configure and read up about using the AAG CloudWatcher but at the moment our initial experience is a positive one. Obviously we will be chatting to Lunatico about our level settings and make some suggestions regarding the software.
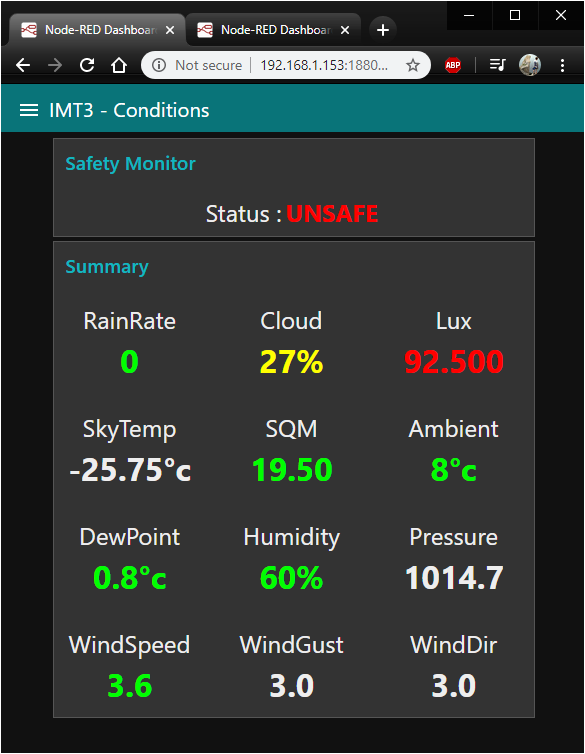
During one of our video sessions whilst watching the T-point run, Chief TOSA Dave mentioned about how it would be nice to see status information of observatory operations in a simple web page.
Since I’d never used Node-Red but had used ASCOM Alpaca via Python I thought this may be the time to learn something new. As I was designing this for Dave I decided to keep the layout, presentation simple along with colour coding in the spirit of Fisher Price toys.
The safety monitor is always visible across all tabs, the colour changes depending on the threshold levels we decide on.
ASCOM Alpaca Weather Conditions
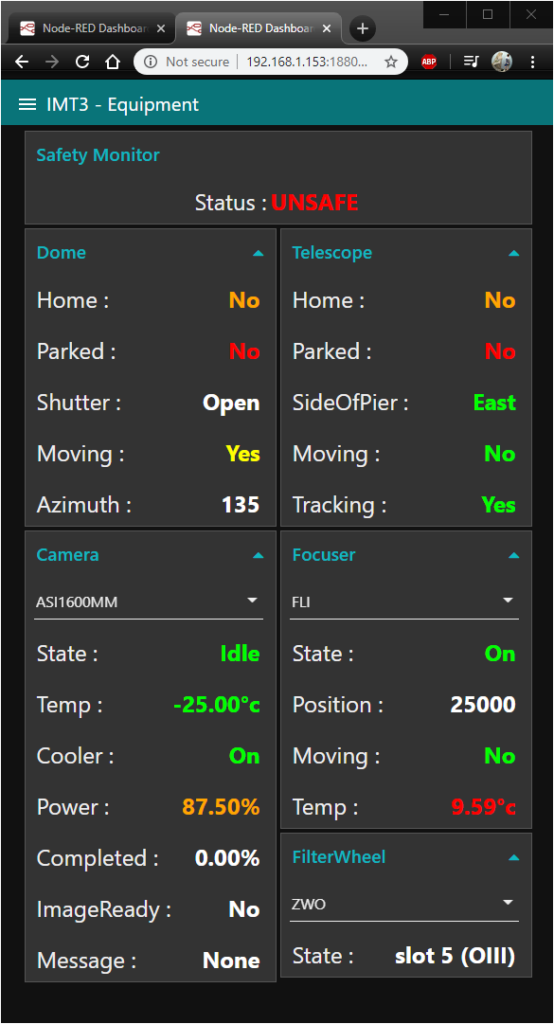
Likewise the main equipment tab displays the equipment status and allows us to select which camera, focuser or filter wheel to monitor.
ASCOM Equipment Status
This project is still very much a work in progress but there is many different ways that the same thing can be accomplished.
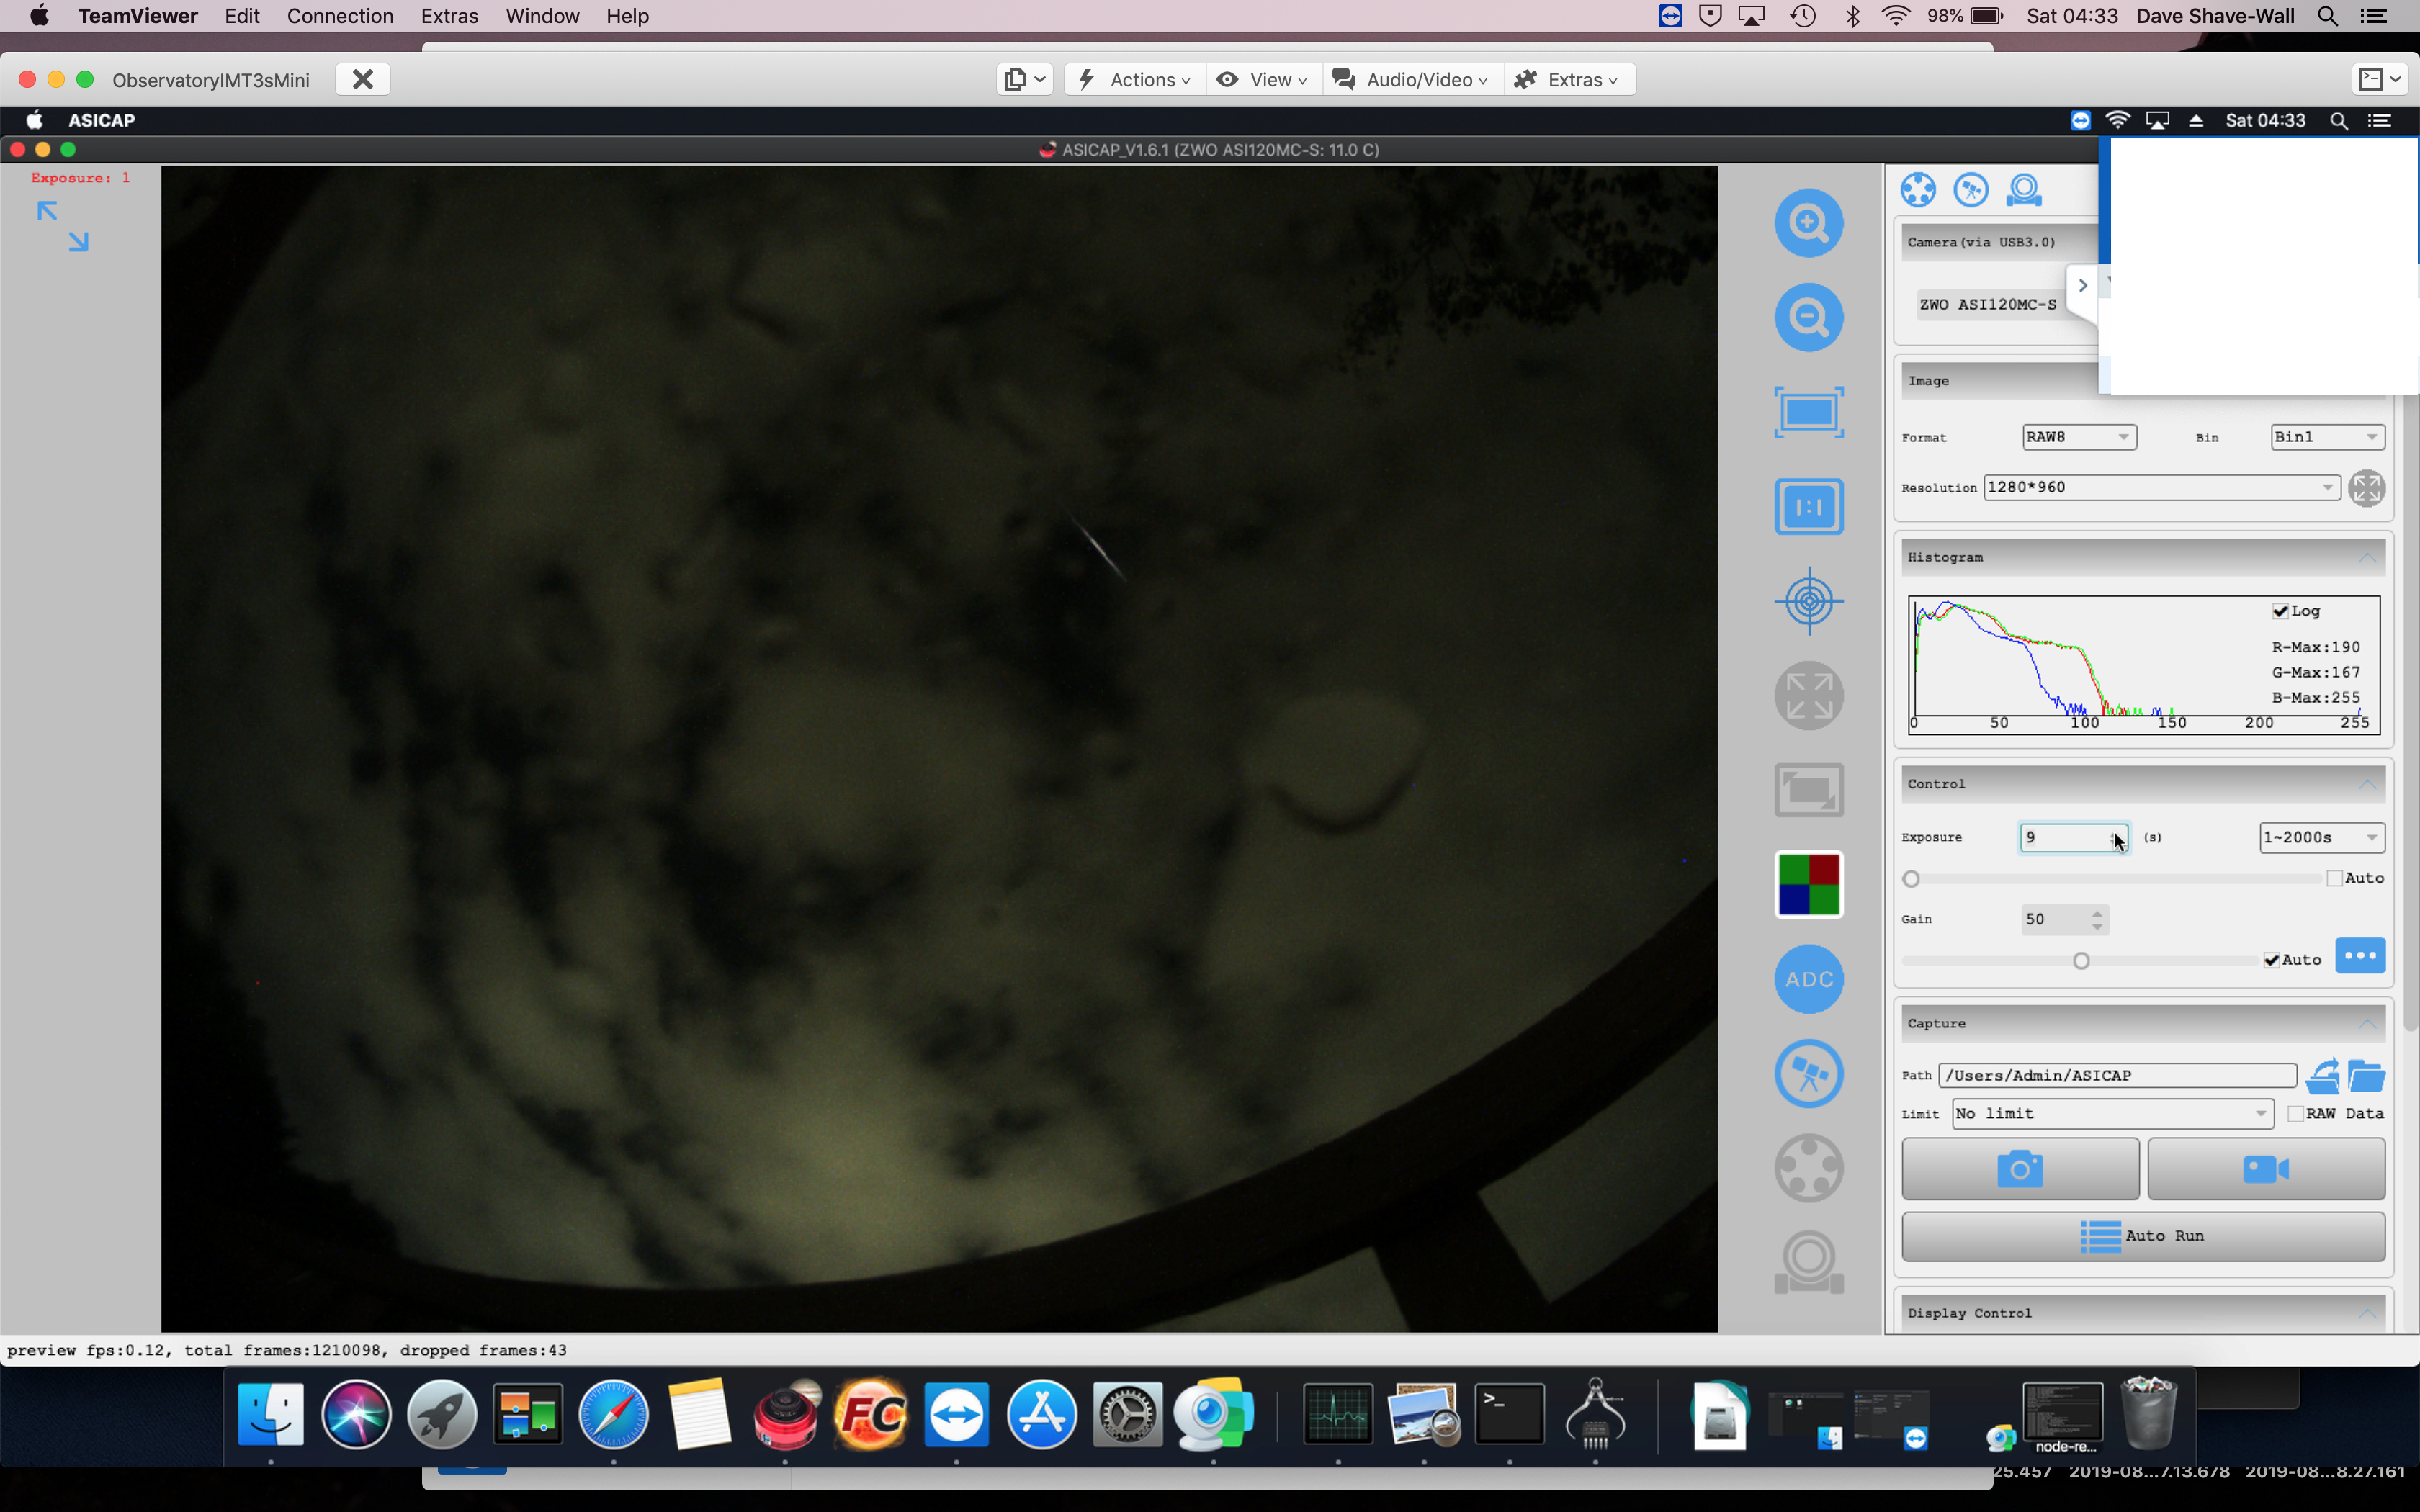
At the IMT we were experiencing stability issues with the ZWO ASI120MC USB3 camera on the MAC/NUC so we decided to move it to it’s own Raspberry Pi4 (4GB) as a cheap experiment.
The Raspberry Pi4 has the advantage of improved networking and connectivity including USB3. One of the downsides of the RPi4 is the increased heat generated by the CPU which is mitigated by housing it in a FLiRC passive case to dissipate the heat and prevent thermal throttling.
Additionally in order to prevent SD card wear and improve the I/O throughput we configured the RPi4 just to boot off the SD card but serve the rest of the file systems from a SSD connected via USB3.
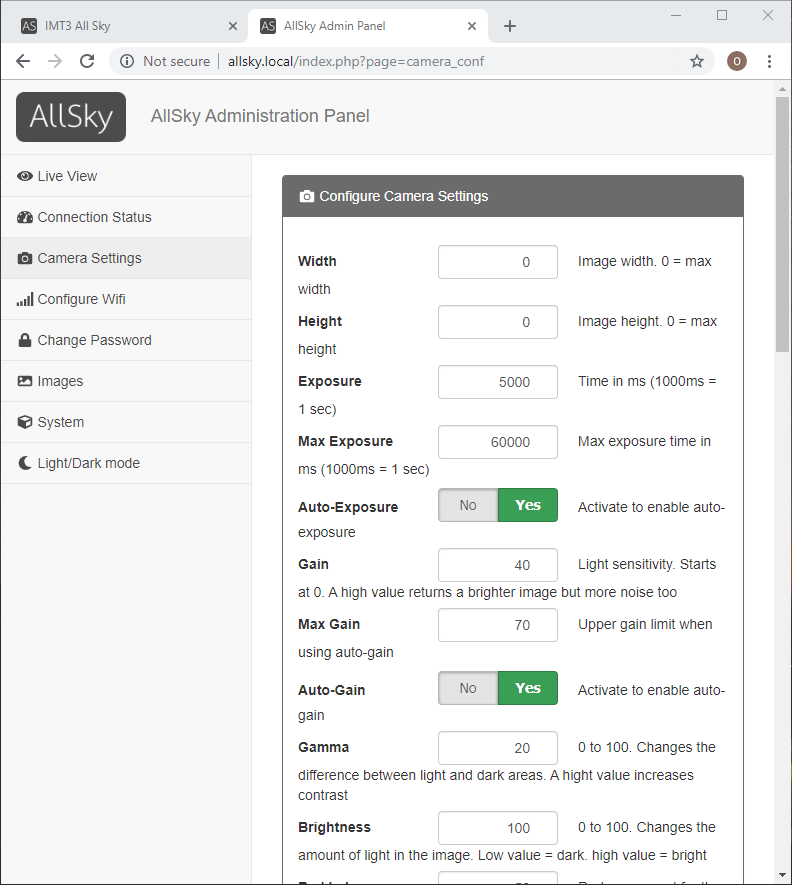
AllSky Camera Software
Using the open-source AllSky Camera project for ASI camera support we gain some advantages. The main advantage is that it’s open source (served via Git), provides an admin and public web portal which is addressed locally as http://allsky.local and the software can be set to start on system startup.
Admin Web Portal
The allskycam software can restart on system reboot but it can also be stopped/restarted via the web admin portal.
The configuration is simple and the mode/behaviour of the software can be controlled via the GUI or via a settings.json file from the command line.
Admin Portal – Camera Settings
I recommend you take the time to create a dark reference image, again this is done via the GUI panel as long exposure frame will show extensive hot pixels.
RGB24 image hot pixels with no dark applied
Non Admin Web Portal
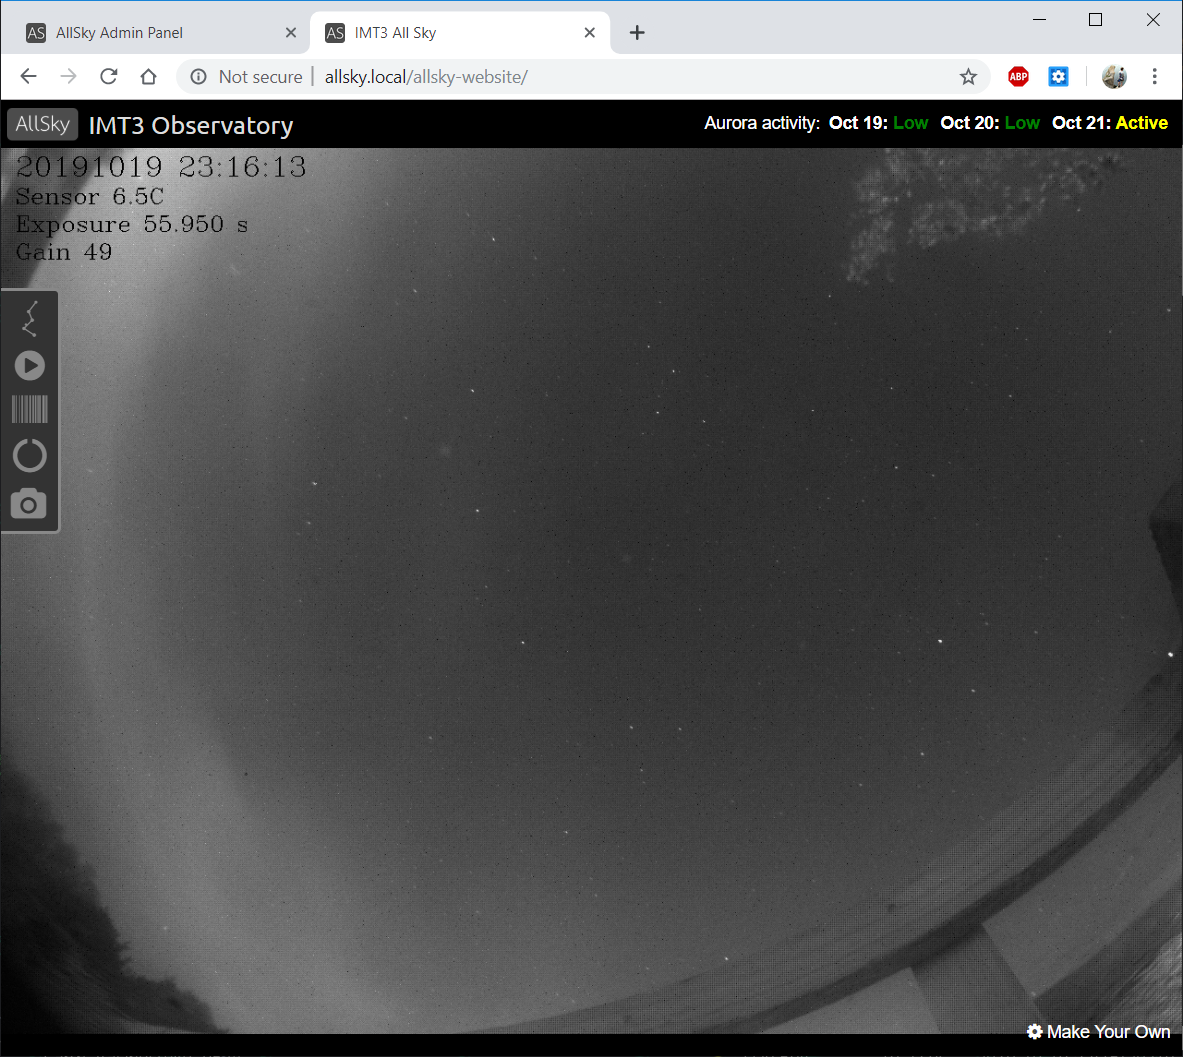
This is accessed via the address http://allsky.local/allsky-website and provides the latest captured image, a constellation overlay and the ability to view time-lapses and star trails.
Local network web site for non admin users
One of the nice features of the software is it’s ability to create a time-lapse of acquired images for the previous night. The following video shows the debayer issues as well as the dewing of the dome cover.
Time Lapse of evening showing dew issues/grayscale bayer
Bob is due to connect up the resistor ring he’s placed around the camera which hopefully should fix the dome dewing we encountered on the first night.
So it remains for us to fix and implement the following :
Resolve the lack of colour images (RGB24)
Image quality breakup
Resolve dark daytime images
Secure copy latest image/time-lapse to an external public website
Scale VirtualSky constellation overlay (180 degrees) down to 150 degrees
I find I notice some interesting things on the All Sky Camera, which is a USB 3 ZWO ASI120MC-S CMOS camera inside a purpose built casing and clear dome. Firstly I land up with beautiful clouds rolling past. I also noticed the light pollution as I mentioned in a previous post from the bathroom window upstairs. This image is when I had the camera on the ground by the observatory as I was testing the maximum length of powered USB I could get away with before data loss caused issues.
Bathroom light on
When the light is turned off it is noticeably darker.
Bathroom light off
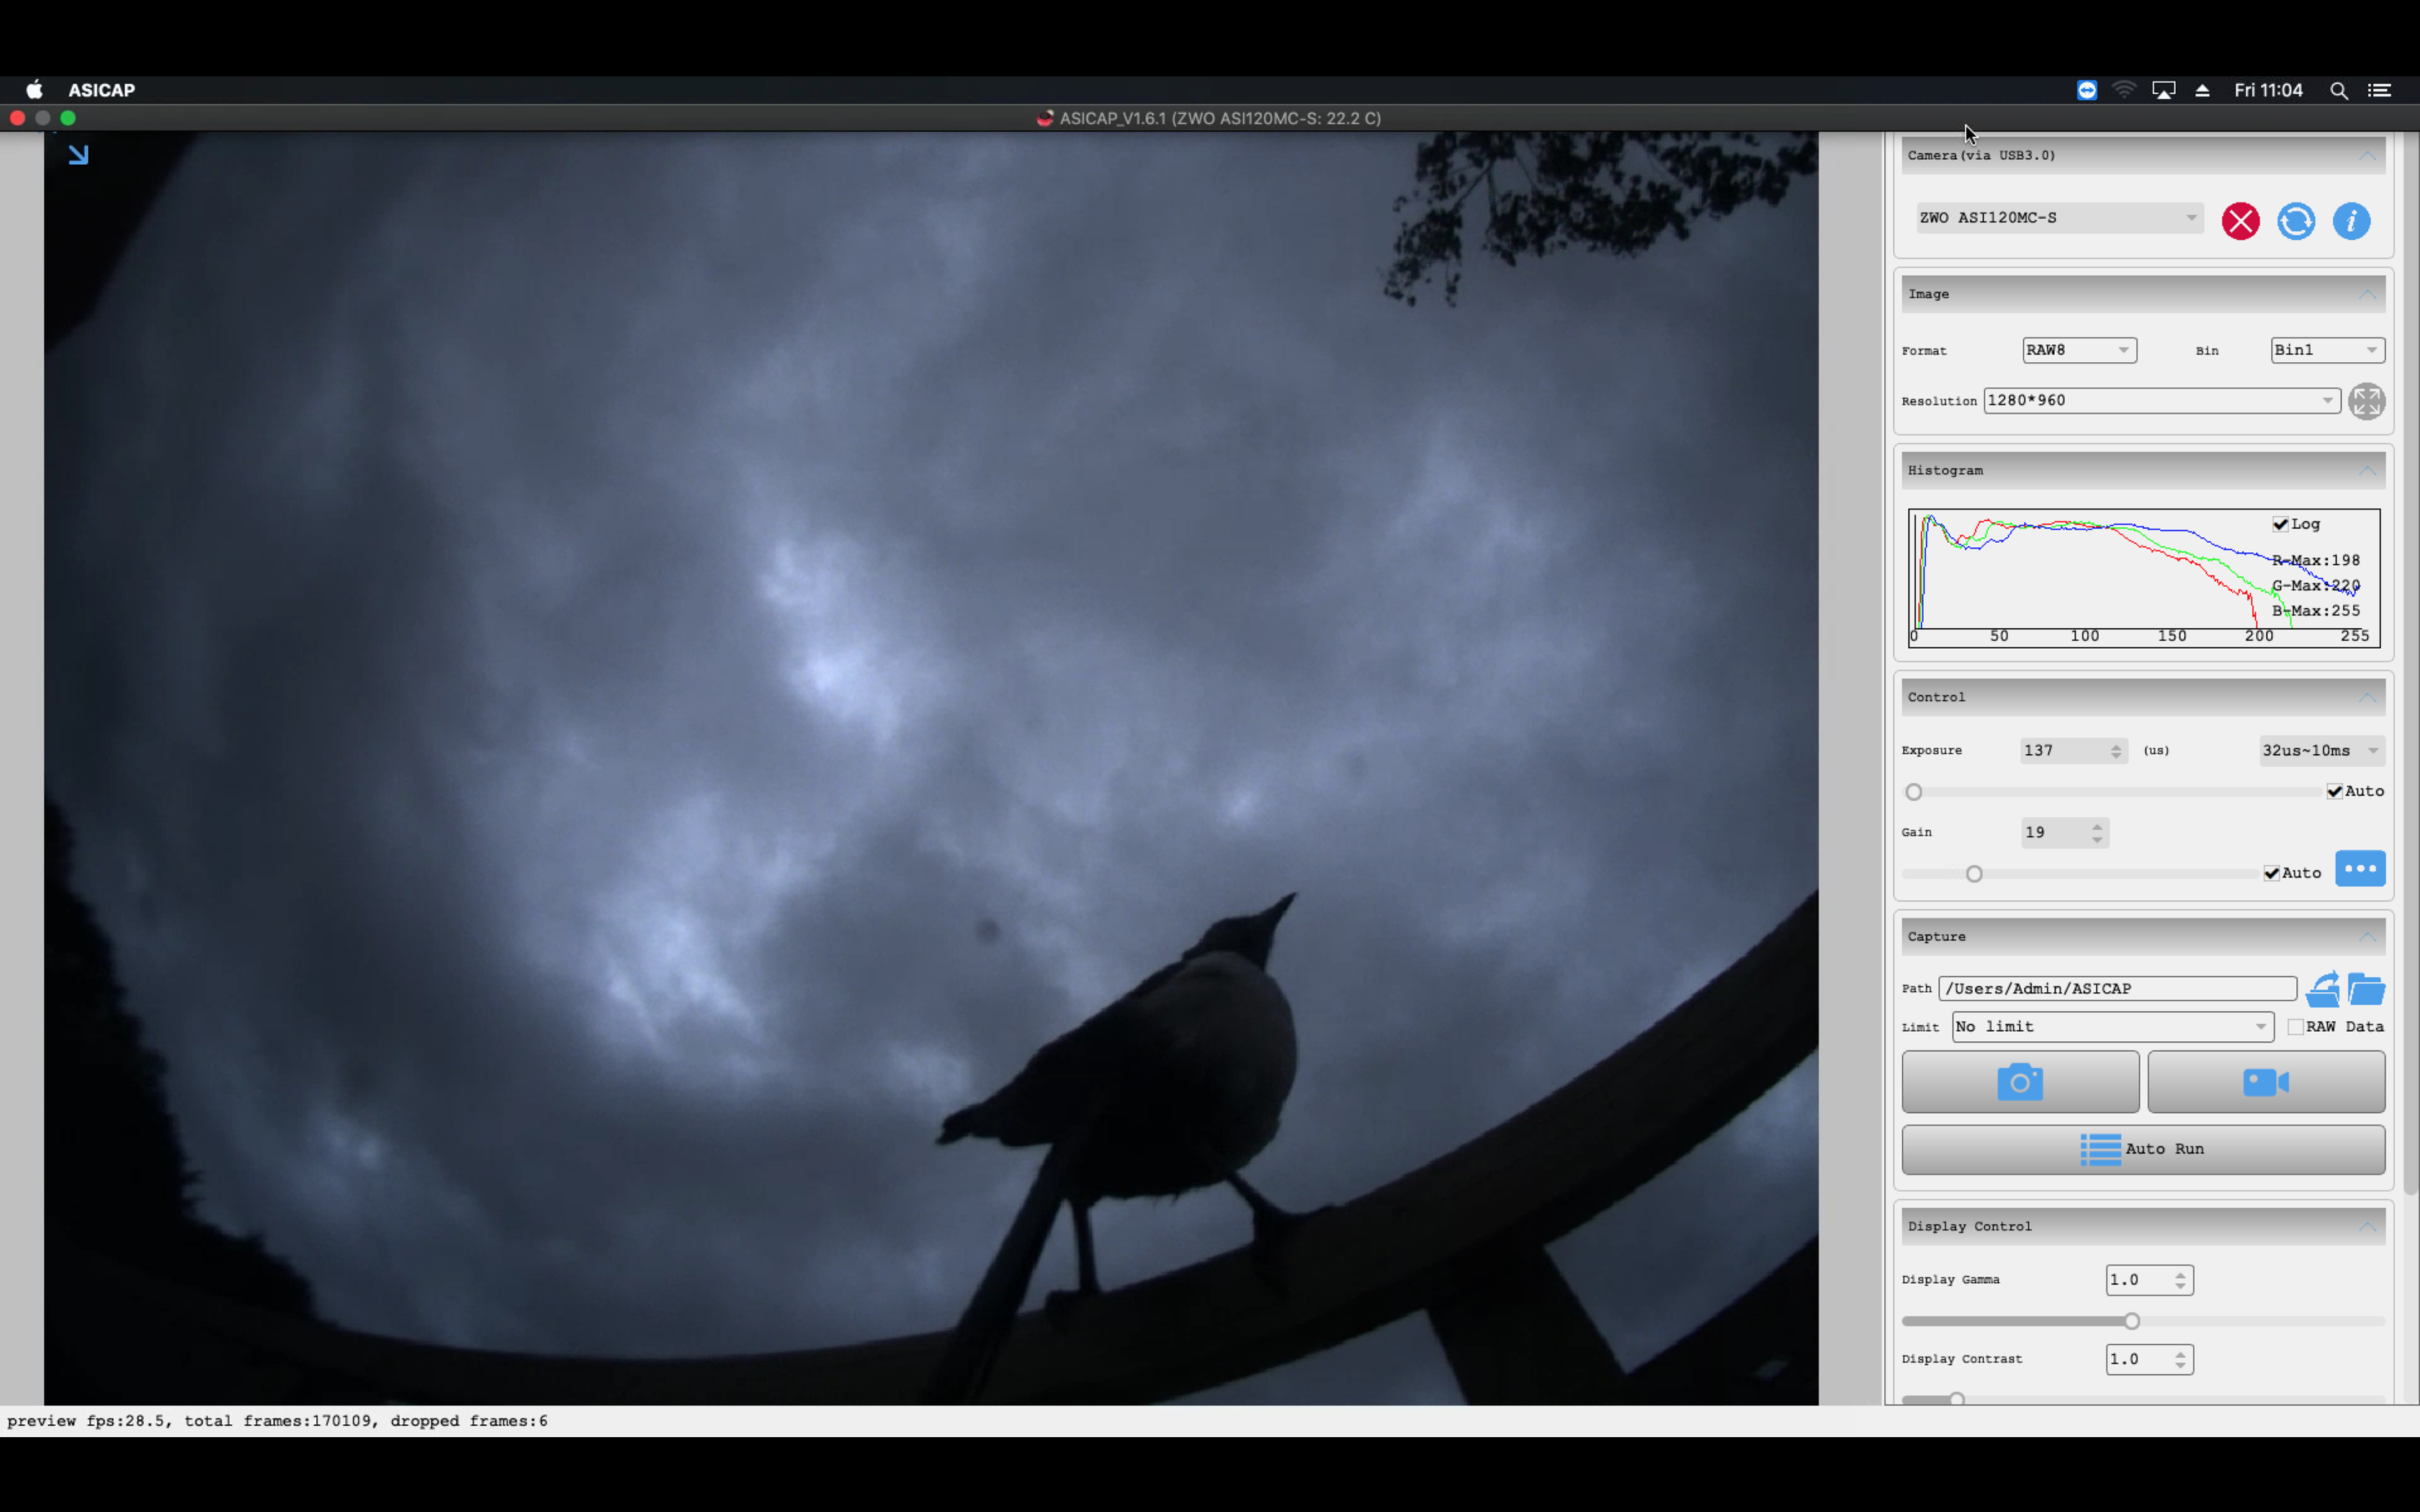
Sometimes I get visitors to the camera.
Daytime visitor
and sometimes I unexpectedly capture a meteor 🙂
Raindrop, Clouds and Meteor
So it transpires I can use a single 3m powered USB cable to the USB hub, I cannot use 2 x 3m powered USB as that causes data loss and hangs and I cannot use a single unpowered cable either.
Apart from the various benefits of darker nights such as better sleeping patterns for humans alongside a bat friendly environment then the benefits for astronomers cannot be understated.
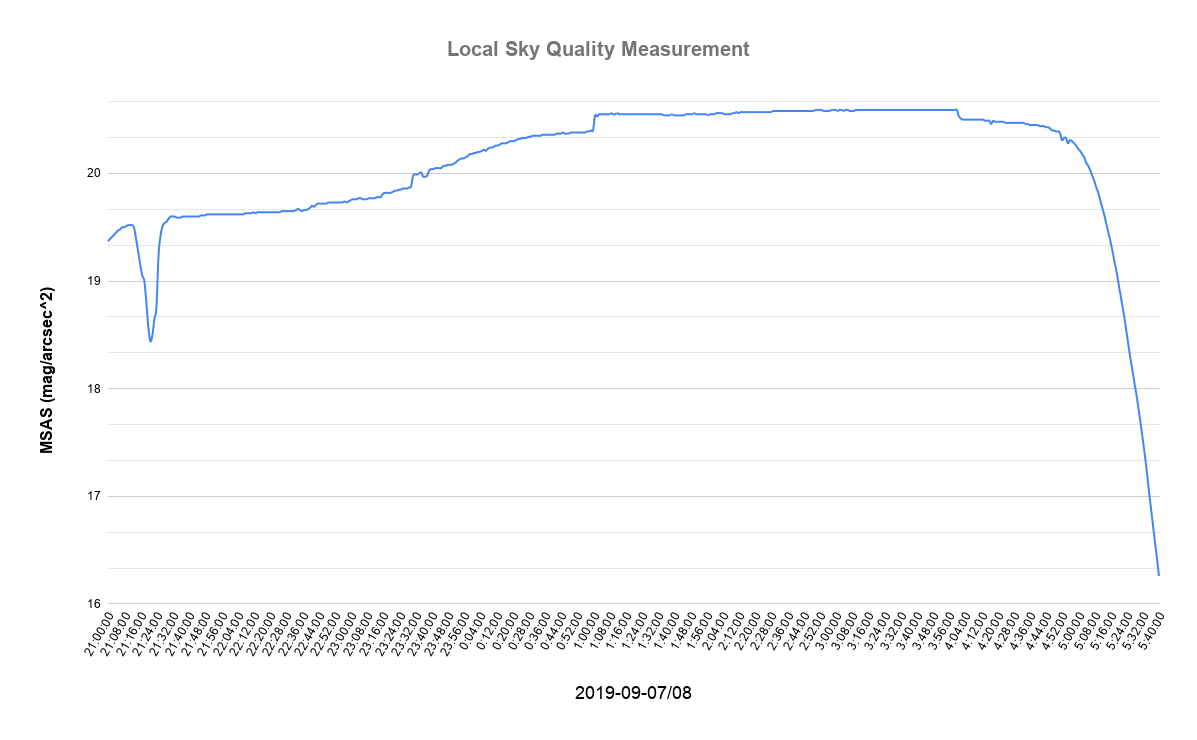
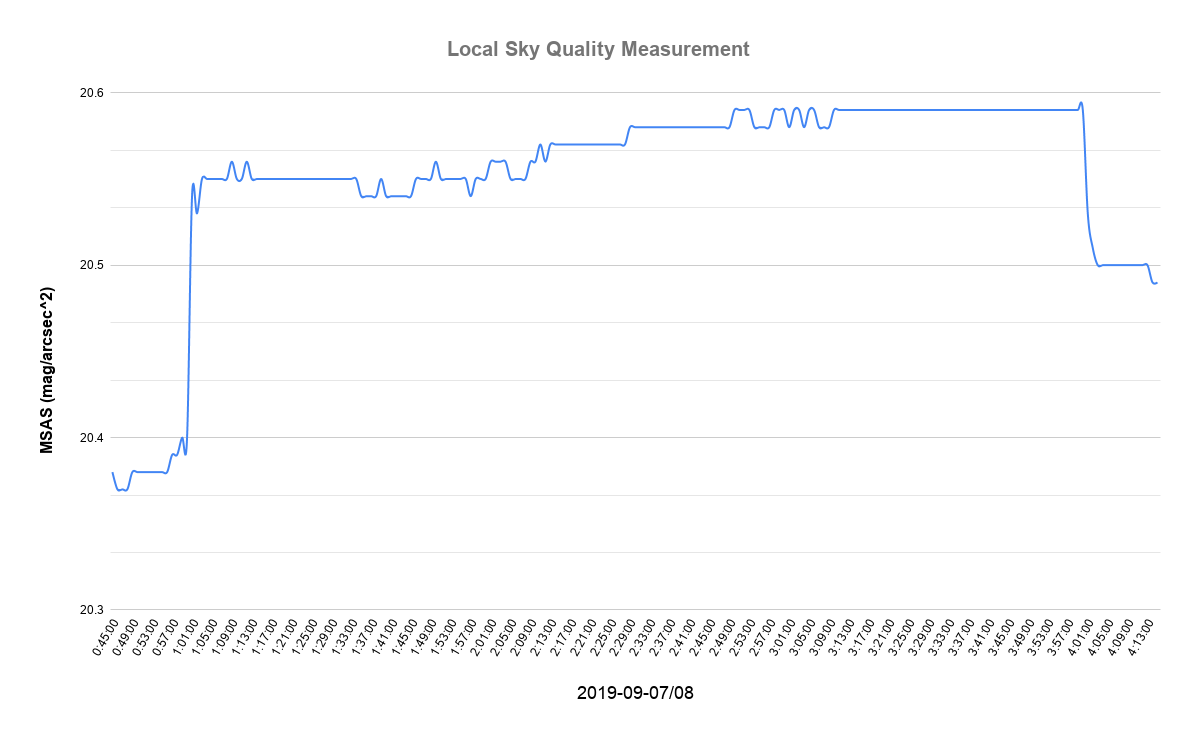
We use a Sky Quality Meter from Unihedron in order to measure the seeing conditions and record it in the long exposure deep sky objects we try to image.
Below is the graph for the entire night of 8/9th September 2019 and the effect of bathroom light close by can be observed at around 21:20. This clearly demonstrates how bad local light pollution can be. By 4:30am the astronomical darkness window had passed and the SQM was dropping.
The effect of the new street light policy at 1am is obvious as an increase from a SQM reading from 20.4 to a maximum of 20.59 is observed until 4am when the street light came back on again and the sky quality immediately drops.
This places the local area as bortle class 4 ( 21.69–20.49) and a long way from a rural setting (21.69-21.89) or even Kielder Water (21.88) which can only get worse with more housing developments and unnecessary outdoor lighting.
So although we are grateful for improvement in the local dark skies it would be great to see the lights staying off for longer in winter so we can attempt to get better images. Hopefully we can start to come close to appreciate what people saw before the intrusion of unnecessary artificial lights in our life bloated out the wonders of the night sky without having to resort to traveling to the top of La Palma.