So given it was a non-work night and predicted to be clear Dave invited me over to test the gear/setup prior to the BASEG Tenerife 2024 trip.
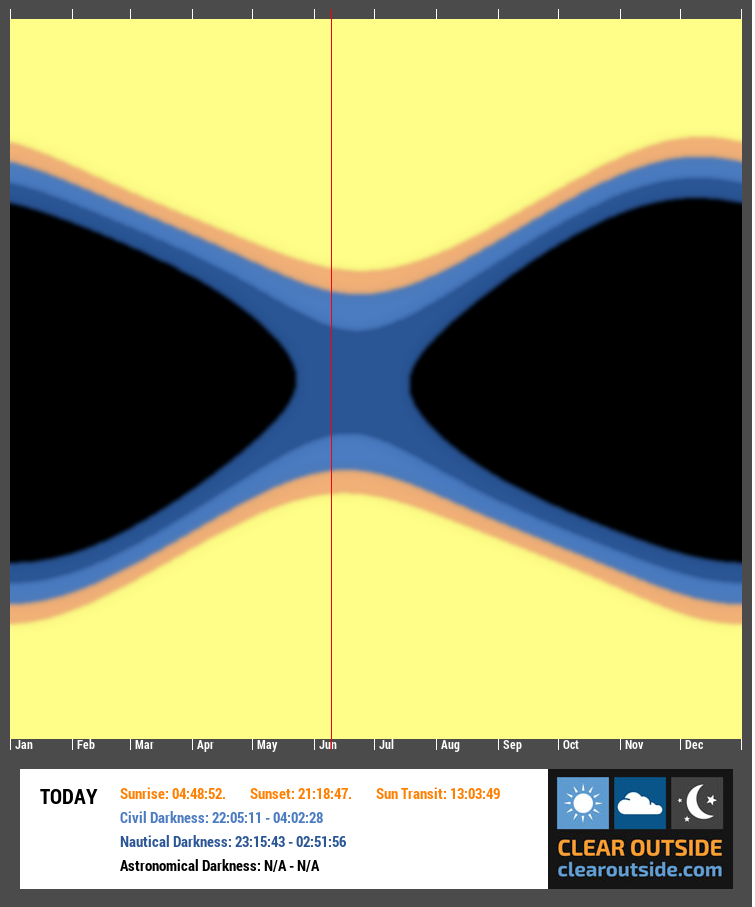
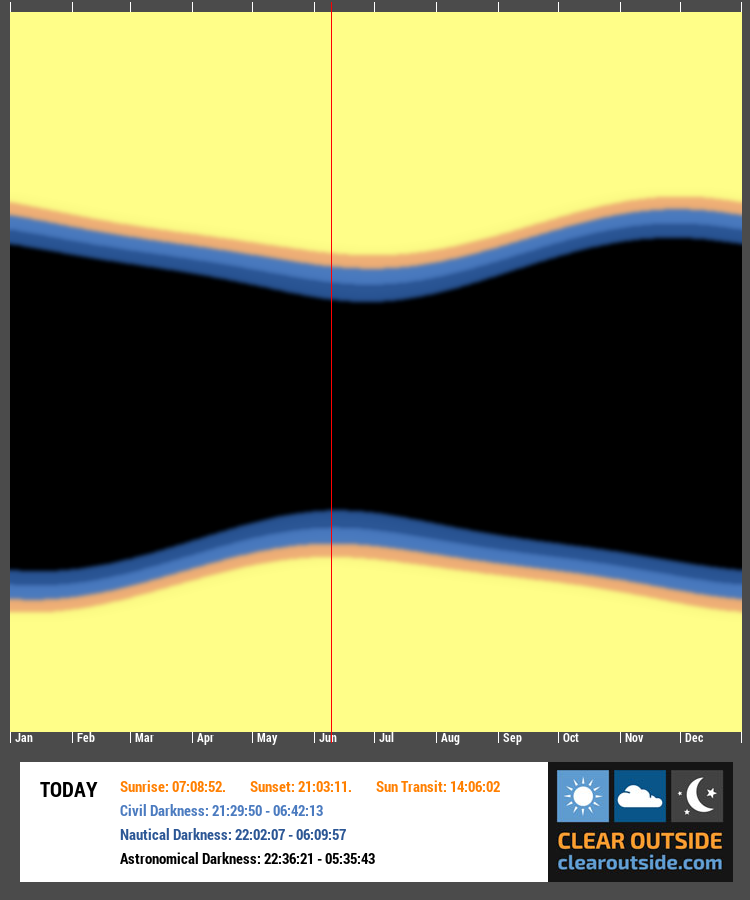
Given we are fast approaching the summer solstice, the nights are getting shorter and lighter. The Annual Darkness chart for IMT3 shows that we currently have no astronomical darkness and the nautical darkness lasts only for some 3.5hrs (left image) and now compare that the darkness graph for Mount Teide in Tenerife (right image) and although we lose some dark hours around the Summer Solstice it’s not as much as is lost being located at 52°N.
Setup – added BlueAstro stick station to measure pressure as Pegasus have not exposed the pressure measurement from the NYX101 mount to the ASCOM layer … why not ? Added weight bag to NYX-101 and GL.inet travel router to top of the scope as MS Windows keeps messing up the Wi-Fi hotspot on the Mele Quieter3C if it does not detect a internet connection ….. how stupid is that. Now I have a permanent hotspot thanks to the instructions given by Cuiv the Lazy Geek on his YouTube channel.
When attempting to polar align when using the QHY PoleMaster I noticed that the sky brightness below 15 mag2/sec (measured by a Unihedron SQM) produced a white screen due to over exposure – the minimal exposure in the now aged the QHY PoleMaster software (> 4yrs since last release) was 50ms which is too long even though I could eyeball Polaris in the early evening sky.
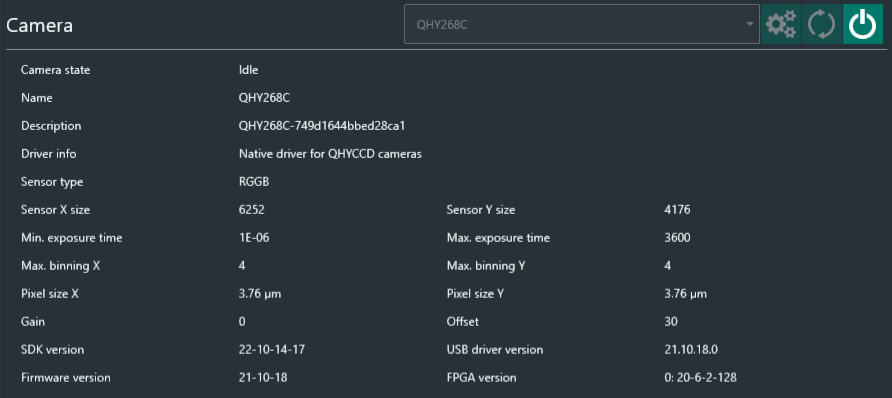
NINA 3.0 start up had not detected the QHY native driver and after I shutdown and restarted the app it then was able to detect the QHY 268C camera. However, it disconnected when it could not cool to -10℃ which I’ve never encountered before. I did eventually managed to get it cool and stay connected.
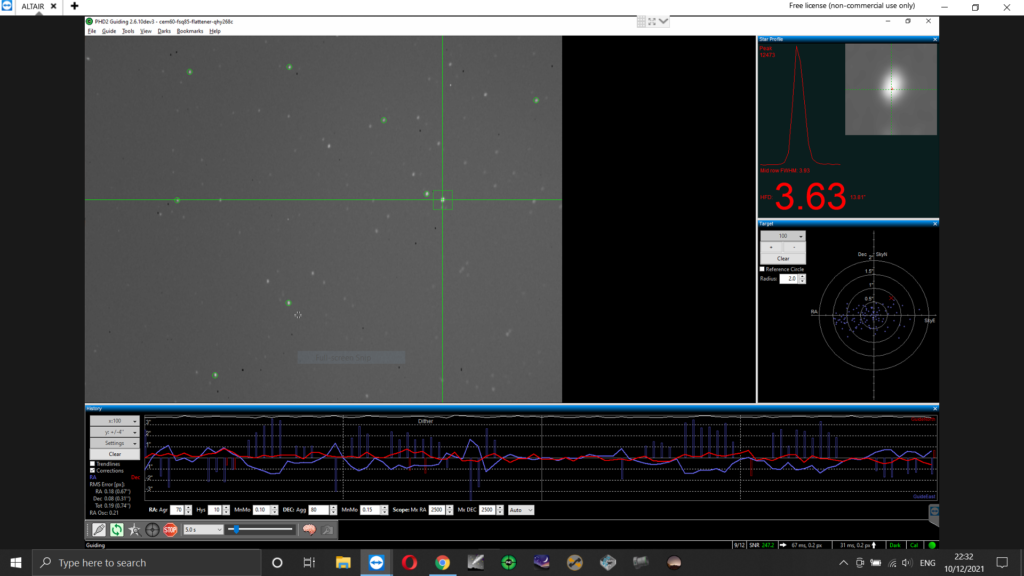
During guiding calibration OpenPHD2 would constantly complain about losing the star. Again the star was clearly visible on the PHD display and after downgrading from 2.6.13dev4 to dev3 and then I suddenly realised the value the error was referring to. I changed the minimal star HFD down to 1.0 from 1.5, also recreated the dark library to remove the possibility of the guider attempting to guide on a hot pixel.
Once guiding, the guide graphs were reporting 0.08 – 0.19 arcsec total polar alignment error. Hopefully I will learn to improve that and maybe repeat the polar alignment procedure or use PHD drift align to refine it.
I also forgot to change filter at the start of the evening from the Antila Quad Band filter to the Baader UV/IR filter. I noticed a halo from the bright star Arcturus in the constellation Bootes which I was testing autofocus on but I decided to continue regardless as I was only testing.
The goal for the night was to grab a base image of T Coronae Borealis (“The Blaze Star”) before it goes nova – it’s a reoccurring nova with a 80 year cycle. The star is currently hovering around 10.2 magnitude and it is predicted based on previous eruptions to reach around magnitude 2. As I ultimately wanted to perform some photometry on the star using the UV/IR cut filter I did want to blow out the cores of any bright star so I opted to use the ExtendedFullWell2CMS mode at gain 0, offset 30 with 60 second exposures. During the sequence I forgot to watch HFR/Star count graph and it rose above 5 which meant I have to refocus to (HFR ~2.0) and so due to my oversight due to chatting I will have to dump a lot of the early subs.
At the end of nautical darkness I stopped the sequence and used the NINA flat wizard (dynamic exposure) with the old PegasusAstro 120 flat panel at 100% brightness to create 25 flats and flat darks for a target of 33% ADU. After packing up and the with the pre-dawn temperature hitting 4℃ just before 4am I was looking forward to getting to bed.
At the next clear non-working evening I will attempt to grab some subs again but this time using the correct filter. Thank you to Dave and family for hosting me once more.
NB – NINA 3.1 was formally released the following day (09/06/2024) !
I’ve always liked what PegasusAstro have been doing with their astronomy equipment and I already own an original FlatMaster120, UPBv1 and a UPBv2.
Overview
Packaging – The mount transport box is (21cm x 34cm x 34cm) which is larger than the AM5 transport box. Weight/Size (6.4 Kg compared to ZWO AM5 5 Kg). The build quality follows the same high quality and blue anodised styling of recent products.
On opening the packaging I found damage to the mount knob indicated a possible rough handling in transit with plastic shrapnel in its plastic bag. This was superficial and did not impact the function or integrity of the mount.
There was no hand-controller supplied in the box but the manual hints that a hand controller can be connected to the ST-4 (EXT) port but no detail on if that is compatible with any existing hand controllers, so for now we have to use the Unity PC application, ASCOM access or the mobile phone application (Android).
The USB2.0 port is better than others I have encountered on other mounts such as iOptron and it grasps the cable securely and does not feel loose or feels like it would just drop off. This is especially useful as I tear down each night so let’s see over time if it maintains the positive connection it has at the moment. I connected the mount USB and power to the UPBv2 sat on top of the scope.
The carbon fibre tripod has no stone bag which can be found on other astro/photography tripods. You could suspend some form of weight from the leg spreader that might help prevent the tripod from tipping over with heavier scopes.
I found the Altitude adjustment a bit loose and takes a bit of getting used to even though the NYX101 has altitude tightening bolts which themselves seem to shift the altitude which again affects polar alignment if you are not careful.
Due to the compact nature of the mount there is no room for a GPS receiver so this function is relied upon either from your phone or by pushing the values from Unity or via Uranus device. If you push from your phone and you have Unity running then Unity will not see the change until you restart Unity.
I like the SW tripod (adapter required) and M12 counterweight compatibility, LX200 protocol support, polemaster placement support. There is a polemaster mounting plate but this is a permanent fixture via screws with no quick release mechanism. However there was a post on Cloudy Nights by PhilippeL on a release adapter he made, CAD link here.
Experience
Usage
Set your park/home positions and then enter in your location/altitude via Unity/Mobile phone app so that the mount understanding things like horizon limits.
As with other mounts, care needs to be exercised that your scope does not collide with the tripod legs, this is still a risk when using the pier extender with longer length scopes.
Unity Software
I couldn’t find a change history or date on the released Unity Platform on the website so it’s not easy to look back when things happened but you can use this link to check the currently available version. I used version 1.8.1733.15, when upgrading the existing Unity software the update process will remove all older versions including the ASCOM drivers and then install the latest version.
I do seem to lose wireless connection to my house router randomly even though the mount was positioned within 6ft of it. I had setup the router to give the mount a static IP address via DHCP but I don’t know it loses the connection – DHCP lease time is set high.
Firmware Update
When I first looked at configuring the NYX-101 to connect to my house network I had no end of trouble getting a connection. The only way I could achieve a connection was to have both the PC/laptop and mount connect to one of my travel routers which itself was also connected my the house wifi.
I soon worked out that the “Smart Connect” feature of my house wifi router was attempting to connect the ESP32 wireless (2.4GhZ) of the NYX to the 5GhZ band. Once I had put the MAC address of the NYX-101 into the exclude list of the house router 5GhZ band then it would reliably connect to the 2.4GhZ band. From that point onwards everything worked as expected and I could then successfully perform the firmware update to 1.15.
The 1.19 firmware (released the week 13th March 2023) also brought a pleasant surprise of the motor noise being reduced when slewing. This is a welcome change since making any noise in a suburban garden location in the early hours of the morning when people sleep with their windows open is highly undesirable.
Resetting park & home
I actually turned off the mount by accident whilst the mount was pointing somewhere in the sky so it lost its position and didn’t know where park and home was. This is easily rectified by moving the mount via one of the applications to the correct marks and setting the home and park positions again. This issue was mostly solved with a later firmware update where the mount now remembers where it is pointed once power is restored. However on performing a meridian flip (no slew & center) and then instructing the mount to home resulted in the mount not being it’s predefined home location.
Mobile App (Android)
Originally there was only Android11+ support but after raising a support ticket (support@pegasusastro.com) to request that the documentation state that the linked app only supported Android 11 I also requested a pre-Android 11 support. This actually appeared pretty quickly on the website so kudos to PegasusAstro for the fast response.
I do suffer regular disconnects from the mount when using the mobile app via the hotspot. I’m not sure why this is as I was sat right next to the mount, could be down to an idle time-out ?
I also see the NYX-101 disconnect from my house wireless router in Unity but could locate no reason why (DHCP lease was valid), I could find no entry in the Unity log files or see no reason on the router. Now this could possibly be either interference from other 2.4GhZ networks or down to the Aluminium casing, would an external aerial resolve this problem ?
There is no way to reconnect to the wireless other than shutting down Unity so as long as you have a USB connection then everything should continue working.
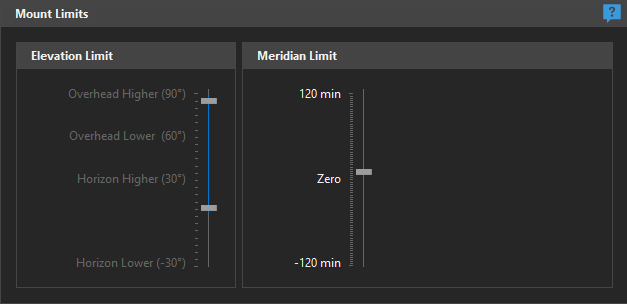
Mount/Altitude Limits & Meridian Flip
To begin with I set the meridian and altitude mount limits in Unity and then test the automated meridian flip using ASCOM simulator for the camera. Regardless would I did the mount would stop 10 degrees because hitting the Meridian. It slowly dawned on me that I had set the meridian limit to -10 which I thought was 10 degrees after the meridian but the value should have been +10 so it was actually stopping 10 minutes before the meridian ……. dooh !
Unity hard limits for Elevation & Meridian
Once I made the change then both NINA and SGPro performed the meridian flip just fine. There is also a switch to enable automatic meridian flip to prevent any potential crashes but I opted to leave this disabled so the mount would just stop tracking but NINA would continue taking new subs in both simple & advanced scheduler.
One item that would really help here in a text box with optional input to set either limits instead of having to grab the slider to see the current setting – I can query/set this in the API but it’s not easy to view and change using the slider method.
Polar Alignment
I used the polemaster software to perform a polar alignment but decided to utilise SharpCap to compare the alignment procedure and difference. Because SharpCap requires the scope to be slewed 90° so the scope weight was now on on horizontal the RA axis dropped causing the mount to shift and results in the PA being 4° off axis.
This would happen regardless even if I tightened up the axis bolts. Talking to another user he suggested at using a counterweight but to me this would negate the mount as a portable mount.
Guiding
Using the OpenPHD guiding reference document (link), it appears the that the harmonic gears have a period of 430 seconds with a periodic error of +/- 20 arcsecs or less. Two complete periods are required for the Permanent Periodic Error Correction (PPEC) before guiding any improvement will be seen, this is pertinent for the imaging train in use at the time. If you change the imaging target the model will re-initiate the PPEC learning cycle.
The recommendation is to set the guiding interval to 1 – 1.5 seconds and try to be within 30 arcsecs of polar alignment error. I certainly found keeping the FSQ85 setup to around 1.5 seconds resulted in better guiding graphs compared to 3 second intervals.
Support
After initially purchasing the mount I took my NYX-101 along to Astrofest 2023 (UK) for Evans to look at (by prior appointment) as I was not entirely happy with the resonance during slewing. I compared my mount against two other NYX-101 mounts in my astronomy society and it definitely sounded like it had been treated roughly during delivery transit. Although Evans did a great job to investigate the mount during the show, due to the noisy nature of the exhibitor floor it was not obvious that it had been resolved until I was in a quiet environment back at home.
On contacting PegasusAstro I was offered to have the mount picked up by DHL and couriered back to Greece for inspection. The whole process from DHL pickup was professional from picking up to receiving the mount back, the service was excellent and he mount was backed with me 7 days later. The courier communications was good but I received no notes or communication on what was done (board serial number was the same) under I enquired. The most important thing the mount operation was much better and more akin to the other two reference mounts I had listened to; my gratitude to Evans and the team for their patience with me.
It had been reported on various forums that the ZWO ASIAir had suddenly stopped working with the NYX-101 and some heated speculation quickly arose as to the reason why this occurred. ZWO was quick to dispel any conspiracy theories and rightly put their hands up and stated it was a bug in ASIAir software (link) which would be resolved in the 2.1 beta release (you will also need the latest firmware). Kudos should go to ZWO for setting for the story straight and resolving the issue to the benefit of the astro community.
First Light Use
So Dave asked me to come over to the observatory for the evenings of 26th & 27th so I could do a test run on the kit I would be taking to Tenerife later that Summer. At this time the M101 Supernova SN 2023ixf so I decided to image it alongside Dave using his 17inch RDK and Bob’s 24 inch RDK.
Using the QHY Polemaster I noticed that when I rotated the mount for alignment that the chosen calibration star moved away from the rotation circle – is the mount slightly misaligned ?
The guiding document available here were extremely helpful in testing out various settings. Certainly I was seeing some trailing around 3 seconds but that could have been due to the PA issues or balance. I ended up using Predictive PEC and setting the interval to 1 second just to see what would happen. I still noticed large variations every now and then and it was not as smooth as I’d hoped for.
Slewing to a target after plate solving it was clear that the mount had moved outside my FoV at first slew. This was unusual for me as my CEM60/NEQ6 first slews were always in the FoV, this issue may be related to an situation observed by Chris Woodhouse and can be rectified by following his forum post.
Chris asked me to confirm his experience of overshoot when slewing in the DEC axis causing the target not to be in resulted field of view. Chris had raised a support ticket for this issue and PegasusAstro were investigating.
Closing Thoughts
The NYX-101 is more expensive that the competing ZWO AM5 but the NYX-101 offers more weight carrying capacity (20 Kg versus 13 Kg without counterweights) and compatibility with those already own QHY Polemaster, SW NEQ6 or similar tripods.
The direct open API (REST) via Unity or access via ASCOM Alpaca allows me to query components and it’s easy to script up web status pages quite easily.
If you only ever plan to use light imaging equipment and are already invested into the ZWO eco system then the AM5 might make more sense but if you wanted to use other vendors equipment then for me ZWO is a closed ecosystem with limited flexibility.
If using USB3 cables for any equipment such as CCD/CMOS cameras then it is wise to invest in a high quality shielded cable as USB3 tends to have issues in the presence of 2.4GhZ. I used 5Ghz wireless from my Mele Quieter3c mini PC to avoid this problem but I would advise to use good shielded cables in all situations.
I’m looking forward to taking the mount on the upcoming trip to Mount Teide, Tenerife to see how well it performs under dark and clear skies 😀
Wishlist
The following wishlist is based on my experience of using the NYX-101 alongside the Ultimate Power Box v2 (Firmware 2.4) and NYX-101 (Firmware X.Y.Z) via the Unity software (1.9.1825.32) :
Would be nice to see dust covers provided in the box for all the various ports on the back of the mount.
An external aerial port might be useful for the included ESP32 wireless connection ?
An option to power other Pegasus items such as the UPBv2 from the aux power port on the mount ? This would mean that then I would only have one cable going up/down from the scope to the mount which is especially useful for those who are mobile and don’t use the NYX mount in a permanent setting.
Include a hand controller in the default offering or document compatibility with any existing hand controllers. Could utilise the USB port instead of relying on the ESP32 internal module ?
Display the MAC address of the ESP32 module in the Unity app (wi-fi network tab) so it’s not necessary to hunt for it in the router’s client connection pages.
A disconnect/reconnect button for an existing wifi connection definition.
An editable display box for both the meridian and altitude limits where I can enter the desired value as I can only know what the settings are by actually grabbing the sliders or reading/setting the position from the REST API.
API call to set/get horizon & meridian limits as a profile similar to the location. This would allow the user with different scopes/piers/tripods to store different hard horizon/meridian and auto meridian flip settings.
If possible add a NYX-101 uptime value to Unity and API similar to other products like the UPBv2 to show how long the NYX-101 has been powered on.
If possible add a timer field to the wireless tab to indicate how long the mount has been connected to the configured wireless access point and/or the USB connection.
The NYX-101 health status in Unity sometimes doesn’t not render correctly on smaller/different aspect screens between Unity releases such as a Dell 13.3″ laptop.
API call to provide NYX-101 health status if the information is not already available via other API calls.
API call to indicate if a new firmware (inc version) is available as it is indicated in Unity ?
A changelog history for NYX-101, Unity & UPB between versions.
Update
As of May/June 2023 there is now a XT60 cable available to run from the AUX port to run to the UPBv2 and now I only need an adapter cable to fit my 10 Amp PSU with a XT60 connector.
14th June : Firmware 1.21 released by PegasusAstro and the patch notes show this release fixes the DEC axis overshoot experienced by Chris Woodhouse :
DEC motor accuracy improvement during slews. In previous firmware declination axis tends to overshoot.
Wi-fi hotspot channel width was reduced from 40MHz to 20MHz to improve channel data integrity.
Wi-fi hotspot can turn ON and OFF.
Wi-fi hotspot channel can be selected from 1 to 11 (11 is the default).
Reset home is not allowed when mount is hard encoder limit.
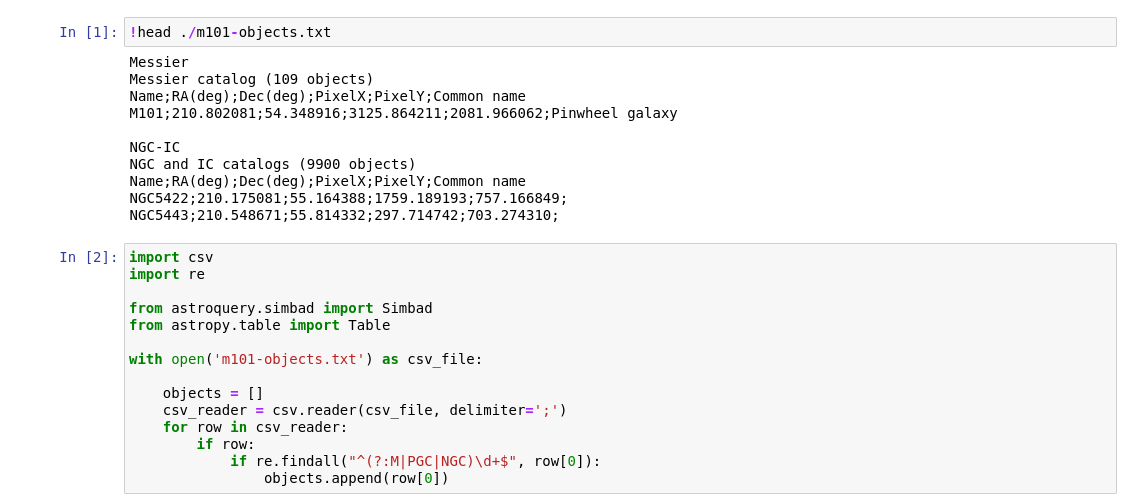
Whilst trying to process my limited data on M101 I noticed the Pixinsight AnnotateImage Script had an option to output the solved objects to a text file.
What I decided I wanted to know was the distance for each of the identified objects so it was time to break out PythonJupyter Notebook and connect to SIMBAD via the very useful Astropy module.
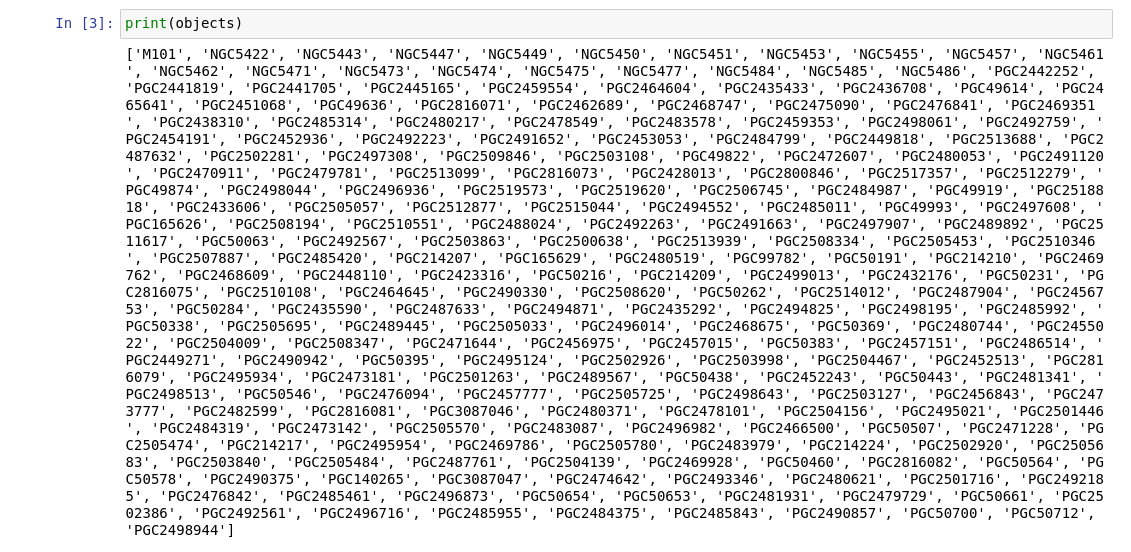
First we need to iterate over the contents of the solved objects text file and push them into a Python list data object (objects).
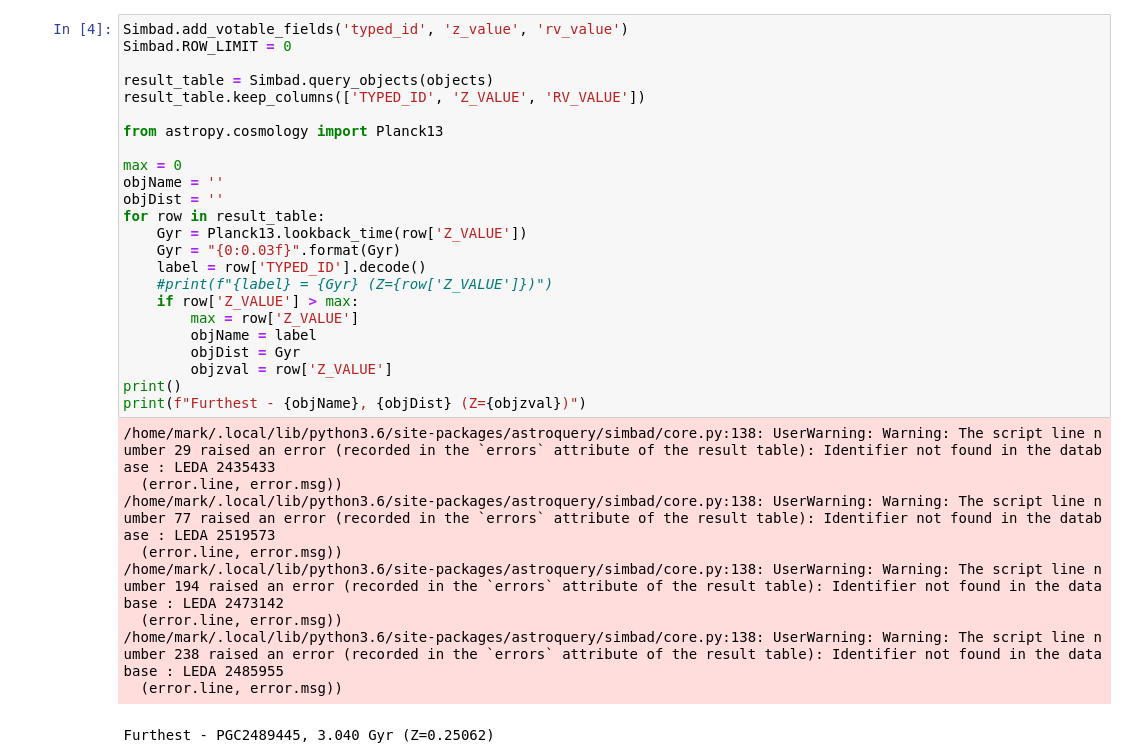
Now we have a list of object names we can send this to the SIMBAD data service via the query_objects function to retrieve information on each of the objects in the list. However, for the purpose of this exercise I’m only really interested in the Z_value (RedShift) and maybe the Radial Velocity, using the Hubble Constant I could calculate the light year distance. Instead of calculating it myself I use the Planck13 class to return the value for the lookback_time function. This returns a value in Gyrs where 1,000,000,000 light years = 1 Gyr.
I really need to read up more on the Astropy API so I can deal with the errors shown above and look to perform inline sorting for the highest Z value. Regardless of the errors most of the objects were returned and based on the Z value the furthest object returned was PGC2489445 at some 3.04 billion light years.
DSW invited me over to the IMT3 observatory for an imaging weekend to image M101 and the recent supernova2023ixf discovery. DSW was using the 12inch RDK and I decided to put the FSQ85 on the Pegasus NYX-101 to test out the setup ready for our Tenerife trip to Mount Teide.
I ran the QHY268C at high gain mode, gain 56, offset 30 and -20℃. I finally managed to cure the noise banding I was experiencing on the QHY268C but using a fully shielded high quality USB3 short length cable that I run from direct to a Pegasus UPBv2 that sits on top of the scope.
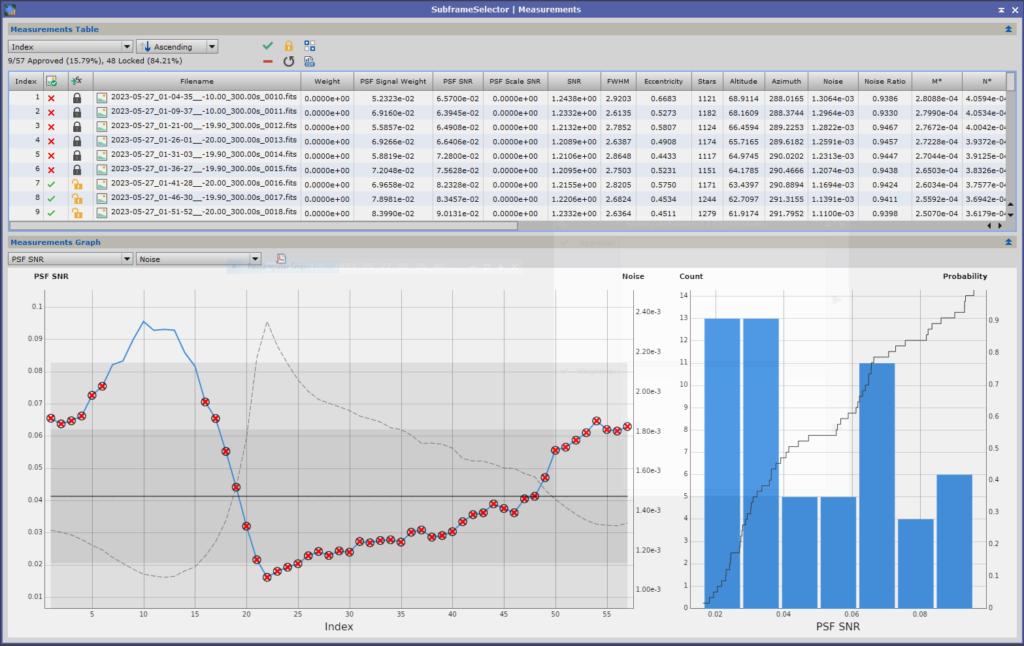
Although it’s mid summer and the Moon was bright and approaching full the phase, the sky conditions on the first night appeared to be okay at first sight. Before processing I decided to check on data quality via the blink module in PixInsight it was obvious that they were a lot of unusable subs due to high cloud and using them would have ruined the quality of any resulting stacked image.
Running the data stack of raw images through the PixInsight Subframe Selector to analyse the PSF SNR versus noise it clearly shows that I could only use 7 frames (35 minutes) didn’t drop below 0.08 from night one whilst all the data from night two should go straight into the bin along with most of night one 🙁
Pixinsight SubFrameSelector
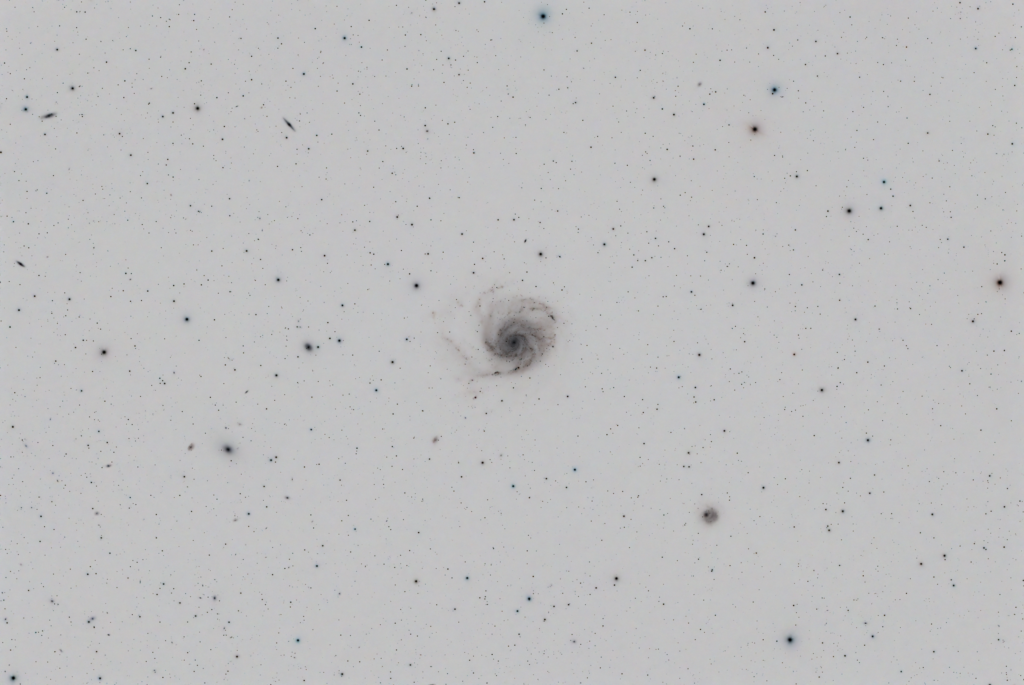
Given I don’t have enough data to do the end result justice due to my poor PixInsight skills I decided to invert the images – I really should subscribe to Adam Block Studios (Shout out !)
Inverted image of M101, supernova 2023ixf and surrounding area
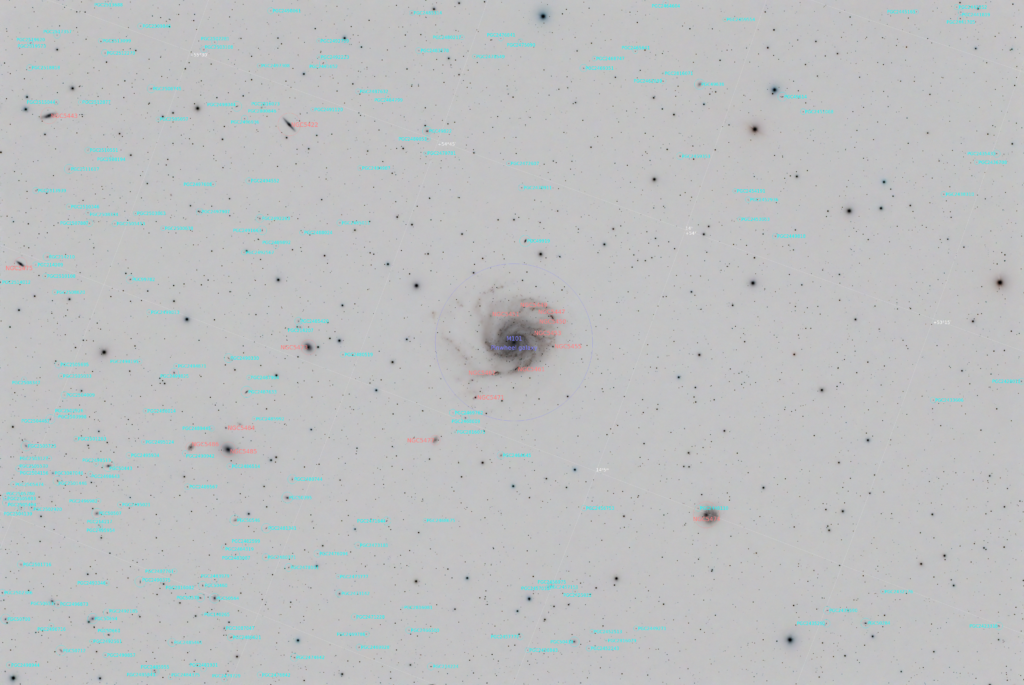
Running the AnnotateImage Script labels the various galaxies in the image which I enjoy looking up to see which type they are, magnitude and how far away they are.
Annotated FoV for area around M101, supernova is not labelled
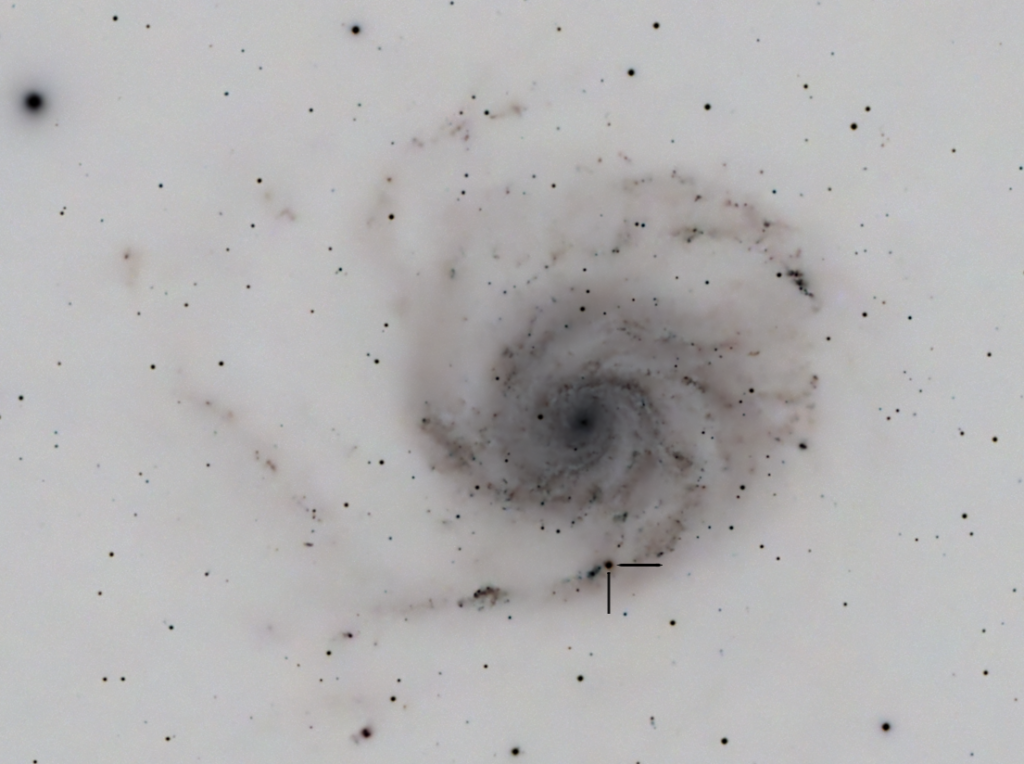
Zooming in to M101 to see the Supernova better, it is located to the right of NGC5461 and indicated by the two arrows.
M101 with SN2023ixf indicated by the arrows
Light Curve
The AAVSO have a light curve plotted from measurements submitted by amateurs, just enter “SN 2023ixf” and submit here. It was still around 11th magnitude on 18th June but there does appear to be a slight decline in the brightness curve.
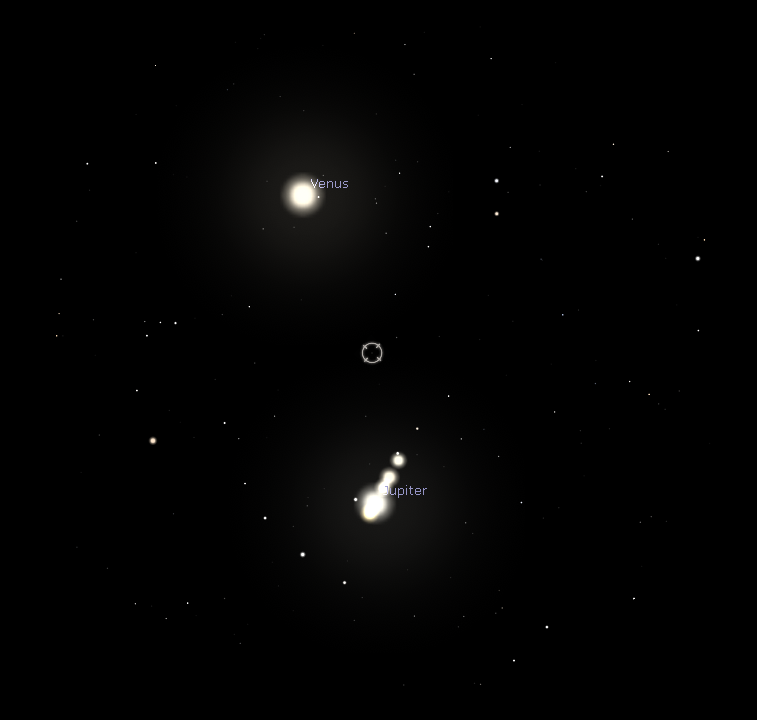
At 18:15 I decided to grab the SkyWatcher Heritage 150 baby Dobsonian and setup it up in the back garden to view the Moon and the conjunction of Venus & Jupiter that were following the setting Sun in the West.
My neighbour saw us in the garden and asked if he could pop over and take a peek. In the 25mm eyepiece we could fit Venus and Jupiter in the same field of view. Venus was way too bright for me to see the slight phase (85.5%) but with Jupiter the two main belts and three moons were clearly visible. In the 10mm we could make out the main four moons with ease.
25mm simulated view (credit Stellarium)
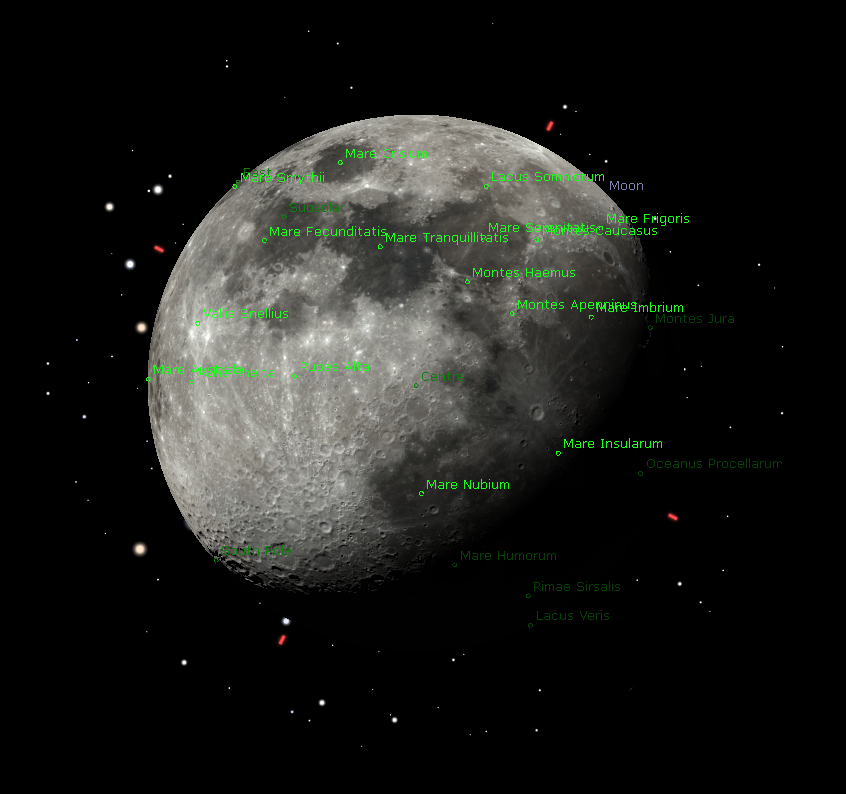
Moving to the Moon we used both the 25mm and 10mm eyepieces to view the craters on the shadow terminator. We tried to grab a mobile phone picture but the baby Dob really isn’t up to the task and all attempts were disappointing.
10mm simulated view (credit Stellarium)
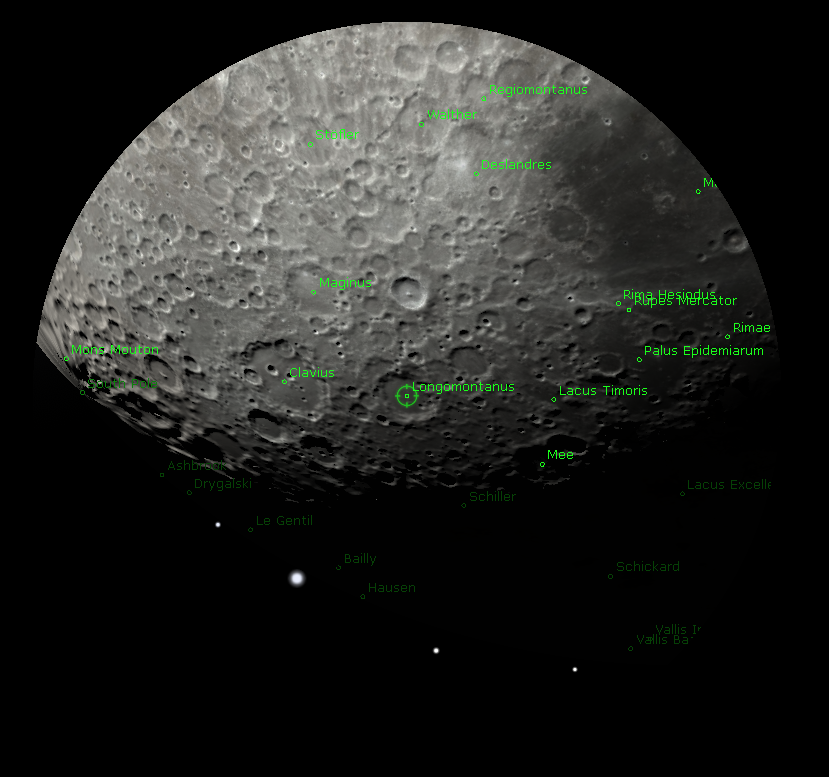
Using the Televue x3 barlow and the 10mm we could see craters in the shadow terminator nicely along with Clavus and the craters within.
Although the baby dob is great for grab and go I feel that SW 8-inch Dobsonian with a really good eyepiece would have done Jupiter more justice but hey the views were good enough and the experience enjoyable.
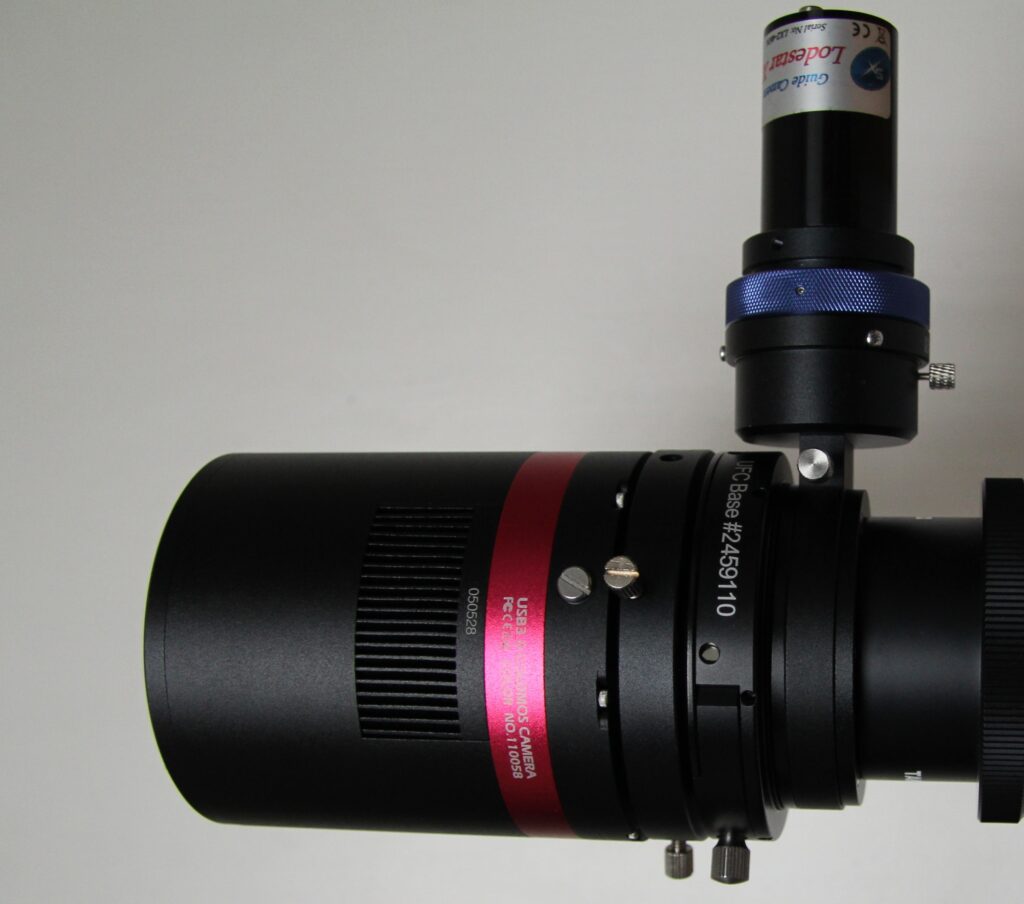
My current setup for OSC on the Takahashi FSQ-85 uses the QHY-OAG-M and the various QHY metal spacers which you screw through the OAG onto the CAA that fronts the QHY286C.
However, I’ve never liked the screw adapter approach for this sensor as unnecessary back focus is wasted due to the weird CAA to QHY286C not being a screw thread. The lack of an IR cut window on the QHY268C sensor means I need to sit an additional filter in the QHY 020055 M48 (F) adapter, in order to change the filter I would have to take the imaging train apart to remove it !!!
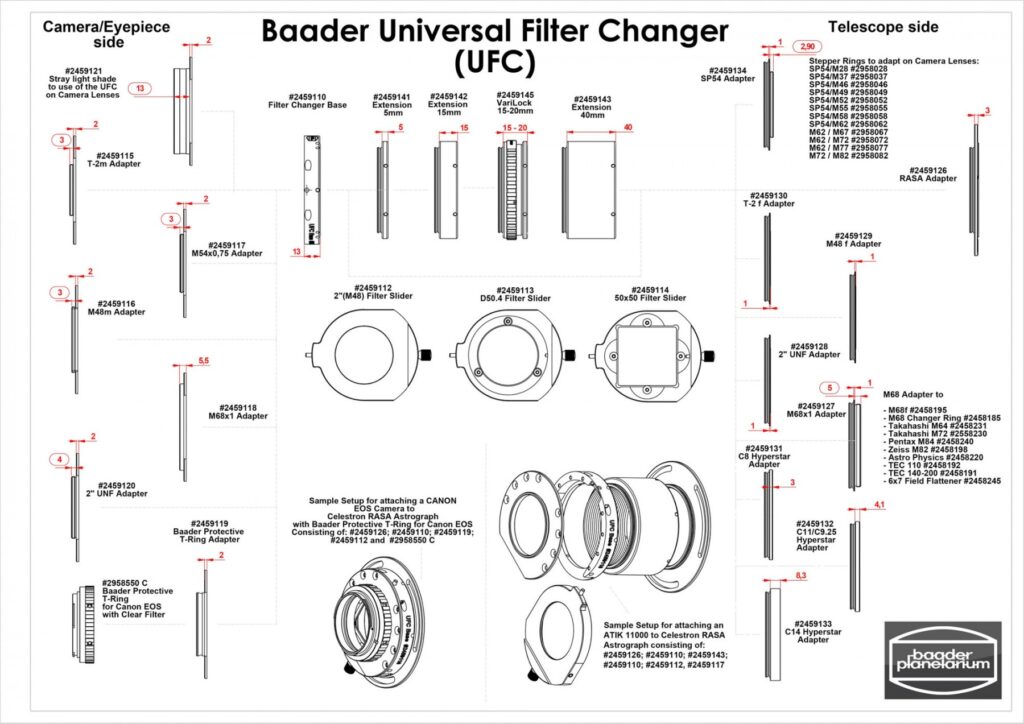
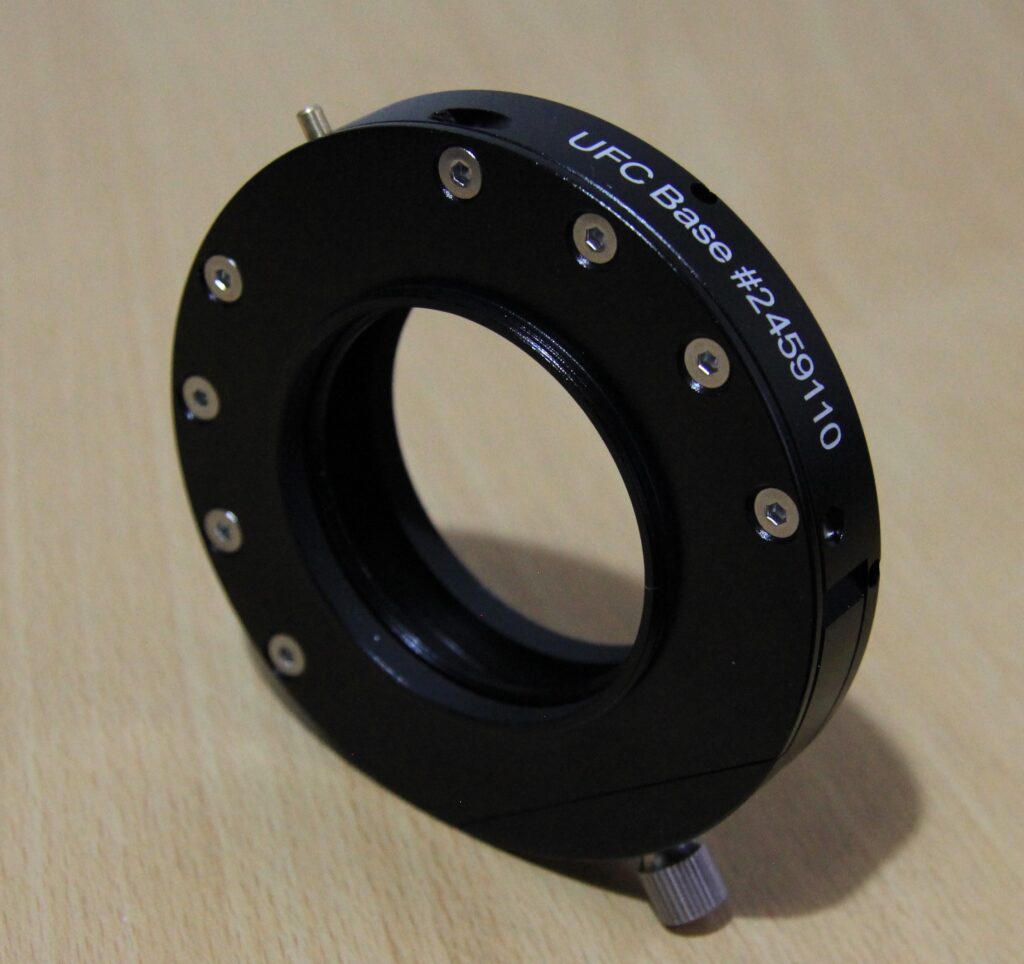
Baader Universal Filter Changer
Enter the Baader Universal Filter Changer (UFC) , the chart below details the core base changer alongside the adapters required to match to most common setups.
You can purchase additional sliders than can hold 50mm, unmounted and threaded 2 inch (M48) filter. The slider is magnetic so it will not dislodge during slews or during scope assembly or disassembly.
The 4 assembled components of the Baader UFC
Proposed Set-up
The Takahashi Flattener (TKA37582) has a metal back focus distance of ~56.2 mm so I need to get close to that but being under that distance is better than being over as I can add additional spacers if needed. The effect of adding a 2mm thick 2-inch filter decreases the optical backfocus by 0.6mm (2mm/3) so I will need to add 0.6mm spacing to account for the filter effect which results in a total distance of ~56.7mm.
Order
Component
Thickness (mm)
1
QHYCCD QHY268C CMOS
17.5
2
QHYCCD CAA M54(f) (#020002)
6
3
Baader UFC M54(m) camera side adapter (#2459117)
2
4
Baader UFC base (#2459110)
13
5
Baader UFC SP54(m) telescope side adapter (#2459134)
1
6
QHYCCD OAG-M M54(f) (#020079) adapter
3
7
M54 Metal Spacer
0.5
8
QHYCCD OAG-M
10
9
QHYCCD Metal Spacer
0.4
10
QHYCCD OAG-M M54(f) adapter
3
11
M54 Metal Spacer
0.3
12
Baader M54 x 0,75 Inverter Ring
0
Total
56.7mm
New Imaging Train
I should now be able to change filters much easily albeit at an additional cost but the flexibility should be worth it. Of course I will need to test the star shapes in the field to make sure that I have the correct back focus and add extra distance if needed.
Vendors
The majority of the Baader UFC components were purchased from FLO (First Light Optics) and the remaining adapter (#2459134) from Tring Astronomy. Delivery and communication by both vendors was great, shame about the Royal Mail industrial action messing deliveries about during the Christmas holiday.
Thanks
My gratitude to Stuart1971 from StargazersLounge who helped me with suggestions to try to sort out the QHY268C noise banding issues.
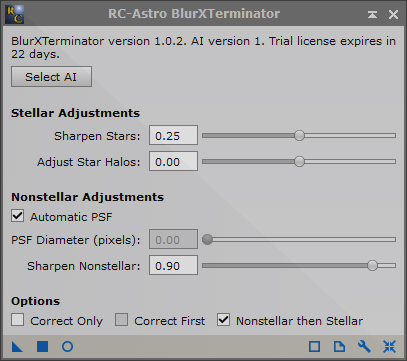
Two plugins I have recently been using are the NoiseXTerminator and BlurXTerminator written by Russell Croman and available from the RC-Astro website.
The new BlurXTerminator plugin is priced at $99.95 although you will get a $10 discount if you already own other RC Astro products and provide the license key at purchase time. Before purchasing it is suggested that you should first check the web site that your hardware and OS meet the requirements to function and download the trial version to test.
The data used was 60*300seconds (5 hours) frames at -20℃ of the Iris Nebula (NGC7023) captured at the IMT3 dark site using a NEQ6 mount, Takahashi FSQ85, Tak Flattener, QHY OAG and QHY268C CMOS camera.
NoiseXTerminator
Recommended Usage
Taken directly from the web site :
NoiseXTerminator can be used at any point in your processing flow. The PixInsight version can handle both linear and nonlinear (stretched) images.
Using NoiseXTerminator on images that have already been heavily processed, particularly with other noise reduction/sharpening software, can produce less than optimal results.
If processing a linear (unstretched) image in PixInsight:
Make sure PixInsight is configured to use 24-bit STF lookup tables. Otherwise you might see what looks like posterization in your image, when it is really just limitations of the lower-precision default lookup tables.
In PixInsight, you can create a preview containing a representative sample of your image, including bright and dark regions, important detail, etc. Select this preview and run NoiseXTerminator on it to allow rapid adjustment of the parameters.
Before & After Comparison
It’s clear that the noise reduction plugin has done a great job although it would have been better had I collected more data to increase the SNR in the first place !
BlurXTerminator
Recently released in December 2022, I thought I would give this plugin a try as I’m rubbish at all the deconvolution/sharpening attempts and I tend to make my images poorer rather than better !
The web page states the following – BlurXTerminator can additionally correct for other aberrations present in an image in limited amounts. Among those currently comprehended for most instruments are:
Guiding errors
Astigmatism
Primary and secondary coma
Chromatic aberration (color fringing)
Varying star diameter (FWHM) and halos in each color channel
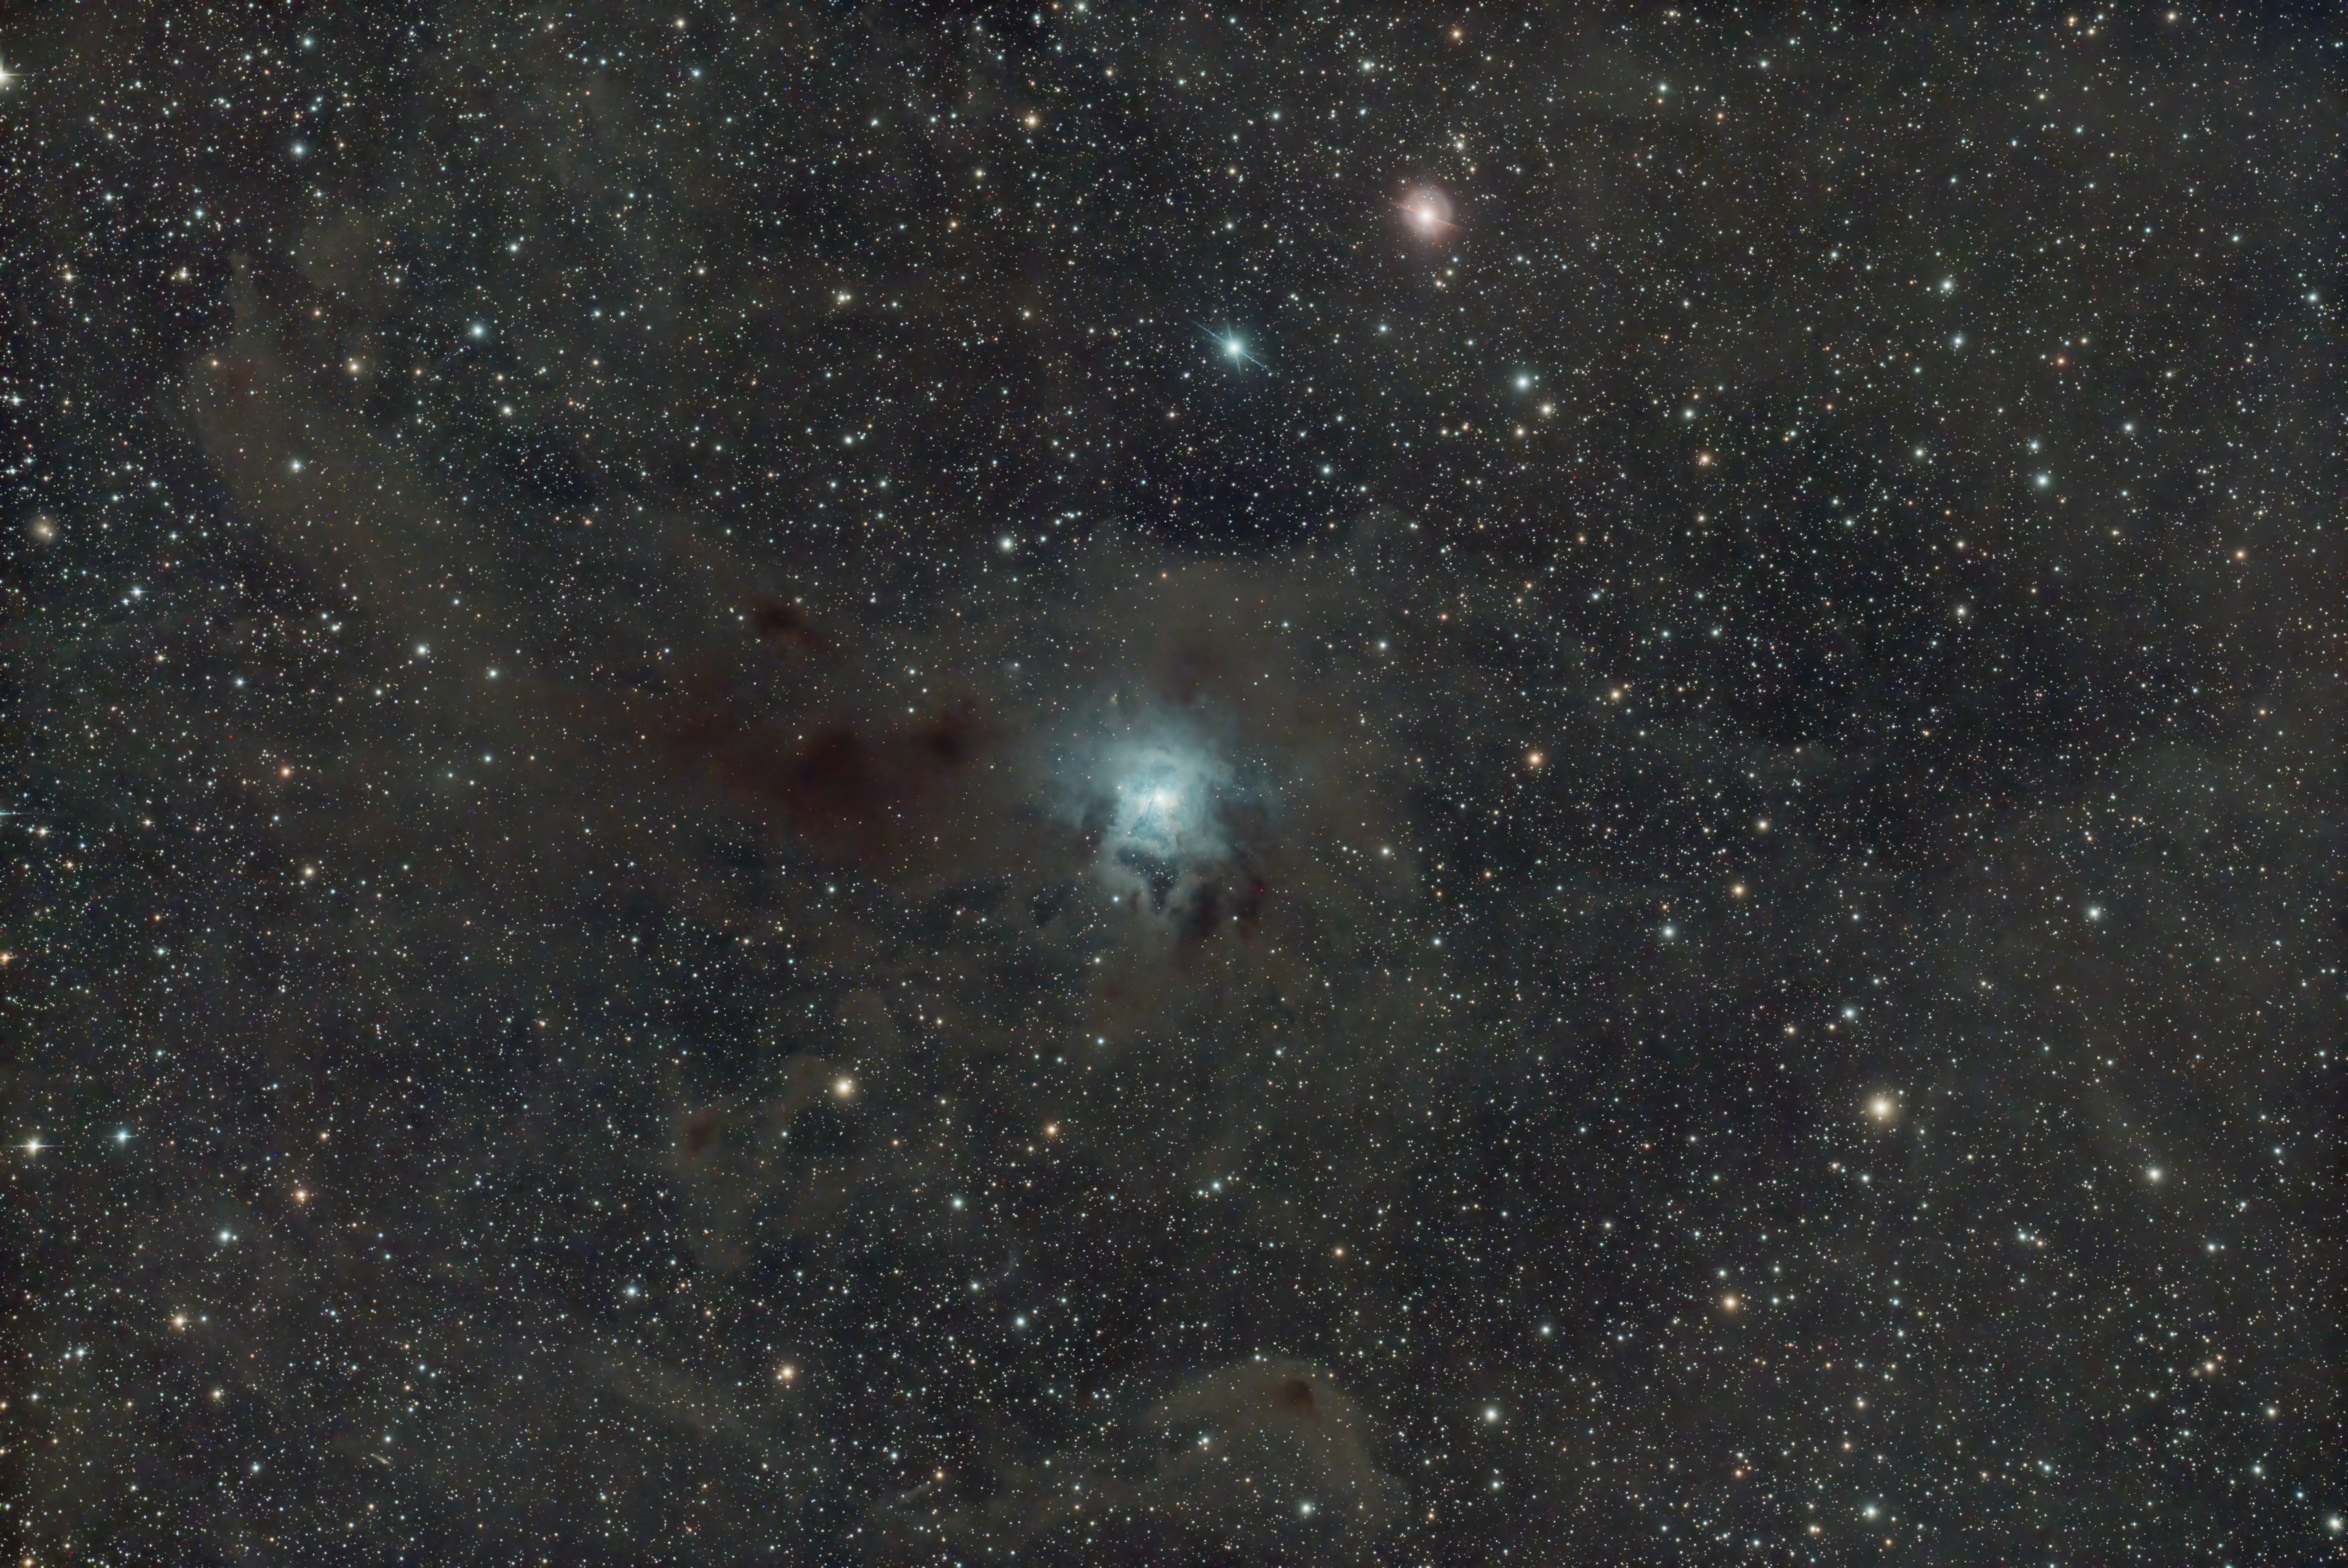
Before & After Comparison
The central part of image before BlurXterminatorThe central part of the image after BlurXterminator
Again we can see that the RC Astro BlurXterminator has done a good job at sharpening the detail in the dust cloud.
Thoughts
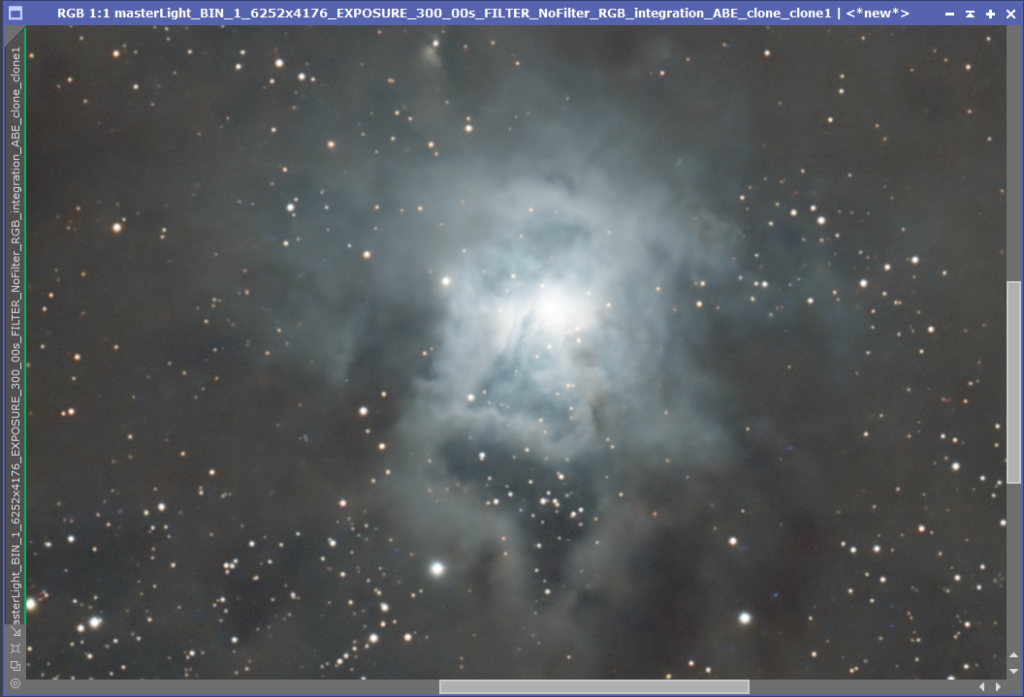
Investing in these two plugins should be considered as money well spent especially when it can save you time in the processing pipeline. The minimally processed image (DBE, SCNR) of NGC7023 (Iris Nebula) where hot pixels and other artifacts still exist but is shown to demonstrate the power of Noise and BlurXterminator :
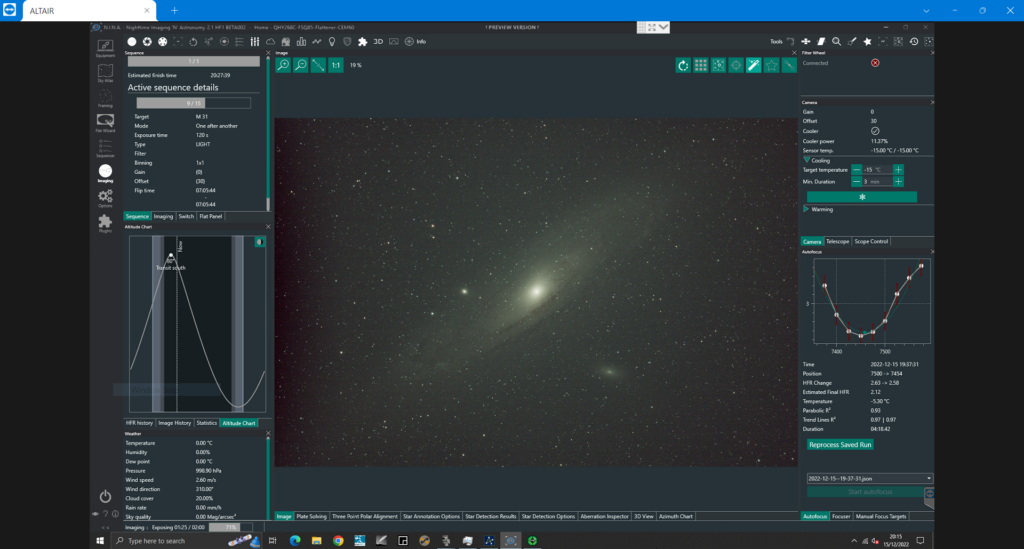
As it was a work night and Dave was working I was imaging from the back garden and not the dark site. I started late in the evening and had issues sorting out the autofocus in NINA which meant I was even later than I had planned.
Using the OptoLong L-Pro filter and the native camera driver (not ASCOM) :
QHY268C Nina Native Mode
The target was decided by Dave as M31 (Andromeda Galaxy), I decided on 120 second exposures at -15℃, gain 0 and offset 30 (Photographic Mode). I finally started to capture data at 19:55 when M31 had already transited 45 minutes earlier.
M31 single sub (stretched) via NINA Imaging Session
I believe the dark shadow to the left is the QHY OAG prism, I may have to reduce it’s depth in the light path or rotate it 45 degrees so it sits on the long horizontal axis.
Once M31 had reached approximately 50 degrees altitude and was starting to set in the West my guiding started going awry especially in RA. I put this done to either balance issues or cable snagging so that’s something I need to look at in the future.
After shutting down earlier than I thought due to the guiding issue and the pending rising Moon I decided to do my darks, flats and dark flats. However my Pegasus Flatmaster refused to connect to NINA so I decided to fix and complete this task on a different day.
I only managed to capture 62 subs which totals just over 2 hours. I was hoping to get at least 6 hrs for a single session and something approaching > 12 hours which means I will need several more nights to capture my required amount of data for M31.
Not a great first outing but given I hadn’t imaged in ages this was expected. I can honestly say that although a OSC coupled with the new harmonic mounts such as the ZWO AM5/Pegasus Nyx are very convenient as part of a lightweight holiday travel setup. OSC also is easier processing but still I can say I’m not a total fan due to the loss of high frequency data, high HFR focus issues and in the case of the QHY268C the noise banding issue which although appears to be removed by darks etc still is unnerving.
Update (17/12/2022)
Have resolved my Flatmaster 120 panel issues but I feel I’m better off with a fully controllable fixed panel instead of a manual panel so I will look into that.
My Darks, Flats and Dark Flats are now done (25 of each) all performed at -15℃ to match this session temperatures but there is still not enough actual data to start processing.
So after ages I’m planning to perform some imaging after being challenged by Dave to produce a OSC image of M31 with the QHY268C that can be of print quality.
The first step was upgrading all the necessary software to make sure both the NUC and laptop would not be interrupted during my planned imaging session.
Windows10 latest Updates (Dec2022)
SGPro (4.2.0936)
NINA (2.1 HF1 Beta002)
ASTAP (2022.12.09)
ASCOM (6.6SP1)
Pegasus Ultimate PowerBox (1.6.1230.46)
iOptron commander (5.9.0.2)
The iOptron CEM60 mount hadn’t been updated in ages and it showed :
HandControllerV2 : 210106
MainBoard : 190716
RA board : 201005
DEC board : 190716
After performing the firmware update procedure, the mount was now showing the following levels :
HandControllerV2 : 220119
MainBoard : 211018
RA board : 211018
DEC board : 211018
Catalog : 150429
Of course I will need to perform a new zero mount position following the upgrade. Tonight I will also be changing the OpenPHD algorithm to PredictivePEC as described by Cuiv the LazyGeek :
In the days of consumer high capacity storage things look great but modern CMOS cameras output fairly large sized FITs but coupled with short exposure sub one evening can result in a large amount of data to process.
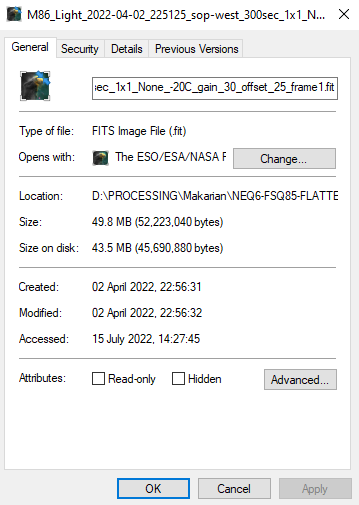
So various solutions are available – block compression and byte compression. Taking one FITs image (test.fit) from a OSC CMOS we can compare different compression methods.
Windows Compression
Using the built compression accessed via a file’s advanced options the file is reduced from 49.8MB down to a 43.5MB of disk usage.
Gzip compression
Using the Linux gzip compression utility (v1.9) we perform a byte-level compression in userspace.
Gzipping the 50MB fits files results in 33MB of disk usage. Using fpack (v1.7.0) results in similar results and the file format (fit.fz). The fit.fz file is supported by the processing tool Pixinsight.
# fpack -g -q0 -v test.fit
Block Compression
Here we utilise the block-level compression feature of IBM Spectrum Scale Developer Edition.
The compression is transparent to the user application and user and they seen as the original file, modified files will need to be recompressed. As this is at the file system block-level the checksum is the same if the file is compressed or not.
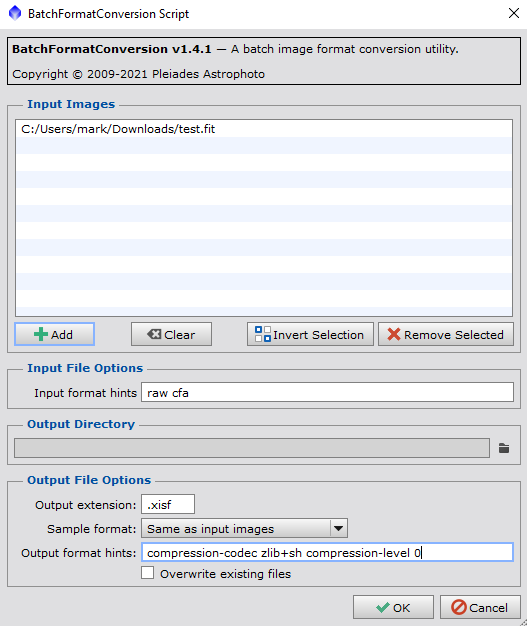
Pixinsight XIF Compression
Pixinsight offers the XISF format as an alternative to the FITs format. Existing FITs file can be converted to XISF using the BatchFormatConversion script. To utilise compression you need to supply the appropriate output hints.
Pixinsight Batch Format Conversion
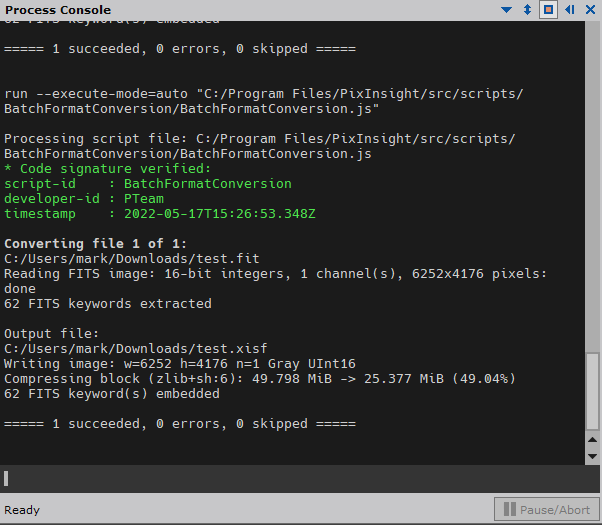
The process console output shows the resulting size of the converted FITs image being reduced to 49% of its original size.
Pixinsight Process Console
Conclusion
Pixinsight XIF compression gives the best compression but the issue is that it is currently not currently an accepted standard and other utilities (astropy) do not have the ability to read them. Pixinsight can also read fit.fz files
NINA can save camera files as FITS or XISF, the XISF method offers LZ4, LZ4HC and Zlib compression but no gzip/fpack option for FITS.
For now I will continue to compress FITS to fit.gz or fit.fz to give me the benefits of space savings whilst still allowing me to use the data across Windows and Linux utilities.
So with short notice a couple of my friends booked a cottage just outside the Kielder Water park boundary in Northumberland. This was booked for same weekend that Storm Eunice and Storm Dudley hammered the UK, the drive from the South of England to the North was very gusty and interesting at times.
Suffice to say that during my short stay in a farm cottage I saw more of Pubs such as the local warm, very friendly and welcoming Star Inn and comfortable cottage fireplaces than I did clear nights.
On the first evening it was broken fast moving cloud so we settled on taking in the various views of the 17 day old moon (94.2%). Although it was very bright being just after full moon, we scoured the edge of the disc looking at the shadowed craters. The first evening’s session was cut short by the cloud and rain, which seemed to set the mood for the week.
On the next few cloudy nights, I spent the time upgrading to ASCOM 6.6, the latest NINA beta and SGPro 64bit. Of course this required me to make sure I had the latest 64bit drivers installed. Once done, I began testing the various bits of hardware within the applications.
Very welcoming when it is wet, windy and foul outside
However on my final evening whilst nestling a Talisker Single Malt in front of the fire. I just happened to peer outside and it was clear, breezy and cold but clear. So since the weather report said it would cloud up I grabbed the Baby Dob (SkyWatcher Heritage 150) and headed outside for a quick sky tour.
With Laurence and Laura we finally saw why astronomers come to the Northumberland National Park. The Milky Way was so obvious stretching from Orion in the South, through Perseus and Cassiopeia and the sheer number of stars was breath taking.
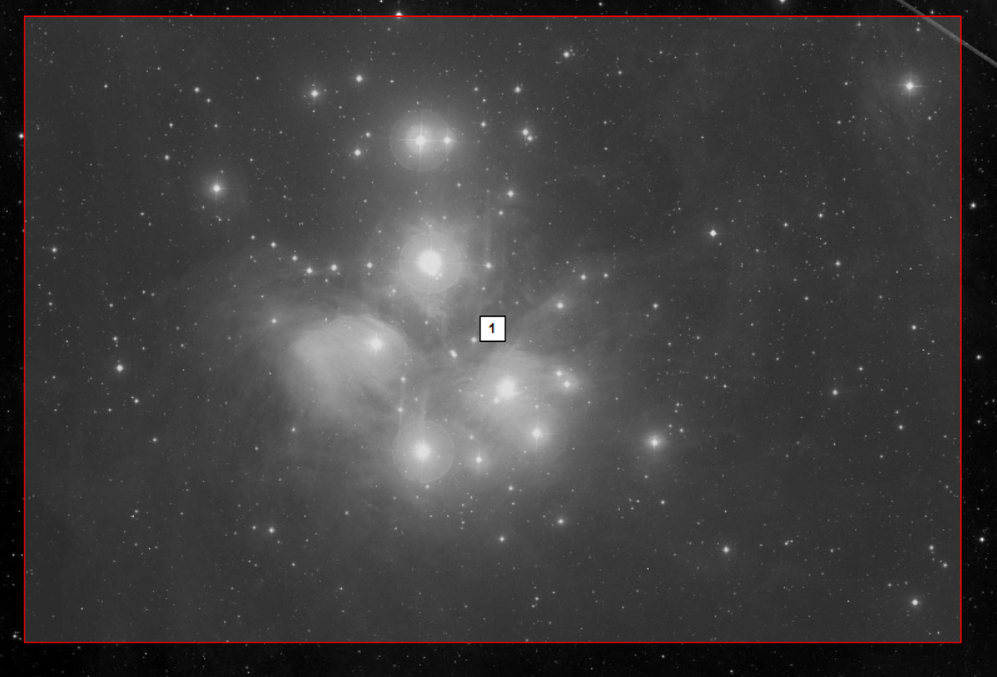
We started looking in Orion, the Orion Nebula (M42) which the 150P does not do it justice and really a 200P and decent eyepiece would be needed to show the wispy cloud structures. We looked at the stars Betelgeuse and Sirius (Canis Major) just to show the colours of these giants before moving along to view the Pleiades (M45) and the star clusters in the constellation of Auriga.
The Double Cluster (NGC 889/NGC 884) in Perseus in the 25mm wide field eye-piece was beautiful. From the Perseus/Cassiopeia border we moved through the milky way and across to Canes Venatici hunting down The Whirlpool Galaxy (M51) which we saw as two misty patches, one smaller fainter patch and a larger patch with a faint core.
Moving southwards we hunted for the globular cluster M3 which was low on the horizon and effectively in the trees but we managed to locate it. Again it was a misty patch and looked like a comet. Switching to the 10mm eye-piece I tried to resolve the patch as stars but I was unable to, maybe due to it’s low altitude but Laura was able to do so with averted vision.
Of course I also forgot that objects I can see from The South Of England are higher up in the sky compared to The North Of England by almost 4 degrees altitude.
Not long after we headed in doors to warm up, the clouds rolled in, the wind picked and the snow started falling as a precursor to the incoming Storm Franklin. Such is life but at least I got a few hours under dark skies even if it was visual and not deep sky imaging.
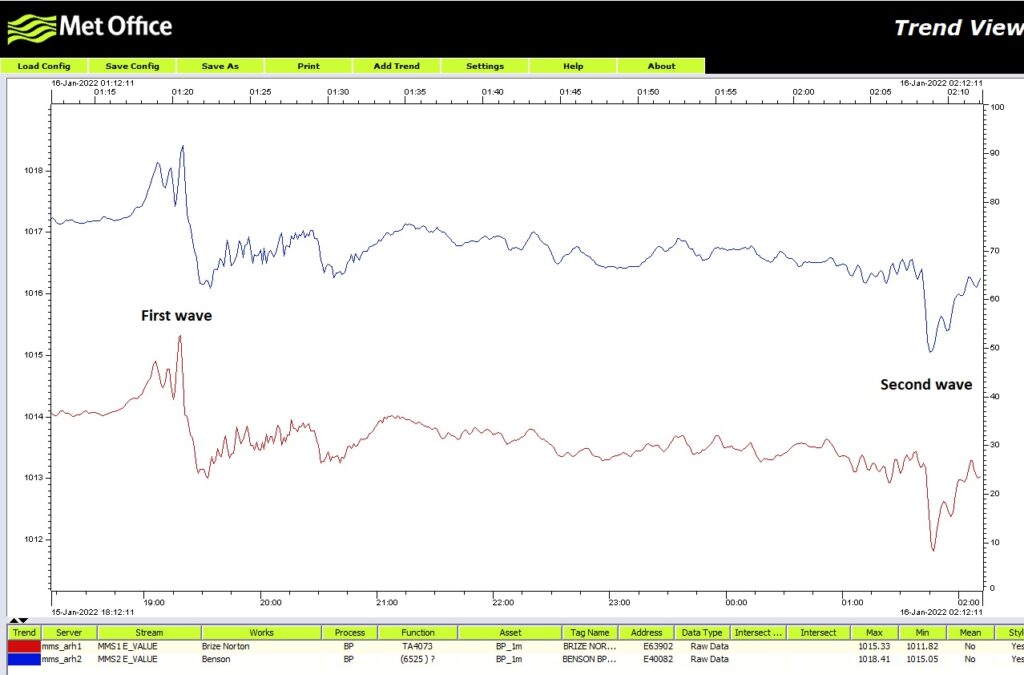
On January 15th 2022 at 15:10 AEDT (04:10 GMT) the Hunga Tonga Hunga Ha’apai underwater volcano near Tonga erupted. Hunga Tonga-Hunga Ha’apai is 1.8 kilometres tall and 20 kilometres wide, but most of it is underwater, with the top 100 metres visible above sea level. The pressure wave generated by the explosion blasted through the atmosphere at more than 1000 kilometres per hour.
Dave mentioned to me that the people had registered a pressure increase on their monitoring devices due to the pressure wave and checking the internet the Met Office has issued a nice graph on Twitter.
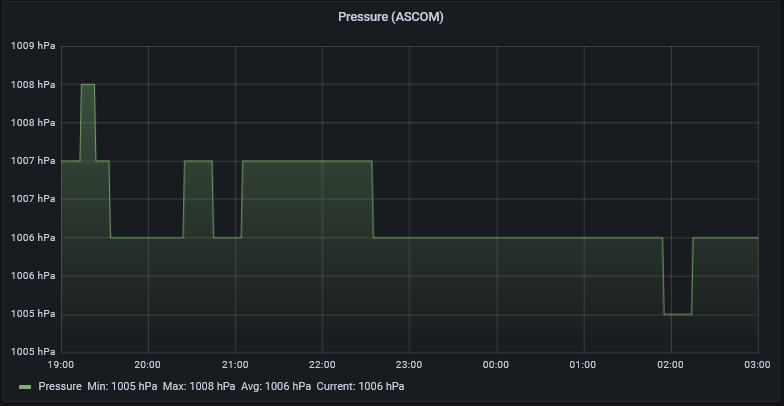
On the observatory Grafana dashboard I could indeed see two pressure waves at the correct time. We only record the pressure every 60 seconds because for astronomy that’s all we need so we do not have the resolution of others but the height of the two events are in the correct range compared to the graph above.
Double pressure wave
The first pressure wave arrived (19:13-19:24) we was 2hPa increase as we have lost some resolution due to sampling period and the Met Office is ~2.5 hPa. We could change the sampling to be lower (15 or 30 secs) as storage is not an issue and then we would have caught a nice defined peak. The second pressure wave (2022/1/16 01:55-2:14) and we measured ~1hPa drop and again was lower than the Met Office due to our sampling period.
Our auxiliary pressure monitoring install was down during this period as the box appeared to have been restarted/rebooted and the ASCOM Alpaca instance was not running which was unfortunate 🙁
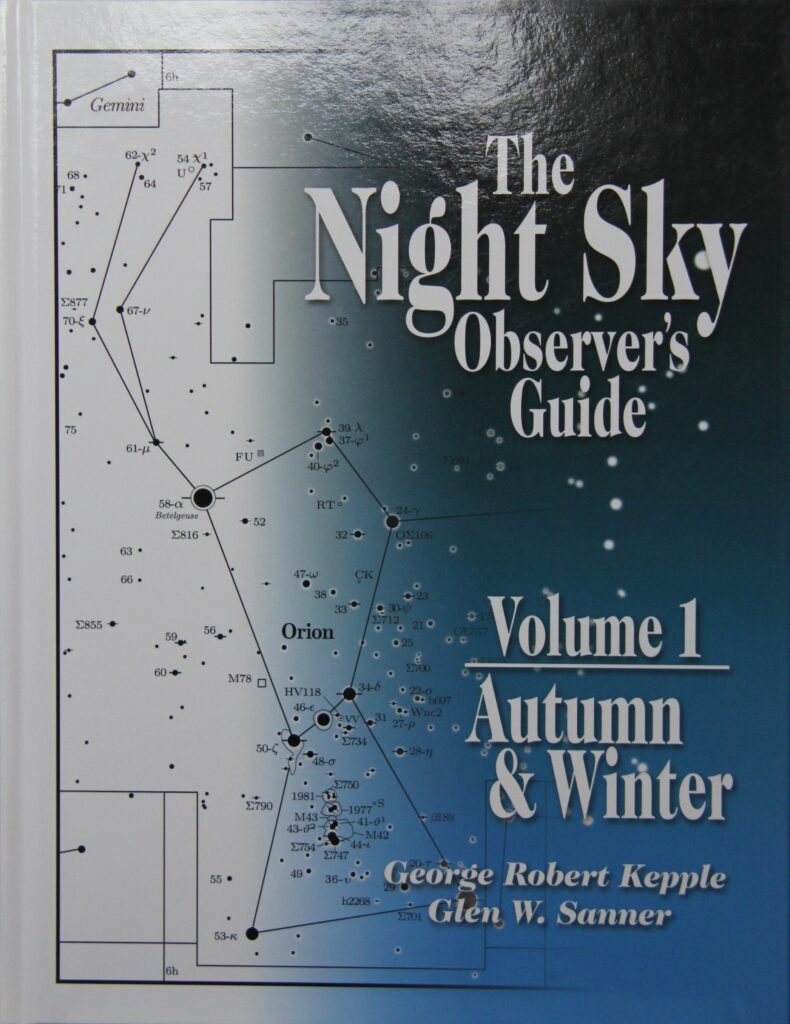
When I started attending the Practical Astronomy Show held at Kettering I picked up my first copy of “The Night Sky Observers Guide Volume 4 – The Glories Of The Milky Way to -54°” written by George Robert Kepple and published by Willmann-Bell inc. These were sold at the Kettering show by the very helpful and knowledgeable staff of The Webb Deep-Sky Society for around £20.
Then in December 2019 ‘The Global Human Malware’ happened and the world went nuts, the Astronomy shows were cancelled year on year and I forgot to complete acquiring the rest of the series. Then suddenly in late 2020 it was announced that the publishers Willmann-Bell had closed and their entire portfolio went out of print.
Unfortunately I did not see the announcement until late Jan 2021, however I managed to obtain a copy of “Volume 2 – Spring & Summer” (ISBN 0-943396-60-3 (V2)) from Zoltan at 356 Astronomy but he told me he was out of stock for the rest of the series.
I contacted the Webb Deep-Sky Society to see if they had any available copies in stock. The president of the society Owen Brazell very promptly replied but informed me that they had sold their remaining stock just days before. He was extremely helpful in trying to help me source any remaining stock but eventually to no avail ! I recommend any avid astronomer should consider subscribing to the Webb Deep-Sky Society here …… I just did 🙂
Well, it arrived this morning and I apologised to my regular postman for having to carry it around by hand all morning.
As with the other volumes the information, maps, diagrams and descriptions are very useful for planning imaging or observing sessions.
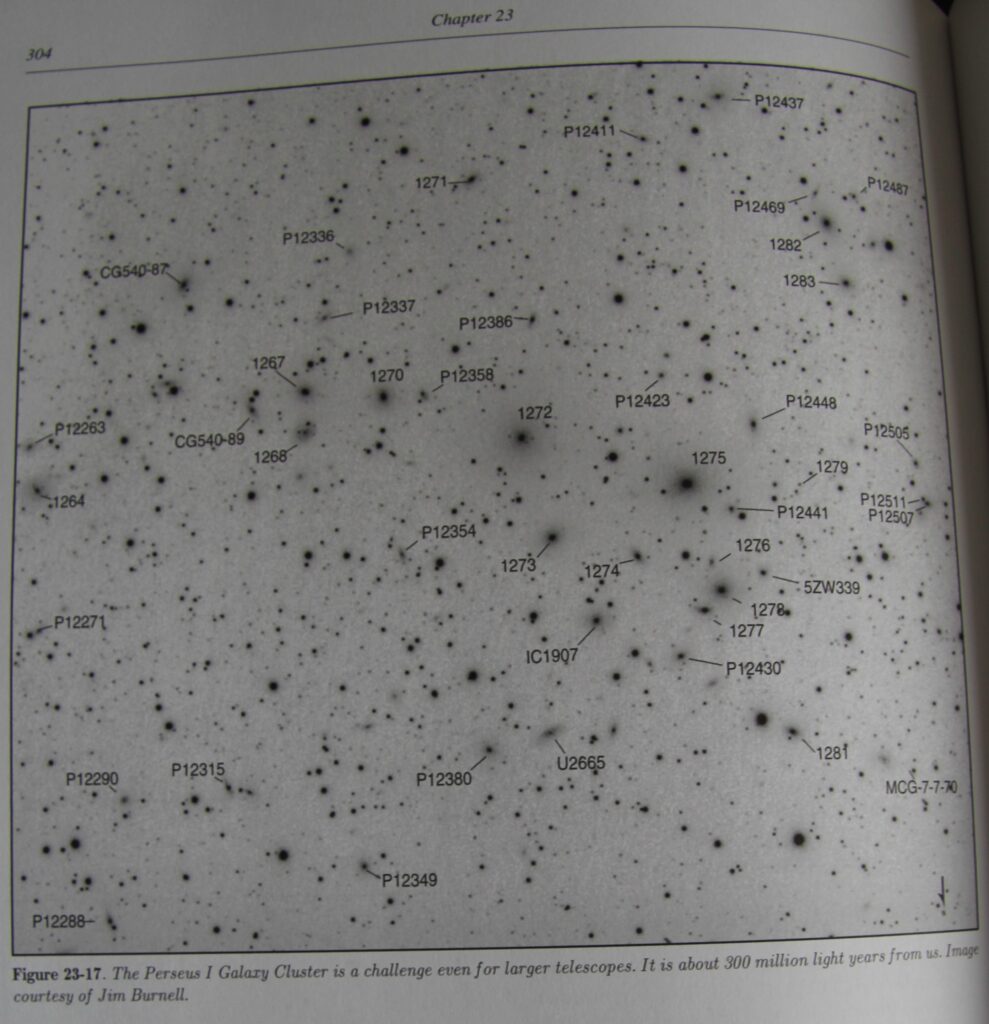
The King of the Northern Winter Constellations – OrionThe fantastic Perseus Galaxy Cluster
I now have only Volume 4 “The Southern Skies” left to purchase but as that would only be a reference for objects I can’t see from the UK it would go mostly underused unless I start using my remote telescope account or travel around or below the equator.
I would like to thank Owen Brazell for all his time and for the ongoing activities of the Webb Deep Sky Society and hopefully we will see them at the next Practical Astronomy Show in March 2022 …. fingers crossed !
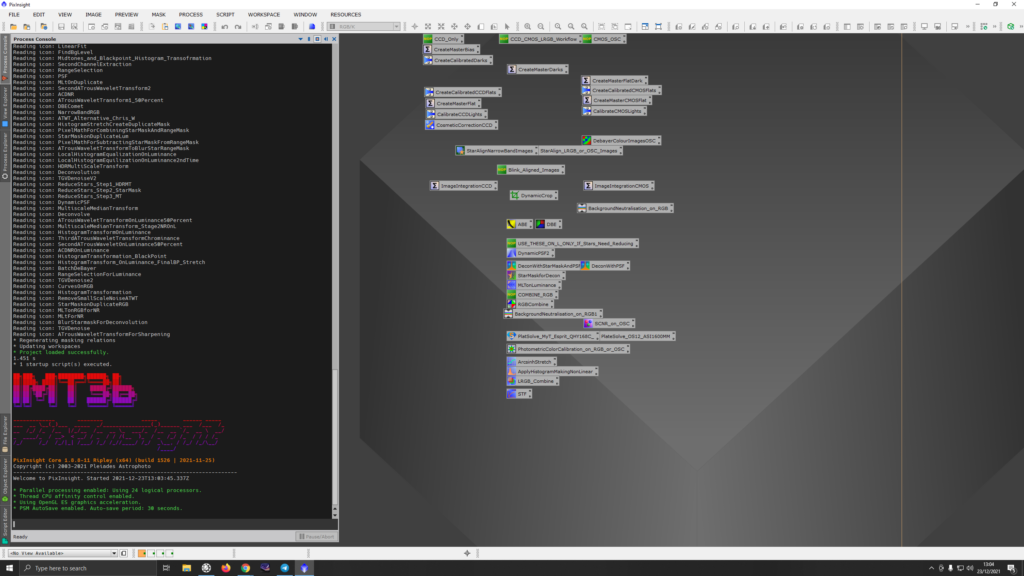
So whilst Dave was processing our M45 QHY268C data, he mentioned how it is frustrating that he has to reload his process icons for his workflow every single time.
After finishing the communications/process diagram for IMT I decided to have a quick look if it was possible. Watching PixInsight startup I noticed access to a few files – banner and startup.scp. For me these were located in the C:\Program Files\PixInsight\etc\startup directory.
Looking through the documentation it seemed possible to add statements to the file which was possible once I had modified it as Administrator.
Method 1 – Load Process Icons
This will load just the process icons into the current workspace on startup. Add the line below to the bottom of C:\Program Files\PixInsight\etc\startup\startup.scp :
open "C:\Users\gingergeek\Pixinsight\Pixinsight DSW Process Icons V10.1.6.xpsm"
Save the file and restart pixinsight.
Method 2 – Load An Empty Project With Process Icons
Another method (preferred) is to create a new project (Empty-process-icons.pxiproject), load in the process icons. Save the project and then change the properties to make it read-only so you can’t accidentally overwrite it later on.
Add the line below to the bottom of C:\Program Files\PixInsight\etc\startup\startup.scp :
open "C:\Users\gingergeek\Pixinsight\Empty-process-icons.pxiproject"
Save the file and restart pixinsight.
I also modified the banner file (in the same directory as startup.scp) so it would show the IMT3b designation. I generator the ASCII art from one of the many online sites, if I can remember which one I will link it here.
Our new PixInsight default project with process icons
Thoughts
The downside to both these methods is that if PixInsight is upgraded/reinstalled then you will lose the settings – not a disaster to be honest as they are easy to put back into place.
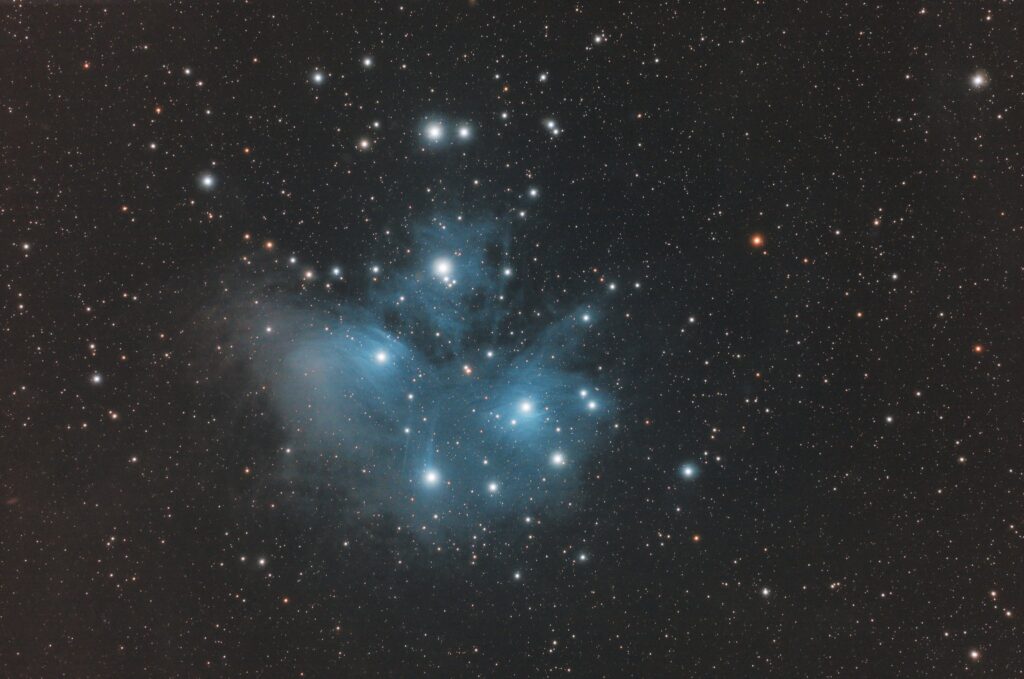
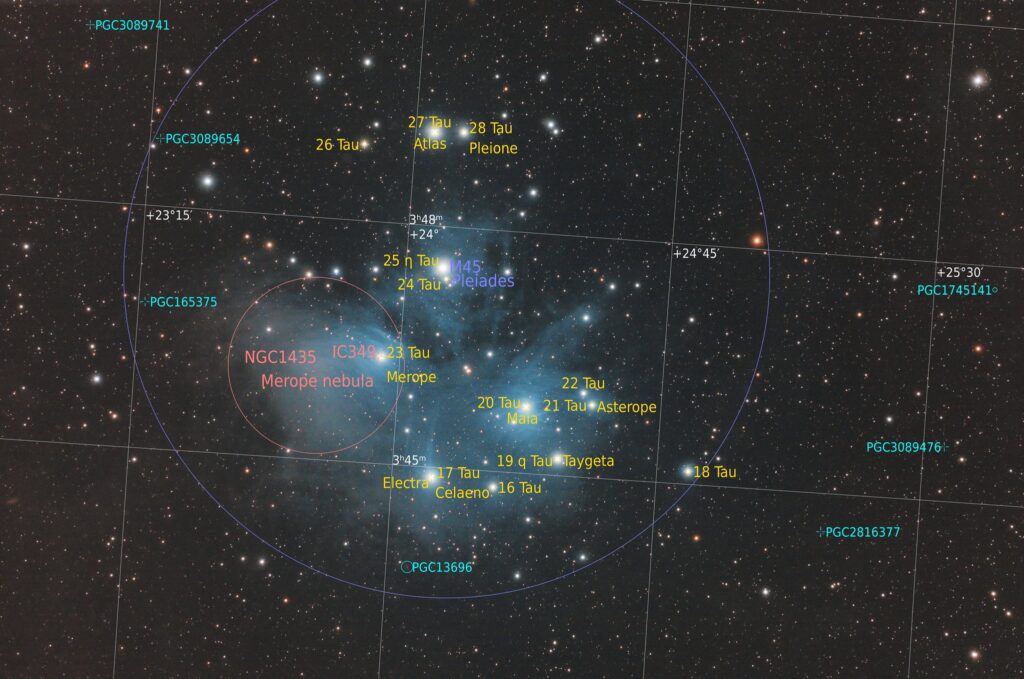
So visiting Dave one evening as we have not met for a while whilst I was updating software Dave processed the QHY268C data we took of M45.
M45 – PixInsight Processed Image
So I’m disappointed that although the image is a good first start I forgot to change the change setting on the gain which in SGPro is in the event settings and not in the top level sequence display 🙁
Dave ran the image through the annotate function of PixInsight. The galaxy PGC13696 near the bottom of the image is actually 232 million light years away.
Unusually it was a clear Friday evening. I did plan to be ready to go as soon at the pole star was visible but my imaging PC insisted on updates and the local hard disk was running at 10MB/s (replacement SSD on the way).
By the time I was ready, mount setup, polar aligned and balanced it was already late. I decided not to use the latest SGPro or NINA beta but just use the existing SGPro version. I was delayed starting as I was having issues with SGPro hanging when it couldn’t talk to the SQM (ASCOM Conditions Observing Hub) on a previous COM port, I need to report this back to the devs as a bug.
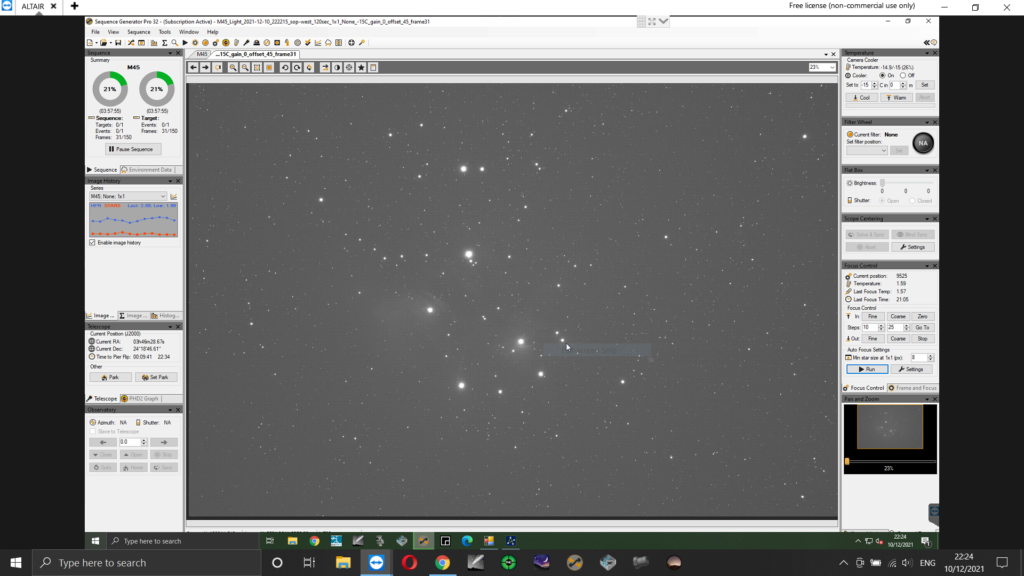
At this point Peg-Leg Dave joined me on a video call and we discussed imaging M45 in different modes on the QHY268C OSC. So we moved the scope to Alp Ari and proceeded to plate solve in SGPro, sync’d the scope Cartes Du Ciel and calibrated OpenPHD2.
Using the SGPro framing and mosaic wizard to decide on the framing for the target sequence I wanted as much of the reflection nebula as possible rather than being dead center.
M45 – SGPro Framing Wizard (FSQ85/QHY268C)
I’ve used the multi-star guiding in OpenPHD2 since it was first released in an earlier beta and I know Dave is looking forward to using it when he moves from using an OAG on his 12-inch RC to a 90mm guide scope to make it easier to get more guide stars or even one star.
Multi-Star Guiding in OpenPHD2
Whilst trying some mode/exposure tests the guiding started acting up in RA, so parking the mount and disengaging the clutches I redid the balance of the scope. It was only marginally off but it was enough to cause issues for the CEM60 …. it is not forgiving !
We decided to increase the Gain/Offset to 15/75 and use the Extended Full-Well mode (#2) of the QHY268C, testing the star brightness levels of various exposure times we opted for 180 seconds as that was under the maximum brightness level.
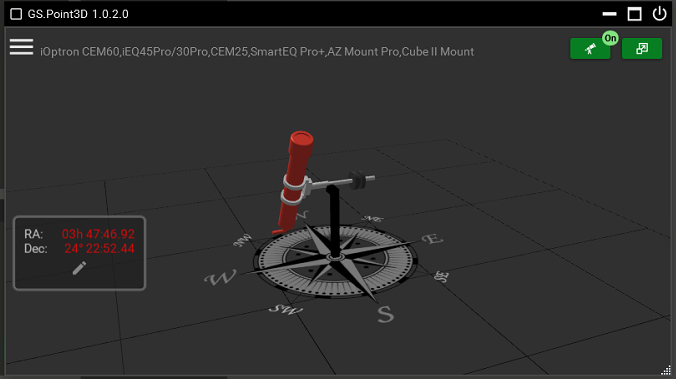
As I currently have no IP camera outside I like to see the mount position using GSPoint3D as I like to view where it is especially during meridian flips. NINA has this built-in now in the recent version 2.0 betas. As SGPro lacks this functionality I can use the view via this is standalone version that connects to the ASCOM mount.
Mount/Telescope virtual viewM45 – Pre Meridian Flip
SGPro paused the guiding just prior to the meridian flip. Following the automated flip, the guider and the imaging sequence automatically restarted after a plate solve and auto centering were performed.
Inverted shot of M45 (180s) – Post Meridian Flip
It gradually got cloudier just after midnight and the quality of the subs declined so I decided to stop acquiring data even though we really wanted over 4 hours of exposure.
I proceeded to take calibration frames. Using a target ADU of ~23,000 the SGPro flat wizard on the Pegasus FlatMaster (100%) gave an exposure time of 9.68s for the Optolong L-Pro filter, 25 flat-frames were taken followed by 25 dark-flat frames of the same exposure time and finally 25 dark frames of 180 seconds.
It was at this point that I realised that the FITs header showed a gain level of 0 and not 15, the offset was correct but I can’t be sure if the EFW mode was used as it’s not in the FITs headers. Only when using the native driver in NINA can you set the mode within the sequence, in SGPro the mode is set in the external ASCOM driver when the camera is not active in SGPro even though though it’s in the ASCOM API as the Camera.ReadoutModes property.
Also for some reason the default setting in the QHY driver is to NOT disable the overscan area which means I have black borders on my images which will make processing the data in Pixinsight a challenge !
I actually got to bed after 3am even though I had planned to stay up until the dawn. Next morning I noticed that my counter-weight had slipped and rotated on the bar. This may have also caused some of the issues with the guiding so I need to set-up earlier and check things more thoroughly in future to avoid these mistakes.
So although it’s not the data we planned it will be worth processing over a wine. The evening was a really a useful experiment and hopefully lessons will be learned …. if I remember the next time.
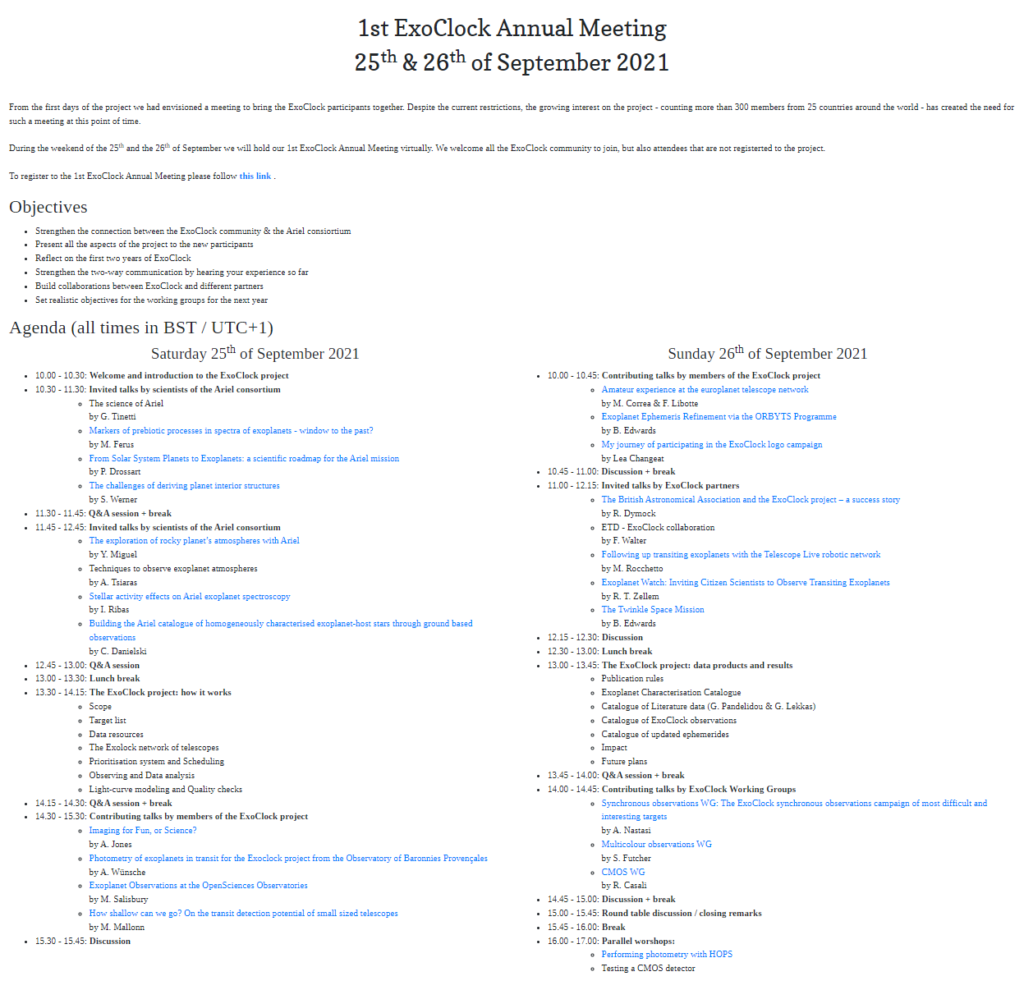
So I had planned to sit in on the Exoclock Annual meeting all day for both days but in the end I could only attend for the pre-lunch meetings as I had promised Dave that I would assist at the IMT3b observatory. So I will catch up on the afternoon talks when they are made available online.
The talks were varied and included experts from the Ariel Mission, Twinkle Mission, JPL, Telescope Live, BAA , members of the Exoclock project followed by workshops of which again I really wanted to be present to participate in the CMOS workshop but I couldn’t.
1st Exoclock Annual Meeting Agenda
25/09 PM – IMT3b Warm Room & Donkey Work
We shutdown the dome computers, network and whilst Bob started on the warm room electrics Dave and I proceeded to 1 ton of scalpings from the front of the house into wheelbarrows and then push them up the garden to be stored ready for the warm room patio construction. It was a very humid day and we were both sweating heavily by the end of it.
The dome computers were repowered and outstanding software updates applied (BIOS, Windows updates, windows software and RPi4 OS & software) before the Autumn imaging sessions begin in earnest.
The day was rounded off by relaxing with a glass of red wine and dinner with Bob, Dave and the family. As the evening turned out to be cloudy there would be no imaging so it was an early night ready for the hard graft on the following afternoon.
26/09 AM – Exoclock Video Conference Day 2
Another set of fine talks and I especially thought it was a nice touch that an artist Lea who won the new Exoclock Logo Competition was awarded some imaging time on Telescope Live.
Lea took a bit a time explaining her background and how she formulated the design for the new logo.
New logo courtesy of Lea Changeat
It was even better that not being an astronomer she was persuaded to undertake some Exoplanet observations and report on her experience.
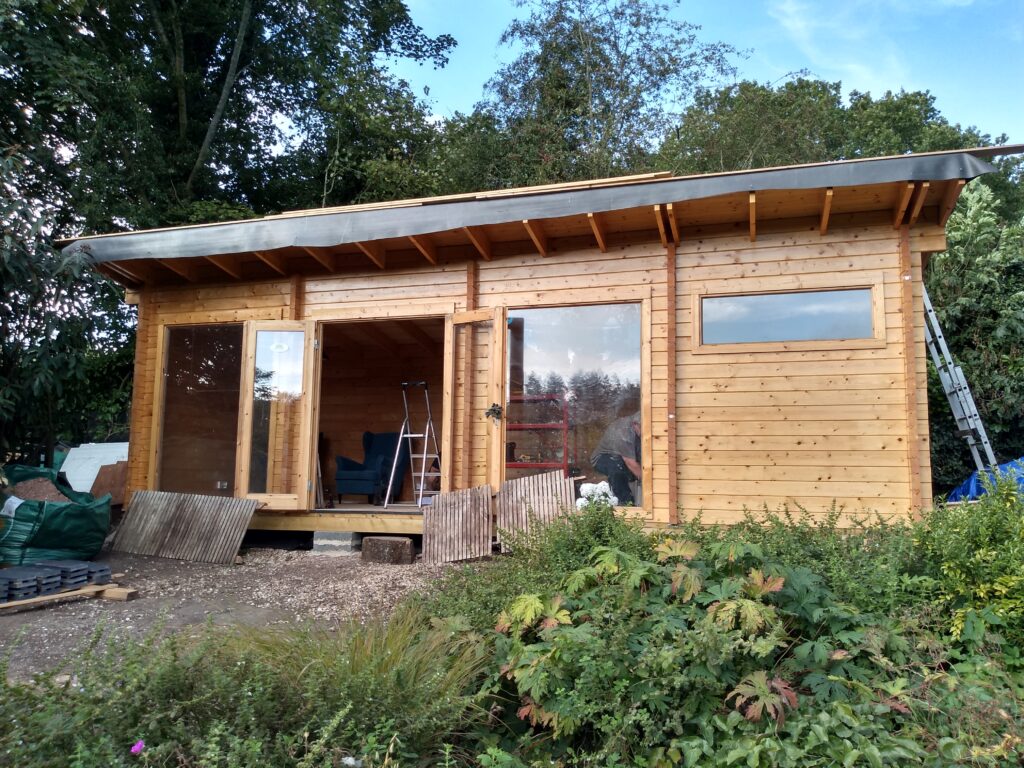
26/09 PM – IMT3b Warm Room Windows
The 7ft double glazed windows were put by Dave, Luke and Tim and myself. It was nerve racking as we manhandled the two panes from near the side of the main house up steps and along the garden with the Tim and Luke taking the awkward window corners whilst Dave and I used floor tile clamps on the glass.
The warm room aka “Wooden GreenHouse”
Bob came over to complete the electrics for the warm room and I left when Dave started stretching on tiptoes to put in the red & white light fittings. I figured I could complete the remaining software updates remotely.
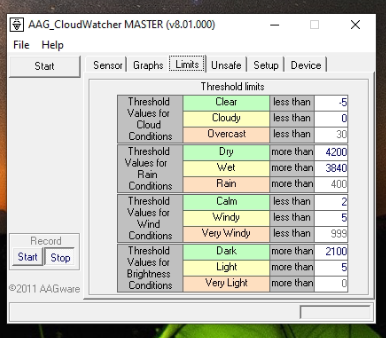
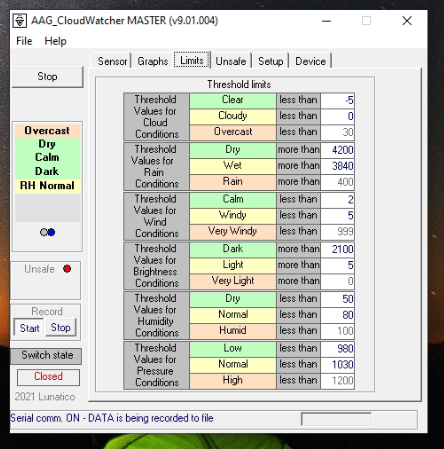
The AAG software was updated to 9.1.4 from the old 8.1.0 version, we still need to investigate the wind sensor reading with Jamie from AAG.
AAG 8.1.0 sensor limits
AAG 9.1.4 sensor limits and new sensors
So we now access to the Humidity sensor settings and the appropriate alert levels. Previously I had to rely on both ASCOM local conditions and internal dome humidity via ASCOM (BlueAstro StickStation) but I wonder if we want to trigger an unsafe state by including the humidity thresholds.
I’ve taken the plunge and dipped my toe into the CMOS world. Since I didn’t have any OSC experience I chatted with DSW (has a QHY186c) and decided on the QHY286C. This I purchased from Bern at ModernAstronomy who has always provided excellent service.
The issue with APS-C sensors when coupled with the Takahashi FSQ85 is that the edges start to show signs of star elongation, I already see this on my Atik460. This can be corrected with the FSQ-85 flattener (ordered from FirstLightOptics) which has the effect of slightly increasing the focal length but also reduces the back focus from the native 197.5mm to 56mm.
Effective Focal Length
455mm (f/5.4)
Image Circle Diameter
44mm
Metal Back Focus
56mm
FSQ-85 EDX with Flattener 1.01x
This means that I can’t use my existing Atik OAG->Atik EFW2 and Atik460 because it’s total distance is 59mm (22mm+24mm+13mm) so it’s out by 2mm even once you include the filter effect on the back focus. Note – This is also true for my Starlight Xpress configuration.
I do not understand why Atik could not have got to within the 55-56mm range by shaving off a mm here and there 🙁 I may need to replace all Atik gear when I convert to mono CMOS or replace the OAG with a guide scope.
So onto the QHY268C, the OSC CMOS unfortunately has a CAA tilt adapter instead of a direct thread connection. This wastes 11mm of precious back focus giving a total distance of 23.5mm whereas the recently released QHY286M CMOS has a 12.5mm back focus !!!!
Also the QHY268C does not have an IR/UV cut filter in place so you need to buy an additional filter and holder and add that to the cost and factor in the adapter and distance needed …. I’m starting to regret this purchase more and more !
Source – QHYCCD.com
Back to the Takahashi Flattener (TKA37852), the back focus is 56.2mm but we add on the filter thickness as it changes the light path (2mm/3=0.66mm) so ~57mm (56.9mm), the imaging train is as follows :
Adapter
Distance (mm)
Accumulated Distance (mm)
Connector
OU031
2
2
M54(M) -> M54(M)
QHY 020770
4
6
M54(F)
QHY Spacers
14.4
20.4
screw
QHY OAG-M
10
30.4
screw
QHY 020055
2.5
32.9
screw
inc filter
0.6
33.5
–
QHY CAA adapter
6
39.5
screw
QHY268C CMOS
17.5
57
screw
FSQ85 Flattener to QHY268C imaging train
The combined weight is 1365g so I may need to adjust the balance of the scope a little as it heavier than my Atik460/EFW2/OAG setup at 1080g.
Completed – Imaging train ready for first light
I may have to adjust the spacers a little but I won’t know until I have received a 2-inch Optolong L-Pro light pollution filter which is currently on back order from FLO.
Transmission chart for Optolong L-Pro
QHY268M
The recently released mono version of the QHY268 looks like it has a proper screw face plate with a more acceptable back focus of 12.5mm. This is more reasonable and would allow me to couple a filter wheel and OAG as well not requiring a IR/UV cut filter.
Like SyedT on StarGazersLounge I could go back to using a guide scope and ditch the OAG and then the imaging train could incorporate a rotator :
I was thinking of a rotator for the remote Esprit120 which has a generous back focus of 76mm so I should have no problems there but that will be another adventure for the future !
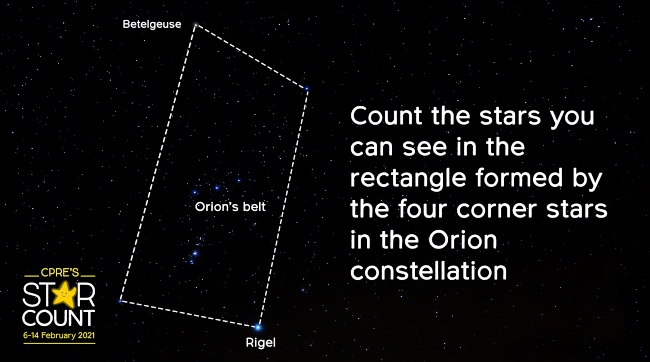
The Campaign for the Protection of Rural England (CPRE) was running it’s annual star count for 2021 from 6th – 14th February.
Basically in order to assess the effect that unnecessary man-made light pollution has on the quality of our life’s the CPRE want people to count the stars they can see within a box formed by the brightest stars in the constellation of Orion (not including the four main stars that form the box) and submit their observations.
Credit – https://cpre.org.uk
A couple of us arranged to get together remotely and count the stars we could see at 8pm on 10/2/2021 when Orion was near it’s highest point in the South. Of course at this time of night the light pollution is also fairly high 🙁
Suburban Sites
Observer
Star Count
Jim
9
GeekBoy
10
GeekGirl
11
Neil
12
Observation – 20:00 10/2/2021
The SQM (Sky Quality Monitor) reading for our (GeekBoy/GeekGirl) location at that time was 19.92 mags/arcsec2 which places it around a Bortle class 5 sky (NELM 5.6-6.0). Of course later on during the night, once the causes of light pollution subside I normally get a reading of 20.6 mags/arcsec2.
Observer
Star Count
Giles
9
Stephen et al
13
Observation – 20:00 12/02/2021
Rural Dark Site
Dave got out with his family to star count from his rural dark site and the comparison is stark ! There may be an age effect on the eye sight here as they are from the same time/location but either way it’s shows what can be seen in the absence of excessive light ingress.
Observer
Star Count
Dave
23
Daughter & Boyfriend
27
Observation – 21:40 10/02/2021
Well that was a bit of fun and a welcome distraction in the current never ending lockdown – thank you guys !