IMT3 ASI1600mm Camera Analysis Part 1

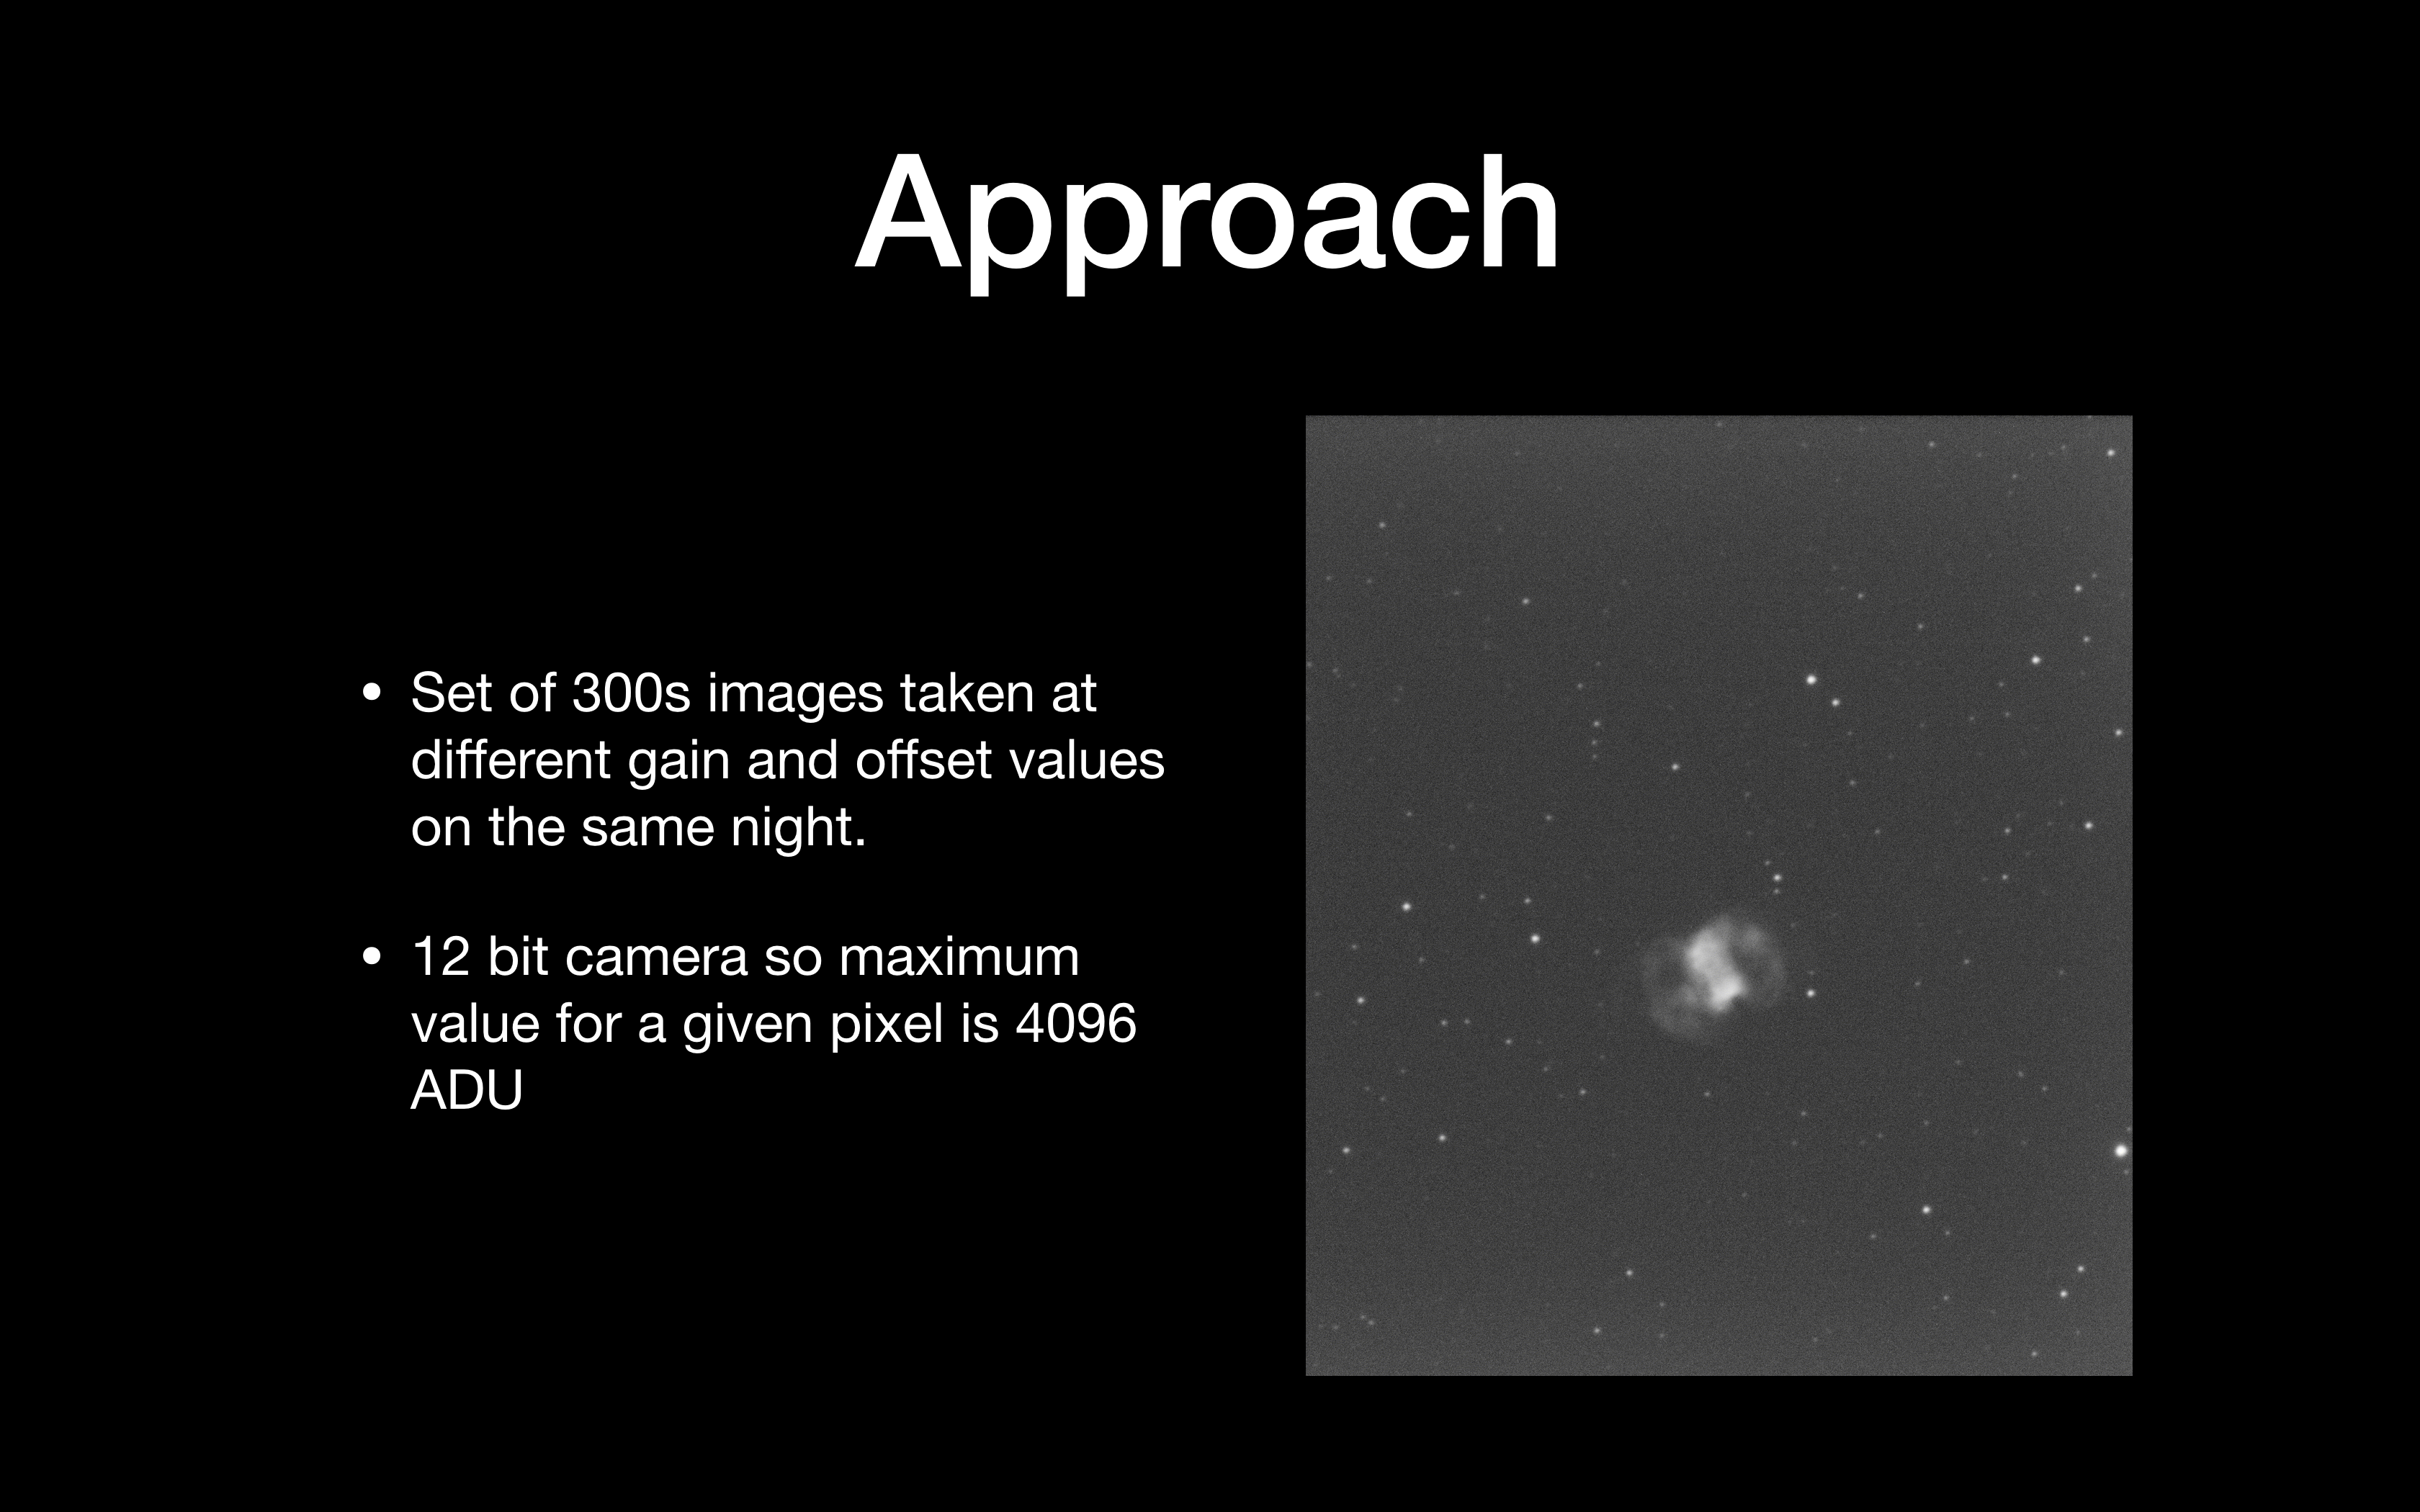
So the main approach here was to start testing the ZWO ASI1600mm on 5min images and decide which is the best Gain and Offset to use. As the object is a planetary nebula I have used my Astrodon 5nm OIII filter to bring out the faintest parts of the nebula. To be thorough, and this will take time, I plan on running the tests for all 7 filters I have.

I have done extensive reading on the topic of image analysis and hope to apply here what I have learnt. Given then camera is running 12 bit, I have a maximum pixel value of 4096 which represents saturation and then any further response is non-linear. Once I have completed 5min testing I will try for 10, 15 and 20 mins. I will then perform further testing by taking a sample set of 10 images to stack and see how that compares with similar total exposure times across the frames.

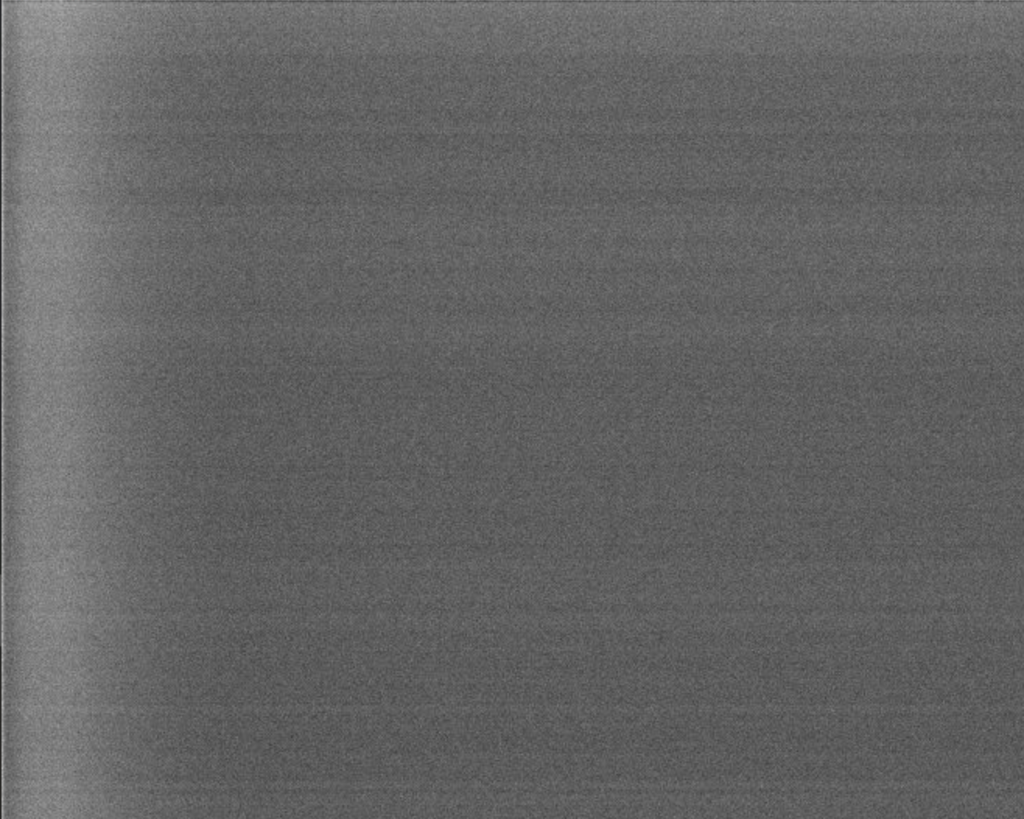
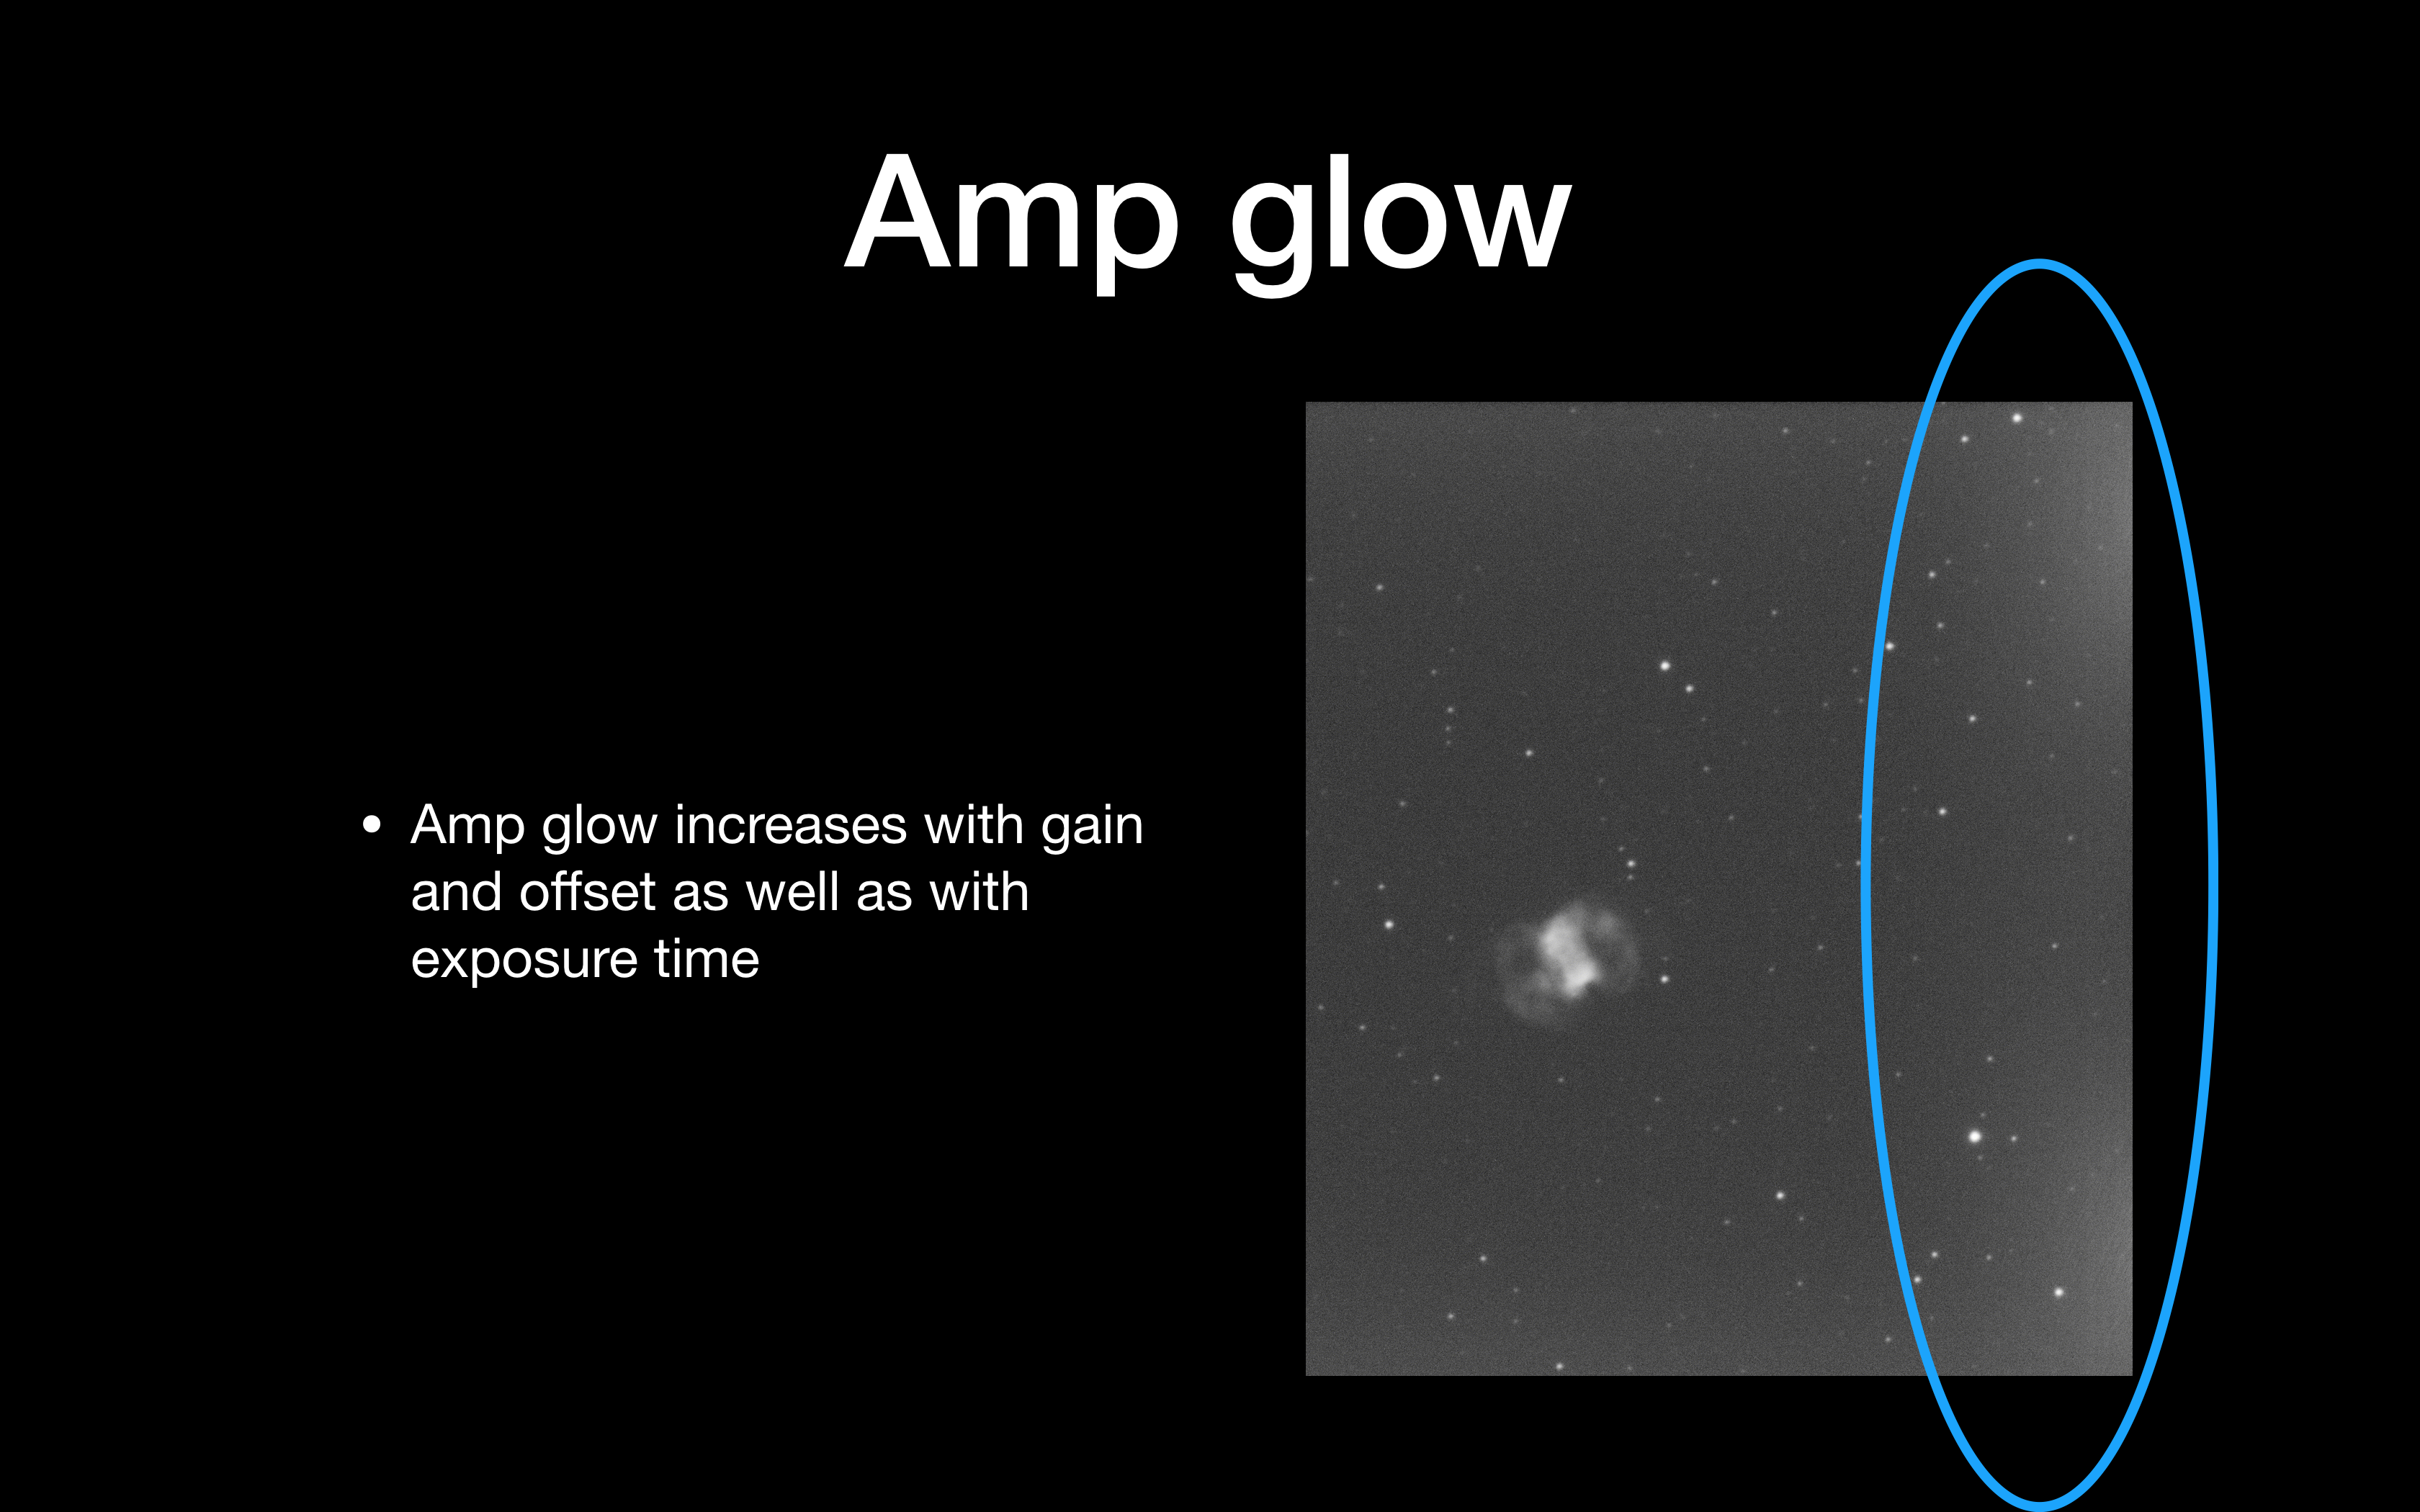
Amp glow is a particular problem with CMOS. Despite the ZWO site suggesting that amp glow is virtually removed in the Pro Cooled camera, it is clearly not, as can be seen in single 5 min subs. The good thing is a dark will remove it effectively. What I need to make sure is that the amount glow does not swamp the image so much that it overpowers the signal from the faint nebula.

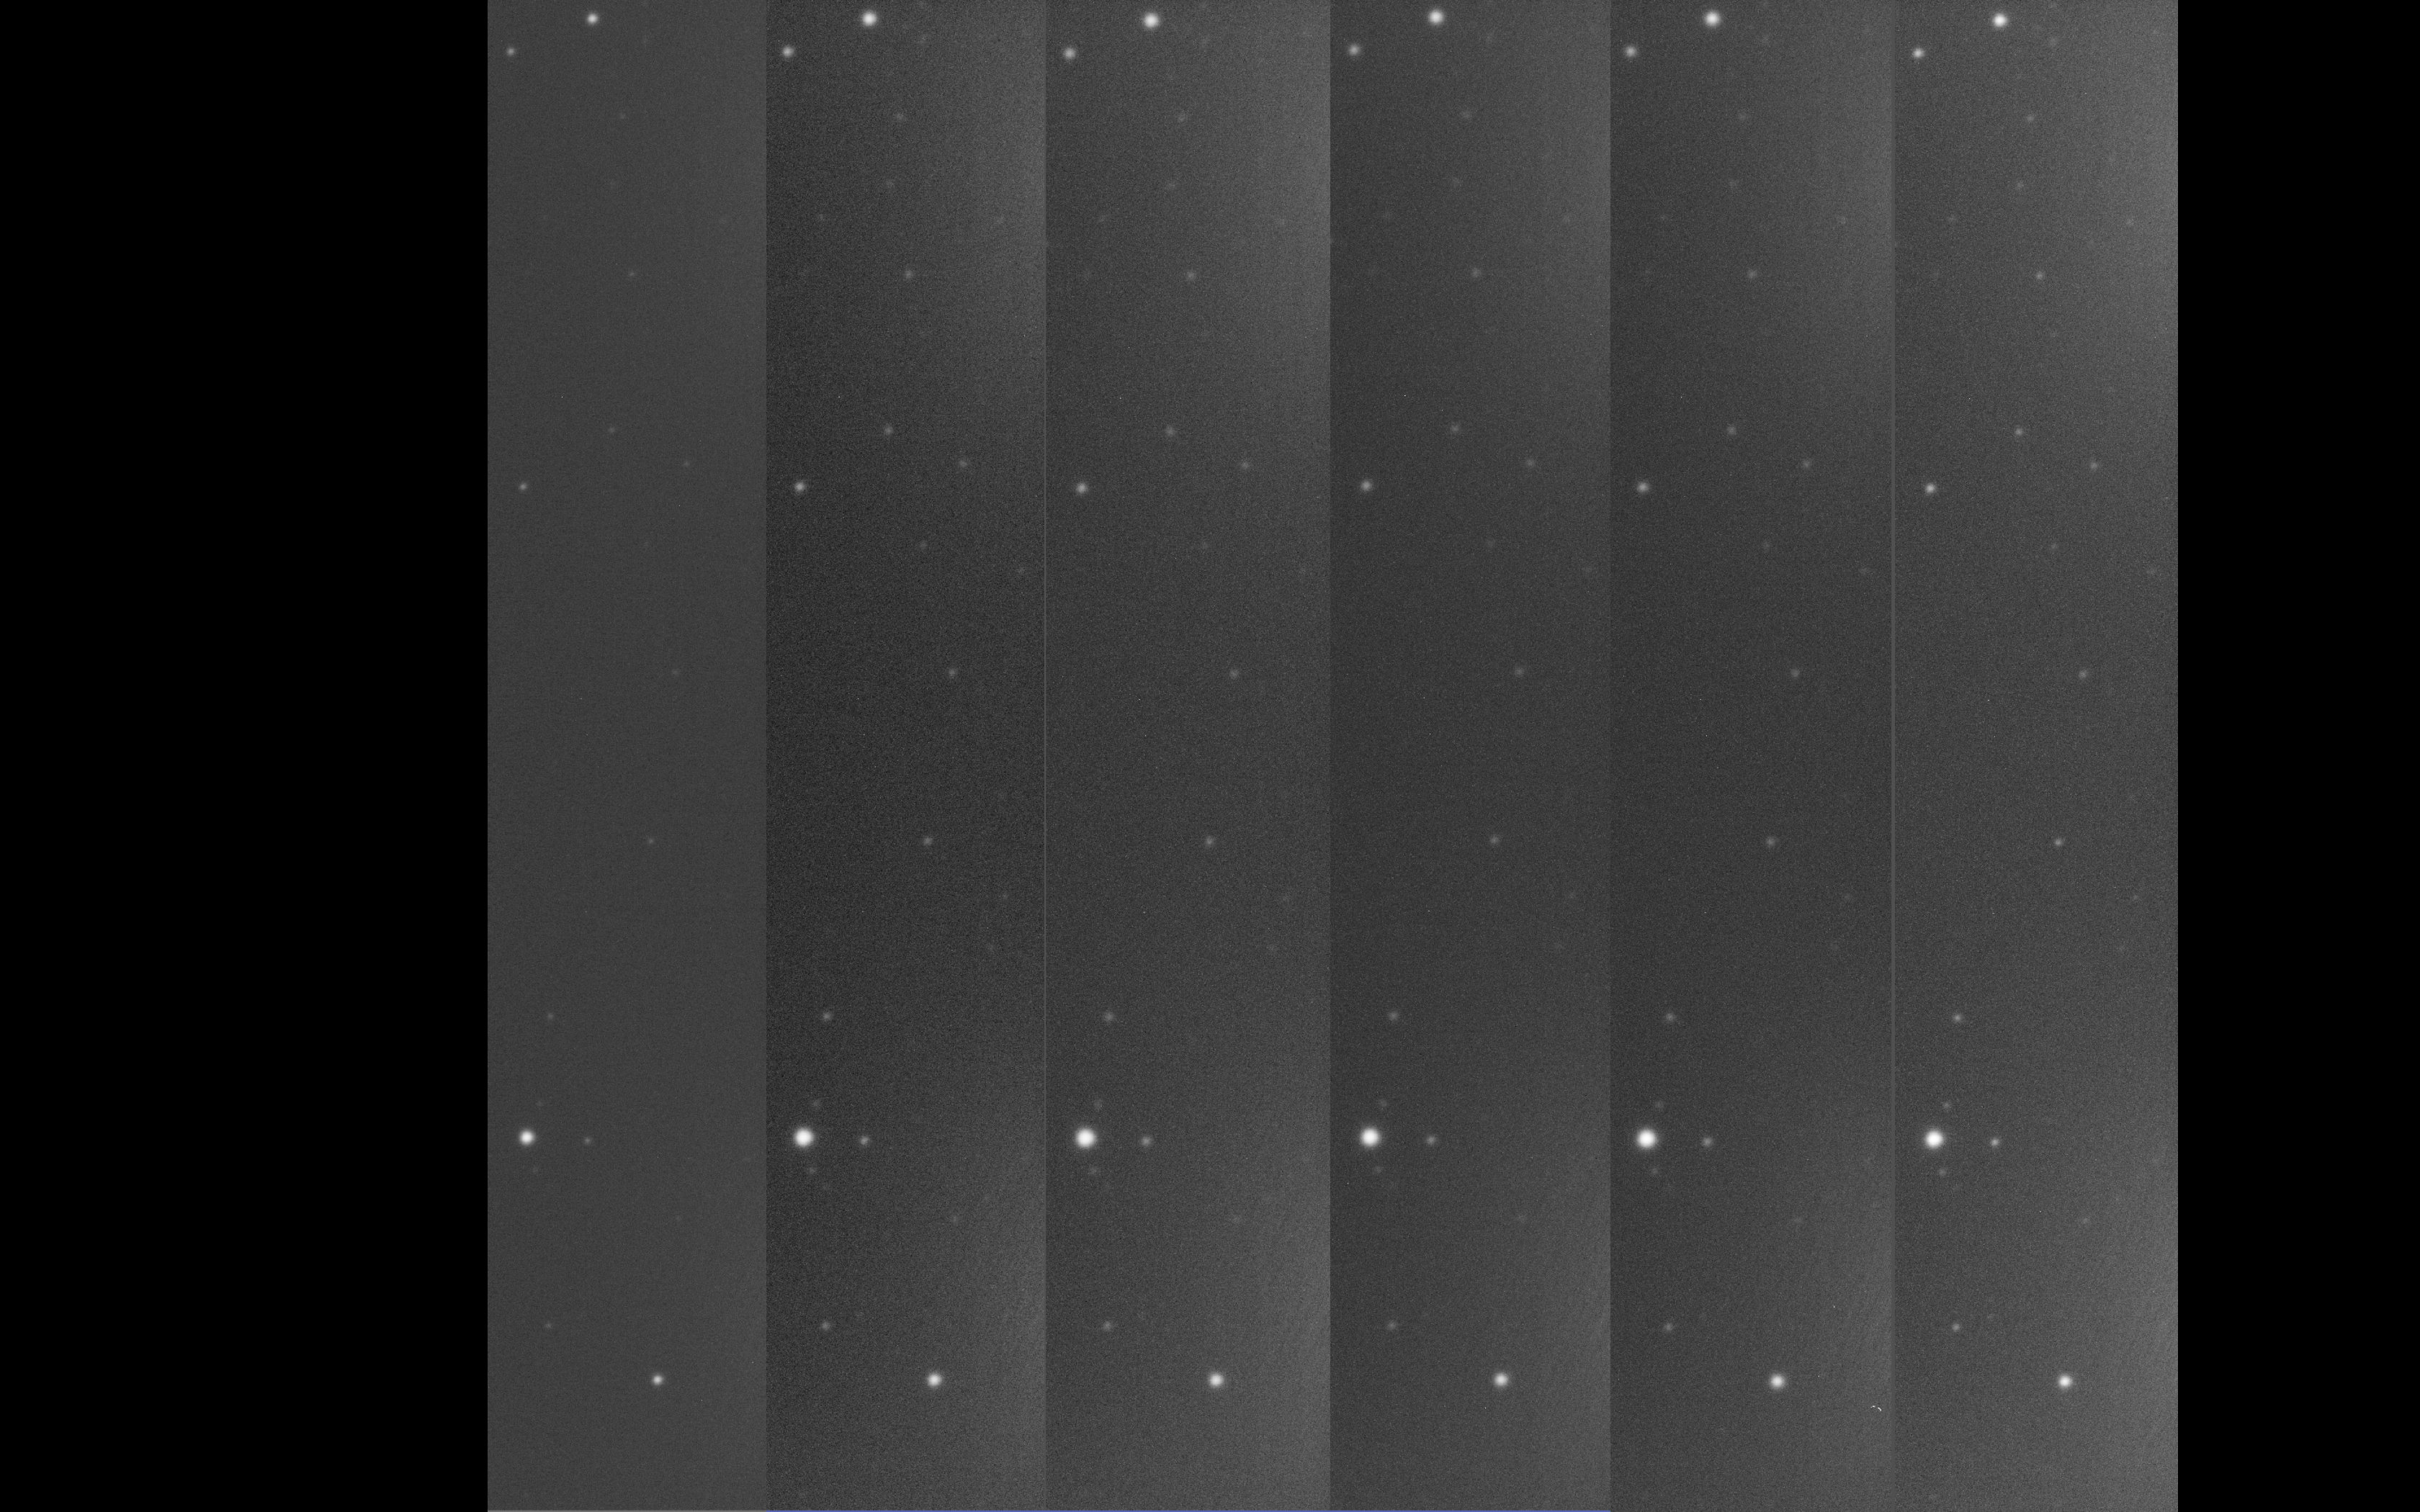
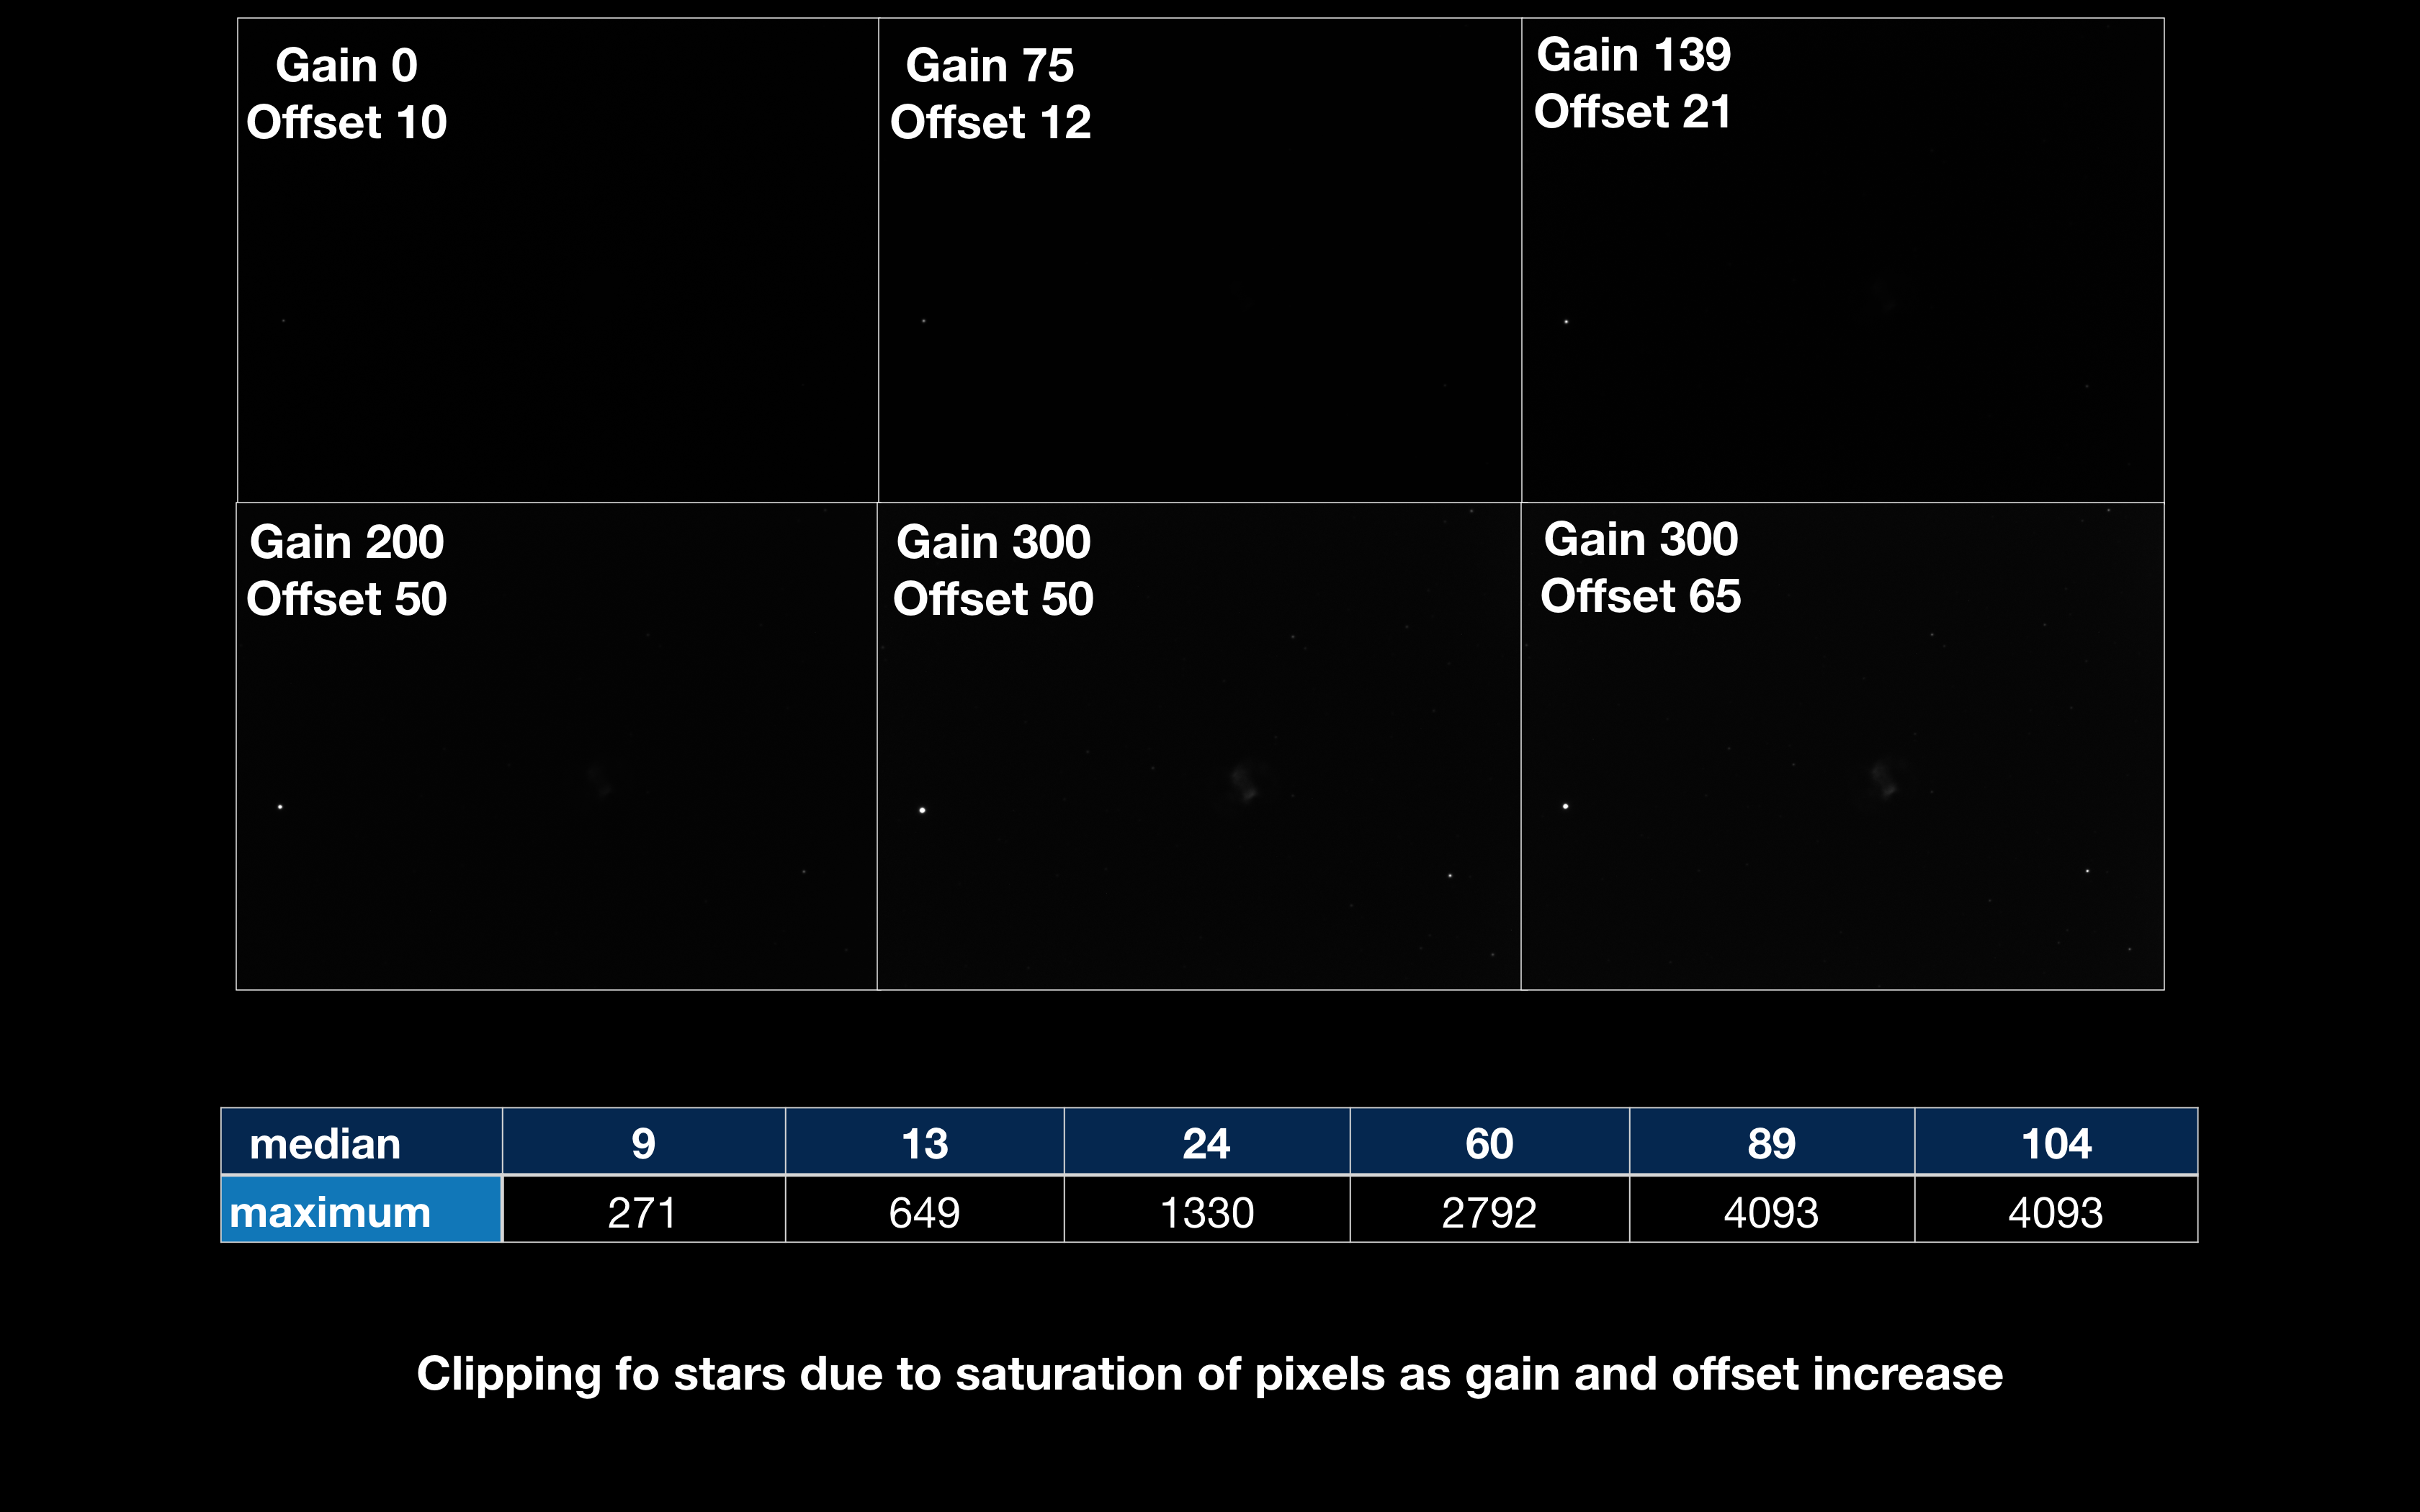
Increasing the gain and offset value from left to right you can see a marked increase in the amp glow. The image slices below are taken from the far right of each frame.

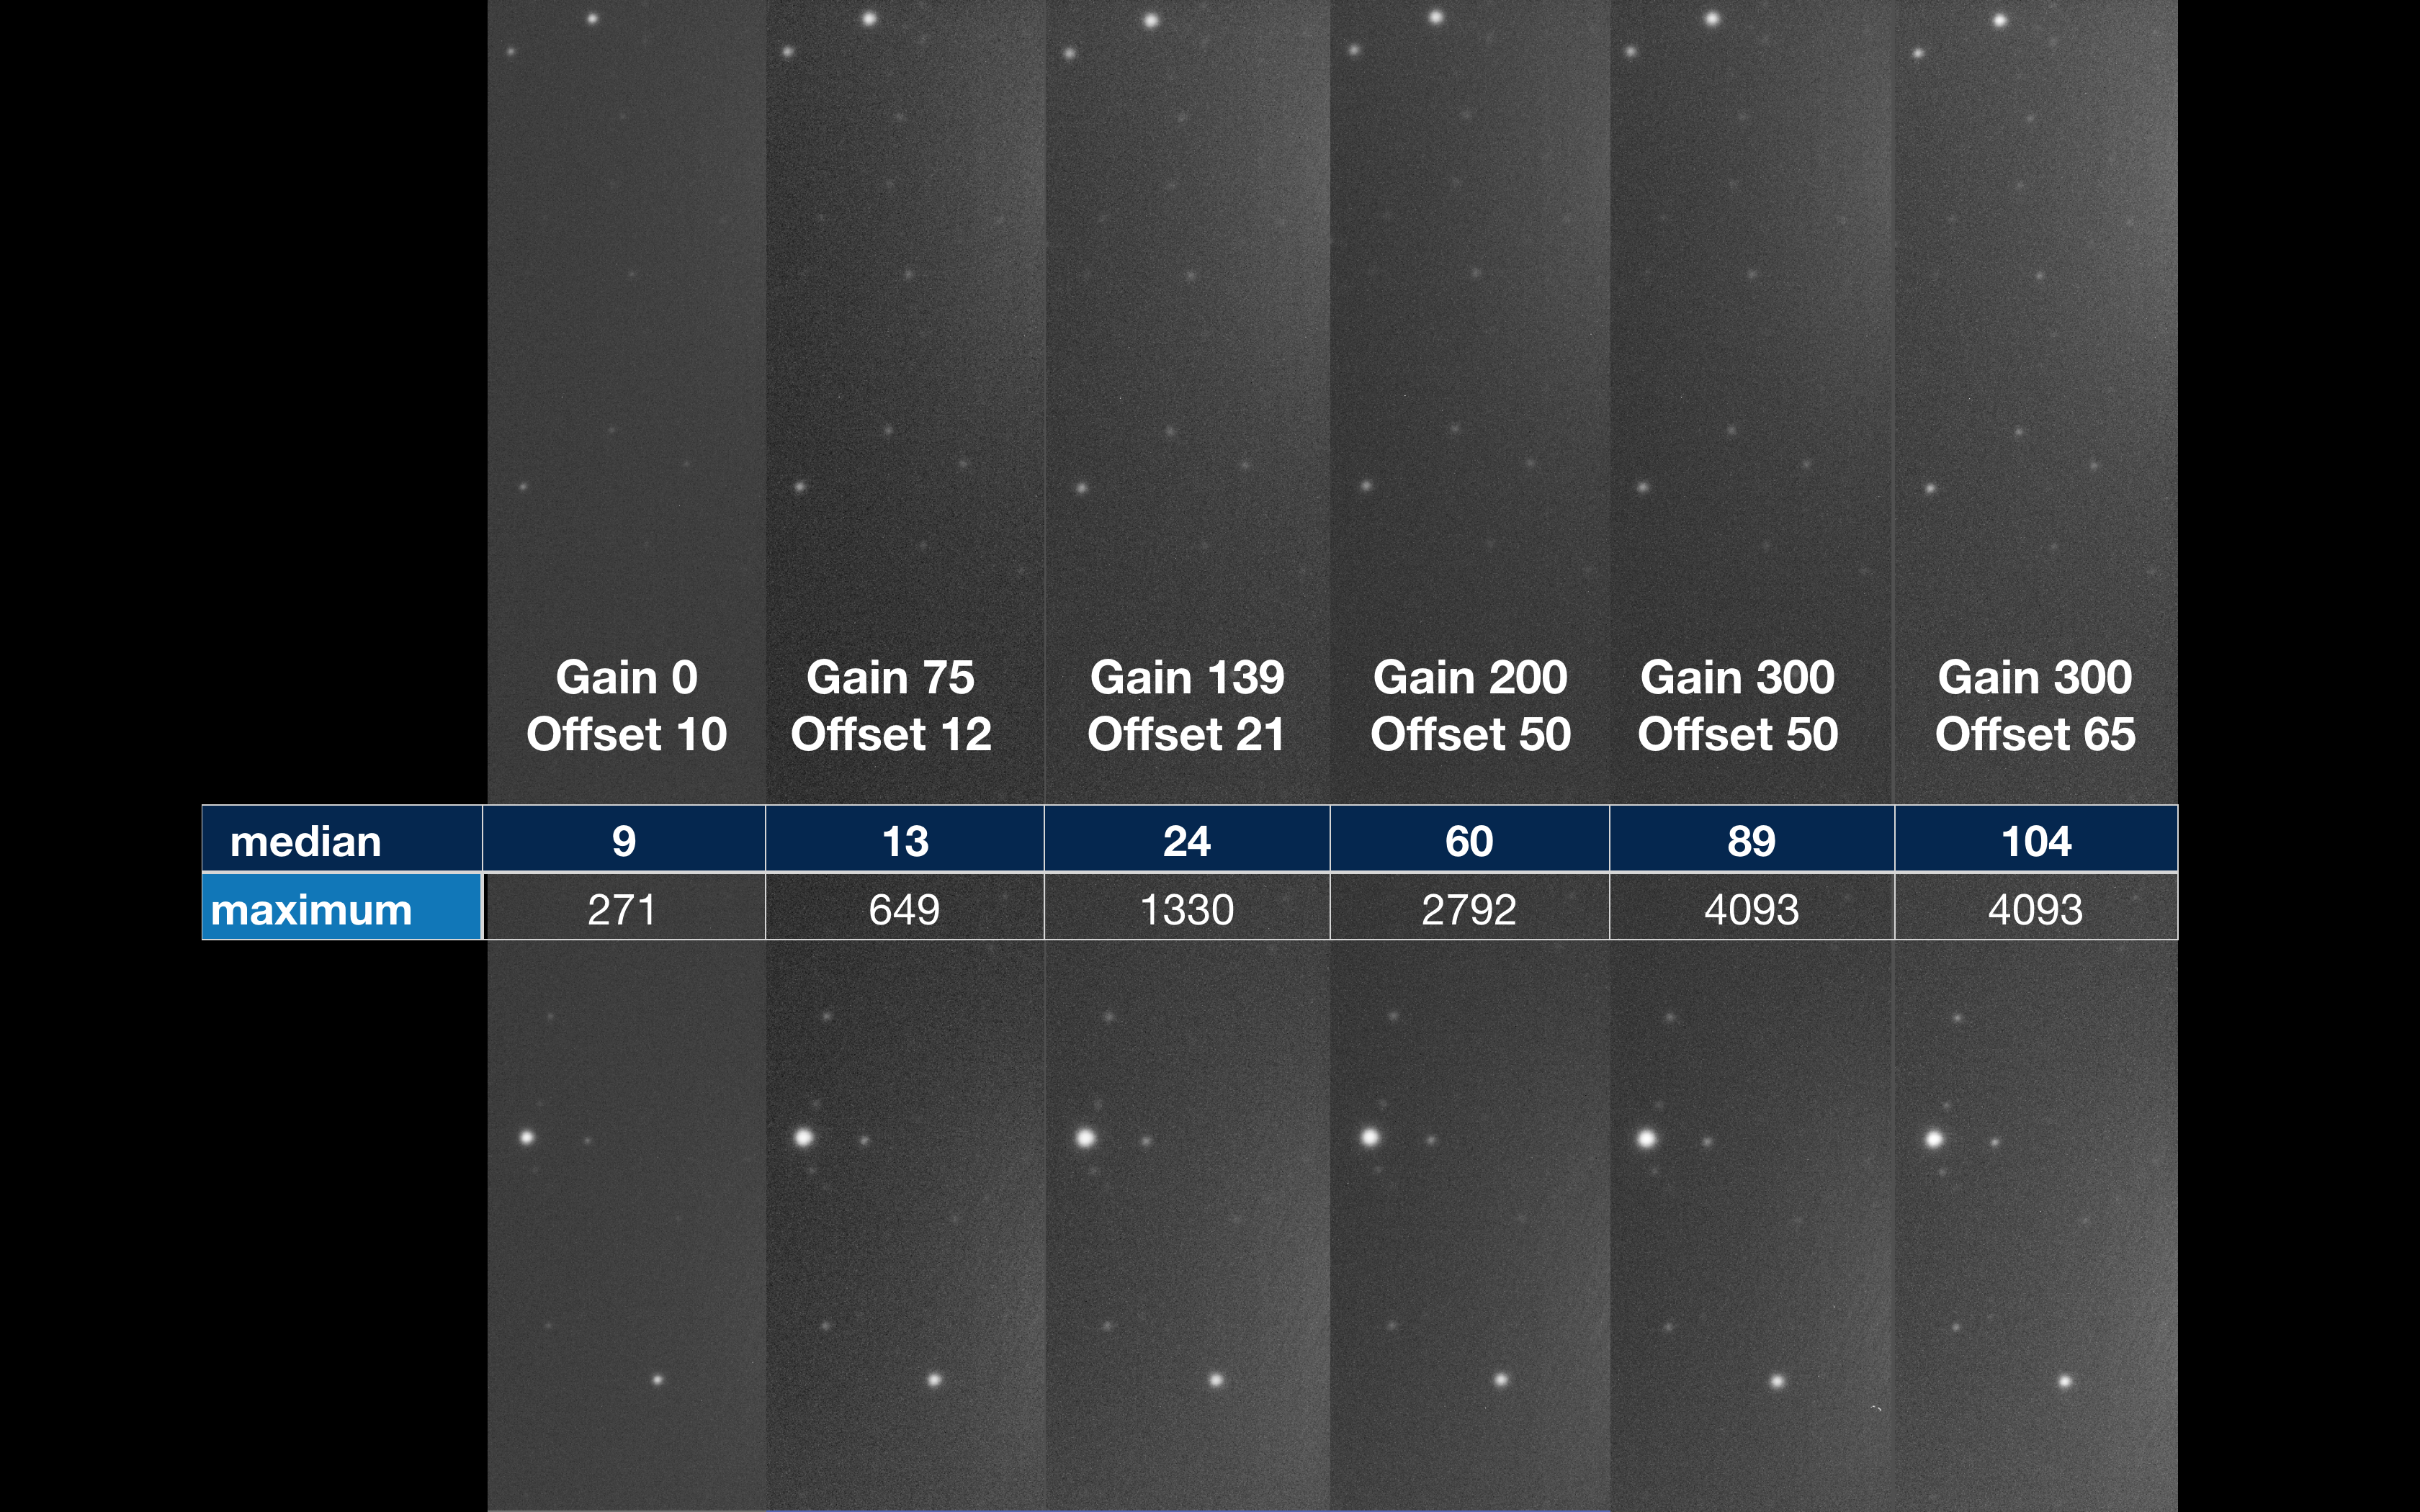
The offset figures in relation to the gain figures have been taken from my reading of various material. The median values are that of the background and the maximum values that of the stars. You can see on this 5min exposure that by the time I reached a gain of 300 one or more of the stars are saturated. In fact the brightest star in this slice is SAO 22510 which is mag 9.53.

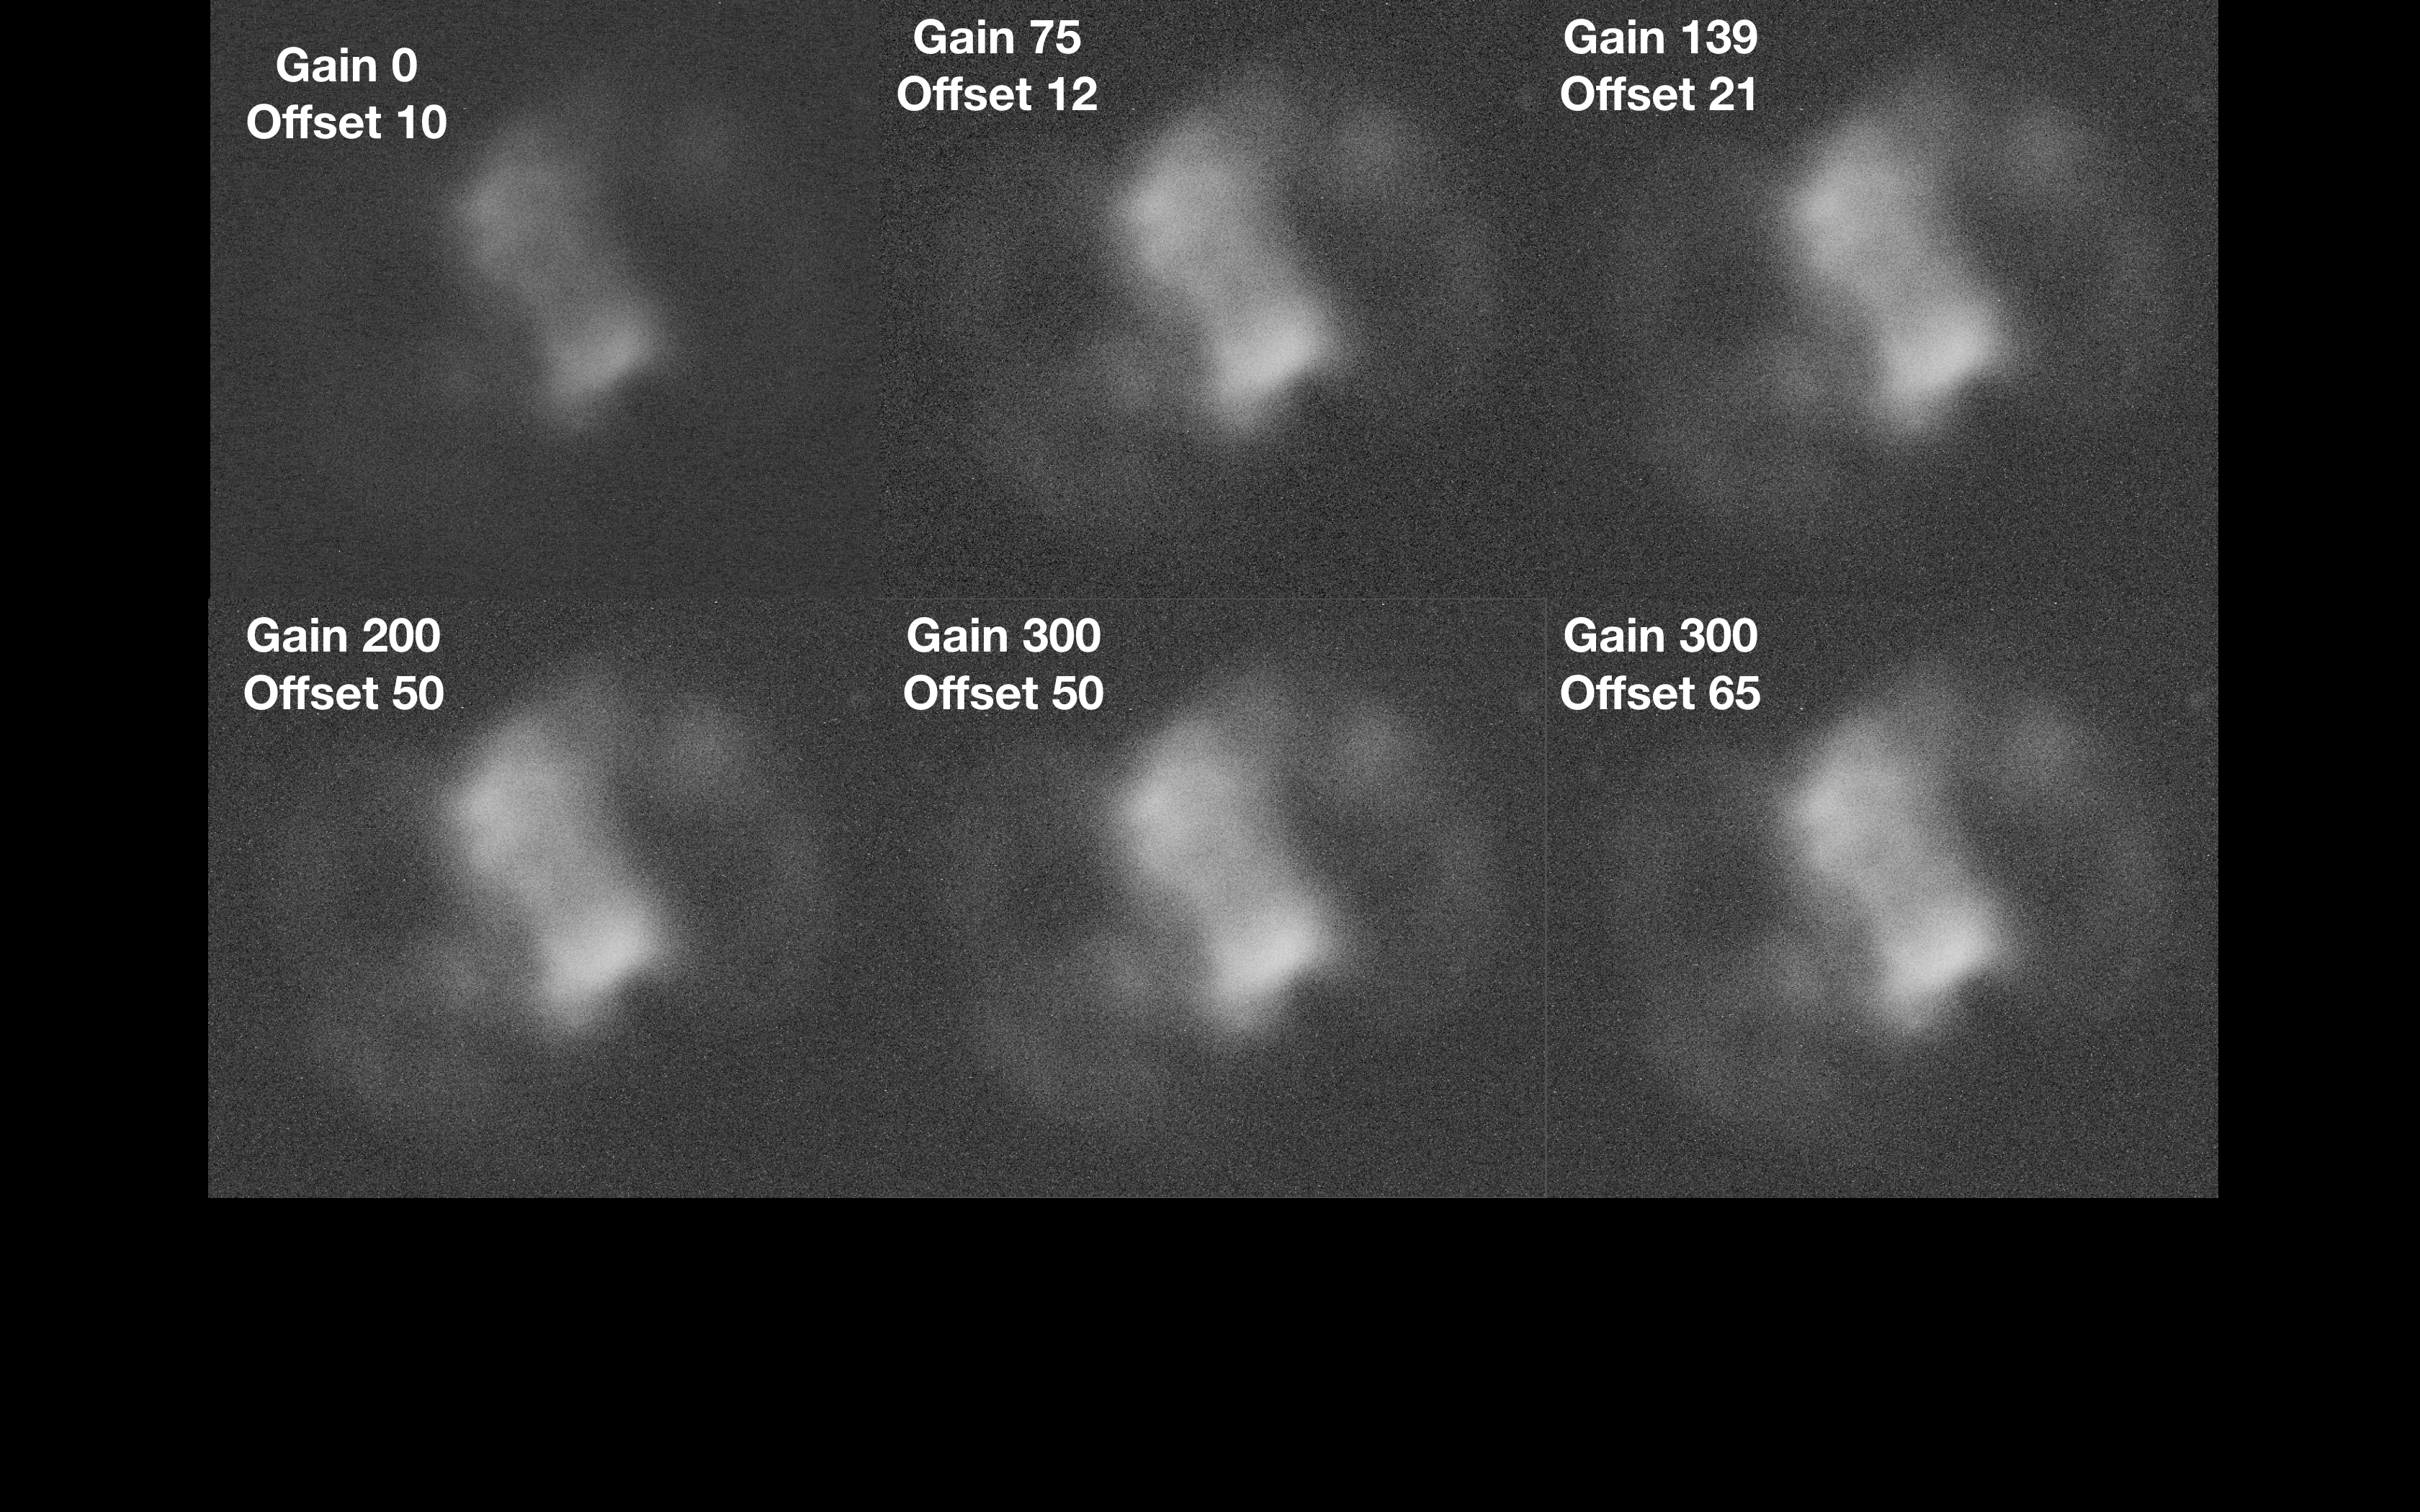
Another way to visualise the saturation effect is looking at the raw unstretched image, whilst a star is visible in the image using gain 139 and 200, on close inspection within PI and looking at the values of the pixels of the star they are not saturated. However gain 300 is. The purpose of this is that an unstretched image is not the defect for telling if parts of the image are saturated as some texts describe, but one can see the increased brightening of the star by gain 300 to know it is a problem.

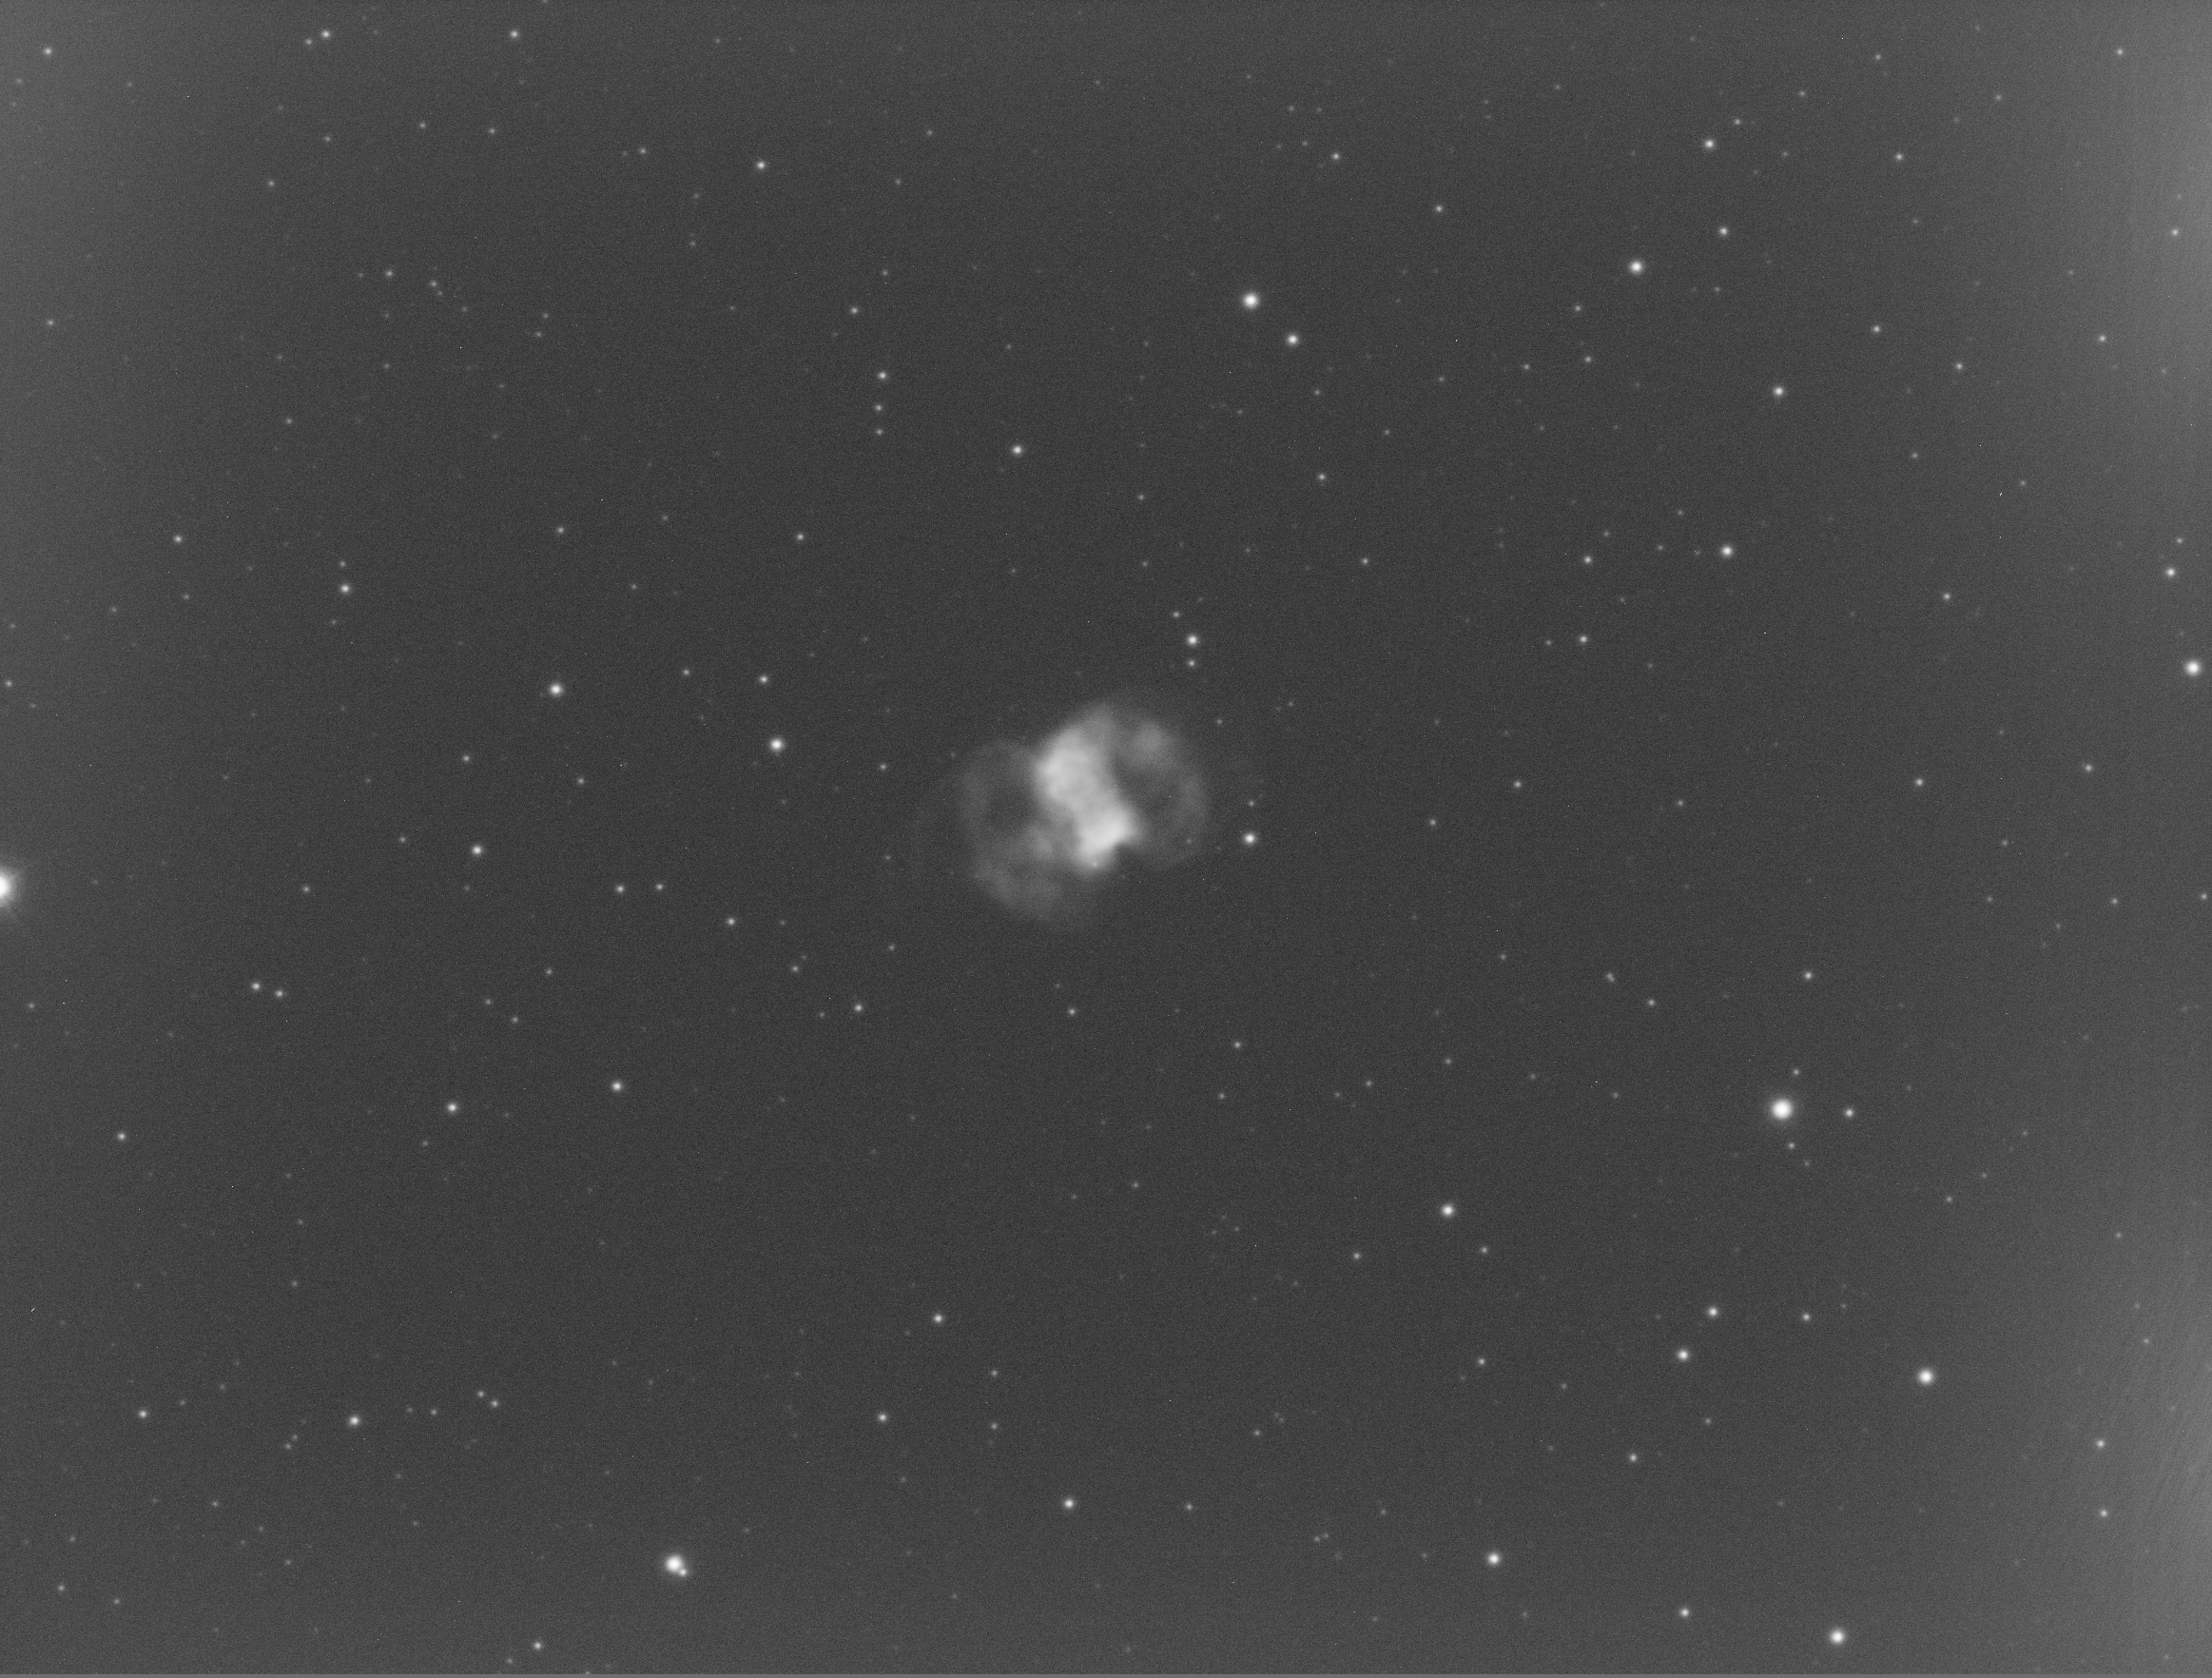
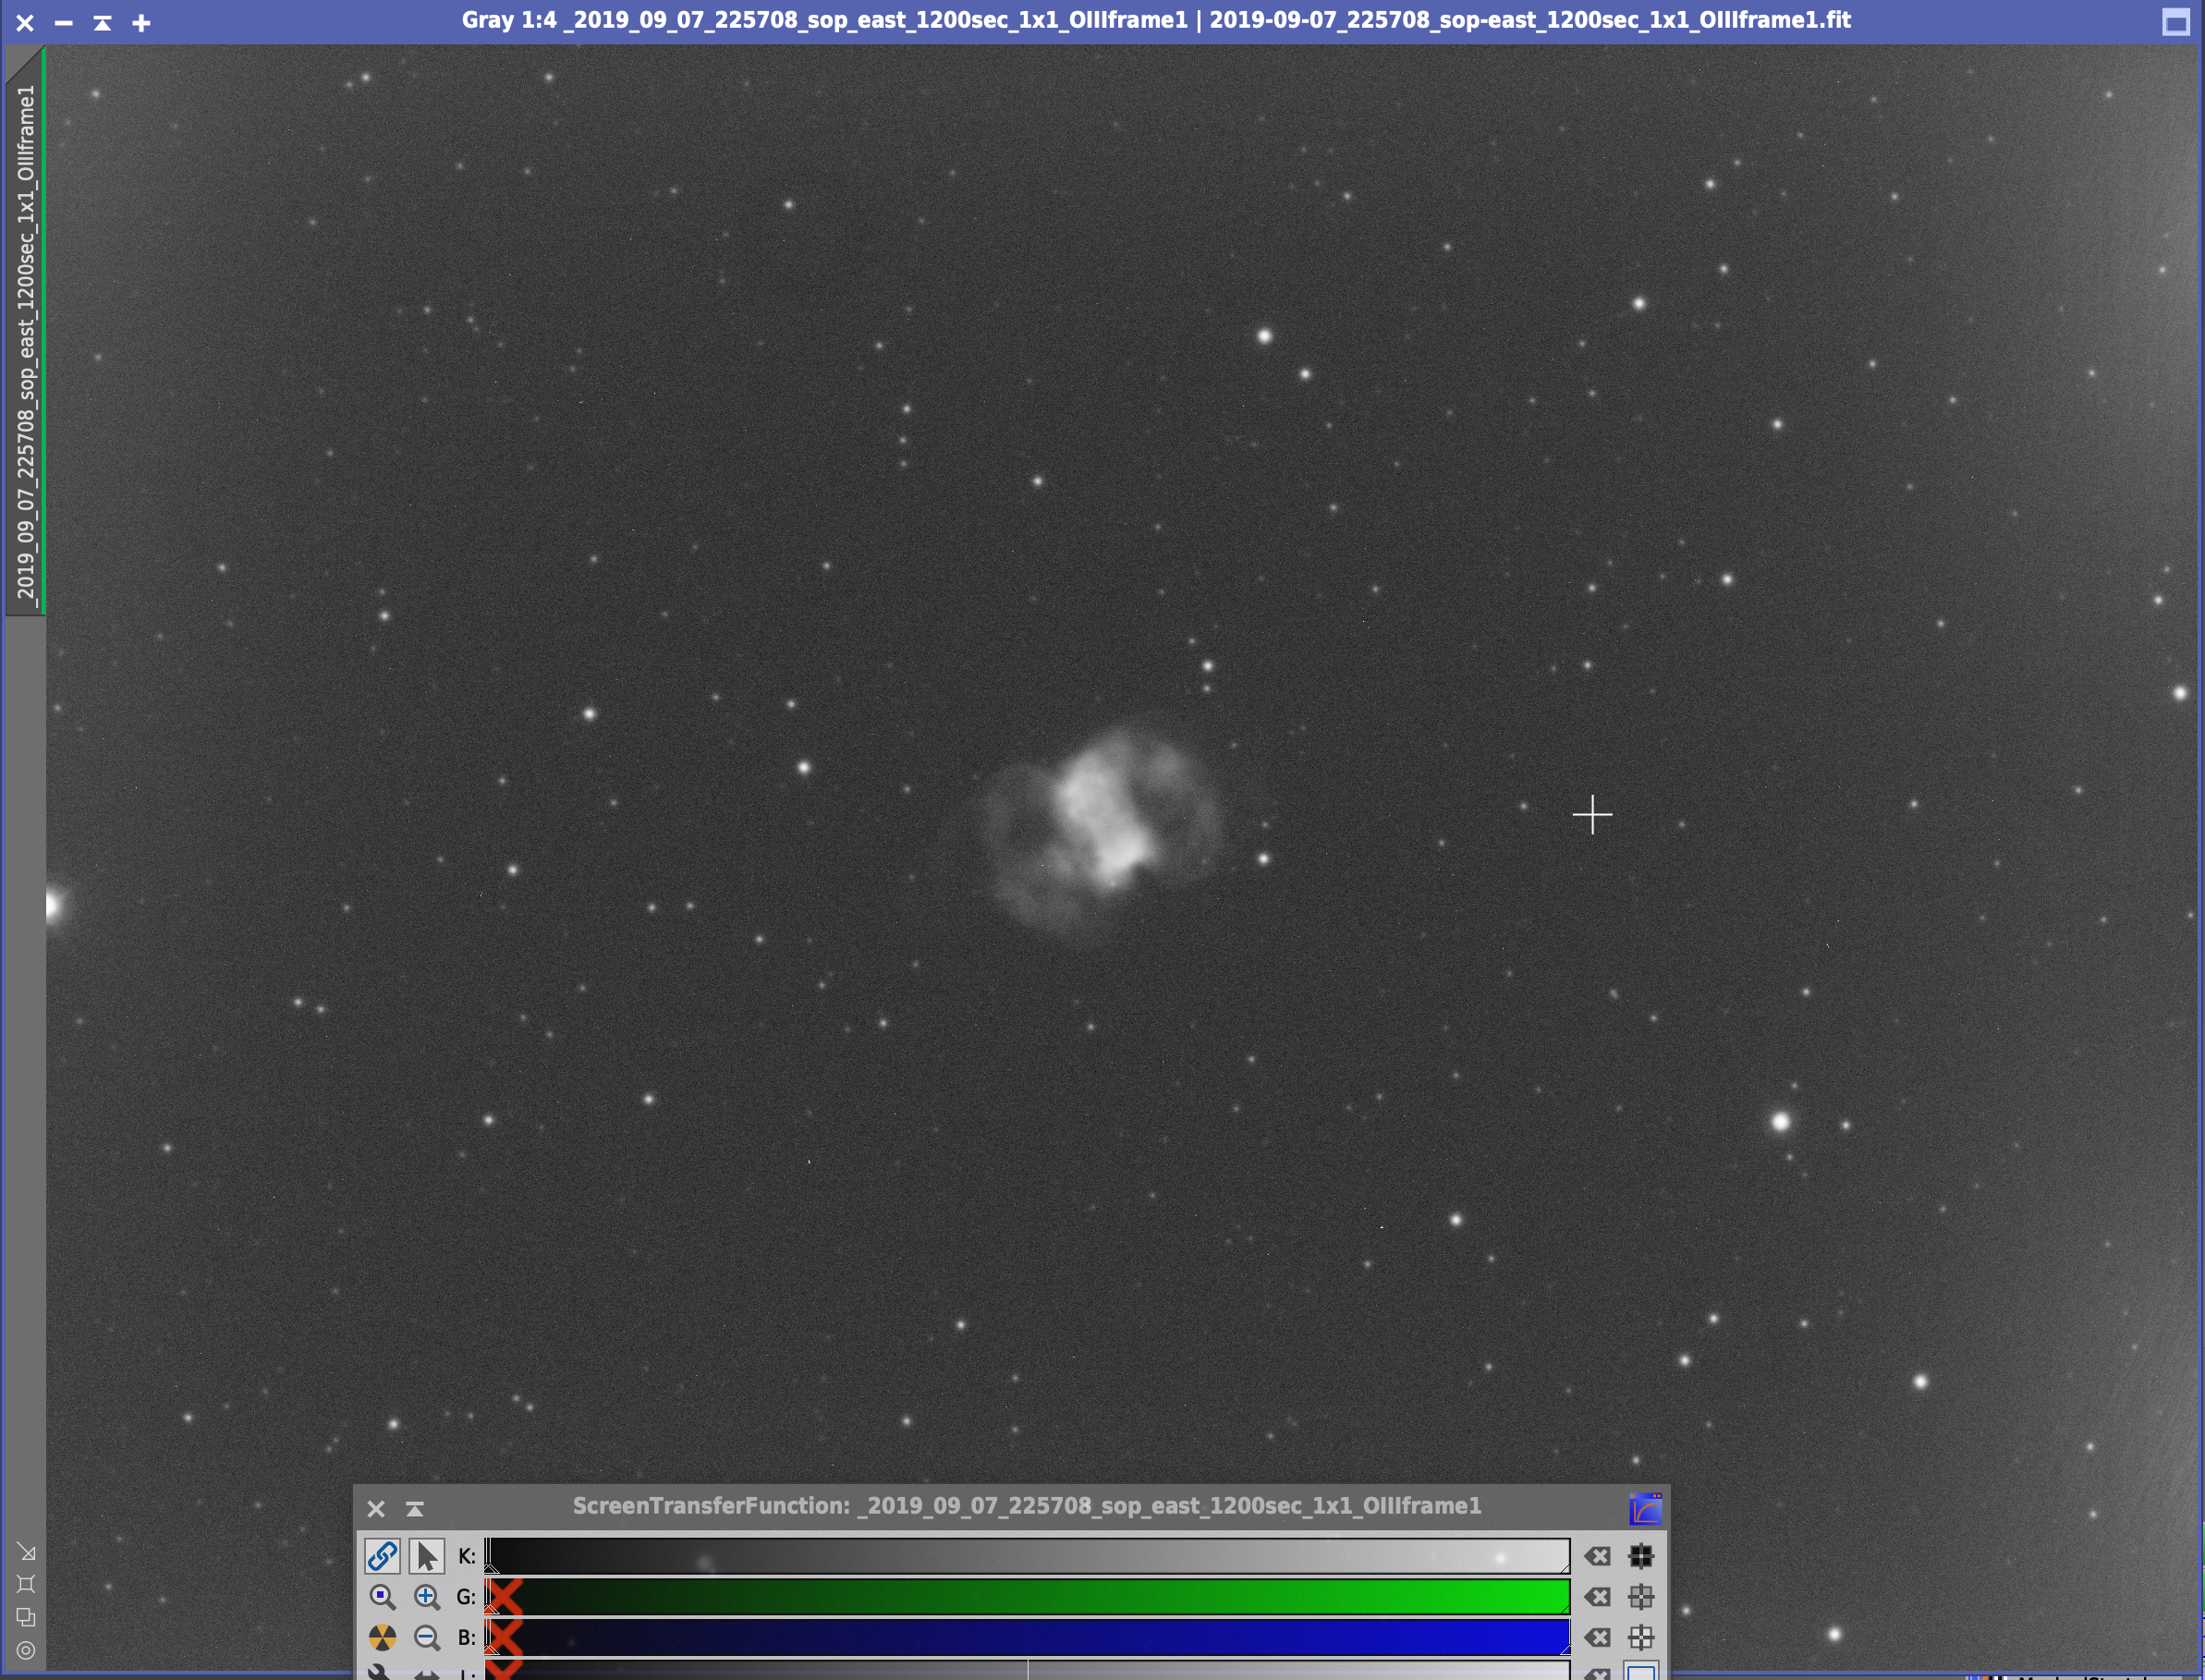
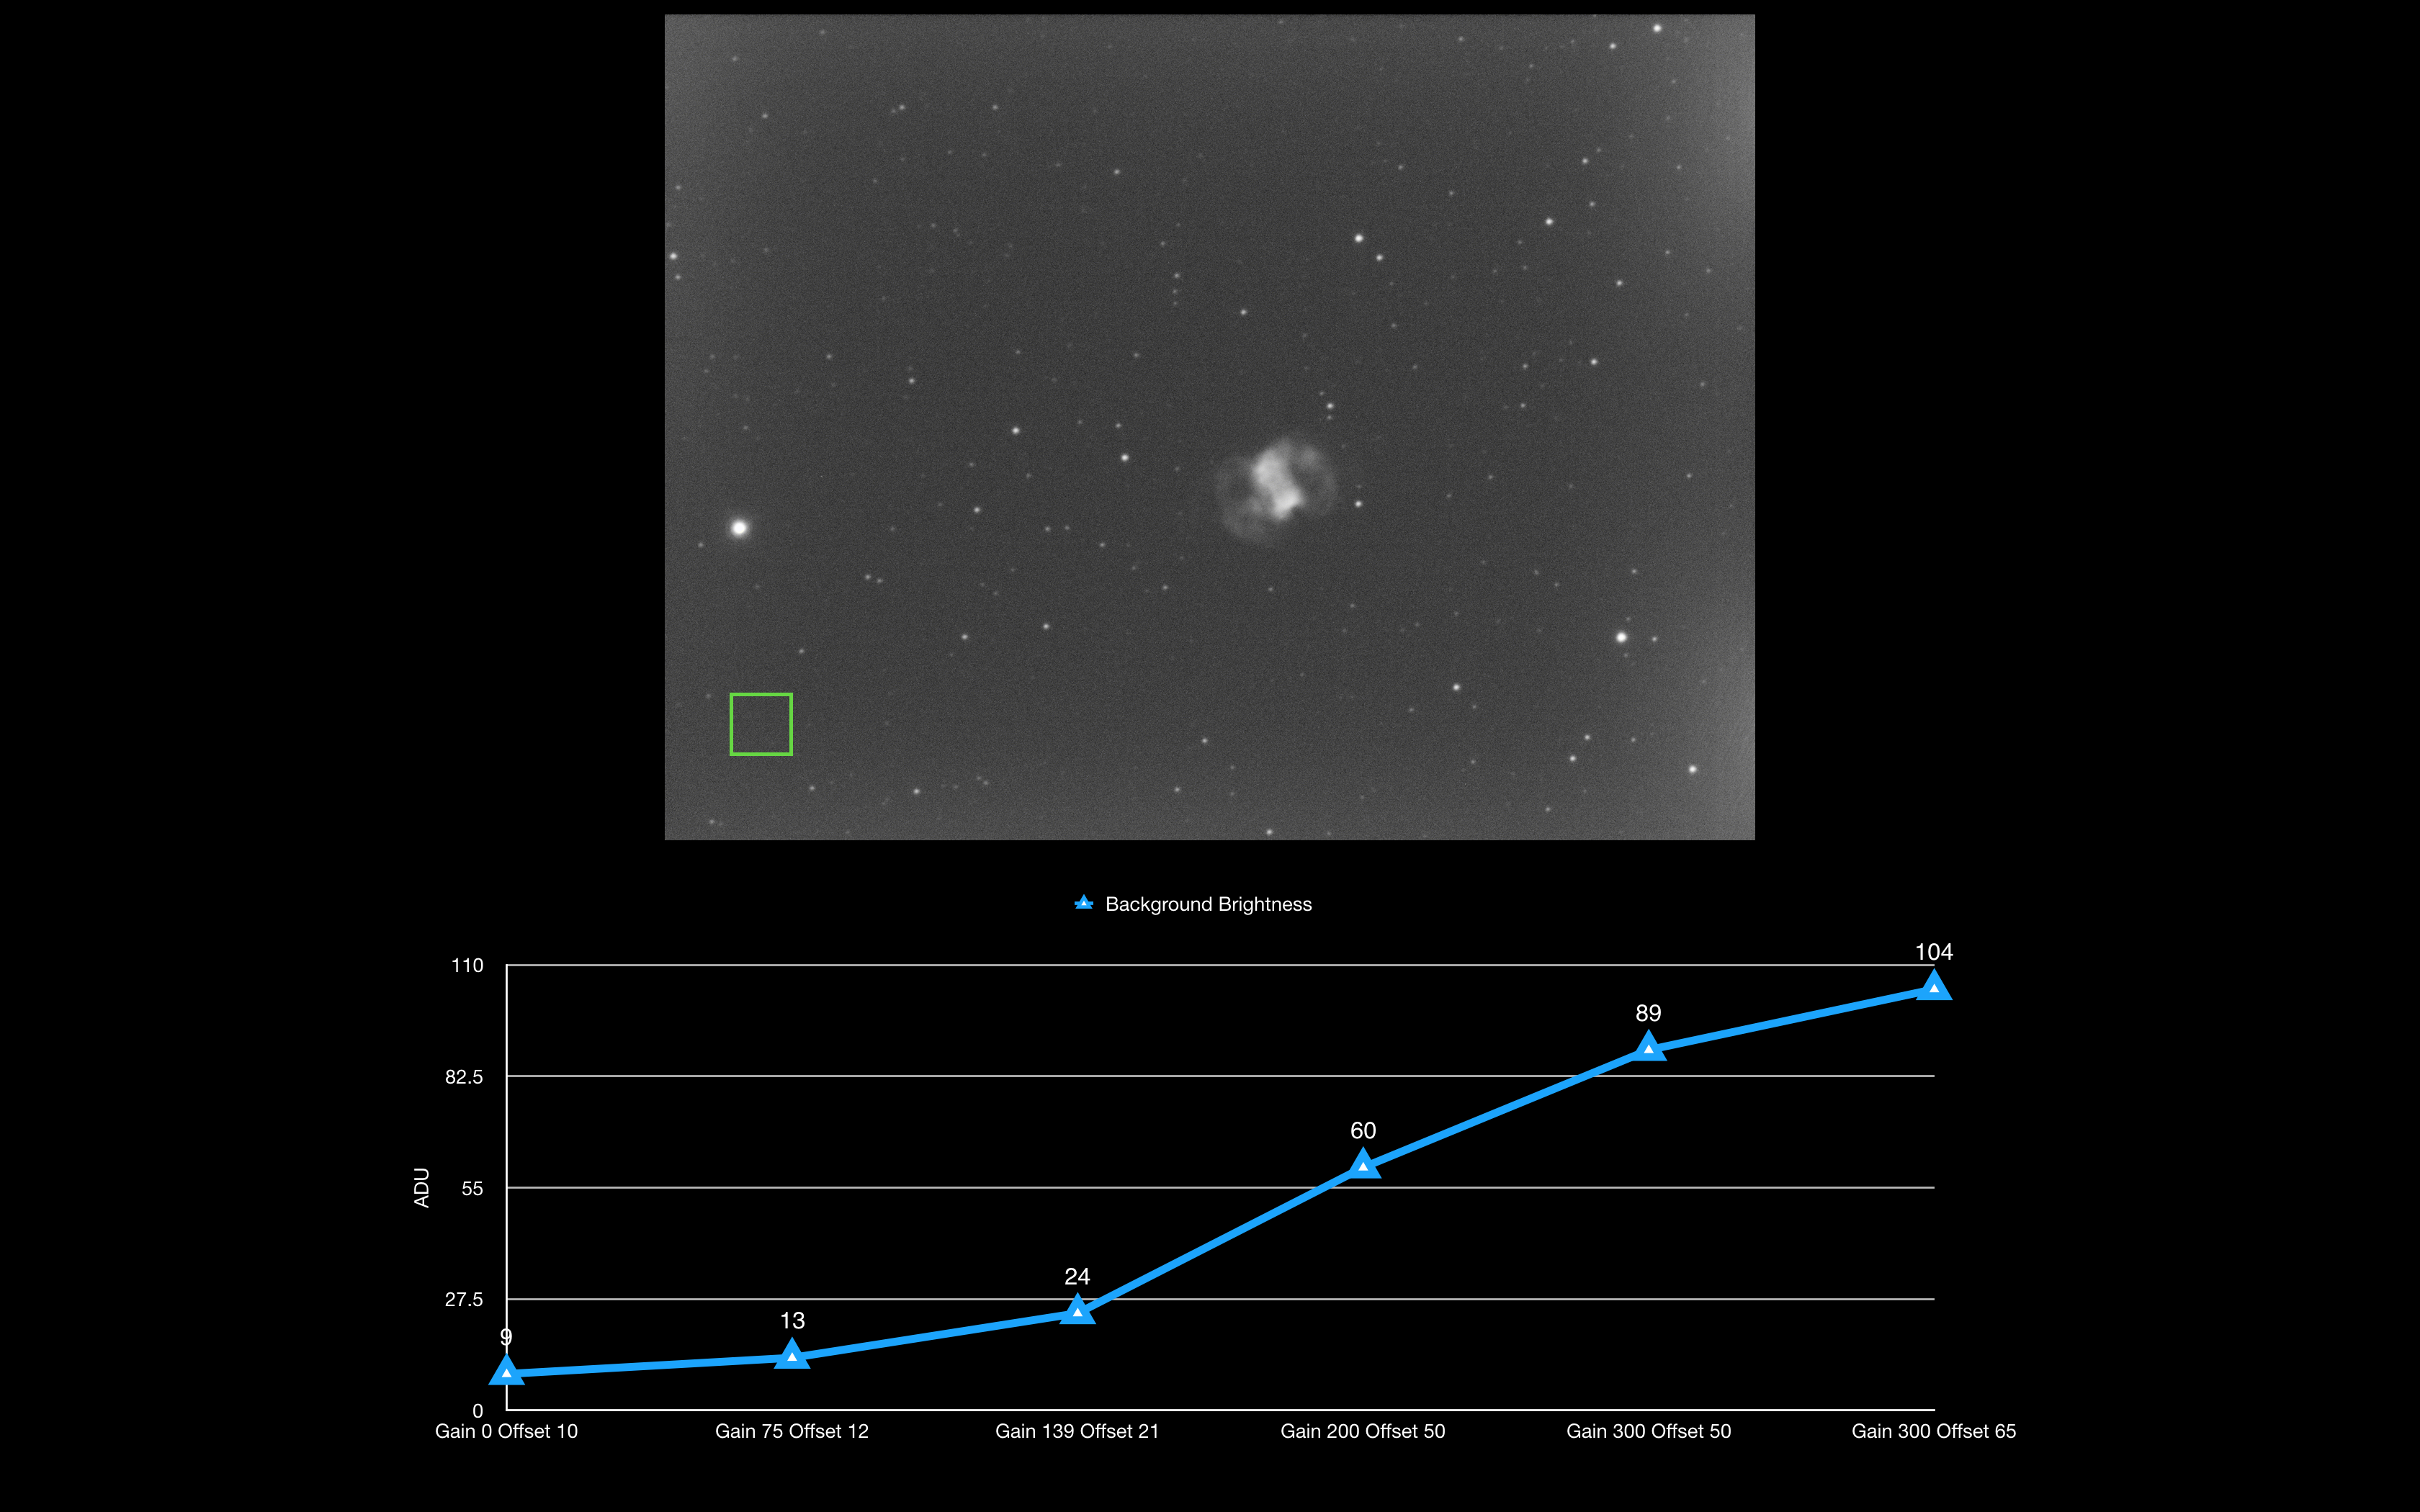
So whilst I have seen the clipping a a few stars at the highest gain I have tested, what about the planetary nebula itself? From the below stretched image one could assume that the brightest part of the nebula was fairly bright and heading towards saturation, but don’t be fooled! Also there is a noticeable increase in the background brightness as the gain increases.

Again as for the amp glow, the aim is to balance the ability to amplify the faintest parts of the nebula without swamping them with the background brightness.

Again here are the values of the settings for gain and offset against the central section of the image.

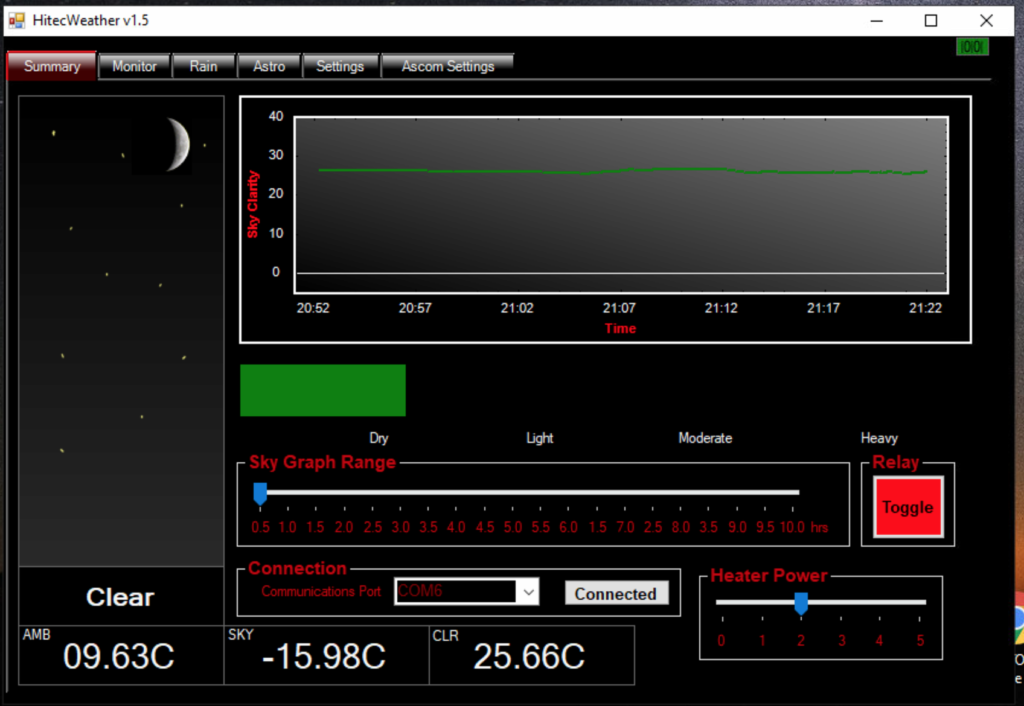
So how bright did the background get? The graph below shows a section of the background free from stars and charts the increase of brightness from a mean figure of 9 ADU with the gain set to 0 and a mean figure of 104 with the gain set to 300. So a large increase but but at least up until gain 200 not a problem, as we will see when we look at the faintest part of the nebula later.

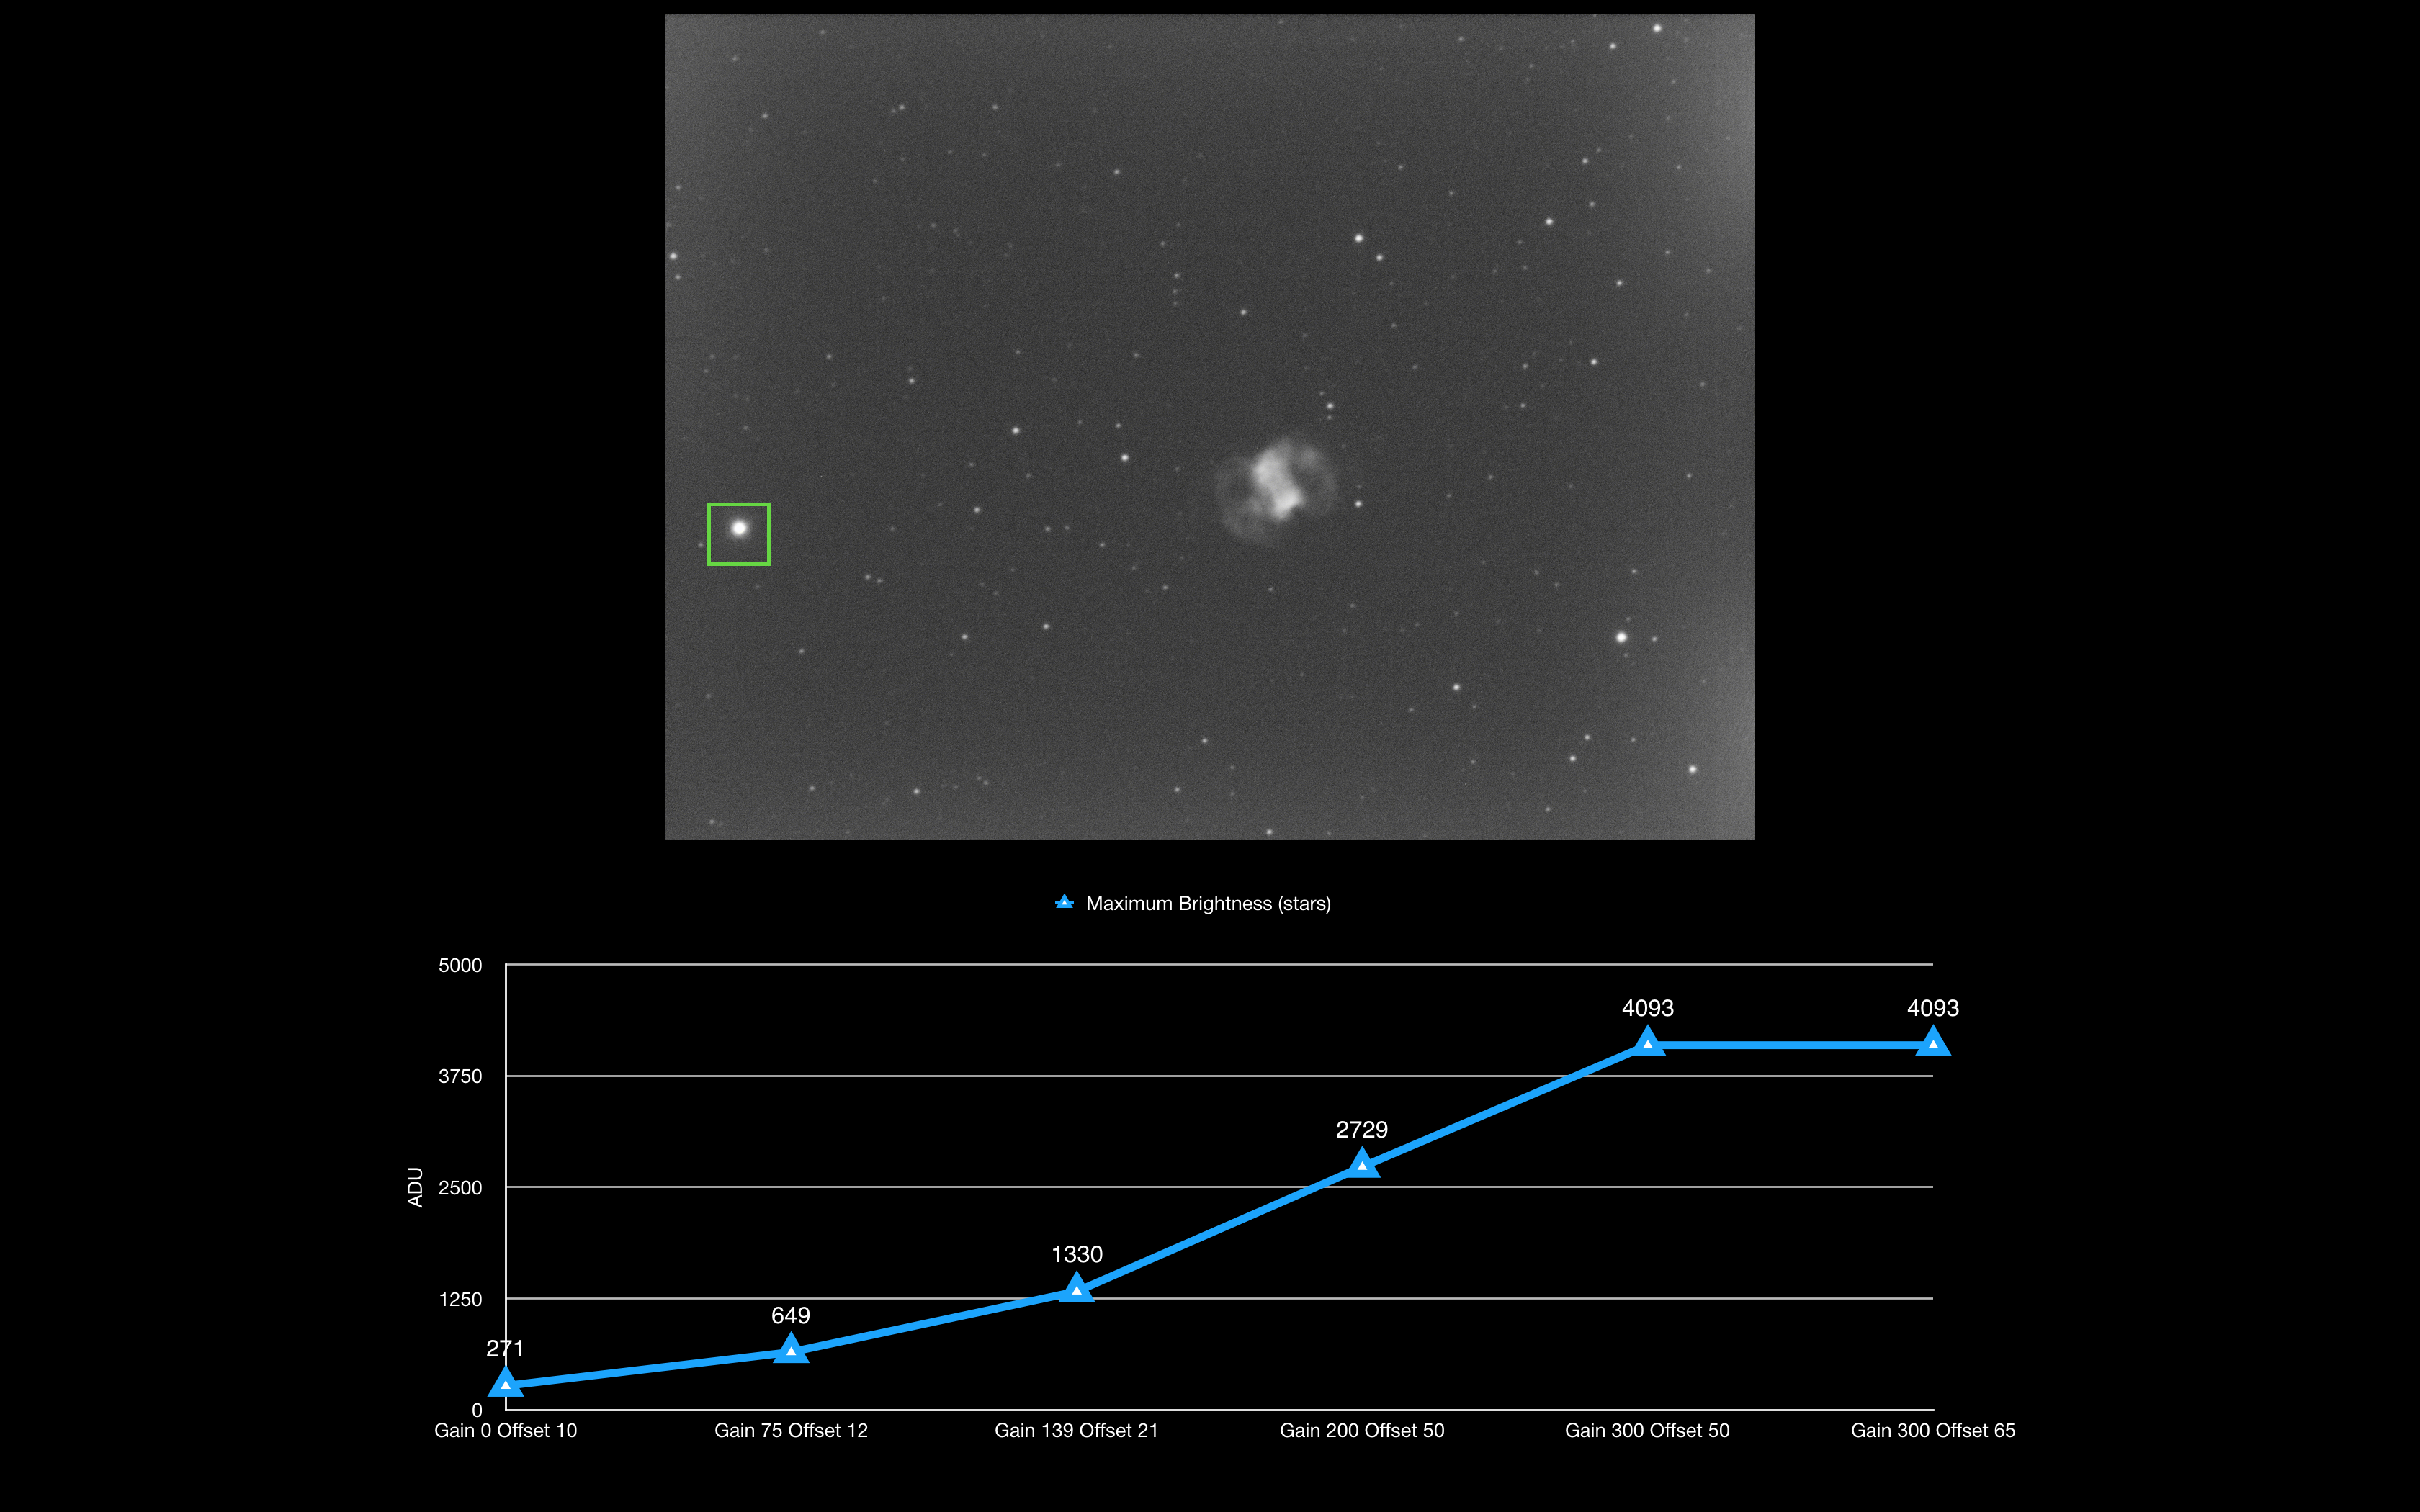
This graph looks at the bright star SAO 22551 (HIP 8063) which is mag 6.66 and the brightest star in the image. Again as previously seen in the right hand slice of the image the star is saturated by gain 300. All figures are the maximum pixel values.

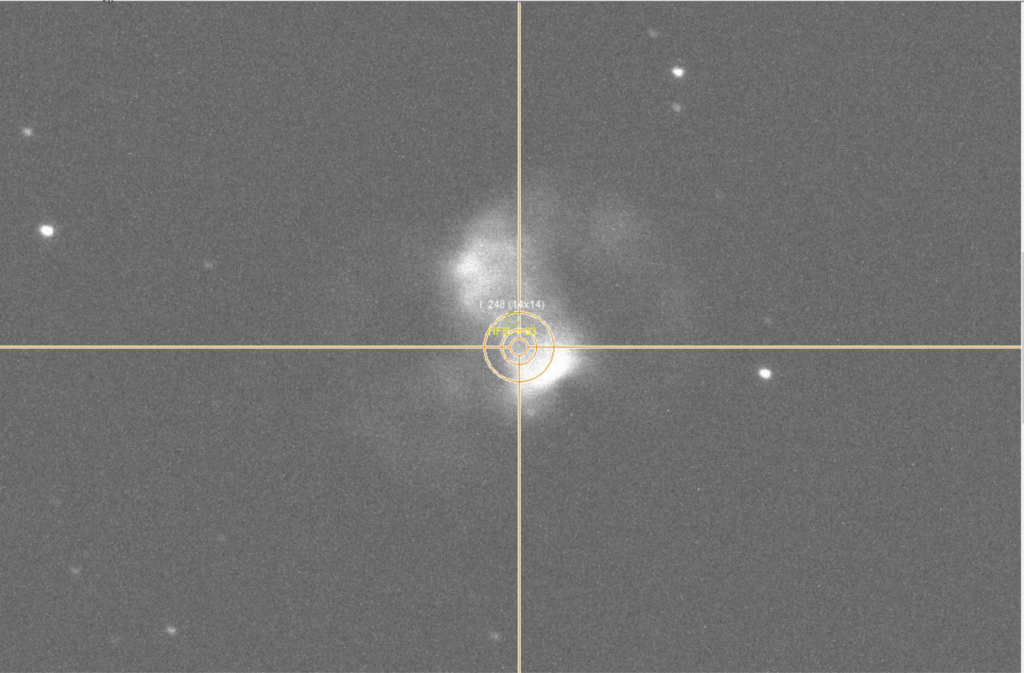
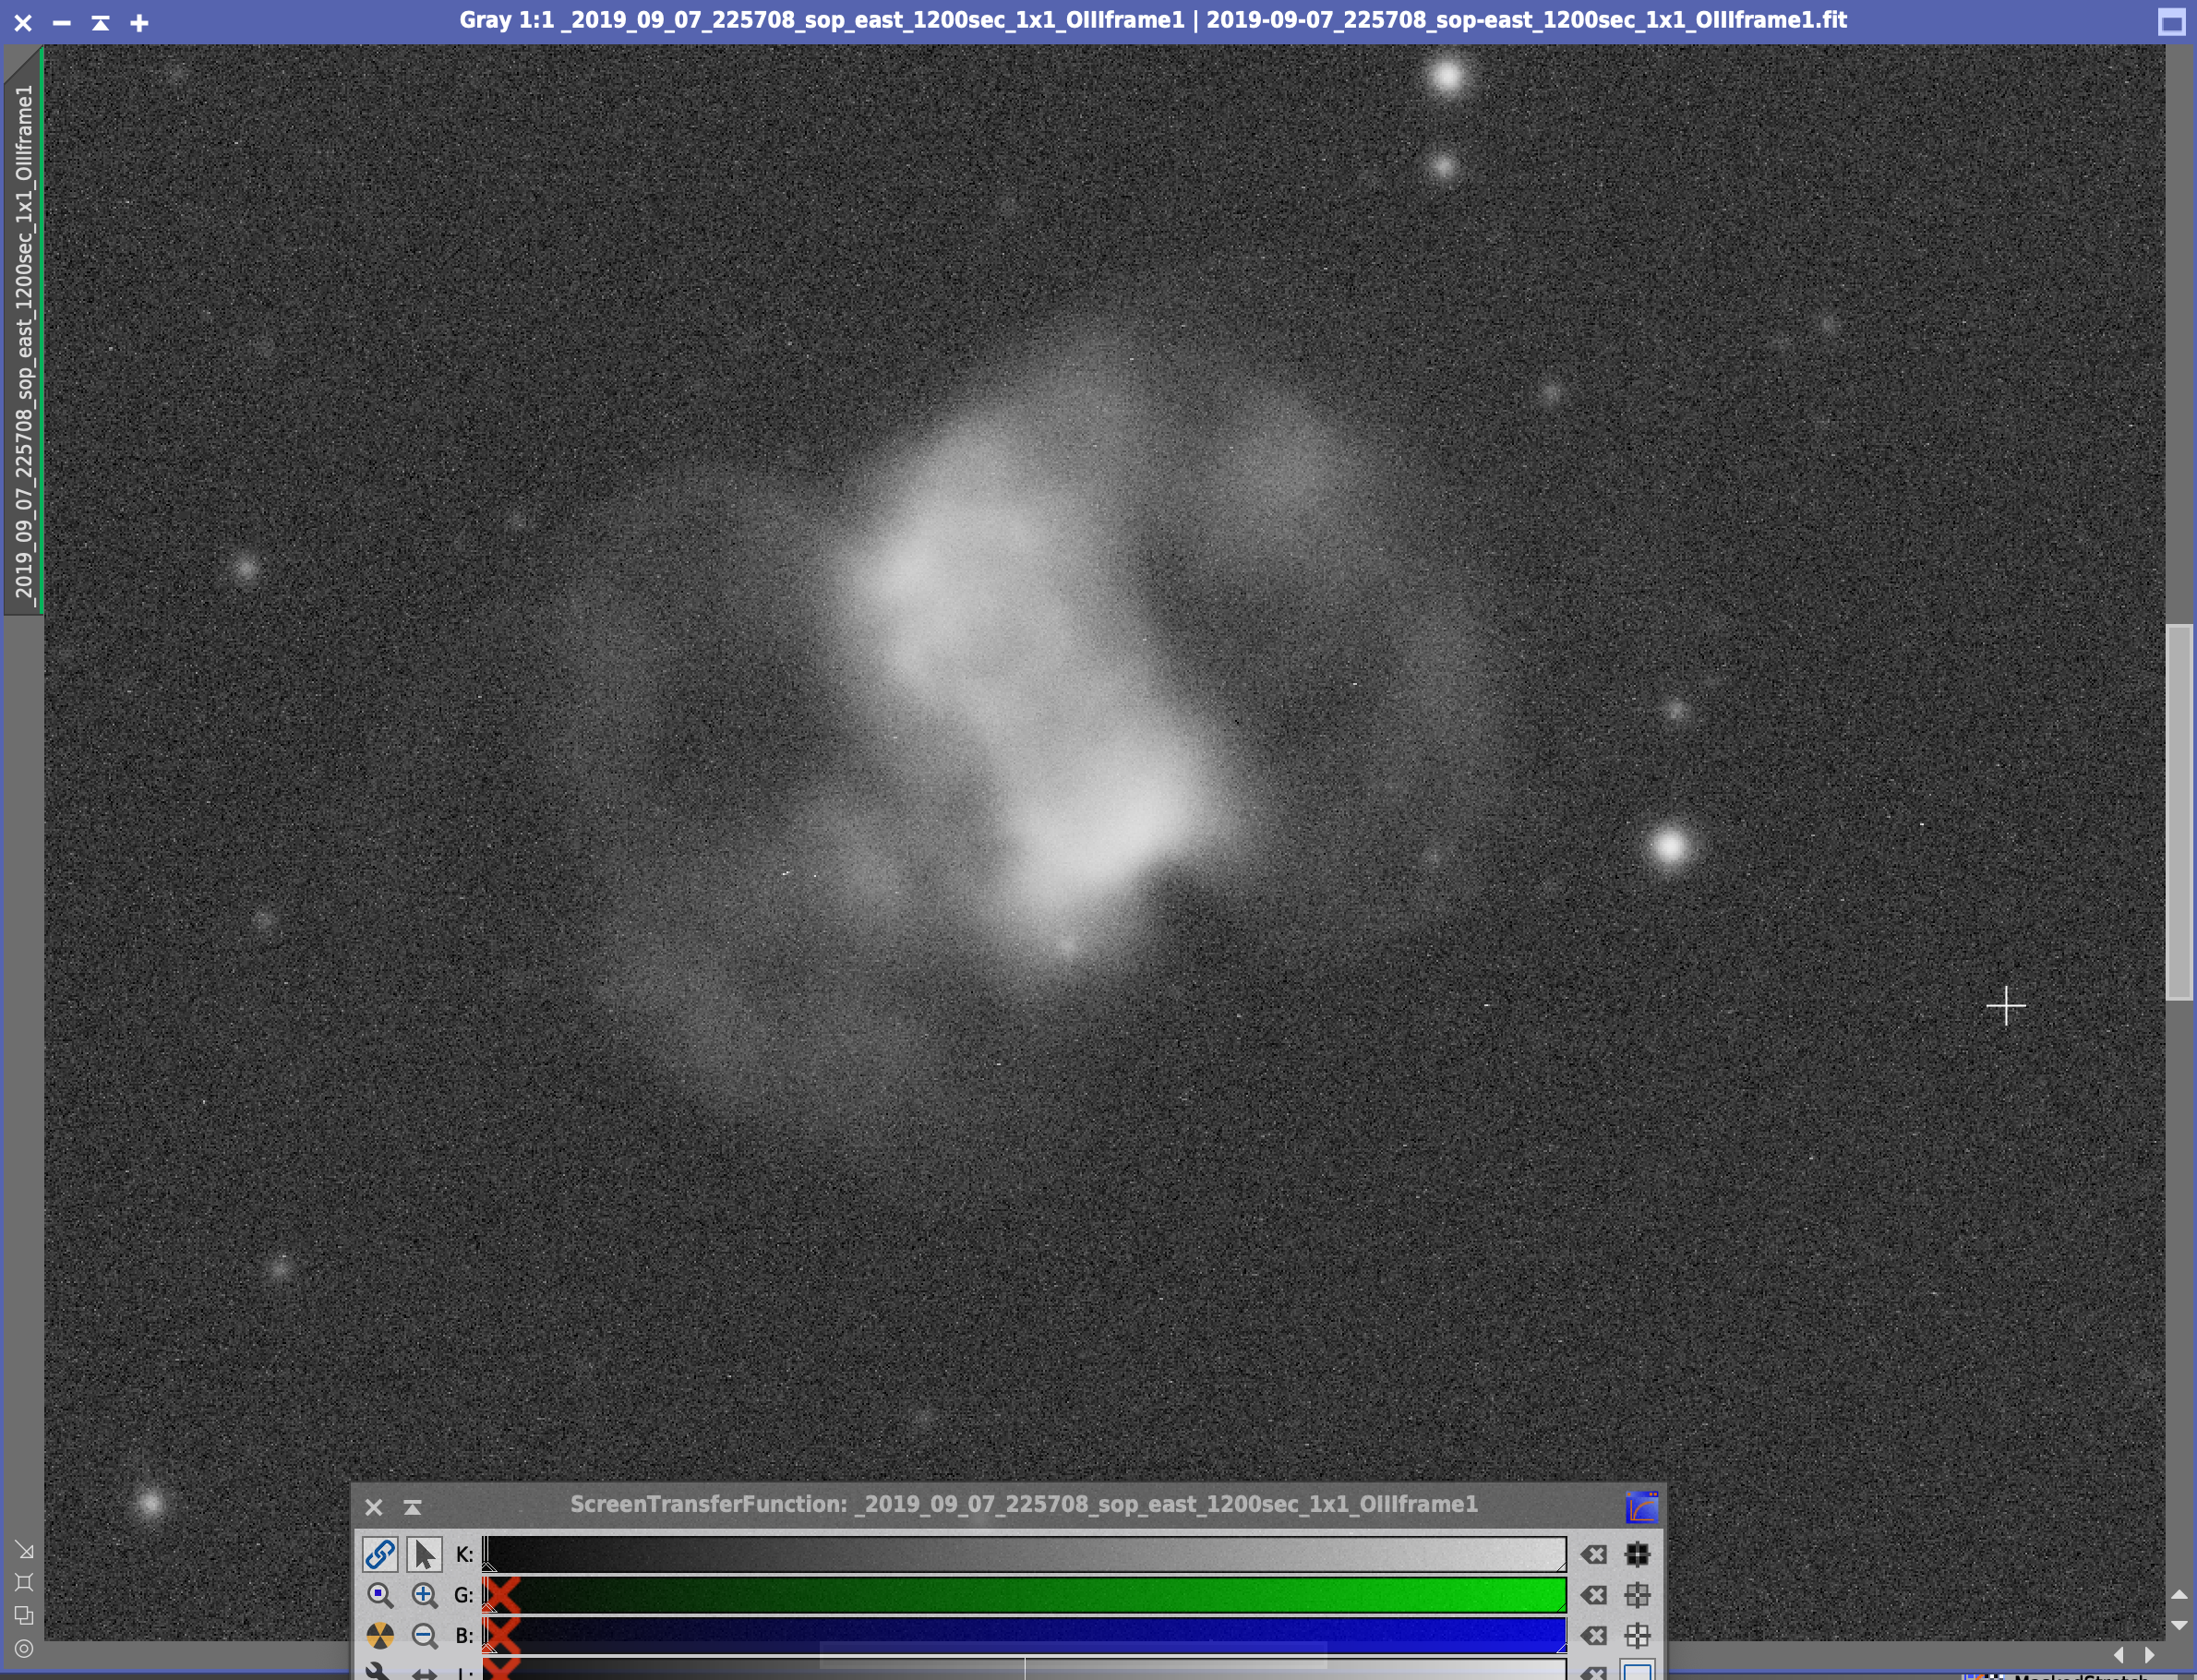
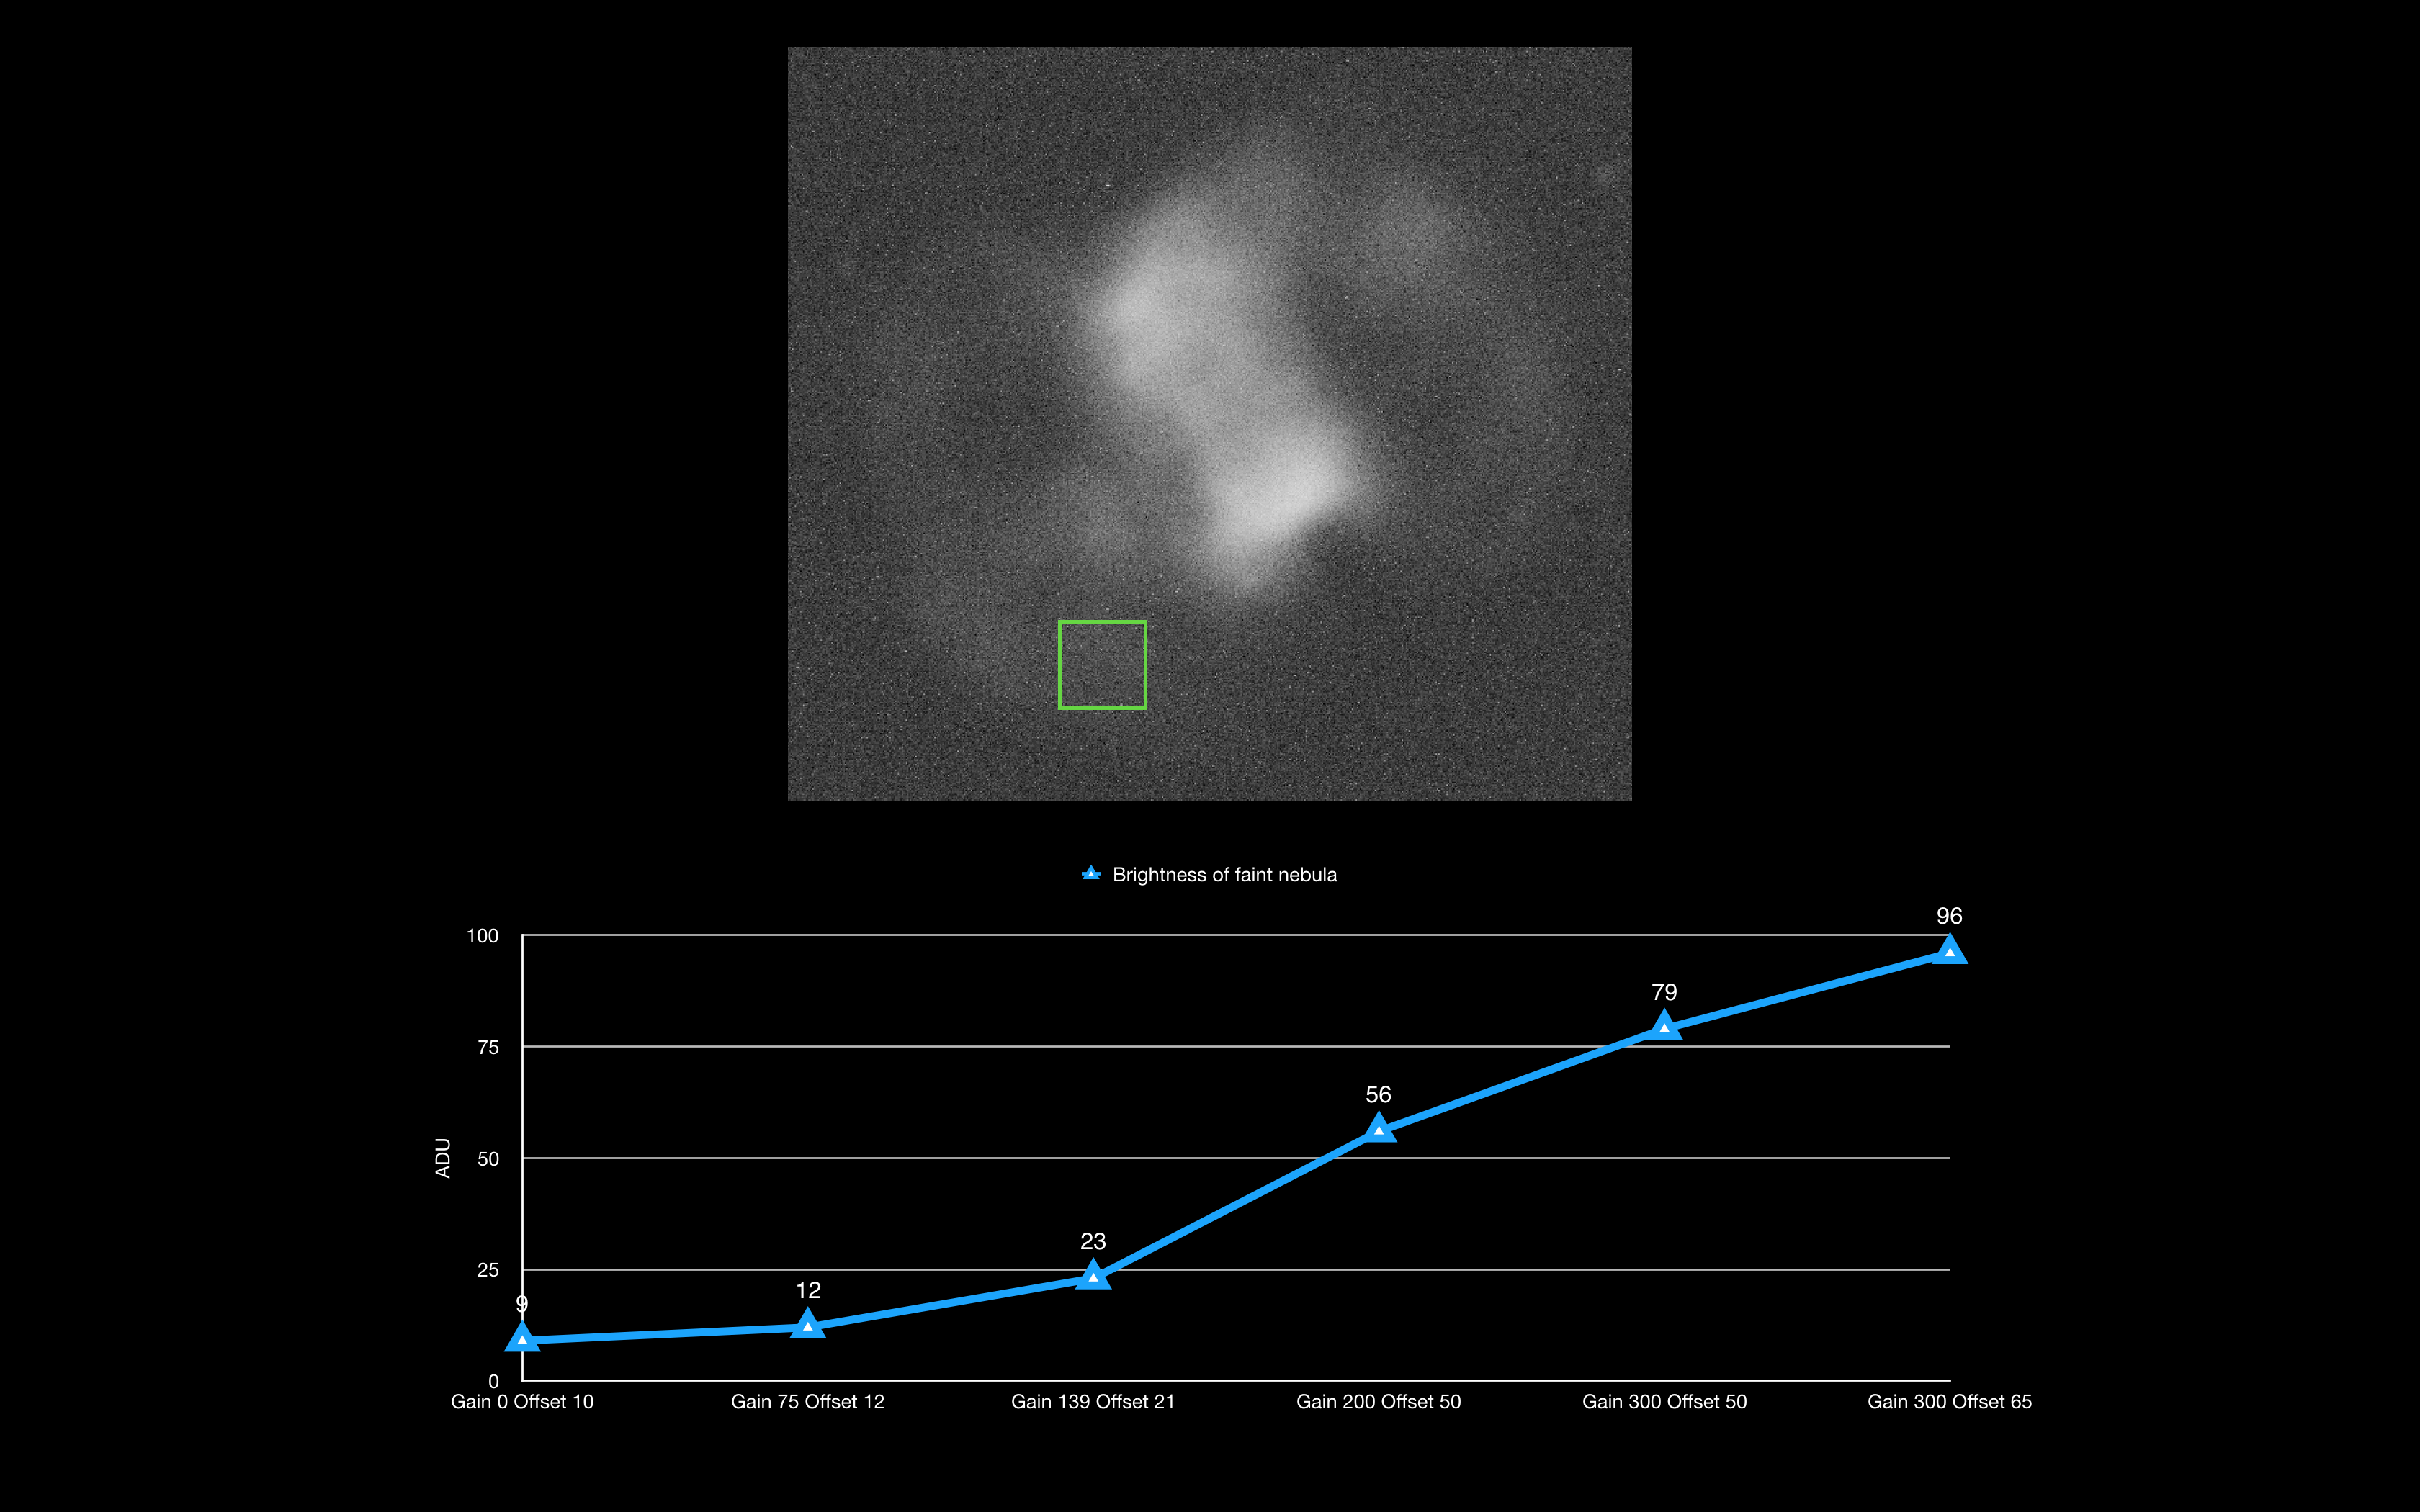
Now let’s focus on the nebula itself and go back to using the mean ADU figures. The picture below shows the section of the nebula I will use for analysis. In particular I focused in on the brightest lobe of the central portion of the planetary nebula and the faintest portion of the left arc.

So looking at the faintest nebula within the left arc we can see that it is not very bright at all and the brightest it gets at gain 300 and offset 65 has a mean figure of 96 ADU. Each and every image at the different gain setting and offset setting is seemingly just below that of the background, which in itself is interesting as the nebula seems to be fainter than the background. So more analysis was needed.

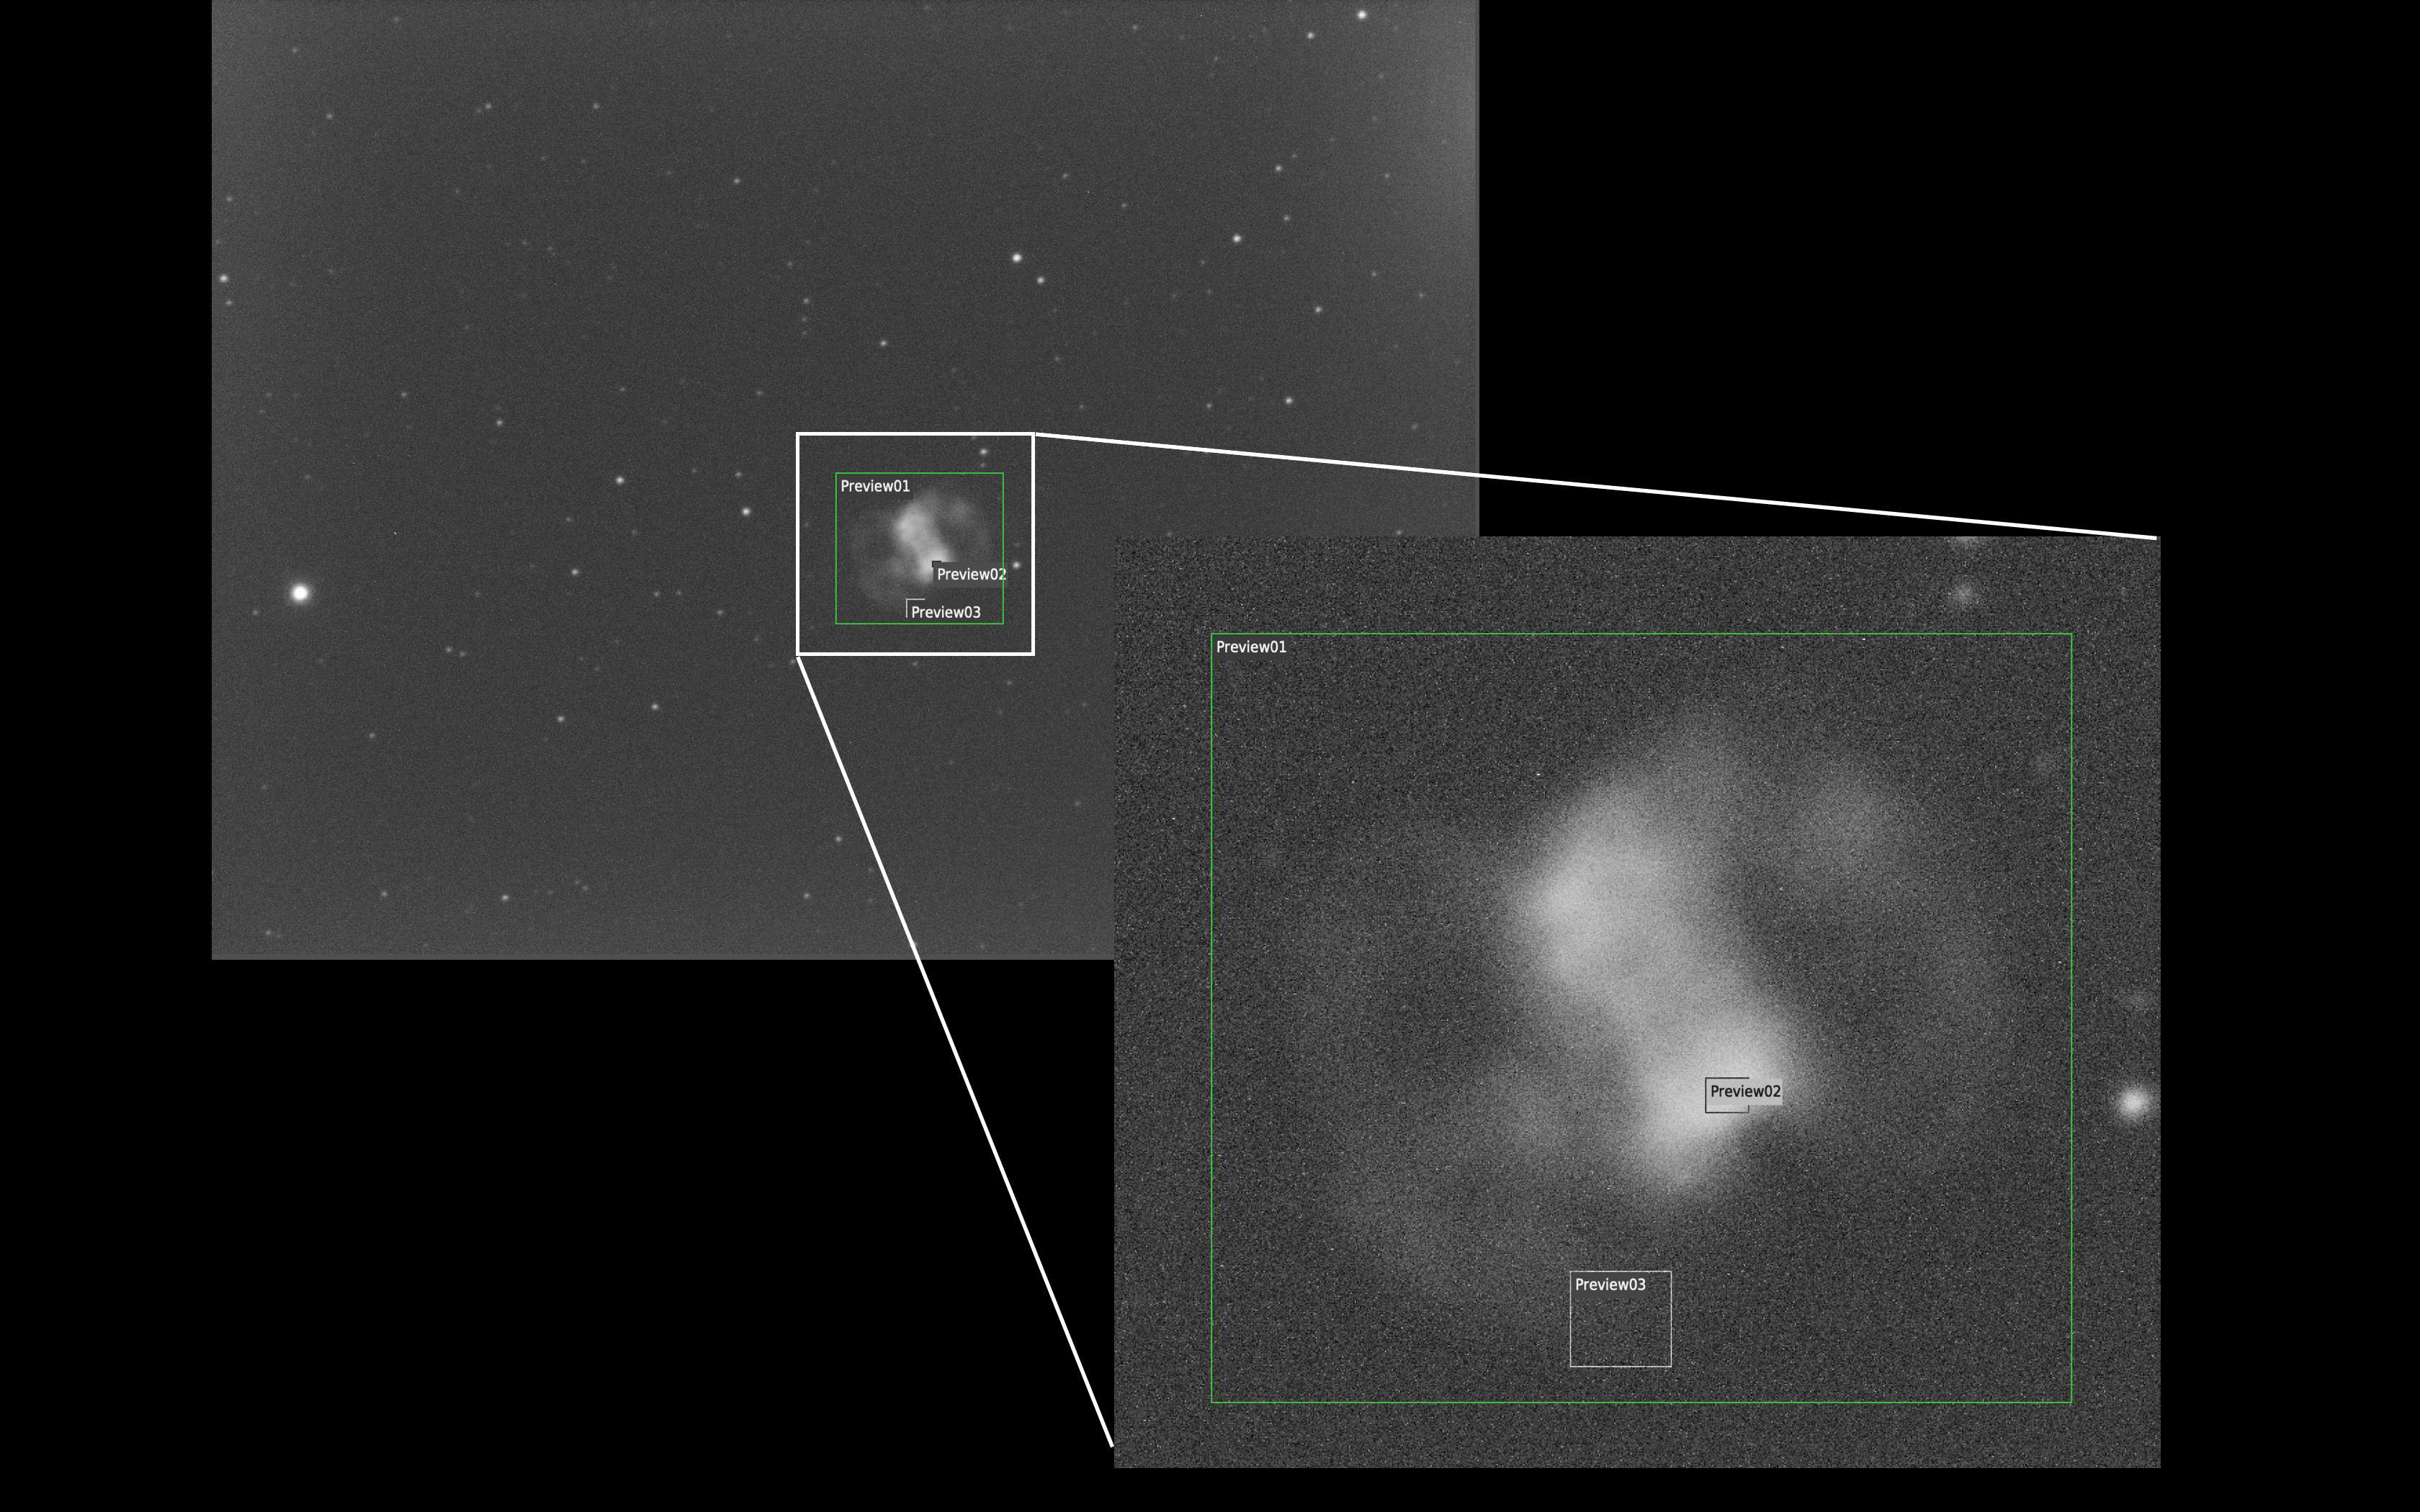
However I then went back and looked at a selection of areas of the background across the image to find that the original background selection to the bottom left of the image was brighter than other areas. Below you can see the image of gain 200 and offset 50, this time with 5 selection boxes. Preview 6 is the nebula as recorded before is mean 56 ADU. Preview 5, so the sky right next door to it has a mean figure of 55, so just below the nebula, hence it is only barely visible. Preview 1 is 54 ADU and Preview 4 is also 54 ADU. So there is brightening on that bottom left corner of the image, so had the nebula fallen at that spot then it would be swapped by the background.

There is only 1 ADU between the nebula and the background adjacent to it at gain 200 offset 50. If we looked at the same to regions in the image of gain 300 and offset 50 then you get a 2 ADU difference. The image with gain 300 and offset 65 gives a 3 ADU difference. So the results show that both gain and offset both help increase the contrast between the background sky and the faintest part of the nebula.

Various previews can be seen to analyse the background vs nebula brightness

The final image below shows the brightest part of the nebula. At gain 300 and offset 65 you see a mean value of 544 ADU which compares to 96 ADU for the faintest part of the nebula and an adjacent background of 93 ADU.

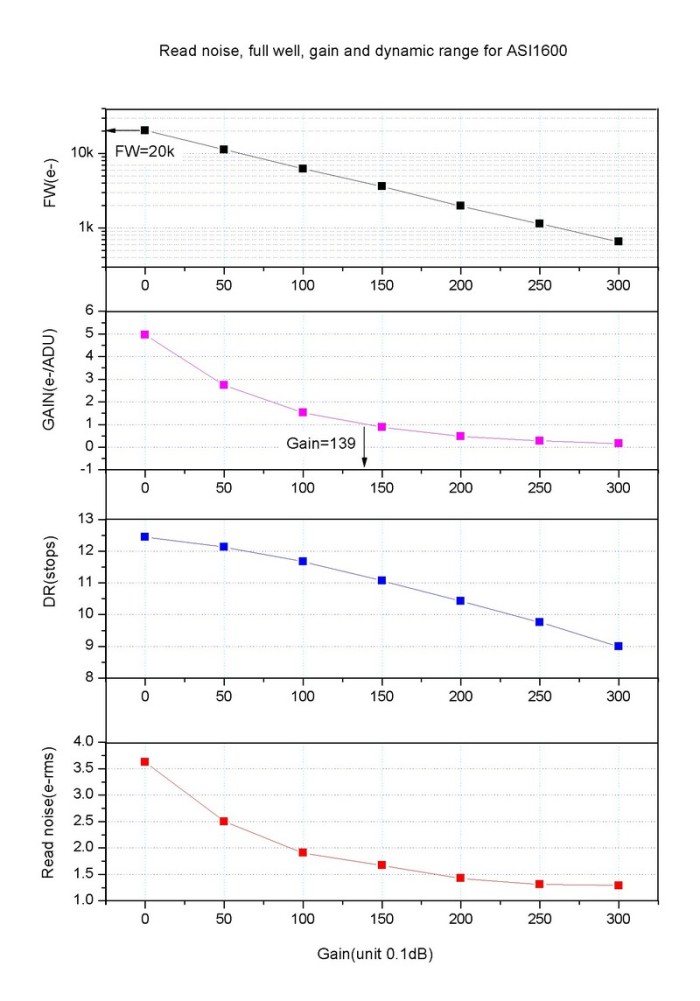
The final piece of information pertains to the camera/chip specification and performance. The graphs below are from the ZWO website and clearly show as expected the more you increase the gain the read noise is lowered but unfortunately so is the full well maximum (the amount of electrons you can store in a pixel) and the lower the dynamic range, which for deep sky objects is a required.

1600 Gain RN DR FW vs gain

So from this first piece of testing what have we learnt? Whilst there seems to be a good sense for increasing the gain and offset to help with the SNR especially between the background and the faintest part of the nebula, the increase in amp glow, decrease in dynamic range and reduction in the well count are all factors. Stacking as we will see, will undoubtably help the situation without necessarily setting a high gain. You can see why people say use Unity Gain, so the setting where 1 electron on the sensor = 1 ADU potentially gives the best result from a tradeoff point of view.

Viewing Report 22nd September 2019 IMT3 ASI1600mm Camera Tests – Part 1

Viewing time period – 19:18 – 23:59

I have spend over 4 hours today reading about the Gain and Offset settings for the ZWO ASI1600mm Pro Cooled mono CMOS camera I have on the back of the 12″ Officina Stellare 305 RiDK f/7/9 telescope.

ZWO ASI1600mm Pro Cooled on Officina Stellare 305 RiDK

In particular the posts by Jon Rista and the images with a similar setup from Glen Newell have led me to a handful of setting I will now try from my location and on M76, the Little Dumbbell planetary nebula that I had started to image recently. I must also comment that Kayron Mercieca also had some useful information pertaining to testing your camera and OTA imaging train for exposure times. See link here

Discussion on exposure times and setting – Cloud Nights

So I have already taken a set of images on the 8th October, 14 of them and they were at a Gain and Offset of 10 (I believe these settings are less than perfect) and an exposure of 1200s, so 20mins through an Astrodon OIII narrowband filter. My location is on a good night in the Orange Zone as per the charts borrowed from the forum discussions and when referring to broadband imaging. For narrow band as per my test here I am between the purple and blue zones.

Broadband minimum exposure table – ASI1600mm
Narrowband minimum exposure table – ASI1600mm

Inspecting the original frames I took you can see slight amp glow from the right of the image, the background has a median of 10 ADU at 12bits. None of the stars are saturated or clipped. The brightest star is 1,854 ADU our of a dynamic range of 0-4,095 ADU. The faintest nebula I can see is 11 ADU so just above the background and the brightest part of the nebula is 77 ADU.

M76 – 1 x 20min OIII Gain 10 Offset 10 – ASI1600mm Pro Cooled

So I will attempt to take a set of images at the following settings across 4 exposure times of 300s, 600s, 900s and 1200s at or after astronomical night at 20:56 onwards if the clouds hold off.

  1. Gain 0 – Offset 10
  2. Gain 75 – Offset 12
  3. Gain 139 – Offset 21
  4. Gain 200 – Offset 50
  5. Gain 300 – Offset 50
  6. Gain 300 – Offset 65

So after several false starts of broken cloud disrupting my ability to keep the dome open, I managed to grab the first 6 frames of 300s as above. Here is an animated GIF of all the images in order of Gain lowest to highest. (Click the image to animate or right mouse click and download)

In my next blog I will look at the analysis of the first 6 frames whilst I take the other frames to compare.

Viewing Report 14th/15th September 2019 – IMT3 TPoint

Viewing time period – 19:47 – 02:58

Tonight Bob and myself had a couple of things to achieve on the dome so that it would be ready for Autumn. As the Moon was out in full force, Bob decided to have a go at ironing out some more configuration bugs with guiding whilst I later in the night would test out the automated TPoint run.

Something I had not appreciated about an automated run was that instead of selecting bright stars, slewing and manually centering as you would when doing a non-automated Tpoint run, the automated run takes images of random or selected areas in the sky rather than centering on a star and then determine how far off it is from where it thought. Unlike a Closed Loop Slew that would take 2 images, one when it completes the initial slew and another when it has shifted to account for the error and plate solving to make sure it is now in the right place, the automated Tpoint just takes that single image then moves on, registering the error as it goes, building the model and applying the correcting to make the pointing better.

So at 23:27 Bob had finished attempting to setup guiding in PHD2 on for the QHY5 guide camera on the Talk 102. There wee still some problems, especially around a little trailing in 2-3 minute images. I suspect that the guider was being over aggressive in correcting in RA and possibly DEC causing the issue. Bob started to play with the parameters but decided to try again another night after reading the PHD2 manual.

Now for the automated TPointing run. We had to go in and setup The SkyX (TSX) so that it could control not only the dome and mount but also the camera on the back of the OS12″. Once that was done we setup the automated calibration run settings to find 10 targets evenly spread around the sky and avoiding the North Celestial Pole.

Target setup

What we did have a challenge with was the Moon, which being very bright does not lend itself well to being able to plate solve next to it with a large telescope, mainly due to light scatter within the tube and an ever increasing brightness in the background.

So the first major obstacle when we clicked start, was once it slewed to the first star field, plate solving there. This proved rather difficult to get working, about 1.5 hours of rather difficult! It kept failing to plate solve. So after reading the manual (RTFM) I realised that there was really only 1 parameter that needed to be changed to get this working and that was increasing the exposure.

TPoint in action

After changing this for 30s to 60s and then again to 120s the solving worked. Why? Well because the Signal to Noise Ration (SNR) was simply not high enough due to the background glow caused by a full Moon.

Target 5 acquired

Now the first target was solved the mount went on slewing, the dome turning and the camera imaging until I reached target 6 of 10 and then it failed again. However looking at the downloaded image it was not hard to see why, clearly the Moon was just off to one side.

Nearby Moon….cannot plat solve this!

So I skipped this target and carried on to complete the set. So with an initial 7 targets solved (a few others were near the Moon) that was enough for the mount to land on the target every time and each time the solving got quicker to the point of being sub second.

With the understanding of how to do an automated Tpoint firmly in the bag we decided to shut down the IMT3 for the night and await a cold dark evening after the clocks go back on 21st September to perform a large Tpoint run of around or possibly over 300 targets.

All Sky Camera Initial Thoughts

I find I notice some interesting things on the All Sky Camera, which is a USB 3 ZWO ASI120MC-S CMOS camera inside a purpose built casing and clear dome. Firstly I land up with beautiful clouds rolling past. I also noticed the light pollution as I mentioned in a previous post from the bathroom window upstairs. This image is when I had the camera on the ground by the observatory as I was testing the maximum length of powered USB I could get away with before data loss caused issues.

Bathroom light on

When the light is turned off it is noticeably darker.

Bathroom light off

Sometimes I get visitors to the camera.

Daytime visitor

and sometimes I unexpectedly capture a meteor 🙂

Raindrop, Clouds and Meteor

So it transpires I can use a single 3m powered USB cable to the USB hub, I cannot use 2 x 3m powered USB as that causes data loss and hangs and I cannot use a single unpowered cable either.

Image processing notes for travel setup

So I managed to go out and quickly bag a few images of M13 to test the travel scope on the night of the 1st to the 2nd September. It was relatively cool and clear. The main aim was could I take images that were not overexposed on stars whilst capturing the fainter stars at the same time. Also I wanted to make sure I could process an image too.

So all in I took 10 x 5 minute exposures but unfortunately I had not read the Skywatcher manual and had not locked up the focus tube. This meant that the first 3 frames were out of focus so I tightened the locking latch and then took the other 7.

On processing the image I noted the black (white) band to the top and right of the image where I had not switched off the setting for Overscan. I could not PixInsight to recognise it properly so I simply pre-processed the image and then cropped it out before processing.

Overscan area present

I managed to get Photometric Colour Calibration working which helped get the colour just right. I then processed in my usual way using the following workflow.

Photometric Colour Calibration Results
Photometric Colour Calibration Settings
  1. Calibrate with Flats and Darks only no Bias as it is a CMOS camera
  2. Integrate the frames
  3. Align
  4. Perform Cosmetic Correction
  5. Debayer
  6. Crop
  7. ABE
  8. Background Neutralisation
  9. Platesolve
  10. Photometric Colour Calibration
  11. Histogram Stretch
  12. TGVDenoise
  13. ACDNR
  14. Curves
  15. Dark Structure Enhance
  16. Exponential Transformation
  17. 2nd set of Curves
  18. SCNR for green

The final image was ok for the short amount of data I obtained and proved my capture setting and workflow worked

M13

Viewing Report 8-9th September 2019 – Local Sky Quality

So recently the local Hampshire Council has been turning off local street lights at 1am and turning them back on at 4am. Now of course this was in a bid to reduce running costs but there is a positive to this change of heart.

Apart from the various benefits of darker nights such as better sleeping patterns for humans alongside a bat friendly environment then the benefits for astronomers cannot be understated.

We use a Sky Quality Meter from Unihedron in order to measure the seeing conditions and record it in the long exposure deep sky objects we try to image.

Below is the graph for the entire night of 8/9th September 2019 and the effect of bathroom light close by can be observed at around 21:20. This clearly demonstrates how bad local light pollution can be. By 4:30am the astronomical darkness window had passed and the SQM was dropping.

The effect of the new street light policy at 1am is obvious as an increase from a SQM reading from 20.4 to a maximum of 20.59 is observed until 4am when the street light came back on again and the sky quality immediately drops.

This places the local area as bortle class 4 ( 21.69–20.49) and a long way from a rural setting (21.69-21.89) or even Kielder Water (21.88) which can only get worse with more housing developments and unnecessary outdoor lighting.

So although we are grateful for improvement in the local dark skies it would be great to see the lights staying off for longer in winter so we can attempt to get better images. Hopefully we can start to come close to appreciate what people saw before the intrusion of unnecessary artificial lights in our life bloated out the wonders of the night sky without having to resort to traveling to the top of La Palma.

Viewing Report 7th/8th September 2019 – IMT3 12″

Viewing time period – 20:43 – 04:32

First thing to say is this is a very long blog, much went wrong tonight before it went right and thus I selected to record as much of the problems here as evidence later if I have the same problem or others indeed do. Tonight I am imaging M76 a planetary nebula in Perseus known as the Little Dumbbell. This is my first real object to image through the IMT3’s 12″ scope. The weather looked good and a quick look through the All Sky Camera showed a clear sky with Vega shining bright overhead and a slight glow with the Sun still setting to the West.

View through ASC

The first thing I needed to do was to slew to a bright mag +2 star, in this instance Caph in nearby Cassiopeia and centre and sync the scope which I did through TheSkyX (TSX). I then slewed to a magnitude +9 star (SAO 21164) nearby so that I could perform an autofocus through the OIII filter using SGPro. The best fit was 73,914.

Auto Focus Achieved

I then took a single 60s exposure just to make sure the focus was right, the stars coming in at around Half Flux Radius (HFR) 4. Meanwhile the camera cooler was running at -20℃ and 28% so I lowered to -28℃ at 60%. It should be noted that every time I perform a closed loop slew in TSX and the camera connects, the camera then looses the information of its status in SGPro and the only way to resolve to disconnect and reconnect. I again will note this is the TOSA User Guide.

Focus image on Mag +9 star

Then I slewed to M76, which on first inspection was still being my neighbours house. So I waited for a while longer and around 21:10 it appeared above the roof for its polar orbit around Polaris. I took a quick image with SGPro of 60 seconds through the OIII filer to see where I was pointing, given I only have a 60 point TPoint model (I need 300 for the best pointing accuracy).

M76 slightly off target

So given I was slightly out I selected the Luminance filter, went back to TSX and performed another Closed Loop Slew and then synced the scope for good measure. The resulting image through TSX and then through SGPro showed a perfect improvement.

On Target

Before imaging I went back to look at the PEC as Bob had mentioned not being able to image for very long on the Tak FS102 after we had taken it off, added the adjuster plate, reattached and added some weights. Not surprisingly the TPoint model will need redoing, however I noted the PEC was turned off, maybe I had not saved the last time I enabled. So I reenabled and saved.

PEC Now Re-enabled

I then went looking for a guide star with PHD2, however even with 10 seconds I could not see one. I looked at TSX and indeed the Field of View (FoV) indicator for the guider showed a fairly barren piece of sky with barely a magnitude +11 star visible.

I performed a quick check of the SQM and it was reading 19.37 and the Hitec Weather station had a reading of around 25 meaning between Haze and Clear. Another quick check of the ASC and that was showing clear. So either I had to move the scope to find a guide star or I could image without guiding……so the only way to tell was take a quick 5min image and see what it looked like.

As suspected the resulting 5min image showed trailing, not surprising given the TPoint model is out so I decided to guide. I slewed around trying to find a decent guide star but nothing came up, literally nothing, which then got me thinking this was not right. So I checked a bright star in the FoV for the guider, still nothing. So I then disconnected the camera and checked the settings and there it was, the setting was for the SX814 which was not powered on (aka GingerGeeks main camera on the Epsrit 120) so I changed this to the Lodestar and took another image, this came into view! Not sure the problem of why it keeps reverting to the SX814 but I will need to check each time and will add to the TOSA User Guide.

Wrong guide camera selected 🙁

So I moved back to M76 entering with TSX again and took an image for guiding through PHD2 and full of stars, well a handful at any rate, plus a load of hot pixels (I need to apply some darks).

I see guide stars and hot pixels 🙂

The resulting guider graph was smooth, too smooth, and the resulting 5 min image was trailed! Ok so something else not right, so after taking a look it turned out I had selected a hot pixel to guide on, so I exposed a little longer from 5s to 10s and selected what looked more like a star and this time tried to guide. The guiding went off the chart which proved this was a star and that I needed to calibrate the guider (seemingly every night I go out, I will need to see if that is right). So off I went to calibrate the guider.

In calibrating I realised the Darks were going to be needed, the first calibration run failed. I then went out to cover the scope using my trusty chair to help with the lift I needed to reach the end of the 12″ as it was point upwards. I then went back inside and took a set of darks ( I thought I had done this before), anyway with a new dark library in hand I recalibrated the guider.

Now suffice to say the problems did not stop there, I had guider calibration failed, star did not move enough and after 4 attempts I managed to calibrate the guider and the guiding then started at last! the main thing was to change the number of steps required to 6 and the pulse time changed then to 1500ms from 200ms. This was enough to resolve the problem.

For completeness here are the settings I am now using that work in PHD2

So after much time spent and it now being precisely 22:33 I realigned M76 in the centre as it had moved with all the calibration challenges (remembering to change the filter to Luminance during the Closed Loop Slew in TSX and then back to OIII to start my imaging run.

I tested at 2 minutes first, then 5 minutes, then 20 minutes before starting the final run to decide on the subs I would use. By 23:14 I had the 20 minutes sub and settled on 20 minute subs for the rest of the night.

Meanwhile the Summer Triangle of Deneb, Vega and Altair could be seen through the ASC and I noted that the star Tarazed in Aquila next to Altair at magnitude +2.7 could be seen also.

Summer Triangle through the ASC

I noticed the trellis lit up and had a quick word with my daughter to close the blind in the bathroom 🙁

Bathroom light on without blind down 🙁

Here is the temperature and pressure information from the dome internal sensors at around midnight.

Internal sensor readings around midnight

At 03:49 I decided to do a quick autofocus to see if the focus had changed during the night and given the temperature outside was now around 5℃. I paused the current sequence which gave me the option of cancelling or pausing at the end of the current image. I then ran autofocus but no stars were found. I went into the setting for autofocus within SGPro and changed the exposure time for the OIII filter from 1 to 20 seconds. This allowed the autofocus to see stars but the auto focus would not complete successfully and just kept creeping out. So instead I gave up, especially since astronomical darkness was finishing soon. Instead I slewed to my Flat position at Az 359, 21′ and Alt 00, 00′ to take the flats.

Co-ordinates for Flat Panel

I went out to the dome to manually turn on the light sheet which we need to automate and then turned it off after I took 10 flats through the OIII filter at 10 seconds each to get a good illumination. It would be 0.5 seconds through Luminance filter. I then packed up set the darks running and went to bed.

Lovely Flat