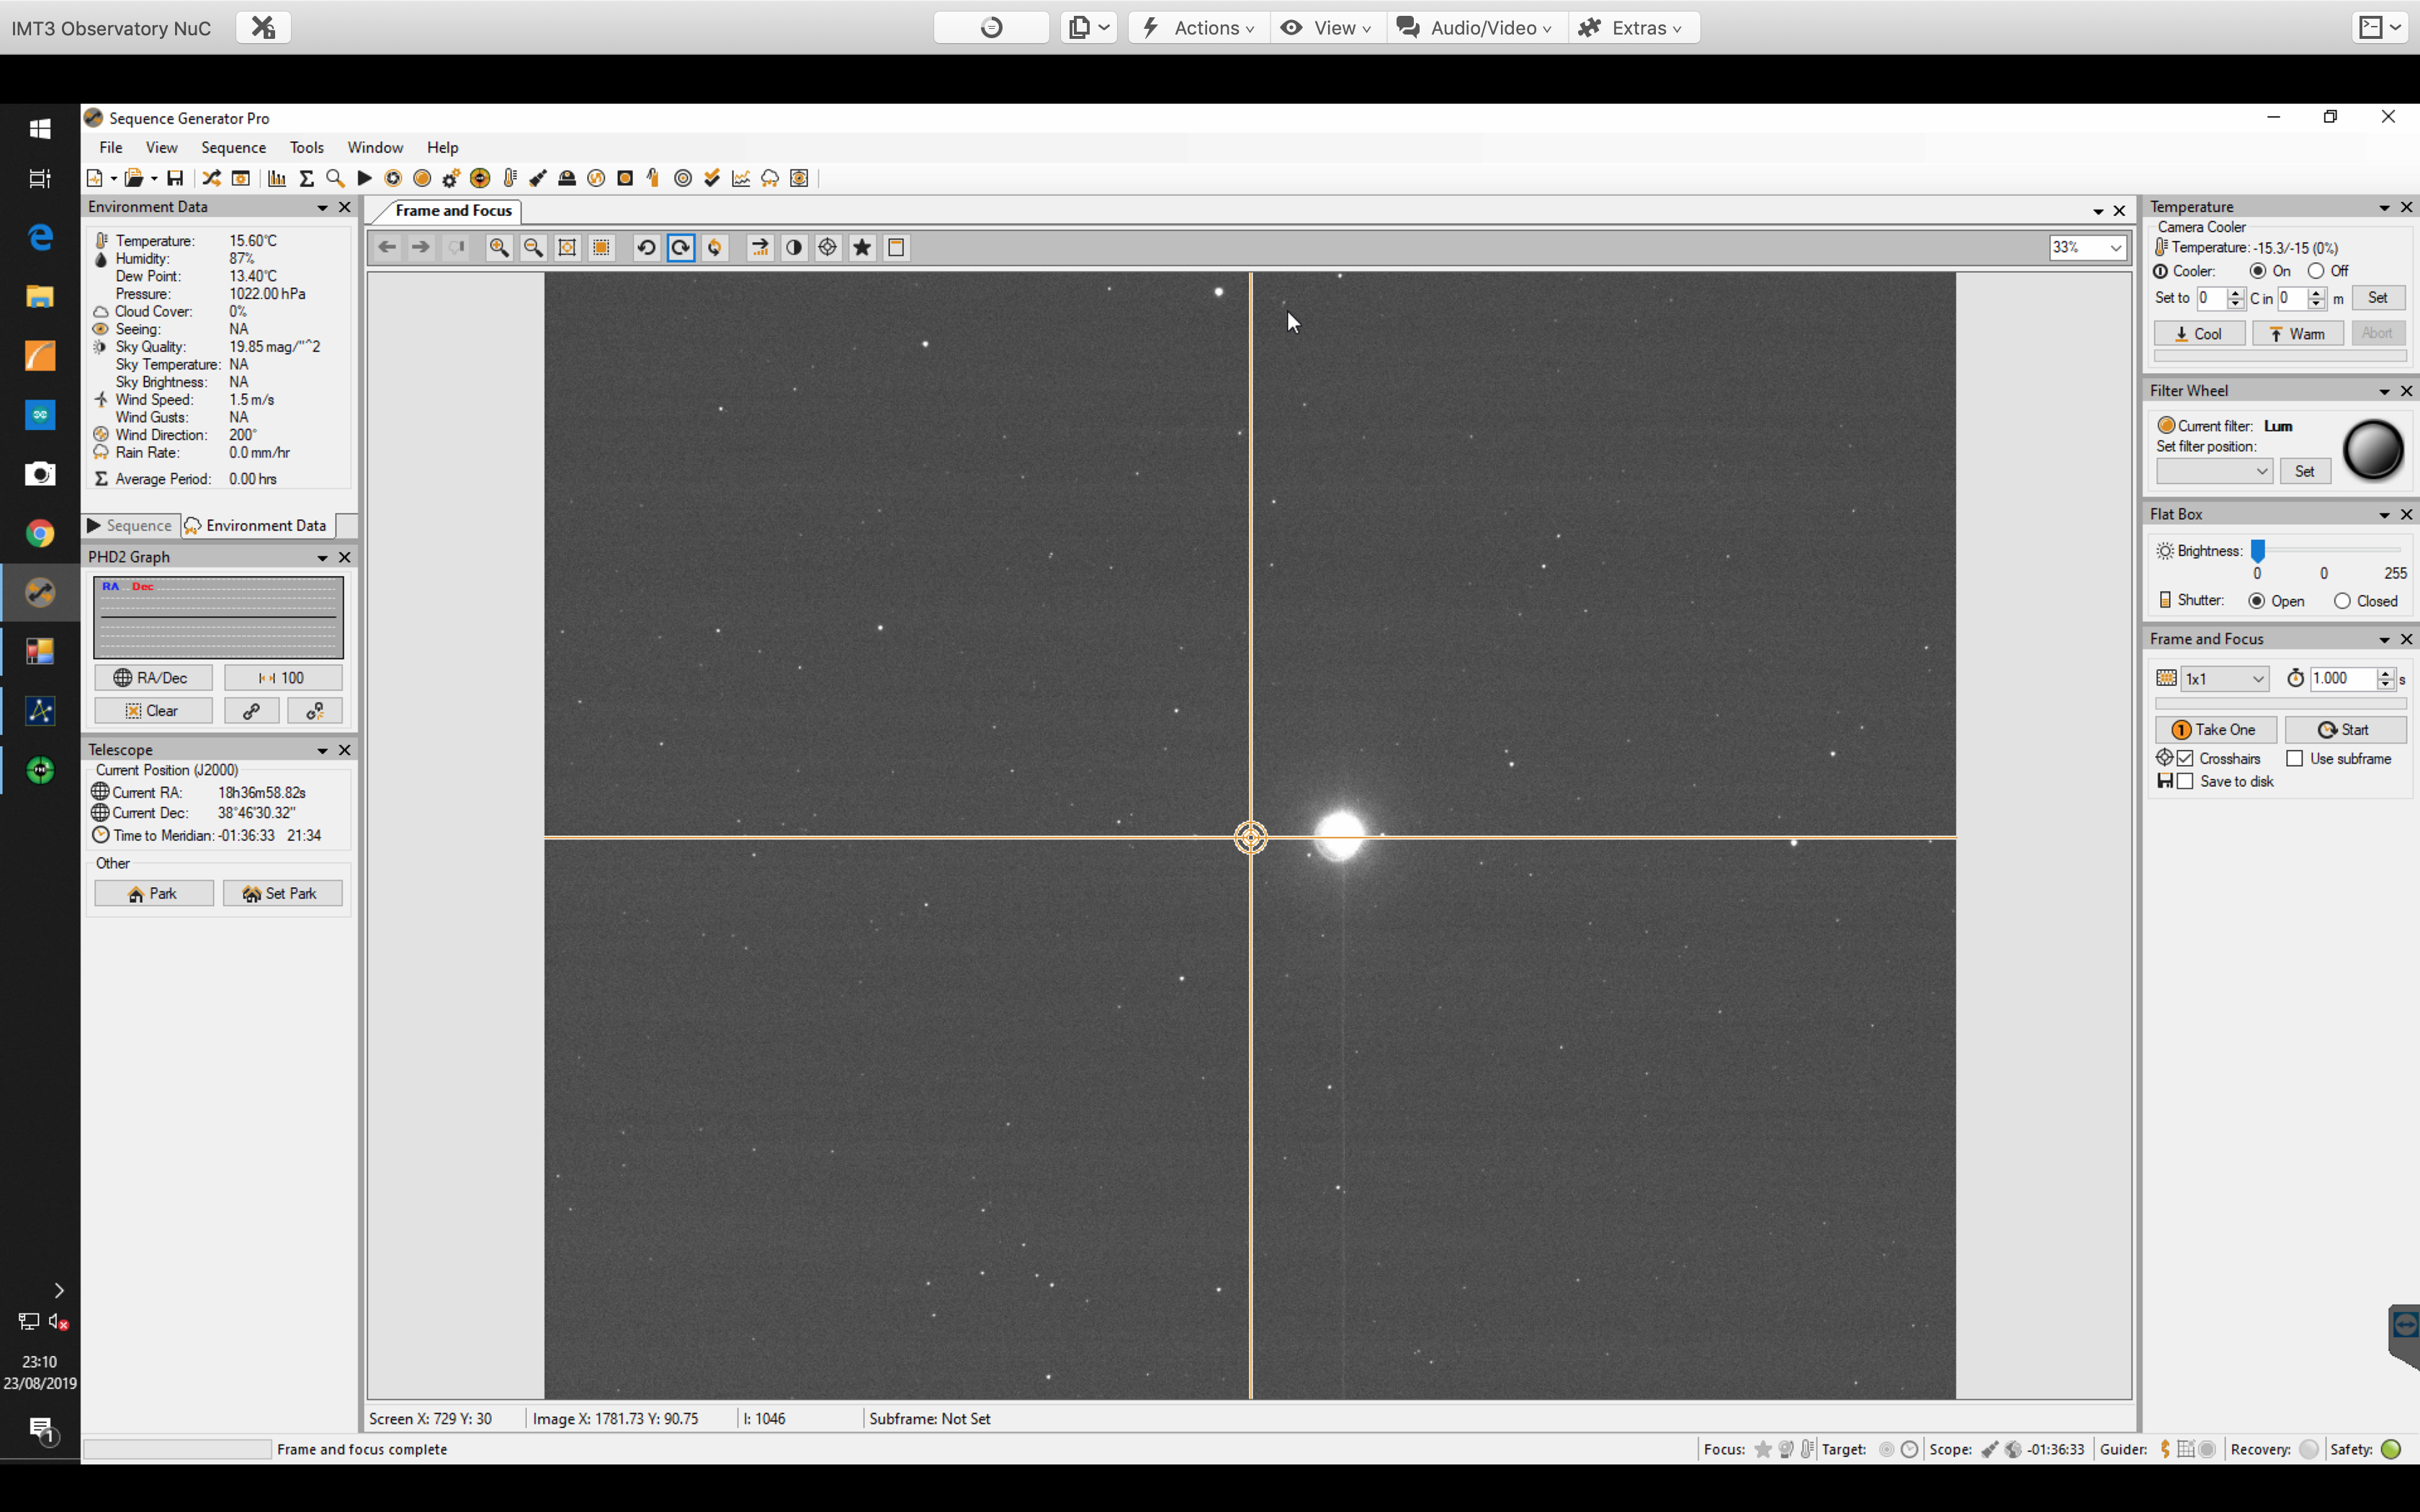
Tonight I plan on setting the 12″ imaging M94, a Messier galaxy in Canes Venatici.
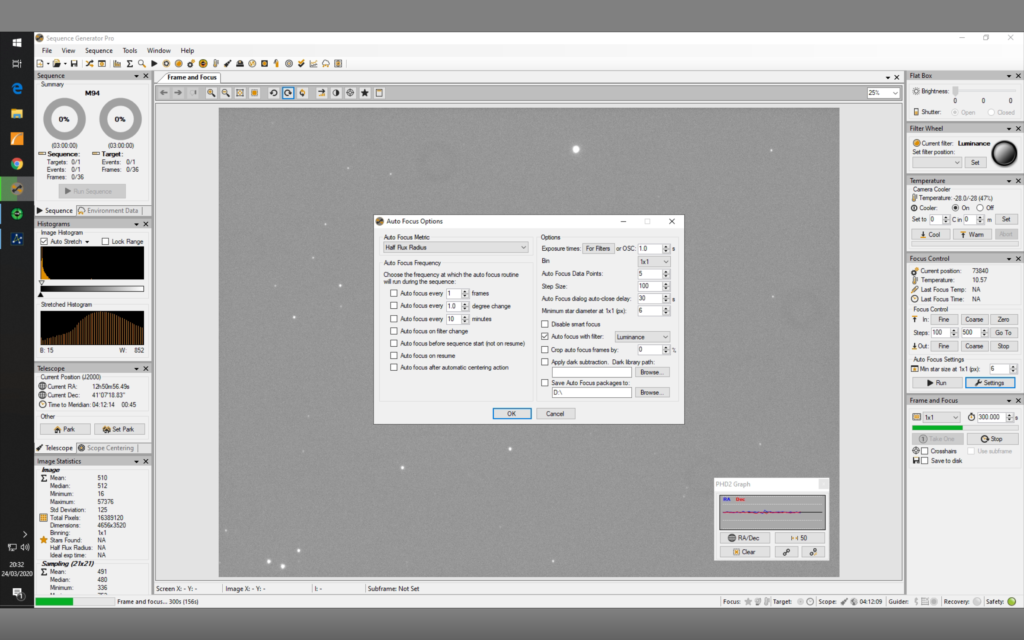
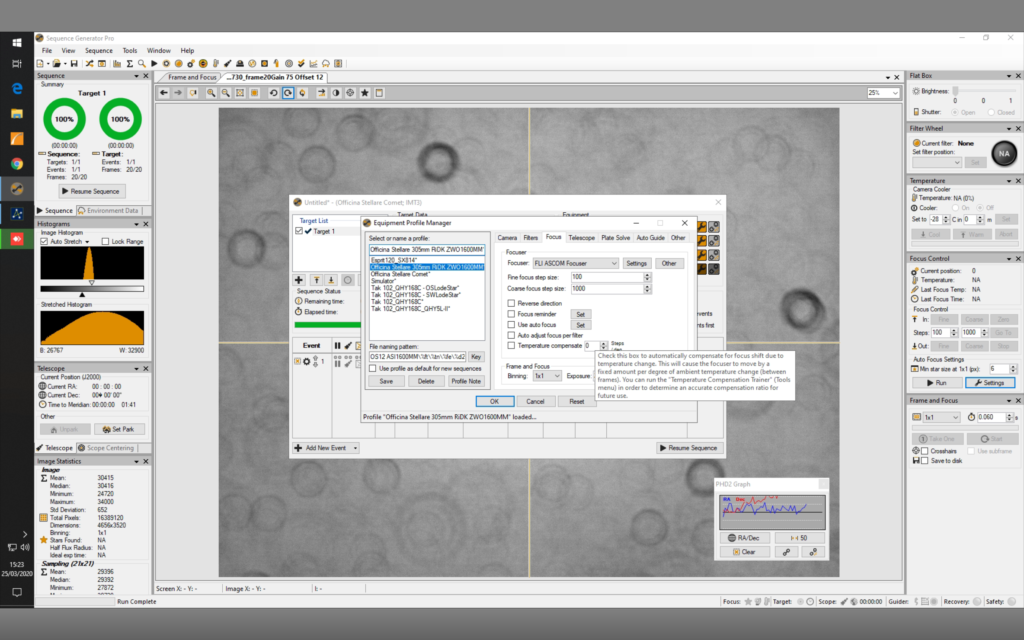
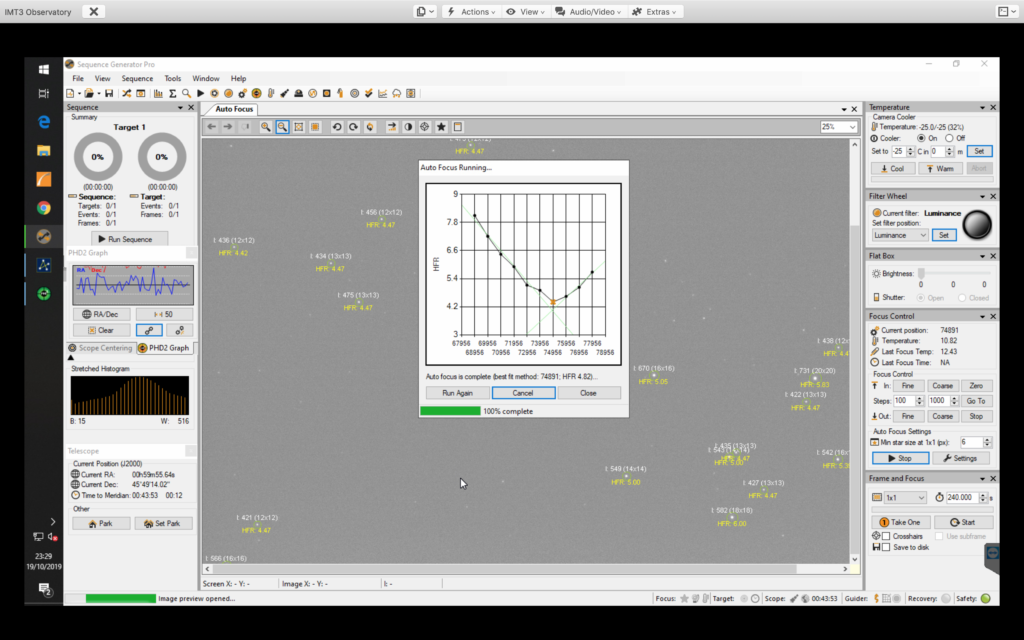
I slewed to nearby star and focused using SGPro after changing a couple of settings in the step size and amount of data points to be used, I set step size to 100 from previous 1000 and data point to 5 from previous 10 and got a much better focus. Focus landed up first time around at 738840
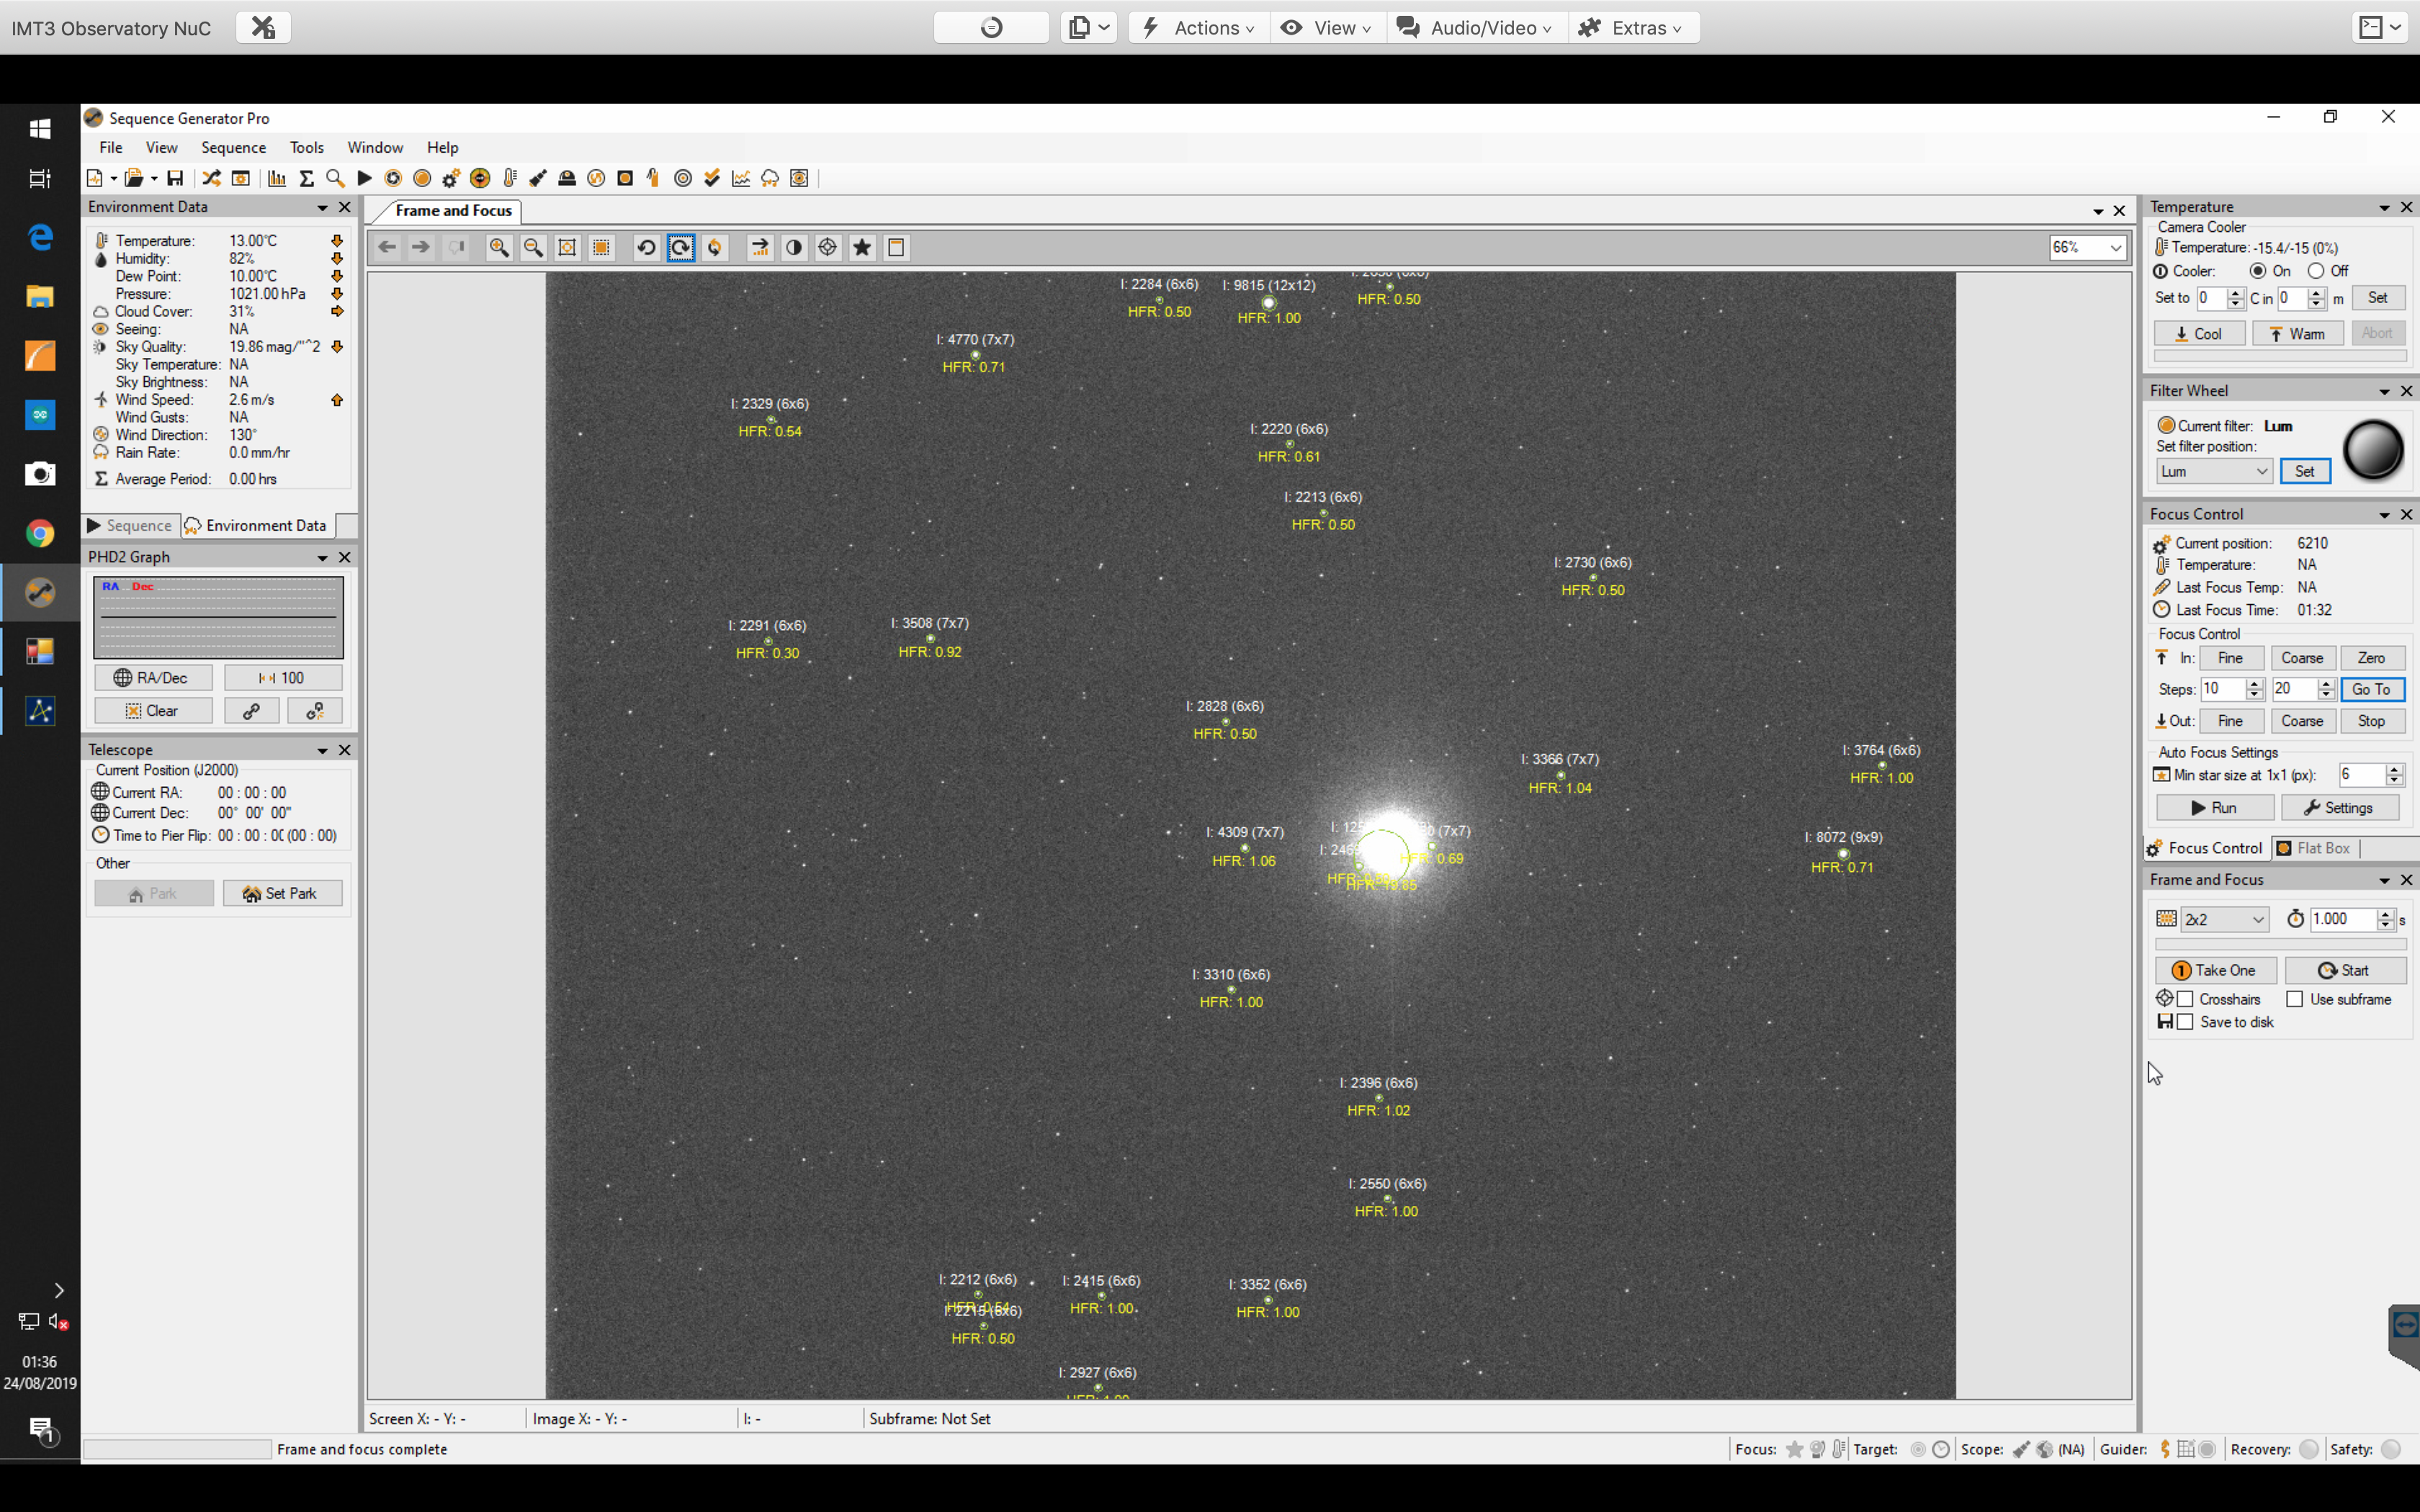
SGPro Autofocus settings changed
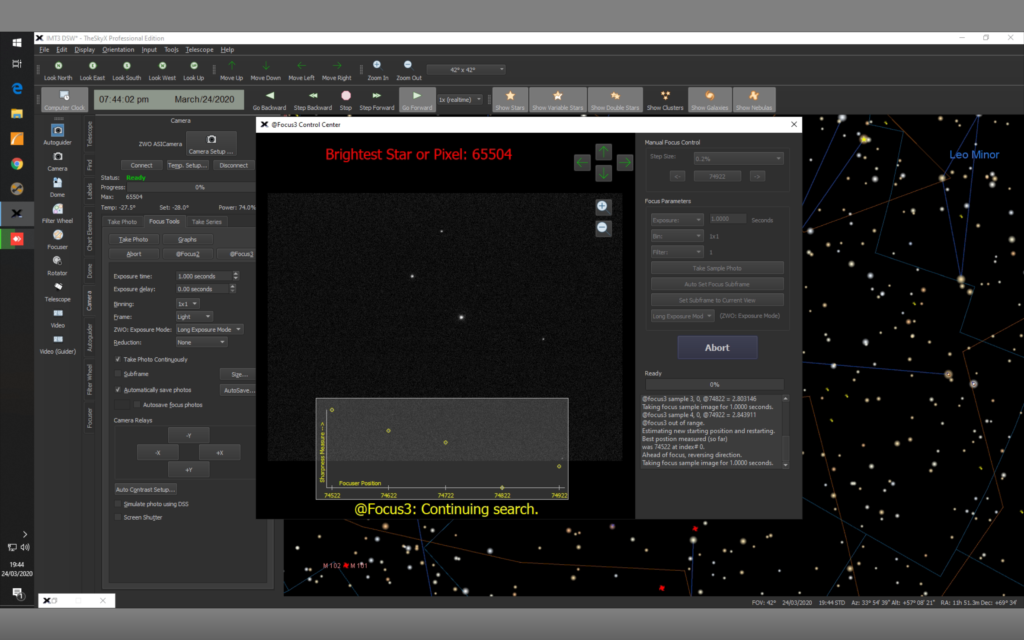
I had tried to get @focus working in TSX but it would fail every time on the galaxy with not enough stars. This meant I could not use TSX to solve and sync to centre M94.
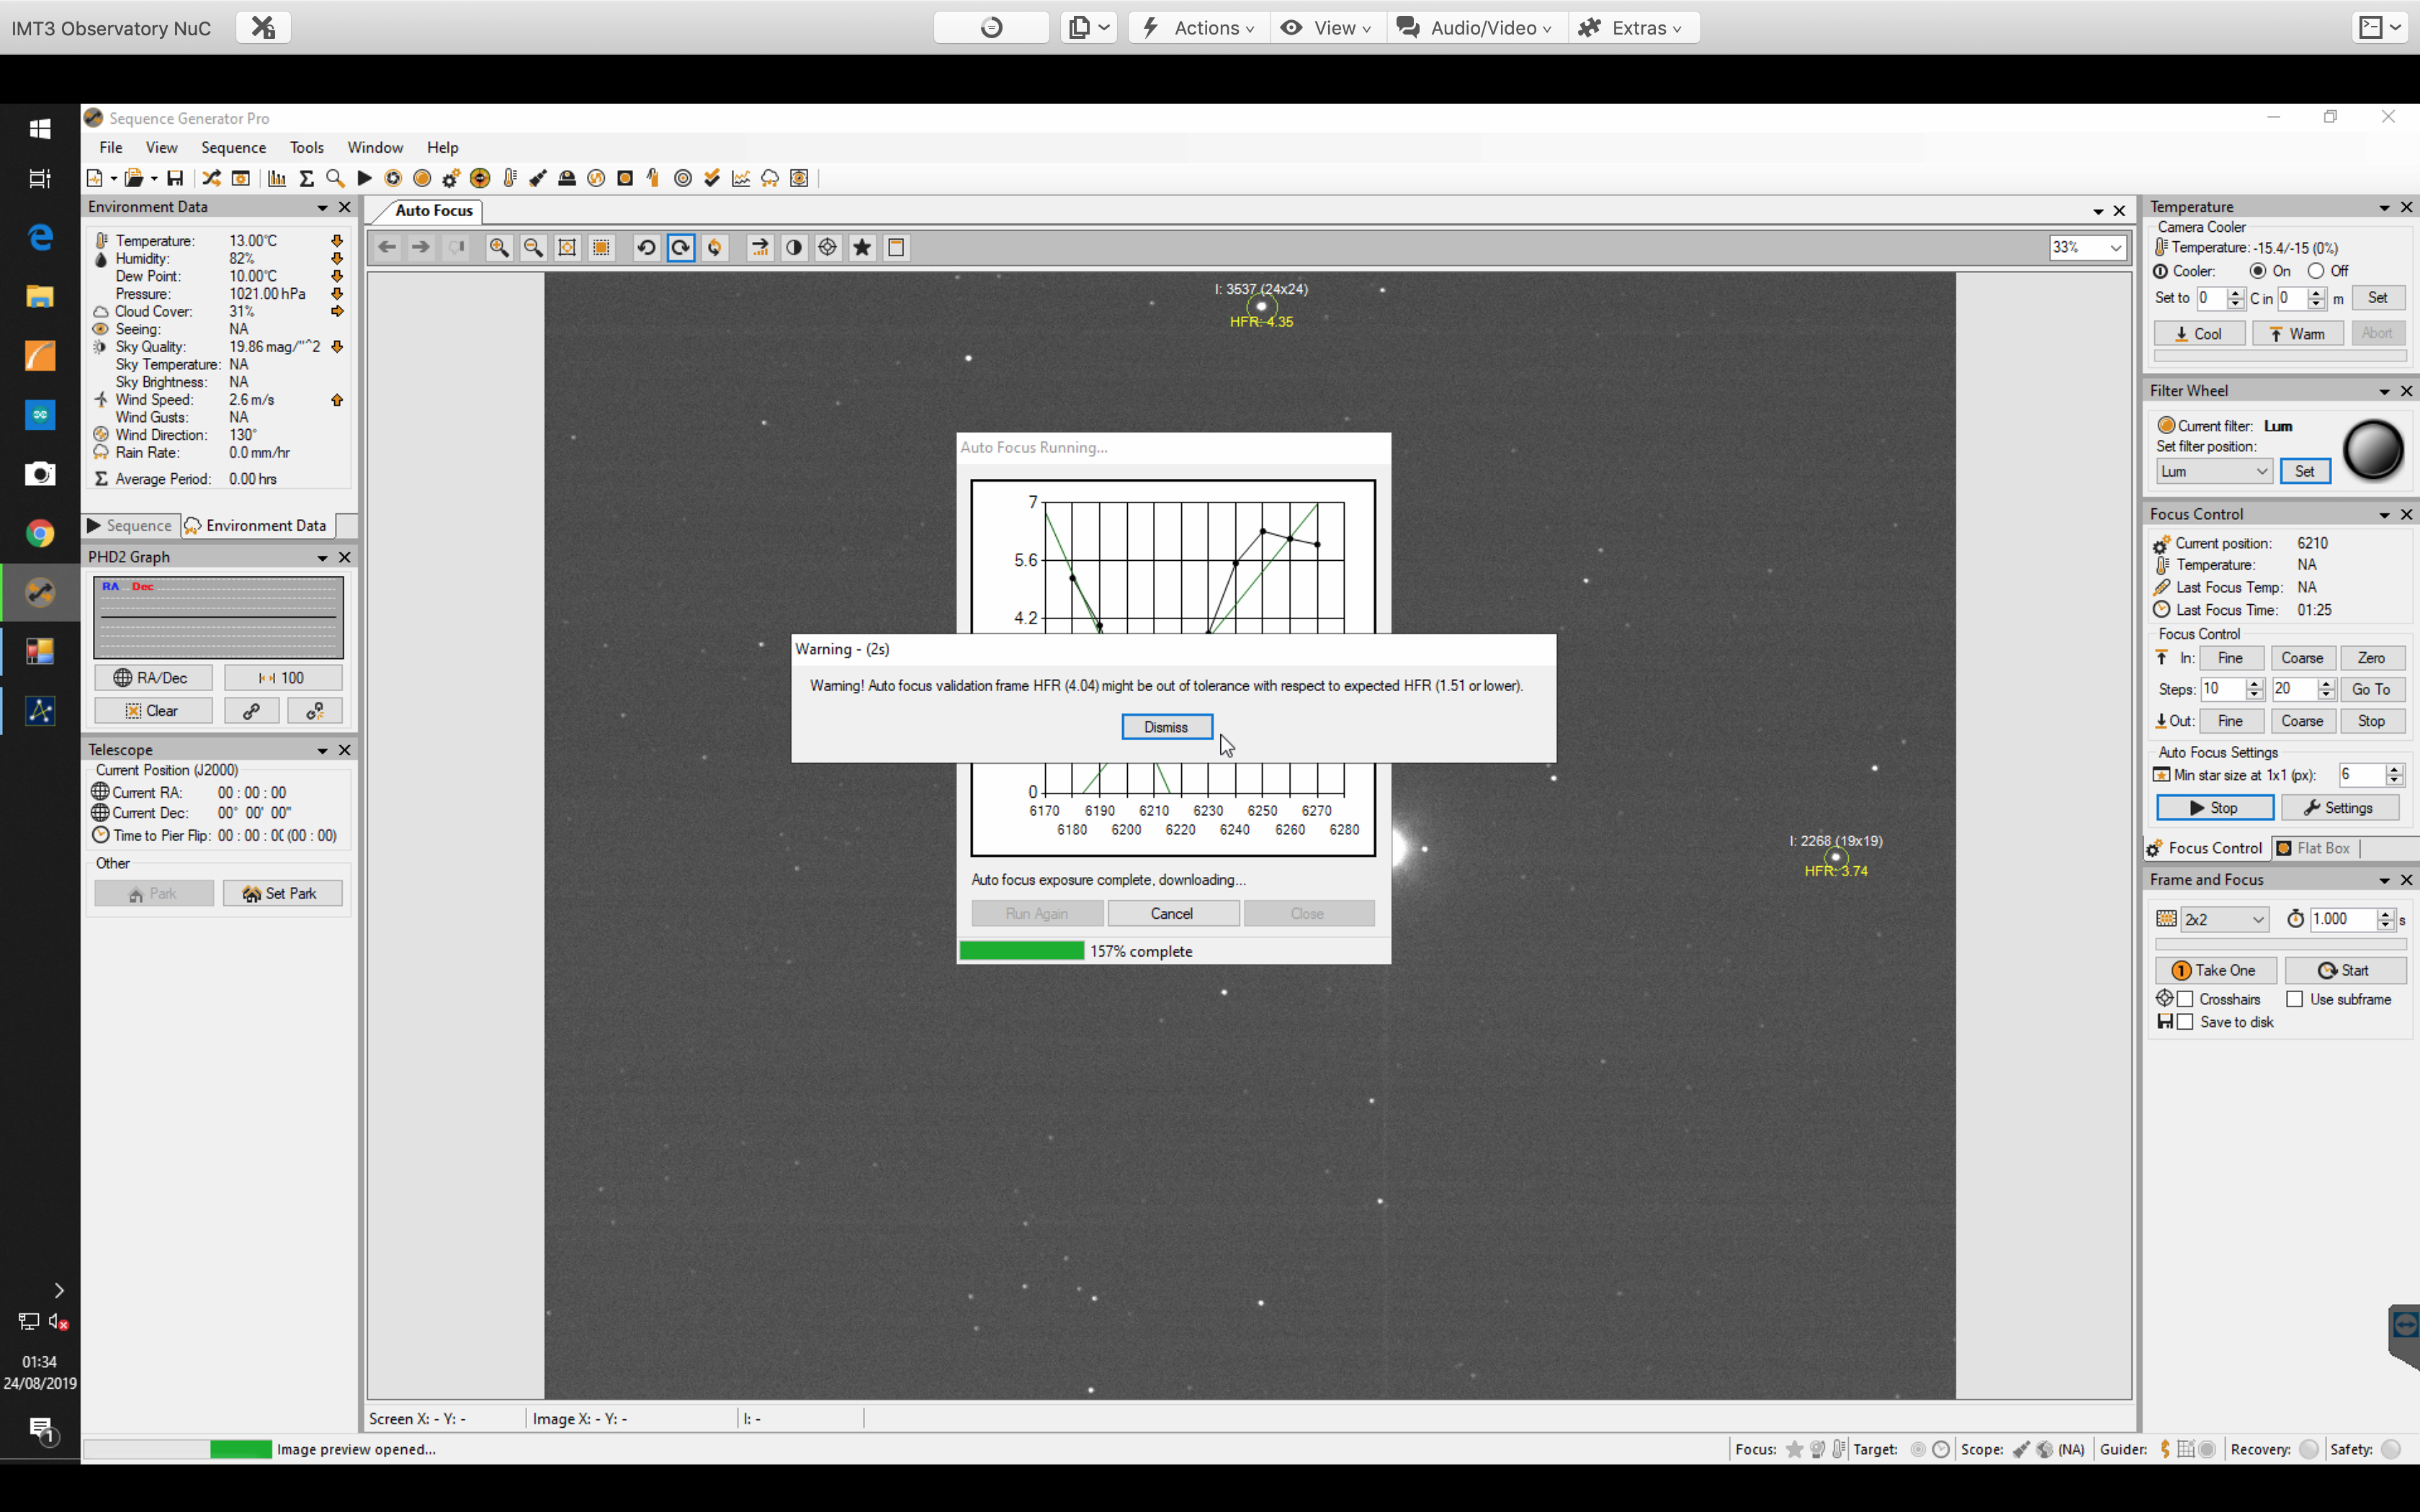
SGPro autofocus
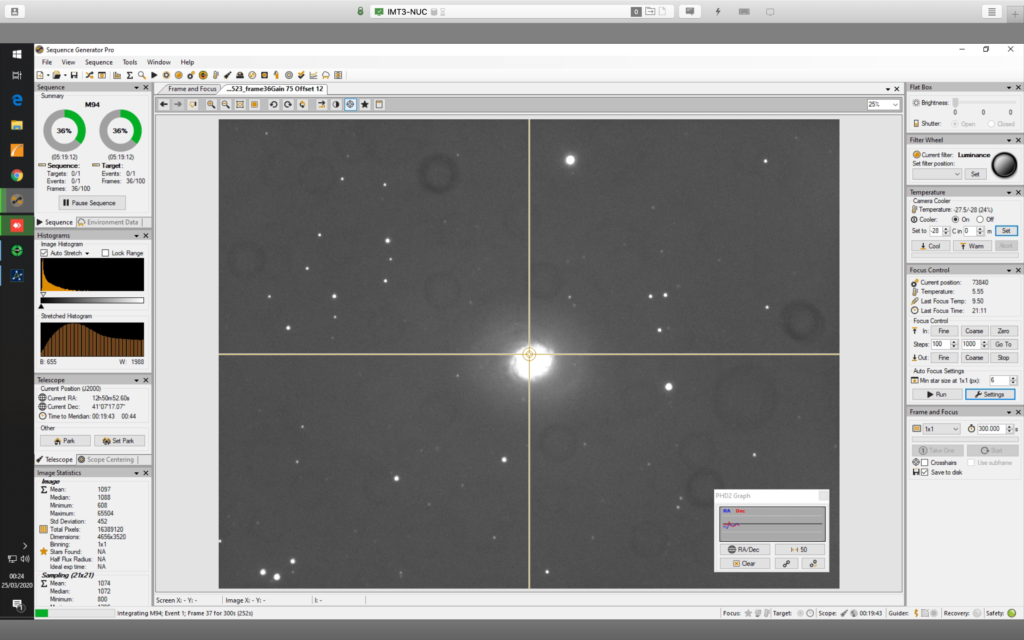
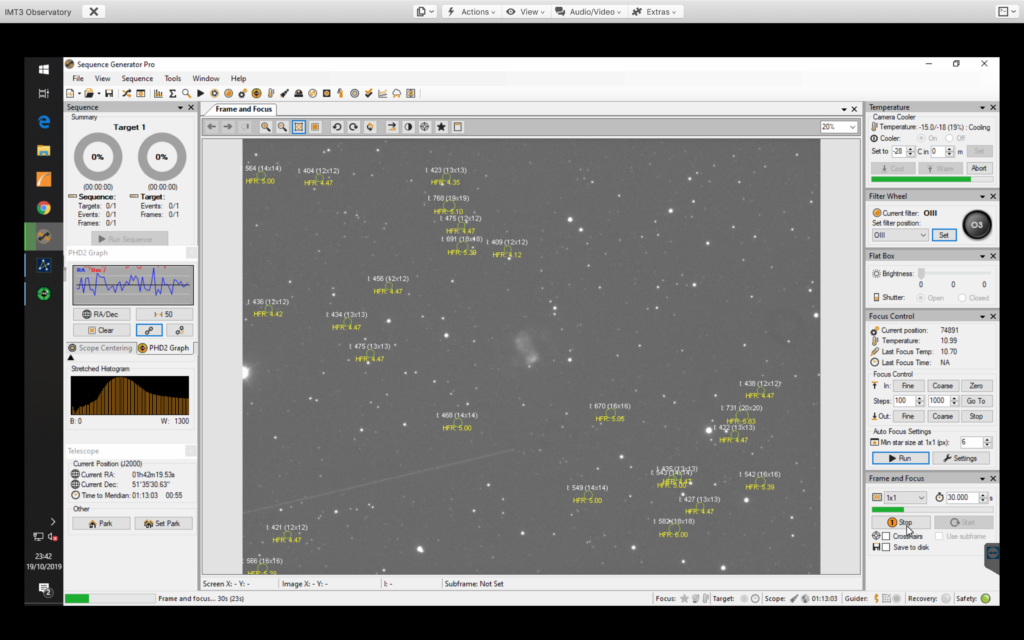
I then tried to centre with SGPro and that also failed so instead I used TSX to connect to the camera and manually moved M94 to the centre of the chip. I ned to get the local plate solver working as it was not running.
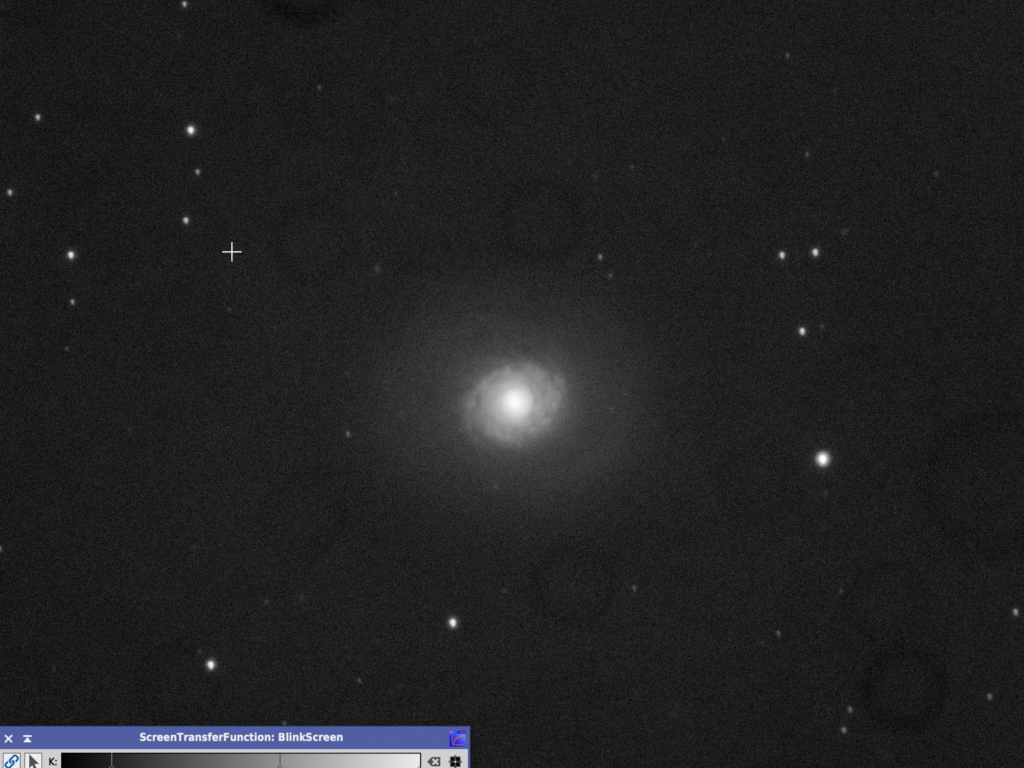
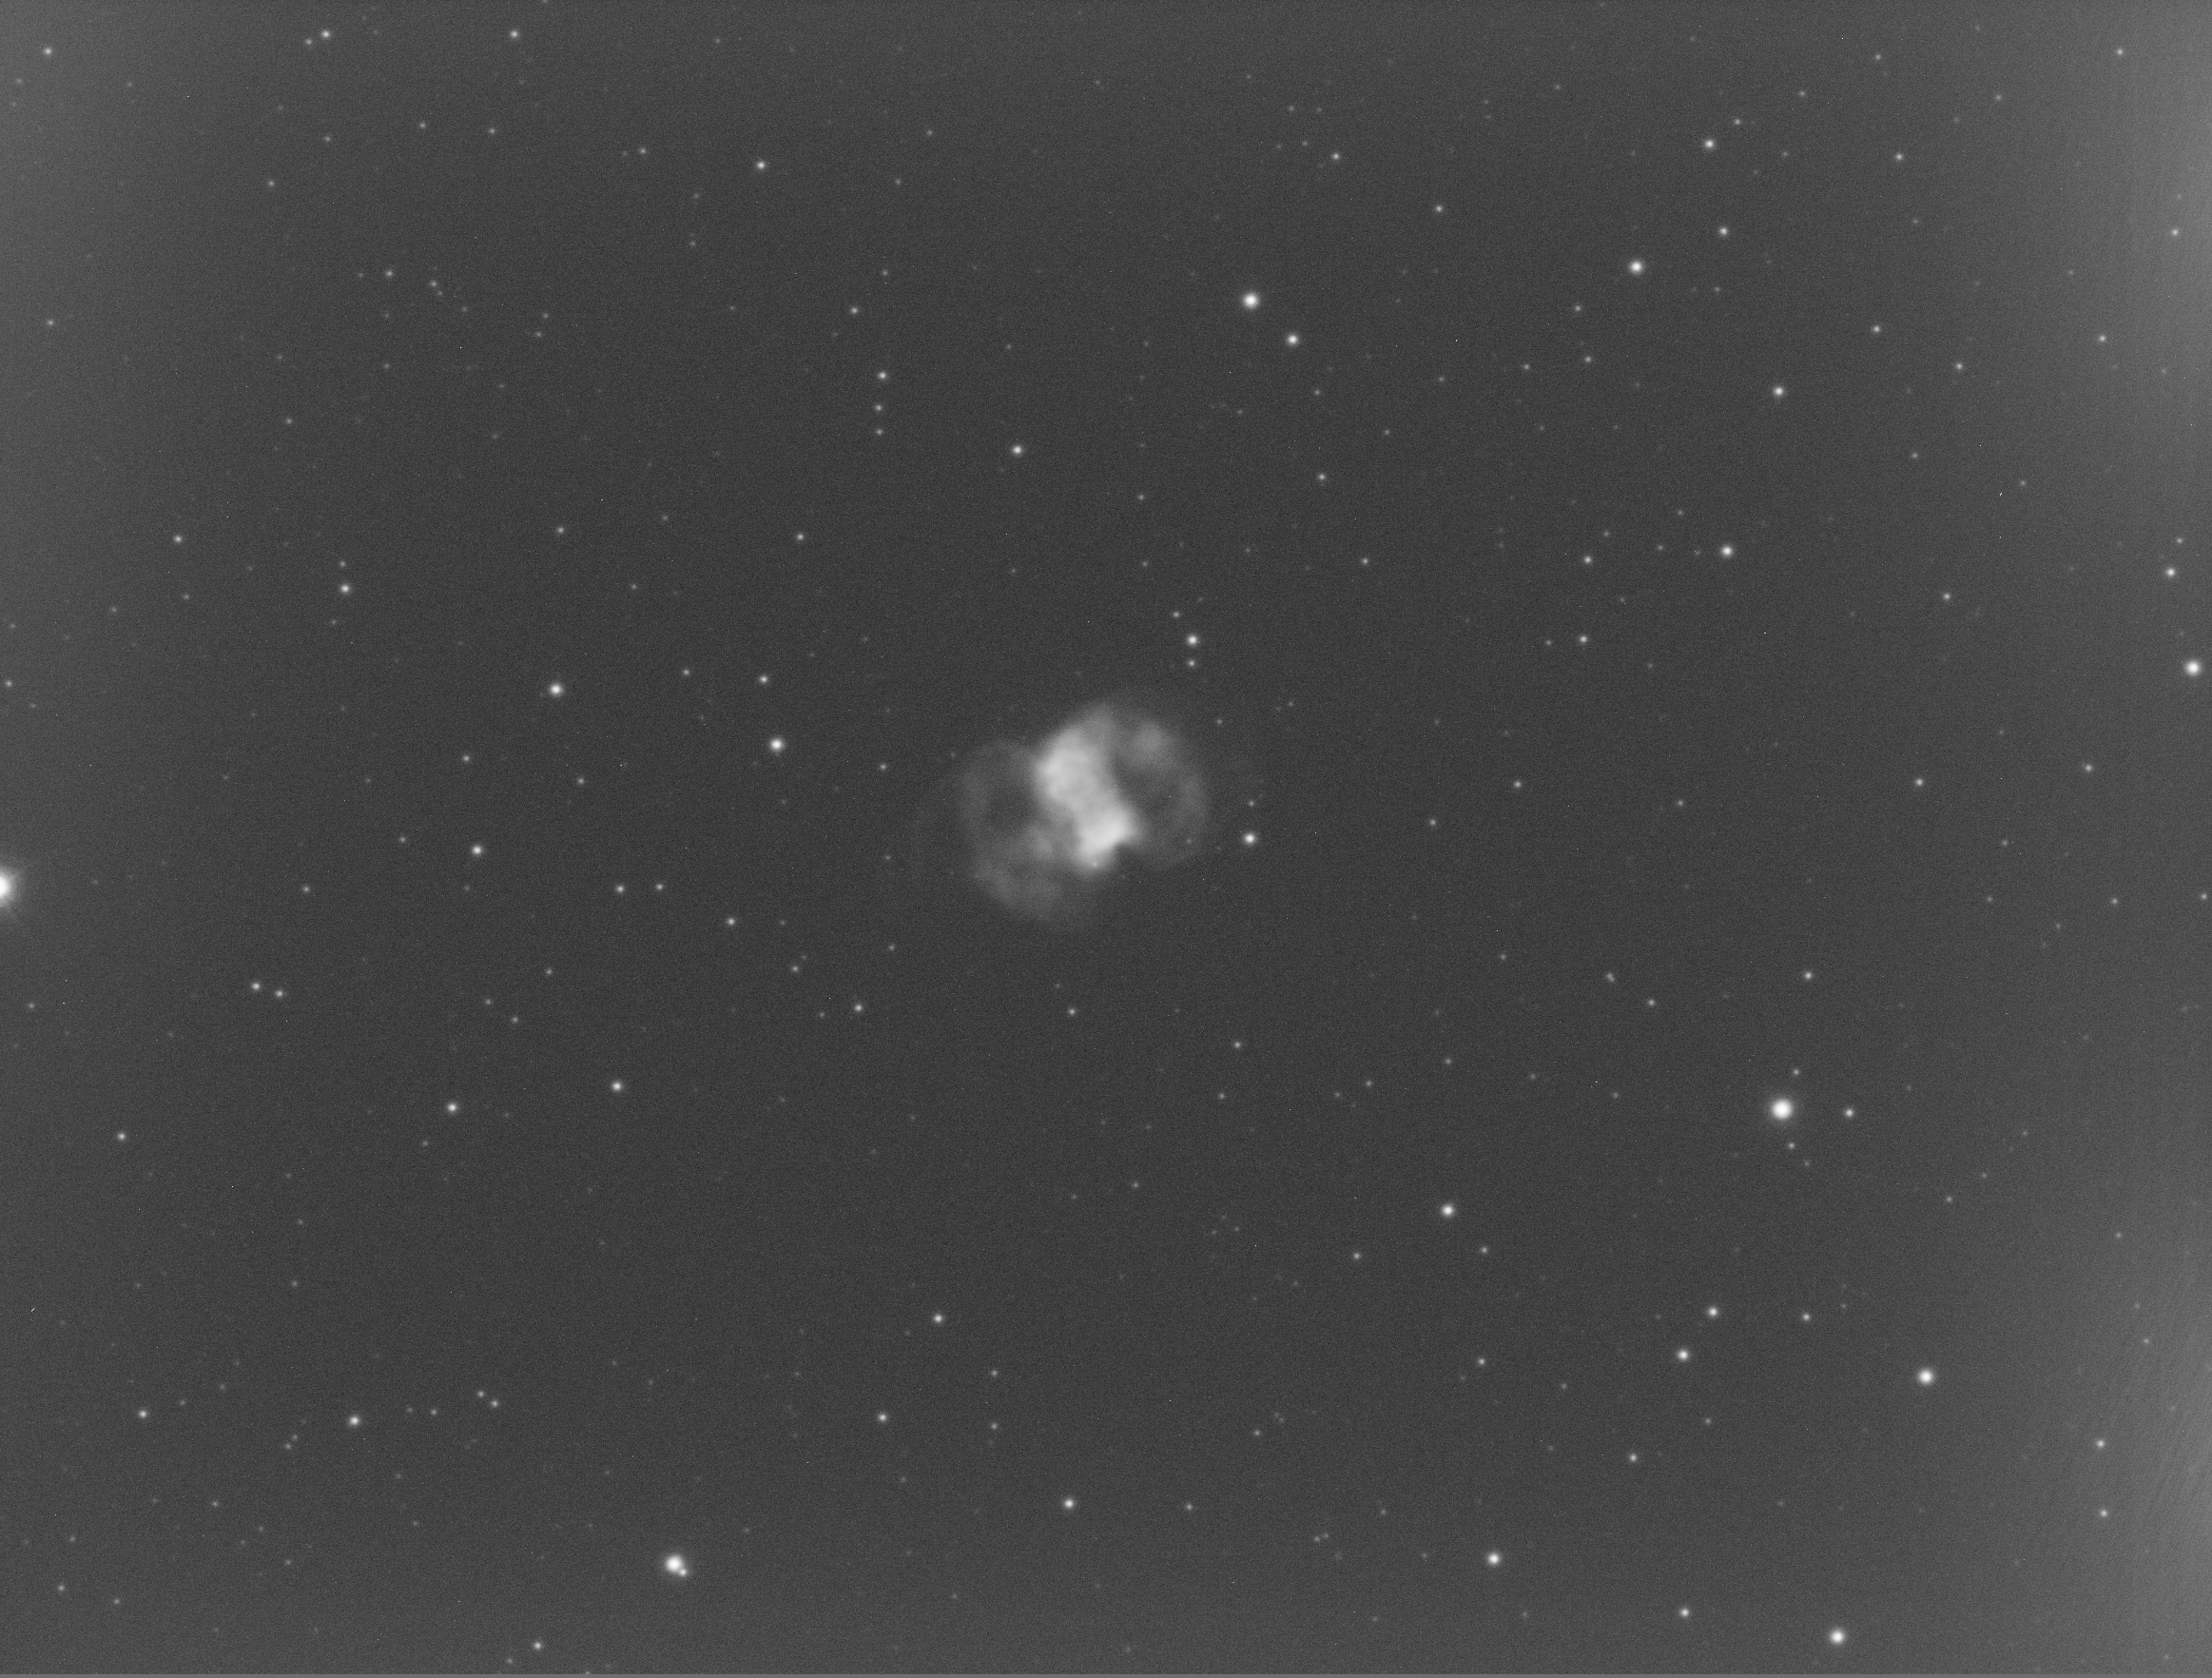
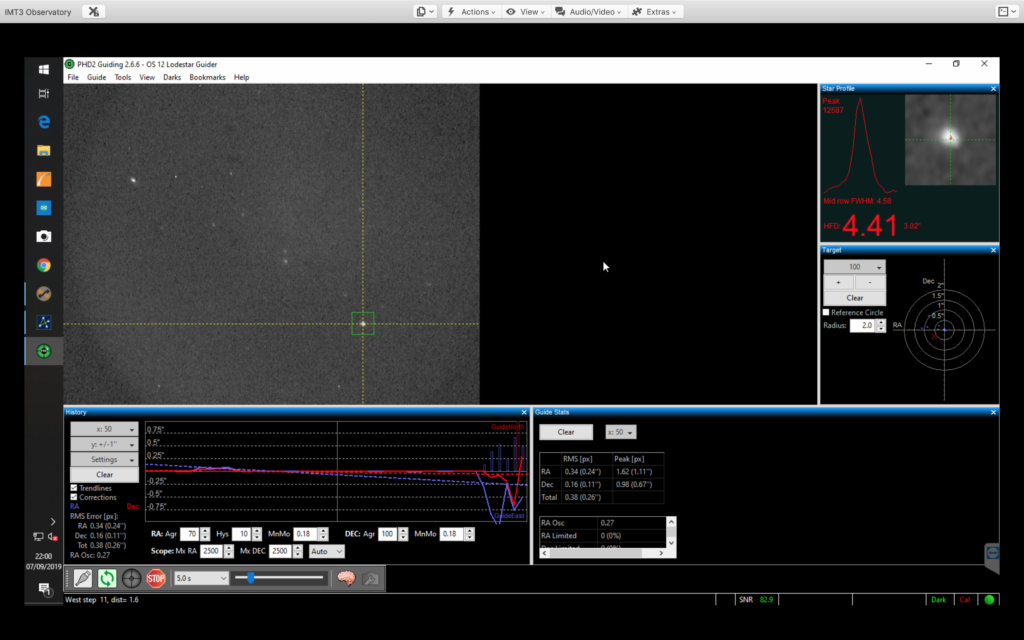
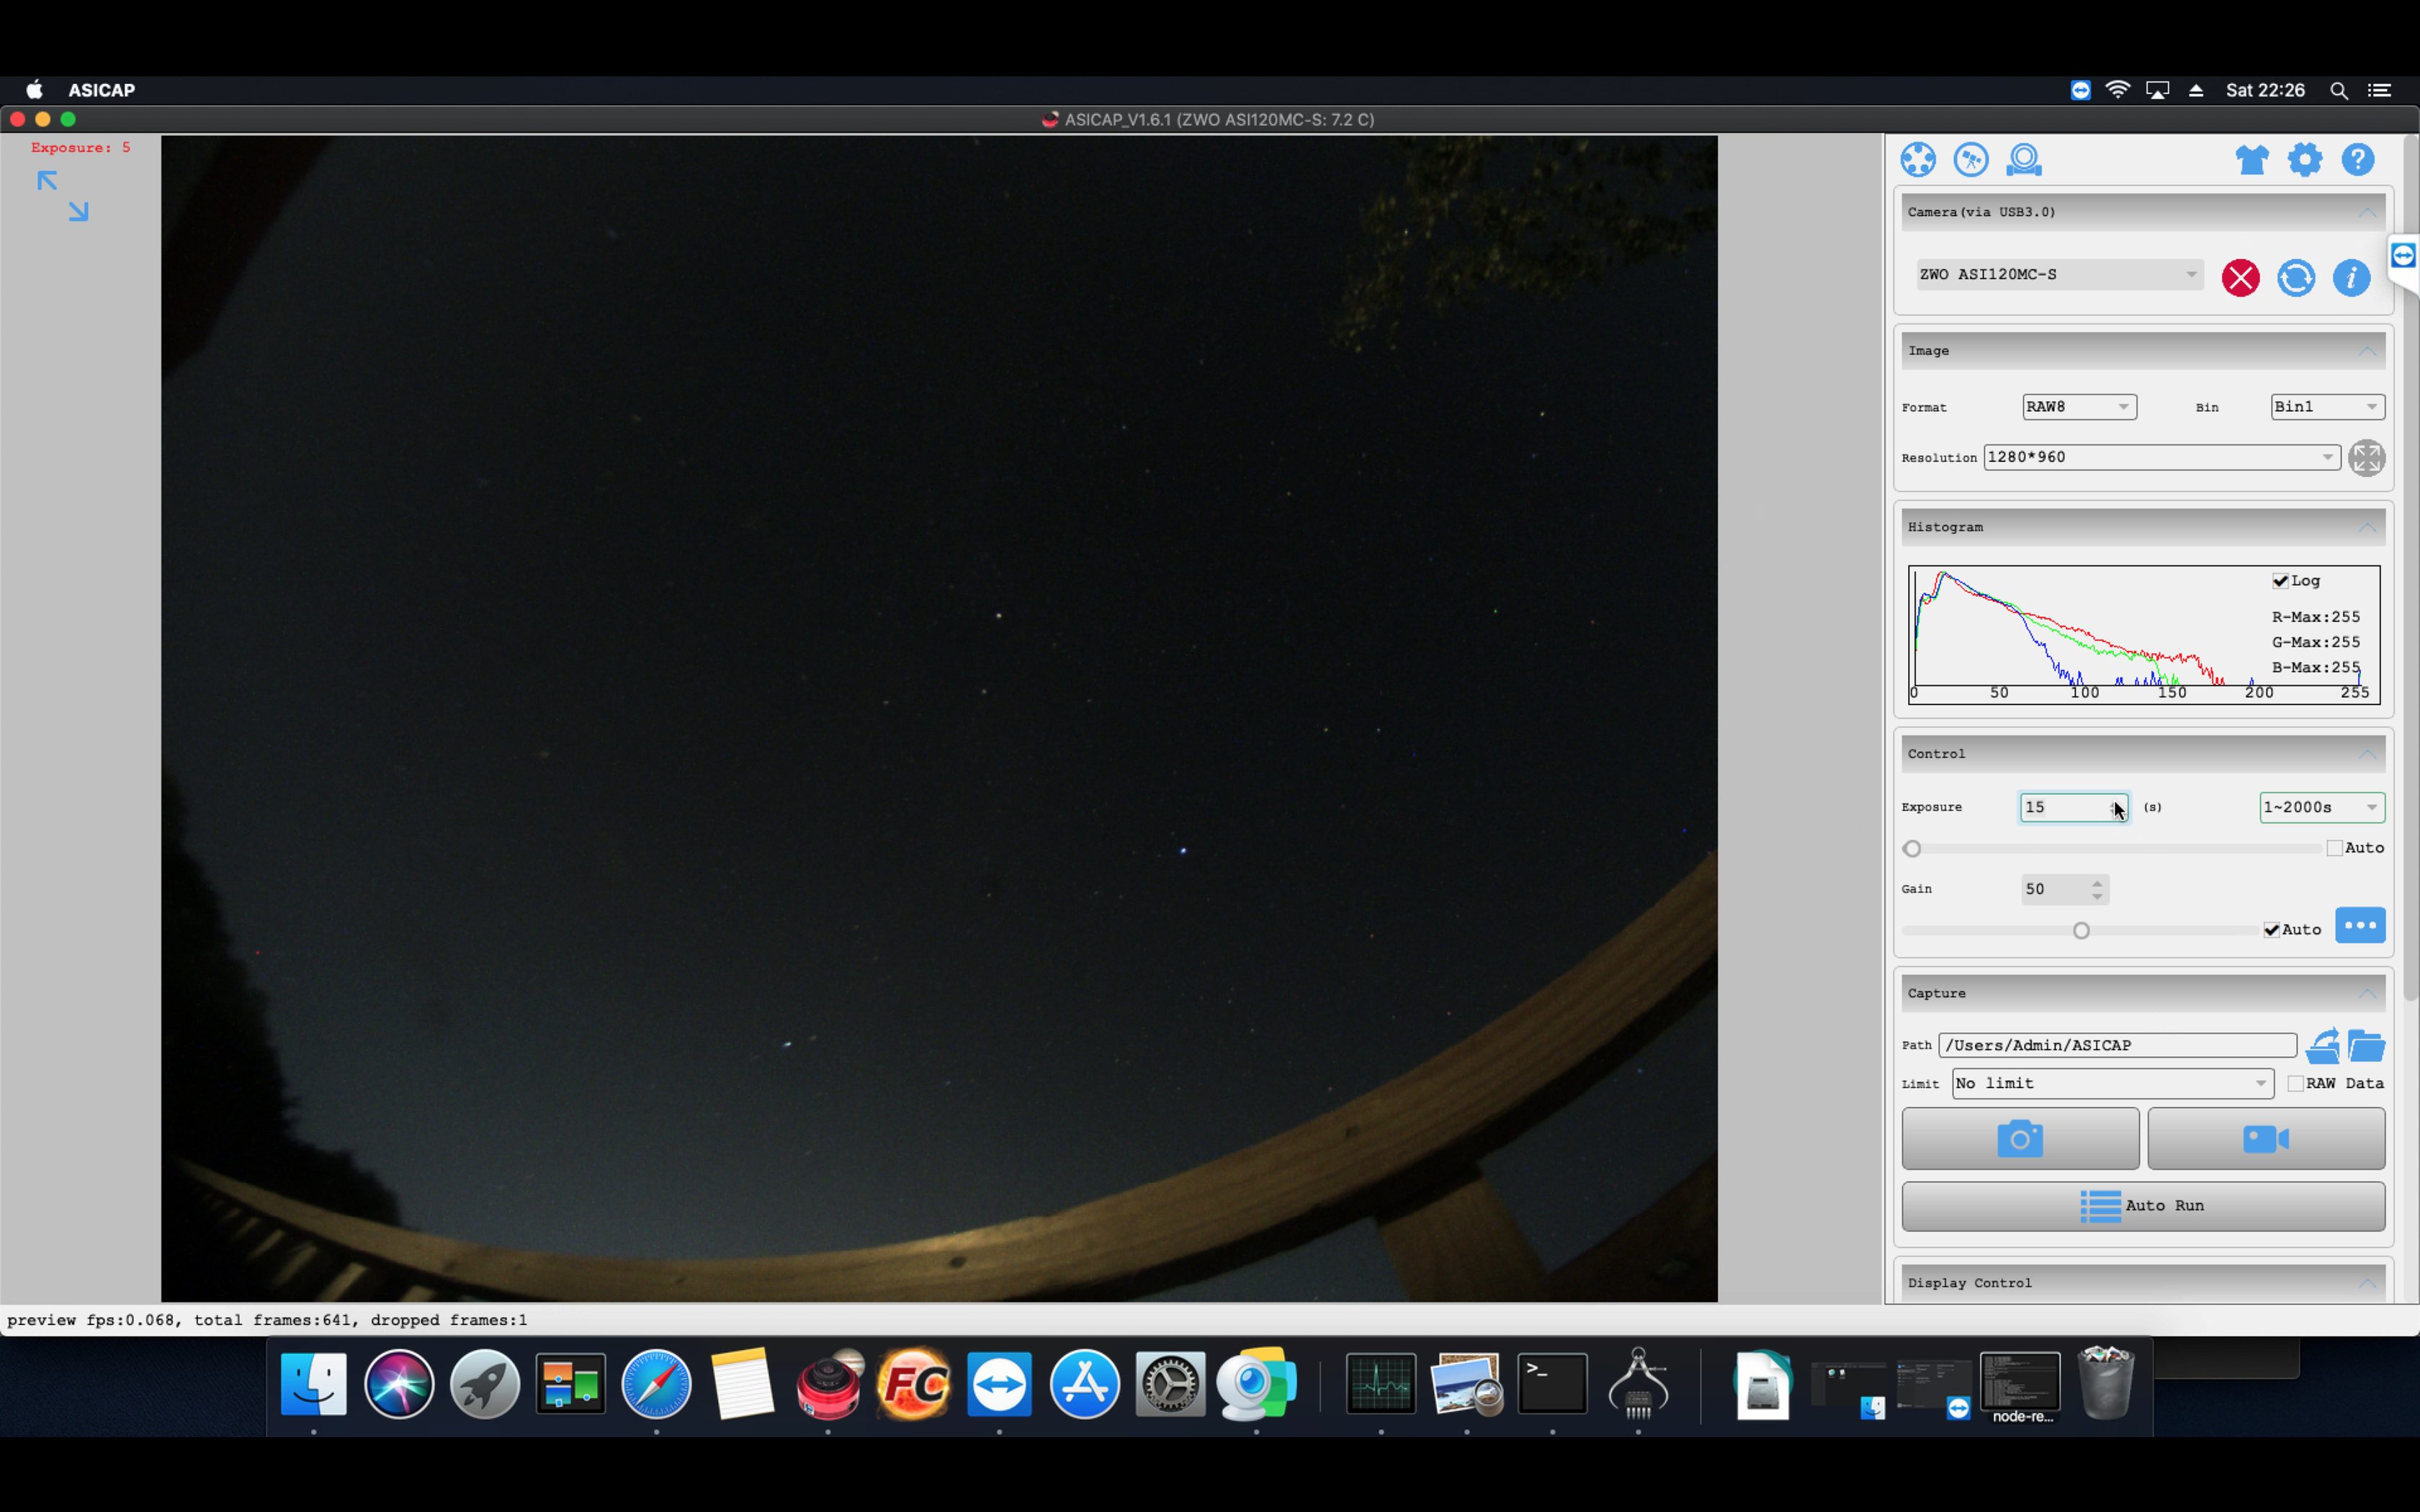
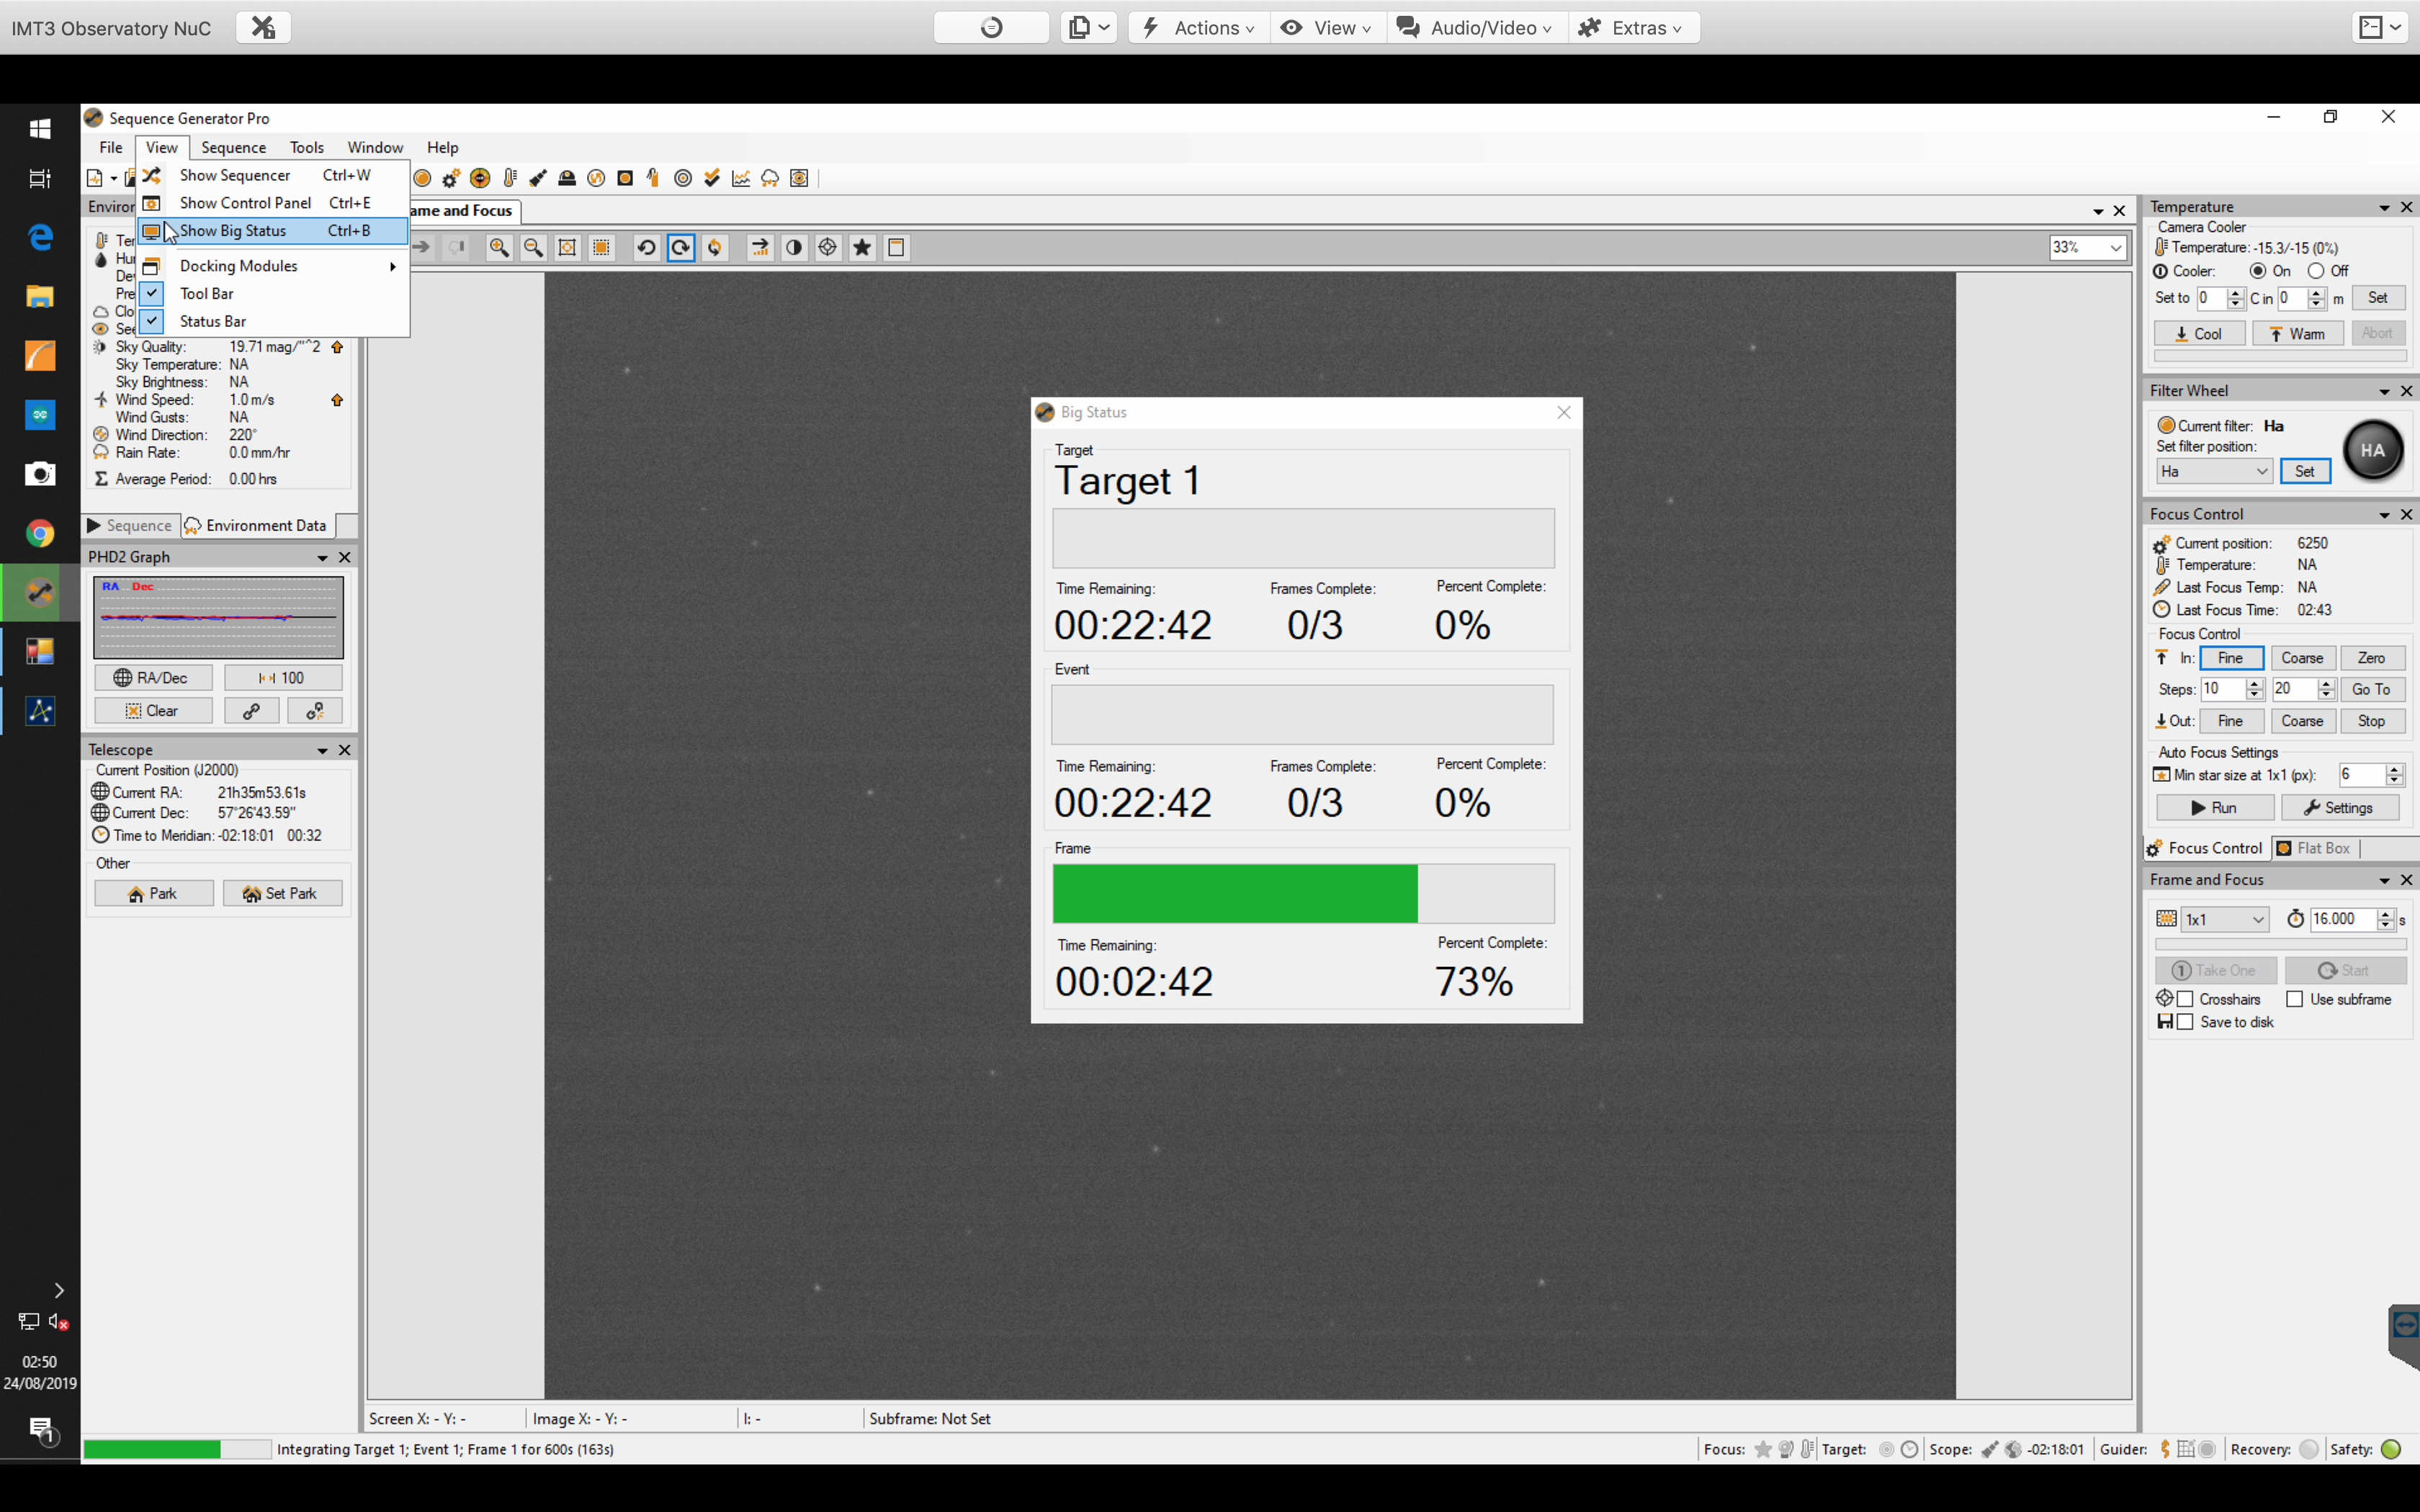
@ 20:32 I took an initial 5min sub to see what the image would be like after setting PHD2 guiding running.
5 min M94 sub
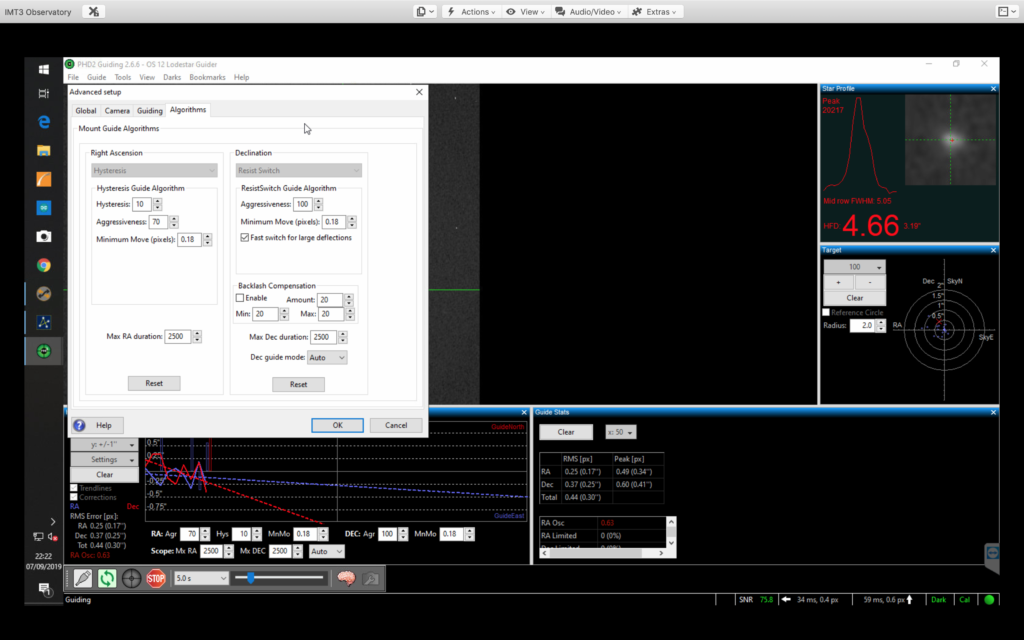
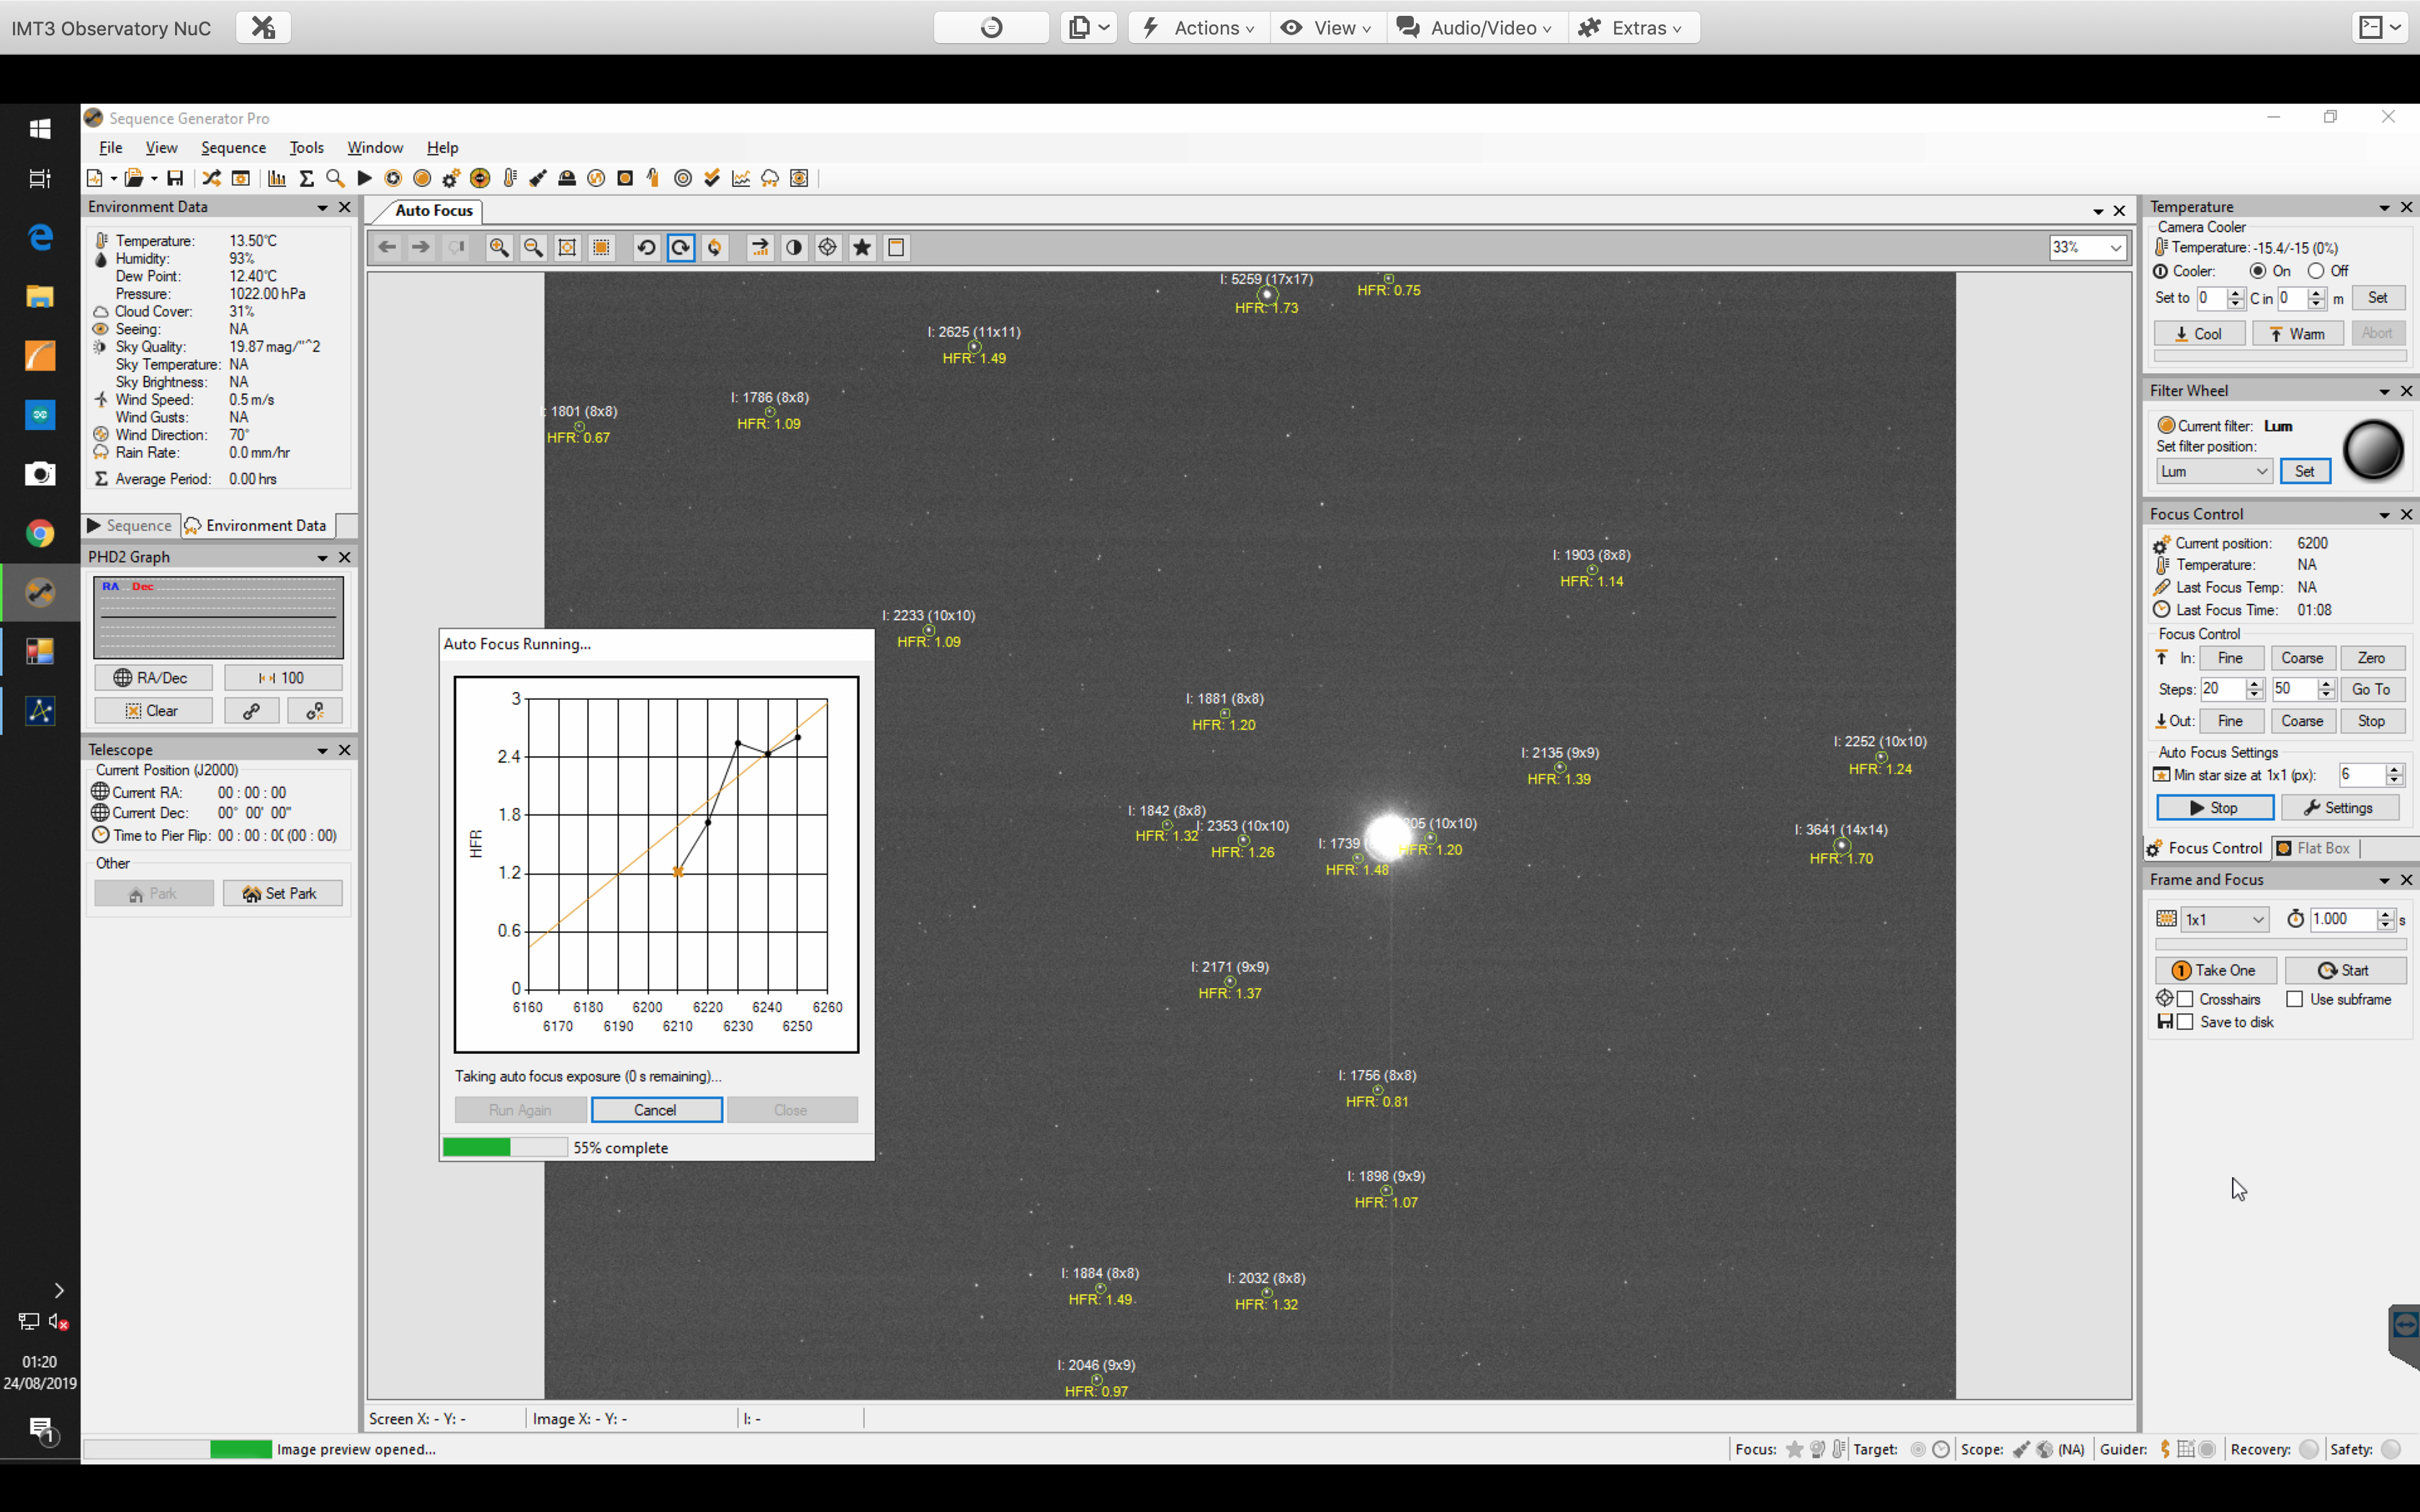
@1:20 and after gathering 3 hours of data I moved to other side of mount so meridian flip. I refocused as it had drifted a lot. I now need to consider setting up focus move for temp as the focus shift is dramatic. I also changed PHD2 Hysteresis setting to 0.20 from 0.10 as the PHD was having problems guiding.
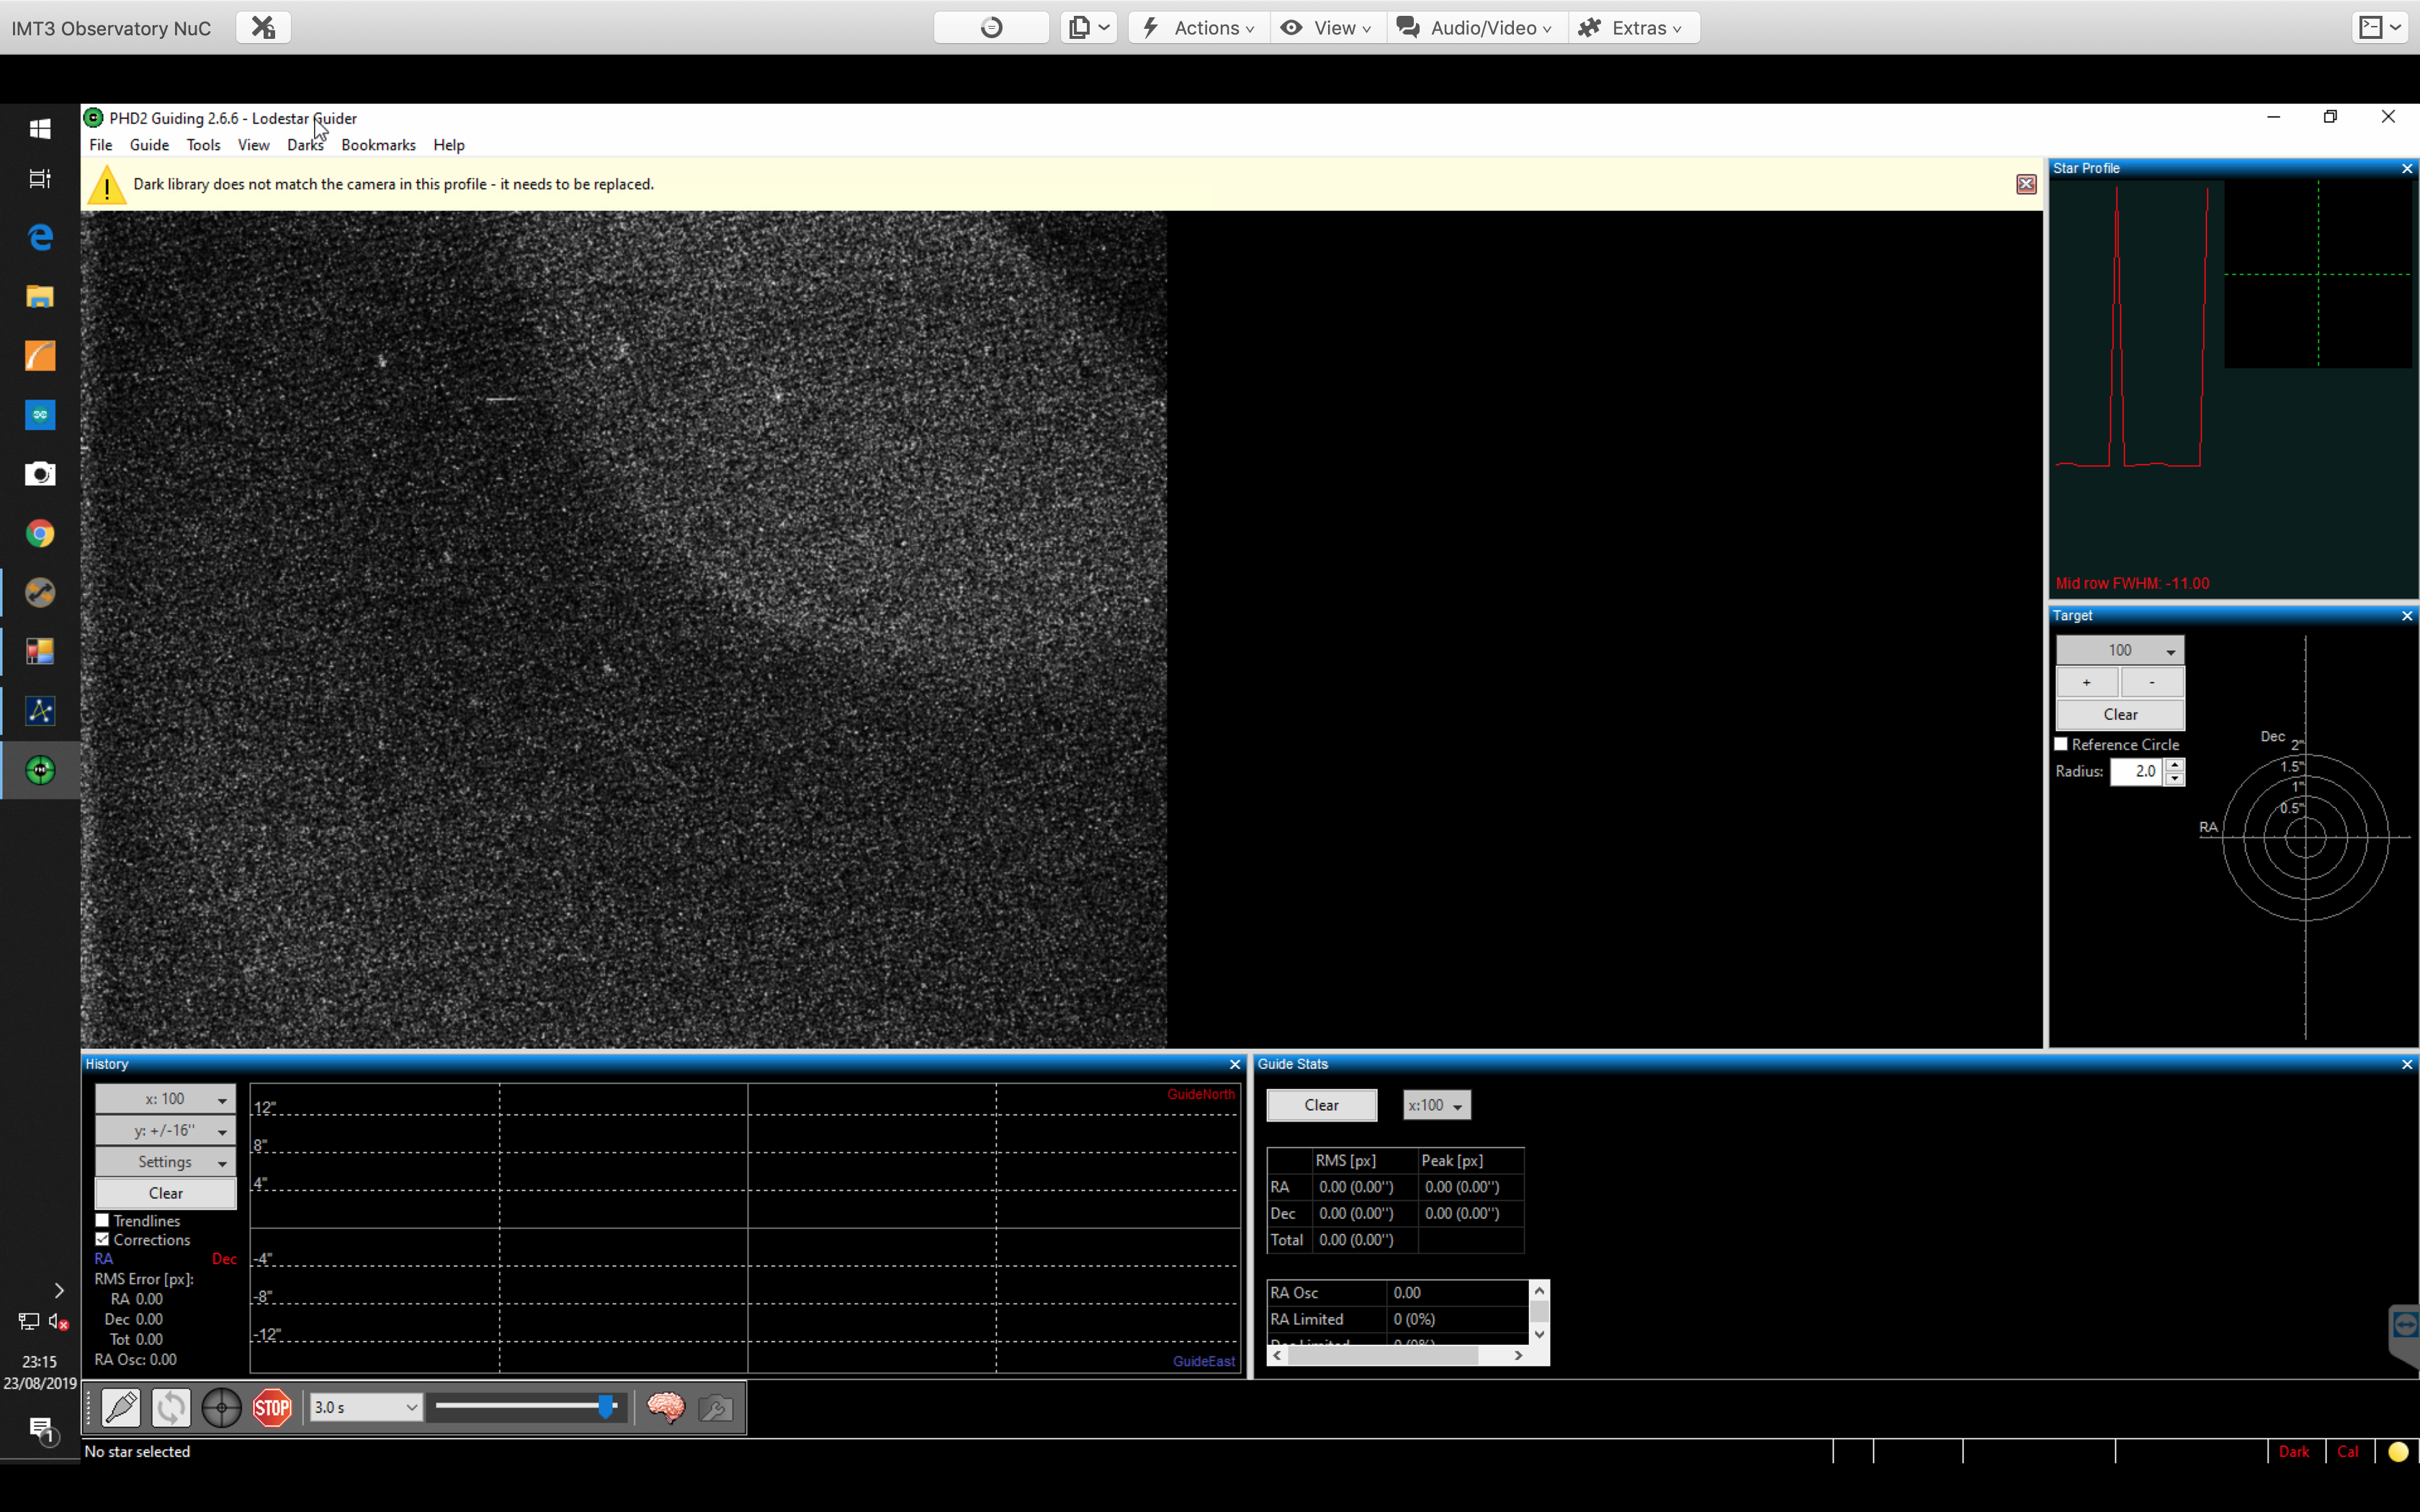
I struggled to find guide star and landed up exposing for 15s and then having to increase, possibly needs recalibrating on this side of the mount. But also I need to find a brighter guide star by moving the mount offsetting the galaxy. The other way is using one of the piggy backed scopes which I may do next time.
@1:43 the dome closed, not sure why, might have been high cloud but probably because the WSX software lost contact with the WSX hardware. I did a reset and reconnected and then it was fine, but as the dome had closed I packed up with 3 hours of Luminance data on M94. I now need to take flats on the morning.
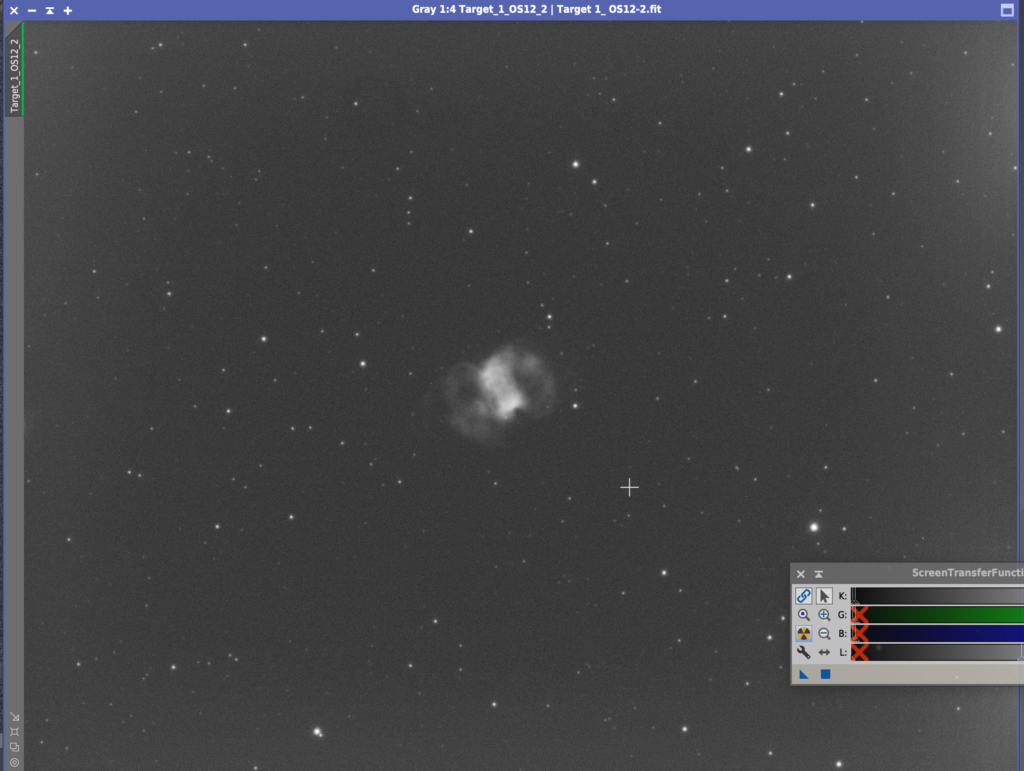
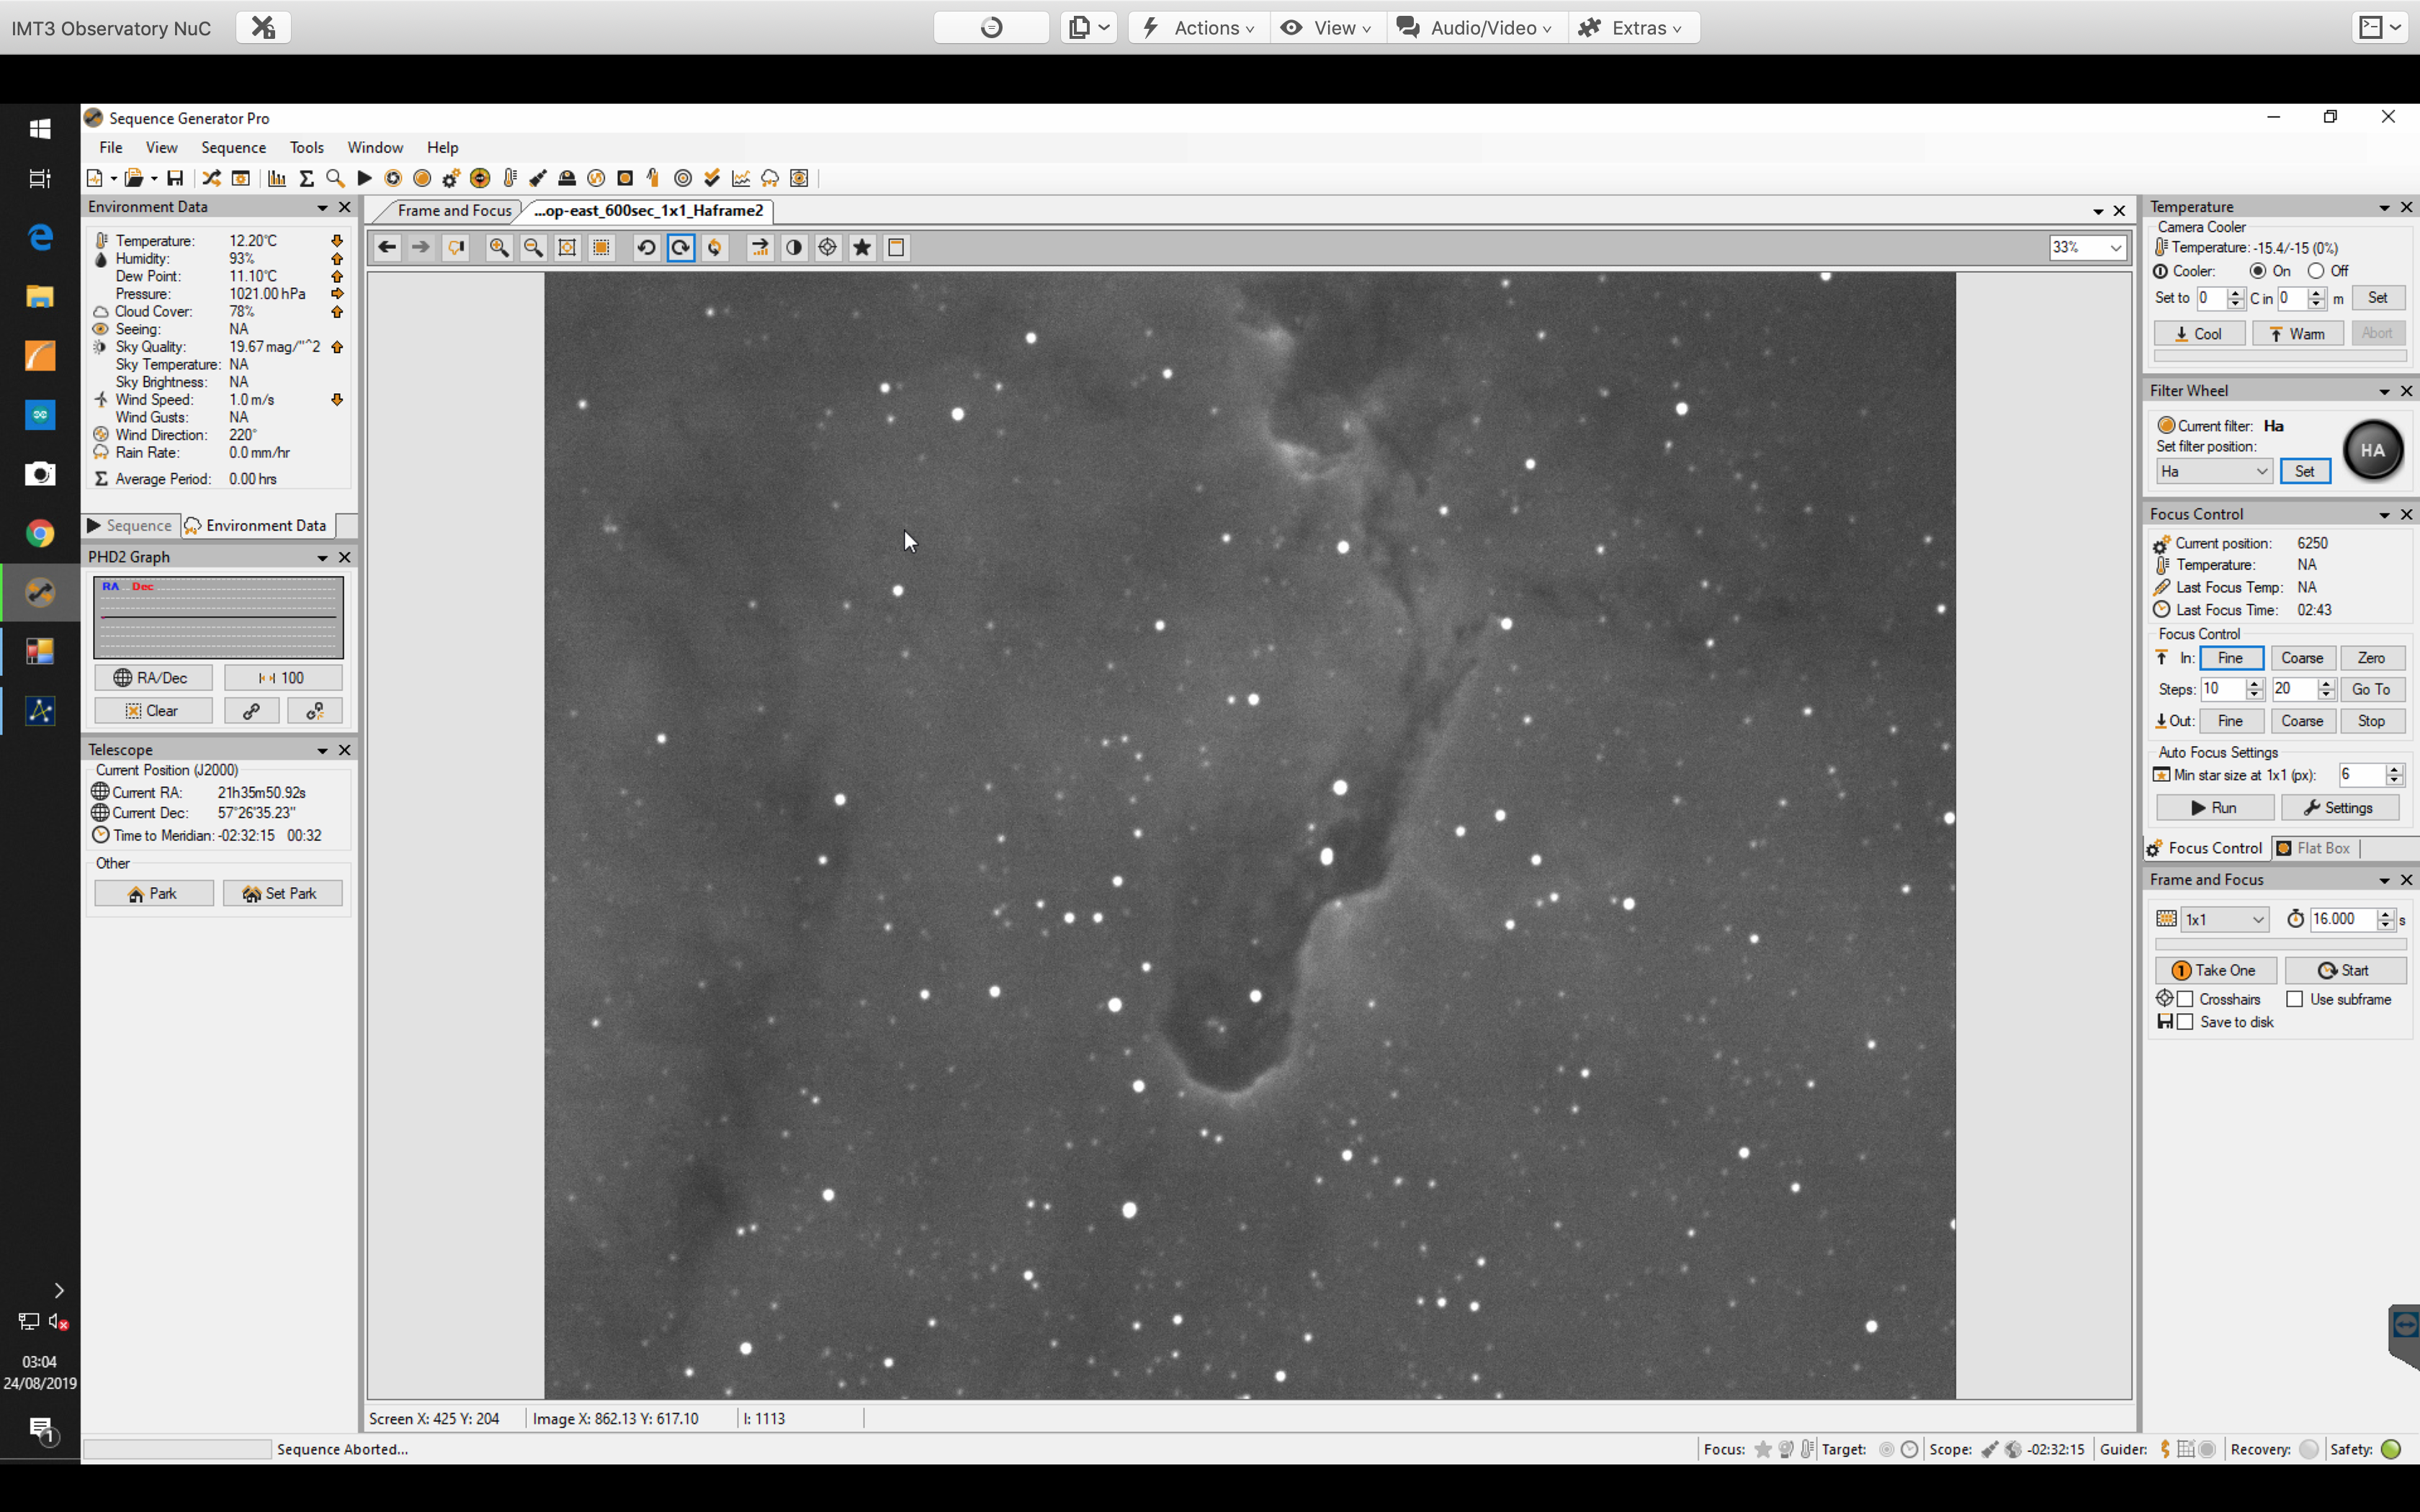
Single 5 min sub stretched in PI
Learning’s for next time……….
Update the SGPro Equipment profile with the changes for step size and data points for autofocus
Make sure the local plate solver is working and online at localhost
Review Anydesk bug that changes mapping of keyboard
Check out why WSX is loosing connection and shutting the dome
Work out how to use temperature compensation for the focuser in SGPro
Flats from the following day at the same focus point
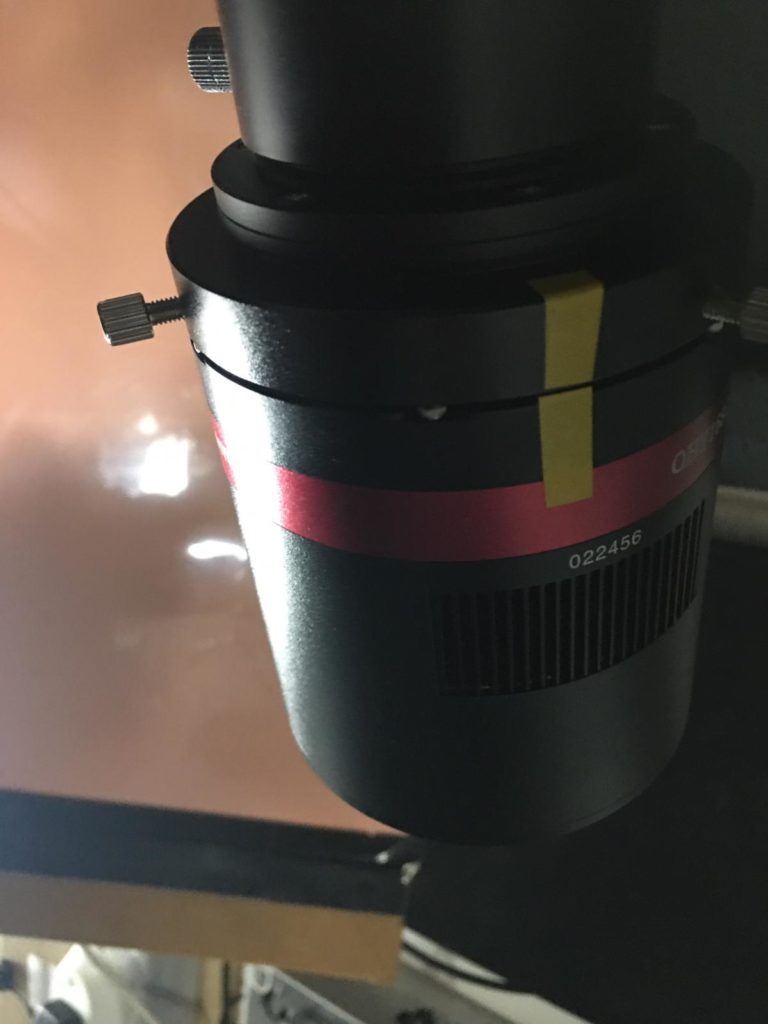
Bob had noticed a lot of dirt on or near the sensor on the QHY168C camera that forms part of the imaging train on the Tak FS102. Today I took the camera off for a little spring clean.
The first thing was to mark the rotation angle of the camera so that it goes back on exactly. 21 degrees is the rotation angle as measured through an actual image.
Taping up position angle on QHY camera
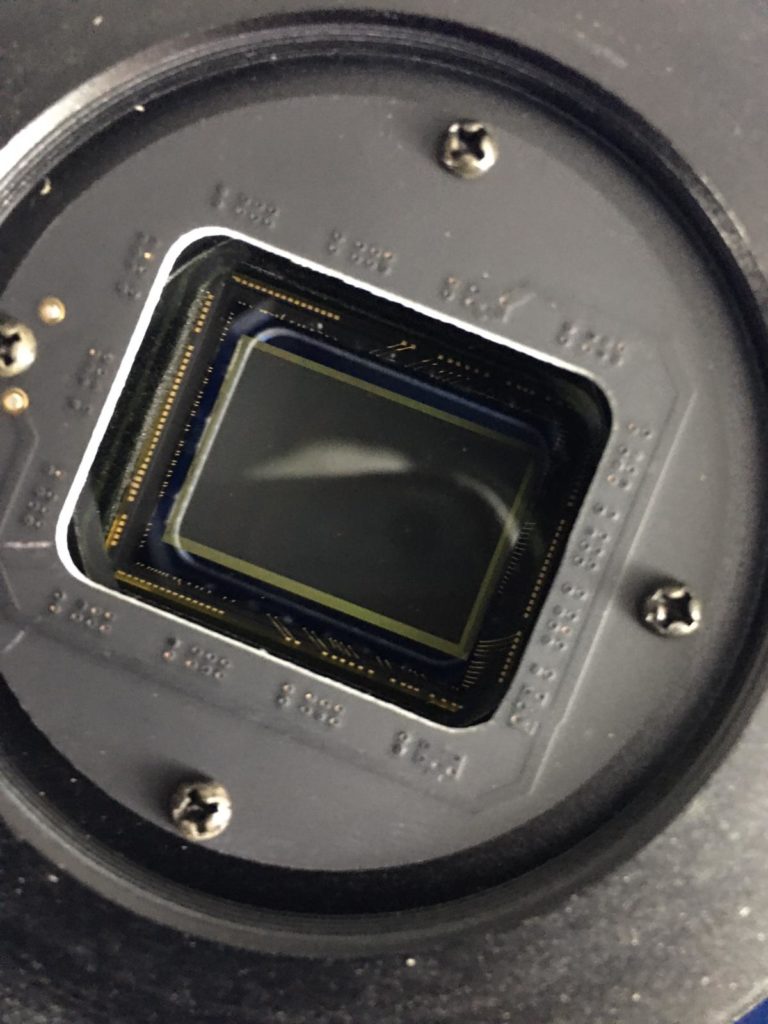
Next I took the camera off loosing the 3 screws holding it in position and then took a look at the CMOS chop glass cover for dirt.
Inspecting QHY168C for dirt on glass cover
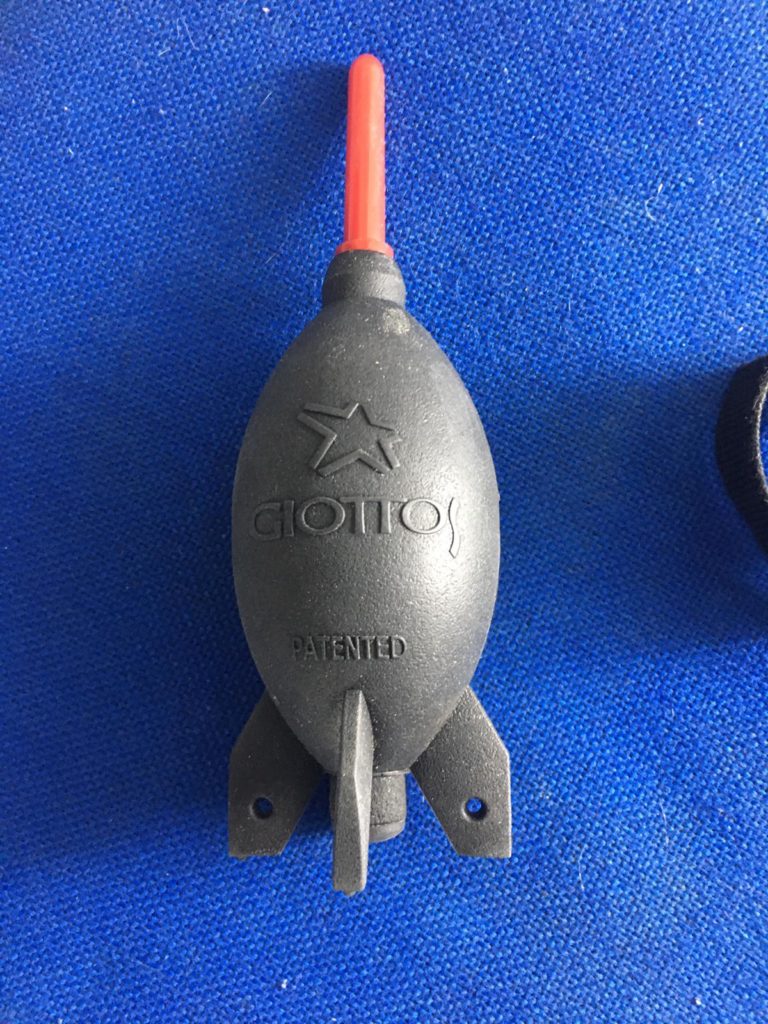
There was really only a couple of pieces of dirt on the cover so I removed them with the blower.
Rocket blower
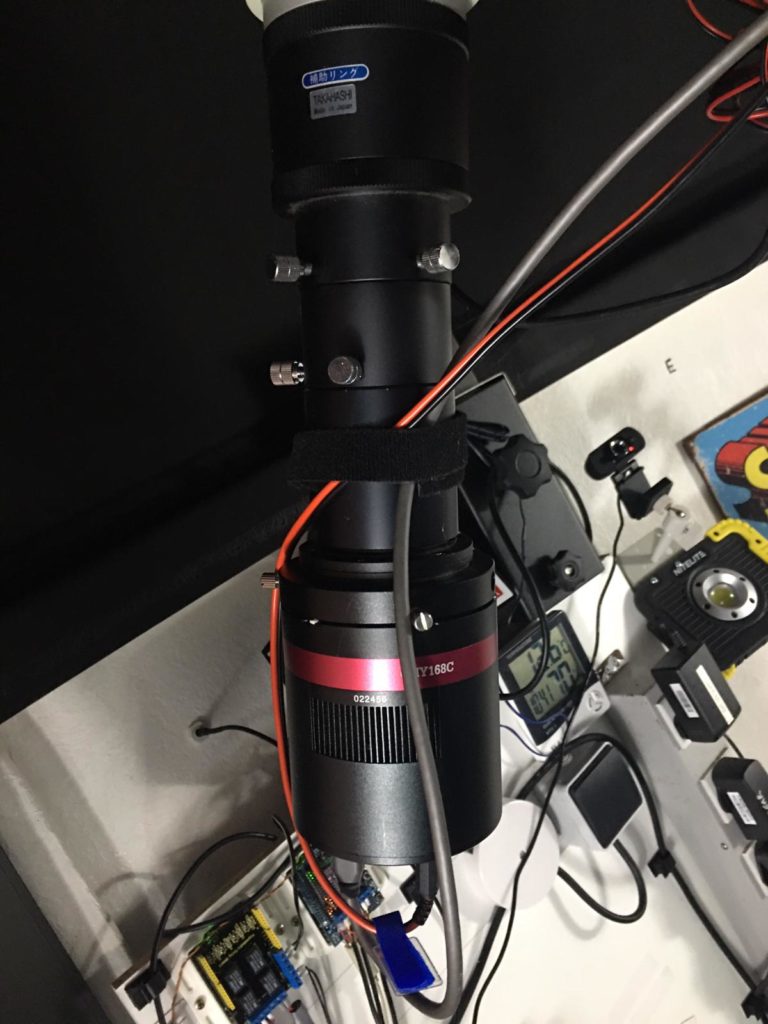
Next I took off the extension tube with which has the glass UV lens inside. At this point I forgot to mark up the position angle when I took the extension tube off. So when I reattached I look at the image train photo to adjust. Hopefully it will be very close and will only require minor adjustment.
Tak FS102 QHY168C imaging train
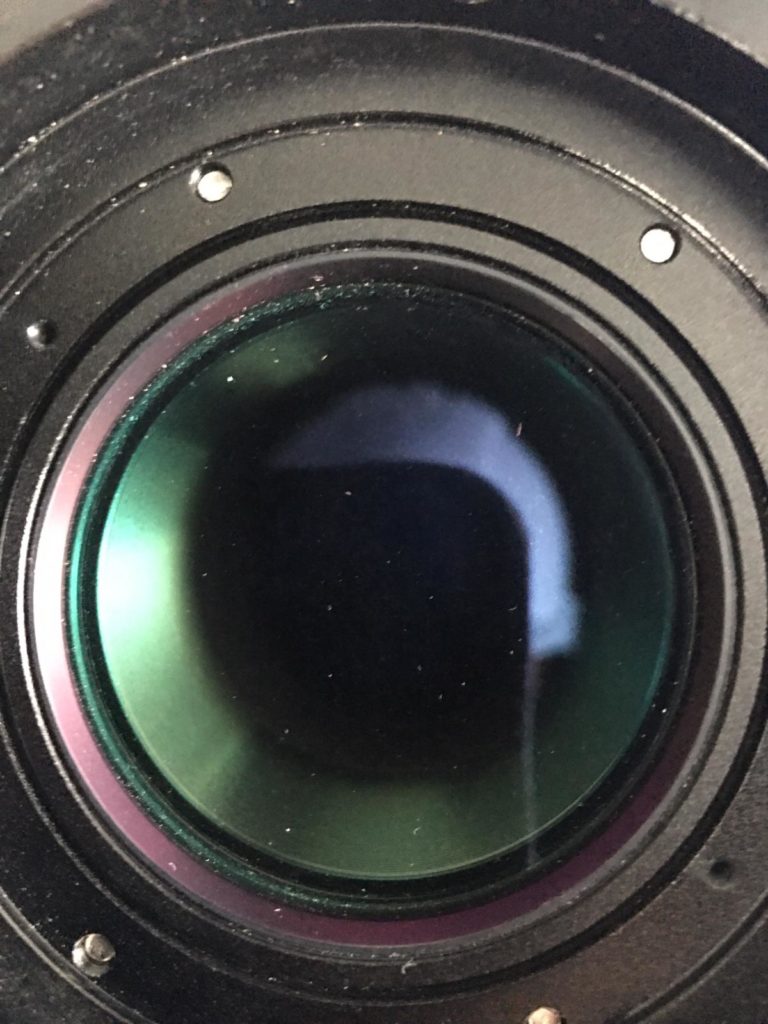
Looking at the UV filter it was instantly visible that there was plenty of dirt and dirt on the glass lens, however it transpired to be on the inside of the lens toward the OTA. O removed the filter to clean with the rocket blower.
UV glass filter dirt and dust
I then reattached the filter, the camera and reset the angle. I followed up by feeling for any play in the Tak OTA bracket that piggy backs it on the OS12″ OTA. I could not feel any. I was checking due to a shift on the FoV when Bob was recently imaging. Again the next time out we will need to readjust.
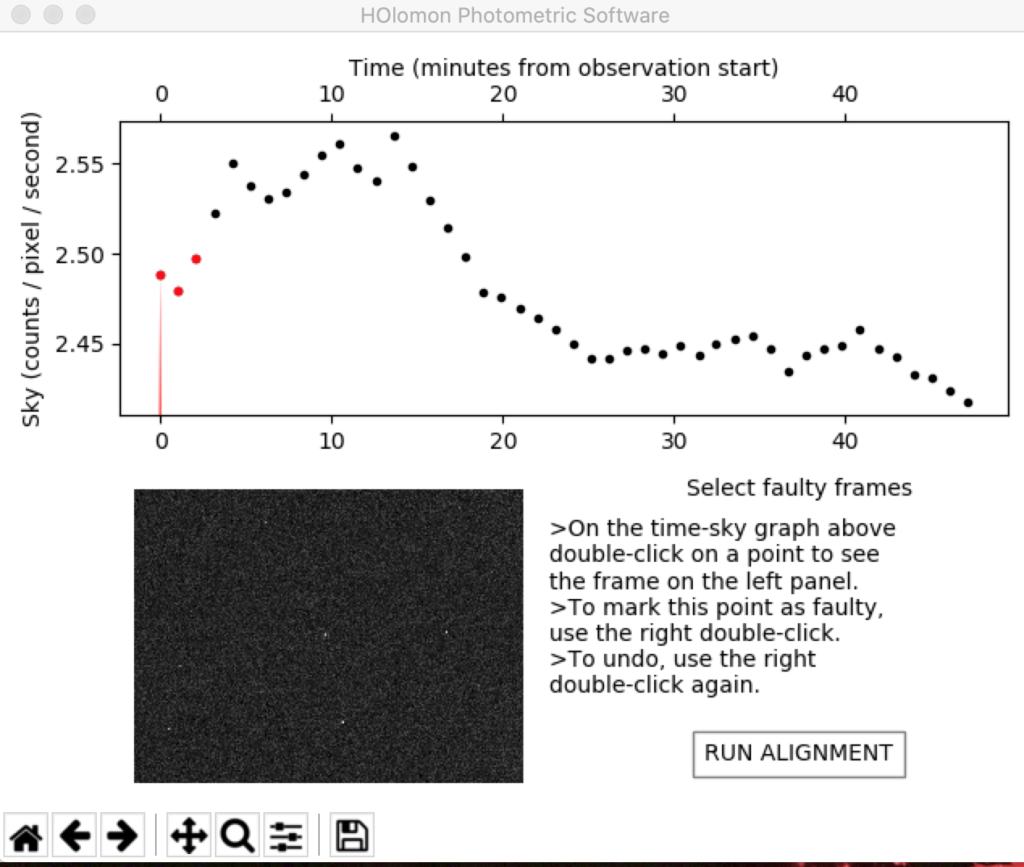
I managed to get only 45 minutes worth of data the other night to test if I could both acquire data and then process it. It took some time to get the downloaded HOPS software from the ExoClock mission working on my Mac, but with the help of Angelos from the project. So I opened the 46 images, I did not capture darks or flats and of course no bias due to it being a CMOS camera. I added information about the observatory and then ran the reduction and alignment code.
Completion of details and opening of 46 images
So the initial chart looked promising, I had taken the first set of frames almost on time for the transit even though you are supposed to start 1 hour before. This was because it took me so long to setup. So the data looks like it shows a decrease in brightness over the 45mins, however I have asked Angelos for his opinion and await a response.
Output from clicking Run Reduction
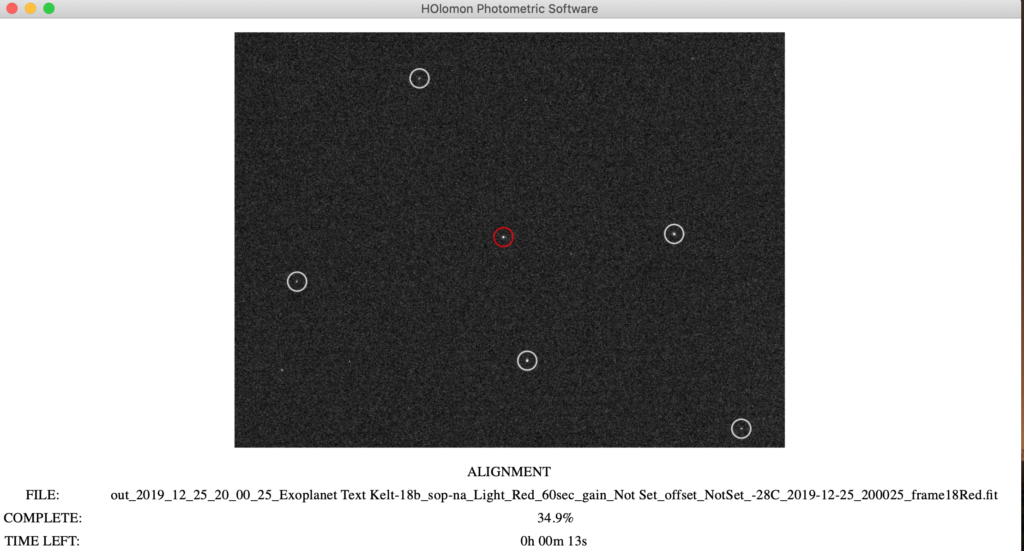
I then selected the target star, KELT-18 with the red circle below, along with 5 comparison stars. I may have selected stars incorrectly here as they are probably suppose to be not variable.
Alignment and comparison star window
The resulting table appeared with the size of the box for each star and its position.
Resulting target and comparison stars
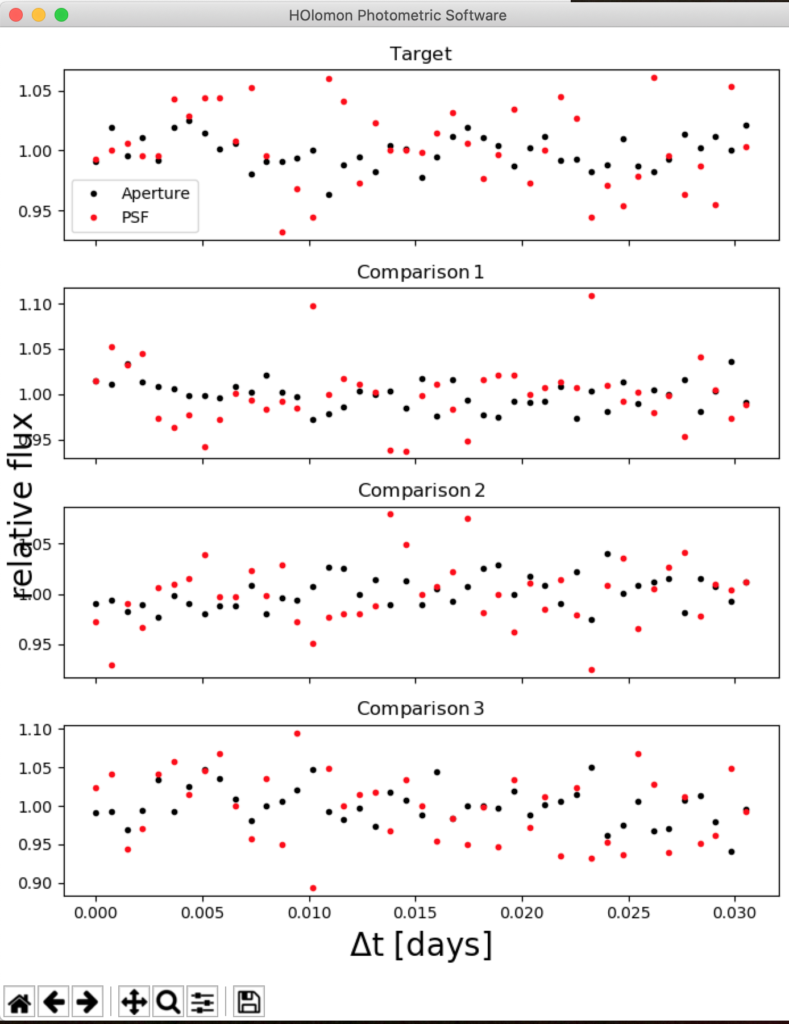
I then ran the photometry code and the following chart was created which to me showed I had done something wrong given the scatter.
Graph output with actual photometric values and PSF in red
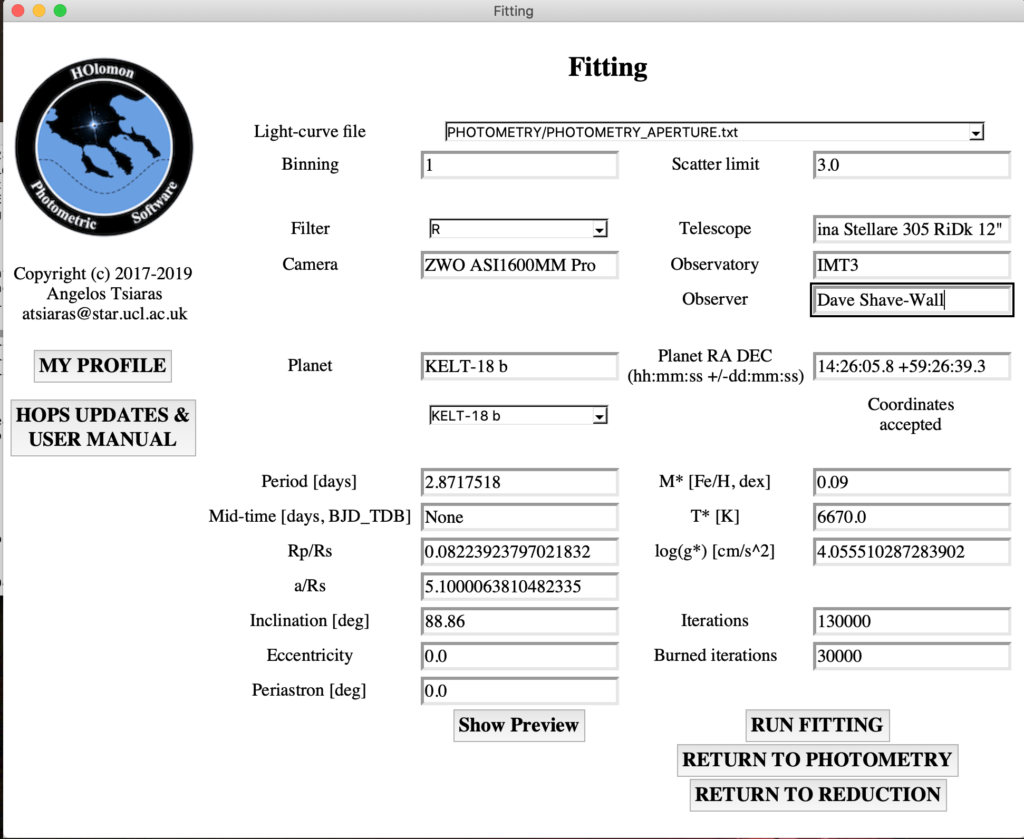
I then for fun ran the fitting code from this screen.
Information for Fitting
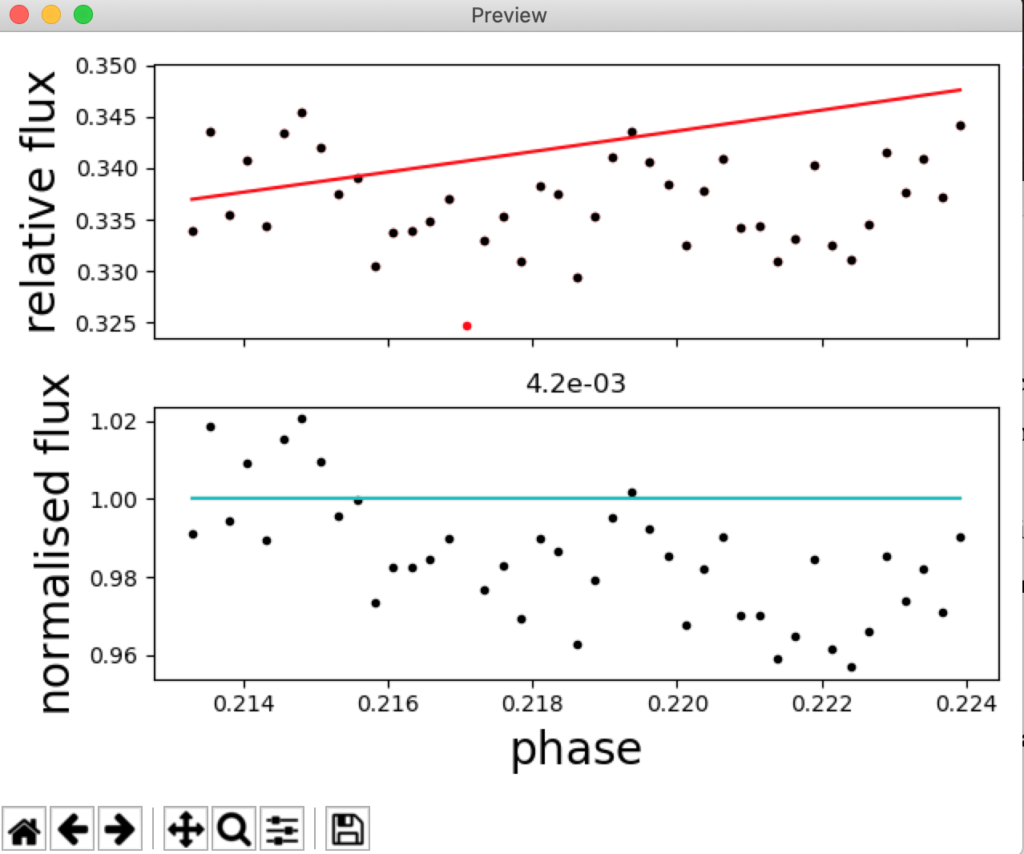
The fitting showed and increase in brightness which was clearly incorrect. So I have learned a few things with this, first is to read up on using the software for analysis, second is to gain more data and calibration frames.
Resulting output clearly showing problems with data
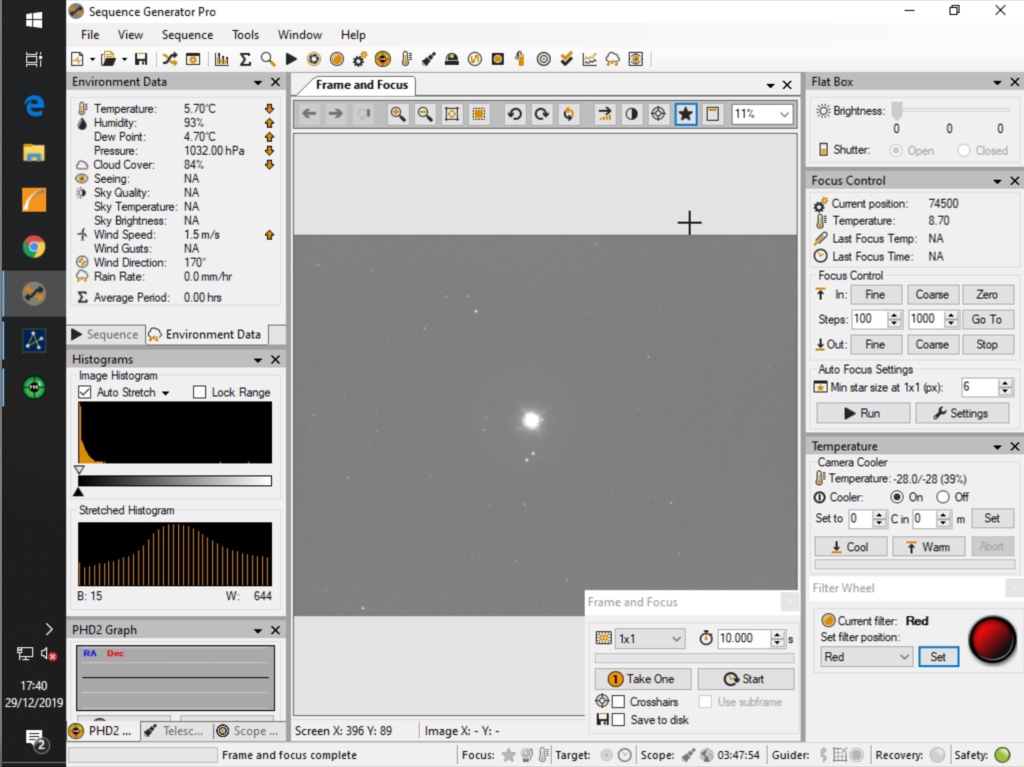
Slightly hazy right now but I have opened the dome up and turned the cooling fans on the 12″. Slewed to Atik, a mag 2.8 star in Perseus and aligned the scope.
Atik mag 2.8 star in Perseus for alignment
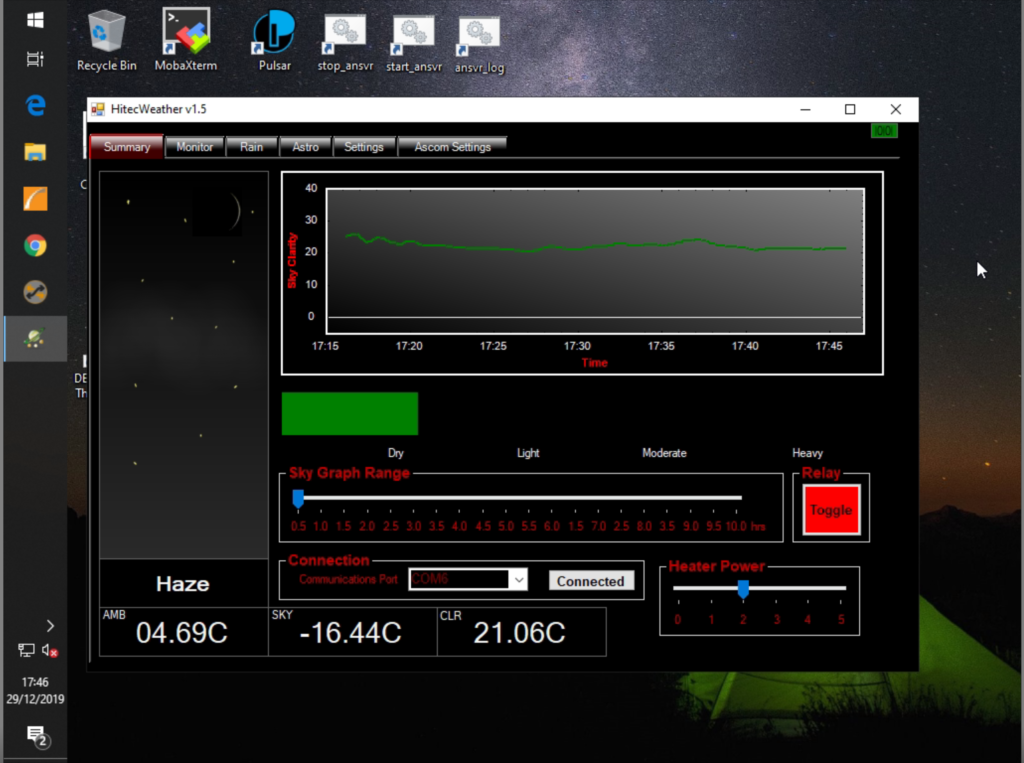
So the star was almost in the centre when I slewed the scope to it, a slight tweak and now synced on it centrally. The Hitec Astro weather station reports slight haze
Hitec Astro Weather Station showing haze
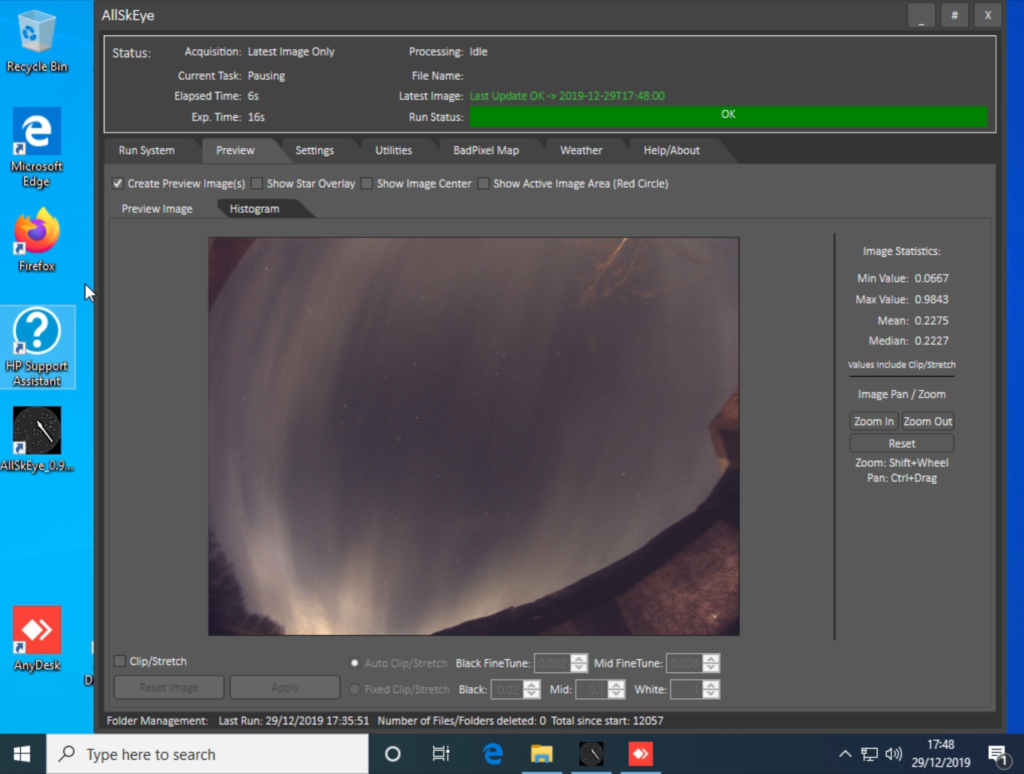
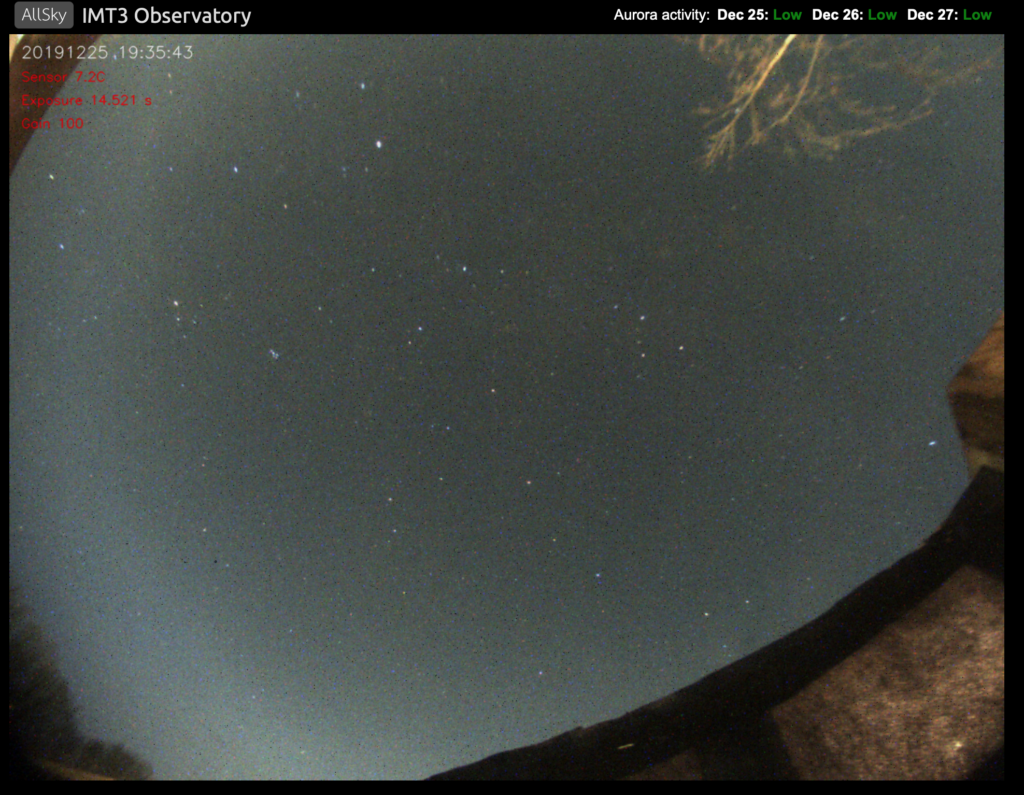
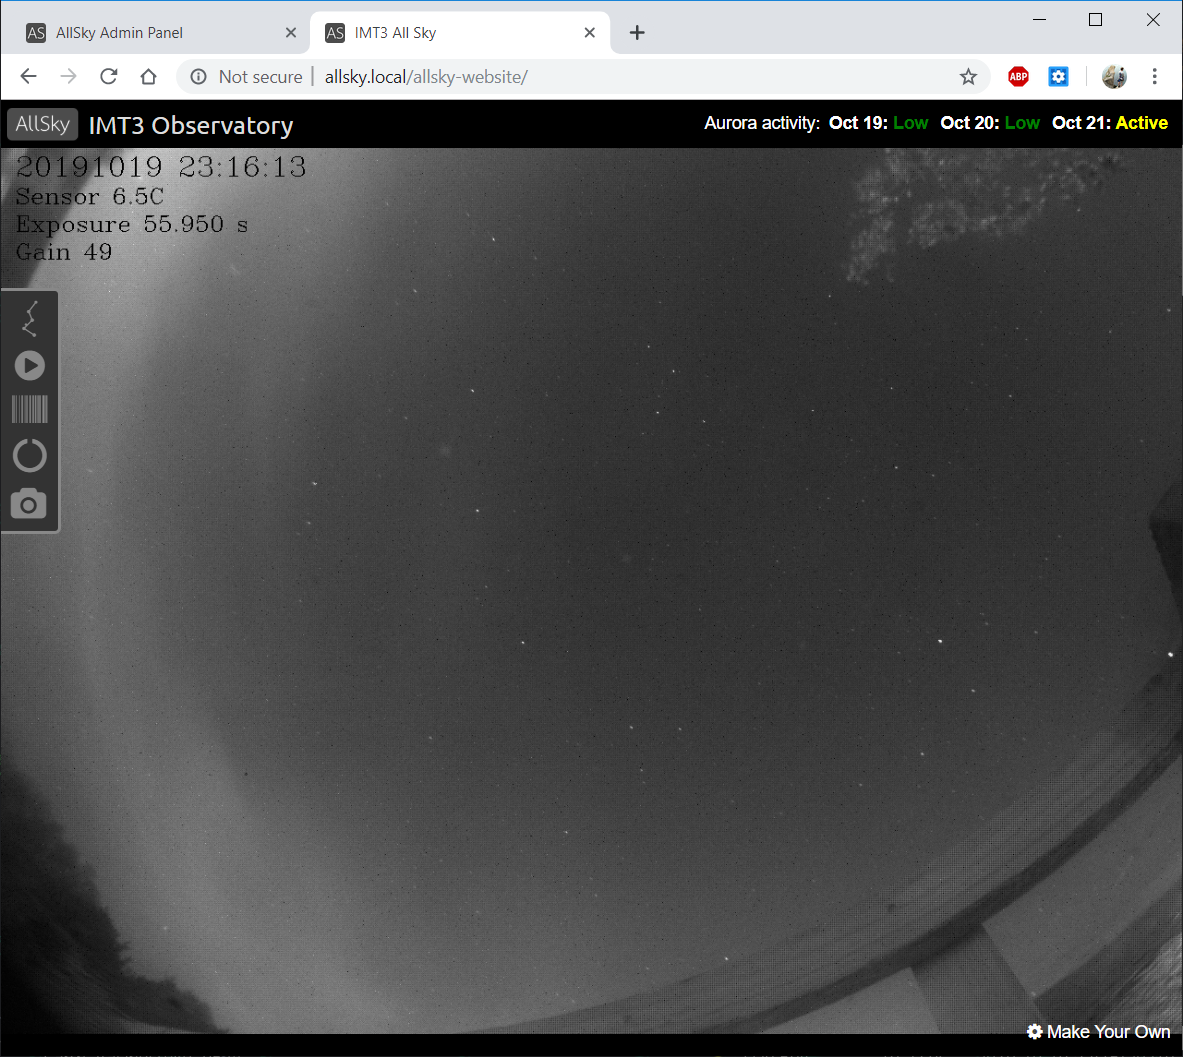
Gingergeek installed a new Intel Windows small form factor computer recently in replacement for the RPi so we could run the AllSkEye software and see if the loss of one of the colour channels was software or hardware. Here is tonights image, which still needs colour calibrating during the day.
As always on Christmas Day, or at least it seems so, the sky was clear for a period of time before the clouds rolled in. The day was dry and cold, sunny and bright, the first time in over a month of rain. Now was the time to take a look at a star and see if I could calibrate my setup for imaging an exoplanet transit.
All Sky Camera
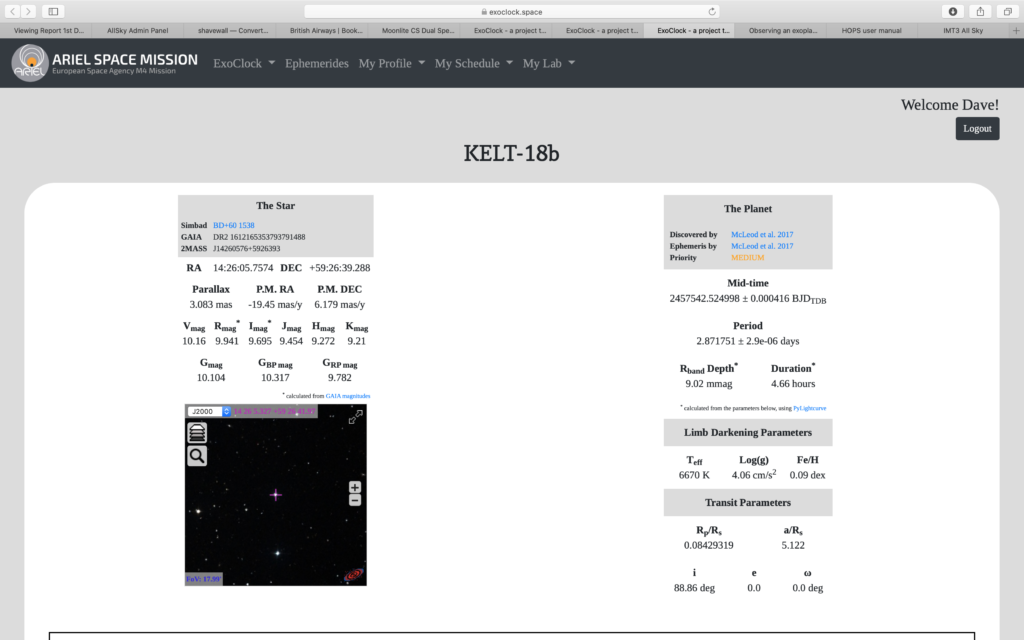
I used the exoclock.space website to find objects for my location and then entered the RA and DEC into The Sky X (TSX) and slewed to it. The star and its associated planet tonight was KELT-18 and the planet KELT-18b. This was very low to the North when I slewed and I struggled doing a slew and sync with the scope in TSX due to not enough stars found.
Exoplanet Target List from Exoclock.com
So instead I placed the RA and DEC into SGPro and asked that to perform a slew and solve, which incidentally worked an absolute treat. The star was centred in the middle of the FoV and the star pattern matched that from the Exoclock website which they give you.
Kelt-18b details including interactive star map
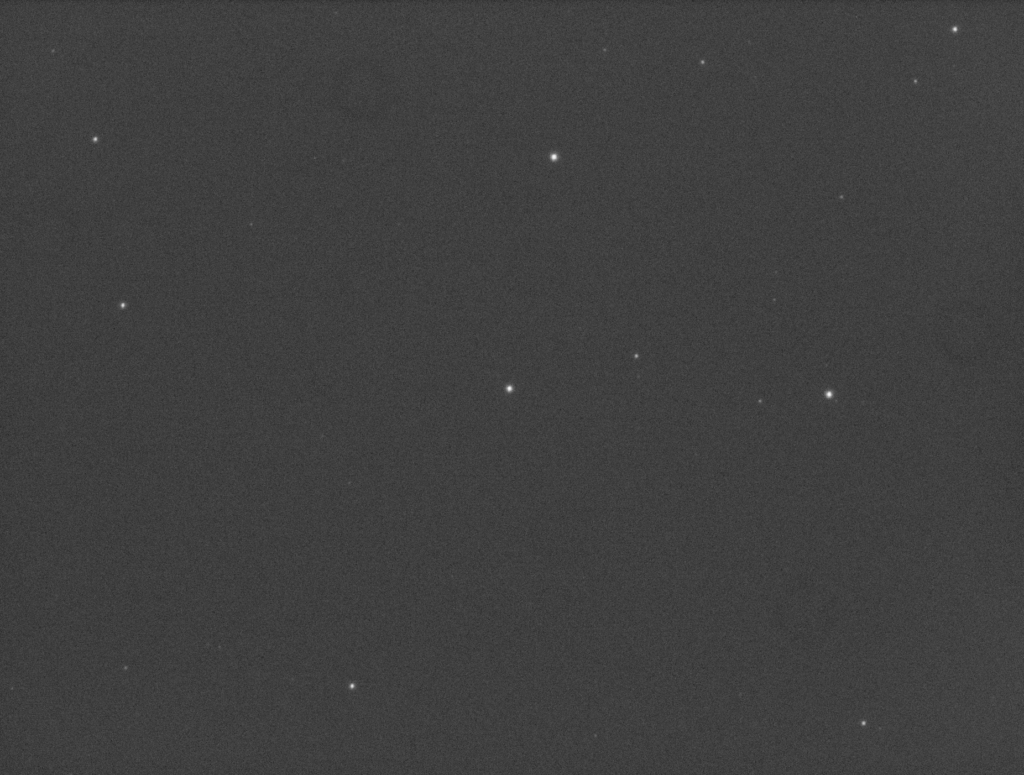
I then setup SGPro to take as many images as I could, each being 1min long as I could not find a guide star. At 1min I did not get any trailing and I should have said, all of this through the 12″. I set the cooler to -28℃ which consumed about 26% power so nicely cold. I choose the red filter as described to lower the amount of noise in the image and allow calibration with other astronomers images.
Resulting image
I had to change the user profile to the Comet profile as I did not wan the guider trying to settle, so restarted the run and was off. I managed to go for around an hour and thus grabbed 46 images. I am not sure if I can use the HOPS software from Exoclock to plot these but will try. I did not bother with calibration frames and if needed I can grab some later.
SGPro sequence running
Either way, a good hours viewing in-between the outgoing festive cheer from one side of my family and the incoming festive cheer tomorrow from the other.
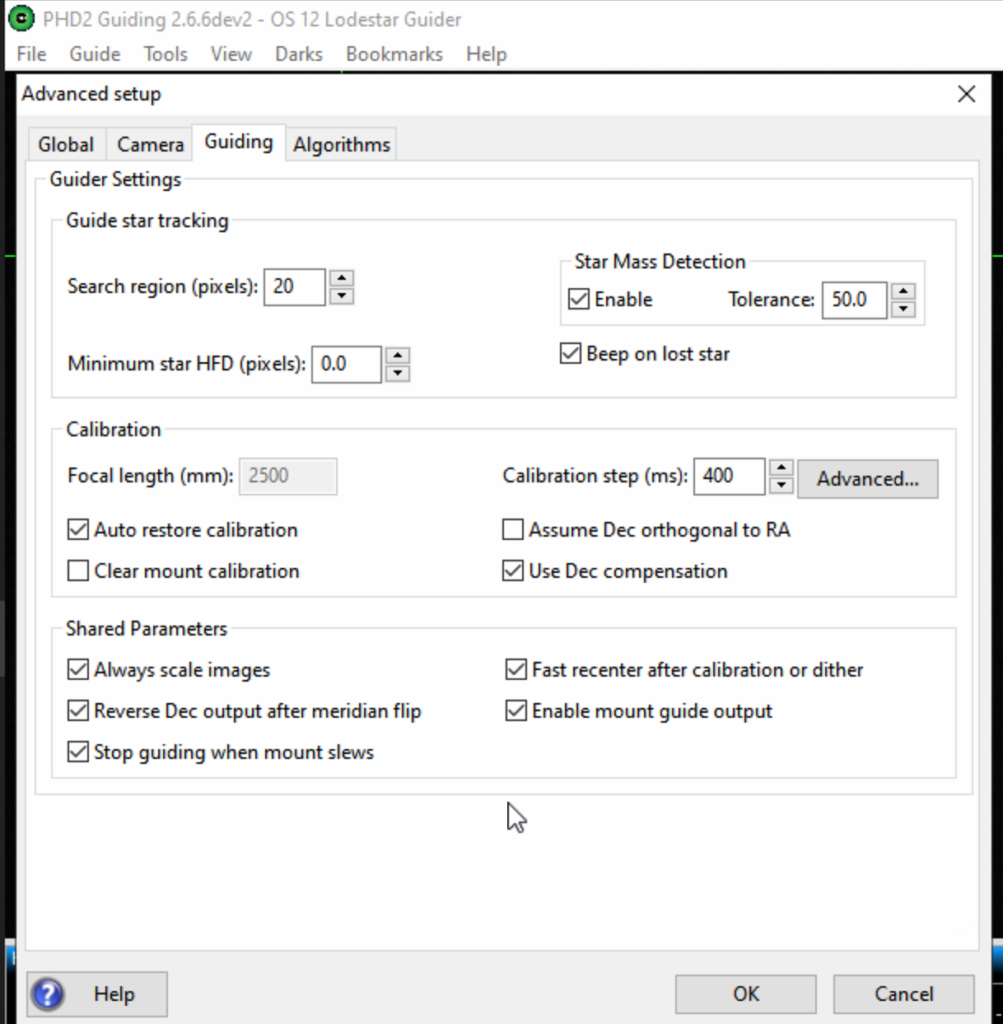
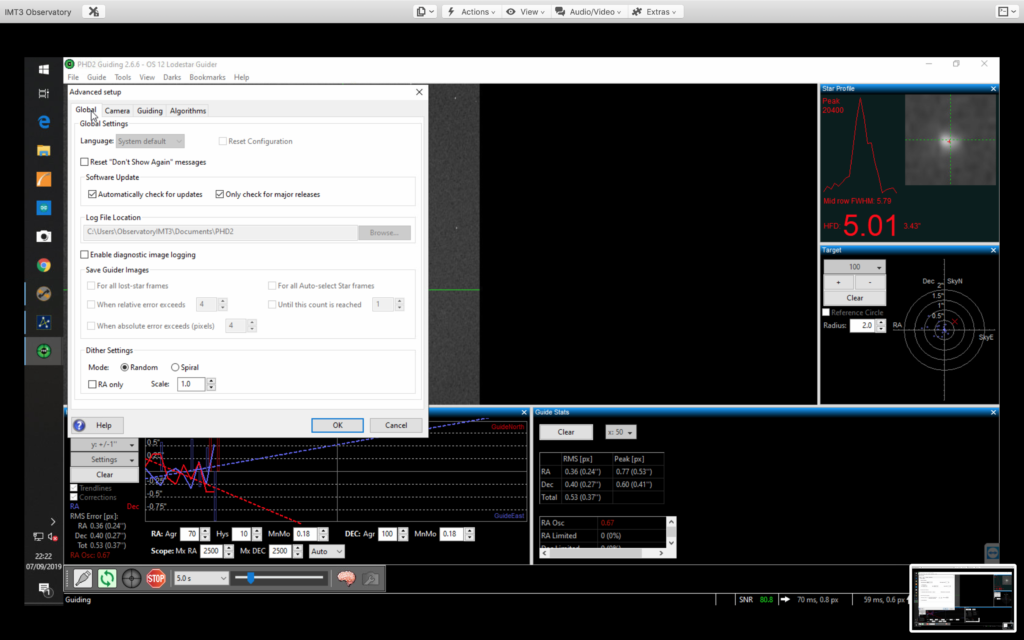
Tonight I wanted to get the PHD2 guiding working when doing a meridian flip without the need to calibrate. A month ago we still failed to get this done, however a little experimenting tonight and changing a single setting has corrected the problem. The setting was the ‘Reverse Dec Outputted After Meridian Flip’ one within the Guiding table of the Advanced Setup, for which I ticked and this fixed the issue.
Reverse DEC output after meridian flip needed ticking!
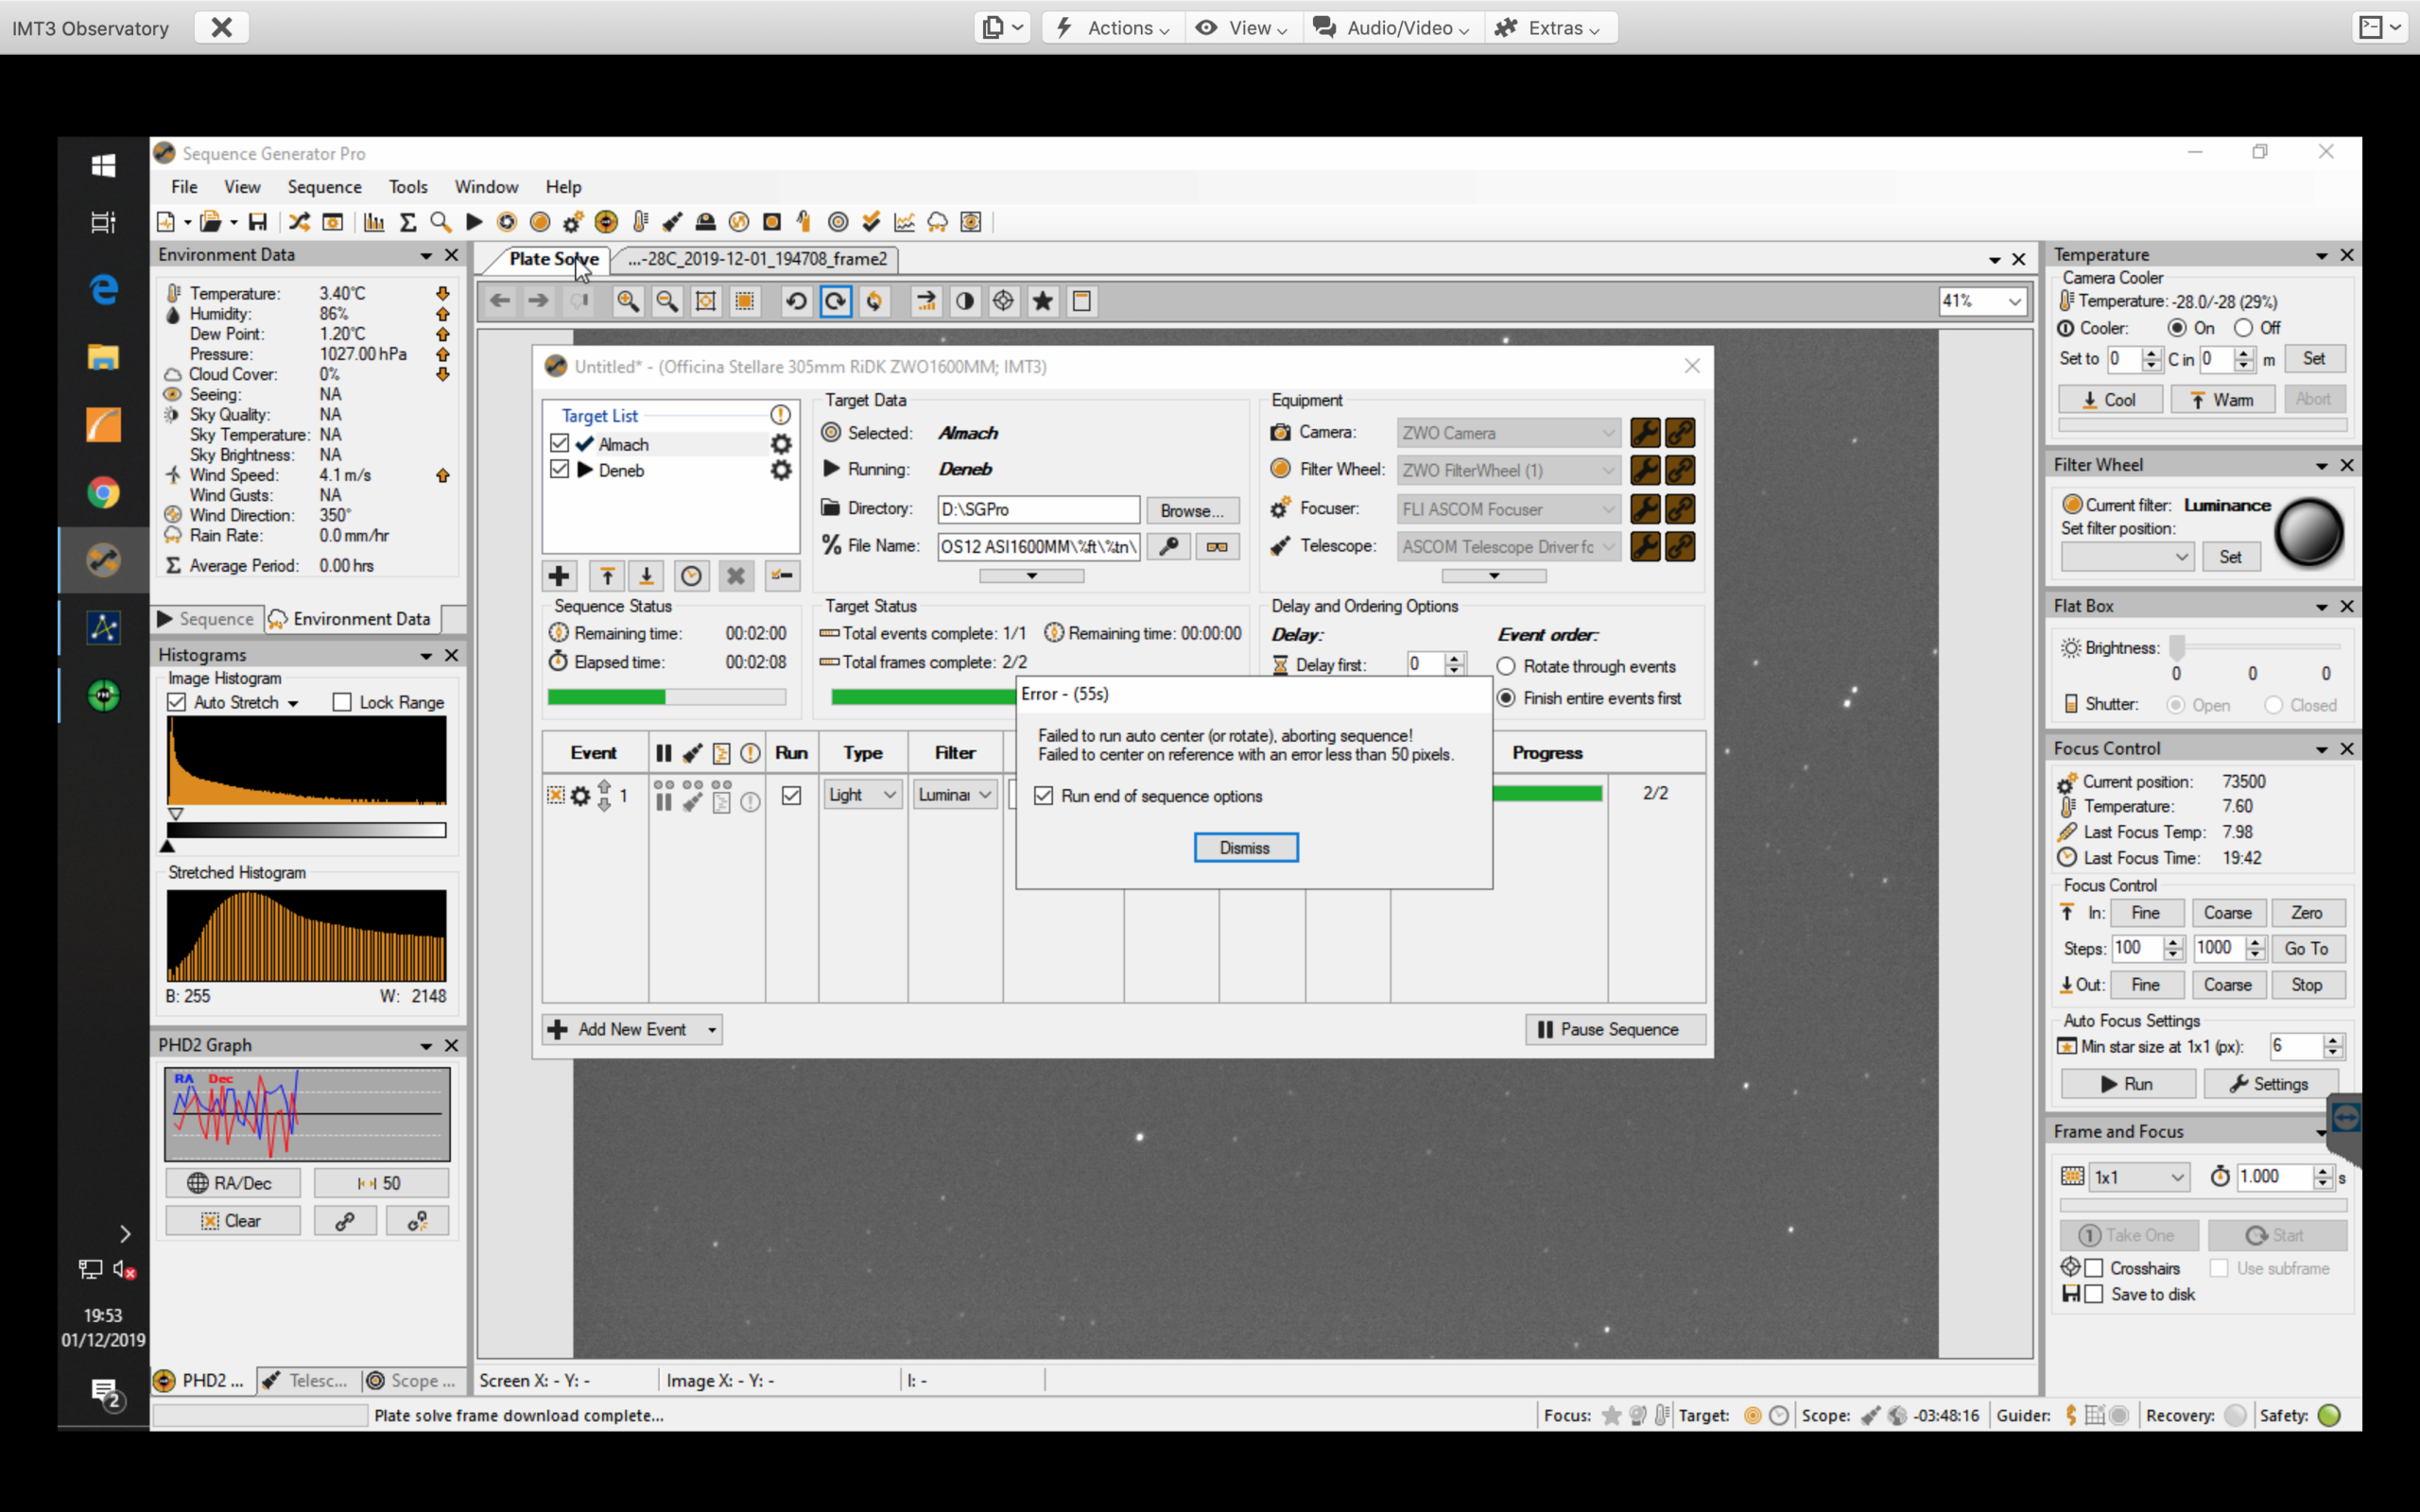
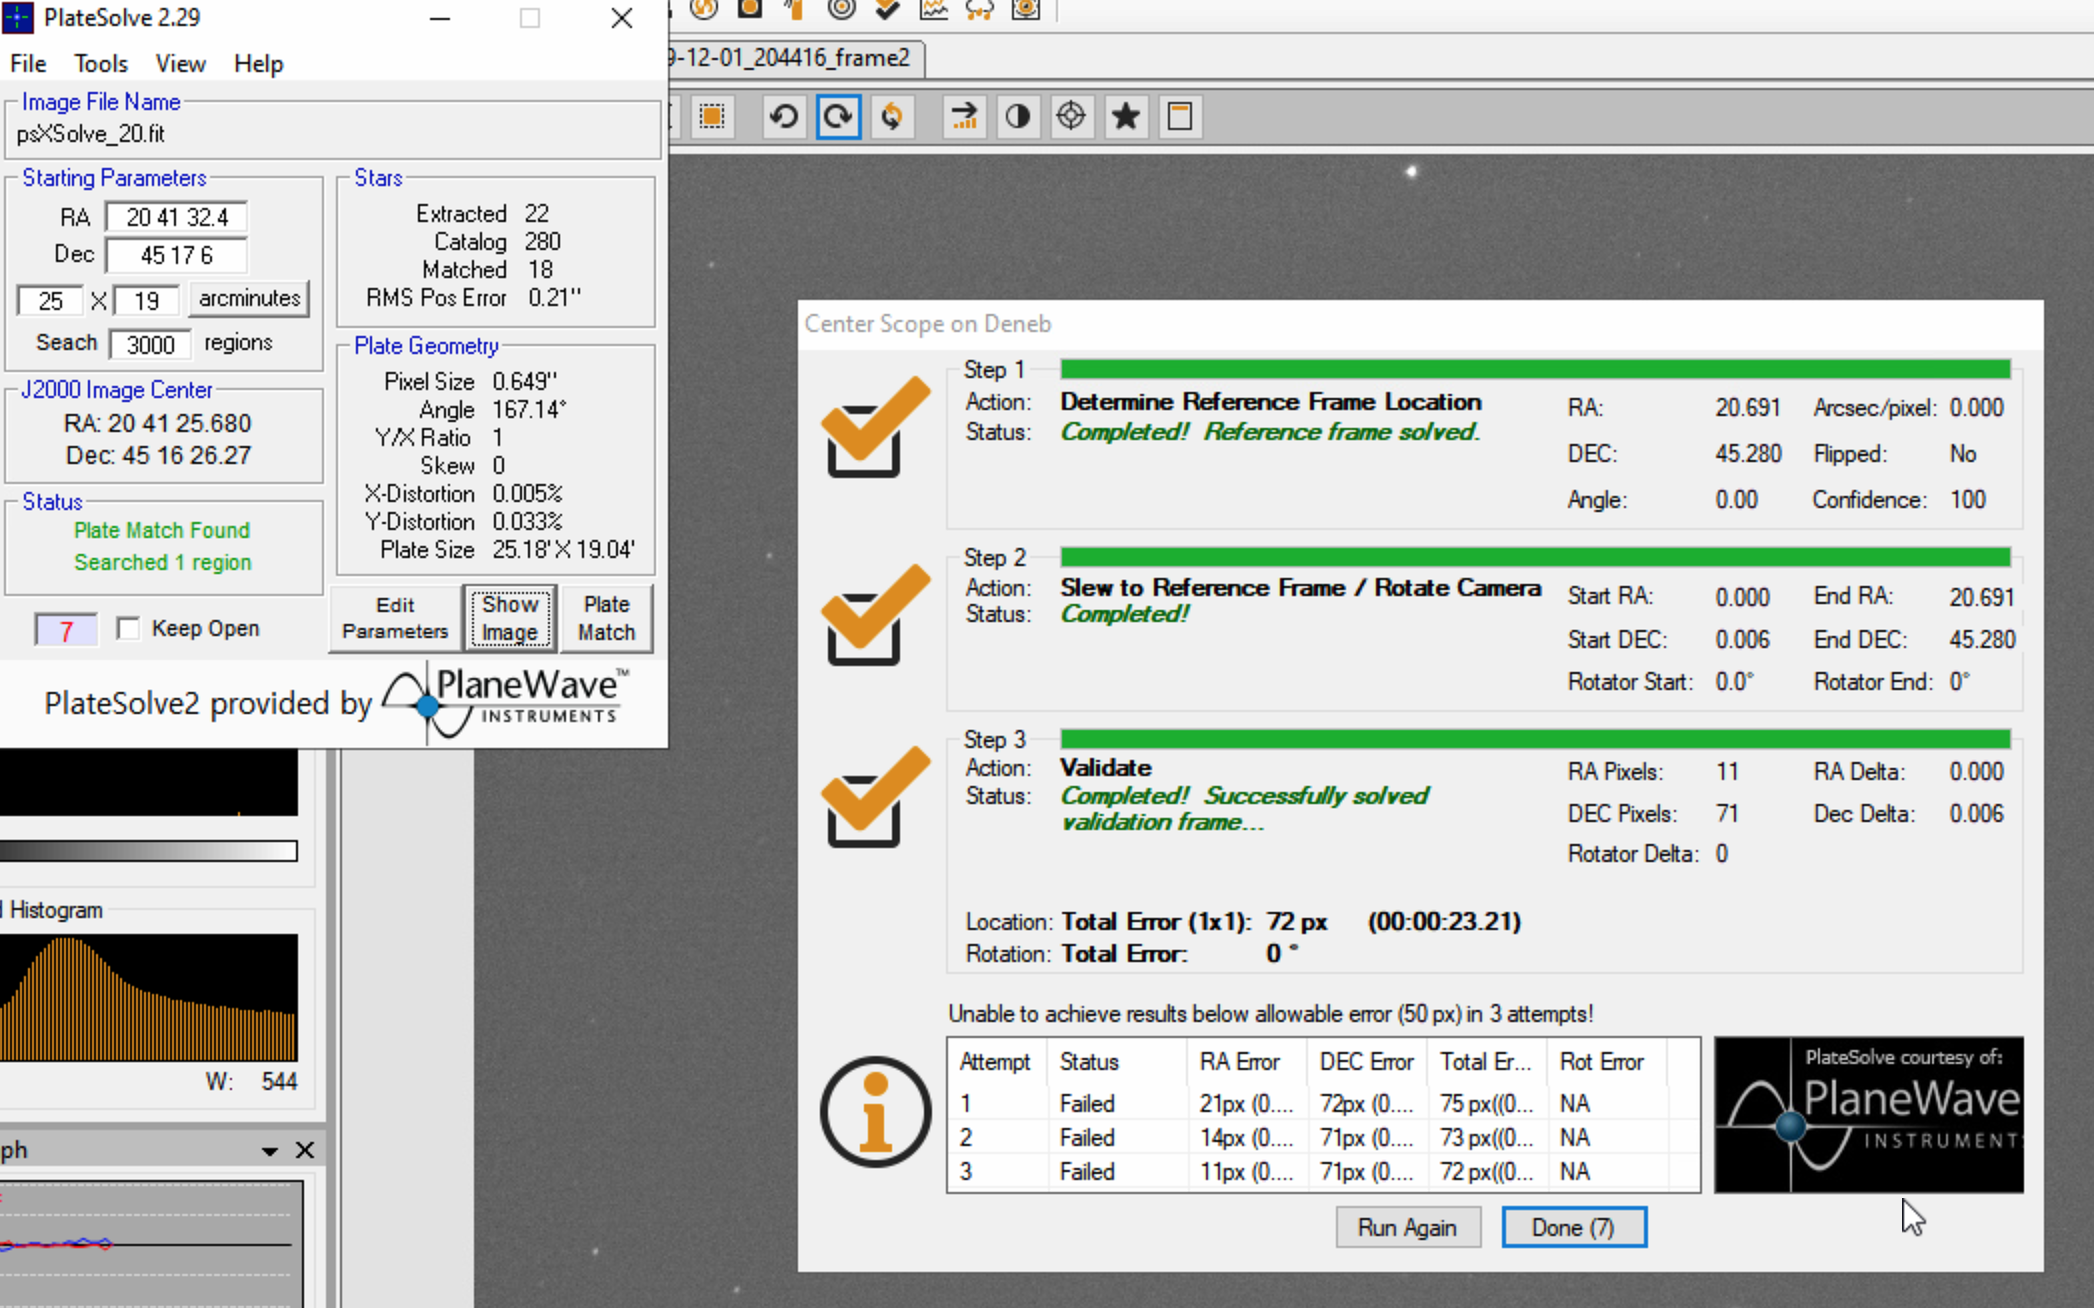
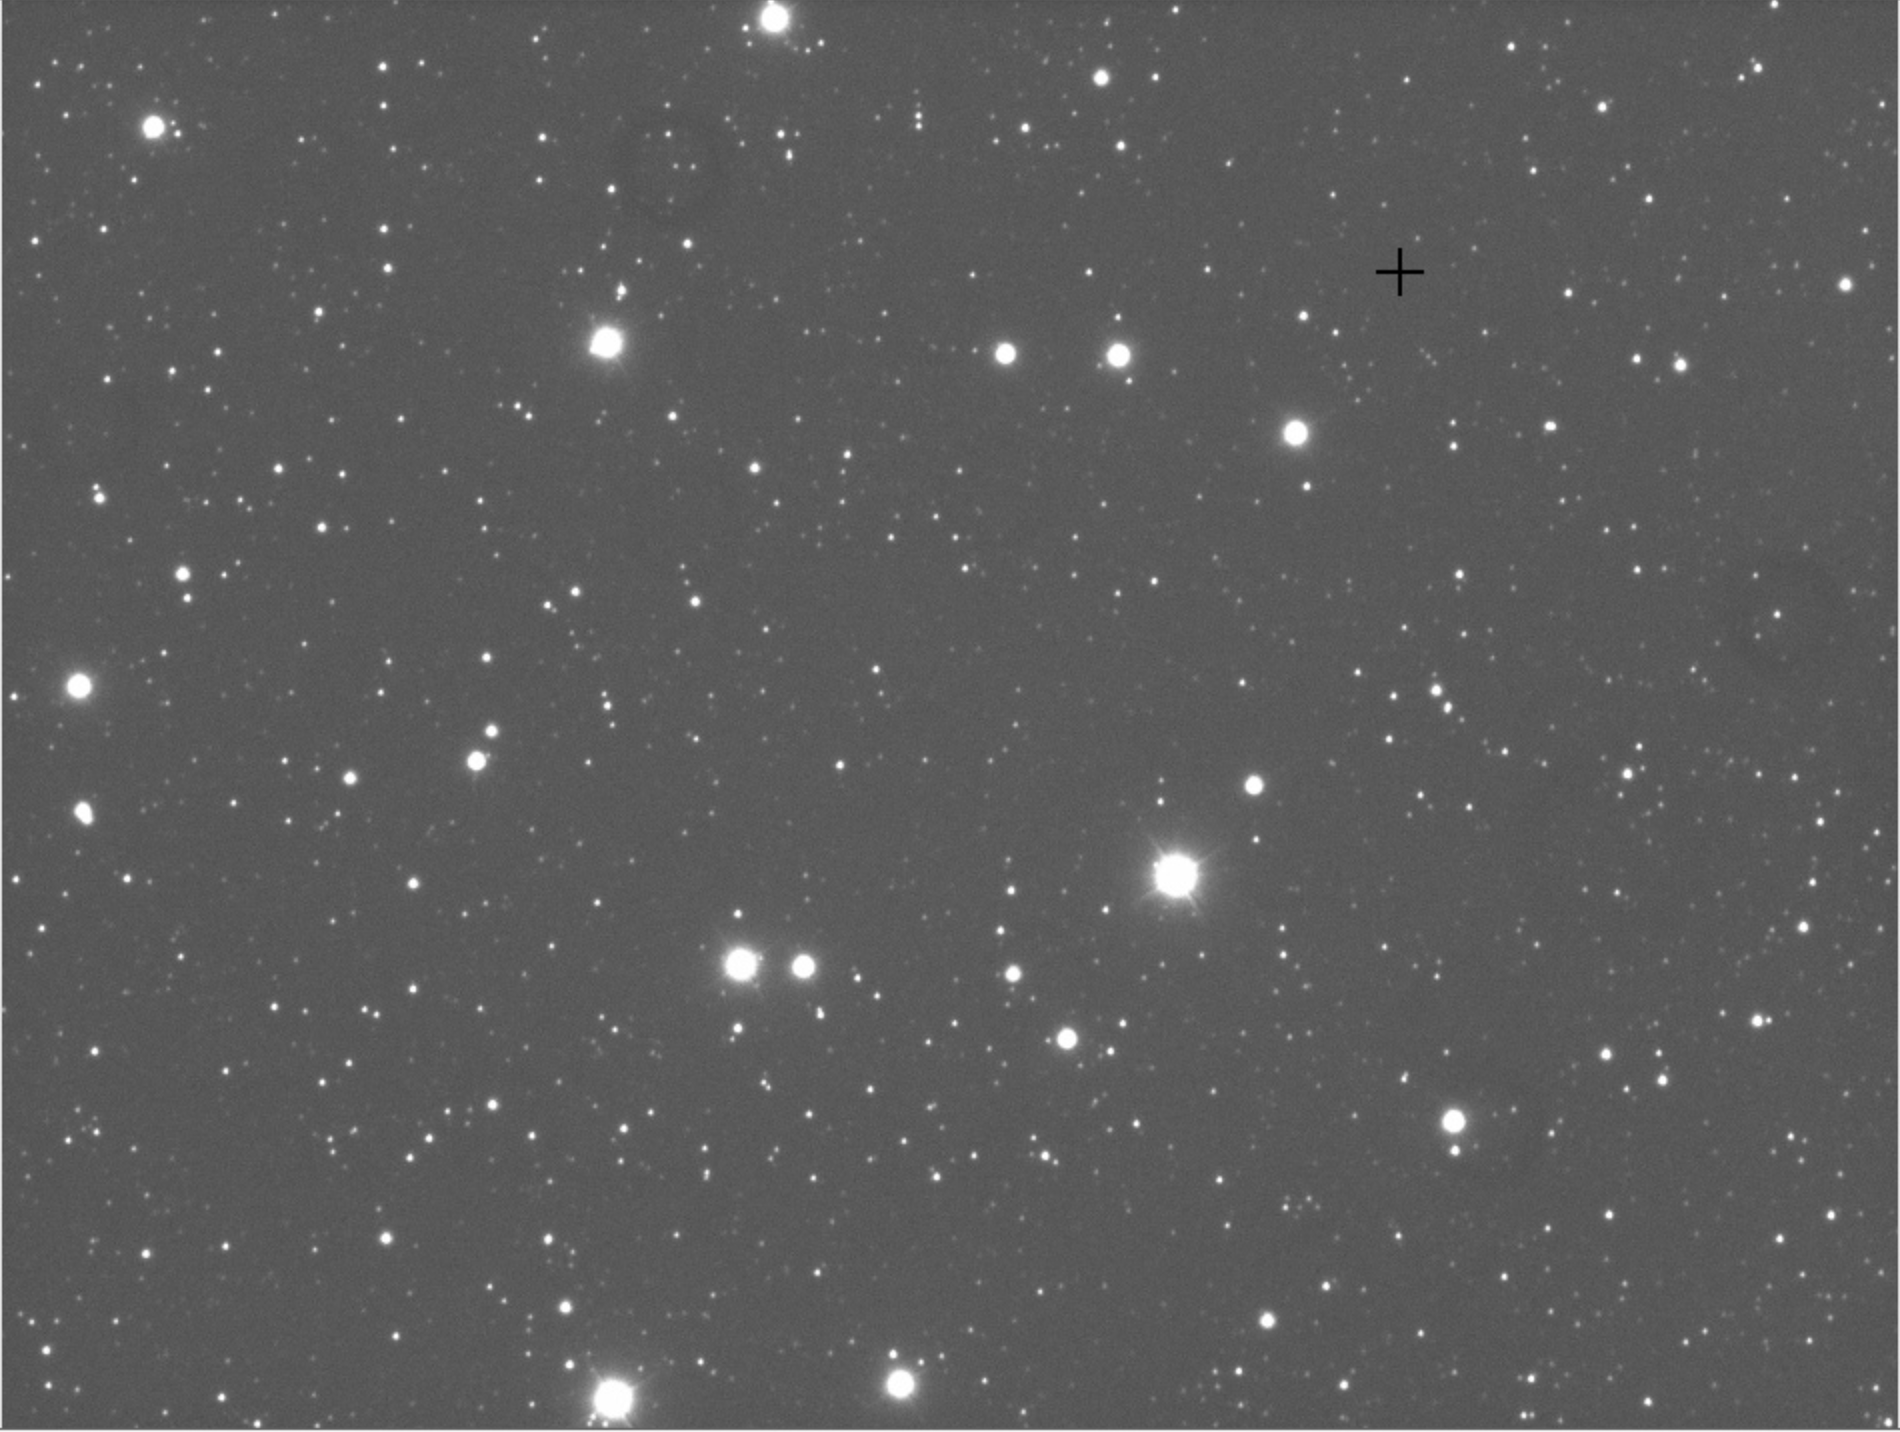
I then decided to try 2 objects either side of the meridian and that worked manually slewing to each and then guiding. What did not work was the slewing automatically to the object in terms of centring on the screen. It slewed to the star, I could see it on the screen, the first object Almach worked ok, but the second object, Deneb appeared on the screen but failed to centre with the error ‘ Failed to auto centre, aborting sequence’ followed by ‘ failed to centre on object with an error less than 50 pixels’. Plate solving works fine, well at least it comes back with success.
Error message failing to centre
So I tried different sets of co-ordinates from TSX including the Topocentric and 2000.0 sets. Neither made a difference, with 2000.0 data used I still got this set of errors which shows an error in pixels of more than 50 in DEC.
DEC Error when centring
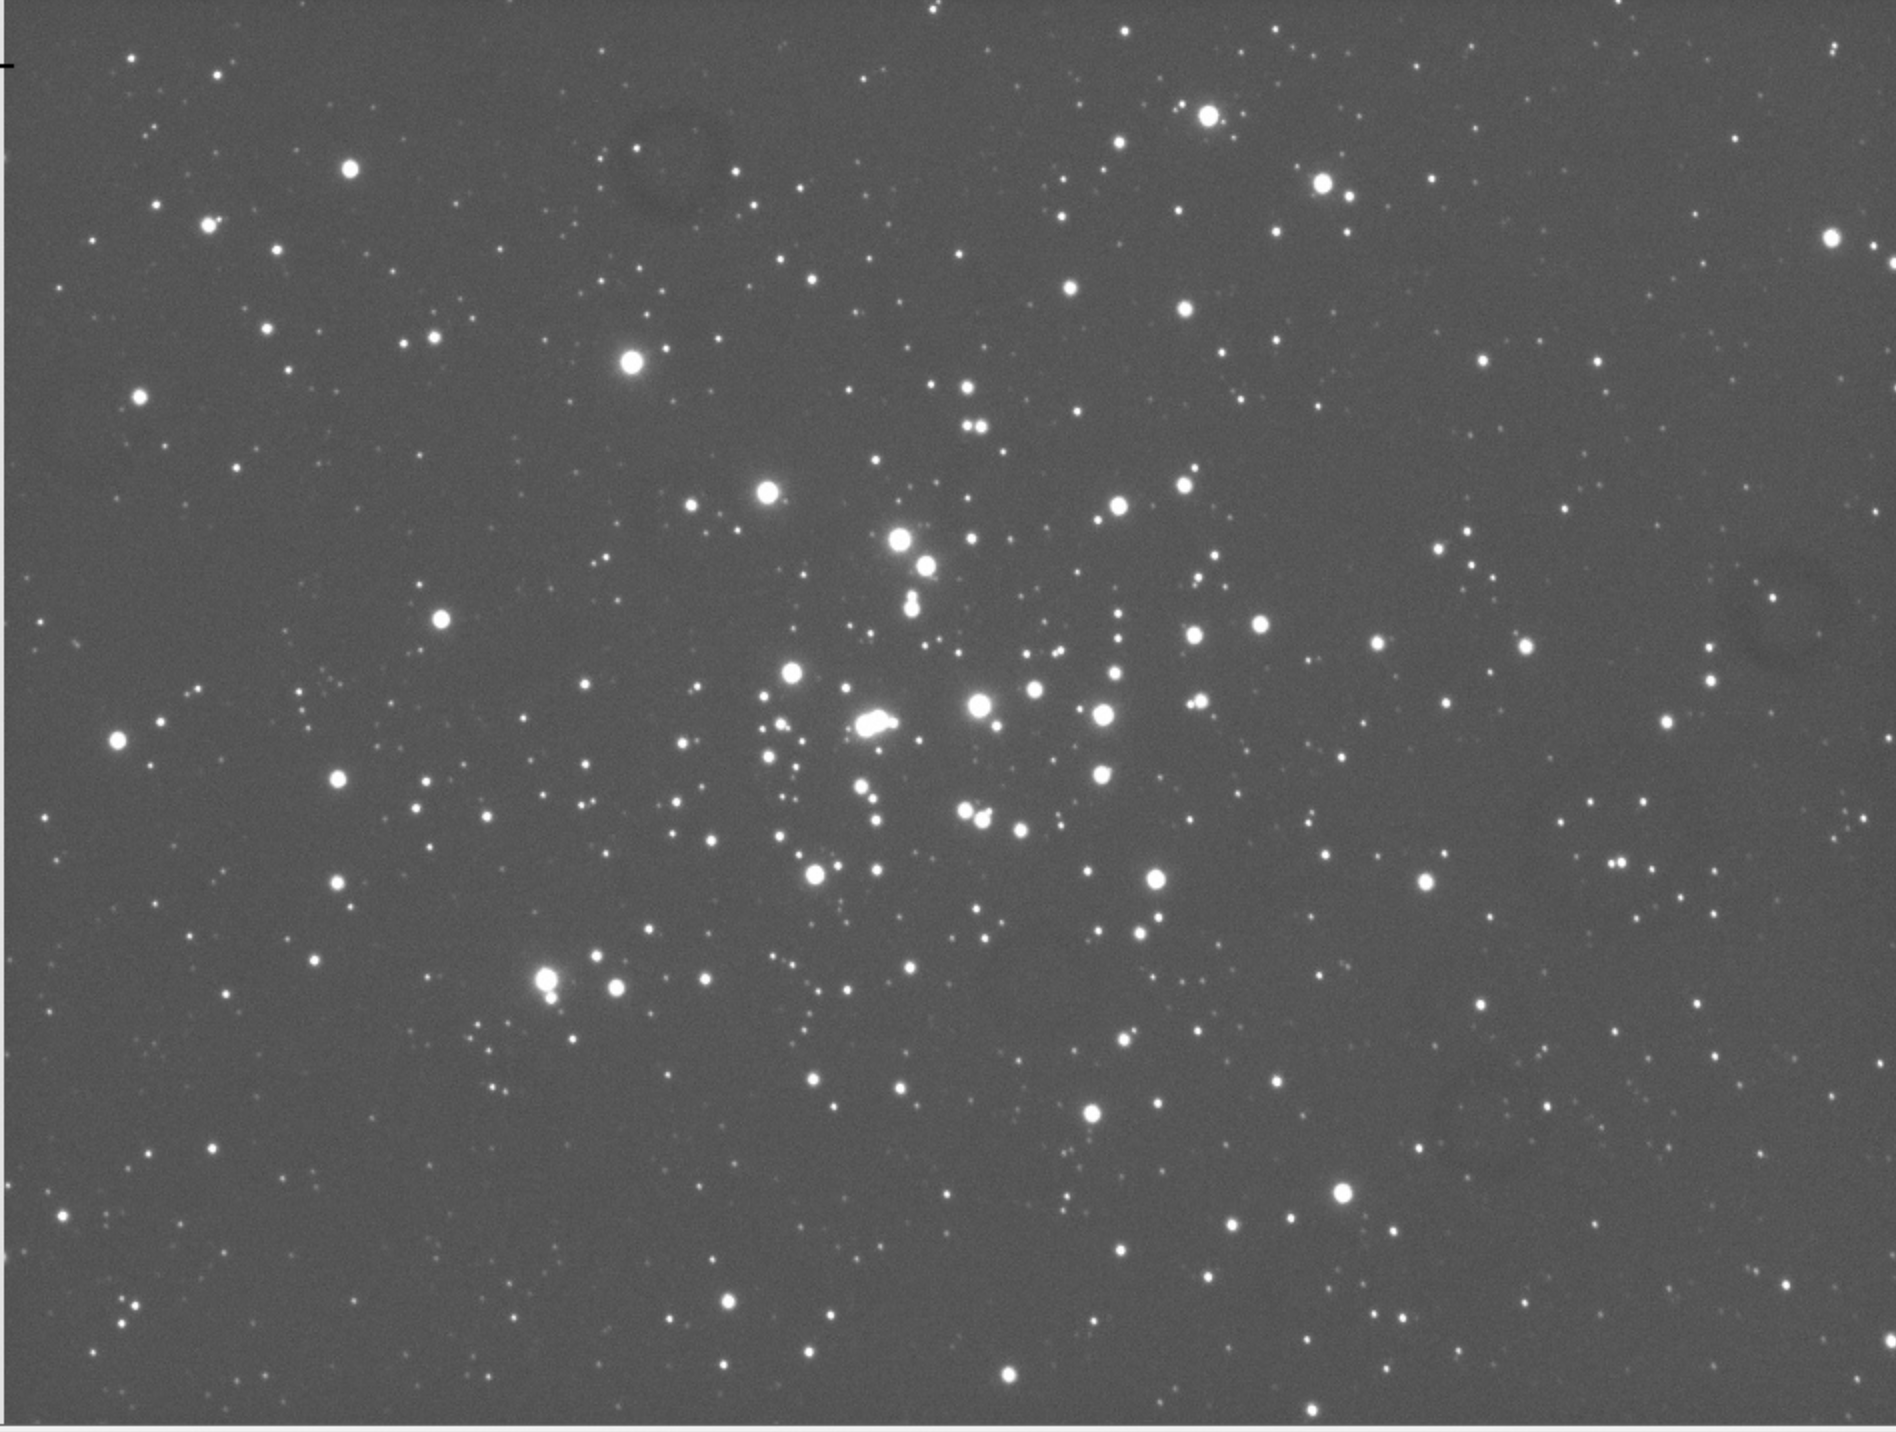
So I decided it might be the very bright object I had picked, star in this case, that was causing the problem. So to further my experimentation this evening I choose two different and less bright objects, M36 and M39, once again on different sides of the Meridian. Success !!
60s uncalibrated guided M39 exposure
So after fixing this I am now happy to go off to bed early (9:30 work tomorrow) with a job well done.
GingerGeek and I tried to sort a few things last night, namely PHD2 guiding on both sides of the mount without any recalibration, automated meridian flip within SGPro, focusing and plate solving. After nearly 2 hours we had not fixed any of these problems. So we need further research/reading to resolve.
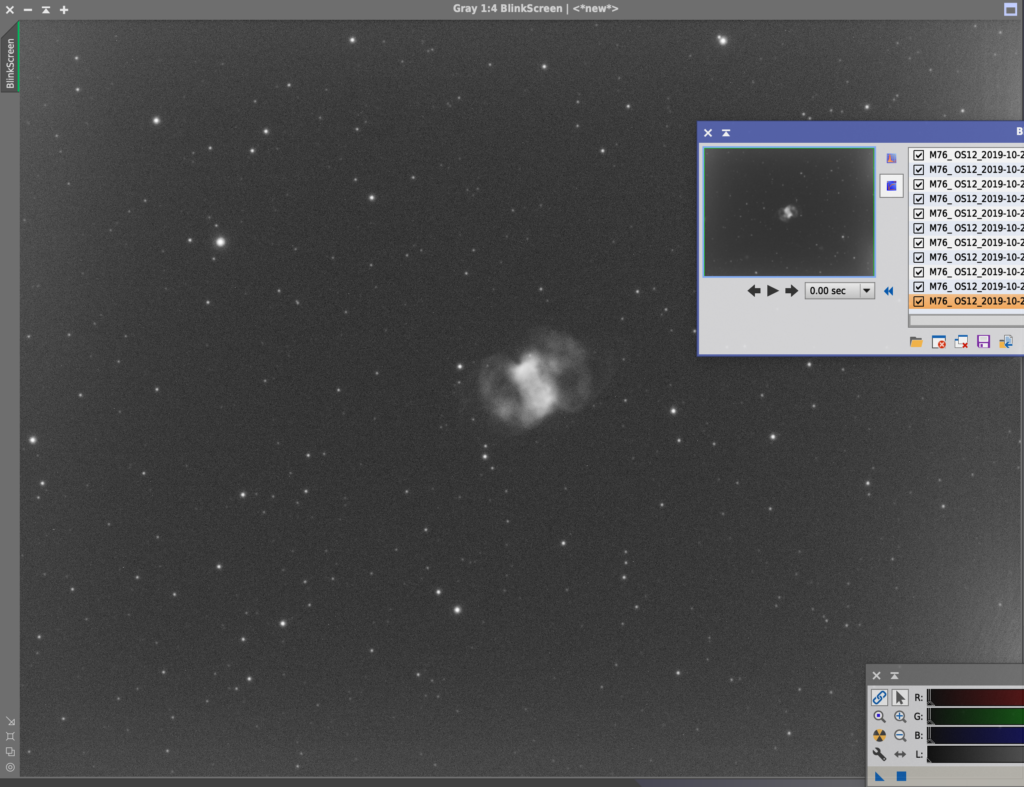
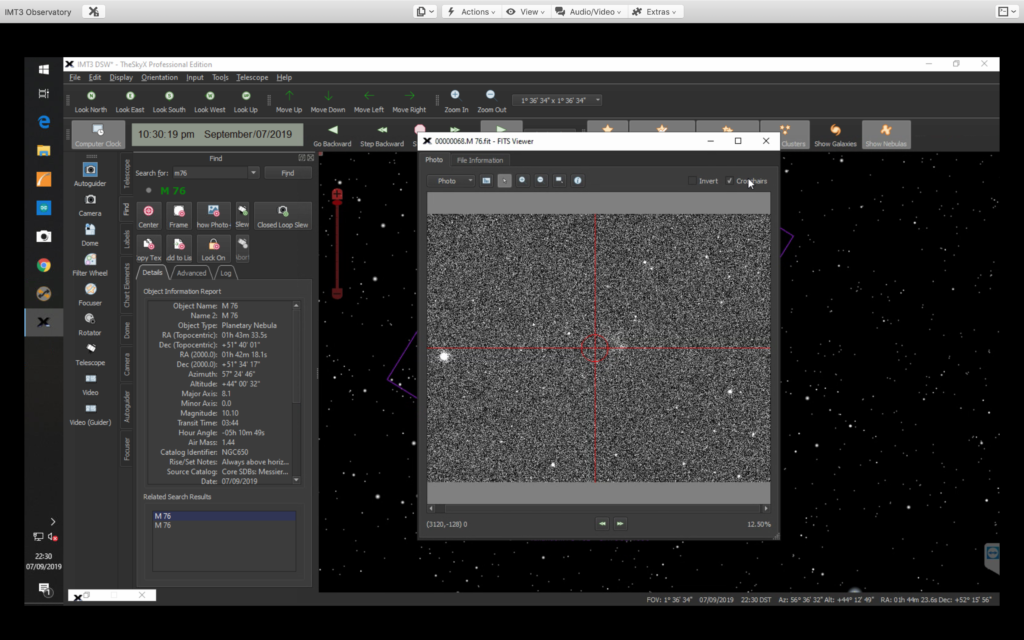
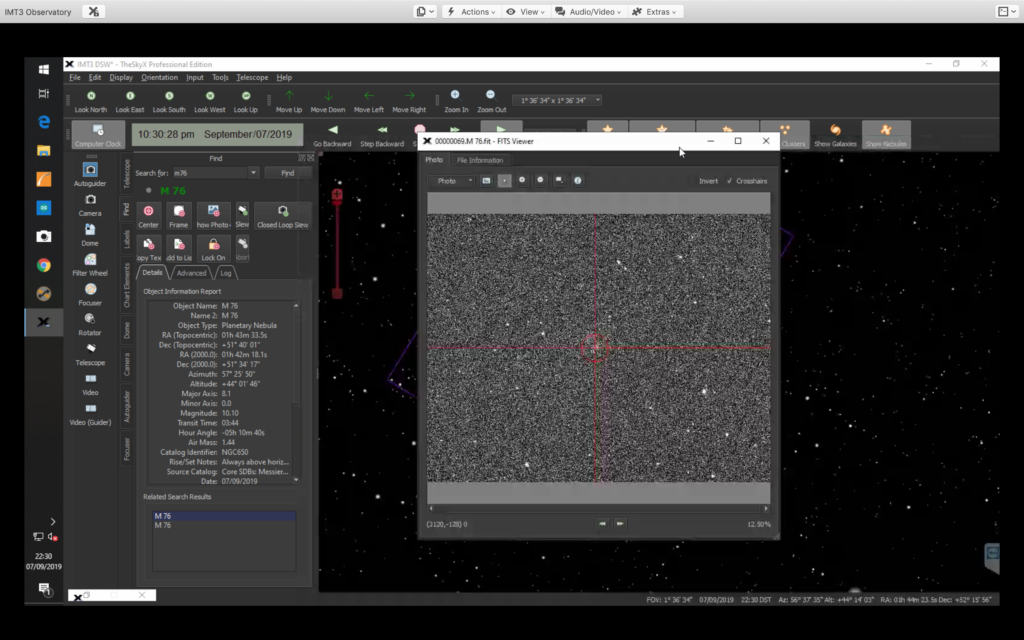
Instead @9pm I decided to take some more images of M76 since it was due to be fairly clear all night. What I found was this was quite simple to now setup and get working as long as I did not mind performing a manual flip at 11:30pm.
There was one other issue last night which was around the dome closing, it suddenly did this around 10pm, not sure why, I think (I now in the light of day cannot be sure) the relay went off. Looking at the Keogram and then the ASC movie for last night it does coincide with a set of cloud going over so maybe that is why it closed. It will be nice to then get it to reopen when clear, another thing to fix at some point.
So as I say, setting up for the run was straightforward and I used TSX rather than SGPro to centre and platesolve M76 as normal. I then took a sample image of 60 seconds found that the focus was more or less spot on for OIII, despite earlier challenges with focus not working and all was ready to go.
On the point of focus problems, we could not get an accurate V-Curve earlier in the evening, SGPro kept coming up with different focus points after each run and eventually we put this down to the dome and scope not having had time to cool given it only being 30 minutes or so. The outside temperature was around 3℃ whilst the inside was just shy of 9℃. Later in the evening the difference was much smaller (I should remember to record this). I can get the ambient temp for the outside the next day from the FITS header but I have no record of the inside ambient temp, something else to fix.
So I went off to bed just after the meridian flip around 11:30pm and after watching a few frames come down. This morning I took flats and darks and closed the dome which was still open with the first frost of the season having set in and frost was covering the inside of the dome.
Quick set of images this evening to take some more data of M76. I can image for 3 hours before a meridian flip. I need to get the automated flip working and thus the plate solving that seems to be having issues. For now I will open the dome and just set it running on OIII through the 12″.
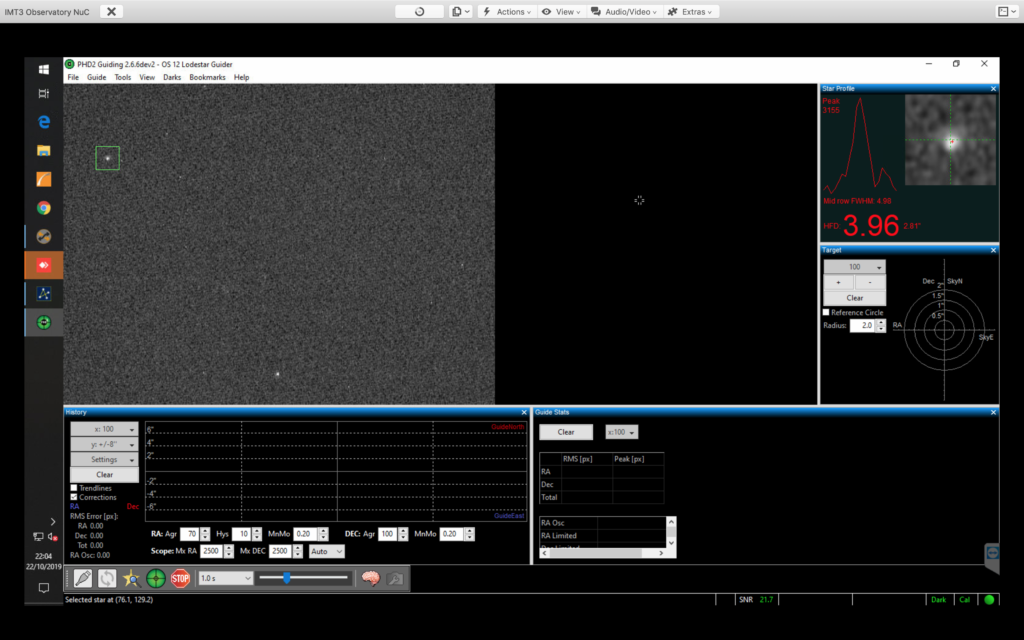
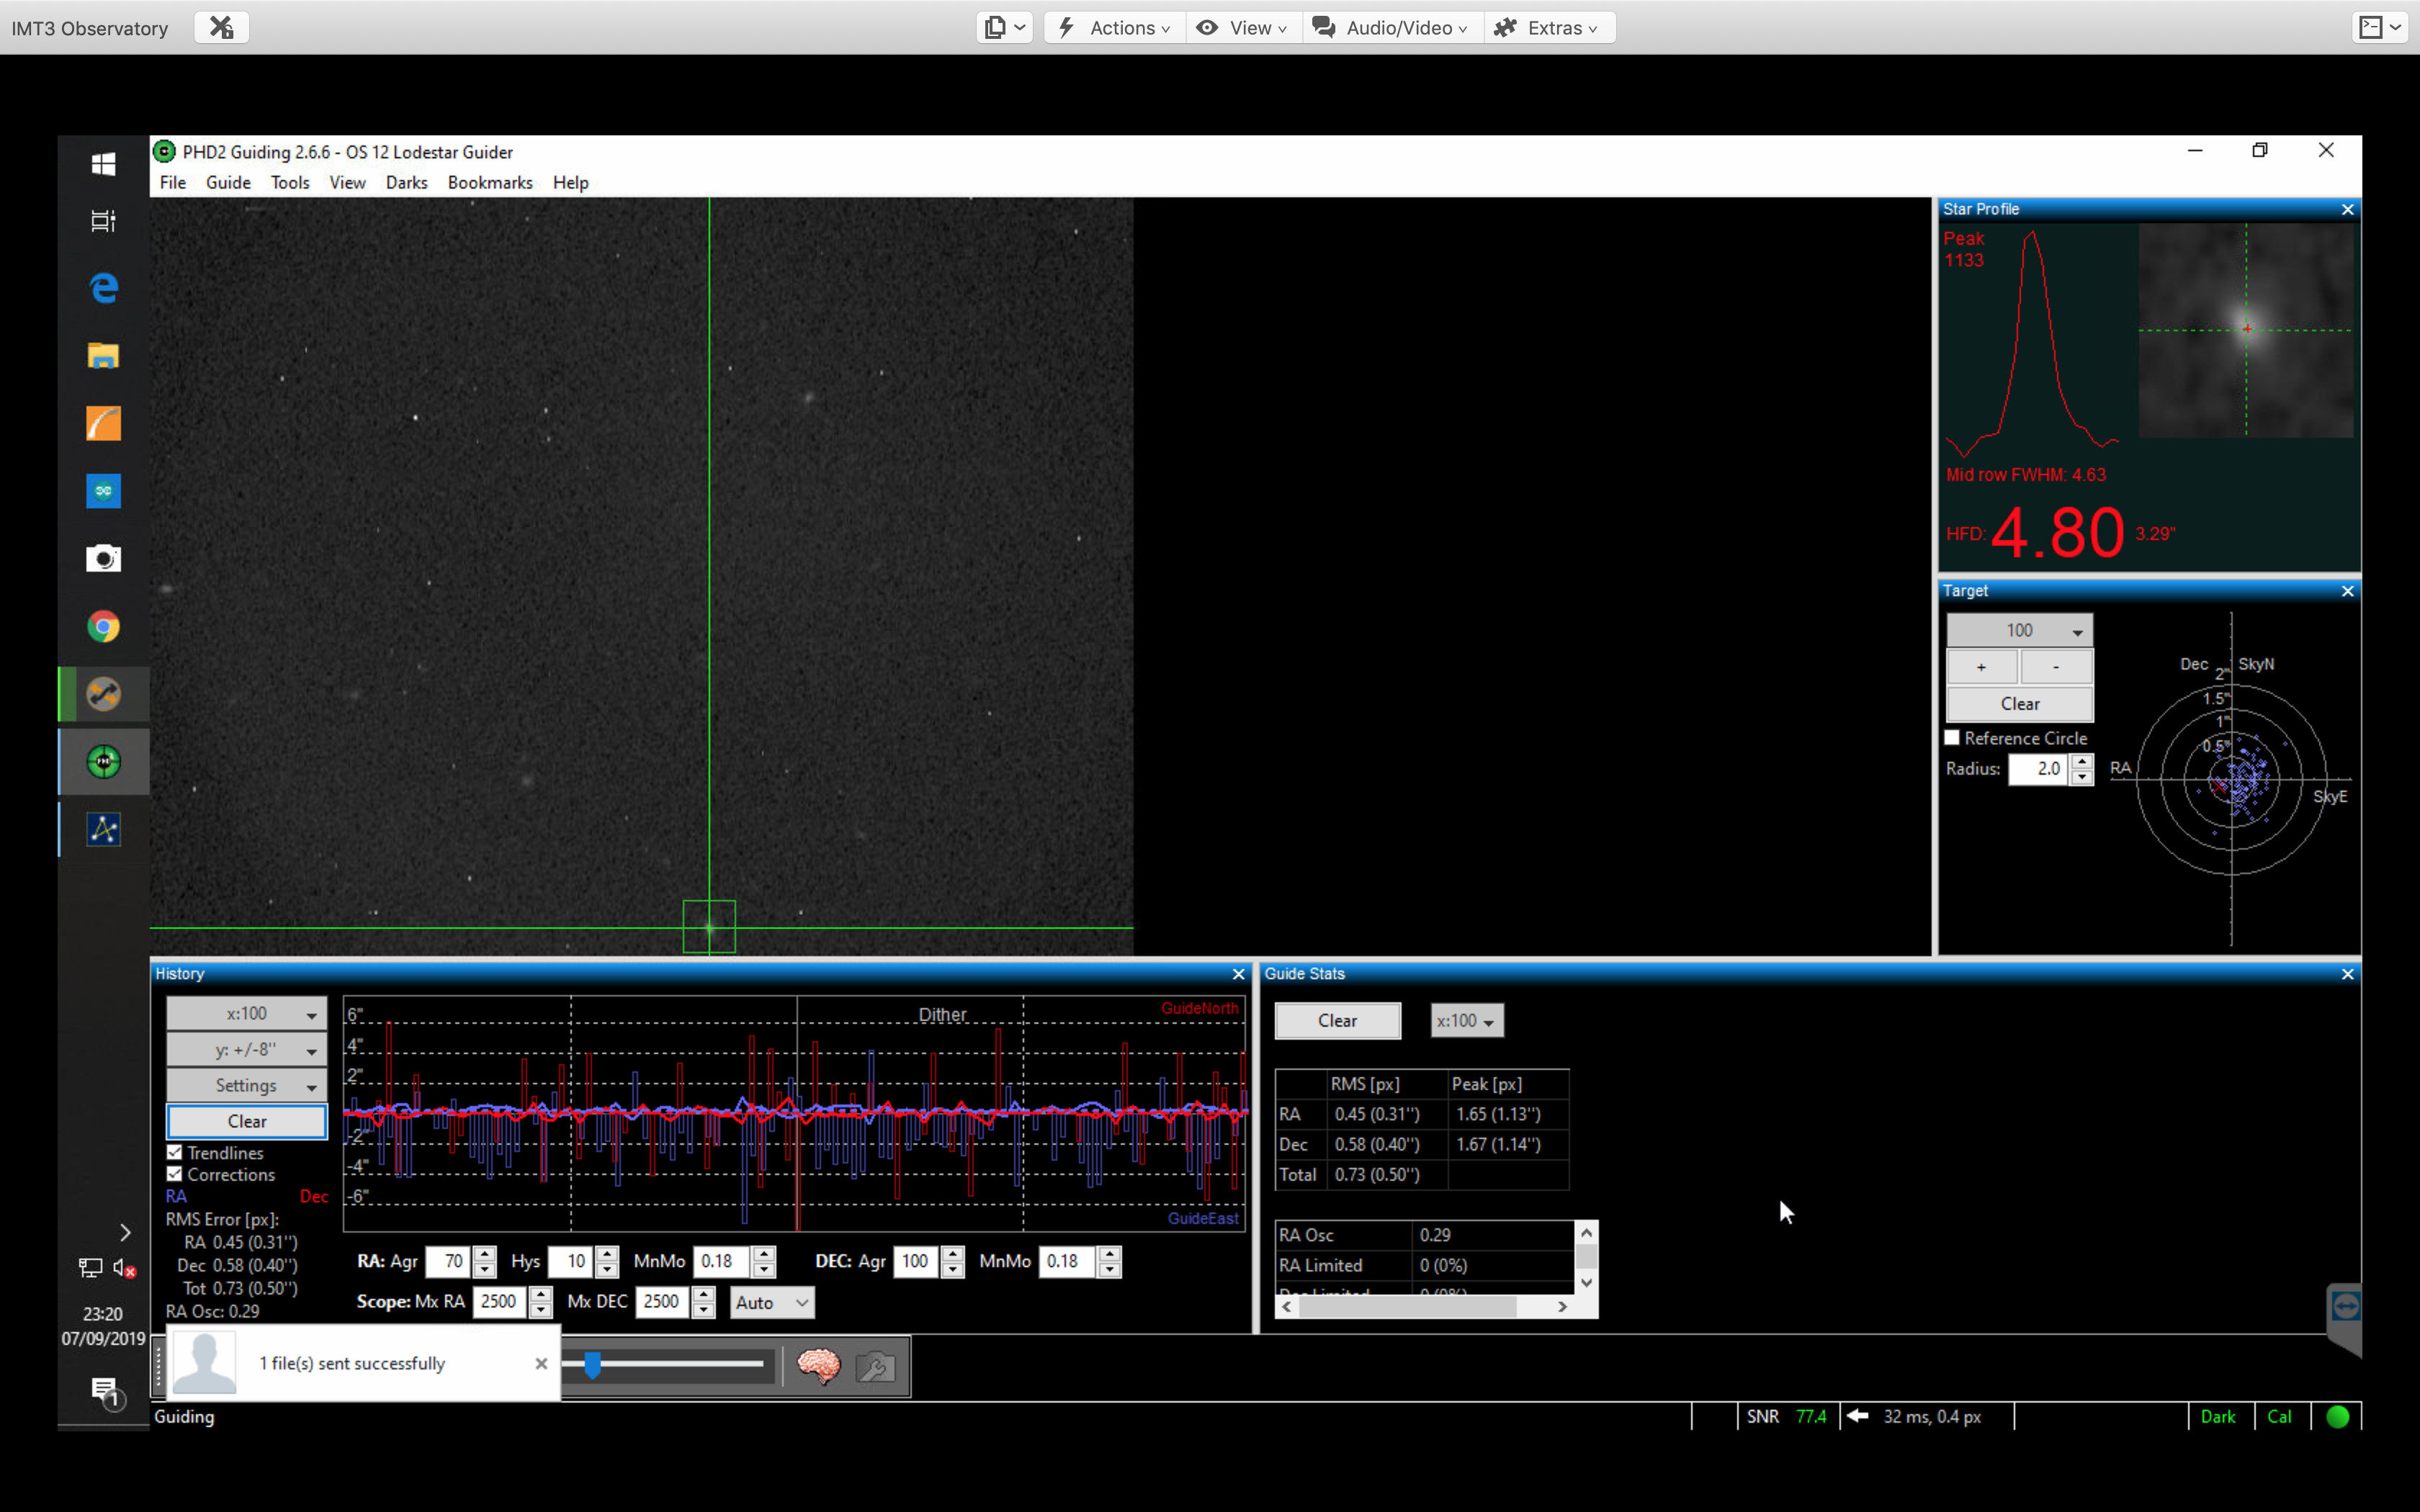
After entering with TSX connected to the ASI camera I started guiding and for setup reasons I have included the guide star here.
Guide Star
@00:45 I managed to do the manual meridian flip and then headed off to be after collecting another 2 hours of OIII data. I left the scope running for the rest of the night knowing that the dome would shut if the sky clouded up.
Last image taken
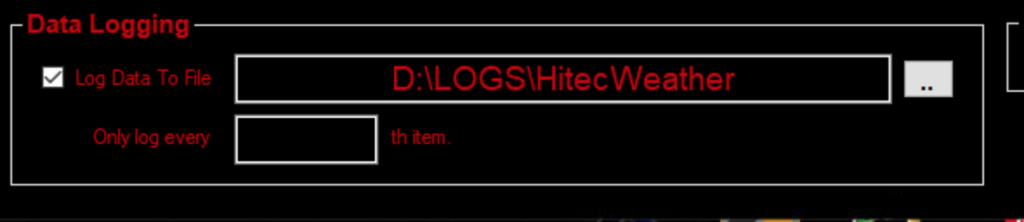
So I am now up at 7am and indeed the dome closed when the clouds rolled in. I have no real notification of when that occurred so I have now set the HitecWeather station software to log on the triggering of the relay to a file so I can see the time it closed.
Alerts now setup
Logging setup for alerts
This will allow me to compare to the Keogram from the ASC and double check the dome is closing at the appropriate time.
Fortunately SGPro is connected to the weather station as a safety monitor and stops imaging if the dome closes. I can see the clouds started to roll in around 1:30am for a few minutes then just before 2pm there were more and by 2:43am after they covered the sky. The good thing is it looks like, although I cannot be sure, the dome would have closed at around 1:50am which is the time of the last image taken assuming the date stamp is the completion of the image.
Safety enabled
I have now taken flats and darks and parked the scope and it is ready for it’s next outing, I also remembered to turn the dehumidifier back on this time. Both the dehumidifier and the flat panel need connecting to an Arduino to automate turning on and off.
View from cameras when in position to flat panel on 12″
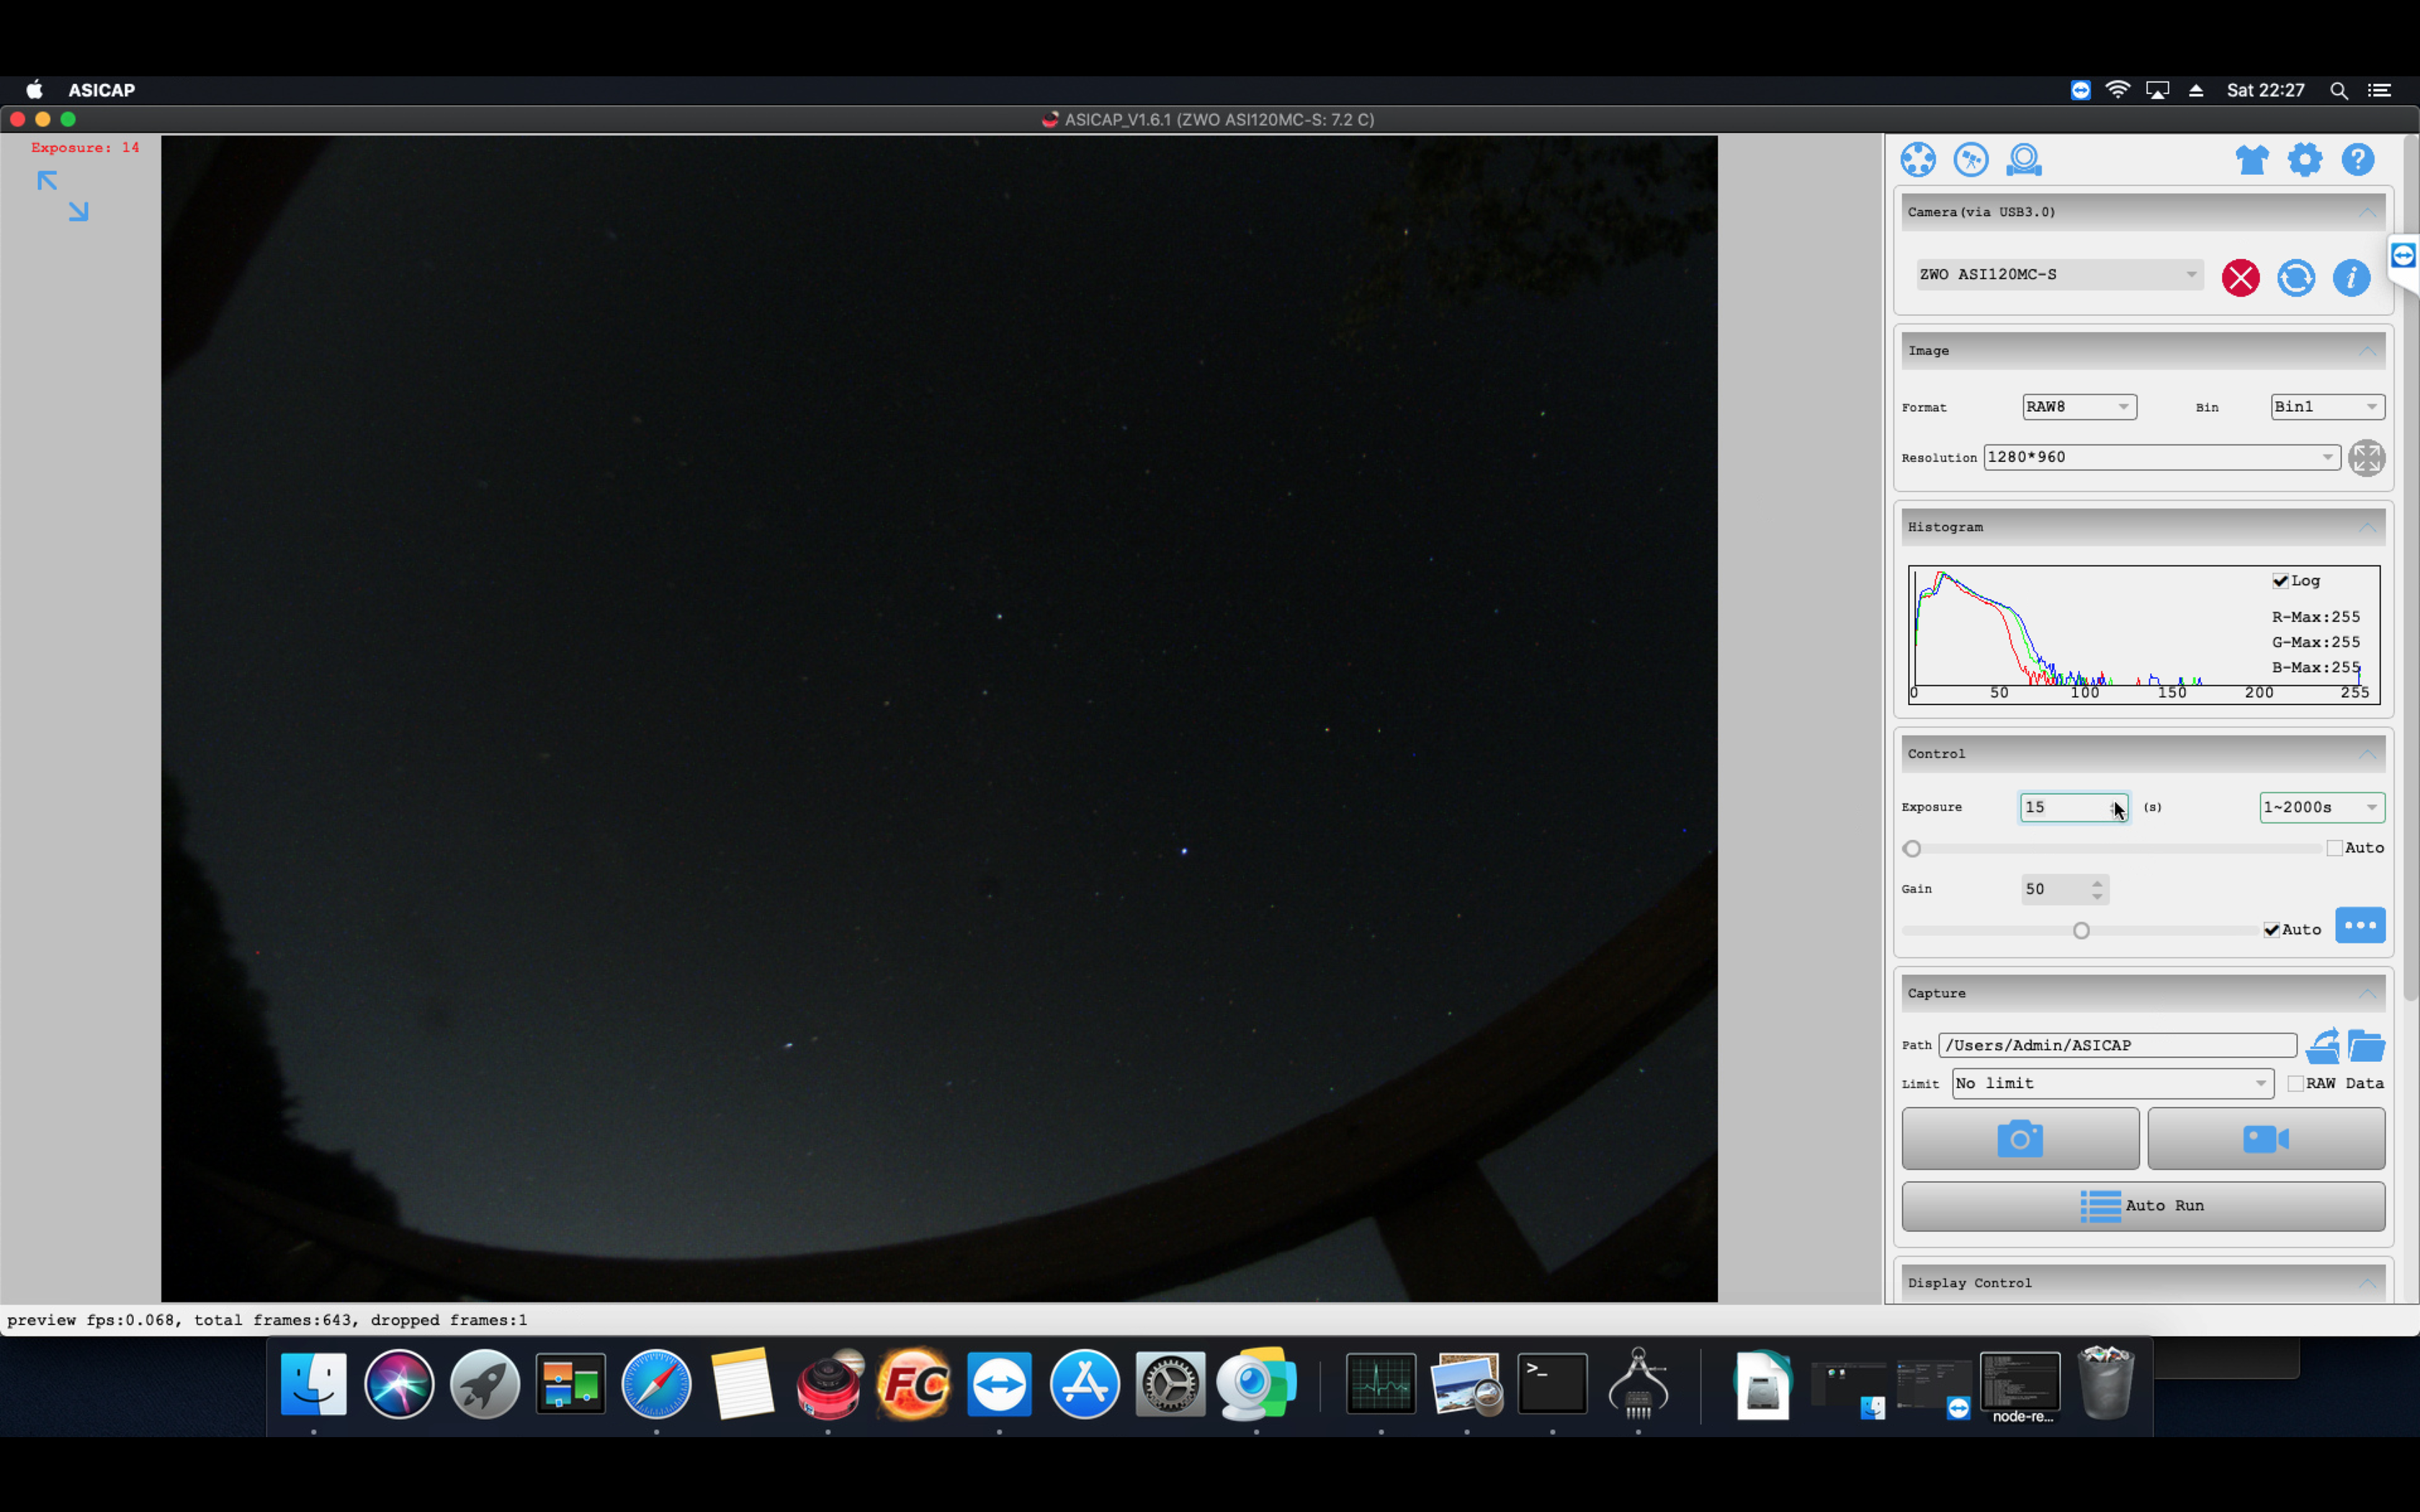
At the IMT we were experiencing stability issues with the ZWO ASI120MC USB3 camera on the MAC/NUC so we decided to move it to it’s own Raspberry Pi4 (4GB) as a cheap experiment.
The Raspberry Pi4 has the advantage of improved networking and connectivity including USB3. One of the downsides of the RPi4 is the increased heat generated by the CPU which is mitigated by housing it in a FLiRC passive case to dissipate the heat and prevent thermal throttling.
Additionally in order to prevent SD card wear and improve the I/O throughput we configured the RPi4 just to boot off the SD card but serve the rest of the file systems from a SSD connected via USB3.
AllSky Camera Software
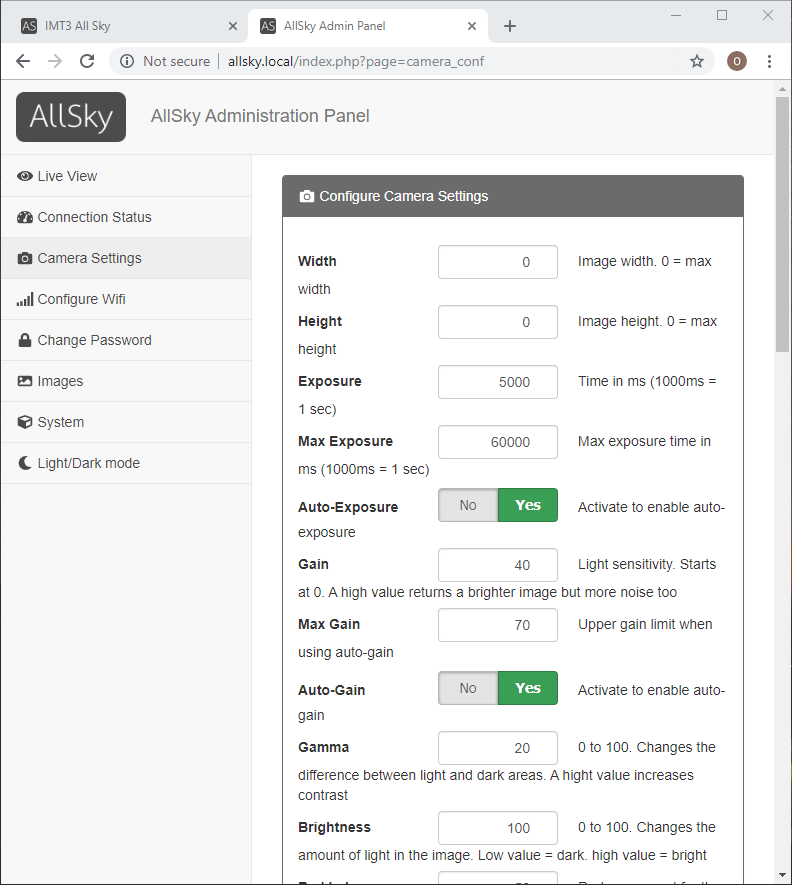
Using the open-source AllSky Camera project for ASI camera support we gain some advantages. The main advantage is that it’s open source (served via Git), provides an admin and public web portal which is addressed locally as http://allsky.local and the software can be set to start on system startup.
Admin Web Portal
The allskycam software can restart on system reboot but it can also be stopped/restarted via the web admin portal.
The configuration is simple and the mode/behaviour of the software can be controlled via the GUI or via a settings.json file from the command line.
Admin Portal – Camera Settings
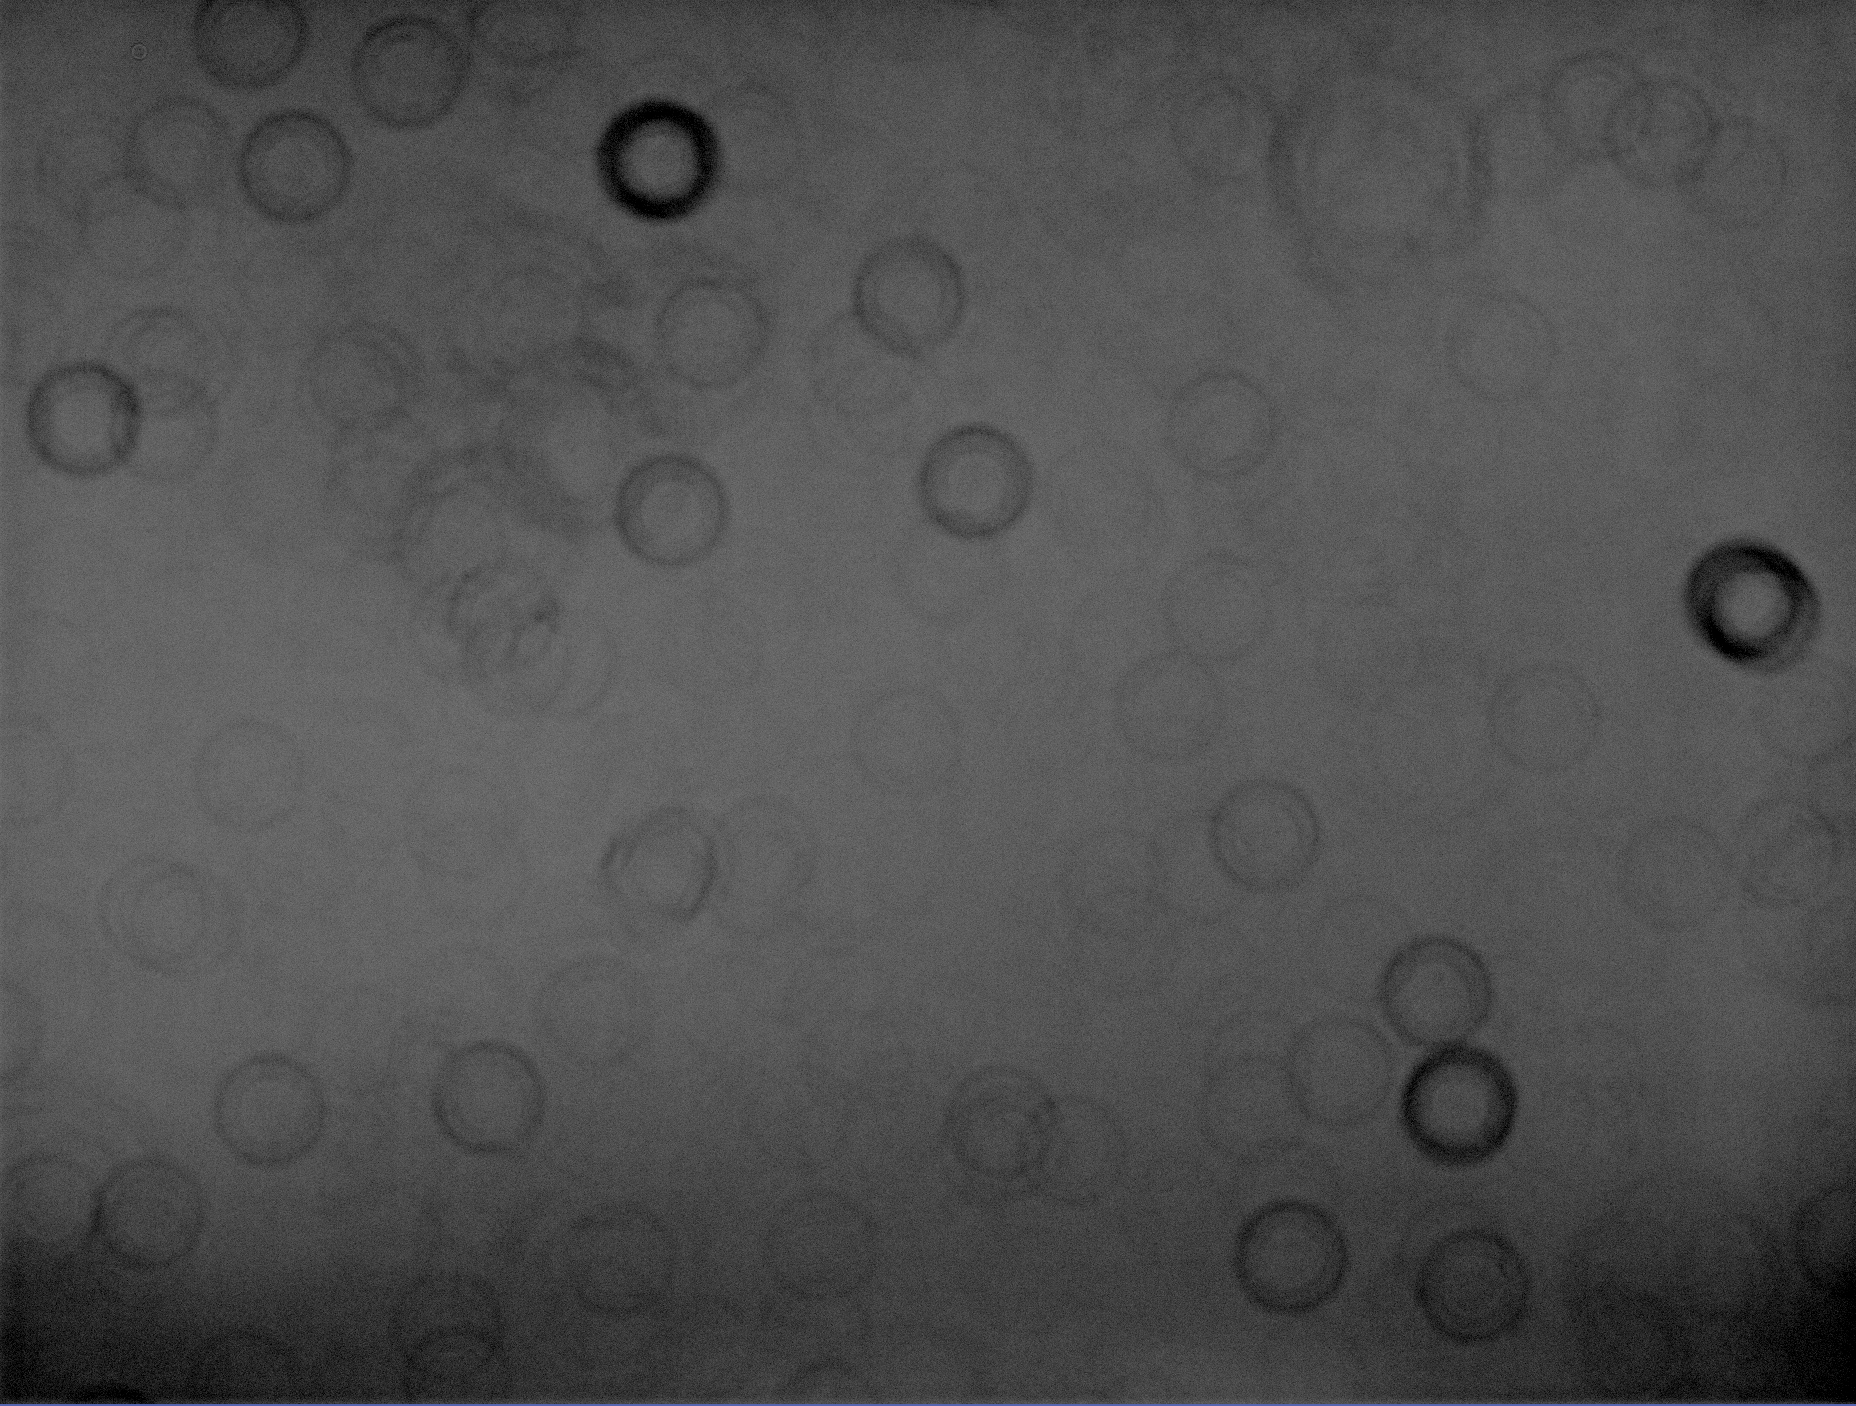
I recommend you take the time to create a dark reference image, again this is done via the GUI panel as long exposure frame will show extensive hot pixels.
RGB24 image hot pixels with no dark applied
Non Admin Web Portal
This is accessed via the address http://allsky.local/allsky-website and provides the latest captured image, a constellation overlay and the ability to view time-lapses and star trails.
Local network web site for non admin users
One of the nice features of the software is it’s ability to create a time-lapse of acquired images for the previous night. The following video shows the debayer issues as well as the dewing of the dome cover.
Time Lapse of evening showing dew issues/grayscale bayer
Bob is due to connect up the resistor ring he’s placed around the camera which hopefully should fix the dome dewing we encountered on the first night.
So it remains for us to fix and implement the following :
Resolve the lack of colour images (RGB24)
Image quality breakup
Resolve dark daytime images
Secure copy latest image/time-lapse to an external public website
Scale VirtualSky constellation overlay (180 degrees) down to 150 degrees
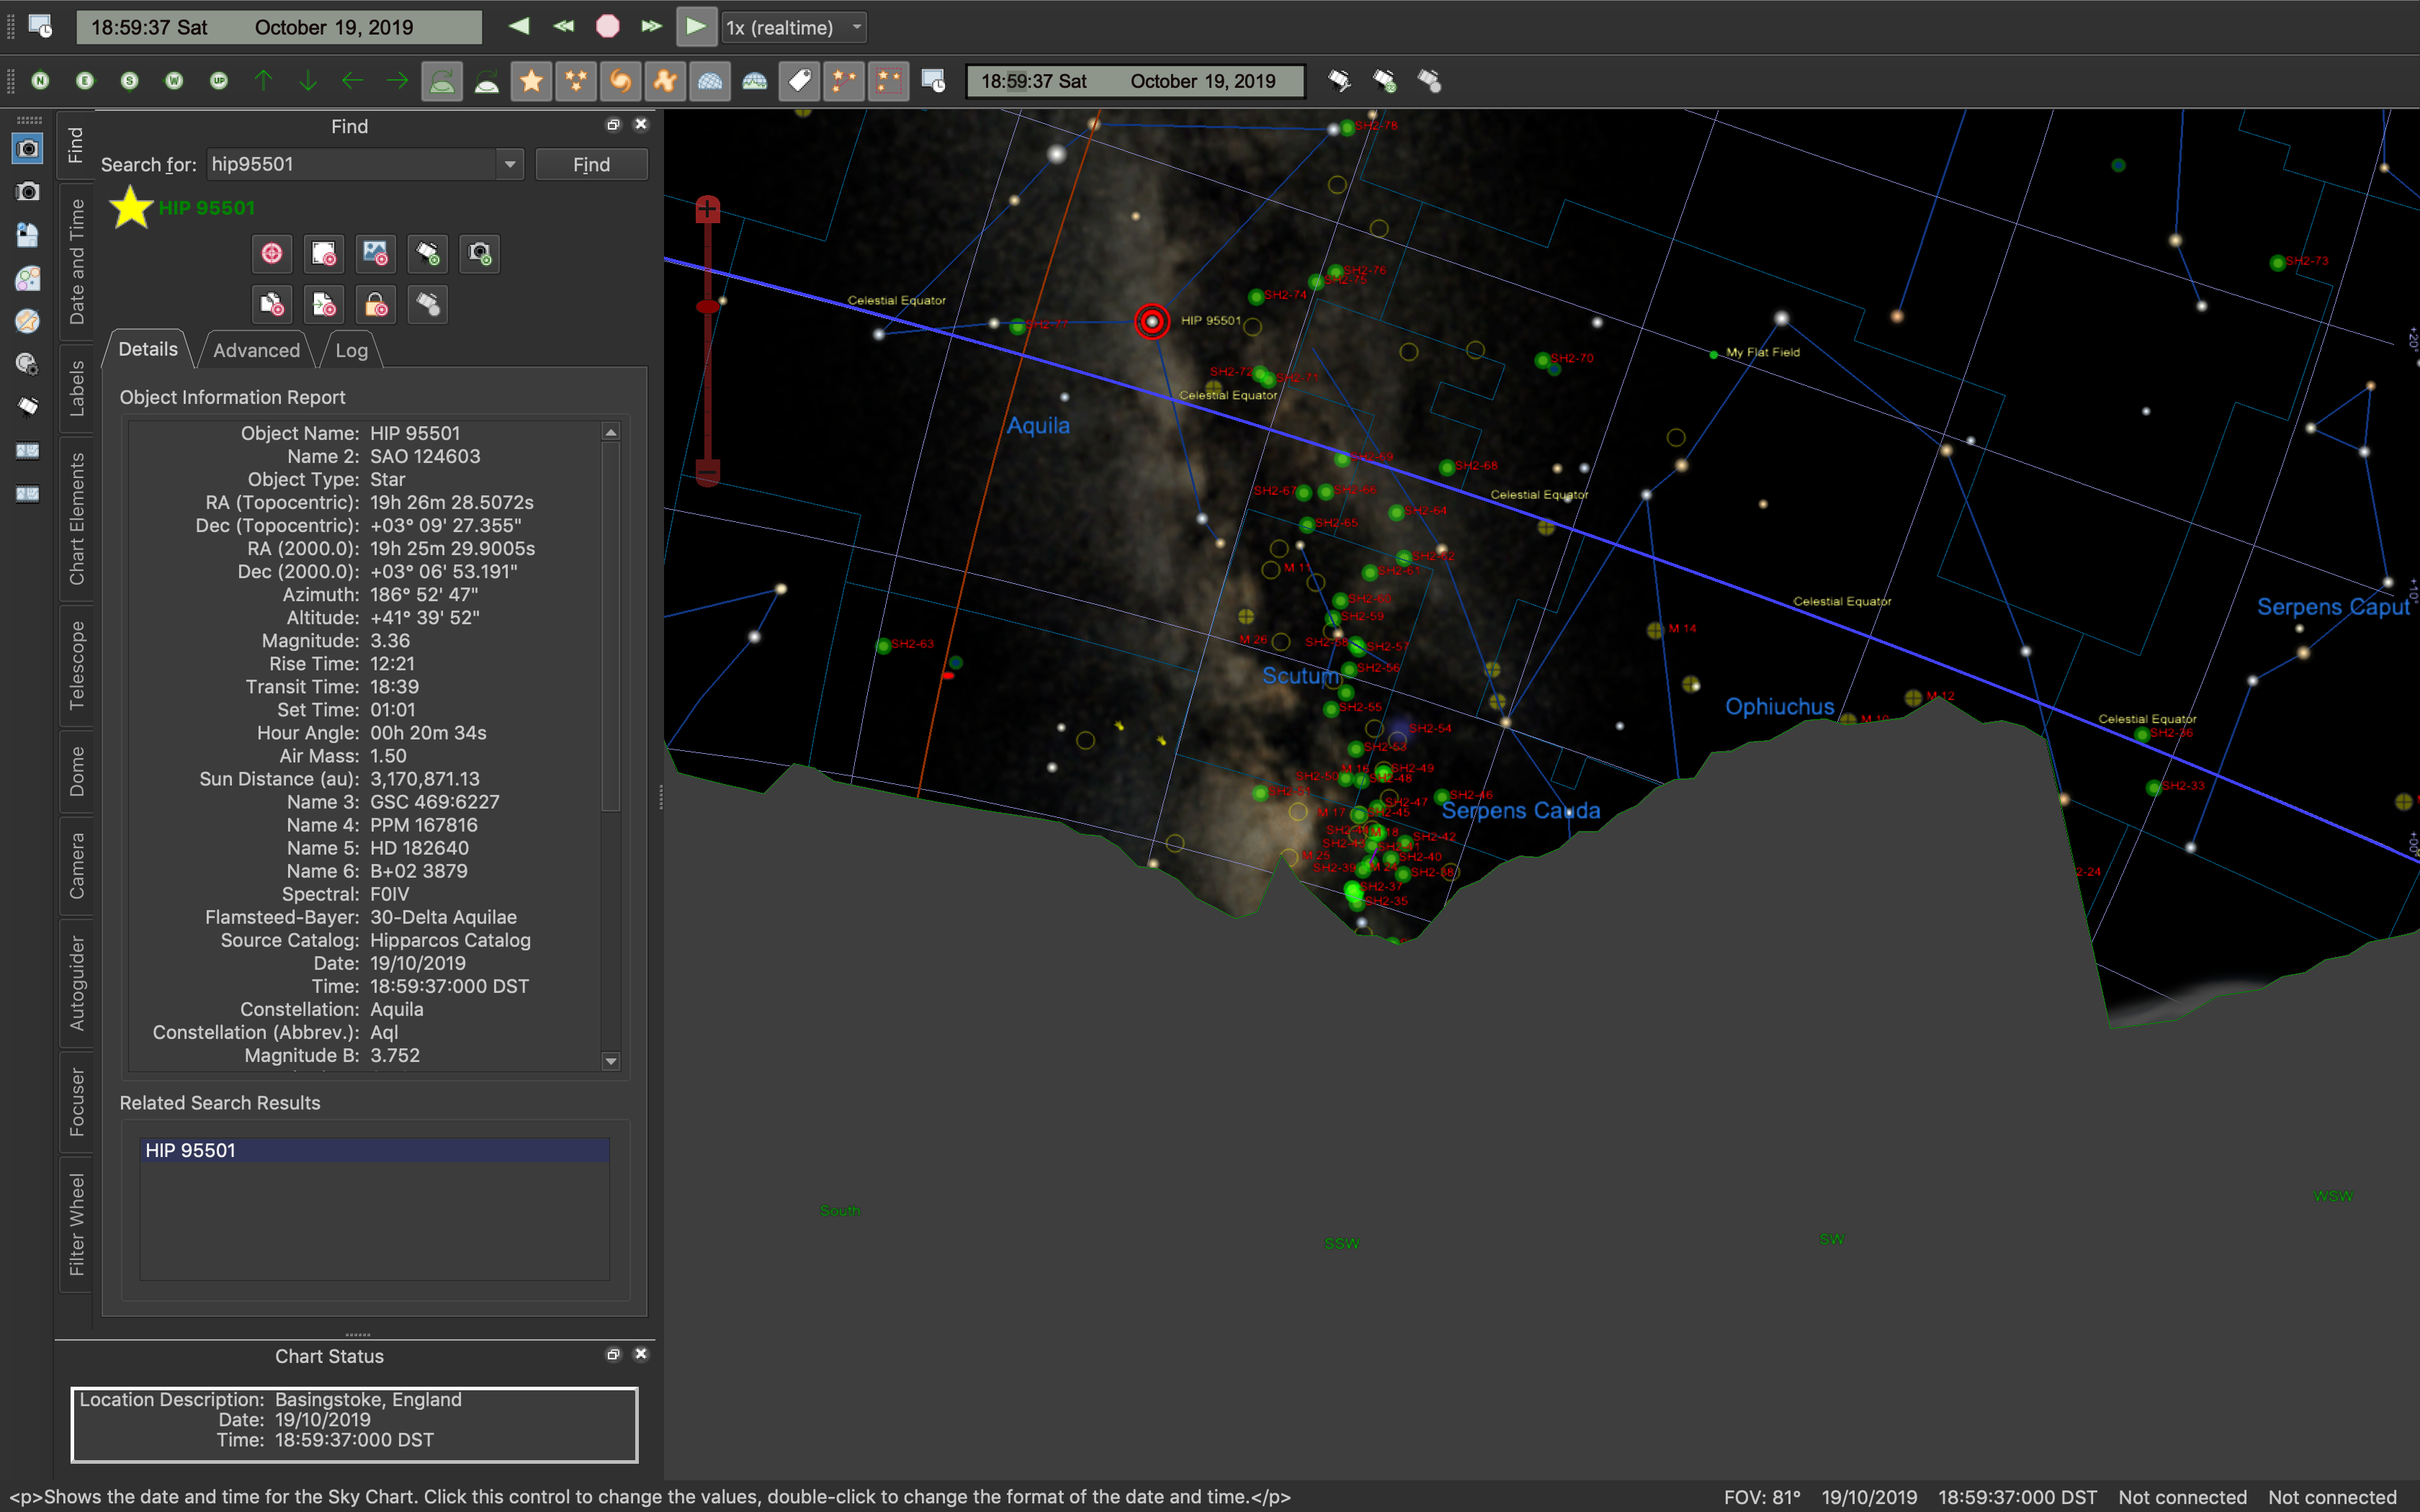
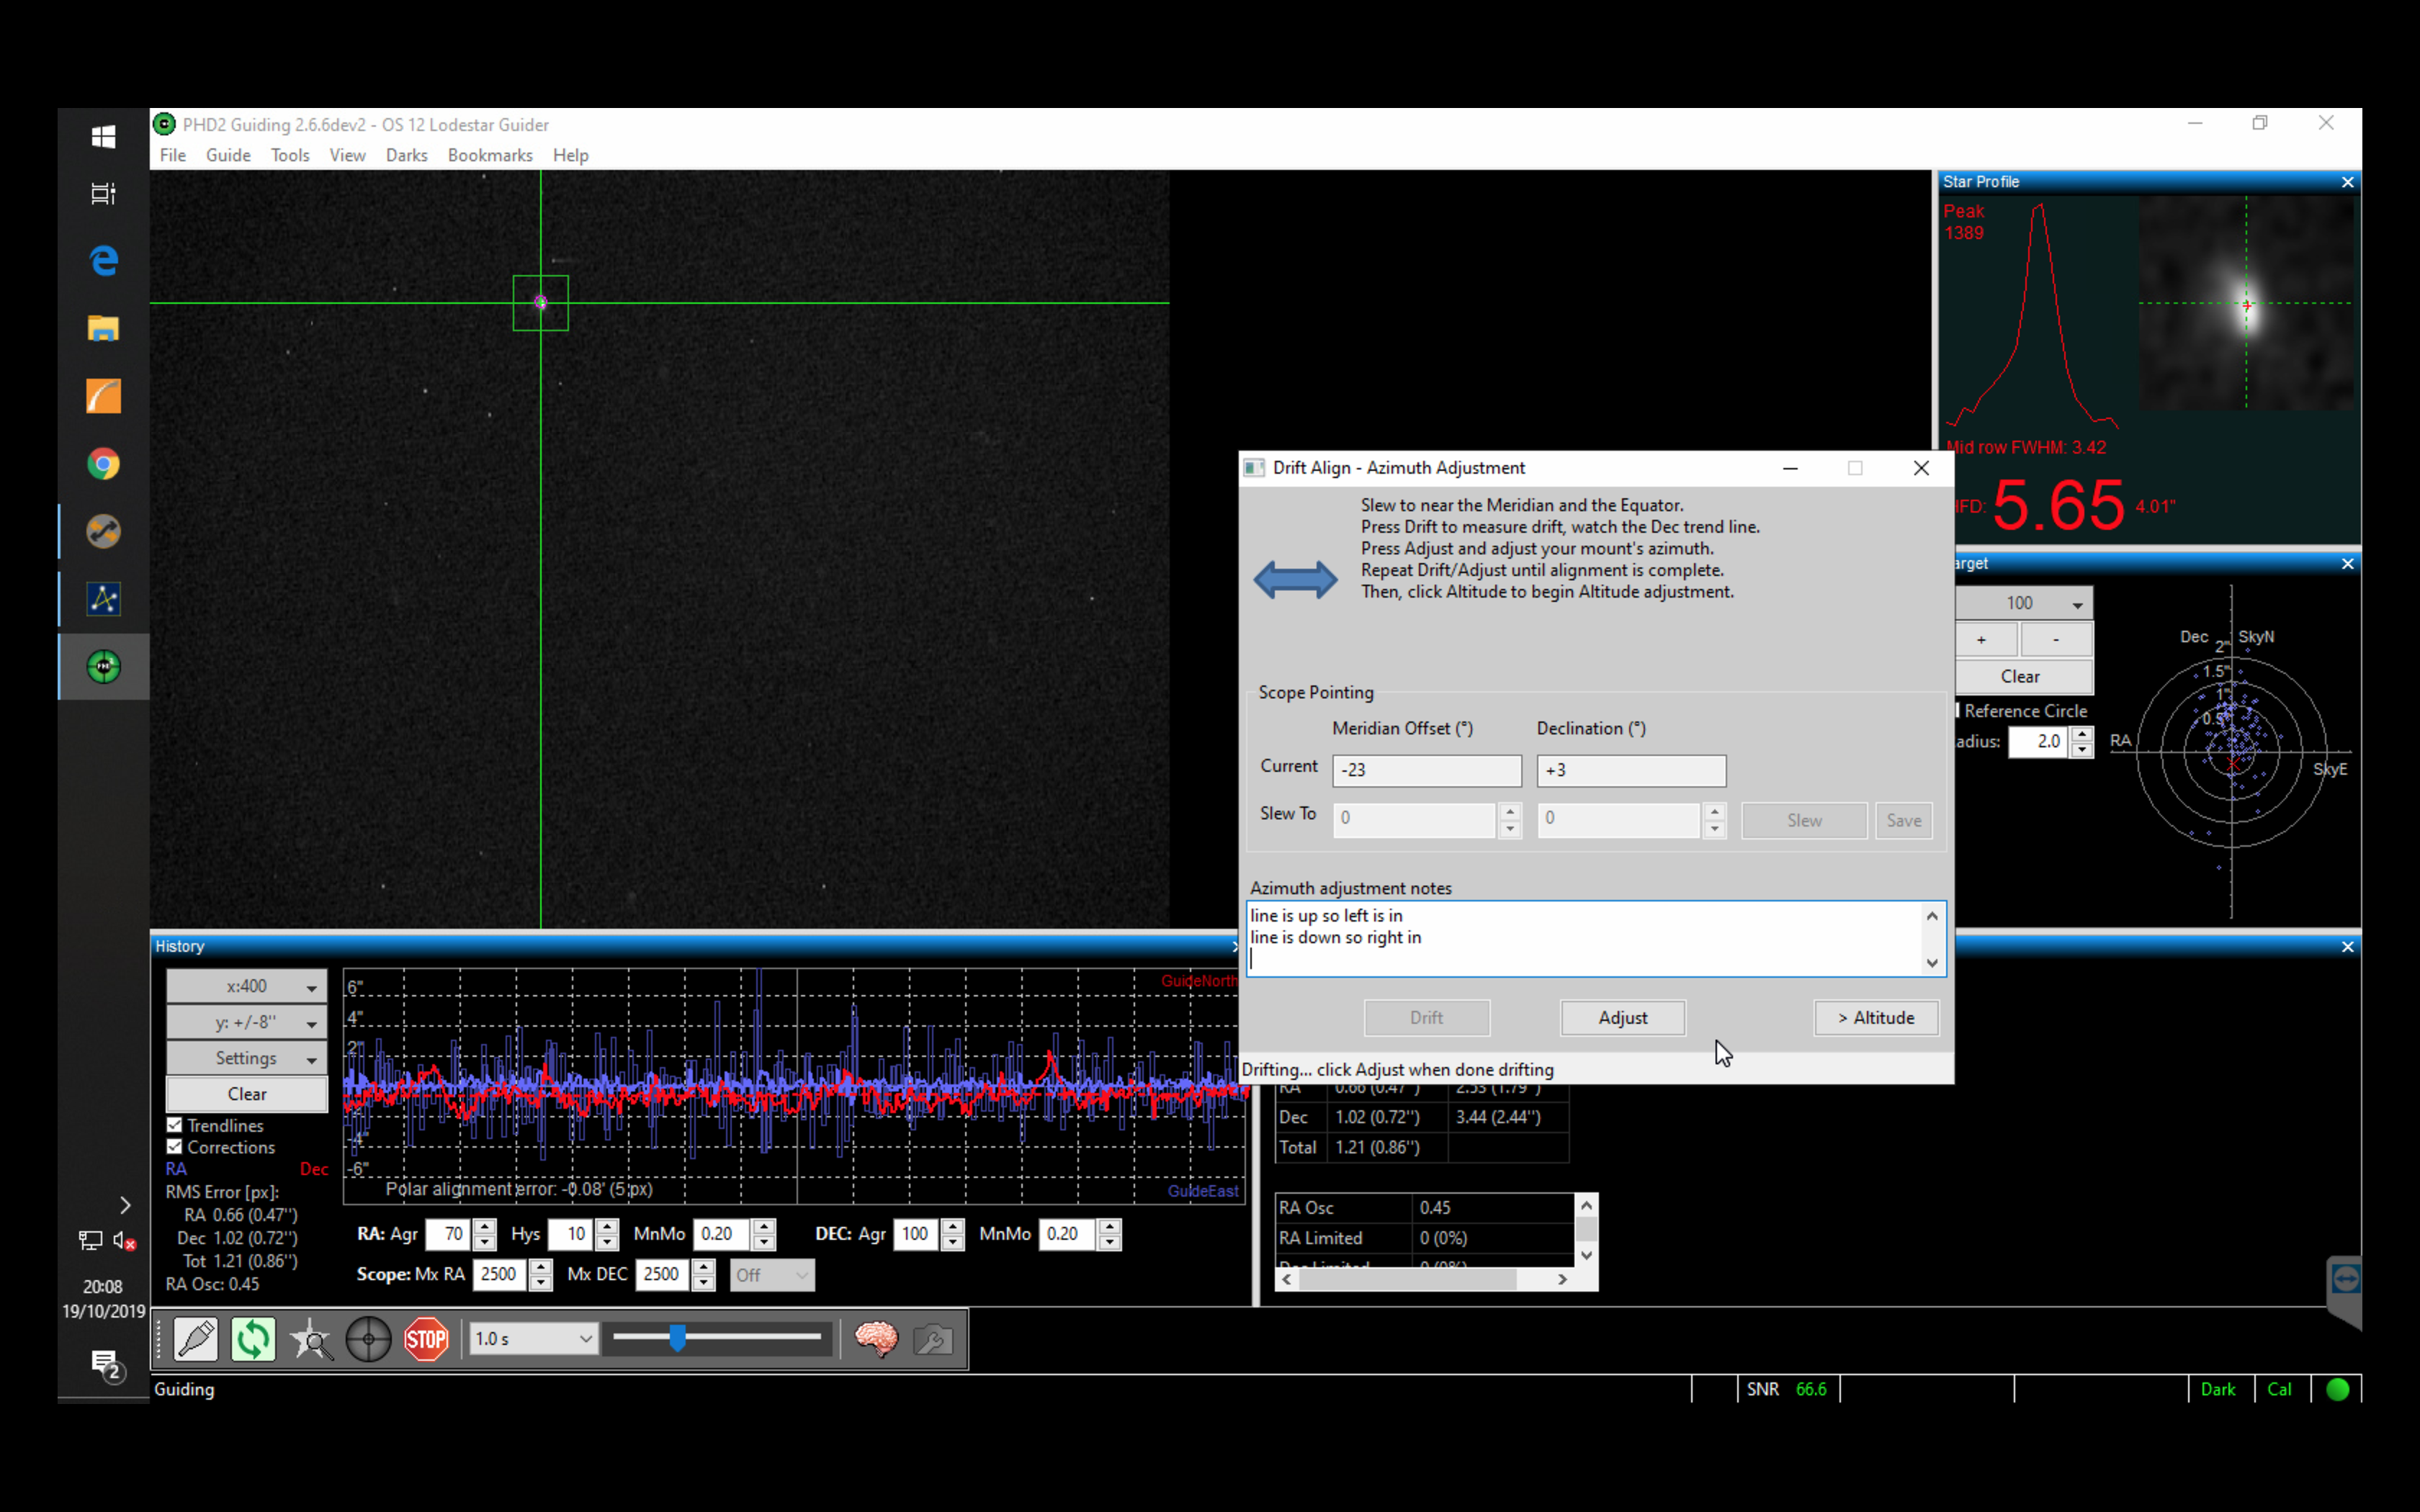
After nearly a month of not imaging from IMT due to a holiday in Tenerife, a week in New York with work and then Manchester and London along with a run of poor weather it was clear on a Saturday night! Another evening commissioning the observatory was needed, so tonight we will again further refine the polar alignment since the last major modification and distribution of weight where we changed the adjustment plate for Bob’s Tank FS 102 OTA. Again we plan to drift align with PHD.
First thing is to find a star near the celestial equator near the Meridian so that it would display the most movement and thus magnify the error of miss polar alignment. I should be able to find HP 95501 @8pm.
Star to drift align for Azimuth
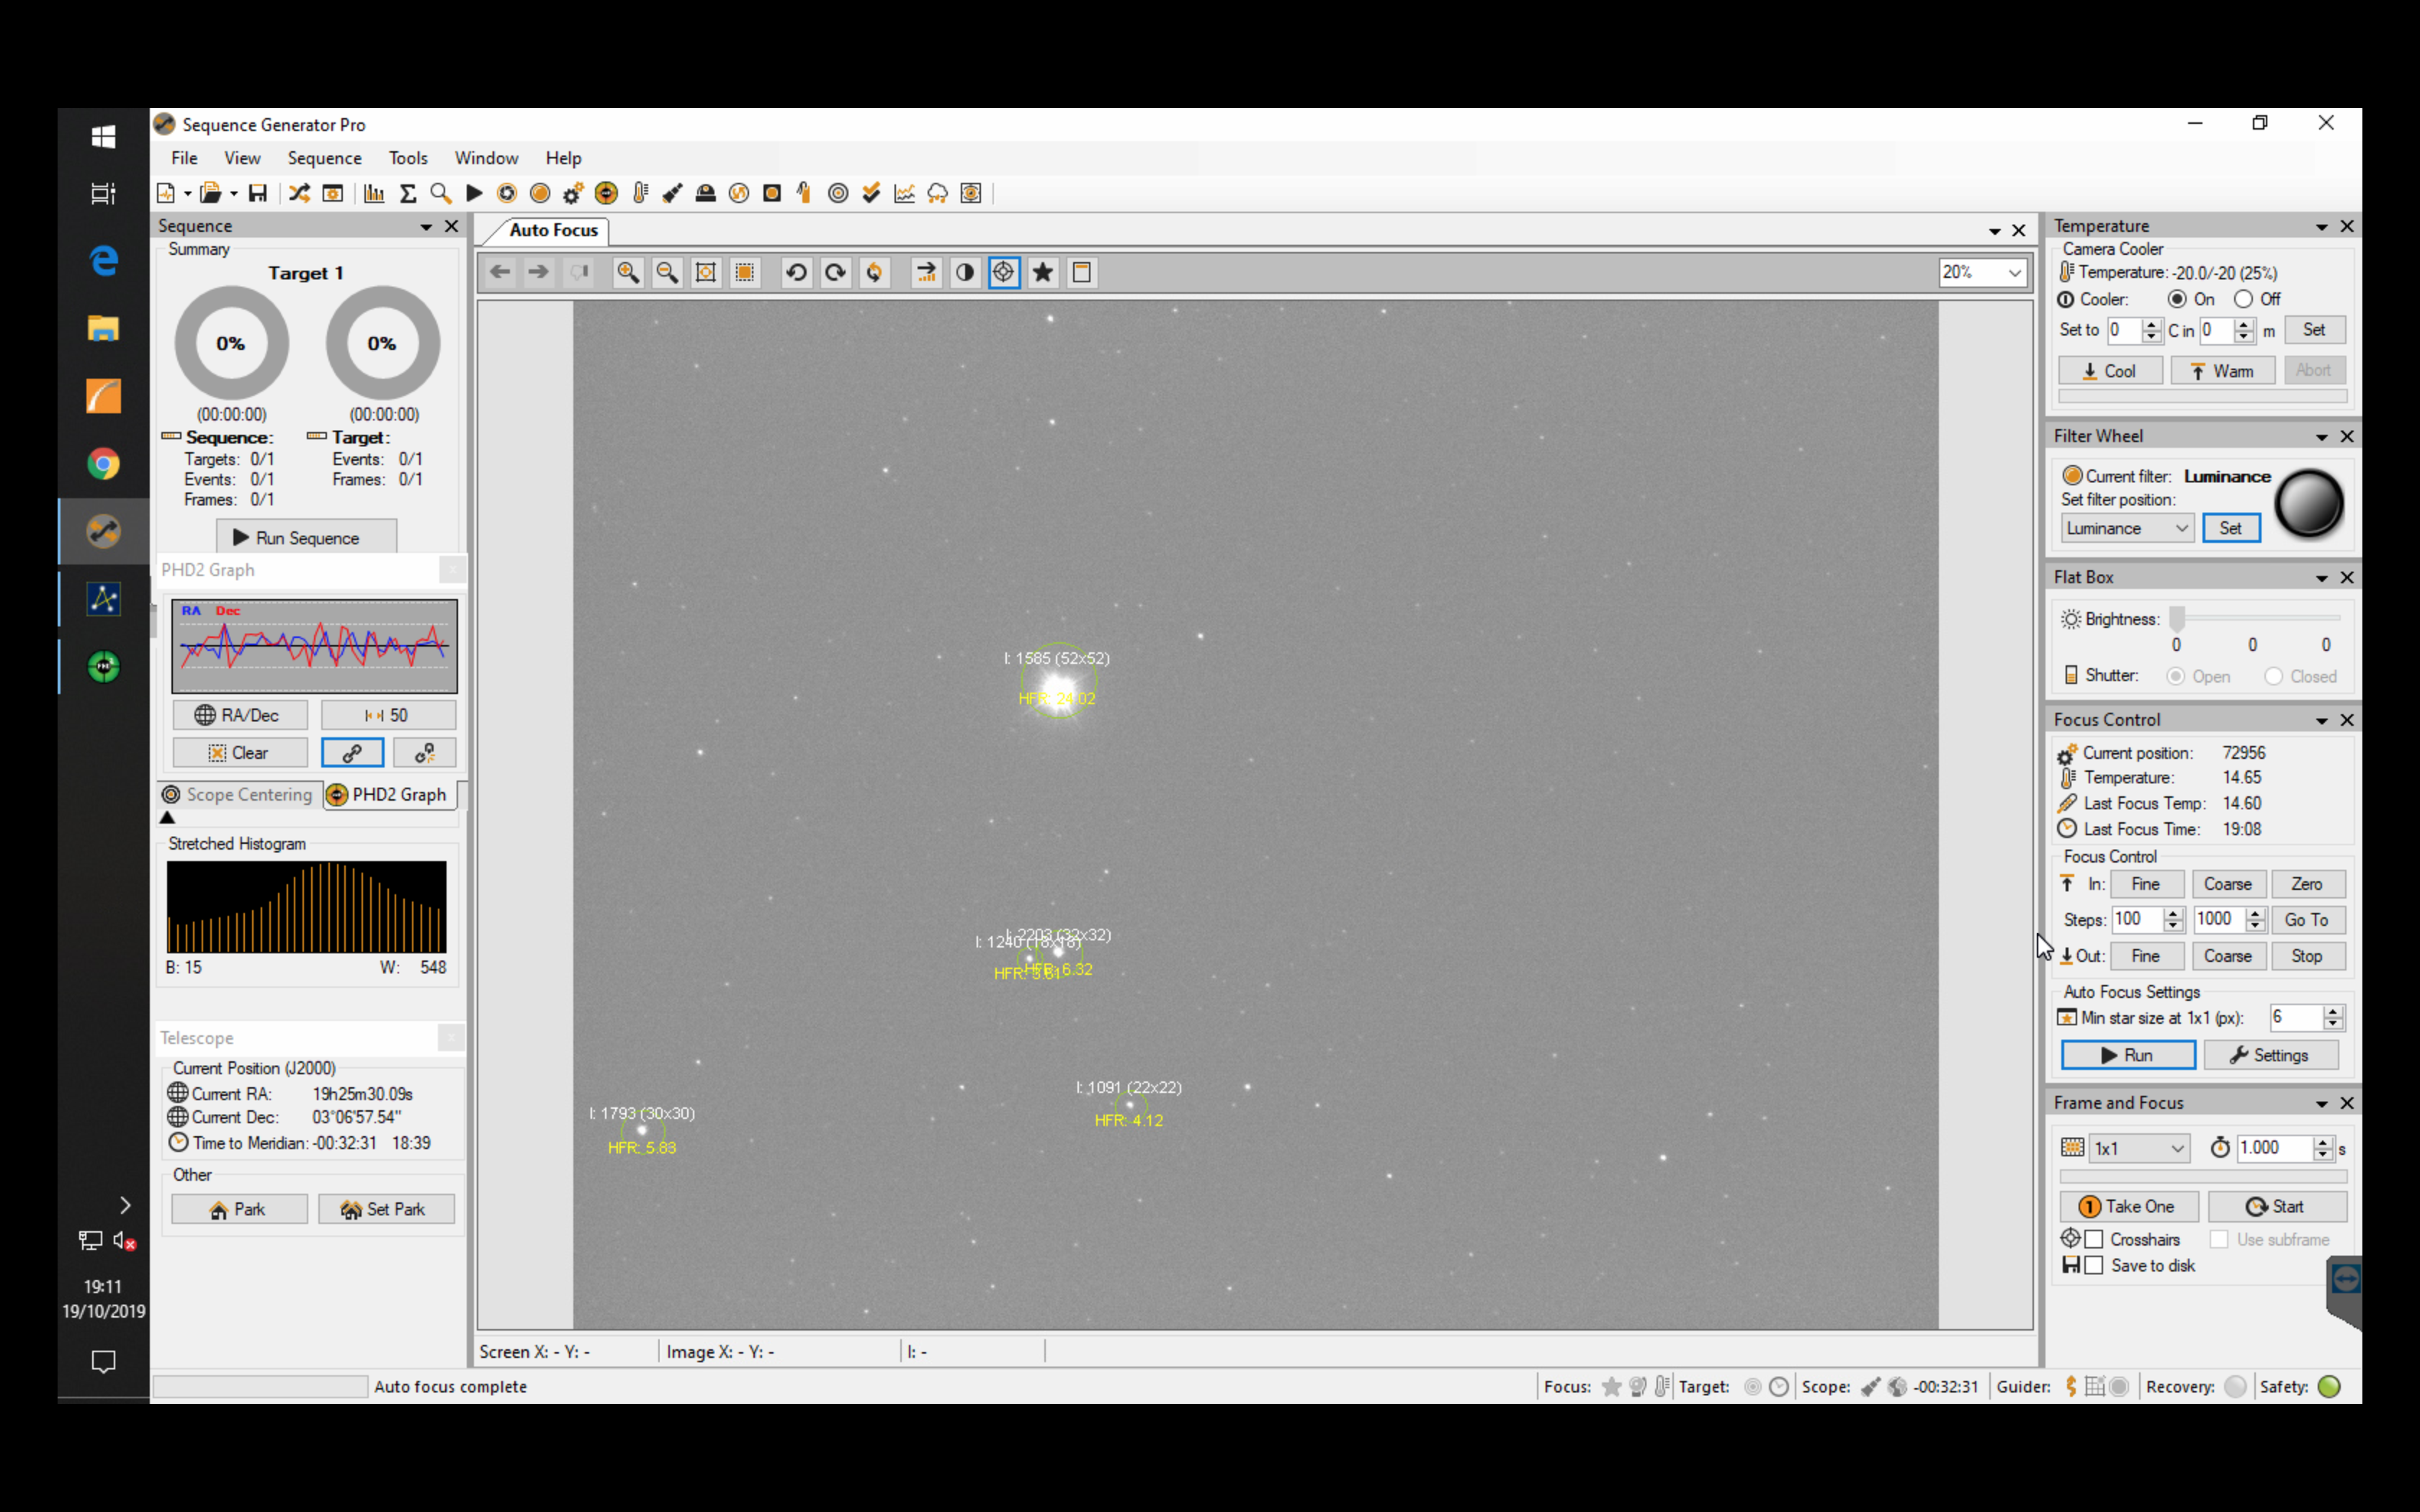
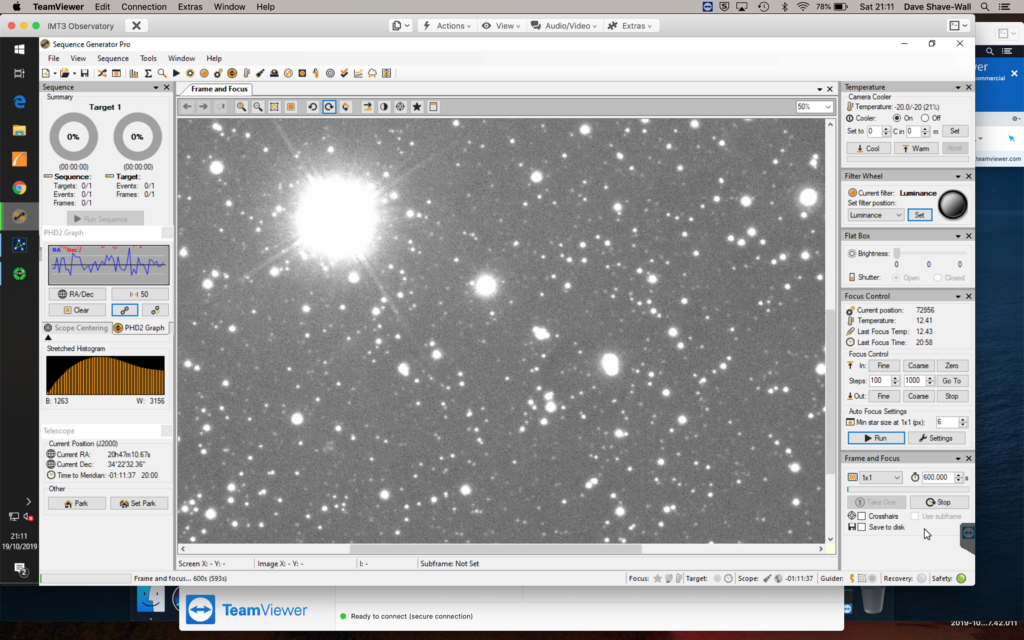
Next I performed an autofocus using the Luminance filter. HIP 95501 is the star to choose for drift aligning the first part, a 1 second image within Frame and Focus in SGPro showed it just off centre which was fine.
Star to guide on
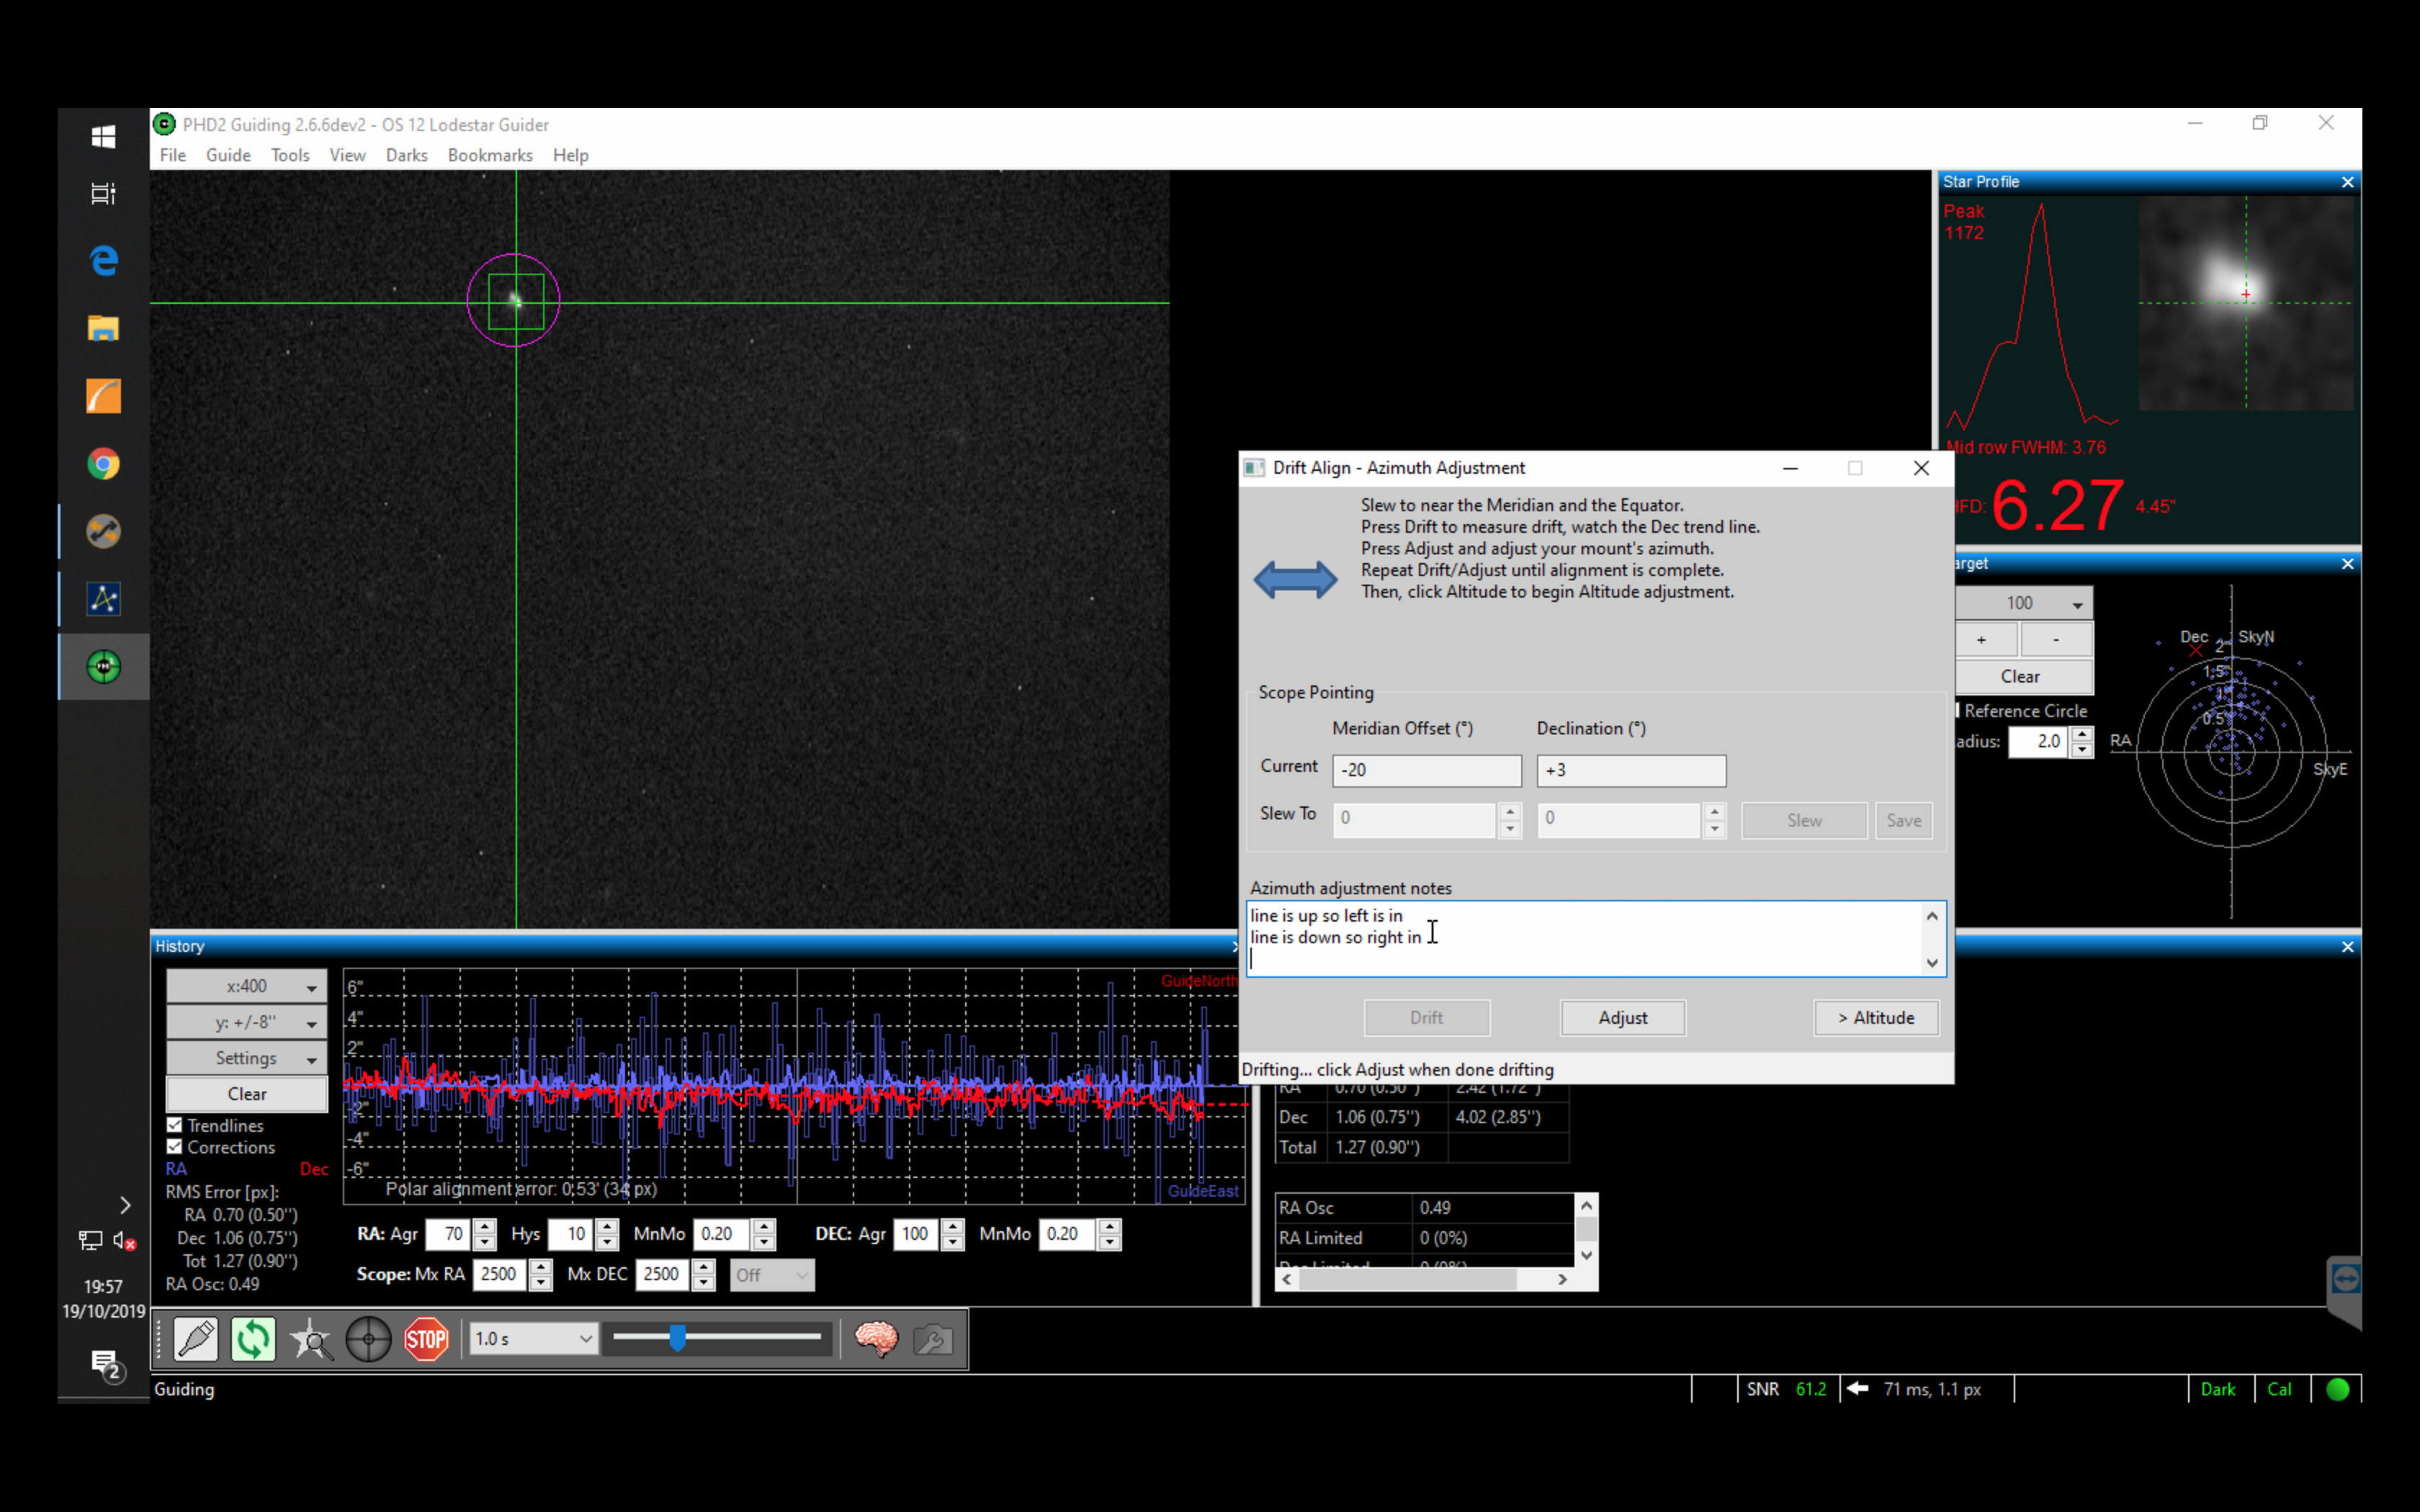
Next I moved the star to place in the Lodestar FoV. Now I can measure the azimuth polar error, ALWAYS ignoring the RA line. Looking at the Dec line I could see I was out by 2.43′ and 39px. I adjusted the thruster knobs on the MEII to move the star to the outset edge of the purple circle showing the error, in this case the right thrust in and left thrust out. I then drifted again and make sure the purple circle gets smaller and the DEC line a much shallower angle.
After first adjustment 0.53′ and 34px out
I adjusted again and got the azimuth error down to a respectable 0.08′ 5px error.
Azimuth error 0.08′ 5px
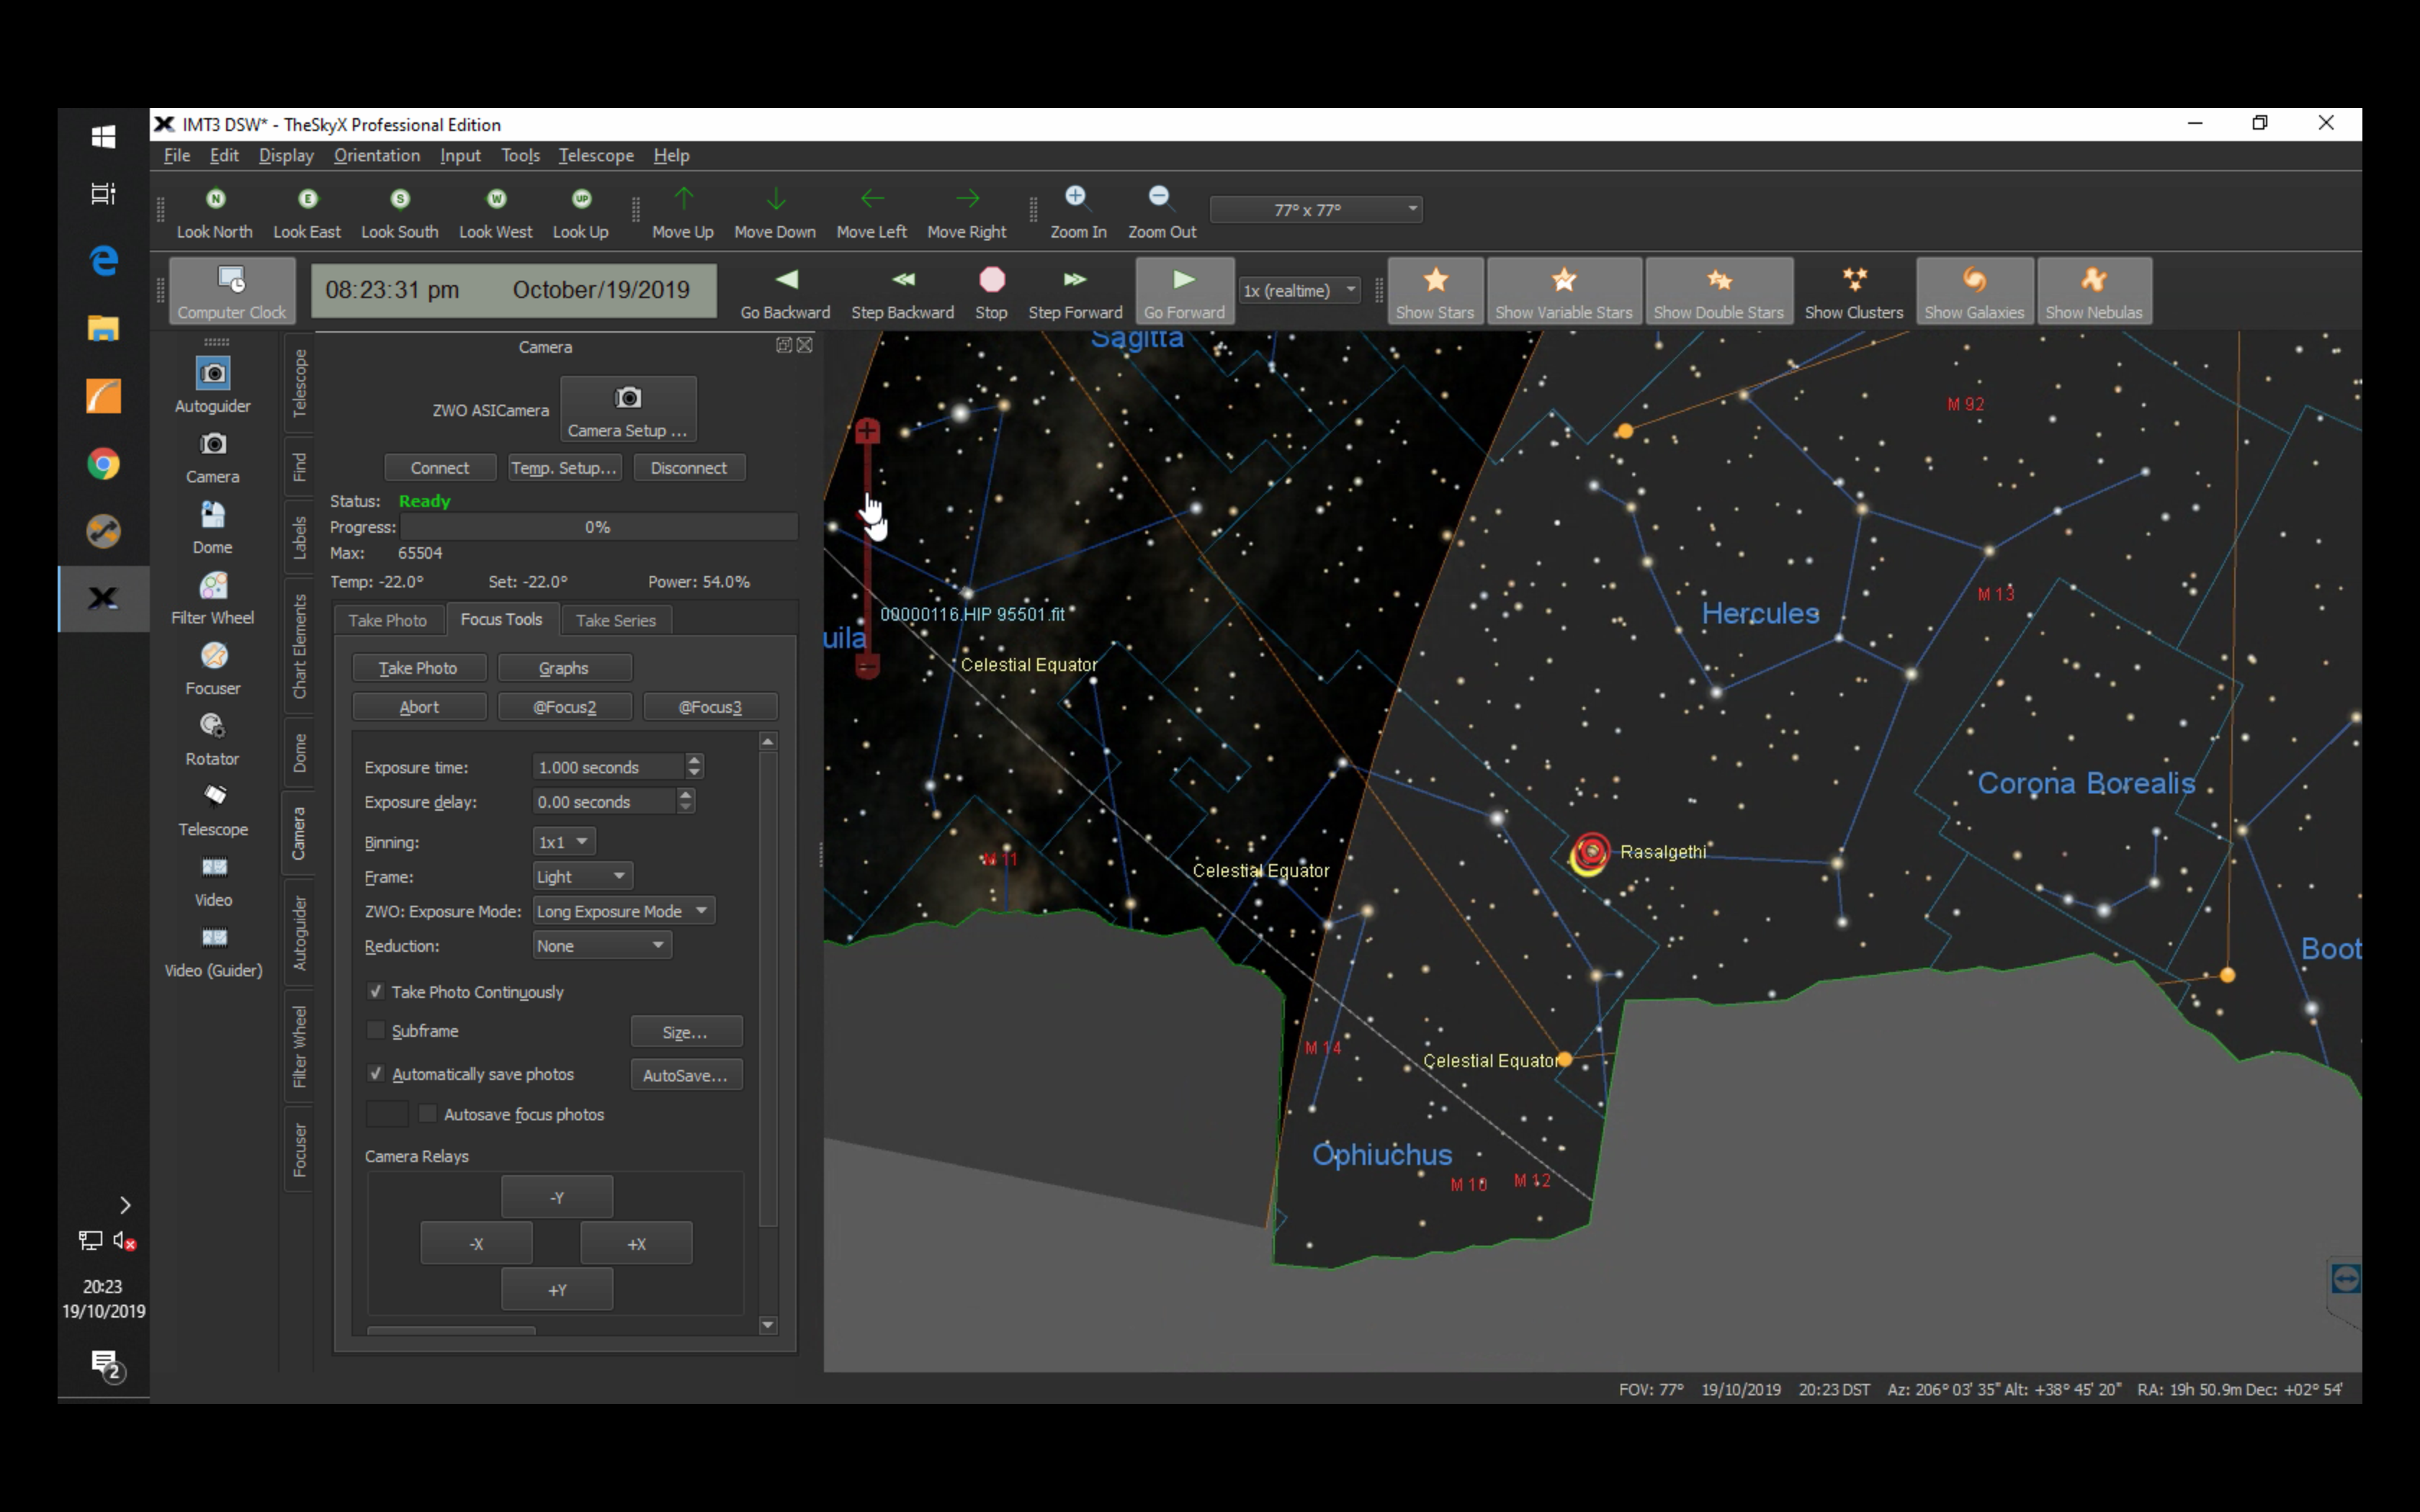
The graph on PHD2 should started to look fairly flat, and so I then attempted to fix the polar error for altitude. I selected a star in the West and near the celestial equator such as Rasalgethi in Hercules.
Rasalgethi used for Altitude adjustment
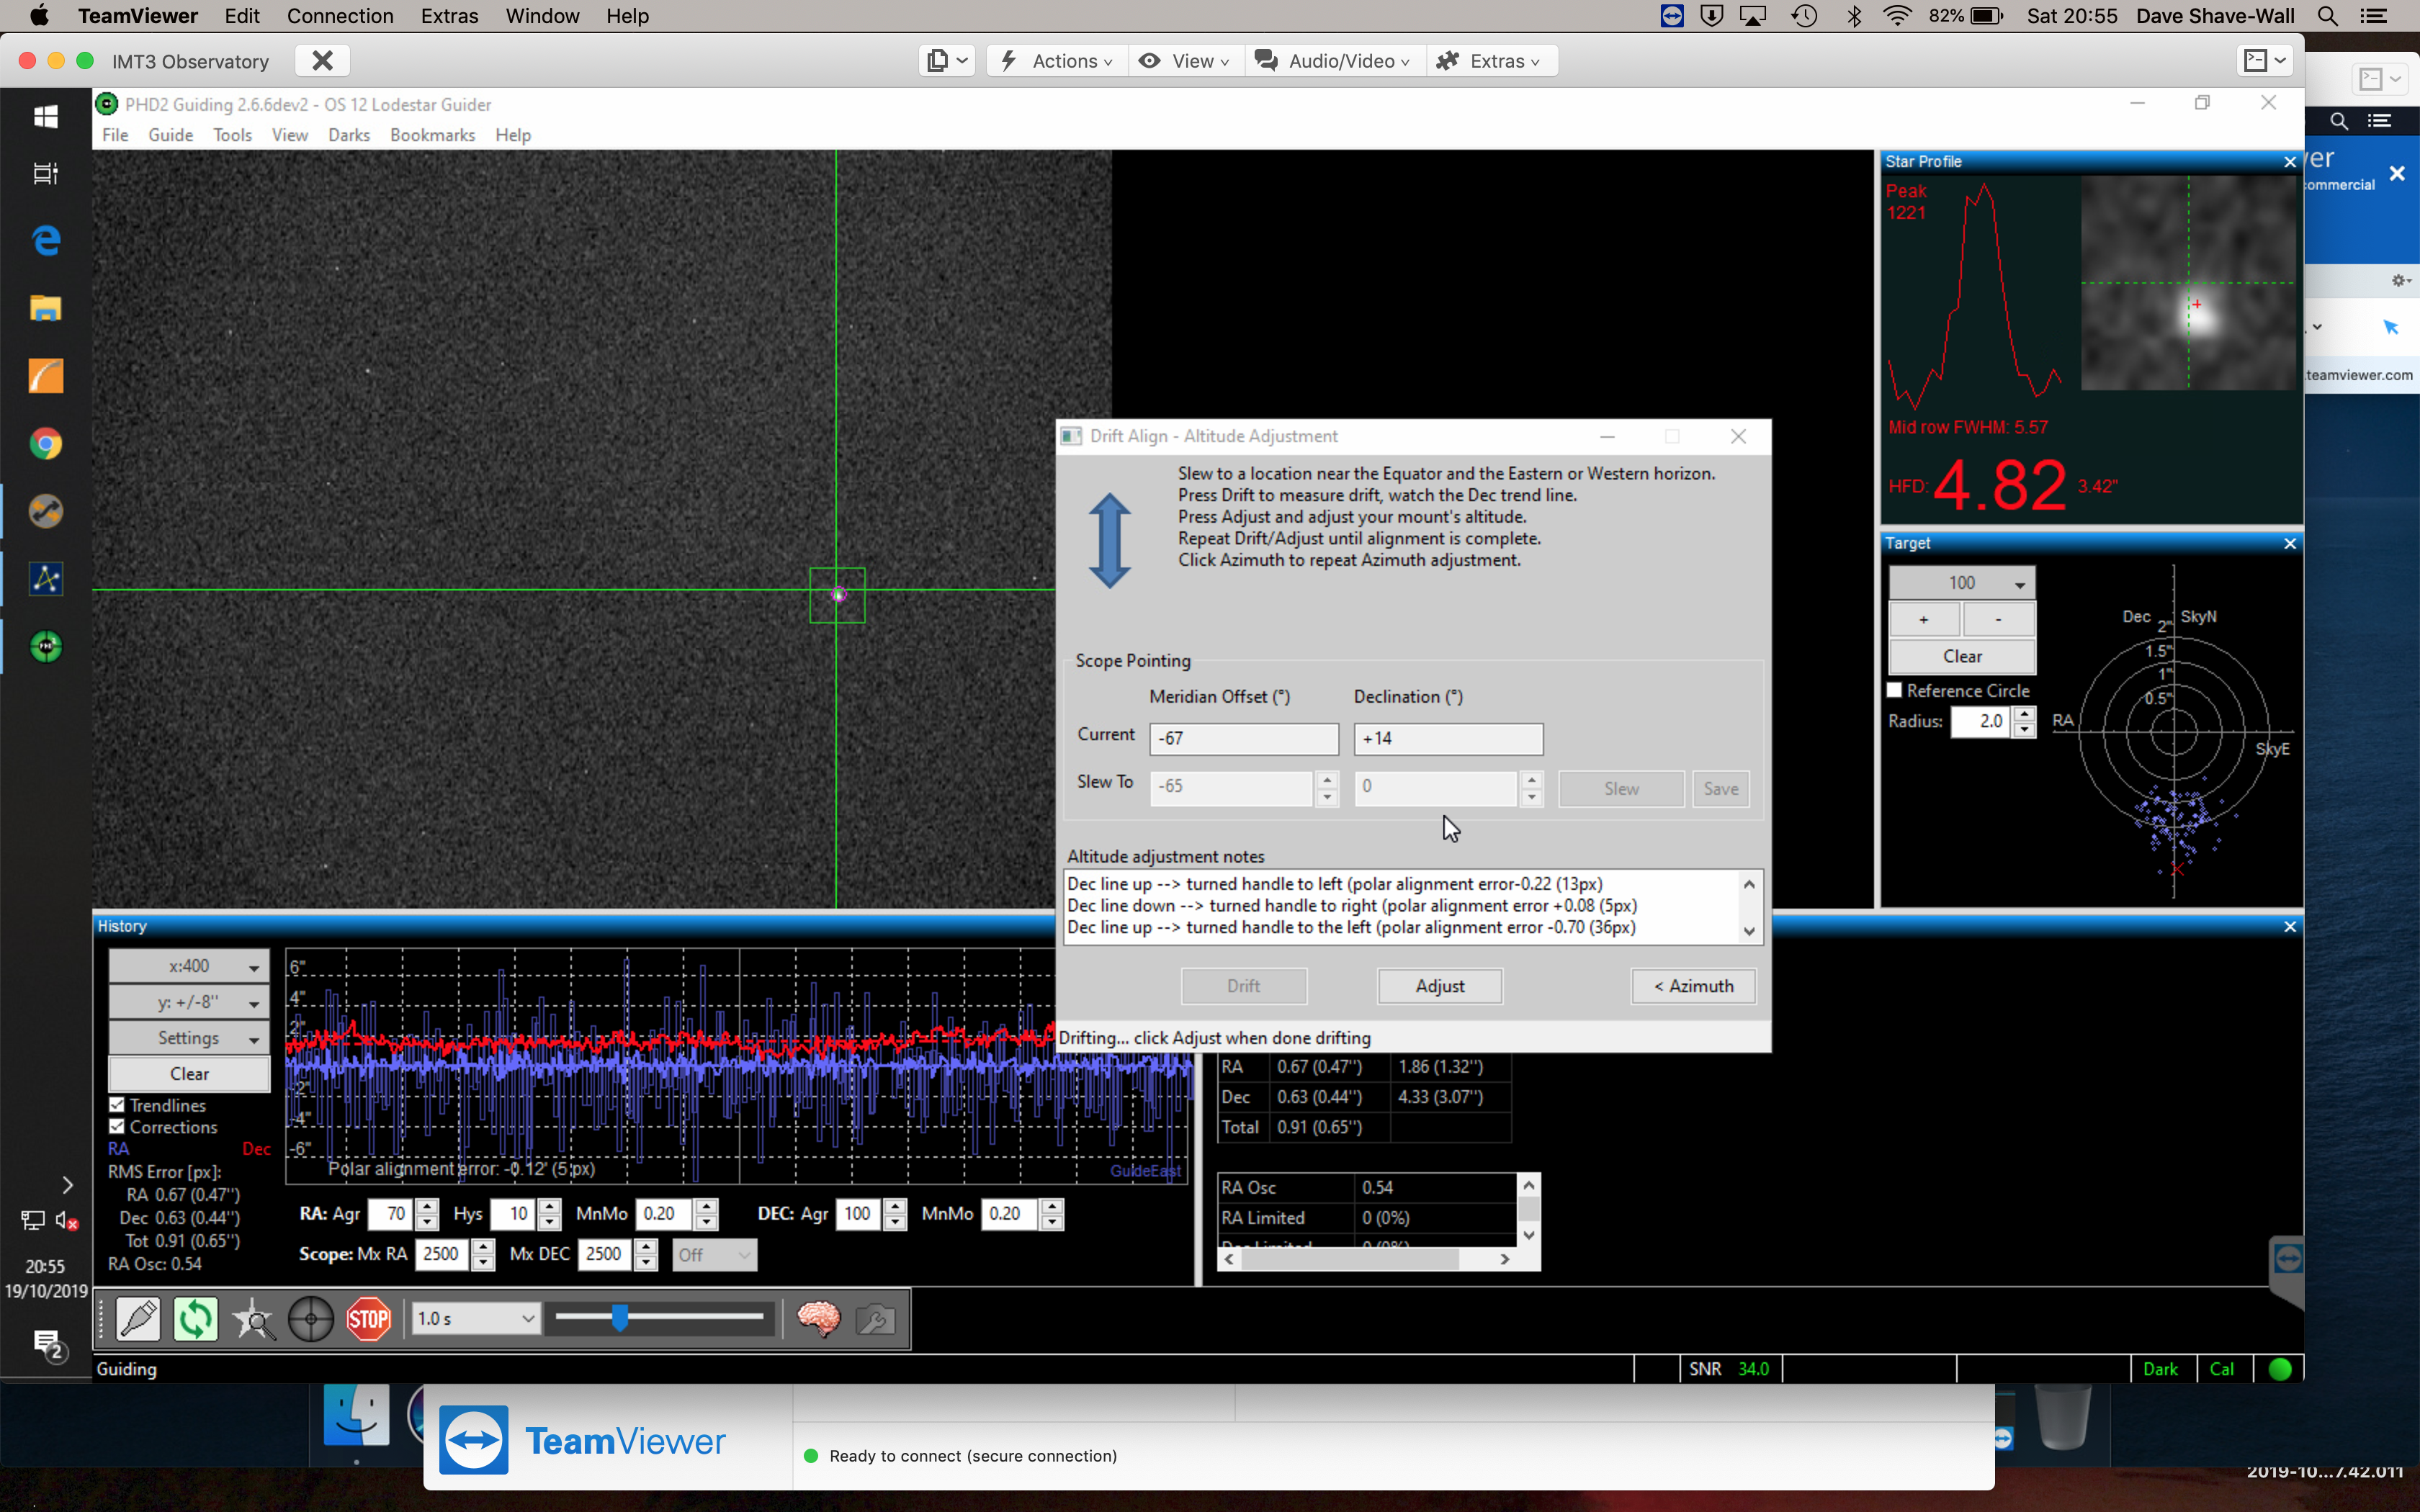
I watched the DEC line only and ignored the RA, the DEC line this time reflecting the error in altitude. Then I adjusted the mount using the altitude adjustment spanner moving the star again to the outside of the purple circle and then retested, finally getting the error down to a suitably small number after only 1 turn of 0.12′ 5px error.
Altitude adjusted to 0.12′ 5px error
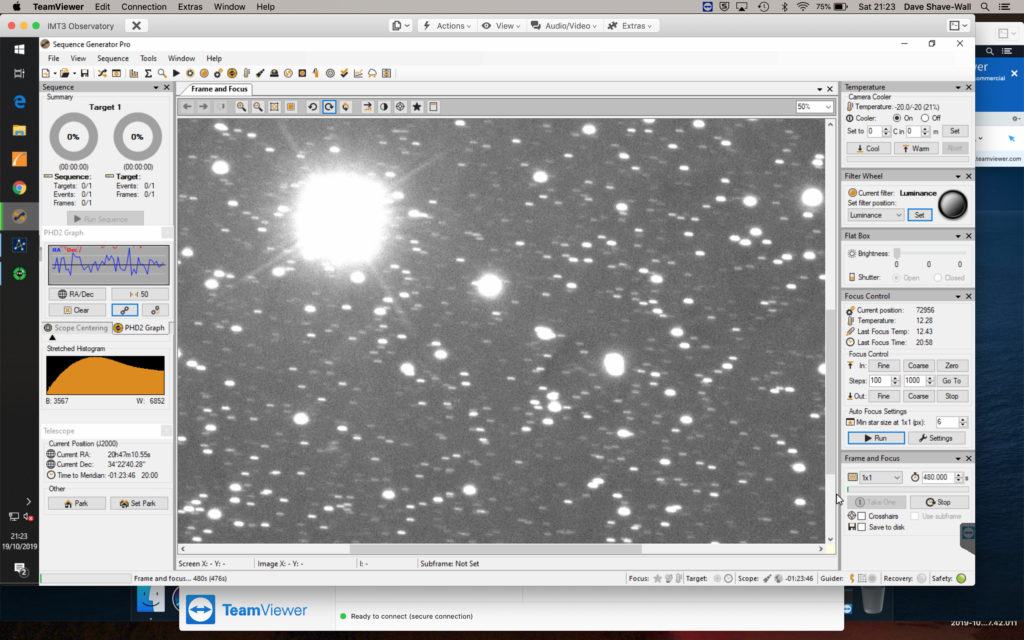
Unfortunately at the extreme West I could only expose unguided for 1min on the 12″ at 2.5m focal length, the stars otherwise looked trailed.
Trailed stars at extreme due West
I then went to near the meridian and a 4 min exposure produced nice sound stars.
4 minute exposure near Meridian
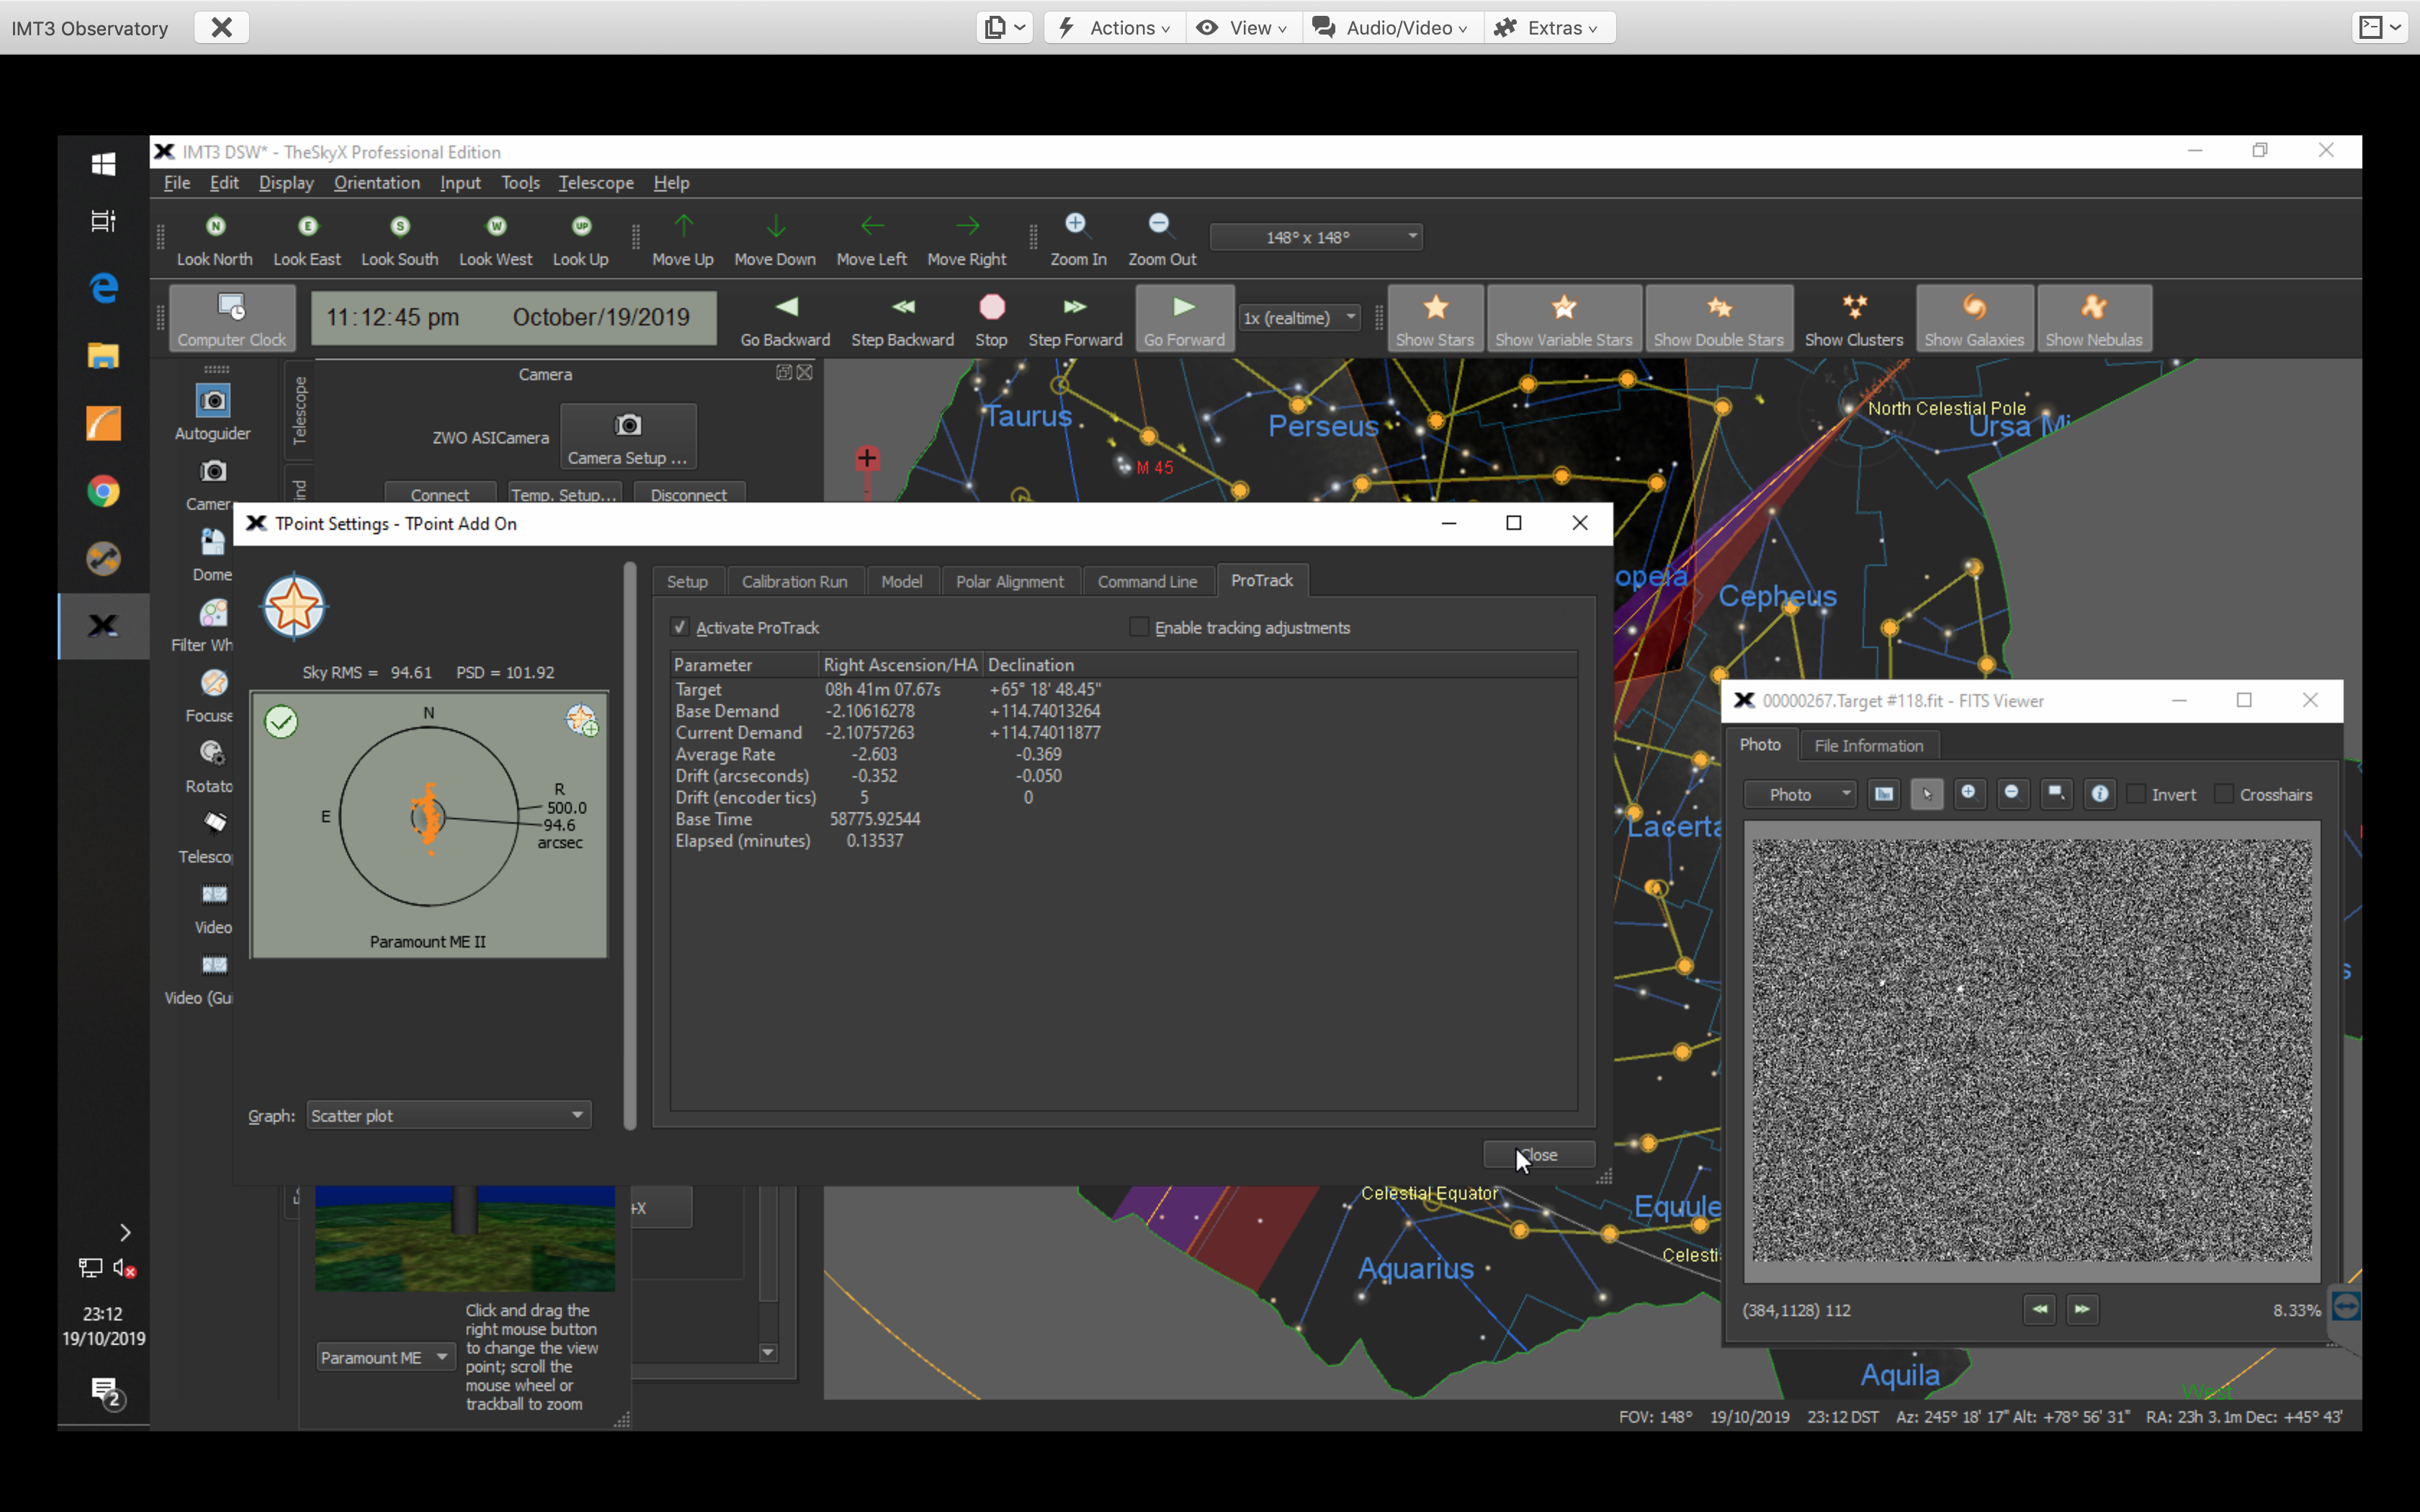
I then went on to do an automated TPoint run, but the problem seemed to be that a large number of samples could not be solved. The resulting TPoint model of 118 samples of which only 90 were usable, was worse than the 60 point model I had before. I will therefore redo the TPoint model the next time it is clear.
TPoint model not as great at 60 points I did before
The whole 118 model took approximately 1.5 hours to complete which is so much better than a manual model.
Completed model 118 points
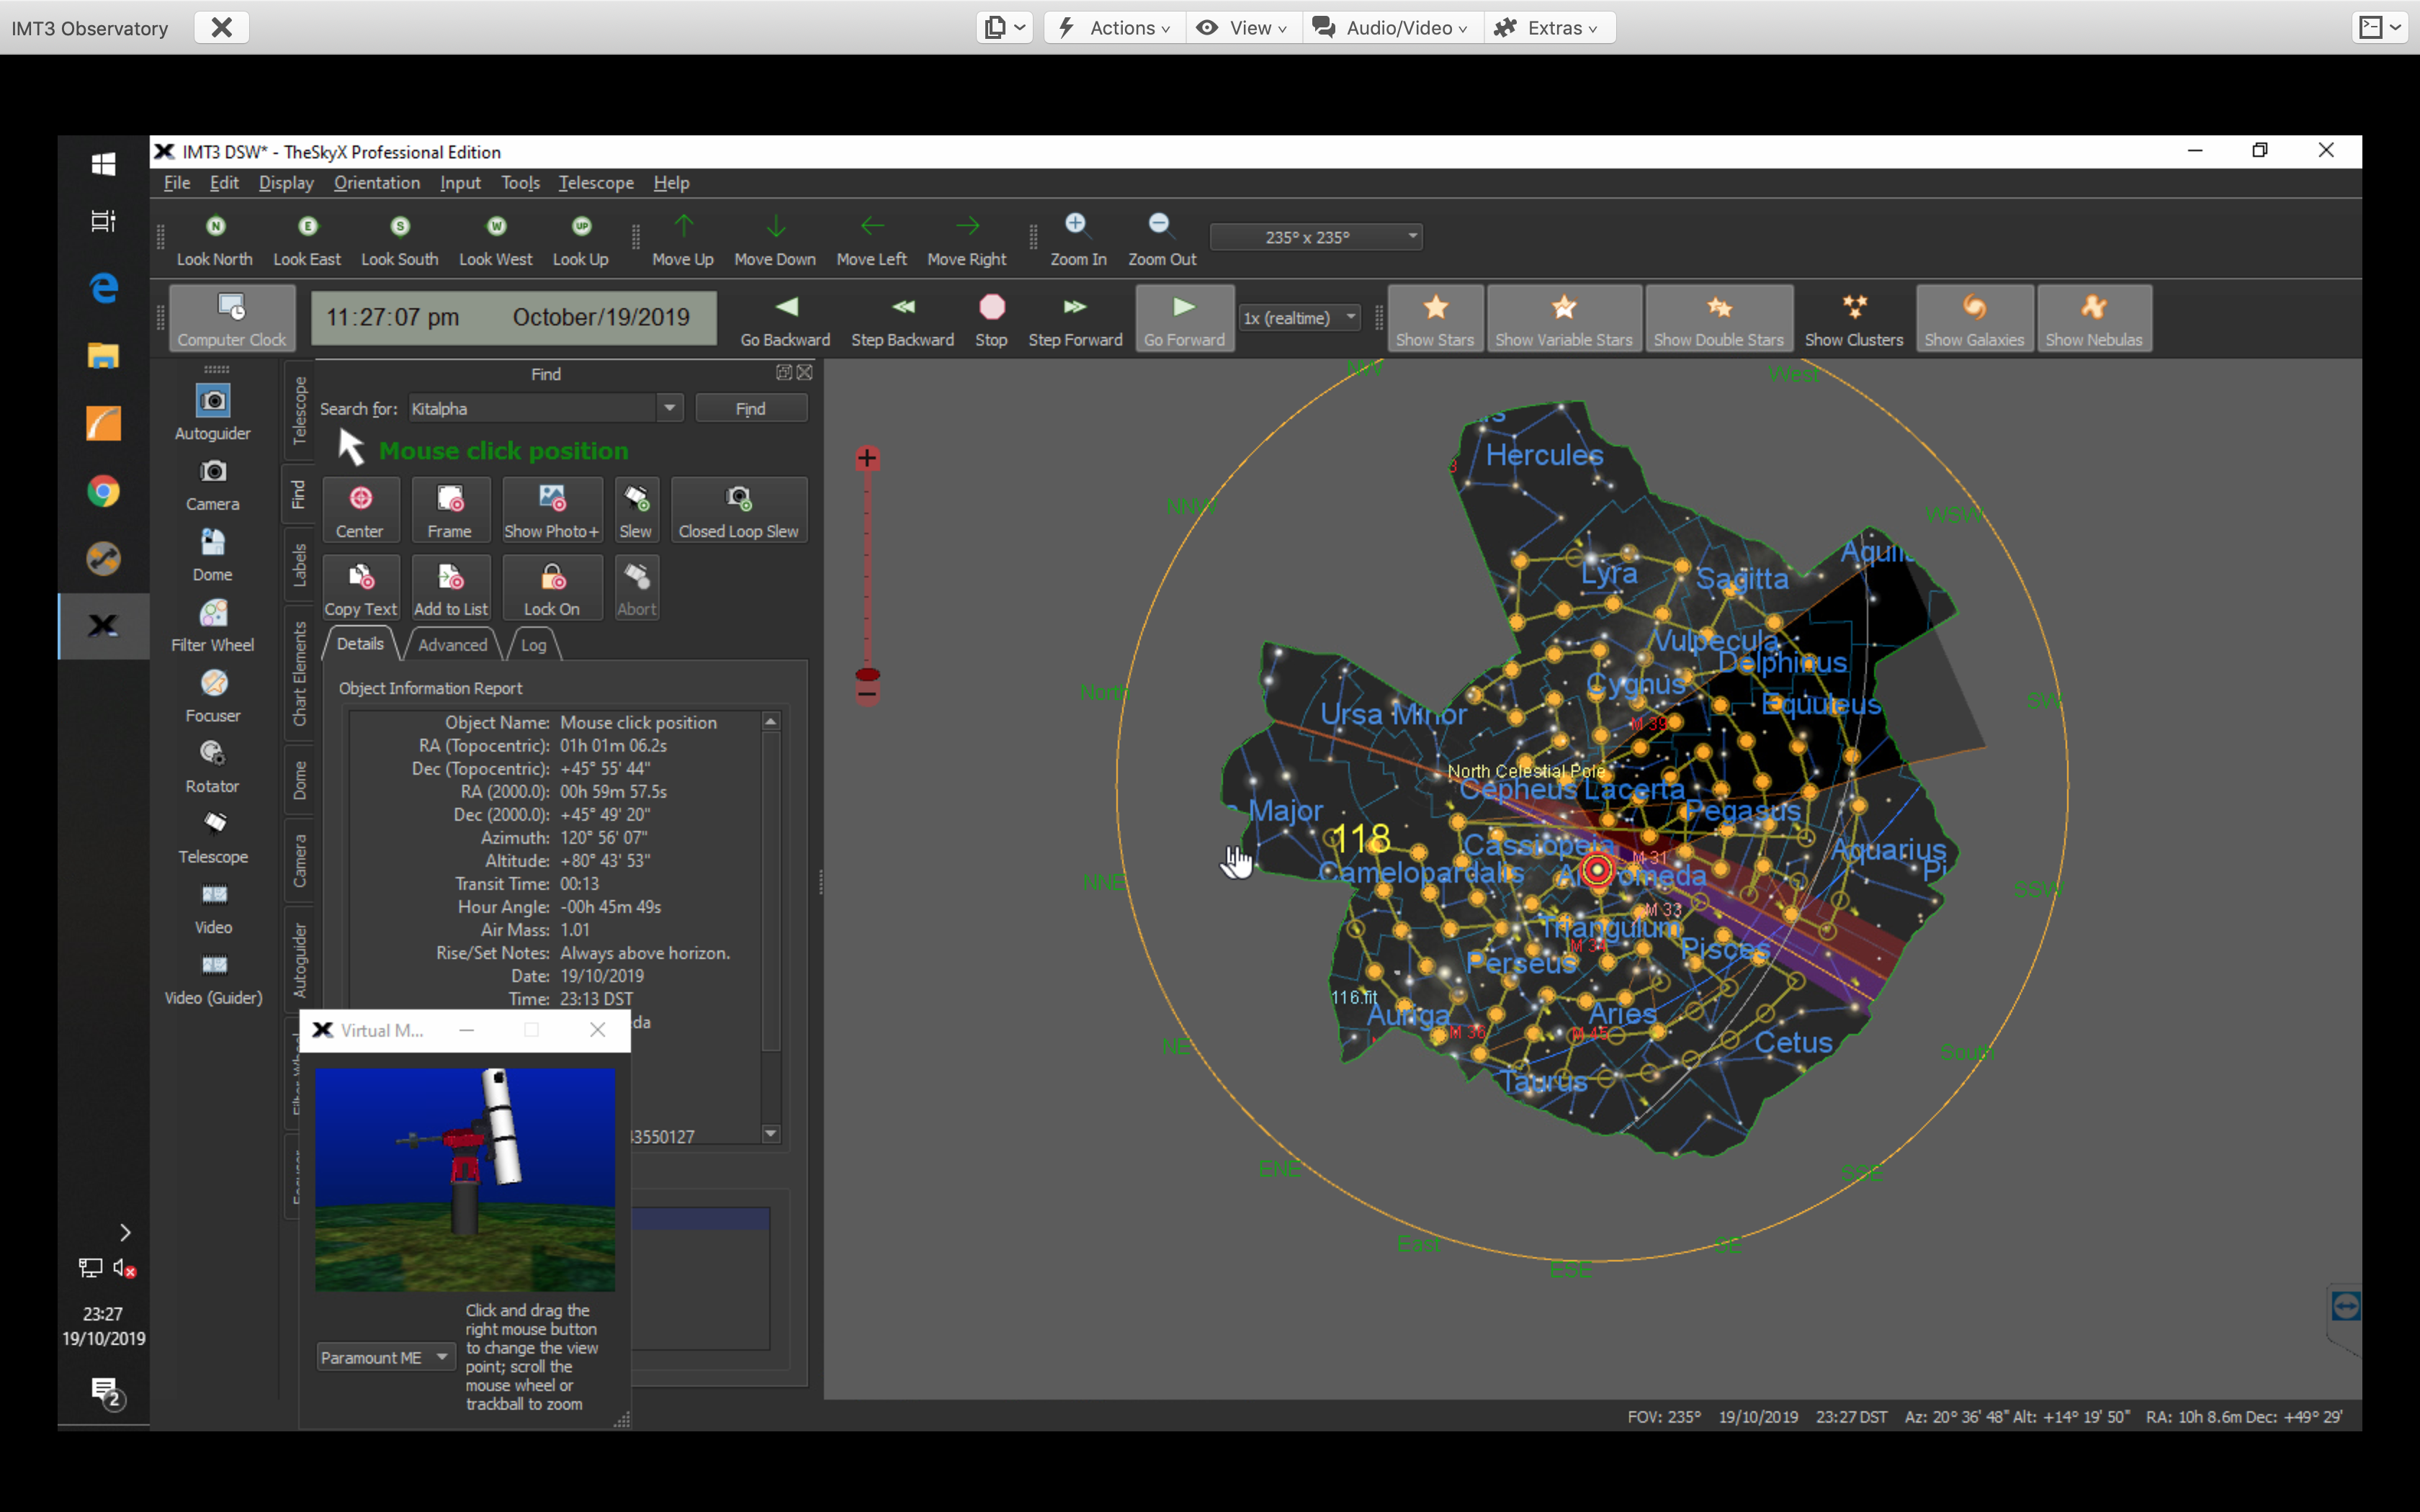
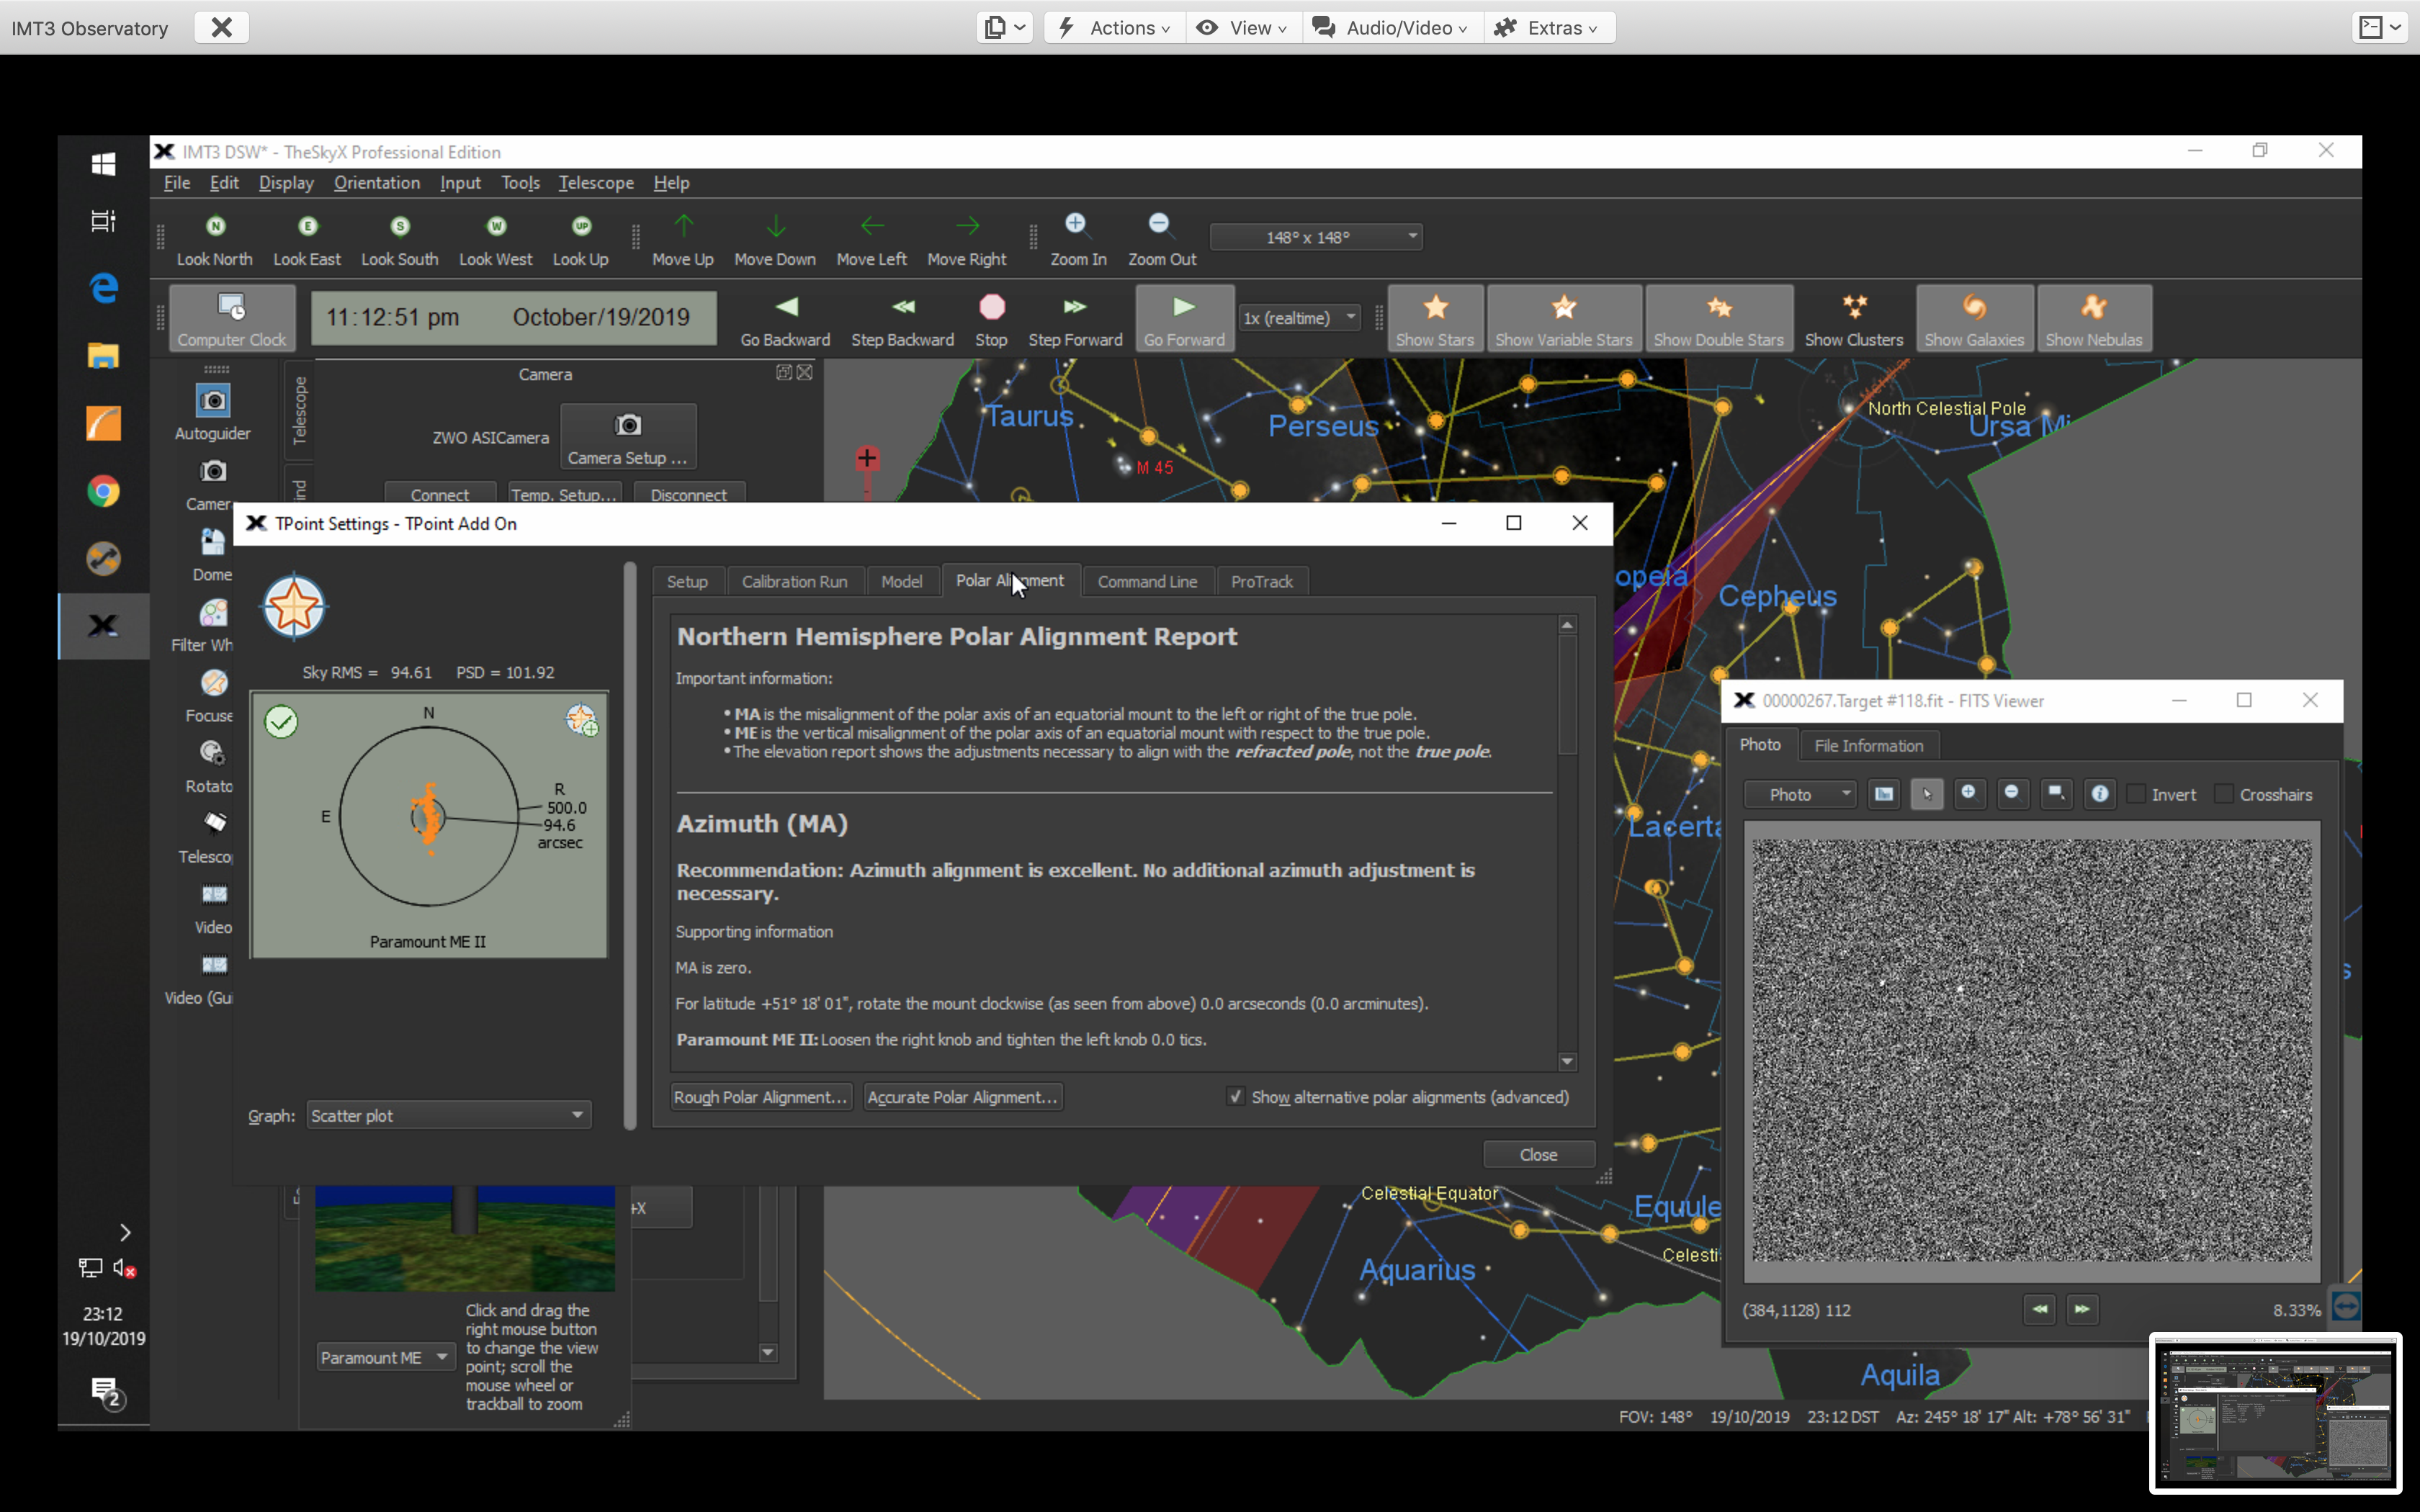
The good thing is the TPoint model told me the polar alignment is excellent!
Polar Alignment is excellent 🙂
It is now @23:30 so I went on to start imaging. First I needed to perform a focus run on Luminance which I did.
Good focus on luminance
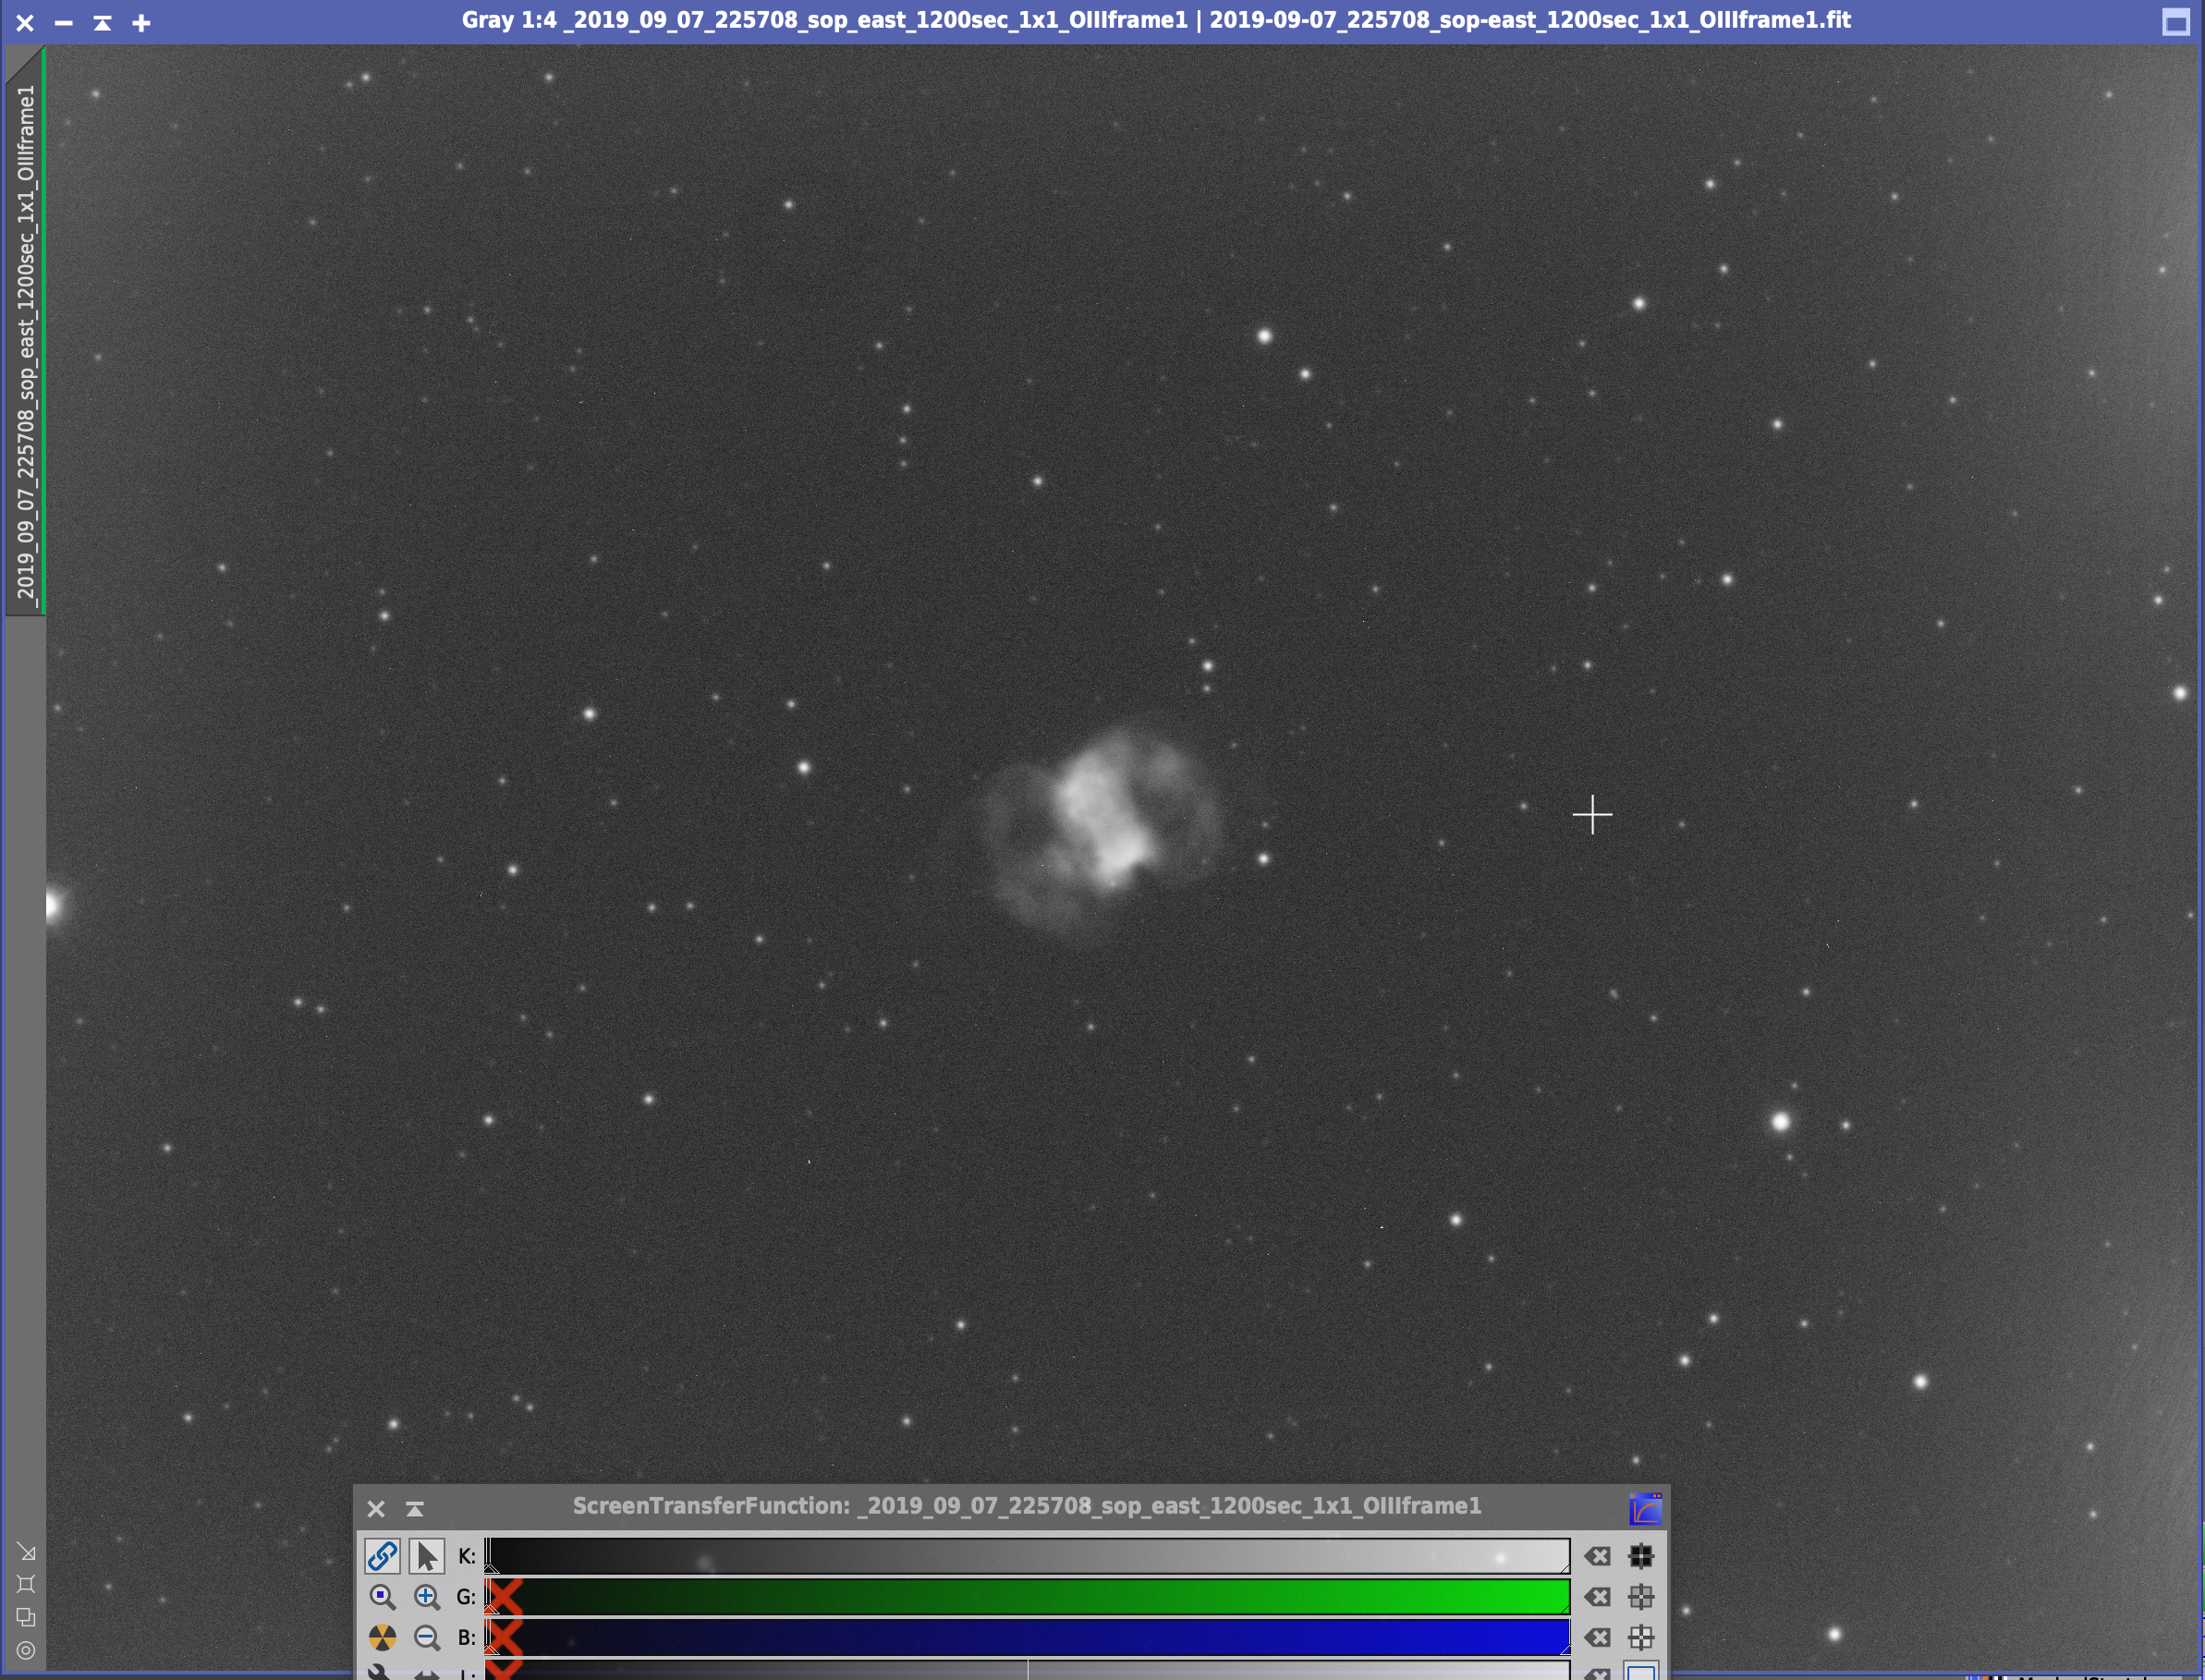
I then slewed to M76 to start my image run, a 30s exposure showed stars in focus and little dumbbell prominent in OIII.
Focused stars and M76 centred
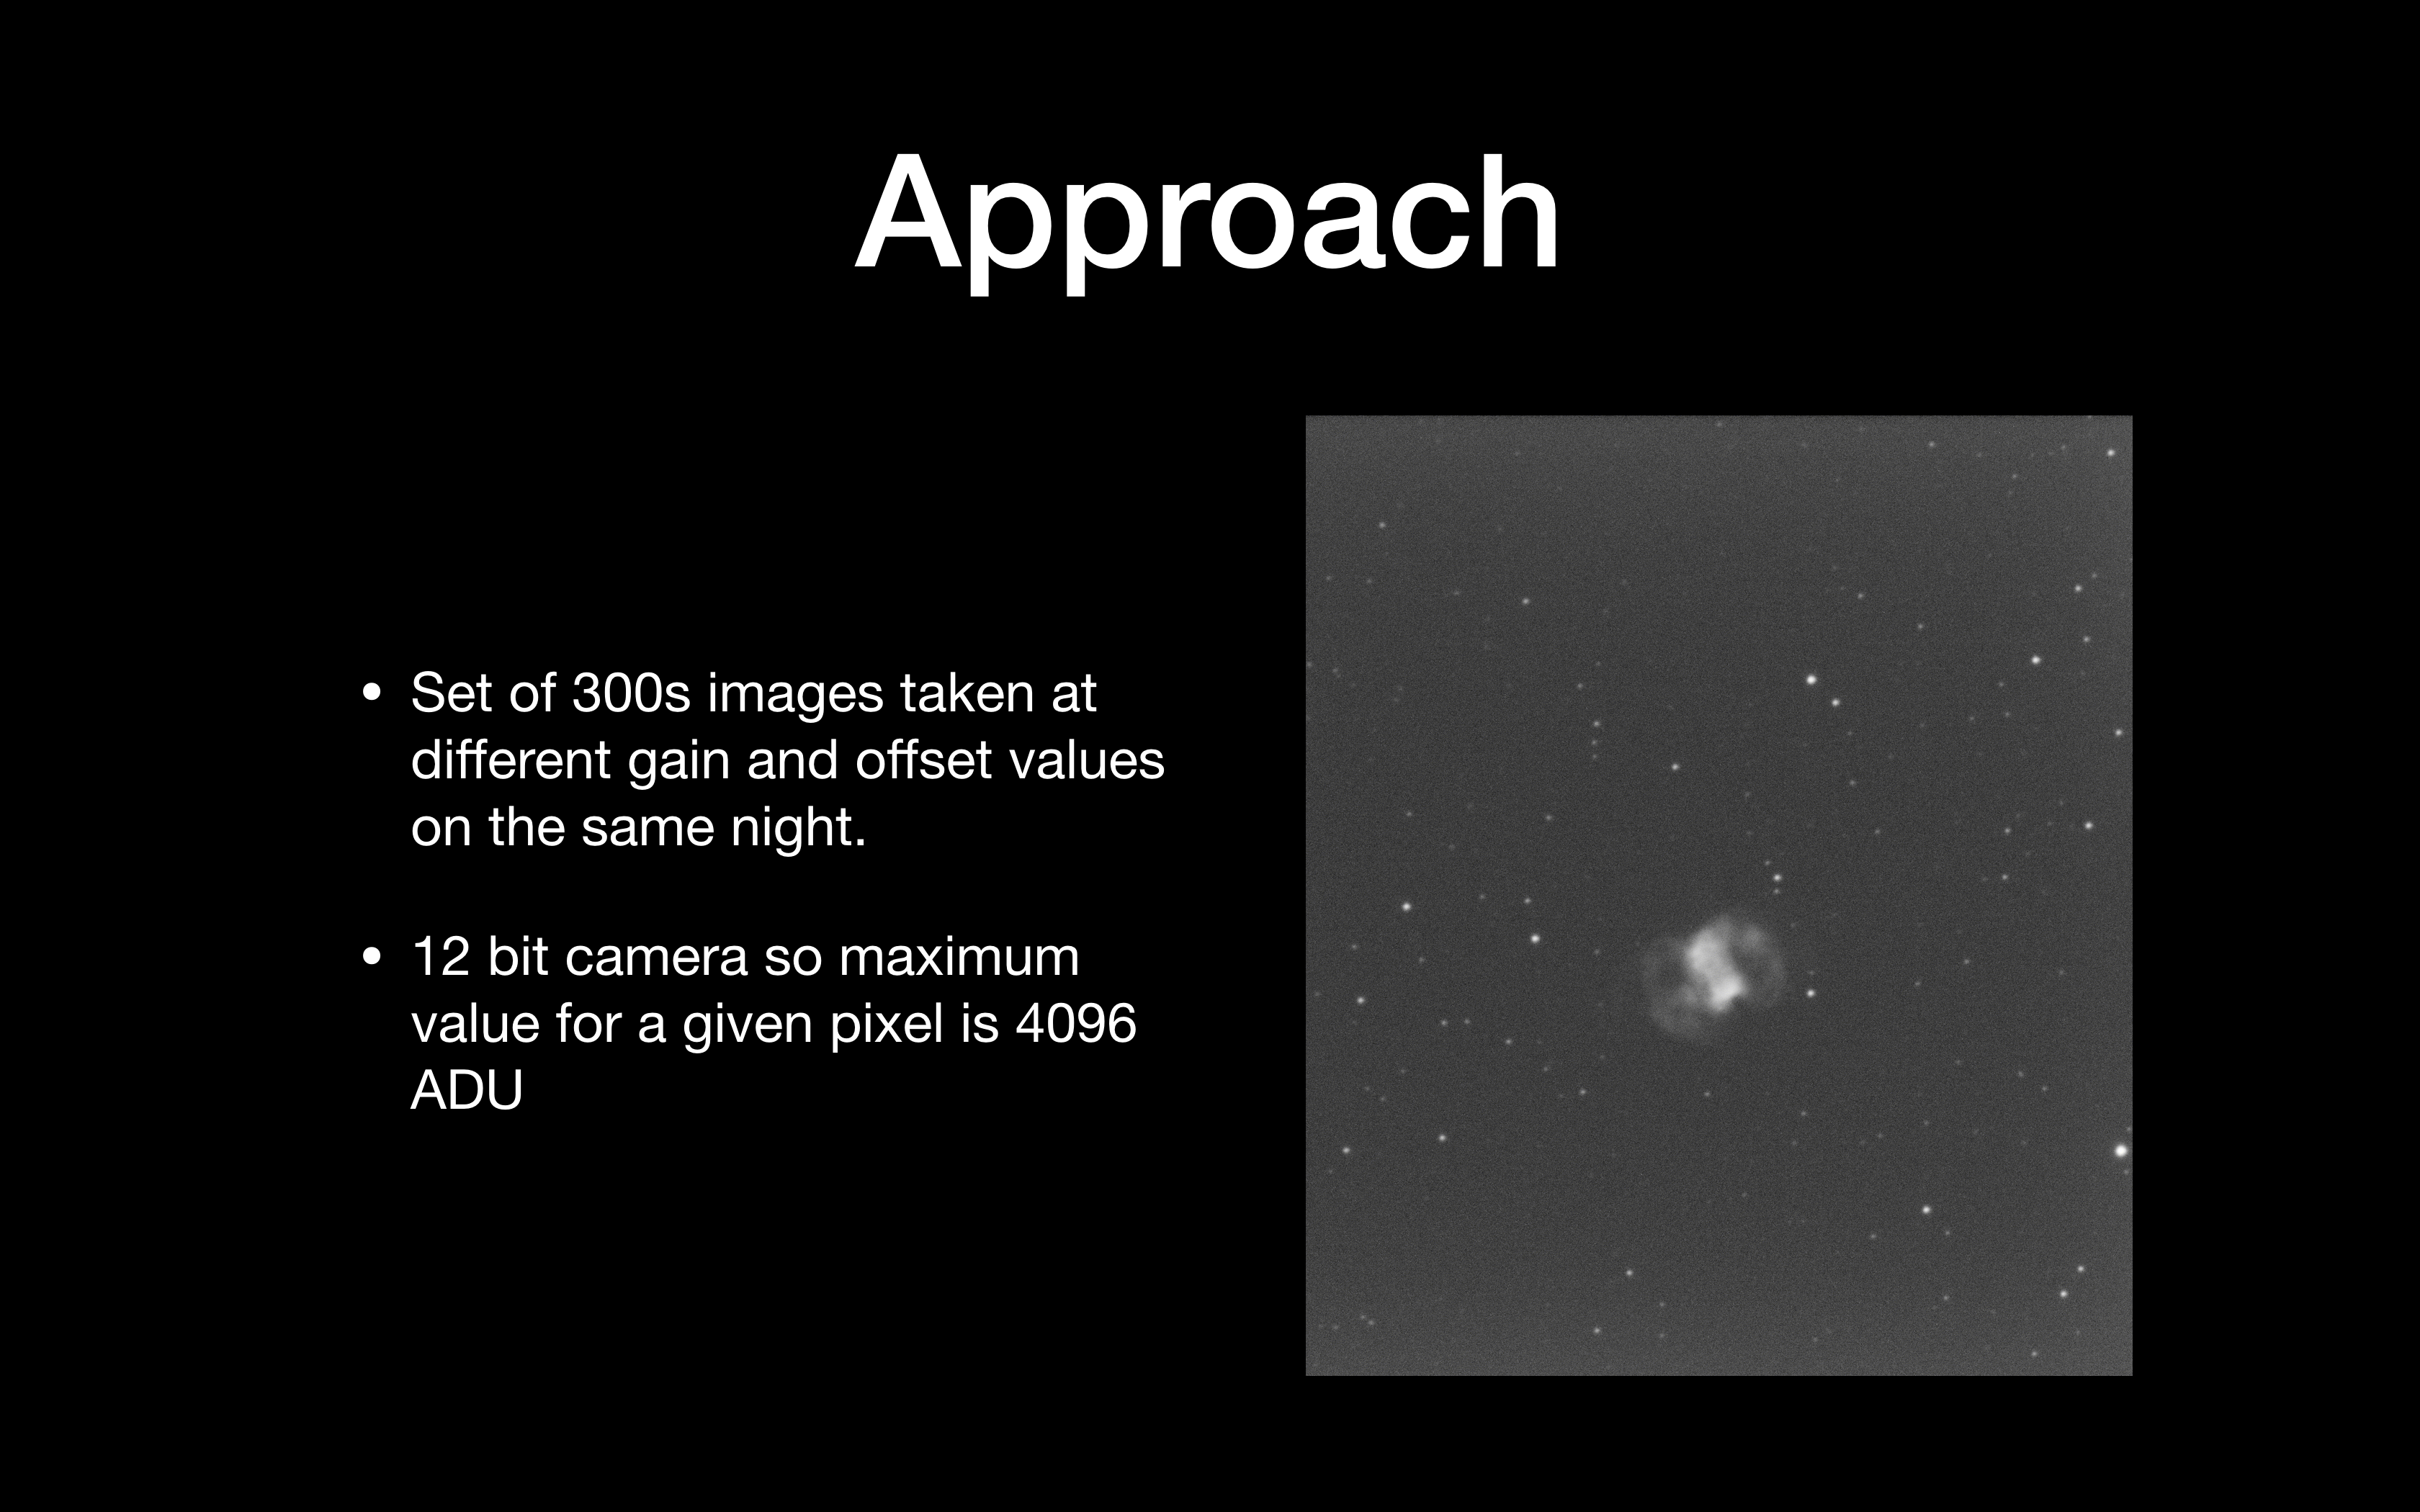
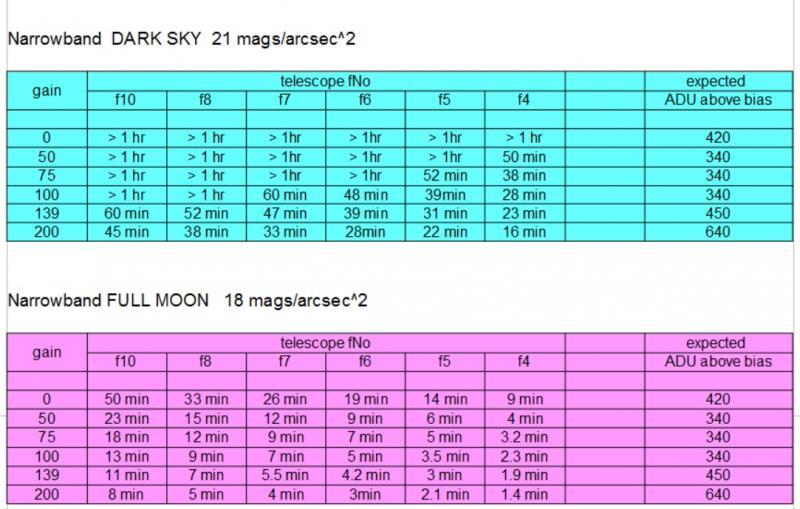
This time round I decided to set the Gain to 139 and the Offset accordingly to 21. I also decided on a 10min exposure rather than 20mins front the last set.
So the main approach here was to start testing the ZWO ASI1600mm on 5min images and decide which is the best Gain and Offset to use. As the object is a planetary nebula I have used my Astrodon 5nm OIII filter to bring out the faintest parts of the nebula. To be thorough, and this will take time, I plan on running the tests for all 7 filters I have.
I have done extensive reading on the topic of image analysis and hope to apply here what I have learnt. Given then camera is running 12 bit, I have a maximum pixel value of 4096 which represents saturation and then any further response is non-linear. Once I have completed 5min testing I will try for 10, 15 and 20 mins. I will then perform further testing by taking a sample set of 10 images to stack and see how that compares with similar total exposure times across the frames.
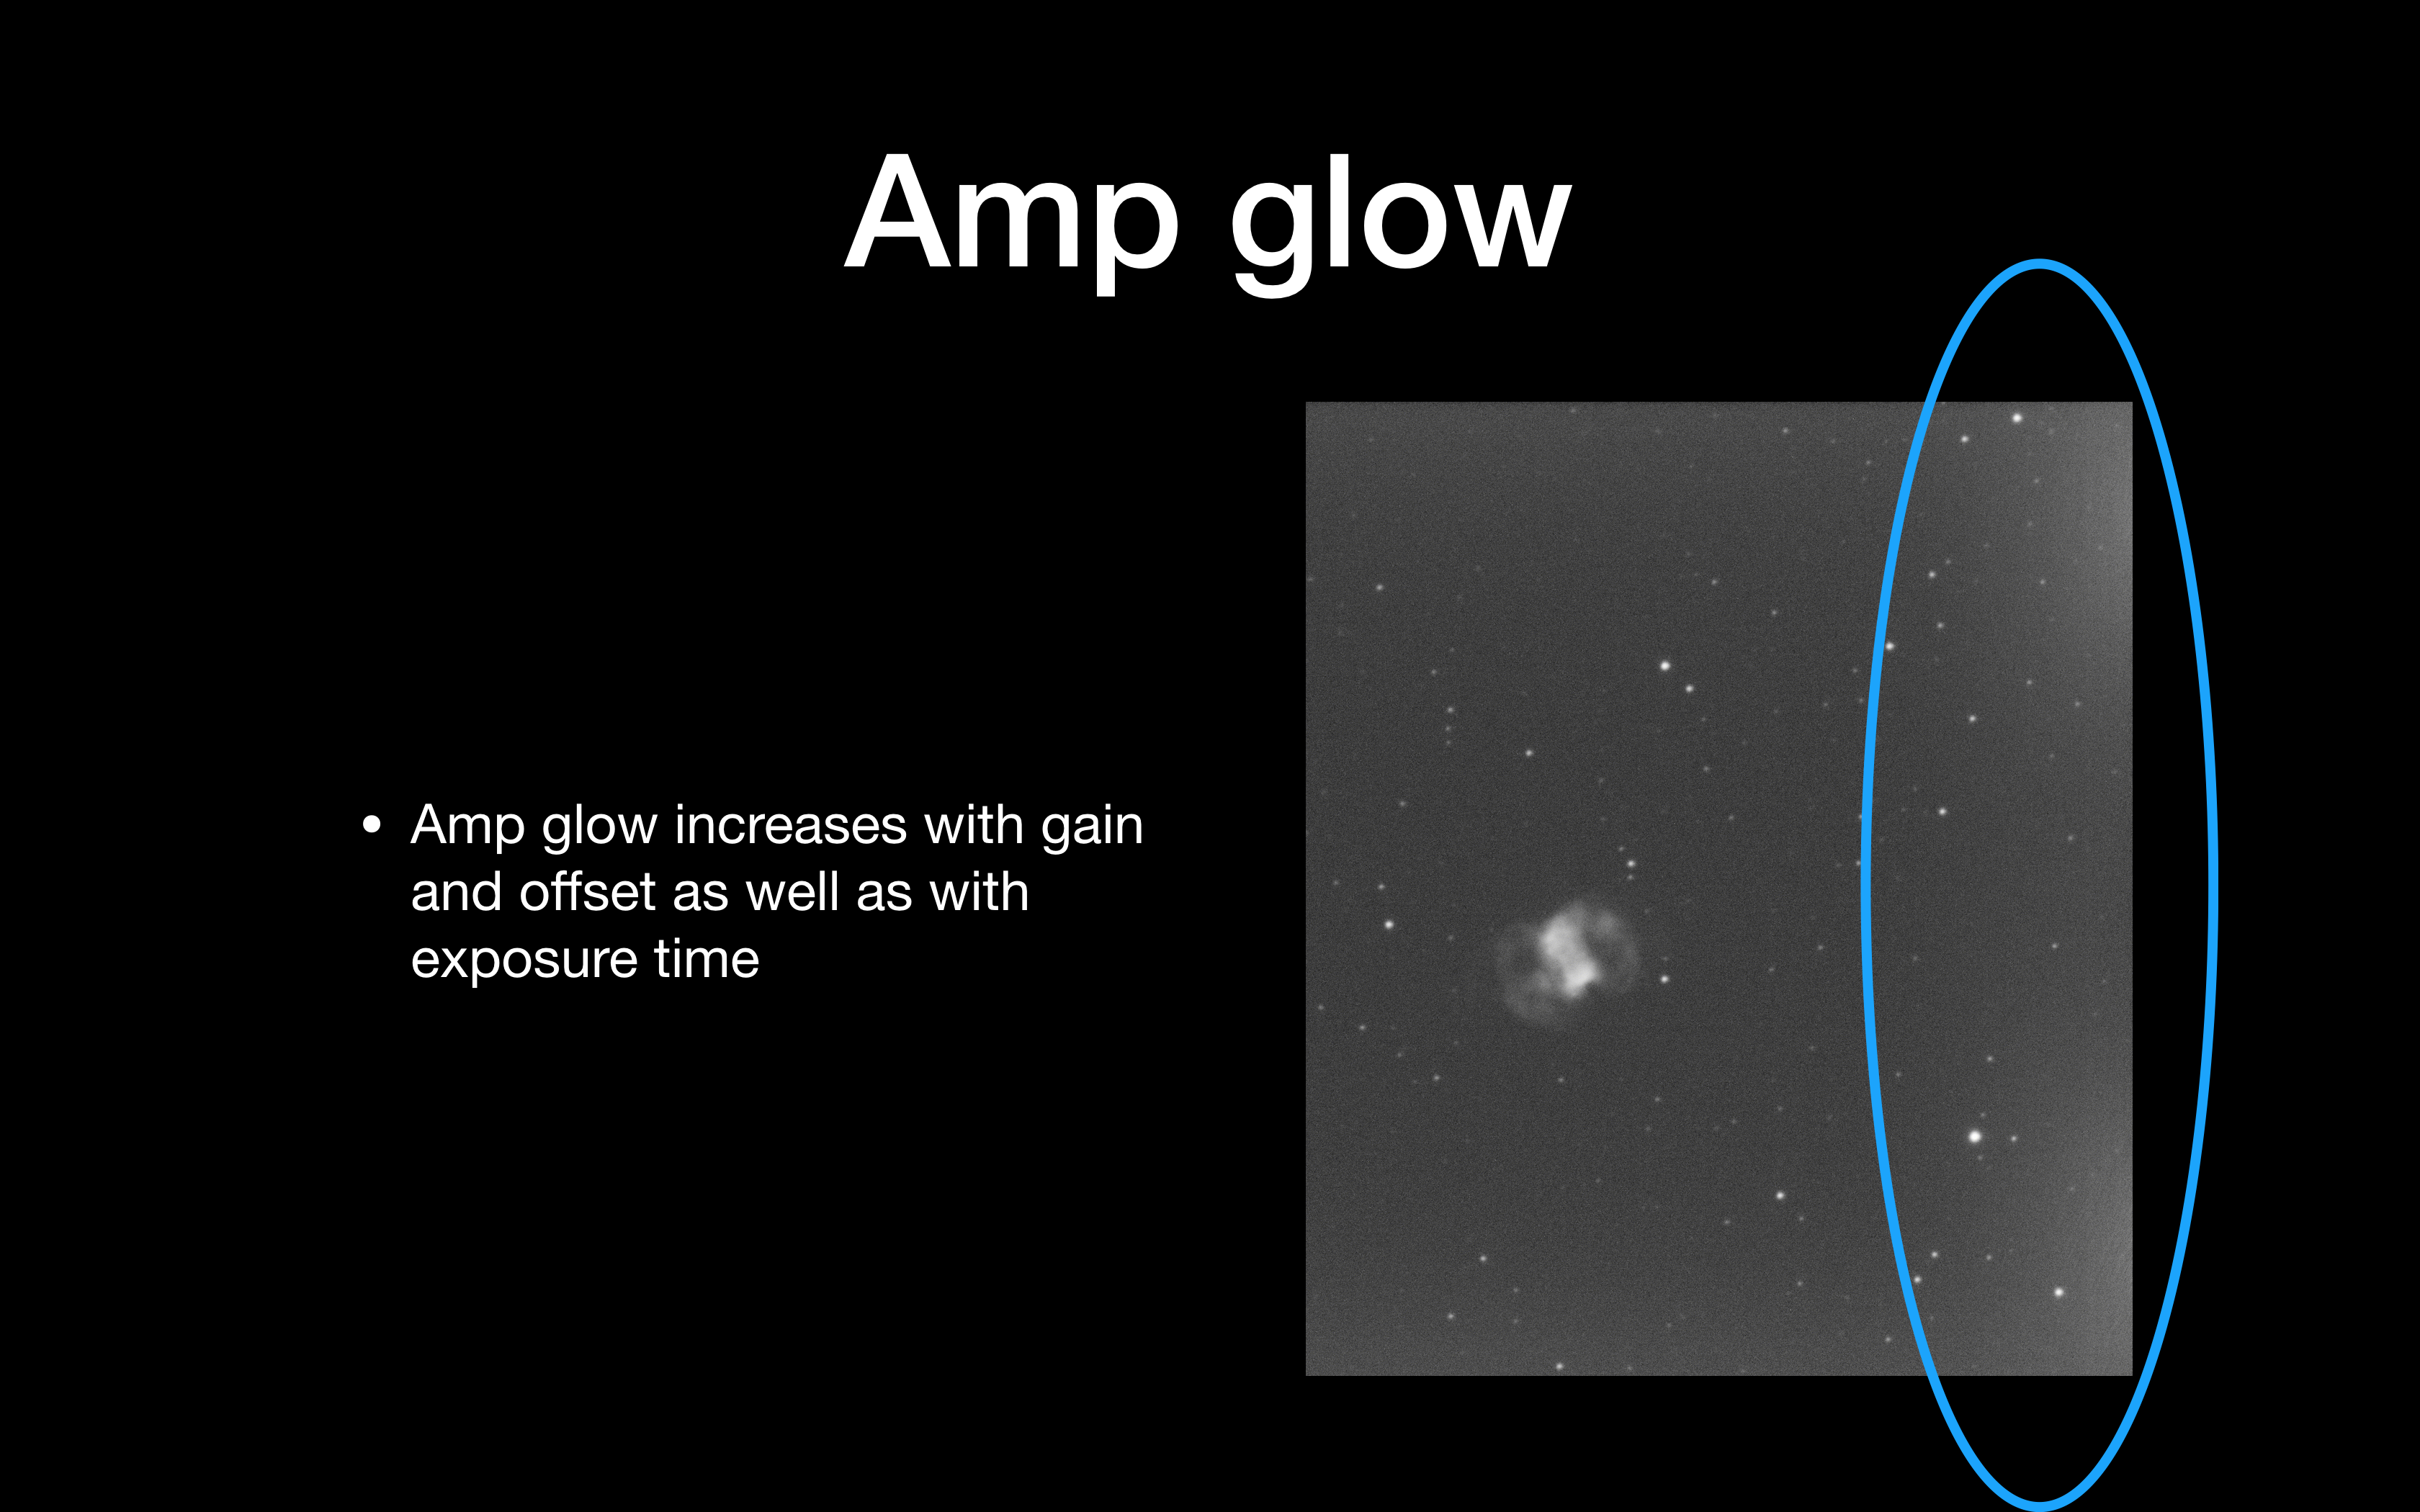
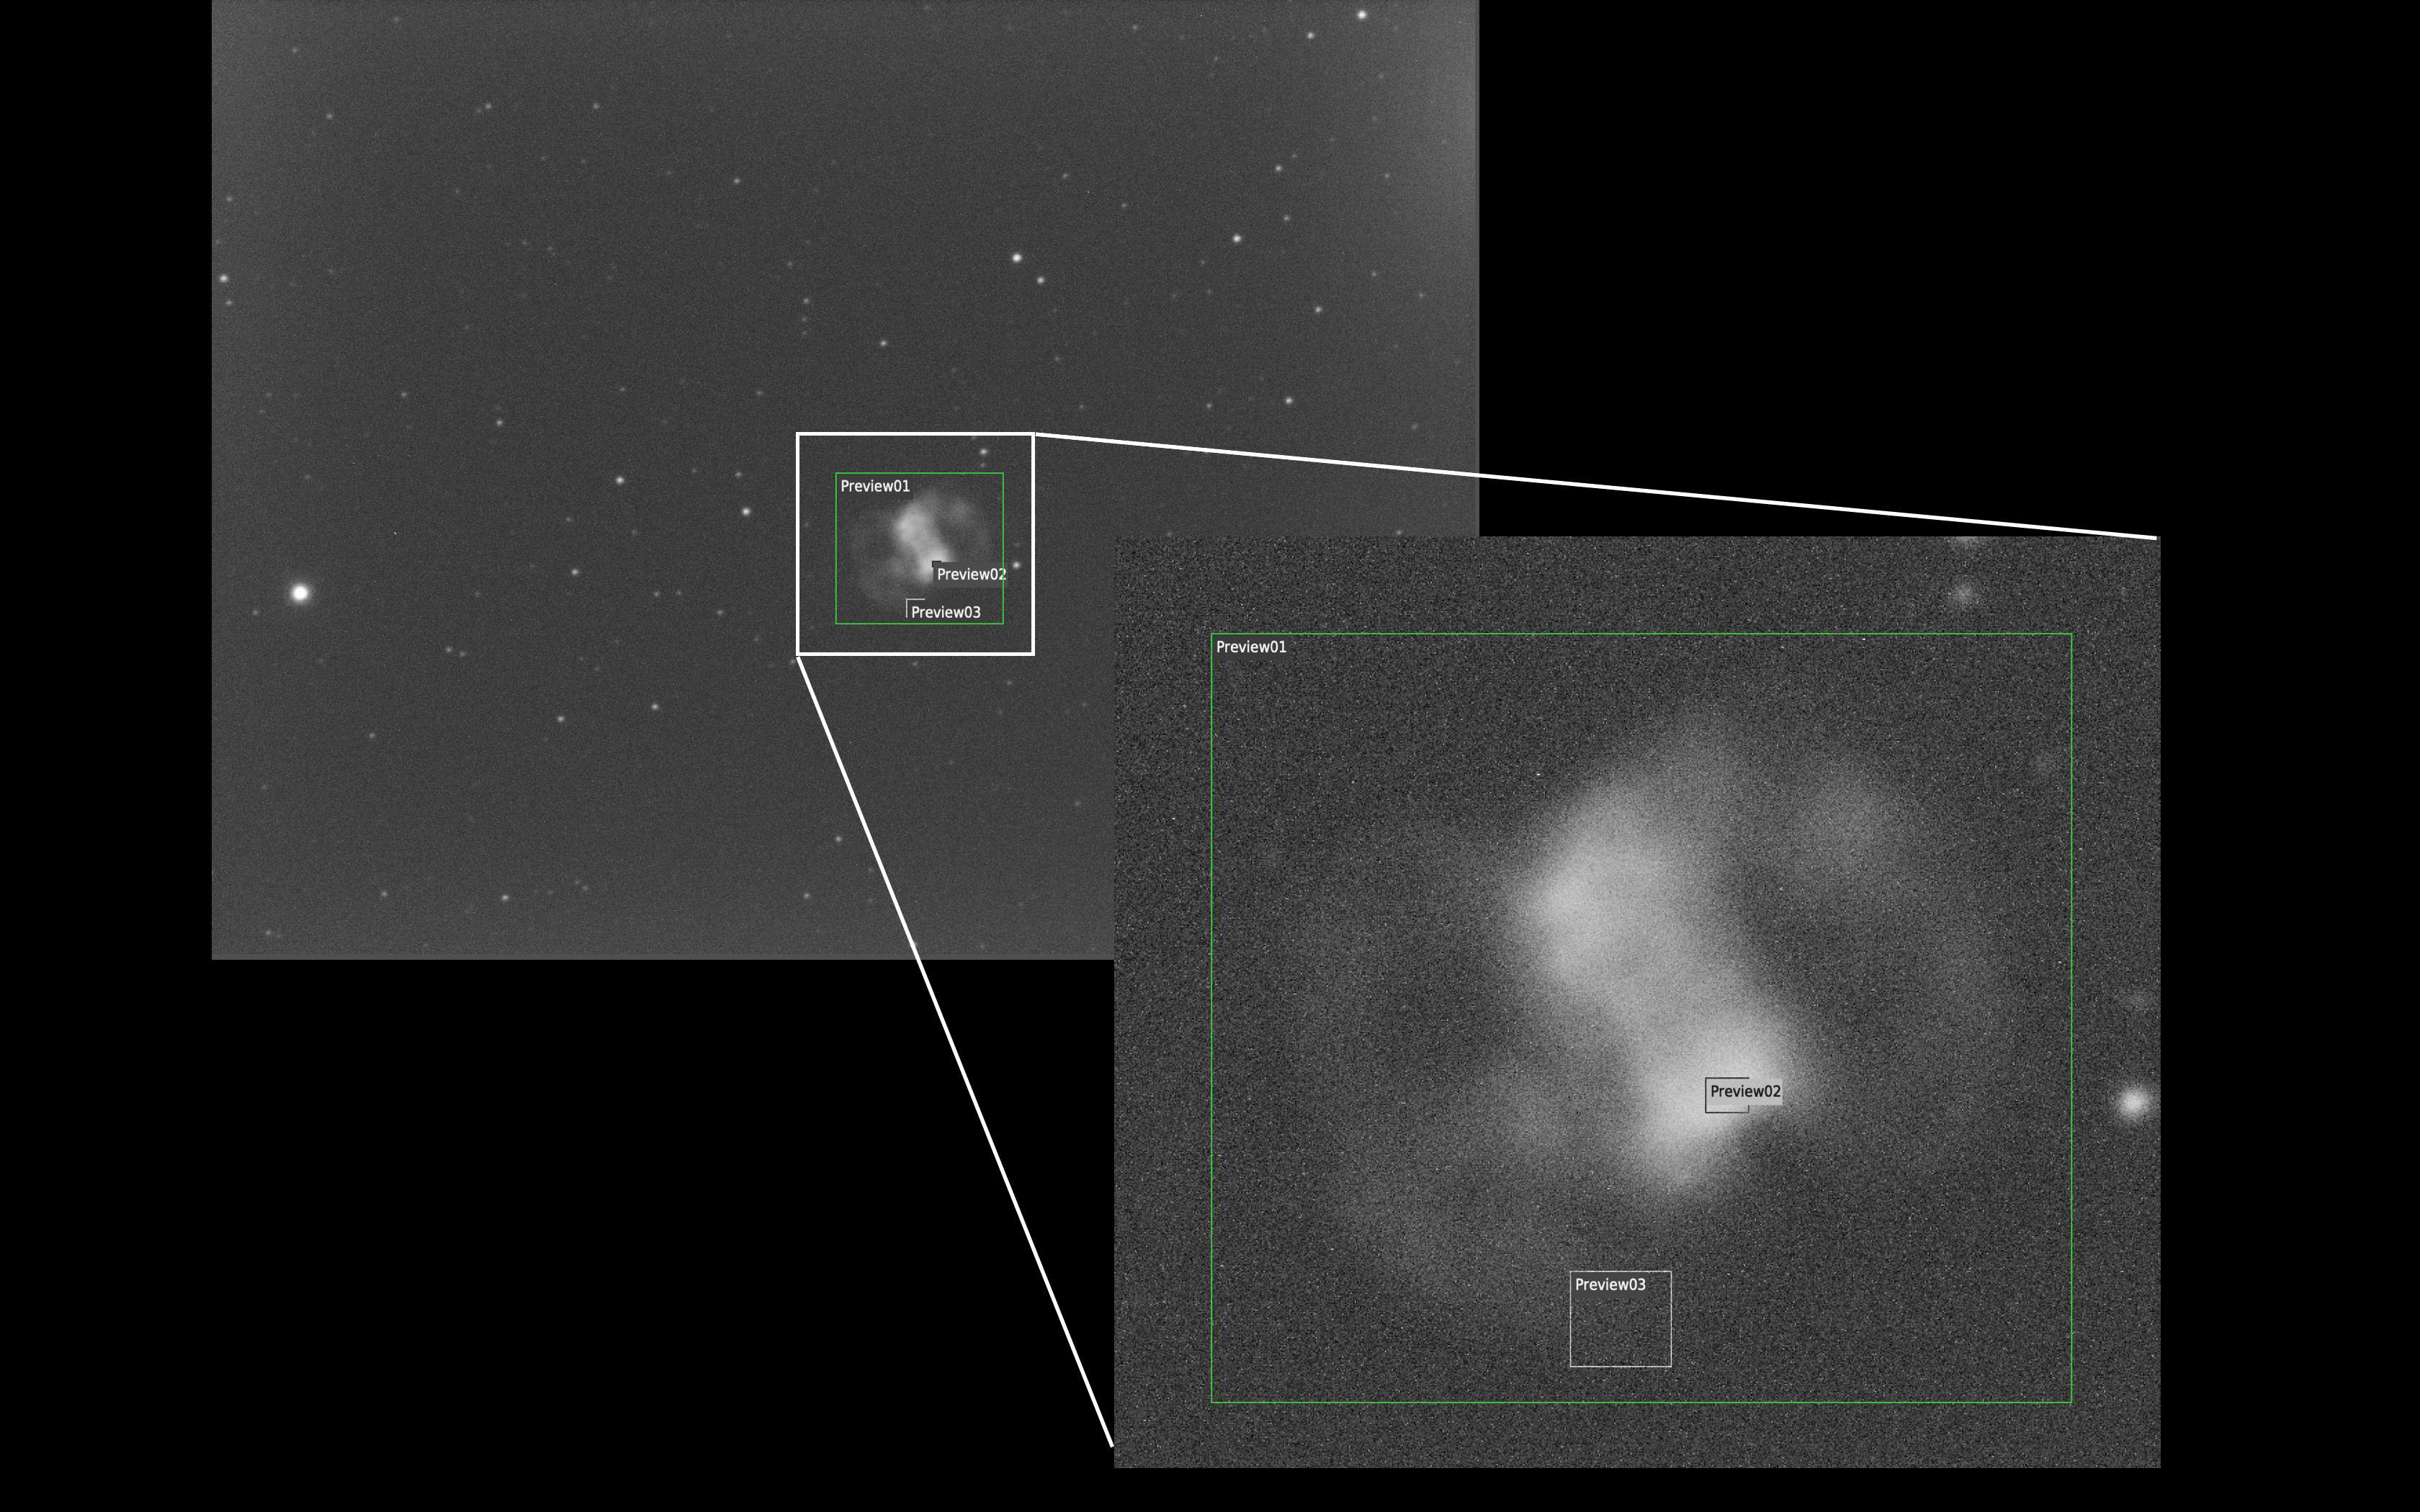
Amp glow is a particular problem with CMOS. Despite the ZWO site suggesting that amp glow is virtually removed in the Pro Cooled camera, it is clearly not, as can be seen in single 5 min subs. The good thing is a dark will remove it effectively. What I need to make sure is that the amount glow does not swamp the image so much that it overpowers the signal from the faint nebula.
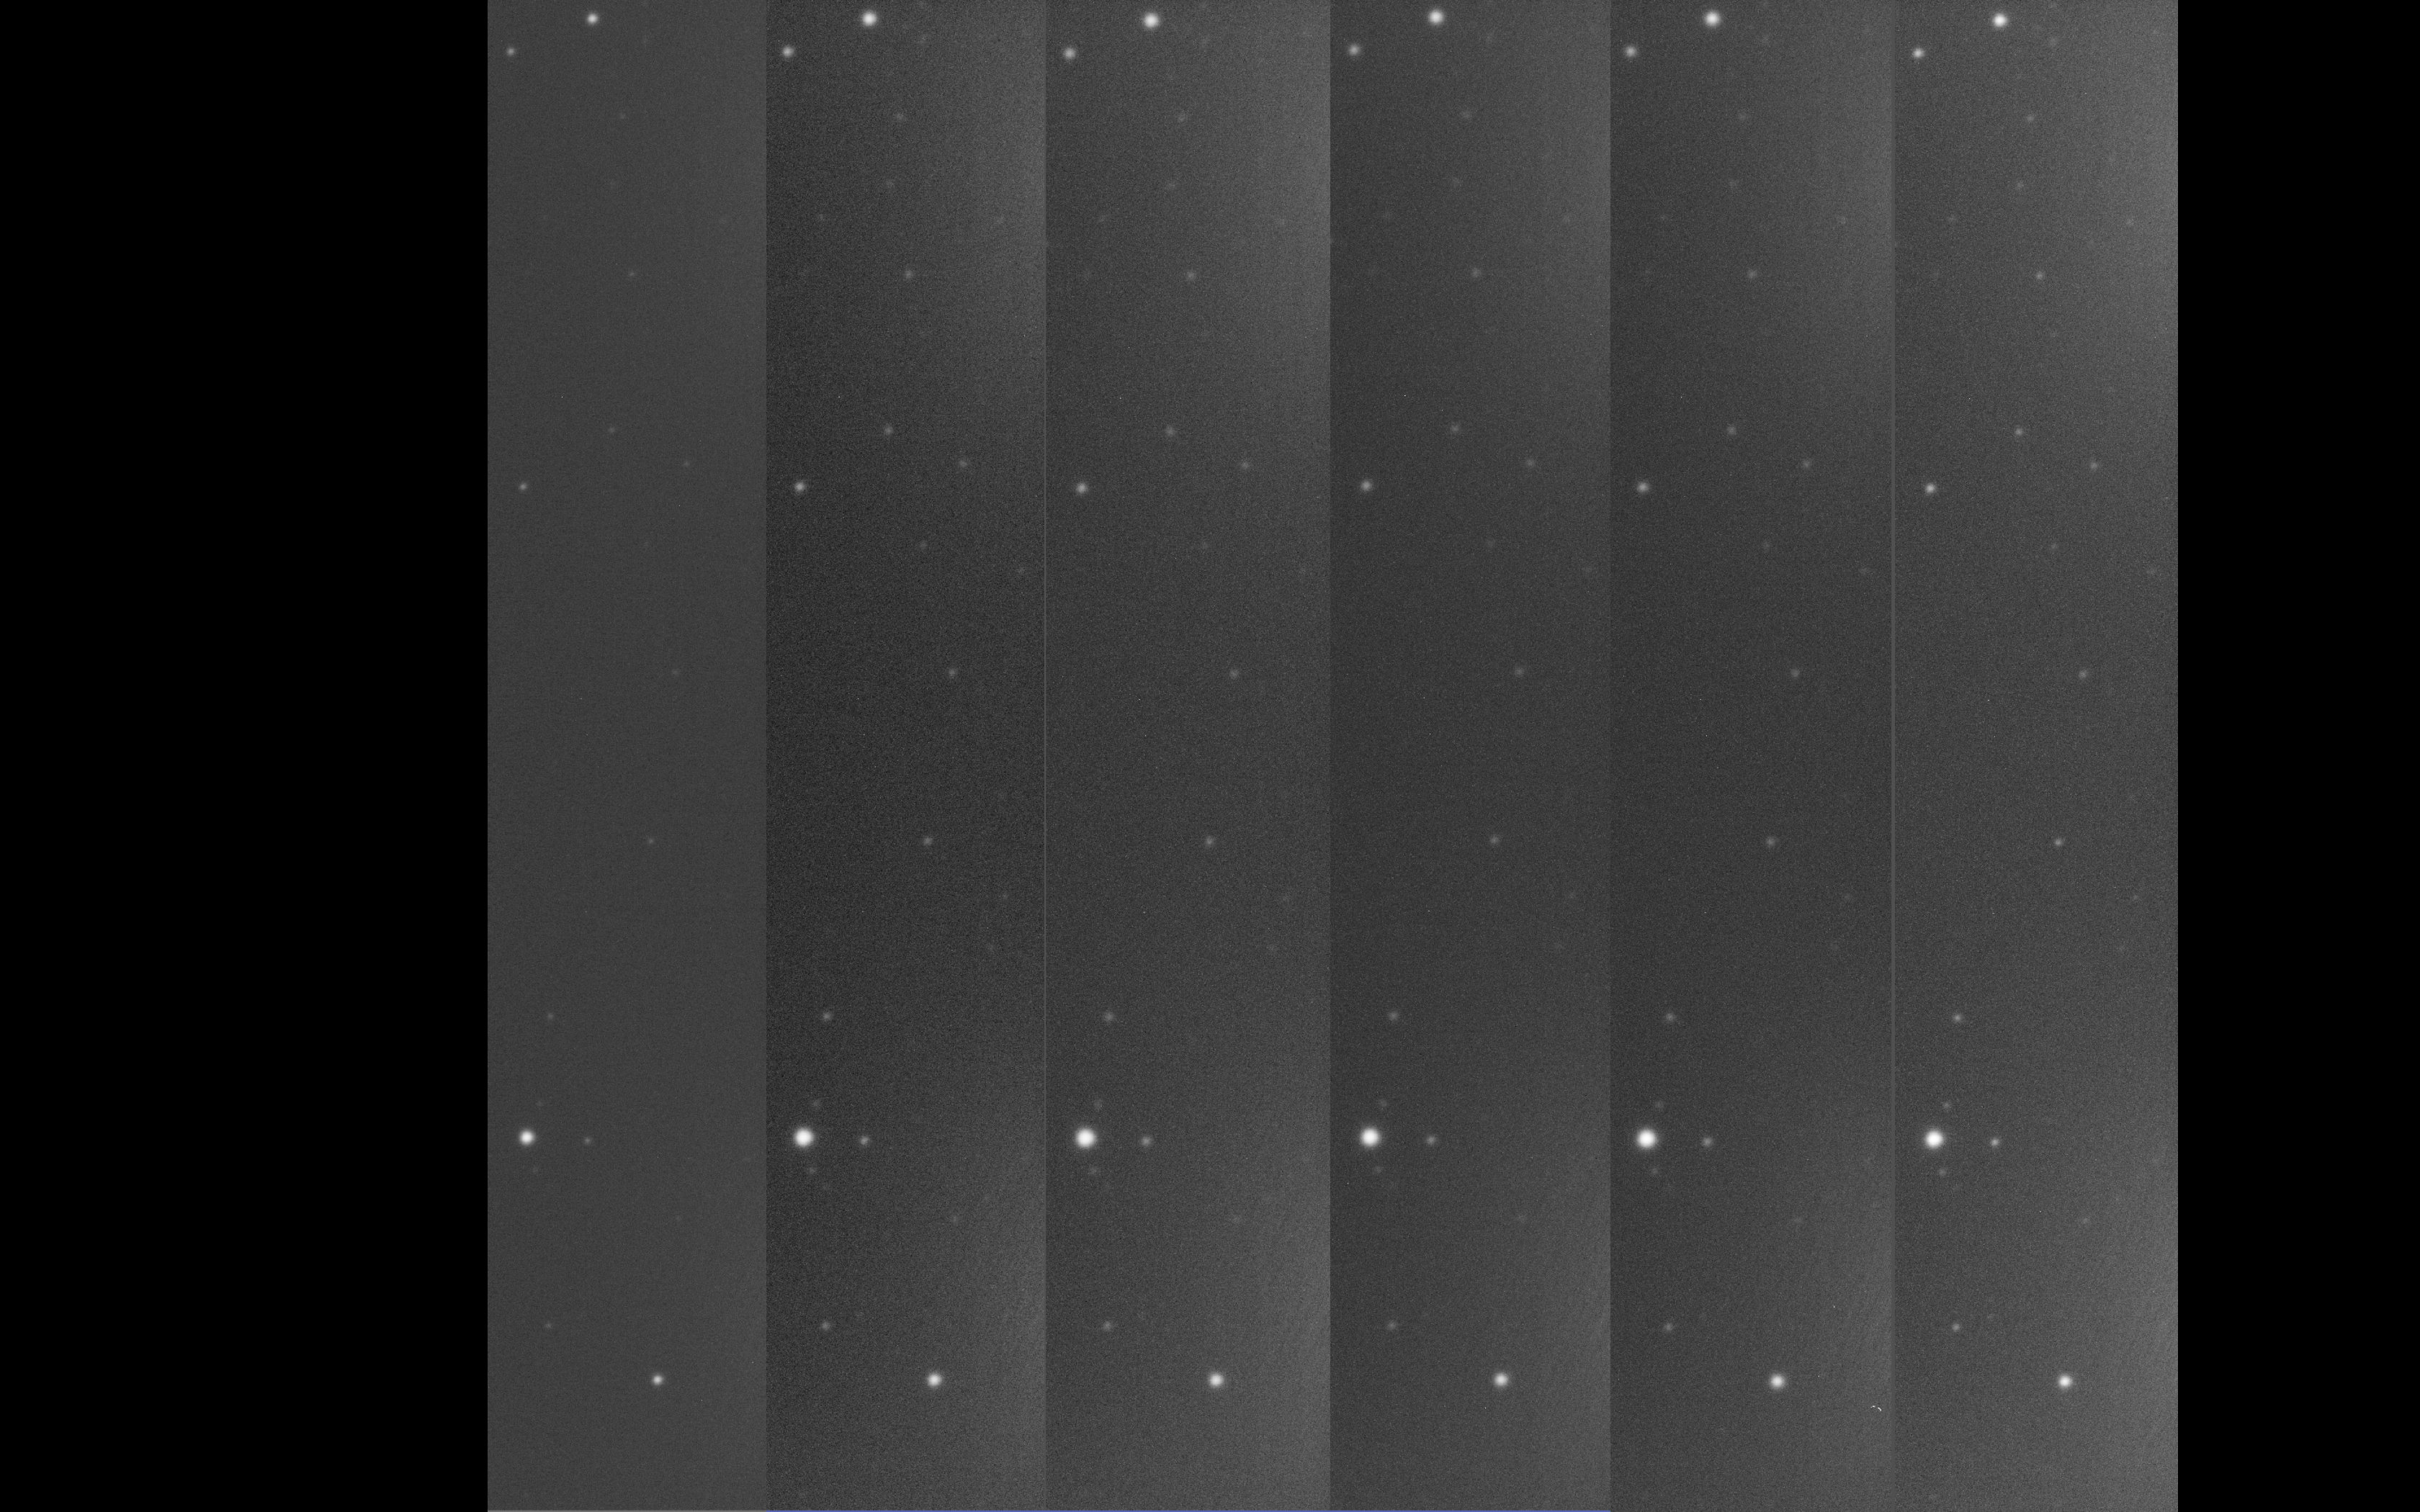
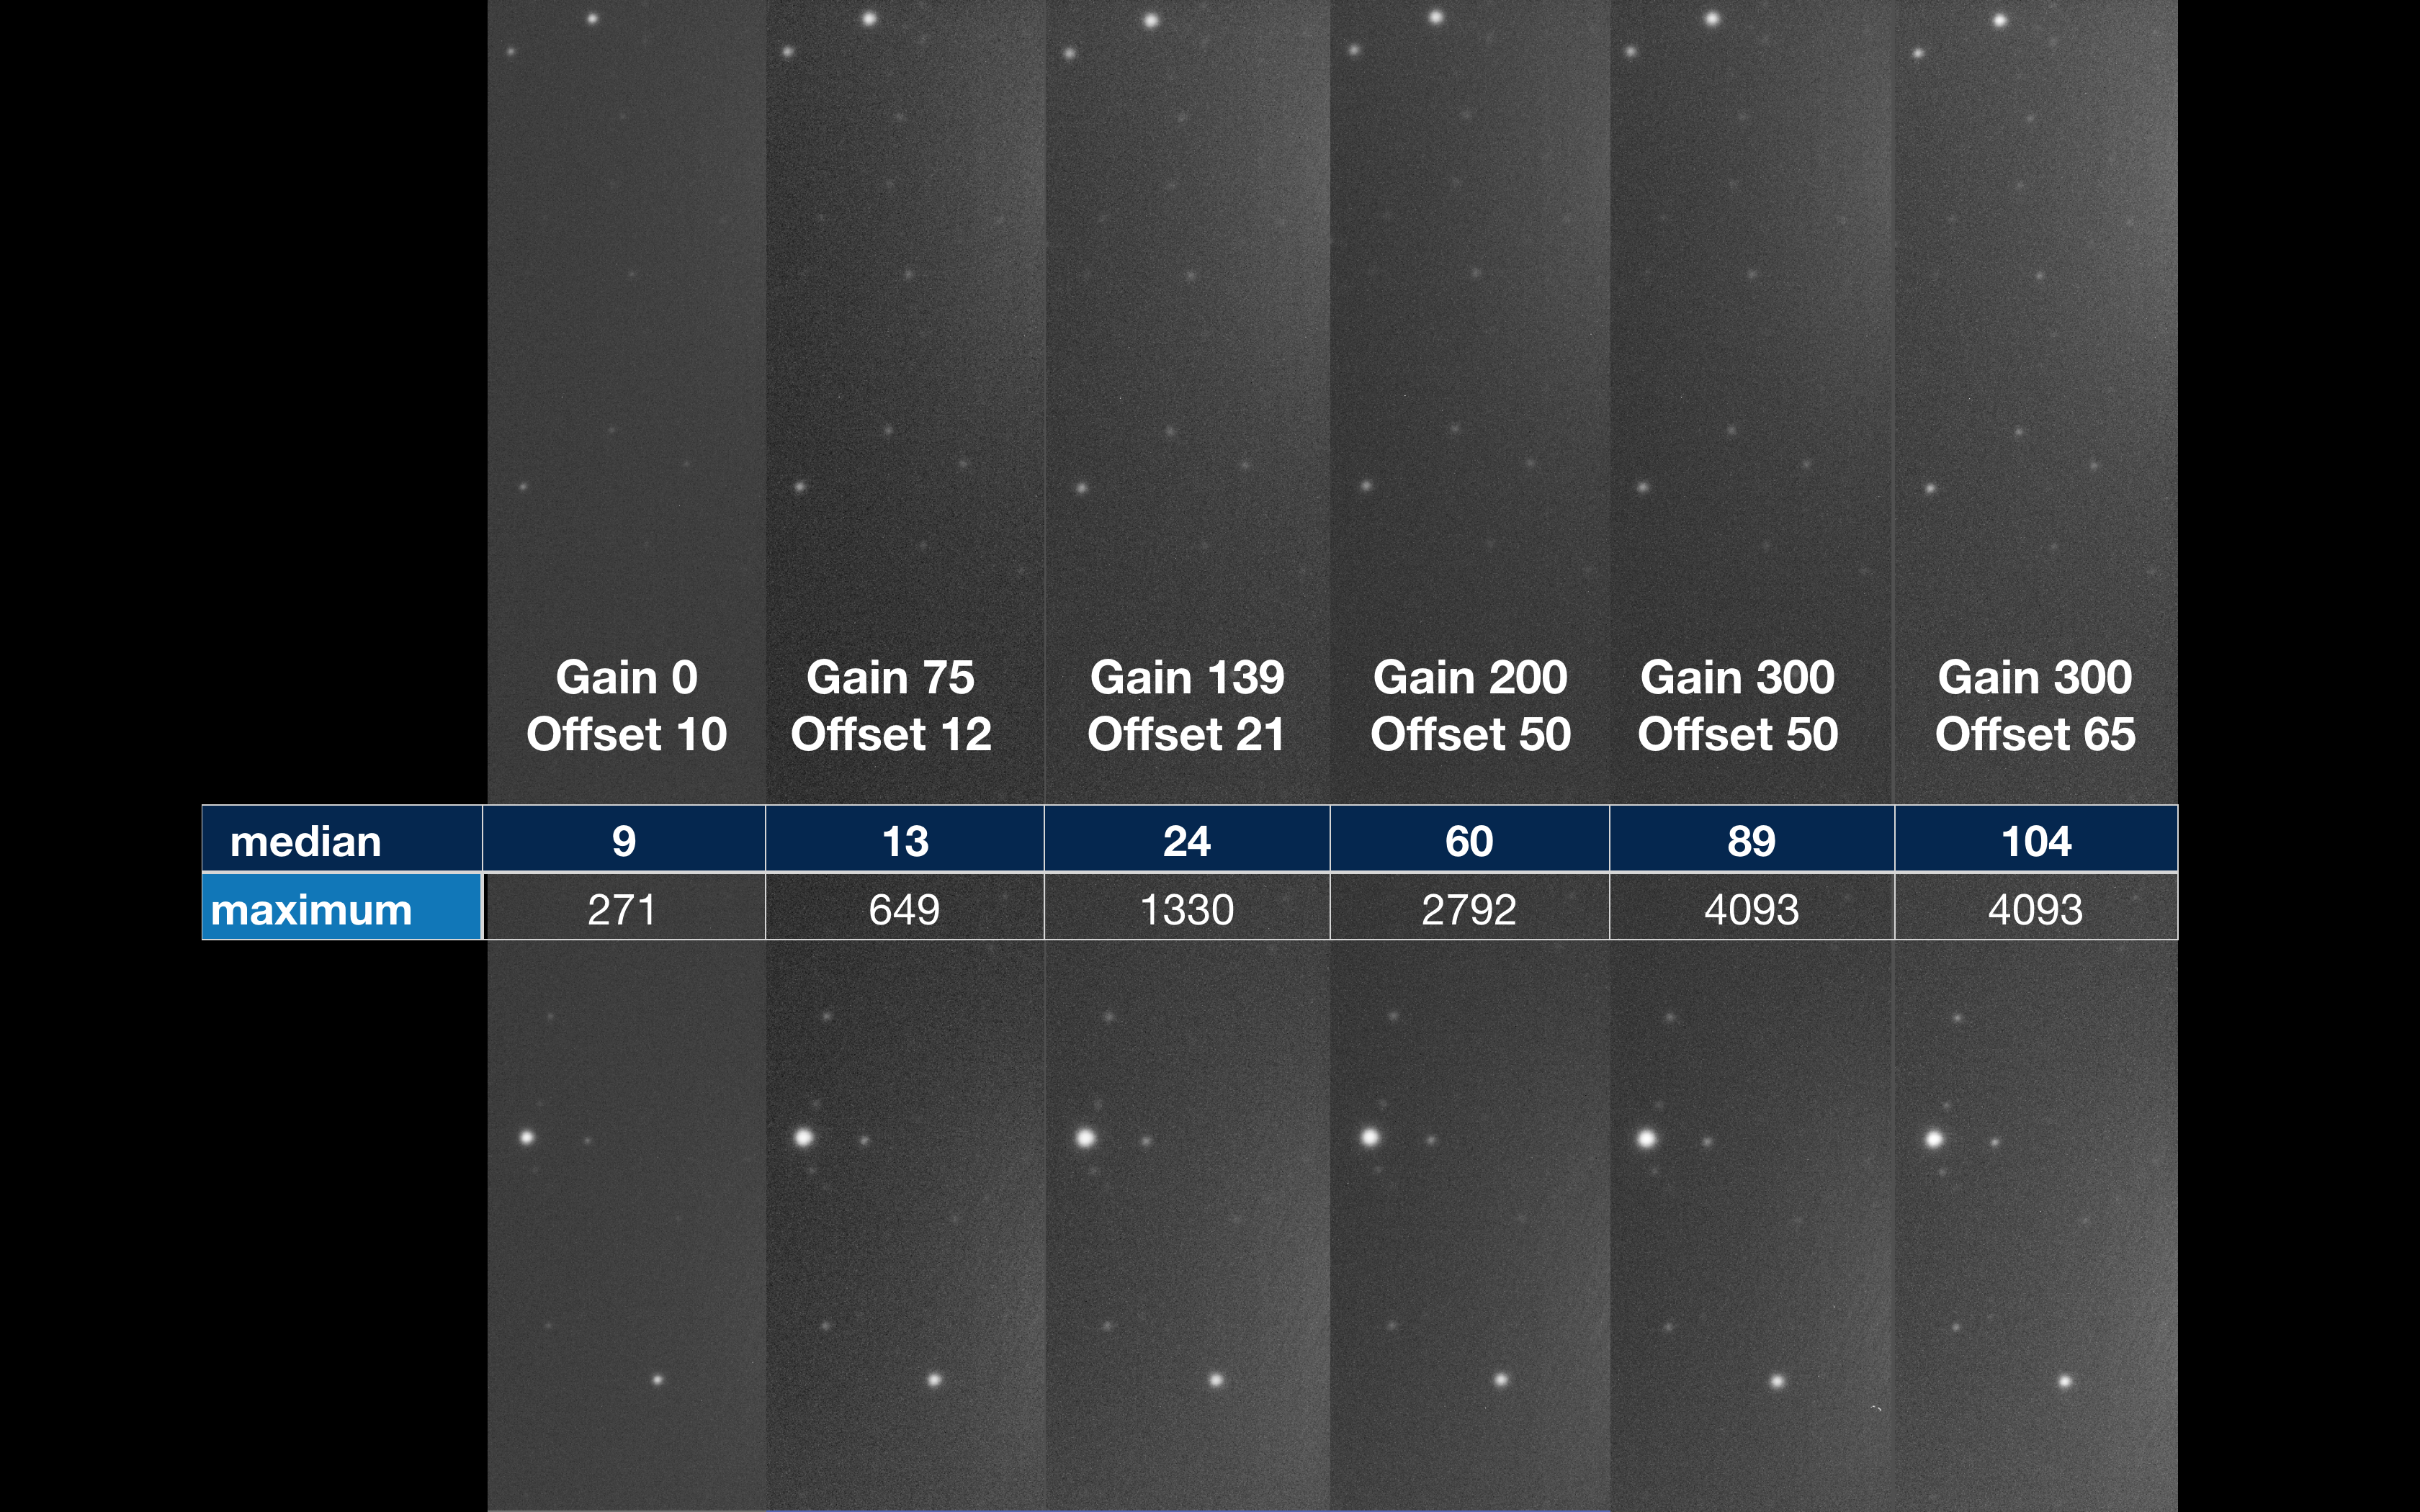
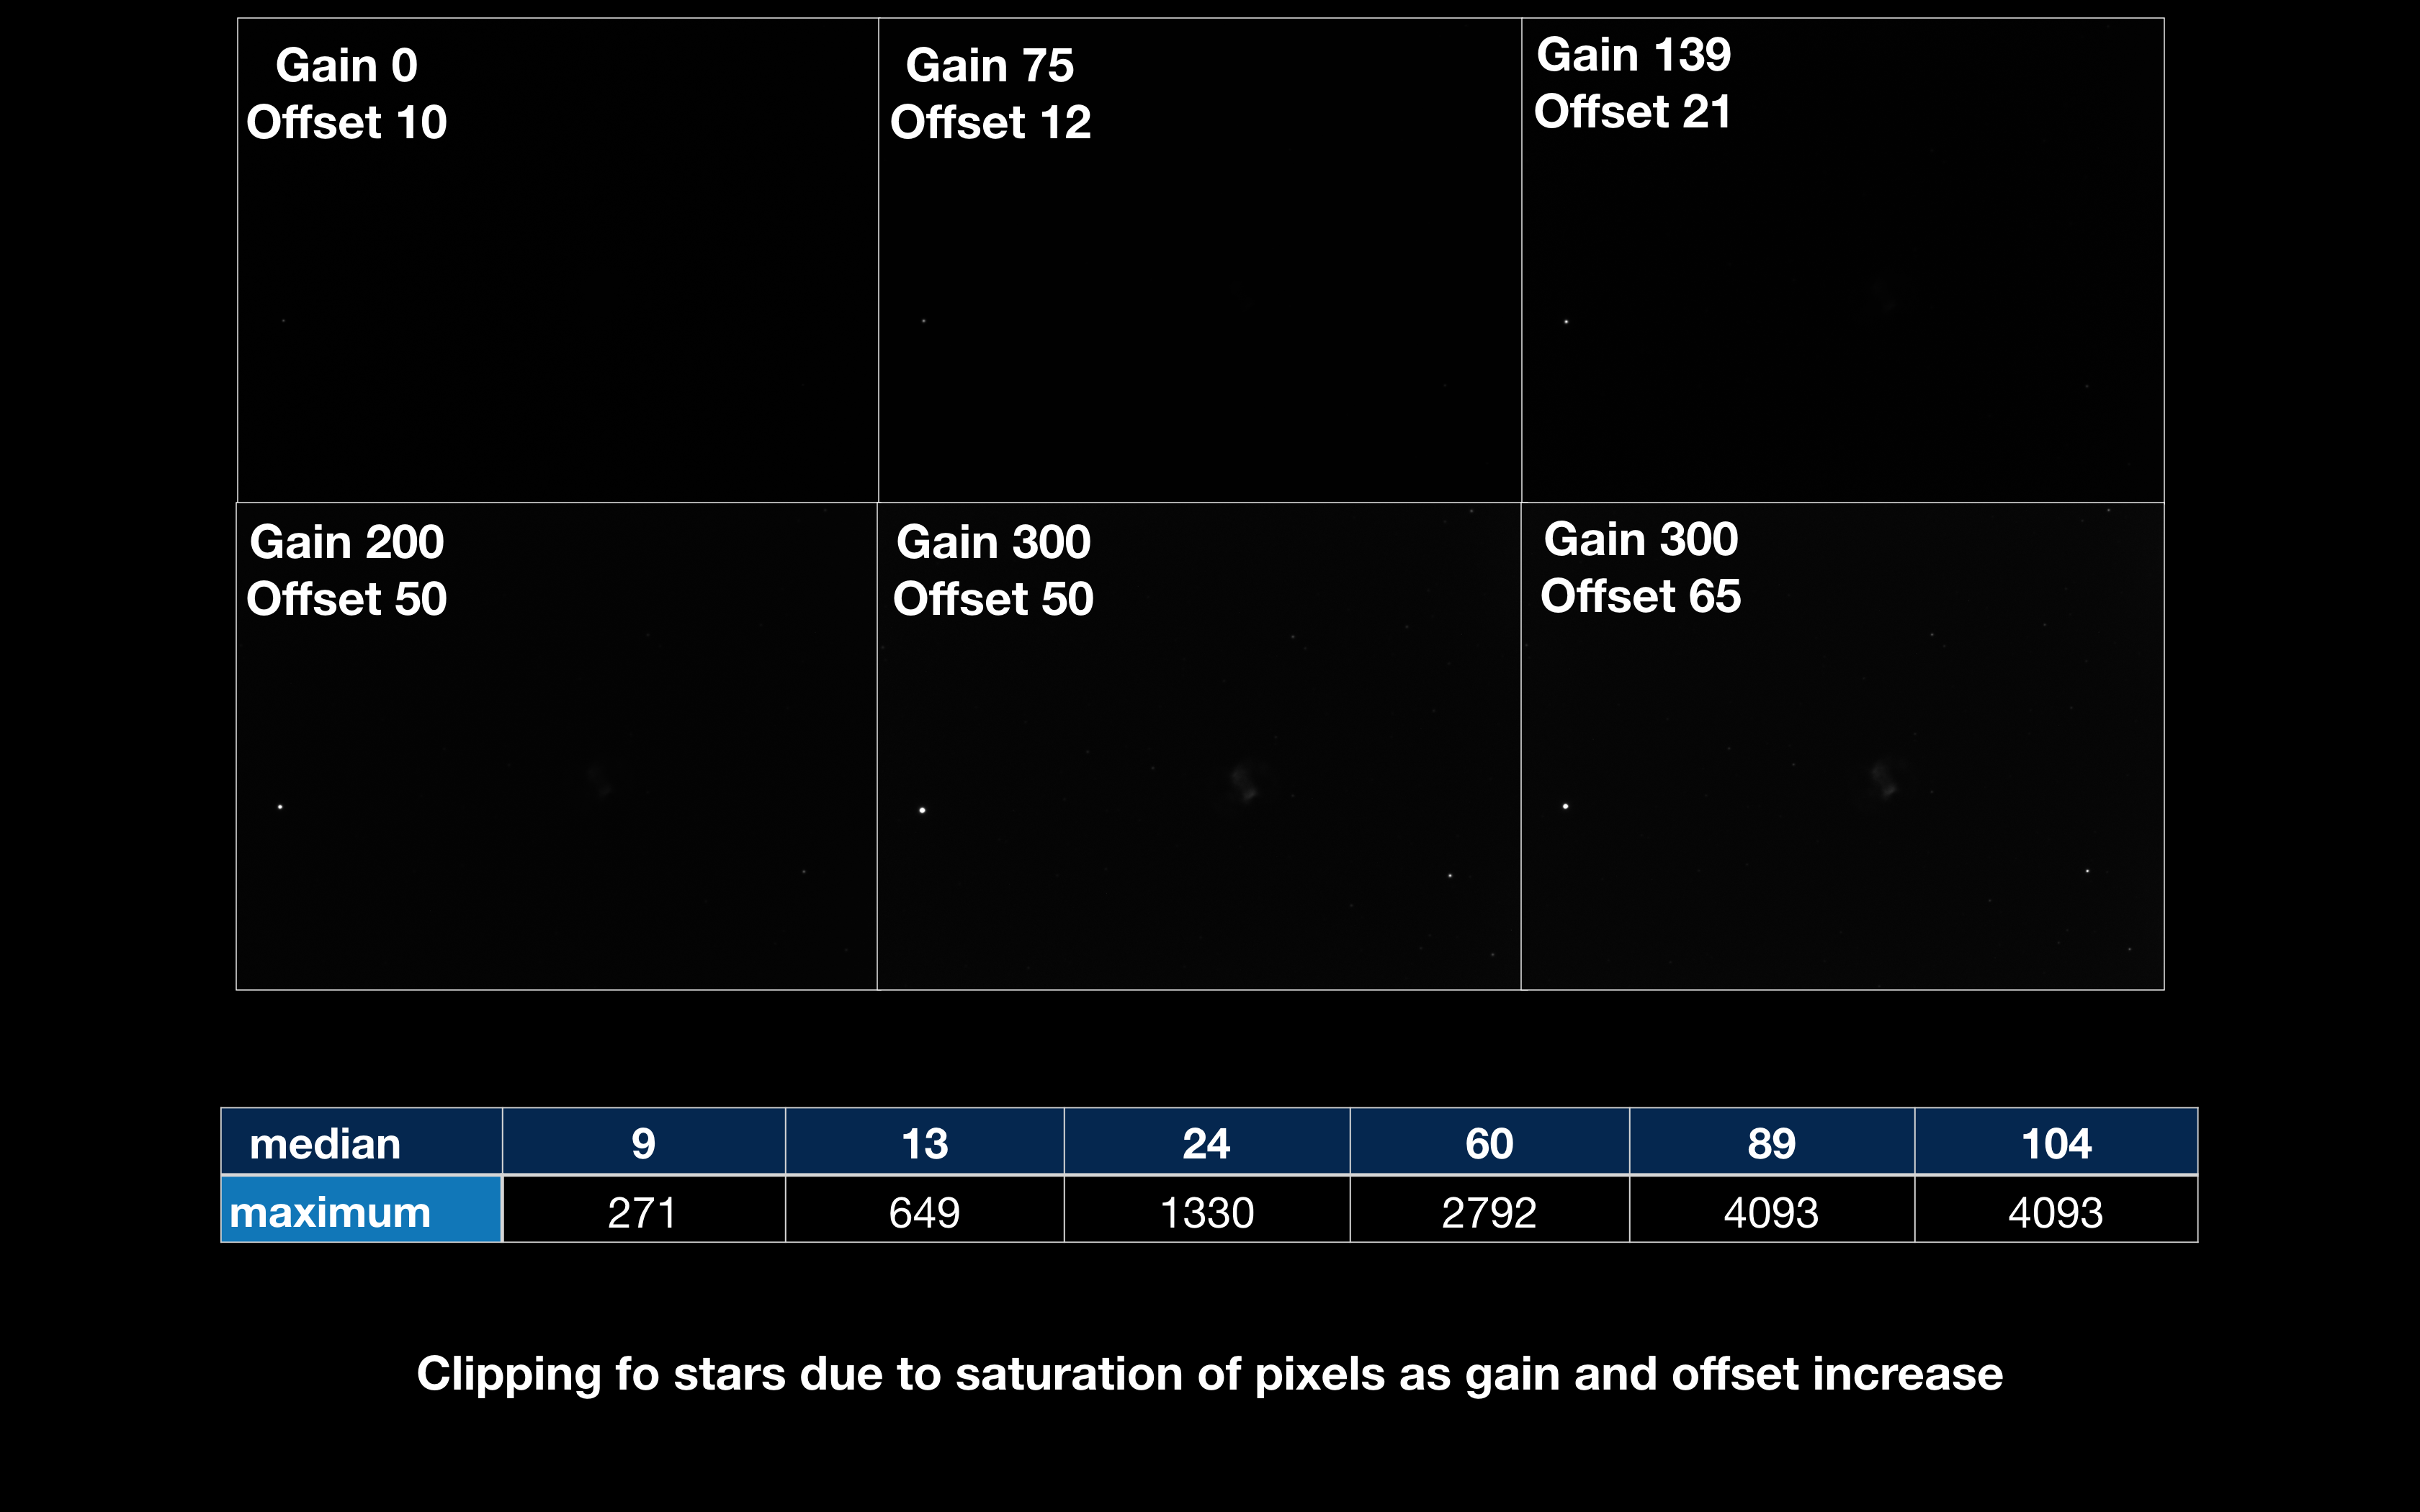
Increasing the gain and offset value from left to right you can see a marked increase in the amp glow. The image slices below are taken from the far right of each frame.
The offset figures in relation to the gain figures have been taken from my reading of various material. The median values are that of the background and the maximum values that of the stars. You can see on this 5min exposure that by the time I reached a gain of 300 one or more of the stars are saturated. In fact the brightest star in this slice is SAO 22510 which is mag 9.53.
Another way to visualise the saturation effect is looking at the raw unstretched image, whilst a star is visible in the image using gain 139 and 200, on close inspection within PI and looking at the values of the pixels of the star they are not saturated. However gain 300 is. The purpose of this is that an unstretched image is not the defect for telling if parts of the image are saturated as some texts describe, but one can see the increased brightening of the star by gain 300 to know it is a problem.
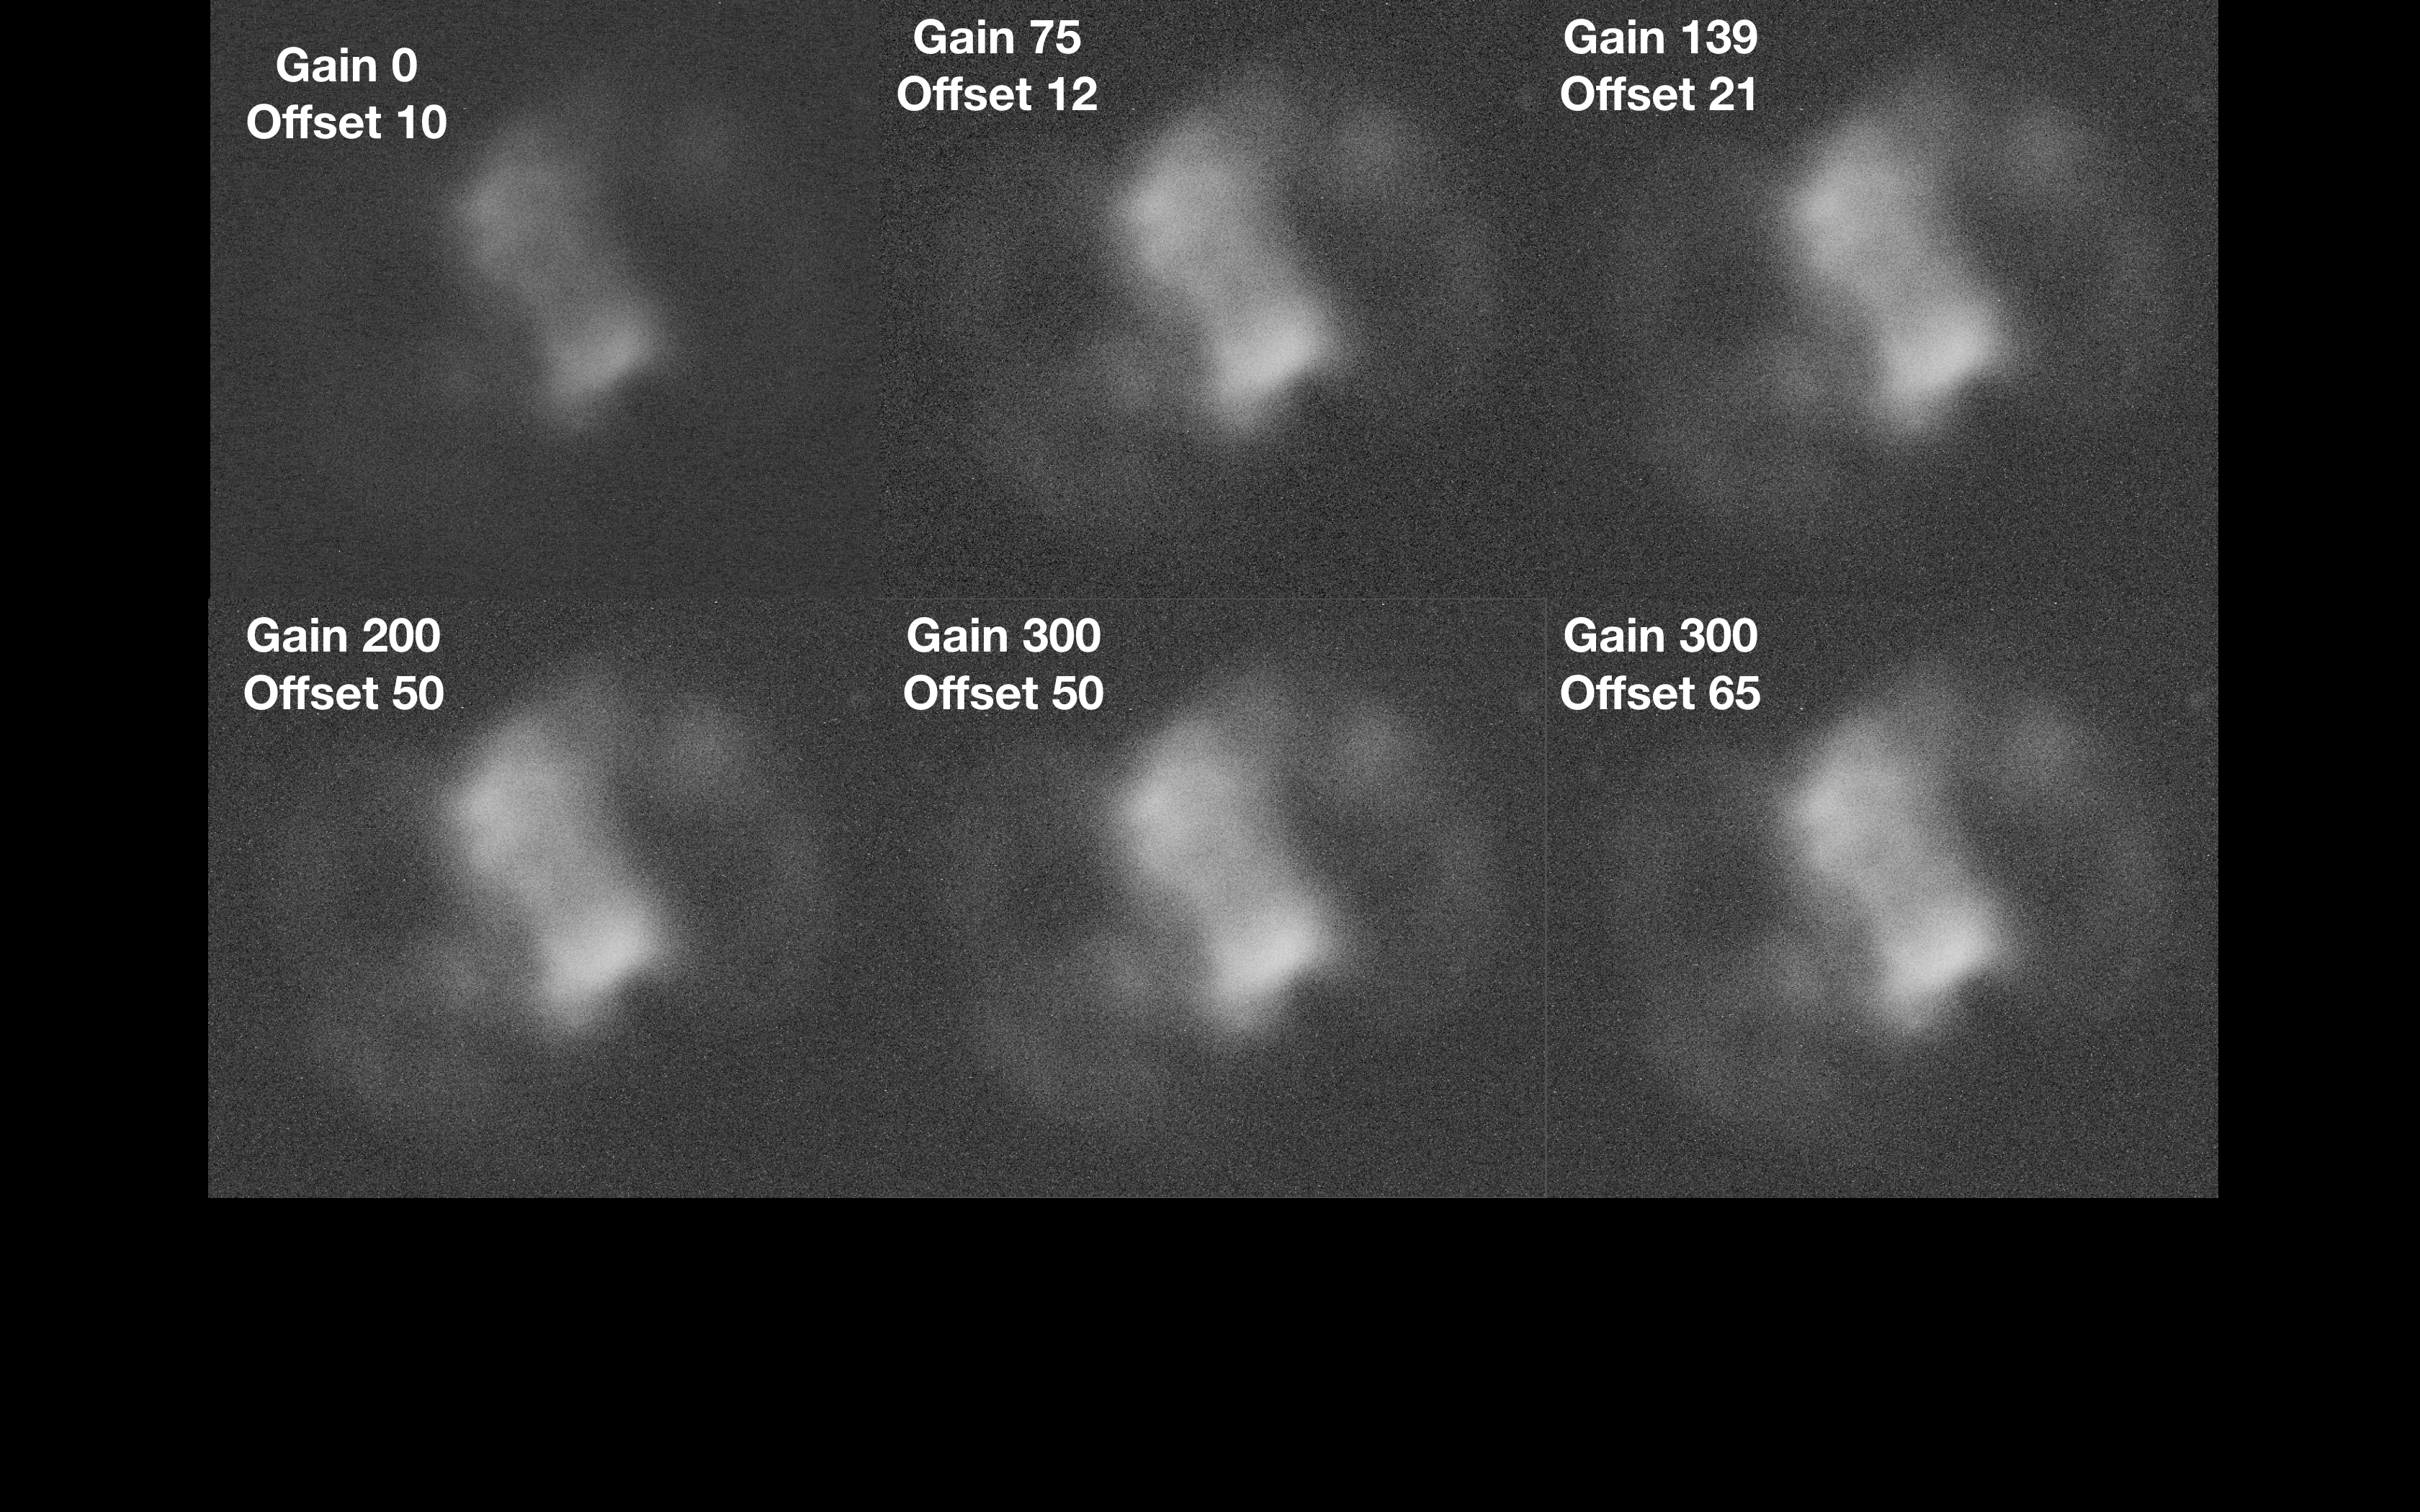
So whilst I have seen the clipping a a few stars at the highest gain I have tested, what about the planetary nebula itself? From the below stretched image one could assume that the brightest part of the nebula was fairly bright and heading towards saturation, but don’t be fooled! Also there is a noticeable increase in the background brightness as the gain increases.
Again as for the amp glow, the aim is to balance the ability to amplify the faintest parts of the nebula without swamping them with the background brightness.
Again here are the values of the settings for gain and offset against the central section of the image.
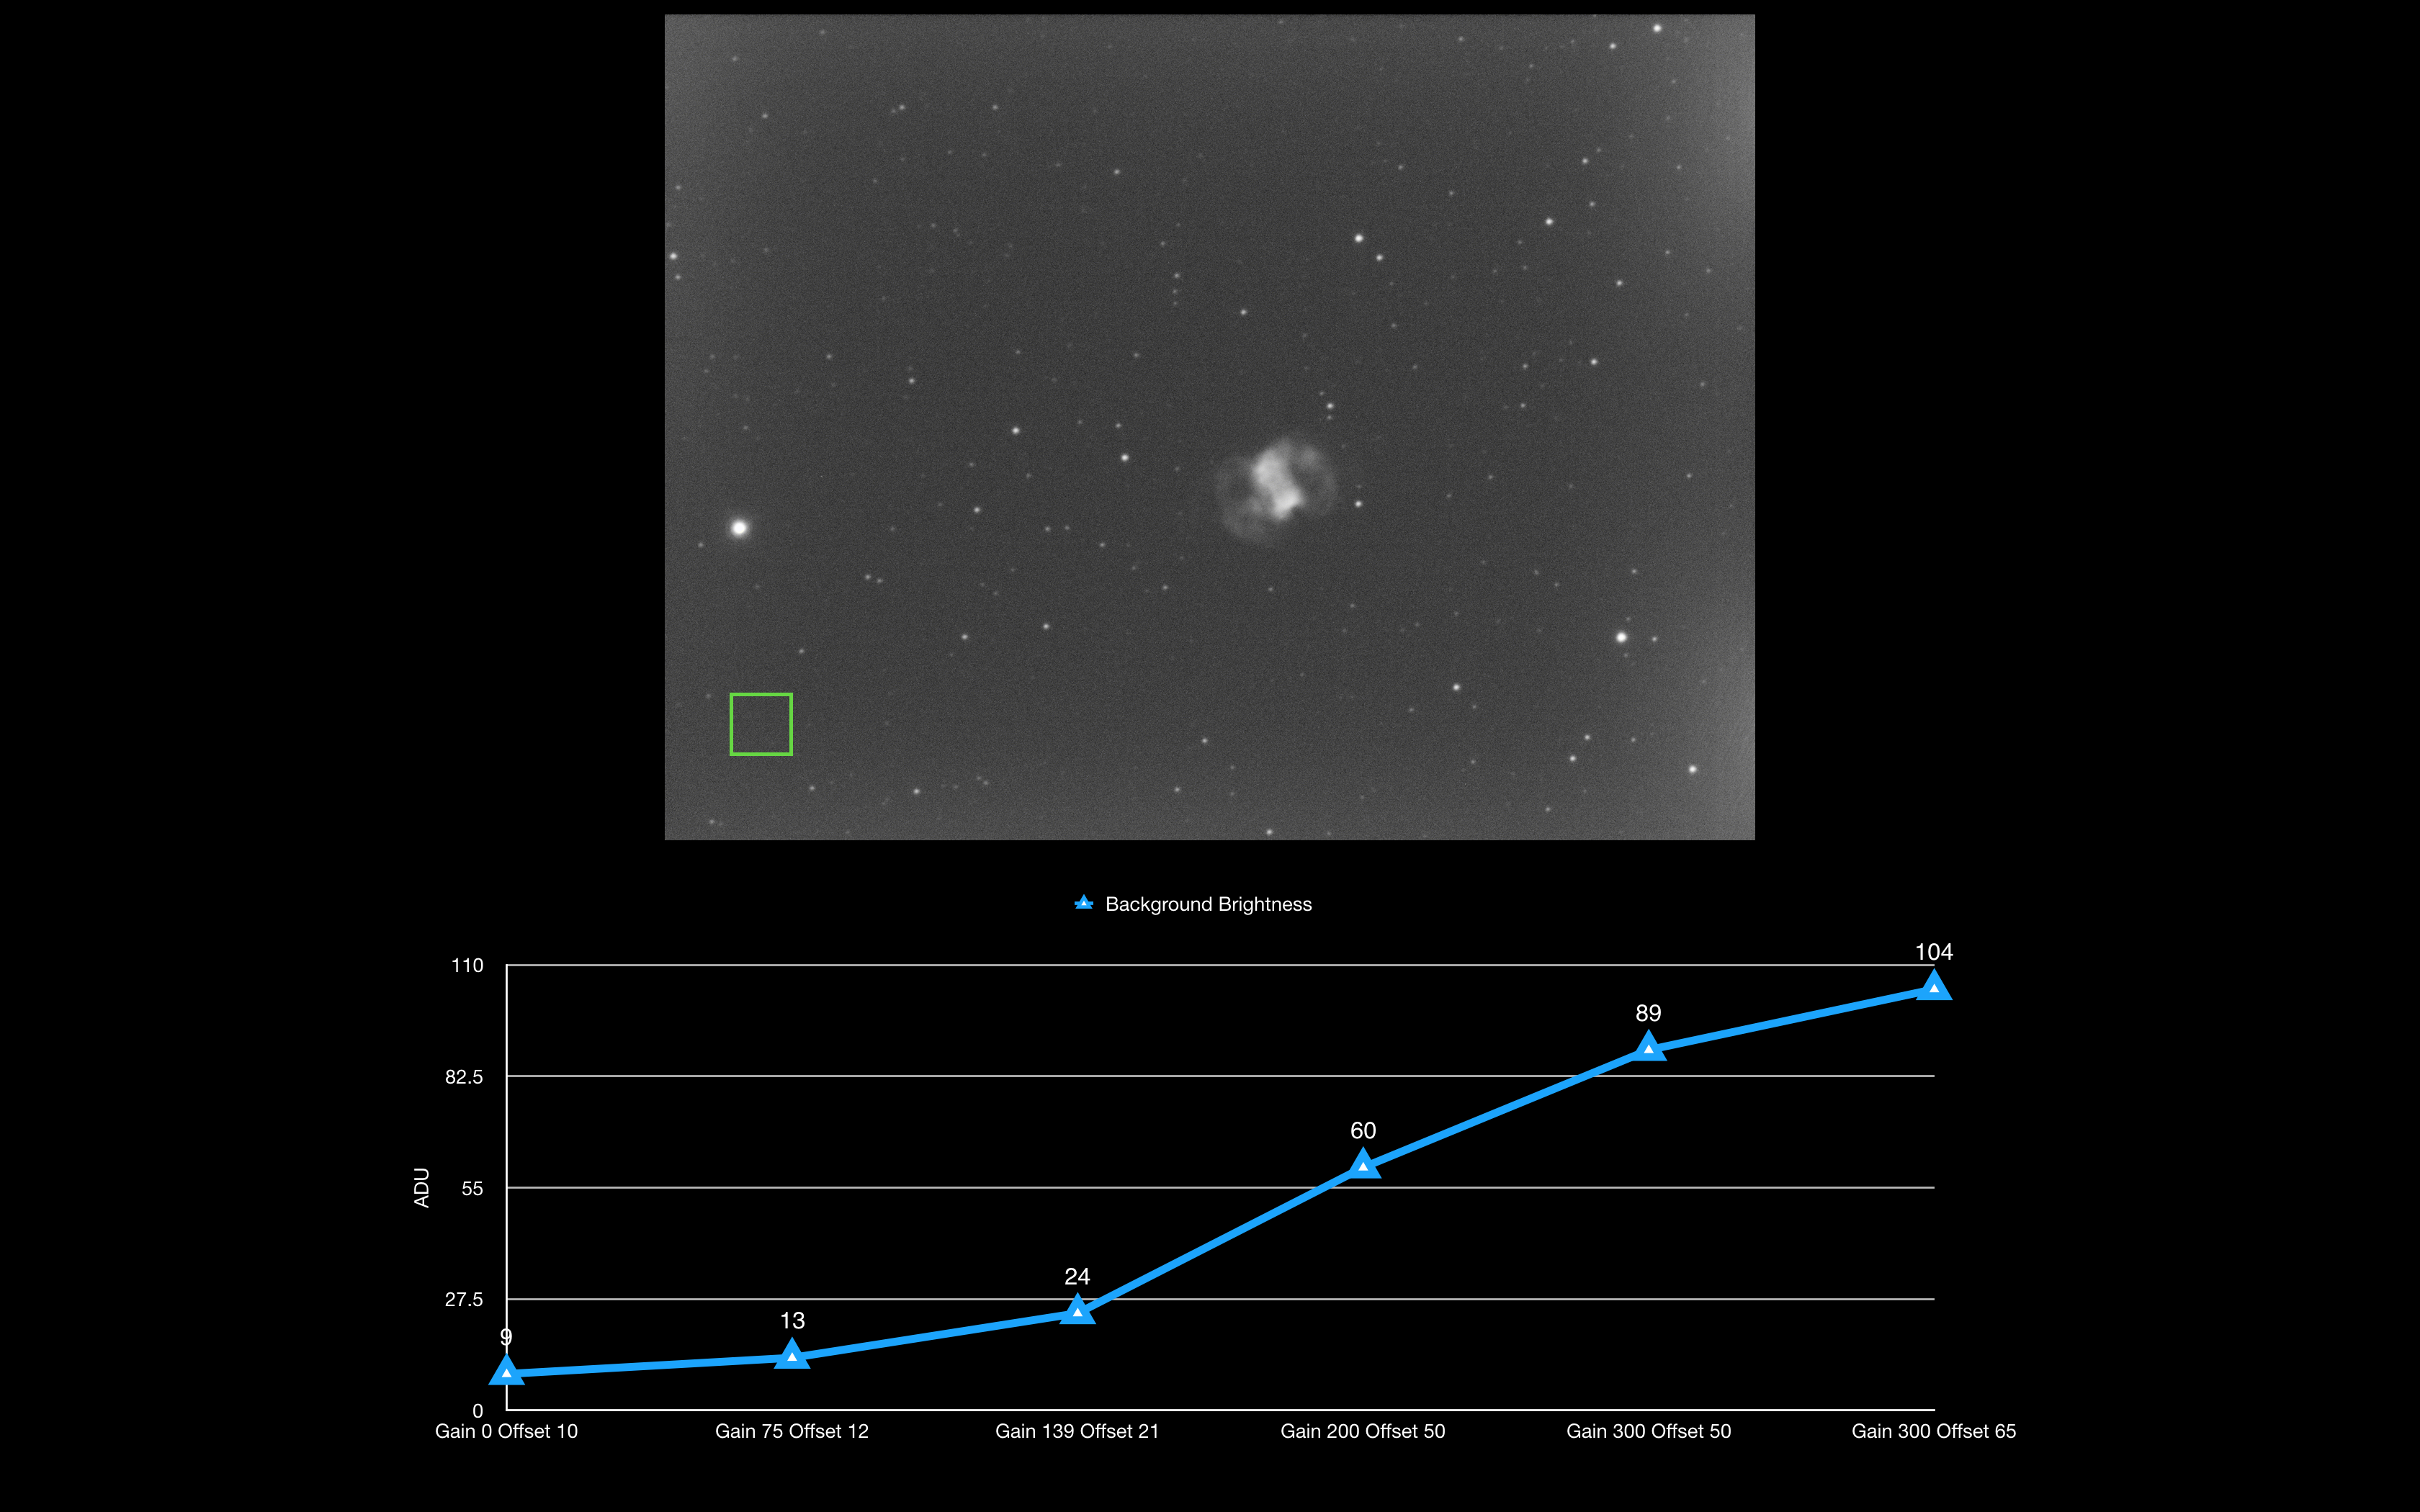
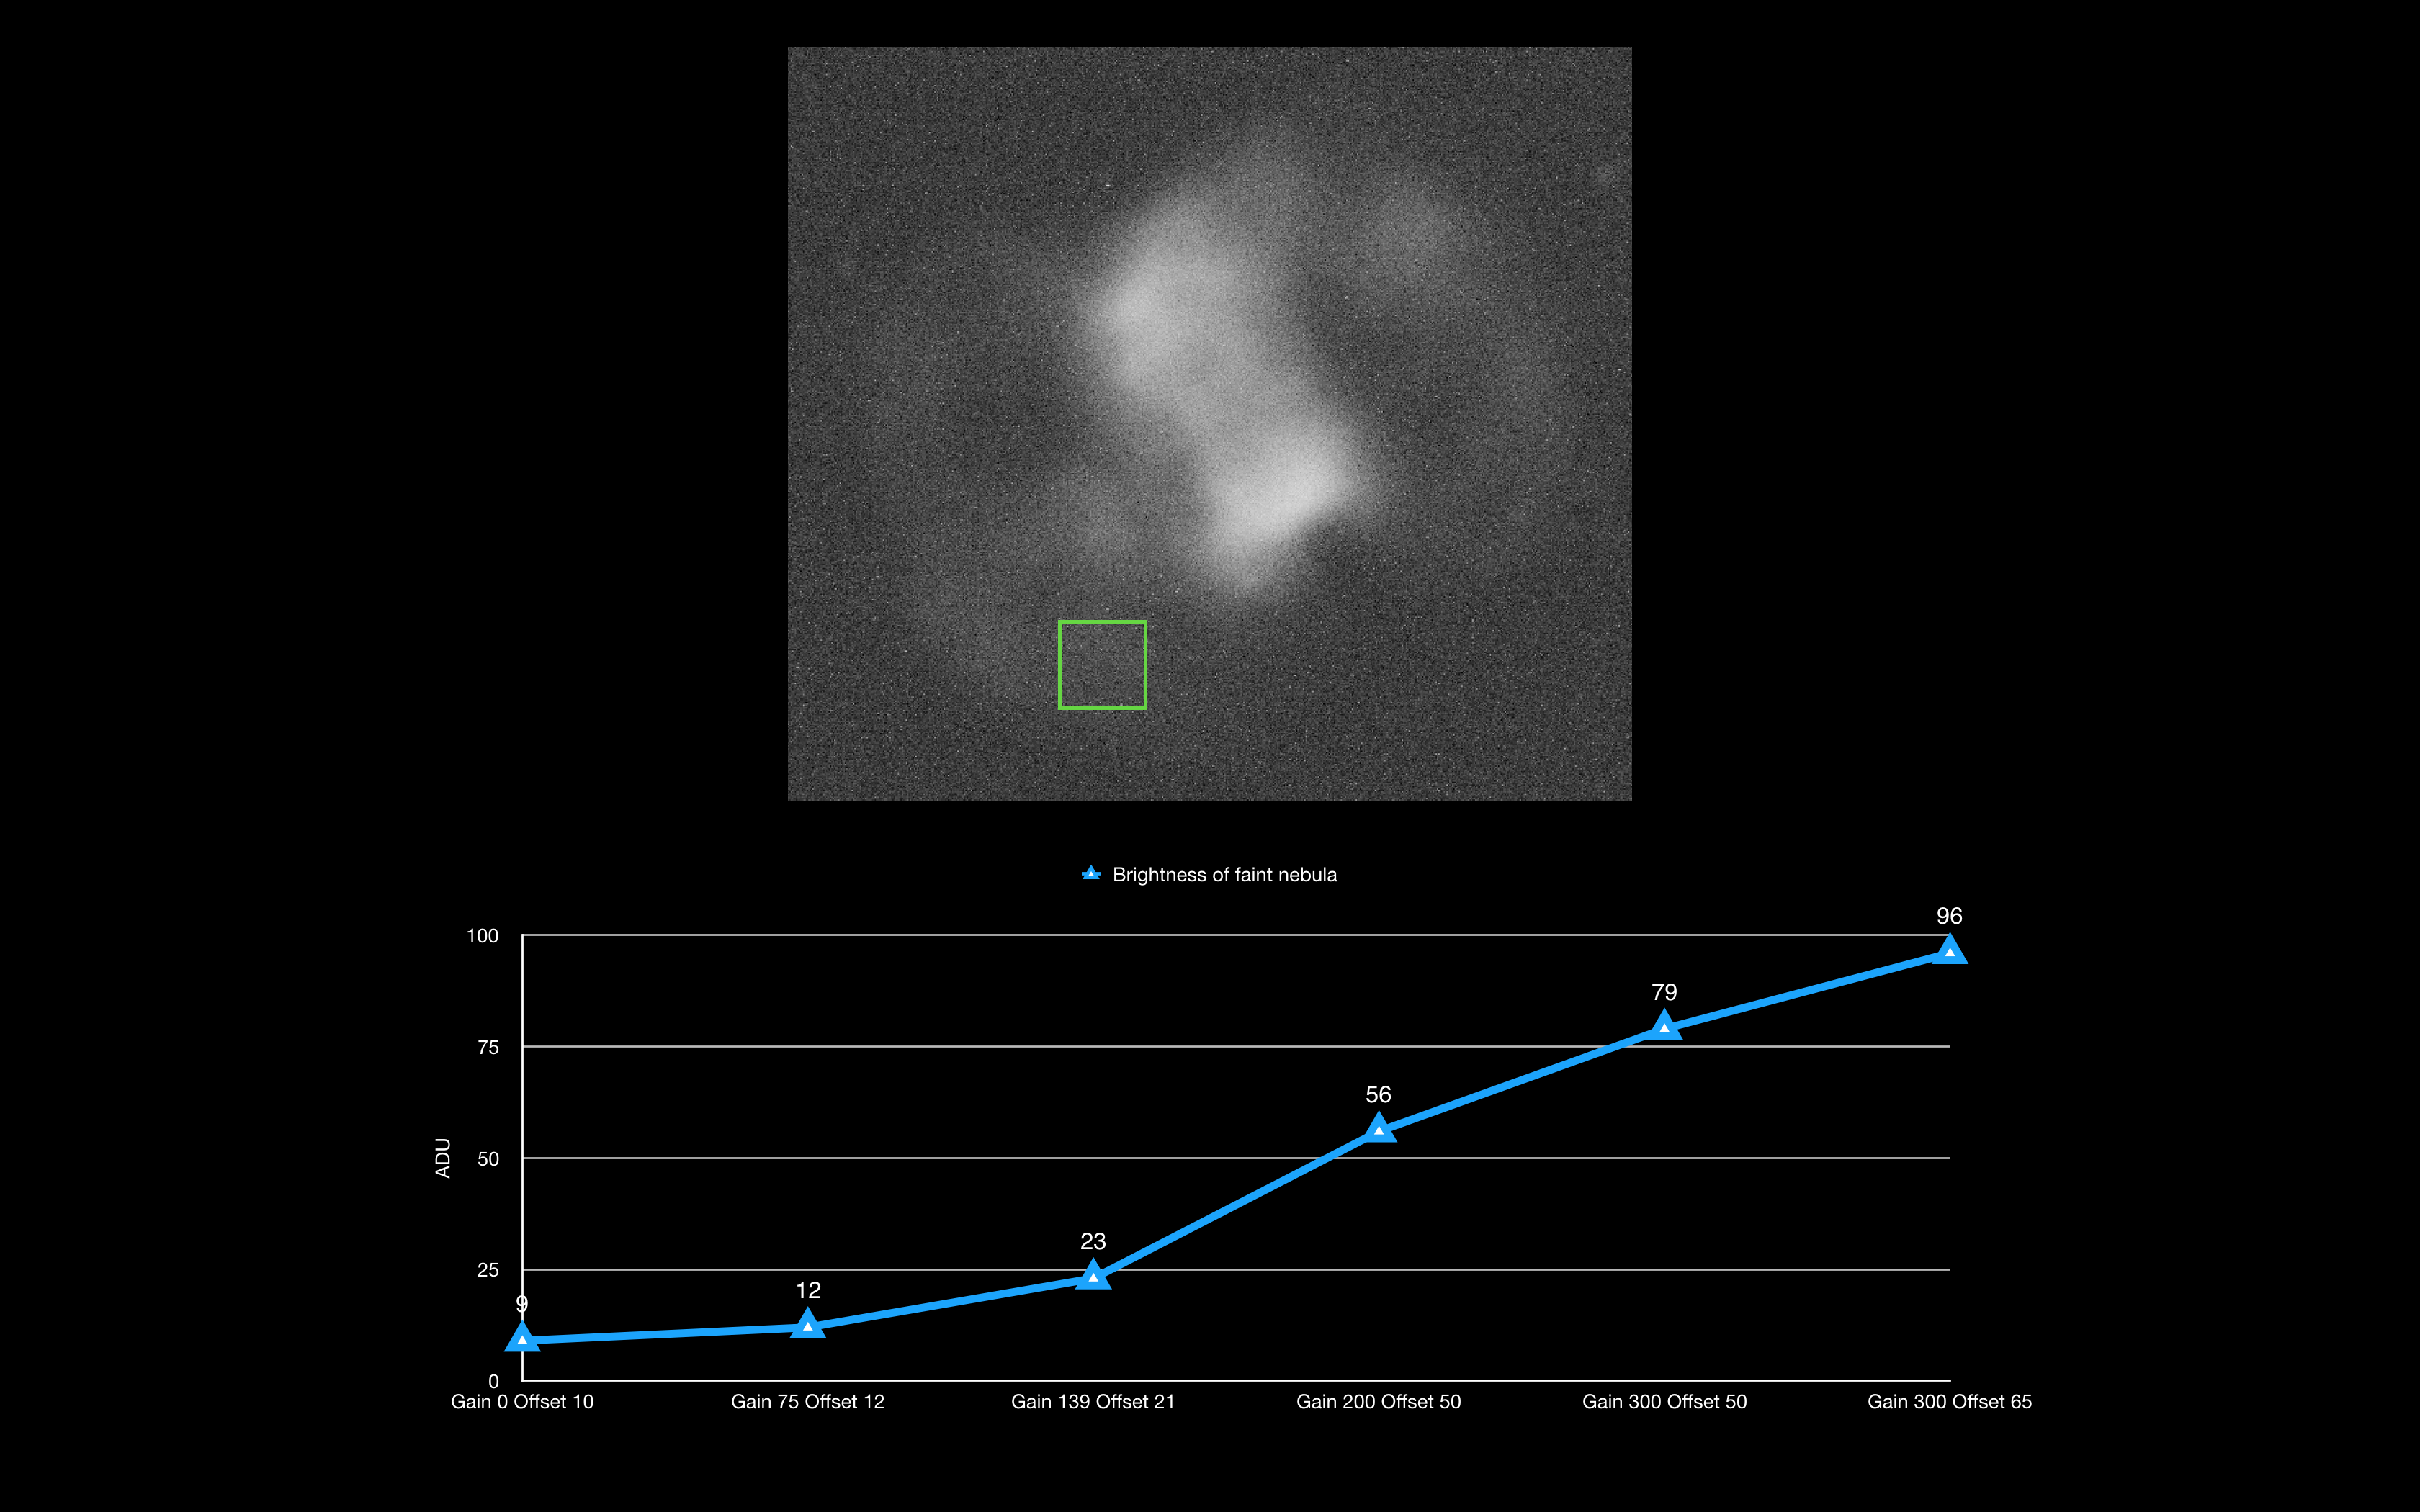
So how bright did the background get? The graph below shows a section of the background free from stars and charts the increase of brightness from a mean figure of 9 ADU with the gain set to 0 and a mean figure of 104 with the gain set to 300. So a large increase but but at least up until gain 200 not a problem, as we will see when we look at the faintest part of the nebula later.
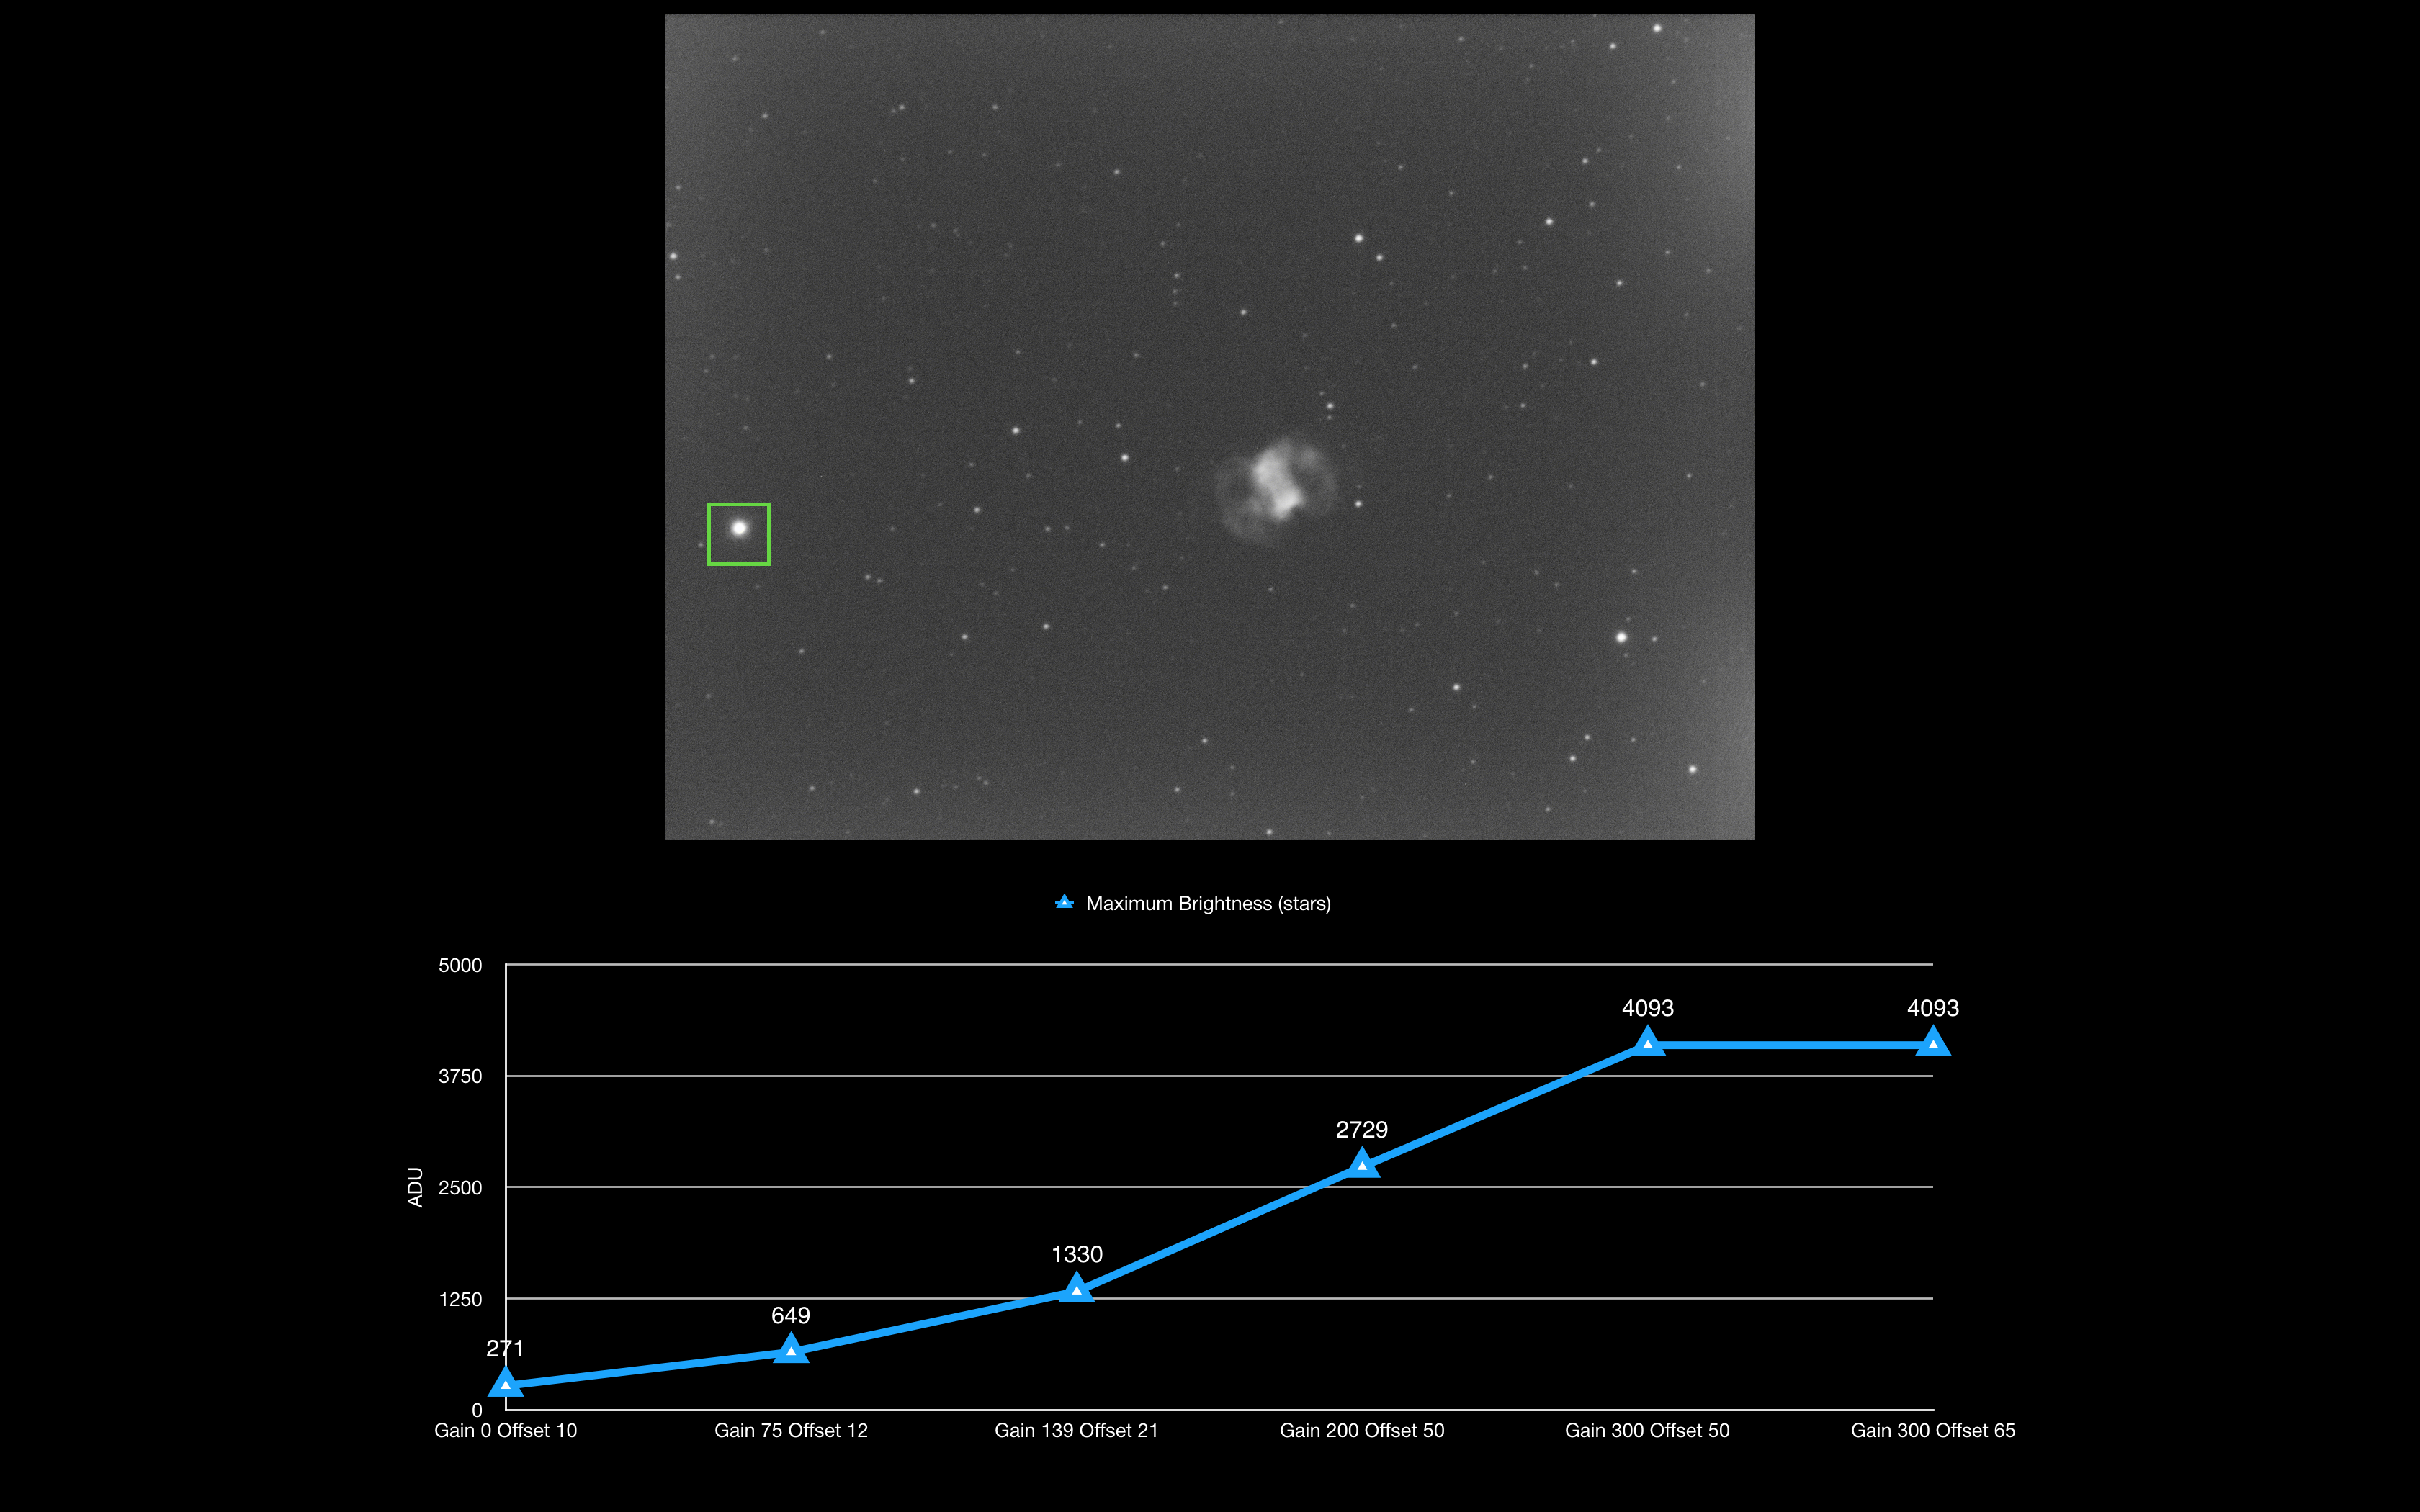
This graph looks at the bright star SAO 22551 (HIP 8063) which is mag 6.66 and the brightest star in the image. Again as previously seen in the right hand slice of the image the star is saturated by gain 300. All figures are the maximum pixel values.
Now let’s focus on the nebula itself and go back to using the mean ADU figures. The picture below shows the section of the nebula I will use for analysis. In particular I focused in on the brightest lobe of the central portion of the planetary nebula and the faintest portion of the left arc.
So looking at the faintest nebula within the left arc we can see that it is not very bright at all and the brightest it gets at gain 300 and offset 65 has a mean figure of 96 ADU. Each and every image at the different gain setting and offset setting is seemingly just below that of the background, which in itself is interesting as the nebula seems to be fainter than the background. So more analysis was needed.
However I then went back and looked at a selection of areas of the background across the image to find that the original background selection to the bottom left of the image was brighter than other areas. Below you can see the image of gain 200 and offset 50, this time with 5 selection boxes. Preview 6 is the nebula as recorded before is mean 56 ADU. Preview 5, so the sky right next door to it has a mean figure of 55, so just below the nebula, hence it is only barely visible. Preview 1 is 54 ADU and Preview 4 is also 54 ADU. So there is brightening on that bottom left corner of the image, so had the nebula fallen at that spot then it would be swapped by the background.
There is only 1 ADU between the nebula and the background adjacent to it at gain 200 offset 50. If we looked at the same to regions in the image of gain 300 and offset 50 then you get a 2 ADU difference. The image with gain 300 and offset 65 gives a 3 ADU difference. So the results show that both gain and offset both help increase the contrast between the background sky and the faintest part of the nebula.
Various previews can be seen to analyse the background vs nebula brightness
The final image below shows the brightest part of the nebula. At gain 300 and offset 65 you see a mean value of 544 ADU which compares to 96 ADU for the faintest part of the nebula and an adjacent background of 93 ADU.
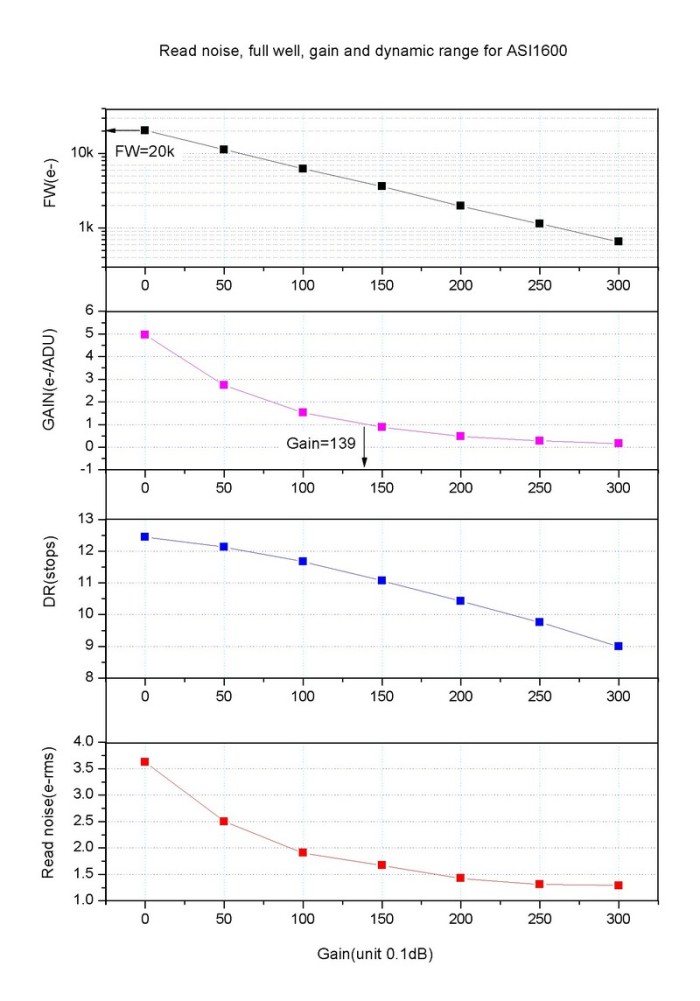
The final piece of information pertains to the camera/chip specification and performance. The graphs below are from the ZWO website and clearly show as expected the more you increase the gain the read noise is lowered but unfortunately so is the full well maximum (the amount of electrons you can store in a pixel) and the lower the dynamic range, which for deep sky objects is a required.
So from this first piece of testing what have we learnt? Whilst there seems to be a good sense for increasing the gain and offset to help with the SNR especially between the background and the faintest part of the nebula, the increase in amp glow, decrease in dynamic range and reduction in the well count are all factors. Stacking as we will see, will undoubtably help the situation without necessarily setting a high gain. You can see why people say use Unity Gain, so the setting where 1 electron on the sensor = 1 ADU potentially gives the best result from a tradeoff point of view.
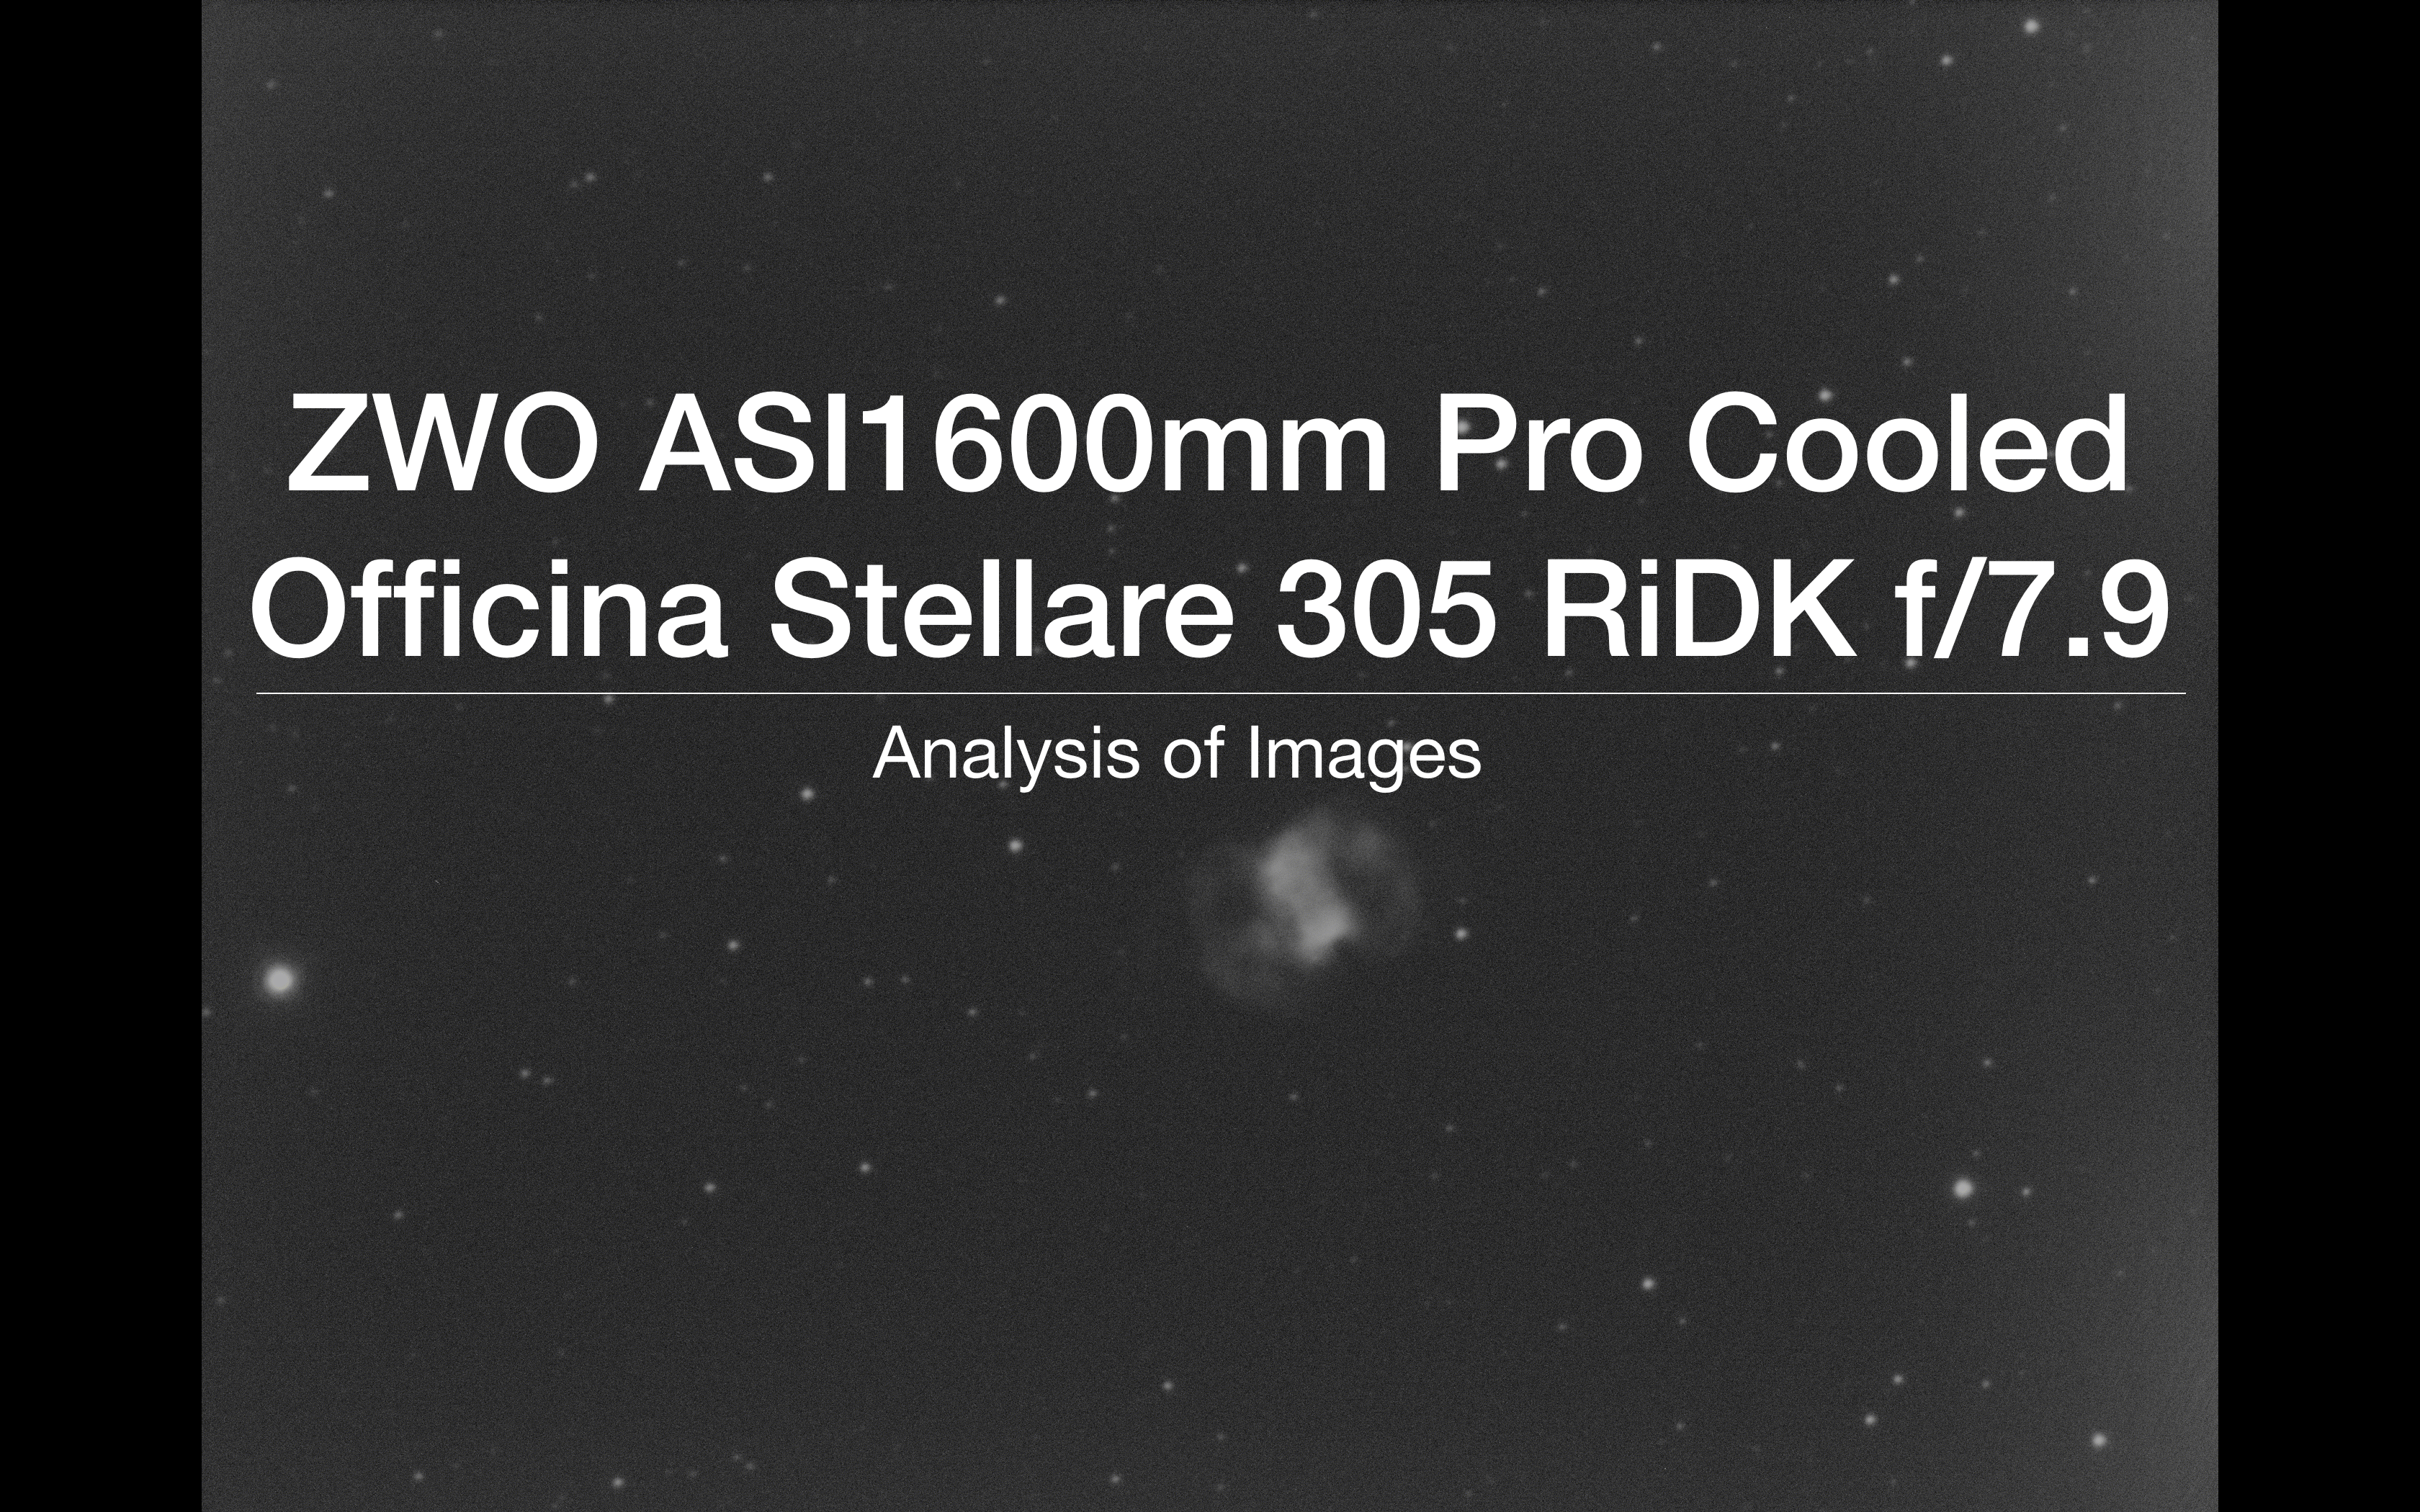
I have spend over 4 hours today reading about the Gain and Offset settings for the ZWO ASI1600mm Pro Cooled mono CMOS camera I have on the back of the 12″ Officina Stellare 305 RiDK f/7/9 telescope.
ZWO ASI1600mm Pro Cooled on Officina Stellare 305 RiDK
In particular the posts by Jon Rista and the images with a similar setup from Glen Newell have led me to a handful of setting I will now try from my location and on M76, the Little Dumbbell planetary nebula that I had started to image recently. I must also comment that Kayron Mercieca also had some useful information pertaining to testing your camera and OTA imaging train for exposure times. See link here
Discussion on exposure times and setting – Cloud Nights
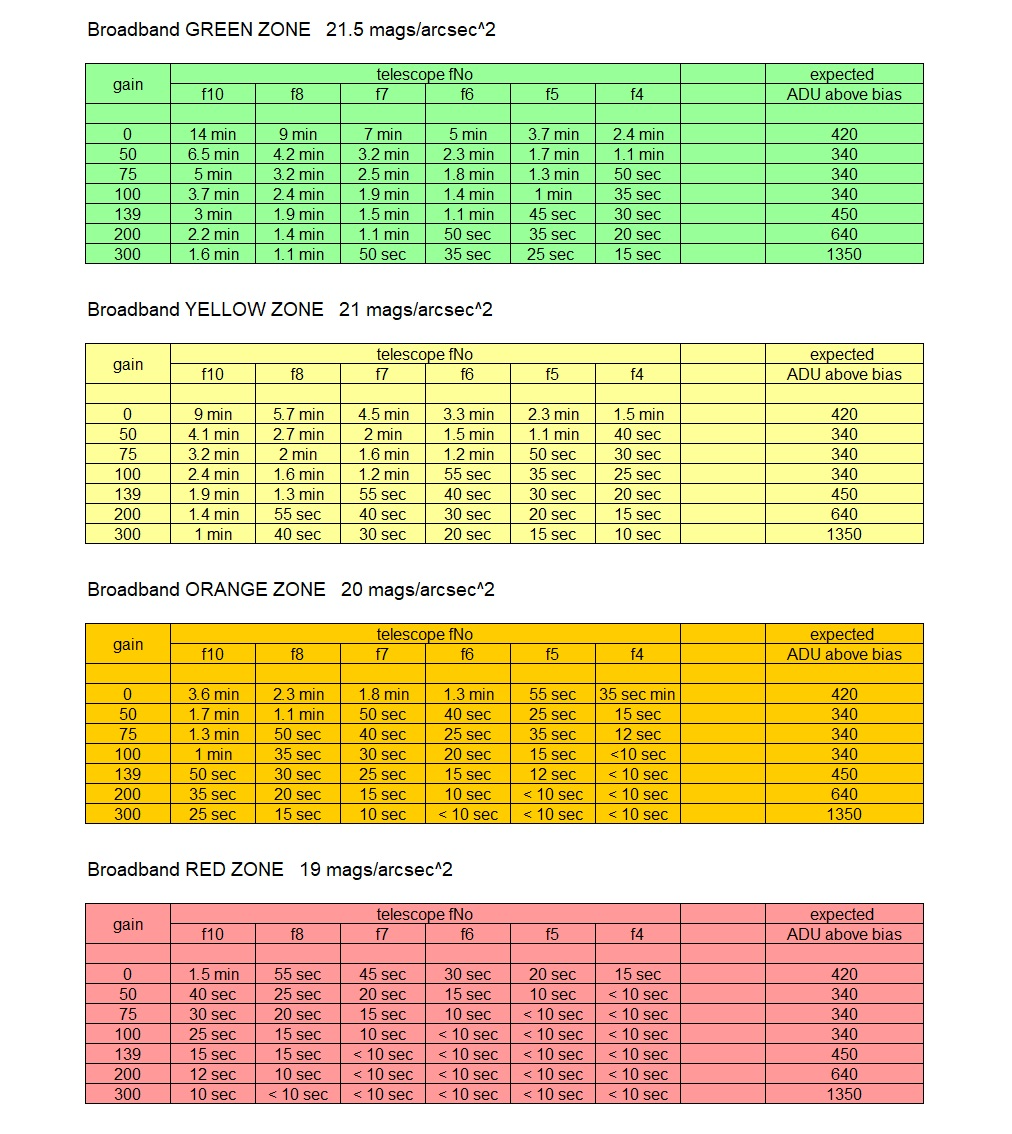
So I have already taken a set of images on the 8th October, 14 of them and they were at a Gain and Offset of 10 (I believe these settings are less than perfect) and an exposure of 1200s, so 20mins through an Astrodon OIII narrowband filter. My location is on a good night in the Orange Zone as per the charts borrowed from the forum discussions and when referring to broadband imaging. For narrow band as per my test here I am between the purple and blue zones.
Inspecting the original frames I took you can see slight amp glow from the right of the image, the background has a median of 10 ADU at 12bits. None of the stars are saturated or clipped. The brightest star is 1,854 ADU our of a dynamic range of 0-4,095 ADU. The faintest nebula I can see is 11 ADU so just above the background and the brightest part of the nebula is 77 ADU.
M76 – 1 x 20min OIII Gain 10 Offset 10 – ASI1600mm Pro Cooled
So I will attempt to take a set of images at the following settings across 4 exposure times of 300s, 600s, 900s and 1200s at or after astronomical night at 20:56 onwards if the clouds hold off.
Gain 0 – Offset 10
Gain 75 – Offset 12
Gain 139 – Offset 21
Gain 200 – Offset 50
Gain 300 – Offset 50
Gain 300 – Offset 65
So after several false starts of broken cloud disrupting my ability to keep the dome open, I managed to grab the first 6 frames of 300s as above. Here is an animated GIF of all the images in order of Gain lowest to highest. (Click the image to animate or right mouse click and download)
In my next blog I will look at the analysis of the first 6 frames whilst I take the other frames to compare.
Tonight Bob and myself had a couple of things to achieve on the dome so that it would be ready for Autumn. As the Moon was out in full force, Bob decided to have a go at ironing out some more configuration bugs with guiding whilst I later in the night would test out the automated TPoint run.
Something I had not appreciated about an automated run was that instead of selecting bright stars, slewing and manually centering as you would when doing a non-automated Tpoint run, the automated run takes images of random or selected areas in the sky rather than centering on a star and then determine how far off it is from where it thought. Unlike a Closed Loop Slew that would take 2 images, one when it completes the initial slew and another when it has shifted to account for the error and plate solving to make sure it is now in the right place, the automated Tpoint just takes that single image then moves on, registering the error as it goes, building the model and applying the correcting to make the pointing better.
So at 23:27 Bob had finished attempting to setup guiding in PHD2 on for the QHY5 guide camera on the Talk 102. There wee still some problems, especially around a little trailing in 2-3 minute images. I suspect that the guider was being over aggressive in correcting in RA and possibly DEC causing the issue. Bob started to play with the parameters but decided to try again another night after reading the PHD2 manual.
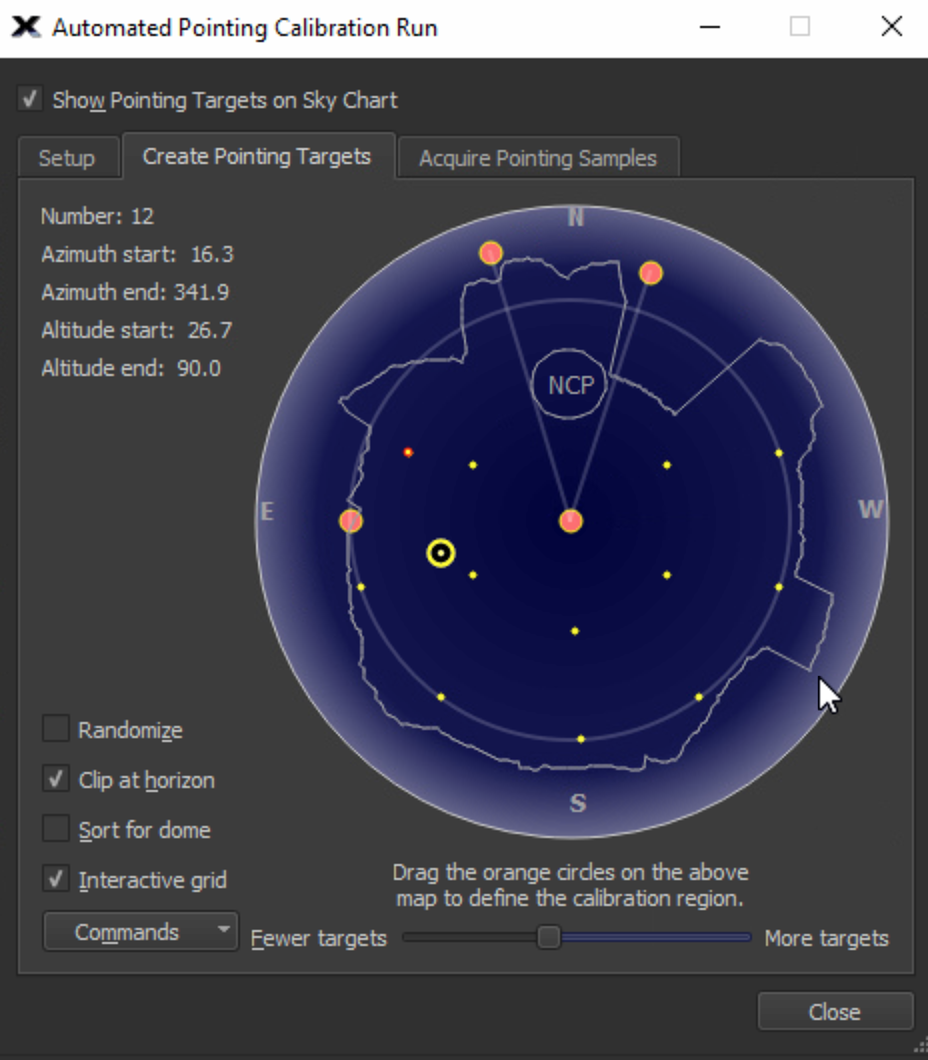
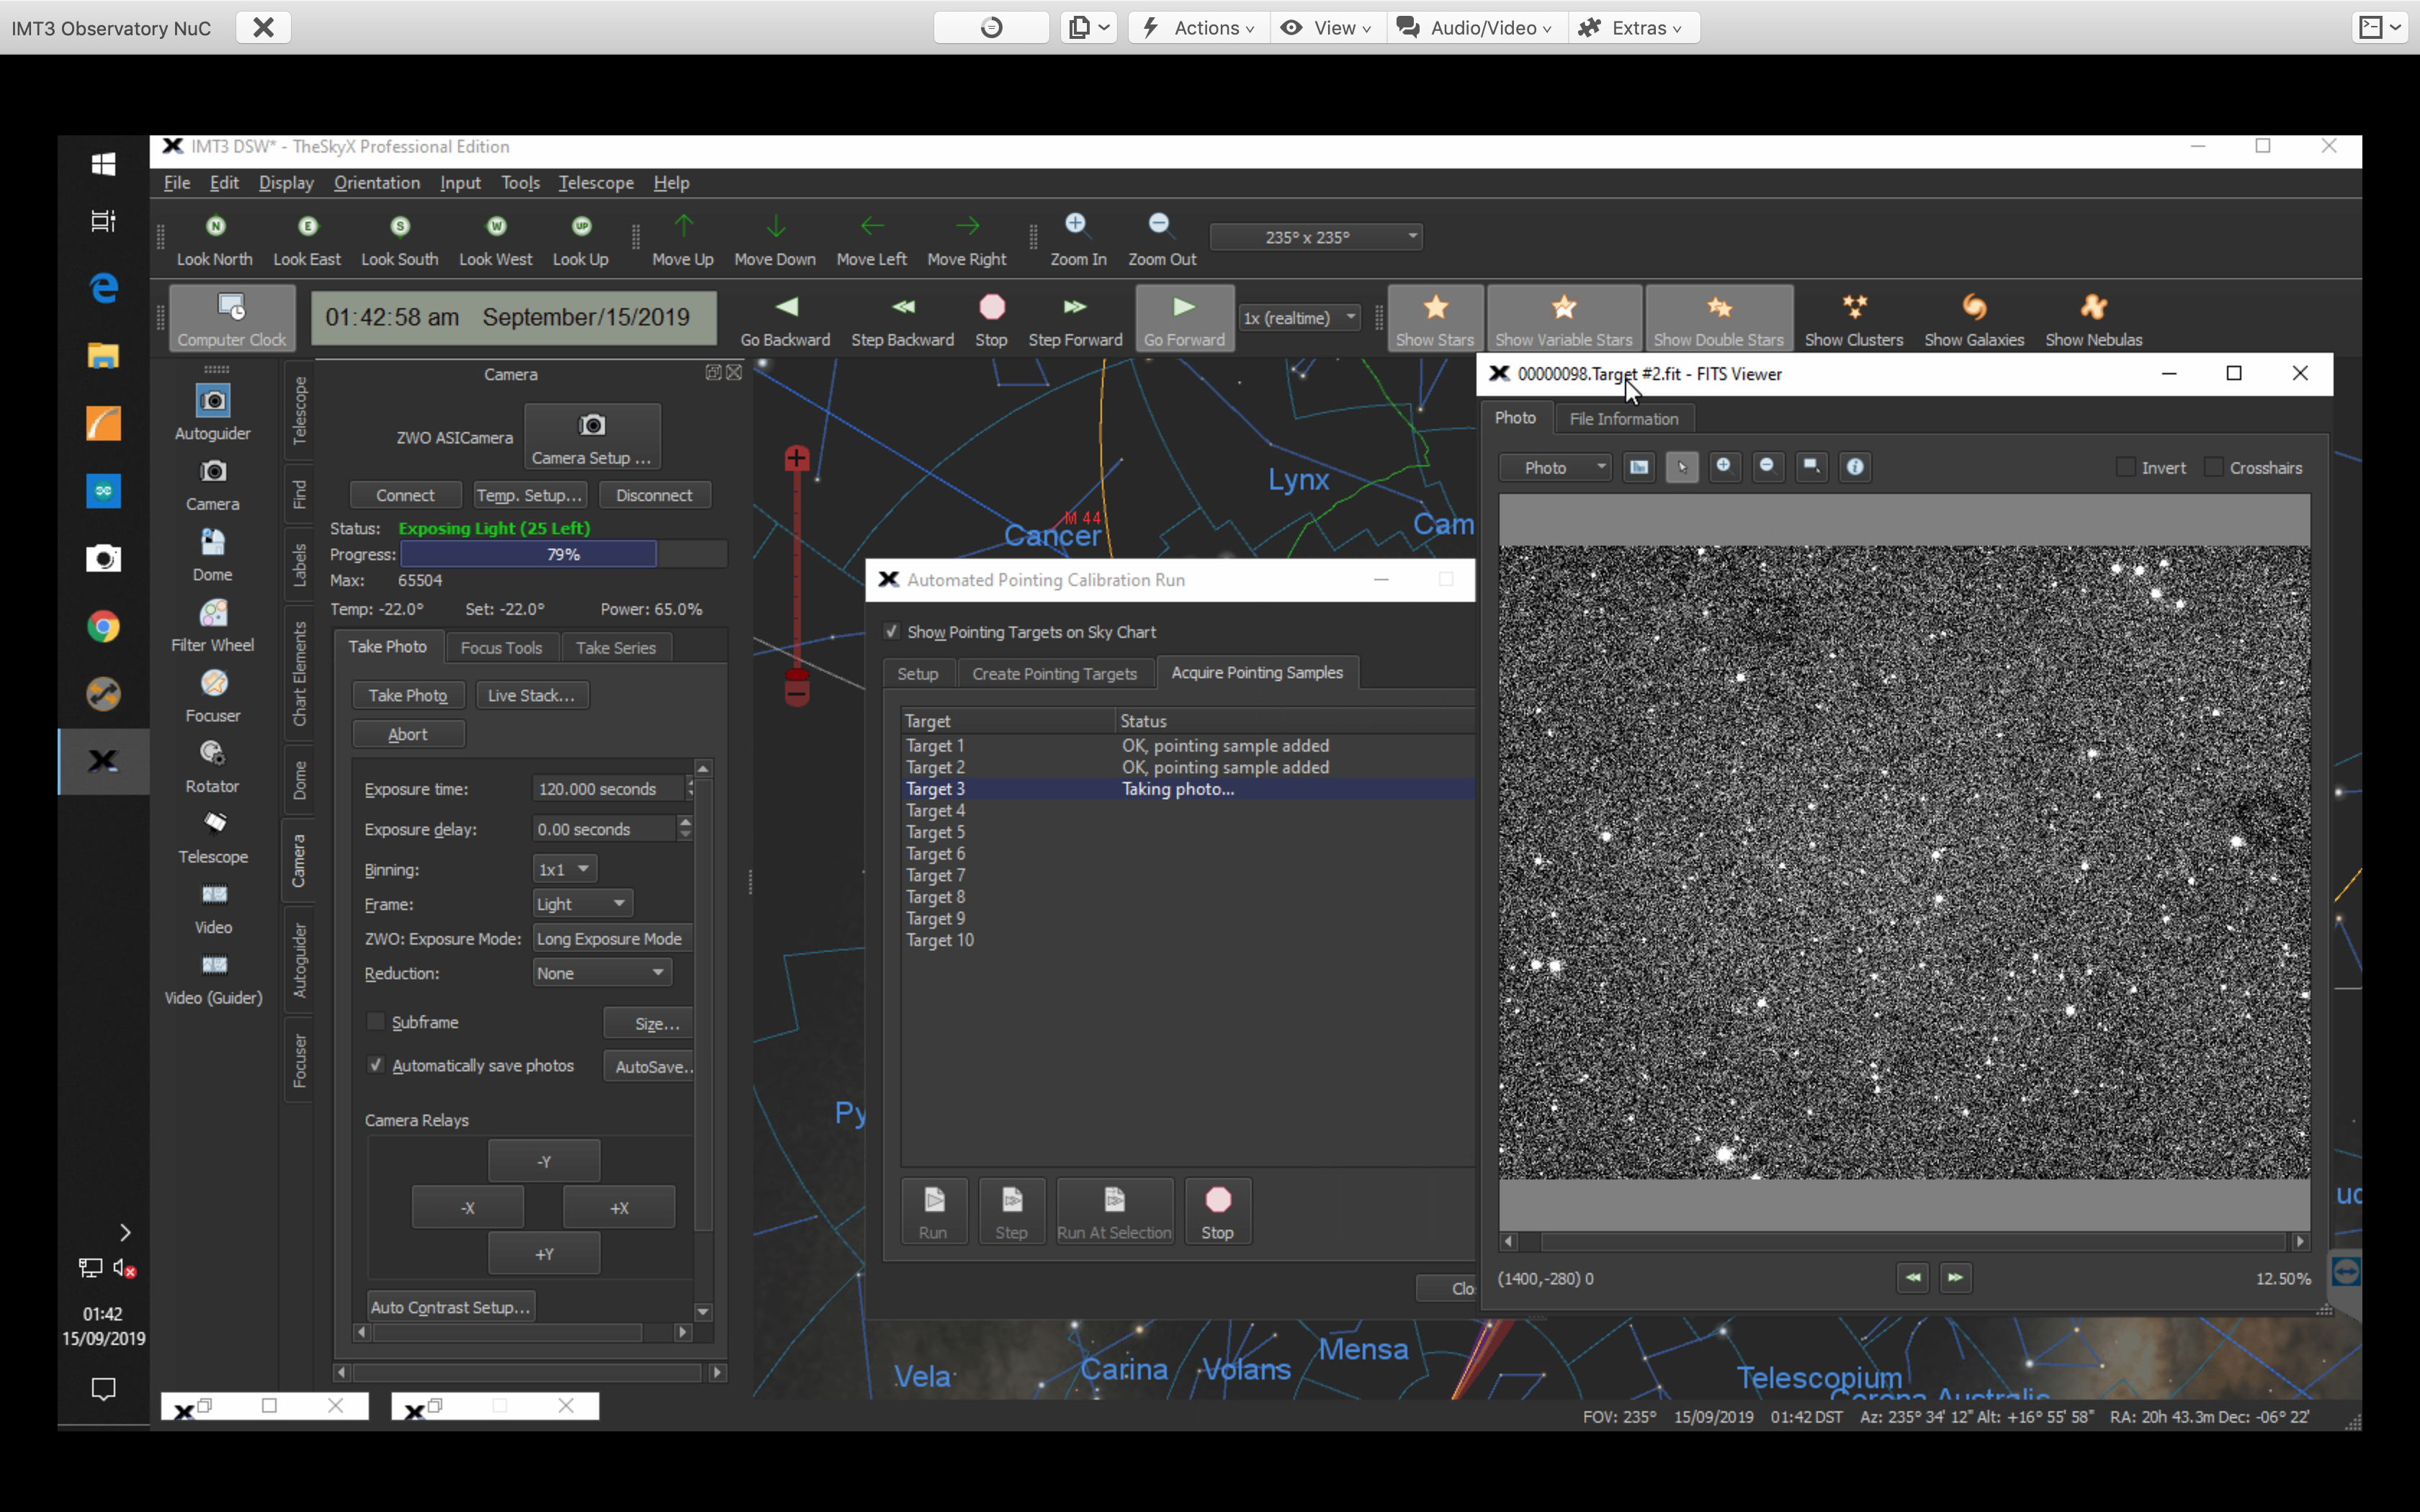
Now for the automated TPointing run. We had to go in and setup The SkyX (TSX) so that it could control not only the dome and mount but also the camera on the back of the OS12″. Once that was done we setup the automated calibration run settings to find 10 targets evenly spread around the sky and avoiding the North Celestial Pole.
Target setup
What we did have a challenge with was the Moon, which being very bright does not lend itself well to being able to plate solve next to it with a large telescope, mainly due to light scatter within the tube and an ever increasing brightness in the background.
So the first major obstacle when we clicked start, was once it slewed to the first star field, plate solving there. This proved rather difficult to get working, about 1.5 hours of rather difficult! It kept failing to plate solve. So after reading the manual (RTFM) I realised that there was really only 1 parameter that needed to be changed to get this working and that was increasing the exposure.
TPoint in action
After changing this for 30s to 60s and then again to 120s the solving worked. Why? Well because the Signal to Noise Ration (SNR) was simply not high enough due to the background glow caused by a full Moon.
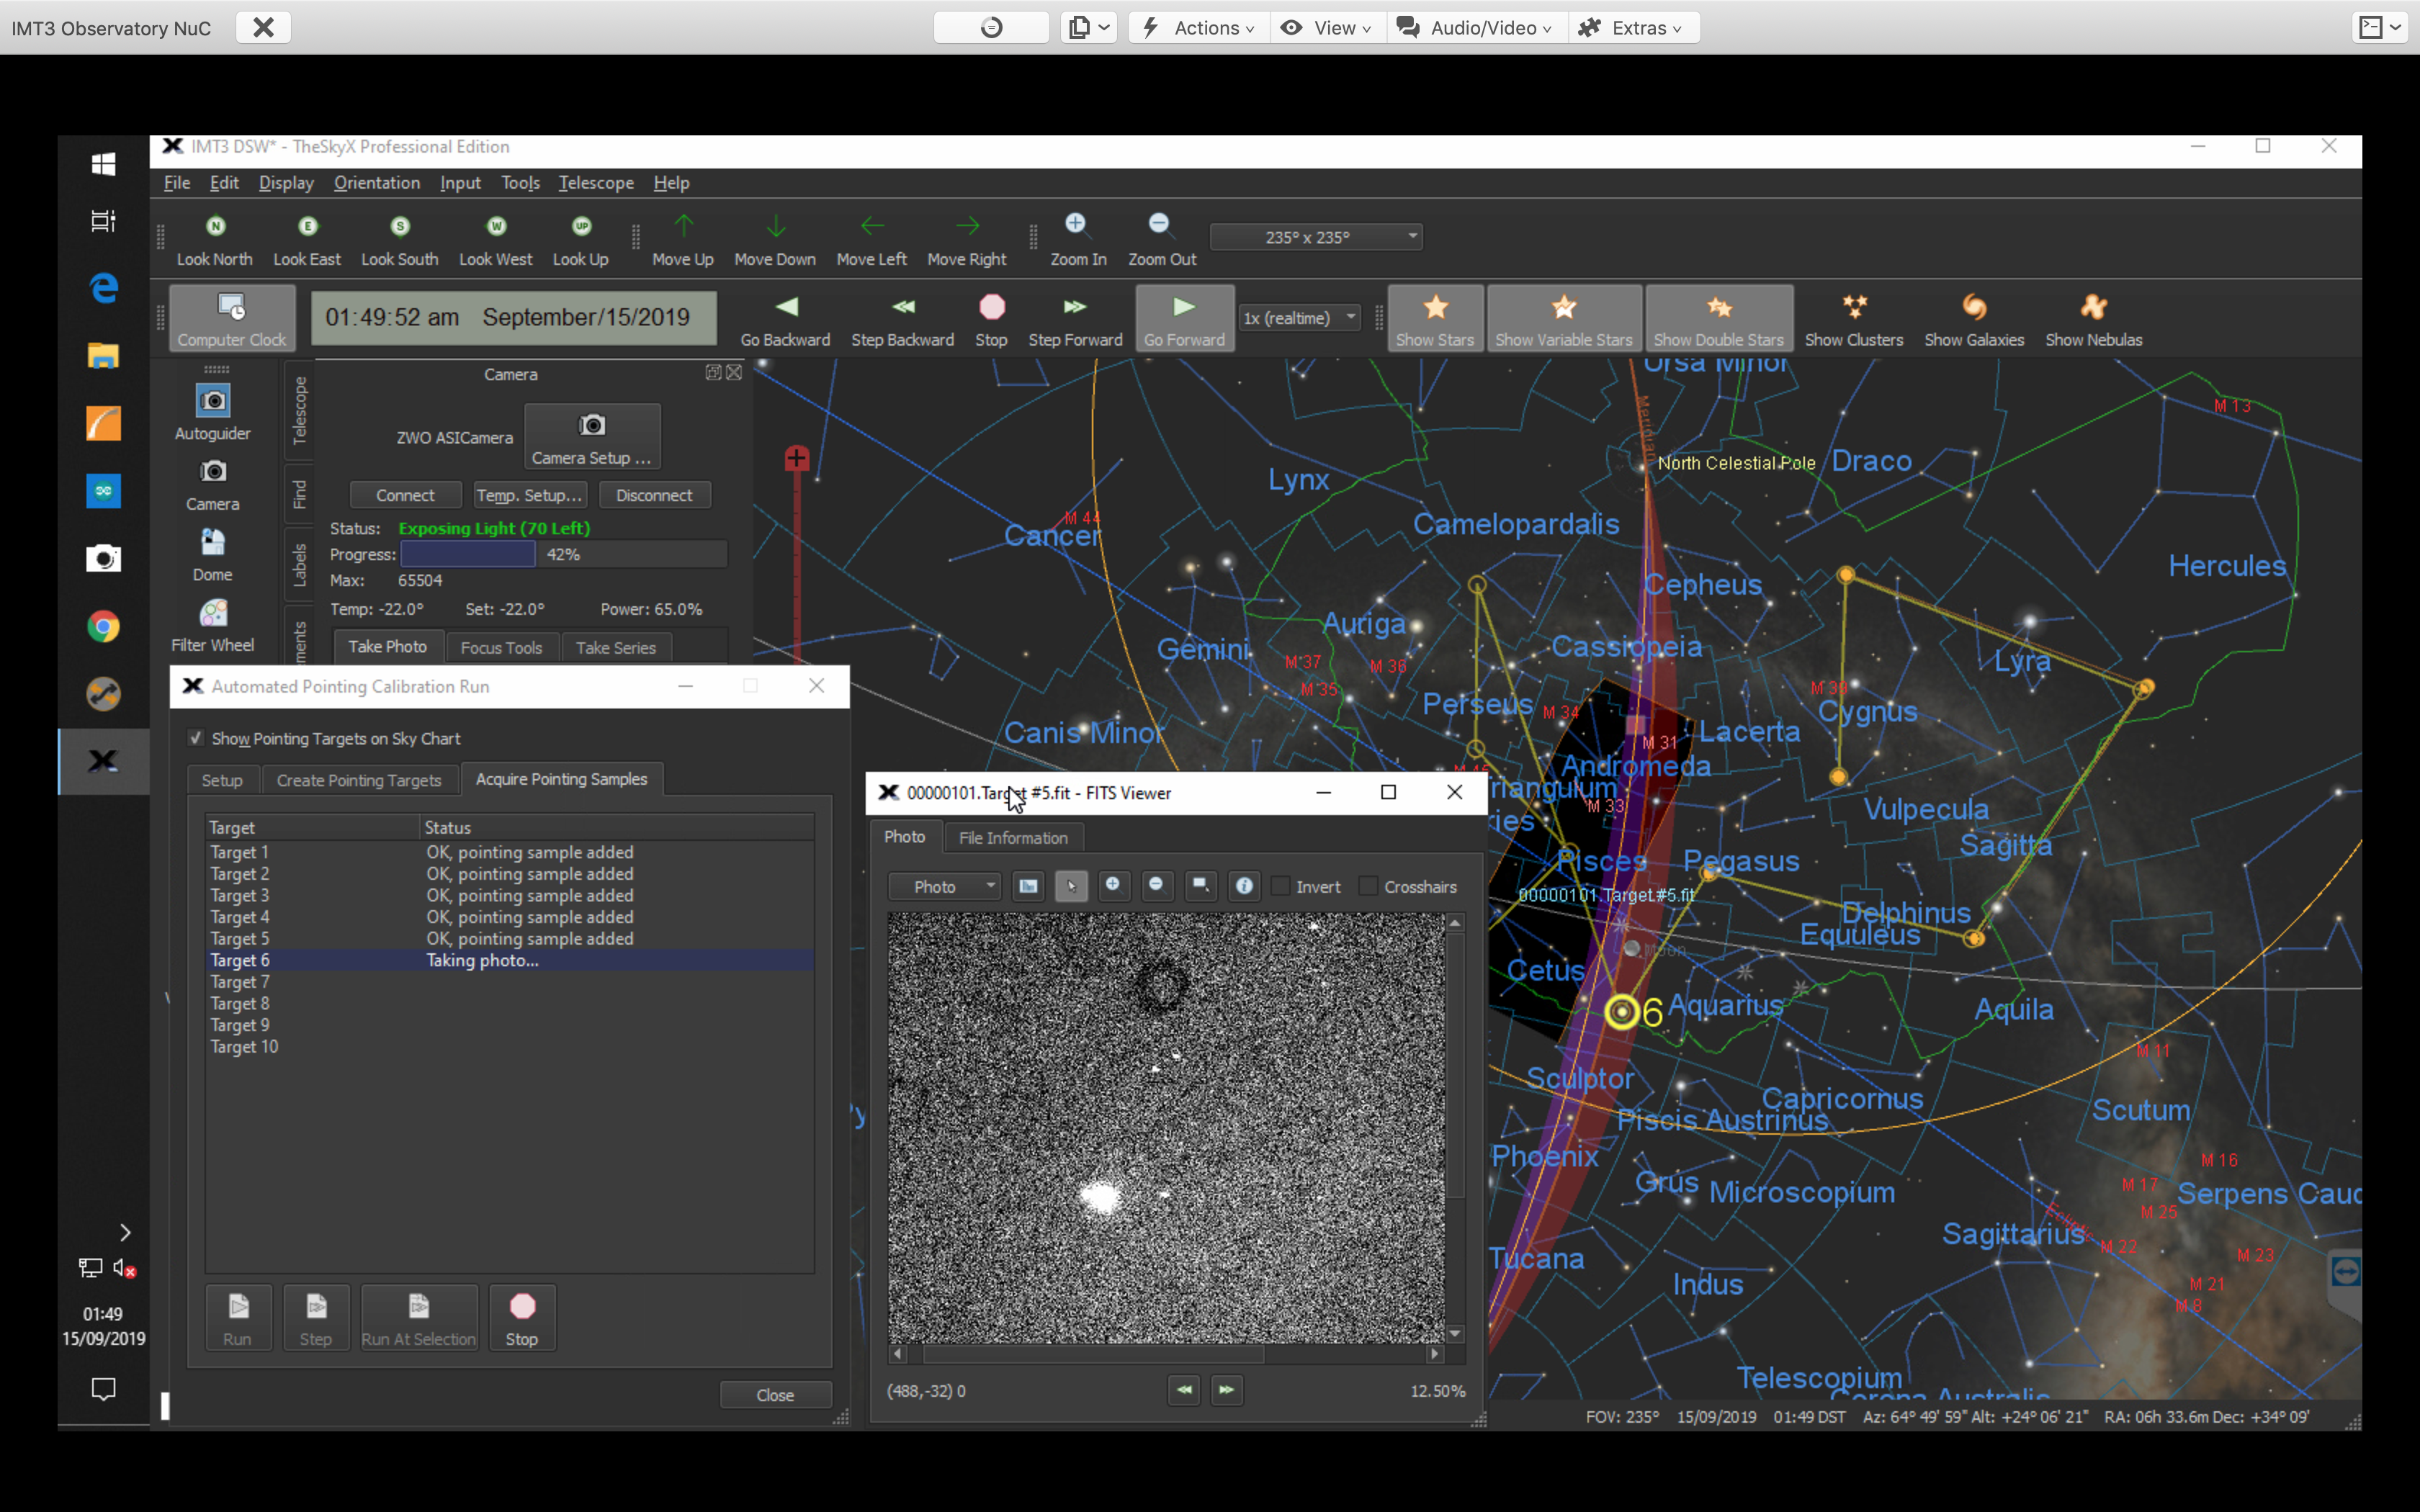
Target 5 acquired
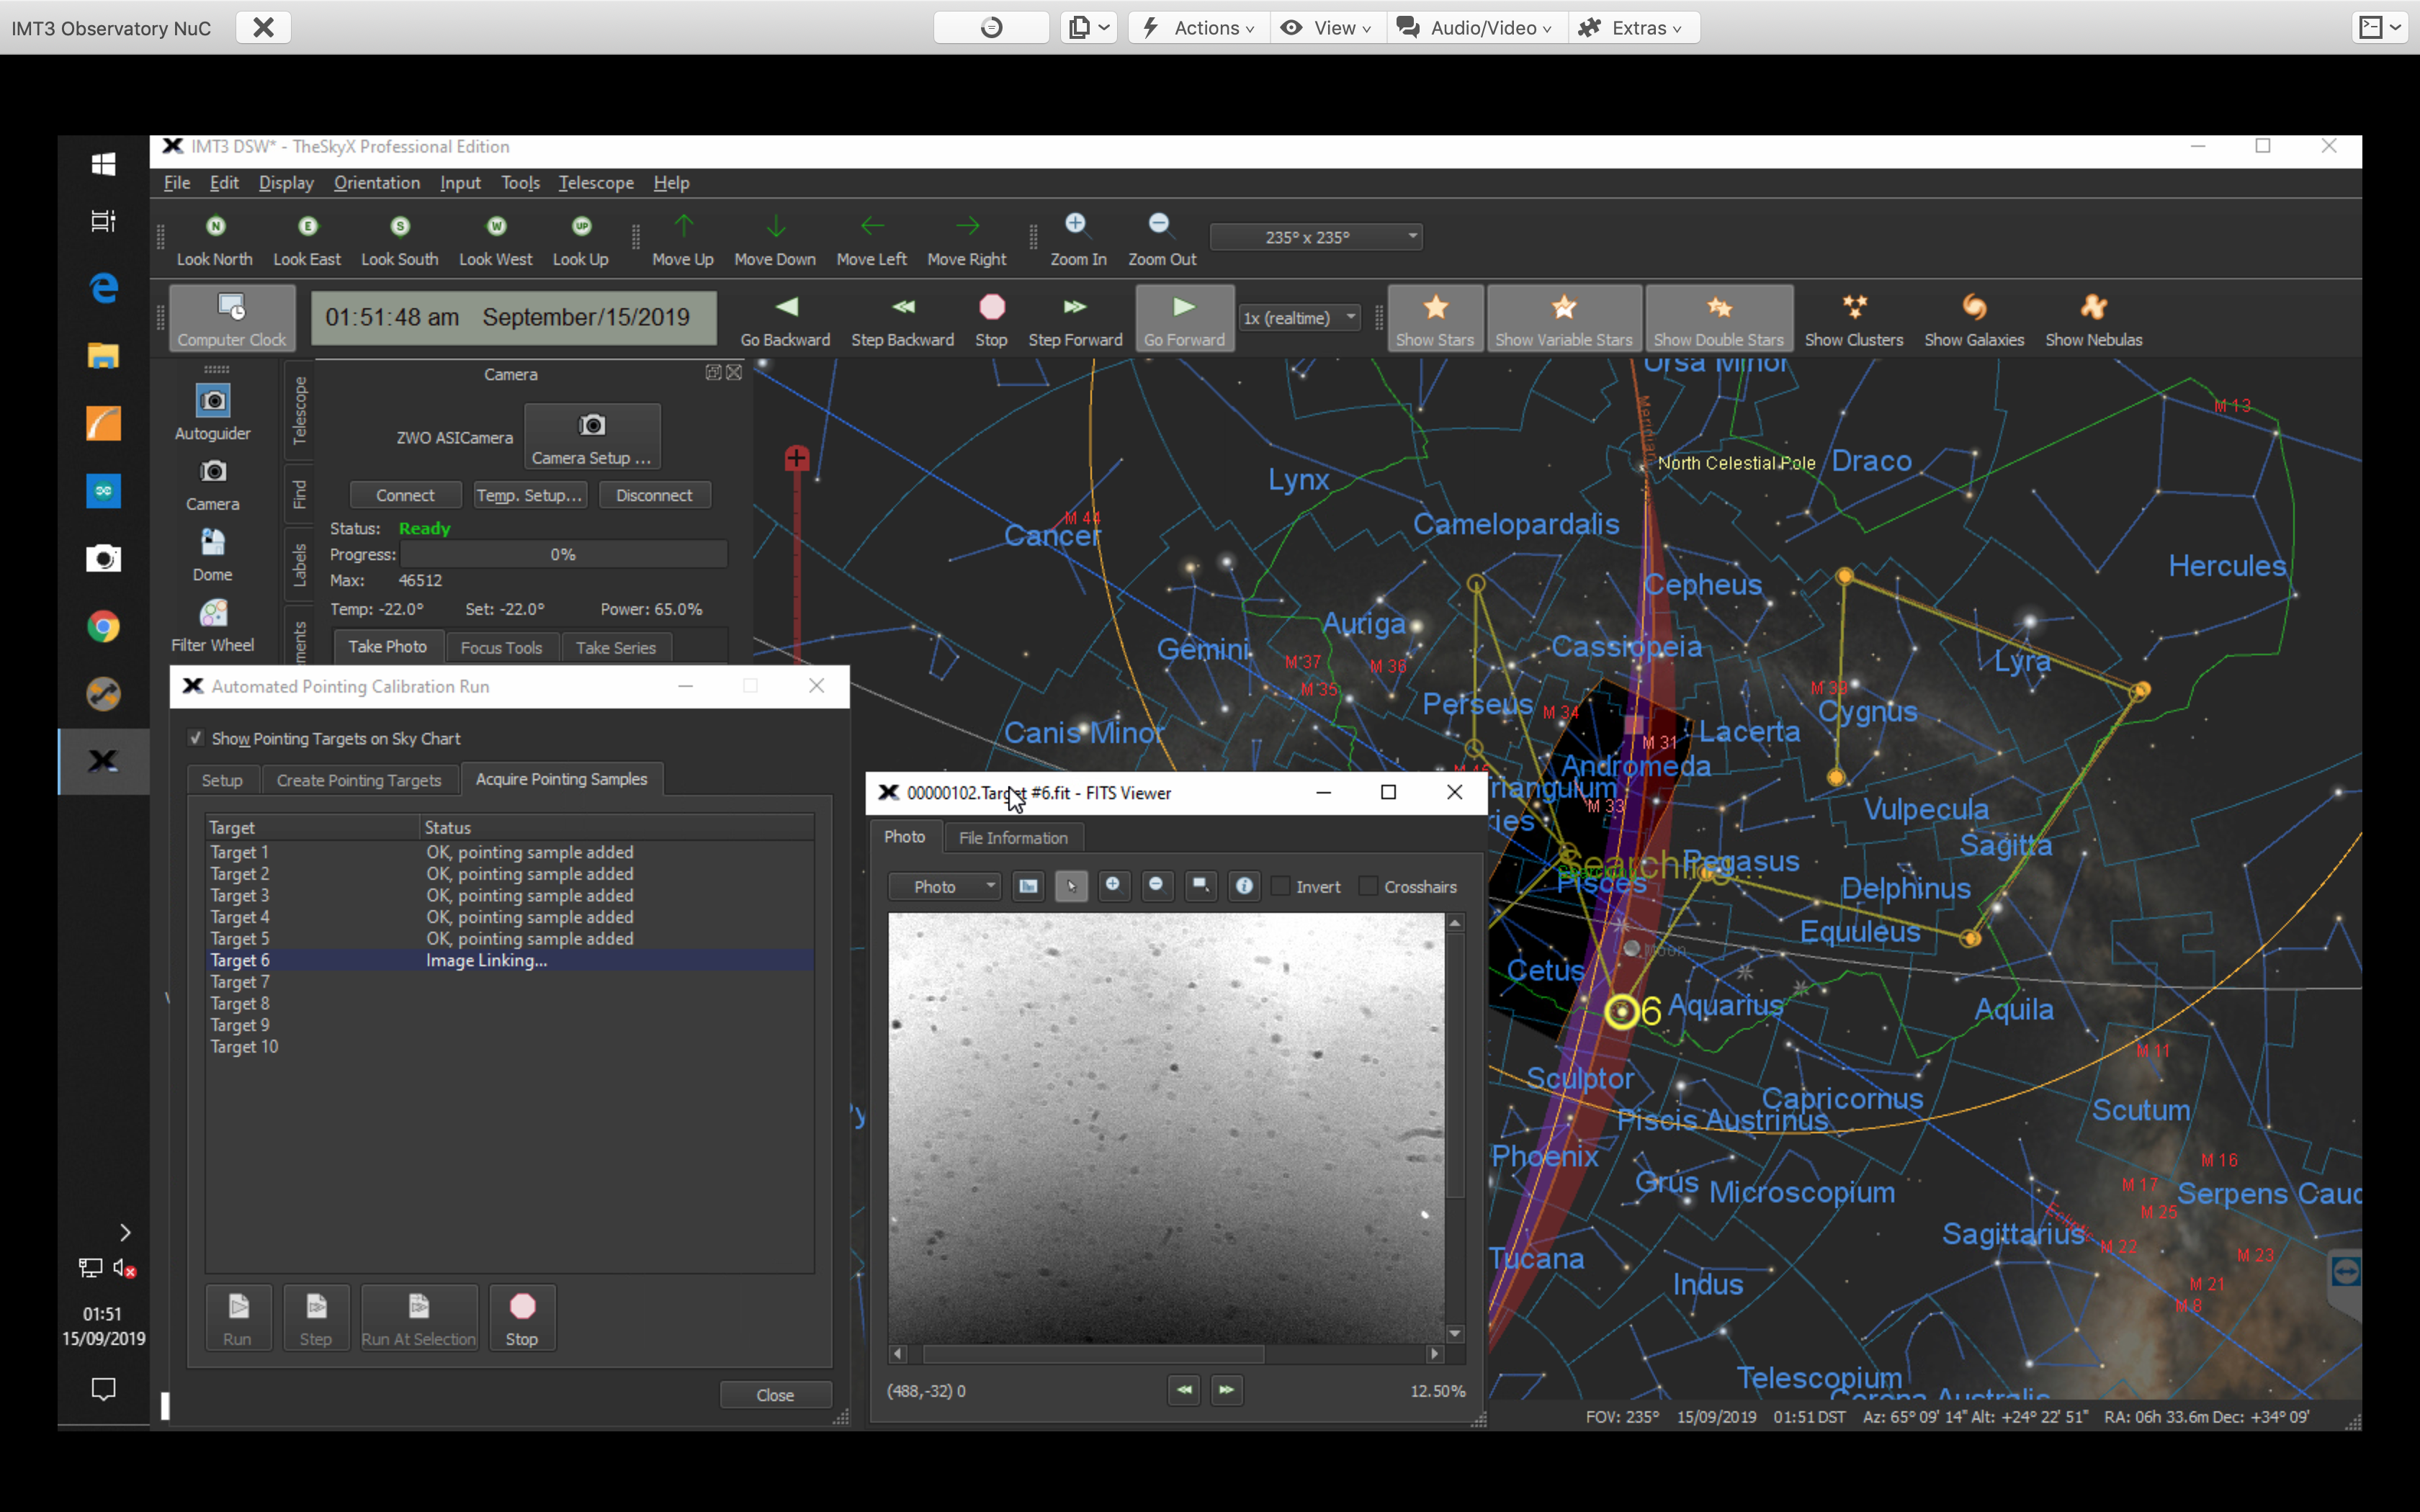
Now the first target was solved the mount went on slewing, the dome turning and the camera imaging until I reached target 6 of 10 and then it failed again. However looking at the downloaded image it was not hard to see why, clearly the Moon was just off to one side.
Nearby Moon….cannot plat solve this!
So I skipped this target and carried on to complete the set. So with an initial 7 targets solved (a few others were near the Moon) that was enough for the mount to land on the target every time and each time the solving got quicker to the point of being sub second.
With the understanding of how to do an automated Tpoint firmly in the bag we decided to shut down the IMT3 for the night and await a cold dark evening after the clocks go back on 21st September to perform a large Tpoint run of around or possibly over 300 targets.
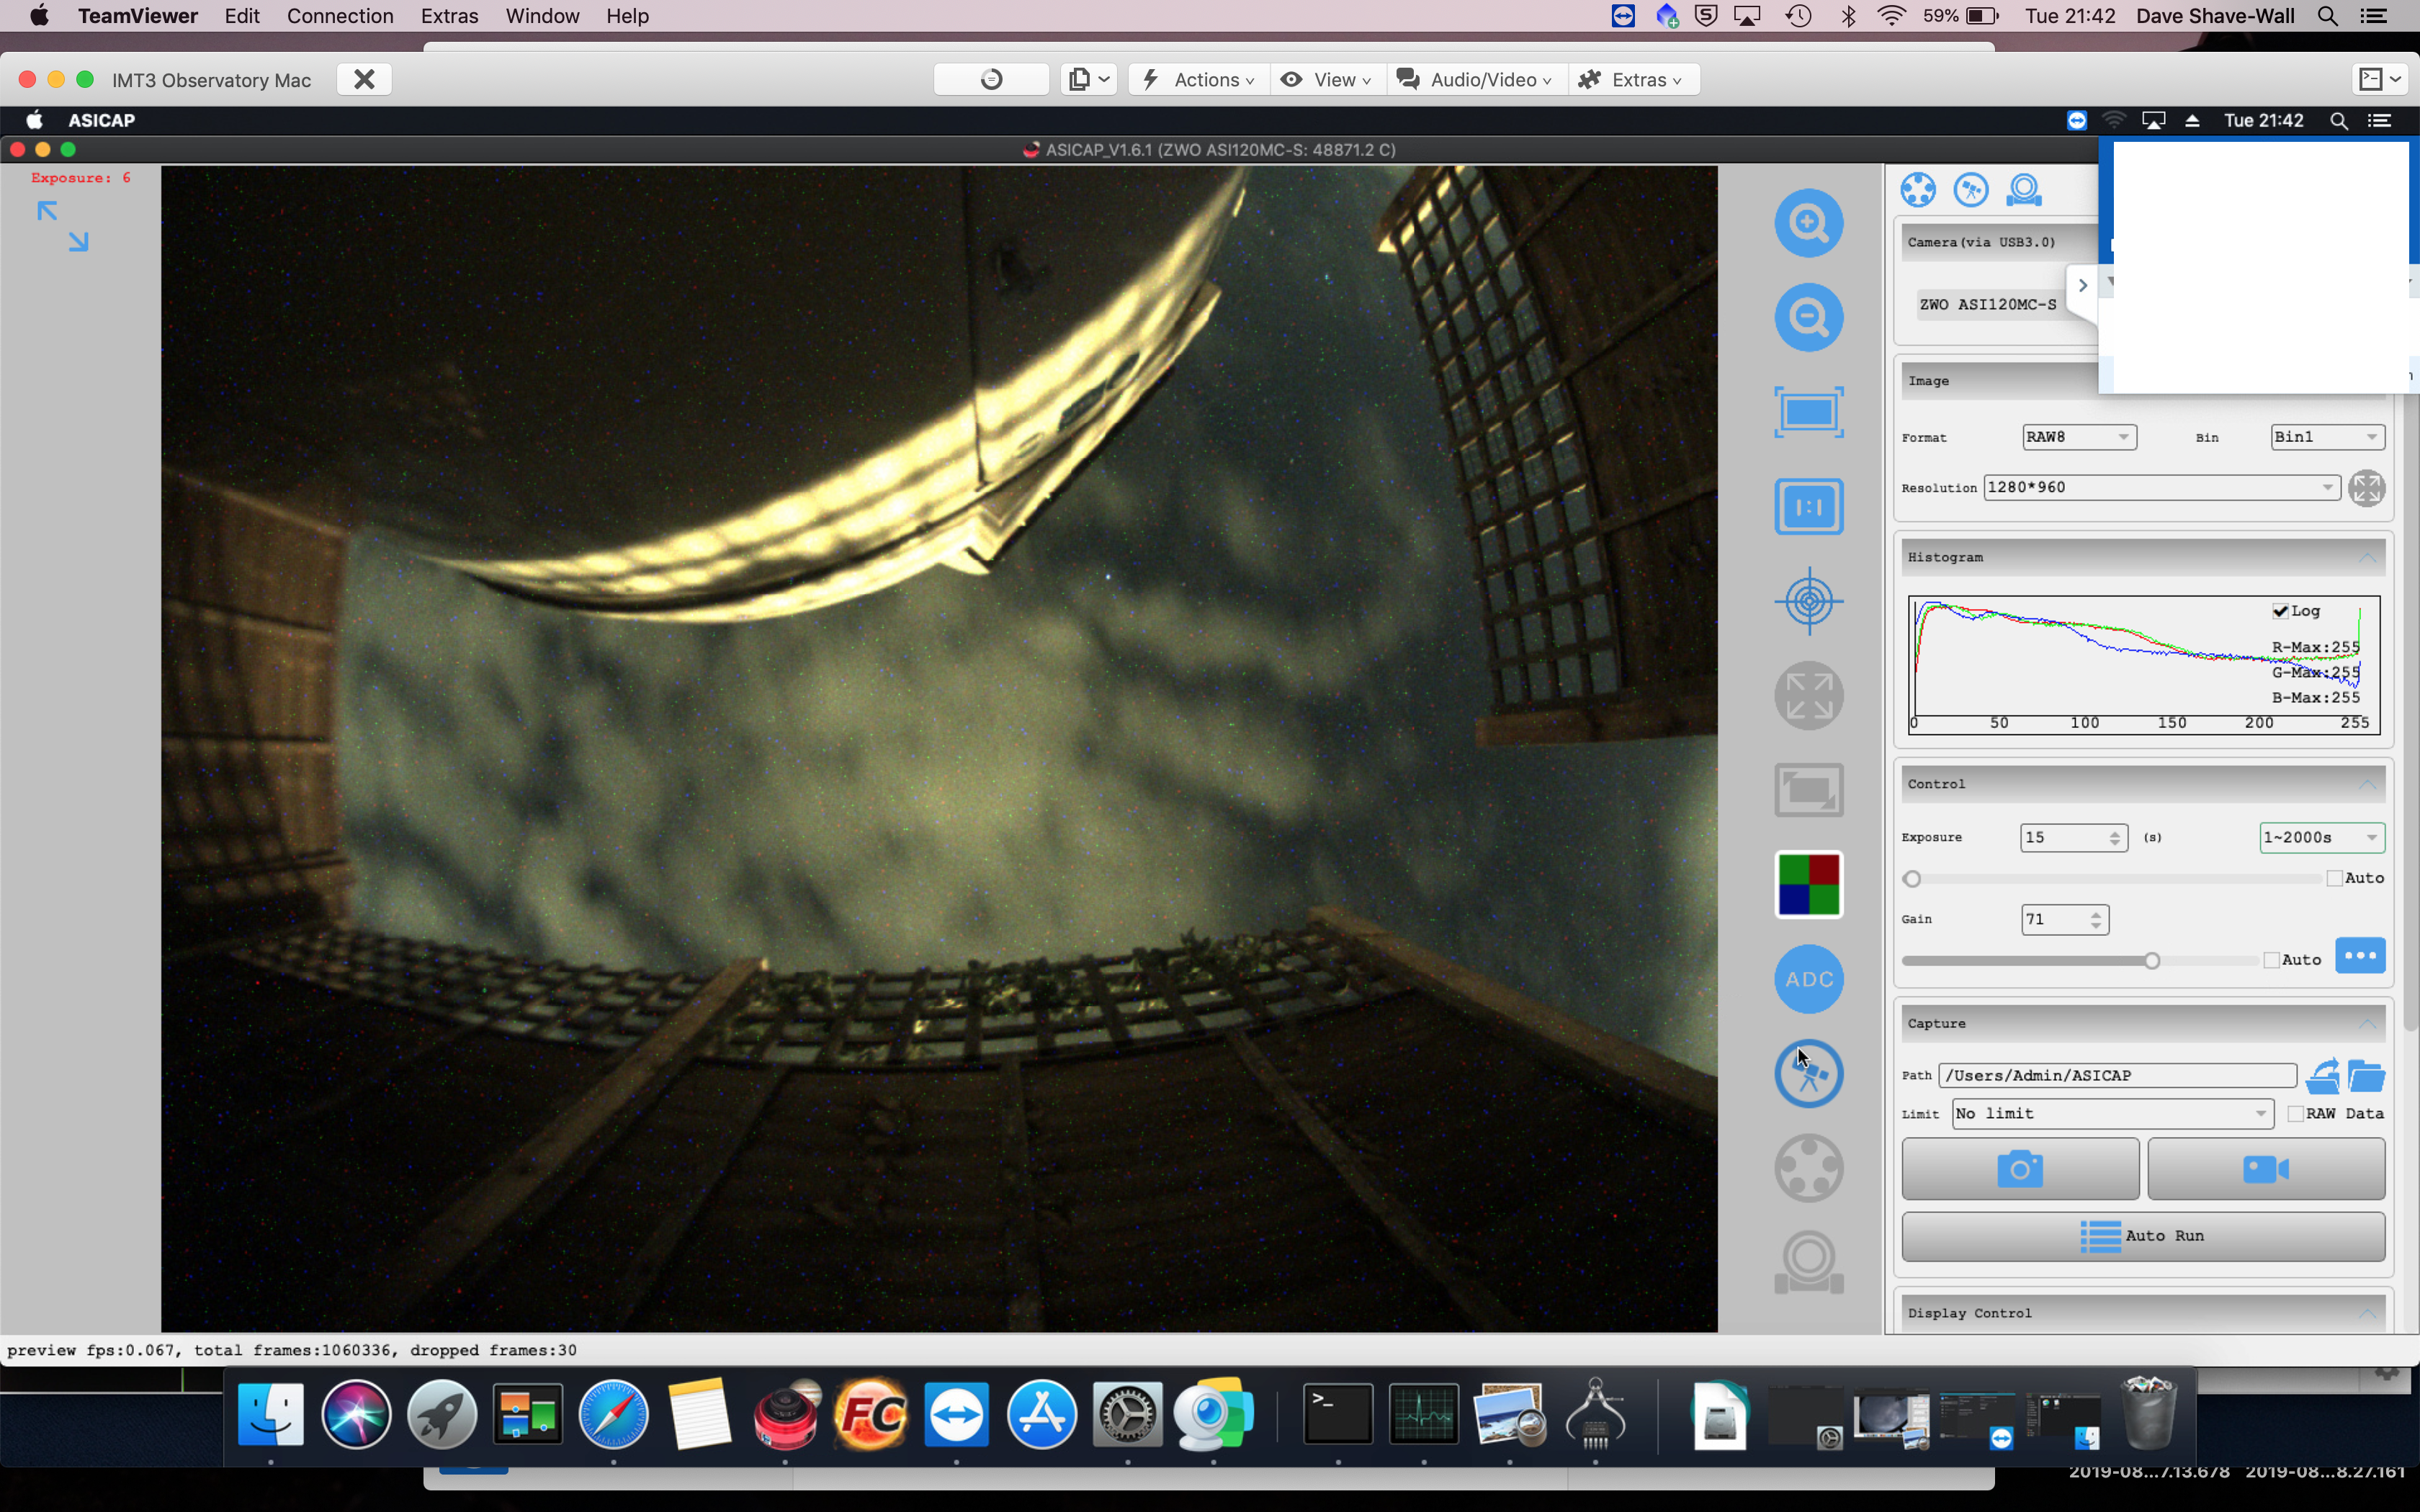
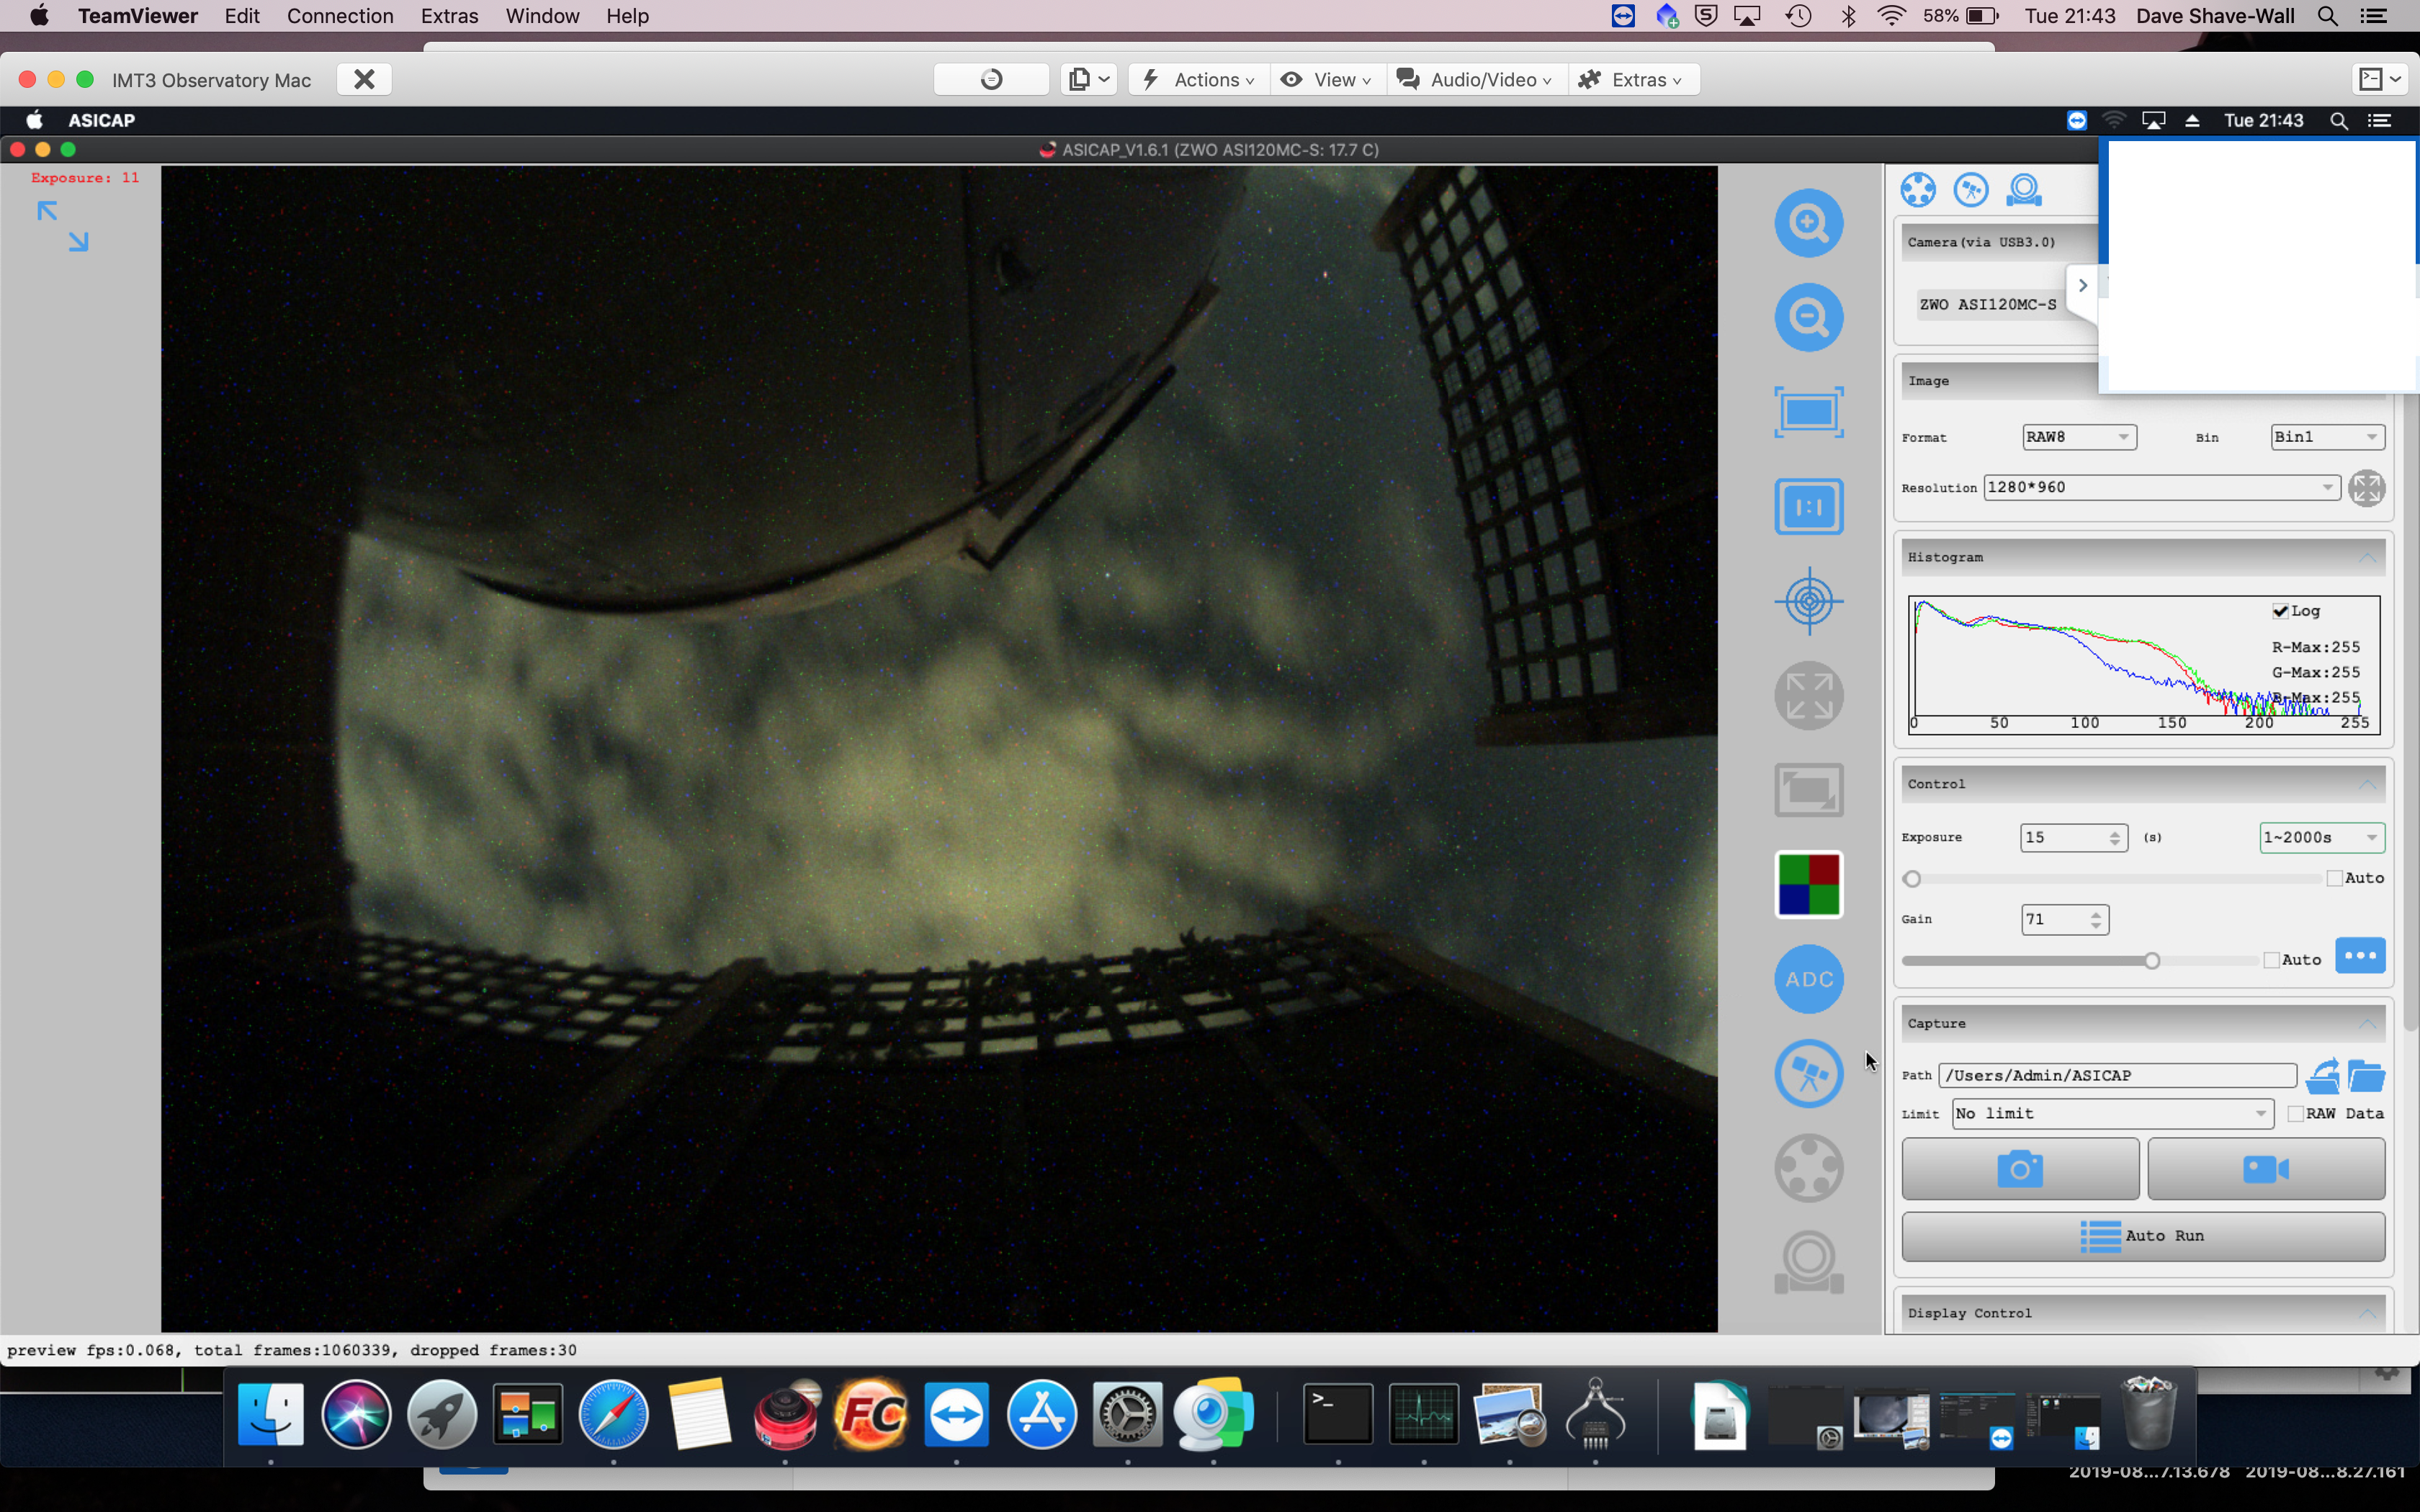
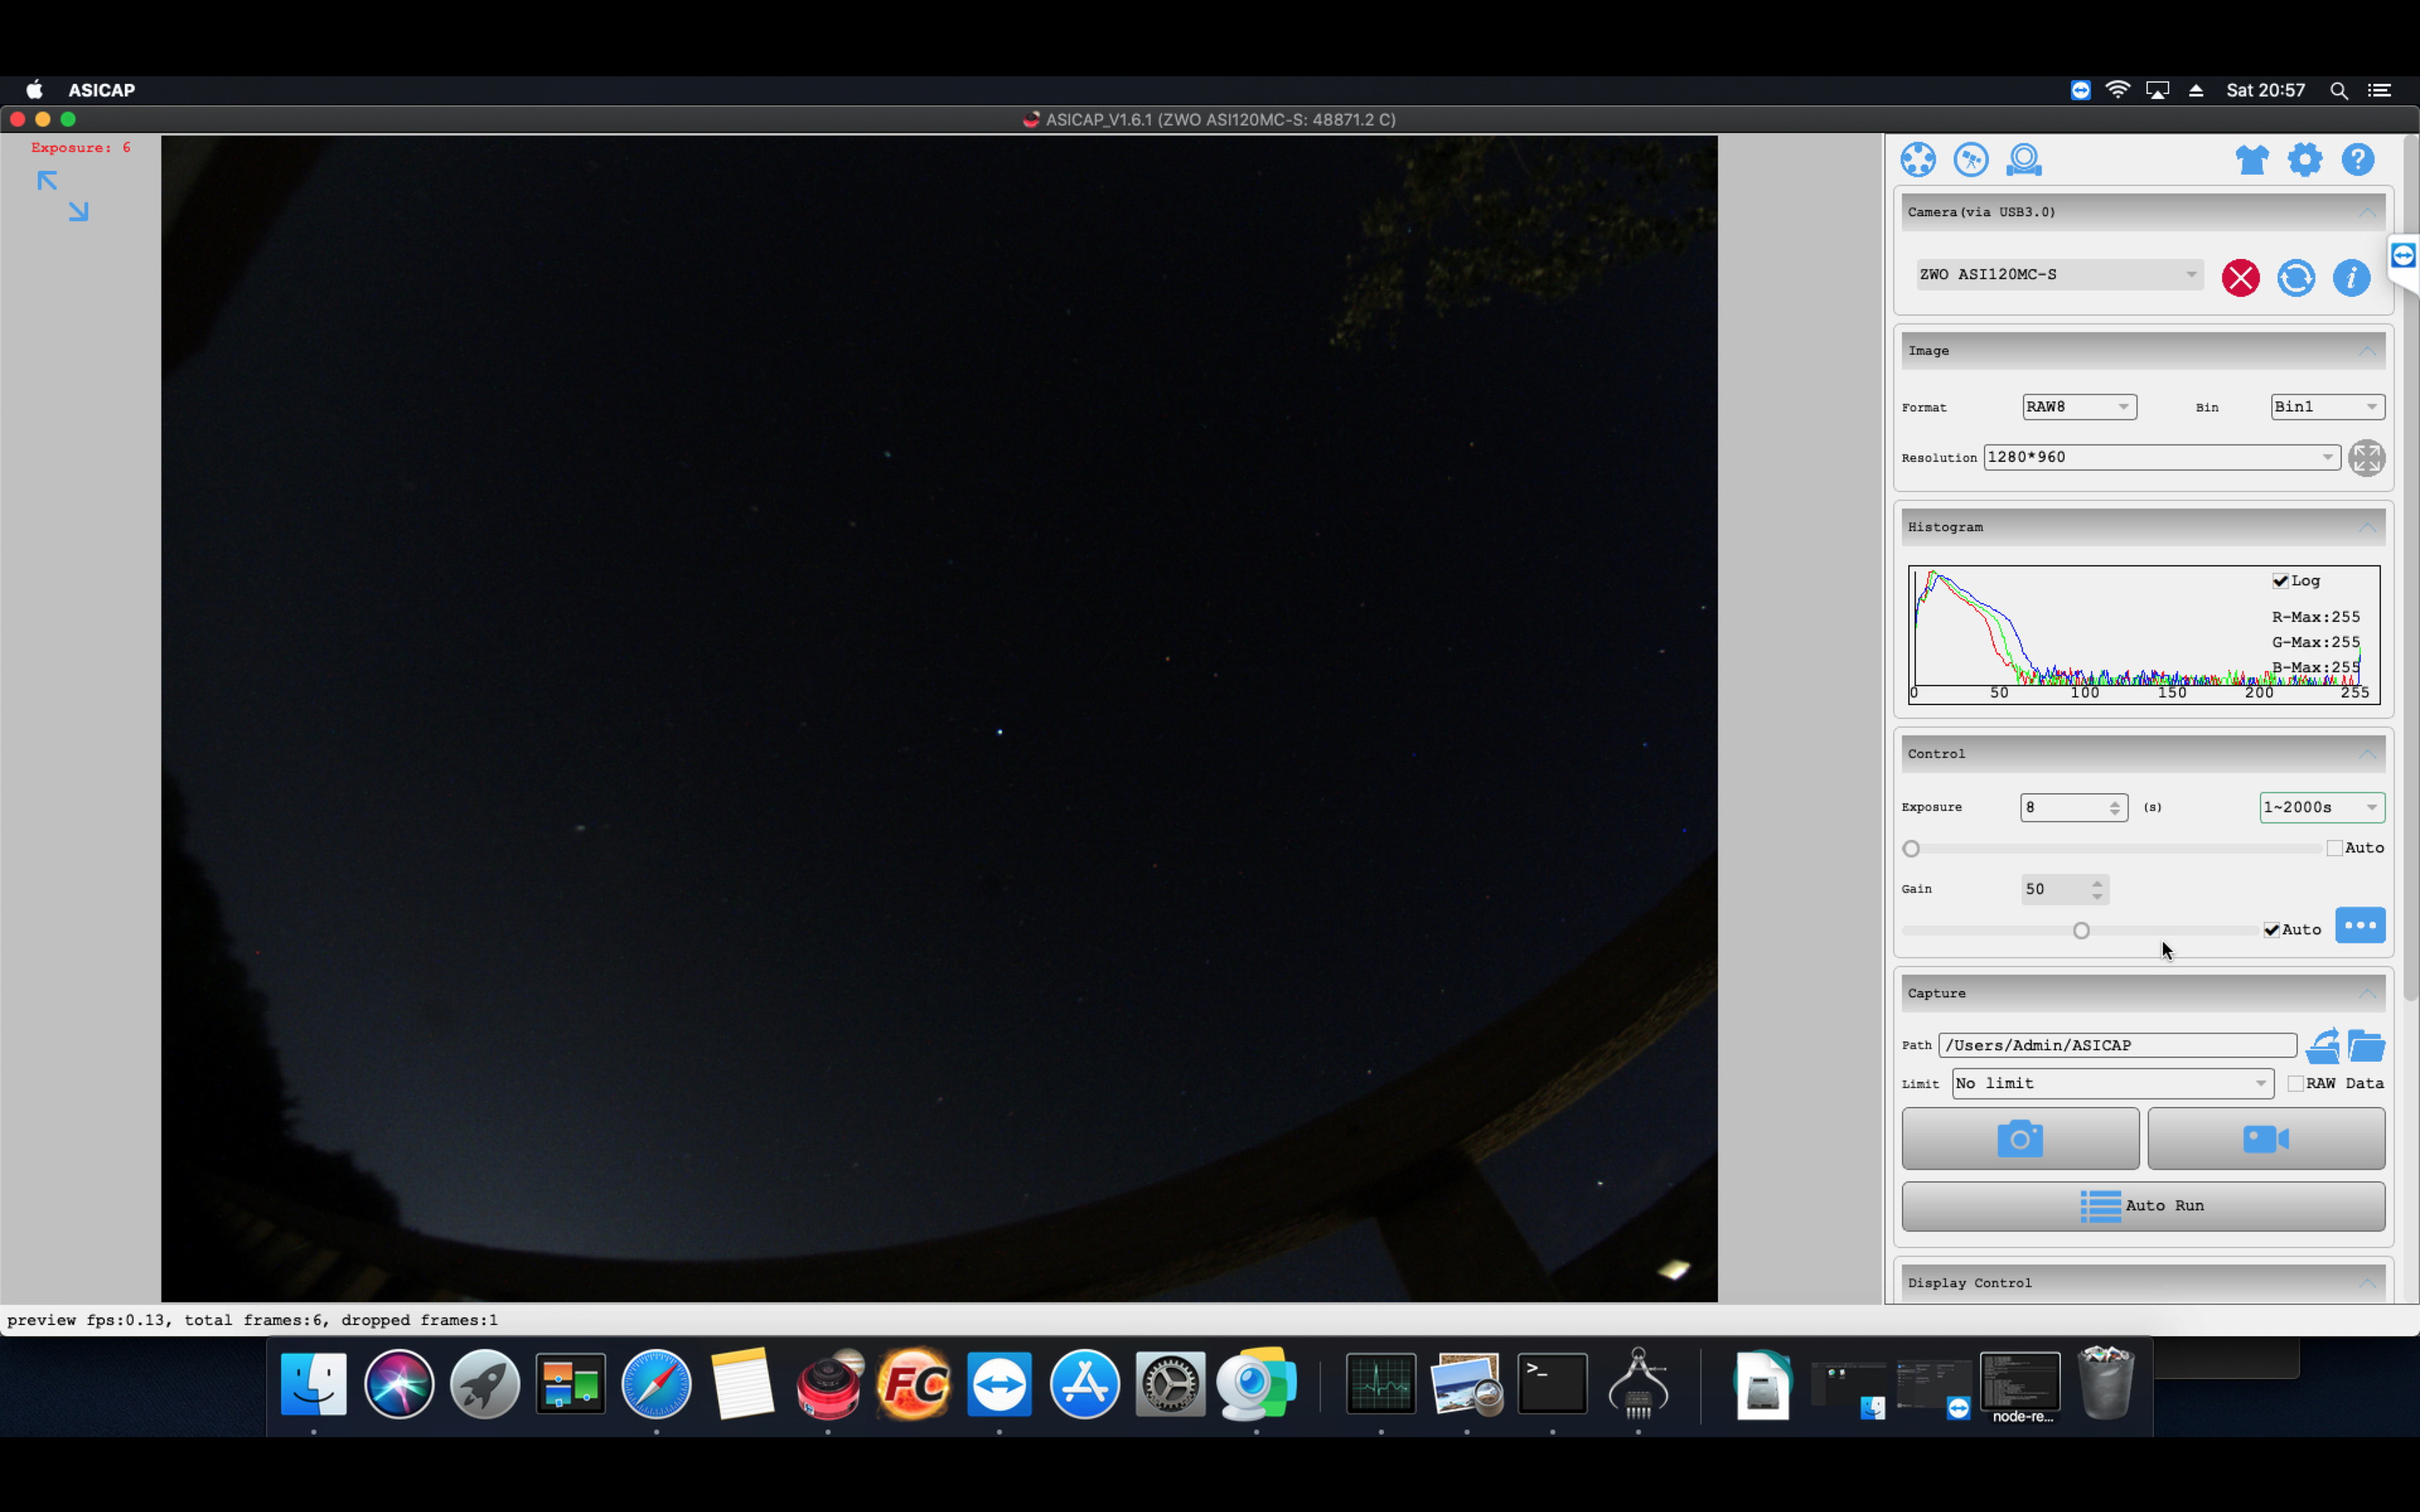
I find I notice some interesting things on the All Sky Camera, which is a USB 3 ZWO ASI120MC-S CMOS camera inside a purpose built casing and clear dome. Firstly I land up with beautiful clouds rolling past. I also noticed the light pollution as I mentioned in a previous post from the bathroom window upstairs. This image is when I had the camera on the ground by the observatory as I was testing the maximum length of powered USB I could get away with before data loss caused issues.
Bathroom light on
When the light is turned off it is noticeably darker.
Bathroom light off
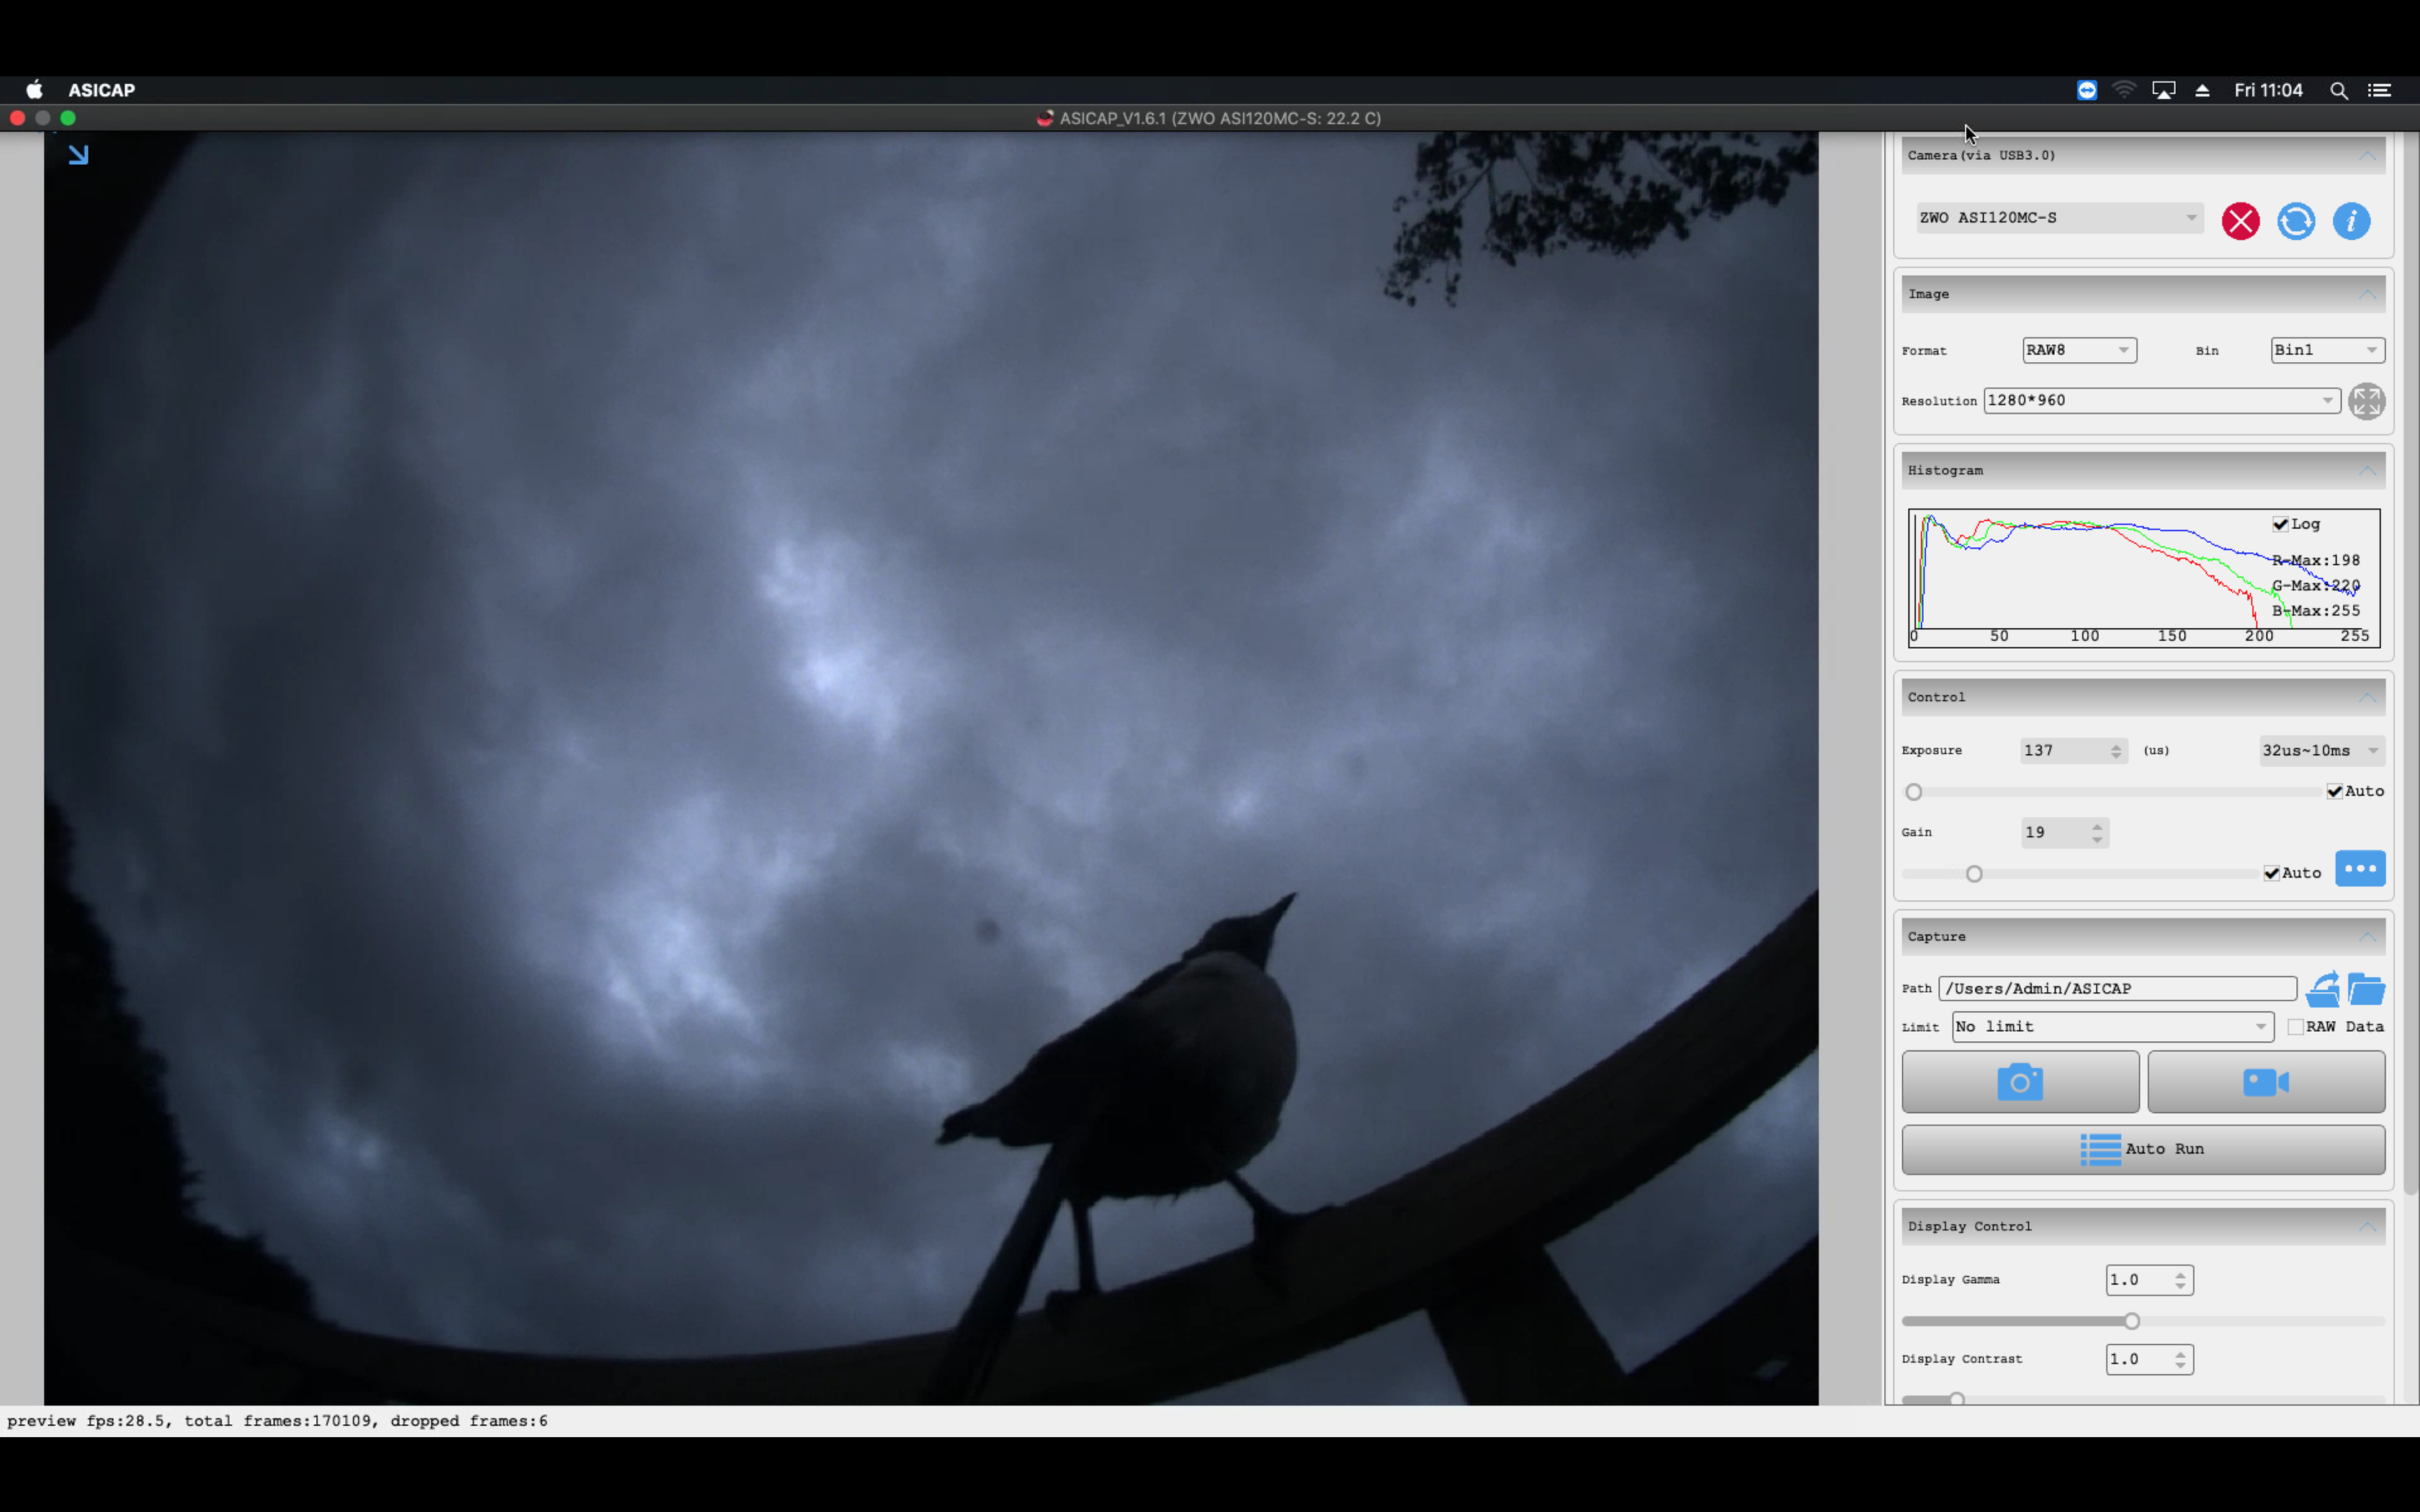
Sometimes I get visitors to the camera.
Daytime visitor
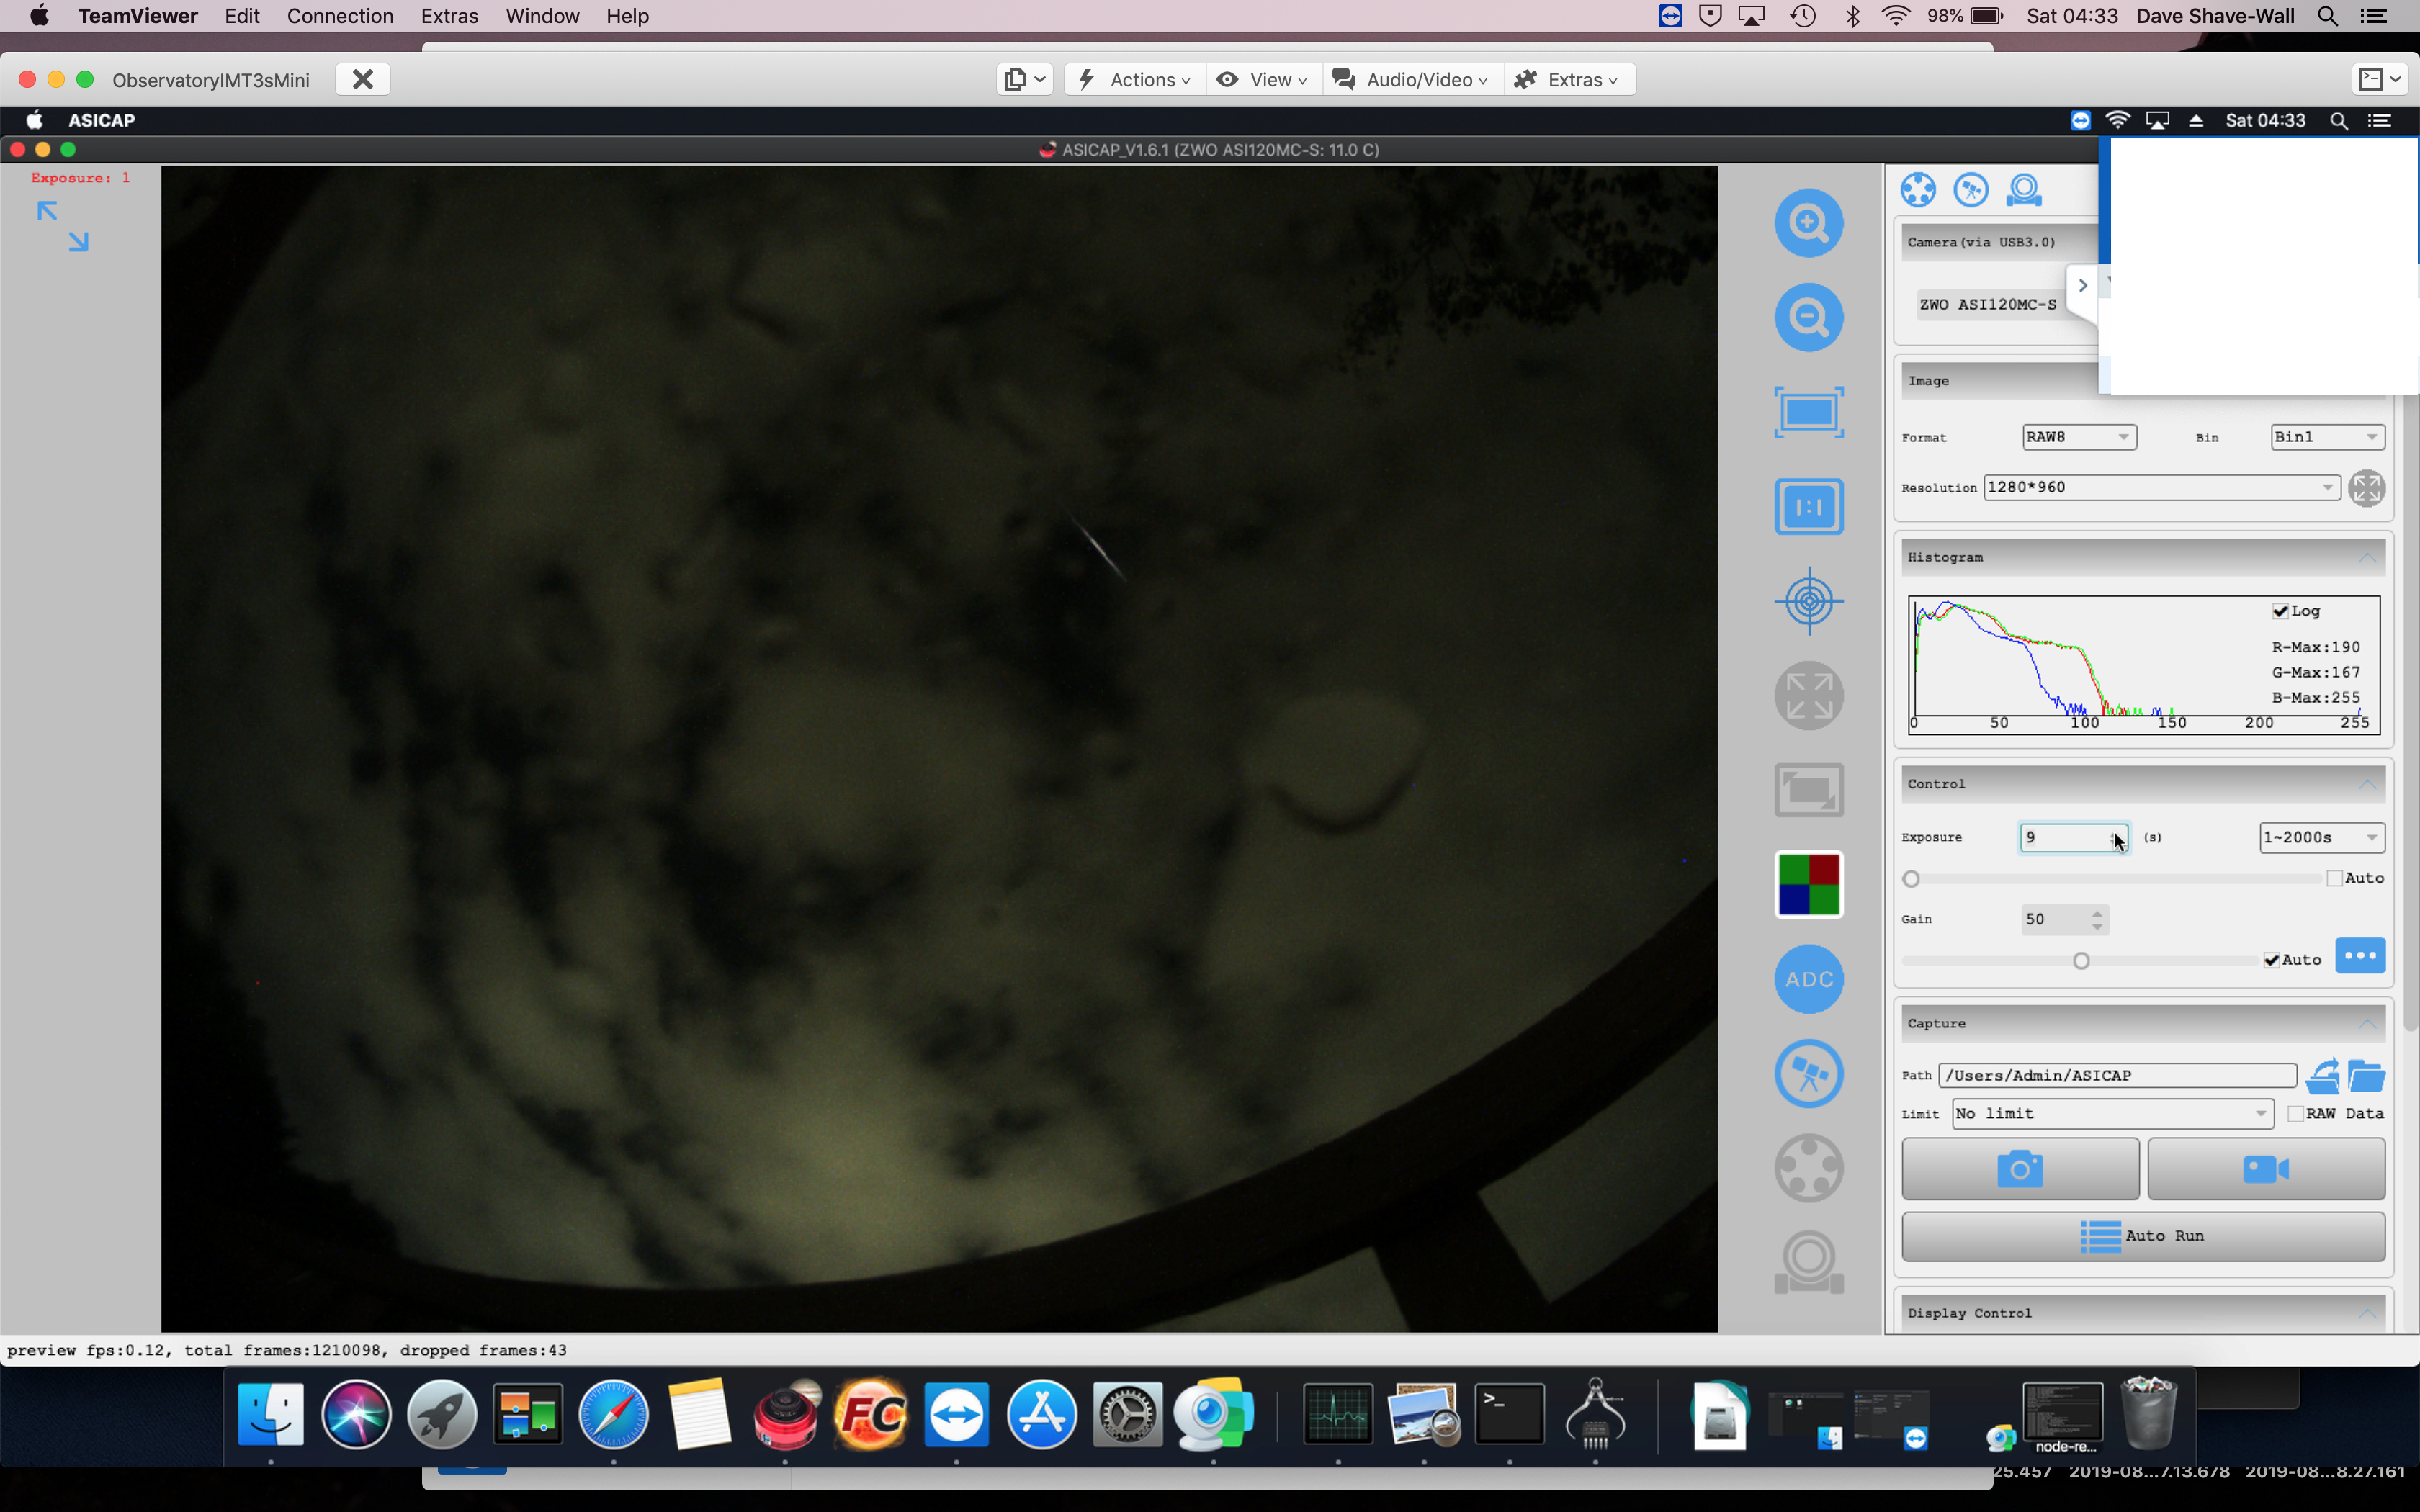
and sometimes I unexpectedly capture a meteor 🙂
Raindrop, Clouds and Meteor
So it transpires I can use a single 3m powered USB cable to the USB hub, I cannot use 2 x 3m powered USB as that causes data loss and hangs and I cannot use a single unpowered cable either.
Apart from the various benefits of darker nights such as better sleeping patterns for humans alongside a bat friendly environment then the benefits for astronomers cannot be understated.
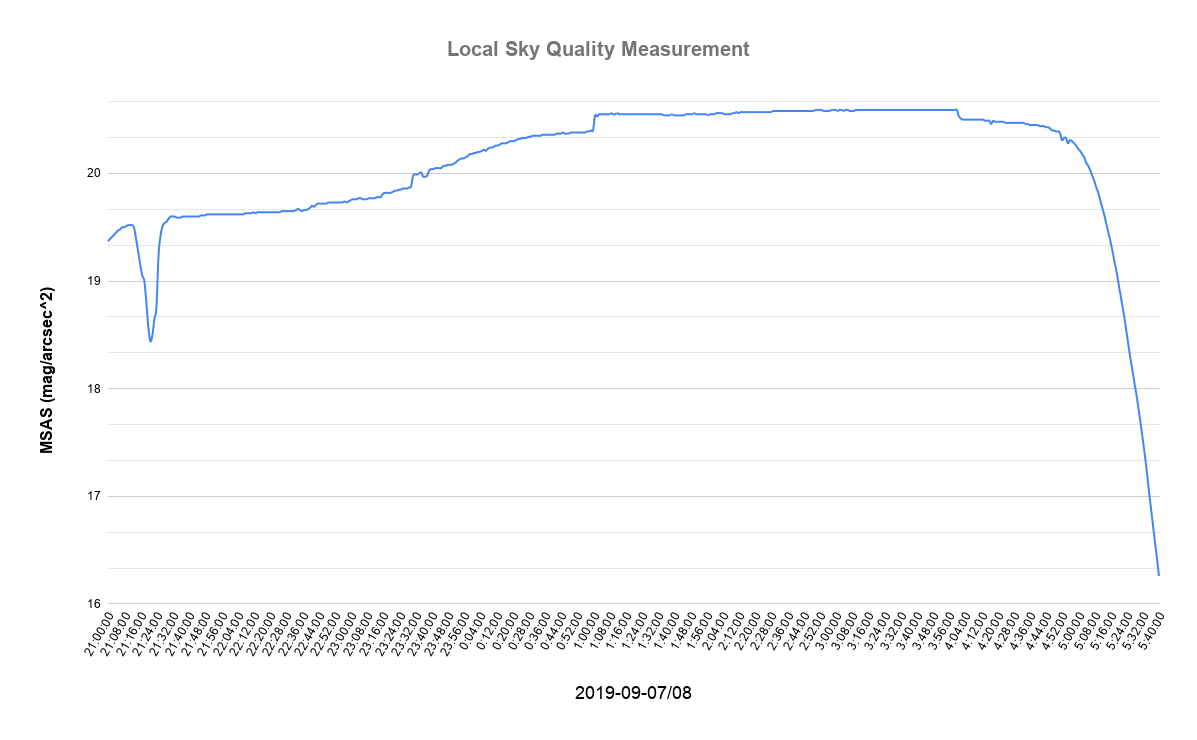
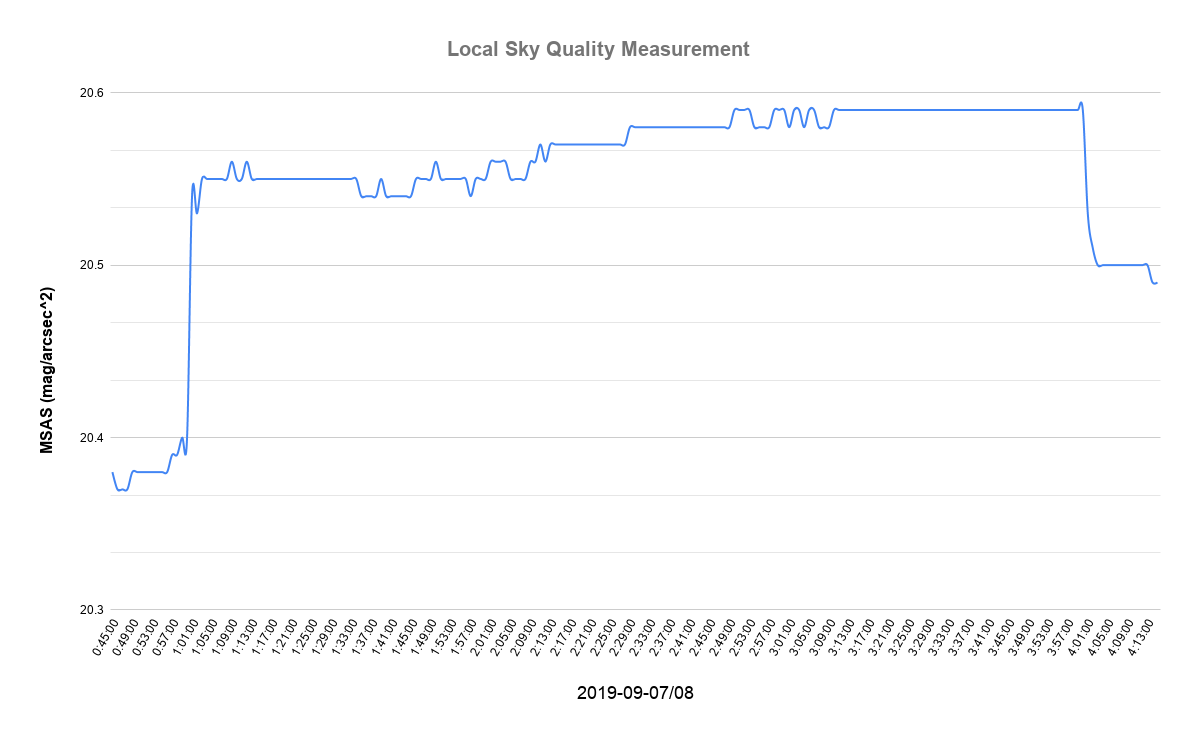
We use a Sky Quality Meter from Unihedron in order to measure the seeing conditions and record it in the long exposure deep sky objects we try to image.
Below is the graph for the entire night of 8/9th September 2019 and the effect of bathroom light close by can be observed at around 21:20. This clearly demonstrates how bad local light pollution can be. By 4:30am the astronomical darkness window had passed and the SQM was dropping.
The effect of the new street light policy at 1am is obvious as an increase from a SQM reading from 20.4 to a maximum of 20.59 is observed until 4am when the street light came back on again and the sky quality immediately drops.
This places the local area as bortle class 4 ( 21.69–20.49) and a long way from a rural setting (21.69-21.89) or even Kielder Water (21.88) which can only get worse with more housing developments and unnecessary outdoor lighting.
So although we are grateful for improvement in the local dark skies it would be great to see the lights staying off for longer in winter so we can attempt to get better images. Hopefully we can start to come close to appreciate what people saw before the intrusion of unnecessary artificial lights in our life bloated out the wonders of the night sky without having to resort to traveling to the top of La Palma.
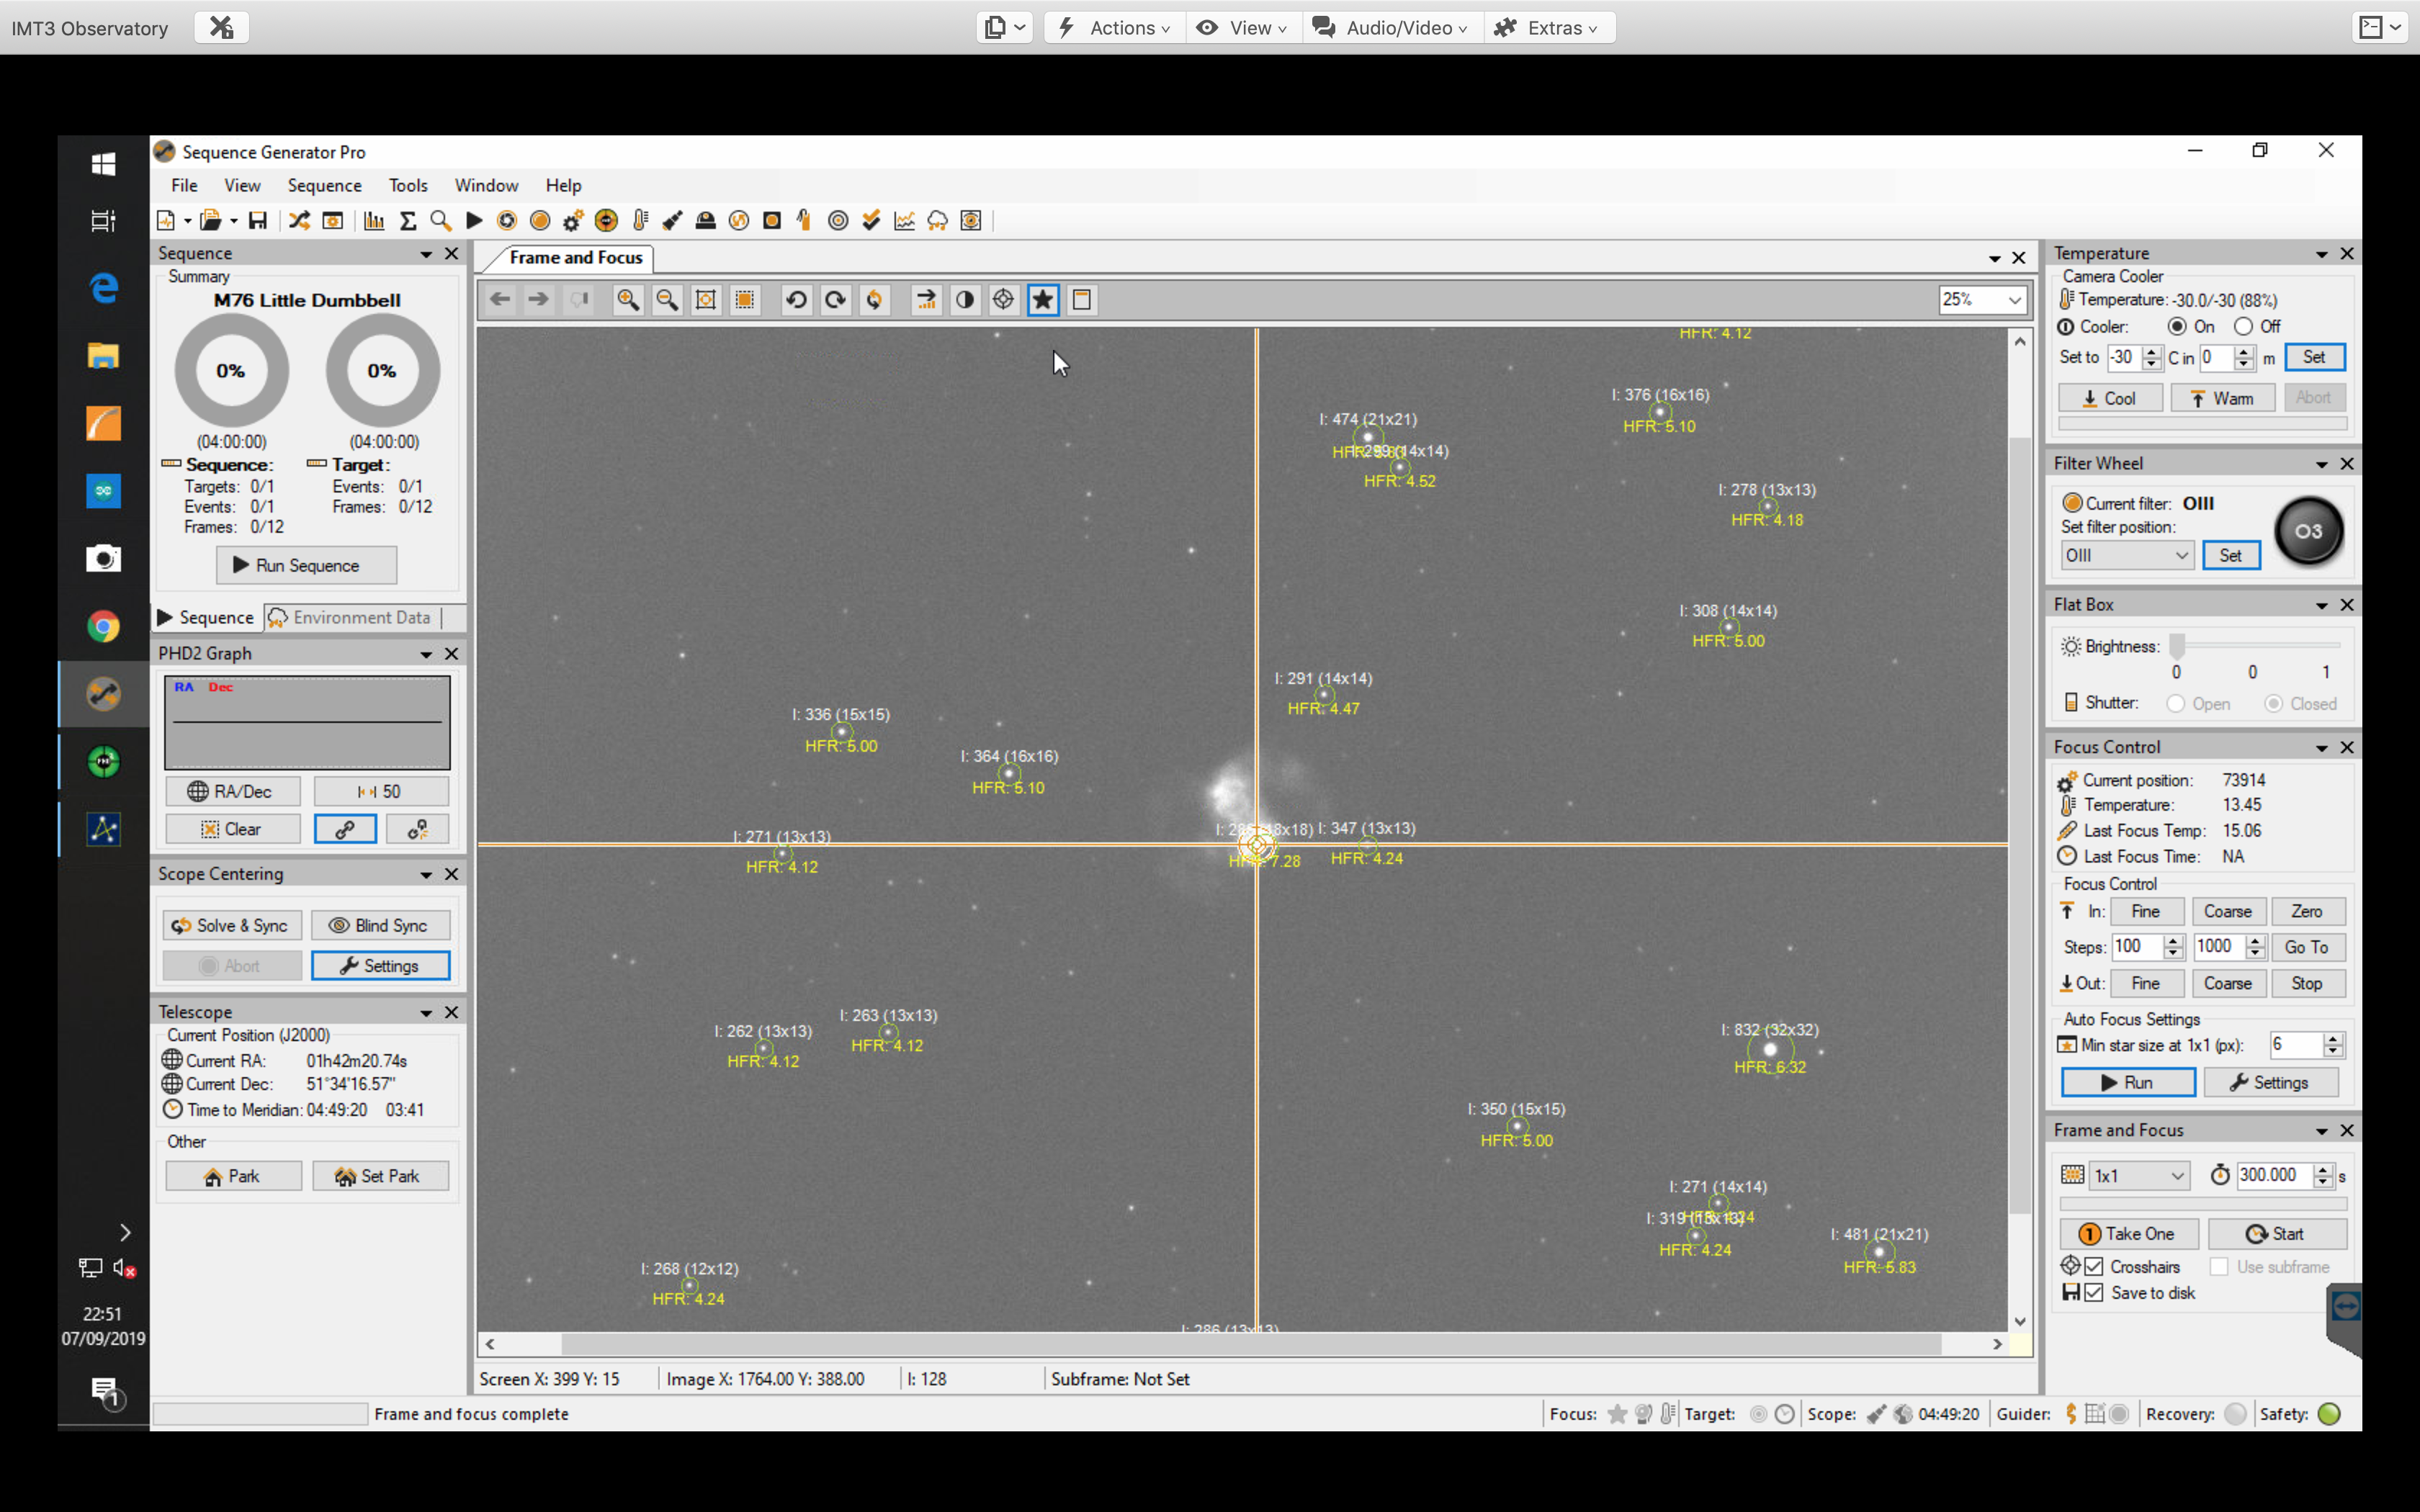
First thing to say is this is a very long blog, much went wrong tonight before it went right and thus I selected to record as much of the problems here as evidence later if I have the same problem or others indeed do. Tonight I am imaging M76 a planetary nebula in Perseus known as the Little Dumbbell. This is my first real object to image through the IMT3’s 12″ scope. The weather looked good and a quick look through the All Sky Camera showed a clear sky with Vega shining bright overhead and a slight glow with the Sun still setting to the West.
View through ASC
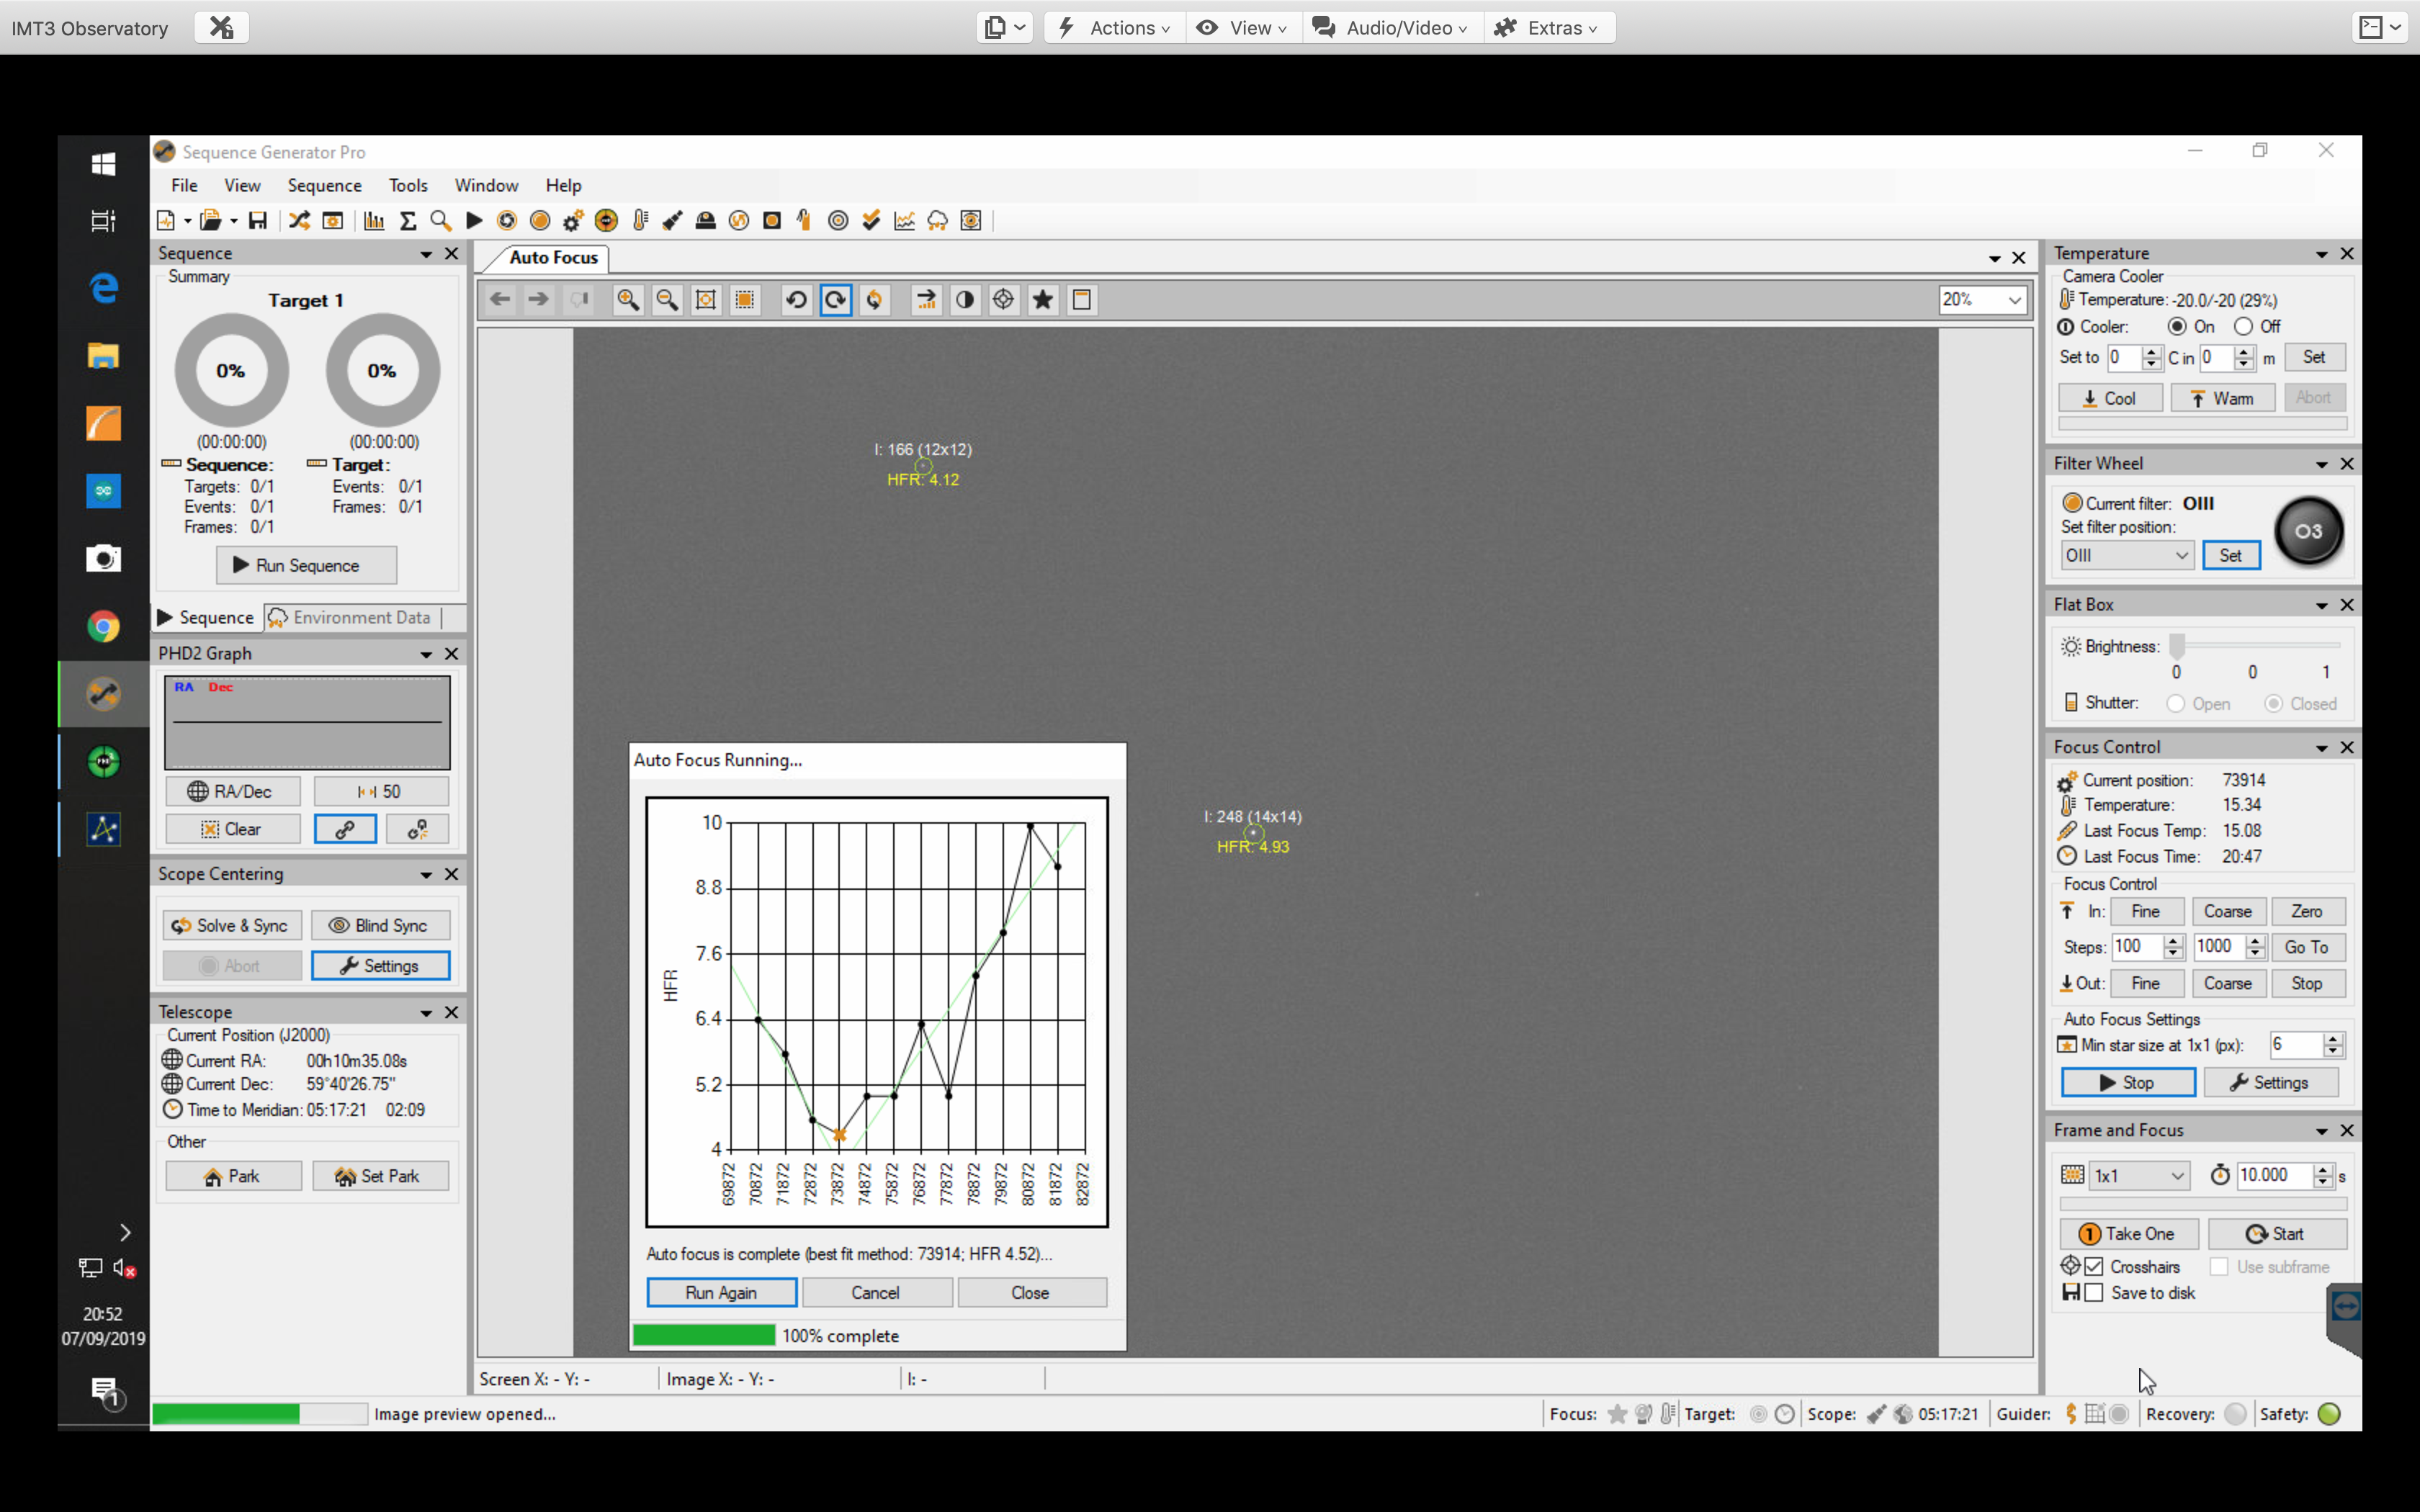
The first thing I needed to do was to slew to a bright mag +2 star, in this instance Caph in nearby Cassiopeia and centre and sync the scope which I did through TheSkyX (TSX). I then slewed to a magnitude +9 star (SAO 21164) nearby so that I could perform an autofocus through the OIII filter using SGPro. The best fit was 73,914.
Auto Focus Achieved
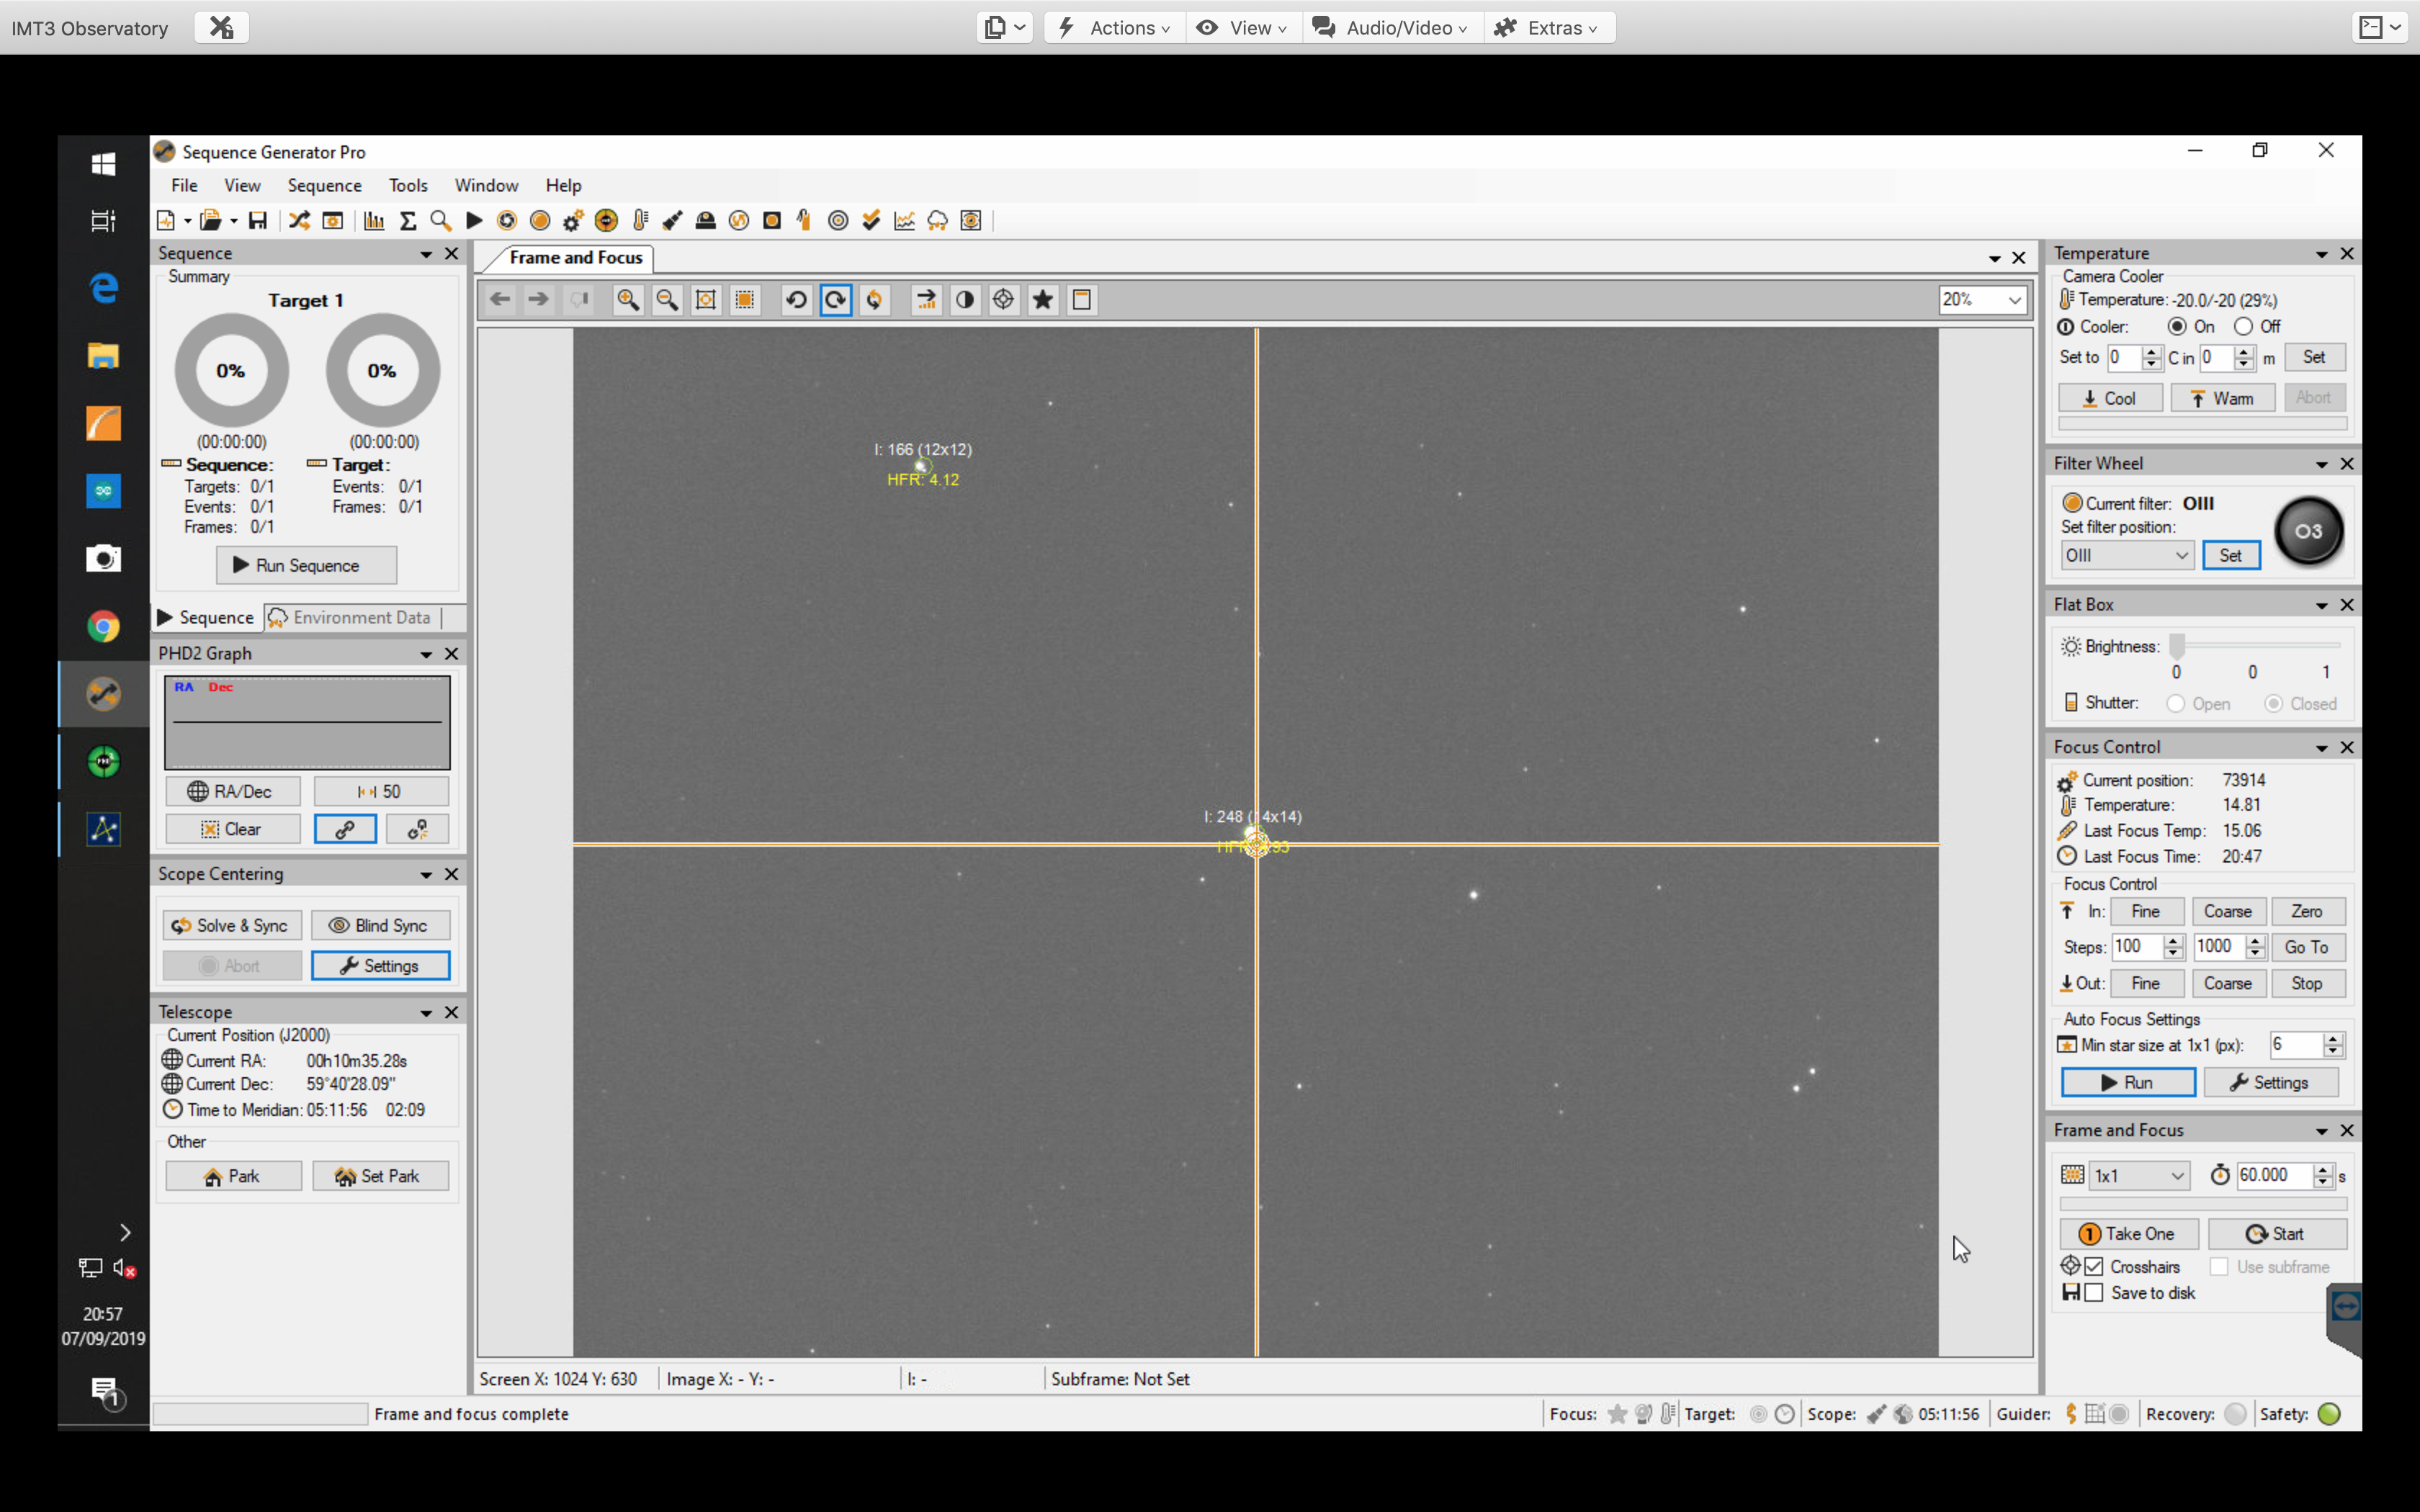
I then took a single 60s exposure just to make sure the focus was right, the stars coming in at around Half Flux Radius (HFR) 4. Meanwhile the camera cooler was running at -20℃ and 28% so I lowered to -28℃ at 60%. It should be noted that every time I perform a closed loop slew in TSX and the camera connects, the camera then looses the information of its status in SGPro and the only way to resolve to disconnect and reconnect. I again will note this is the TOSA User Guide.
Focus image on Mag +9 star
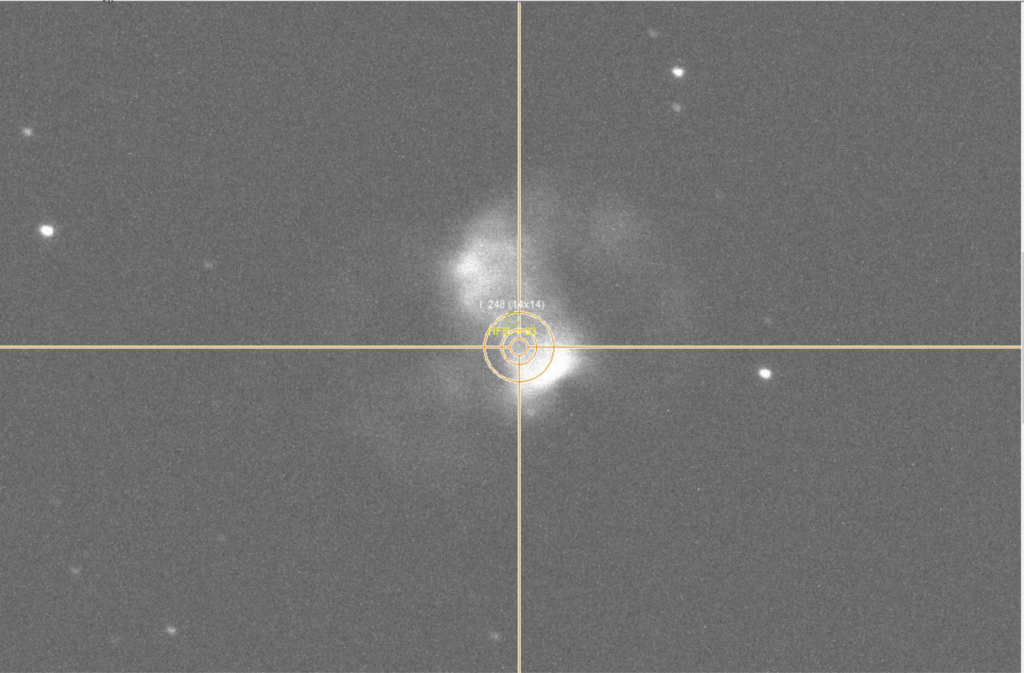
Then I slewed to M76, which on first inspection was still being my neighbours house. So I waited for a while longer and around 21:10 it appeared above the roof for its polar orbit around Polaris. I took a quick image with SGPro of 60 seconds through the OIII filer to see where I was pointing, given I only have a 60 point TPoint model (I need 300 for the best pointing accuracy).
M76 slightly off target
So given I was slightly out I selected the Luminance filter, went back to TSX and performed another Closed Loop Slew and then synced the scope for good measure. The resulting image through TSX and then through SGPro showed a perfect improvement.
On Target
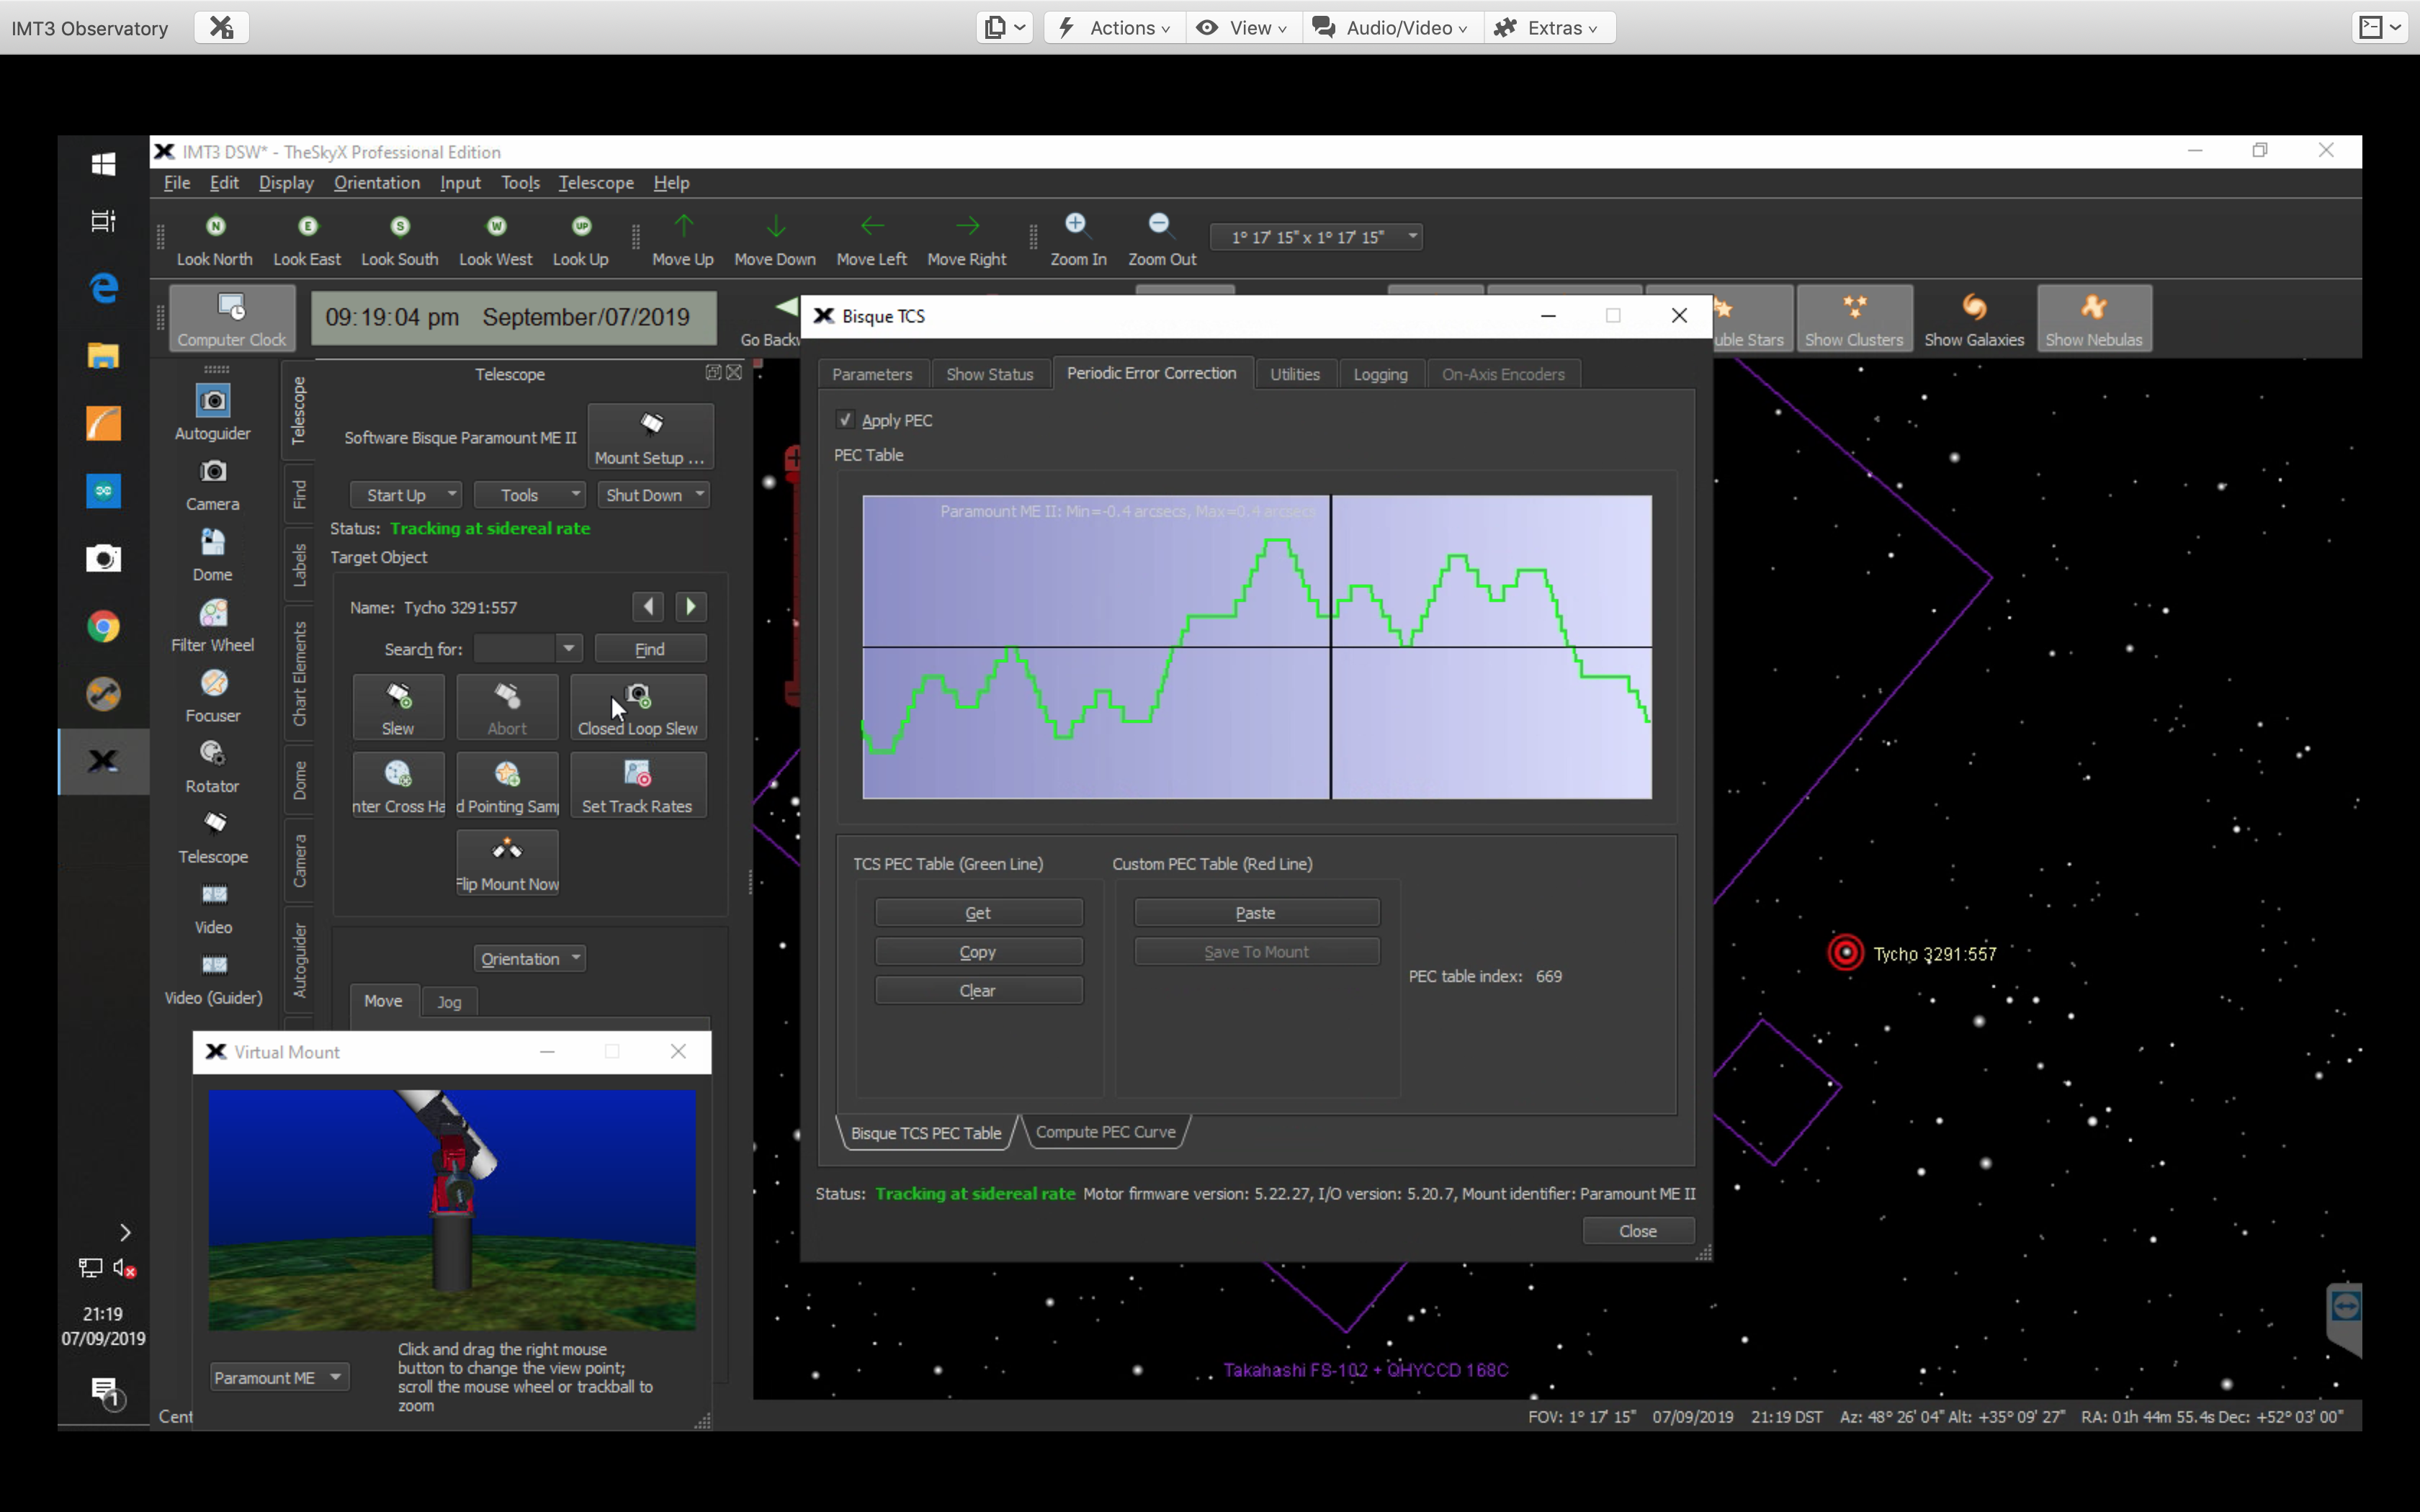
Before imaging I went back to look at the PEC as Bob had mentioned not being able to image for very long on the Tak FS102 after we had taken it off, added the adjuster plate, reattached and added some weights. Not surprisingly the TPoint model will need redoing, however I noted the PEC was turned off, maybe I had not saved the last time I enabled. So I reenabled and saved.
PEC Now Re-enabled
I then went looking for a guide star with PHD2, however even with 10 seconds I could not see one. I looked at TSX and indeed the Field of View (FoV) indicator for the guider showed a fairly barren piece of sky with barely a magnitude +11 star visible.
Guider FoV – bottom right square is fairly limited in stars
Blank guider image …..
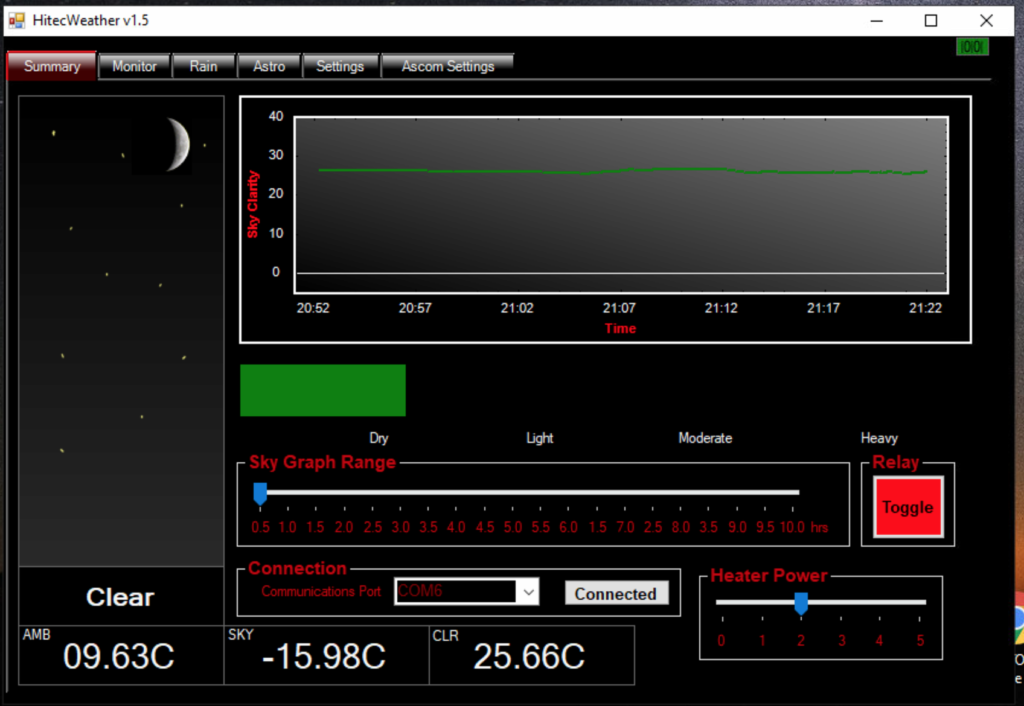
I performed a quick check of the SQM and it was reading 19.37 and the Hitec Weather station had a reading of around 25 meaning between Haze and Clear. Another quick check of the ASC and that was showing clear. So either I had to move the scope to find a guide star or I could image without guiding……so the only way to tell was take a quick 5min image and see what it looked like.
SQM reading
Hitec Astro Weather Station
Trailing stars
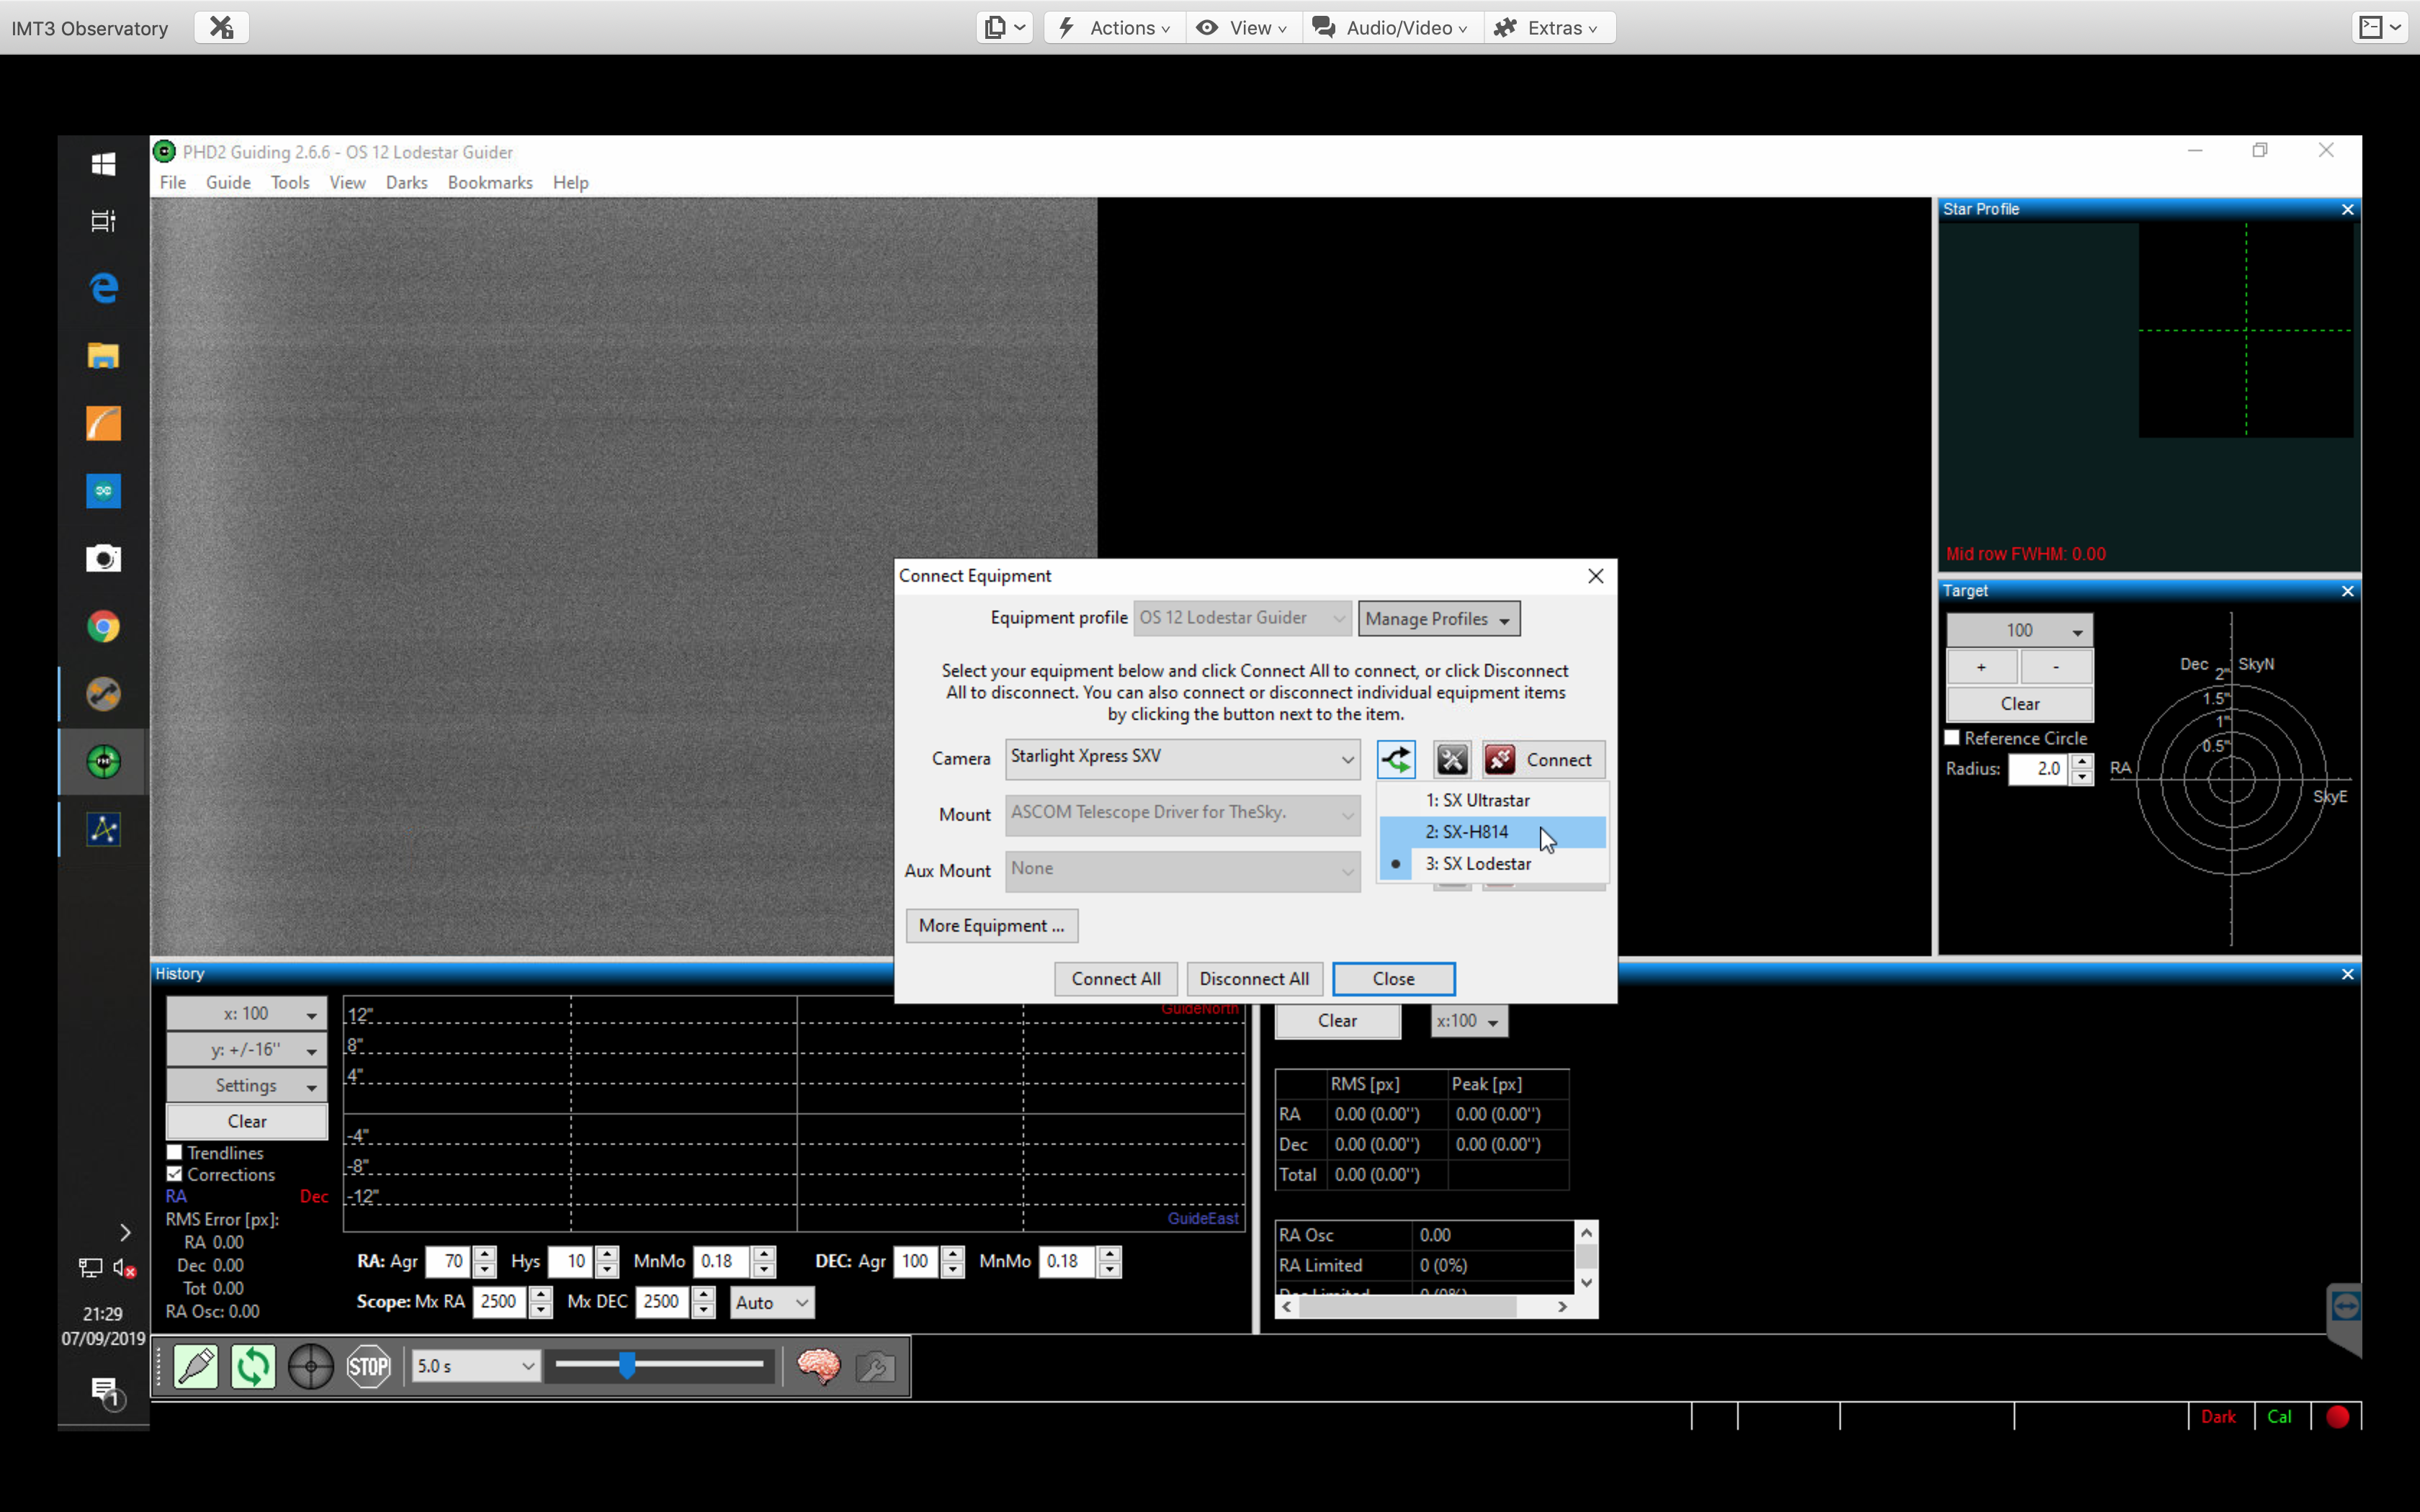
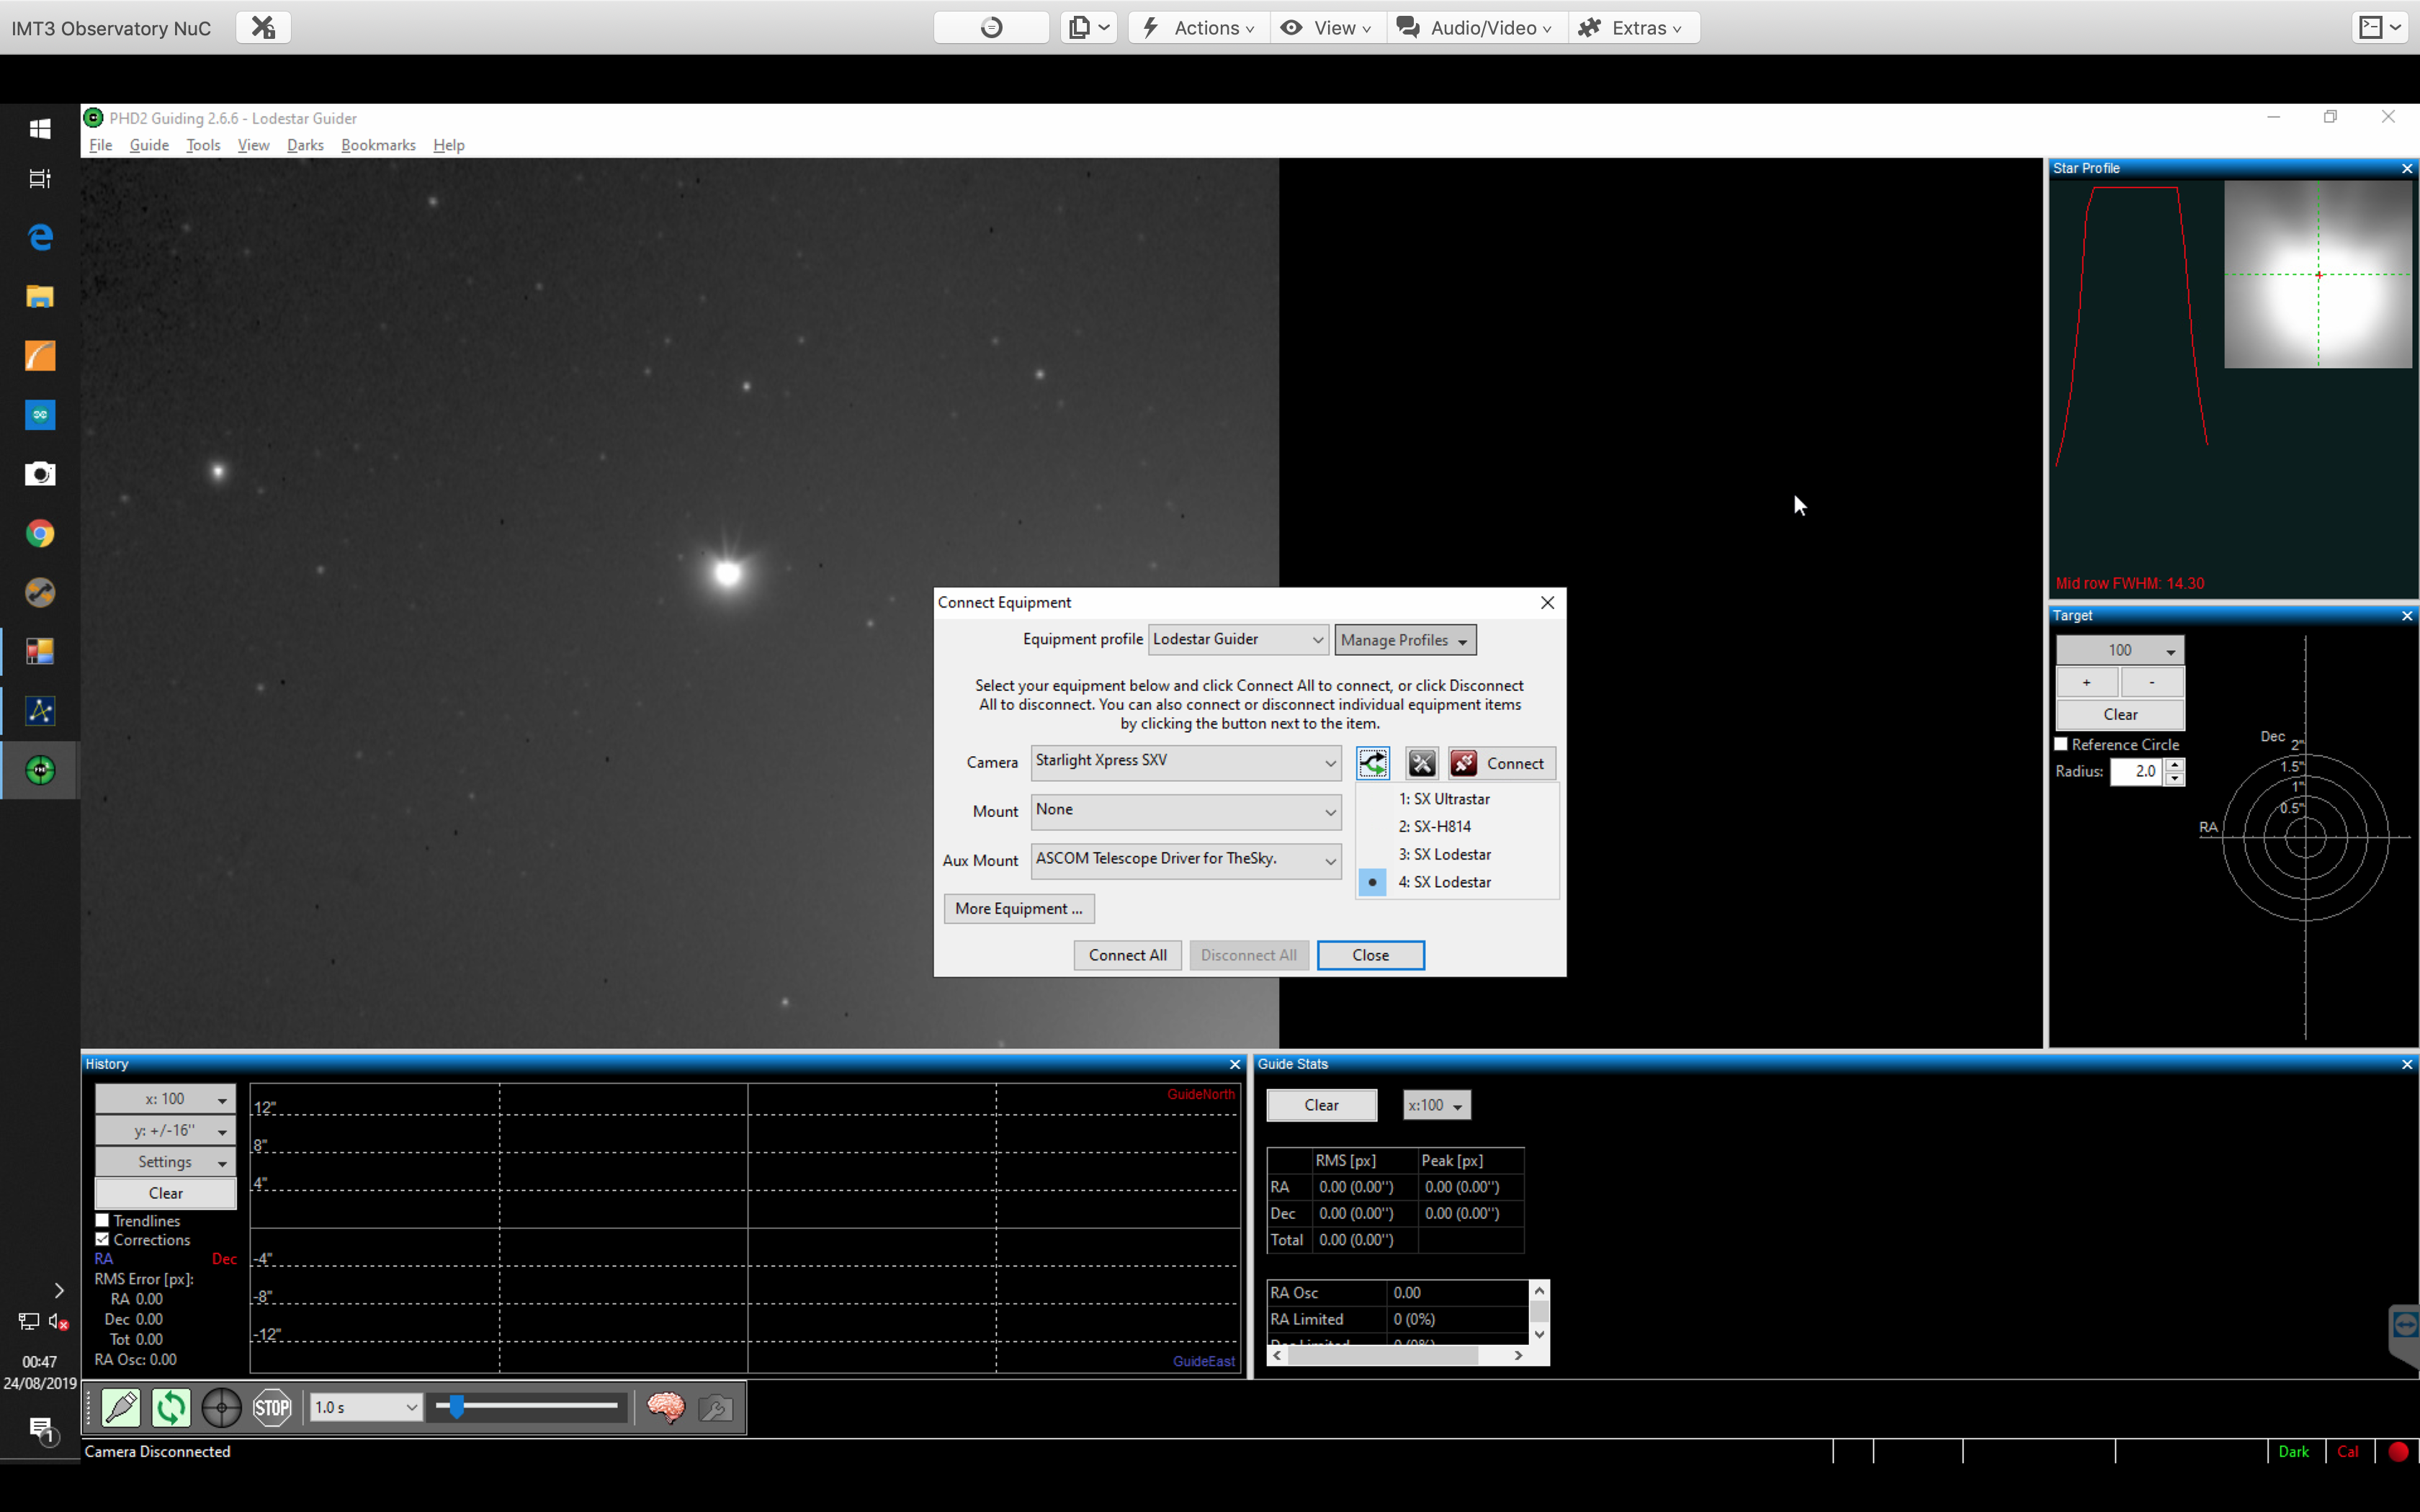
As suspected the resulting 5min image showed trailing, not surprising given the TPoint model is out so I decided to guide. I slewed around trying to find a decent guide star but nothing came up, literally nothing, which then got me thinking this was not right. So I checked a bright star in the FoV for the guider, still nothing. So I then disconnected the camera and checked the settings and there it was, the setting was for the SX814 which was not powered on (aka GingerGeeks main camera on the Epsrit 120) so I changed this to the Lodestar and took another image, this came into view! Not sure the problem of why it keeps reverting to the SX814 but I will need to check each time and will add to the TOSA User Guide.
Wrong guide camera selected 🙁
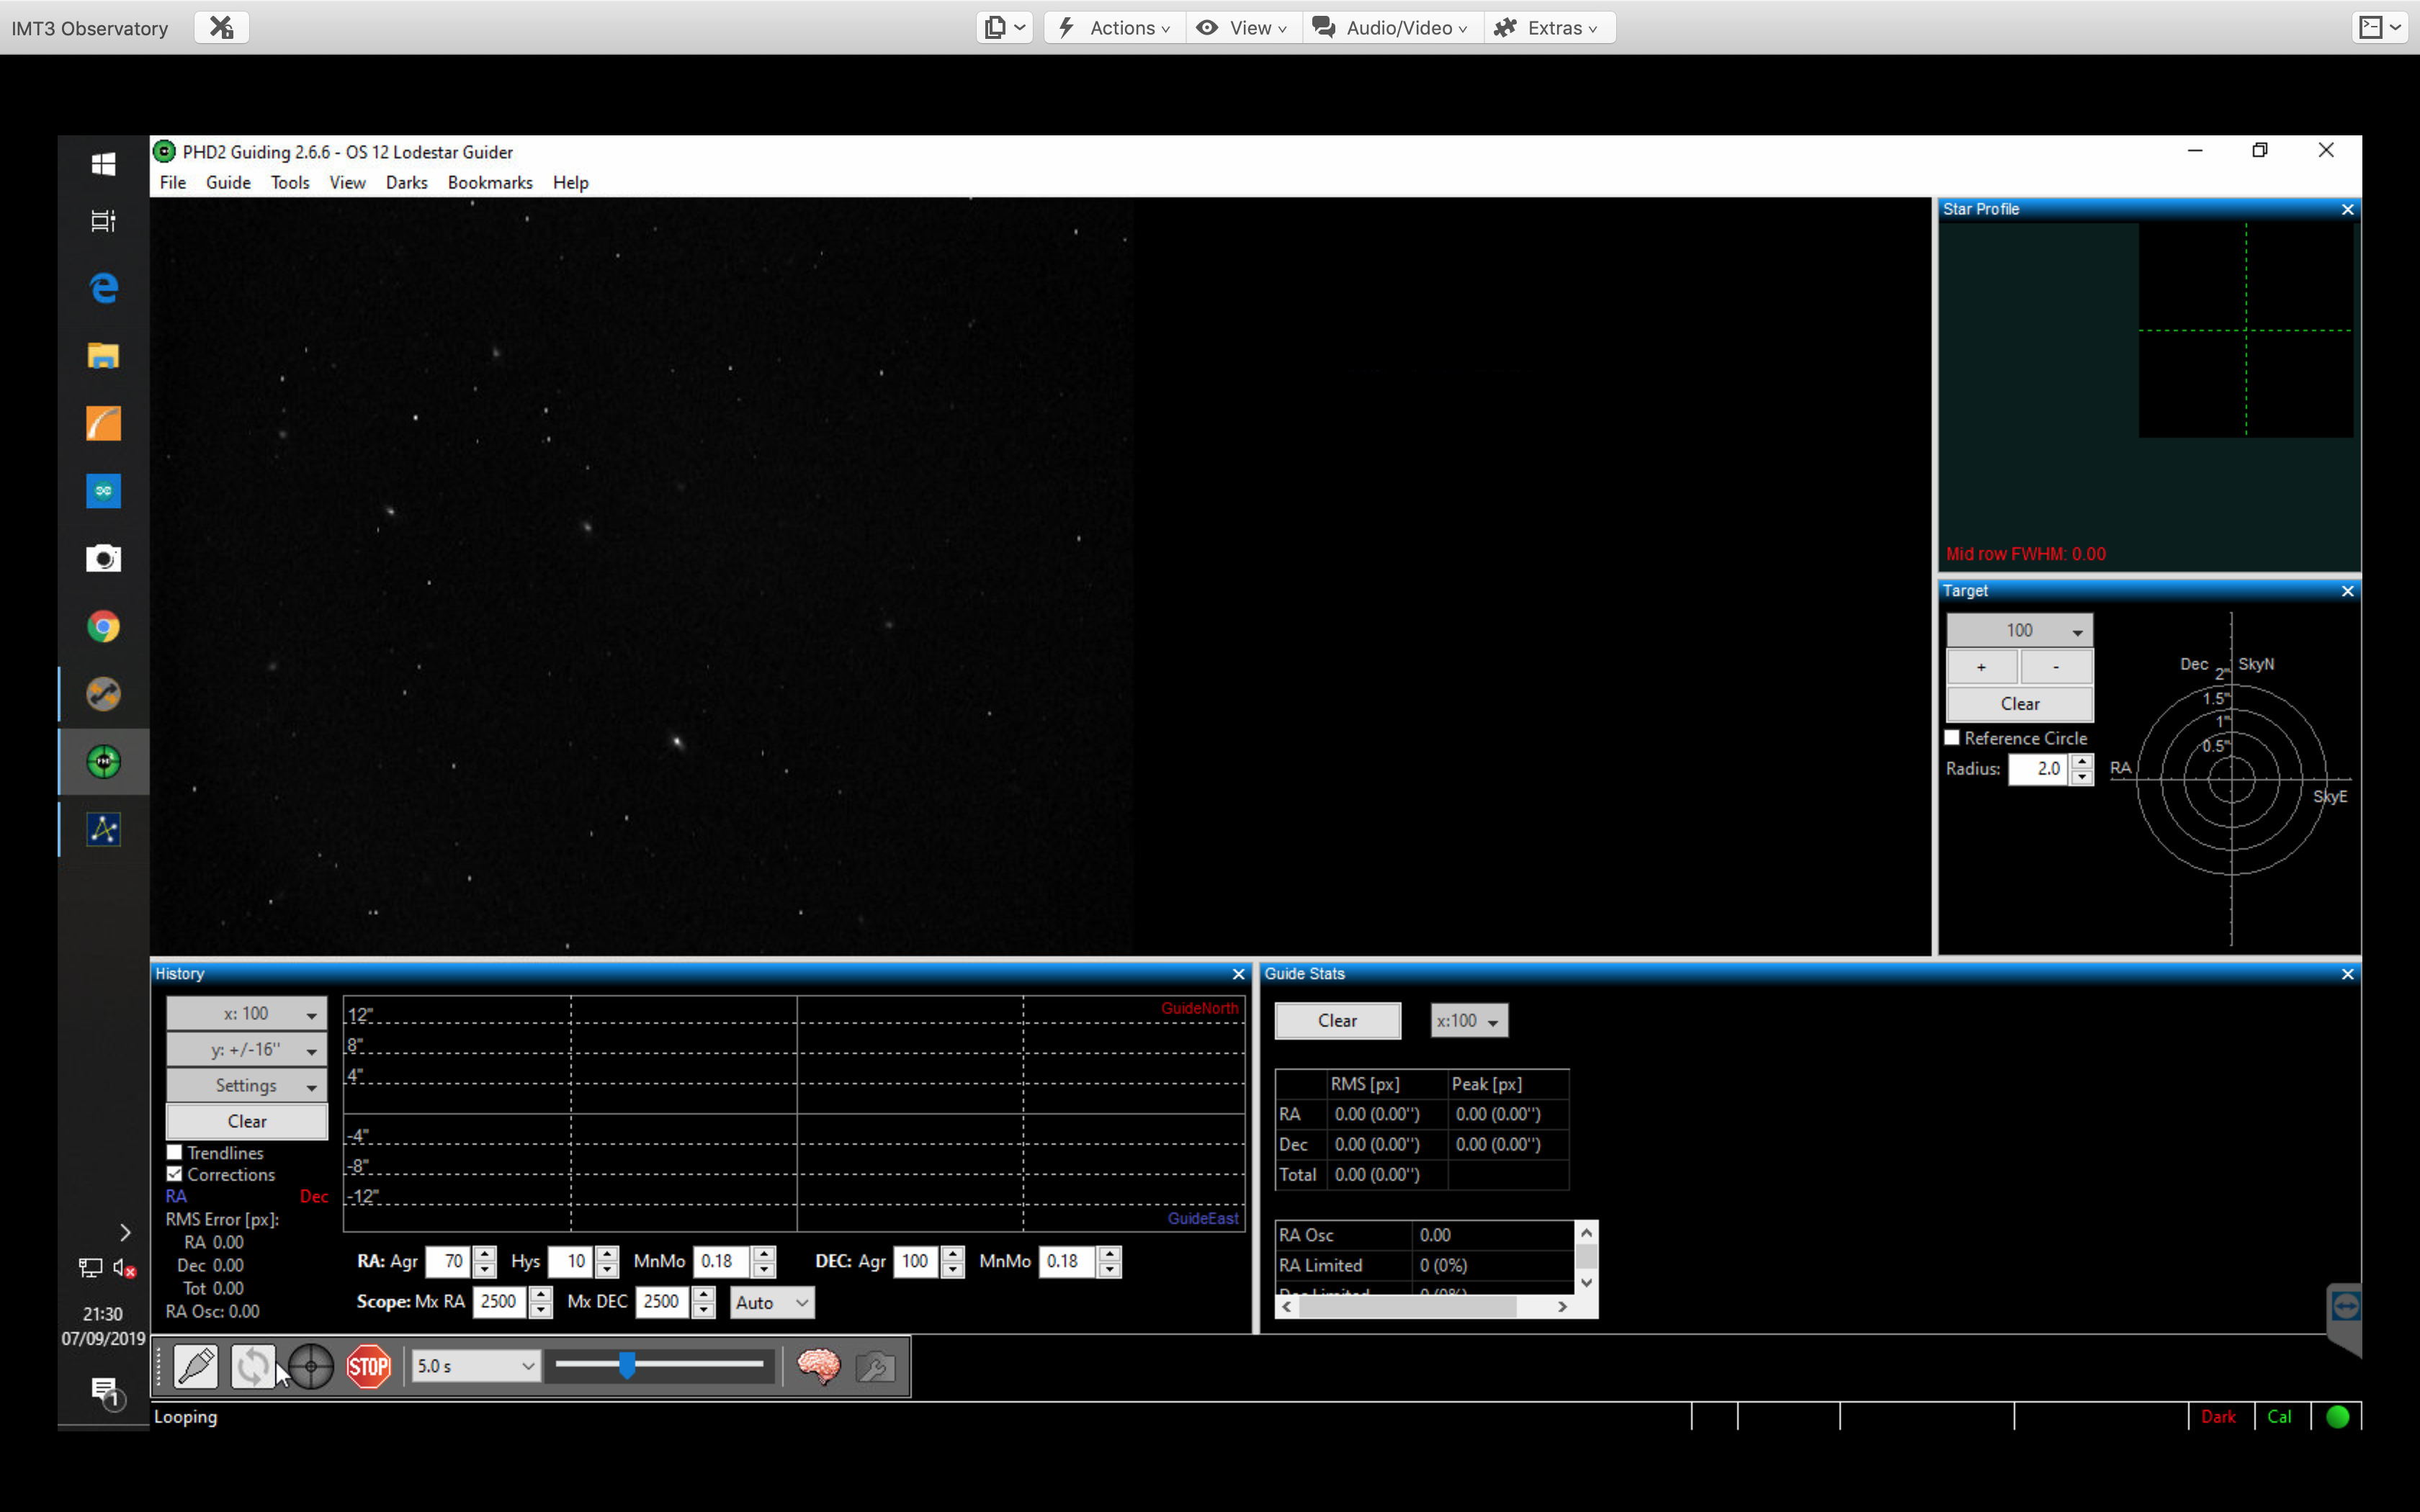
So I moved back to M76 entering with TSX again and took an image for guiding through PHD2 and full of stars, well a handful at any rate, plus a load of hot pixels (I need to apply some darks).
I see guide stars and hot pixels 🙂
The resulting guider graph was smooth, too smooth, and the resulting 5 min image was trailed! Ok so something else not right, so after taking a look it turned out I had selected a hot pixel to guide on, so I exposed a little longer from 5s to 10s and selected what looked more like a star and this time tried to guide. The guiding went off the chart which proved this was a star and that I needed to calibrate the guider (seemingly every night I go out, I will need to see if that is right). So off I went to calibrate the guider.
Guiding too flat…
Hot pixel not a star!
Finally a star but guiding off the chart!
In calibrating I realised the Darks were going to be needed, the first calibration run failed. I then went out to cover the scope using my trusty chair to help with the lift I needed to reach the end of the 12″ as it was point upwards. I then went back inside and took a set of darks ( I thought I had done this before), anyway with a new dark library in hand I recalibrated the guider.
Makeshift ladder…do not try this at home 🙂
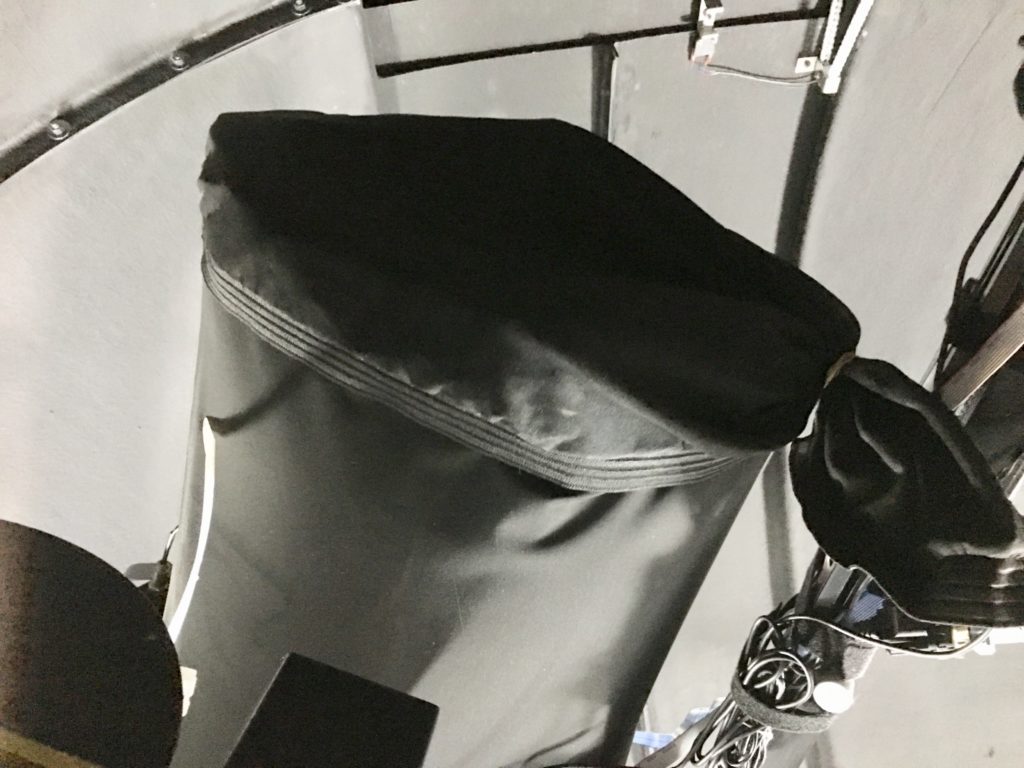
Cover on scope for guider darks
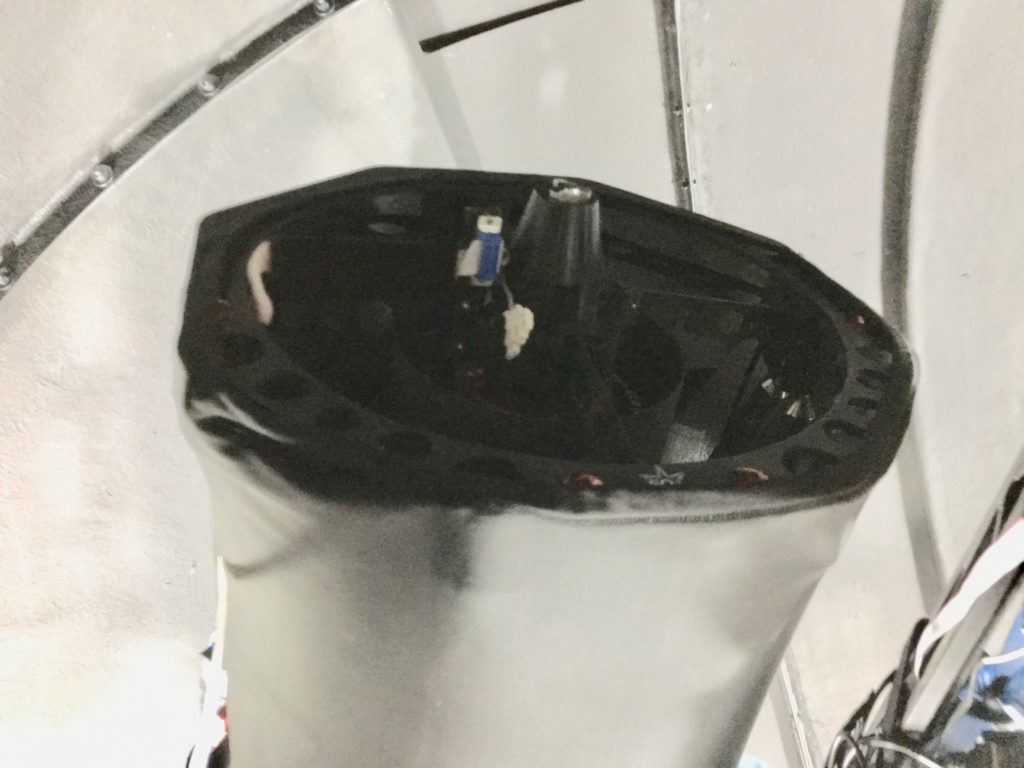
Cover off scope
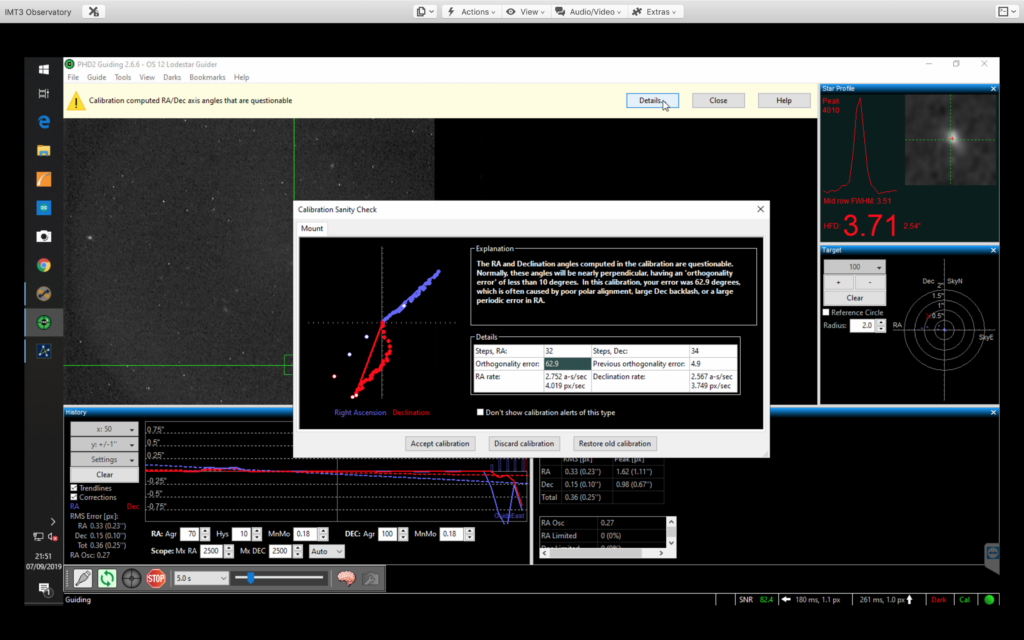
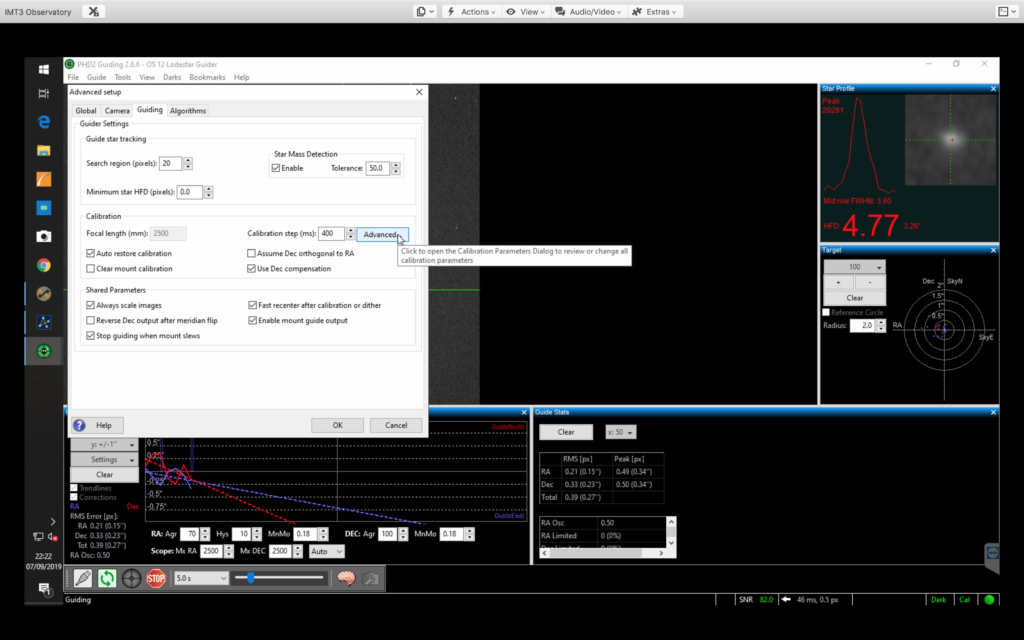
Now suffice to say the problems did not stop there, I had guider calibration failed, star did not move enough and after 4 attempts I managed to calibrate the guider and the guiding then started at last! the main thing was to change the number of steps required to 6 and the pulse time changed then to 1500ms from 200ms. This was enough to resolve the problem.
Guider RA and Dec are Questionable!!!
Guider calibration stars did not move enough
Guider calibration not enough points
Finally guider calibration successful 🙂
For completeness here are the settings I am now using that work in PHD2
Correct guider settings
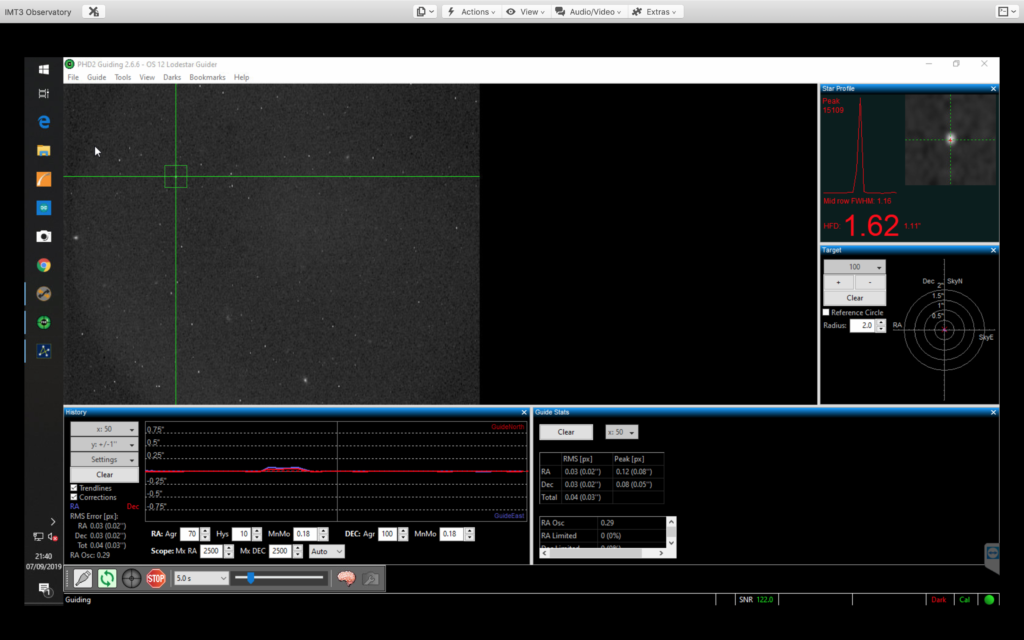
So after much time spent and it now being precisely 22:33 I realigned M76 in the centre as it had moved with all the calibration challenges (remembering to change the filter to Luminance during the Closed Loop Slew in TSX and then back to OIII to start my imaging run.
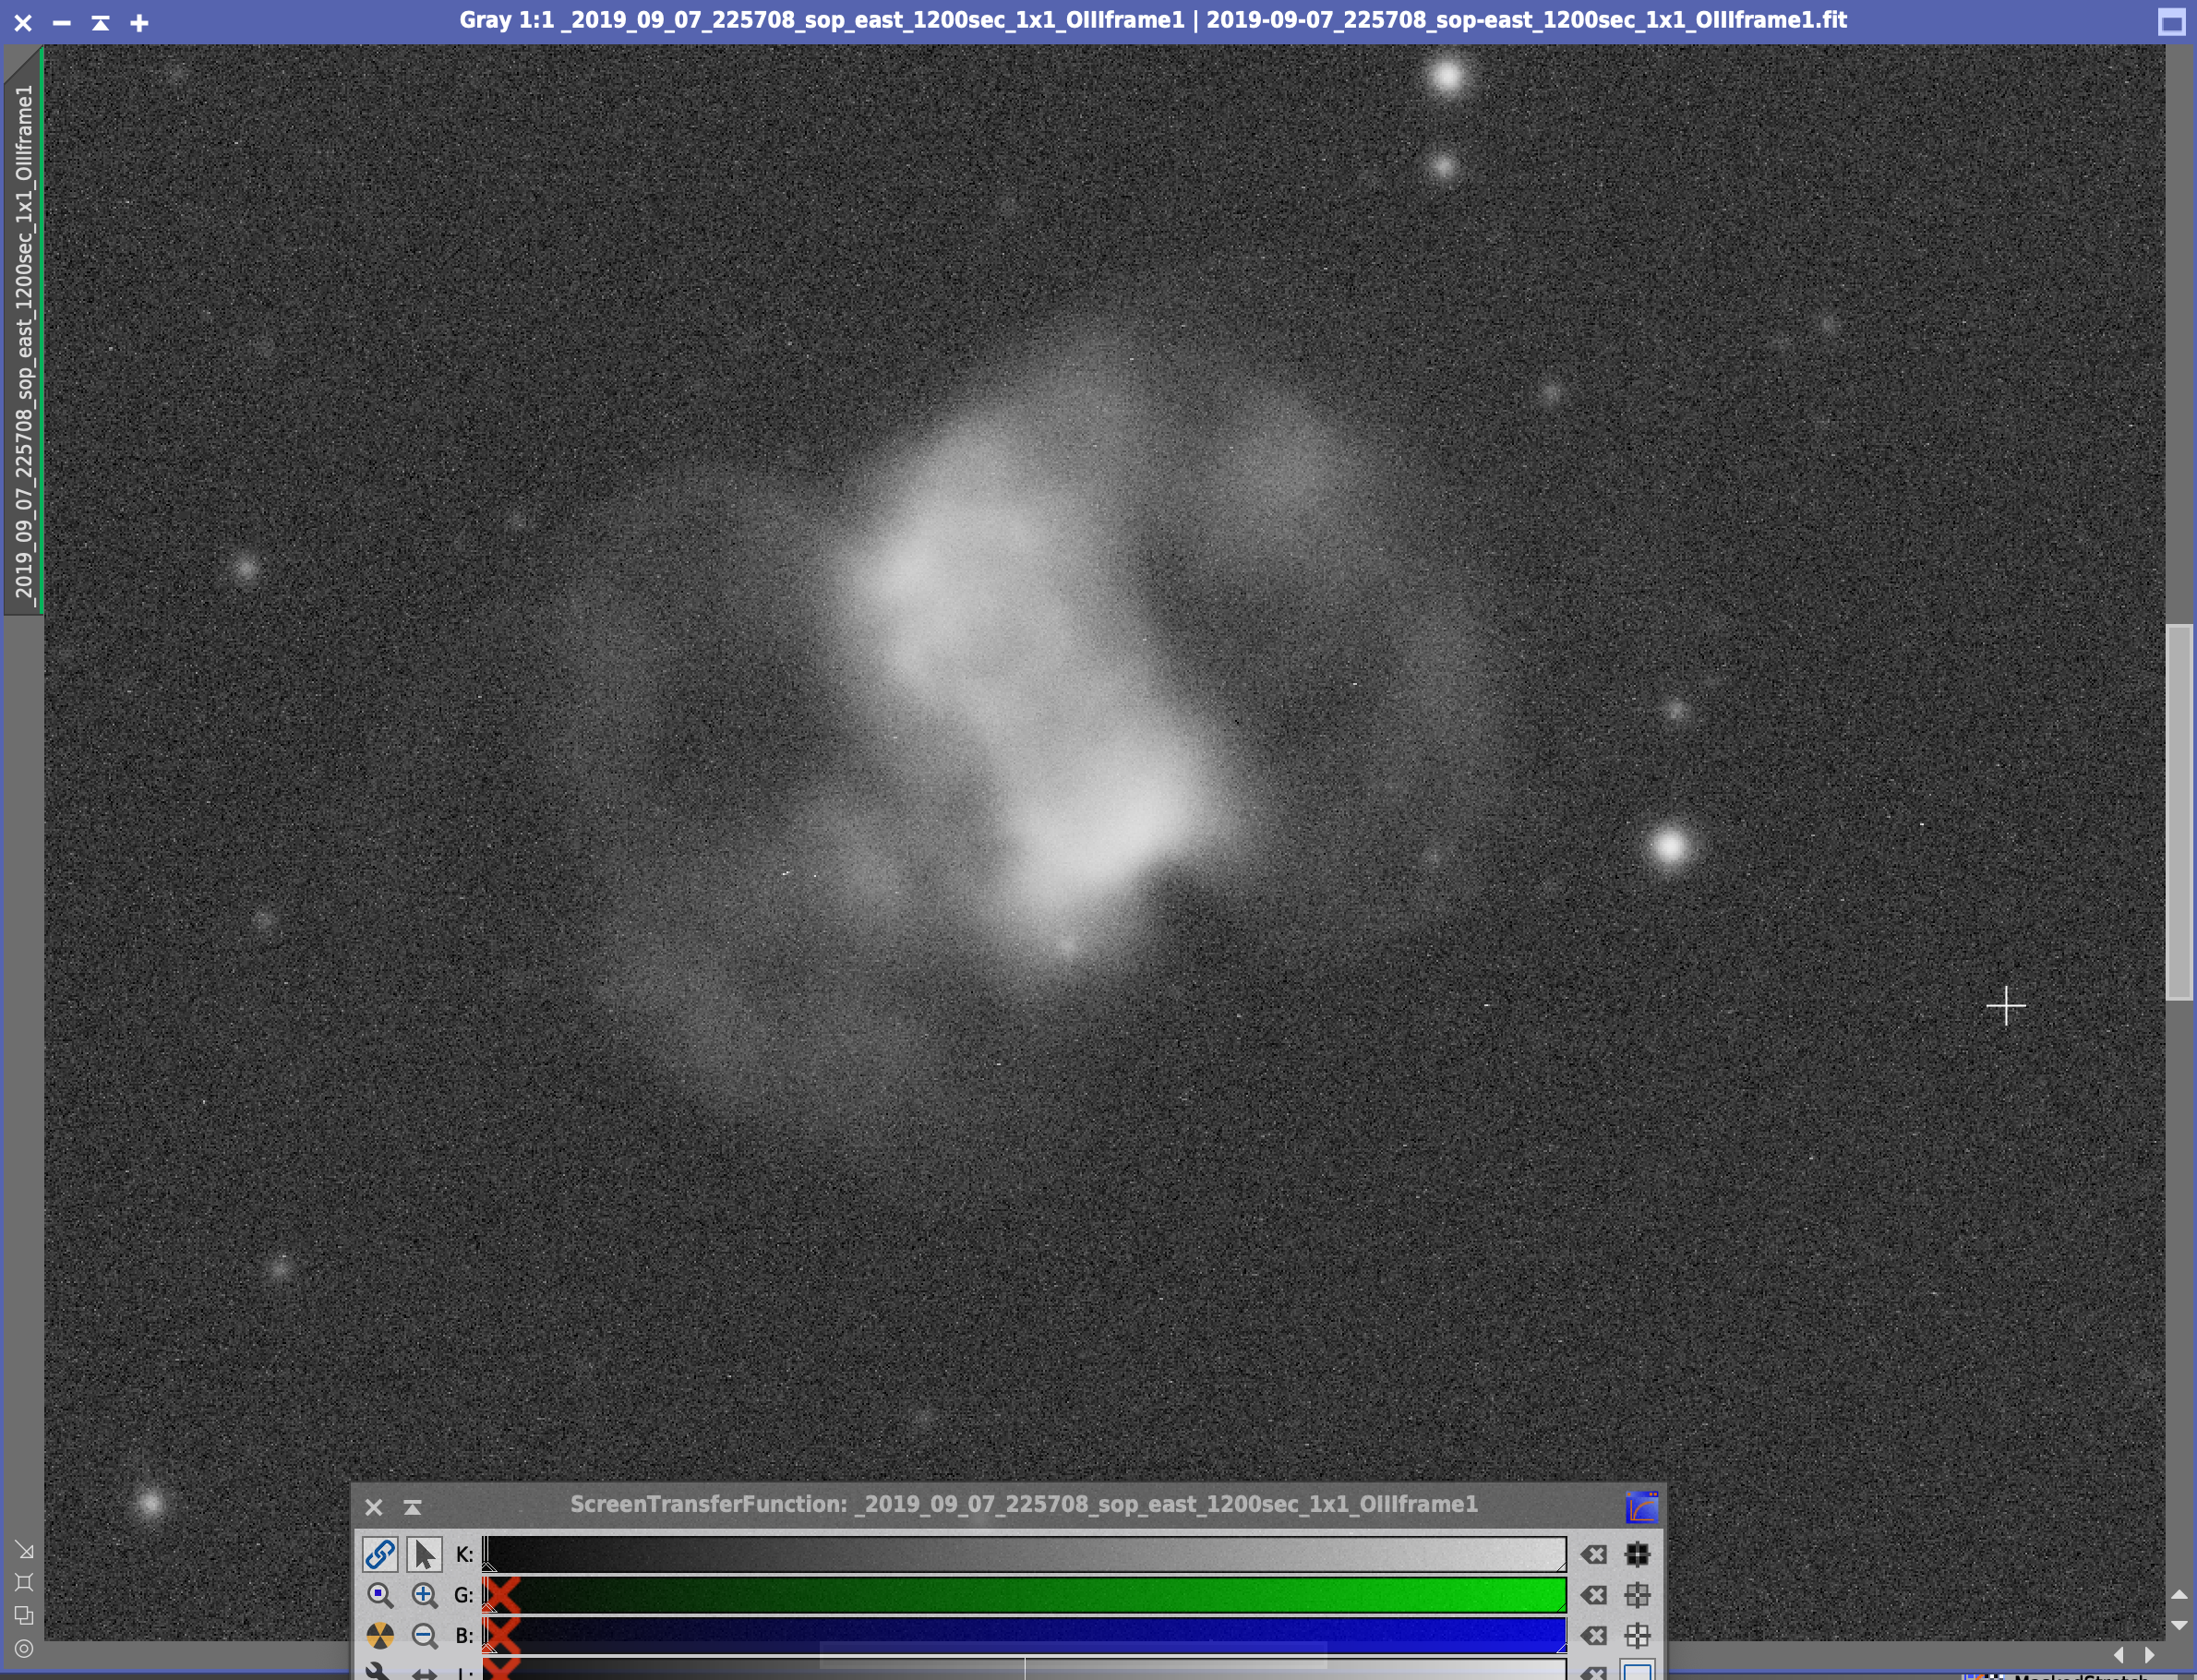
I tested at 2 minutes first, then 5 minutes, then 20 minutes before starting the final run to decide on the subs I would use. By 23:14 I had the 20 minutes sub and settled on 20 minute subs for the rest of the night.
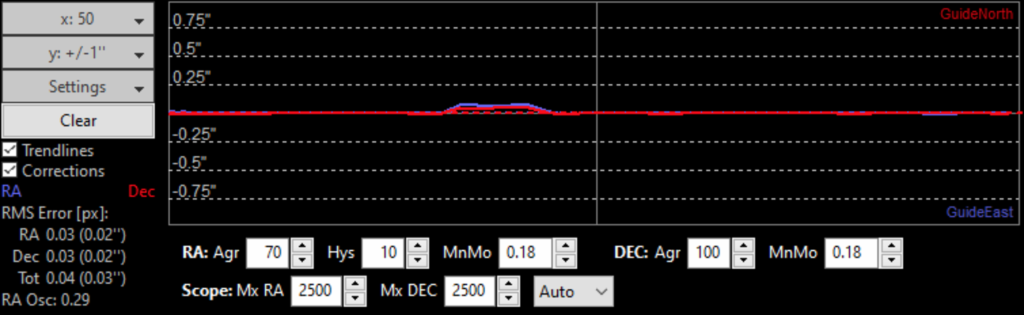
Guider graph looking very smooth
First 20min sub image down and fairly tight stars for my focal length and OIII
Quick stretch of M27 single sub in PixInsight
M27 zoomed section single 20min OIII Sub
Meanwhile the Summer Triangle of Deneb, Vega and Altair could be seen through the ASC and I noted that the star Tarazed in Aquila next to Altair at magnitude +2.7 could be seen also.
Summer Triangle through the ASC
I noticed the trellis lit up and had a quick word with my daughter to close the blind in the bathroom 🙁
Bathroom light on without blind down 🙁
Here is the temperature and pressure information from the dome internal sensors at around midnight.
Internal sensor readings around midnight
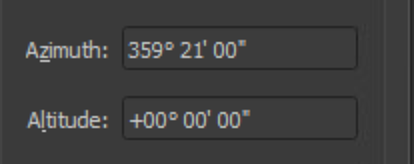
At 03:49 I decided to do a quick autofocus to see if the focus had changed during the night and given the temperature outside was now around 5℃. I paused the current sequence which gave me the option of cancelling or pausing at the end of the current image. I then ran autofocus but no stars were found. I went into the setting for autofocus within SGPro and changed the exposure time for the OIII filter from 1 to 20 seconds. This allowed the autofocus to see stars but the auto focus would not complete successfully and just kept creeping out. So instead I gave up, especially since astronomical darkness was finishing soon. Instead I slewed to my Flat position at Az 359, 21′ and Alt 00, 00′ to take the flats.
Co-ordinates for Flat Panel
I went out to the dome to manually turn on the light sheet which we need to automate and then turned it off after I took 10 flats through the OIII filter at 10 seconds each to get a good illumination. It would be 0.5 seconds through Luminance filter. I then packed up set the darks running and went to bed.
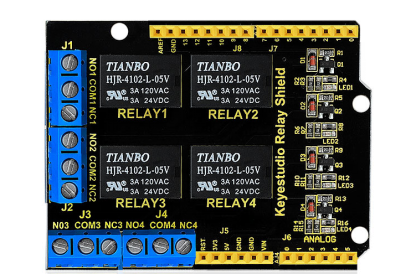
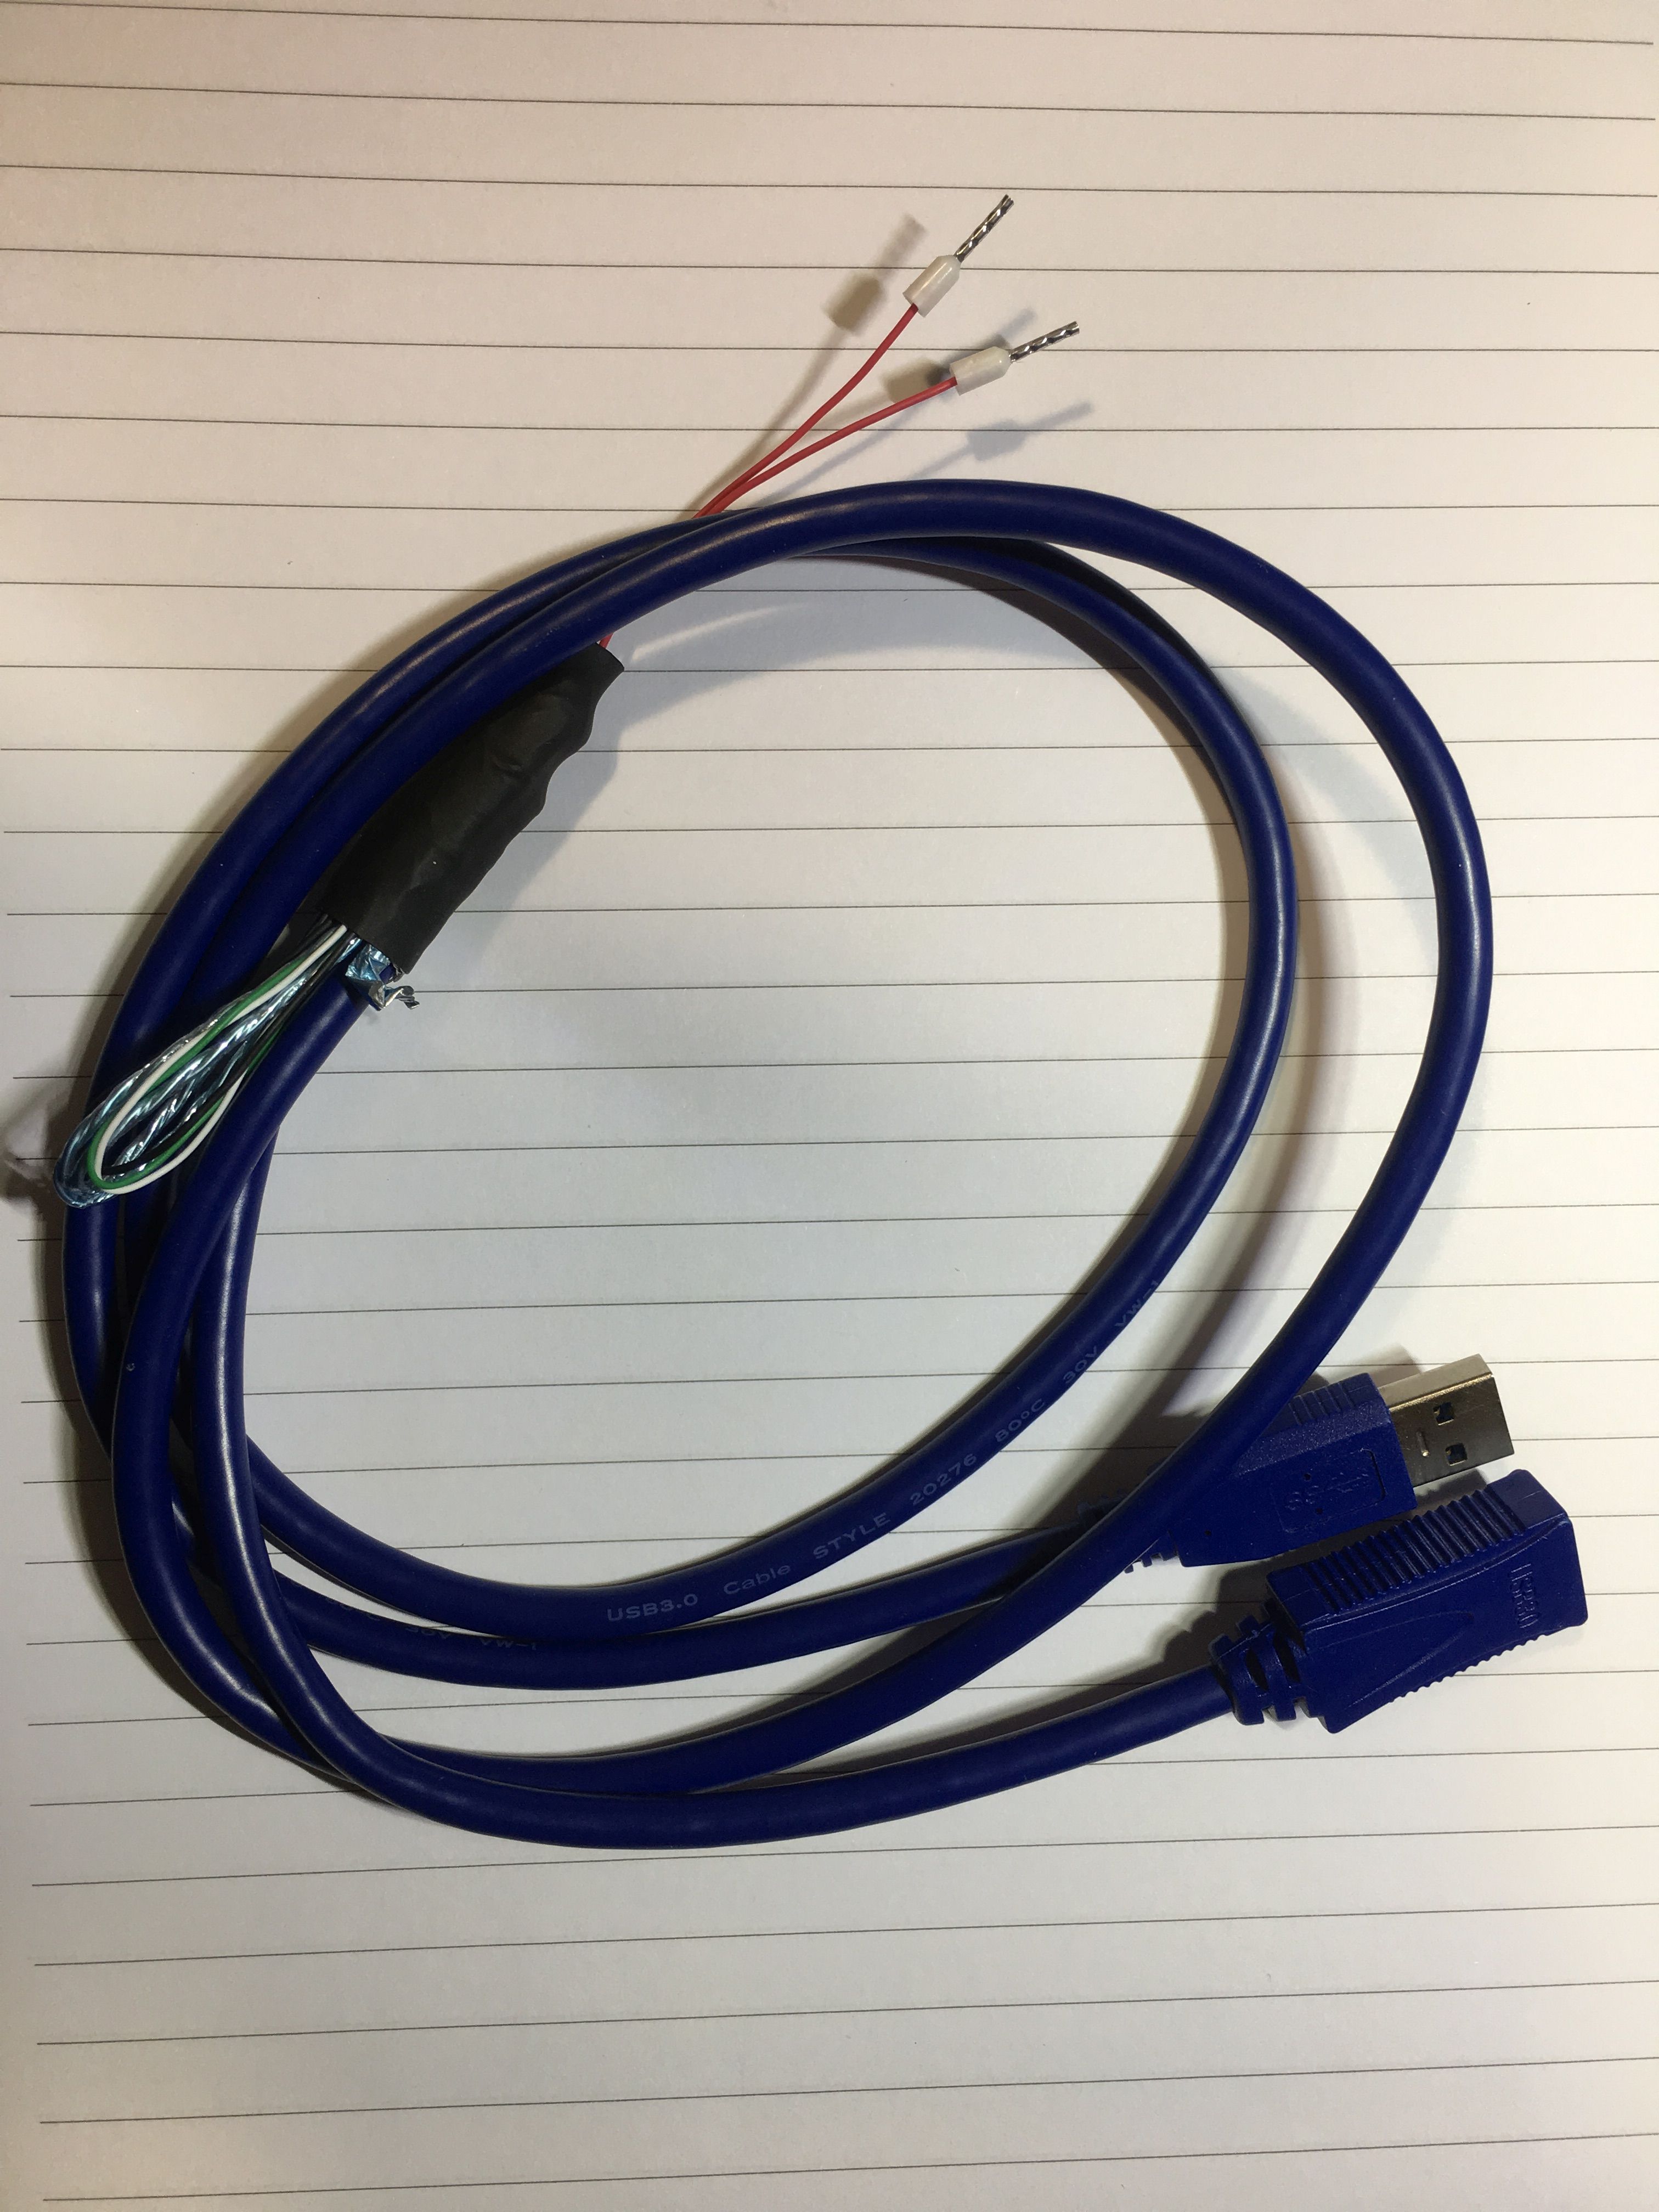
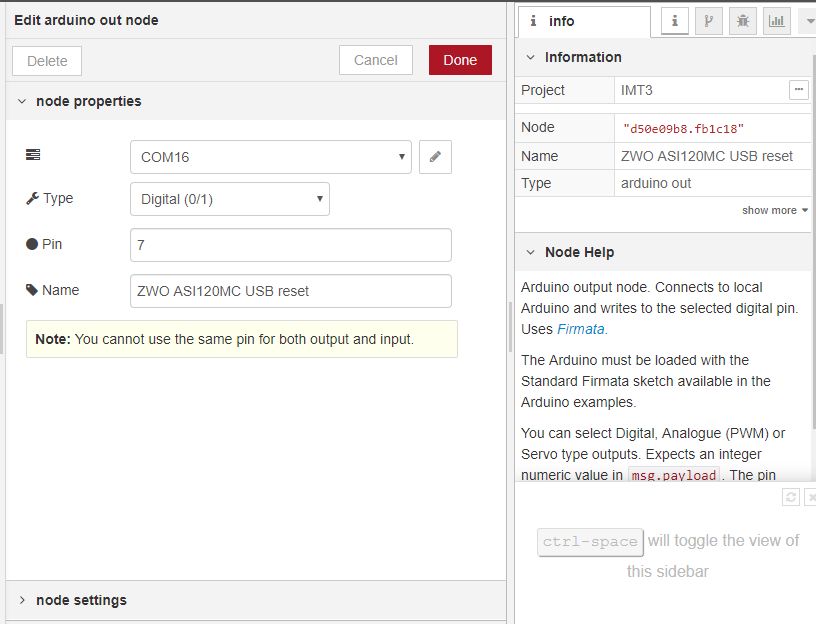
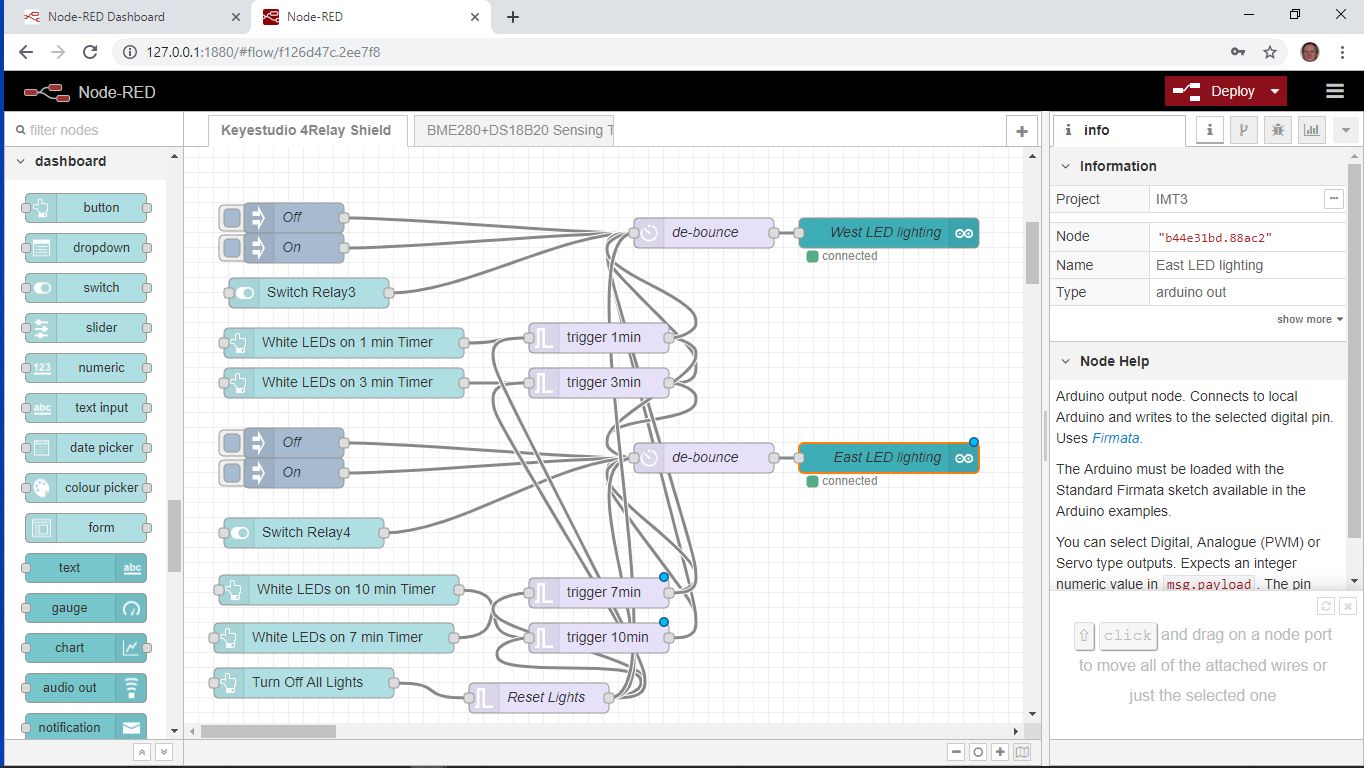
In this part we’ll look at the Node-RED flow that controls the Arduino with a 4-Relay Shield attached. As previously mentioned, these relays are used to allow us to remotely reset the All Sky Camera and HiTechAstro Wx STn, which we found had a tendency to hang and wouldn’t reset unless the USB connection was broken and remade. As we would not be in a position to unplug and re-plug the USB connections I came up with a solution. By modified some short USB extension cables and breaking into the +5v line I could then connect to the ‘Normally Closed’ contacts of one of the relays, picking the relay effectively turns off the USB device connected to that cable.
Relay Shield that attaches directly to an Arduino UNO
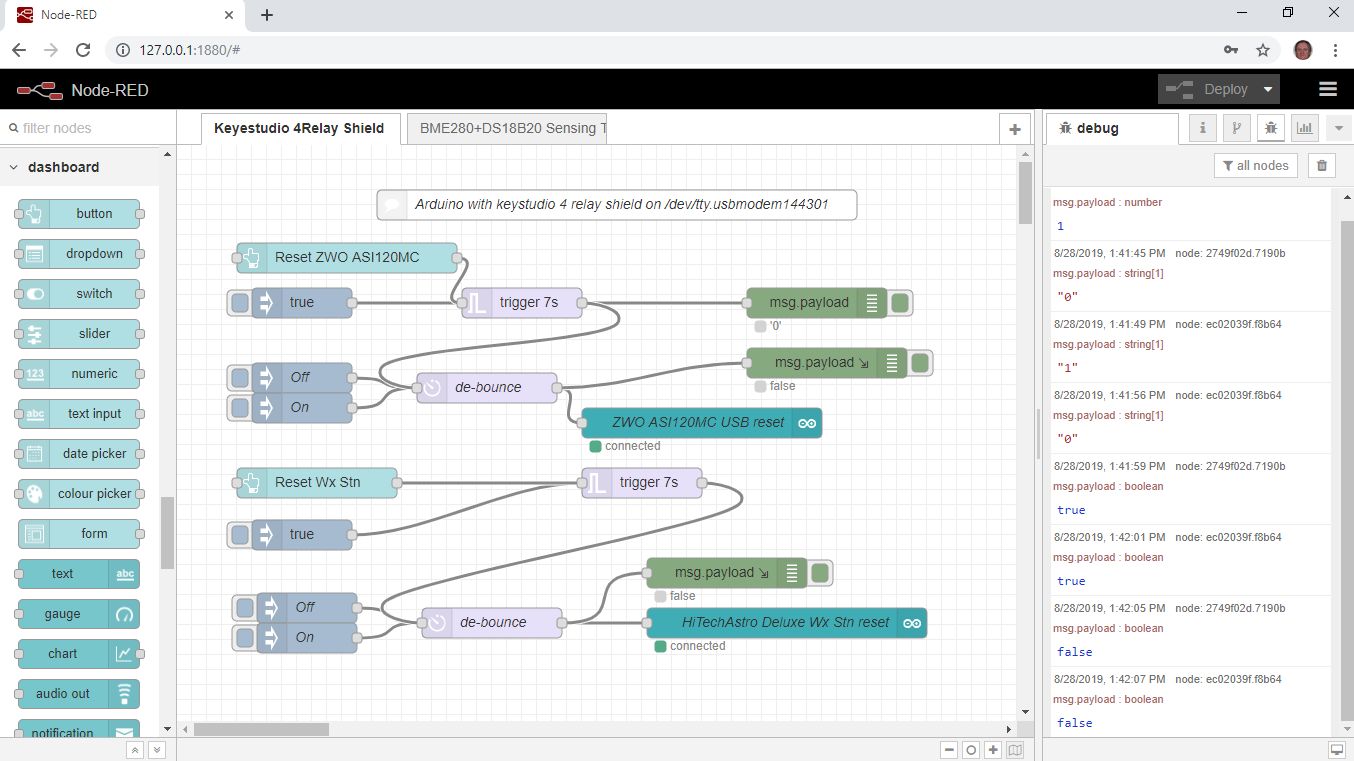
Modified USB extension cableSnapshot of the flow to control the relays to reset ASC and Wx Stn
For this solution, we don’t write any code for the Arduino but do load it with Standard Firmata code that comes with the Arduino IDE.
Just open a new sketch, select the StandardFirmata from the Examples and upload to the Arduino.
Firmata is a generic protocol for communicating with microcontrollers from software on a host computer. It is intended to work with any host computer software package.
If not done already we need to go to npm and install the node-red-node-arduino nodes.
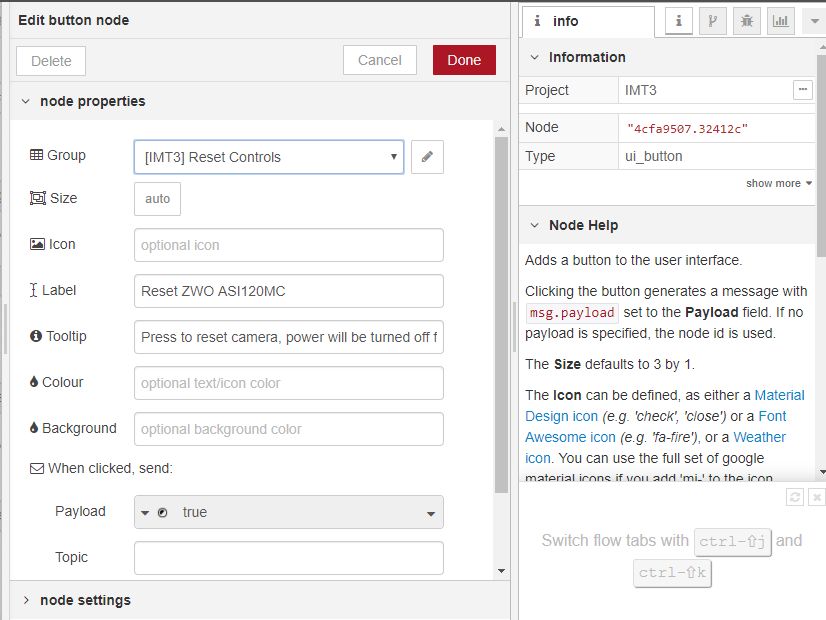
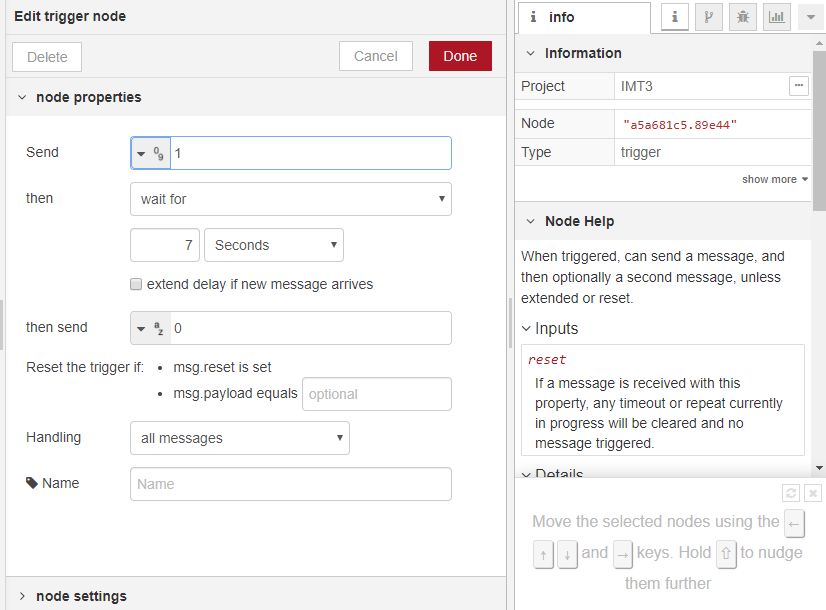
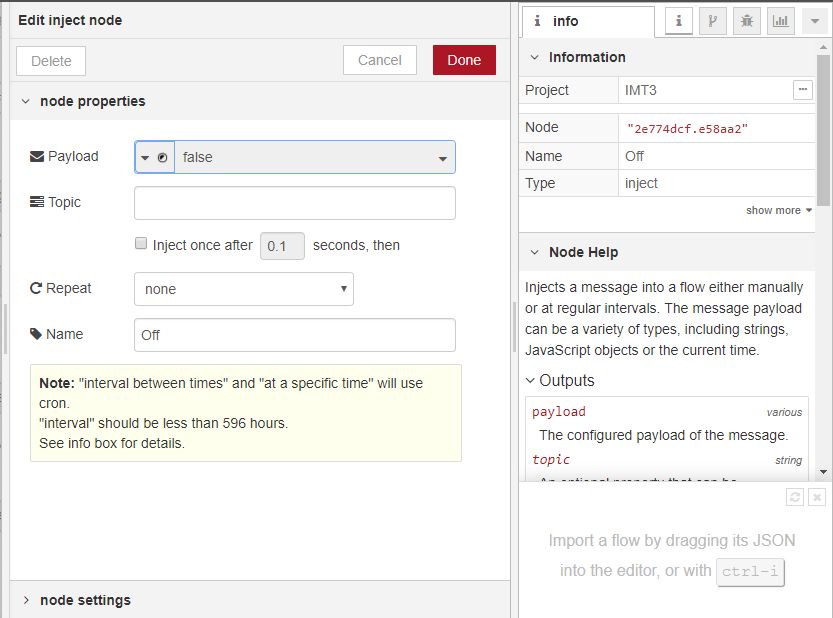
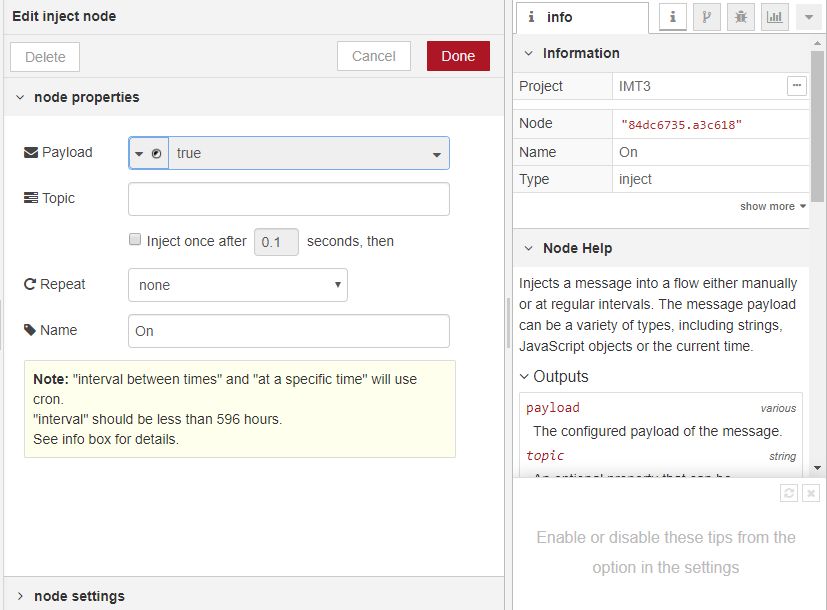
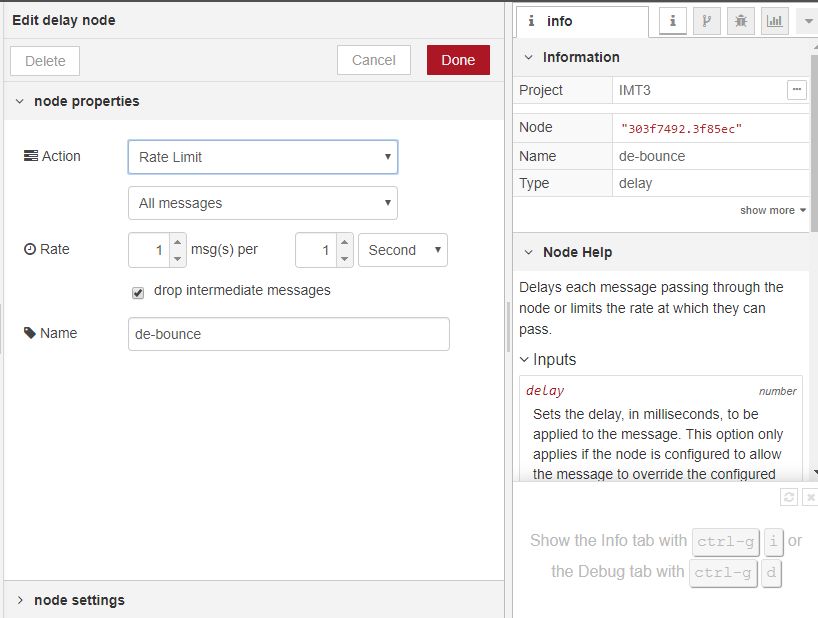
Originally I used a Dashboard Switch to select each relay, but it can get confusing when turning on the relay turns off the device attached, so I replaced the Switch with a Button node, pass the message to a Trigger node that will activate for 7 seconds (give the OS time to recognize the USB device has been disconnected), debounce the signal before passing onto the Arduino Output node which connects to the local Arduino and writes to the selected digital pin turning the relevant Relay On.
As there are only a few basic nodes in this flow, here are some snapshots of how each is set-up:
This button will appear on the Dashboard under the Reset Controls group
7 seconds seems long enough but can easily be changed.
Off Button
On Button
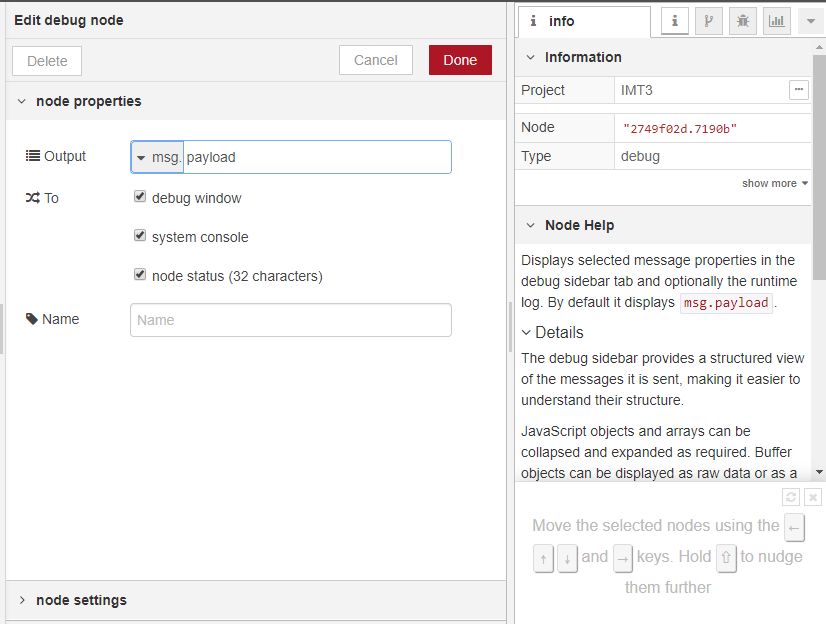
debounce the signaldebug options Pin 7 drives the appropriate relay
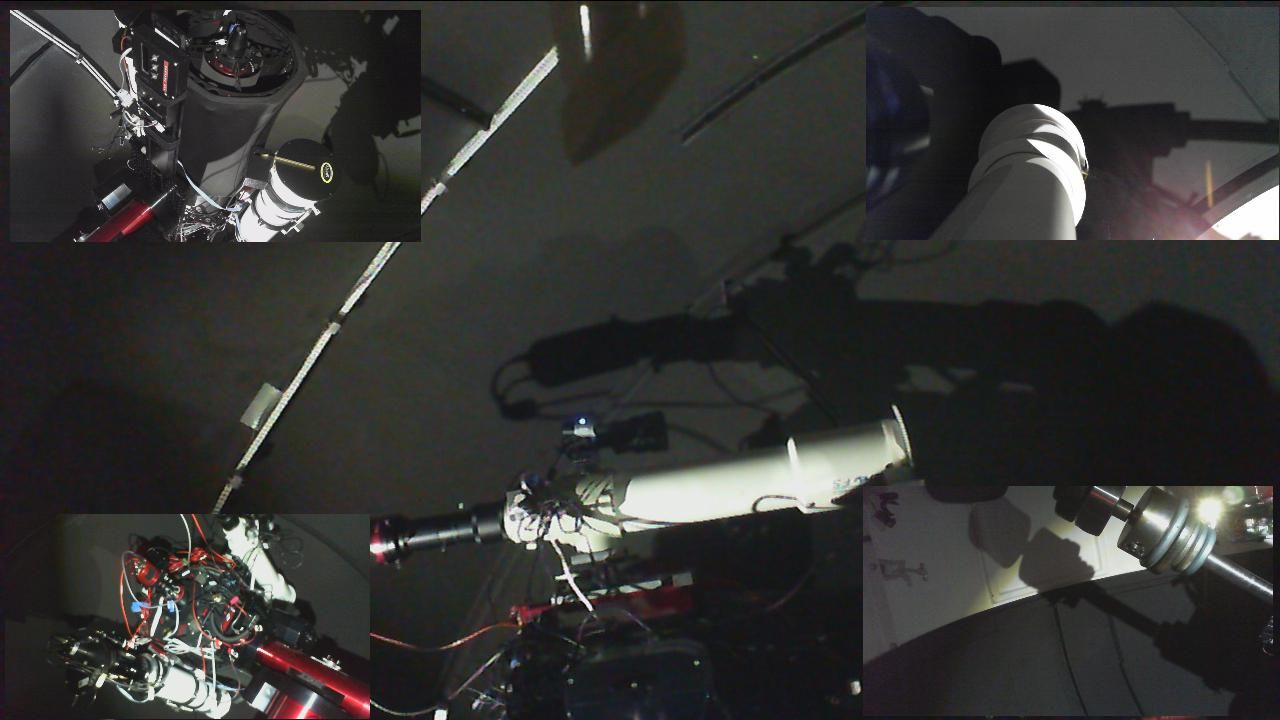
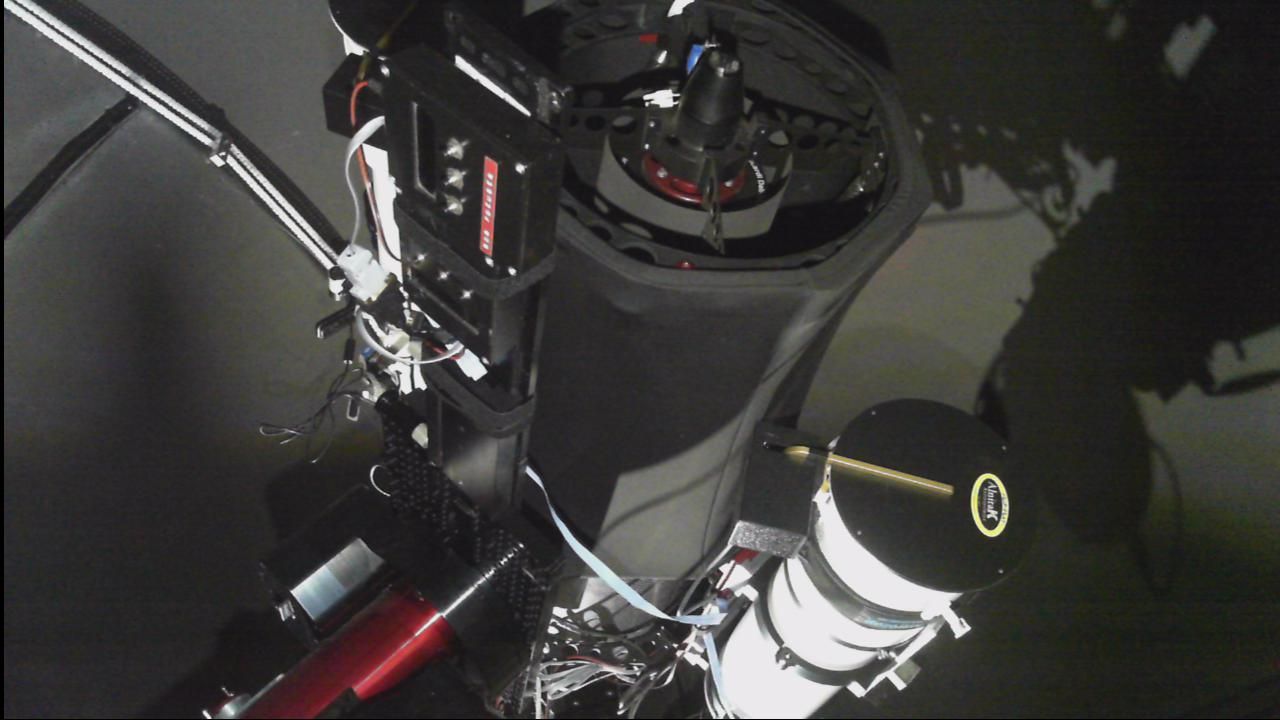
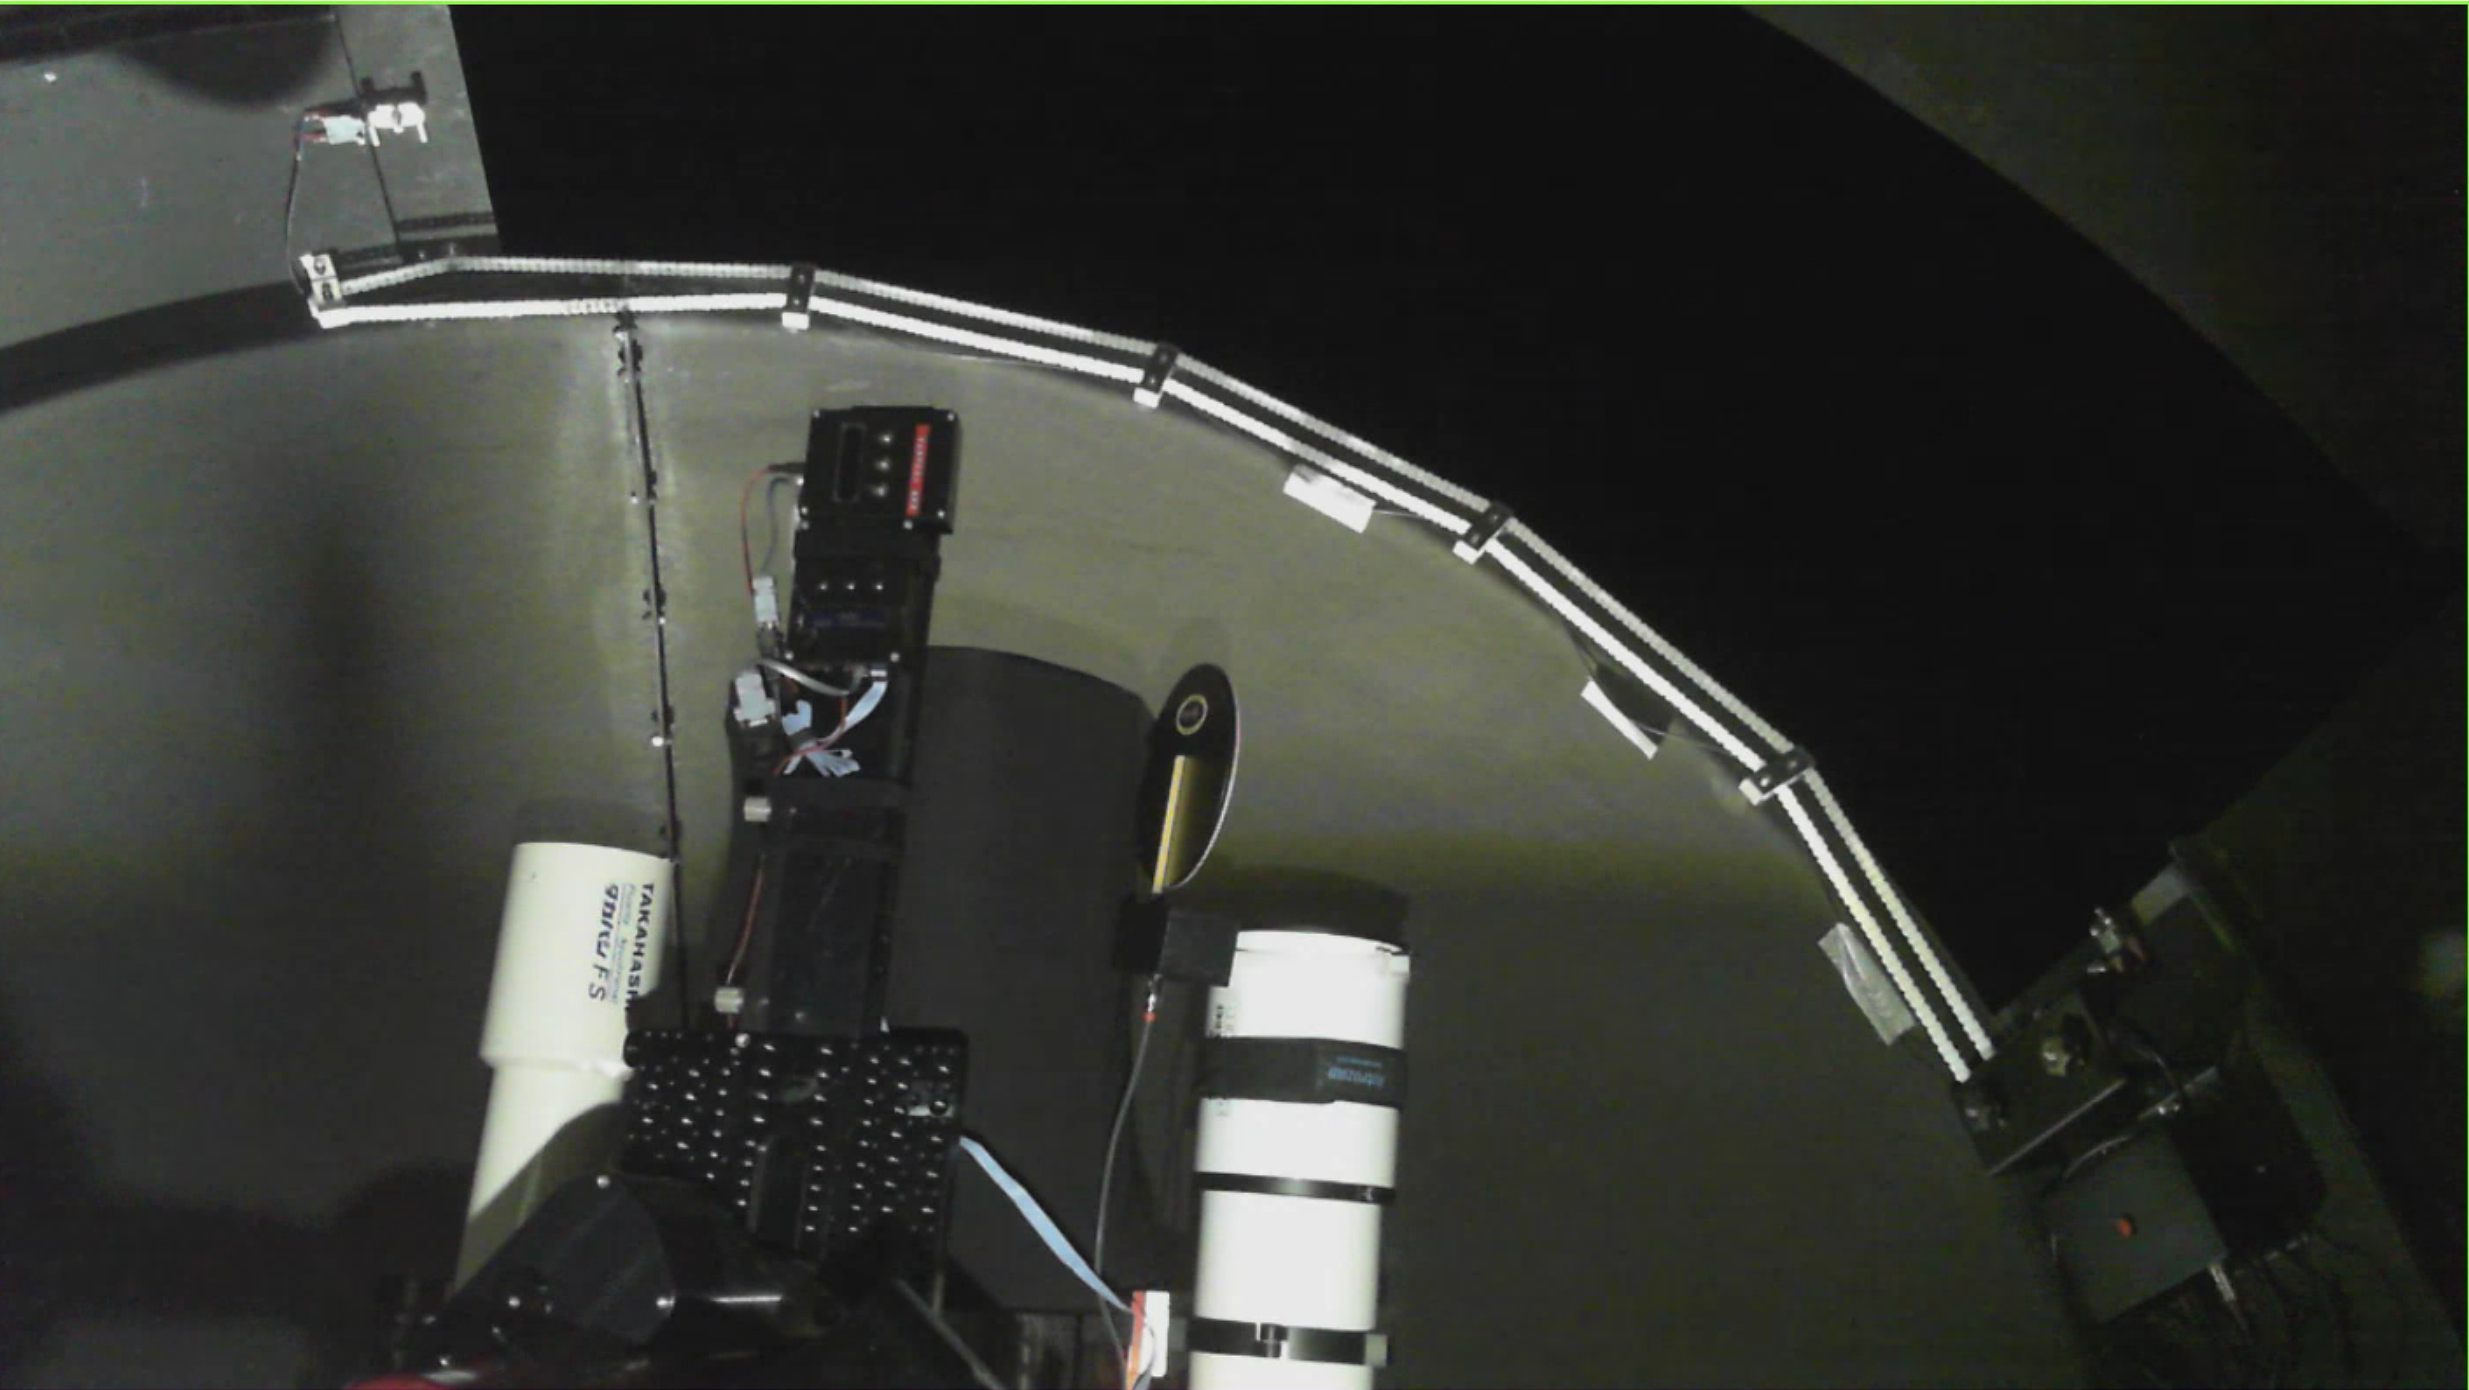
So the above covers the two relays that are used to reset the All Sky Camera and HiTechAsto Wx Stn. The same building blocks are used to control a pair of battery power LED worklights to provide illumination for the Web Cameras we have dotted around the dome and on the mount. After inadvertently leaving the lights on, on one occasion, the batteries needed to be replaced after a single use. So now in addition to having switches control the lights, we also have Buttons to push for preset times on of 1, 3, 7 or 10 minutes, with an option to turn them off early.
LED lighting control
Unlit dome
Picture-in-Picture Flip-Flat ClosedJust a couple of counter-weightsWill the last one out please turn off the lights
Wrapping up for today
Here’s the Node-RED flow for the Relay Shield
[{"id":"f126d47c.2ee7f8","type":"tab","label":"Keyestudio 4Relay Shield","disabled":false,"info":""},{"id":"56ffe7a5.6b85f8","type":"comment","z":"f126d47c.2ee7f8","name":"Arduino with keystudio 4 relay shield on /dev/tty.usbmodem144301","info":"Bob T - 28July2019\n\nKeyestudio 4 card shield to control LED lights, \nHiTechAstroDeluxe weather station and \nZWO ASI120MC All Sky Camera \n\nBosch BME280 and Dallas DS18B20 displays on the Dashboard","x":440,"y":60,"wires":[]},{"id":"2e774dcf.e58aa2","type":"inject","z":"f126d47c.2ee7f8","name":"Off","topic":"","payload":"false","payloadType":"bool","repeat":"","crontab":"","once":false,"onceDelay":0.1,"x":125,"y":233,"wires":[["303f7492.3f85ec"]]},{"id":"303f7492.3f85ec","type":"delay","z":"f126d47c.2ee7f8","name":"de-bounce","pauseType":"rate","timeout":"5","timeoutUnits":"seconds","rate":"1","nbRateUnits":"1","rateUnits":"second","randomFirst":"1","randomLast":"5","randomUnits":"seconds","drop":true,"x":310,"y":243,"wires":[["d50e09b8.fb1c18","2749f02d.7190b"]]},{"id":"84dc6735.a3c618","type":"inject","z":"f126d47c.2ee7f8","name":"On","topic":"","payload":"true","payloadType":"bool","repeat":"","crontab":"","once":false,"onceDelay":0.1,"x":125,"y":263,"wires":[["303f7492.3f85ec"]]},{"id":"5c5f0bd2.1c2534","type":"inject","z":"f126d47c.2ee7f8","name":"Off","topic":"","payload":"false","payloadType":"bool","repeat":"","crontab":"","once":false,"onceDelay":0.1,"x":130,"y":463,"wires":[["f88adc8a.2c784"]]},{"id":"d7751e20.14c83","type":"inject","z":"f126d47c.2ee7f8","name":"On","topic":"","payload":"true","payloadType":"bool","repeat":"","crontab":"","once":false,"onceDelay":0.1,"x":130,"y":493,"wires":[["f88adc8a.2c784"]]},{"id":"d59eb4bd.942ae8","type":"inject","z":"f126d47c.2ee7f8","name":"Off","topic":"","payload":"false","payloadType":"bool","repeat":"","crontab":"","once":false,"onceDelay":0.1,"x":110,"y":615,"wires":[["2743f87.650a908"]]},{"id":"c1c23f86.91668","type":"inject","z":"f126d47c.2ee7f8","name":"On","topic":"","payload":"true","payloadType":"bool","repeat":"","crontab":"","once":false,"onceDelay":0.1,"x":110,"y":645,"wires":[["2743f87.650a908"]]},{"id":"84553f20.8f26c","type":"inject","z":"f126d47c.2ee7f8","name":"Off","topic":"","payload":"false","payloadType":"bool","repeat":"","crontab":"","once":false,"onceDelay":0.1,"x":110,"y":840,"wires":[["35bc3b9f.4f8f94"]]},{"id":"39cd3cf9.7a7024","type":"inject","z":"f126d47c.2ee7f8","name":"On","topic":"","payload":"true","payloadType":"bool","repeat":"","crontab":"","once":false,"onceDelay":0.1,"x":110,"y":870,"wires":[["35bc3b9f.4f8f94"]]},{"id":"f88adc8a.2c784","type":"delay","z":"f126d47c.2ee7f8","name":"de-bounce","pauseType":"rate","timeout":"5","timeoutUnits":"seconds","rate":"1","nbRateUnits":"1","rateUnits":"second","randomFirst":"1","randomLast":"5","randomUnits":"seconds","drop":true,"x":315,"y":478,"wires":[["f55deca6.8236f","ec02039f.f8b64"]]},{"id":"2743f87.650a908","type":"delay","z":"f126d47c.2ee7f8","name":"de-bounce","pauseType":"rate","timeout":"5","timeoutUnits":"seconds","rate":"1","nbRateUnits":"1","rateUnits":"second","randomFirst":"1","randomLast":"5","randomUnits":"seconds","drop":true,"x":520,"y":630,"wires":[["9f8d9580.1d3348"]]},{"id":"35bc3b9f.4f8f94","type":"delay","z":"f126d47c.2ee7f8","name":"de-bounce","pauseType":"rate","timeout":"5","timeoutUnits":"seconds","rate":"1","nbRateUnits":"1","rateUnits":"second","randomFirst":"1","randomLast":"5","randomUnits":"seconds","drop":true,"x":520,"y":855,"wires":[["b44e31bd.88ac2"]]},{"id":"2749f02d.7190b","type":"debug","z":"f126d47c.2ee7f8","name":"","active":true,"tosidebar":true,"console":true,"tostatus":true,"complete":"payload","x":650,"y":218,"wires":[]},{"id":"ec02039f.f8b64","type":"debug","z":"f126d47c.2ee7f8","name":"","active":true,"tosidebar":true,"console":true,"tostatus":true,"complete":"payload","x":550,"y":428,"wires":[]},{"id":"a5a681c5.89e44","type":"trigger","z":"f126d47c.2ee7f8","op1":"1","op2":"0","op1type":"num","op2type":"str","duration":"7","extend":false,"units":"s","reset":"","bytopic":"all","name":"","x":345,"y":158,"wires":[["d0ab65b2.542c38","303f7492.3f85ec"]]},{"id":"d0ab65b2.542c38","type":"debug","z":"f126d47c.2ee7f8","name":"","active":true,"tosidebar":false,"console":false,"tostatus":true,"complete":"payload","x":640,"y":158,"wires":[]},{"id":"af46adb4.e7a03","type":"inject","z":"f126d47c.2ee7f8","name":"","topic":"","payload":"true","payloadType":"bool","repeat":"","crontab":"","once":false,"onceDelay":0.1,"x":125,"y":158,"wires":[["a5a681c5.89e44"]]},{"id":"688bcc2f.63ec14","type":"trigger","z":"f126d47c.2ee7f8","op1":"1","op2":"0","op1type":"str","op2type":"str","duration":"7","extend":false,"units":"s","reset":"","bytopic":"all","name":"","x":315,"y":360,"wires":[["f88adc8a.2c784"]]},{"id":"ab716ad9.cd6008","type":"inject","z":"f126d47c.2ee7f8","name":"","topic":"","payload":"true","payloadType":"bool","repeat":"","crontab":"","once":false,"onceDelay":0.1,"x":125,"y":390,"wires":[["688bcc2f.63ec14"]]},{"id":"5a6fb133.d07c7","type":"trigger","z":"f126d47c.2ee7f8","op1":"1","op2":"0","op1type":"str","op2type":"str","duration":"10","extend":false,"units":"min","reset":"false","bytopic":"all","name":"","x":415,"y":1035,"wires":[["35bc3b9f.4f8f94","2743f87.650a908"]]},{"id":"d50e09b8.fb1c18","type":"arduino out","z":"f126d47c.2ee7f8","name":"ZWO ASI120MC USB reset","pin":"7","state":"OUTPUT","arduino":"ae78048.c81a0f8","x":585,"y":285,"wires":[]},{"id":"f55deca6.8236f","type":"arduino out","z":"f126d47c.2ee7f8","name":"HiTechAstro Deluxe Wx Stn reset","pin":"6","state":"OUTPUT","arduino":"ae78048.c81a0f8","x":610,"y":478,"wires":[]},{"id":"9f8d9580.1d3348","type":"arduino out","z":"f126d47c.2ee7f8","name":"West LED lighting","pin":"5","state":"OUTPUT","arduino":"ae78048.c81a0f8","x":705,"y":630,"wires":[]},{"id":"b44e31bd.88ac2","type":"arduino out","z":"f126d47c.2ee7f8","name":"East LED lighting","pin":"4","state":"OUTPUT","arduino":"ae78048.c81a0f8","x":705,"y":855,"wires":[]},{"id":"d111e9f5.d3a008","type":"ui_switch","z":"f126d47c.2ee7f8","name":"Switch Relay4","label":"Switch East LED Lights on","tooltip":"","group":"4486153f.db803c","order":2,"width":0,"height":0,"passthru":true,"decouple":"false","topic":"","style":"","onvalue":"true","onvalueType":"bool","onicon":"","oncolor":"","offvalue":"false","offvalueType":"bool","officon":"","offcolor":"","x":120,"y":930,"wires":[["35bc3b9f.4f8f94"]]},{"id":"1ed486f7.f803b9","type":"ui_switch","z":"f126d47c.2ee7f8","name":"Switch Relay3","label":"Switch West LED Lights on","tooltip":"","group":"4486153f.db803c","order":1,"width":0,"height":0,"passthru":true,"decouple":"false","topic":"","style":"","onvalue":"true","onvalueType":"bool","onicon":"","oncolor":"","offvalue":"false","offvalueType":"bool","officon":"","offcolor":"","x":125,"y":690,"wires":[["2743f87.650a908"]]},{"id":"4cfa9507.32412c","type":"ui_button","z":"f126d47c.2ee7f8","name":"","group":"207b2faf.303c7","order":1,"width":0,"height":0,"passthru":false,"label":"Reset ZWO ASI120MC","tooltip":"Press to reset camera, power will be turned off for 7 seconds","color":"","bgcolor":"","icon":"","payload":"true","payloadType":"bool","topic":"","x":170,"y":113,"wires":[["a5a681c5.89e44"]]},{"id":"334aa4c3.95f1bc","type":"ui_button","z":"f126d47c.2ee7f8","name":"","group":"207b2faf.303c7","order":1,"width":0,"height":0,"passthru":false,"label":"Reset Wx Stn","tooltip":"Press to reset Weather Station, power is removed for 7 seconds","color":"","bgcolor":"","icon":"","payload":"","payloadType":"str","topic":"","x":140,"y":338,"wires":[["688bcc2f.63ec14"]]},{"id":"dce61d46.cf408","type":"ui_button","z":"f126d47c.2ee7f8","name":"","group":"4486153f.db803c","order":6,"width":0,"height":0,"passthru":false,"label":"White LEDs on 10 min Timer","tooltip":"","color":"","bgcolor":"","icon":"","payload":"true","payloadType":"bool","topic":"","x":155,"y":987,"wires":[["5a6fb133.d07c7"]]},{"id":"1e8859e3.2aa6a6","type":"ui_button","z":"f126d47c.2ee7f8","name":"","group":"4486153f.db803c","order":4,"width":0,"height":0,"passthru":false,"label":"White LEDs on 3 min Timer","tooltip":"","color":"","bgcolor":"","icon":"","payload":"true","payloadType":"bool","topic":"","x":160,"y":780,"wires":[["88932bbe.119258"]]},{"id":"88932bbe.119258","type":"trigger","z":"f126d47c.2ee7f8","op1":"1","op2":"0","op1type":"str","op2type":"str","duration":"3","extend":false,"units":"min","reset":"false","bytopic":"all","name":"","x":415,"y":780,"wires":[["2743f87.650a908","35bc3b9f.4f8f94"]]},{"id":"ab204ac6.07c528","type":"ui_button","z":"f126d47c.2ee7f8","name":"","group":"4486153f.db803c","order":5,"width":0,"height":0,"passthru":false,"label":"White LEDs on 7 min Timer","tooltip":"","color":"","bgcolor":"","icon":"","payload":"true","payloadType":"bool","topic":"","x":150,"y":1035,"wires":[["d37c1fc3.44ece"]]},{"id":"d37c1fc3.44ece","type":"trigger","z":"f126d47c.2ee7f8","op1":"1","op2":"0","op1type":"str","op2type":"str","duration":"7","extend":true,"units":"min","reset":"false","bytopic":"all","name":"","x":415,"y":990,"wires":[["35bc3b9f.4f8f94","2743f87.650a908"]]},{"id":"9ec5abcd.94bff8","type":"ui_button","z":"f126d47c.2ee7f8","name":"","group":"4486153f.db803c","order":3,"width":0,"height":0,"passthru":false,"label":"White LEDs on 1 min Timer","tooltip":"","color":"","bgcolor":"","icon":"","payload":"true","payloadType":"bool","topic":"","x":160,"y":740,"wires":[["871ac8c.880b438"]]},{"id":"871ac8c.880b438","type":"trigger","z":"f126d47c.2ee7f8","op1":"1","op2":"0","op1type":"str","op2type":"str","duration":"1","extend":false,"units":"min","reset":"false","bytopic":"all","name":"","x":415,"y":735,"wires":[["35bc3b9f.4f8f94","2743f87.650a908"]]},{"id":"9b4c5ff.75b30a","type":"ui_button","z":"f126d47c.2ee7f8","name":"","group":"4486153f.db803c","order":6,"width":0,"height":0,"passthru":false,"label":"Turn Off All Lights","tooltip":"","color":"","bgcolor":"","icon":"","payload":"","payloadType":"str","topic":"","x":120,"y":1080,"wires":[["eb116cf.e91769"]]},{"id":"eb116cf.e91769","type":"trigger","z":"f126d47c.2ee7f8","op1":"0","op2":"false","op1type":"str","op2type":"bool","duration":"250","extend":false,"units":"ms","reset":"","bytopic":"all","name":"Reset Lights","x":355,"y":1095,"wires":[["d37c1fc3.44ece","5a6fb133.d07c7","88932bbe.119258","871ac8c.880b438","35bc3b9f.4f8f94","2743f87.650a908"]]},{"id":"9fd74bd7.3fd648","type":"ui_button","z":"f126d47c.2ee7f8","name":"","group":"4486153f.db803c","order":7,"width":0,"height":0,"passthru":true,"label":"Don't Push this button","tooltip":"","color":"","bgcolor":"","icon":"","payload":"true","payloadType":"bool","topic":"","x":250,"y":1290,"wires":[["2ed3e3dc.0f6cac"]]},{"id":"2ed3e3dc.0f6cac","type":"trigger","z":"f126d47c.2ee7f8","op1":"true","op2":"false","op1type":"bool","op2type":"bool","duration":"1","extend":false,"units":"s","reset":"","bytopic":"all","name":"","x":435,"y":1290,"wires":[["8af19751.a0fec8"]]},{"id":"ffabd20f.040af","type":"inject","z":"f126d47c.2ee7f8","name":"","topic":"","payload":"true","payloadType":"bool","repeat":"","crontab":"","once":false,"onceDelay":0.1,"x":80,"y":1290,"wires":[["9fd74bd7.3fd648"]]},{"id":"8af19751.a0fec8","type":"arduino out","z":"f126d47c.2ee7f8","name":"","pin":"13","state":"OUTPUT","arduino":"ae78048.c81a0f8","x":590,"y":1290,"wires":[]},{"id":"ae78048.c81a0f8","type":"arduino-board","z":"","device":"COM16"},{"id":"4486153f.db803c","type":"ui_group","z":"f126d47c.2ee7f8","name":"IMT3 - Lights","tab":"a9e9728d.77c83","order":6,"disp":true,"width":"6","collapse":true},{"id":"207b2faf.303c7","type":"ui_group","z":"","name":"Reset Controls","tab":"a9e9728d.77c83","order":7,"disp":true,"width":"6","collapse":true},{"id":"a9e9728d.77c83","type":"ui_tab","z":"f126d47c.2ee7f8","name":"IMT3","icon":"dashboard","order":2,"disabled":false,"hidden":false}]
I chose to run Node-RED locally on my Windows 10 laptop so my first step was to download and install a supported prerequisite version of Node.js which will also include npm (Node Package Manager).
npm is the worlds largest Software Registry containing over 800,000 code packages. It is free to use and Open-source developers use npm to share their software.
npm includes a CLI (Command Line Client) that we will use to download and install software.
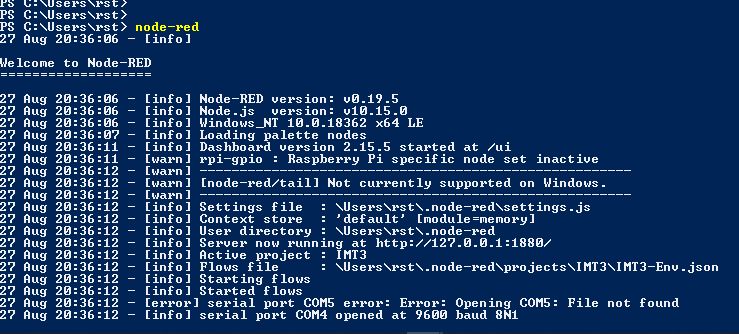
Having installed Node.js open Windows PowerShell to execute the npm cli command to install Node-RED
npm install -g --unsafe-perm node-red
The command installs Node-RED as a global module along with its dependencies.
Once installed as a global module we can use the node-red command to start Node-RED in a terminal. Ctrl-C or closing the terminal window will stop Node-RED.
You can then access the Node-RED editor by pointing your browser at http://localhost:1880/
To access the Node-RED Dashboard point your browser at http://localhost:1881/
By default, Projects are disabled 🙁 , so brush up on your Vi skills* as we need to go and edit settings.js file located in the .node-red directory. *other editors are available.
Just remember to press escape key, colon, w q bang when done! … now where did I drag that up from, I hadn’t used Vi in years!
After an initial foray into Node-RED, I realised I would need to use Projects within Node-RED. A pre-req for this is Git. With that installed I was good to create my first Project.
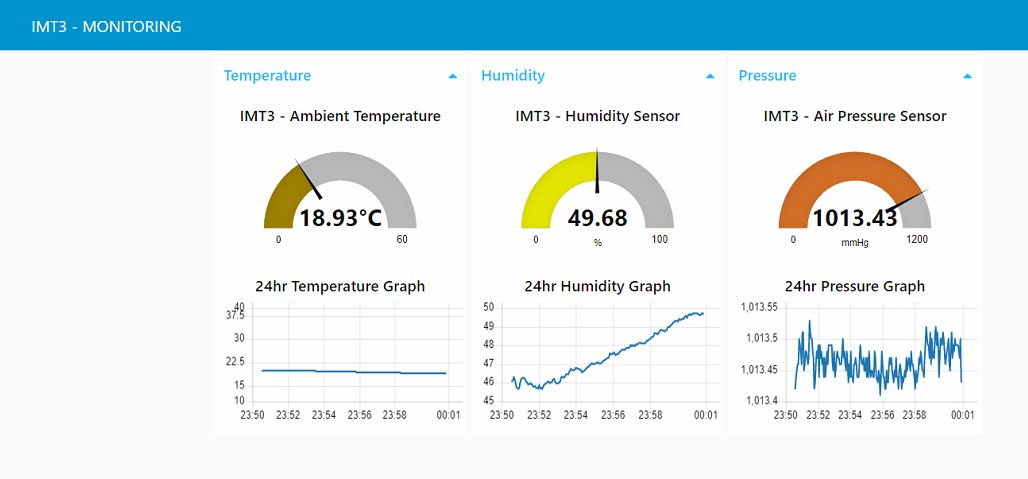
I was surprised how quickly I was able get some meaningful results and was soon using npm to add nodes from the Node-RED library for the Dashboard, Arduino and much more. It wasn’t long before I had my first Dashboard displaying the output of the BME280 sensor which looked like the following:
My first Node-RED Dashboard display
An early comment from our dear friend Mil Dave asked “What’s the Dew Point“? … thanks Dave !
Google to the rescue, however the Dewpoint calculation formulae found on the web look pretty scary. Fortunately a search of the Node-RED library found a flow with a dewpoint function defined that I was able to adapt to my flow. A snapshot of the flow follows as it is now beginning to take shape and looks like this:
Node-RED Flow
The green debug nodes are useful to follow the message as they progress through the flow, the debug output can be displayed in the debug window, the system console or as node status appearing just below the debug node
The data from the Arduino arrives on the Serial node which is configured for the com port the Arduino is connected to. I’ve found it easier to determine the relevant com port from the Arduino IDE rather than via control panel and device manager. Also the ‘Get board info’ from the IDE has prove very useful when running Node-RED on MAC OS.
Double clicking any node will open up an Edit window to let you configure each node
Connected to the Serial node is a Split Node. This splits the incoming message into a sequence of messages and is setup to split the message when it finds a comma.
The message is passed to the next node which is a function node which contains some Javascript to give a variable name to each of the values received from the Arduino.
The next Function node Splits these seven values and presents them on a separate output of the node which can then be connected to individual Dashboard Gauges.
var msgS1C = {payload: (msg.payload.S1C).toFixed(2)};
var msgS1F = {payload: (msg.payload.S1F).toFixed(2)};
var msgS2C = {payload: (msg.payload.S2C).toFixed(2)};
var msgS2F = {payload: (msg.payload.S2F).toFixed(2)};
var msgBT = {payload: (msg.payload.BT-1.4).toFixed(1)};
var msgBH = {payload: (msg.payload.BH).toFixed(1)};
var msgBP = {payload: (msg.payload.BP).toFixed(0)};

return [msgS1C, msgS1F, msgS2C, msgS2F, msgBT, msgBH, msgBP];
Having split these values out, the Temperature and Humidity values need to be recombined by the Join node so they can be passed to the Dew Point function node.
var newMsg = {};
var parts = msg.payload.split(",");
var Th = parseFloat(parts[0]);
var Hu = parseFloat(parts[1]);

var temp = -1.0*Th;
es = 6.112*Math.exp(-1.0*17.67*temp/(243.5 - temp));
ed = Hu/100.0*es;
eln = Math.log(ed/6.112);
td = -243.5*eln/(eln -17.67);

var Dp = td.toFixed(1);

newMsg = {payload: Dp,
     topic: "DewPoint"};

return newMsg;
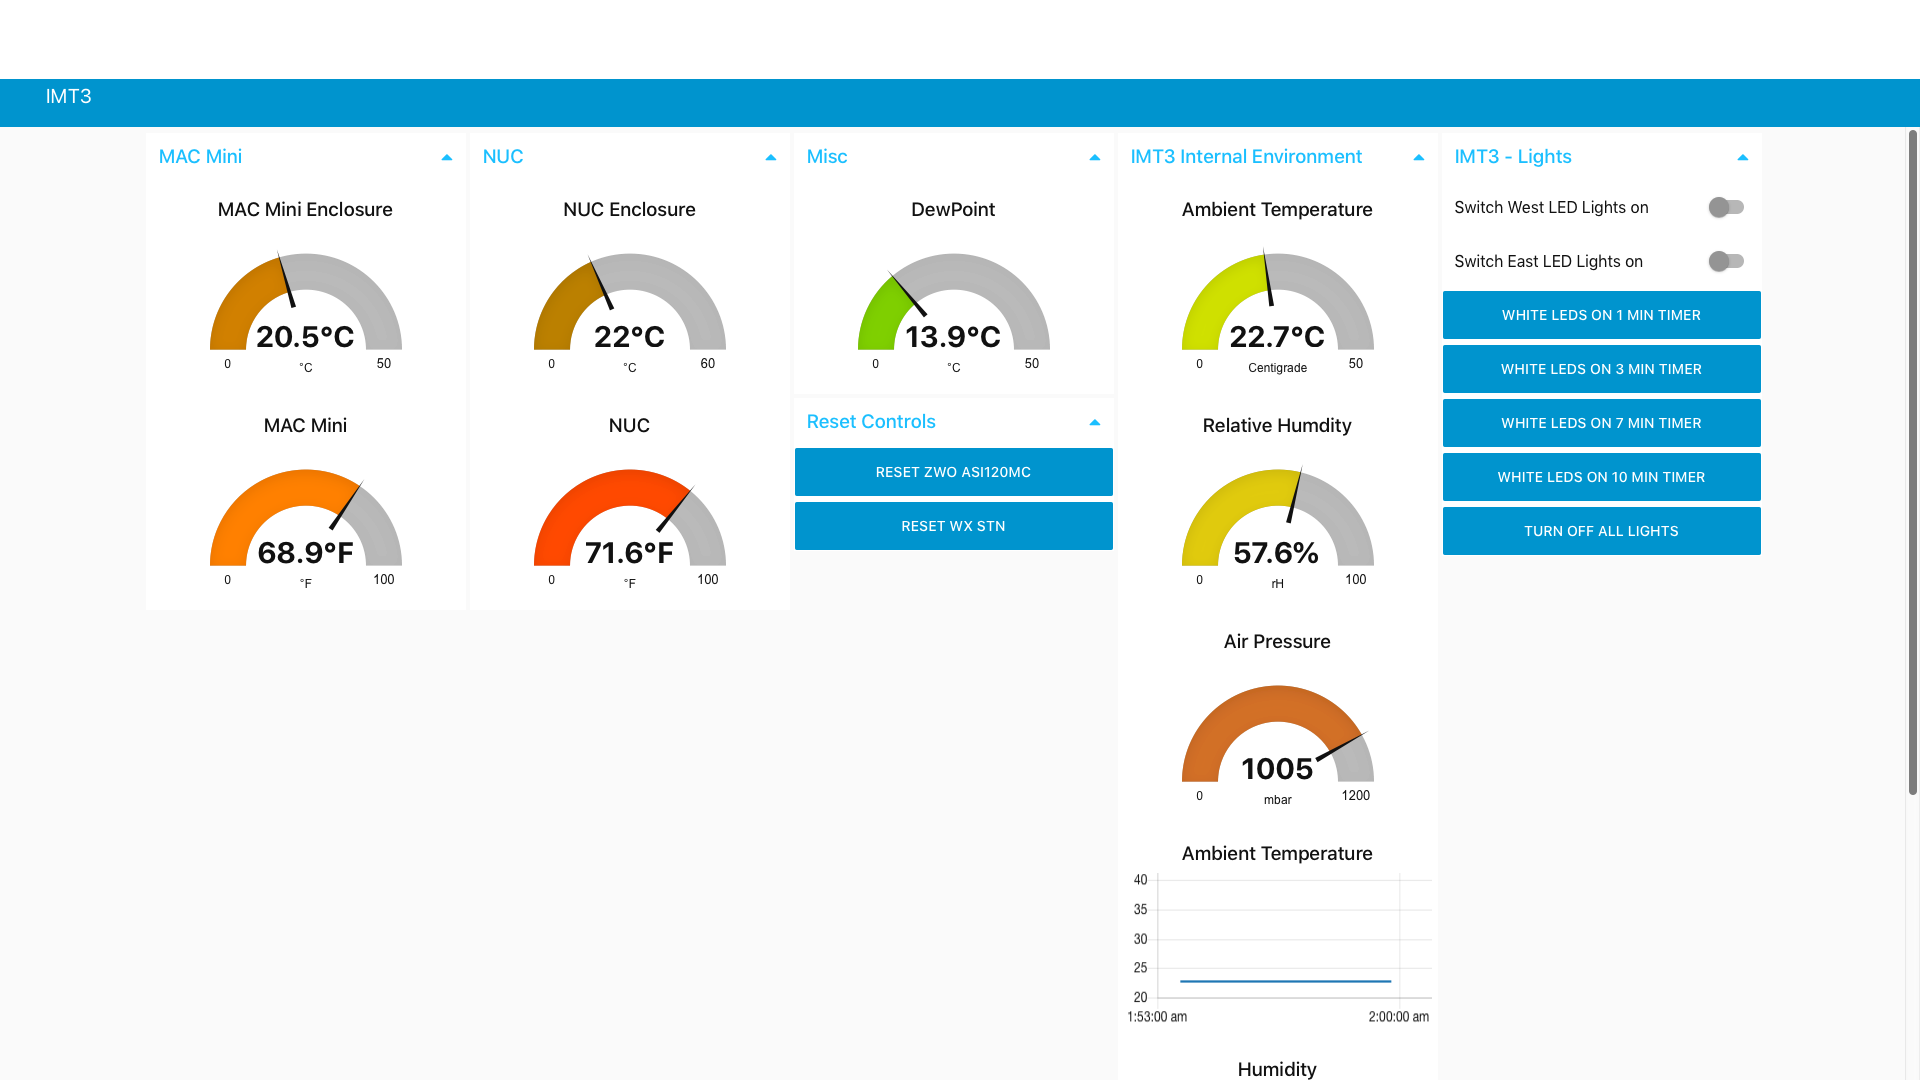
The DewPoint is now passed to a Dashboard Gauge node and displayed. The Dashboard currently looks like this:
IMT3 Environmental Dashboard
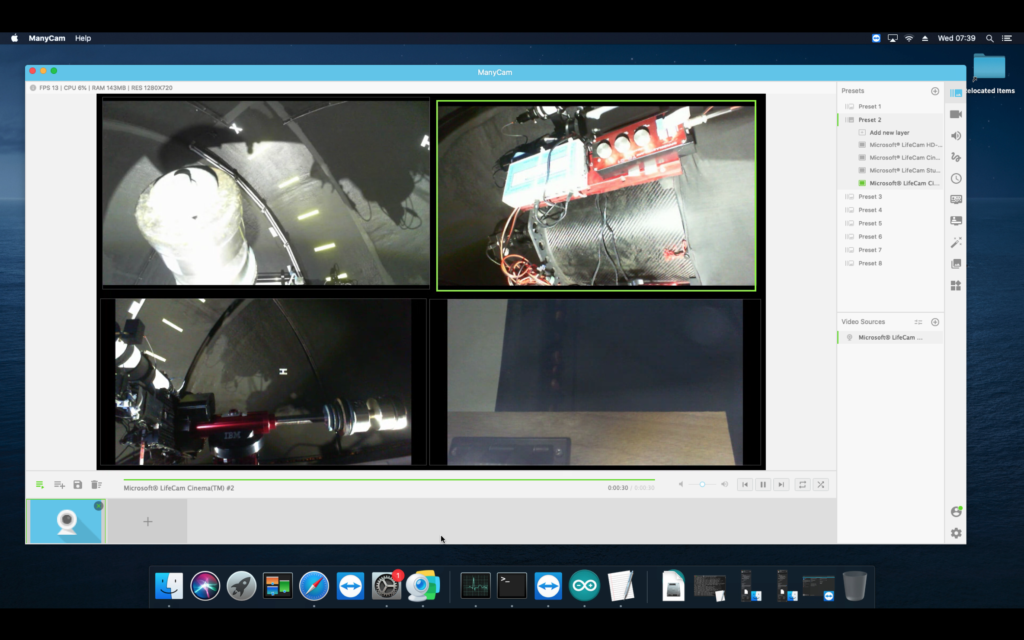
In Pt.3 we’ll take a look at the flow that controls the Arduino with the 4-Relay Shield that allows us to remotely reset the All Sky Camera, HiTechAstro Wx Stn and control a pair of LED lights to illuminate the rig so we can use ManyCam to monitor the web cams installed in the observatory.
The following is the current Node-RED flow running on the IMT3 MAC Mini
IMT3 Environmental Monitoring Pt.1 Bob Trevan – Aug2019
When Dave, Mark and I first started planning what equipment we were going to install in IMT3 we started with a block diagram of what we thought we were going to install so we could determine the number of USB ports we would need and the power requirements. This soon morphed into much more as we started adding kit to the project.
Although the Observatory is install in the UK and not Spain as was originally planned, we decided we would still need a fair bit of monitoring to allow remote sensing of the local conditions. In particular making sure it was safe to open the shutter for a remote observing session
During AstroFest in Feb 2019 we bought a HiTechAstro Deluxe Weather Station which can be used as an ASCOM safety device to autonomously close the Dome Shutter if rain or cloud is detected. Although we were lead to believe it would directly interface with the Pulsar Dome Controller, this was not the case and required a simple interface consisting of a SPST Relay to control the shutter. Once the Relay is picked the shutter closes and will stay closed until the operator manually resets the state of the relay via the weather station software. The software has a number of options to configure to determine when to close the shutter
Although the Shutter itself has a battery pack that has sufficient capacity to close the shutter in the event of a power outage we decided to add an APC UPS with PowerChute software so provide AC power resilience to critical components. The shutter battery is wirelessly charged when the dome is parked at the end of each observing session.
In addition to the Cloud and Rain sensor, we also have a Sky Quality Meter and All Sky camera mounted on the same pole. The cable run to the pole from the panel inside the dome to which we were mounting various components … MAC Mini, 10-port USB HUB, Power Bricks, etc … is about 10m. The cabling provided with the Weather Station was somewhat shorter than this which meant having to extend it with the challenges of making the external connections water tight.
The HiTechAstro Wx Stn is also a Cloud Sensor utilizing an IR sensor to measure the Sky Temperature and a Dallas DS18B20 to measure Ambient Temperature. The waterproof probe is attached to the underside of the mounting bracket.
For monitoring the Dome Internal conditions I started looking at what we could achieve using an Arduino (*1) with various sensors. Currently we have two Arduinos installed, the first utilizes an Arduino UNO R3 with a Bosch BME280 (*2) Temperature, Humidity and Pressure Sensor and a pair of Dallas DS18B20 (*3) temperature probes for monitoring the internal temperatures of the enclosures housing the MAC Mini and Intel NUC (*4) (more on the NUC later). The current version of code running on this Arduino is provided at the end of this part of the blog.
A second Arduino has a 4-relay shield attached. The relays are used to control two 380 lumens LED lights inside the dome and after modifying a couple of short USB extension leads, breaking into the +5v line, the remaining 2 relays are used to reset the All Sky Camera and HiTechAstro Deluxe Wx Stn, when the need arises (which is all too frequently). This Arduino is programmed to run Standard Firmata code allowing Node-RED to communicate via the serial port and control the relays.
*1 Arduino is an open-source electronics platform based on easy-to-use hardware and software. Arduino boards are able to read inputs – light on a sensor, a finger on a button, or a Twitter message – and turn it into an output – activating a motor, turning on an LED, publishing something online.
The Arduino integrated development environment (IDE) is a cross-platform application (for Windows, macOS, Linux) that is written in the programming language Java, C, C++. It is used to write and upload programs to Arduino compatible boards. User-written code only requires two basic functions, for starting the sketch and the main program loop. For more info see https://en.wikipedia.org/wiki/Arduino_IDE
*2 Bosch BME280 The BME280 is an integrated environmental sensor developed specifically for mobile applications where size and low power consumption are key design constraints. The unit combines individual high linearity, high accuracy sensors for pressure, humidity and temperature in an 8-pin metal-lid 2.5 x 2.5 x 0.93 mm³ LGA package, designed for low current consumption (3.6 μA @1Hz), long term stability and high EMC robustness.
*3 Dallas DS18B20 The DS18B20-PAR digital thermometer provides 9 to 12–bit centigrade temperature measurements and has an alarm function with nonvolatile user-programmable upper and lower trigger points. The DS18B20-PAR communicates over a 1-Wire bus, which by definition requires only one data line (and ground) for communication with a central microprocessor. It has an operating temperature range of –55°C to +100°C and is accurate to ±0.5°C over a range of –10°C to +85°C.
*4 Next Unit of Computing (NUC) is a line of small-form-factor barebone computer kits designed by Intel. The NUC motherboard measures 4 × 4 inches (10.16 × 10.16 cm)
The Bosch BME280 Sensor uses the I2C bus and the Dallas DS18B20 probes use a One-Wire interface. Each of the DS18B20 has a unique internal 64-bit address created during the manufacturing process, so you can just keep adding as many as you need with relative ease.
Currently, every 20 seconds, the Arduino spits out 7 values separated by commas and terminated with a line feed, these are:
DS18B20 Ext sensor Temperatue in °C
DS18B20 Ext sensor Temperature in °F
DS18B20 Int sensor Temperature in °C
DS18B20 Int sensor Temperature in °F
BME280 sensor Temperature in °C
BME280 sensor Humidity in %
BME280 sensor Pressure in mPa
e.g. 27.0000,80.6000,26.0000,78.8000,28.53,43.53,1008.28
Mark also donated a HiTechAstro Hub to the project which is used to control DC power to the Cameras, Focuser, Filter Wheels and potentially Dew Heaters, but with three rigs mounted on the SB Paramount ME-II we were quickly using all available USB Ports and Switched DC power ports available.
After several ‘Hangs’ of the NUC due the to the software packages tested with the All Sky Camera, we added a MAC mini to run the environment applications, leaving the Intel NUC to run the Main Applications to control the mount and Cameras. The Sky X, Sequence Generator Pro etc…
So we now have a number of PC / MAC applications, controlling and displaying various functions of IMT3. But how do we display the Arduino data ?
Working for IBM, Dave had been exposed to Node-RED. Originally developed by IBM, Node-RED is a flow based development tool for visual programming for wiring together hardware devices, APIs and online services as part of the Internet of Things.
Node-RED provides a web browser-based flow editor, which can be used to create Javascript fuctions. The runtime is built on Node.js. The flows created in Node-RED are stored using JSON. Since version 0.14 MQTT nodes can make properly configured TLS connections.
In 2016, IBM contributed Node-RED as an open source JS Foundation project.
One of the Node-RED projects is a dashboard UI for Node-RED, and this is how the Arduino sensor data is displayed, along with the flow that controls the 4 relays on the Arduino Relay Shield.
We have a new vocabulary to learn; IoT, MQTT, node.js, Node-RED, JSON, Arduino, Sketch, Flow and new languages to learn C, C++, Javascript and we haven’t even mentioned the BBC MicroBit or Raspbery Pi and Python 🙂
I’ll describe the Node-RED flows I currently have working and the Dashboard in Pt. 2.
Arduino Code:
/********************************************************************
* Arduino code used for monitoring the Internal Ambient Temperature,
* Humidity and Air Pressure of IMT3 Observatory using a Bosch BME280 sensor
* and two Dallas DS18B20 temperature probes to measure the temperatures of
* the MAC Mini and Intel NUC enclosures.
*
* I have commented out alot of the lines used during development, but left
* them in to help comment the code.
*
* Currently, every 20 seconds, the Arduino spits out 7 values separated by
* commas and terminated with a line feed, these are:
*
* DS18B20 Ext sensor Temperatue in °C
* DS18B20 Ext sensor Temperature in °F
* DS18B20 Int sensor Temperature in °C
* DS18B20 Int sensor Temperature in °F
*
* BME280 sensor Temperature in °C
* BME280 sensor Humidity in %
* BME280 sensor Pressure in mPa
*
* e.g. 27.0000,80.6000,26.0000,78.8000,28.53,43.53,1008.28
*
* The above will be displayed as Gauges on a Node-RED Dashboard.
*
* Bob Trevan August 2019
*******************************************************************/
/******************************************************************
This is a library for the BME280 humidity, temperature & pressure sensor
Designed specifically to work with the Adafruit BME280 Breakout
----> http://www.adafruit.com/products/2650
 These sensors use I2C or SPI to communicate, 2 or 4 pins are required
to interface. The device's I2C address is either 0x76 or 0x77.
 Adafruit invests time and resources providing this open source code,
please support Adafruit and open-source hardware by purchasing products from Adafruit!
Written by Limor Fried & Kevin Townsend for Adafruit Industries.
BSD license, all text above must be included in any redistribution
*******************************************************************/
#include <Wire.h>
#include <SPI.h>
#include <Adafruit_Sensor.h>
#include <Adafruit_BME280.h>
#include <OneWire.h>
#include <DallasTemperature.h>

#define BME_SCK 13
#define BME_MISO 12
#define BME_MOSI 11
#define BME_CS 10

Adafruit_BME280 bme; // I2C
char buffer[60];
// Onewire Reference and assign it to pin 5 on the Arduino
OneWire oneWire(5);
// declare as sensor reference by passing oneWire reference to Dallas Temperature.
DallasTemperature sensors(&oneWire);
// declare the device addresses
//Device 1: 0x28, 0x41, 0x0F, 0x84, 0x1F, 0x13, 0x01, 0x16
//Device 2: 0x28, 0x89, 0x25, 0x6E, 0x1F, 0x13, 0x01, 0x3F

//Device 3: 0x28, 0xAD, 0x43, 0xE2, 0x1B, 0x13, 0x01, 0x8D
//Device 4: 0x28, 0x0B, 0xA9, 0x63, 0x1F, 0x13, 0x01, 0xCC

//Device 5: 0x28, 0x52, 0xDA, 0x71, 0x1F, 0x13, 0x01, 0x68
//Device 6: 0x28, 0xAA, 0xBD, 0x68, 0x3C, 0x14, 0x01, 0x4E

// Select the pair of sensor used with this Arduino, these addresses have previously been read with a separate piece of Arduino code.
DeviceAddress ExtSensor = {0x28, 0xAA, 0xBD, 0x68, 0x3C, 0x14, 0x01, 0x4E};
DeviceAddress IntSensor = {0x28, 0x52, 0xDA, 0x71, 0x1F, 0x13, 0x01, 0x68};

// Variables to hold the temperatures
float ExtC; // originally had one sensor hanging out of my study window
float IntC; // and a second sensor by my desk.

void setup() {
Serial.begin(9600);

// Serial.println(F("BME280 test"));
bool status;
status = bme.begin(0x76); // I2C Address
if (!status) {
Serial.println("Could not find a valid BME280 sensor, check wiring!");
while (1);
}

// Serial.println("-- Default Test --");

Serial.println();

// set the resolution to 9 bit - Valid values are 9, 10, or 11 bit.
sensors.setResolution(ExtSensor, 9);

// confirm that we set that resolution by asking the DS18B20 to repeat it back
//Serial.print("Exterior Sensor Resolution: ");
//Serial.println(sensors.getResolution(ExtSensor), DEC);
//Serial.println();
// set the resolution to 9 bit - Valid values are 9, 10, or 11 bit.

sensors.setResolution(IntSensor, 9);

// confirm that we set that resolution by asking the DS18B20 to repeat it back
//Serial.print("Interior Sensor Resolution: ");
//Serial.println(sensors.getResolution(IntSensor), DEC);
//Serial.println();
}

void loop() {
// Tell the Ext sensor to Measure and Remember the Temperature it Measured
sensors.requestTemperaturesByAddress(ExtSensor); // Send the command to get temperatures
// Get the temperature that you told the sensor to measure

ExtC = sensors.getTempC(ExtSensor);

//Serial.print("Exterior Sensor: ");
//Serial.print("Temp C: ");

Serial.print(ExtC,4); // The four just increases the resolution that is printed
Serial.print(",");

//Serial.print(" Temp F: ");
// The Dallas Temperature Control Libray has a conversion function... we'll use it

Serial.print(DallasTemperature::toFahrenheit(ExtC),4);
Serial.print(",");

// Tell the INT sensor to Measure and Remember the Temperature it Measured sensors.requestTemperaturesByAddress(IntSensor); // Send the command to get temperatures
// Get the temperature that you told the sensor to measure

IntC = sensors.getTempC(IntSensor);

//Serial.print("Interior Sensor: ");
//Serial.print("Temp C: ");

Serial.print(IntC,4); // The four just increases the resolution that is printed
Serial.print(",");

//Serial.print(" Temp F: ");
// The Dallas Temperature Control Libray has a conversion function... we'll use it

Serial.print(DallasTemperature::toFahrenheit(IntC),4);
Serial.print(",");
//Serial.println("\n");
printTemp();
printHum();
printPa();
delay(20000);
}

void printTemp() {
dtostrf(getTemp(),1,2,buffer);

// Serial.print("Temperature = ");

Serial.print(buffer);
Serial.print(",");

// Serial.println(" *C");
}

void printHum() {
dtostrf(getHum(),1,2,buffer);

// Serial.print("Humidity = ");

Serial.print(buffer);
Serial.print(",");

// Serial.println(" %");
}

void printPa() {
dtostrf(getPa(),1,2,buffer);

// Serial.print("Pressure = ");

Serial.println(buffer);

// Serial.println(" hPa");
}

double getTemp(void) {
double t;
t = bme.readTemperature();
return (t);
}

double getHum(void) {
double h;
h = bme.readHumidity();
return (h);
}

double getPa(void) {
double p;
p = (bme.readPressure() / 100.0F);
return (p);
}
GingerGeek round tonight to align his guide scope, focus it and make sure guiding works. The first thing we had to do though was unplug my camera and then plug his into the Mount Hub Pro due the fuse problem from the last session when it melted through the fuse holder, that will be fixed later this weekend.
Next we slewed to Vega as seen above and took a quick image to see how far out the Esprit 120 is compared to where the OS12″ is pointing so that we can adjust it later.
Espri 120 missalignment from OS12″
So it would seem focusing was a bit more of a challenge than we thought. The first thing is we bought an adapter for the guide scope (aka the finder that came with the Esprit 120) but it did not provide enough back focus for the camera. We had a look round the adapters in the dome and found a nose extension for the Lodestar, however it was not a c-mount end to it so we landed up duck taping it on tonight until GingerGeek can bring round his adapter.
The next challenge was not seeing any stars in the lodestar, after what seemed like a long while we came to the conclusion that the picture we were looking at on the screen in PHD2 was not the camera we thought, it was instead the one from the OS12″ which at this point was not pointing through the slit.
Wrong Lodestar selected
After looking through the settings on PHD2 we found a new setting we had not seen before, which seemed to be because we have multiple ASCOM cameras connected.
Selecting the right camera
The symbol is a double arrow and when clicked a drop down list of 4 Starlight Xpress cameras appeared, so we chose the 4th one which was one of the two Lodestars and that worked.
I then adjusted the guide scope in its two ring holders and aligned close to Vega which we had slewed to. Now the guide scope was spot on and the main scope ever so slightly off. This will be solved when we either shim the scope to align with the OS12″ or when we add/change the way in which it is connected to the losmandy mounting plate.
By 12:40am we had the focus sorted for the guide scope and we moved back in doors to connect back to the 2 cameras for this evening, lodestar and main imaging camera and then the Lakeside focuser to start an autofocus run on the main camera.
Finally starting auto focus
At 1:20am we were still trying to focus as we had not setup the autofocus routing for the Esprit 120 before, the OS12″ is now fine but this was a new challenge. GingerGeek spend an appreciable amount of time changing the step size and other settings in SGPro to effect the focus routine. Finally autofocus did a great job and we landed up at a focus point of 6225 for the Luminance filter. However there was an amount of backlash and this caused the focus point to not be the same in a one direction. GingerGeek needs to find out where he wrote down the figure we measured for backlash so we can add in.
Good auto focus achieved but with slight errorIn focus Luminance Image
Next we slewed to the star near the Elephant Trunk, SAO 33570 and changed the filter to Ha. GingerGeek then started an auto focus run for this filter. As it was now late we were missing setting simple things such as the exposure time increase from 1s to 15s needed to actually register any stars to focus on.
Once focused (ish) as we are tired now, we started a short test image run of 10mins subs for the Ha. GingerGeek showed me the Big Status window which is a much nicer interface to your image progress.
Big Status window
We then had a problem with guiding, there were inconsistent rates between the RA and DEC axis. This caused trailing of stars so we stopped the guiding, however the next image although still out of focus showed promise especially given we were not guiding.