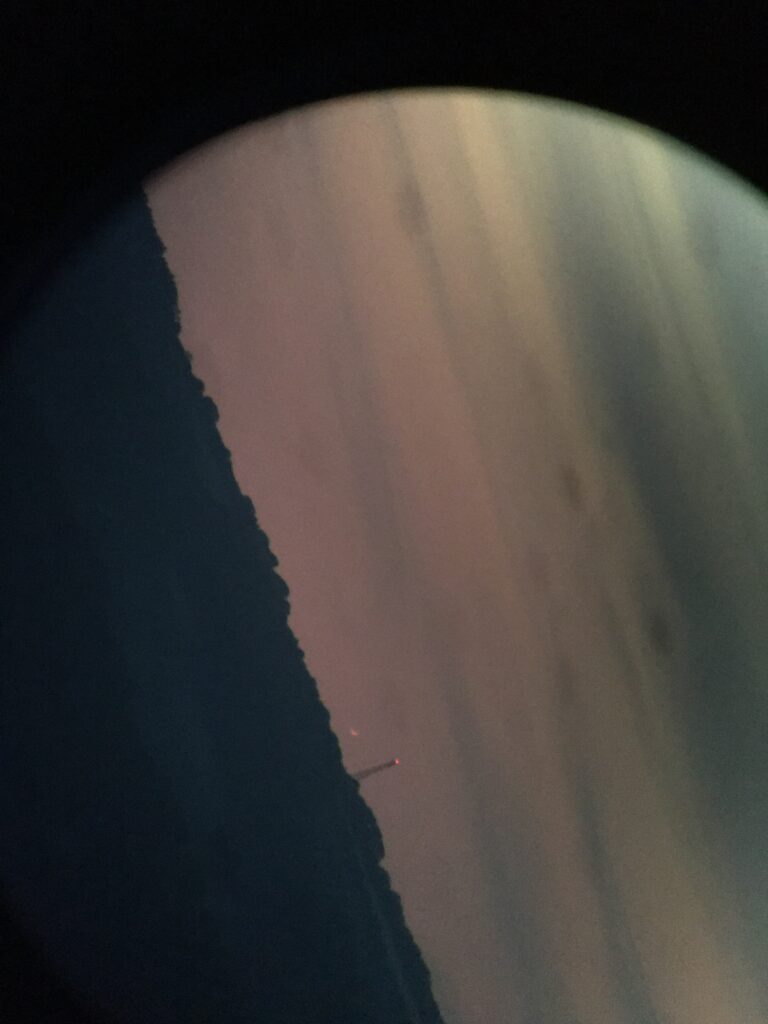
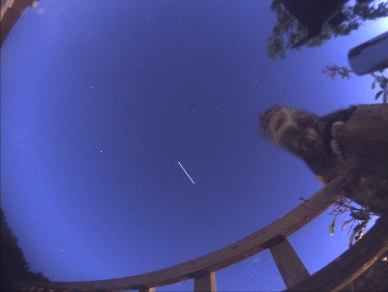
Just watched the ISS go over, first time for GingerGeek. Videoed it using the iPhone 8 and it came out great. Also have the lovely noise of an owl in the background.
ISS passes overhead
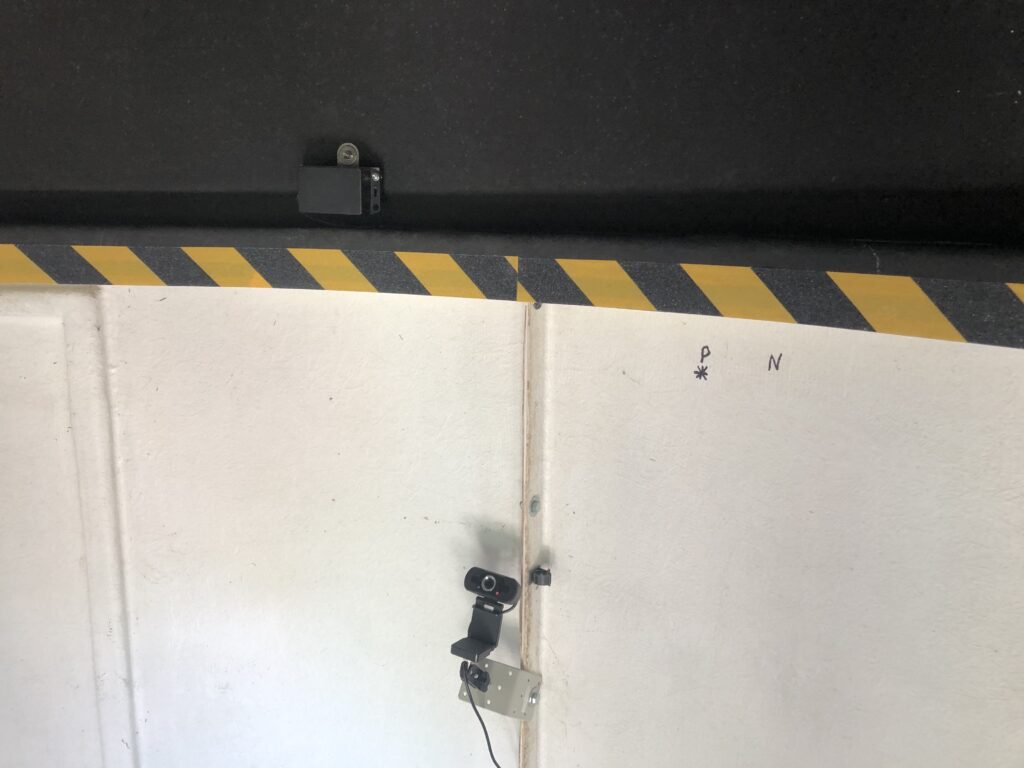
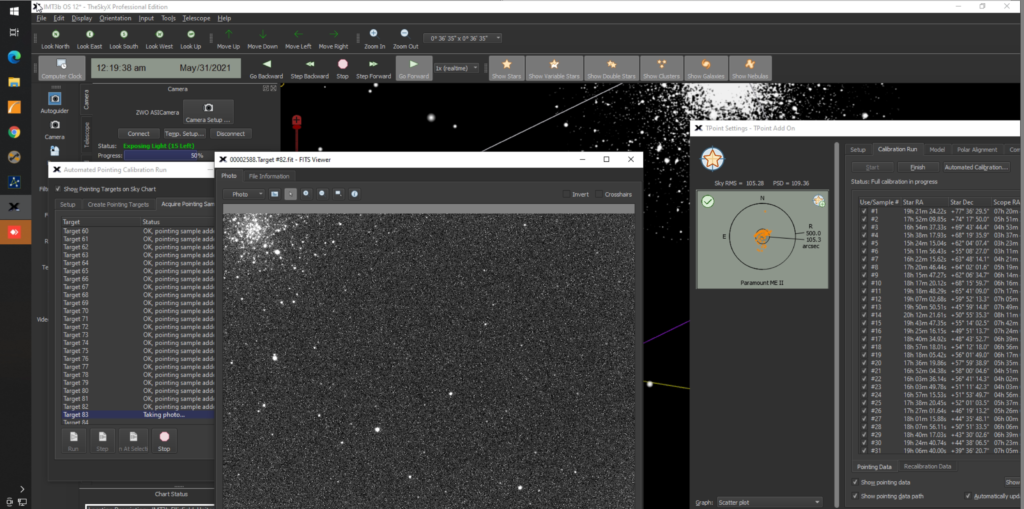
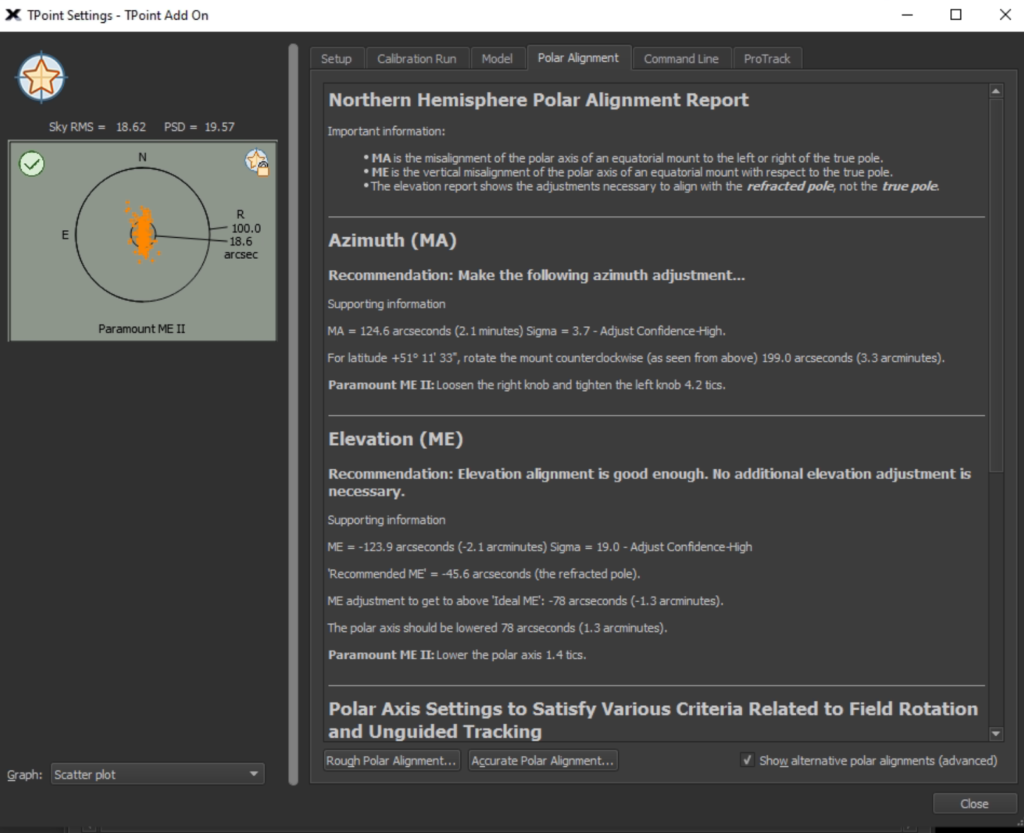
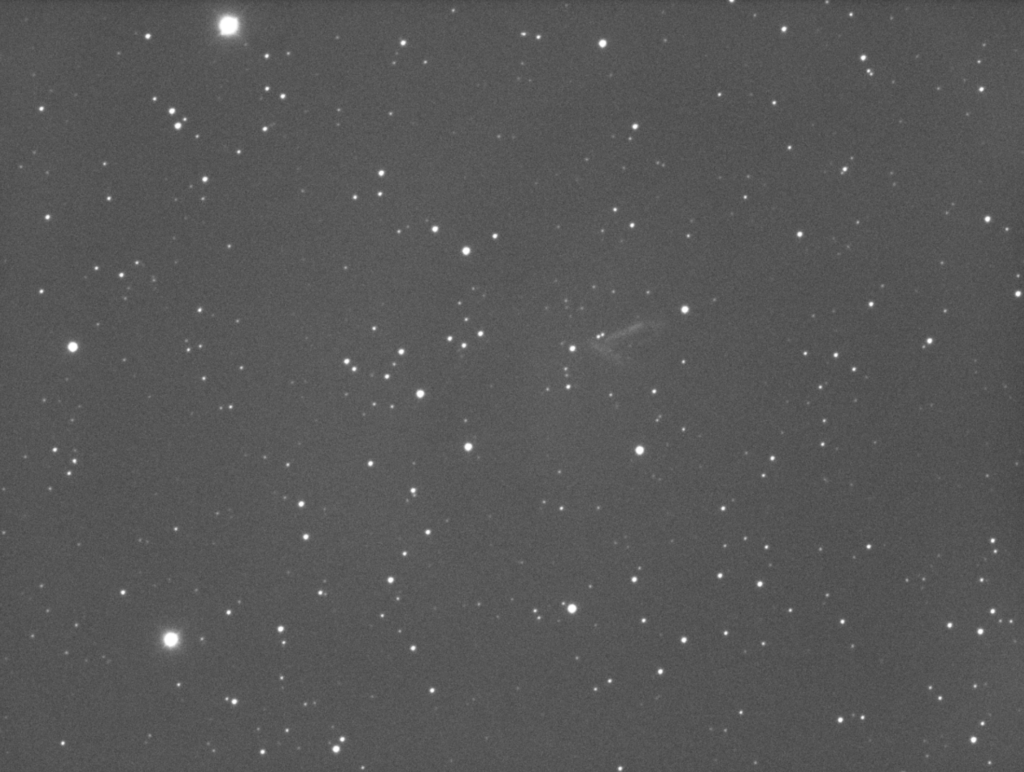
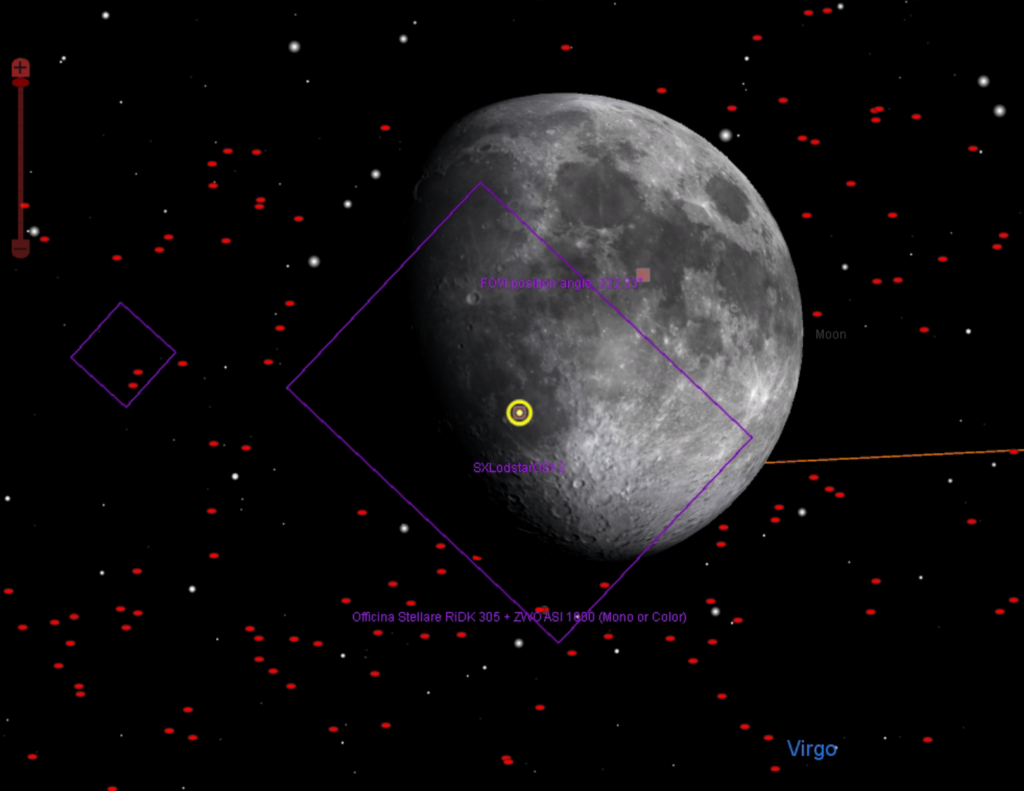
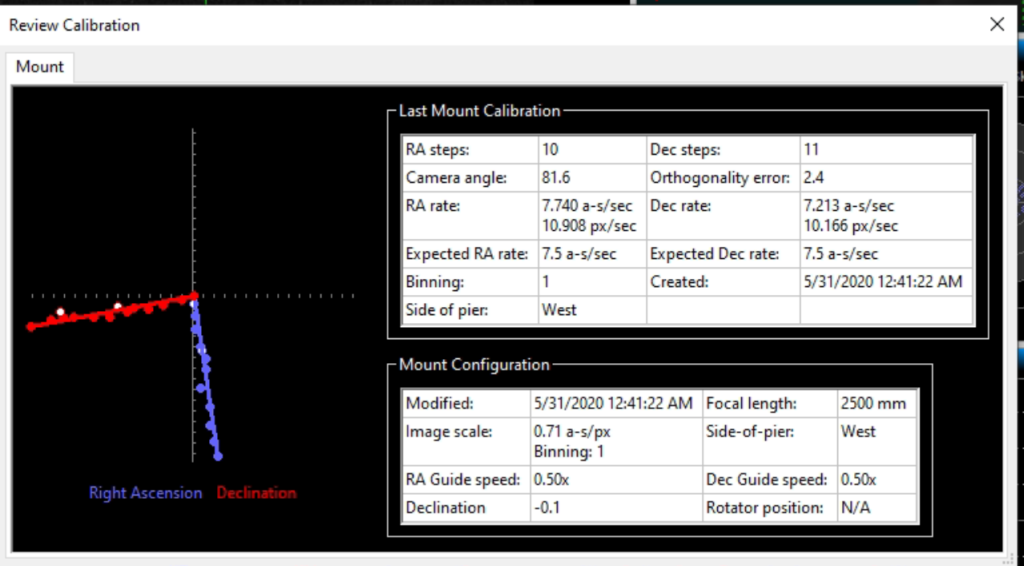
Started Tpoint at 11pm. Used 30 second exposures and image scale of 0.33 arc/pix. I am performing a 212 point Tpoint model.
Tpointing near a globular cluster
Well TPoint model complete, of course I forgot to initially do around 25 TPoints, adjust the polar alignment which is our in Azimuth by 2.1 arcmins and then rerun.
TPoint results
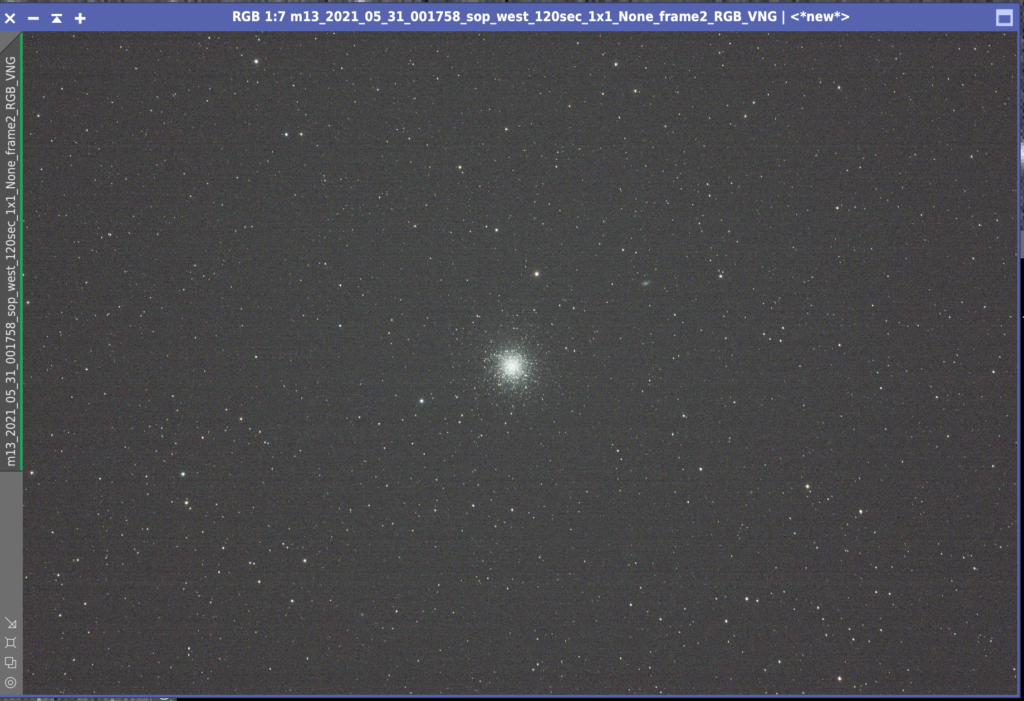
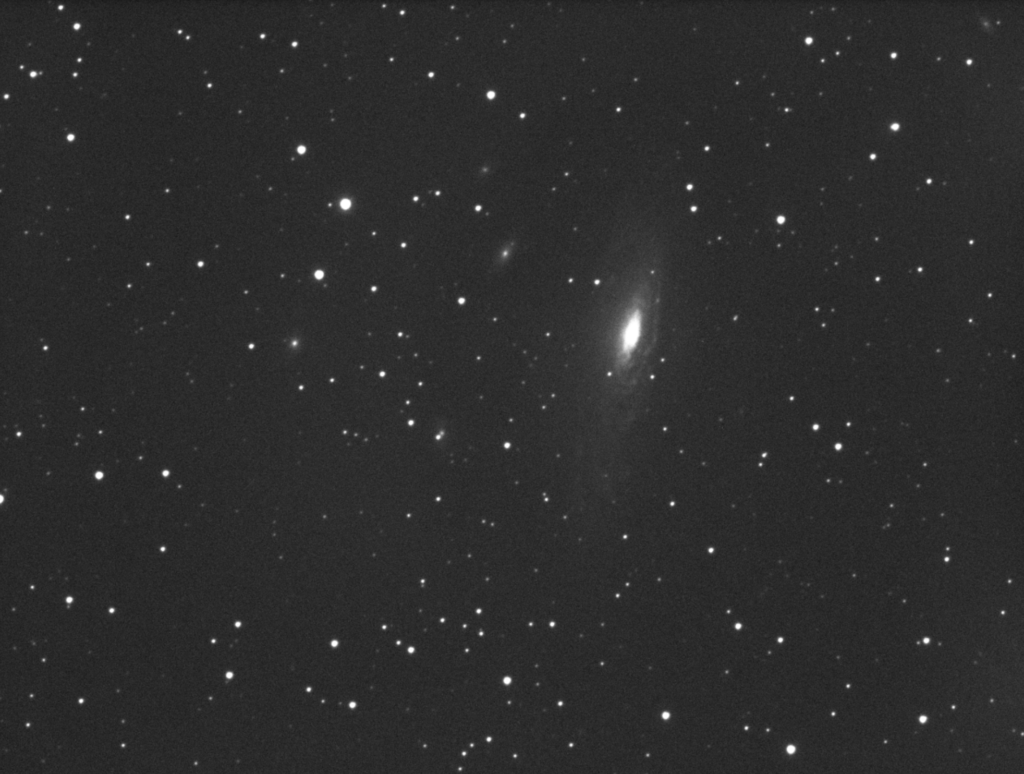
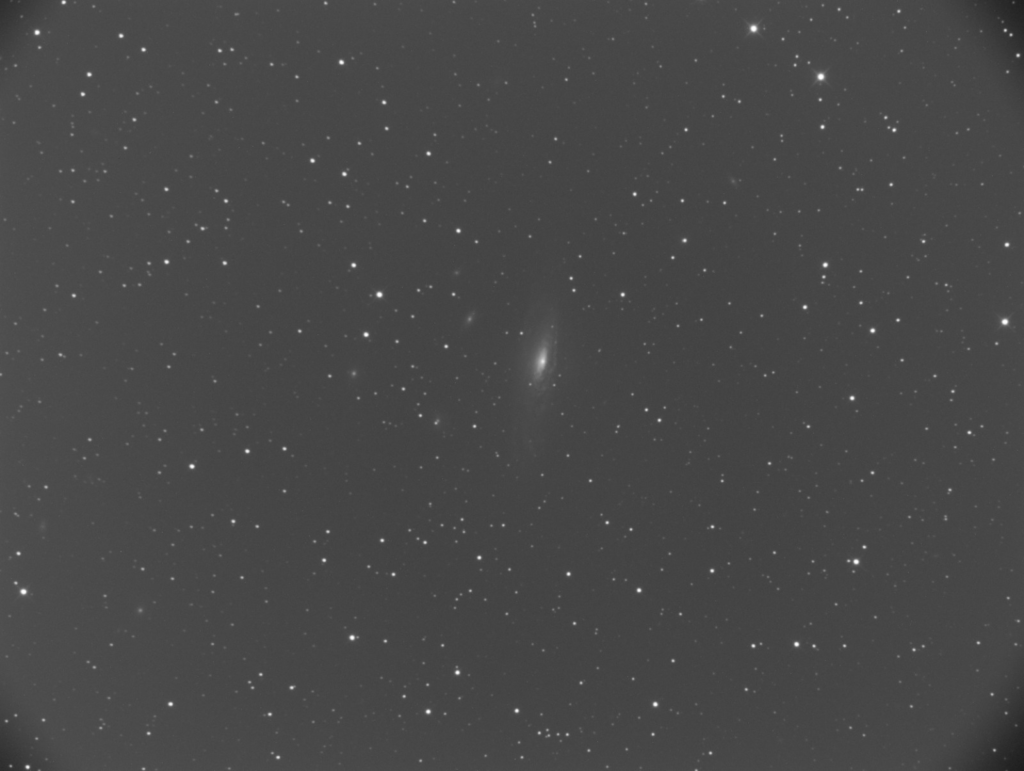
Meanwhile before we finished I ran one of GingerGeeks M13 images through PI as a single frame from his new camera.
M13 from GingerGeek (60 seconds, Mode0, Gain 0, Offset 30)
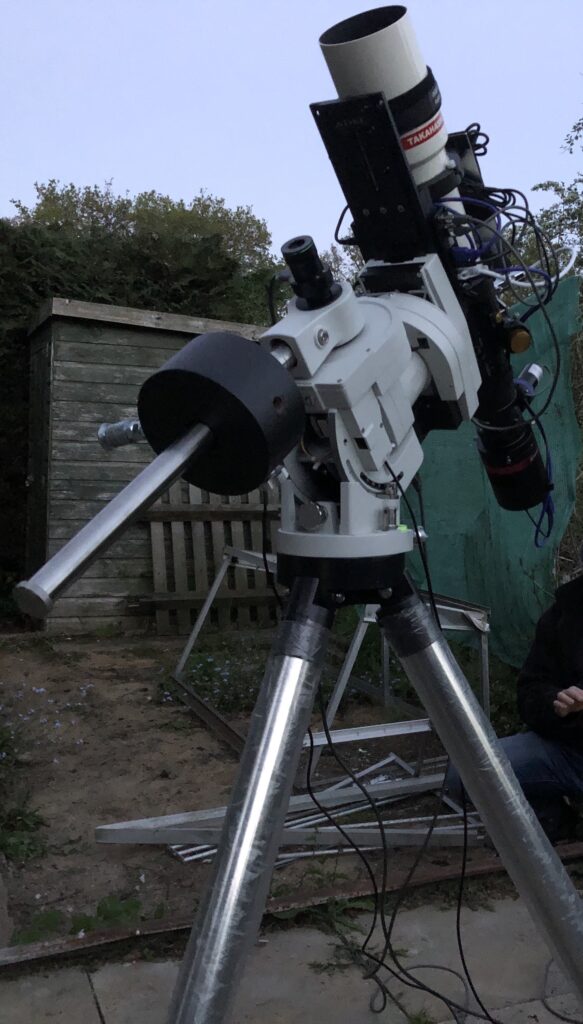
Another long pause between observations, after what seems like 3-4 weeks if not 1-2 months of storms, gales force winds and rain. However, tonight Bob came over and now that I have the new rotator installed with the new adapters I could use the 12″.
Ready for darkness
We setup under clear, warm and light skies. For the first time we put a couple of chairs and table down by the IMT3b. Bob helped setup the 6″ dob and the 100mm binos. We opened the dome and awaited darkness.
100mm Binos
I wanted to make sure that the rotator worked well, that the Field of View, FoV, worked within TSX and that I setup a small amount of Points on the scope. We also decided to see if we could visually see the Intellsat satellites and that I could track on them with the 12″.
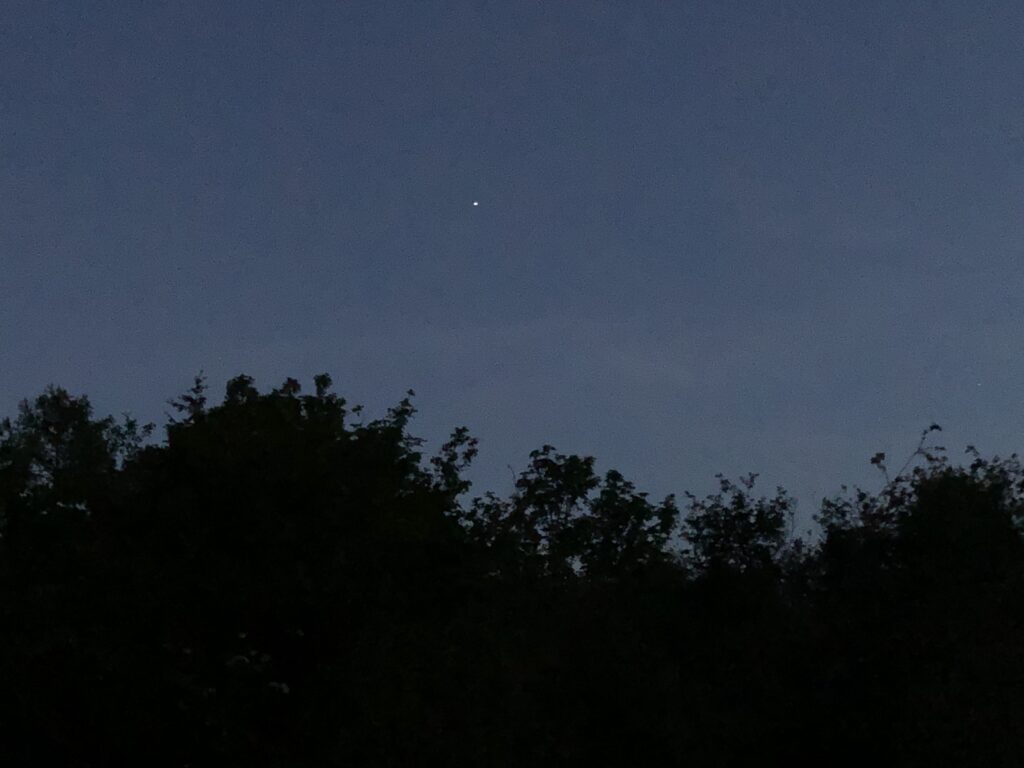
Whilst waiting for darkness, Bob found what looked like a planet rising in the East, however it turned out to be Vega. We noticed in the corner of the IMT area by the IMT shed that you could see not only Polaris, now the Sycamore had been removed, but also low in the East and thus Vega at +11° altitude.
Bob then spotted Polaris first! Amazing! I normally find stars first, especially Polaris. However given Bob was in my garden and unfamiliar with the his bearings it was astounding he found Polaris so quickly. Well done keen eyed Bob 🙂
Soon darkness fell and we pointed the binos and scopes towards Intelsat. It became apparent quickly that we were not going to be able to eyeball it due to not having a good enough understanding of the surrounding star field. Meanwhile on the 12″ we slewed and quickly found the satellites. We then use the rotator to move the FoV so that we could fit 4 satellites on the chip which was pretty cool.
Intelsat and Thor satellites
We then star hopped to M5 with the bins, then with the 6″ and finally with the 12″. The view through he 100mm binos was of course fantastic, fair superior to the 6″ dob. The image through the 12″ showed a dense star field.
I then set about collecting a half dozen Tpoints just to make sure that objects we in the FoV, however the first slew proved the polar alignment was good enough to do this. I produced a small TPoint model and stuck to that for now. I will need to go out later this week and perform a much longer automated TPoint. For that I need to fix the dome this is currently jamming.
We then sorted the rotator out, making sure the angle and FoV represented in TSX was correct. After changing the x and y values for the FoV indicator it worked perfectly.
About midnight we saw the best fireball ever cross in towards South East just below Arcturus. It was very orange and stunning.
After then slewing the 12″ to M81 to make sure the rotator reflected what we actually wanted to see, Bob and I called it a night. The Moon was due to rise shortly.
A good night for us and welcome after the rain and a harsh Covid-19 lockdown.
I’ve taken the plunge and dipped my toe into the CMOS world. Since I didn’t have any OSC experience I chatted with DSW (has a QHY186c) and decided on the QHY286C. This I purchased from Bern at ModernAstronomy who has always provided excellent service.
The issue with APS-C sensors when coupled with the Takahashi FSQ85 is that the edges start to show signs of star elongation, I already see this on my Atik460. This can be corrected with the FSQ-85 flattener (ordered from FirstLightOptics) which has the effect of slightly increasing the focal length but also reduces the back focus from the native 197.5mm to 56mm.
Effective Focal Length
455mm (f/5.4)
Image Circle Diameter
44mm
Metal Back Focus
56mm
FSQ-85 EDX with Flattener 1.01x
This means that I can’t use my existing Atik OAG->Atik EFW2 and Atik460 because it’s total distance is 59mm (22mm+24mm+13mm) so it’s out by 2mm even once you include the filter effect on the back focus. Note – This is also true for my Starlight Xpress configuration.
I do not understand why Atik could not have got to within the 55-56mm range by shaving off a mm here and there 🙁 I may need to replace all Atik gear when I convert to mono CMOS or replace the OAG with a guide scope.
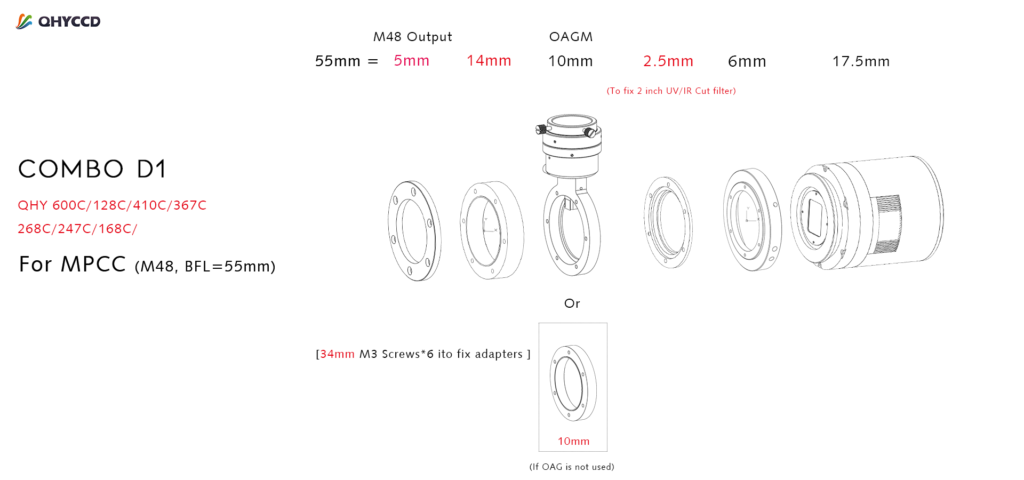
So onto the QHY268C, the OSC CMOS unfortunately has a CAA tilt adapter instead of a direct thread connection. This wastes 11mm of precious back focus giving a total distance of 23.5mm whereas the recently released QHY286M CMOS has a 12.5mm back focus !!!!
Also the QHY268C does not have an IR/UV cut filter in place so you need to buy an additional filter and holder and add that to the cost and factor in the adapter and distance needed …. I’m starting to regret this purchase more and more !
Source – QHYCCD.com
Back to the Takahashi Flattener (TKA37852), the back focus is 56.2mm but we add on the filter thickness as it changes the light path (2mm/3=0.66mm) so ~57mm (56.9mm), the imaging train is as follows :
Adapter
Distance (mm)
Accumulated Distance (mm)
Connector
OU031
2
2
M54(M) -> M54(M)
QHY 020770
4
6
M54(F)
QHY Spacers
14.4
20.4
screw
QHY OAG-M
10
30.4
screw
QHY 020055
2.5
32.9
screw
inc filter
0.6
33.5
–
QHY CAA adapter
6
39.5
screw
QHY268C CMOS
17.5
57
screw
FSQ85 Flattener to QHY268C imaging train
The combined weight is 1365g so I may need to adjust the balance of the scope a little as it heavier than my Atik460/EFW2/OAG setup at 1080g.
Completed – Imaging train ready for first light
I may have to adjust the spacers a little but I won’t know until I have received a 2-inch Optolong L-Pro light pollution filter which is currently on back order from FLO.
Transmission chart for Optolong L-Pro
QHY268M
The recently released mono version of the QHY268 looks like it has a proper screw face plate with a more acceptable back focus of 12.5mm. This is more reasonable and would allow me to couple a filter wheel and OAG as well not requiring a IR/UV cut filter.
Like SyedT on StarGazersLounge I could go back to using a guide scope and ditch the OAG and then the imaging train could incorporate a rotator :
I was thinking of a rotator for the remote Esprit120 which has a generous back focus of 76mm so I should have no problems there but that will be another adventure for the future !
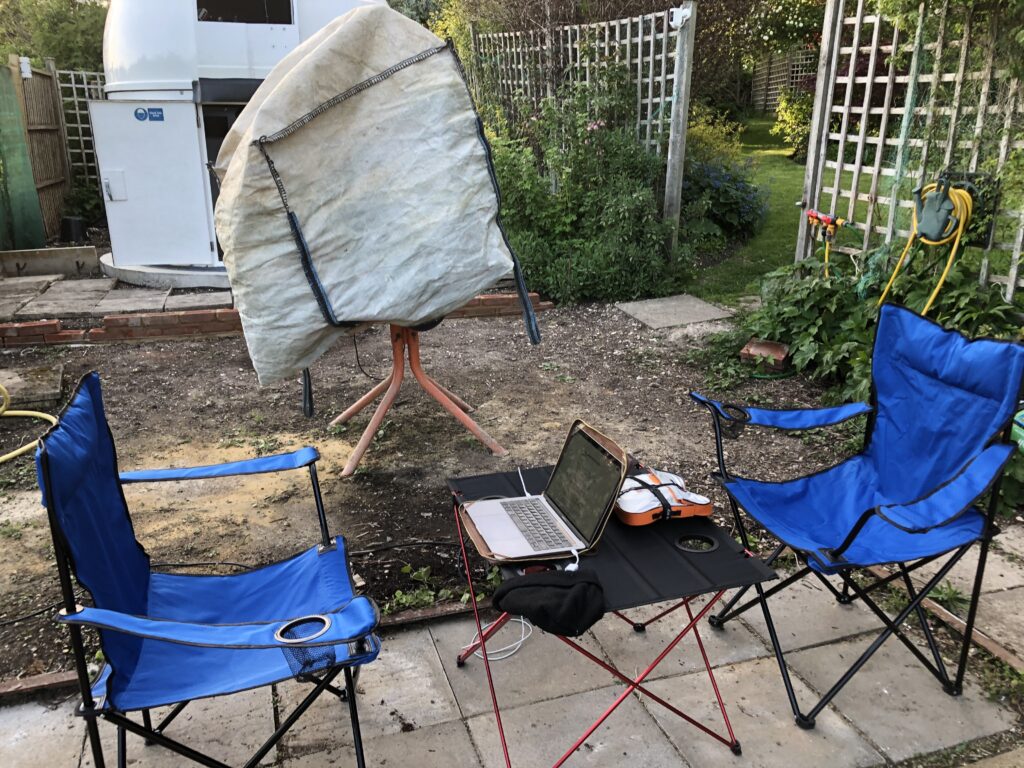
So whilst Dave was in his garden using the binoculars and failing down holes in the process I was setting up to relearn how to take images ….. it’s been that long and the weather hasn’t helped.
So all was going well except that the Moon was bright and right near the winter nebulas. Even how bright the moon was I decided to use the time and practice using the Monkey Head Nebula as my target.
The tripod was levelled and the iOptron CEM60 polar aligned, the scope was balanced, the Atik460 CCD was cooled (-25℃), OpenPHD calibrated, the plate solver completed and the successfully sync’d and . The first step was to autofocus on a decent bright set of stars before the imaging run.
That was when the night was over ! SGPro set about running it’s autofocus but strange things were happening. SGPro was reporting that the LakeSide Astro focuser position was changing but the star HFR profile was not changing and the V curve remained flat. Since the focuser position was “changing” I did not think to go out into the garden with a red torch for an hour.
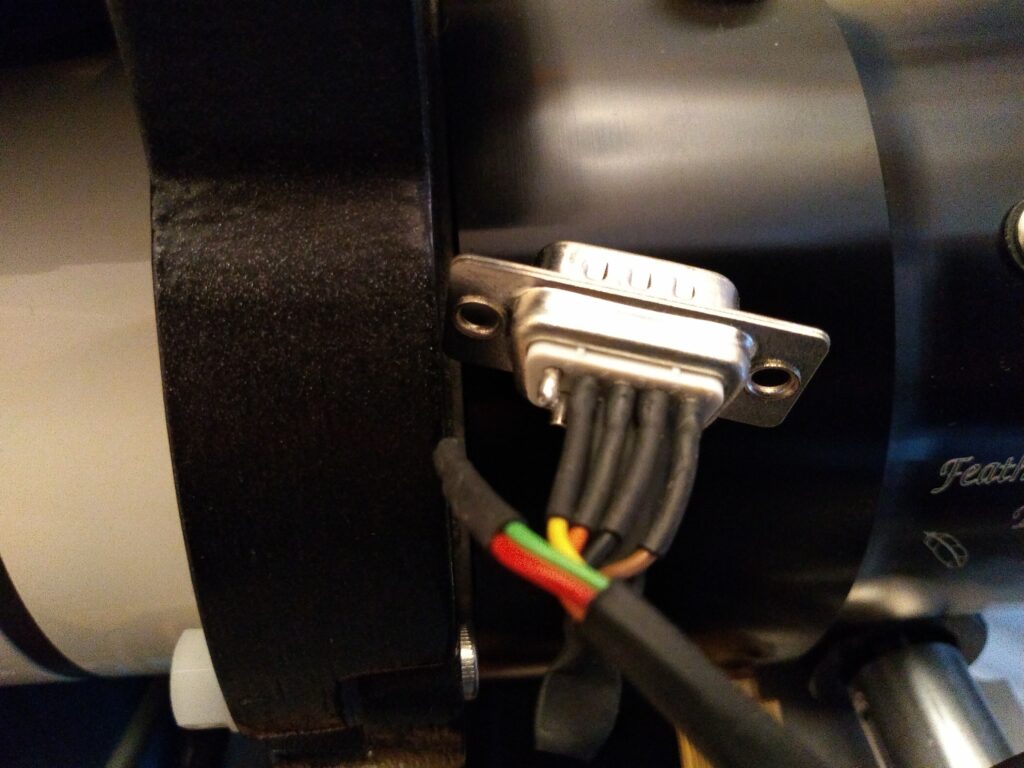
Upon inspection it was fairly obvious why it wasn’t working and inside the issue was proved to be a disconnected wire on the motor port.
Hmm …. I wonder what the issue could be !
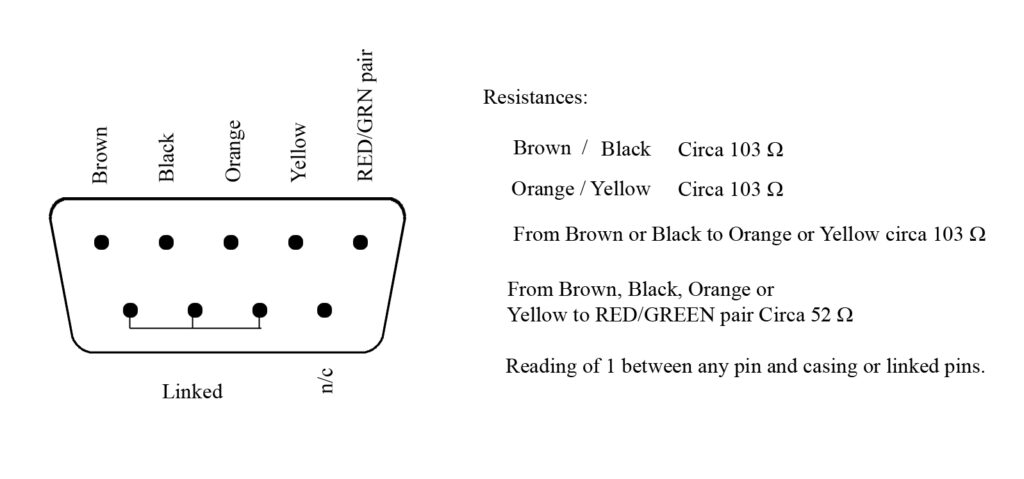
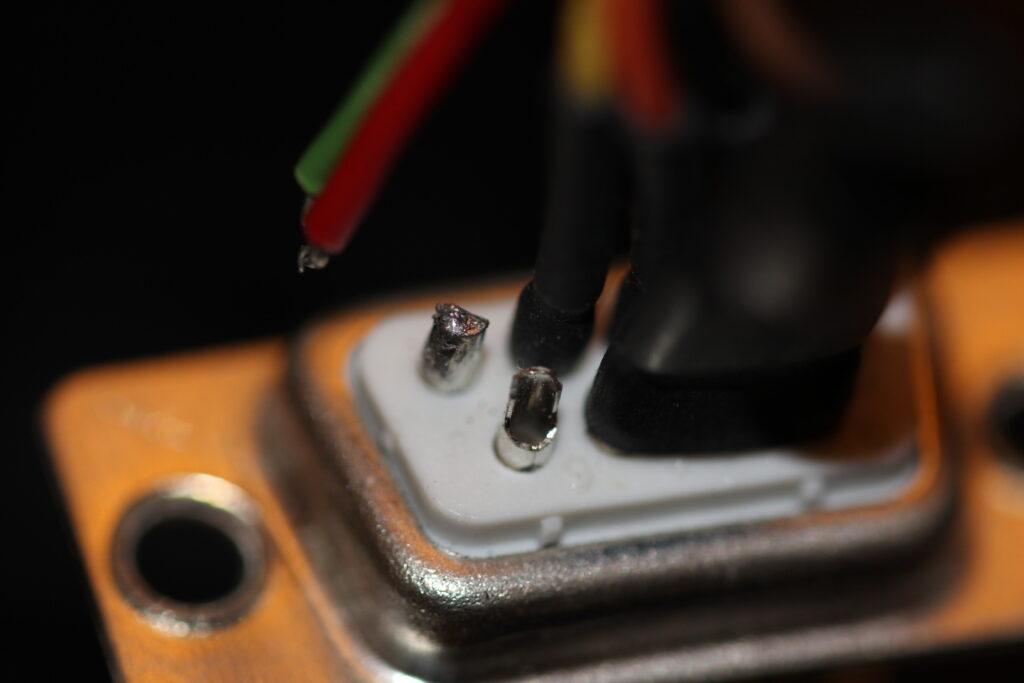
I thought it would be prudent to double check which of the two spare connectors the wire came from and indeed it is the top one.
Removing the heat shrink outer and you can see that there is barely any wire left since the majority of it was left in the solder when it broke off. This will require a wire extension and the old solder with the remains of the wire removed first before new solder being reapplied.
View of full cup connector with solder and empty cup connector
So since I’m really bad at soldering and I was worried about having to replace the whole unit (£90) I asked a friend who is fairly handy at this to perform the fix for me.
So during the ongoing Human Malware situation we have been concentrating on imaging asteroids, comets and more recently performing exoplanet measurements on the 12inch RC than long exposure deep sky astrophotography.
Astronomy is one those hobbies that is for most part is sole activity for the dark early hours of the morning and these days is usually done remotely. It was therefore disappointing that when one of the team went to use the Sky-Watcher Esprit 120ED for a night of astrophotography and found that he was unable to open the Optec Alnitak Flip-Flat. As the lockdown and travel restrictions progressed due to the initial wave of the human malware situation the issue was soon forgotten as we continued our focus to performing exoplanet observations on the 12inch RC for the ESA Ariel Mission.
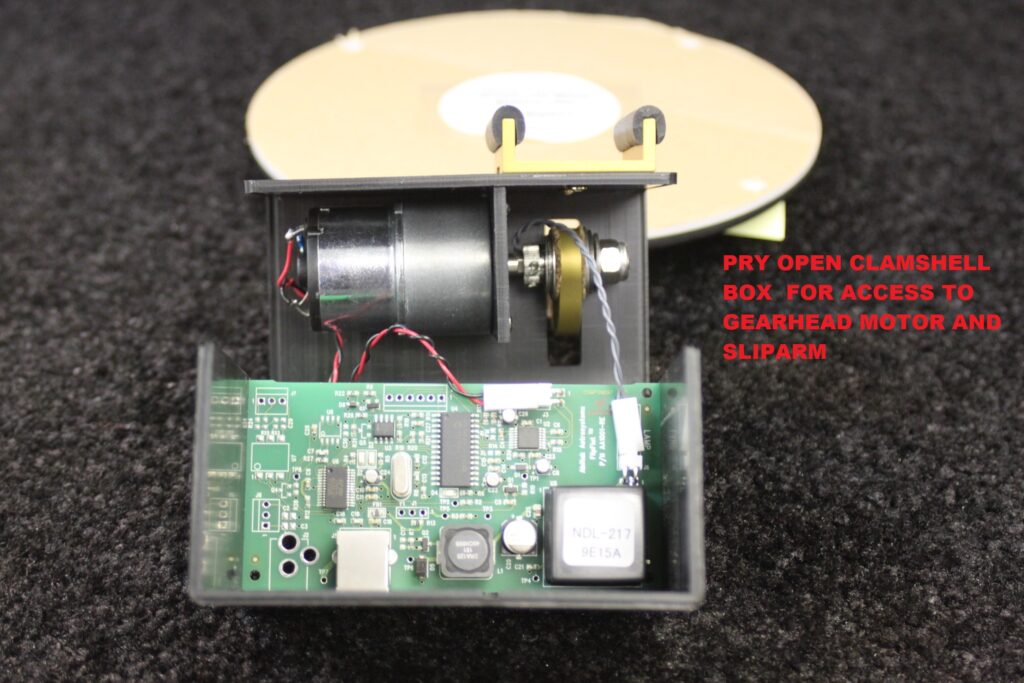
Now that IMT3 has been decommissioned ready for it to be reborn as IMT3b at it’s new rural darker sky site I decided to take the opportunity to retrieve the FlipFlat and diagnose the issue at home on my desk.
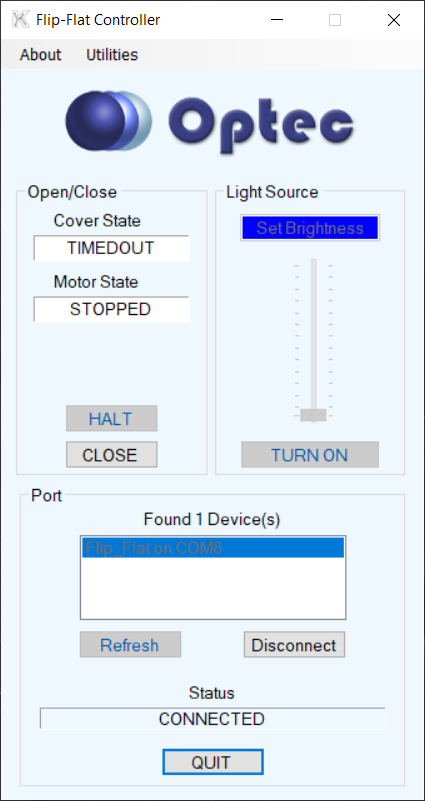
Using the Alnitak controller software, I could hear the motor running but it never seemed to complete the close or open. All it continued to display was the TIMEDOUT message as shown below.
Timing out !
I sent an email off to the vendor I purchased it from but after a month I got no reply. In the hope I would not be left with an expensive paperweight I reached out to Optec. After quite a few weeks of getting no reply I was pleasantly surprised to receive a message from Jeff Dickerman (President) of Optec. Jeff apologised for not responding earlier and offered to help resolving the issue. The error message seemed to be a known issue and it was generally an easy resolution which required taking the box apart. Jeff sent me instructions on how to take the unit apart and fix the problem.
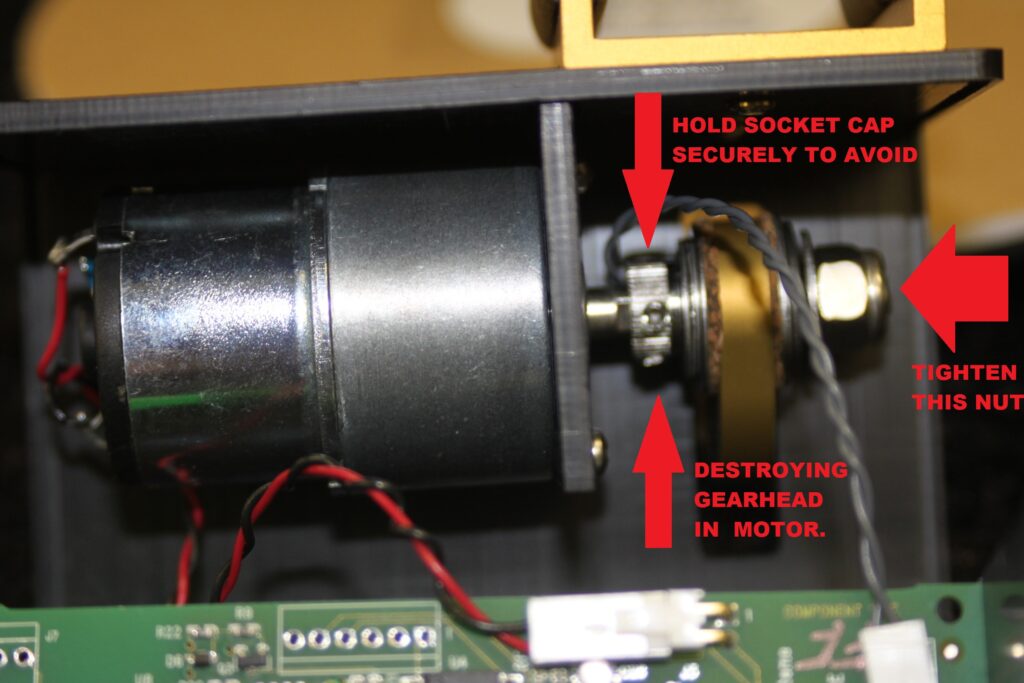
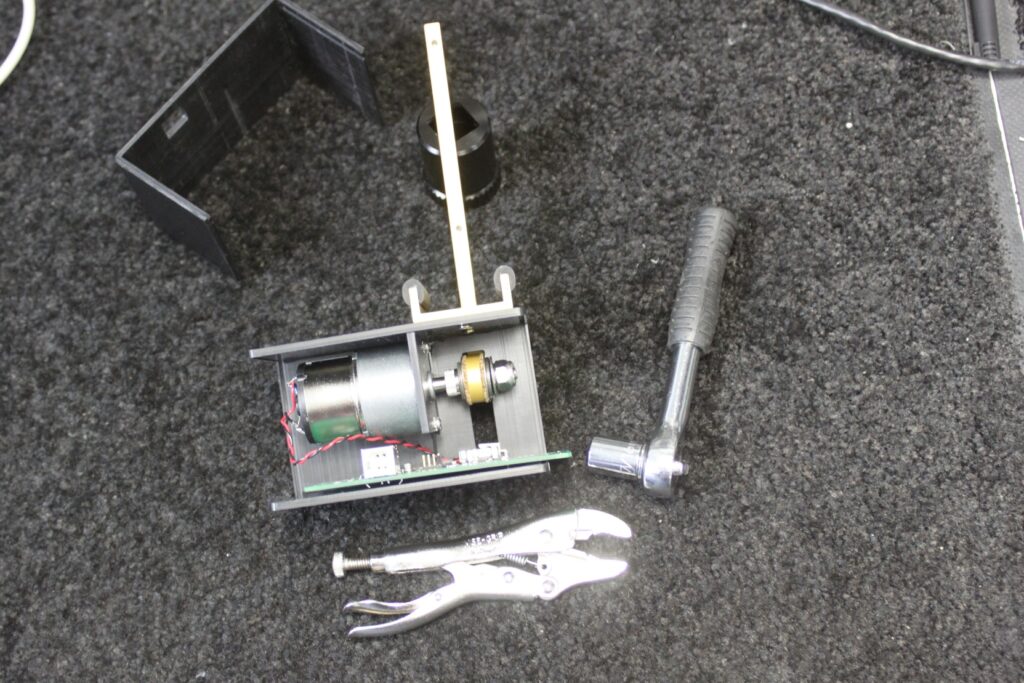
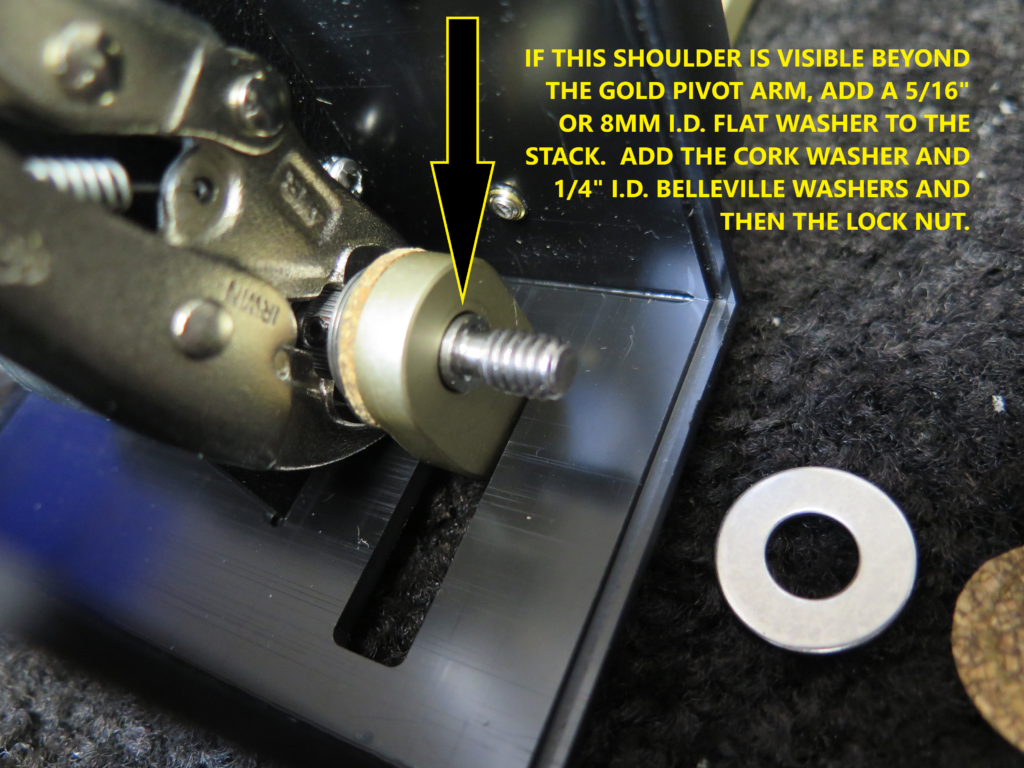
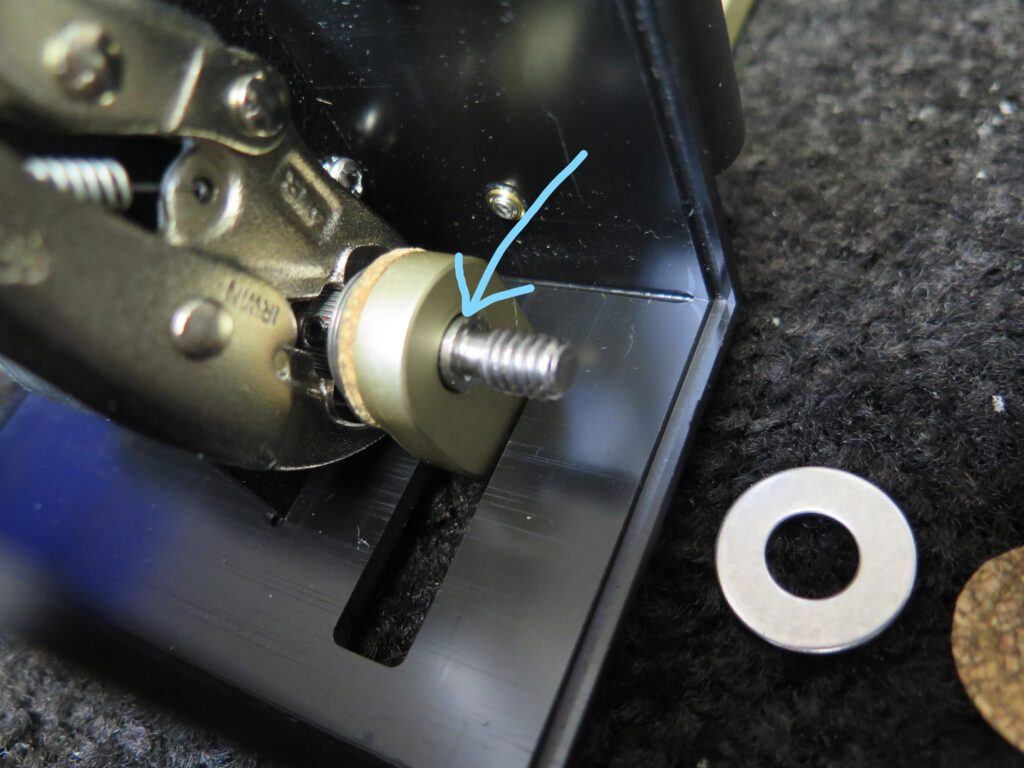
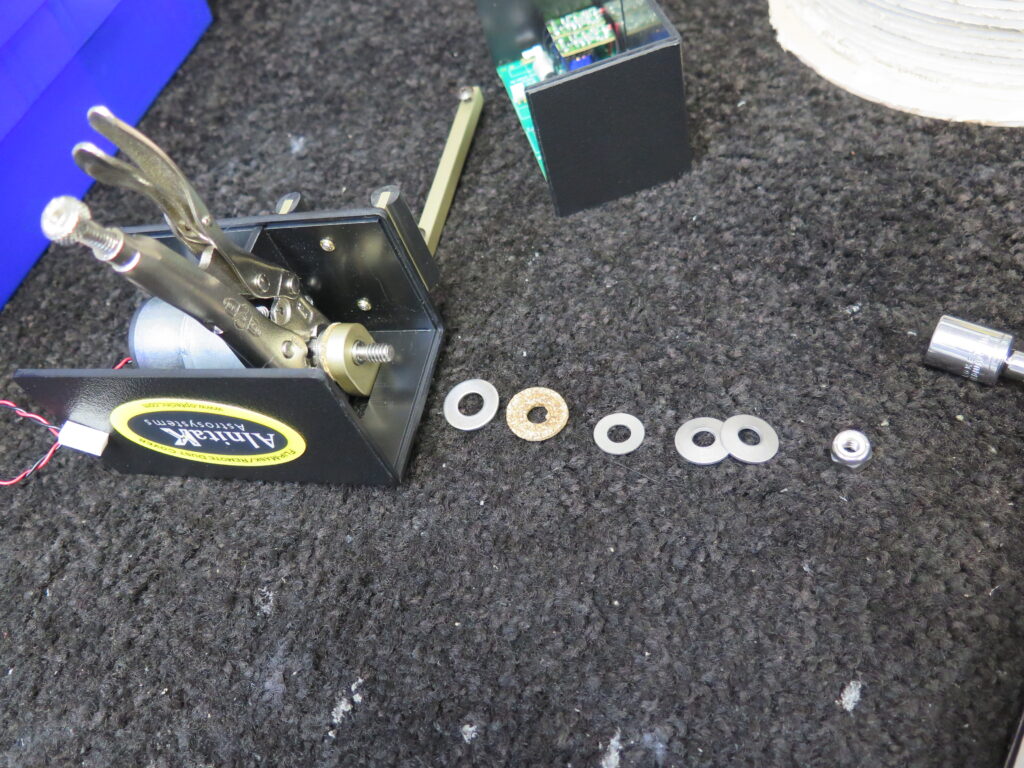
You’ll see the motor is attached to an internal wall with a modified shoulder screw and stack of Belleville washers. These spring washers are used to allow the arm to slip when someone grabs the lamp and physically tries to force the cover closed. Unfortunately they can also allow the arm to slip during an open or close operation which leads to that dreaded “TIMED OUT” message. Optec have redesigned the stack a bit to eliminate this issue going forward.
To correct, you might be able to adjust the washer stack by removing the lock nut and sliding off the washer stack to the pivot arm. Check carefully to see if the shoulder screw protrudes beyond the pivot arm. If so, rather than installing the cork washer next, install a 5/16” ID washer first to cover the exposed shoulder. Next add the cork washer and stack of Belleville washers. Finally screw the lock nut back in place and tighten while holding the shoulder screw near the motor (this is important to avoid breaking the internal motor gears).
Step 1 – Pry open clamshell
Step 2 – Shows what to secure
Step 3 – Tools needed
Step 4 –
Step 5 – Check shoulder visibility
Step 5a – Shoulder
Step 6 – Washer Stack
In the end I decided to courier the unit back to Optec for repair as I did not want to render my unit completely useless in case I made a mistake.
I’m extremely grateful to Jeff, Tina and the team at Optec for all there help, patience and understanding. I’m a very happy customer and the flip-flat will be rejoining the Esprit120 when the IMT relocation is complete at it’s new rural location. I can then do a Homer Simpson and annoy Dave with “Flap goes open, flap goes shut, flap goes open ……”
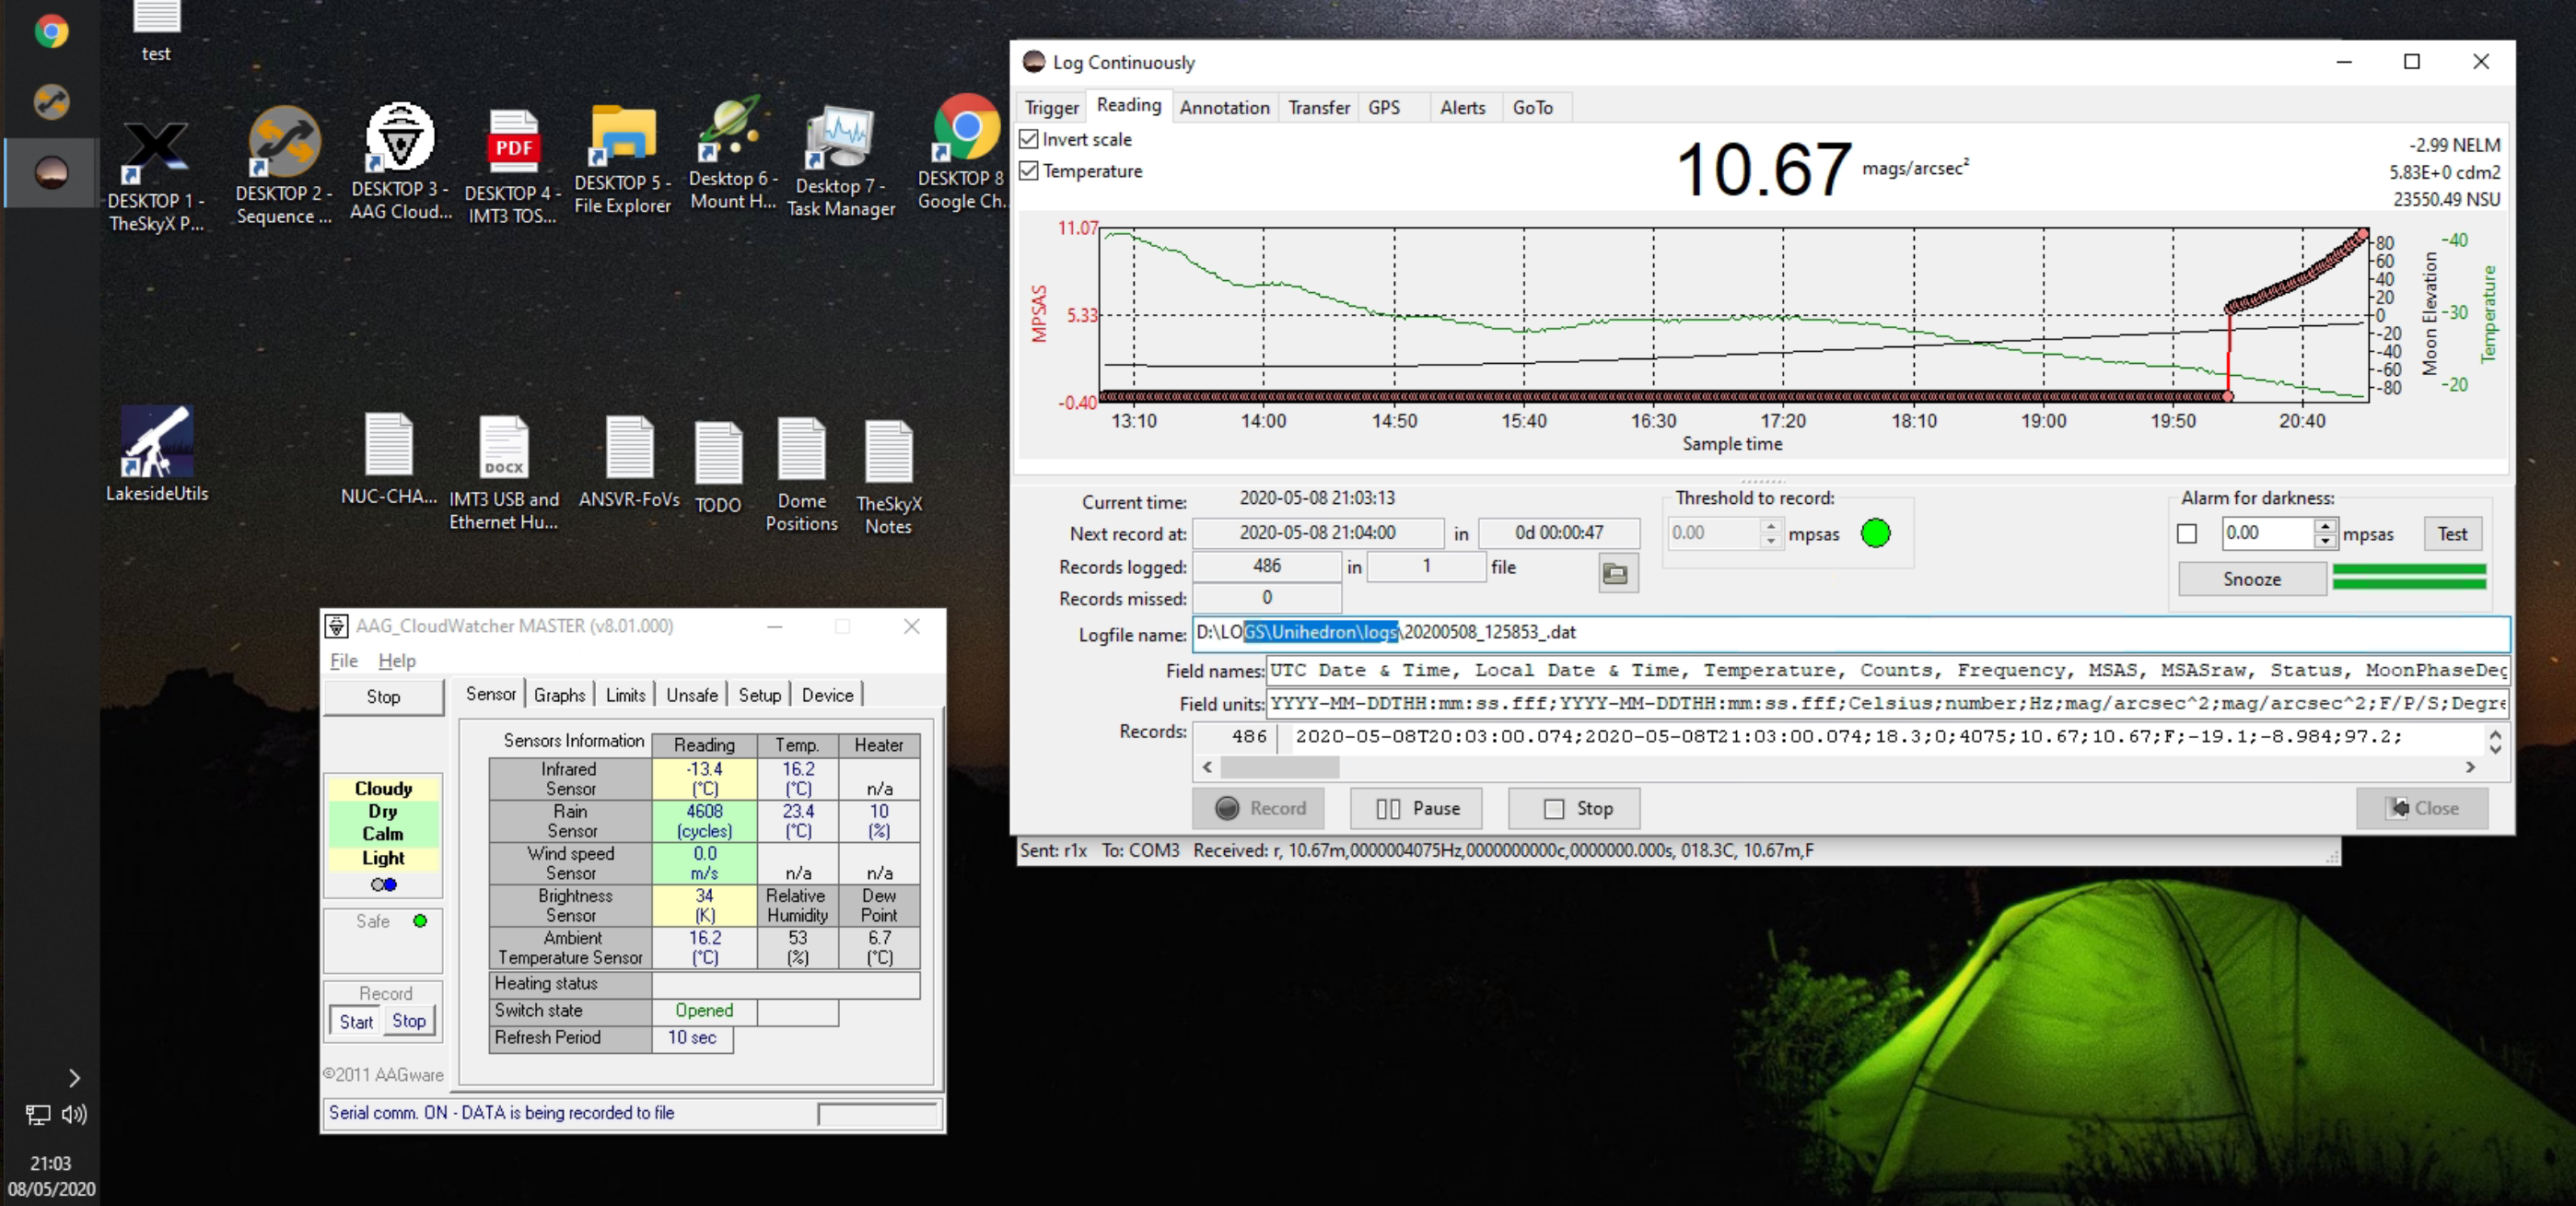
Session period 21:00 – 23:57, transit start ~21:16 and end ~00:05
Started with Lum autofocus at 21:17 but on changing to the Red filter the HFR rose to 8.5 so refocused on Red at 21:20, position 60789, HFR 3.97 at 21℃. The change in HFR was more likely the warm sky and seeing conditions.
Restarted imaging at 21:39 at new Gain 10 and Offset 10 with a 15 second exposure to get the exposure down well below the 65k max to around 35k. The target star is a magnitude +7.69 so the initial Gain 139 Offset 21 and even Gain 75 Offset 12 were too high even at 10 seconds exposure.
We started with no delay in between the exposures until the start of the transit, then decided due to the large amount of data (35GB) being collected we should put a delay in which we did of 60 seconds. In hindsight we should be placed a smaller delay period in 15-30 seconds to allow us to gather more data points for the transit period. We have emailed the ESA team to start a conversation on planning exposure/delay settings for transits.
We then finished was forced to finish before the projected transit was completed when the clouds rolled in, and took Dark, Bias and Flats frame at Gain 10, Offset 10 ready for the analysis software.
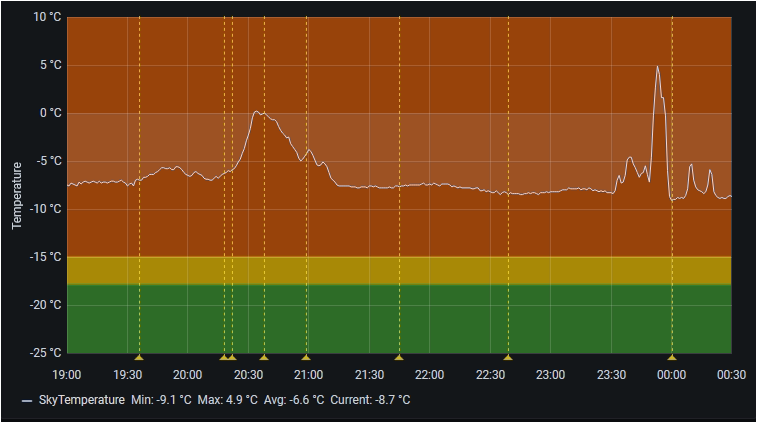
After reviewing the data and the monitoring graphs it is obvious that the less than desirable Sky Temperature showed it was not truly clear. Below is the effect of high haze and cloud passing across the sky during our observation session. It should be noted that we have not had sky with a reading <= -18℃ since mid July.
Not a truly clear sky during the transit
How much impact this has on the observation and measurements we will discuss with the Exoplanet team.
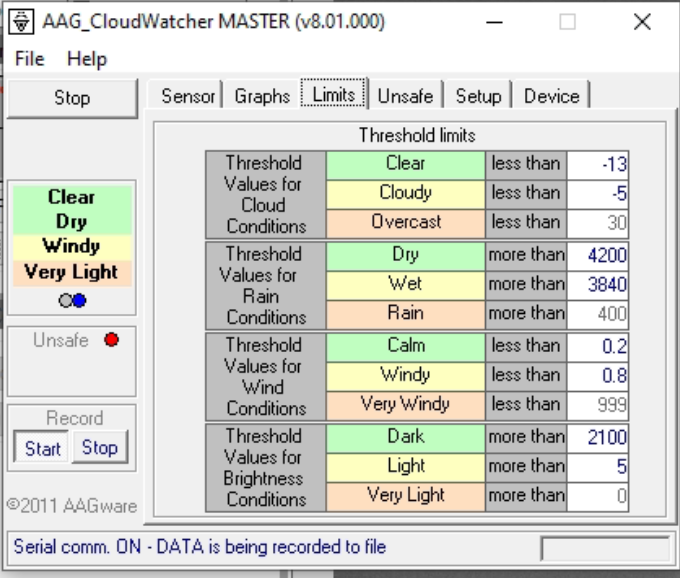
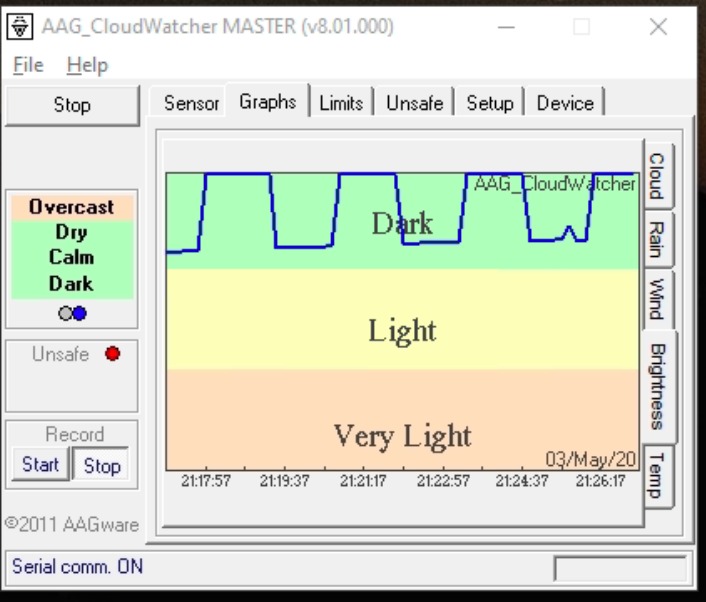
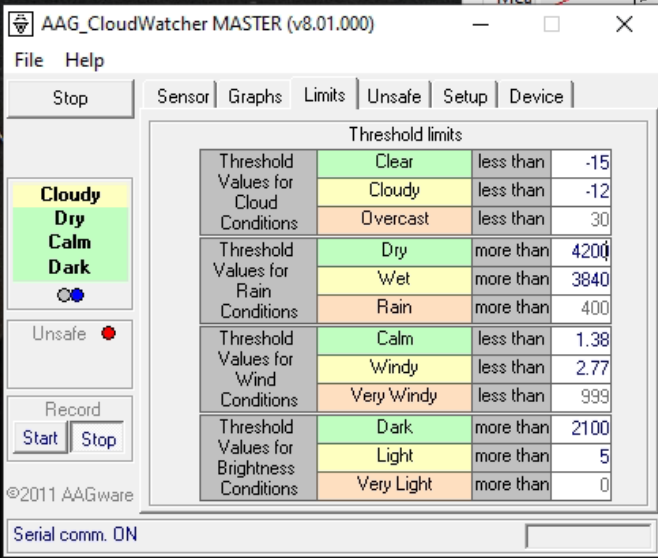
Tonight GingerGeek came over for a bit of social distancing friendly astronomy along with a bottle of Malbec wine. The idea was to calibrate the AAG, specifically when it goes from Very Bright to Light to Dark and at those points what the SQM value is along with the Sun’s position below the horizon. The AAG needs to get to 2100 which is dark, light is 5 and very light is 0.
The first time we noticed the values starting to change on the AAG brightness when it moved from its continuous reading throughout the day was at 21:47 when the Sun was -3.45 degrees below the horizon and the SQM was 10.15.
Within seconds the AAG read 9 and was already on Light vs Very Light and the Sun was now -3.54 degrees below the horizon and the SQM read 10.28.
It took almost half an hour for the AAG to get to dark. At 22:16 the AAG finally reached 2100, the SQM was at 13.97 and Sun was at -6.52 degrees below the horizon.
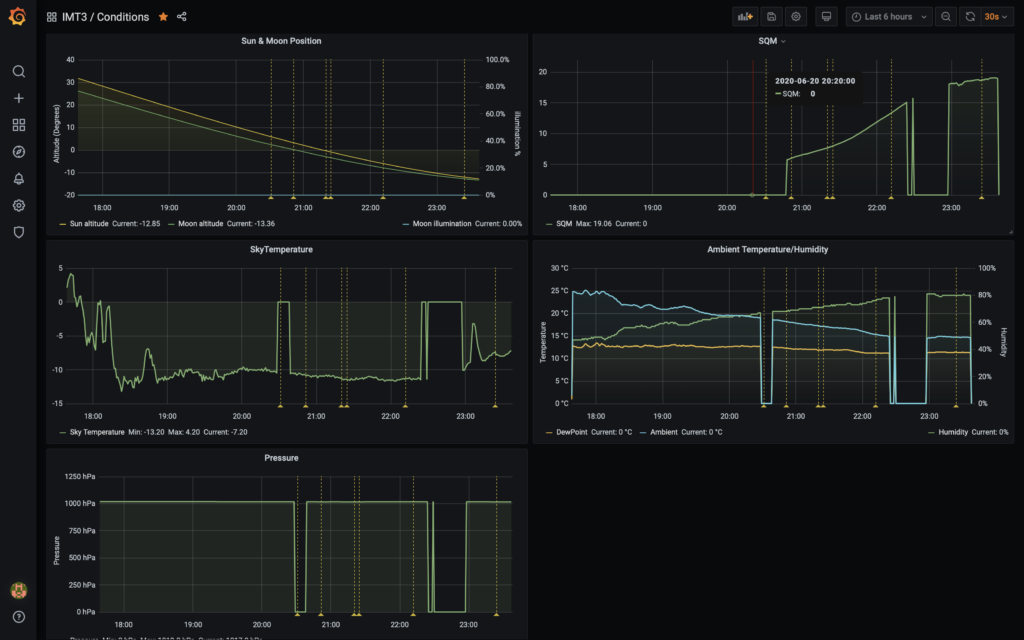
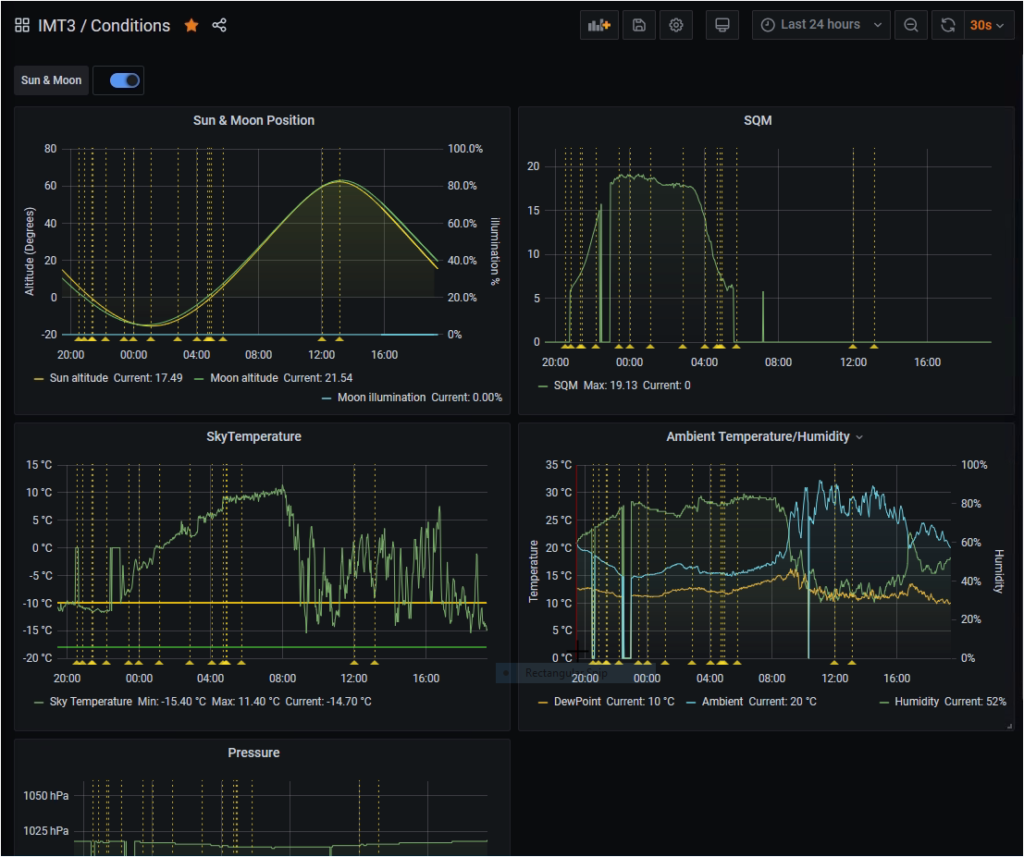
GingerGeek had also developed a new server for IMT3 to visualise some of the data from the observatory. The Grafana dashboard charts below show the data along with the Sun altitude.
New IMT3 Grafana dashboard
Looking at the last 24 hours shows the effect of the light nights on the SQM. The raised values after 4am went the value should be reducing or zero is the effect of a cat or bird covering the sensor. Also worthy of note is the sky temperature which shows the effect of cloud as the SkyTemperature increases. A truly clear sky would yield a value of -18℃ or better.
Shows the entire night
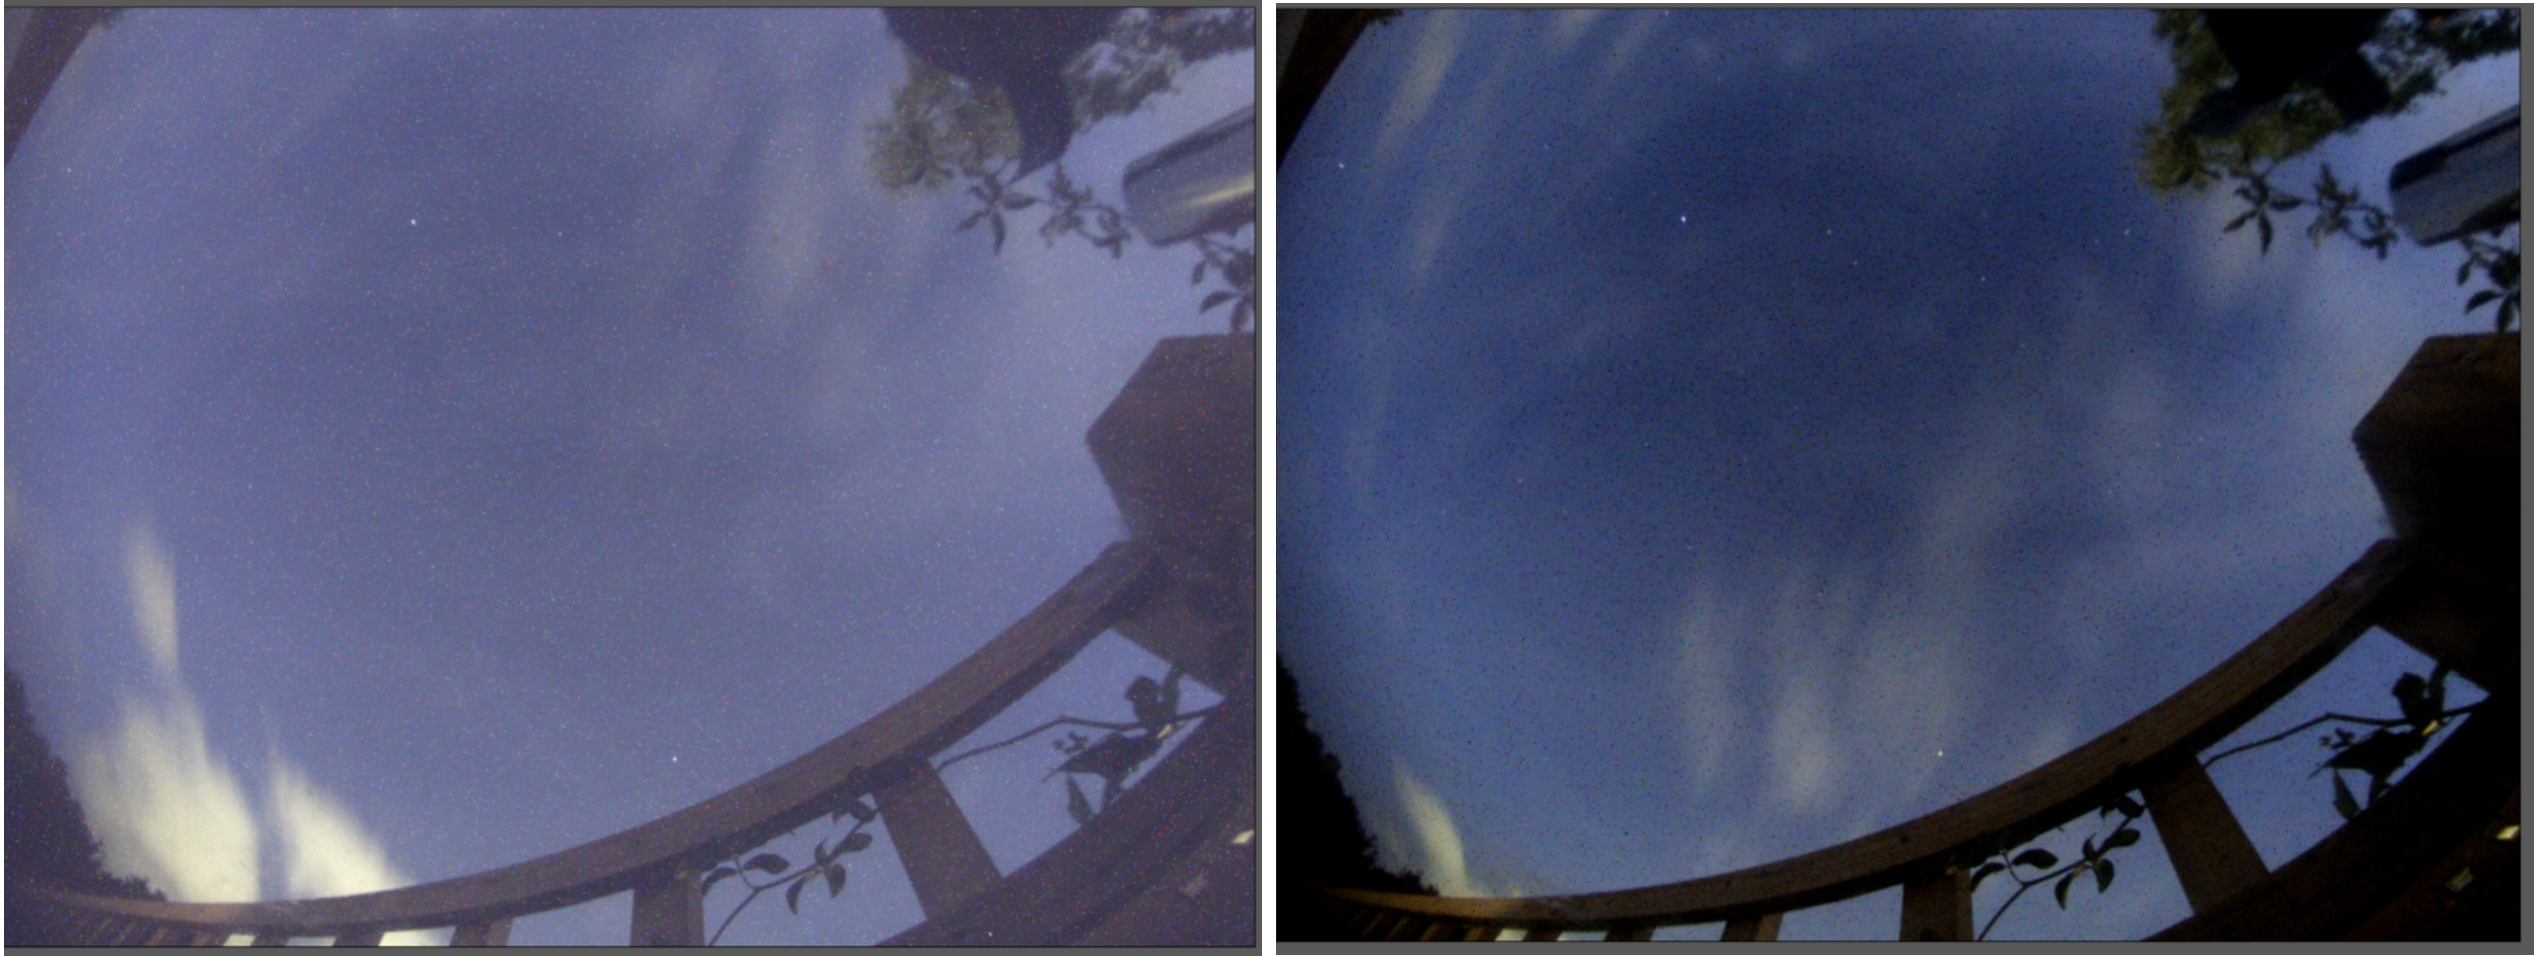
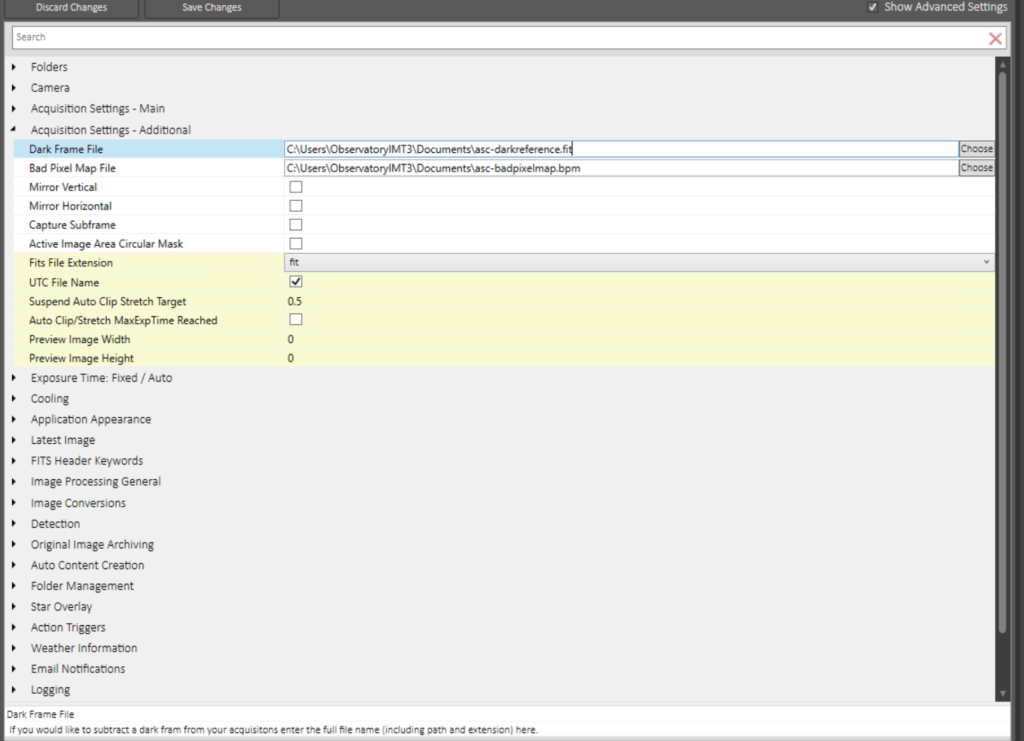
We also took darks on the ASC and applied them since we had never bothered to do it before. The shot below shows the before and after effect of applying the dark/bad pixel map. The whole image looks a lot cleaner and darker, although there seems to be some negative representation going on with dark pixels.
Before and after applying darks
The setting that needed to be changed in the ASC software took GingerGeek a while to find.
ASC Setting to apply darks
During the daytime the ASC looked awful but remote the darkframe reference file and just applying the badpixel map seem to be better. Tonight’s set of images will show if this is better or not.
The only other odd thing that happened tonight was the dome closed without the safety setting it off. Not sure why yet ……
So I opened the dome late this evening as it was not due to be clear. However an opening in the cloud meant I could test guiding again on the 12″, especially whilst it was light in the late Spring weeks.
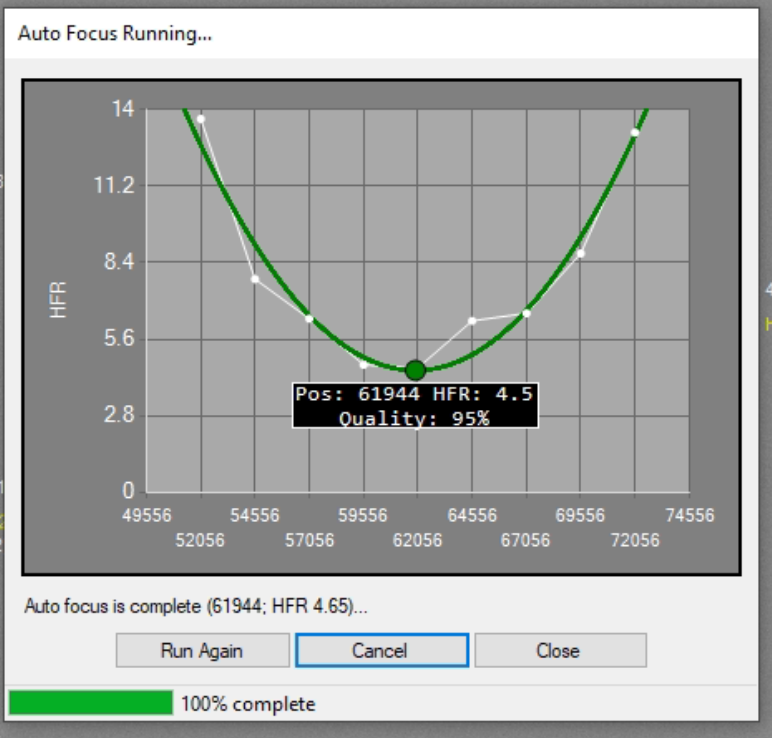
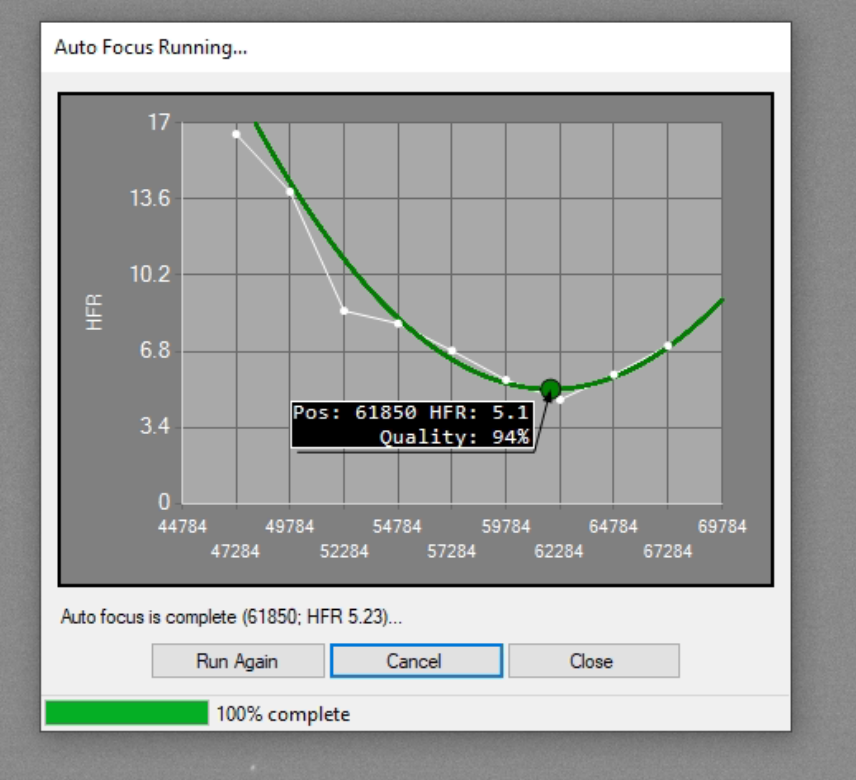
The first job was as always to focus which brought me to a reading of 61944 at 19.83℃.
Focus run
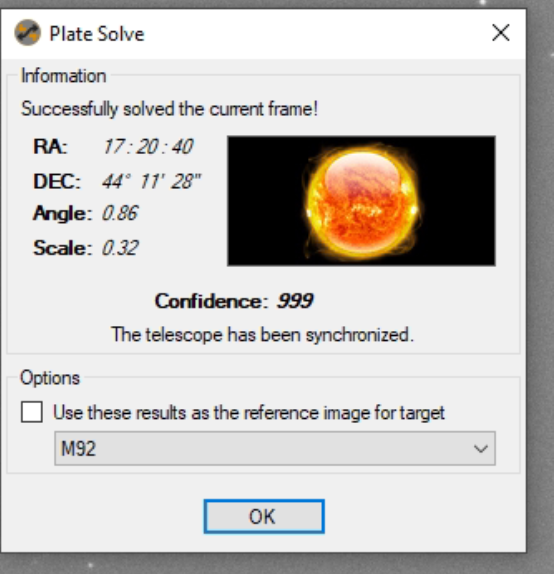
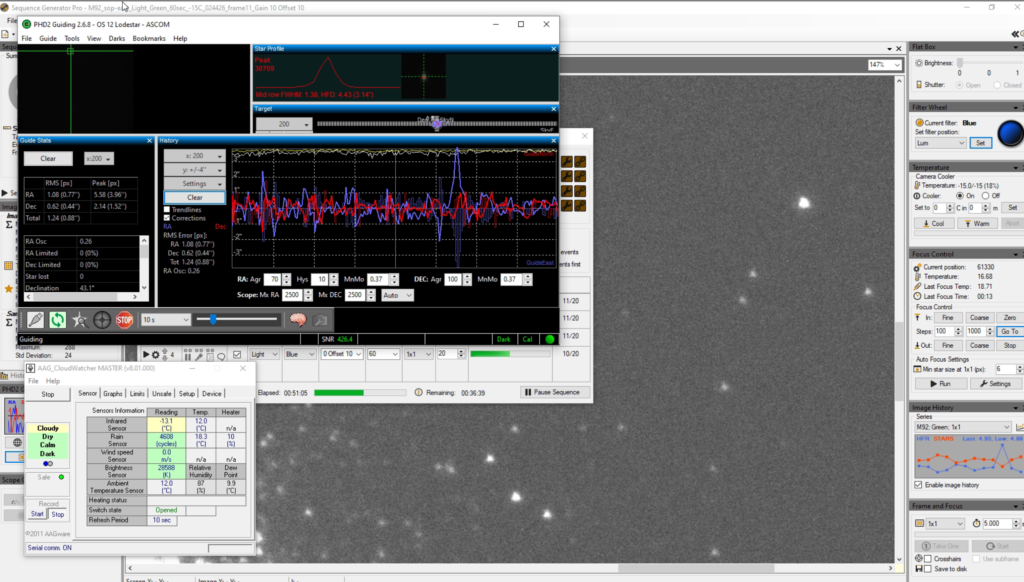
Another small job was to sort the guider FoV out. I went ahead and used M92 to align the guider.
Aligning guider FoV using M92
The final FoV settings are here for completness.
FoV for guider
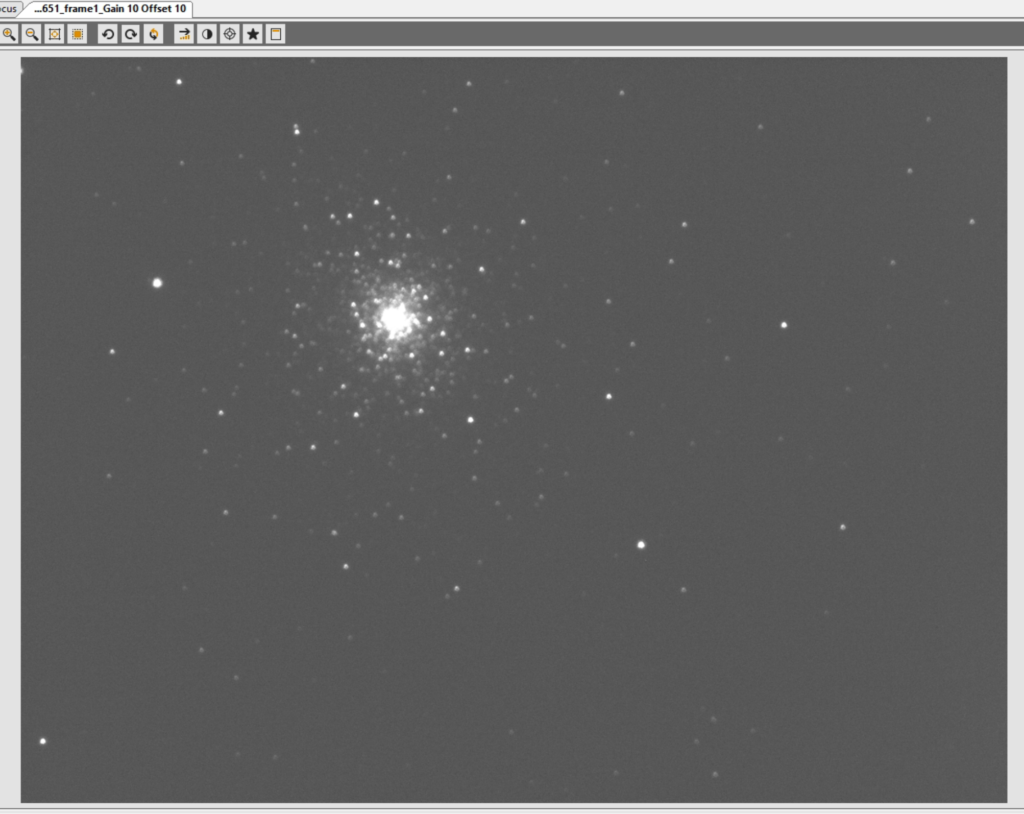
Set AS1600 to Gain and Offset 10 due to cluster being very bright and I needed to set a standard of 60 seconds minimum exposure. Gain 139 and Offset 21 gas saturated unless I selected 15 seconds, Gain 75 and Offset 12 saturated at 30 seconds so hence 10 and 10 which came in about 58k ADU.
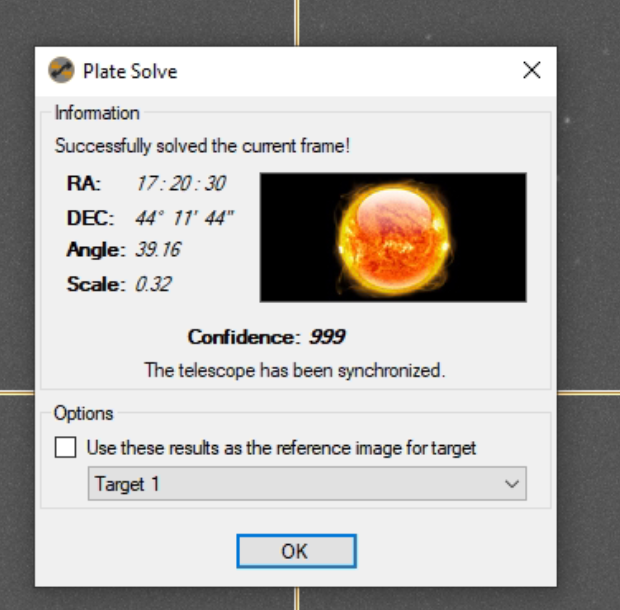
I then performed a slew to a nearby star so I could centre the scope, there platsolve completed successfully and I updated TSX and the FoV for the 12″ with the new angle.
Platesolve
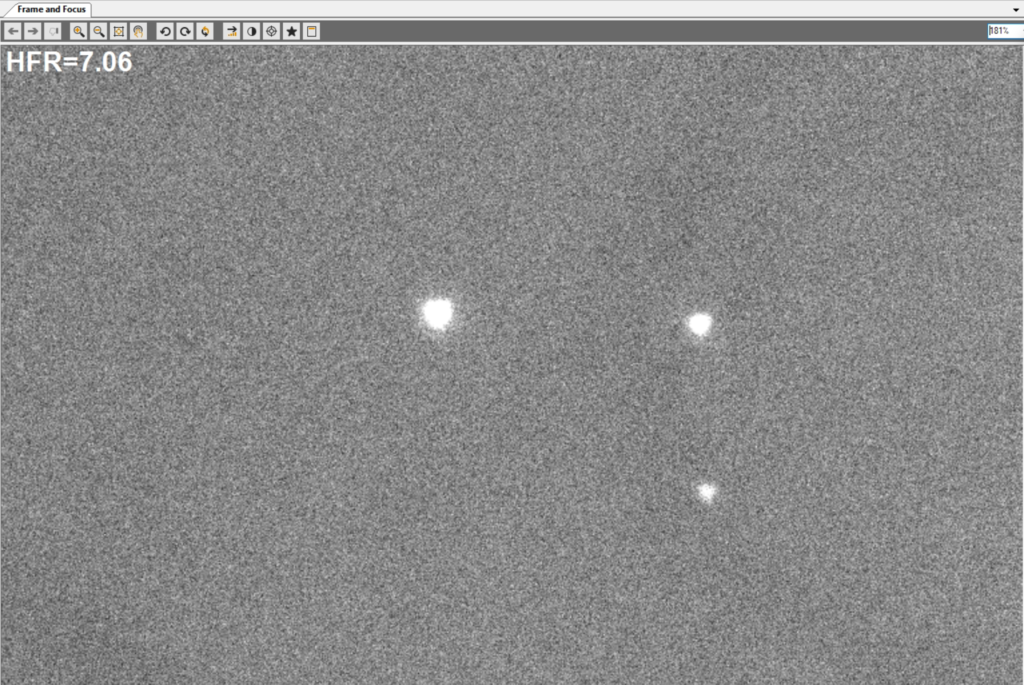
The first image of 60 seconds came down and was out of focus, I then realised changing the profile SGPro forgot the autofocus setting, so I had to stop the run, delete the images and set the original focus point then rerun.
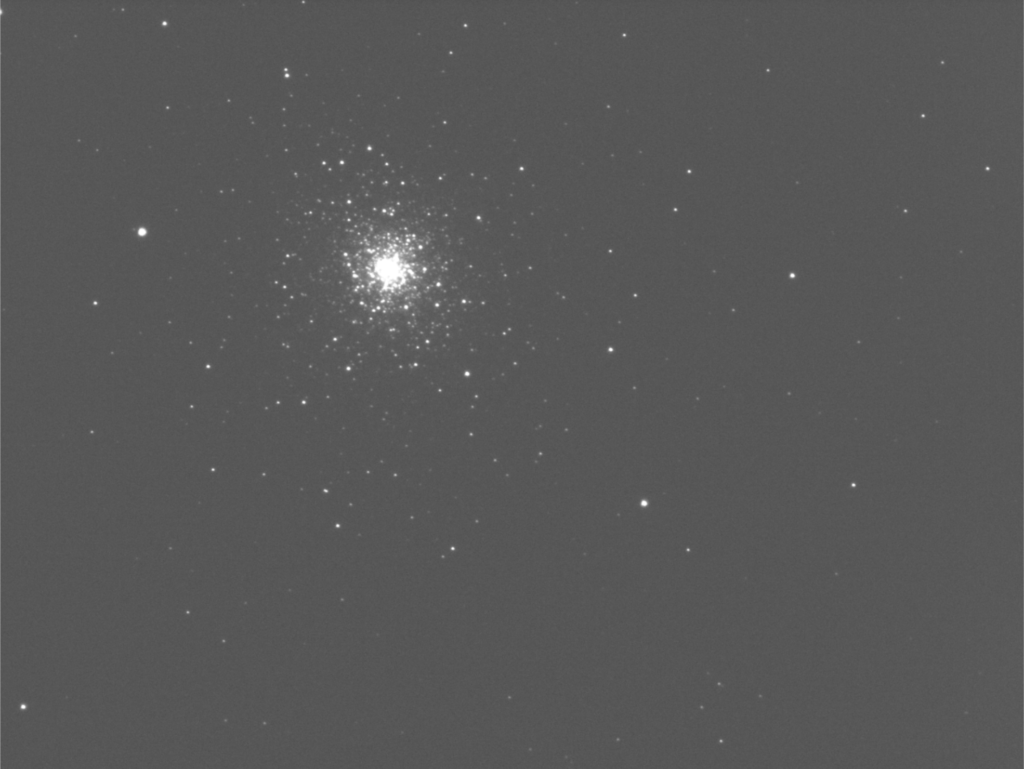
M92 out of focusM92 in focus
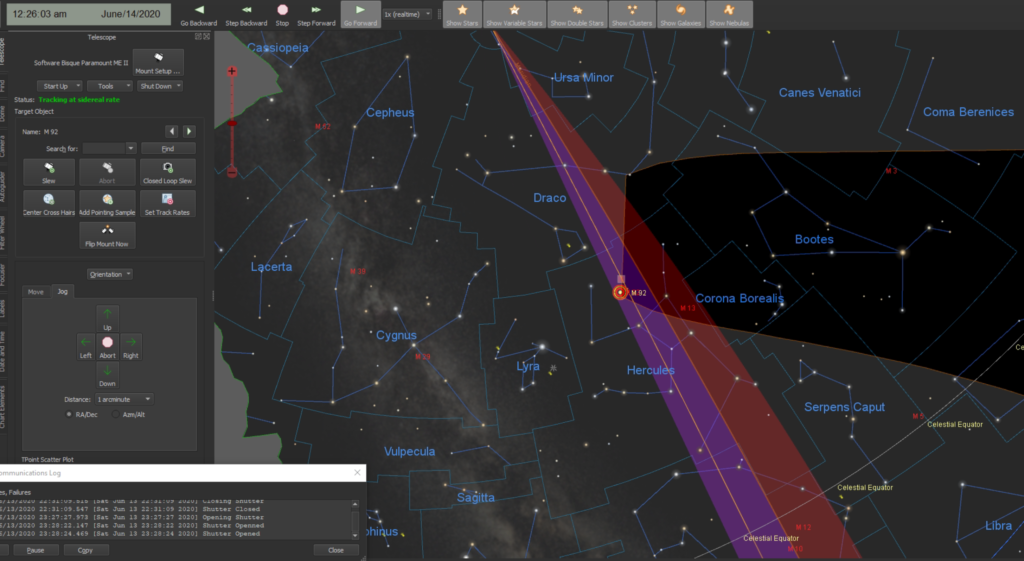
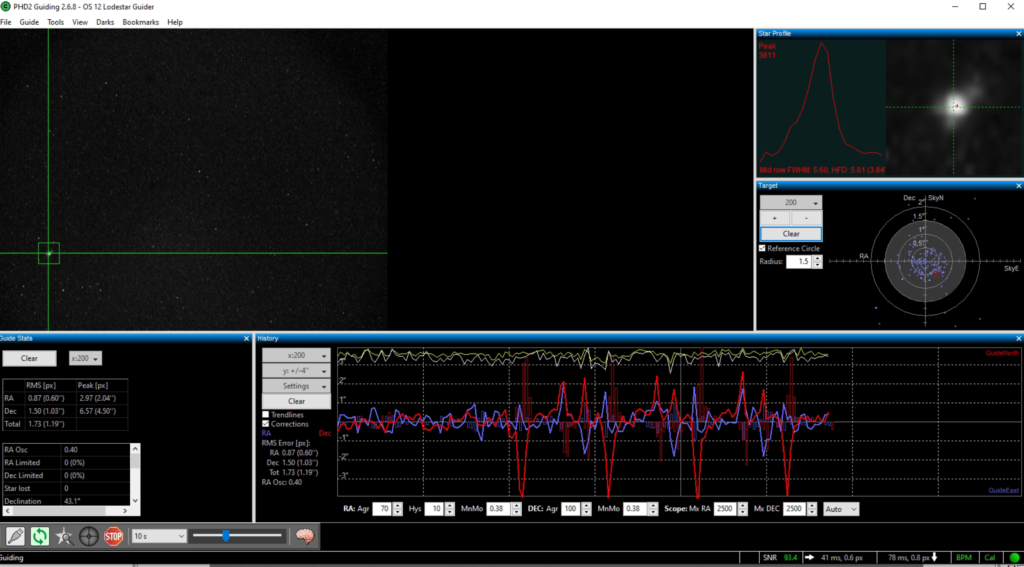
Next I ran a few images but then to my horror I had the same guiding issue, where the star moves being dragged up and down in a periodic way. I slewed elsewhere and tried again and the problem did not occur. I was near M92 and just East of the Meridian and quite high up. Not sure why that is a problem.
Near the Meridian
I could not resolve, I waited a while then performed a meridian flip and low and behold the problem went away, again not sure why. I still have this terrible noise coming from the RA motor/gear area. I decided to bite the bullet and take off various caps on the scope listening and looking inside. I decided it was not after all, the through the mount cabling but coming from the RA gear itself, so I looked for the MEII guide for removing the worm block and then followed the instructions to take off the RA cover.
RA gearing and belt noise
This gave me instant feedback on what the issue was, the belts driving the axis were making a noise. On looking through forums on Bisque.com I found a few people with similar issues and needing to grease the belts, they were told Lubriplate was a good grease. This is an American grease so I will find a similar here and then apply, I will ask Bob first for his suggestion.
So the night wore on and the LRGB frames of M92 I thought I would take whilst testing guiding progressed. At one point the imaging stopped due to cloud. I just caught the dome before it closed to change the safety sensor due to cloud. When it cleared it never really cleared, with the sky temperature reading about -14℃.
Not very clear
Nearing the end of the imaging session, I had caught about 15 frames of each of the filters.
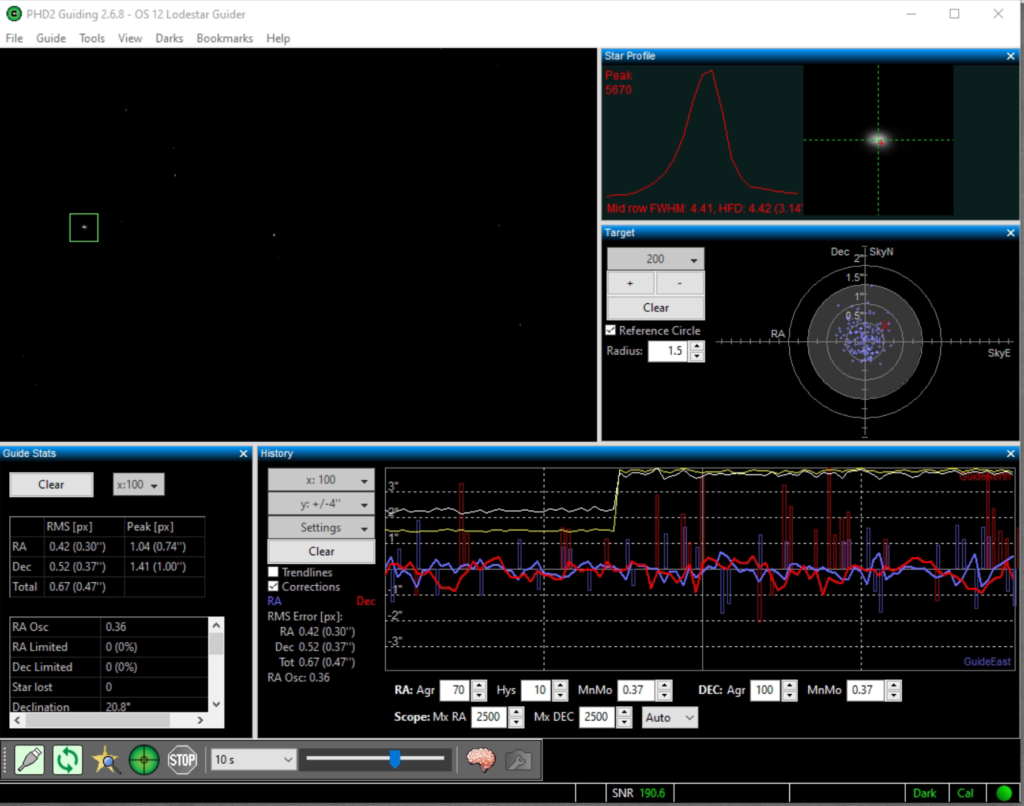
Good guiding and imaging
The guider was behaving mostly with he odd funny jolt. By 3:30 am the sky was lightening very quickly.
3:30am and bright
By this time I had stopped guiding and imaging. I closed the dome, slewed the scope to the flat panel and proceeded to take a set of LRGB flats for Gain 10 Offset 0 and also Gain 139 and Offset 21 as request from the previous nights imaging.
It was unexpectedly clear this evening so I opened the dome late, so no cooling down.
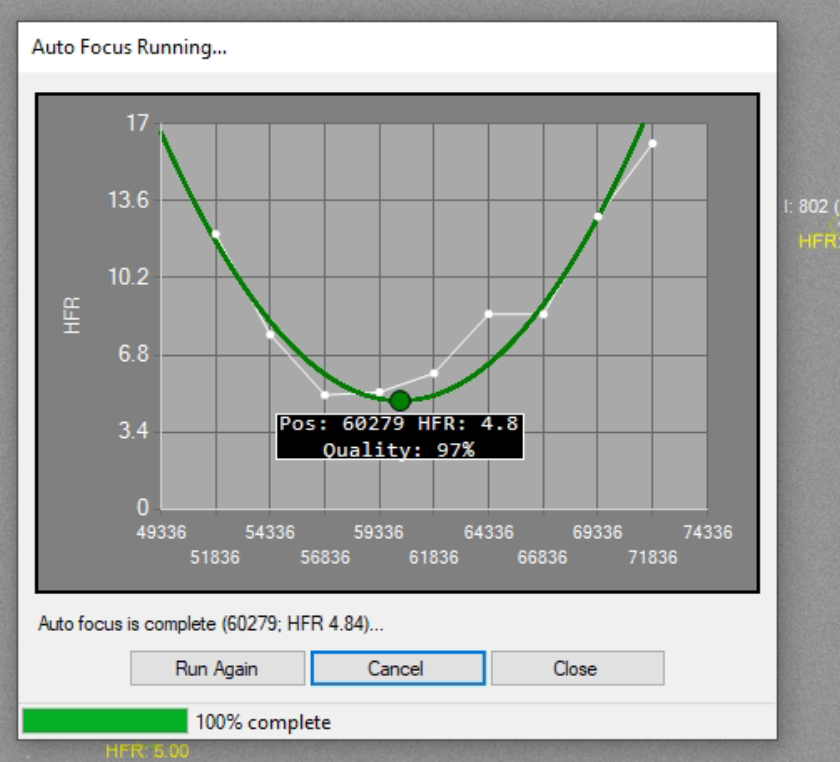
Focus 60,279 Lum filter at 19.93℃
Autofocus run
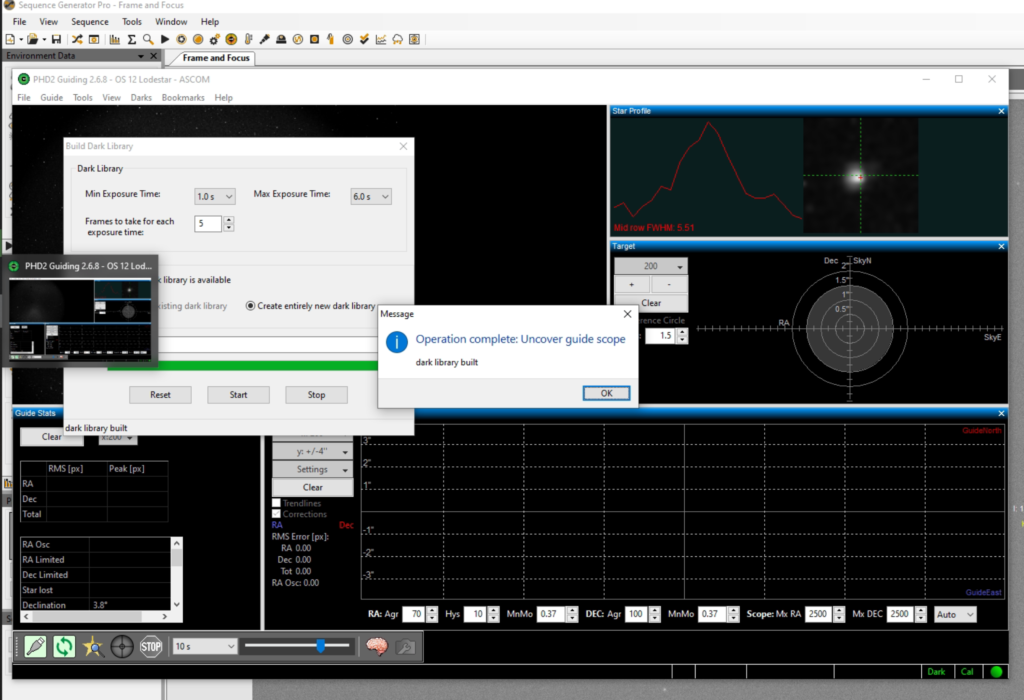
Slewed to Arp 286 as I had seen on Flickr and wanted to see what it looked like in 12″. I noted I needed a new set of Darks for the Lodestar off axis guider after we had changed the driver recently, so I set about taking those with PHD2.
autoguider darks
The problem I then saw was no guide star in the FoV! I really need a rotator!!!!!
So I will image without the guider. The first image jumped as I realised the auto-guider was still on and trying to track nothing sending the mount this way and that. So I disabled and set about running 3 x LRGB for 300 seconds a piece
The first image was Luminance and looked ok, although bright due to high level cloud and no astronomical darkness this time of year. I also noted the mark on the filter caused by the LensPen! I won’t use that again. However I do expect that to come out with the flat so not too bothered. Also I could go clean it I just don’t want more dust on the filter so will leave until I have a reason to take the camera off again.
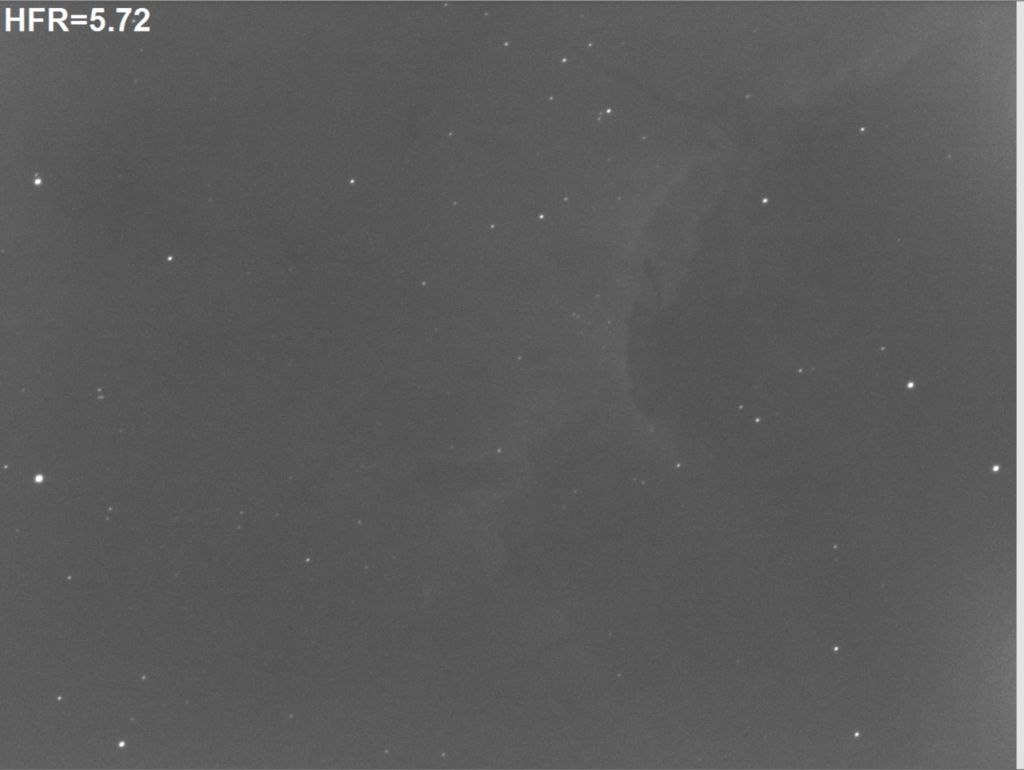
Arp 285 Luminance 300 seconds
For reference here is the luminance flat.
Luminance Flat showing Lenspen mark
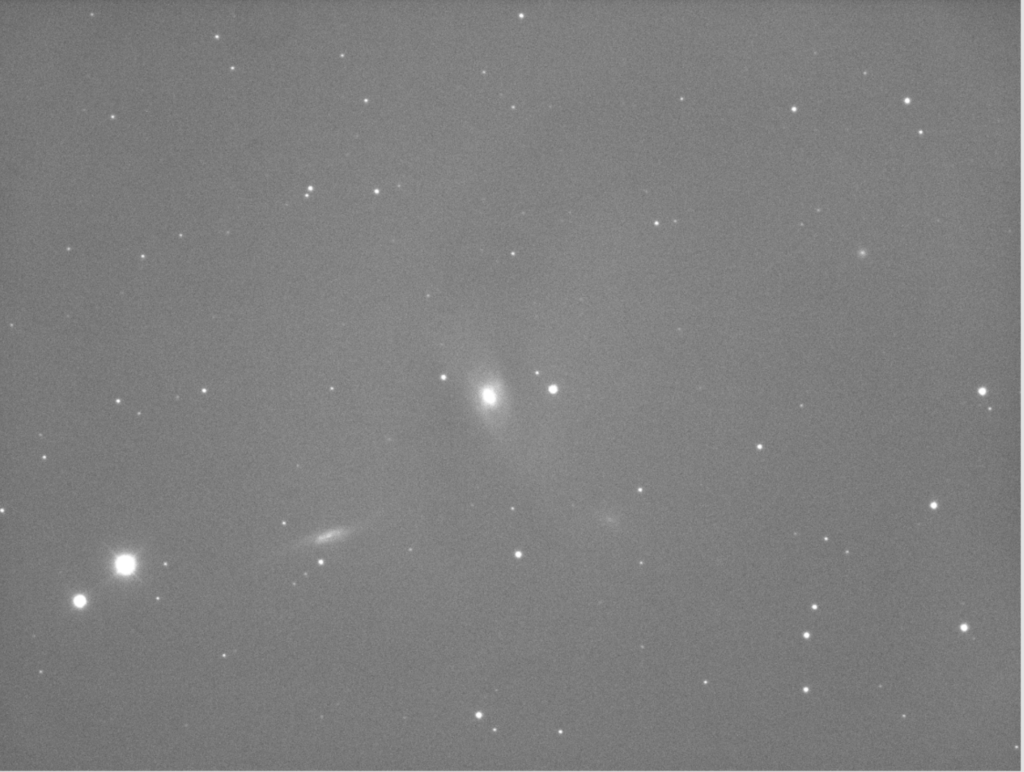
Next up was Red filter for 300 seconds
Arp 286 Red 300 seconds
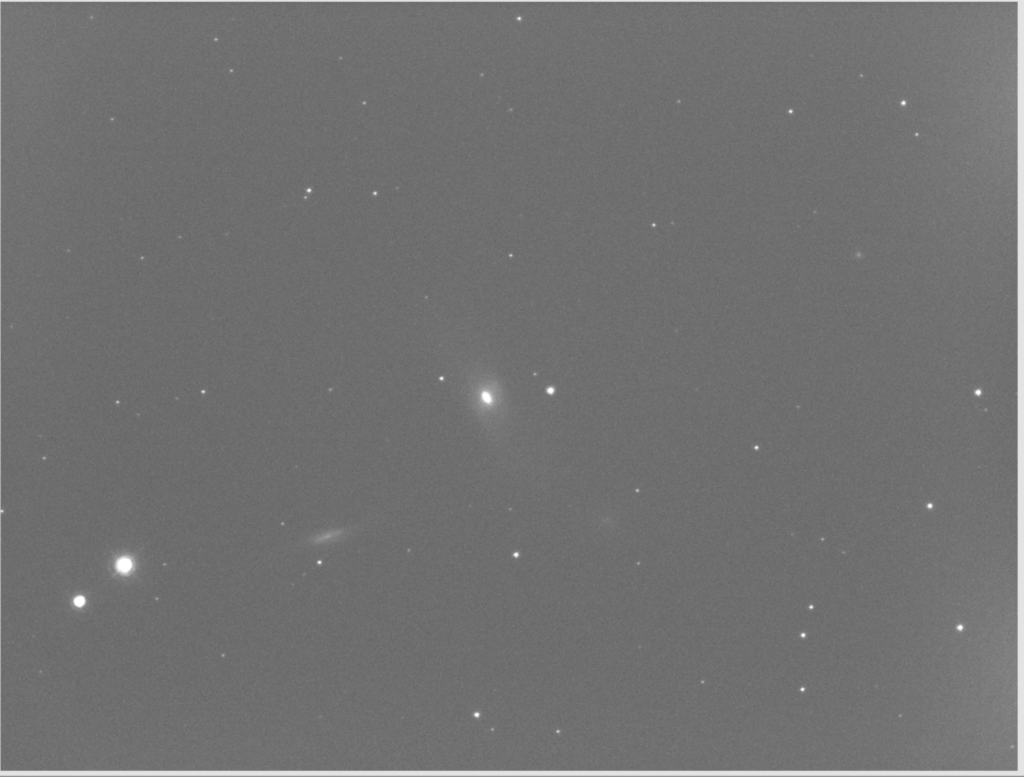
Then Green filter
Arp 286 Green 300 seconds
Then finally Blue filter.
Arp 286 Blue 300 seconds
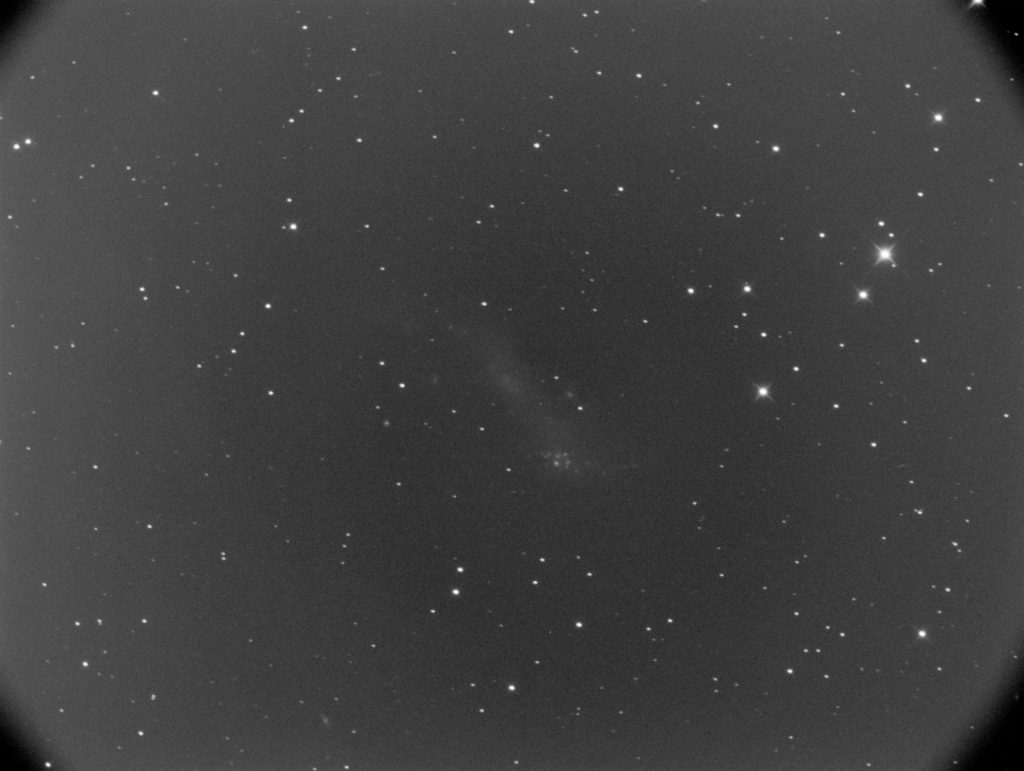
So I left it to run for 3 x 300 seconds each filter. Meanwhile Mil Dave came online and opened his dome and we decided to go for a joint target to see how they compare. Given Arp 286 was below Dave’s hedge I mentioned the Coddington Nebula IC2574 which is actually a galaxy, being the object in my latest image from the travel rig with the Esprit120 and the comet passing. It has some interesting star clusters in it. We agreed on luminance and 300 seconds. Here is Dave’s result ….
Coddington Nebula by Mil Dave
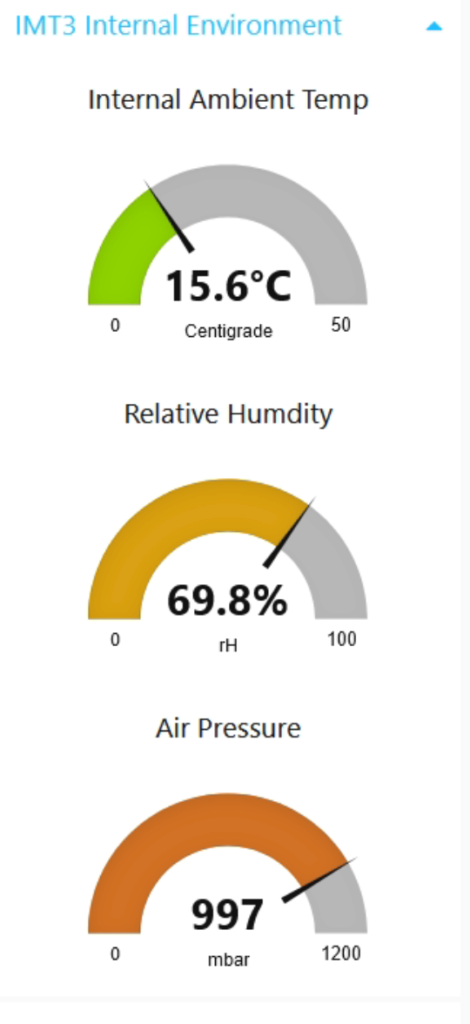
Meanwhile the humidity kept rising
IMT3 environment gauges
At just gone midnight I finished the short run on Arp 286 and slewed to Coddington to catch up with Mil Dave. First I did a quick refocus as the temperature had dropped about 2℃ since I started.
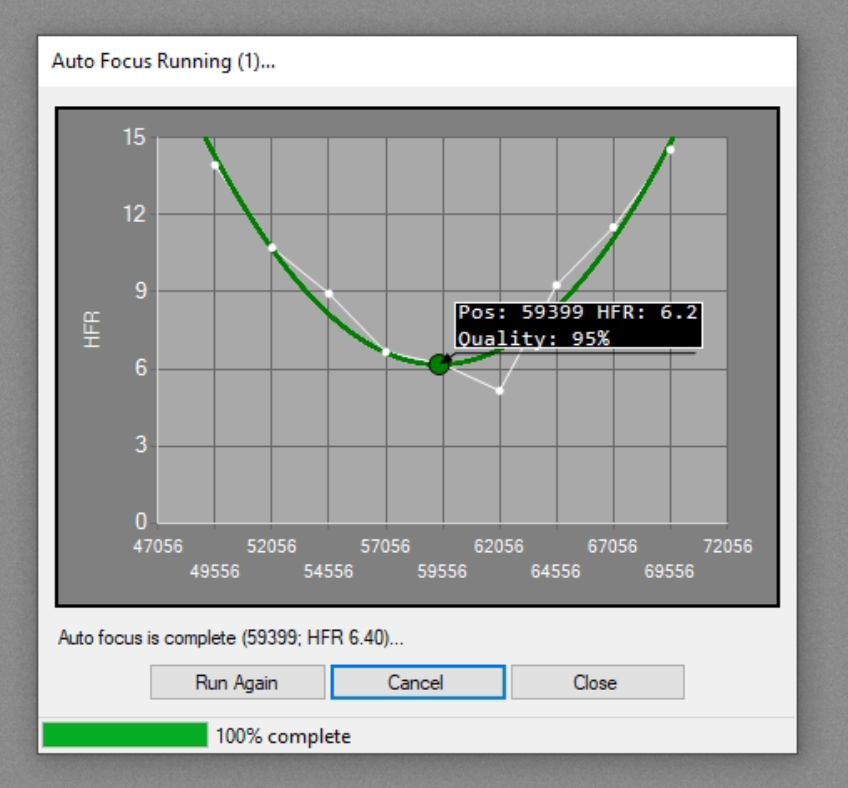
refocus but note the point at 62,056
The refocus put me near but not near enough so I changed to 62,056 for a better HFR which worked. Then I went on to do Coddington and here is my result.
Coddington behind the tree from 12″
I had problems with unguided exposure, then had a problem finding a guide star, then the object was behind a tree!
So next I slewed to Mil Dave’s choice of object, here is Mil Dave’s image
Arp 214
I managed to find a guide star straight away and grabbed this
Arp 214
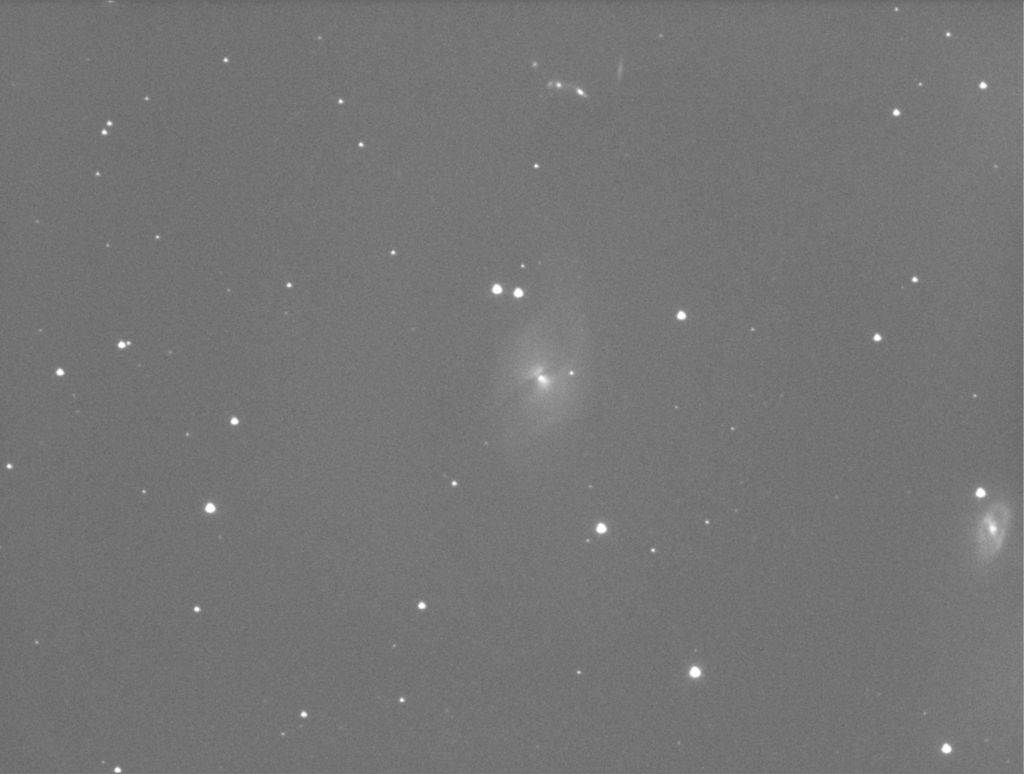
Notice my screen stretch is different hence the bright background. It is just a quick screen grab off the NUC. My turn to pick now, so went for several objects but all behind offending hedges at Mil Dave’s house. So I sent Dave off to choose one. He came back shortly with Arp 278. So off we set. Here is mine.
Arp 278
and of course Mil Daves….but no, he forgot to save it 🙁
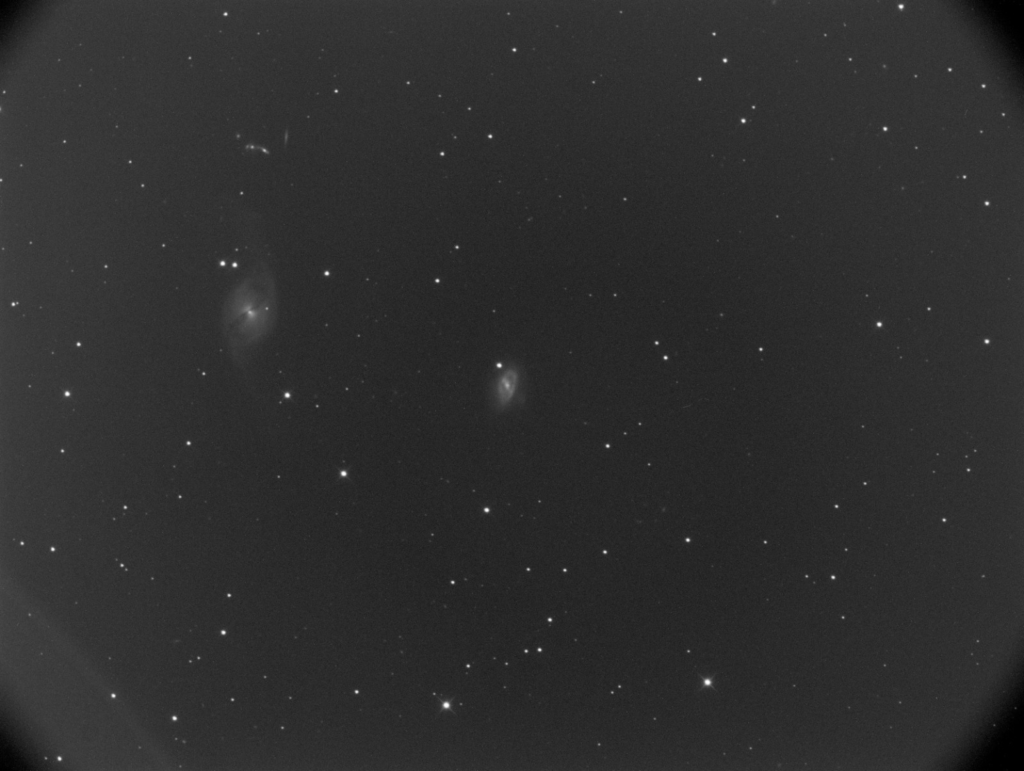
So my object next, I selected one nearby to save the rather long dome rotation I just did, and the resulting loud noise when it jammed! I need to look at that. Meanwhile Mil Dave trundled his round manually. So I choose NGC 7331, also known as C30 and Herschel H53-1, so also on my list for the Herschel 400. This is what I got.
NGC 7331 12″
Meanwhile the cloud from the South East started to creep in and my daughter, who just came in even at this hour of 1:36 said it was foggy outside.
ASC Cloud coming
Dave’s grabbed the NGC 7331 below.
NGC 7331 Mil Dave
I was about to suggest a Sharpless object when the clouds rolled in enough for me to shut the dome. It was reading -4.8℃ sky temperature and the limit was less than 30 for overcast, so I manual overrode.
ASC Clouds
Just before it shut this is the image I got of SH2-126 which is impossible to see since it probably needs the Ha filter rather than luminance.
SH2-126 300s 12″ Luminance
Well a good night all round, given we thought it was going to be cloudy it was nice to come out and play with Mil Dave and go hunting faint fuzzies, so a goodnight from me and a goodnight from him ?
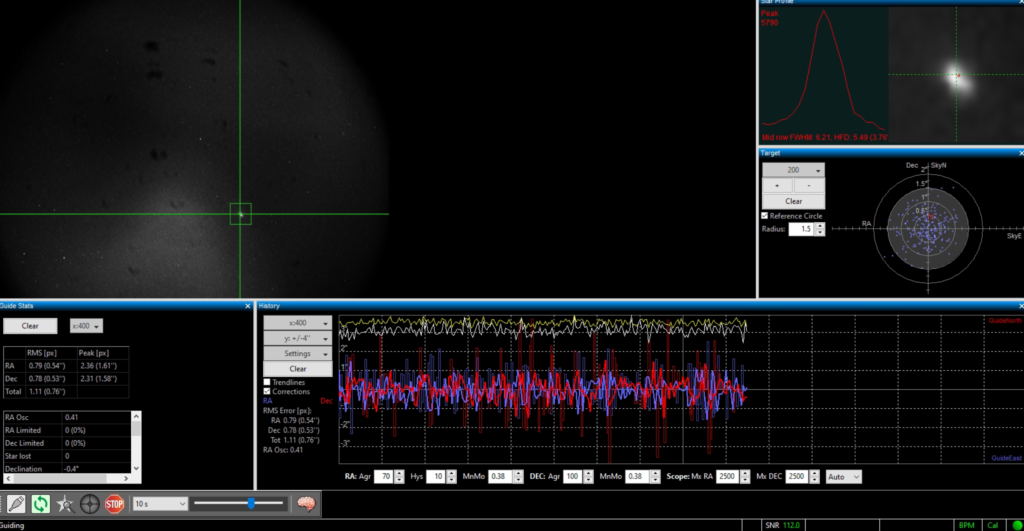
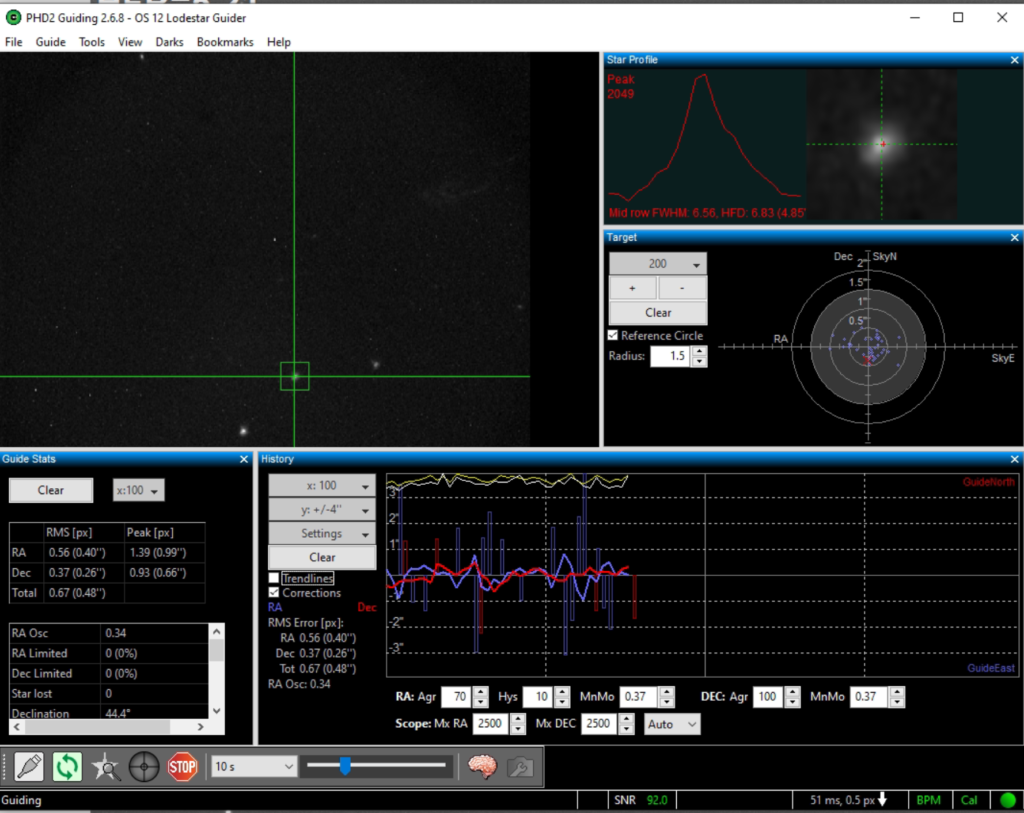
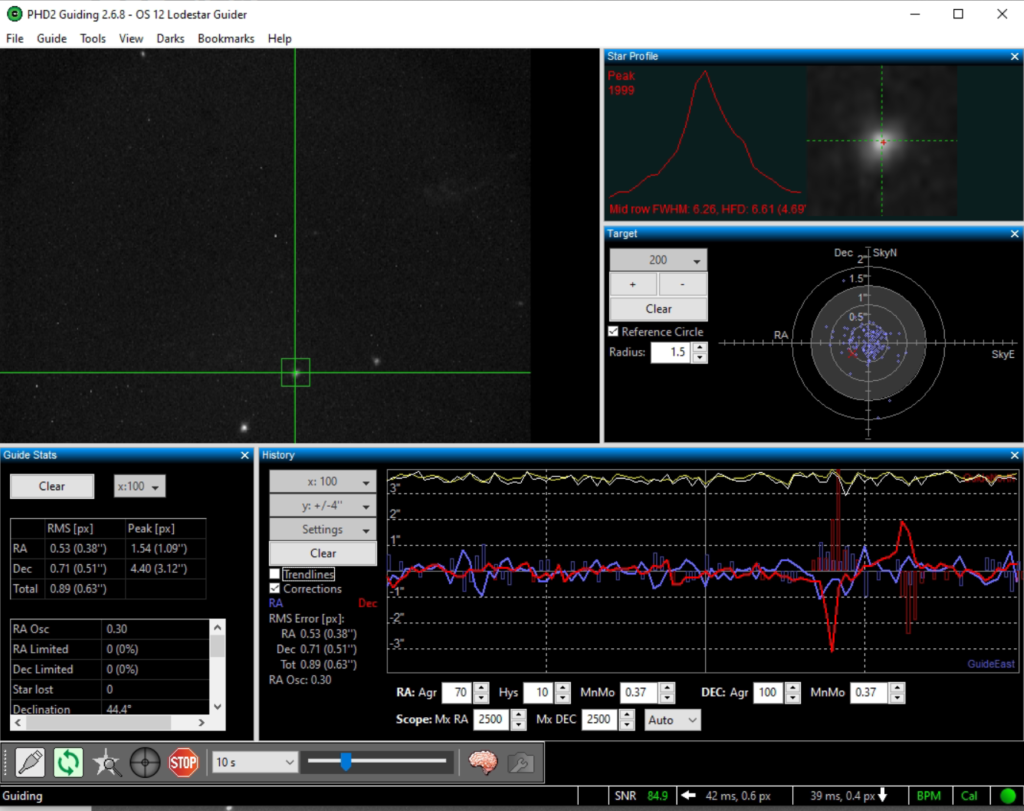
Now guiding on star to West side of mount around 0 degrees Dec and near the Meridian to see if problem reoccurs, graph looks ok but there is a slight regular pattern of error.
Slewed to M92 which is a glob currently at Alt +74, Dec 43 and on the East side of the mount where I had issues last night. I plate solved the image.
The auto focus run looked good
Found guide star by moving M92 slightly off centre. Now guiding. All looked good for a short while. So each section of PHD2 graph is 25 points, so when you have 100 points selected there are 4 sections of the graph. This mean each section/column represents own my case 250 seconds as I expose for 10 seconds, so just over 4 minutes per section. So the errors I saw last night were about 12mins apart. This cannot be the work gear as it has a cycle of 2min 29sec. This is from the latest Paramount manual for the MEII.
Tracking at the sidereal rate, one revolution of the worm takes 149.6 seconds (2 minutes 29 seconds).
The right ascension gear has 576 teeth.
The declination gear has 475 teeth.
The error I am seeing is about 4mins. I cannot continue imaging as every few frames are trailed.
I opened the dome at 5pm. I wanted to try tonight to sort guiding via PHD2 again on the 12″ this evening and then on Esprit120 if enough time allowed.
I changed the PHD2 Profile for 12″ from 6 calibration steps to 12. Performed calibration. Started test guiding in West at +47 Alt. Tried 300 seconds exposure x2 all good
I Slewed back to the East and to Pelican Nebula. Set the Reverse Dec Output After Meridian Flip tick box again ! It then re-calibrated for this side of the mount.
I have also changed the assume Dec orthogonal to the RA axis.
I reran the calibration a number of times until there was no longer an error at the end of the calibration. There was also trailing of stars. Some of the problem seems to have been an incorrect calibration, we need the RA and DEC rates to be very close indeed. Some of ours this evening were 1.5 arcsec difference. The good calibration we finally settled on was 0.5 arcsec difference. The other change was I went out and tightened up the grub screw holding the Lodestar guider on the prism tube that goes into the OAG body, this was loose and I could move the back end of the guider around. This was due to changing the OAG position recently and clearly not tightening the grub screw in enough.
Good calibrationGood guiding after good calibration
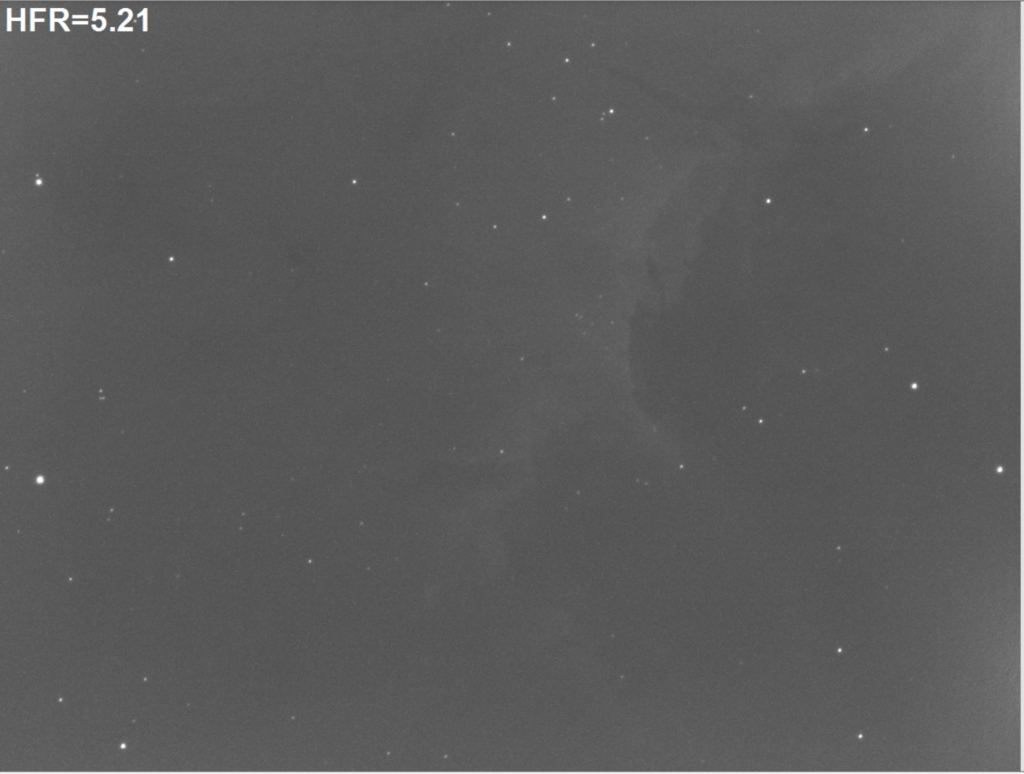
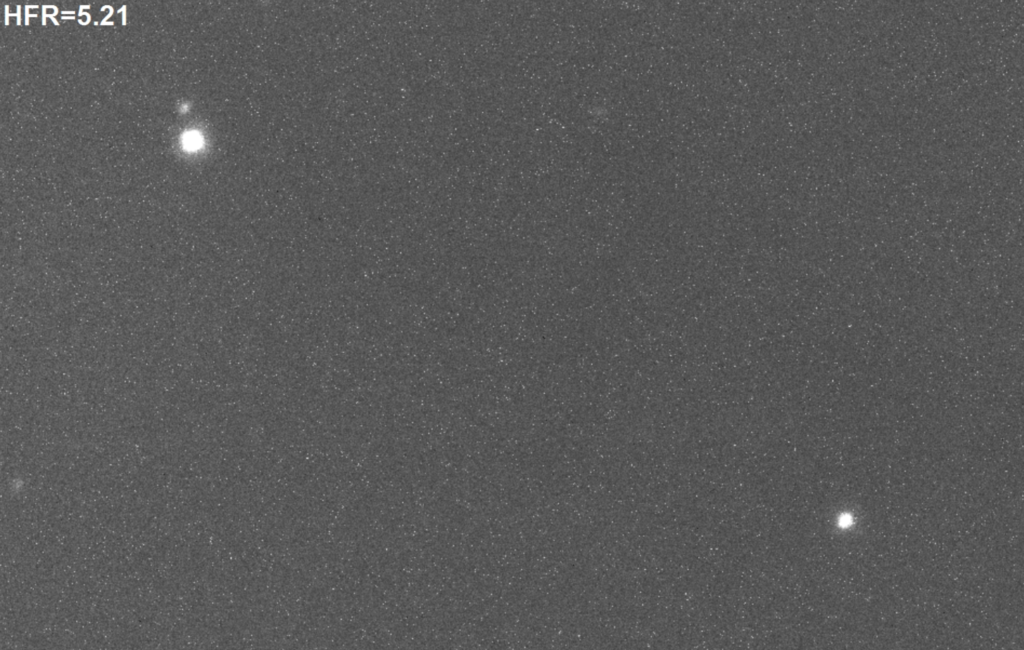
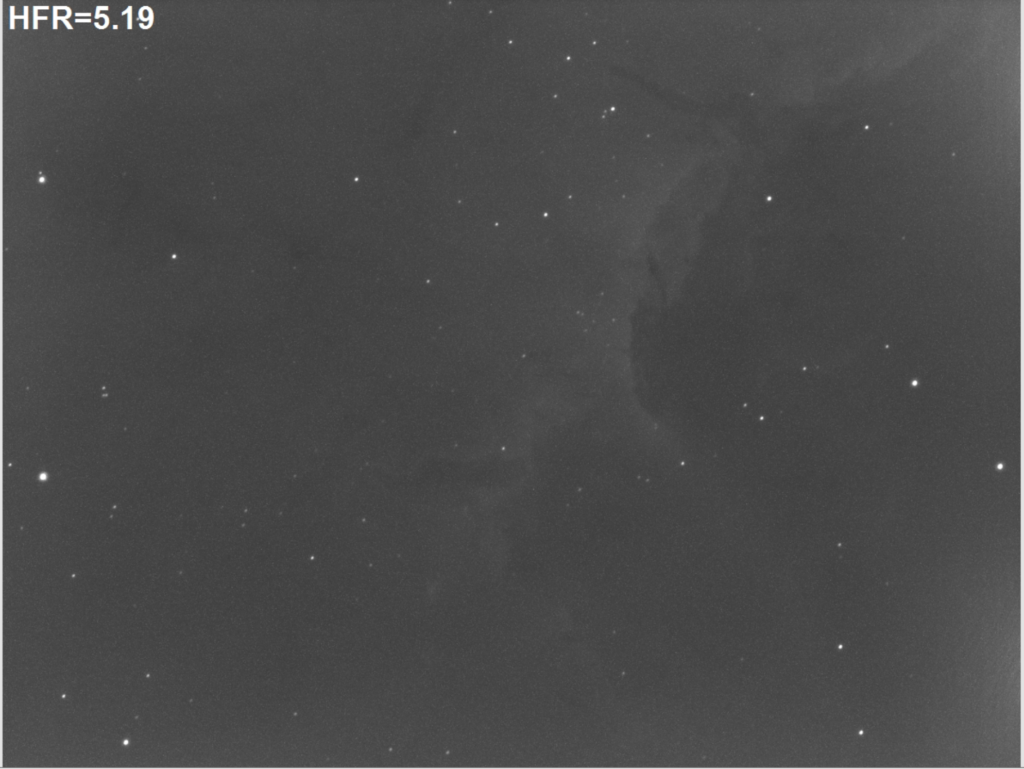
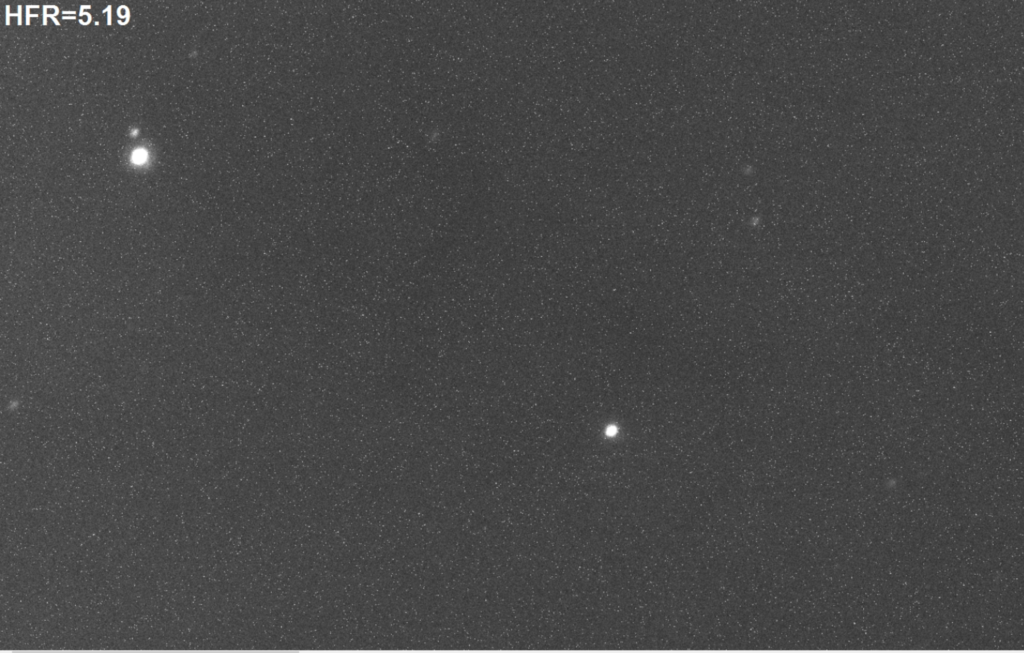
I then refocused on Lum and then switched to Ha. This is the image after 300s with a much better HFR of 5.21
Pelican 300s in focus with no trailed starsClose up of stars from 300s image
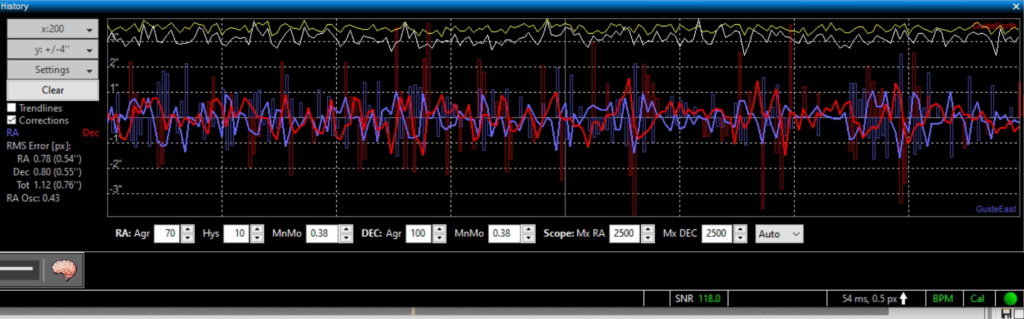
When I had a bump in the seeing (assumed) the PHD2 graph looked like this
PHD2 graph bump in seeing
the resulting image of 300s I was in the middle of looked like this :
Image effected by seeing and bump in PHD2 graph
and zoomed in you can see the problem.
Trailed stars due to that seeing bump
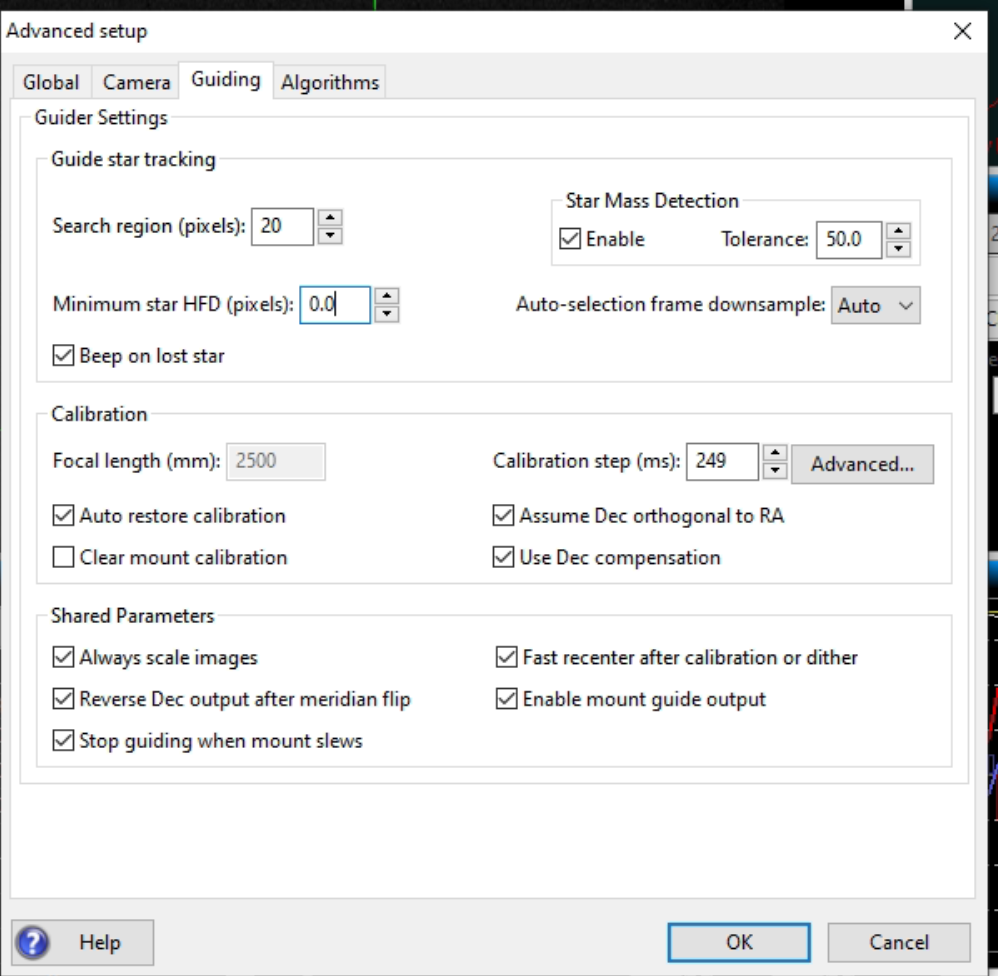
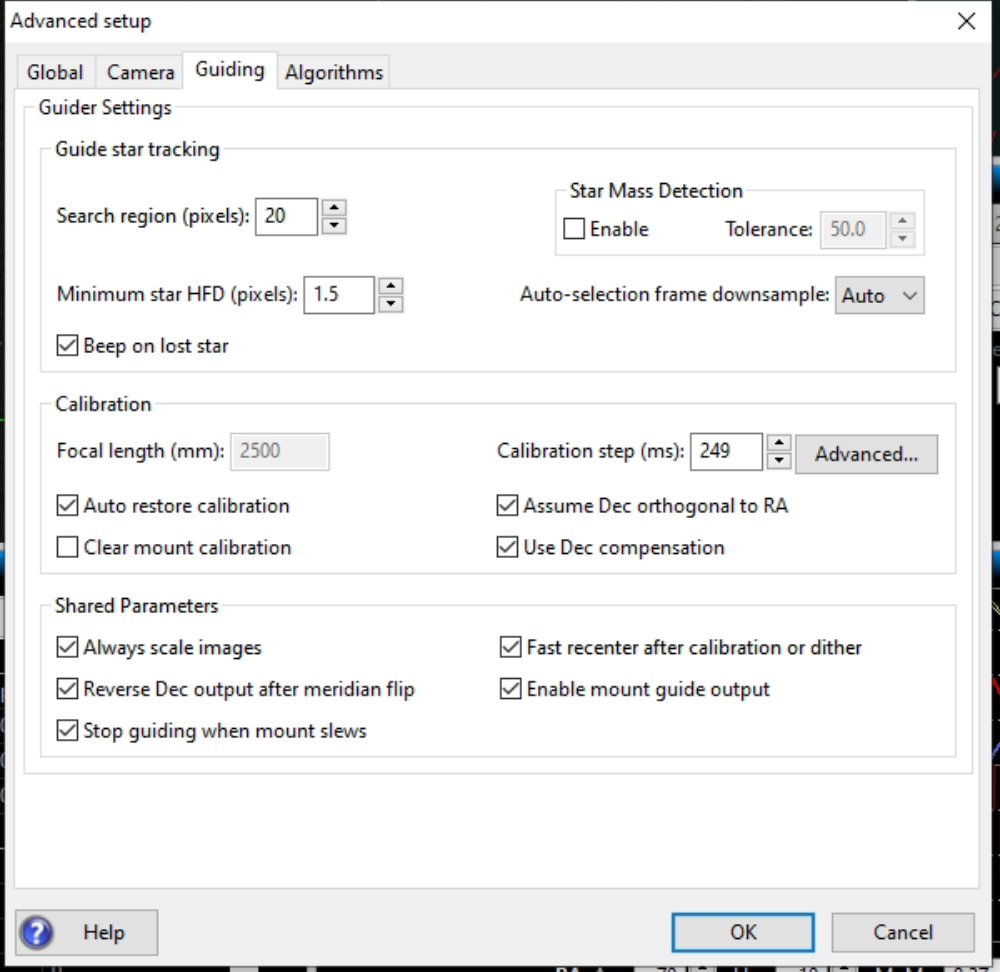
Watching Chris Woodhouse’s excellent YouTube video on PHD2 guiding he has also set the min star size to stop it picking up a hot pixel, something we have seen this evening. He has also disabled Star Mass Detection, which stops PHD restarting if it if it thinks another star has been picked even though it may not have, both of these under the brain and guiding tab.
Settings before the changeMinimum star HFD and Star Mass Detection changes
It’s now 2:51am, the sky is brightening but the seeing has settled, the mount is behaving and I am taking 600s Ha images of the Pelican Nebula without any trailing of stars. The odd spike sees a jump up to 3 arcsecs occasionally.
600s Pelican in Ha with good guidingClose up view of stars at 600s
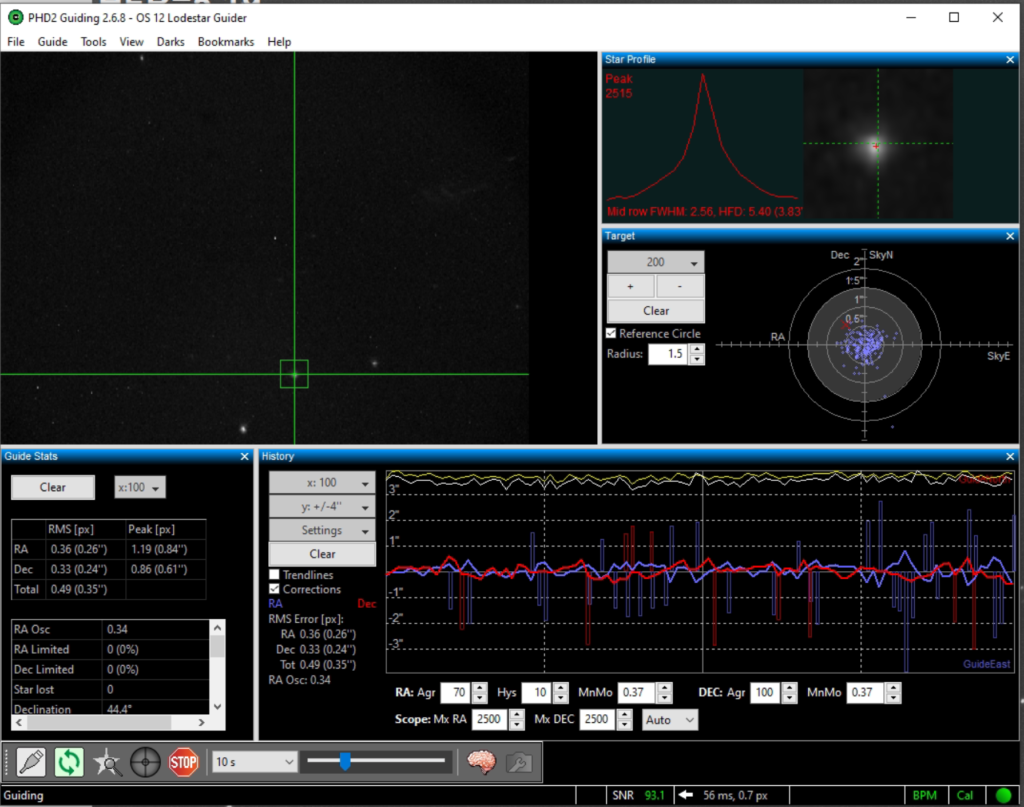
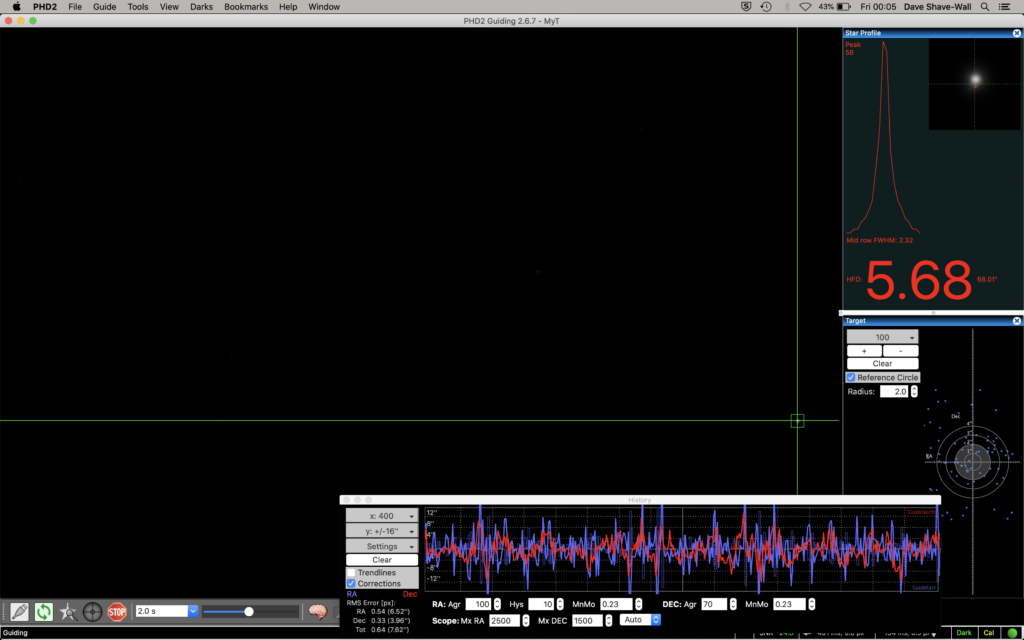
The guiding graph below shows a really good small RMS below 1 which is key.
PHD good guiding below 1 RMS
So by 3:19am the sky is really getting bright and showing on the SQM as 18.6 and dropping fast. I have stopped guiding and imaging and will now head to bed. The final focus position for Ha was 59925 so I can grab flats tomorrow! I will then take a look at the Esprit120 tomorrow night.
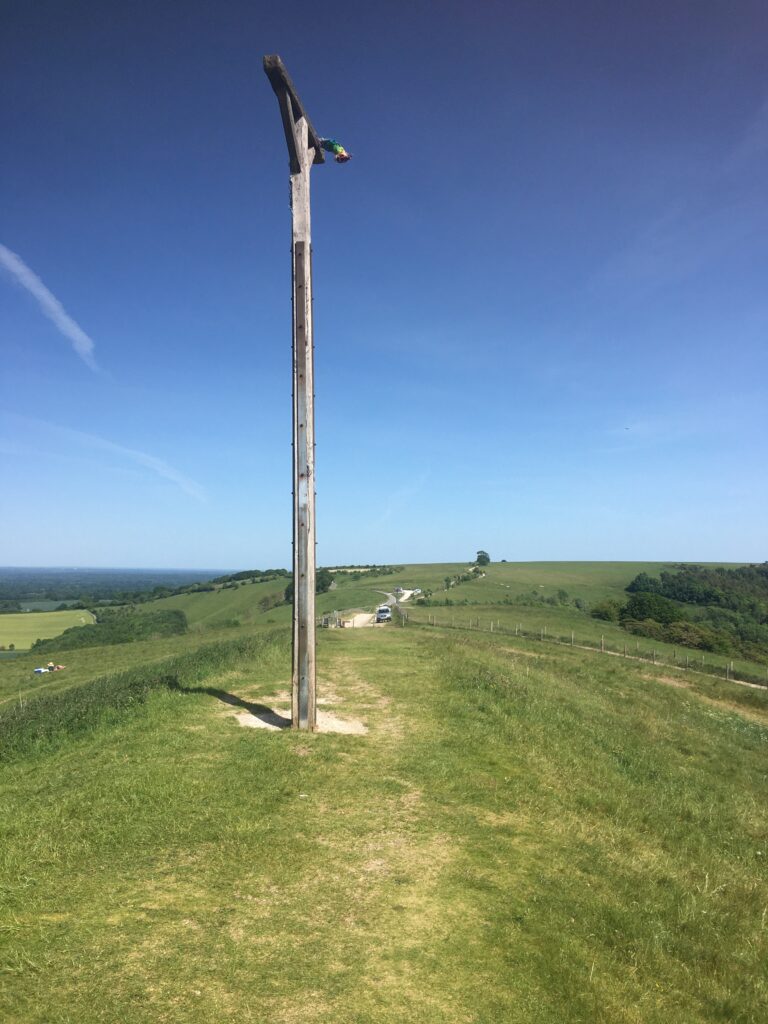
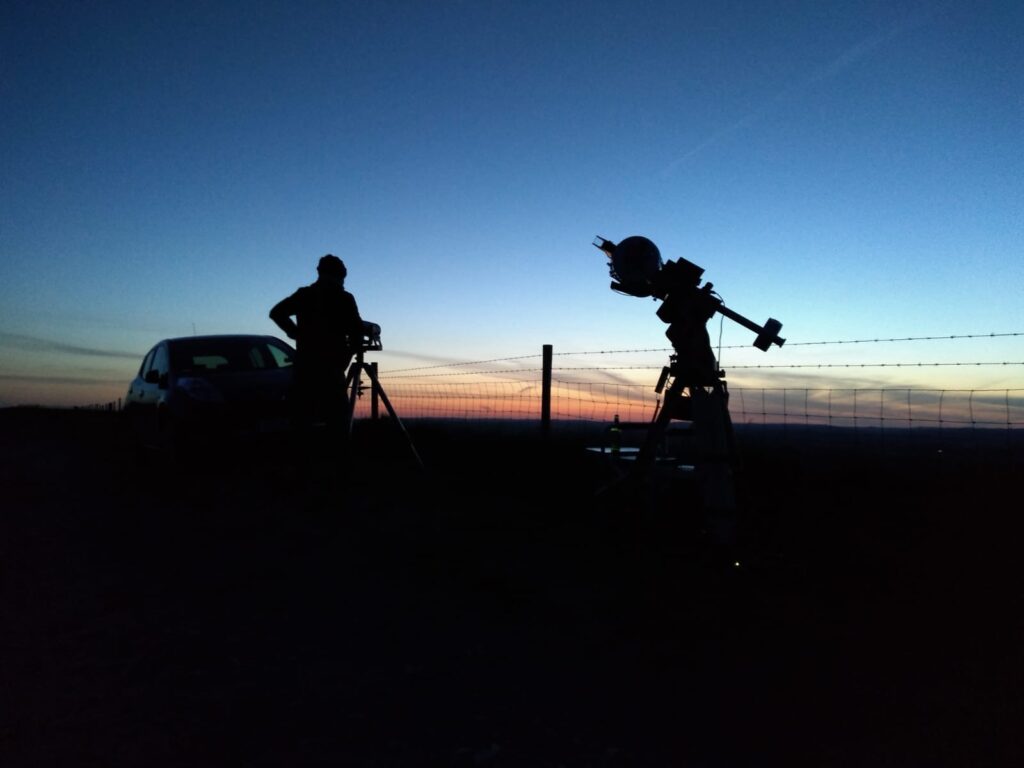
Another visit to Combe Gibbet tonight with another astronomer, GingerGeek. After forcing him to leave the comfort and safety of his own home, where his girlfriend gives him tea, coffee and beer and with the luxury of mains electricity, he joined me at the very dark, very blustery sight near 1,000 ft up in the North Downs of Berkshire, formally Hampshire, they moved the line!
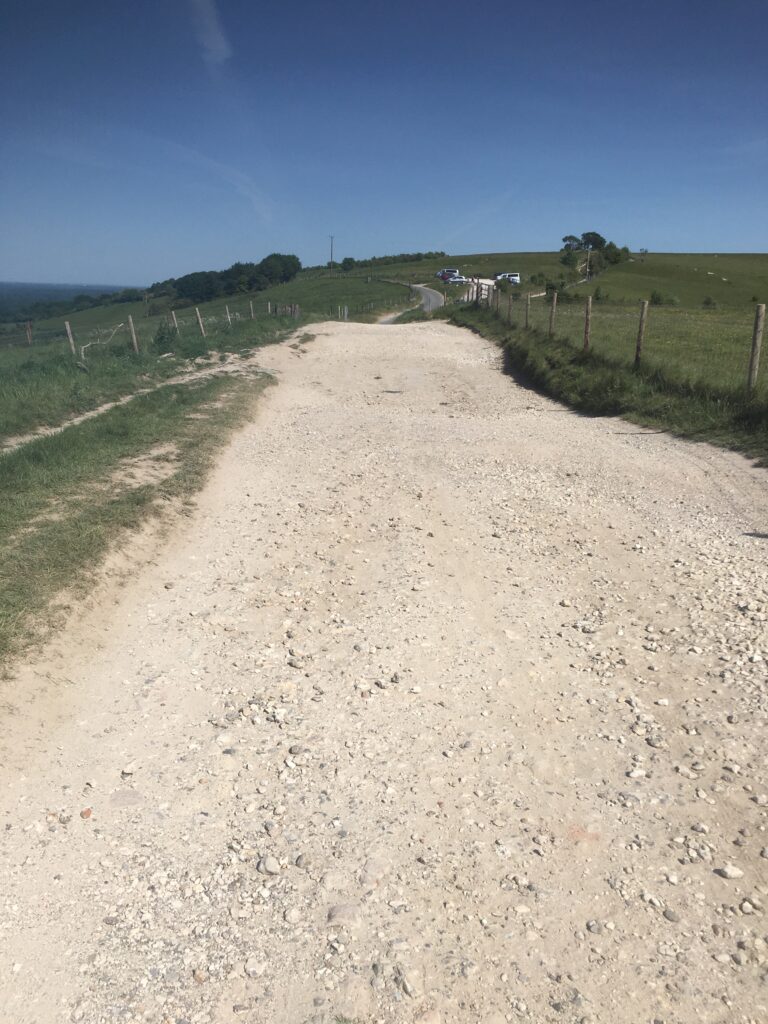
We left at 7:30pm and after the 50min trip arrived at the long road up to and past the Gibbet, which is really not much of a road at all.
Not a road, looking down the bottom part of the track
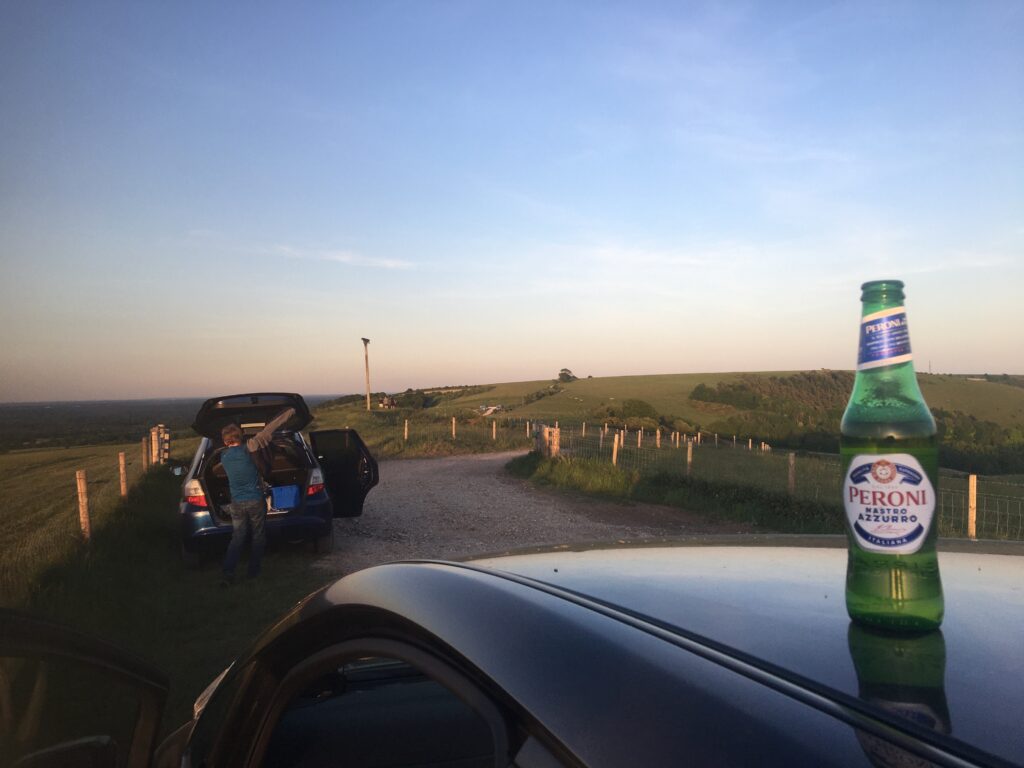
We drove carefully to the top, both parked our cars and set about setting up for the evening. GingerGeek had his Tak FSQ85 on his CEM 60 iOptron mount whilst I setup my usual array of large 4″ binoculars and at first the Mak 180 on the Paramount MyT. Later I would swap to the Esprit 120ED. To celebrate the outing, little geek had brought some beer 🙂
Beer O’Clock!
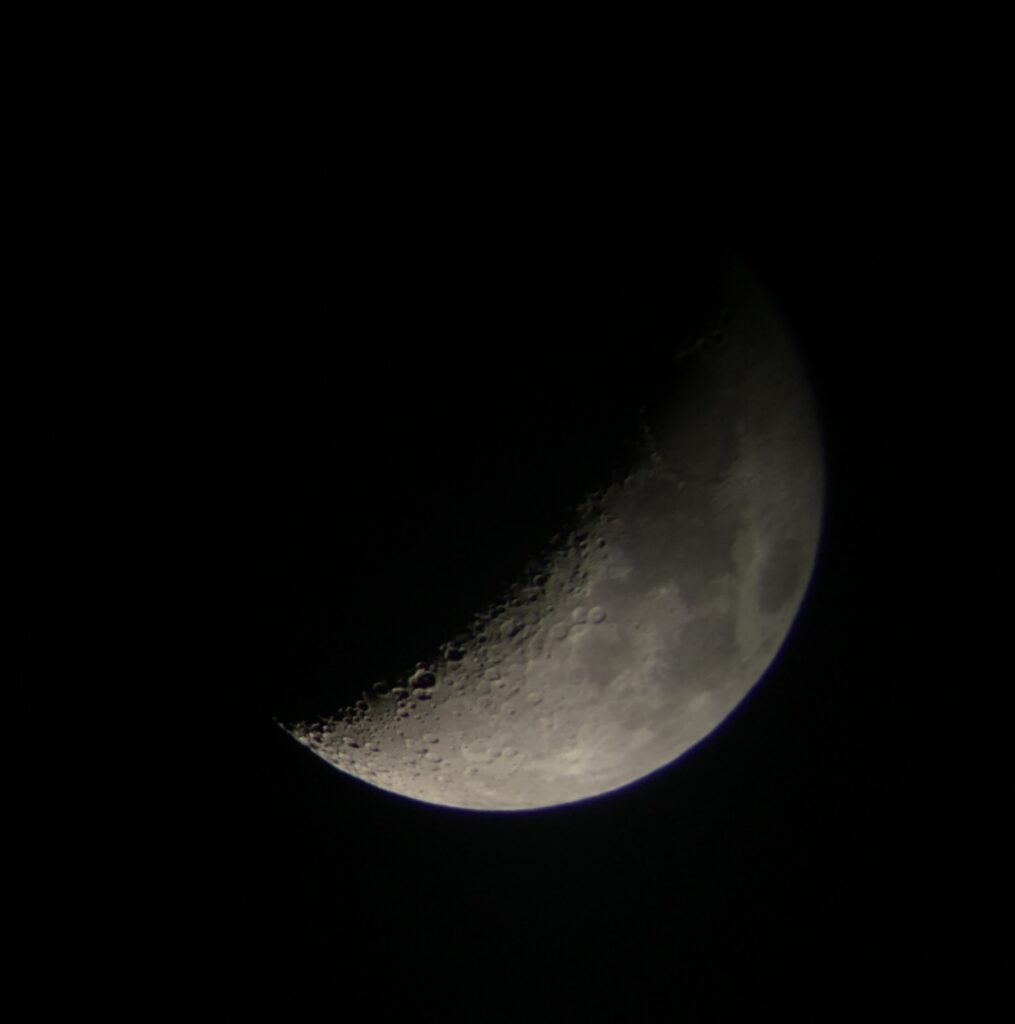
The Sun soon started to set, the day trippers hung around to watch the sunset and then were gone. I started looking at the Moon through the Altair Astro binoculars which is just a wonderful sight. A Camera cannot capture the experience of seeing the Moon with its Earthshine and in full as the FoV is 1 degree in the binoculars was a wonderful framing.
Moon through binos taken afocal with iPhone 6sPlus
Next up was Venus before it sets, it is amazing just how bright it still is given its phase. I found in the binoculars eventually as it was hidden behind that cloud band in the distance. I then tried to get it in the Mak180, when a few new things happened. Firstly I could not slew to it as I had yet to polar align, so I had to place the scope in the right place. At the focal length of the Mak180, some 2.7m it is difficult to find something faint behind cloud just by pointing. I eventually gave up. I then noticed my laptop power had diminished by nearly 30% over about 20-25 minutes, this was due to Firecapture just hogging the USB bus capturing 100’s fps. So I was going to start the night short on juice! So I turned Firecapture off whilst I went to find Mercury in the binoculars.
Venus through 4″ binos taken afocal with iPhone 6sPlus
Mercury was a challenge, so much so I could not find it, I put that down to that not well placed cloud band. Meanwhile I pointed the Mak180 at the Moon to have a look, but by the time I had finished I the laptop was done to 53% !!!! Not so good.
So it was time to chat to GingerGeek (GG) before I put the Esprit 120 on the mount. GG was having lots of problems setting up. Firstly he had swapped the rings on the mount for the Tak that day and was struggling to balance the scope. It was so bad the scope kept dropping nose first then camera first and then either way depending on its orientation. Eventually, after much cursing, actually a lot of cursing, GG settled for the imbalance and continued to setup, unfortunately not before he knocked his beer over in his boot of the car ? fortunately I did not laugh too much ??
I went back to my setup, placed the Esprit on the mount and then set about getting focus with Ezcap, the software that comes with the ZWO camera. I do find the software very straight forwards and does what it says on the tin as it were. I then slewed to one of the open clusters I wanted to image and realised it resided in the North and that the twilight was still very much apparent so not suitable for imaging. Instead I settled for M51 high up as to the West was the Moon.
M51 300s Image uncalibrated
It is a lovely image at 5 minutes, I could see instantly at least 4 other galaxies and the colour of the main Messier galaxy was very pleasing. I look forward to processing the resulting subs. I set the timer for 1 hour (12x300secs) and went back off for veggie soup, cheese rolls, brownies and coffee that GG had kindly brought along.
crop of uncalibrated 300s M51
GG at this point was having issues focusing for his 5 minutes shot of the Pelican in Ha, he had made some other changes to the software before heading up the hill too which was confounding him. After some more time he finally had focus and started to image. However whilst a few of the images were okay, the resulting imbalance and gusts of wind made it difficult to keep pin sharp images. It should also be notes at this point that GG and I were running from the same car battery, although GG was only running the camera from it, the mount was running from his Lithium battery.
Stunning Pelican Nebula – 300s Ha uncalibrated
At just before 1am the inverter connected to the spare car battery turned off due to loading and power. Everything stopped for both of us ??? however GGs mount kept running due to the Lithium battery. I closed down my setup and allowed GG to reset his camera and reconnect, he then went on to start imaging, however the resulting image had moved significantly and GG decided to give up. So we spend the next 40 minutes packing up. Whilst this was going on we looked at Saturn and Jupiter through the binoculars which was a wonderful sight. Now for the 50 minute drive home to unload the car just before dawn, although by 2am it was clearly getting lighter.
Guiding graph on Esprit 120 Paramount MyT last night, all over the place with wind
The SQM for the site last night was 20.91 although the Moon was very bright. The site is also very dusty, and my laptop was covered in the morning. Another incident was that I inadvertently unscrewed the cover from the guider as I transferred from one scope to another and the glass cover fell out, I now have dust and dirt on the sensor to clean. It is not a great design by ZWO for the ASI290MC as it really needs a locking grub screw to top that happening or a reverse thread.
Herbig-Haro object at the end of the long feature can just be seen.
GGs image has set us on a little project to image the HH 555 bipolar jet at the end of the major turn of gas in the Pelican Nebula. We will attempt over the next few nights to get an image from both the Esprit 120 ED Pro from the IMT3 dome in Ha and also from the OS 12″ to see what it looks like compared to the Tak FSQ85. Another good social distancing astronomy session ? goodnight.
I thought I ought to document this so that I remember this is now the new normal for making a flat master for my CMOS camera, the ZWO ASI1600MM. The problem I found again after not processing images for some time, was that the normal way of processing without Flat Darks produces a master flat with embossed, so raised doughnuts across the image.
Batchpreprocessing – > Darks tab -> Optimization Threshold -> move from 3 to 10 – > this removes the dark entirely and also removes the amp glow but introduces loads of noise so clearly not right at all. So I contacted my friend Dave Boddington who is a bit of an expert on this topic and he gave me some good advice that has of course worked.
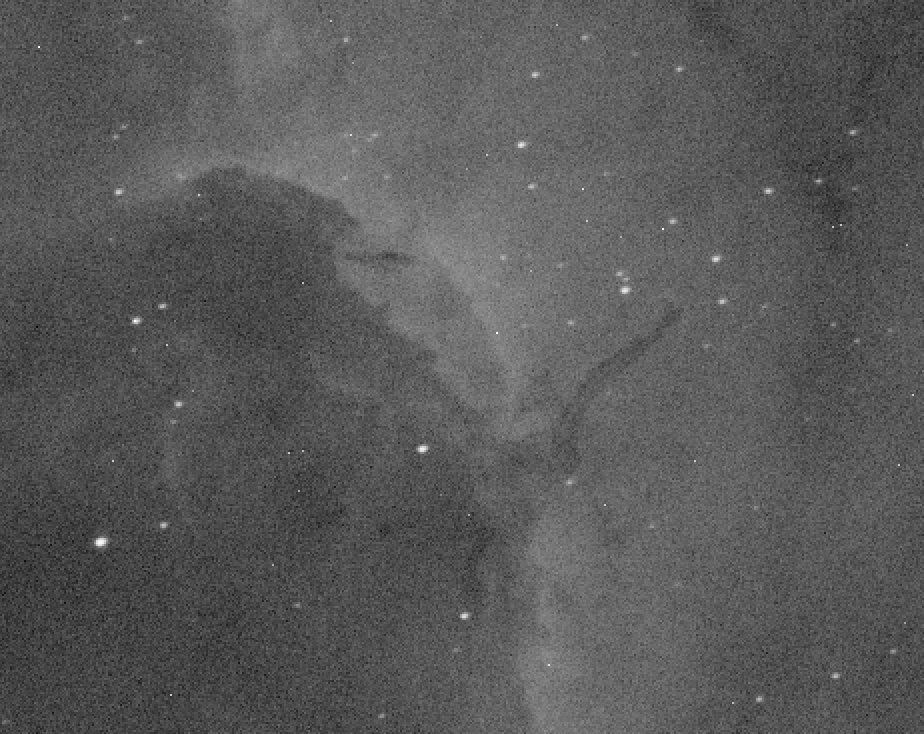
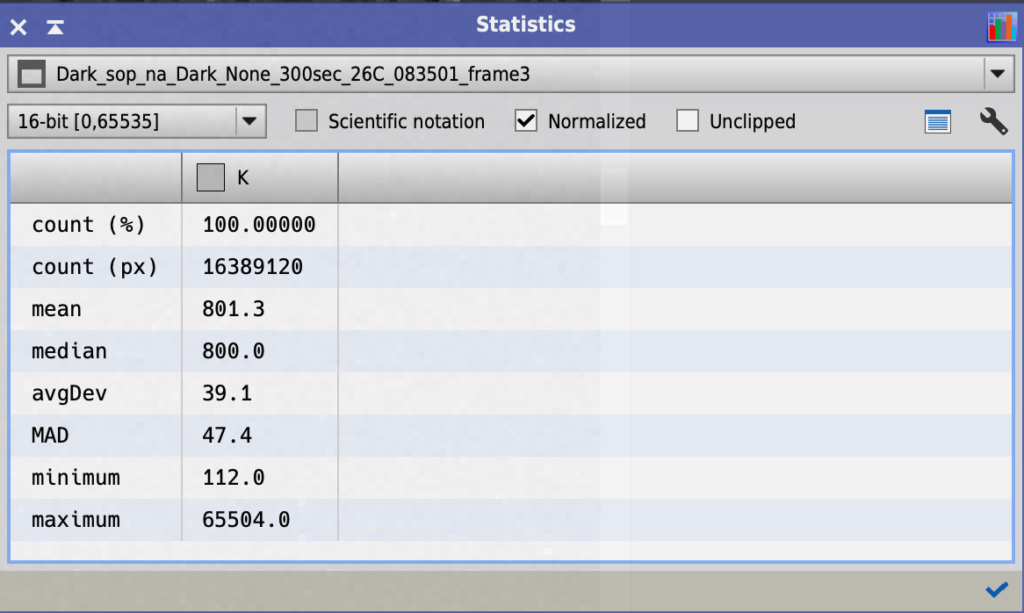
So first let’s detail what I am calibrating. On the 20th April 2020 I took a set go Ha frames of M84, these were 300s exposure and with a Gain of 193 and I believe an Offset of 21, however we had some changes over the previous week so driver the Offset is no longer stored in the FITS header. It was when we were using the ZWO native driver. The temperature of the cooler was set to -26℃. I have 8 of these frames.
M94 300s light
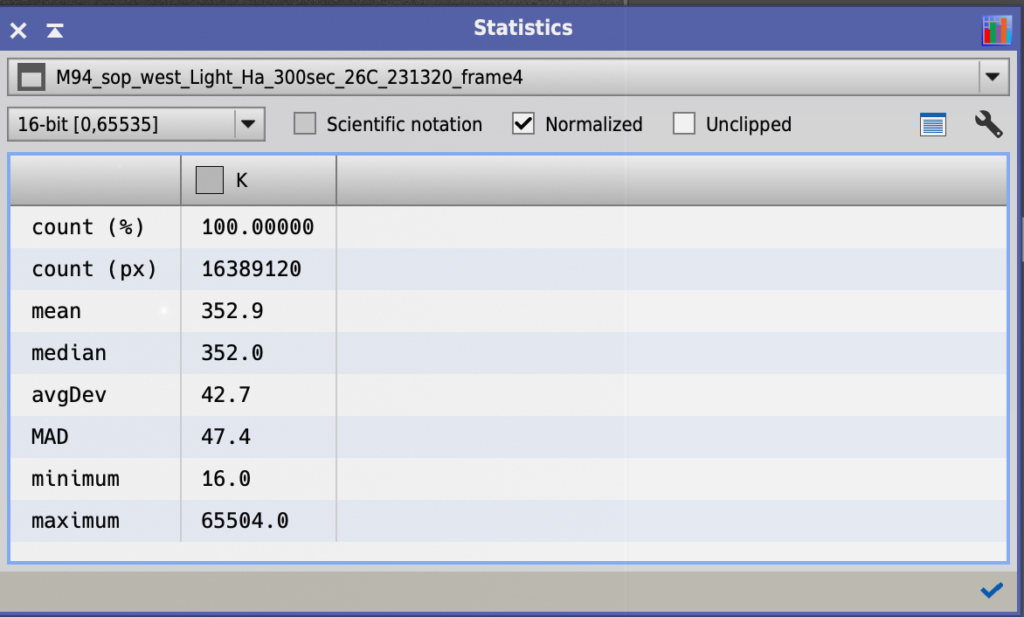
I also have a set of 10 darks at the same settings. However when using the Statistics tool Dave noticed the Mean of the image was 800 and the Mean of the Ha frame was 353. This is in a 16 bit notation. The camera however is a 12 bit camera and this means the Mean for the dark is 50 and the Mean for the Ha is 22, so a difference of 28 in 12 bit and 447 in 16 bit. I will come back to this later.
Mean of Ha 300s lightMean of Dark 300s
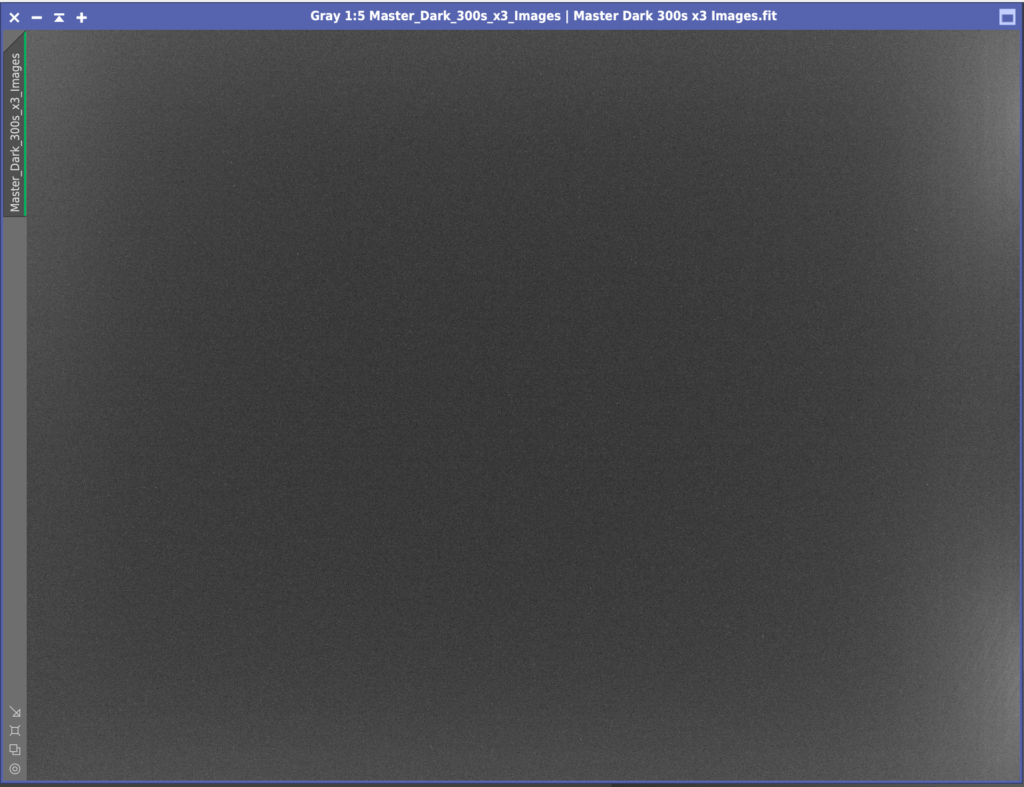
First I created a Master Dark for the Ha frames using the normal ImageIntegration settings. I did not calibrate darks with Bias as you do not need bias with a CMOS cooled camera. Next I created a Master Flat Dark for the Flat frames using the same ImageIntegration settings.
Single 300s Dark with hot pixels and amp glow
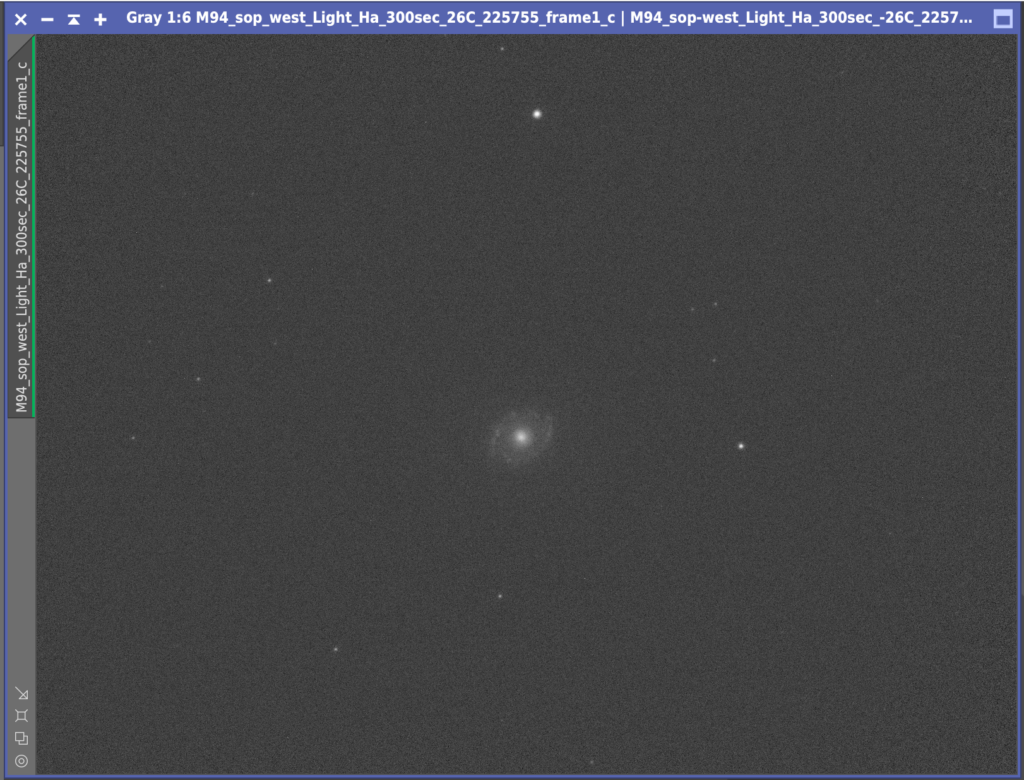
Then I found the Ha images did not need to have the flats applied so I skipped that step for the narrowband images. Next I Calibrated the Ha lights with ImageCalibration and because of that discrepancy above which looks like it was induced by having the Offset for the darks set to 12 and the Offset for the lights set to 21 I added 600 as suggested by Dave Boddington to the Output Pedestal in the Output files section of ImageCalibration. I made sure Evaluate Noise was ticked and that both Calibrate and Optimise were unticked in the Master Dark section. Master Bias was unticked and so was Master Flat for the narrow band images as mentioned.
Calibrating Ha lights with Master Dark
This created a clean set of calibrated Ha lights that did not require flats to be applied.
Calibrated 300s Ha light with Master Dark
Next I had some issues in Star Aligning the frames. The error I received was ‘Unable to find an initial set of putative star pair matches’, due to the frames being very sparsely filled with stars and the background being quite light compared to the stars. A quick look on the PI forum showed increasing the Noise Reduction in the Star Detection section from 0 to 4 sorted the issue, with all but 1 frame being aligned. I was then down to 7 x 300s Ha lights. The final frame was very light due to cloud.
7 x 300s Ha Calibrated with Darks, Aligned and stacked
I then integrated these 7 frames together. I had a challenge with trying to get the hot pixels in a few areas to disappear using Cosmetic Correction and pixel rejection during stacking so I will remove these after by hand before combining into the larger set
hot pixels not removed
So in essence what I have learnt is that I need to have really clean filters and camera glass. That all the doughnuts are on the those surfaces and not anywhere else. That the flats must be between 22k and 26k for the CMOS cameras, although this has some tolerance either way. That I need to set the camera to the right Gain, Offset and Temp as the lights and that I need the right flats for the right lights!
Today has been wet, windy and cloudy, which for once is a blessing! Why I hear you ask? Well simply put, to calibrate the hell out of the AAG one needs inclement weather and today has provided that in spades 🙂
So after monitoring the AAG all day here are the final settings. I have changed the limits for the wind only today, but I have extended the time period for the graph from 10mins to 1 hour. The wind has recorded over 1.1 m/s which may not seem a lot but at times has blown garden furniture around and the bins.
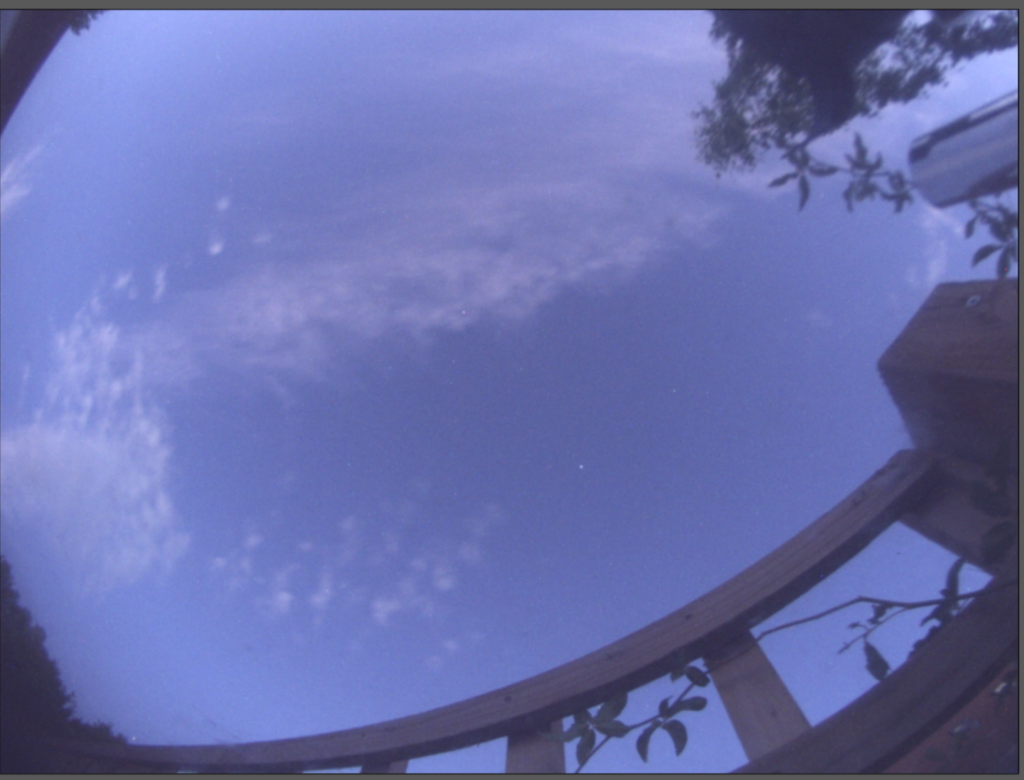
So for a short period of time we had settled on using AllSkyEye. Recently we noticed that the author had issued a Kerogram and stretched horizon generate of the latest image but only available in a new Pro Edition.
The Pro edition was only £20 for a 3 user license, the author gives this purchase as a donation to the charity of his choice – good man ! So now we have AllSkyEye Pro in use at the IMT2 and IMT3 domes.
Latest Image with custom text overlays
Latest Image Horizon Projection
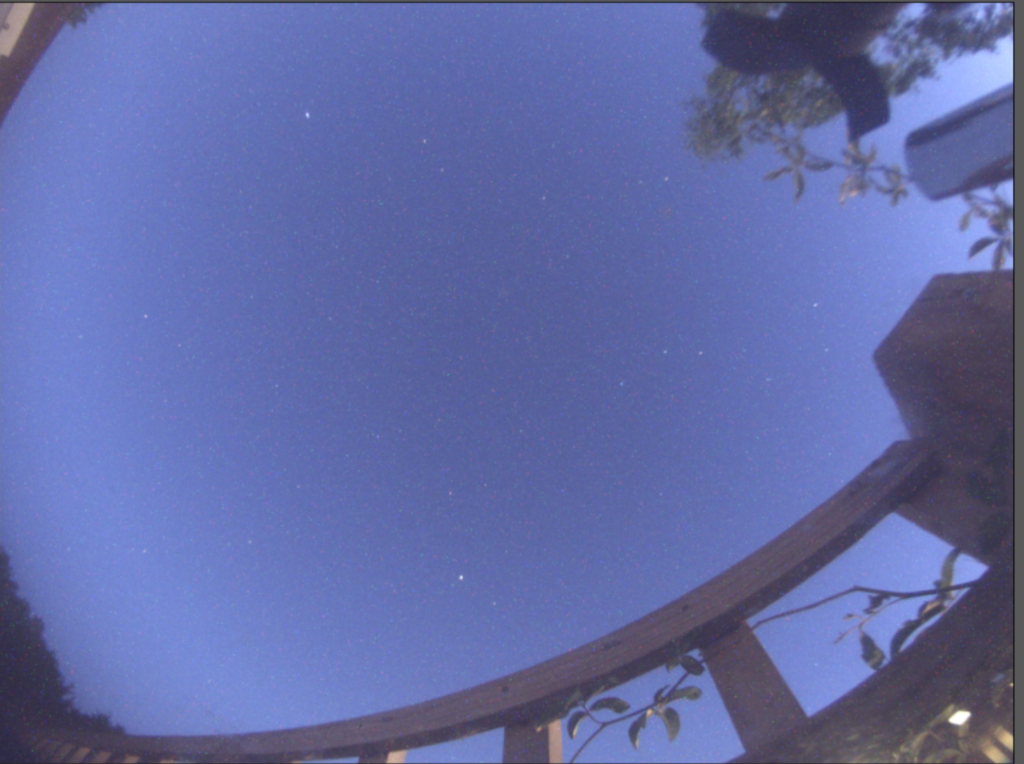
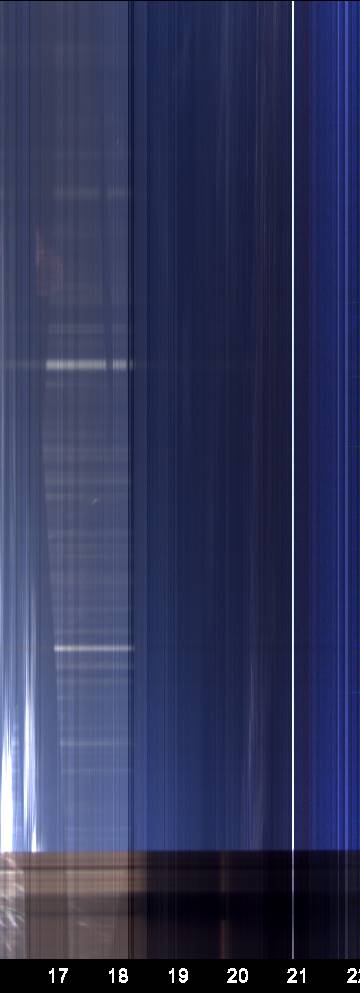
A Keogram is an image composed of slices taken from images in a sequential time order.The slices (which are always taken from the same location and with the same shape) are stitched together to form an image displaying a timeline of the selected part of the image as shown below.
Keogram
We still have the dark map to take to remove the hot pixels from the image but at the moment it gives us a nice view remotely before we decide to open the dome – that’s if the AAG Cloudwatcher limits agree and it thinks it’s safe to do so of course !
Bob noticed we had our local security guard aka Fluffy watching over his night’s imaging and turning to watch an ISS pass.
Fluffy stands guard at the weather station as the ISS passes over
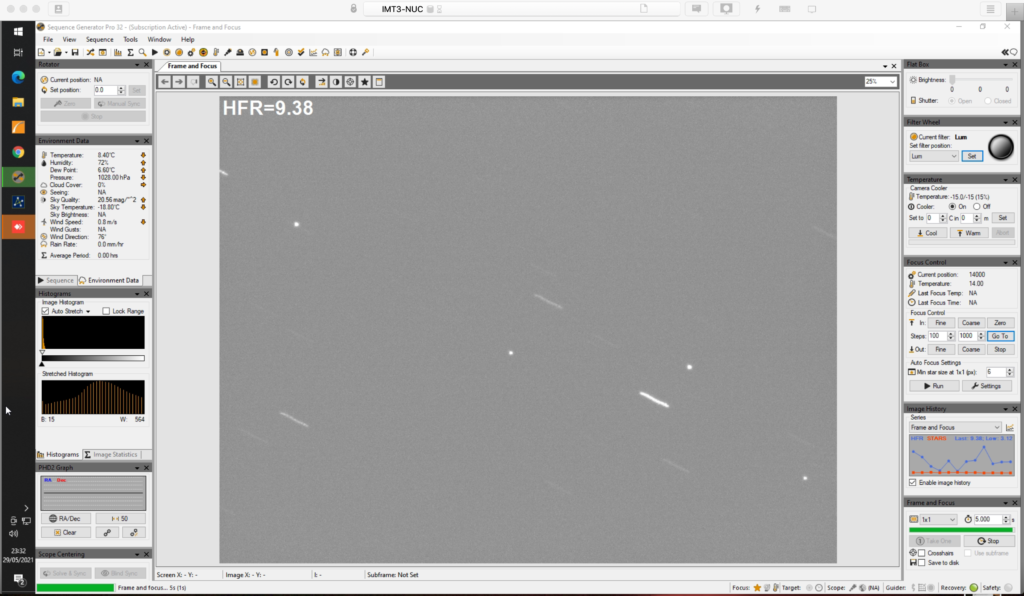
22:05 Frame and focus on 9.26 and 7.64 magnitude stars used before moving to M61 to capture some Lum frames for calibration of flats to solve the doughnut embossing.
22:18 Slewed to M61, performed Solve ‘n’ sync, slew here for centring the object, ran four Luminance subs of 300 seconds each (Bin1x1) at Gain 139 and Offset 21. This was completed by 22:38.
22:45 Chief TOSA then warmed up the CMOS camera, set the filter wheel to the empty slot position, powered off and disconnected the camera and filter wheel. This was so the ASI1600MM and filter wheel could be detached and a blanking filter installed into the empty filter wheel slot position without having to open up the filter wheel. The idea is that we move to the blank filter position when taking Dark subs to prevent light leakage on the Officina Stellare 12-inch.
22:55 Everything was back online and the SGPro profiles were modified to reflect the new blank filter location.
23:13 Unfortunately a dust mote was introduced onto the CMOS sensor window so we sent Chief TOSA back out to the dome to do the job properly this time 🙂 This meant parking the mount, warming up the camera, powering off the camera, remove it, clean the sensor and reattach the camera.
23:24 All reassembled and powered back on, slewed to NGC 4147 (Globular cluster) ready for a a 60 second Lum filter test which showed that a decent cleaning job had been done ….. about time too !
23:40 As it was getting hazy/cloudy it was decided to collect some calibration frames, in this case 25×10 minute dark subs at Gain 39 Offset 21 using the new blank filter.
23:50 We logged off from the remote session and left the dark frame sequence running until it was due to finish in the early morning.
We recently decided to replace our existing weather station with one that had better ASCOM integration. I had previously looked at the AAG CloudWatcher but at the time felt it offered more than we need but that turned out to not be the correct choice.
We ordered the AAG with an internal humidity sensor, the optional anemometer, mounting kit and 10 meter communications cable. Due to the ongoing human malware situation it took two weeks for it to arrive from Spain and was delivered to the IMT3 chief TOSA.
Once the new PSU arrived the Chief TOSA then set about removing the existing weather station and installing the AAG cloudwatcher.
All Sky Camera, AAG CloudWatcher, Unihedron SQM and another rain sensor
This also meant connecting the safety relay circuit wires to the Pulsar Dome, installing the AAG software, downloading the ASCOM boltwood driver and configuring SGPro. Within SGPro we have set the safety status set to be “OK to image” where the required conditions are more stringent than the conditions for the dome to open. The reason being that we want the dome to open as the light begins fade and allow the scopes to cool down but not be okay to image until it is dark.
On the first night of operation we ran into a problem. Unlike the other sensor readings and graphs we would see the temperature and cloud readings have an expected shape but the sky brightness sensors kept going up and down at a regular interval then gave the graph a saw-tooth shape.
Unfortunately this resulted in the safety status going on and off until we overrode it. We sent a quick email to Lunatico reporting the symptoms and asking for advice. It didn’t take long for Jaime to reply informing us that another customer reported the same issue and asked for a few days to investigate.
Good to his word we received an email from Jaime explaining the issue and asking if we could perform a firmware upgrade. Now due to the current lockdown restrictions this meant that I had to co-ordinate over the phone with the resident Chief TOSA to physically disconnect and reconnect the power whilst I remotely set the firmware update. The initial issues encountered were due to PEBCAK (Problem Exists Between Chair And Keyboard) as I had not read the documentation correctly !
New Firmware 5.73 loaded
That evening we watched and the Sky Brightness line graph was now as expected and not looking like a cog shaped wheel. Well done Jaime@Lunatico.es for the quick response and fix, Chief TOSA was a happy dome dwarf again and that’s what counts !
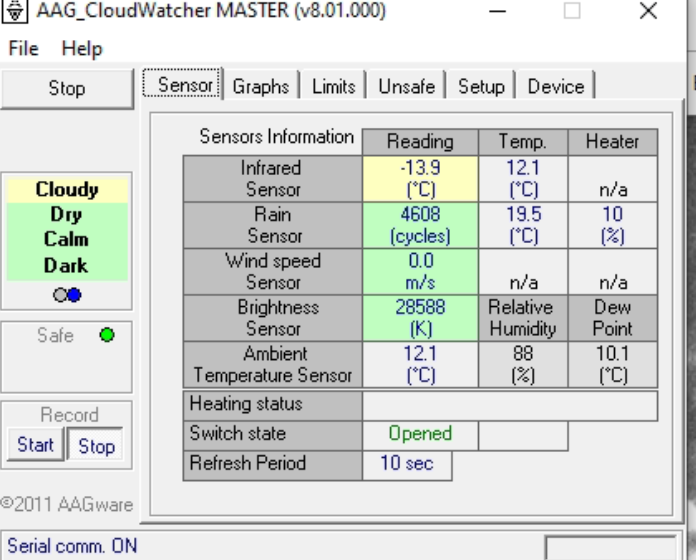
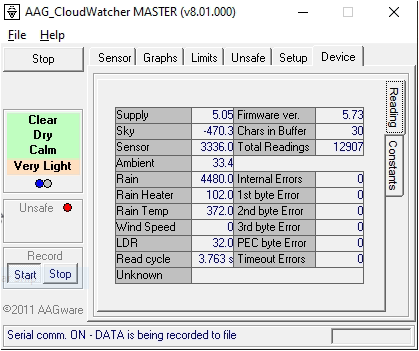
At the moment we are trying to get the cloud sensor to be more accurate to what we visually observe, this is an ongoing effort. We decided to record the AAG Sky Brightness sensor readings at various times and compare with our SQM readings :
Event
SQM
AAG Brightness Value
Civil Darkness
13.08
949
Chief TOSA setting OK to open
13.89
2100
Nautical Darkness
18.92
28588
Astronomical Darkness
19.03
28588
Using the above values it looks like we could reduce our chosen threshold level of 2100 to 1000 in order to allow the dome to open and the scopes to cool down. The Sky Brightness does not appear to change beyond Nautical Darkness. We are now investigating the correct value for the early morning from the AAG logs. This is so we know what the Sky Brightness value should be at which to stop imaging and close the dome in the early morning when unattended.
We still have at lot to configure and read up about using the AAG CloudWatcher but at the moment our initial experience is a positive one. Obviously we will be chatting to Lunatico about our level settings and make some suggestions regarding the software.
Bob, GingerGeek and I rationalised the SGPro Profiles and created a smaller set to account for the fact we could now dynamically change the guider in SGPro and also simplify the Gain, Offset and the sensor set temperature within the profiles.
Before we did this GingerGeek recorded the Brightness value from the AAG weather station and the SQM reading as nautical twilight occurred
AAG and SQM readings at Nautical Twilight
We agreed on the following basic parameters for imaging. 3 profiles for the OS OTA at 3 different Gains and Offsets. 1 profile for the Tak with the need to change the parameters of the camera to one of the 3 correct Gain and Offsets now documented in the TOSA manual. Finally 1 profile for the Tak and as it is a CCD then there is no Gain or Offset. We also agreed the premise of exposure times for the 3 OTAs to make calibration frames simpler – 1, 2 minute for RGB on the OS, 5 minutes for Luminance and 10 minutes for narrowband. For the Tak as it is a OSC we agreed on 1, 2 and 5 minutes. For the Sky-Watcher Esprit 1, 2 and 5 minutes for Luminance and 10 minutes for narrowband. We also agreed on the temperature of the scopes to be run at as suggested by Dave Boddington, we have gone for semi-simple. So for the OS and Esprit we will image at -15℃ in Summer and -25℃ in Winter. For the Tak we will image at -20℃ all year round. Note the new Flats are at the new lower 23k ADU setting.
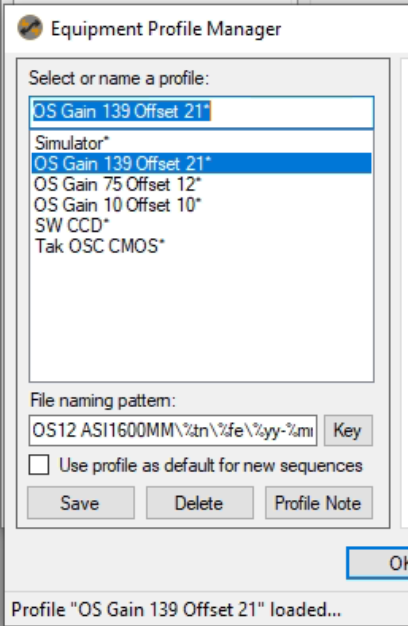
New set of simplified profiles
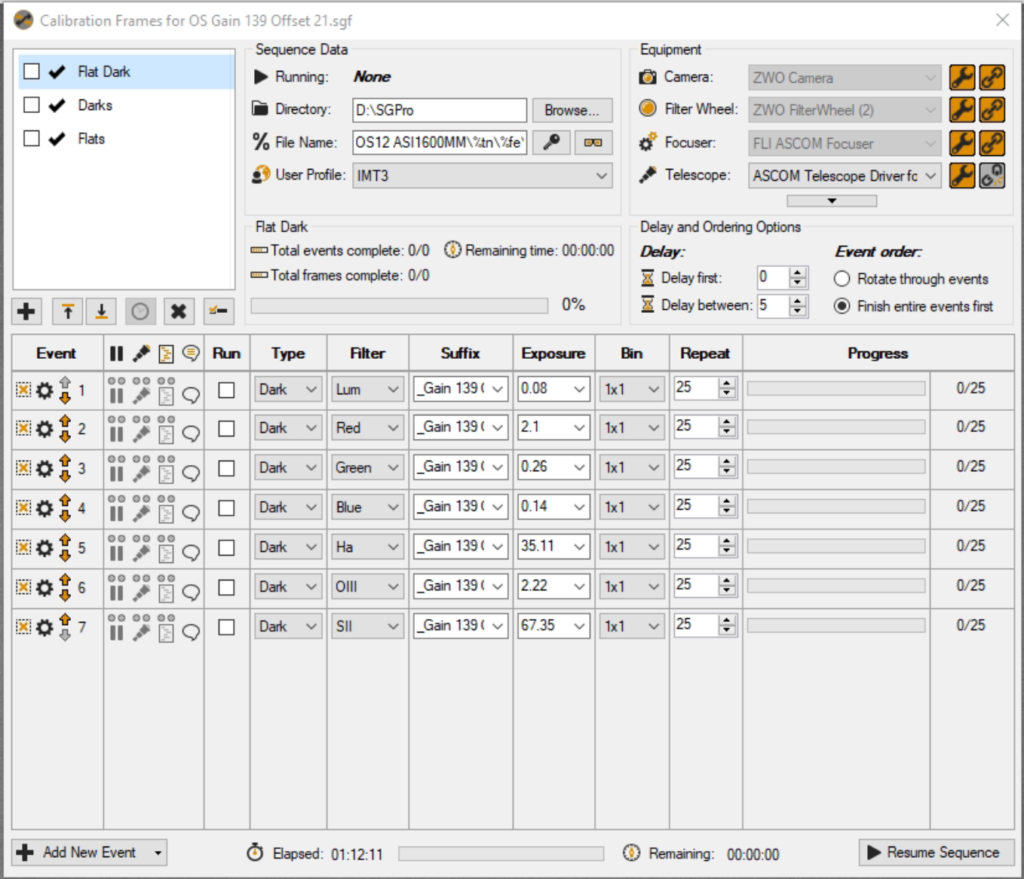
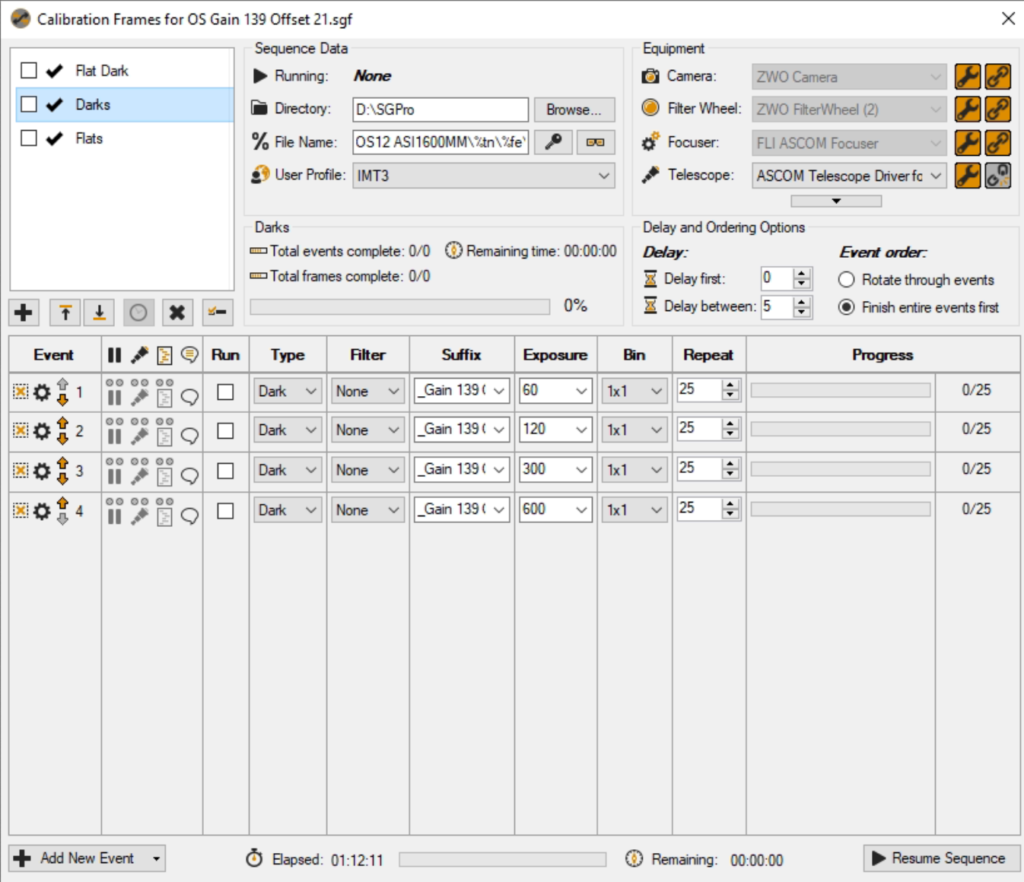
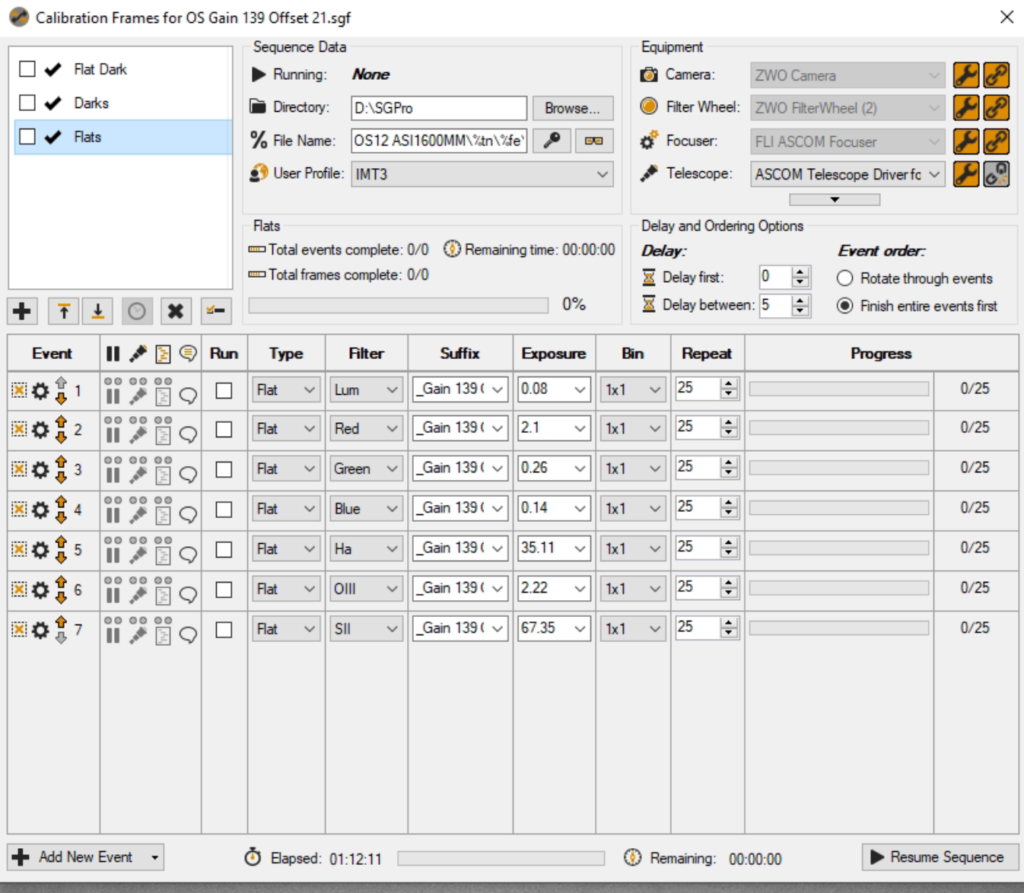
So now all the profiles were changed and setup, we set a sequence running for OS Gain 139 Offset 21 for Flat Darks and Darks 1, 2 and 5 minutes. We will need to do 10 minutes tomorrow night. The Flats incidentally for this set of calibration frames was then completed the following morning by 11am before the Sun got too high and the camera failed to cool to -15℃.
Flat Darks for new profileDarks for new profileFlats for new profile
Finally I saved the sequence as calibration frames for OS Gain 139 Offset 21 so that it is now easy to pull this up and redo if needed. I also took Bob’s advice and separated out the Flat Darks, Darks and Flats into different tasks. So tomorrow nights job is narrowband darks using this gain and offset followed by starting the new run for gain 75 and offset 12.
Opened dome early switching the safety for the brightness on the new AAG. The first thing to do tonight was to calibrate a little but more the infrared sensor which informs the cloud coverage. This was suggesting it was Cloudy, borderline Overcast and given it was very clear with a hint at wisps of cloud I adjusted the couple of figures for the sensor, from -17 for Clear to -14 and from -14 for Cloudy to -12.
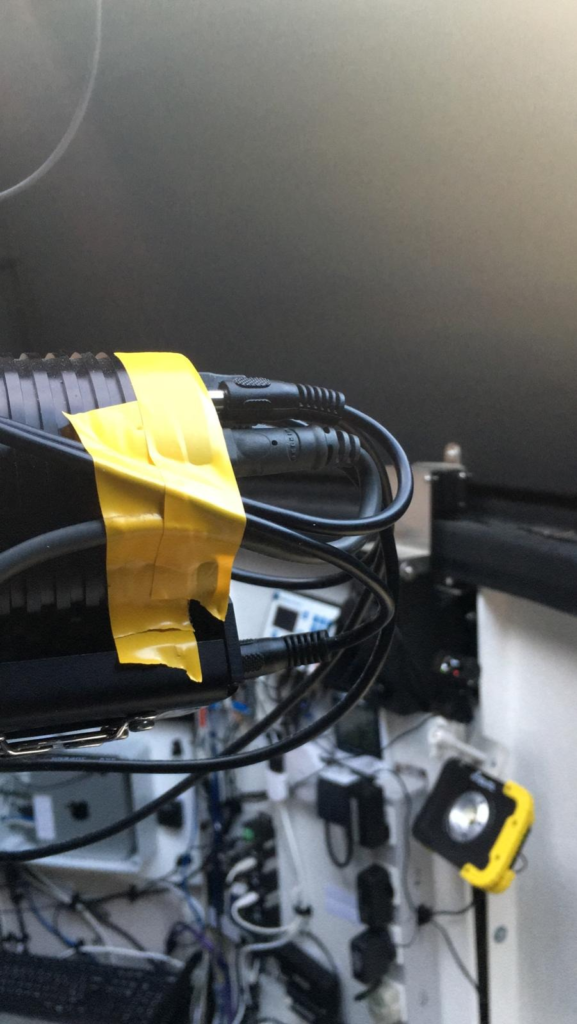
I then set about taping up the USB and power for the SX camera on the Esprit. This is because the connectors supplied are clearly not in tolerance as I have tried many cables and they call fall out. The tape should suffice for the moment and now the camera reconnects to the NUC computer running SGPro.
Tape for USB cable
GingerGeek and I started to have a look at the sky around 9pm. The sky was not totally clear with some wisps of cloud. We tried to get to a point where we could test guiding the 12″ through the Esprit, however as ever the clouds rolled in. However, during setting up the SX814 camera on the Esprit as the guider and performing a darks calibration run we got an error on the USB bus again (we get lots of USB errors) which not only kicked out the SX814 but also the AAG weather station. The problem was it almost killed the AAG software and we had to cancel the process running to resolve. This meant we lost all the settings in the AAG so we have tried to rebuild as per the new screen shots below.
AAG Weather Station New Settings
So instead we re-ran the Flats Calibration Wizard for the OS with the camera set to Gain 139 Offset 21 and also another run at Gain 75 Offset 12. The reason for re-running is that I suspect the flats we have are ever so slightly over exposed at 30-32k rather I prefer them to be at 22-23k.
We also created 2 new profiles that were simply named so we can see them in the list and simplify the naming convention and amount of profiles needed. We will choose the guider on the night within one of the two profiles created. We will also look to review and simply the other profiles for the two additional OTAs tomorrow and delete the remains profiles given the large number we now have.
The plan for the night (to try using the Esprit120 as the guider for the OS 12″ if it is on the West side of the Mount) was scuppered as we couldn’t connect to GingerGeek’s SX814 camera. GingerGeek checked in device manager and COM7 is missing so we suspect the USB cable has dropped out again.
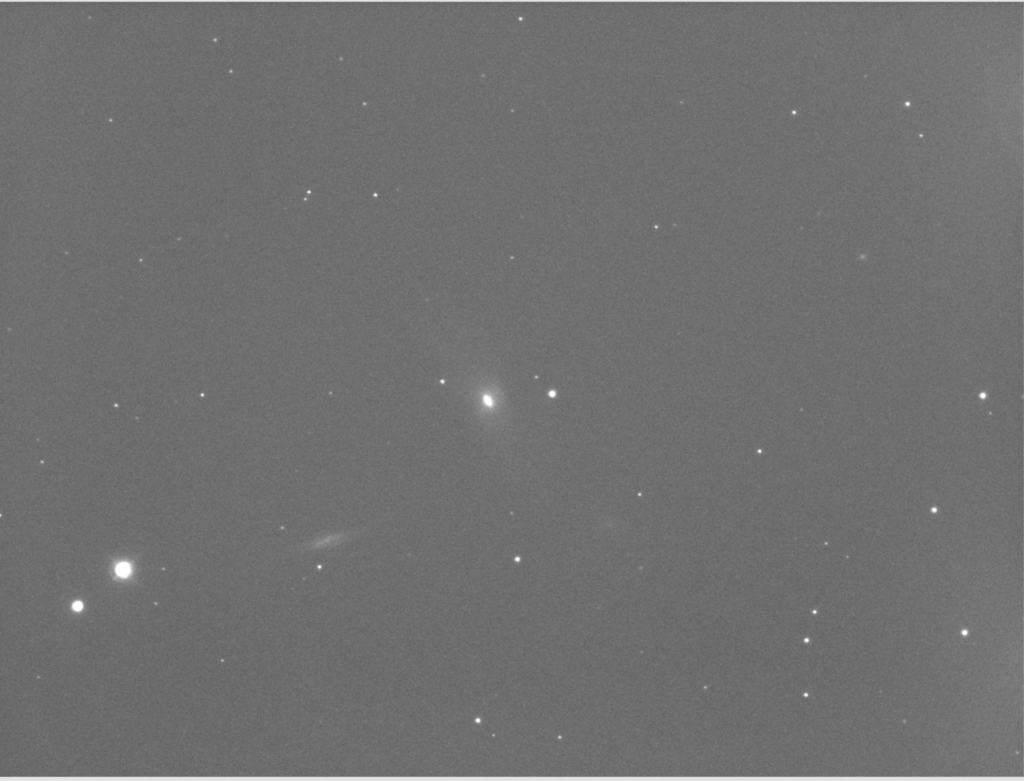
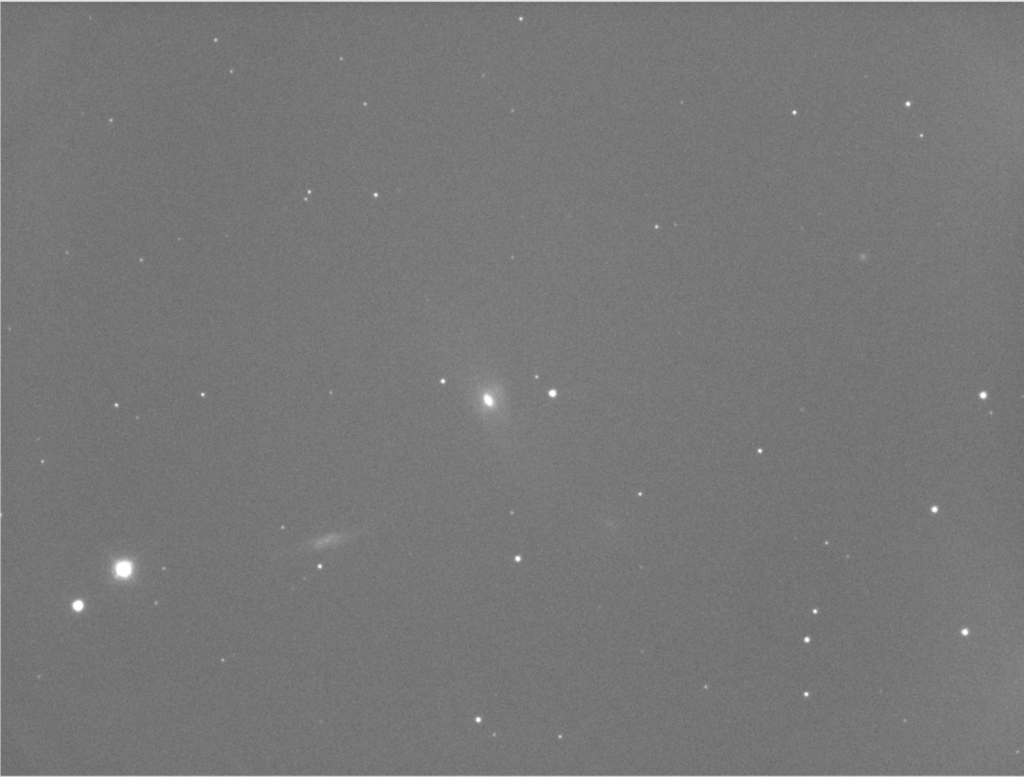
Following on the the news earlier in the day of the SN in M61, I slew to it and grabbed some 300s unguided subs ( which also proves that it is the guiding that is moving the mount unnecessarily … but we knew that already !). Thare was a suggesting on the evenings group Zoom call that the drift might be due to ‘Cone Error’, but I found several posts stating that ‘Cone error does not affect guiding’. After M61 dropped into the weeds I slewed to M3 and grabbed some Luminance frames shutting down very tired at around 4am.